100SR - Washing machine Reliable - Free user manual and instructions
Find the device manual for free 100SR Reliable in PDF.

| Product type | Rotary steam press |
| Brand | Reliable |
| Model | 100SR |
| Dimensions (working position) | 94 x 40 x 105 cm (L x D x H) |
| Dimensions (folded position) | 52 x 40 x 100 cm (L x D x H) |
| Weight | 39 kg |
| Roller length | 84 cm |
| Water tank capacity | 1.3 L (with cartridge) / 1.4 L (without cartridge) |
| Power supply | 120 V / 60 Hz, 1.8 kW max |
| Recommended fuse | 16 A minimum |
| Ironing speed | 2.40 – 6.80 revolutions per minute |
| Temperature settings | 5 levels: Synthetic, Silk, Wool, Cotton, Linen |
| Steam functions | Continuous steam, steam on demand, 3 flow rates (A, B, C) |
| Foot pedal | 3 positions: A (raised), B (lowered), C (work with speed control) |
| Display / Indicators | LED: power on (green), temperature (red), water level (blue), spent pellets (blue), steam (blue) |
| Safety | Thermal fuse (steam generator 216°C, heating plate 260°C), manual disengagement lever, energy-saving automatic shutdown after 8 min of inactivity |
| Maintenance and cleaning | Clean with a soft, dry cloth; washable roller covers (cotton) or replaceable (felt) |
| Spare parts and repairability | Replacement anti-scale cartridge, ironing covers and felt available at reliableco.com |
| Warranty | 1 year limited (parts and labor) |
| General information | Household use only; tap water with anti-scale pellets or distilled water recommended |
Frequently Asked Questions - 100SR Reliable
User questions about 100SR Reliable
0 question about this device. Answer the ones you know or ask your own.
Ask a new question about this device
Download the instructions for your Washing machine in PDF format for free! Find your manual 100SR - Reliable and take your electronic device back in hand. On this page are published all the documents necessary for the use of your device. 100SR by Reliable.
USER MANUAL 100SR Reliable
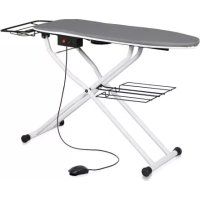
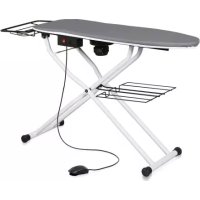
At Reliable, we do what we love, and take pride in doing it right. You want what's best for the people, places and things that matter in your life - from where you live to what you wear. So do we. From the start, we approach every product with a craftsman's attention to detail and passion for making it right. Quality, functionality, design and customer service play an equally important part in delivering what's right for you. The Verve 100SR Rotary Press allows you to press a wide variety of garments with ease. Top quality steam delivery ensures a crisp and professional finish to your fabrics.
For your safety and to fully enjoy the advantages of this product, please take a few minutes to read all of the important safeguards and care instructions. Keep this manual handy and review the product warranty for your reference.
TECHNICAL SPECIFICATIONS
| Dimension, Working Position | 36,5" W x 13" D x 41" H | 94/40/105 cm |
| Dimension, Folded Down Position | 20,47" W x 17,17" D x 39,40' H | 52/40/100 cm |
| Weight | 85 lbs | 39 kg |
| Roller Size | 33" | 84 cm |
| Water Tank Capacity | 2,74 pints | 1,3 L |
| Excess Temperature Fuse (steam generator / heating shoe) | 421/500 F | 216/260 °C |
| Nominal Voltage (60 Hz) | 120V | 120 V |
| Power Consumption (max.) | 1,8 kW | 1,8 kW |
| Fuse (home wiring) at least | 16 A | 16 A |
| Ironing Speed (rpm) | 2,40 - 6,80 | 2,40 - 6,80 |
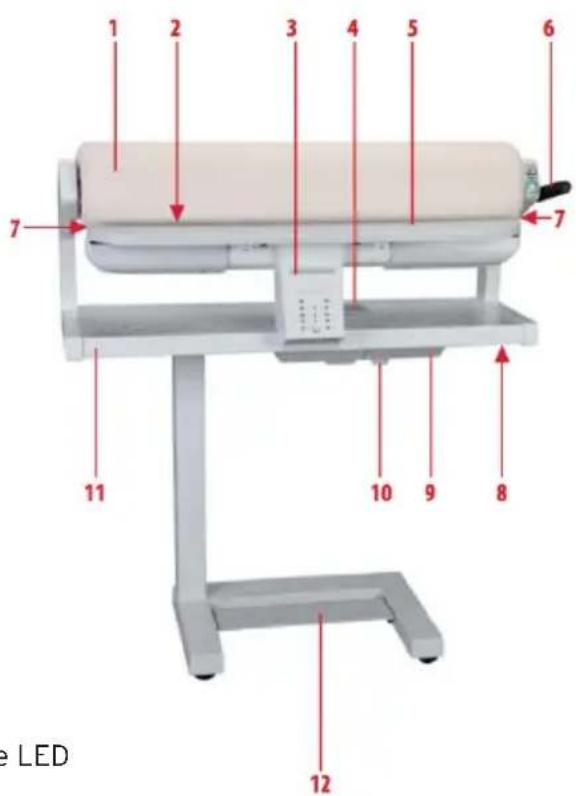
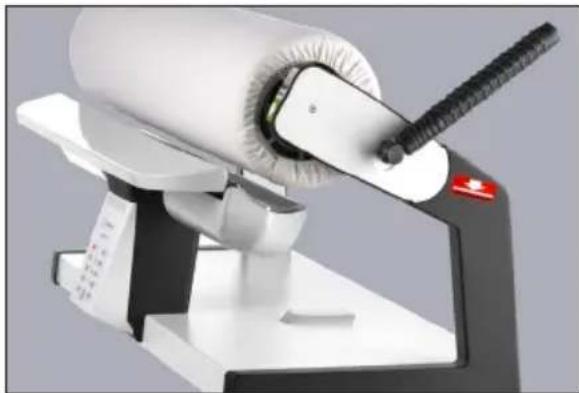
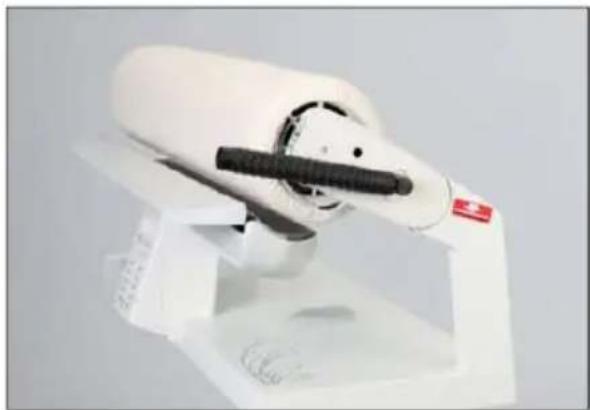
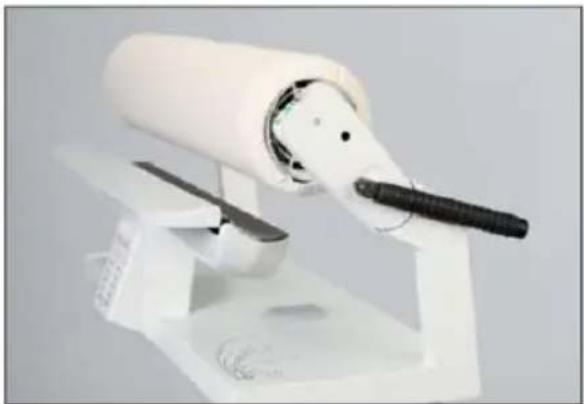
PARTS LIST FOR THE ROTARY PRESS
- Ironing roller
- Heating shoe with steam slot
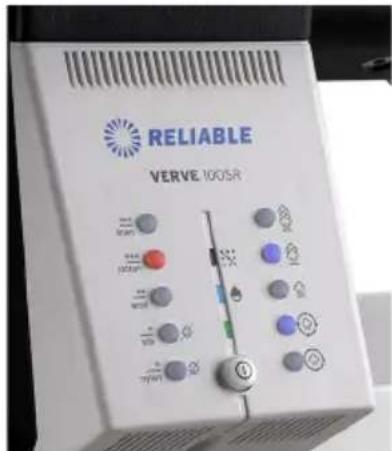
- Operator's console control buttons
- Filler opening with lime descending cartridge
- Support plate
- Manual release lever
- Open end roller - dual end feed
- Bolt for unfolding
- Water tank
- Drain plug
- Collecting table
- Foot pedal
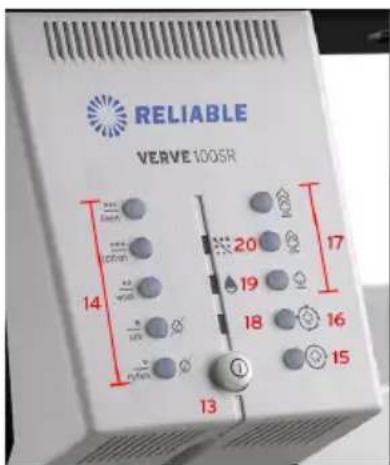
- Power button
- Heat Setting buttons with red LEDs
- Continuous Steam button with blue LED
- Demand Steam button with blue LED
- Steam Setting buttons with blue LEDs
- Power On button with green LED
- Remaining Water button with blue LED
- Descaling Granulate Used button with blue LED
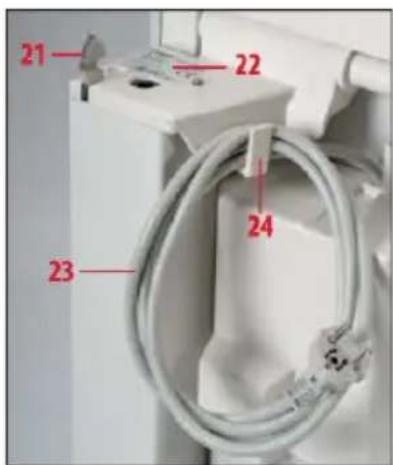
- Locking lever for unfolding
- Identification plate
- Power cable
- Cable hook
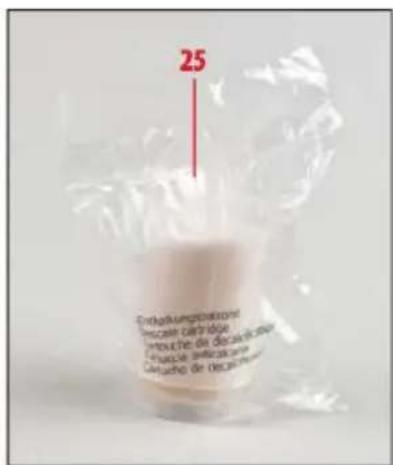
- Spare lime descending cartridge
IMPORTANT SAFETY INSTRUCTIONS
- Read all instructions.
- Use appliance only for its intended use.
- To reduce the risk of electric shock, do not immerse the appliance in water or other liquids.
- Never pull power cord to disconnect from outlet; instead, grasp plug and pull to disconnect. Do not handle the plug with wet hands.
- Do not allow cord to touch hot surfaces. Let appliance cool completely before putting away. Loop cord loosely on cord hook when storing.
- Always disconnect appliance from electrical outlet when filling with water, when emptying water tank, and when not in use.
- Do not operate appliance with a damaged cord, or if appliance has been dropped or damaged. To reduce the risk of electric shock, do not disassemble or attempt to repair appliance.
- Unplug power plug before filling or draining water tank, before leaving the room (even briefly), before cleaning and maintenance and after use.
- Close supervision is necessary for any appliance being used by or near children. Do not leave appliance unattended while connected. Keep children and pets away from the Rotary Press.
- Caution! There is a danger of burning when touching hot parts of the Rotary Press. Burns could occur from touching hot metal parts, hot water, or steam. Use care when you turn a steam appliance upside down - there may be hot water in the reservoir.
- Only connect the Rotary Press to a power supply at the voltage shown on the identification plate. All power carrying devices (sockets, switches, extension cables, house fuse, etc.) must be designed for a power rating that is equivalent to the power supply requirement of the Rotary Press as shown on the identification plate and guarantee proper protective grounding. To avoid overloading, do not connect any other appliances or electric devices to this circuit.
- If an extension cord is absolutely necessary, be sure the cord has an ampere rating in accordance with the ampere rating of the Rotary Press. Cords rated for less amperage may overheat. Care should be taken to arrange the cord so that the cord cannot be pulled or tripped over.
- The Rotary Press may only be used to iron garments and other items in accordance with proper use.
- Do not install the Rotary Press in rooms subjected to frost. Nevers switch "on" the Rotary Press when frozen. The Rotary Press should be operated in normal room ambient temperatures and humidity. If the Rotary Press is subjected to frost somehow, it should be plugged in only after the condensation on the machine is completely dried out.
- Switch on the Rotary Press only when it is in the unfolded and upright position.
- Do not place objects in openings of the unit that are required to be clear.
- Do not use the Rotary Press if the power cable or other power devices are damaged, if there are doubts regarding the safety or danger due to unseen damage (for example, internal
damage if the unit has fallen over), if there is visible damage, if the unit is malfunctioning, or if the collecting table is wet (for example, if the water tank has been over-filled).
- Switch off the power only when the ironing roller is completely raised.
SAVE THESE INSTRUCTIONS. For household use only.
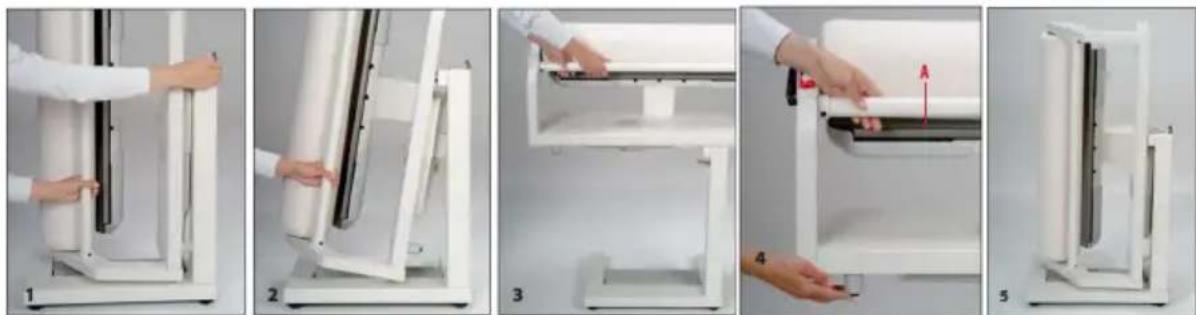
SETTING UP THE ROTARY PRESS
- To set up your Rotary Press, first unhook the power cable. With your left hand, tightly grip the Connecting Rod (A) in the lower third area. With your right hand, push the Locking Lever forward and hold it pressed. To prevent the Rotary Press from rolling away, place one foot in front of or on the frame.
- Raise the ironer slightly and then release the Locking Lever.
- Now raise the Rotary Press with both hands up till it stops in the fully upright position, making sure that the Locking Lever engages. You should hear it click into place. The Rotary Press can be easily rolled on its rollers.
- Connect the power cable plug of the Rotary Press into the socket.
Note: Remove the protective paper (wrapped around the ironing roller for shipping) and discard it.
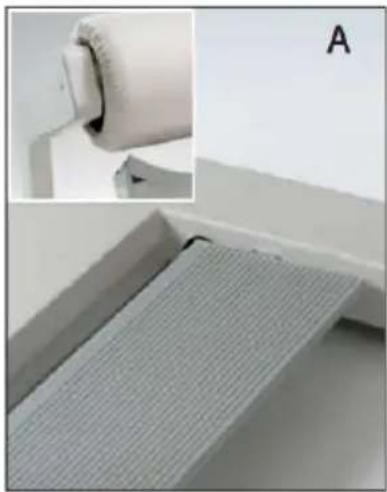
FOLDING THE ROTARY PRESS FOR STORAGE
- Before folding the Rotary Press, unplug the power cable from the socket. The Rotary Press must be completely cooled down. With the left hand, grip the connecting rod and raise it slightly. Push the bolt, located on the underside of the collecting table, with your right hand until it disengages.
- Allow the ironing roller to lower slowly until you hear it engage the locking mechanism. The Rotary Press can be easily rolled on its rollers.
USING THE FOOT PEDAL
The Foot Pedal is used to control the raising and lowering of the ironing roller, as well as its speed. There are 3 positions: A, B and C.
Position A is the Starting Position. The roller remains in the raised position. The Foot Pedal is not in use.
Position B is the Press Position. The roller is lowered and ready for pressing when you apply light pressure to the Foot Pedal.
Positions C is the Working Position. The roller is lowered and rotating. In Position C, the Rotary Press has an electronic speed control. The more you step on the foot pedal, the faster the roller will rotate.
Note: The Reliable Rotary Press is fitted with an energy-saving circuit. If the foot pedal is not operated for up to 8 minutes, the heater and steam generator are automatically switched off. When the foot pedal is pressed again, the heating shoe, and if appropriate, the steam generator, are switched on again. The most recently set ironing setting has been reached only when no LEDs are flashing. Ironing can then be continued.
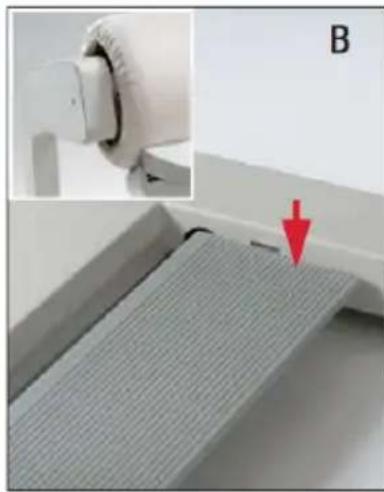
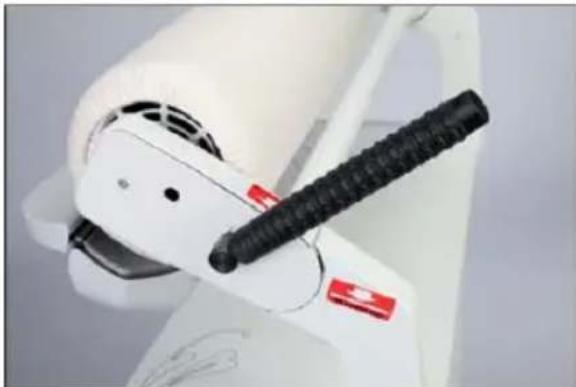
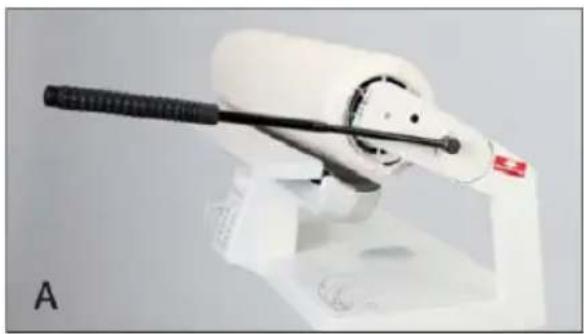
Your Rotary Press is equipped with a manual lever. Use it only when needed and according to the instructions. The manual lever has two functions:
MANUAL RELEASE
Manual release lever is used in the event of an unexpected interruption of the ironing roller, for example, if there is a power failure. The manual release prevents any damage to your garment and the ironing cover due to heat.
To operate, push the release lever manually back to the red strip located on the top of the unit which is approximately 100^ from the original position of the lever (see picture). This will raise the iron roller from the heating shoe and enable user to remove the garment safely.
The manual release lever cannot reset until the power is on and the ironing roller has reached the press position. To do this, pull the manual lever completely forward to the original position.
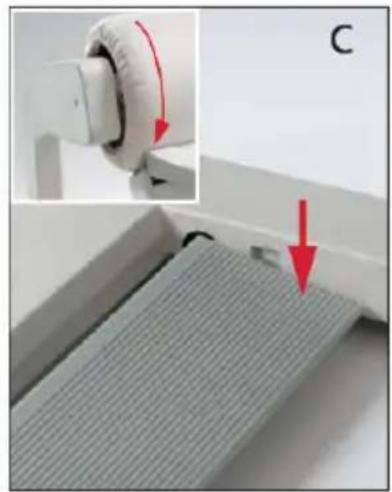
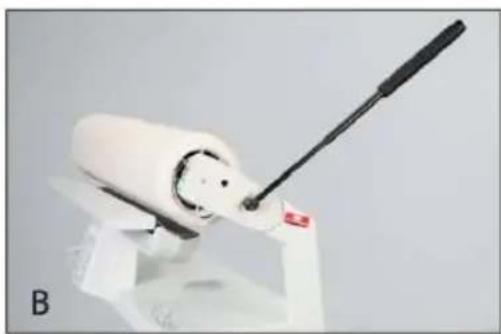
MANUAL RELEASE FOR SERVICE CASE
When needed, it is possible to raise the iron roller to a service position.
You can raise the iron roller to this position only when the power is turned Off. The roller must be in non-ironing position (roller up).
To operate, push the release lever manually back to the red strip located on the side of the unit which is approximately 180^ from the original position of the lever (see picture).
The ironing roller is raised to the service position - two inches over the heating shoe. To return the roller back, pull the manual release lever completely forward to the original position.
Note: Never switch ON the Rotary Press when the ironing roller is raised to the service position.
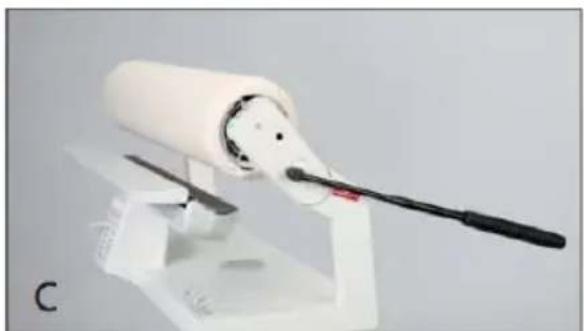
ABOUT THE TELESCOPIC MECHANISM OF THE LEVER
The release lever has a telescopic feature to simplify the use of the lever. If you have difficulty in pushing the lever in folded position, then pull to unfold the telescopic arm. This will reduce the force necessary for moving the lever in both directions.
Return the telescopic lever back to the folded position after usage.
PREPARING FOR STEAM GENERATION
In this section we will cover information on suitable water for steam generation, how to use the water tank, lime descaling cartridge and lime descaling granulate.
The Reliable Rotary Press can be operated without water, but for crease-free results, the steam should be switched on. The steam is applied from below and ensures complete steam penetration of the items being ironed.
WATER WHICH MAY BE USED
- Tap Water -The Rotary Press can be operated using normal tap water regardless of its hardness. However, tap water should be used only in conjunction with the lime descaling granulate supplied.
- Distilled Water - Distilled water is available at most grocery stores. It can be used without the descending granulate.
WATER WHICH MAY NOT BE USED
- Water with Additives - On no account must starch, fabric conditioner, perfume or finishers be added. For this reason, water from condenser tumble driers may not be used, as this may also contain additives such as fabric conditioners. No liability is accepted for damage to your Rotary Press or your laundry caused by this.
- Water from Domestic Water Softening Systems - Domestic water softening systems remove lime from the water but add other substances to the system, depending on the descaling system. This water is therefore not suitable for the Rotary Press.
FILLING THE WATER TANK
The Remaining Water LED illuminates blue if there is no water, or if there is only 10% water in the water tank. The water tank must now be filled before any further steam ironing is done.
SWITCH OFF THE POWER AND UNPLUG THE MACHINE.
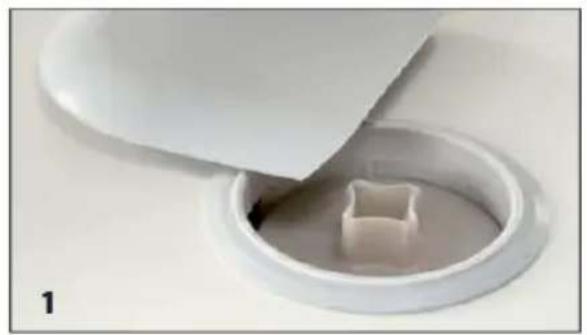
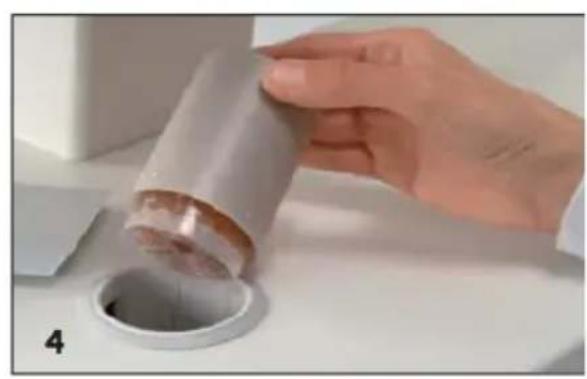
- Pull upward on the cap of the filler opening. The lime descending cartridge is in the filler opening.
- Remove the lime decaling cartridge. You may need to loosen the cartridge by a sideways movement (wiggle it). Then, turn the cartridge clockwise while pulling it upwards
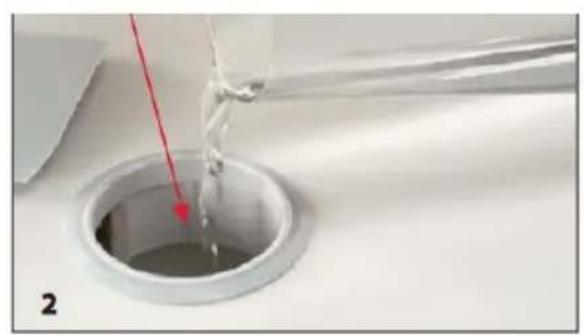
- Slowly fill with water up to the bottom of the filler opening (see illustration). Do not fill with hot water. For the water level indicator to function properly, after the Remaining Water LED indicator has illuminated, top up with at least 10 ounces (0.3 liters). Total tank capacity is 2.74 pints (1.3 liters) with a descaling cartridge. The total tank capacity is 2.95 pints (1.4 liters) without a descaling cartridge.
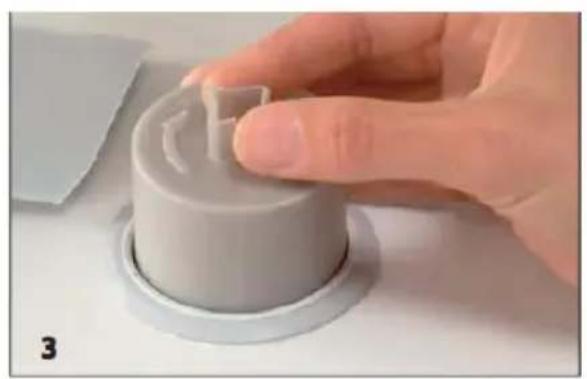
- Replace the lime descending cartridge and press the cap onto the filler opening.
Note: The filler opening must always be kept closed to prevent the water supply from becoming contaminated. There is a delay in the steam development after an empty water tank has been filled or if a new descaling granulate cartridge has been inserted.
GENERAL INFORMATION ON DESCALING GRANULATE
The descending granulate in the lime descending cartridge must always remain slightly damp. Where there are long intervals between ironing (with the water tank empty) the decaling granulate must be moistened with water or kept apart from the Rotary Press in a sealed plastic bag.
The water tank must be emptied during very long intervals between ironing.
New, full descaling cartridges are available by visiting the Reliable website at: www.reliablecorporation.com.
CHECKING DESCALING CARTRIDGE PLACEMENT FOR INITIAL MACHINE USE
The Reliable Rotary Press is supplied with a lime descaling cartridge inserted in the water tank. The cartridge is placed below the cap of the filler.
- Switch off the power and unplug the Rotary Press before removing/replacing the cartridge. Remove the cap by pulling it upwards and make sure that the descending cartridge is pushed down fully. Press the cap onto the filler opening.
- There is one spare cartridge supplied in a plastic bag with your Rotary Press. You should keep the spare cartridge in the plastic bag until necessary to replace it in the Rotary Press, to prevent the granulate in the descaling cartridge from drying out.
If the Descaling Granulate Used display LED is triggered approximately one minute after inserting a lime descending cartridge, proceed as follows:
Switch off the power and unplug.
Open the cap and push the lime descending cartridge down fully into position. Replace the cap.
Plug in the Rotary Press again and switch on the power.
FUNCTIONS & SETTINGS FOR IRONING
This chapter provides information on all the electronic functions of your Reliable Rotary Press, as well as recommended settings for ironing various garments and other items
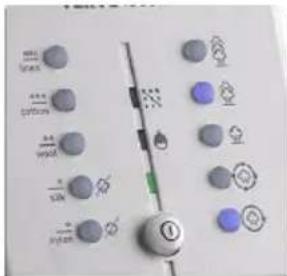
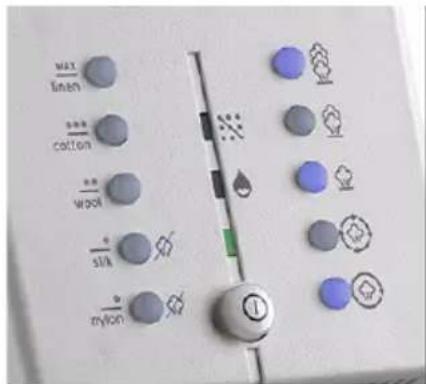
HEAT SETTINGS BUTTONS
The red LED of the preselected Heat Setting (14) flashes when the Rotary Press is switched on. Select the required heat setting for ironing and wait until the corresponding LED shows a steady red light. If a new temperature setting is selected (including a lower setting), the corresponding LED flashes until the selected temperature is reached. The Rotary Press has five different heat settings: Synthetic, Silk, Wool, Cotton and Linen.
Note: Ironing with steam is not possible at heat settings of Synthetic and Silk. This is indicated by symbols on the Operator's Console.
CONTINUOUS STEAM BUTTON
When Continuous Steam (15) is pressed, the LED illuminates blue. At the same time one of the buttons for steam settings (17 A, B or C) flashes blue until the steam generator has heated up. The LED then remains illuminated and steam generation begins. The Rotary Press now produces steam, even if the foot pedal is not pressed and it is possible to select between three steam settings (minimum A, medium B or maximum C).
DEMAND STEAM BUTTON
When the Demand Steam button (16) is pressed, the LED illuminates blue. At the same time one of the buttons for steam settings (17 A, B or C) flashes blue until the steam generator has heated up. The LED then remains illuminated and steam generation begins. It is now possible to select between three steam settings: (minimum A, medium B and maximum C). The Rotary Press now only produces steam when the foot pedal is pressed in the B and C position.
STEAM SETTING BUTTONS
By means of three buttons - 17 A, B and C - it is possible to vary the amount of steam for the different steam settings: 17A for minimum steam, 17B for medium steam and 17C for maximum steam. The corresponding LED flashes until the steam generator has heated up. The LED then remains illuminated and steam generation begins.

IRONING SETTINGS
IRONING WITHOUT STEAM
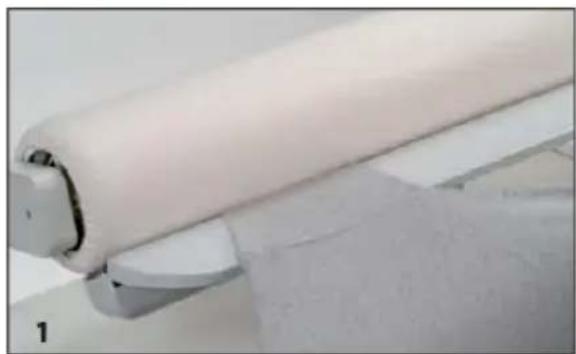
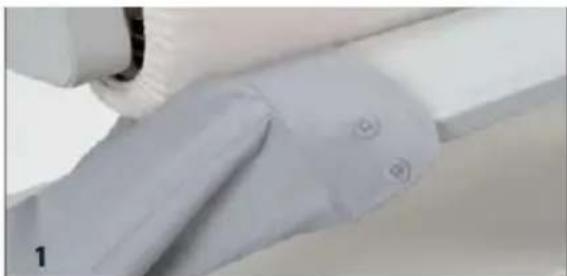
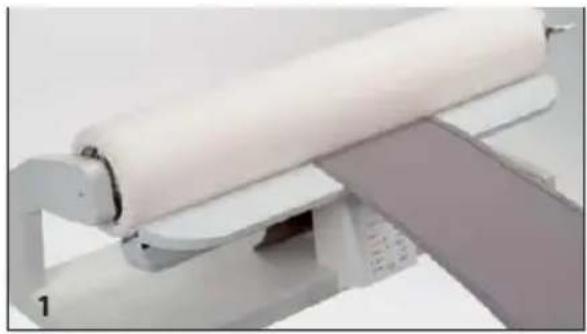
Immediately after the Power Switch is switched on, the green LED Power On illuminates. The LED of the preselected Heat Setting flashes red. Select the required temperature setting for ironing and wait until the corresponding red LED illuminates steadily. The heating shoe temperature is automatically reheated during ironing. If a new temperature setting is selected (including a lower setting), the corresponding LED flashes until the selected heating shoe temperature is reached. (Illustration 1 - heat setting of Wool without steam)
If the current temperature setting is selected again, the heater is switched off and the red LED goes out. The heater is now switched off but your Rotary Press remains ready for use. (Illustration 2 - heating shoe will be cooling off but the roller will still move)
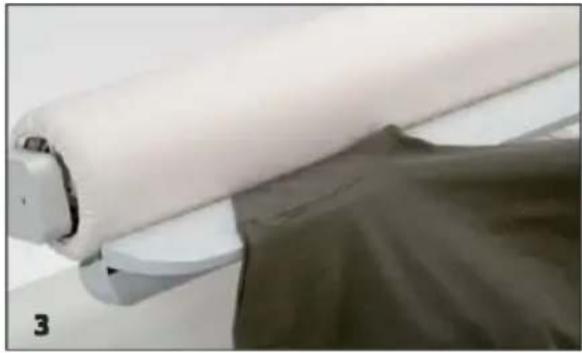
If the temperature is set to Synthetic or Silk, it is not possible to iron with steam. (Illustration 3)
Note: When ironing without steam, the garment should be still slightly damp or dampened, i.e., sprayed with water, to achieve the best results.
IRONING WITH DEMAND STEAM
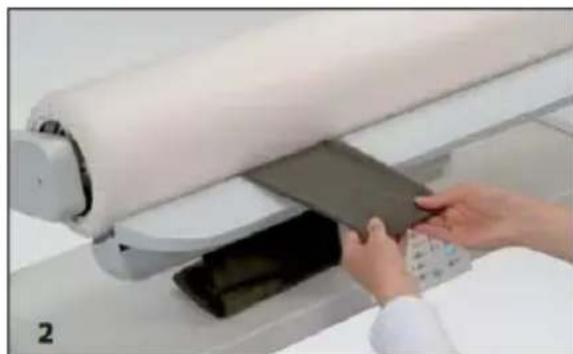
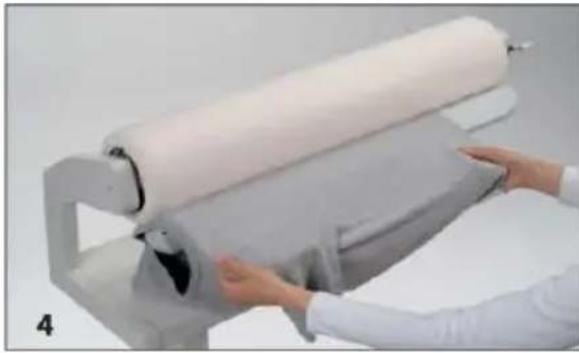
The Rotary Press steams only when the foot pedal is in position B or C. It is now possible to select between 3 steam settings: Minimum, Medium, and Maximum. This means that less energy and water are used when not needed. Immediately after the Power Switch is switched on, the green LED Power On illuminates. Select the required temperature setting Wool, Cotton or Linen for ironing and wait until the corresponding red LED illuminates steadily. The heating shoe temperature is automatically maintained during ironing. If a new temperature setting is selected (including a lower setting), the corresponding LED flashes until the selected heating the temperature is reached. (Illustration 4 - heat setting of Cotton without steam)
If the current temperature setting is selected again, the heater is switched off and the red and blue LED goes out. The heater is now switched off but your Rotary Press remains ready for used. (Illustration 2 - heating shoe will be cooling off but the roller will still move)
When the Demand Steam Button is pressed, the blue LED illuminates. At the same time, the blue steam setting button (in the medium position) flashes until the steam generator has heated up. The LED then remains illuminated and steam generation begins. Select one of the three steam settings. (Illustration 5)
IRONING WITH CONTINUOUS STEAM
The Rotary Press steams even if the foot pedal is not pressed and you can select between the three steam settings: Minimum, Medium and Maximum, to match the amount of steam to the garment and thus obtain the best result.
Ironing with continuous steam is suitable for ironing wool pullovers or velvet garments that are not to be pressed. Instead, these are smoothed by passing them over the heating shoe and the continuous steam with the ironing roller in the raised position.
Immediately after the Power Switch is switched on, the green LED Power On illuminates. Select the required temperature setting Wool, Cotton or Linen for ironing and wait until the corresponding red LED illuminates steadily.
The heating shoe temperature is automatically reheated during ironing. If a new temperature setting is selected (including a lower setting), the corresponding LED flashes until the selected heating shoe temperature is reached. (Illustration 1)
When the Continuous Steam button is pressed, the blue LED illuminates. At the same time, the medium blue steam setting flashes until the steam generator has heated up. The LED then remains illuminated and steam generation begins. Select one of the three steam settings. (Illustration 6)
AFTER IRONING
Press the Power Switch. The green LED goes out. Now unplug from the socket.
Do not fold the Rotary Press until it has fully cooled down!
HOW TO USE
This chapter contains step-by-step instructions on how to iron various types of garments and home décor items with your Reliable Rotary Press.
GENERAL INFORMATION
Before ironing with your Rotary Press, check the care labels of your items for any specific care instructions.
Place the item in position so that any zippers, buttons, hooks, etc, face upward towards the roller.
It is possible to iron without steam, with demand steam or with continuous steam.
For some materials such wool sweaters or fabrics with pile (such as velvet or corduroy), the use of the iron roller for pressing or ironing is not recommended. Instead, the garment should be drawn over the steam slot in Continuous Steam mode.
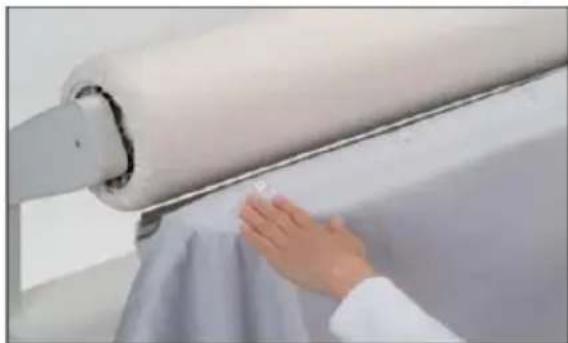
The large ironing area also enables bed linens and table cloths to be ironed without difficulty. The large collecting table holds the garments flat after ironing.
After ironing, lay the garments together and allow them to cool.
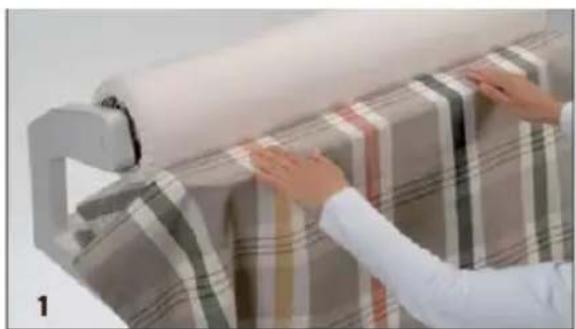
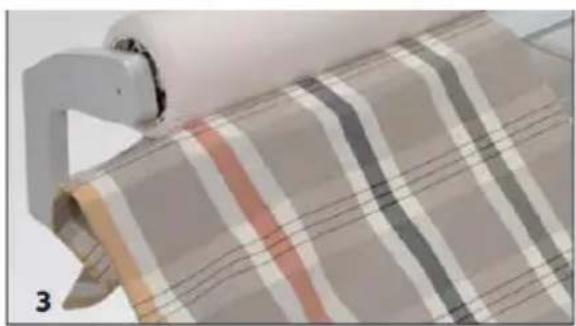
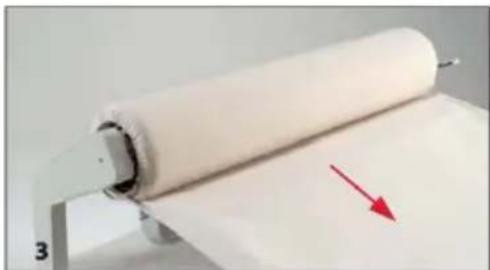
IRONING SMALL FLAT ITEMS
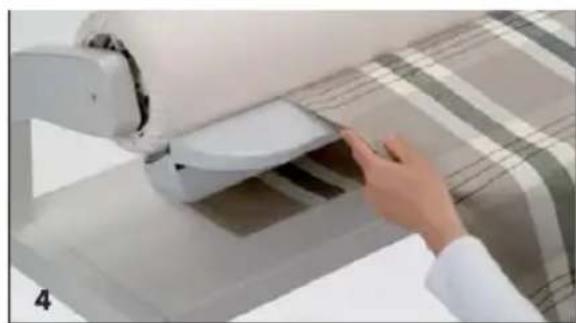
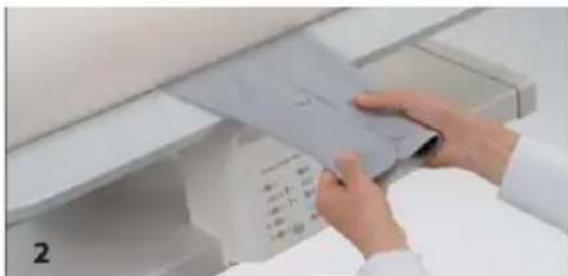
- To iron smaller, flat items such as tea towels, napkins, placemats, etc, place the item on the support plate and slide it between the heating shoe and iron roller so that it is caught by the roller when the foot pedal is pressed.
- Allow the item to run through.
- The ironed item is automatically folded on the collecting table.
IRONING LARGE FLAT ITEMS
To iron larger, flat items such as tablecloths, the center section of the fabric is pressed first, then the sides of the tablecloth are pressed.
- Place the tablecloth centered over the heating shoe with the ends of the tablecloth falling off each end of the heating shoe. Press the center section of the tablecloth.
- With the roller in the raised position, gently pull the fabric back towards you over the heating shoe.
- Softly fold the tablecloth in half and place the tablecloth so that the ironed part hangs over at one end of the heating shoe. This will prevent pressing a crease into the center of the tablecloth.
- Placing your index finger between the two layers of fabric will act as a guide and allow you greater control as the tablecloth to feeds through, helping to eliminate the any unwanted creases. If necessary, turn over the table cloth and iron it on the other side.

IRONING BED LINENS
Bed linens, such as duvet covers, can be ironed either from the left or right side. In either case, button it up or zip it first, making sure that the buttons or zipper face upward toward the ironing roller.
Because a duvet cover consists of two layers of fabric, it should not be folded for ironing. A cover must be ironed section by section. Where there is heavy creasing, it should be ironed from both sides.
Duvet covers are basically ironed in the lengthwise direction starting from the buttonhole/zipper side.
Begin at one end of the cover and iron the necessary sections. Each time, pull the duvet cover forward, out over the heating shoe and position it again.
IRONING T-SHIRTS OR KNIT TOPS
- When ironing T-shirts or other types of knit tops, begin with the sleeves. Insert the sleeve of the T-shirt at a slant (side seam parallel to the roller) and iron it up to the sleeve seam.
- For T-shirts with long sleeves, the sleeves should first be ironed up to the cuff, starting from the middle.
- Then, insert the sleeve of the T-shirt at a slant to the elbow height (side seam parallel to the roller) and iron it from the center up to the sleeve seam.
- Now pull the T-shirt over one end of the heating shoe, first iron the back, then the side seam. Finally, iron the front and second side seam.
- When ironing side seams, pull the T-shirt outwards each time so that the area under the sleeves can be ironed easily.

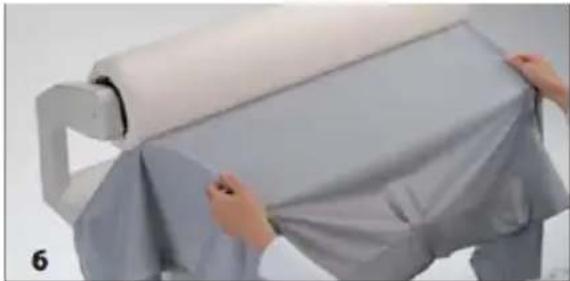
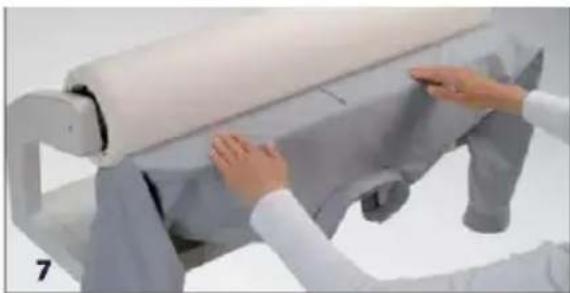
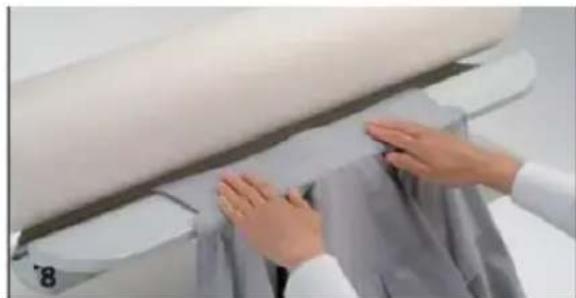
IRONING SHIRTS OR BLOUSES
- Place the cuff on the end of the heating shoe and iron it. Repeat the process for the second cuff.
- Now insert the sleeve of the shirt to elbow height and iron it, while maintaining a slight pull, from the center of the sleeve up to the cuff, making sure that the cuff opening is facing upwards. If necessary, turn the sleeve over and iron it from the other side.
- Insert the sleeve at a slant to elbow height (side seam parallel to the roller) and iron it from the center up to the sleeve seam. If necessary, turn the sleeve over and iron it from the other side. Repeat the process for the second sleeve.
- Place the button placket so that the button faces upwards and iron the front up to the sleeve seam.

- Pull the shirt outwards and iron over the side seam to approximately 6 inches (15cm) into the back. Repeat the process for the other front.
- Place the hem of the back on the heating shoe and iron the back up to the start of the sleeve
- Now pull both sleeves over the free ends of the heating shoe. Iron the shirt up to the collar. If there are back pleats, draw them together so that the pleats lie properly. If the shirt cannot be pulled over the free end of the heating shoe, insert the back as done for the front and iron from sleeve seam to sleeve seam.
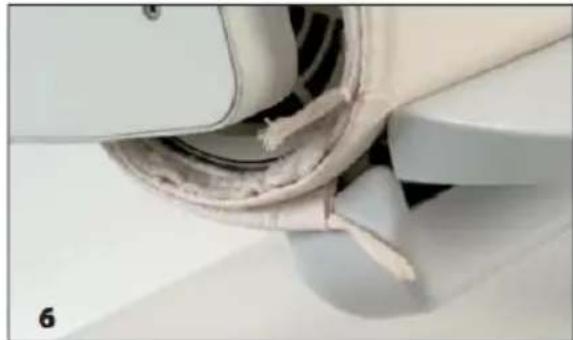
- Press the collar from the free end to the collar stand (Illustration 8).
IRONING TROUSERS
- Iron the legs separately on both sides from the bottom up to the crotch seam.
- Pull the top part of the trousers over one free end of the heating shoe. Make sure that the zipper is facing upwards toward the iron roller. Iron the top of the trousers working from the center back to the center front.
- For crisp crease in the leg, press again as pictured. Starting at the hem area, first press the bottom front crease and then the back crease.
- Now pull the trousers to the left and press the top break in the crease from both sides.
Note: For some fabrics, it is advisable to place a damp cloth over the heating shoe, to prevent any shiny areas from appearing on the fabric.
IRONING RUFFLES OR FOLDS
Ruffles or folds are always ironed at a free end of the heating shoe. Iron slowly.
CARE & MAINTENANCE
This chapter contains information with regard to the care and maintenance of your Reliable Rotary Press.
For your own safety, always switch off the power switch of the Rotary Press and unplug when servicing the machine.
GENERAL CARE
To clean the Rotary Press, use a soft, dry, clean and lint-free cloth. Particularly stubborn dirt can be removed using a soft cloth and a commercial cleaning agent.
Use a commercial cleaning agent to clean the ironing sole plates. Never scratch or scrape the heating shoe.
If it is necessary to renew the ironing roller cover, only use the original Reliable ironing cloths and original Reliable padding covers obtainable from our website at www.reliablecorporation.com.
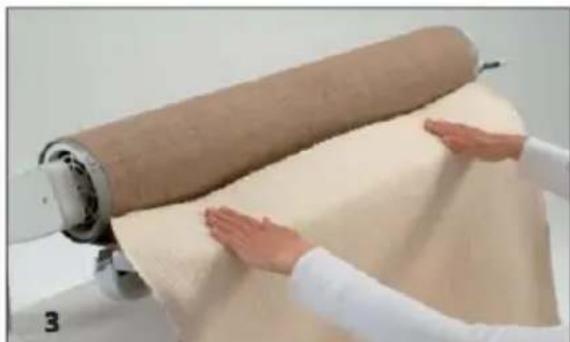
REPLACING OR RENEWING THE IRONING ROLLER COVERS
The ironing roller covers may only be replaced when the heating shoe is cold.
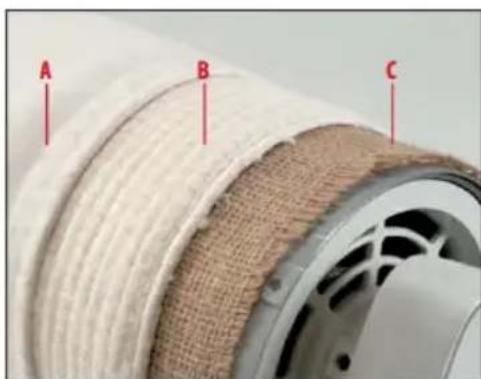
The ironing roller is covered by three layers.
A. Ironing cloth of grey cotton, replaceable. This cover can be washed at 86^ F (30^ C). However, there is a risk the cover shrinks when washed. In this case, we recommend fitting a new ironing cloth.
B. The soft padded cover is replaceable. This cover may not be washed but should only be shaken out slightly.
C. Jute cover, not replaceable
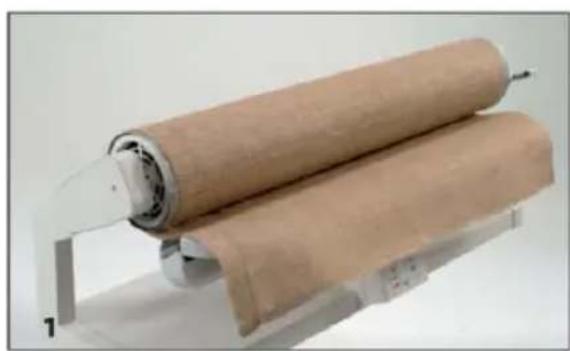
UNWINDING THE IRONING COVERS
- Pull out the cord loops at both ends of the roller and open the loops.
- Switch on the Service function: Press and hold button 15 "Continuous Steam" and the power switch. The heater for the heating shoe is switched Off in this mode.
- Press the foot pedal and pull the ironing cloth (A) forward to remove. This causes the ironing roller to rotate in reverse without a closing function.
- Press the foot pedal again and pull the padding cover (B) forward to remove. The jute cover (C) remains on the roller.

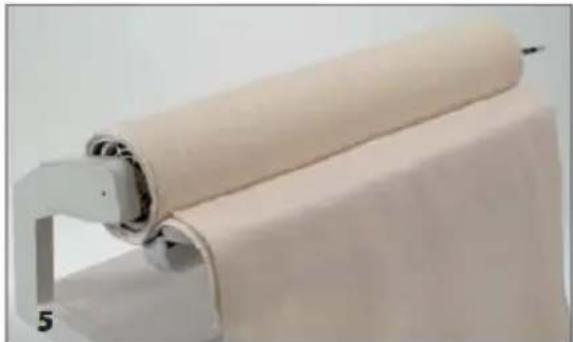
WINDING THE IRONING COVERS
Note: All layers must project evenly and be centered at both sides of the ironing roller so that the roller remains open for ventilation.
- Unwind the jute cover (C) approximately 10 inches (25cm)
- To wrap the ironing roller, press the buttons of steam settings min 17A and maximum 17C. This means that the ironing roller will remain in the lowered position even when the foot pedal is operated.
- The padding cover has a smooth and rough side. Only one short side of the cover is trimmed. Place the trimmed short side on the jute cover with the rough side upwards. Press the foot pedal and wind the padding cover onto the ironing roller.
- When winding on the padding cover, make sure that the cover is aligned at the left and right with the ironing roller. To do this, spread the padding cover smoothly to the right and left by gently brushing with your hands as the pad is rolling on, causing it to slightly expand outward. After winding on the padding cover, allow the ironing roller to rotate for approximately ten turns.

- After the tenth turn, the end of the padding cover must lie on the top of the ironing roller. As pictured, place the ironing cloth (A) on the padding cover with the wrong side upwards making sure that the cord ends project evenly. Wind the ironing cloth onto the ironing roller.
- Wind on the ironing cloth completely and make sure that the end of the ironing cloth lies on the heating shoe.
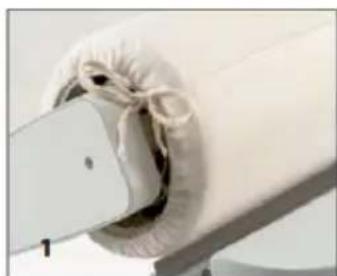
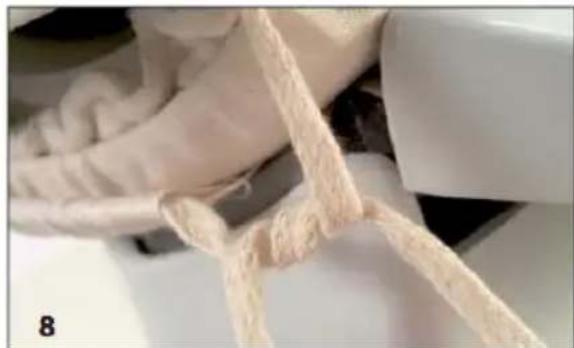
- Tighten the cord at both ends of the roller, first on the inner and then on the outer ends of the ironing cloth.
- Wrap the cord ends round twice, pull them tight and then tie. The end of the cord must remain tensioned during the whole operation. Slide the ends under the ironing cover. Press Continuous Steam button (the Rotary Press returns to the main program) or switch the Power Switch Off and then On again. The Rotary Press restarts in the main program and the ironing roller lifts up.

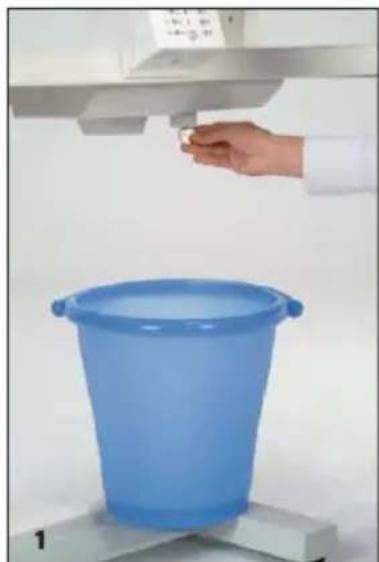
EMPTY THE WATER TANK
Switch off the power and unplug.
After use, the water tank should be emptied. Do this before folding and storing the Rotary Press.
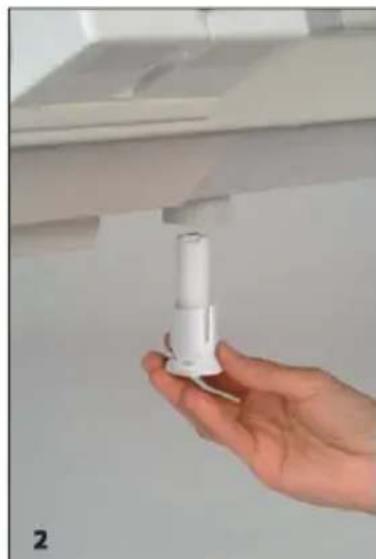
- Place a bucket under the water tank. Using a suitable coin, undo the drain plug and unscrew it completely. When unscrewing the drain plug the expanding polystyrene float for Remaining Water LED (19) drops out. Now drain the water tank.
- To close the water tank, fit the polystyrene float to the pin of the drain plug and insert it vertically into the opening of the water tank. Tighten the drain plug.
TECHNICAL SPECS & WARRANTY INFORMATION
WARRANTY & REPAIR
- Do not disassemble or attempt to repair this appliance. Incorrect reassembly or repair could cause considerable damage, risk of fire, electric shock, or injury to persons when the appliance is used.
- Service under the warranty may be obtained by returning the appliance, along with a Proof of Purchase (such as the purchase receipt) to:
Reliable Corporation
100 Wingold Avenue, Unit 5
Toronto, Ontario
Canada M6B 4K7
www.reliablecorporation.com
TECHNICAL SPECIFICATIONS
| Dimension, Working Position | 36,5" W x 13" D x 41" H | 94/40/105 cm |
| Dimension, Folded Down Position | 20,47" W x 17,17" D x 39,40' H | 52/40/100 cm |
| Weight | 85 lbs | 39 kg |
| Roller Size | 33" | 84 cm |
| Water Tank Capacity | 2,74 pints | 1,3 L |
| Excess Temperature Fuse (steam generator / heating shoe) | 421/500 F | 216/260 °C |
| Nominal Voltage (60 Hz) | 120V | 120 V |
| Power Consumption (max.) | 1,8 kW | 1,8 kW |
| Fuse (home wiring) at least | 16 A | 16 A |
| Ironing Speed (rpm) | 2,40 - 6,80 | 2,40 - 6,80 |
Reliable Corporation ("Reliable") warrants to original purchaser of its products that every product sold by Reliable (a "Reliable Product") is free from defects in material and workmanship for a period of one year from the date of purchase if properly used and maintained. Subject to the conditions and limitations set forth below, Reliable will either repair or replace any part of a Reliable Product that proves defective by reason of improper workmanship or materials. If the defective Reliable Product is no longer available and cannot be repaired effectively or replaced with an identical model, Reliable shall replace the defective Reliable Product with a current Reliable Product of equal or greater value. Repaired parts or replacement products will be provided by Reliable on an exchange basis, and will be either new or refurbished to be functionally equivalent to new. If Reliable is unable to repair or replace a Reliable Product, it will refund the current value of that Reliable Product at the time the warranty claim is made.
This limited warranty does not cover any damage to a Reliable Product that results from improper installation, accident, abuse, misuse, natural disaster, insufficient or excessive electrical supply, abnormal mechanical or envsteamermental conditions, wear and tear resulting from normal use of the product, or any unauthorized disassembly, repair, or modification. This limited warranty does not extend to any indirect, consequential or incidental damages that may be suffered by a user or from the use of a Reliable Product, including without limitation, any liability for third party claims for damage, and is limited to the amount paid by the original purchaser Reliable Product with respect to which this limited warranty protection applies. This limited warranty does not apply with respect to products that have been altered or which are missing serial numbers or for products not purchased directly from Reliable or a dealer authorized by us to sell Reliable Products.
This limited warranty is the only warranty that applies to any Reliable Product, supersedes any and all terms that may be contained in any other document or purchase order and may not be altered or amended except expressly in writing by Reliable.
To obtain a repair or replacement under the terms of this warranty, please contact our customer service group at 1-800-268-1649 or at support@reliablecorporation.com. You will be required to submit an original receipt via fax or e-mail. The receipt must reflect that you are the original purchaser, the product was bought directly from us or from an authorized Reliable dealer and that the warranty claim is being made within the warranty period. You will be issued a return authorization number (RA#) and asked to ship the defective product together with proof of purchase and RA#, prepaid insured to the following address:
Reliable Corporation, 5-100 Wingold Avenue, Toronto, ON M6B 4K7. Freight collect shipments will be refused. The risk of loss or damage in transit will be borne by the customer. Once Reliable receives the defective product, it will initiate the repair or replacement process.
If you have any questions regarding this warranty, you may write to:
Reliable Corporation
100 Wingold Avenue, Unit 5
Toronto, Ontario
Canada M6B 4K7
www.reliablecorporation.com
VERVE 100SR
PRESSE ROTATIVE
GUIDE D'UTILISATION
FRANÇAIS
RELIABLE. PROCHE DE VOUS.
Reliable Corporation
100 Wingold Avenue, Unit 5
Toronto, Ontario
Canada M6B 4K7
www.reliablecorporation.com
Reliable Corporation
100 Wingold Avenue, Unit 5
Toronto, Ontario
Canada M6B 4K7
www.reliablecorporation.com
VERVE 100SR
PRENSA ROTATIVA
RELIABLE. JUNTO A USTED.
APAGUE Y DESCONECTE.
Reliable Corporation
100 Wingold Avenue, Unit 5
Toronto, Ontario
Canada M6B 4K7
www.reliablecorporation.com
Reliable Corporation
100 Wingold Avenue, Unit 5
Toronto, Ontario
Canada M6B 4K7
www.reliablecorporation.com
DID YOU KNOW?
We supply thousands of dry
cleaners and major
department store alteration
shops with ironing stations
and ironing tables.