Ready - DJ Equipment Reloop - Free user manual and instructions
Find the device manual for free Ready Reloop in PDF.
| Product Type | 2-Channel DJ Console |
| Brand | Reloop |
| Model | Ready |
| Power Supply | USB 5V, 2A (via USB-B port) or external power adapter |
| Main Functions | 2 channels, 2-band EQ, Highpass/Lowpass filter, crossfader, pitch fader, performance pads (8 pads per deck), loop encoder, software effects, compatibility with Serato DJ Lite/Pro and djay |
| Connectivity | Master output RCA, headphone output 3.5mm jack, USB-A iOS port, USB-B PC/Power port, Kensington lock |
| Compatible Software | Serato DJ Lite, Serato DJ Pro, djay (iOS/iPadOS) |
| Maintenance and Cleaning | Use a slightly damp cloth, avoid solvents and aerosols |
| Safety | Do not expose to humidity, do not open the casing, use on a flat and stable surface, observe operating temperatures (5°C to 35°C) |
| Spare Parts and Repairability | Wear parts (jog wheels, faders) can be replaced from the outside; all maintenance must be carried out by a qualified technician |
| General Information | Manufactured by Global Distribution GmbH & Co. KG, Schuckertstr. 28, 48153 Münster, Germany; © 2021 |
Frequently Asked Questions - Ready Reloop
User questions about Ready Reloop
0 question about this device. Answer the ones you know or ask your own.
Ask a new question about this device
Download the instructions for your DJ Equipment in PDF format for free! Find your manual Ready - Reloop and take your electronic device back in hand. On this page are published all the documents necessary for the use of your device. Ready by Reloop.
USER MANUAL Ready Reloop
English 02-07
Deutsch 08-13
Francais. 14-19
Espanol. 20-25

PORTABLE PERFORMANCE CONTROLLER FOR SERATO
Instruction Manual
CAUTION!
For your own safety, please read this operation manual carefully before initial operation! All persons involved in the installation, setting-up, operation, maintenance and service of this device must be appropriately qualified and observe this operation manual in detail. This product complies with the requirements of the applicable European and national regulations. Conformity has been proven. The respective statements and documents are deposited at the manufacturer.
Bedienungsanleitung
ACHTUNG!
To prevent fire or avoid an electric shock do not expose the device to water or fluids!
Never open the housing!
WARNING!
Keep information for further reference!
For your own safety, please read this operation manual carefully before initial operation! All persons involved in the installation, setting-up, operation, maintenance and service of this device must be appropriately qualified and observe this operation manual in detail. This product complies with the requirements of the applicable European and national regulations. Conformity has been proven. The respective statements and documents are deposited at the manufacturer.
Please remove the Reloop Ready from its packaging. Check before initial operation to make sure that the device has not been visibly damaged during transport. If you detect any damage to the power cable or the casing, do not operate the device. Contact your specialised dealer.
SAFETY INSTRUCTIONS
CAUTION
Please exercise particular caution when handling AC 100 - 240 V, 50/60Hz power voltage. This voltage rating may lead to a critical electrical shock! Any damage caused by the non-observation of this operation manual excludes any warranty claims. The manufacturer is not liable for any damage to property or for personal injury caused by improper handling or non-observation of the safety instructions.
WARNING!
To prevent fire or avoid an electric shock do not expose the device to water or fluids! Never open the housing!
This device left the factory in perfect condition. To maintain this condition and to ensure a risk-free operation the user must observe the safety instructions and warnings contained in this operation manual.
For reasons of safety and certification (CE) the unauthorised conversion and/or modification of the device is prohibited. Please note that in the event of damage caused by the manual modification to this device any warranty claims are excluded.
- The inside of the device does not contain any parts which require maintenance, with the exception of wear parts that can be exchanged from the outside. Qualified staff must carry out maintenance, otherwise the warranty does not apply!
The fuse must exclusively be exchanged against fuses of the same class, with the same trigger features and nominal current rating.
- Ensure that the power will only be supplied after the device has been fully set up.
Only use cables that comply with regulations. Observe that all jacks and bushes are tightened and correctly hooked up. Refer to your dealer, if you have any questions.
- Ensure that when setting up the product, the mains cable is not squashed or damaged by sharp edges.
- Prevent the mains cable from coming into contact with other cables! Exercise great care when handling mains cables and connections. Never touch these parts with wet hands!
- Connect the power cable exclusively to appropriate shock-proof outlets. The only supply point to be used is a supply outlet in accordance with specifications of the public supply network.
- Disconnect the device from the supply outlet when not in use and before cleaning! Be sure to hold the mains plug by the body. Never pull the mains cord!
- Position the device on a horizontal and stable low-flame base.
- Avoid any concussions or violent impact when installing or operating the device.
- When selecting the location of installation, make sure that the device is not exposed to excessive heat, humidity and dust. Be sure that no cables lie around openly. You will endanger your own safety and that of others!
- Do not rest any containers filled with liquid that could easily spill onto the device or in its immediate vicinity. If, however, fluids should access the inside of the device, immediately disconnect the mains plug. Have the device checked by a qualified service technician before re-use. Damage caused by fluids inside the device is excluded from warranty.
Do not operate the device under extremely hot (in excess of 35^ ) or extremely cold (below 5^ ) conditions. Keep the device away from direct exposure to the sun and heat sources such as radiators, ovens, etc. (even during transport in a closed vehicle). Always ensure sufficient ventilation.
- The device must not be operated after being taken from a cold environment into a warm environment. The condensation caused hereby may destroy your device. Do not switch on or operate the device until it has reached ambient temperature!
Controls and switches should never be treated with spray-on cleaning agents and lubricants. This device should only be cleaned with a damp cloth. Never use solvents or cleaning fluids with a petroleum base for cleaning.
- When relocating, the device should be transported in its original packaging.
- When starting operation, the crossfaders and volume controls of your amplifier must be set to minimum level. Bring the loudspeaker switches into the "OFF" position. Wait between 8 to 10 seconds before increasing the volume to avoid damage to loudspeakers.
Devices supplied by voltage should not be left in the hands of children. Please exercise particular care when in the presence of children.
- At commercial facilities the regulations for the prevention of accidents as stipulated by the organization of professional associations must be observed.
- At schools, training facilities, hobby and self-help workshops the operation of the device must be monitored with responsibility by trained staff.
- Keep this operation manual in a safe place for later reference in the event of questions or problems.
APPLICATION IN ACCORDANCE WITH REGULATIONS
This device is a 2-channel DJ controller, which can regulate and mix audio signals. The device needs to be connected to a tablet or computer and an audio amplifier or active speakers.
If the device is used for any other purposes than those described in the operation manual, damage can be caused to the product, leading to the exclusion of warranty rights. Moreover, any other application that does not comply with the specified purpose harbours risks such as short circuit, fire, electric shock, etc.
- The serial number determined by the manufacturer must never be removed to uphold the warranty rights.
MAINTENANCE
- Check the technical safety of the device regularly for damage to the mains line or the casing, as well as for wear of wear parts such as rotary and sliding switches.
If it is to be assumed that the safe operation is no longer feasible, then the device must be disconnected and secured against accidental use. Always disconnect the mains plug from the outlet! - It must be assumed that a safe operation is no longer feasible, if the device bears visible defects, if the device no longer functions, following longer storage under unfavourable conditions or after major transport stress.
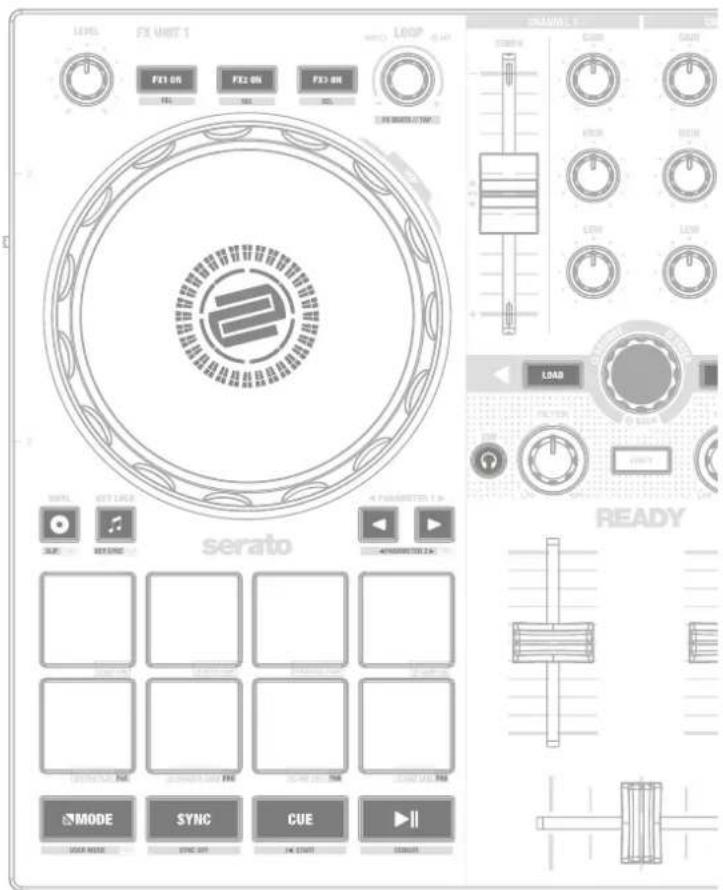
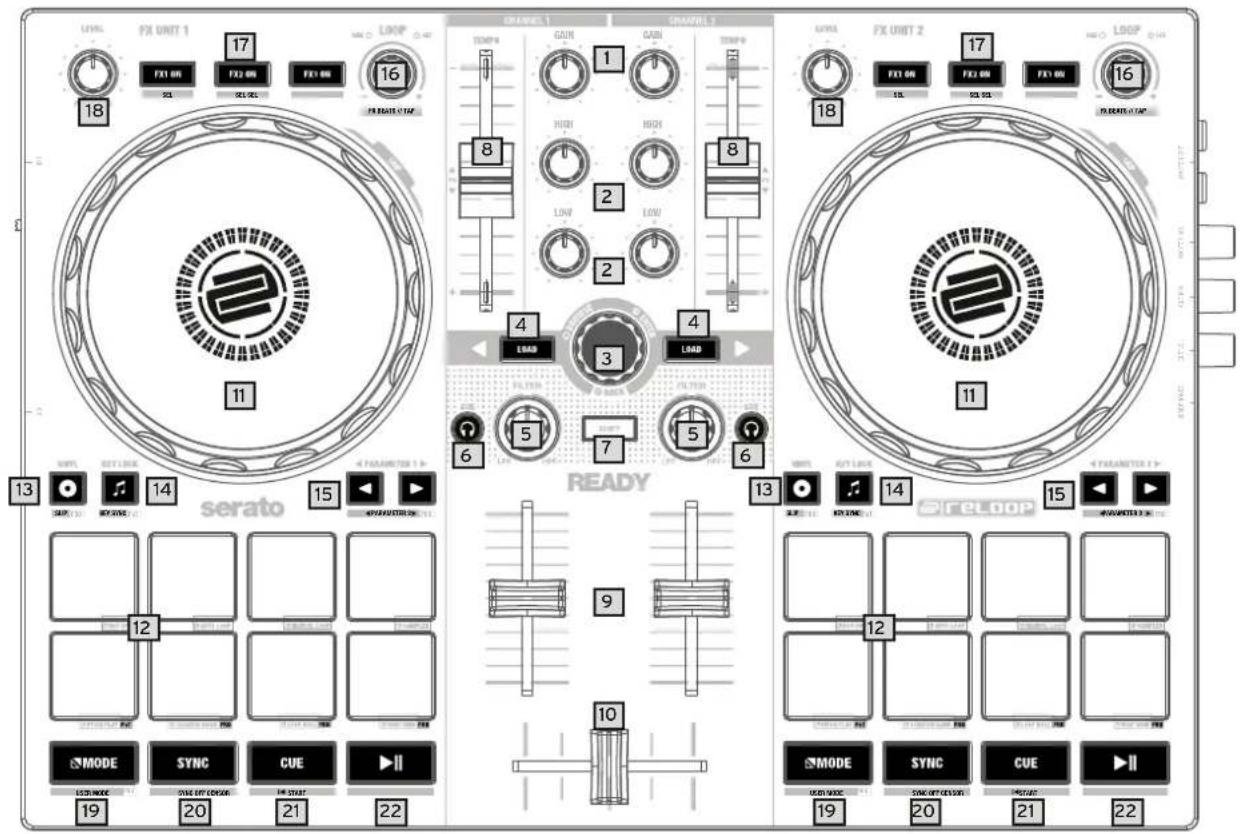
CONTROLS
RIGHT PANEL
LEFT PANEL
DESIGNATIONS:
- Gain
- Equalizer (2-band)
- Browse Encoder
- Track Load Button
5.Filter - Headphones/Cue Buttons
- SHIFT
- Pitch Fader
- Linefader
10.Crossfader - Jog Wheel
- Performance Pads
- Vinyl
- Key Lock
- Parameter Button
- Loop Encoder
- FXONButton
- FX Control
- MODE
- MODEL
- SYNC
21.CUE -
PLAY/PAUSE
-
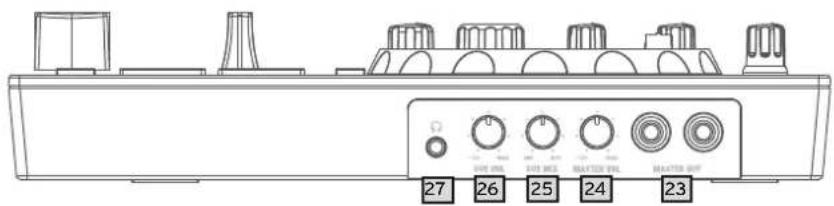
Master Out (RCA)
- Master Volume
- Headphones/Cue Mix
- Headphones/Cue Volume
- Headphones Out (3,5mm Jack)
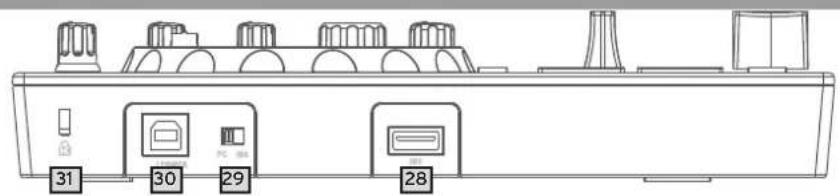
- USB-A-iOS-Port
- USB Source Switch
- USB-B PC/Power Port
- Kensington Lock
SCOPE OF DELIVERY:
- Reloop Ready
- RCA Cable
-USB Cable
-Instruction Manual
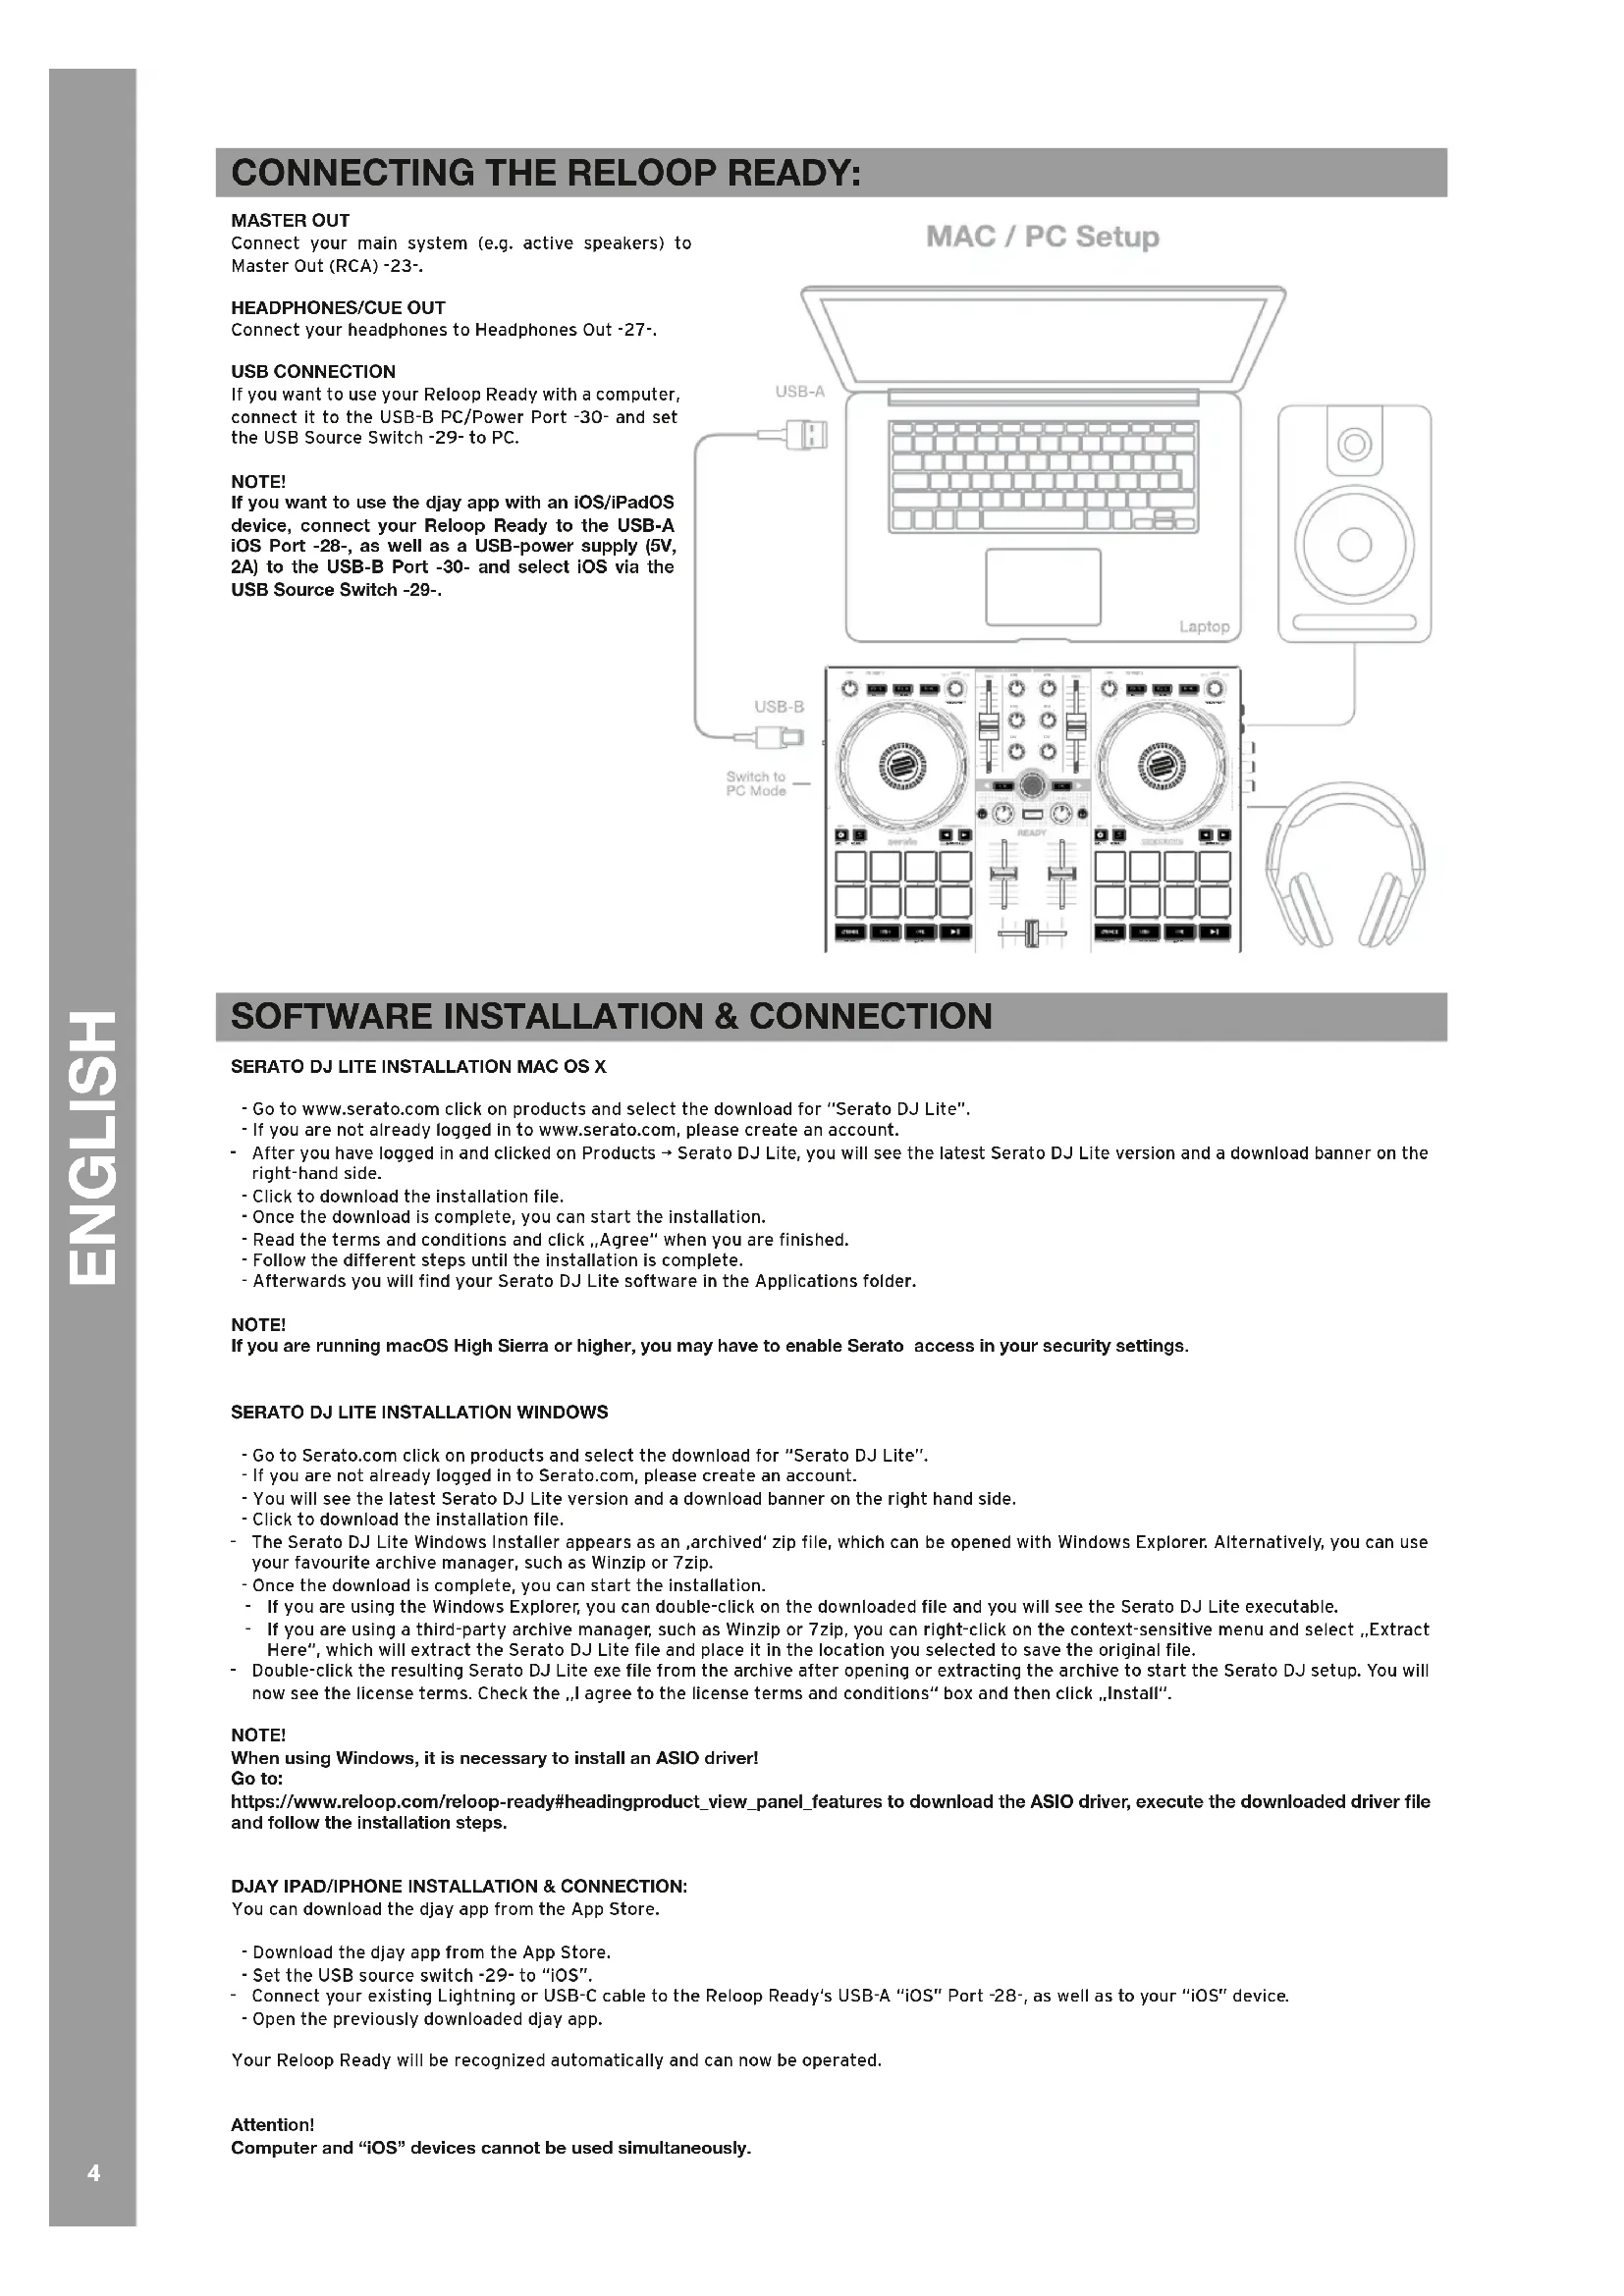
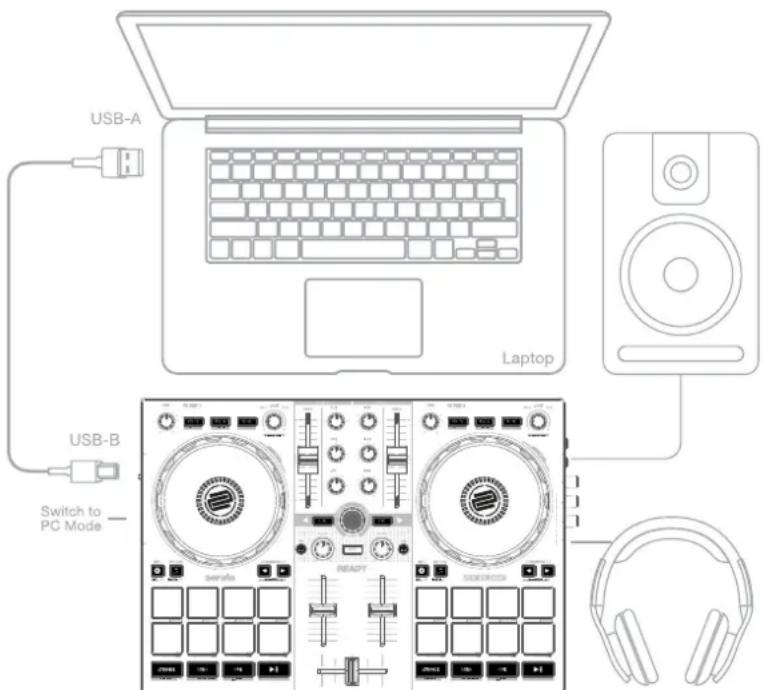
CONNECTING THE RELOOP READY:
MASTER OUT
Connect your main system (e.g. active speakers) to Master Out (RCA)-23-.
HEADPHONES/CUE OUT
Connect your headphones to Headphones Out -27-.
USB CONNECTION
If you want to use your Reloop Ready with a computer, connect it to the USB-B PC/Power Port -30- and set the USB Source Switch -29- to PC.
NOTE!
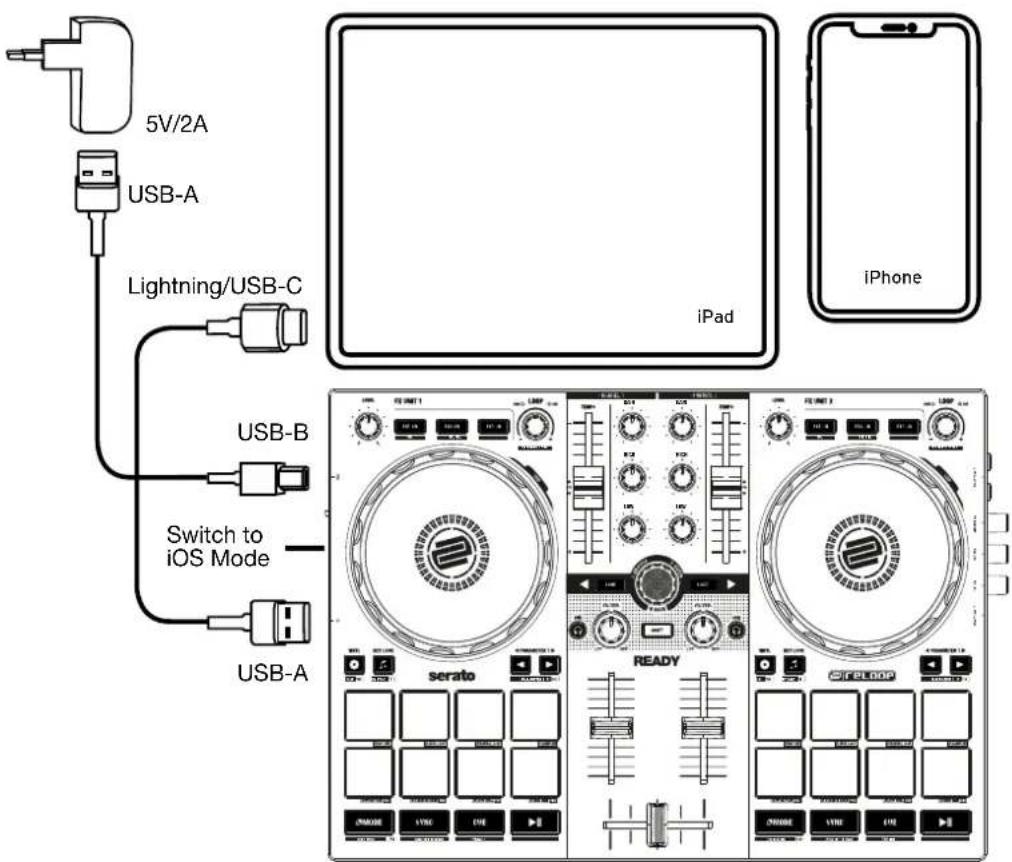
If you want to use the djay app with an iOS/iPadOS device, connect your Reloop Ready to the USB-A iOS Port -28-, as well as a USB-power supply (5V, 2A) to the USB-B Port -30- and select iOS via the USB Source Switch -29-.
MAC / PC Setup
SOFTWARE INSTALLATION & CONNECTION
SERATO DJ LITE INSTALLATION MAC OS X
- Go to www.serato.com click on products and select the download for "Serato DJ Lite".
If you are not already logged in to www.serato.com, please create an account.
After you have logged in and clicked on Products Serato DJ Lite, you will see the latest Serato DJ Lite version and a download banner on the right-hand side.
- Click to download the installation file.
- Once the download is complete, you can start the installation.
- Read the terms and conditions and click „Agree“ when you are finished.
- Follow the different steps until the installation is complete.
- Afterwards you will find your Serato DJ Lite software in the Applications folder.
NOTE!
If you are running macOS High Sierra or higher, you may have to enable Serato access in your security settings.
SERATO DJ LITE INSTALLATION WINDOWS
- Go to Serato.com click on products and select the download for "Serato DJ Lite".
If you are not already logged in to Serato.com, please create an account. - You will see the latest Serato DJ Lite version and a download banner on the right hand side.
-
Click to download the installation file.
-
The Serato DJ Lite Windows Installer appears as an,archived' zip file, which can be opened with Windows Explorer. Alternatively, you can use your favourite archive manager, such as Winzip or 7zip.
-
Once the download is complete, you can start the installation.
If you are using the Windows Explorer, you can double-click on the downloaded file and you will see the Serato DJ Lite executable.
If you are using a third-party archive manager, such as Winzip or 7zip, you can right-click on the context-sensitive menu and select „Extract Here", which will extract the Serato DJ Lite file and place it in the location you selected to save the original file.
Double-click the resulting Serato DJ Lite exe file from the archive after opening or extracting the archive to start the Serato DJ setup. You will now see the license terms. Check the „I agree to the license terms and conditions" box and then click „Install".
NOTE!
When using Windows, it is necessary to install an ASIO driver!
Go to:
https://www.reloop.com/reloop-ready#headingproduct_view-panel_features to download the ASIO driver, execute the downloaded driver file and follow the installation steps.
DJAY IPAD/IPHONE INSTALLATION & CONNECTION:
You can download the djay app from the App Store.
- Download the djay app from the App Store.
- Set the USB source switch -29- to "iOS".
Connect your existing Lightning or USB-C cable to the Reloop Ready's USB-A "iOS" Port -28-, as well as to your "iOS" device.
- Open the previously downloaded djay app.
Your Reloop Ready will be recognized automatically and can now be operated.
Attention!
Computer and "iOS" devices cannot be used simultaneously.
Always connect the supplied USB cable to the USB-B PC/Power Port -30- and connect it to a USB power supply. Please only use the original power cable of your tablet / smartphone or use an appropriate power supply unit (5V, 2A) to ensure a sufficient power supply. Alternatively, you can purchase the following USB power supply as a spare part: Item No.: 243382.
OPERATION SERATO DJ LITE:
1. GAIN
Use the Gain Control -1- to adjust the channel volume.
2. EQUALIZER
With the 2-band Equalizer -2- you can adjust the treble and bass for channels 1 & 2.
3. BROWSE ENCODER
Use the Browse Encoder -3- to navigate through your music libraries. Press the Browse Encoder -3- to confirm your selection.
SHIFT: To go back one menu item, press SHIFT -7- + Browse Encoder -3-.
4. TRACK LOAD
Press the Track Load button -4- to load a track to the desired deck.
5. FILTER
Channel 1 & 2 have an individual Filter -5-. In the 12 o'clock position the filter is switched off. Turning Filter -5- clockwise creates a high-pass effect, turning it counter-clockwise creates a low-pass effect.
6. HEADPHONES/CUE BUTTONS
With the Headphones/Cue Buttons -6- you can monitor the respective audio signal of channels 1 & 2.
7. SHIFT
Pressing SHIFT-7+ a selected button activates the respective functions of the 2nd level, according to the labelling of the device.
NOTE!
Some functions of the 2nd level can only be executed with the
Serato DJ Pro version, these can be recognized by the additional PRO labelling.
8. PITCH FADER
The Pitch Fader -8- determines the tempo of the track.
9. LINEFADER
With the Linefader -9- you can adjust the output volume for channels 1 & 2.
10.CROSSFADER
The Crossfader -10- switches between the left and right channel.
11. JOG WHEEL
The Jog Wheel -11- is active by default in pitch bend mode. The surface is touch-sensitive and reacts to body tension. Turning the outer rim -11- can be used to perform a pitch bend.
SHIFT: By pressing SHIFT -7+ turning the Jog Wheel -11- at the same time, you can perform the SKIP/quick search function (fast scroll through track).
12. PERFORMANCE PADS
The Performance Pads -12- are colour-coded drum pads that control the selected performance mode. The different performance modes can be activated by holding the MODE Button -19- and pressing the subsequently selected Performance Pad mode -12-.
THE FOLLOWING PERFORMANCE MODES ARE AVAILABLE:
Hot Cue Mode = Triggers the 4 available cue points per deck and the pad colours light up in the corresponding colours.
- SHIFT: By pressing SHIFT -7- and the respective Cue Pad, the selected Cue Point will be deleted.
- PRO: In Serato DJ Pro you are able to set up 8 hot cues per deck.
Auto Loop Mode = Each of the 4 Performance Pads In the first row has a different loop length. Pressing it will activate It Immediately according to the length, pressing it again will deactivate the Auto Loop. The 4 pre-assigned loop sizes on the Drum Pads can be changed via the Parameter Buttons -15-. The Performance Pads in the second row (5-8) are assigned as follows:
- Pad 5: Move the selected loop backwards in the track
- Pad 6: Adjust the reduction parameter to move the selected loop within the track
- Pad 7: Adjust the enlargement parameter to move the selected loop within the track
- Pad 8: Move the selected loop forward in the track
PRO: In Serato DJ Pro you can also half or double the selected loop by using the Parameter Buttons -15-.
Manual Loop Mode = The 4 Performance Pads in the first row are assigned to the following functions:
- Pad 1: Set Loop In
- Pad 2: Set Loop Out
- Pad 3: Loop On/Off
- Pad 4: Jump to activated Loop In, pressing Pad 4 again deactivates loop
PRO: In Serato DJ Pro the pads in the second row are assigned as follows:
- Pad 5: Upward Scrolling through loops
- Pad 6: Downwards Scrolling through loops
- Pad 6: Save activated loop to empty loop slot
- Pad 8: Not assigned
Sampler Mode = Triggers the respective sample in the sample bank using the 4 drum pads -12-.
SHIFT: Pressing SHIFT -7 + the active sample drum pad will stop playback of the sample.
PRO: In Serato DJ Pro you are able to load 8 samples to the Sample Bank.
NOTE!
In Serato DJ Lite, you only have access to the 4 Performance Modes listed above. With the exception of Auto Loop Mode, the Performance
Pads in the second row (5-8) are assigned with the same function in each DJ Lite Performance Mode, as follows:
- Pad 5: Reverse On/Off
- Pad 6: Hold to rewind the track
-
Pad 7: Hold to forward the track
-
Pad 8: Playback from temporarily set Cue point, if the Cue is not set, the start Cue is automatically set to the beginning of the track and will start playing immediately (CUP - Cue and Play)
If you are a Serato DJ Pro user, you will have access to 4 additional DJ Pro Performance Modes in the second row of the Performance Pad section -12-.
PRO P'n'T: Pitch Play Mode = In combination with the Pitch'n'Time Expansion Pack you can play your cues in different keys via the Performance
Pads -12. There are 3 scales available. To switch between the scales, press the left or right Parameter Button -15- of the respective channel. The
pad with the keynote is always lit white and the cue point is played in the regular pitch.
SHIFT: To select another hot cue point, hold down the SHIFT Button -7- and press the desired Performance Pad -12- (Hot Cue) at the same time.
PRO: Scratch Bank Mode = In Scratch Bank Mode you can assign 8 audio files from your Serato DJ Pro library to each of the 8 Performance Pads. When a pad is pressed, the respective file is loaded onto the deck. The pads on the left will be loaded to deck 1 and the pads on the right will be loaded to deck 2. To set up your Scratch Bank files, click on the Scratch Bank icon in the top toolbar of Serato DJ Pro to display the Scratch Bank panel. In this panel you can load or eject audio files to the respective scratch banks and select the desired settings. These settings include the starting point, repeat on/off and key lock on/off. By clicking on the button in the upper left corner of the Scratch Bank panel, you can switch between advanced and simple view.
SHIFT: Hold down SHIFT -7- and click on any Scratch Bank Pad to unload the currently loaded file and reload the title that was last loaded on this deck.
PRO: Loop Roll-Mode = Each Performance Pad in the first row (1-4) enables/disables a loop roll when the pad is held. Each Pad is assigned a specific loop length of 1/8 - 1.
The Pads in the second row (5-8) control the Beat Jump function.
- Pad 5: Beat Jump backwards
- Pad 6: Adjust the reduction parameter of the Beat Jump
- Pad 7: Adjust the enlargement parameter of the Beat Jump
- Pad 8: Beat Jump forward
PRO: Beat Grid Mode = In Beat Grid mode you can adjust the grid and track timing to the selected song. The pads in the first row (1-4) will adjust the grid of the track and the pads in the second row (5-8) will adjust the timing of the track.
13. VINYL
Vinyl -13- switches from Pitch Bend Mode to Vinyl Mode, where you can use the Jog Wheels -11- to perform the scratch function.
PRO SHIFT: By pressing SHIFT -7+ Vinyl -13- you activate/deactivate Slip Mode. If slip mode is active, you can perform various actions (cue pionts or scratches) and the playing track will continue at exactly the position, where the track would be if, you had not performed any actions.
14. KEY LOCK
Key Lock -14- activates/deactivates the Key Lock function.
PRO P'n'T SHIFT: In combination with the Pitch'n'Time Expansion Pack, pressing SHIFT -7+ Key Lock activates/deactivates the Key Sync function.
This allows you to match the key of the current track to the key of the track on the other deck.
15. PARAMETER BUTTONS (PRO PARAMETERS)
The Parameter Buttons -15- control the parameter functions for each deck, depending on the selected mode (e.g. FX parameter setting).
PRO SHIFT: By pressing SHIFT -7- + Parameter Buttons -15- you can control the parameter functions of the 2nd level, depending on the selected mode.
16. LOOP ENCODER
By turning the Loop Encoder -16- you can select the loop length (1/32-32 bars). Pressing the Loop Encoder -16- activates the previously selected loop length, pressing it again deactivates the loop.
SHIFT: By holding down SHIFT -7- and rotating the respective Loop Encoder -16-, you can set the Beats Multiplier value for the software effects of the respective channel.
SHIFT: By holding down SHIFT -7- and pressing the loop encoder -16- to the beat, you can manually enter the timing of the software effects.
17.FX ON BUTTONS
Use the FX ON Buttons -17- to activate/deactivate the 3 selected software effects in your effect bank.
SHIFT: Holding SHIFT -7- and pressing the FX ON Keys -17-, you can select the desired software effect for the respective effect bank.
18.FX CONTROL
With FX Control -18- you can adjust the effect intensity (depth) of the effects activated in the effects bank.
19. MODE
Holding the MODE button -19- + pressing a Pad Mode activates the selected Performance Mode (see: 12. Performance Pads).
PRO SHIFT: Holding down SHIFT -7- and pressing the MODE button -19- enters User Mode. Here you can assign the Performance Pads -12- according to your personal preferences.
20.SYNC
SYNC -20- automatically synchronises the BPM value of one track to the other deck.
SHIFT: Pressing SHIFT -7- + SYNC -20- will deactivate SYNC mode.
21.CUE
Use the CUE Buttons -21- to create and trigger a temporary cue point. This is represented by a white cue marker. If the CUE Button -21- is pressed during playback, it automatically stops and jumps back to the set cue point (CUE play mode). If you pause playback and press the CUE Button -21-, a new cue point is created at the current track position (CUE pause mode).
22. PLAY/PAUSE
PLAY/PAUSE -22- starts/pauses playback of the respective deck.
23. MASTER OUT (CINCH)
Your main system (e.g. active speakers) is connected to the Master Out (RCA) -23- and controlled by the Master Volume control -24-.
24. MASTER VOLUME
The Master Volume Control -24- is used to adjust the master volume output.
The Headphones/Cue Mix Control -25- mixes the volume balance between the channel and master signal in the headphones.
-LEFT=CUE
- CENTER = 50/50 Ratio
-RIGHT Master
26. HEADPHONES VOLUME
Use the Headphones/Cue Volume Control -26- to adjust the volume of your headphones signal.
27. HEADPHONES/CUE OUT
The Headphones/Cue Output -27- is used to connect your headphones to your Reloop Ready.
28. USB-A "OS PORT
The USB-A IOS Port -28- is used to connect an IOS device.
Please additionally connect a USB power supply to the USB-B PC/Power Port -30-.
NOTE!
If you want to use an iOS device, make sure that the USB Source Switch -29- is set to iOS.
29. USB SOURCE SWITCH
Use the USB Source Switch -29- to switch between your desired USB mode (computer- or IOS-operation).
30. USB-B PC/POWER PORT
Use the USB-B PC/Power Port -30- to connect a computer. as well as a USB power cable to charge your iOS device via the Reloop Ready.
NOTE!
If you want to use a computer, make sure that the USB Source Switch -29- is set to PC.
31. KENSINGTON LOCK
The Kensington Lock -31- serves to secure your Reloop Ready from being stolen.
NOTE
PRO: Requires the Serato DJ Pro Version to unlock the Pro features & Performance Modes.
P'n'T: Requires the Serato Pitch'n'Time Expansion Pack.
MINIMUM SYSTEM REQUIREMENTS:
You can check the current Serato DJ Lite / Serato DJ Pro system requirements for Mac or Windows at serato.com.
You can check the current djay system requirements for „iOS“//”iPadOS“, Android, Mac or Windows at algoriddim.com.
TECHNICAL DATA:
Sound Card Resolution: 24bit / 48kHz
Frequency Response: 20Hz-20kHz
Signal to Noise Ratio: 95DB (USB)
Total Harmonic Distortion:0.1%
Master Out: RCA
Headphone Out: 3,5mm (1/8 Jack)
Power: DC-5V/2AUSB-B
Power Consumption iOS connection:......DC-5V / 2A USB-B
Power Consumption PC connection:DC-5V / 500mA USB-B
Dimensions: 325mm x 48mm x 220mm
Weight: 1,143 kg
ACHTUNG!
P'n'T: Erfordert das Serato Pitch'n'Time Expansion Pack.
Sound Card Resolution: 24bit / 48kHz
Frequency Response: 20Hz-20kHz
Signal to Noise Ratio: 95DB (USB)
Total Harmonic Distortion: <0.1%
Master Out: RCA
Headphone Out: 3,5mm (1/8 Jack)
Power: DC-5V/2AUSB-B
Power Consumption iOS connection:......DC-5V / 2A USB-B
Power Consumption PC connection:......DC-5V / 500mA USB-B
Dimensions: 325mm x 48mm x 220mm
Gewicht: 1,143 kg
P'n'T: Necessite le Serato Pitch'n'Time Expansion Pack.
CONFIGURATION REQUIRE:
Sound Card Resolution: 24bit / 48kHz
Frequency Response: 20Hz-20kHz
Signal to Noise Ratio: 95DB (USB)
Total Harmonic Distortion: <0.1%
Master Out: RCA
Headphone Out: 3,5mm (1/8 Jack)
Power: DC-5V/2AUSB-B
Power Consumption iOS connection:......DC-5V / 2A USB-B
Power Consumption PC connection:......DC-5V / 500mA USB-B
Dimensions: 325mm x 48mm x 220mm
Gewicht: 1,143 kg
JATENCION!
Sound Card Resolution: 24bit / 48kHz
Frequency Response: 20Hz-20kHz
Signal to Noise Ratio: 95DB (USB)
Total Harmonic Distortion: <0.1%
Master Out:RCA
Headphone Out: 3, 5mm
Power: DC-5V/2A USB-B
Power Consumption iOS connection:....DC-5V / 2A USB-B
Power Consumption PC connection:......DC-5V / 500mA USB-B
Dimensions: 325mm x 48mm x 220mm

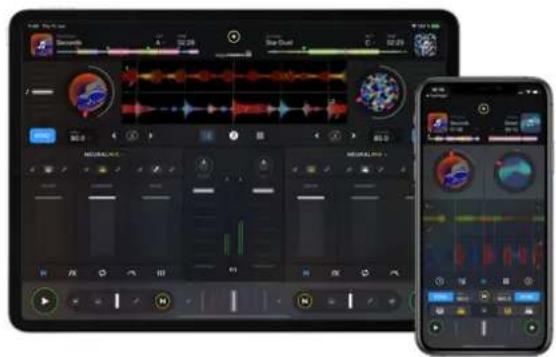
1. DOWNLOAD DJAY


2. CONNECTION
LEARN MORE ABOUT THE FULL RELOOP PRODUCT RANGE AT
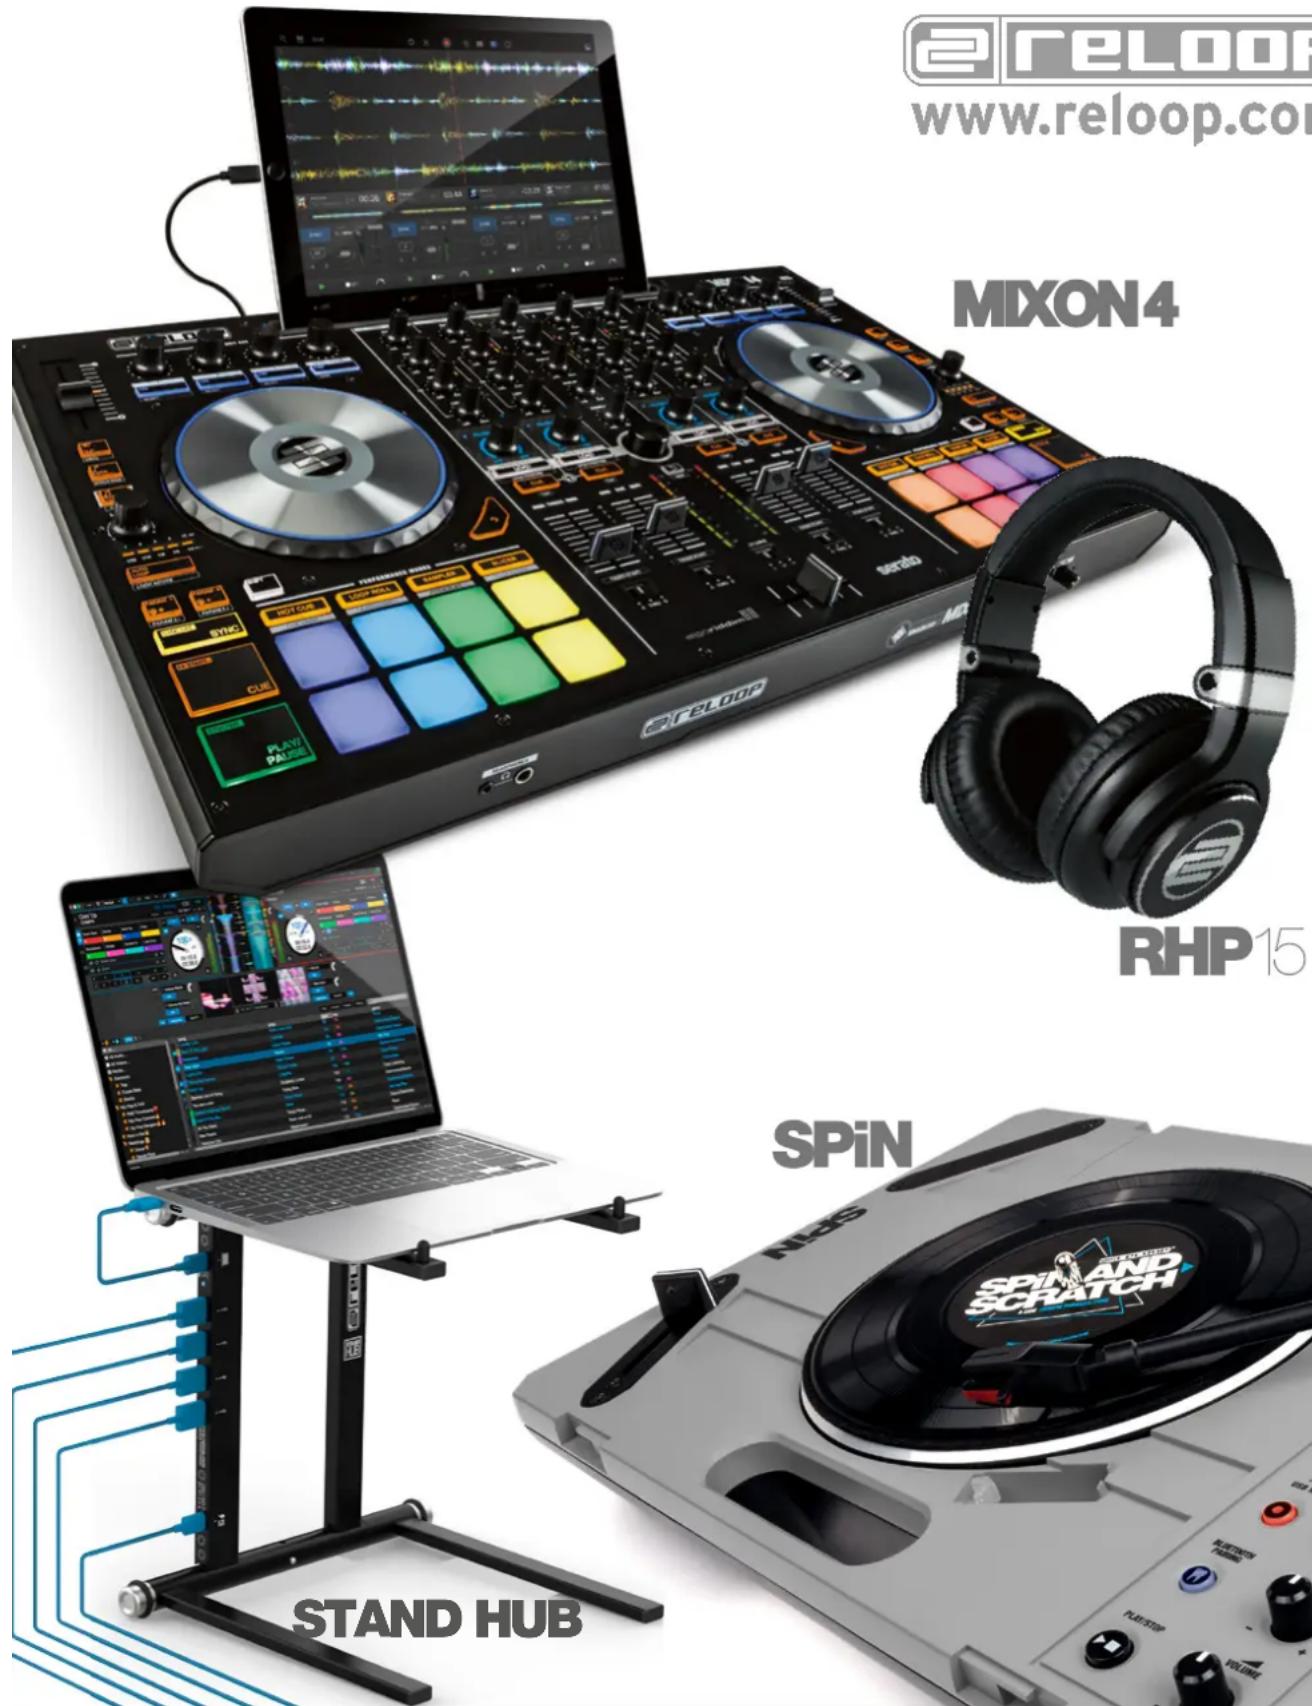
RELOOP
www.reloop.com
MXON4
RHP15
SPIN

RELOOP
www.reloop.com
Reloop Distribution
Global Distribution GmbH & Co. KG
Schuckertstrasse 28,48153 Muenster / Germany
Fax: +49.251.6099368
Subject to alterations.
Illustrations similar to original product.
Misprints excepted.