Buddy - DJ Equipment Reloop - Free user manual and instructions
Find the device manual for free Buddy Reloop in PDF.
| Product type | 2-channel DJ controller |
| Brand | Reloop |
| Model | Buddy |
| Manufacturer | Global Distribution GmbH & Co. KG |
| Design year | 2020 |
| Mains power supply | 100-240 V ~ 50/60 Hz |
| USB power supply | 5 V, 2.1 A (via power adapter) |
| Connectivity | Master output RCA, headphone output 3.5 mm jack, USB-B PC/Power port, USB-A iOS port |
| Software compatibility | djay (iOS, iPadOS, Android, Windows, Mac) |
| Main functions | 2-band EQ, High/Lowpass filter, crossfader, linefader, effects, pitch fader, performance pads (Hot Cue, Auto Loop, Touch FX, Sampler, Slicer, Bounce Loop, Neural Mix, Looper), browser, loop, sync |
| Package contents | Reloop Buddy, RCA cable, USB cable |
| Care and cleaning | Use a slightly damp cloth, never solvents or gasoline |
| Safety | Do not open the casing, avoid moisture and liquids, unplug when not in use, do not block ventilation |
| Maintenance | No user-serviceable parts inside; maintenance by qualified personnel |
| Warranty | Warranty excludes damage from improper use or unauthorized modification |
| Operating conditions | Ambient temperature 5°C to 35°C, keep away from heat, humidity, and dust |
Frequently Asked Questions - Buddy Reloop
User questions about Buddy Reloop
0 question about this device. Answer the ones you know or ask your own.
Ask a new question about this device
Download the instructions for your DJ Equipment in PDF format for free! Find your manual Buddy - Reloop and take your electronic device back in hand. On this page are published all the documents necessary for the use of your device. Buddy by Reloop.
USER MANUAL Buddy Reloop
English. 02-06
Deutsch 07-11
François 12-16
Espanol. 17-21
BUDDY
COMPACT 2-DECK DJ CONTROLLER
FOR iOS / iPADOS / ANDROID / MAC & PC

Instruction Manual
CAUTION!
For your own safety, please read this operation manual carefully before initial operation! All persons involved in the installation, setting-up, operation, maintenance and service of this device must be appropriately qualified and observe this operation manual in detail. This product complies with the requirements of the applicable European and national regulations. Conformity has been proven. The respective statements and documents are deposited at the manufacturer.
Bedienungsanleitung
ACHTUNG!
To prevent fire or avoid an electric shock do not expose the device to water or fluids!
Never open the housing!
WARNING!
Keep information for further reference!
CAUTION! For your own safety, please read this operation manual carefully before initial operation! All persons involved in the installation, setting-up, operation, maintenance and service of this device must be appropriately qualified and observe this operation manual in detail. This product complies with the requirements of the applicable European and national regulations. Conformity has been proven. The respective statements and documents are deposited at the manufacturer.
Congratulations on purchasing your Reloop Buddy. Thank you for placing your trust in our disc jockey technology. Before operating this equipment, we ask you to carefully study and observe all instructions.
Please remove the Reloop Buddy from its packaging. Check before initial operation to make sure that the device has not been visibly damaged during transport. If you detect any damage to the power cable or the casing, do not operate the device. Contact your specialised dealer.
SAFETY INSTRUCTIONS
CAUTION! Please exercise particular caution when handling power voltage. This voltage rating may lead to a critical electrical shock! Any damage caused by the non-observance of this operation manual excludes any warranty claims. The manufacturer is not liable for any damage to property or for personal injury caused by Improper handling or non-observation of the safety instructions.
WARNING! To prevent fire or avoid an electric shock do not expose the device to water or fluids! Never open the housing!
This device left the factory in perfect condition. To maintain this condition and to ensure a risk-free operation the user must observe the safety instructions and warnings contained in this operation manual.
For reasons of safety and certification (CE) the unauthorised conversion and/or modification of the device is prohibited. Please note that in the event of damage caused by the manual modification to this device any warranty claims are excluded.
- The inside of the device does not contain any parts which require maintenance, with the exception of wear parts that can be exchanged from the outside. Qualified staff must carry out maintenance, otherwise the warranty does not apply!
- The fuse must exclusively be exchanged against fuses of the same class, with the same trigger features and nominal current rating.
- Ensure that the power will only be supplied after the device has been fully set up.
Only use cables that comply with regulations. Observe that all jacks and bushes are tightened and correctly hooked up. Refer to your dealer, if you have any questions.
- Ensure that when setting up the product, the mains cable is not squashed or damaged by sharp edges.
- Prevent the mains cable from coming into contact with other cables! Exercise great care when handling mains cables and connections. Never touch these parts with wet hands!
- Connect the power cable exclusively to appropriate shock-proof outlets. The only supply point to be used is a supply outlet in accordance with specifications of the public supply network.
- Disconnect the device from the supply outlet when not in use and before cleaning! Be sure to hold the mains plug by the body. Never pull the mains cord!
- Position the device on a horizontal and stable low-flame base.
- Avoid any concussions or violent impact when installing or operating the device.
- When selecting the location of installation, make sure that the device is not exposed to excessive heat, humidity and dust. Be sure that no cables lie around openly. You will endanger your own safety and that of others!
Do not rest any containers filled with liquid that could easily spill onto the device or in its immediate vicinity. If, however, fluids should access the inside of the device, immediately disconnect the mains plug. Have the device checked by a qualified service technician before re-use. Damage caused by fluids inside the device is excluded from warranty.
Do not operate the device under extremely hot (in excess of 35^ ) or extremely cold (below 5^ ) conditions. Keep the device away from direct exposure to the sun and heat sources such as radiators, ovens, etc. (even during transport in a closed vehicle). Always ensure sufficient ventilation.
The device must not be operated after being taken from a cold environment into a warm environment. The condensation caused hereby may destroy your device. Do not switch on or operate the device until it has reached ambient temperature!
Controls and switches should never be treated with spray-on cleaning agents and lubricants. This device should only be cleaned with a damp cloth. Never use solvents or cleaning fluids with a petroleum base for cleaning.
- When relocating, the device should be transported in its original packaging.
- When starting operation, the crossfaders and volume controls of your amplifier must be set to minimum level. Bring the loudspeaker switches into the "OFF" position. Wait between 8 to 10 seconds before increasing the volume to avoid damage to loudspeakers.
Devices supplied by voltage should not be left in the hands of children. Please exercise particular care when in the presence of children.
- At commercial facilities the regulations for the prevention of accidents as stipulated by the organization of professional associations must be observed.
- At schools, training facilities, hobby and self-help workshops the operation of the device must be monitored with responsibility by trained staff.
- Keep this operation manual in a safe place for later reference in the event of questions or problems.
APPLICATION IN ACCORDANCE WITH REGULATIONS
- This device is a 2-channel DJ controller, which can regulate and mix audio signals. The device needs to be connected to a tablet or computer and an audio amplifier or active speakers.
If the device is used for any other purposes than those described in the operation manual, damage can be caused to the product, leading to the exclusion of warranty rights. Moreover, any other application that does not comply with the specified purpose harbours risks such as short circuit, fire, electric shock, etc. - The serial number determined by the manufacturer must never be removed to uphold the warranty rights.
MAINTENANCE
- Check the technical safety of the device regularly for damage to the mains line or the casing, as well as for wear of wear parts such as rotary and sliding switches.
If it is to be assumed that the safe operation is no longer feasible, then the device must be disconnected and secured against accidental use. Always disconnect the mains plug from the outlet!
It must be assumed that a safe operation is no longer feasible, if the device bears visible defects, if the device no longer functions, following longer storage under unfavourable conditions or after major transport stress.
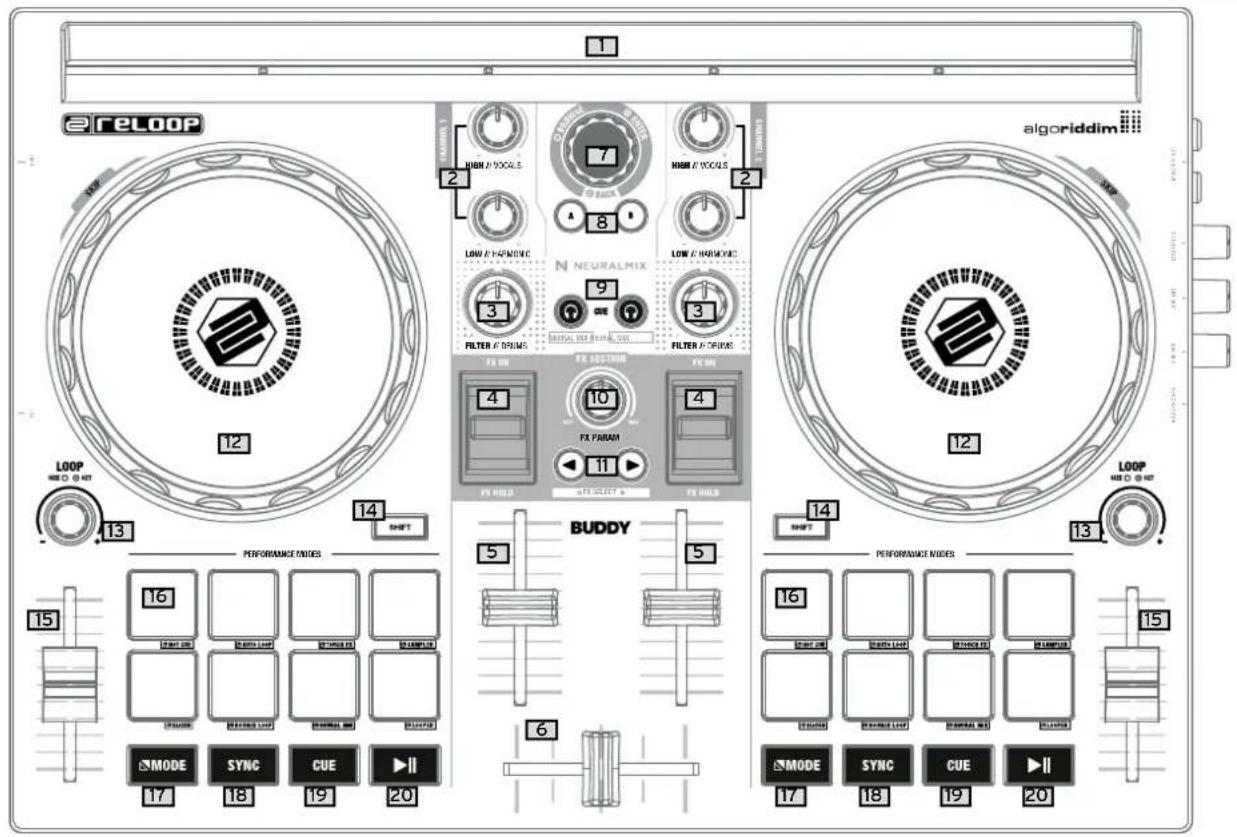
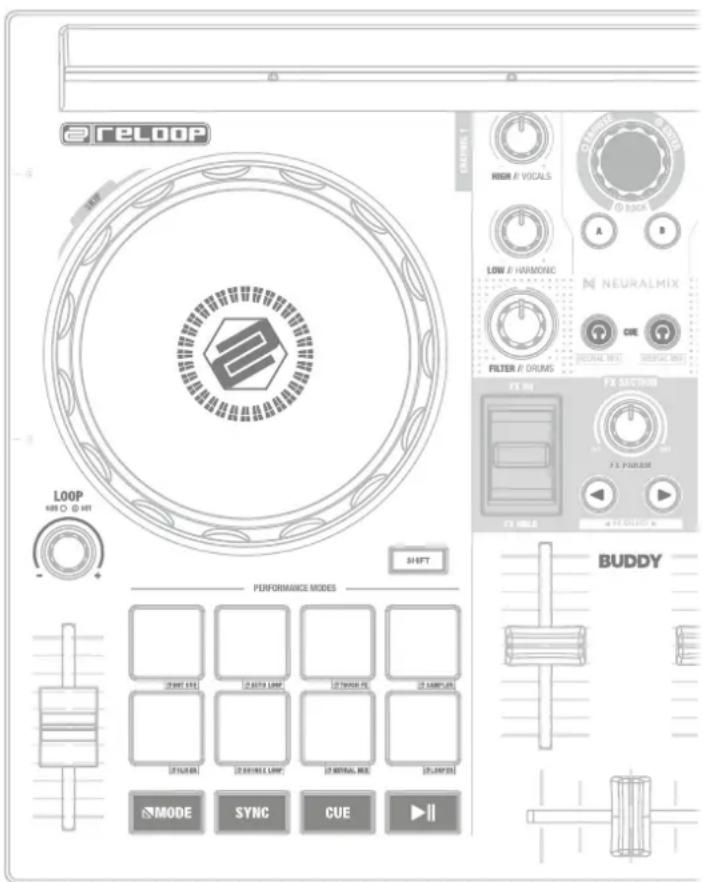
CONTROLS
RIGHT PANEL
LEFT PANEL
DESIGNATION
- Docking Station
- Equalizer (2-band)
3.Filter - FX-Paddle
- Linefader
6.Crossfader - Browse Encoder
- Track Load Buttons
- Headphones Cue Buttons
- FX Control
- FX Parameter Buttons
- Jog Wheel
- Loop Encoder
- Shift Buttons
- Pitch Fader
- Performance Pads
17.Mode Buttons - Sync Buttons
- Cue Buttons
- Play/Pause Buttons
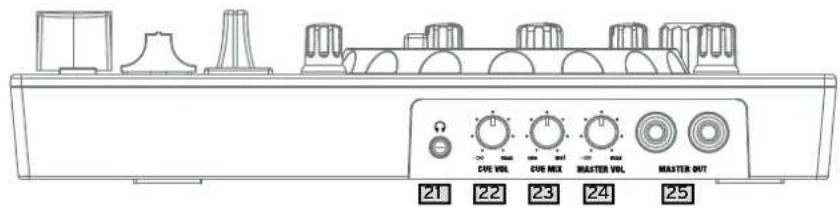
- Headphones Out (3.5 mm Jack)
- Headphones Cue Volume
- Headphones Cue Mix
-
Master Volume
-
Master Out (RCA)
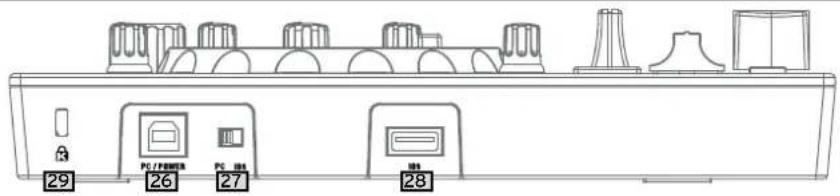
- USB-B PC/Power Port
- USB Source Switch
- USB-A-IOS-Port
- Kensington Lock
SCOPE OF DELIVERY:
- Reloop Buddy
- RCA Cable
- USB Cable
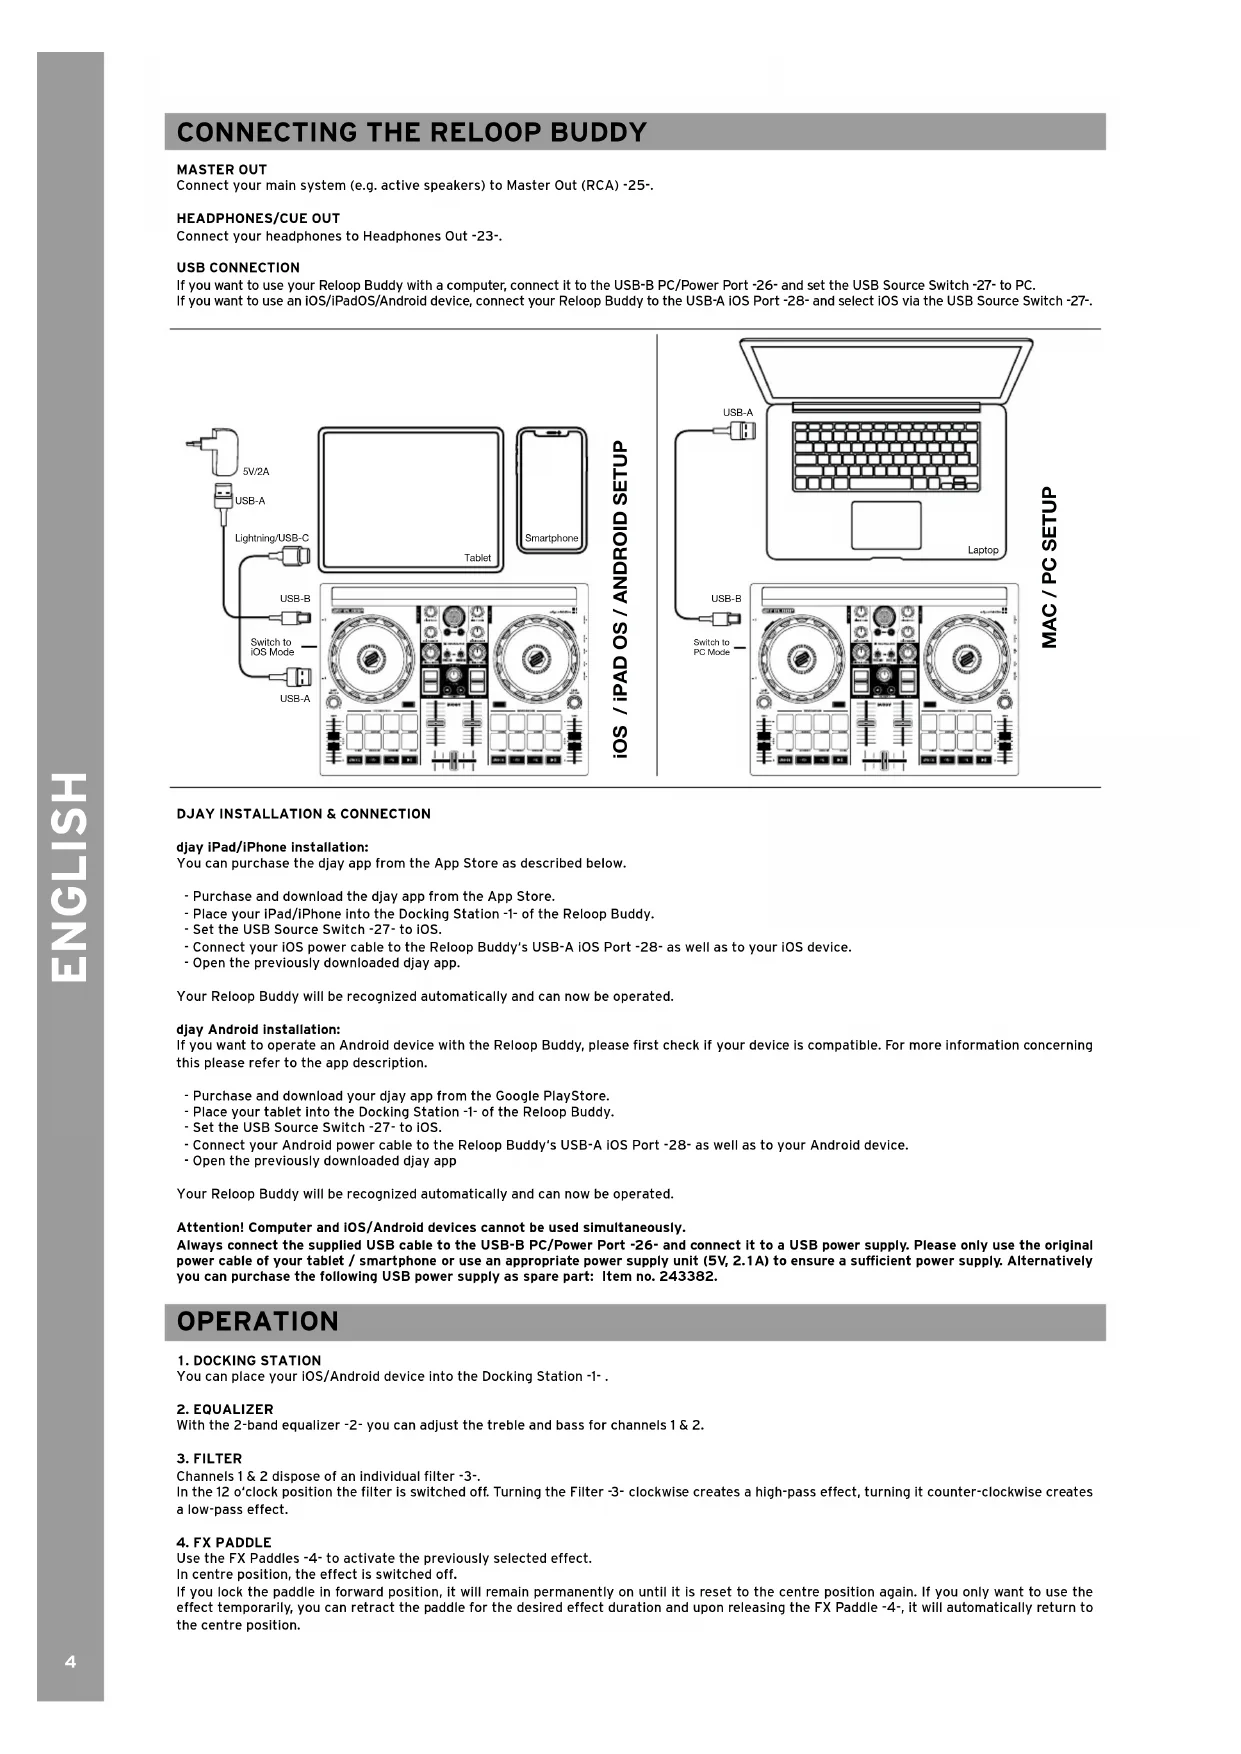
CONNECTING THE RELOOP BUDDY
MASTEROUT
Connect your main system (e.g. active speakers) to Master Out (RCA)-25-
HEADPHONES/CUE OUT
Connect your headphones to Headphones Out -23-.
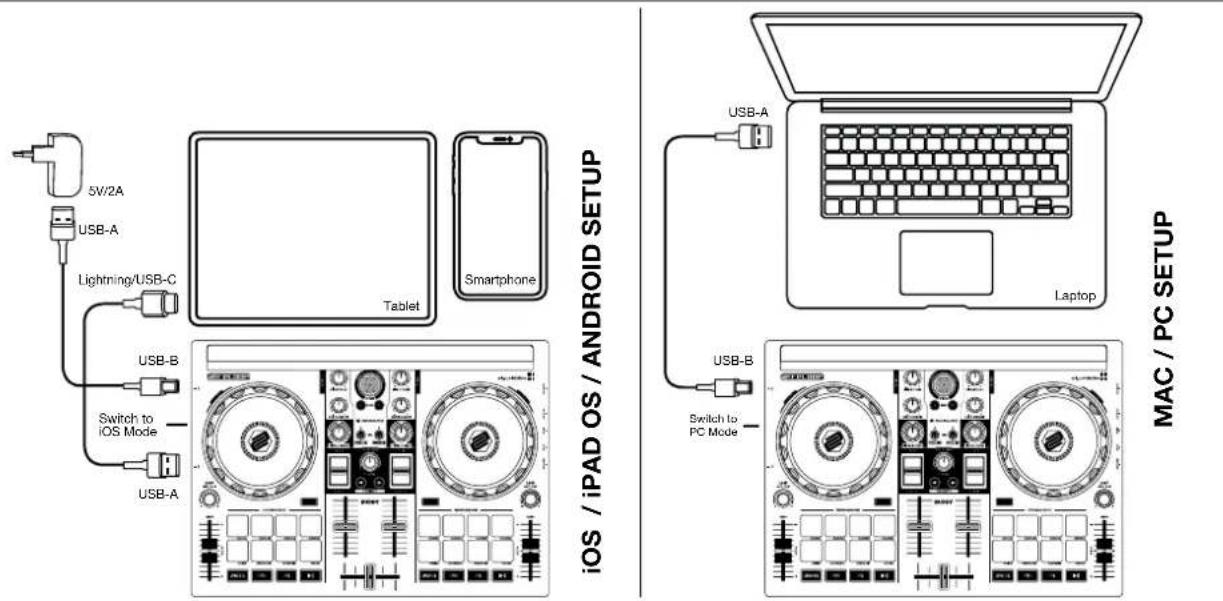
USB CONNECTION
If you want to use your Reloop Buddy with a computer, connect it to the USB-B PC/Power Port -26- and set the USB Source Switch -27- to PC.
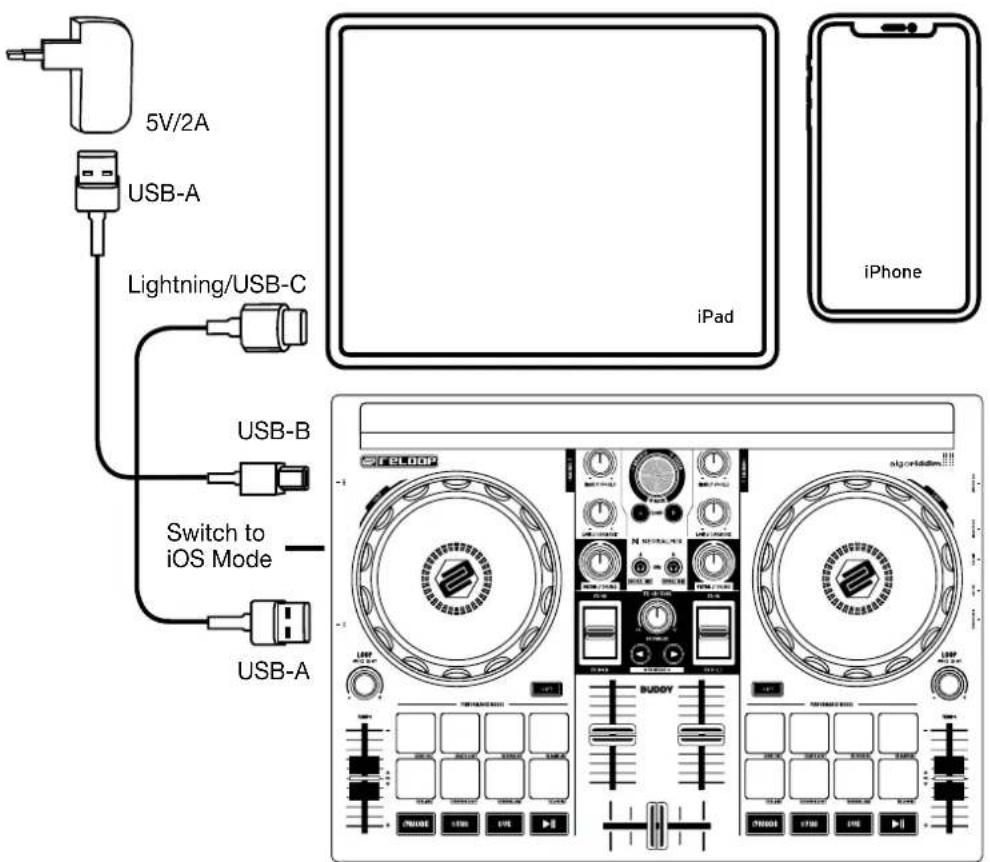
If you want to use an iOS/iPadOS/Android device, connect your Reloop Buddy to the USB-A iOS Port -28- and select iOS via the USB Source Switch -27-.
DJAY INSTALLATION & CONNECTION
dJay IPad/IPhone Installation:
You can purchase the djay app from the App Store as described below.
Purchase and download the djay app from the App Store.
- Place your iPad/iPhone into the Docking Station -1- of the Reloop Buddy.
- Set the USB Source Switch -27- to iOS.
- Connect your iOS power cable to the Reloop Buddy's USB-A iOS Port -28- as well as to your iOS device.
- Open the previously downloaded djay app.
Your Reloop Buddy will be recognized automatically and can now be operated.
djay Android installation:
If you want to operate an Android device with the Reloop Buddy, please first check if your device is compatible. For more information concerning this please refer to the app description.
- Purchase and download your djay app from the Google PlayStore.
- Place your tablet into the Docking Station -1- of the Reloop Buddy.
- Set the USB Source Switch -27- to IOS.
- Connect your Android power cable to the Reloop Buddy's USB-A iOS Port -28- as well as to your Android device.
- Open the previously downloaded djay app
Your Reloop Buddy will be recognized automatically and can now be operated.
Attention! Computer and iOS/Android devices cannot be used simultaneously.
Always connect the supplied USB cable to the USB-B PC/Power Port -26- and connect it to a USB power supply. Please only use the original power cable of your tablet / smartphone or use an appropriate power supply unit (5V, 2.1A) to ensure a sufficient power supply. Alternatively you can purchase the following USB power supply as spare part: Item no. 243382.
OPERATION
- DOCKING STATION
You can place your iOS/Android device into the Docking Station -1-
- EQUALIZER
With the 2-band equalizer -2- you can adjust the treble and bass for channels 1 & 2.
- FILTER
Channels 1 & 2 dispose of an individual filter -3-.
In the 12 o'clock position the filter is switched off. Turning the Filter -3- clockwise creates a high-pass effect, turning it counter-clockwise creates a low-pass effect.
4.FX PADDLE
Use the FX Paddles -4- to activate the previously selected effect.
In centre position, the effect is switched off.
If you lock the paddle in forward position, it will remain permanently on until it is reset to the centre position again. If you only want to use the effect temporarily, you can retract the paddle for the desired effect duration and upon releasing the FX Paddle -4-, it will automatically return to the centre position.
NOTE You can choose from the effects included in the software, which can be controlled via the 1 FX bank.
5. LINEFADER
With the Linefaders -5- you can adjust the output volume for channels 1 & 2
6.CROSSFADER
The Crossfader -6- switches between the left and right channel.
7. BROWSE ENCODER
Use the Browse Encoder -7- to navigate through your music libraries.
Press the Browse Encoder -7- to confirm your selection.
SHIFT To go back one step in the menu layer, press Shift -14+Browse Encoder -7-
8. TRACK LOAD BUTTONS
Press the Track Load button -8 A or B to assign a track to the desired deck.
9. HEADPHONES CUE BUTTONS
With the Headphones Cue Buttons -9- you can monitor the respective audio signal of channels 1 & 2.
SHIFT NOTE
In Neural MixTM mode you control the Algoriddim Neural MixTM functions.
The Neural Mix™ EQ mode is activated by pressing Shift -14+ the Headphone Cue Button -9- of the desired channel.
This will divide the selected track into 3 stems, which can be controlled individually via the 2-Band Equalizer -2- and Filter -3-.
- High = Vocals
- Low = Harmonic
-Filter = Drums
10. FX CONTROL
With the FX Control -10- you can adjust the FX intensity (dry/wet) of the selected effect.
In dry position the effect is turned off. The further you turn the FX Control -10- clockwise to wet position, the more the effect's intensity increases.
11.FXPARAMETERBUTTONS(FXSELECT)
With the Parameter Buttons -11- you control the parameter functions, depending on the active mode (e.g. FX parameter adjustment).
SHIFT By pressing Shift -14- + FX Parameter Buttons -11- you can choose between the desired effects.
12. JOG WHEEL
The Jog Wheel -12- is permanently active in vinyl/scratch mode. The surface is touch-sensitive and reacts to body tension. By turning the Jog Wheel's edge -12- it is possible to perform a pitch bend.
Shift By pressing Shift -14+ turning the Jog Wheel -12- at the same time, you can perform the quick search function (fast scrolling through track).
13. LOOP ENCODER
By turning the Loop Encoder -13- you can select the loop's length (1/32-32 bars).
Pressing the Loop Encoder -13- activates the previously selected loop length, pressing it again deactivates the loop.
14. SHIFT
Pressing Shift -7+ a selected button activates the respective functions of the 2nd layer according to the labelling of the device.
NOTE The Shift Buttons -14- are dedicated to the respective deck.
15. PITCH FADER
The Pitch Faders -15- determine the track's tempo.
16. PERFORMANCE PADS
The Performance Pads -16- are colour-coded drum pads that trigger the selected performance mode.
The different performance modes can be activated by holding the Mode Button -17- and simultaneously pressing the selected Performance Pad mode -16-.
THE FOLLOWING PERFORMANCE MODES ARE AVAILABLE:
- Hot Cue Mode = Triggers the 8 available cue points per deck and the pad colours light up in the corresponding colours. SHIFT By pressing Shift -14- and the respective cue pad, the selected cue point will be deleted.
- Auto Loop Mode = Each of the 8 performance pads has a different loop length. Pressing it will activate it immediately according to the length, pressing it again will deactivate auto loop.
- Touch FX Mode = The drum pads have different instant effects that are activated by pressing the respective pad.
- Sampler Mode = Triggers the respective sample in the sample bank using the 16 drum pads.
- Slicer Mode = The slicer divides a track in 8 segments and spreads them across the 8 pads. Now it is possible to spontaneously remix a track by playing the various pad segments.
- Bounce Loop Mode = Press one of the 8 pads to loop a track. The length varies from pad to pad.
-
Neural Mix™ Mode = In Neural Mix™ pad mode you control the Algoriddim Neural Mix™ functions via the drum pads. The drum pads are assigned as follows:
-
Drum Solo On/Off = Mute Harmonic & Vocal
- Harmonic Solo On/Off = Mute Drum & Vocal
- Vocal Solo On/Off = Mute Drum & Harmonic
- Drum Swap On/Off (deactivates the drum stem of the selected channel and activates solo for the drum stem of the other channel)
- Drum Solo Hold = Mute Harmonic & Vocal
- Harmonic Solo Hold = Mute Drum & Vocal
- Vocal Solo Hold = Mute Drum & Harmonic
-
Drum Swap Hold (deactivates the drum stem of the selected channel and activates solo for the drum stem of the other channel)
-
Looper-Mode = Triggers the Looper Sequencer in dJay.
17. MODE BUTTONS
Pressing the Mode Button -17- activates the performance mode selection.
Now you can select your desired performance mode via the respective drum pad.
(see also: 16. Performance Pads).
18.SYNC BUTTONS
Sync -18- allows the BPM value of one track to be automatically adjusted to the other deck. By pressing Sync -18- again, you deactivate the sync function.
19.CUE BUTTONS
Use the Cue Buttons -19- to create and trigger a temporary cue point. This is represented by a white cue marker. If the Cue Button -19- is pressed during playback, the playback stops and automatically jumps back to the set cue point (cue play mode). If you pause playback and then press the Cue Button -19-, a new cue point is created at this track position (cue pause mode).
20. PLAY/PAUSE BUTTONS
The Play/Pause Buttons -20- start/pause the playback of the respective deck.
21. HEADPHONES CUE OUTPUT
Connect your headphones to the Headphones Cue Output -21- of the Reloop Buddy.
22. HEADPHONE VOLUME
Use the Headphones Cue Volume control -22- to adjust the volume of your headphones signal.
The Headphones Cue Mix control -23- mixes the volume balance between the channel and master signal via the headphones.
- Left = Cue
- Centre = 50/50 ratio
-Right = Master
24. MASTER VOLUME
The Master Volume control -24- is used to adjust the master output volume.
25. MASTER OUT (RCA)
Your main sound system (e.g. active speakers) is connected to Master Out (RCA) -25- and controlled by the Master Volume control -24-.
26. USB-B PC/POWER PORT
Use the USB-B PC/Power Port -26- to connect a computer, as well as a USB power cable to charge your iOS/Android device via the Reloop Buddy.
Note If you want to use a computer, make sure that the USB Source Switch -27- Is set to PC.
27. USB SOURCE SWITCH
Use the USB Source Switch -27- to switch between your desired USB mode (computer or iOS/Android-operation).
28. USB-A IOS PORT
The USB-A iOS Port -28- is used to connect an iOS/Android device.
Please additionally connect a USB power supply to the USB-B PC/Power Port -26-.
NOTE If you want to use an iOS/Android device, make sure that the USB Source Switch -27- is set to iOS.
29. KENSINGTON LOCK
The Kensington Lock -29- serves as anti-theft method for your Reloop Buddy.
NOTE: DJAY ON DIFFERENT PLATFORMS
Please note that the app feature scope may vary, depending on the platform being used. Please visit the djay App Store page on the respective platform App Store to check which features are supported.
MINIMUM SYSTEM REQUIREMENTS
You can check the current system requirements for iOS/iPadOS, Android, Mac or Windows at algoriddim.com.
Mac, iOS, iPadOS, iPhone, iPad and OS X are trademarks of Apple Inc., registered in the U.S. and other countries.
Windows is a registered trademark of Microsoft Corporation in the United States and other countries.
Intel (i3/i5/i7) and Intel Core are trademarks of Intel Corporation in the U.S. and other countries.
Android is a trademark of Google LLC in the United States and other countries.
djay and Neural MixTM are registered trademarks of algoriddim GmbH in the United States and other countries.
TECHNICAL INFORMATION
Sound Card Resolution: 24bit/48kHz
Frequency Response: 20Hz-20kHz
S/Noise Ratio: 95db (USB)
THD: <0.1%
Power: DC-5V > 2A USB-B
Master Out: RCA
Headphone Out: 3.5 mm
Dimensions: 325 x 220 x 48 mm (WxDxH)
Weight: 1.042 kg
djayiPad/iPhone Installation:
djay Android Installation:
- High = Vocals
- Low = Harmonic
-Filter = Drums
10.FX-REGLER
Mac, iOS, iPadOS, iPhone, iPad and OS X are trademarks of Apple Inc., registered in the U.S. and other countries.
Windows is a registered trademark of Microsoft Corporation in the United States and other countries.
Intel (I3/15/17) and Intel Core are trademarks of Intel Corporation in the U.S. and other countries.
Android is a trademark of Google LLC in the United States and other countries.
djay and Neural Mix™ are registered trademarks of algoriddim GmbH in the United States and other countries.
TECHNISCHE DATEN
- High = Vocals
- Low = Harmonic
-Filter = Drums
10. RÉGULATEUR FX
Mac, iOS, iPadOS, iPhone, iPad and OS X are trademarks of Apple Inc., registered in the U.S. and other countries.
Windows is a registered trademark of Microsoft Corporation in the United States and other countries.
Intel (i3/i5/i7) and Intel Core are trademarks of Intel Corporation in the U.S. and other countries.
Android is a trademark of Google LLC in the United States and other countries.
djay and Neural MixTM are registered trademarks of Algoriddim GmbH in the United States and other countries.
DONNÉES TECHNIQUES
Sound Card Resolution: 24bit/48kHz
Frequency Response: 20Hz-20kHz
Headphone Out: 3.5mm
Dimensions: 325mm (W) x 220mm (D) x 48mm (H)
Weight: 1,042 kg
Mac, iOS, iPadOS, iPhone, iPad and OS X are trademarks of Apple Inc., registered in the U.S. and other countries.
Windows is a registered trademark of Microsoft Corporation in the United States and other countries.
Intel (i3/i5/i7) and Intel Core are trademarks of Intel Corporation in the U.S. and other countries.
Android is a trademark of Google LLC in the United States and other countries.
djay and Neural Mix™ are registered trademarks of algoriddim GmbH in the United States and other countries.
DATOS TECNICOS:
Sound Card Resolution: 24bit/48kHz
Frequency Response: 20Hz-20kHz
Headphone Out: 3.5mm
Dimensions: 325mm (W) x 220mm (D) x 48mm (H)
Weight: 1,042 kg

1. DOWNLOAD DJAY


2. CONNECTION
LEARN MORE ABOUT THE FULL RELOOP PRODUCT RANGE AT
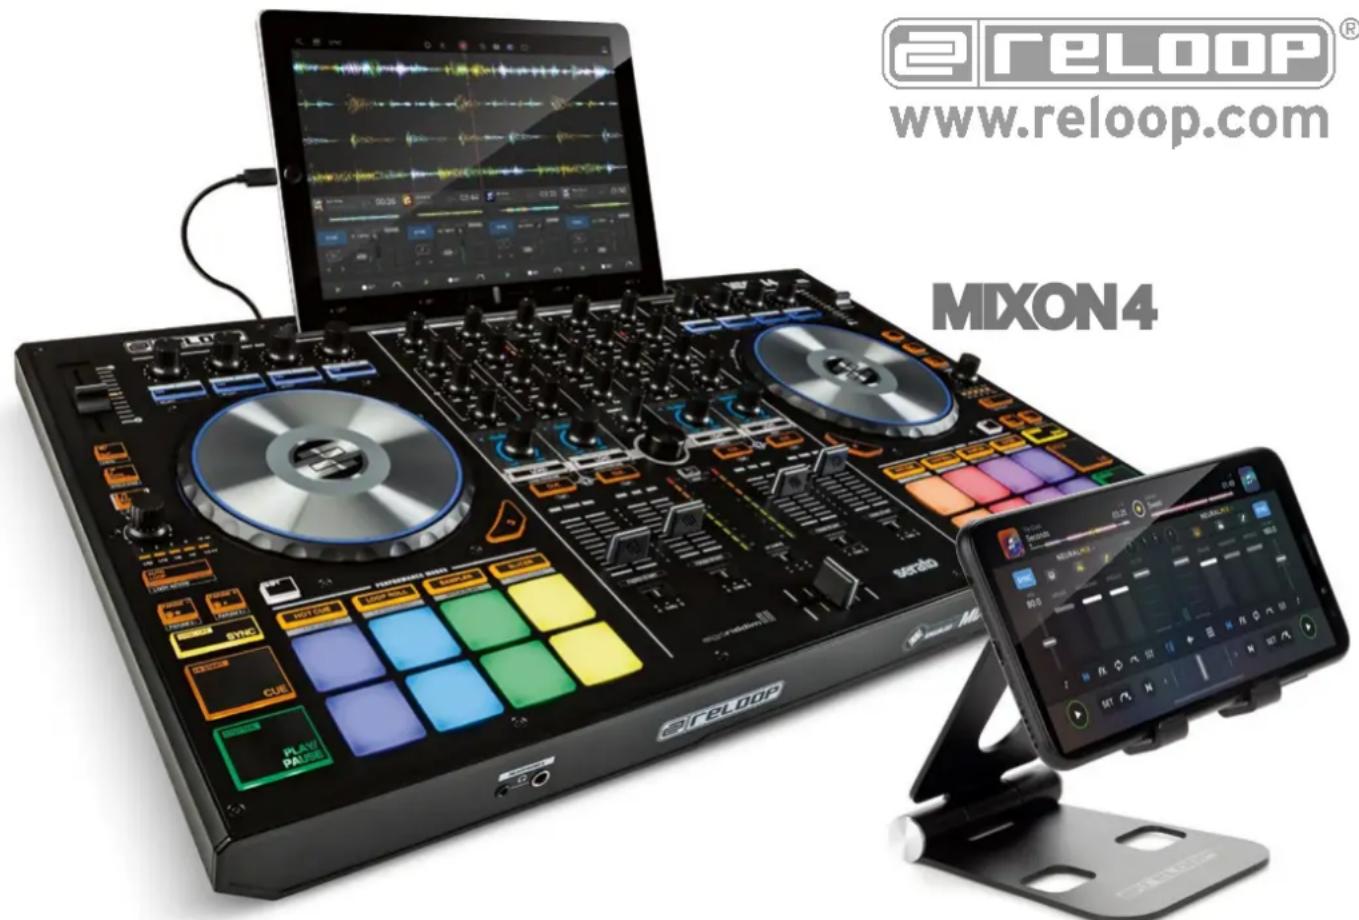
SMART DISPLAY STAND


www.reloop.com
Reloop Distribution
Global Distribution GmbH & Co. KG
Schuckertstrasse 28,48153 Muenster / Germany
Fax: +49.251.6099368
Subject to alterations.
Illustrations similar to original product.
Misprints excepted.