
LUMIX DMW-MCTZ20E - Photo Accessories PANASONIC - Free user manual and instructions
Find the device manual for free LUMIX DMW-MCTZ20E PANASONIC in PDF.
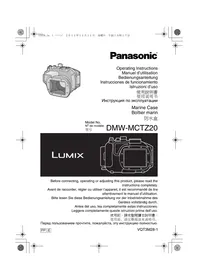


| Product Type | Waterproof housing (marine case) for digital camera |
| Brand | Panasonic |
| Model | LUMIX DMW-MCTZ20E |
| Dimensions (W×H×D) | Approx. 150 × 94 × 103 mm |
| Weight | Approx. 475 g (including diffuser) |
| Material | Polycarbonate |
| Maximum operating depth | 40 m / 130 ft |
| Operating temperature | 0 °C to 40 °C |
| Compatible camera models | DMC-TZ20, DMC-ZS10, DMC-TZ19, DMC-ZS9, DMC-TZ18, DMC-ZS8 (as of 01/2011) |
| Waterproof structure | O-ring seal |
| Main functions | Underwater shooting, focusing, flash, weight attachment for buoyancy adjustment |
| Supplied accessories | O-ring, silica gel (5 pieces of 1 g), grease tube, wrist strap, weights (2) + fixing screws, diffuser/cord |
| Maintenance and cleaning | Rinse in fresh water after each use; regularly check and grease the O-ring; use only the supplied grease and silica gel |
| Safety and usage precautions | Do not use beyond 40 m; do not open underwater; avoid shocks and high temperatures; do not use solvents or chemicals |
| Spare parts and repairability | Replacement O-ring (VMG1798), silica gel (VZG0371), grease tube (VZG0372), wrist strap (VFC4190), weights (VXA8726), diffuser (VYK4X94). Overhaul recommended every 3 years |
Frequently Asked Questions - LUMIX DMW-MCTZ20E PANASONIC
User questions about LUMIX DMW-MCTZ20E PANASONIC
0 question about this device. Answer the ones you know or ask your own.
Ask a new question about this device
Download the instructions for your Photo Accessories in PDF format for free! Find your manual LUMIX DMW-MCTZ20E - PANASONIC and take your electronic device back in hand. On this page are published all the documents necessary for the use of your device. LUMIX DMW-MCTZ20E by PANASONIC.
USER MANUAL LUMIX DMW-MCTZ20E PANASONIC
Operating Instructions
Before connecting, operating or adjusting this product, please read the
instructions completely.
Please read these instructions completely before use.
Before Use 3 Accessories. 5 Handling and Care 6 Components 8 What is the O-ring? 9 Preparation-Setting the O-ring- 10 Preparation -Checking the Case is Waterproof- . . . . . 14 Preparation -Attaching the Digital Camera- 15 Taking Pictures 18 Tips for Taking Pictures in the Water 19 After Use 20 Cleaning and Storing 21 Caution for Use 21 Specifications 23
- This Marine Case is designed for a Panasonic Digital Camera.
You can enjoy taking pictures underwater at depths up to 40 m/130 feet.
- In the case of water leakage due to insufficient care, Panasonic is in no
way liable for damage to any products (digital camera, batteries, card etc.)
inside this Case, photography costs or any other expenses.
- Panasonic also offers no compensation for accidents resulting in injury or damage to property.
- Read the operating instructions for your digital camera.
- Before attaching the digital camera, submerge the case in water for
about 3 minutes or more to check that there is no water leakage.
About handling this Case
- Use under the following conditions.
Water depth: Up to 40 m/130 feet - Ambient temperature: 0°C to 40°C / 32°F to 104°F
- Do not use the Case in water over 40°C / 104°F. The heat may damage the Case or cause water leakage.
- The Case is made of impact resistant polycarbonate, however be careful when using it. It can be easily scratched when taking pictures in rocky places etc., and can be damaged by impact if dropped etc. When travelling, pack the Case carefully to prevent any direct impact if it is dropped etc., and do not leave the digital camera in the Case. Only attach the digital camera to the case if you are transporting it a short distance such as from the airport to the diving spot. (You cannot reuse the material the Case was packed in at the time of purchase to transport it.)
- When boarding a plane, the change in atmospheric pressure may cause the inside of the Case to expand, causing damage to the Case. Remove the O-ring before boarding a plane.
Insert the removed O-ring into the supplied exclusive polyester bag.
- Do not leave the digital camera in the Case for a long period of time in a car, a ship, or exposed to direct sunlight etc. The Case is an airtight device, so the temperature inside the Case will become very high and the digital camera may stop operating properly. Do not let the temperature inside the Case become too high.
Using the Case in high or low temperatures
- If you open or close the Case where it is humid or hot and then move to a place that is cold or dive underwater, condensation may appear inside the Case, the glass surface may become cloudy, and the digital camera may be damaged.
- If you suddenly move the Case from a cold place or cold water to a warm place, the glass surface may become cloudy. Wait until the Case becomes close to the air temperature before taking pictures.
About preparation
- Do not open or close the Case where it may be splashed by water or sand may get in it. We recommend opening or closing the Case indoors.
- Replace the battery, card etc. and attach the digital camera indoors where there is little moisture.
- If you must open or close the Case at the diving spot to replace the battery or the card, be sure to follow the steps below.
- Select a place where the Case will not be splashed by water and sand will not get in it.
- Blow off any drops of water in the gap between the rear case and the front case and on the buckle. Thoroughly wipe off any remaining drops of water with a dry cloth.
- Thoroughly wipe off any drops of water on your body or hair.
- Be particularly careful about any water coming from the sleeves of your thermal suit.
- Do not touch the digital camera if your hands are wet from sea water. Wet a towel with fresh water and place it in a polyester bag beforehand. Use this towel to wipe off any drops of water or sand on your hands or body.
- This Case does not absorb shock. If you place a heavy object on the Case or cause shock to it, the digital camera may be damaged. Be careful when you are using the case.
When you first open the package, check that the Case and all the accessories are included and that there has been no damage to the Case or any of the accessories during distribution or transportation. If you find something unusual, consult your dealer before using the Case.
Do not use any accessories except those specified below.
| Replacement O-ring VMG1798 * In exclusive polyester bag * One has been attached to the unit in advance. | Silica Gel (Desiccant) (1 g/5 pieces) VZG0371 | ||
| Grease (for O-ring) VZG0372 | Hand Strap VFC4190 | ||
| Weight (2), Weights attachment screw VXA8726 | |||
| Diffuser/String VYK4X94 ● You can remove this diffuser when not using it. Removing | Attaching Align with the mark on the back of the case and attach. | ||
- Do not place the Case where it may fall.
- If the Case falls on your head or foot, it will injure you and cause the Case to malfunction.
- Never alter the Case.
- If water leaks into the digital camera because the Case was altered, the digital camera may be damaged beyond repair.
- If you continue to use the digital camera after water has leaked into it, this may cause a fire.
- Do not use the Case while scuba diving without proper training.
- You should only operate the Case while scuba diving if you have been properly trained and certified for this sport.
- Never place the Case, grease, silica gel or O-ring within the reach of infants.
- If any part of an infant's body is caught in the Case, it may cause an injury.
- Infants may accidentally swallow the grease, silica gel or O-ring.
- Consult a doctor immediately if you think an infant may have swallowed the grease, silica gel or O-ring.
- Do not hang the strap around your neck underwater.
- It may become wound around your neck causing suffocation or other serious injuries.
- Thoroughly wash any grease on your hands.
- Do not allow the grease on your hands to come into contact with your mouth or eyes.
- If water leaks into the case, stop using it immediately.
- This may cause an electric shock, burning or a fire.
- Consult your dealer.
- If anything abnormal occurs while using the Case underwater, please follow all necessary procedures and guidelines for decompressing when you ascend.
- If you ascend too quickly, you may get caisson disease.
- If smoke or abnormal heat, smells or sounds come from the Case, stop using it immediately.
- These may cause an electric shock, burning or fire.
- Remove the digital camera from the Case and then immediately remove the battery from the digital camera.
- Consult your dealer.
- Be careful when opening the Case after water leakage.
- The leaked water may blow out or the rear case may flip.
- Do not leave the Case where the temperature is high.
- The temperature inside the Case becomes very high particularly when it is exposed to direct sunlight on a beach, a ship etc. or when it is left in an airtight car in the summer. The heat may damage the Case or its inner parts.
- If a digital camera is attached to the Case, it may also be damaged.
- If you use the attached digital camera when the temperature inside the Case is very high, it may cause leakage, short-circuiting or insulation failure resulting in fire or malfunction.
- Do not handle the digital camera or the battery with wet hands.
- This may cause an electric shock or malfunction.
When taking pictures with the flash
- When taking pictures with the flash, the corners of the picture may be vignetted or the picture may not be lit evenly.
- When taking pictures with the flash, the available flash range is less underwater than on land.
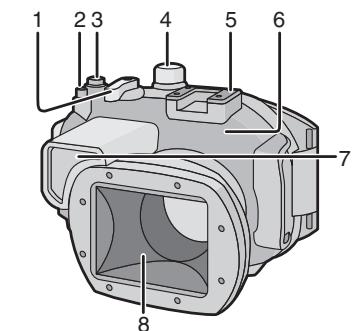
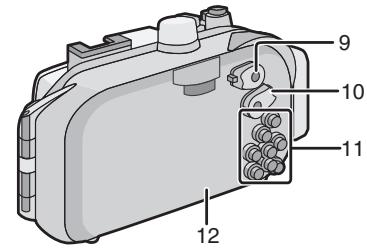
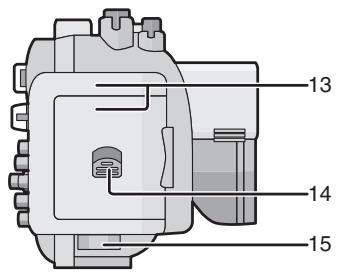
- Zoom Lever
- Motion Picture Button*1 3. Shutter Button
- Mode Dial
- Mounting Shoe for INON Inc., External Strobe*2
- Front Case
- Diffuser (Supplied)
- Front Glass
- Camera ON/OFF Switch
- [Rec]/[Playback] Selector Switch
- Button Operation Section (Read the operating instructions of the digital camera for details about each button operation.)
- Rear Case
- Buckle
- Lock Release Lever
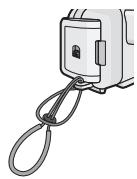
- Strap Eyelet (for attaching the supplied hand strap and diffuser)
*1 There is an operation button on the marine case that has multiple functions. Follow the button indication (function) on the digital camera when using the marine case.
This function may not be available depending on the camera used.
*2 This is a mounting shoe dedicated for an external strobe manufactured by INON Inc.
Please refer to INON Inc. regarding compatible strobe.
http://www.inon.co.jp/INON_WORLD_body.html
- The O-ring is a waterproofing packing used for underwater cameras, watches and diving equipment.
- The O-ring keeps the Case waterproof by sealing the gap between the rear case and the front case.
How the O-ring keeps the Case waterproof
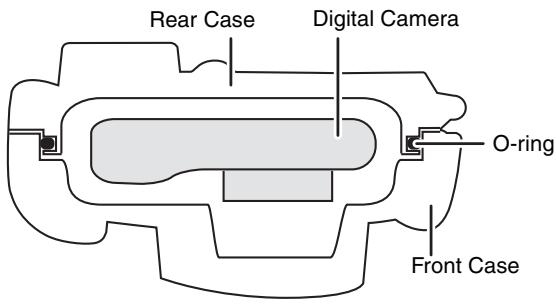
The gum comes into contact with the sides of the Case making the Case waterproof and stopping water from entering from the gap.
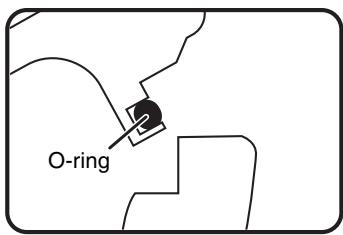
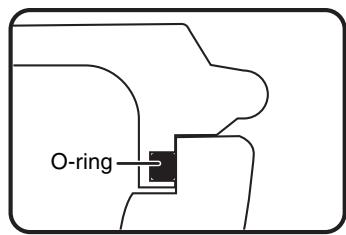
When water pressure acts on the O-ring, the surface of the O-ring expands and the Case is sealed more tightly.
The O-ring prevents water leakage by coming into uniform contact with the sides of the Case. Therefore, good care of the O-ring is very important. Incorrect care of the O-ring may cause water leakage.
Be sure to set the O-ring before attaching a digital camera.
Thoroughly wash and dry your hands before handling the O-ring. Place the O-ring where there is no sand or dust.
1 Loosen the O-ring with your fingers to remove it.
- Loosen part of the O-ring with the tips of two fingers and then lift the loosened part. Be careful not to scratch the O-ring with your fingernails.
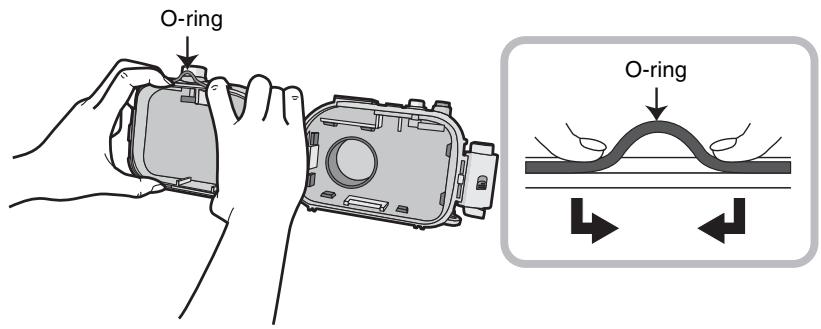
Note
- Do not use a pointed object to remove the O-ring. This may scratch or damage the O-ring.
2 Check the O-ring.
- Check that there is no dirt, sand, hair, dust, salt crystals, lint or grease on the O-ring. If you find any of these, remove them with a soft, dry cloth.
Dirt
Sand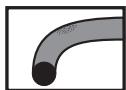
Hair
Dust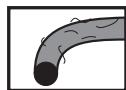
Salt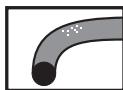
Lint crystals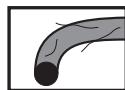
- There may be dirt on the O-ring that you cannot see. Check if there is any dirt by rubbing your finger over the O-ring.
- Be careful not to leave any fibers from the dry cloth on the O-ring when wiping it.
- Check that the O-ring is not ripped, twisted, squashed, frayed or scratched and that there is no sand sticking to it. Replace the O-ring in these cases.
Ripped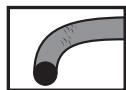
Twisted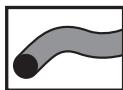
Squashed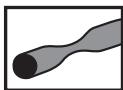
△ Frayed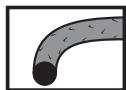
△ Scratched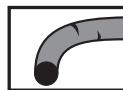
△ Sand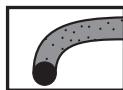
3 Inspect the O-ring groove.
Grains of sand or hardened salt crystals may get into the O-ring groove. Remove them carefully with an air spray or a cotton swab. If you use a cotton swab, be careful not to leave any fibers from it in the O-ring groove.
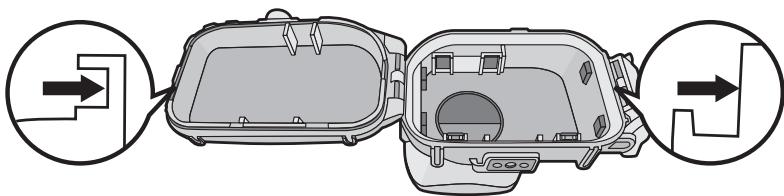
- Inspect the front case groove as well as the rear case (side where O-ring is set) groove.
4 Apply the grease (supplied).
Apply O-ring grease to clean the surface of the O-ring and replenish the oil.
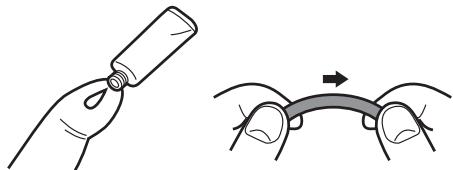
- Apply a rice-grain size of grease (supplied) evenly to the O-ring with the tip of your finger. (Do not apply the grease with paper or a cloth. The fibers from the paper or cloth may stick to the O-ring.)
- If there is too much grease on the O-ring, dirt and dust will stick to it causing water to leak in. Therefore, hold the O-ring between the balls of your finger and thumb and gently remove excess grease.
- By applying the O-ring grease thinly and evenly, the O-ring fits flexibly to the groove of the marine case and keeps it airtight.
- Use only the specified grease. If you use other types of grease, the surface of the O-ring may be damaged causing water leakage.
5 Fit the O-ring evenly into the O-ring groove.
Check the following:
- There is no dirt sticking to the O-ring. The O-ring has not come out. The O-ring is not twisted.
- The O-ring is not stretched too much.
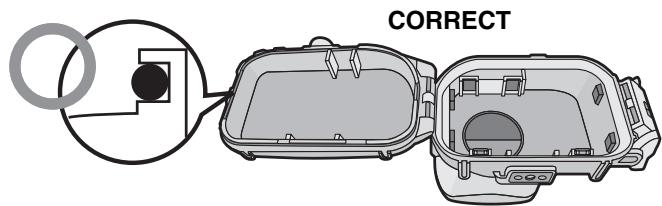
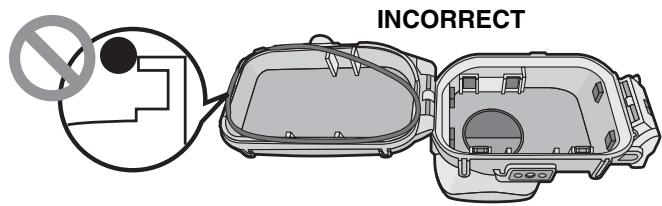
6 Inspect the O-ring one last time.
Check the following one more time:
- There is no dirt sticking to the O-ring. The O-ring has not come out. The O-ring is not twisted.
- There are no scratches or squashed parts on the O-ring.
Thoroughly wipe any grease off your hands with a dry cloth. Afterwards wash thoroughly with fresh water.
7 Close the buckle.
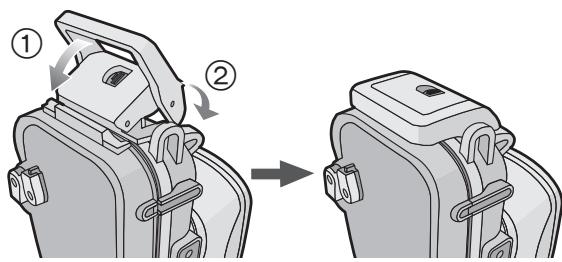
- Check that no foreign materials are sticking to the outer surface of the O-ring or the buckle on the front case and then close the Case.
Notes
- To keep the Case completely airtight, do not scratch the surface of the O-ring that comes into contact with the sides of the Case.
- Never use an O-ring that has been scratched or damaged by dirt etc. This will cause water leakage.
- Each time you use the Case, remove the O-ring and check that there is no dirt, sand, hair or other foreign materials in the O-ring groove and then apply a thin coat of grease (supplied). If you apply too much grease, dirt and the dust may stick to the O-ring causing water leakage.
- Be sure to bring a spare O-ring in case the O-ring that you are using becomes damaged or scratched.
After setting the O-ring, check that no water leaks into the Case by submerging it in a water tank, bath tub etc. for more than about 3 minutes before attaching a digital camera.
- Do not use the Case in water over 40°C / 104°F . The heat may damage the Case or cause water leakage.
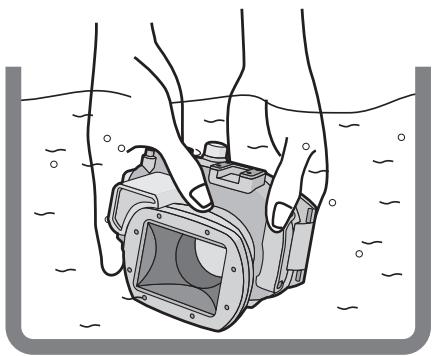
Carry out the same test after attaching the digital camera to the Case. (P15)
Notes
- If bubbles rise from the Case when it is submerged in water or there is water inside the Case when you take it out of the water, there is water leakage. In these cases, consult your dealer.
- If water leaks into the Case while you are using it and the digital camera is submerged in water, remove the battery immediately. Hydrogen gas can cause burning or explosion if there is a fire nearby.
- If you dive quickly while holding the Case or throw the Case from a ship into the sea, some water leakage may occur because of high pressure. This is not a malfunction of the Case. Always dive slowly into the water.
- The Case is designed to be used at a depth of up to 40m / 130 feet. If you dive deeper than 40m / 130 feet, part of the Case may be damaged beyond repair.
- When closing the Case, be careful that no foreign materials get caught between the O-ring and the O-ring groove. Even one strand of hair or one grain of sand can cause water leakage.
Read the notes on page 17 before attaching the digital camera.
Check that the ON/OFF Switch on the camera and the case is set to [OFF], and [Rec]/[Playback] selector switch is set to [O].
- Remove the strap from the digital camera.
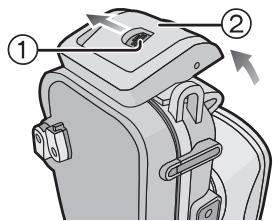
1 Push ② up with your finger while sliding ① to open the buckle.
2 Attach the digital camera to the Case.
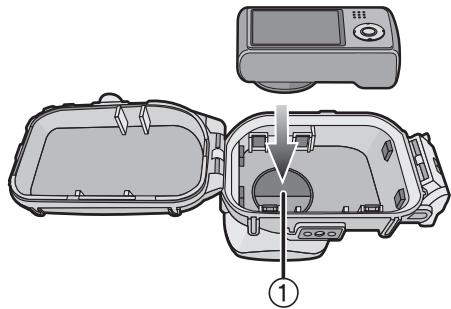
- Be careful not to catch the shading hood ①.
3 Insert the silica gel (supplied).
Always use new silica gel.
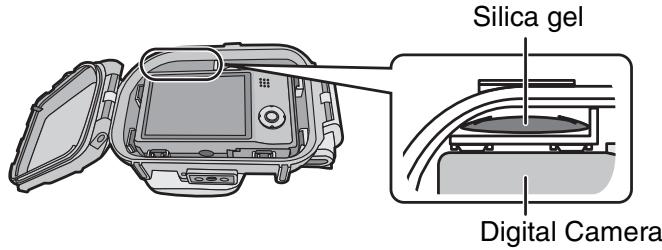
- When inserting the silica gel, bend it as shown in the illustration below and then insert it as far as possible. If you close the Case with the silica gel not fully inserted, the silica gel will get caught in the O-ring causing water leakage.
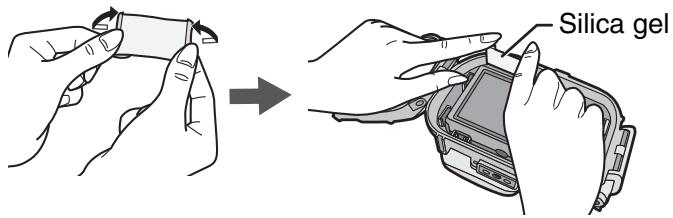
- If the air temperature is high and the water temperature is low, condensation may appear inside the Case. To prevent condensation, insert silica gel (supplied) inside the Case in advance. To prevent the Case from becoming fogged up, insert the silica gel about 1 to 2 hours before using the Case.
4 Close the buckle.
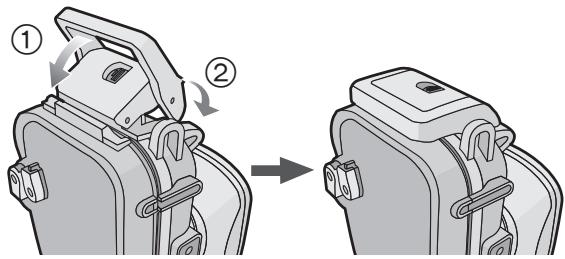
Check that the buckle is closed firmly. Do not insert the strap etc. in the buckle.
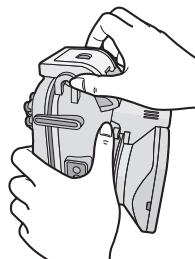
5 After you have attached the digital camera, check one more time that no water leaks into the Case. (P14)
Notes
- Be careful not to get the shading hood dirty with fingerprints etc.
- Check one more time that the O-ring is fitted evenly into the O-ring groove.
- Avoid opening or closing the Case where there is a lot of sand or dust and in humid or wet places.
- If there is a sudden change of humidity caused by moist air entering the Case, condensation may appear inside the Case.
- To prevent condensation, set the digital camera in as dry a place as possible. Also, check that the silica gel (supplied) is sufficiently dry before inserting.
- If sunscreen or suntan oil sticks to the Case, wash it off immediately with lukewarm water to prevent reduced waterproofness or discoloration.
If a digital camera with GPS function is attached to the marine case, failure of positioning or other major errors may occur due to interference in the reception of radio waves from the GPS satellite.
Attaching the weights
About using the weights
Attach the weights to adjust to the preferred buoyancy when using the marine case. Use them as necessary.
Refer to the following about buoyancy underwater.
① If you use the digital camera and the marine case only: They will float slowly in fresh water or seawater. (Plus buoyancy) If you use the digital camera, the marine case and 1 weight: They will float even more slowly in fresh water or seawater than ① (Plus buoyancy) ③ If you use the digital camera, the marine case and 2 weights: They will sink slowly in fresh water or seawater. (Minus buoyancy)
How to attach the weights
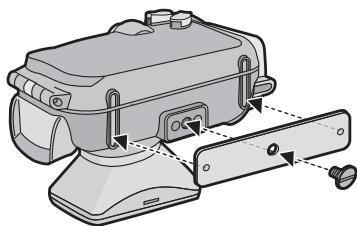
If you use 1 weight, align the protruding part of the weight with the tripod receptacle on the marine case and then using a slotted screwdriver or similar, use the supplied weights attachment screw to attach to the tripod receptacle.
If you use 2 weights, align the projecting part of the second weight with the indented part of the first weight so that the weights do not overlap and then attach them to the tripod receptacle.
■ Be sure to check the following before entering the water Check the following before diving.
Is there sufficient remaining battery power? Is there sufficient memory in the card? Is the O-ring fitted evenly into the O-ring groove? - Have you checked that no water leaks into the Case? Is the buckle closed firmly?
Taking pictures
1 Turn the camera on.
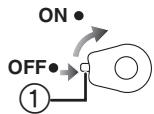
Press ① to release the lock and then set to [ON].

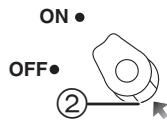
Press ② to lock.
2 Display the scene mode menu and then set [Underwater].
- Read the operating instructions of the digital camera for details.
3 Aim the AF area on the LCD monitor at the subject you want to focus on.
4 Press [AF-L] to focus.
- Press [AF-L] again to cancel.
5 Press the shutter button fully to take the picture.
Notes
- Before attaching the camera to the Case, we recommend setting the clock again. (Read the operating instructions of the digital camera for details.)
- If there are any particles floating in front of the camera, it may focus on them instead of the subject.
- If there are drops of water or dirt sticking to the front glass, you may not be able to focus properly. Be sure to wipe the front glass before taking pictures.
When the image is too bluish in the water
① Select [White Balance] from the [Rec] Mode menu. ② Press [DISP.] to display [WB Adjust]. ③ Press [AF-L] to adjust the white balance. ④ Press [MENU/SET] to finish.
- You can also press the shutter button halfway to finish.
Select the best picture
Set the flash to [ ]
Using the Auto Bracket Function (For models with an Auto Bracket Function)
- Each time the shutter button is pressed, 3 pictures with different exposures are automatically recorded. You can select the desired picture from the 3 pictures.
Use Burst Mode
- When taking pictures of a fast-moving subject (a fish etc.), you can select your favourite picture after taking the pictures using Burst Mode.
Note
- WB fine adjustment (Underwater Mode) is also supported when recording motion pictures. (Compatible model: DMC-TZ20/DMC-ZS10)
The white balance can be adjusted according to water depth or preference.
For more information, read the operating instructions of the digital camera.
After you have finished taking pictures, follow the steps below.
1 Submerge the Case in fresh water for about 30 minutes or more without removing the digital camera to remove any salt crystals etc.
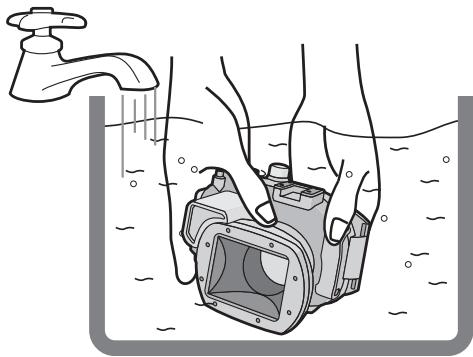
- Press all the operation buttons etc. on the Case to wash away any seawater. If the salt crystals are not removed from the buttons etc., they will harden and the buttons will become inoperable.
- Do not wash the Case with fast-running or pressurized water etc. as it may cause water leakage.
2 Wipe the water with a dry cloth that has no salt crystals sticking to it and then dry the Case completely.
- Do not dry the Case by exposing it to direct sunlight. This may discolor or damage the Case or may hasten deterioration of the O-ring.
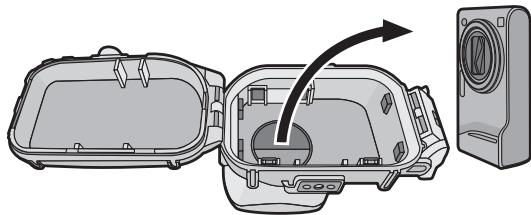
3 Open the rear of the case to remove the digital camera.
4 Remove the O-ring from the Case and check that there is no dirt etc. in the O-ring groove. 5 Check that there are no scratches etc. on the O-ring while you are applying the grease.
Notes
Be careful when removing the digital camera from the Case so that it does not get wet.
- Remove the camera with clean hands. (Wash your hands with fresh water and then thoroughly dry them.)
- Thoroughly dry any moisture on your body or hair. (Be particularly careful about any water coming from the sleeves of your thermal suit.)
- When the weather or the sea is particularly bad, select a place where the digital camera will not get wet, e.g., indoors or where there is a roof overhead.
Cleaning and Storing
1. Wash the outside of the Case with water.
- Wash the outside of the Case until it is clean. (P20)
- Confirm that the O-ring is set securely, be sure to close the Case, and then wash only the outside with water.
- Wipe off any dirt inside the Case with a wet, soft cloth.
Notes
- Do not wash the Case with high-pressure water as it may cause water leakage. Remove the digital camera before washing the Case with water.
- Do not leave the digital camera inside the Case when storing it.
- Detach the O-ring from the marine case and store it so it will not dry. For details, please read page 22. When storing for a long period of time, insert it in the supplied exclusive polyester bag after first removing the O-ring.
- To prevent the weights and weights attachment screw from rusting, detach them after use and thoroughly remove any salt or water before storing.
Caution for Use
■ Handling of the O-ring
- Do not use alcohol, thinner or a chemical cleaning agent for cleaning the O-ring. This will cause damage to, or deterioration of, the O-ring.
- If you will not be using the Case for a long period of time, remove the O-ring from the O-ring groove, apply a thin coat of grease (supplied), place it in exclusive polyester bag and then store it in a cool, dark place to prevent the surface from being damaged. When you use the O-ring again, thoroughly check that it is not scratched, damaged or split.
- Use only the specified grease. If you use other types of grease, the surface of the O-ring may be damaged causing water leakage.
- The O-ring comes into contact with the sides of the Case making the Case waterproof. Do not knock, insert foreign materials (dirt, sand, hair etc.) or scratch the O-ring or sides of the Case.
- Use the tips of your fingers to remove the O-ring. Do not use a pointed object as it may scratch or damage the O-ring.
- After removing the O-ring from the rear case, wipe off any dirt, sand, hair or other foreign materials on it. Also wipe the O-ring groove and the inner sides of the front case which come into contact with the O-ring.
- Never use an O-ring that has been scratched or damaged by dirt etc. This will cause water leakage. Replace it with a new O-ring.
- After replacing the O-ring, when not in use for a long period of time, after attaching the digital camera or when replacing the battery, if the marine case is opened please thoroughly check the O-ring for damage or any cracks.
After checking, shut the marine case, immerse in water (a water tank or a bath tub) for approximately 3 minutes or more, then check that there are no water leaks. (P14)
- O-rings are consumable products. Although the lifespan of O-rings will depend on how well they are maintained, how often they are used and their storage conditions, we recommend replacing them every year even if you cannot see any scratches.
About maintenance
- Do not use the chemicals shown below for cleaning, rustproofing, defogging or repair. Using them directly or indirectly (with a chemical spray etc.) on the Case may cause it to crack.
| Prohibited chemicals | Cautions |
| Volatile organic solvents/ Chemical cleansers | Do not clean the Case with volatile organic solvents such as alcohol, gasoline or thinner or with chemical cleansers. Clean it with fresh water or lukewarm water. |
| Anti-corrosives | Do not use anti-corrosives as the metal parts of the Case are made from stainless steel or brass. Clean it with fresh water. |
| Anticlouding agents | Do not use commercially available anticlouding agents. Be sure to use the silica gel indicated in these operating instructions. |
| Adhesives | Do not use adhesives for repair. If the Case needs to be repaired, consult your dealer. |
- If grease sticks to the digital camera, wipe it off with a soft, dry cloth.
- When wiping the inside of the Case, only use a soft, dry cloth. Wipe the inside of the front glass with a soft, dry cloth before and after use to keep the glass clear.
■ About storage and inspection after use
Always take the digital camera out of the Case. - Make sure that no dirt or dust is stuck to the O-ring. - Thoroughly dry the Case at room temperature and then store it in a cool, dark place. - We recommend that the Case be inspected about 3 years after purchase. This inspection involves dismantling and cleaning the Case, inspecting all the parts and repairing them if necessary and checking the waterproofness of the Case using the same hydrostatic test equipment that was used to check the waterproofness before purchase. The customer is responsible for all transportation costs. - Do not dismantle any parts or use any accessories not specified in these operating instructions and do not alter the Case. If the Case does not work properly, consult your dealer.
Specifications
| Compatible model: | DMC-TZ20/DMC-ZS10/DMC-TZ19/DMC-ZS9/DMC-TZ18/DMC-ZS8 (As of January 2011*) |
| Dimensions: | Approx. 150 mm (W)×94 mm (H)×103 mm (D) [5.91" (W)×3.70" (H)×4.06" (D)] (excluding the projecting parts) |
| Mass (Weight): | Approx. 475 g/1.047 lb (including the diffuser) |
| Material: | Polycarbonate |
| Waterproof construction: | O-ring sealing |
| Water resistant depth: | 40 m/130 feet |
- Refer to the operating instructions, catalogue, website etc. of the digital camera for the latest information on models that can be used.
Panasonic Consumer Electronics Company, Division of Panasonic Corporation of North America One Panasonic Way, Secaucus, NJ 07094
Panasonic Canada Inc. 5770 Ambler Drive, Mississauga, Ontario, L4W 2T3
Panasonic Canada Inc.
5770 Ambler Drive,
Mississauga, Ontario
L4W 2T3
(905) 624-5010
www.panasonic.ca
© Panasonic Corporation 2011
Printed in Japan
2 Check the O-ring.
After replacing the filter, do not use it.
Do not wear the strap around your neck.
- The strap may get caught on something and cause injury or other serious accidents.
Rinse the mask thoroughly with water.
- Do not allow water to enter your mouth or eyes.
- If water enters the filter, immediately stop using it.
Water entering the filter may cause electric shock, fire, or other hazards. Contact a dealer.
- If any malfunction occurs while using the filter underwater, follow all procedures and rules for decompression when surfacing.
Surfacing too quickly may cause decompression sickness.
- If smoke, excessive heat, unusual odor, or unusual sound is emitted from the filter, immediately stop using it.
- Avoid impacts, drops, or fire. - Immediately remove the battery from the device, then take the battery out of the device. - Contact the dealer.
- Be careful when opening the device after adding water to it.
Do not touch the battery or the device with wet hands.
*2 The installation data for the device is intended for use in industrial production only.
The ring is not dirty. The ring is not out of the groove. The ring is not twisted. There are no scratches or dents on the sealing ring.
Carefully remove the lubricant from your hands with a dry cloth, then thoroughly wash your hands with water.
7 Close the latch.
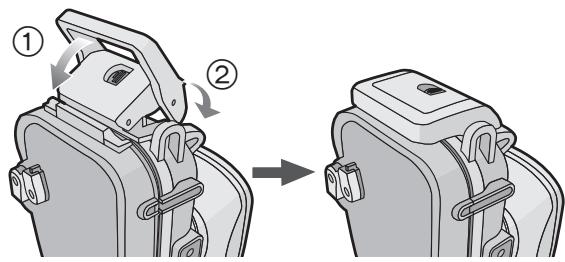
- Make sure that on the outer surface of the sealing ring and on the front parts of the device there are no particles of contamination, then close the device.
Application
- To ensure the tightness of the device, do not damage the surface of the sealing ring, which is in contact with the front parts of the device. Do not use a ring with scratches or damage. This may lead to water entering the device.
- Before using the device, simply remove the sealing ring, make sure that there is no dirt, sand, hair, or other materials in the ring groove, then apply a thin layer of lubricant (included in the delivery set). If you apply a large amount of lubricant, dirt and dust may stick to the sealing ring, which will lead to water entering the device.
- Make sure you have a spare sealing ring in case the used ring is damaged or scratched.
After installing the sealing ring, before installing the battery, check that water does not enter the device by submerging the device in a tank of water, a bathtub, or another container with water for about 3 minutes.
Do not use the device in water with a temperature above 40°C. High temperature may lead to damage to the device or to water entering the device.
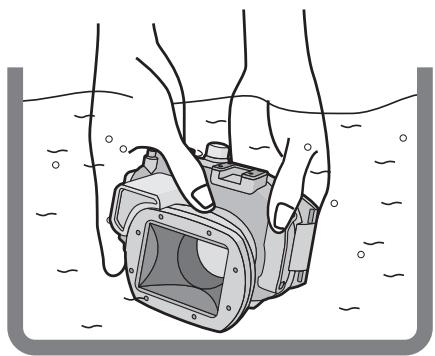

Install the battery into [ ]
The functions of automatic tuning of exposure values (models equipped with the function of automatic tuning of exposure values)
1. Soak the camera in fresh water for at least 30 minutes without removing the waterproof case. This is necessary to remove salt crystals from the buttons, etc.
![PANASONIC LUMIX DMW-MCTZ20E - Install the battery into [ ] - 1](/content/2019/11/53484/images/0242eea8a3b5e629f6b8304060a8f97fcce27dd784ea698644d759bba4ad1fdb.jpg)
- To rinse off salt water, press all the buttons on the housing. If salt crystals are not removed, the buttons may stick, and the crystals may harden, causing the buttons to stop working normally. Do not rinse the camera under running water or in water with high pressure. This may cause water to enter the camera.
2. Wipe the camera with a dry cloth that has no salt crystals, and then immediately dry the housing. Do not dry the housing in direct sunlight. This may cause discoloration or damage to the housing and accelerate aging of the O-ring. 3. To remove the waterproof case, open the back of the housing.
![PANASONIC LUMIX DMW-MCTZ20E - Install the battery into [ ] - 2](/content/2019/11/53484/images/e376c6da80f96966f5c9aca8ac6dae68833876c52d309a7f6ebbaf1ba484514b.jpg)
4. Remove the O-ring from the housing and make sure there is no dirt or other foreign particles in the O-ring groove. 5. Apply grease to the O-ring and check that the ring has no scratches or other damage.
Note
Be careful when removing the camera from the housing so that moisture does not get on the camera.
Remove the camera with dry hands. (Wash your hands with fresh water and dry thoroughly.) Thoroughly dry any moisture on your body and hair. (Be especially careful that water does not drip from your sleeves onto the camera or the waterproof housing.) - In bad weather, choose a place where moisture will not get on the camera, for example, inside a car or under a roof.
Cleaning and storage
1. Rinse the outer surface of the housing with water.
- Then wipe the outer surface of the housing. (P178)
- Make sure the O-ring is installed securely, close the housing, and then rinse it only on the outside with water.
- Wipe off dirt inside the housing with a damp, soft cloth.
Note
Do not rinse the housing in fast-flowing water or in water with high pressure. When immersing the housing in water, remove the camera. - Do not leave the camera in the housing. - Detach the O-ring from the housing for storage and store it in a way that it does not dry out. See detailed information on page 180.
Remove the O-ring from the groove using a special tool included in the delivery kit, after first removing the sealing ring.
To prevent rust formation after use, disconnect the load and the load securing screw, and thoroughly remove any salt and water residues before storage.
Handling the O-ring
Do not use solvents, acids, or chemical cleaning agents to clean the O-ring. These substances can damage the O-ring or impair its properties. If the filter will not be used for an extended period, remove the O-ring from the groove, apply a thin layer of lubricant (included in the delivery kit), place the O-ring in a special plastic bag, and store it in a cool, dark place. This will prevent damage to the ring's surface. Before reusing the O-ring after storage, carefully check that the ring's surface has no scratches or tears. - Apply only the specified type of lubricant. Using other types of lubricants may damage the O-ring, leading to water ingress into the filter. - The O-ring contacts the filter parts, ensuring the filter's leak-tightness. Do not strike it, do not allow foreign materials (dirt, sand, hair, etc.) to come into contact with it, and do not scratch the O-ring or the filter parts. - Remove the O-ring with your fingertips. When removing the O-ring, do not use sharp objects, as they may puncture the O-ring. - After removing the O-ring from the rear part of the filter, remove any dirt, sand, hair, and other foreign materials. Also, wipe the area under the O-ring and the inner surfaces of the filter that come into contact with the O-ring. Do not use a cloth with scratches or damage. This may lead to water ingress into the filter. Replace the O-ring with a new one. - After replacing the O-ring, if it will not be used for an extended period, after adjusting the pressure chamber or replacing the accumulator, etc., if the filter for water supply is open, carefully check the O-ring for any damage or cracks. After checking, close the filter for water supply, immerse it in water (tank with water or liquid) for approximately 3 minutes or more, then ensure that no water enters the filter. (P172) - O-rings are consumable items. Although the service life of O-rings depends on their care, frequency of use, and storage conditions, it is recommended to replace O-rings every year, even if there are no visible scratches on the rings.
Maintenance
Do not use the chemicals listed below for cleaning, rust prevention, anti-fogging, or repair. Direct application to the filter (via sprayer or other methods) may cause cracks on the filter.
- ABOUT HANDLING THIS CASE
- USING THE CASE IN HIGH OR LOW TEMPERATURES
- ABOUT PREPARATION
- HOW THE O-RING KEEPS THE CASE WATERPROOF
- LOOSEN THE O-RING WITH YOUR FINGERS TO REMOVE IT
- NOTE
- CHECK THE O-RING
- INSPECT THE O-RING GROOVE
- APPLY THE GREASE (SUPPLIED)
- FIT THE O-RING EVENLY INTO THE O-RING GROOVE
- INSPECT THE O-RING ONE LAST TIME
- CLOSE THE BUCKLE
- NOTES
- AFTER SETTING THE O-RING, CHECK THAT NO WATER LEAKS INTO THE CASE BY SUBMERGING IT IN A WATER TANK, BATH TUB ETC. FOR MORE THAN ABOUT 3 MINUTES BEFORE ATTACHING A DIGITAL CAMERA
- CARRY OUT THE SAME TEST AFTER ATTACHING THE DIGITAL CAMERA TO THE CASE. (P15)
- ATTACHING THE WEIGHTS
- ABOUT USING THE WEIGHTS
- HOW TO ATTACH THE WEIGHTS
- BE SURE TO CHECK THE FOLLOWING BEFORE ENTERING THE WATER CHECK THE FOLLOWING BEFORE DIVING
- TAKING PICTURES
- TURN THE CAMERA ON
- DISPLAY THE SCENE MODE MENU AND THEN SET [UNDERWATER]
- AIM THE AF AREA ON THE LCD MONITOR AT THE SUBJECT YOU WANT TO FOCUS ON
- PRESS [AF-L] TO FOCUS
- PRESS THE SHUTTER BUTTON FULLY TO TAKE THE PICTURE
- WHEN THE IMAGE IS TOO BLUISH IN THE WATER
- SELECT THE BEST PICTURE
- SET THE FLASH TO [ ]
- CLEANING AND STORING
- WASH THE OUTSIDE OF THE CASE WITH WATER
- CAUTION FOR USE
- HANDLING OF THE O-RING
- ABOUT MAINTENANCE
- ABOUT STORAGE AND INSPECTION AFTER USE
- SPECIFICATIONS
- CLOSE THE LATCH
- APPLICATION
- INSTALL THE BATTERY INTO [ ]
- CLEANING AND STORAGE
- HANDLING THE O-RING
- MAINTENANCE
Brand : PANASONIC
Model : LUMIX DMW-MCTZ20E
Category : Photo Accessories