
LUMIX DMW-FL360LGK - Photo Accessories PANASONIC - Free user manual and instructions
Find the device manual for free LUMIX DMW-FL360LGK PANASONIC in PDF.

| Product Type | External flash for digital cameras |
| Brand | Panasonic |
| Model | LUMIX DMW-FL360LGK |
| Category | Photo accessories |
| Power supply | 4 AA batteries (alkaline LR6 or Ni-MH HR6), 6.0 V DC |
| Charging time (full flash) | Approx. 2.0 s (alkaline) / 1.5 s (Ni-MH) |
| Number of flashes (full flash) | Approx. 250 (alkaline) / 350 (Ni-MH, min. 1900 mAh) |
| Flash duration | Approx. 1/20000 s to 1/500 s (except FP) |
| Guide number | 36 (ISO 100) / 12 (ISO 100 with diffuser) |
| Illumination angle | 12 mm to 42 mm (35 mm equiv: 24 mm to 85 mm), with diffuser: 8 mm (16 mm) |
| AF assist lamp | Range: 1 m to 5 m |
| Flash modes | TTL AUTO, AUTO, MANUAL, FP TTL AUTO, FP MANUAL, SL AUTO, SL MANUAL, RC |
| Dimensions (W × H × D) | 62.0 × 104.0 × 98.0 mm (excluding protrusions) |
| Weight | Approx. 376 g (with batteries) / 257 g (main unit) |
| Operating temperature | 0 °C to 40 °C |
| Operating humidity | 10% to 80% (without condensation) |
| Maintenance and cleaning | Remove batteries before cleaning; wipe with a soft, dry cloth |
| Safety precautions | Do not expose to water, sand or shocks; use only recommended batteries; do not disassemble |
| Warranty | 1 year parts and labor (Canada) |
Frequently Asked Questions - LUMIX DMW-FL360LGK PANASONIC
User questions about LUMIX DMW-FL360LGK PANASONIC
0 question about this device. Answer the ones you know or ask your own.
Ask a new question about this device
Download the instructions for your Photo Accessories in PDF format for free! Find your manual LUMIX DMW-FL360LGK - PANASONIC and take your electronic device back in hand. On this page are published all the documents necessary for the use of your device. LUMIX DMW-FL360LGK by PANASONIC.
USER MANUAL LUMIX DMW-FL360LGK PANASONIC
Please read these instructions carefully before using this product, and save this manual for future use.
send e-mail to: lumixconcierge@ca.panasonic.com
Operating Instructions FLASH
Thank you for purchasing Panasonic product. Please read these instructions carefully before using this product, and save this manual for future use.
Contents
Information for Your Safety. 2
Precautions. 6
Supplied Accessories 6
Names of Parts. 7
Control Panel. 7
Continuous Firing. 7
Preparing a Battery (optional) 8
Loading Batteries. 8
Attaching to the Camera. 8
Turning on the Flash. 8
Shooting 9
Flash Mode 10
Button Functions. 11
Wireless Flash Settings. 12
Placing Wireless Flash Units. 12
Fixing the Irradiation Angle 13
Using the Wide Panel. 13
Using the Catch Light Plate. 13
Other Settings 13
Custom Settings. 14
Camera without Communication
Functions 15
Slave Mode 16
Cautions for Use 16
Specifications 16
Limited Warranty (ONLY FOR
U.S.A. AND PUERTO RICO) 18
Limited Warranty (ONLY FOR CANADA) 21
Information for Your Safety
CAUTION!
To reduce the risk of fire, electric shock or product damage,
- Do not install or place this unit in a bookcase, built-in cabinet or in another confined space. Ensure this unit is well ventilated.
IMPORTANT SAFETY INSTRUCTIONS
When using your photographic equipment, basic safety precautions should always be followed, including the following:
- Read and understand all instructions before using.
- Close supervision is necessary when any appliance is used by or near children. Do not leave appliance unattended while in use.
- Care must be taken as burns can occur from touching hot parts.
- Do not operate if the appliance has been dropped or damaged - until it has been examined by qualified service personnel.
- Let appliance cool completely before putting away.
- To reduce the risk of electric shock, do not immerse this appliance in water or other liquids.
- To reduce the risk of electric shock, do not disassemble this appliance, but take it to qualified service personnel when service or repair work is required. Incorrect reassembly can cause electric shock when the appliance is used subsequently.
- The use of an accessory attachment not recommended by the manufacturer may cause a risk of fire, electric shock, or injury to persons.
SAVE THESE INSTRUCTIONS
CAUTION
- Danger of explosion if battery is incorrectly replaced. Replace only with the type recommended by the manufacturer.
-
When disposing the batteries, please contact your local authorities or dealer and ask for the correct method of disposal.
-
Do not heat or expose to flame.
- Do not leave the battery(ies) in a car exposed to direct sunlight for a long period of time with doors and windows closed.
- If rechargeable batteries are to be used, then rechargeable batteries manufactured by Panasonic are recommended.
THE FOLLOWING APPLIES ONLY IN THE U.S.A.
FCC Note:
This equipment has been tested and found to comply with the limits for a Class B digital device, pursuant to Part 15 of the FCC Rules.
These limits are designed to provide reasonable protection against harmful interference in a residential installation. This equipment generates, uses and can radiate radio frequency energy and, if not installed and used in accordance with the instructions, may cause harmful interference to radio communications. However, there is no guarantee that interference will not occur in a particular installation. If this equipment does cause harmful interference to radio or television reception, which can be determined by turning the equipment off and on, the user is encouraged to try to correct the interference by one or more of the following measures:
- Reorient or relocate the receiving antenna.
- Increase the separation between the equipment and receiver.
- Connect the equipment into an outlet on a circuit different from that to which the receiver is connected.
- Consult the dealer or an experienced radio/TV technician for help.
Any unauthorized changes or modifications to this equipment would void the user's authority to operate this device.
This device complies with Part 15 of the FCC Rules. Operation is subject to the following two conditions: (1) This device may not cause harmful interference, and (2) this device must accept any interference received, including interference that may cause undesired operation.
Responsible Party:
Panasonic Corporation of North America
One Panasonic Way
Secaucus, NJ 07094
Support Contact:
Panasonic Consumer Marketing Company of North America
Telephone No.: 1-800-211-PANA (7262)
This Class B digital apparatus complies with Canadian ICES-003.
-If you see this symbol
Information on Disposal for Users of Waste Electrical & Electronic Equipment (private households)

This symbol on the products and/or accompanying documents means that used electrical and electronic products should not be mixed with general household waste.
For proper treatment, recovery and recycling, please take these products to designated collection points, where they will be accepted on a free of charge basis. Alternatively, in some countries you may be able to return your products to your local retailer upon the purchase of an equivalent new product.
Disposing of this product correctly will help to save valuable resources and prevent any potential negative effects on human health and the environment which could otherwise arise from inappropriate waste handling. Please contact your local authority for further details of your nearest designated collection point.
Penalties may be applicable for incorrect disposal of this waste, in accordance with national legislation.
For business users in the European Union
If you wish to discard electrical and electronic equipment, please contact your dealer or supplier for further information.
Information on Disposal in other Countries outside the European Union
This symbol is only valid in the European Union.
If you wish to discard this product, please contact your local authorities or dealer and ask for the correct method of disposal.
Precautions
- This is the external flash for the Panasonic digital cameras (mentioned as flash in the following). When this flash is used together with a digital camera that supports wireless mode, shooting with a wireless flash becomes possible. Available functions vary depending on the digital camera used. As for the corresponding digital cameras, please visit our web site. http://panasonic.jp/support/global/cs/dsc/ (This Site is English only.)
Handling the unit
- Do not subject the unit to strong vibration or impact. Doing so may not only cause the unit to malfunction but also cause the flash head to break.
- Sand and dirt may cause the unit to malfunction. When using the unit in an environment such as a beach, take steps to protect it from sand and dirt.
- This unit is neither dust-proof nor splash-proof. If by any chance water droplets, etc. are splashed on the unit, wipe them off with a dry cloth. If the unit fails to function correctly, consult your dealer or Panasonic.
- Read the operating instructions for your digital camera.
Supplied Accessories
[Inspection to be performed when you unpack the unit]
When removing the unit from its packing box, check that the main unit and the supplied accessories are there and also check their external appearance and functions to verify that they have not sustained any damage during distribution and transportation.
If you discover any trouble, contact your vendor before using the product.
Product numbers correct as of October 2012. These may be subject to change.
![PANASONIC LUMIX DMW-FL360LGK - [Inspection to be performed when you unpack the unit] - 1](/content/2019/09/53477/images/01f6c1062887a20321540c9e5b51704b1d195b29f8673f616705f7909ffa6e43.jpg)
![PANASONIC LUMIX DMW-FL360LGK - [Inspection to be performed when you unpack the unit] - 2](/content/2019/09/53477/images/65527f33378dd5a85ee8bbdac2e16d0d18afb6657d53b9ef8e6e6082c1af6edb.jpg)
1 Flash case
2 Flash stand
- The batteries are optional.
![PANASONIC LUMIX DMW-FL360LGK - [Inspection to be performed when you unpack the unit] - 3](/content/2019/09/53477/images/4b2ae9ef797c7883eb0bf2f279e37e91938da94b77a6dc94199cd42acba2c976.jpg)
① Wide panel
② Flash head
③ Wireless sensor
④ AF assist lamp/LED light
⑤ Flash sensor
⑥ Catch light plate
⑦ Control panel
[AUTO CHECK] lamp
(9) [TEST/CHARGE] button/lamp
10 [OK] button
① Bounce unlock button
⑫ [BACK LIGHT] button
[ON/OFF] button
14 Lock lever
⑤ Dial
a () : Flash intensity adjustment button
b () : [MODE] button
c () : LED light button
d () : [ZOOM] button
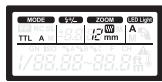
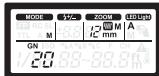
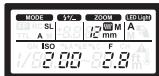
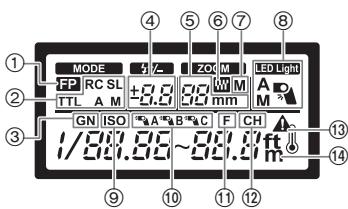
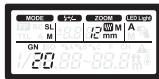
Control Panel
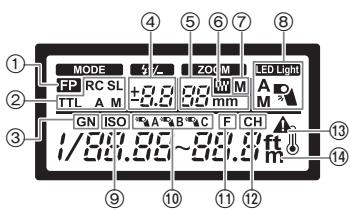
① FP firing
② Flash mode
③ Guide number (GN)
④ Flash intensity adjustment
⑤ ZOOM value
(6) FOUR THIRDS
⑦ Zoom mode
⑧ LED light
⑨ ISO sensitivity
10 RC mode group
① Aperture (F)
⑫ RCmode channel
⑬ Temperature warning
14 Distance units
Continuous Firing
The flash may become hot when fired many times in succession, resulting in damage or malfunction. The flash should be fired no more than 10 times in succession at intervals of 2.5 seconds, after which it should be left unused for at least 10 minutes.
Preparing a Battery (optional)
Choose from the below batteries:
- LR6/AA Alkaline dry batteries (x 4)
- HR6/AA Rechargeable nickel metal hydride batteries (Ni-MH) (x 4)
R6/AA Manganese dry batteries cannot be used.
The use of batteries made by Panasonic is recommended.
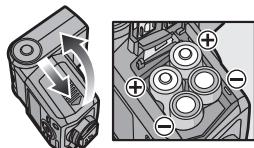
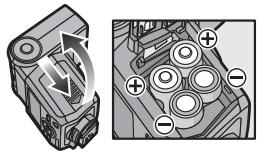
Loading Batteries
- Use alkaline dry batteries or rechargeable nickel metal hydride batteries.
1 Slide the battery cover to open it.
2 Insert the batteries with correct [+] /[-] polarity.
3 Close the battery cover by sliding it back firmly as far as it will go.


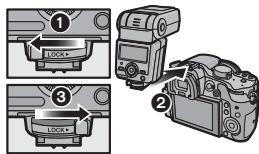
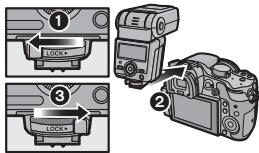
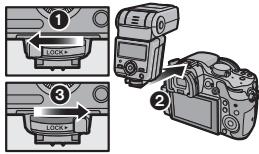
Attaching to the Camera
Confirm that both the camera and flash are off. Attaching or removing the flash while either the flash or the camera is on may result in malfunction.
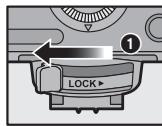
1 Slide the lock lever in the direction opposite to that indicated by the [LOCK ] icon (①).
2 Slide the flash into the hot shoe until it clicks securely into place (②).
3 Slide the lock lever to the [LOCK▶] position (③).
- To remove the flash, slide the lock lever in the direction opposite to the [LOCK▶] arrow and slide it from the shoe.
Turning on the Flash
Attach a flash to the camera, and then turn the camera on.
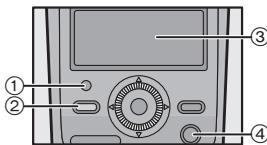
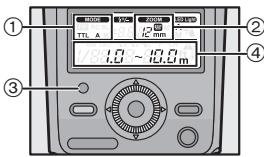
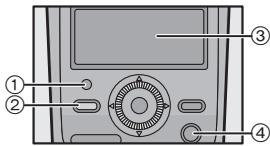
① [AUTO CHECK] lamp
(2) [TEST/CHARGE] lamp
③ Control panel
④ [ON/OFF] button
Press the [ON/OFF] button.
- The control panel display will turn on.
To turn the flash off, press the [ON/OFF] button again. - Replace the batteries if the [TEST/CHARGE] lamp does not light after:
| 30 seconds (Alkaline dry batteries) |
| 10 seconds (Rechargeable nickel metal hydride batteries) |
- If the [TEST/CHARGE] lamp and [AUTO CHECK] lamp blink simultaneously, batteries are running low. Replace the batteries. Using a considerably exhausted battery may result in malfunction.
- The flash will enter sleep mode whenever the camera enters sleep mode.
- If no operations are performed for approximately 60 minutes, the flash will turn off automatically. Press the [ON/OFF] button to turn it on.
- Oscillating sound may be output while charging the flash, but this is not malfunction.
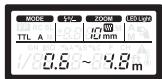
Shooting
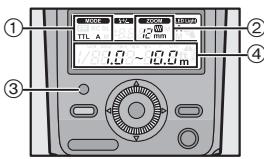
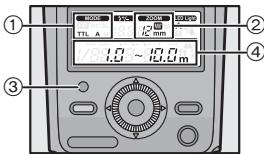
① Flash mode
② Lighting angle Displayed according to the focal length of the lens.
③ [AUTOCHECK]lamp
④ Light working range
1 Use camera controls to choose the flash mode.
See the camera operating instructions for details.
2 Choose a flash mode.
"Flash Mode" (P10)
- The camera and flash will exchange shooting information and the flash working range will be displayed in the control panel.
3 Press the shutter button halfway.
- Flash range varies with camera settings (ISO sensitivity, aperture, and lens focal length).
4 Press the shutter button the rest of the way down to take the picture.
The unit emits light in proper exposure if [AUTO CHECK] lamp flashes for approximately 5 seconds.
- When using a flash, flash light may be blocked by the lens body, lens hood, etc.
- Use the wide panel to prevent overexposure at ranges of less than 1m (3.3 feet) (P13).
Choose a flash mode according to your subject and shooting conditions.
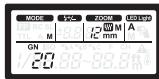
1 Press the [MODE] (▲) button.
2 Rotate the dial to select a flash mode.
- While [MANUAL] or [FP MANUAL] is selected, pressing [MODE] (▲) button allows you to set the guide number. Press the [MODE] (▲) again to turn back.
3 Press the [OK] button.
| Control panel display | Control operation |
| [ TTL AUTO] | The flash light intensity is controlled automatically according to the camera's setup. The flash will be adjusted based on the brightness taken through the camera's lens. Usually use this mode with a camera with communication capability. |
| [Blink]: Out of flash working range | The flash will be adjusted based on the brightness captured by flash sensor on the flash. If the camera has communication capability, this mode can be used only when the camera is an AUTO-compatible model. |
| [ RC Manual] | In this mode, the flash is emitted according to the guide number setting. The flash displays the optimal range, which is calculated based on the guide number and camera settings. |
| [ RC RC ] | Wireless control is available with Panasonic digital cameras that support wireless mode. (P12) |
| [ FP TTL AUTO] | FP firing. This mode allows you to use flash photography even at shutter speeds faster than the flash synchronization speed of the camera. • Maximum output is reduced, resulting in a smaller flash working range. Flash working range also diminishes with shutter speed. |
| [ FP MANUAL] | [FP TTL AUTO]: Flash level is set automatically. [FP MANUAL]: The flash fires at the selected guide number. The flash displays the optimal range, which is calculated based on the guide number and camera settings. |
![PANASONIC LUMIX DMW-FL360LGK - Press the [OK] button. - 1](/content/2019/09/53477/images/610ef14a88b4c03cf74cc9185b30fd3230ff2272373600dd61ef8224b52debda.jpg)
| Control panel display | Control operation |
| [SL AUTO] | The flash can be fired remotely in sync with any flash fired by other units. |
| [SL AUTO]: Flash level is set automatically. [SL MANUAL]: The flash fires at the selected guide number. | [SL AUTO]: Flash level is set automatically. [SL MANUAL]: The flash fires at the selected guide number. |
Button Functions
| Button | Function | Use |
| [52] | Adjust flash level by up to ±5 EV. This value is combined with adjustments to flash compensation made using the camera. | 1 Press [52] (▲) or [ZOOM] (▼). 2 Rotate the dial to select the value, and then press the [OK] button. |
| [ZOOM] | Adjust the lighting angle manually. [M] appears in the display. | |
| [4] | Manually turn the LED light on or off. | 1 Before shooting, set the LED light to [M]. “Other Settings” (P13) 2 Press [4] (▲) to turn the LED light on. Press [4] (▲) again to turn the LED light off. To view the LED brightness setting, press and hold [4] (▲) for 2 seconds while the LED light is on. • The flash and batteries may become warm if you keep the LED light on, but this is not a malfunction. |
| [TEST/CHARGE] | To fire a test flash, press the [TEST/CHARGE] button while the [TEST/CHARGE] lamp is lit. | |
| [BACK LIGHT] | The control panel backlight lights for about 15 seconds. | |
Wireless Flash Settings
Wireless control is available with Panasonic digital cameras that support wireless mode. See the operating instructions of the digital camera for operation of the digital camera during wireless flash shooting.
1 Set the camera to wireless mode.
2 Set the flash to [RC] mode.
"Flash Mode" (P10)
- When [RC] is selected, pressing [MODE] (▲) button allows you to set a channel. Press the [MODE] (▲) button again to turn back.
3 Use the flash to select the channel and group.
"Other Settings" (P13)
| CH Channel | Set the camera and flash to the same channel. |
| * A * B * C Group | The camera can adjust flash settings separately for up to 3 groups; choose the group to which the flash belongs. |
The Firing mode, the flash adjustment, and the manual flash adjustment can be set for each group by operating the camera.
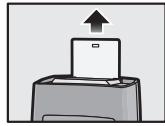
Placing Wireless Flash Units
Since the communication is performed with the flash emission of the camera, the flash positioning range varies with the camera. Refer to the camera operating instructions for details about the flash positioning range.
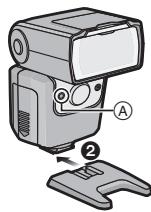
1 Attach the supplied stand.
- Slide the lock lever in the direction opposite to that indicated by the [LOCK ] icon (①) and slide the flash onto the stand until it clicks securely into place (②).
- Slide the lock lever to the [LOCK ] position to latch the flash in place.
- To remove the flash, slide the latch in the direction opposite to the [LOCK ] arrow and slide it from the stand.
2 Position the flash with the wireless sensor (A) facing the camera.
Take a test shot after positioning.
- We recommend using a single group of up to three remote flash units.
- Flash may not fire due to the angle or distance between the camera and the object.
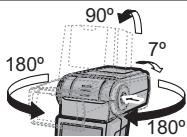
Fixing the Irradiation Angle
Point the flash head at a wall or ceiling for bounce flash photography. The area illuminated at ranges of 0.5m (1.6 feet) to 1.0m (3.3 feet) will not be correct; point the flash down.
Pressing the bounce unlock button, turn the light-emitting section up/down and left/right.
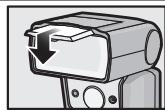
Using the Wide Panel
Use the built-in wide panel for flash photography when the focal length of the lens is wider than 12mm
Slide out the wide panel and place it on the flash head.
- The estimated range display changes when the wide panel is used.
- The lighting angle can be set to 10 mm and 8 mm only.
- Do not tilt the wide panel up.
- The ZOOM display will blink if the lens has a focal length of 12 mm or more.
Using the Catch Light Plate
Reflecting the flash light allows you to shoot with the catch light effect, which reflects light in the models eyes.
Slide out the catch light plate.
Point the flash directly upward with the plate toward the subject.
Other Settings
The following options can be selected in the control panel.
1 Press the [OK] button.
An item will blink in the control panel.
2 Press / / to highlight items.
3 Rotate the dial to select the setting, and then press [OK] button.

| Option | Description |
| MODE (flash mode) | P10 |
| (FLASH intensity adjustment) | P11 |
| ZOOM (lighting angle) | P11 |
| (LED light) | Choose whether the LED lights automatically or manually. [A]: Lights automatically as required. [M]: Lights when the LED light button is pressed. None: Does not light. |
| GN (guide number) | Adjust flash level. |
| ISO sensitivity | Adjust ISO sensitivity. |
| Group | Choose a group for [RC] mode. (P12) |
| Aperture | Adjust aperture. |
| Channel | Choose a channel for [RC] mode. (P12) |
Custom Settings
Customize settings for improved ease of use.
1 Press and hold the [OK] button for more than 2 seconds.
The flash will enter custom settings mode.
2 Press / to highlight items.
3 Rotate the dial to change the highlighted item.
4 Press and hold the [OK] button for more than 2 seconds to end the settings.
| Control panel | Option | Description | |
| I L R | AF assist lamp | [A]: Controlled by camera. [OFF]: Does not light. | |
| LED L M | I / B | LED brightness | [1/1] to [1/16]: Adjust LED brightness. |
| MODE SL | Slave flash | [ON]: Flash control display shows slave mode. [OFF]: Flash control display does not show slave mode. | |
| C P O N | Flash cable | [ON]: Flash cable not used. [OFF]: Flash cable used. | |
| ZOOM W mm | 4-3 | Zoom display | [W]: Display values for FOUR THIRDS lenses. None: Display 35 mm film camera equivalent values. |
| Control panel | Option | Description |
| m | Distance units | [m]: Distances displayed in meters. [ft]: Distances displayed in feet. |
| BP ON | Wide panel detection | [ON]: Flash detects position of wide panel. Lighting angle adjusted automatically. [OFF]: Flash does not detect wide panel position. |
| GN ON | Guide number display | [ON]: Flash output is shown as a guide number. [OFF]: Flash output is shown as a relative value. |
| MODE ISO F A ON | Auto light sensing | [ON]: The ISO sensitivity and the aperture are adjusted to match the camera. [OFF]: The ISO sensitivity and the aperture of the flash can be adjusted with the dial. • This can only be used for digital cameras with communication functions. (Only when the flash mode is set to [AUTO] or [SL AUTO] mode.) |
| ISO 100 | Auto ISO display | [25] to [3200]: Display the ISO sensitivity when [AUTO] is selected as the flash mode for cameras that can not communicate with the flash unit. |
■ Returning the custom settings to the default setting
Press and hold the [OK] button and [BACK LIGHT] button together for more than 2 seconds
The control panel will blink once when settings are reset.
Display of the distance unit does not return to the default setting.
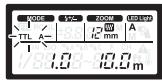
Camera without Communication Functions
AUTO
Set aperture and ISO sensitivity to the values selected with the camera.
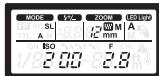
1 Set the flash mode to [AUTO].
"Flash Mode" (P10)
- When [AUTO] is selected, pressing [MODE] (▲) button allows you to set the aperture. Press the [MODE] (▲) button again to turn back.
![PANASONIC LUMIX DMW-FL360LGK - Set the flash mode to [AUTO]. - 1](/content/2019/09/53477/images/c5ca4a28bf04aedb6df5dcc99a2910738ff50d163d289a37268606d65dc1cc2e.jpg)
2 Match the zoom position to the focal length of the lens.
["ZOOM"] (P11)
3 Adjust aperture and ISO sensitivity.
"Other Settings" (P13)
If the selected values are out of the flash working range, [ISO] and [F] will blink in the display. The [AUTO CHECK] lamp blinks for about 5 seconds after the shutter is released to show that the flash has fired successfully.
MANUAL
Choose the guide number.
1 Set the flash mode to [MANUAL].
"Flash Mode" (P10)
2 Match the zoom position to the focal length of the lens.
["ZOOM"] (P11)
3 Set the guide number.
"Other Settings" (P13)
Slave Mode
The flash can be fired remotely in sync with any flash fired by other units.
1 Set the flash mode to [SL AUTO] or [SL MANUAL].
"Flash Mode" (P10)
Adjust other flash settings as for [AUTO] or [MANUAL] mode.
"Camera without Communication Functions" (P15)
2 Position the flash.
Flash positioning method is same as the wireless mode.
"Placing Wireless Flash Units" (P12)
Refer to the camera operating instructions for details about the flash positioning range.
- Set the flash mode of the camera to the manual which does not fire the pre-flash. If the camera fires the pre-flash, the external flash synchronizes with the pre-flash of the camera, and cannot fire the flash light properly.
- The flash may fire in response to flash units used by other photographers.


Cautions for Use
About the unit
Do not carry the unit when it is still attached to the camera body.
About the batteries
Be sure to remove the batteries when you will not be using the unit for a long period of time.
Specifications
Specifications are subject to change without notice.
Power requirements: DC 6.0 V
| Batteries recommended for use | LR6/AA Alkaline dry batteries × 4/HR6/AA Rechargeable nickel metal hydride batteries (Ni-MH)× 4 |
| Charging time (from full flash until the [TEST/CHARGE] lamp lights) | Approx. 2.0 sec.: LR6/AA Alkaline dry batteries Approx. 1.5 sec.: HR6/AA Rechargeable nickel metal hydride batteries |
| Firing period | Approx. 1/20000 sec. to 1/500 sec.(Varies depending on the flash intensity; FP firing excluded.) |
| No. of flashes (with full flash) | Approx. 250 flashes: LR6/AA Alkaline dry batteries Approx. 350 flashes: HR6/AA Rechargeable nickel metal hydride batteries (min. 1900 mAh type) (Differs depending on the photo taking conditions.) |
| AF assist lamp | Effective distance: approximately 1 m (3.3 feet) to 5 m (16 feet)(Differs depending on the digital camera and type of lens used) |
| Flash modes | TTL AUTO/AUTO/MANUAL/FP TTL AUTO/FP MANUAL/SL AUTO/SL MANUAL/RC |
| Guide number | 36 (ISO100), 12 (ISO100: When the wide panel is used) |
| Lighting angle | Covers the angle of view of 12 to 42 mm lenses (35 mm film camera equivalent: 24 to 85 mm)(With wide panel: 8 mm lens, 35 mm film camera equivalent: 16 mm) |
| Dimensions | Approx. 62.0 mm (W)×104.0 mm (H)×98.0 mm (D)[2.441" (W)×4.095" (H)×3.858"(D)](excluding the projecting parts) |
| Mass (weight) | Approx. 376 g/0.829 lb (including batteries) Approx. 257 g/0.567 lb (main unit) |
| Operating temperature | 0 °C to 40 °C (32 °F to 104 °F) |
| Operating humidity | 10%RH to 80%RH (no condensation) |
For the U.S.A.
Panasonic Consumer Marketing Company of North America, Division of Panasonic Corporation of North America
One Panasonic Way, Secaucus, NJ 07094
For CANADA
Panasonic Canada Inc.
5770 Ambler Drive, Mississauga, Ontario L4W 2T3
www.panasonic.ca
Printed in China
Limited Warranty
(ONLY FOR U.S.A. AND PUERTO RICO)
Panasonic Consumer Marketing Company of North America,
Division of Panasonic Corporation of North America
One Panasonic Way, Secaucus, New Jersey 07094
Panasonic Products Limited Warranty
Limited Warranty Coverage (For USA and Puerto Rico Only)
If your product does not work properly because of a defect in materials or workmanship, Panasonic Consumer Marketing Company of North America (referred to as "the warrantor") will, for the length of the period indicated on the chart below, which starts with the date of original purchase ("warranty period"), at its option either (a) repair your product with new or refurbished parts, (b) replace it with a new or a refurbished equivalent value product, or (c) refund your purchase price. The decision to repair, replace or refund will be made by the warrantor.
| Product or Part Name | Parts | Labor |
| Digital Camera Accessories | 90 Days | 90 Days |
| Batteries (Non-rechargeable batteries are not warranted.) | 10 Days | Not Applicable |
During the "Labor" warranty period there will be no charge for labor. During the "Parts" warranty period, there will be no charge for parts. This Limited Warranty excludes both parts and labor for non-rechargeable batteries, antennas, and cosmetic parts (cabinet). This warranty only applies to products purchased and serviced in the United States or Puerto Rico. This warranty is extended only to the original purchaser of a new product which was not sold "as is".
Mail-In Service
For assistance in the U.S.A. and Puerto Rico in obtaining repairs, please ship the product prepaid to:
Panasonic Exchange Center
4900 George McVay Drive
Suite B
McAllen, TX 78503
panacare@us.panasonic.com
Online Repair Request
To submit a new repair request and for quick repair status visit our Web Site at www.panasonic.com/repair.
When shipping the unit, carefully pack, include all supplied accessories listed in the Owner's Manual, and send it prepaid, adequately insured and packed well in a carton box. When shipping Lithium Ion batteries please visit our Web Site at www.panasonic.com/BatteryHandling as Panasonic is committed to providing the most up to date information. Include a letter detailing the complaint, a return address and provide a daytime phone number where you can be reached. A valid registered receipt is required under the Limited Warranty.
IF REPAIR IS NEEDED DURING THE WARRANTY PERIOD, THE PURCHASER WILL BE REQUIRED TO FURNISH A SALES RECEIPT/PROOF OF PURCHASE. INDICATING DATE OF PURCHASE, AMOUNT PAID AND PLACE OF PURCHASE. CUSTOMER WILL BE CHARGED FOR THE REPAIR OF ANY UNIT RECEIVED WITHOUT SUCH PROOF OF PURCHASE.
Limited Warranty Limits And Exclusions
This warranty ONLY COVERS failures due to defects in materials or workmanship, and DOES NOT COVER normal wear and tear or cosmetic damage. The warranty ALSO DOES NOT COVER damages which occurred in shipment, or failures which are caused by products not supplied by the warrantor, or failures which result from accidents, misuse, abuse, neglect, mishandling, misapplication, alteration, faulty installation, set-up adjustments, misadjustment of consumer controls, improper maintenance, power line surge, lightning damage, modification, introduction of sand, humidity or liquids, commercial use such as hotel, office, restaurant, or other business or rental use of the product, or service by anyone other than a Factory Service Center or other Authorized Servicer, or damage that is attributable to acts of God.
THERE ARE NO EXPRESS WARRANTY EXCEPT AS LISTED UNDER "LIMITED WARRANTY COVERAGE".
THE WARRANTYOR IS NOT LIABLE FOR INCIDENTAL OR CONSEQUENTIAL DAMAGES RESULTING FROM THE USE OF THIS PRODUCT, OR ARISING OUT OF ANY BREACH OF THIS WARRANTY.
(As examples, this excludes damages for lost time, travel to and from the servicer, loss of or damage to media or images, data or other memory or recorded content. The items listed are not exclusive, but for illustration only.)
ALL EXPRESS AND IMPLIED WARRANTY, INCLUDING THE WARRANTY OF MERCHANTABILITY, ARE LIMITED TO THE PERIOD OF THE LIMITED WARRANTY.
Some states do not allow the exclusion or limitation of incidental or consequential damages, or limitations on how long an implied warranty lasts, so the exclusions may not apply to you.
This warranty gives you specific legal rights and you may also have other rights which vary from state to state. If a problem with this product develops during or after the warranty period, you may contact your dealer or Service Center. If the problem is not handled to your satisfaction, then write to the warrantor's Consumer Affairs Department at the addresses listed for the warrantor.
PARTS AND SERVICE, WHICH ARE NOT COVERED BY THIS LIMITED WARRANTY, ARE YOUR RESPONSIBILITY.
Customer Services Directory (United States and Puerto Rico)
Obtain Product Information and Operating Assistance; locate your nearest
Dealer or Service Center; purchase Parts and Accessories; or make
Customer Service and Literature requests by visiting our Web Site at:
http://www.panasonic.com/help
or, contact us via the web at:
http://www.panasonic.com/contactinfo
You may also contact us directly at:
1-800-211-PANA (7262)
Monday-Friday 9am-9pm, Saturday-Sunday 10am-7pm EST
For hearing or speech impaired TTY users, TTY: 1-877-833-8855
Accessory Purchases (United States and Puerto Rico)
Purchase Parts, Accessories and Instruction Books online for all Panasonic Products by visiting our Web Site at: http://www.pstc.panasonic.com. Or, send your request by E-mail to: npcparts@us.panasonic.com You may also contact us directly at: 1-800-332-5368 (Phone) 1-800-237-9080 (Fax Only) (Monday-Friday 9am-9pm EST) Panasonic National Parts Center 20421 84th Ave S., Kent, WA 98032 (We accept Visa, MasterCard, Discover Card, American Express)
For hearing or speech impaired TTY users, TTY: 1-866-605-1277
As of October 2012
Panasonic Canada Inc.
5770 Ambler Drive, Mississauga, Ontario L4W 2T3
PANASONIC PRODUCT - LIMITED WARRANTY
Panasonic Canada Inc. warrants this product to be free from defects in material and workmanship under normal use and for a period as stated below from the date of original purchase agrees to, at its option either (a) repair your product with new or refurbished parts, (b) replace it with a new or a refurbished equivalent value product, or (c) refund your purchase price. The decision to repair, replace or refund will be made by Panasonic Canada Inc.
| Digital Camera | One (1) year, parts and labour |
| Digital Camera Peripherals | One (1) year, parts and labour |
| Digital Camera Accessories | Ninety (90) days, parts and labour |
This warranty is given only to the original purchaser, or the person for whom it was purchased as a gift, of a Panasonic brand product mentioned above sold by an authorized Panasonic dealer in Canada and purchased and used in Canada, which product was not sold "as is", and which product was delivered to you in new condition in the original packaging.
IN ORDER TO BE ELIGIBLE TO RECEIVE WARRANTY SERVICE HEREUNDER, A PURCHASE RECEIPT OR OTHER PROOF OF DATE OF ORIGINAL PURCHASE, SHOWING AMOUNT PAID AND PLACE OF PURCHASE IS REQUIRED
LIMITATIONS AND EXCLUSIONS
This warranty ONLY COVERS failures due to defects in materials or workmanship, and DOES NOT COVER normal wear and tear or cosmetic damage. The warranty ALSO DOES NOT COVER damages which occurred in shipment, or failures which are caused by products not supplied by Panasonic Canada Inc., or failures which result from accidents, misuse, abuse, neglect, mishandling, misapplication, alteration, faulty installation, set-up adjustments, misadjustment of consumer controls, improper maintenance, improper batteries, power line surge, lightning damage, modification, introduction of sand, humidity or liquids, commercial use such as hotel, office, restaurant, or other business or rental use of the product, or service by anyone other than a Authorized Servicer, or damage that is attributable to acts of God.
Dry cell batteries, printer ink cartridge and paper are also excluded from coverage under this warranty.
Rechargeable batteries are warranted for ninety (90) days from date of original purchase.
THIS EXPRESS, LIMITED WARRANTY IS IN LIEU OF ALL OTHER WARRANTYES, EXPRESS OR IMPLIED, INCLUDING ANY IMPLIED WARRANTYES OF MERCHANTABILITY AND FITNESS FOR A PARTICULAR PURPOSE. IN NO EVENT WILL PANASONIC CANADA INC. BE LIABLE FOR ANY SPECIAL, INDIRECT OR CONSEQUENTIAL DAMAGES RESULTING FROM THE USE OF THIS PRODUCT OR ASRISING OUT OF ANY BREACH OF ANY EXPRESS OR IMPLIED WARRANTY. (As examples, this warranty excludes damages for lost time, travel to and from the Authorized Servicer, loss of or damage to media or images, data or other memory or recorded content. This list of items is not exhaustive, but for illustration only.)
In certain instances, some jurisdictions do not allow the exclusion or limitation of incidental or consequential damages, or the exclusion of implied warranties, so the above limitations and exclusions may not be applicable. This warranty gives you specific legal rights and you may have other rights which vary depending on your province or territory.
WARRANTY SERVICE
For product operation and information assistance, please contact:
Our Customer Care Centre:
Telephone: 1-800-99-LUMIX
(1-800-995-8649)
Fax #: (905) 238-2360
Email link: lumixconcierge@ca.panasonic.com
For defective product exchange within the warranty period, please contact the original Dealer or our Customer Care Centre.
Panasonic Canada Inc.
5770, Ambler Drive, Mississauga (Ontario) L4W 2T3
PRODUIT PANASONIC - GARANTIE LIMITÉE
Panasonic Corporation of North America
One Panasonic Way
Secaucus, NJ 07094
Panasonic Consumer Marketing Company of North America
Telefono: 1-800-211-PANA (7262)
LO SIGUIENTE SOLO INTERESA A CANADA.
| 버닝 | 기름 | 울이용화심지오 . |
| [52] | 几乎所有徒刑都不敢 ±5 EV 巴지 썸plet违法行为 . 본 간을 키모라에서의 썸plet 사 본 고 원 Crack 과 haul 만 들属实 . . | 1 [42] 울 于 [ZOOM] (▼) 을 neurop ris si о . 2 다 이 ell le le le le le le le le le le le le le le le le le le le le le le le le le le le le le le le le le le le le le le le le le le le le le le le le le le LE JO JO JO JO JO JO JO JO JO JO JO JO JO JO JO JO JO JO JO JO JO JO JO JO JO JO JO JO JO JO JO JO JO JO JO JO JO JO JO JO JO JO JO JO JO JO JO JO JO JO J JO JO JO JO JO JO JO JO JO JO JO JO JO JO JO JO JO JO JO JO JO JO JO JO JO JO JO JO JO JO JO JO JO JO JO JO JO JO JO JO JO JO JO JO JO JO JO JO JO JD JD JD JD JD JD JD JD JD JD JD JD JD JD JD JD JD JD JD JD JD JD JD JD JD JD JD JD JD JD JD JD JD JD JD JD JD JD JD JD JD JD JD JD JD JD JD JD JD JD jd jd jd jd jd jd jd jd jd jd jd jd jd jd jd jd jd jd jd jd jd jd jd jd jd jd jd jd jd jd jd jd jd jd jd jd jd jd jd jd jd jd jd jd jd jd jd jd jd jd JD JD JD JD JD JD JD JD JD JD JD JD JD JD JD JD JD JD JD JD JD JD JD JD JD JD JD JD JD JD JD JD JD JD JD JD JD JD JD JD JD JD JD JD JD JD JD JD JD J JD JD JD JD JD JD JD JD JD JD JD JD JD JD JD JD JD JD JD JD JD JD JD JD JD JD JD JD JD JD JD JD JD JD JD JD JD JD JD JD JD JD JD JD JD JD JD JD JD JC JC JC JC JC JC JC JC JC JC JC JC JC JC JC JC JC JC JC JC JC JC JC JC JC JC JC JC JC JC JC JC JC JC JC JC JC JC JC JC JC JC JC JC JC JC JC JC JC JC JD JD JD JD JD JD JD JD JD JD JD JD JD JD JD JD JD JD JD JD JD JD JD JD JD JD JD JD JD JD JD JD JD JD JD JD JD JD JD JD JD JD JD JD JD JD JD JD JD JB JB JB JB JB JB JB JB JB JB JB JB JB JB JB JB JB JB JB JB JB JB JB JB JB JB JB JB JB JB JB JB JB JB JB JB JB JB JB JB JB JB JB JB JB JB JB JB JB JB JC JC JC JC JC JC JC JC JC JC JC JC JC JC JC JC JC JC JC JC JC JC JC JC JC JC JC JC JC JC JC JC JC JC JC JC JC JC JC JC JC JC JC JC JC JC JC JC JC JC JC JC JC JC JC JC JC JC JC JC JC JC JC JC JC JC JC JC JC JC JC JC JC JC JC JC JC JC JC JC JC JC JC JC JC JC JC JC JC JC JC JC JC JC JC JC JC JC JC JC JD JD JD JD JD JD JD JD JD JD JD JD JD JD JD JD JD JD JD JD JD JD JD JD JD JD JD JD JD JD JD JD JD JD JD JD JD JD JD JD JD JD JD JD JD JD JD JD JD JD JC JC JC JC JC JC JC JC JC JC JC JC JC JC JC JC JC JC JC JC JC JC JC JC JC JC JC JC JC JC JC JC JC JC JC JC JC JC JC JC JC JC JC JC JC JC JC JC JC JD JC JC JC JC JC JC JC JC JC JC JC JC JC JC JC JC JC JC JC JC JC JC JC JC JC JC JC JC JC JC JC JC JC JC JC JC JC JC JC JC JC JC JC JC JC JC JC JC JC J JC JC JC JC JC JC JC JC JC JC JC JC JC JC JC JC JC JC JC JC JC JC JC JC JC JC JC JC JC JC JC JC JC JC JC JC JC JC JC JC JC JC JC JC JC JC JC JC JC J JC JC JC JC JC JC JC JC JC JC JC JC JC JC JC JC JC JC JC JC JC JC JC JC JC JC JC JC JC JC JC JC JC JC JC JC JC JC JC JC JC JC JC JC JC JC JC JC JC JB JC JC JC JC JC JC JC JC JC JC JC JC JC JC JC JC JC JC JC JC JC JC JC JC JC JC JC JC JC JC JC JC JC JC JC JC JC JC JC JC JC JC JC JC JC JC JC JC JC JB JC JC JC JC JC JC JC JC JC JC JC JC JC JC JC JC JC JC JC JC JC JC JC JC JC JC JC JC JC JC JC JC JC JC JC JC JC JC JC JC JC JC JC JC JC JC JC JC JC JC JC JC JC JC JC JC JC JC JC JC JC JC JC JC JC JC JC JC JC JC JC JC JC JC JC JC JC JC JC JC JC JC JC JC JC JC JC JC JC JC JC JC JC JC JC JC JC JC JC J JC JC JC JC JC JC JC JC JC JC JC JC JC JC JC JC JC JC JC JC JC JC JC JC JC JC JC JC JC JC JC JC JC JC JC JC JC JC JC JC JC JC JC JC JC JC JC JC JC |
早,自
UcTaHOBka aKKymyIaTOPOB. 139
PpNkpePenneKΦoTOKaMepe ... 139
BkIIOUeHHe BCbIiKn. 139
CbeMka 140
Pekim BCbIuKn 141
Функции KHONOK. 142
HactroKbcepnoBodHoro UnpaBHeNnBCbIuKo. 143
Pa3meueHne 6ecnpoBOnhix BCblwek. 143
OnpeeneHne yrgna ocBeeHnra .... 144
IcnoB3ObaHne ⅢnpokoyrobnHn IaHei 144
IcnoJIb3OBAHne paHeNn DnA co3dHaHs 6JInKOB 144
Dpyrhe nactpokn 144
Ponb3OBaTeJIbckne HacTpoIkn ...145
ΦOTOKaMepa C ΦyHKUaMn CBra3N 146
Pekm BeDOMO BcNbIuKn 147
Ppeoctopoxhoctn npn nCnoJIb3OBAHm 147
TexHnueckne xapaKTepeNCTnKnI....148
HΦopMaçnIДЯBaшeй6e3OnaCHOCTN
IPDEIOCTEPEXEHNE!
PekomeHnyeTcNcNoJIb3OBAbAkkymyIaTObpI npOn3BOdCTBa Panasonic.
YctaHOBka aKKymyIaTOPOB
Ncnpb3yTeIeOnOpHbIe cyXne AkkymnyTOpblnI npere3apxKaembIe HKeKb-MetanIIrnnDnBHe AkkymNyTOpbl.
1 TTo6bl OTKpbItb KpbIiKy OTcKa dIaKKyMyJrTOPOB, CdBnHbTe ee B CTOPOHy.
2 BCTaBbTe aKKymyIaTOpbl,Co6JIIOda npabnIbHyIO NOJIaRPhOcTB [+] / [-]
3 3aKpOTe KpbIshky OToCeka IJnAkkymyTOpOB, NlnotHO 3aDbHHyB ee Ha3ad Do yNopa. PnIKpePJIeHne K foToKampe
YbTeB,TO FOToKAMepa N BCblska BBykHIOHeHbl. EcN BcbluKa
PmKpEnIeTcR ININ CHIMaTeC, KOrDa BCblska INn FOToKAMepa BKHOHeHa,3TO
MOxET PInBECTn K HcNpPaBHOCHTn.
1 CbBnHbTe 6IoknpyUoHm pblYaXoK B HApBaJIeHmN, npOTbONJOnXHom yka3AHOMy Ha3NaYe [LOCK ] (①).
2ПLOTHOBCTABBTe BCNbIshkyB KONOJkIpynHaDnEhKHOte, CdBnrae ee do ueJIyka (②)
3 CbBnHbTe 6JIOKnpUoI npbIaXOK B noJoxKeHne [LOCK ] (③).
- ΦTO6bI CHBt BcBnIky, CdbHbTe 6bOKpyOuIy BbIaXoK B HApabJIeHN, npTOBnONOpONKmUykaAHHOMy CTpeKNoI [LOCK], N bblte BCbTIkuN3 KOJNOkDN pINHADJIEXHXOCTei.
BkJIouYeHne BCnbIiSKN
PnPKeNTe BCbIbIky K fOToKampe, a 3aTeM BkJIIOHTe fOToKamepy.

① INДикаТор [AUTO CHECK]
② INHdikaTop [TEST/CHARGE]
③Панелыуnpавления
④ KhoNka[ON/OFF]
HaxmTe KhoNky [ON/OFF].
BkIIOUHTcA DnCJIe naneJynpabHeHna.
- UTo6bI BvIKJIOHHTB BCNbIiKy, eUe pa3 HaxMnTe KhoNkY [ON/OFF].
CMeHNTe AKKyMnyTOpbI,ecnIN HnDnKaTOp [TEST/CHARGE] He 3aropaetc cnCTy:
| 30 sekyн(d) (шточные сухиakумларotbl) |
| 10 sekynd (népeзаряжемынкель-металл-гигridиныakумларotbl) |
- Ecnn INdinkaTop [TEST/CHARGE] n INdinkaTop [AUTO CHECK] mraioT oNDOBpeMeHNO, y AkkymyIaTOPOB Hn3kn 3apRd. CmEHnTe AkkymyIaTOpbl. Icnonb3ObaHne CnblHo pa3prJxehHoro AkkymyIaTopa MoKET npINBeCTN K HeINCPaBHOCTNo.
KazdiB p3n npeXeOe FOtOKaMepb B Pekm CHa BCbluHa TAKKepeXoDMB Pekm CHa. - EcIN B TeyEHNE pN6N3IeTNbHO 60 CekyHd He BblONHReTcH NkAKHX Opeaun, BCbnlka ABTomAtueckn BblKIOuAeTc. YTo6bI CHOBA BKNIOHTb BCbnlkuH, haxMITE KhONky [ON/OFF].
B. Vo Bpema 3aqrkAn MIOKMOE TcbluaTbCdOxkaui 3Byk, HO 3TO HE ABNIEETPnIshAKOB HEnCNPABHCTOn.
CbeMka
① PeXIM BCnbIbIKN
② Yoron ocBeueHnnaOTo6paKaAeTc corNachoФokyChMypacCToHnIO o6bEktBa.
③ INHДиKaTOp [AUTO CHECK]
④ Pa6ochn dnaana3OH OcBeuneHn
1 TTo6bI Bb6paTb peKIM BCnbluKn, nCNoJIb3yIte 3JemeHTbl ynpabLeHna fOtoKaMepebl.
Iopno6HyIO IHΦopMaζuio CM. B INHCTpyKζuio NO 3Kcπyatauio ΦOTOKaMepbl.
2 BbIbepepeXIM BCnbIuKn.
"Pekim BCnblkM" (P141)
PyuHoi pexm (MANUAL)
Bb6op BeyuJero Yncna.
1 YctaHOBnte peXm BcIbIiKn Ha [MANUAL].
"PexkIM BCnblIshKn"(P141)
2 YCTaHOBtne NOnOKeHHe yBEnuYeHnB COOTBeTcTBn CΦOKyChbIM paCtOHaHm O6BJeKtNbA.
[ZOOM]" (P142)
3 YctaHOBnte BeDyUee HcNo.
BCbnlka YnpaBnEETcNtAHTAUHNO H cpa6aTbIbAet CnHXPOHO CO cpa6aTbAHiemE DpyrIN BCbnIleK.
1 UctaHOBnte peKIM BCnbIshKn Ha [SL AUTO] nnn [SL MANUAL].
"Pekm BCnbIuKn" (P141)
BbIOnHnTe AApYNe HAcTpoIK BcNbIuKc CornaCHO pEXHMY [AUTO] uIN [MANUAL].
"ΦOTOKaMepa C ΦyHKUЯMn CBa3n"(P146)
2 BbIbepe paCNOJIOXeHne BCnbluKn.
Cnoc6b pacnoJokHeB BcbluKn TaKo JKe, KaN dIa 6beCnpOboDnOr opeKIma.
"Pa3meueHne 6ecnpoBOndbIX BCbIweK" (P143)
3aBaTaXeHHaKymyIToPiB.....155
PpneDnHaHHNo foToKamepn ....155
BbIMKHeHHcnaJaxy 155
3HOMka 156
Pexim cnajaxy 157
Функii KHOПОК. 158
HanaaTyBaHHa 6e3dpoToboro cnanaxy. 159
Po3a7uBaHn86e3dpoTOBnx cnapanixi. 159
KopekciKaTa BnPOMiHOBaHHa 160
KopncTyBaHnHaIIpOKoKYTHOIO nAHeJIIO 160
KopncTyBaHnB BiDmbaHem. 160
Inui HanaaTbyBaHHra 160
IIndBidiyaJIbHiHaJIaHTyBaHnHa....161
Kamepa 6e3Функци 3B'Я3ky ...162
Pexim Slave 163
3anobixhni 3axoNi 10do BnKOpncTaHH 163
TexhihixapakTepecnTkn. 164
InΦopMaζίŋДЯВaωοῖБεπeκη
YBATAI!
ДязANOбiraHн NOXKeJi,уражehн eNEKtpnHm cTpyMOM YI noшкджehн Виpo6y:
He BCTaHOBNIIOte I he PO3MIuYIe CEi npICTePI y o6MeXeHOMy npocToPi: Na KHNKIOBx NOnIauX, B6yDobAHnx WaΦaTx Ta IH. PepeKoHaIeTcε, Io npICTeP DOpBe BEHTNIIIOCTcSry.
YBAGA
IHTeHCNBHOCTi Cnajaxy
b () : Khonka [MODE]
c () : KhoNka cBitIIOiOHO
OCBITJIeHHJ
d () : KhoNka [ZOOM]
Panaelb kepyBaHHa
1PEKmFP-CINXHPOH3auii
② Pěkúm cnaJaxy
③ Повідіне Ус\'но (GN)
[4]PeryiIOBAAHnI INTECHNBOHOCTI cnansy
⑤ 3haueHHHaHbJIKeHHa
(6) FOUR THIRDS
⑦ KEMK HABJIKNKEHNN
C8TlIOADJeOCBITNEHH
⑨ CaiTNOHTYTNIBCTb ISO
10 Tpyna RCpexmy
⑪Дiαφρarma(F)
12 KaHai RCpeXIMy
13Полереджени npo harpiv
10Ondnui BiDCTaHi
Бeзперевна зйомka
IicnKilbKoX nocnIOOBHnxCpauOBAHb CnlaJX MoKe CnIbHo HarpITNC, 10 npin3beDe do noKoDKeHNHa ABO HeCnpaBHOcti. CnanaXOM MOnKa KopNCTyBaTNC HE bIleBe 10paBt NocnIb 3 iHTepBaON 2,5 cekyHdi, nicr Yoro Heo6xIdo DaTI Myo OxOnOHyn BnpoDObKn 10 xBNHIn.
Пидrostовka akymулаяtopа (noctaçaçъся okpemo)
ObepiB 3 akymyIaTOpIb, HabeJeHx HnKHe:
- LR6/AA Пухни сухи батуг (4 wт.)
HR6/AA Hikei-MetanriDpiNdi akymyIaTOpN (Ni-MH) (4 wt.)
R6/AA Maprahuebi cyxi 6atapei BnKOpncTOBvBaTu He MoXHa.
PekomeHnyeTbcra KOpntyBaTncra akymyIaTopamn BInpO6HnUcTba Panasonic.
3aBaHTaXeHHaKymyIaTopiB
BukopncTobyTe lyxhi cyxi batapei a6o HikeIbMetanirdpndni akymnyTopn.
1 3cyhble Kpnuky akymyIaTOpHOro BiDciKy, uOb BiDkPnTu II.
2 BCTaBTe 6aTapei,doTpmyuocnb noJrphocti [+] / [-]
3 3aKpInTe aKyMylTOpHn BiDcIK, MaKcImaIbHo 3aUnHNBuN KpUShy.
PnEHaHnI OΦOTokMepn
IpekoahTeec, 10 foTOkamepn I cnaJax BmKHeH. JkIo nIac npEHaHn CnJax abo foTOkamepa BBIMKHeH, 1e MoKe cnpuHHIn HeCpabHicTb.
1 3cynbTe pikcatOp y 6ik, npOTnIeKHH Bka3aHOMy 3HaYKOM [LOCK ] (①).
2 BCTaBTe cPanax y nOcaKOBe micue do nobHOi fikcaii (②).
3 3aunHItb φikcatop, 3cyHyBm noIy noIoxeHn [LOCK ] (③).
3nTn cnaJax, 3cyHbTe xfKcTOp y 6ik, npToIeKHN BkA3aHOMy CtrpiIKoHa 3NaKy [LOCK▶], iBmMItb cnaJax 3 nocakOBoro Micu.
BbIMKHeHn cnaJaxy
PnueHaHte cnaJax do FOtOKaMepn i BBIMKHiTb.
① INДикaТоР [AUTO CHECK]
② IzhinkaTop [TEST/CHARGE]
③Панель керваимя
④ Khonka[ON/OFF]
HaTnCHiTB KhONKy [ON/OFF].
BbIMKHeTbcEkapaHaHeniKepyBaHHa.
-ДиВИМКнЕнHAcIaMyHaTnCiHtB3HOByHaKhoNkY[ON/OFF].
- HacTab yac 3amini n6baTapei, kkuo iHnKatop [TEST/CHARGE] He cbiitbcBnpoIDOBX:
| 30 sekyнд (nyжни cyxi δатAPEI) |
| 10 sekyнд (нікель-металгідридни akуmunларόри) |
-Якшо оданчобимаоть иднкатори [TEST/CHARGE] ta [AUTO CHECK], akymлароть сддZipадут. Виить бате!. Виорпстанна майжбинхенхь сатер моче срсн�нгн'tи Несрпавись.
- Ykso Kaempa nepei de do pexmy Chy, cnaan BHHnTb TAK caMO.
-Яков Второв Зпmidtун 60xbintin He bKohybatn HiaKmДiIN, cnaJax abTOMaTHO BmKHeTcR.Для NOBTOHOro BMKAHHa HauKOnky [ON/ OFF].
-Пизэрдсаллaxy може 6уTN uHTHO Bi6pyHOn 3ByK -ц He e 03HaKoH HecnpabHocti.
3иOMka
① Pekim cnaJaxy
② KyTocBITnHnBiDnOBiDae pokcni DobxHi 06'ekTnBa.
③ Izhikatop [AUTO CHECK]
④ Pobouydiana30n Cbitla
1 Bn6epitb Ha kamepi pexm cnaiaxy.
3a 6iIbI dtaiJIbHOIO iHΦopMaizEIO 3BepTaI TeCb do IHCTpyKUii 3 ekCnnyatauii foTOkAmepn.
2 BnbepiB peXm cnaJaxy.
"Pekim cpanaxy" (P157)
Kamepa ta cnaiax o6miHOTbc cnHXponi3auiHOIO IHOpMaueio I ha naHeniynpabnHHBVCBITb8pcobouy diaian3OH cbitna.
3 HaTnCiHtB KhONky 3aTBopa HanoNoBuHy.
-Дианазон саллaxy 3anexkntb BID hanaWtYbaHb kamepN (CBITIOuyTINBicTB ISO,ДiaФрма,фokycha DOBxMHa O6'KTnBa).
4ДлЯЗИOMКиСЛДМakcIMaJIbHObHaTnCHyTu Na KhoNky 3aTBOPY.
PnpiBnnpomHcBtIO HanexHoI ekCNo3uI, JaKIo IHnKaTOp [AUTO CHECK] 6bnmae npn6n3HO BnpoDobX 5 cekyHd.
- Пи ВИКОПИСТАНHI спалaxy ИOrO CBiTny може пepeшКoДжати Корпсу 6'ЕТИВа, 6БЕнда тош.
- Wipokokutyha naheIb 3aTocobyetbcy dIy 3anO6irahnI nepeekcn03uII ha BiDCTahi MeHse 1 M (P160).
PexnCnajaxy Obnpaetbcra BiNobiHNO do o6'ekTy ta yMOB 3iOMKn.
1 HaTnchItb KhoNky [MODE] (▲).
2 Nobephitb nck, 06b o6paTn pexm cnaJaxy.
BnbpatnpoBipHe nCNo.
1 YctaHOBntn pexm cnaaxy [MANUAL].
"Pexn m cnaaxy" (P157)
2Пивецп похжнг Habихewsнгу y BiinobiHictb Фokychi BiDctahi 6'ekTnBa.
["ZOOM"] (P158)
3 3aata npoBIDne YncIIO.
"InuiHaJauTbAHn" (P160)
Pexim Slave
Cnapanax Moze KepyBaTncBiDlaNeHO, CnHxPoHizyUOCh 3 6yDb-jaKIM CnapanaxOM, IIO KepyETbcr iHsMMn pnpCTpOMN.
1 YctahOBITb pexn m cnaIaxy [SL AUTO] a6o [SL MANUAL].
"Pekim cpanaxy" (P157)
HanauTyIe iHi hanauTyBaHHa cnlaaxy nD peXIM [AUTO] afo [MANUAL].
"Kamepa 6e3 fynkci 38'3ky" (P162)
2 Po3aTyIe cnaJax.
Metodpo3tauybaHnna Cnapanaxy Toi camn, 0o y 6e3dpOTOBOMpyekmii
"Po3TaUyBaHnH 6e3dpoTObuX cnaJaxiB" (P159)
IeTanbHlue np03Hy po3aUyBaHHc cnaAnx yINB. B IHCTpyKuii 3 ekCnnyatau KaMepn.
- PekHM cnaanya Kamepr cnid yctahOBHTyNHMM, nii daq akoro he BiDybaertcbn nonepedhBorho cnaanya.
JaKIOKaMepa oPoBntb nonepedHn Cnanax, 3OBHIuHn Cnanax CnHXPOHiYcTbCa 3nOpePdHm Cnanaxom KaMepa I He DaCTb HaneXHO OCBITNeHH.
CnanaX MoKe cnpaBobyBaTn y BiNobiNb Ha cnajaXn iHxNΦOTorpaΦiB.

3an06ixhi 3axoOnI zOdo BnKOpncTaHHa
Bidomocti npo npnctriin
He nepenocitb npnctpi, konn noro Bce ue BctaHOHa Kopnyci kamepn.
Ipo akymyIaTOpI
O6OB'3KOBO BnMItb 6aTapei, kKIO Bn He 6yDte BnKOpNCTOBvBaTH npICTpi npotraom TpBaNoro Yacy.
Texhichi xapaKTepeNCTnKn
TexhiXapaKTePncTnMoKyTb 3mHIOBaTuc8e3 nonepedhboTO NOBIDOMJIeHHJ.
BnMOr nO XnVBneHHIO: 6,0 B noctiHoro cTpyMy
Pursuant to at the directive 2004/108/EC, article 9(2)
Panasonic Testing Centre
Panasonic Marketing Europe GmbH
Winsberging 15, 22525 Hamburg, Germany
- Operating Instructions FLASH
- Contents
- Information for Your Safety
- IMPORTANT SAFETY INSTRUCTIONS
- SAVE THESE INSTRUCTIONS
- CAUTION
- THE FOLLOWING APPLIES ONLY IN THE U.S.A.
- FCC Note:
- -If you see this symbol
- Information on Disposal for Users of Waste Electrical & Electronic Equipment (private households)
- For business users in the European Union
- Information on Disposal in other Countries outside the European Union
- Precautions
- Handling the unit
- Supplied Accessories
- [Inspection to be performed when you unpack the unit]
- Control Panel
- Continuous Firing
- Preparing a Battery (optional)
- R6/AA Manganese dry batteries cannot be used.
- Loading Batteries
- Attaching to the Camera
- Turning on the Flash
- Press the [ON/OFF] button.
- Shooting
- Press the [MODE] (▲) button.
- Rotate the dial to select a flash mode.
- Press the [OK] button.
- Wireless Flash Settings
- Set the camera to wireless mode.
- Set the flash to [RC] mode.
- Use the flash to select the channel and group.
- Placing Wireless Flash Units
- Attach the supplied stand.
- Position the flash with the wireless sensor (A) facing the camera.
- Fixing the Irradiation Angle
- Using the Wide Panel
- Slide out the wide panel and place it on the flash head.
- Using the Catch Light Plate
- Slide out the catch light plate.
- Other Settings
- Custom Settings
- ■ Returning the custom settings to the default setting
- Camera without Communication Functions
- AUTO
- Set the flash mode to [AUTO].
- Match the zoom position to the focal length of the lens.
- Adjust aperture and ISO sensitivity.
- MANUAL
- Slave Mode
- Cautions for Use
- About the unit
- About the batteries
- Specifications
- Limited Warranty
- (ONLY FOR U.S.A. AND PUERTO RICO)
- Panasonic Products Limited Warranty
- Limited Warranty Coverage (For USA and Puerto Rico Only)
- Mail-In Service
- Online Repair Request
- Limited Warranty Limits And Exclusions
- THERE ARE NO EXPRESS WARRANTY EXCEPT AS LISTED UNDER "LIMITED WARRANTY COVERAGE".
- ALL EXPRESS AND IMPLIED WARRANTY, INCLUDING THE WARRANTY OF MERCHANTABILITY, ARE LIMITED TO THE PERIOD OF THE LIMITED WARRANTY.
- Customer Services Directory (United States and Puerto Rico)
- Accessory Purchases (United States and Puerto Rico)
- Panasonic Canada Inc.
- PANASONIC PRODUCT - LIMITED WARRANTY
- LIMITATIONS AND EXCLUSIONS
- WARRANTY SERVICE
- PRODUIT PANASONIC - GARANTIE LIMITÉE
- LO SIGUIENTE SOLO INTERESA A CANADA.
- HΦopMaçnIДЯBaшeй6e3OnaCHOCTN
- YctaHOBka aKKymyIaTOPOB
- BkJIouYeHne BCnbIiSKN
- HaxmTe KhoNky [ON/OFF].
- CbeMka
- TTo6bI Bb6paTb peKIM BCnbluKn, nCNoJIb3yIte 3JemeHTbl ynpabLeHna fOtoKaMepebl.
- BbIbepepeXIM BCnbIuKn.
- PyuHoi pexm (MANUAL)
- InΦopMaζίŋДЯВaωοῖБεπeκη
- YBATAI!
- YBAGA
- Panaelb kepyBaHHa
- Бeзперевна зйомka
- Пидrostовka akymулаяtopа (noctaçaçъся okpemo)
- 3aBaHTaXeHHaKymyIaTopiB
- PnEHaHnI OΦOTokMepn
- BbIMKHeHn cnaJaxy
- HaTnCHiTB KhONKy [ON/OFF].
- 3иOMka
- Bn6epitb Ha kamepi pexm cnaiaxy.
- BnbepiB peXm cnaJaxy.
- HaTnCiHtB KhONky 3aTBopa HanoNoBuHy.
- 4ДлЯЗИOMКиСЛДМakcIMaJIbHObHaTnCHyTu Na KhoNky 3aTBOPY.
- HaTnchItb KhoNky [MODE] (▲).
- Nobephitb nck, 06b o6paTn pexm cnaJaxy.
- Pexim Slave
- 3an06ixhi 3axoOnI zOdo BnKOpncTaHHa
- Texhichi xapaKTepeNCTnKn
Brand : PANASONIC
Model : LUMIX DMW-FL360LGK
Category : Photo Accessories