
B02100019HD2 - Computer console Tripp Lite - Free user manual and instructions
Find the device manual for free B02100019HD2 Tripp Lite in PDF.
User questions about B02100019HD2 Tripp Lite
0 question about this device. Answer the ones you know or ask your own.
Ask a new question about this device
Download the instructions for your Computer console in PDF format for free! Find your manual B02100019HD2 - Tripp Lite and take your electronic device back in hand. On this page are published all the documents necessary for the use of your device. B02100019HD2 by Tripp Lite.
USER MANUAL B02100019HD2 Tripp Lite
- AC Power Cord
- Owner's Manual
- Mounting Brackets
Features
- Rackmount console (LCD monitor, keyboard, touchpad) in an integrated 1U rackmountable housing
- Sleep mode when the monitor cover is closed
- Rackmountable in EIA-standard 19-inch rack (1U)
- Includes rackmount brackets
• Supports resolutions up to 1920 x 1080 - Includes a USB 2.0 pass-through port, which can be used to provide easy access to a USB port on a connected device (KVM switch or computer)
- Includes a DVI-I port for connecting to a DVI or VGA* server or KVM switch
*VGA server connection using the included DVI-to-VGA adapter
SAVE THESE INSTRUCTIONS
This manual contains important instructions that should be followed during the installation and operation of the rackmount console described in this manual. Read all instructions thoroughly before attempting to install or operate the rackmount console. Failure to comply will void the warranty and could damage the rackmount console or connected equipment.
WARNING:
Use of this equipment in life support applications where failure of this equipment can reasonably be expected to cause the failure of the life support equipment or to significantly affect its safety or effectiveness is not recommended.
PROTECT YOUR INVESTMENT!
Register your product for quicker service and ultimate peace of mind.
You could also win an ISOBAR6ULTRA surge protector—a \$100 value!
www.tripplite.com/warranty

text_image
TRIPP·LITE
Introduction
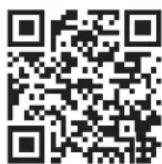
Front View
1 Handle: Pull to slide the module out; push to slide the module in.
2LCDMonitor: After sliding the module out, flip up the cover to access the LCD monitor, keyboard and touchpad.
3 Keyboard
4 RackmountingBrackets: The brackets secure the chassis to an EIA-standard 19-inch rack or rack enclosure.
52.-ButtonTouchpad:Press the left button to left-click; press the right button to right-click. Scroll up and down the screen by running finger up or down the far right side of the touchpad.
6 Console and LCD Controls: The controls located here include the console power On/Off button and the buttons used to control the position and picture setting of the LCD display.
7 Pass-Through USB Port: This port is inactive until a USB A male/male cable (Tripp Lite UR020-Series) is used to connect the pass-through port on the back of the console to a USB port on a computer or KVM switch. When active, a USB device connected to the front of the console will be available for use with the connected computer or KVM switch.
text_image
Technical diagram of a laptop chassis with numbered components for identificationRear View
1 Console Port Section: Connects the console to your server or KVM switch with the included KVM cable kit.
2 Power Socket: The AC power cord plugs in here.
3 Pass-Through USB Port: This port is connected to the pass-through USB port on the front of the console. The front pass-through port is active when a USB A male/male cable (Tripp Lite UR020-Series) is connected between the pass-through port on the back and a USB port on a KVM switch or server.

text_image
MACRAM/RCD01/2 2 3 1Rackmounting
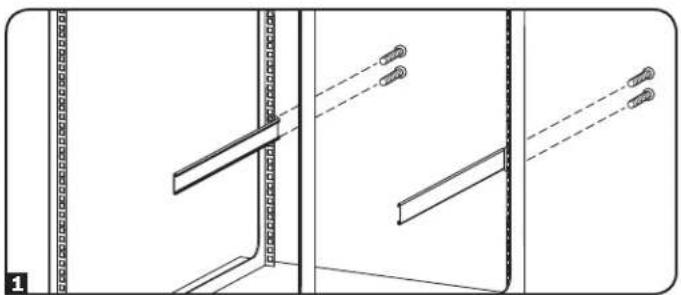
Tripp Lite's 1U Rackmount Console is designed for mounting in a 1U rack system. The various mounting options are explained in the sections that follow.
Standard 4-Post Rackmounting
The standard rackmounting brackets that come attached to the unit allow it to be installed in EIA-standard 1U racks by a single individual.
1 Slide out the rear mounting brackets from the console, and mount both brackets (separate from the console) to the inside rear of a 1U rack system using user-supplied screws.
2 Gently slide the console into the two rear-mounted brackets in the rack. Secure the console in place by inserting user-supplied screws.
2-Post Rackmounting
The console can also be mounted in a 2-post rack using the optional 2-Post Rackmount Kit (Tripp Lite model B019-000). The mounting hardware allows for the console to be opened with the drawer in any position. The kit provides added stability and prevents the console frame from twisting. See the B019-000 Owner's Manual for detailed mounting instructions.
natural_image
Technical line drawing of a door frame assembly with mounting brackets and diagonal braces (no text or symbols)
natural_image
Technical line drawing of a mechanical assembly with no visible text or symbolsInstallation
Refer to the installation diagrams below as you perform these steps.
Note: Make sure the power to the computer or KVM switch being connected to the console is powered off before proceeding with the installation.
1 Using the included cable kit, connect the DVI connector marked CONSOLE to the DVI port on the back of the console.
2 Connect the DVI connector marked SERVER to the DVI port on your server or KVM switch.
Note: If you are connecting to a computer with a VGA port, use the included DVI-I to VGA adapter. If your server or KVM switch uses a DVI-D port, you will need a DVI-I to DVI-D adapter such as Tripp Lite's P118-000 (sold separately). To connect to a server or KVM switch that uses an HDMI port, you will need a DVI to HDMI adapter, such as Tripp Lite's P132-000 (sold separately).
3 Connect the USB connector on the SERVER side of the included cable kit to a USB port on your server or KVM switch.
Note: Although KVM switches contain two USB console ports for keyboard and mouse, you can plug the cable kit's USB connector into either port.
4 Remove the USB covers from each of the pass-through USB ports. Connect the pass-through USB port on the back of the console to a USB port on a computer or KVM switch using a USB A male/male cable, such as Tripp Lite's UR020-Series. Connect a USB device to the pass-through USB port on the front of the console.
Note: The pass-through ports do not connect to the internal components in the console (keyboard, touchpad or console).
5 Connect the power cord to the socket on the back of the console, and then plug it into a Tripp Lite Surge Protector, Power Distribution Unit (PDU), or Uninterruptible Power Supply (UPS).
6 Power on the connected computer or KVM switch.
7 Turn on the LCD screen by pressing the On/Off button on the control panel of the built-in monitor.
Computer Installation
Note: The diagram below shows the connection of a computer with USB keyboard and mouse ports. To connect to a PS/2 computer, use a PS/2 to USB adapter such as Tripp Lite's ODT60002 (sold separately).

text_image
Computer Installation 4 1 2 3 5KVM Installation
Note: The diagram below shows the connection of a B042-016 KVM switch. The console ports of different model KVM switches may be located elsewhere on the unit.

text_image
KVM Installation 1 2 3 4 5Specifications
Function Specification
| Connectors | Console 1 x DVI-I female | |
| Cable Kit 1 x DVI-I male to 1 x DVI-I male, 1 x USB male | ||
| Power 1 x IEC-60320-C14 AC socket (100-240V~, 50/60Hz) | ||
| Comm. 1 x USB (Type A to Type A) | ||
| LCD Resolution 1920 x 1080; DDC2B | ||
| Environment | Operating Temperature: 32° to 104°F | |
| Storage Temperature: -13° to 140°F | ||
| Humidity: 20 - 90% RH Noncondensing | ||
| Housing Metal | ||
| Weight 27.78 lbs. | ||
| Dimensions (L x W x H) | 27.28 x 18.78 x 1.7 in. | |
Warranty and Product Registration
1-YEAR LIMITED WARRANTY
TRIPP LITE warrants its products to be free from defects in materials and workmanship for a period of one (1) year from the date of initial purchase. TRIPP LITE's obligation under this warranty is limited to repairing or replacing (at its sole option) any such defective products. To obtain service under this warranty, you must obtain a Returned Material Authorization (RMA) number from TRIPP LITE or an authorized TRIPP LITE service center. Products must be returned to TRIPP LITE or an authorized TRIPP LITE service center with transportation charges prepaid and must be accompanied by a brief description of the problem encountered and proof of date and place of purchase. This warranty does not apply to equipment which has been damaged by accident, negligence or misapplication or has been altered or modified in any way.
EXCEPT AS PROVIDED HEREIN, TRIPP LITE MAKES NO WARRANTIES, EXPRESS OR IMPLIED, INCLUDING WARRANTIES OF MERCHANTABILITY AND FITNESS FOR A PARTICULAR PURPOSE. Some states do not permit limitation or exclusion of implied warranties; therefore, the aforesaid limitation(s) or exclusion(s) may not apply to the purchaser.
EXCEPT AS PROVIDED ABOVE, IN NO EVENT WILL TRIPP LITE BE LIABLE FOR DIRECT, INDIRECT, SPECIAL, INCIDENTAL OR CONSEQUENTIAL DAMAGES ARISING OUT OF THE USE OF THIS PRODUCT, EVEN IF ADVISED OF THE POSSIBILITY OF SUCH DAMAGE. Specifically, TRIPP LITE is not liable for any costs, such as lost profits or revenue, loss of equipment, loss of use of equipment, loss of software, loss of data, costs of substitutes, claims by third parties, or otherwise.
Product Registration
Visit www.triplite.com/warranty today to register your new Tripp Lite product. You'll be automatically entered into a drawing for a chance to win a FREE Tripp Lite product! *
* No purchase necessary. Void where prohibited. Some restrictions apply. See website for details.
FCC Notice, Class A
This device complies with part 15 of the FCC Rules. Operation is subject to the following two conditions: (1) This device may not cause harmful interference, and (2) this device must accept any interference received, including interference that may cause undesired operation.
Note: This equipment has been tested and found to comply with the limits for a Class A digital device, pursuant to part 15 of the FCC Rules. These limits are designed to provide reasonable protection against harmful interference when the equipment is operated in a commercial environment. This equipment generates, uses, and can radiate radio frequency energy and, if not installed and used in accordance with the instruction manual, may cause harmful interference to radio communications. Operation of this equipment in a residential area is likely to cause harmful interference in which case the user will be required to correct the interference at his own expense. The user must use shielded cables and connectors with this equipment. Any changes or modifications to this equipment not expressly approved by Tripp Lite could void the user's authority to operate this equipment.
Regulatory Compliance Identification Numbers
For the purpose of regulatory compliance certifications and identification, your Tripp Lite product has been assigned a unique series number. The series number can be found on the product nameplate label, along with all required approval markings and information. When requesting compliance information for this product, always refer to the series number. The series number should not be confused with the marketing name or model number of the product.
WEEE Compliance Information for Tripp Lite Customers and Recyclers (European Union)

Under the Waste Electrical and Electronic Equipment (WEEE) Directive and implementing regulations, when customers buy new electrical and electronic equipment from Tripp Lite they are entitled to:
- Send old equipment for recycling on a one-for-one, like-for-like basis (this varies depending on the country)
- Send the new equipment back for recycling when this ultimately becomes waste
Tripp Lite follows a policy of continuous improvement. Product specifications are subject to change without notice.

text_image
TRIPP·LITE
1111 West 35th Street, Chicago, IL 60609 USA • www.tripplite.com/support
1111 West 35th Street, Chicago, IL 60609 USA • www.tripplite.com/support
text_image
Technical diagram of a laptop chassis with numbered components for identification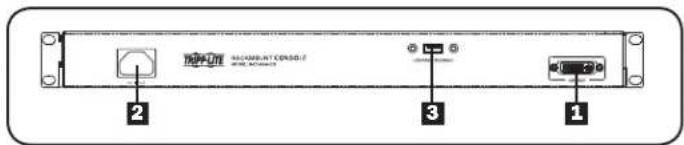
text_image
MACSAR-ATCOSO 2 3 1
natural_image
Technical line drawing of a door frame assembly with mounting brackets and diagonal braces (no text or symbols)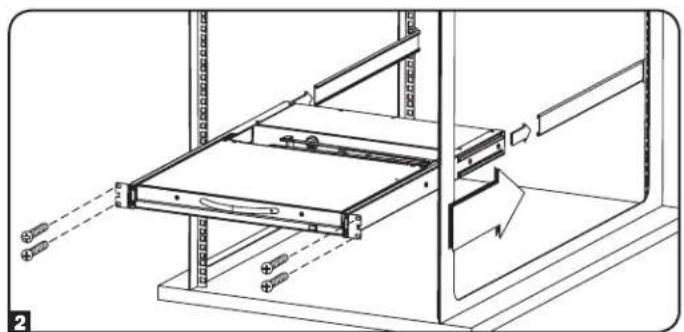
natural_image
Technical line drawing of a mechanical assembly with no visible text or symbolsInstalación
1111 West 35th Street, Chicago, IL 60609 USA • www.tripplite.com/support
1111 West 35th Street, Chicago, IL 60609 USA • www.tripplite.com/support
text_image
Technical diagram of a laptop chassis with numbered components for identification
text_image
MACSARNT CEROSO 2 3 1
natural_image
Technical line drawing of a door frame assembly with mounting brackets and structural details (no text or symbols)
natural_image
Technical line drawing of a mechanical assembly with no visible text or symbolsInstallation
1111 West 35th Street, Chicago, IL 60609 USA • www.tripplite.com/support
1111 W. 35th Street, Chicago, IL 60609 USA · www.tripplite.com/support
text_image
Technical diagram of a laptop chassis with numbered components for identification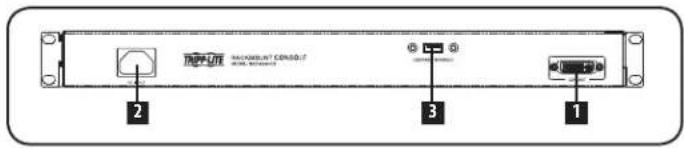
text_image
MACROWANT CENSOLIT RACE SYSTEMS 2 3 1
natural_image
Technical line drawing of a door frame assembly with mounting fixtures and structural details (no text or symbols)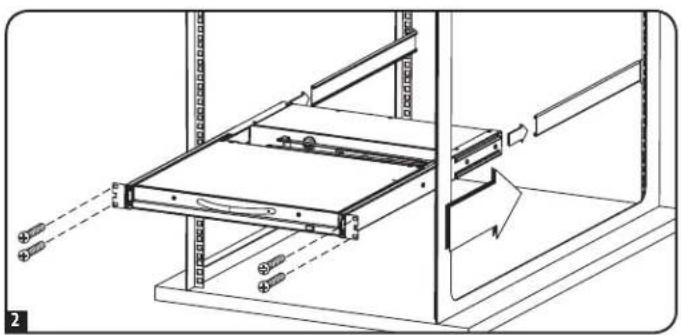
natural_image
Technical diagram of a server rack with mounting hardware and a directional arrow indicating movement (no text or symbols)Установка
1111 West 35th Street, Chicago, IL 60609 USA • www.tripplite.com/support