
VCH 9632 - Vacuum Cleaner GRUNDIG - Free user manual and instructions
Find the device manual for free VCH 9632 GRUNDIG in PDF.
| Product type | Rechargeable 2-in-1 stick vacuum |
| Brand | Grundig |
| Model | VCH 9632 |
| Rated motor power | 115 W |
| Operating voltage | 21.6 V DC |
| Battery type | Li-ion |
| Dust container capacity | 0.5 L |
| Filtration | Washable HEPA H10 filter |
| Included accessories | Turbo brush, dusting brush, furniture brush, charging station with storage compartment |
| Runtime | Variable by speed, up to 5 hours full charge |
| Charging time | Approximately 5 hours |
| Adapter input | 100-240 V ~ 50/60 Hz |
| Adapter output | 27 V / 500 mA |
| Rated power of turbo brush | 5 W |
| Usage mode | Vertical or hand vacuum (cordless) |
| Speed setting | 2 speeds (maximum and reduced) |
| LED indicators | Charge and power level |
| Maintenance | Container, HEPA filter and brush roll washable with water |
| Safety | Automatic shut-off on charger, child protection (8 years and up) |
| Recommended use | Domestic only, floors, furniture, curtains |
| Spare parts and repairability | Original Grundig accessories available; parts availability for at least 5 years |
Frequently Asked Questions - VCH 9632 GRUNDIG
User questions about VCH 9632 GRUNDIG
0 question about this device. Answer the ones you know or ask your own.
Ask a new question about this device
Download the instructions for your Vacuum Cleaner in PDF format for free! Find your manual VCH 9632 - GRUNDIG and take your electronic device back in hand. On this page are published all the documents necessary for the use of your device. VCH 9632 by GRUNDIG.
USER MANUAL VCH 9632 GRUNDIG
natural_image
Exterior view of a modern vacuum cleaner (no visible text or symbols)
natural_image
Abstract grayscale illustration of a curled paper corner (no text or symbols)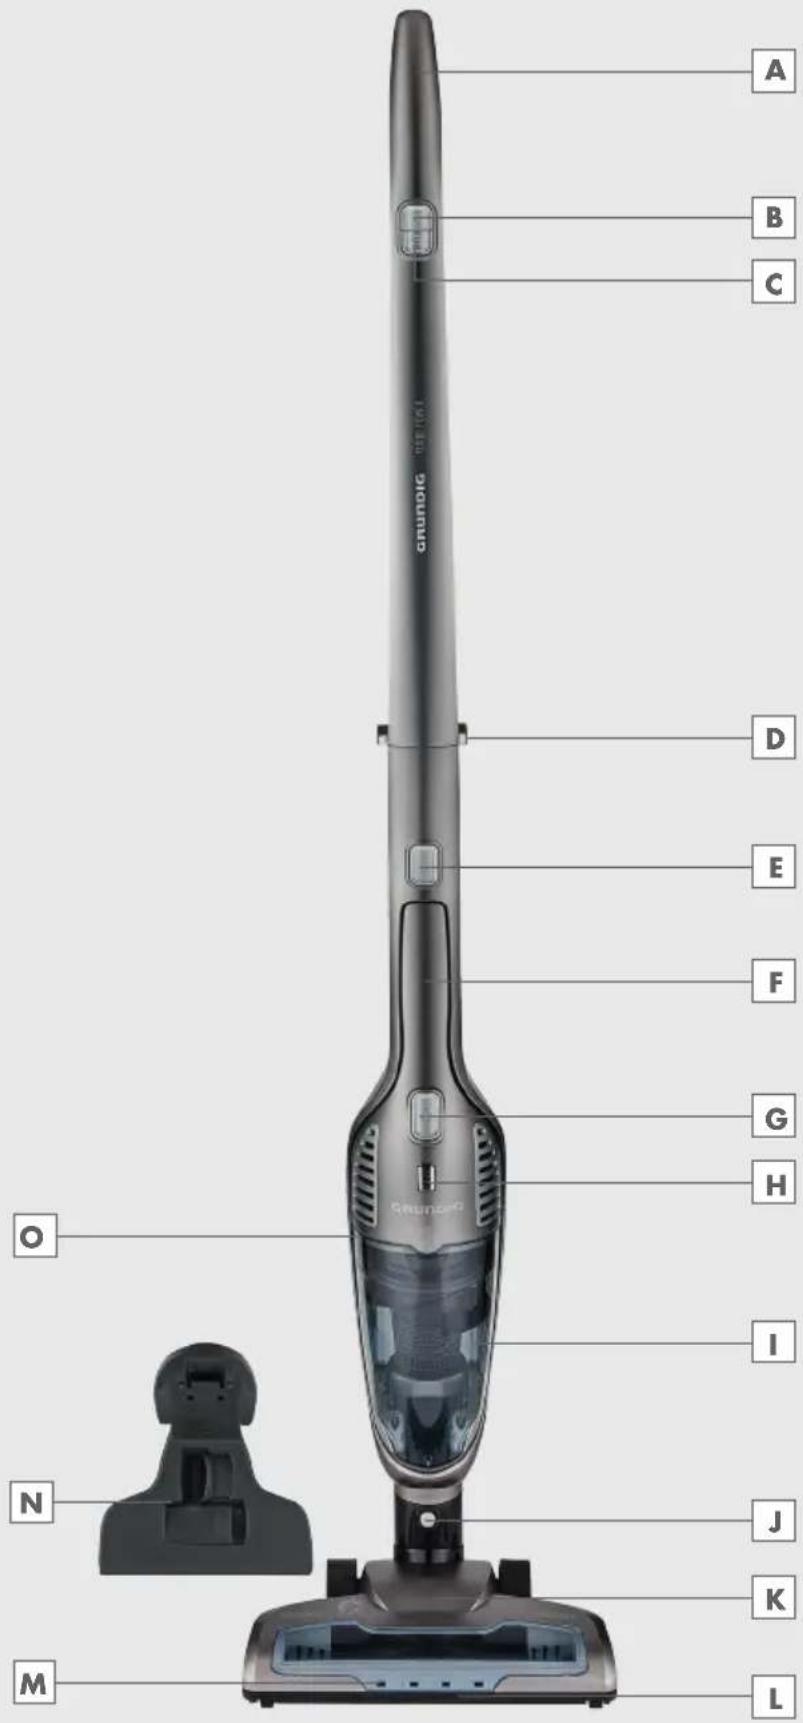
DEUTSCH 05 - 14
ENGLISH 15 - 23
TÜRKÇE 24-32
ESPAÑOL 33-42
FRANÇAIS 43-52
HRVATSKI 53-61
POLSKI 62-71
SVENSKA 72-80
NORSK 81-89
SUOMI 90-98
DANISH 99-108
natural_image
Technical line drawing of a vacuum cleaner with directional arrows indicating motion (no text or symbols)natural_image
Line drawing of a vacuum cleaner with a vertical arm and propeller, shown in profile view (no text or symbols)natural_image
Technical line drawing of a mechanical device with a downward arrow indicating assembly or motion (no text or symbols present)natural_image
Line drawing of a vacuum cleaner with attached cable and power outlet (no text or symbols)natural_image
Technical line drawing of a vacuum cleaner with directional arrow indicating motion (no text or symbols)natural_image
Technical line drawing of a handheld device with handle, ventilation slots, and a separate open lid (no text or symbols)natural_image
Technical line drawing of a mechanical component with concentric rings and internal gear-like structure (no text or symbols)natural_image
Technical line drawing of a mechanical component with cross-sectional view (no text or symbols)natural_image
Technical line drawing of a hand-operated device with internal components and directional arrows indicating assembly (no text or symbols)Turbobürste reinigen
natural_image
Line drawing of a robotic vacuum cleaner with directional arrow indicating motion (no text or symbols)Please read this instruction manual thoroughly prior to using this appliance! Follow all safety instructions in order to avoid damages due to improper use!
Keep the instruction manual for future reference. Should this appliance be given to a third party, then this instruction manual must also be handed over.
■ Always keep hair, clothing and any other utensils away from the appliance during operation in order to prevent injury and damages.
■ The appliance is designed for domestic use only. Warranty will be voided if the appliance is used for industrial or commercial purposes.
- Observe these instructions in order to prevent damage to the appliance or danger arising from improper use.
■ Do not use on wet surfaces and do not attempt to use on wet objects.
■ Do not use the appliance in wet surroundings.
■ Do not use the appliance with wet hands.
■ This appliance is designed for vacuuming dirt and dust particles. Do not attempt to use it on large objects which could block and damage the appliance.
■ Do not use to clean cigarette stubs, ash from a fireplace or matches. This could cause a fire.
■ This appliance is not designed for cleaning people or animals.
■ Do not insert any foreign objects into the suction intake. Always keep the suction intake free of all objects.
■ Never operate the appliance without the filter.
■ Clean the filter when necessary.
■ Only use original GRUNDIG accessories when replacing parts.
■ Check if the mains voltage on the rating label corresponds to your local mains supply.
■ Always pull out the power cord after the charging process, before cleaning or carrying out any maintenance on the appliance or the charging unit.
■ Avoid using extension cables or multipoint connectors. Plug the appliance directly in a wall socket if possible.
■ For additional protection, this appliance should be connected to a household residual current device with a maximum rating of 30 mA. Consult your electrician for advice.
■ Do not disconnect the plug by pulling on the cable.
■ Never use the appliance if it or the power cord is visibly damaged. This also applies if the appliance has accidentally become wet. Please contact a service centre in this case.
- Our GRUNDIG Household Appliances meet all applicable safety standards; thus if the appliance or the power cord is damaged, it must be replaced by the dealer, a service centre or a similarly qualified and authorised service person to avoid any danger arising. Faulty or unqualified repair work may cause danger and risk to the user.
- Keep the appliance away from children.
■ This appliance can be used by children aged from 8 years and above and persons with reduced physical, sensory or mental capabilities or lack of experience and knowledge if they have been given supervision or instruction concerning use of the appliance in a safe way and understand the hazards involved. Children shall not play with the appliance. Cleaning and user maintenance shall not be made by children without supervision.
- Do not dismantle the appliance under any circumstances. No warranty claims are accepted for damage resulting from improper handling.
■ Do not use the appliance if the air duct and the ventilation slot are blocked. Always keep the air duct and ventilation slot free of dirt, hair and any other elements which could obstruct or block the air flow.
■ Only use the power cord provided.
Dear Customer,
Congratulations on the purchase of your new GRUNDIG 2 in 1 rechargeable vertical vacuum cleaner VCH 9630-VCH 9631-VCH 9632.
Please read the following user notes carefully so that you can enjoy your quality Grundig product for many years to come.
A responsible approach!

GRUNDIG focuses on contractually agreed social working conditions with fair wages for both internal employees and suppliers, as well as on the efficient use of raw materials with continual
waste reduction of several tonnes of plastic each year – and availability of at least 5 years for all accessories.
For a future worth living. For a good reason. Grundig.
HEPA filter
HEPA stands for High Efficiency Particulate Air. HEPA filters are particulate air filters, which filter more than 99.9% of all dust particles larger than 0.1 to 0.3 micrometres out of the air. Viruses, respirable dusts, mite eggs and mite excrement, pollen, smoke particles, asbestos, bacteria, diverse toxic dusts and aerosols are removed from the air.
Extra accessories:
■ Washable HEPA H10 filter
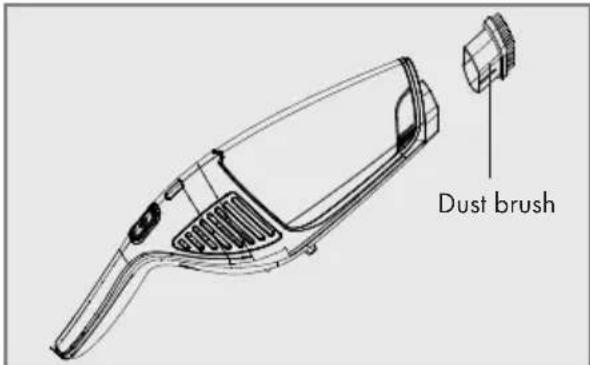
■ Dust brush suitable for the cleaning of curtains, and sensitive and fragile objects
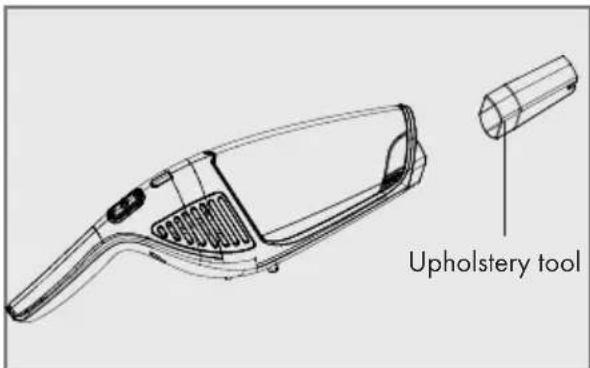
■ Upholstery tool for floors, stairs, cars, sofas and armchairs
■ Charging station with accessory compartment
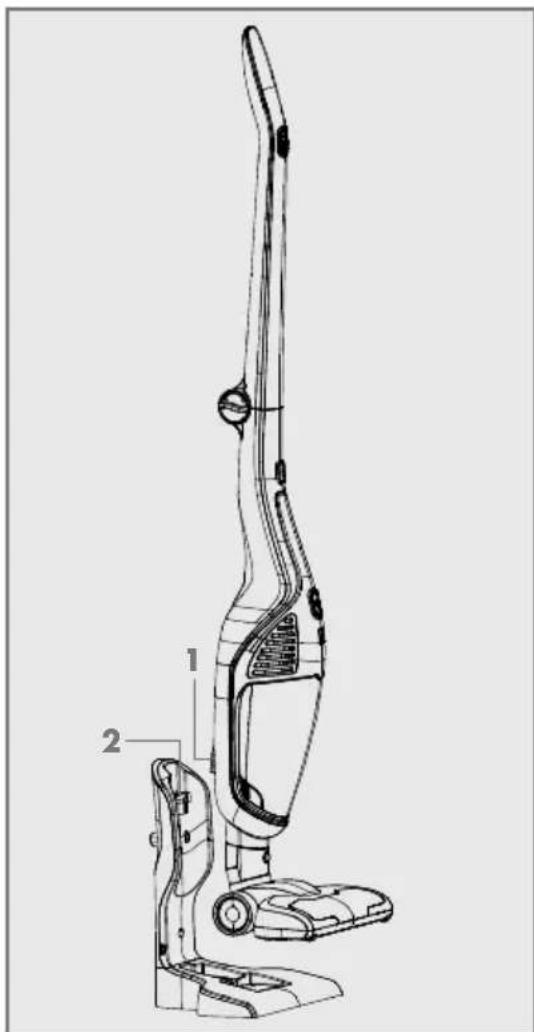
Controls parts
See image on page 3.
A Stick vacuum cleaner handle
B Stick vacuum cleaner on/off button
C Speed adjustment button
D Handle collapsing button
E Cordless vacuum cleaner removal button
F Cordless vacuum cleaner handle
G Cordless vacuum cleaner on/off button
H LED light and charging indicator
Dust container
J Turbo brush removal button
K Turbo brush
L Charging unit
Power indicator
N Accessory storage compartment
Dust container removal button
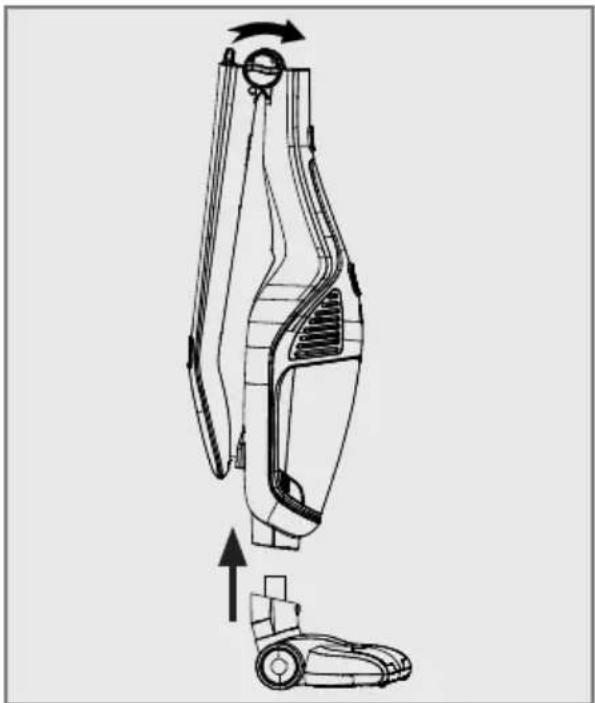
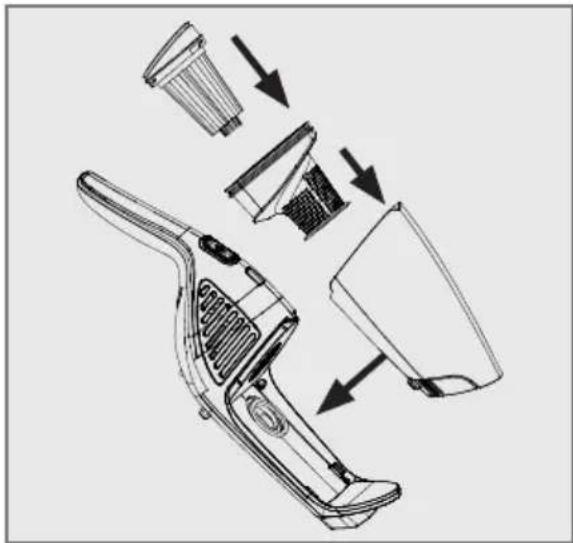
Installation of body and turbo brush
1 Install K Turbo brush on the body.
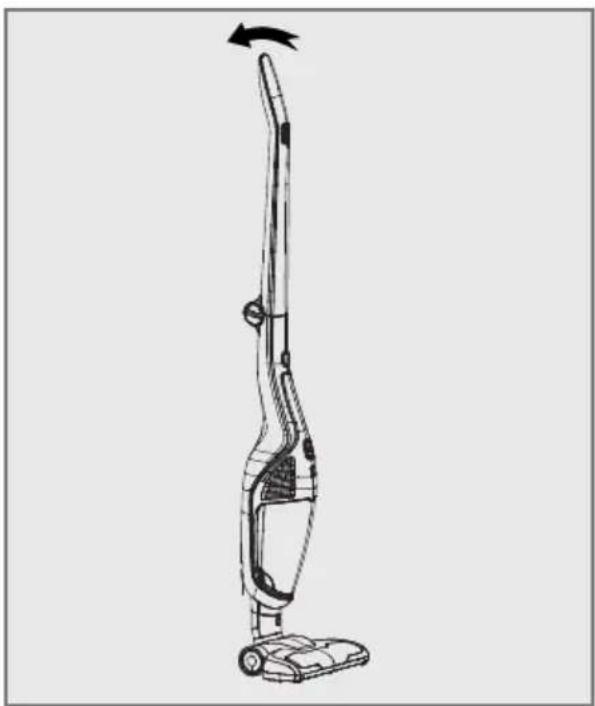
2 Lift the handle A towards the arrow direction.
natural_image
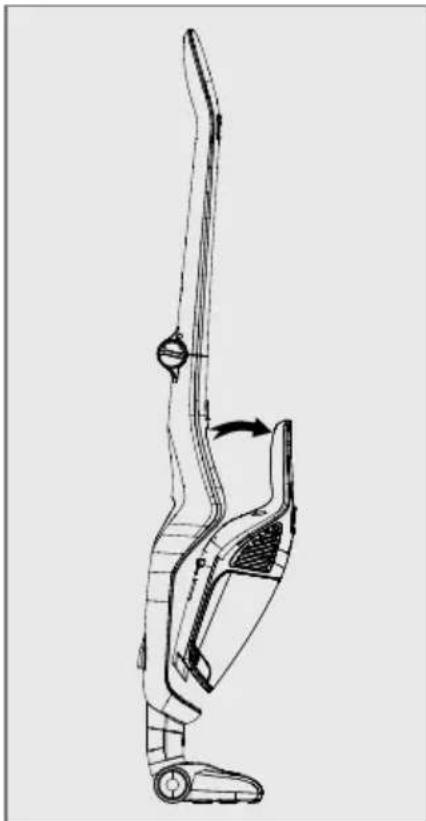
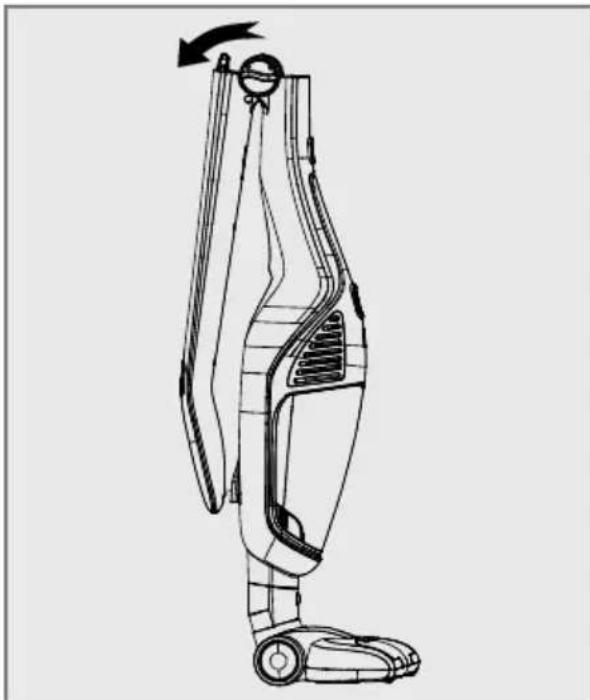
Technical line drawing of a robotic vacuum cleaner with directional arrows indicating motion (no text or symbols)3 In order to fold the handle A turn folding button D clockwise (in position) and fold the handle in the direction of the arrow.
natural_image
Line drawing of a vacuum cleaner with a vertical arm and propeller, shown in profile view (no text or symbols)Mounting the charging unit
1 Place the charger on charging stand.
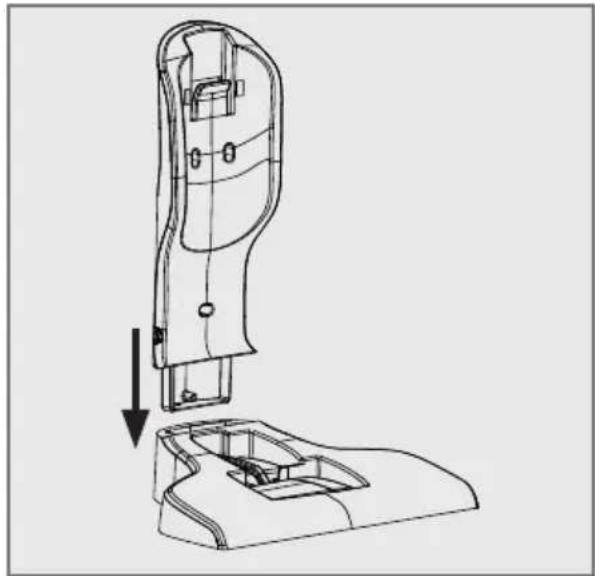
natural_image
Technical line drawing of a mechanical device with a downward arrow indicating assembly or motion (no text or symbols present)2 Use screws to fix the unit on the wall or place on a horizontal surface.
Charging the appliance
1 Insert the thin end of the adapter to the charger L and plug the adapter in.
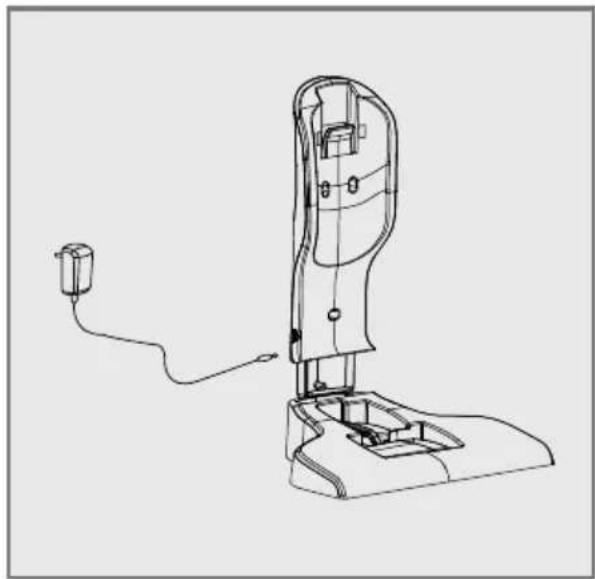
natural_image
Line drawing of a vacuum cleaner with attached cable and power outlet (no text or symbols)2 Place the appliance on the charger, socket on the body (1) must be fitted to the socket on the stand (2).

3 In the meantime, charging indicator LED H is lit and product starts charging; all charging indicators are lit when charging is over.
4 When you plug your appliance to charging unit L charging LED H on the product that is connected indicates successful connection.
- Blue charging indicator LED H means the appliance is charging.
- When all charging indicator LEDs H light blue, this means that charging is over.
Note
It takes up to 5 hours for the appliance to be fully charged.
Warning
■ Appliance cannot be run during the charging process.
Using your appliance
1 Press on/off button B to switch on your appliance.
2 When you press on/off button B, appliance will start at maximum speed. Press speed adjustment button C to use in low speed. When you press speed adjustment button again, the appliance will run at maximum speed again.
3 After using the appliance, switch it off by pressing the On/off button.
Note
- Check power indicator LEDs M during operation. As charging level decreases, these indicators will gradually go off and the appliance will stop working when all indicators are off.
■ Appliance will automatically stop if it is placed on charger while still in use.
Starting cordless vacuum cleaner
1 Press removal button E to remove the vacuum cleaner from the body.
natural_image
Technical line drawing of a vacuum cleaner with directional arrow indicating motion (no text or symbols)2 Press on/off button G of the cordless vacuum cleaner to switch on your appliance.
3 After using the appliance, switch it off by pressing the On/off button G of the cordless vacuum cleaner.
Accessories
Accessories of your appliance are in the storage compartment N of the charging unit.
You can use your accessories by inserting them to the end of your vacuum cleaner.
Dust brush
Suitable for cleaning the curtains, and sensitive and fragile objects.
Upholstery tool
Suitable for cleaning the floorings, stair steps, inside of the cars, sofas, armchairs etc.
Cleaning the dust container
Notes
It is recommended to clean the dust container ☐ after every use.
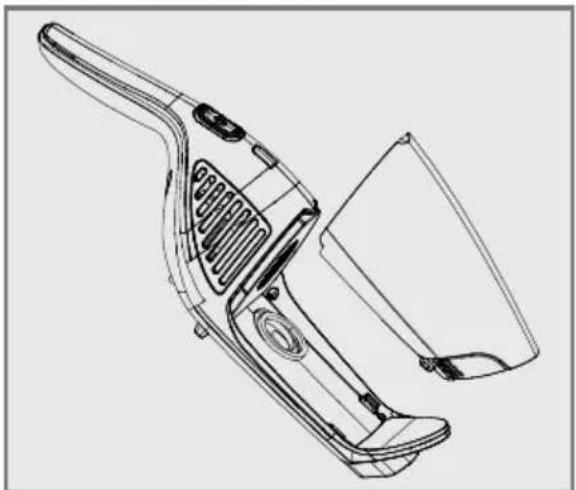
1 Press the dust container removal button ☐ to remove the dust container.
natural_image
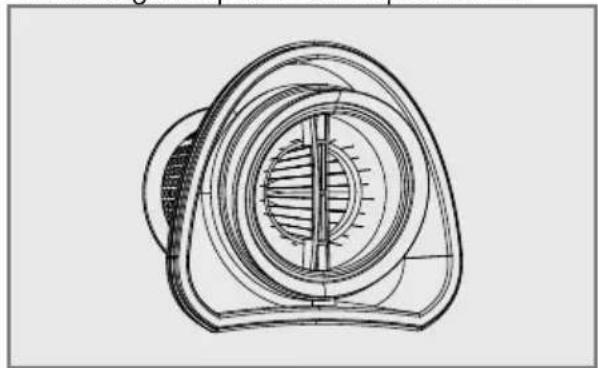
Technical line drawing of a handheld device with handle, ventilation slots, and a separate open lid (no text or symbols)2 Pull the filter from its holder by holding the handle and remove it from dust container 1.
natural_image
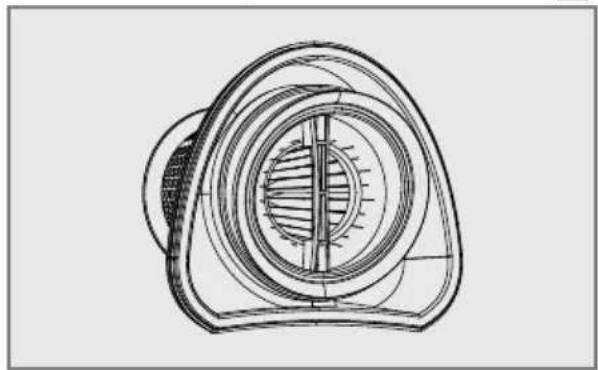
Technical line drawing of a mechanical component with concentric circular features and internal structure (no text or symbols)3 Remove the HEPA filter by grasping the handle of the filter holder and turning counterclockwise.

natural_image
Technical line drawing of a mechanical component with cross-sectional view (no text or symbols)4 Wash out the dust container, filter holder and HEPA filter under the running water.
5 Clean the body of the cordless vacuum cleaner with a soft damp cloth.
6 Replace the HEPA filter in its holder after all parts are dried and place filter holder in the dust container 1.
7 Replace the dust container in the body of cordless vacuum cleaner.
natural_image
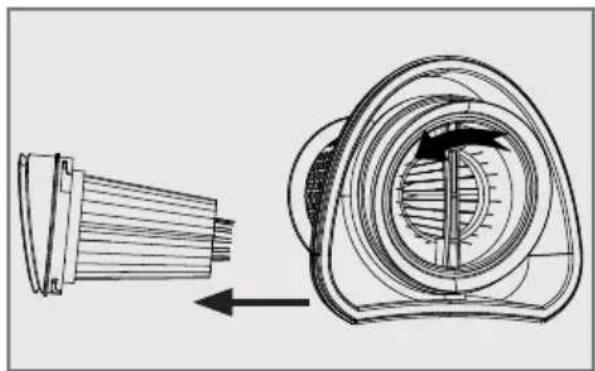
Technical line drawing of a hand-operated device with internal components and directional arrows indicating assembly (no text or symbols)Cleaning the turbo brush
1 Release the lock using the roll brush release tab to clean the turbo brush K as shown below and remove the roll brush.

2 After cleaning and drying the brush roll, reattach it and lock the tab.
Storage
Store the appliance in a vertical position or with its handle folded.
In order to fold the handle turn folding button D clockwise (in position) and fold the handle in the direction of the arrow.
natural_image
Line drawing of a robotic vacuum cleaner with directional arrow indicating motion (no text or symbols)Compliance with WEEE Directive and Disposing of the Waste Product

This product complies with EU WEEE Directive (2012/19/EU). This product bears a classification symbol for waste electrical and electronic equipment (WEEE). This product has been manufactured with high quality parts and materials which can be reused and are suitable for recycling. Do not dispose of the waste product with normal domestic and other wastes at the end of its service life. Take it to the collection center for the recycling of electrical and electronic equipment. Please consult your local authorities to learn about these collection centers.
Compliance with RoHS
Directive
The product you have purchased complies with EU RoHS Directive (2011/65/EU). It does not contain harmful and prohibited materials specified in the Directive.
Technical data
| Model VCH 9632 VCH 9631 VCH 9630 | |||
| Operating voltage DC 21.6V | DC 18V | DC 14.4V | |
| Nominal motor power | 115W | 105W | 95W |
| Adaptor input | 100-240V 50/60Hz | ||
| Adapter output | 27V 500mA | 22V 500mA | 18V 500mA |
| Protection class | II | ||
| Turbo brush nominal power | 5W | ||
| Batteries | Li-ion | ||
| Dust capacity | 0.5 L | ||
Technical and design modifications reserved!
Package information
Package of the product is made of recyclable materials in accordance with our National Legislation. Do not dispose of the packaging materials together with estic or other wastes. Take them to the ng material collection points designated cal authorities.
natural_image
Technical line drawing of a robotic vacuum cleaner with directional arrows indicating motion (no text or symbols)natural_image
Line drawing of a single vacuum cleaner with a left-hand rule, shown in profile view (no text or symbols)natural_image
Technical line drawing of a mechanical device with a downward arrow indicating assembly or disassembly (no text or symbols present)natural_image
Line drawing of a vacuum cleaner with attached cable, no text or symbols presentnatural_image
Technical line drawing of a vacuum cleaner with directional arrow indicating motion (no text or symbols)natural_image
Technical line drawing of a handheld device with handle, ventilation slots, and a separate handle (no text or symbols)natural_image
Technical line drawing of a mechanical component with concentric circular features and internal gear-like structure (no text or symbols)natural_image
Technical line drawing of a mechanical component with cross-sectional view showing internal structure (no text or symbols)natural_image
Technical line drawing of a hand-operated device with internal components and directional arrows indicating assembly (no text or symbols)natural_image
Line drawing of a robotic vacuum cleaner with directional arrow indicating motion (no text or symbols)natural_image
Technical line drawing of a vacuum cleaner with directional arrows indicating motion (no text or symbols)natural_image
Line drawing of a single vacuum cleaner with a left-hand rule and arrow indicating rotation (no text or symbols)natural_image
Technical line drawing of a mechanical device with a downward arrow indicating assembly or motion (no text or symbols present)natural_image
Line drawing of a vacuum cleaner with attached cable, no text or symbols presentPREPARACIÓN
natural_image
Technical line drawing of a vacuum cleaner with handle and blade assembly (no text or symbols)natural_image
Technical line drawing of a handheld device with handle, ventilation slots, and a separate panel (no text or symbols)natural_image
Technical line drawing of a mechanical component with concentric circular features and internal gear-like structure (no text or symbols)natural_image
Technical line drawing of a mechanical component with cross-sectional view (no text or symbols)natural_image
Technical line drawing of a hand-operated device with internal components and directional arrows indicating assembly (no text or symbols)natural_image
Line drawing of a robotic vacuum cleaner with directional arrow indicating motion (no text or symbols)natural_image
Technical line drawing of a robotic vacuum cleaner with directional arrows indicating motion (no text or symbols)natural_image
Line drawing of a vacuum cleaner with a vertical arm and propeller, shown in profile view (no text or symbols)natural_image
Technical line drawing of a mechanical device with a downward arrow indicating assembly or motion (no text or symbols present)natural_image
Line drawing of a vacuum cleaner with attached cable, no text or symbols presentnatural_image
Line drawing of a vacuum cleaner with directional arrow indicating motion (no text or symbols)natural_image
Technical line drawing of a handheld device with handle, ventilation slots, and a separate handle (no text or symbols)natural_image
Technical line drawing of a mechanical component with concentric rings and internal structure (no text or symbols)natural_image
Technical line drawing of a mechanical component before and after assembly (no text or symbols)natural_image
Technical line drawing of a hand-operated device with internal components and directional arrows indicating assembly (no text or symbols)Nettoyage de la brosse turbo
natural_image
Line drawing of a robotic vacuum cleaner with directional arrow indicating motion (no text or symbols)natural_image
Technical line drawing of a robotic vacuum cleaner with directional arrows indicating motion (no text or symbols)natural_image
Line drawing of a single vacuum cleaner with a left-hand rule, shown in profile view (no text or symbols)Montiranje punjača
1 Stavite punjač na stalak za punjenje.

natural_image
Technical line drawing of a mechanical device with a downward arrow indicating assembly or motion (no text or symbols present)2 Vijcima pričvrstite jedinicu na zid ili je stavite na vodoravnu površinu.
Punjenje uređaja
1 Umetnite kratki kraj adaptera u punjač L i uključite adapter u struju.

natural_image
Line drawing of a vacuum cleaner with attached cable, no text or symbols present2 Stavite uređaj na punjač. Utičnica na kućištu (1) mora biti postavljena na utičnicu na stalku (2).
3 U međuvremenu, LED indikator punjenja H svijetli i proizvod se počinje puniti. Svi indikatori punjenja svijetle kad je punjenje gotovo.
natural_image
Line drawing of a vacuum cleaner with directional arrows indicating motion (no text or symbols)natural_image
Technical line drawing of a handheld device with handle, ventilation slots, and a separate blade (no text or symbols)2 Povucite filtar s držača dok držite ručku i izvadite ga iz spremnika za prašinu 1.
natural_image
Technical line drawing of a mechanical component with concentric circular features and internal gear-like structure (no text or symbols)3 Izvadite HEPA filtar tako da primite ručku držača filtra i okrenete je u smjeru suprotnom od kazaljke na satu.
natural_image
Technical line drawing of a mechanical component with an arrow indicating direction (no text or symbols present)4 Isperite spremnik za prašinu 1, držač filtra i HEPA filtar tekućom vodom.
5 Očistite kućište bežičnog usisivača mekom vlažnom krpom.
6 Vratite HEPA filtar u držač nakon što se osuše svi dijelovi i stavite držač filtra u spremnik za prašinu I.
7 Vratite spremnik za prašinu u kućište bežičnog usisivača.

natural_image
Technical line drawing of a hand-operated device with internal components and directional arrows indicating assembly (no text or symbols)ČIŠĆENJE I ODRŽAVANJE
natural_image
Line drawing of a robotic vacuum cleaner with directional arrow indicating motion (no text or symbols)Usklađenost s Direktivom o električnom i elektroničkom opremom (WEEE) i zbrinjavanju otpada
Ovaj proizvod usklađen je s EU Direktivom WEEE (2012/19/EU). Ovaj proizvod nosi klasifikacijsku oznaku za električni i elektronski otpad (WEEE).
Ovaj je proizvod proizveden s visokokvalitetnim dijelovima i materijalima koji se mogu ponovno upotrijebiti i prikladni su za reciklažu. Ne odlăžite otpadne uređaje s normalnim otpadom iz kućanstva i drugim otpadom na kraju servisnog vijeka. Odnesite ga u sabirni centar za recikliranje električne i elektroničke opreme. Obratite se lokalnim vlastima da biste saznali više informacija o sabirnim centrima.
Tehnički podaci
Usklađenost s Direktivom o zabrani uporabe određenih opasnih tvari u električnoj i elektroničkoj opremi (RoHS)
natural_image
Technical line drawing of a vacuum cleaner with directional arrows indicating motion (no text or symbols)natural_image
Line drawing of a tall vacuum cleaner with a curved arrow indicating rotational motion (no text or symbols)natural_image
Technical line drawing of a mechanical device with a downward arrow indicating assembly or motion (no text or symbols present)natural_image
Line drawing of a vacuum cleaner with attached cable and power outlet (no text or symbols)natural_image
Line drawing of a vacuum cleaner with directional arrow indicating motion (no text or symbols)natural_image
Technical line drawing of a handheld device with handle, ventilation slots, and a separate panel (no text or symbols)natural_image
Technical line drawing of a mechanical component with concentric circular features and internal gear-like structure (no text or symbols)natural_image
Technical line drawing of a mechanical component with cross-sectional view (no text or symbols)natural_image
Technical line drawing of a hand-operated device with internal components and directional arrows indicating assembly (no text or symbols)natural_image
Line drawing of a robotic vacuum cleaner with directional arrow indicating motion (no text or symbols)natural_image
Technical line drawing of a robotic vacuum cleaner with directional arrows indicating motion (no text or symbols)natural_image
Line drawing of a vacuum cleaner with a vertical arm and propeller, shown in profile view (no text or symbols)natural_image
Technical line drawing of a mechanical device with a downward arrow indicating assembly or motion (no text or symbols present)natural_image
Line drawing of a vacuum cleaner with attached cable and power outlet (no text or symbols)natural_image
Line drawing of a vacuum cleaner with directional arrow indicating motion (no text or symbols)natural_image
Technical line drawing of a handheld vacuum cleaner device (no text or symbols)natural_image
Technical line drawing of a mechanical component with concentric circular features and internal gear-like structure (no text or symbols)natural_image
Technical line drawing of a mechanical component with an arrow indicating rotation or assembly (no text or symbols present)natural_image
Technical line drawing of a hand-operated device showing internal components and directional arrows (no text or symbols)natural_image
Line drawing of a robotic vacuum cleaner with directional arrow indicating motion (no text or symbols)natural_image
Technical line drawing of a robotic vacuum cleaner with directional arrows indicating motion (no text or symbols)natural_image
Line drawing of a single vacuum cleaner with a left-hand rule and arrow indicating rotational motion (no text or symbols)Montere ladeenheten
1 Sett laderen i ladestativet.

natural_image
Technical line drawing of a mechanical device with a downward arrow indicating assembly or motion (no text or symbols present)natural_image
Line drawing of a vacuum cleaner with attached cable, no text or symbols presentnatural_image
Line drawing of a vacuum cleaner with a vertical blade and handle, showing motion direction (no text or symbols)natural_image
Technical line drawing of a handheld device with handle, ventilation slots, and a separate open lid (no text or symbols)natural_image
Technical line drawing of a mechanical component with concentric circular features and internal gear-like structure (no text or symbols)natural_image
Technical line drawing of a mechanical component with cross-sectional view (no text or symbols)natural_image
Technical line drawing of a hand-operated device with internal components and directional arrows indicating assembly (no text or symbols)natural_image
Line drawing of a robotic vacuum cleaner with directional arrow indicating motion (no text or symbols)natural_image
Technical line drawing of a robotic vacuum cleaner with directional arrows indicating motion (no text or symbols)natural_image
Line drawing of a vacuum cleaner with a vertical arm and propeller, shown in profile view (no text or symbols)natural_image
Technical line drawing of a mechanical device with a downward arrow indicating assembly or motion (no text or symbols present)natural_image
Line drawing of a vacuum cleaner with attached cable and power outlet (no text or symbols)natural_image
Line drawing of a vacuum cleaner with a vertical blade and handle, showing motion direction (no text or symbols)Verhoilusuulake
natural_image
Technical line drawing of a handheld device with handle, ventilation slots, and a separate open lid (no text or symbols)natural_image
Technical line drawing of a mechanical component with internal gear and shaft (no text or symbols)natural_image
Technical line drawing of a mechanical component with cross-sectional view (no text or symbols)natural_image
Technical line drawing of a hand-operated device with internal components and directional arrows indicating assembly (no text or symbols)natural_image
Line drawing of a robotic vacuum cleaner with directional arrow indicating motion (no text or symbols)natural_image
Technical line drawing of a robotic vacuum cleaner with directional arrows indicating motion (no text or symbols)natural_image
Line drawing of a vacuum cleaner with a left-hand rule, shown in profile view (no text or symbols)natural_image
Technical line drawing of a mechanical device with an arrow indicating assembly or movement (no text or symbols present)natural_image
Line drawing of a vacuum cleaner with attached cable, no text or symbols presentnatural_image
Technical line drawing of a vacuum cleaner with directional arrow indicating motion (no text or symbols)natural_image
Technical line drawing of a handheld device with handle, ventilation slots, and internal components (no text or symbols)natural_image
Technical line drawing of a mechanical component with concentric circular features and internal structure (no text or symbols)natural_image
Technical line drawing of a mechanical component with an arrow indicating direction (no text or symbols present)4 Skyl opsamlingsbeholderen 1, filterholderen og HEPA-filteret under rindende vand.
natural_image
Technical line drawing of a hand-operated device with internal components and directional arrows indicating assembly (no text or symbols)natural_image
Line drawing of a robotic vacuum cleaner with directional arrow indicating motion (no text or symbols)


- Turbobürste reinigen
- A responsible approach!
- HEPA filter
- Extra accessories:
- Controls parts
- Installation of body and turbo brush
- Mounting the charging unit
- Charging the appliance
- Note
- Warning
- Using your appliance
- Starting cordless vacuum cleaner
- Accessories
- Dust brush
- Upholstery tool
- Cleaning the dust container
- Notes
- Cleaning the turbo brush
- Storage
- Compliance with WEEE Directive and Disposing of the Waste Product
- Compliance with RoHS
- Directive
- Technical data
- Package information
- PREPARACIÓN
- Nettoyage de la brosse turbo
- Montiranje punjača
- Punjenje uređaja
- ČIŠĆENJE I ODRŽAVANJE
- Usklađenost s Direktivom o električnom i elektroničkom opremom (WEEE) i zbrinjavanju otpada
- Tehnički podaci
- Usklađenost s Direktivom o zabrani uporabe određenih opasnih tvari u električnoj i elektroničkoj opremi (RoHS)
- Montere ladeenheten
- Verhoilusuulake
Brand : GRUNDIG
Model : VCH 9632
Category : Vacuum Cleaner