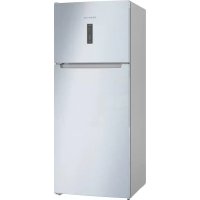
BD2076LFXN - Refrigerator Profilo - Free user manual and instructions
Find the device manual for free BD2076LFXN Profilo in PDF.



| Product type | Combined refrigerator-freezer |
| Brand | Profilo |
| Model | BD2076LFXN |
| Total net volume | Approximately 450 L |
| Refrigerator volume | Approximately 300 L |
| Freezer volume | Approximately 150 L |
| Dimensions (H x W x D) | 185 x 70 x 65 cm (estimated) |
| Net weight | Approximately 85 kg (estimated) |
| Power supply | 230 V ~ 50 Hz |
| Climate class | SN-T (ambient temperature 10-43 °C) |
| Number of doors | 2 (refrigerator and freezer) |
| Main functions | No Frost, LED lighting, water dispenser (depending on model) |
| Lighting | LED (user-replaceable) |
| Maintenance and cleaning | Unplug before cleaning, use a soft cloth and soapy water |
| Safety | Unplug 60 seconds before repair, wear gloves, use original parts |
| Spare parts and repairability | Available parts: door gasket, handles, hinges, shelves, bins, LED lighting |
| General information | Manual available in multiple languages, repair tips included |
Frequently Asked Questions - BD2076LFXN Profilo
User questions about BD2076LFXN Profilo
0 question about this device. Answer the ones you know or ask your own.
Ask a new question about this device
Download the instructions for your Refrigerator in PDF format for free! Find your manual BD2076LFXN - Profilo and take your electronic device back in hand. On this page are published all the documents necessary for the use of your device. BD2076LFXN by Profilo.
USER MANUAL BD2076LFXN Profilo
4.8 CMraHa Ha npomeHnB paT 18
4.8.1 OTcTaHbAHe Ha npomeHJb paT 18
4.8.2 MoHTIpaHHe Ha npOMeHNMBra paPrt 18
4.9 CmHa Ha npomEnnBna paT 19
4.9.1 OToTpaHraBaHe Ha npOMeHnBn paPf 19
4.9.2 MoHTnpaHe Ha TbBkABy paT 19
4.10 CmHa Ha KOMnneKta 3a 3aKycka 20
4.10.1 PpemaxBaHe Ha KOMnneKta 3a 3akycka. 20
4.10.2 MoHTpaHe Ha KOMNNeKta 3a 3akycka.. 20
4.11 CMHa Ha Ta6nKata 3a 6yTNIK 21
4.11.1 CbanyHe Ha Ta6nukata 3a 6ytnkn 21
4.11.2 MoHTIpaHa Ha TaJIuKaTa 3a 6yTJIKn 21
4.12 CMnHa Ha CTeIaxa Ha BpaTata 22
4.12.1 3BaKaHa HcTeJaHa BpaTata. 22
4.12.2 MoHTpaHe Ha CTenaxKa Ha BpaTata 22
4.13 CmHa Ha KOHTeHepa 3a 3ampa3EHxpaHHTEN npOdykTN 23
4.13.1 3BaJdHa Ha KOHTeHepa 3a 3ampa3EH XpaHITENn npOyKTn.. 23
4.13.2 MoHTnpaHe Ha KOHTeHepa 3a 3ampa3EH XpaHHTeHN npOdykTN 23
4.14 CmHa Ha KOHTeHepa 24
4.14.1 ⅠЗваданHa konTeHepa.. 24
4.14.2 MoHTnpaHe Ha KOHTeHepa 24
4.15 CMHa Ha pa3TeaTeHmKoHTeHep.. 25
4.15.1 ⅠЗваданHa pa3TeRaTeHnKoHTeHep 25
4.15.2 MoHTnpaHe Ha pa3TeRaTeHHra KOHTeHep 25
4.16 CMHa Ha LED cnot narnata 26
4.16.1 CbajHe Ha LED cnot lamnata 26
4.16.2 MoHTpaHe Ha LED cnot lamnata 26
4.17 CmHa Ha LED oCBetJeHneTo otrope 27
4.17.1 CbAJIHe Ha LED ocBeTneHnETo 27
4.17.2 MoHTpaHe Ha LED ocBETneHMeTo OTrope 28
4.18 CMHa HA LED cBeTnHata Ha CtpaHnHata neHa 29
4.18.1 CbAJIHe Ha LED cbETnHaTa Ha cTpaHnHaTa JeHTa 29
4.18.2 MoHTnpaHe Ha LED CBeTInHaTa Ha CTpaHnHaTa JeHTa 30
OTHOCHO To3n DokyMeHT
1.1 Baxha nHΦopMaζη
1.1.1 Uen
TeHc cBbETn 3a pEmOH T NOMarat Ha Ntpe6nTEnla da pEmOHtnpa Cam ypeiB n BcOTBeTCTBnC pernameHTa 3a ekONOrOcb6p3No npoeKtnpaHe Ha ypeiNe (OT03.2021 r.).
cBbPbKAT NHΦOpMAUJI KaJa CMeHrTe OnpEeHEn PEepBn YacTb, BKNIOHTENHO PEPNDypeJHn H NICKOBE.
Ako IMATE HRAKAKINBbNPoC,MOJIa CbPjKeTe Ce c HAUNO OTDeN 3a OBCNYKBHe Ha KIMENTH. Hne HOCIM OTBOBOPHOCT 3a UeTH, CAMO AKO CbBeNTe 3a peMOHT ca cna3eHN npabInHO.
1.2 06aCHeHne Ha cHMBOJInTe
1.2.1 HbHa onachoct
IpeynpeintenHnbe CbctoT OT CMBON IN CNHnHa Dyma.CnHnHaTaDyMa nok3Ba cepno3HOCTTA Ha onaCHOCTTA.
| Ниво на predecessorнechе 3начене | |
| ОПАСHОCT | Есnasbaанeto на predecessorнechею сбоб楚дени有很大 do сMbrt по серноши Нараловaning. |
| ПРЕДУПЕЖДЕНЕ | Есnasbaанeto на predecessorнechею сбоб楚дени有很大 do сMbrt по серноши Нараловaning. |
| ВИМATEЛНО | Есnasbaанeto на predecessorнechею сбob楚дени有很大 do сMbrt по серноши Нараловaning. |
| ВИМAHINEI | Есnasbaанeto на predecessorнechею сбob楚дени有很大 do сMbrt по сьпес themselves. |
Tabuua 1: Hua Ha onachocm
1.2.2 Cnmbon3a onachoct
CMMBOIHTE 3a onACHOCT Ca CMMBOIHTH HIOB6paKeHn, KOITTO DABAT INHINKAJIUM 3a BIDAA ONAOHTHE
BTo3n DOKyMeHCTe H3N013BaT CNEdHInTe CMBOIN 3a OnaCHOCT:
| Симboл за опасост 3начени | Овци поедуридатello сбобчине |
| Опасост от[eilektprucecco наржени | |
| Риск ot[eckллозия | |
| Опасost от[nорязвени |
OTHOCHO To3n DokyMeHT
MoHTnpaTeB o6paTeH peI.

PemOH
4.3 CmHa Ha rohata naHt ha BpataTa
Cneunannn HNCTpyMeHTN:
HakpaHHK Torx TX20 6,3 MM (1/4") [00340865]
PENEUPPEXDEHNE
Teekn, o6emncTuypeu!
MoHTnpaIteB06paTeHpeI.

PemOH
4.4 CmHa Ha rohata naHTa Ha BpaTata (BpTa c dncnnei)
CneuaJIHHHHTpymeHTn:
HakpaHHK Torx TX20 6,3 MM (1/4") [00340865]
PPEUYPNPEJDEHNE
Teekn, o6emncTuypeu!
4.4.2 MoHTnpaHe Ha roPHaTa nAHTa Ha BpaTaTa
MoHTnpaTBeBobpaTeHpe.

PemOH
4.5 CmHa Ha cpeHata naHTa Ha Bpata
Cneunannn HNCTpyMeHTN:
HakpaHHK Torx TX20 6,3 MM (1/4") [00340865]
PDEYIPKXDEHNE
TeKKn, o6emnctuypei!
MoHTnpaTBeBobpaTeHpe.

PemOH
4.6CMraHa Ha donHaTa naHTa Ha BpaTaTa
Cneunannn HNCTpyMeHTN:
HakpaHHK Torx TX20 6,3 MM (1/4") [00340865]
PNEyPEXKDEHNE
TeKKn, o6emnctuypei!
MoHTnpaIteB06paTeHpeI.

PemOH
4.7 CmHa Ha paPta
N3nCKBaHe:
BpaTaTa e oTbopeHa.
4.7.1 N3BaXdAne Ha paΦTa
H3dbpnaTepaTa.
PaftbtecbaneH.
4.7.2 MoThupaHe Ha paΦTa
MOHTnpaTeB06paTeHpe.

PemOH
4.8 CmHa Ha npomehnB paΦT
M3nCKBaHe:
BpaTaTa e oTBopeHa.
4.8.1 OTeTpaHraBaHe Ha npomEHHB paΦT
- 1.ИЗдьрайтдяснataceкинHa npomehnBnpaФt Hanpei(1). 2.ОТспаHTeДяснataceкинHa npomehnBnpaФt(2).
- OCTpaHete JIbata CeKua Ha npomHeINBn paTn no cbun HAHN
PpomeHnBnT paTe oTcPaHeN.
4.8.2 MoHTIpaHe Ha npOMeHINBnPa paT
MoHTpaTBe Bo6paTeH peI.

PemOH
4.9 CmHa Ha npomeHnBna paΦT
M3nCKBaHe:
BpaTaTa e oTBopeHa.
4.9.1 OTeTpaHbAe Ha npomeHnBna paΦT
- OtctpaHete cTbKneHHa padT(1).
- NobdHnHeTe TbBkABnpaft n ro n3dbpnaTe HabhN (2).
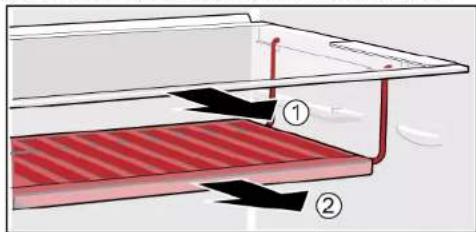
TbBkABnPaPTe oCTpaHeH.
4.9.2 MoHTnpaHe Ha TBKBaBn paΦT
MoHTnpaIteB06paTeHpeI.

PemOH
4.10 CmHa Ha KOMnJKeTa 3a 3aKycka
N3nCKBaHe:
Bpatae oTbopeha.
4.10.1 PpeMaxBaHe Ha KOMJIeKtA 3a 3aKycka
BdHrHeTe KOMnEeTa 3a 3aKcKa Iro n3BaTe.
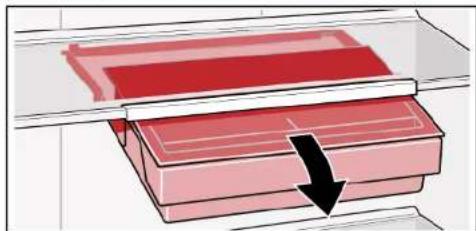

KOMNNEKTbT 3a3kycka e oTcpaHeH
4.10.2 MoHTIpaHc Ha KOMIIeKTa 3a 3aKycka
MoHTpaTBe BoPaTeH peI.

PemOH
4.11 CmraHa Ha Ta6nukata 3a 6ytunkn
M3nCKBaHe:
BpaTaTa e oTBopeHa.
4.11.1 CbajnHe Ha Ta6nukata 3a 6ytunkn
H3dbpnaTe Ta5nHkata 3a 6ytnkn.
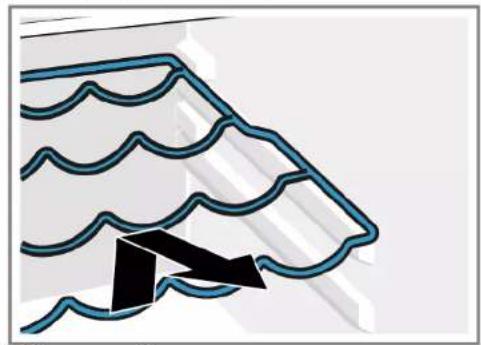
Ta5nukata3a6ytnknecbaneHa.
4.11.2 MoHTnpaHHe Ha Ta6nUkKaTa 3a 6yTnKu
MoHTnpaIteB06paTeHpeI.

PemOH
4.12 CmHa Ha cTeNa Ka Ha BpaTaTa
M3nCKBaHe:
Bpatae oTbopeha.
4.12.1 3BaxdaHe Ha cTeJaKa Ha BpaTaTa
NobHHTeCTeJaKaHaBpaTAtHarope.
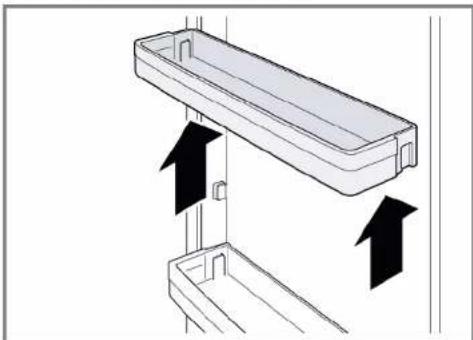

CTenakbTaHaBpaTaTaeCBaneH.
4.12.2 MoHTnpaHe Ha cTeNaKa Ha BpaTaTa
MoHTnpaTteB06paTeHpe.

PemOH
4.13 CMHa Ha KOHTeHepa 3a 3ampa3EHn XpaHHTeHH npOdykTN
N3nCKBaHe:
BpaTaTa e oTBopeHa.
4.13.1 N3Baxdahe Ha KOHTeHepa 3a 3ampa3EH XpaHNTenH npOdykTN
- 13abpnaTe DOKpaK KOHeHepa 3a 3aMPa3eHN XpaHnTeHN npOdyKTn (1). 2. 2BaTe KOHeHepa 3a XpaHnTeHN npOdyKTn (2).
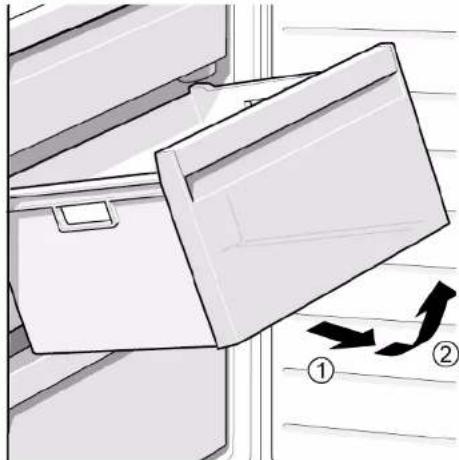
KoHTeHepb3a 3aMPa3EHn XpaHHTeHn npOpykTN e N3BaJeH.
4.13.2 MoHTnpaHe Ha KOHTeHepa 3a 3ampaehn XpaHntEnn npOdykTN
MOnTnpaTaeB06paTeHpeJ.
4.16 CMHa Ha LED cnot JAmnata
CneuaJIHHnHCTpymeHTn:

CneuaJIeH INHCTpyMeHT [00342180]

BauTpyedcHabcnLEDocBeTneHHeKToHeN3CKBaNo
Toba OCBETNeHMe MOKe Da 6bDe peMOHTnpaHO cMoO t CneuaJIuCTn
OT cnIyKbata 3a 06cnIyXBaHe Ha KIneHTn INN ONT KBaINΦuPaHn Tex
HNUI!


ONACHOCT
Pnck OT TokOB ydap npaH nuH anpeXeHne!
Onachoc3a KINBOTA OT TOKOB ynap B CnyaHa HEnpaBnnepeMOHT
Eeektpnckte Taactn Tp6Ba da ce pemohnpat ot kbaanhphiapan hnekeptexn.
CnepeMOHTa Tp8Ba Da ce N3BbPn npOBepka 3a be30NaCHOCT
cbrnacHO VDE 0701 nnn B cbOTBETCTBNE cbc CneuHHTe 3a


ONACHOCT
PnCK OT TOKOB ydap npaH qactn noH anpeXeHne!
CmbptOT TOKOB ydap
N3knHouTe ypeDnTe OT eNEKTPuYeCKOTO 3axpaHBAHe nohe 60 ce
KyHINIpeDN3aONOVAHeHa pemOHTa.

BHIMATEHNO
Octpn pb6oBe!
HapaHbAHmOTnop3BaHe
Hocete npednaHn pbkauu.
N3nCKBaHe:
YpeIbTe EINKIOUeHOT3aXpaHbHaHeTo.
Bpaatae oTBopeHa.
4.16.1 CbānHa He LED cNOT JAmNaTa
- INON3BAIte CneuHnHCTpyMeHT, 3a Da INBAdITe LED cnot lamnata (1).

2.ИЗкпунеTe eNEKtpuYeCKNTe Bp63KN Ha LED cNOT nAMnata.
LED cnot lamnata e cbaneHa.
4.16.2 MoHTnpaHe Ha LED cnot lamnata
MoHTnpaIteB06paTeHpeI.

PemOH
4.17 CMЯHa HA LED oCBeTneHneTo otrope
CneuaJIHm HhCTpyMeHTn:
NnockaOTBeptKaBpbx2,4MMX0,4MMX60MM,B KOMnIeKTa[00341820]

Baunat ype n cnaeHc LED ocBtneHme, KoTe He n3uKbNaodpBkka. Toba ocBtneHme MoKe da 6bJe peMOHTnpaHO cAmO t CneuaHnCTU ot cnykbaTa 3a 06cnjxBaHe Ha KNHeTH NnONt KBAIINPauPAHnTexNnui!


ONACHOCT
Pmck ot TKOB yub npoprna tactn noanHanpexkHe!
OnAnOHCT 3a KWBOTA ot TKOB yub aB city nHnepBA
EeKtPrVcKeTteAactn TpRbBa da ce pEmOHnpaT OT KBaIMnHnPnHnPAHn EeKToTeXHnU.
CnepemoHTA Tp8Ba 1a Ce n3BbpIIN npOBepKa 3a 6e30NaCHOCTcRlachO VDE 0701 mN B cTbETCTBHe CbC cneunHnHnTe 3a cTpaHATA paope6n.


ONACHOCT
PnCK OT TOKOB ydap npaH nuactn noH anpeXeHne!
CmbptOT TOKOB ydap
N3KNUOHTe ypeIne O t eEKNPTHcNEKT0 3aXPAHbAHe nOte 60 ceKHynnpEn3aONBaHa He pMeOTHa.


BHIMATEJIHO
Octpn pb6oBe!
HapaHbHaMnO Tnpa3BaHe
Hocete npedna3n pbkauu.
N3nckBaHe:
YpeDbTe N3KJIIOUeHOT 3aXpaHbHaHeTO.
BpaTata e OTbopeHa
TopHnTe BbTpewHn pHTnHr Ce oTcPaHBA.
4.17.1 CbajnHe Ha LED ocBtJeHneTo
- Ppemectete LED oCBETneHneto HnABO.
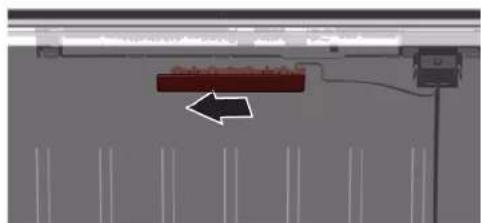
Cbbp3aHETo KbM eNktpnHeCKaT MaPeka Ha LED OCBETneHnTo e npeKbHato.
2.Ocbo6oTeKyKIneHaLEDocBteHneHMeTo.
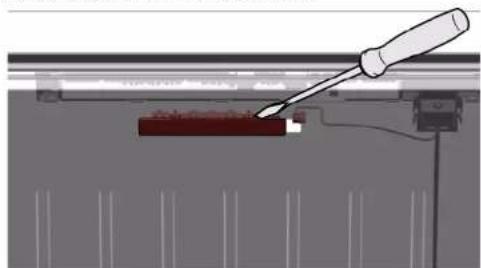

PemOH
3.CBaIeTE LEOBOCBETNEHHeIO,PNDMBKBaIKnHO Hanpei.
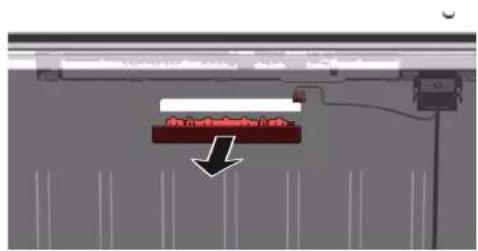
LEDocBETneHMeToeCBaneHO.
4.17.2 MoHTnpaHe Ha LED ocBETneHnEto OTrope
MOHTnpaTBeB0bpaTeHpeI.

PemOH
4.18 CMnHa Ha LED cbEtnnHata Ha cTpaHnHaTa JeHtA
CneuaJIHHHHTpymeHTn:
CmykateHnHa yaa 05Mm [00342224]

Bawrrype en CLEDocBeTneHKeTo He n3nckBa noi
Dpbkka.
ToBa OcbTneHnme MoKe Da 6bDe peMoHTnpaHO CaMO OT CNeuaJIuCTTu
OTcnyk6ata 3a 06cnykbahe Ha KIneHTN INI ON KBaINuPauHn TX Hnui!


ONACHOCT
Pnck OT TokOB yap nopadn qactn noHanpeXeHne!
Onachoc3a KINBOTA OT TOKOB ynap B CnyaHa HEnpaBnnepeMOHT
Eeektpnckte Taee Tp86Ba da ce pemohnpat ot kbaanHnHnpan HnekeptexHHn.
CnEi pemOHa Tp6BaJa ce n3bPm npOBepKa 3a 6e3oNaHcOCT cbrIacHO VDE 0701 mN B cBtBeTcBHe Cbc CneuHnHnTe 3a cTpaHATA pa3nope6M


ONACHOCT
PnCK OT TOKOB ydap npaH nuacn noH anpeXeHne!
CmbptOT TOKOB ynap
N3knHouTe ypeDnTe OT eNEKTPuYeCKOTO 3axpaHBAHe nohe 60 ce
KyHINIpeDN3aONOVAHeHa pemOHTa.

BHIMATEENHO
Octpnpb60Be!
HapaHaBaHmO Tnpa3BaHe
HocTe npedna3n pbKaBn.
N3nCKBaHe:
YpeBt E n3KIOUeH OT 3aXpaHbHeTo.
Bpatatae oTbopeha
PaTOBete Ha XnAaHnHOTo OTdeneHne ca 3BaHeH.
4.18.1 CbānHe HA LED cbTJnHaTa Ha ctpaHnHaTa JeHTa
- Noctabete CmykatenHATA aHaA bPxy rOpHATA tPeT ha LED cBETnHATA ha CTPAHNHATA neHTA.
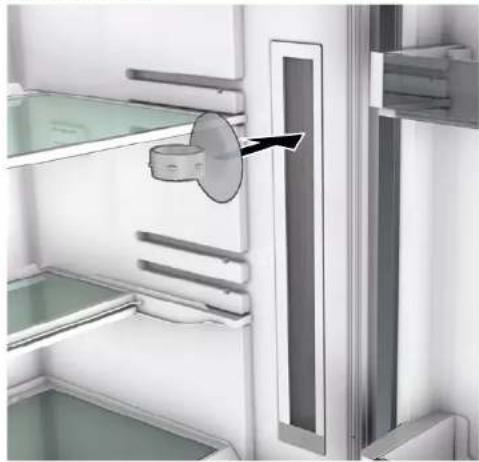

PemOH
2.Иььрайе cmyкATEннATA淘汰а спpeHATA LED CBETNHa HA CTpaHHTaJIeHTA cEDHO BbPTENBO DmKeHne.
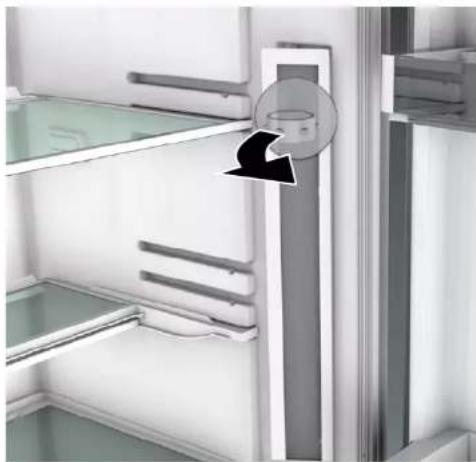
- 3nKIOeTe eNKeTpuNecKa Ta Bp3ka HA LED CBeTIHATA Ha cTaPAHHTA nEHTA. LED CBeTIHMA Ha cTaPAHHTA neHTA eCBANEHa.
4.18.2 MoHTnpaHc Ha LED cBeTnHaTa Ha cTpaHnHaTa IeHTa
1.Cbpxte enektpueckata Bpb3ka HA LED cbetnhata Ha ctpaanhata nehta.
2.ФИКСИРАТЕ LED CBETNIMATA на CTРANHATA LAHNTA Na HENHOTO MRCTO HA CTENHATA na OTDENEHNETO (KYKITE UPKAPT).
LED cbETnHaTa Ha cTpaHHTa NaHTa e MoHTnpaHa.
Sorg for at sikre apparater mod at glide.


PAS PAI
Fare for nedfaldende dele pga. Iosnede skruer!
ronskade pga. nedfaldende dele
Sorg for at sikre componenten mod at falde ned.

BEMERKI
Fare for nedfaldende dele pga. Iosnede skruer!
Sorg for at sikre componenten mod at falde ned.
Preindstilling:
Sorg for at sikre apparater mod at glide.


PAS PAI
Fare for nedfaldende deleg pga. Iosnedeskruer!
rsonskade pga. nedfaldende dele
Sorg for at sikre componenten mod at falde ned.
BEM/ERK!
Fare for nedfaldende dele pga. Iosnede skruer!
Sarg for at sikre componenten mod at falde ned.

FARE
Sorg for at sikre apparater mod at glide.

Fare for nedfaldende dele pga. Iosnede skruer!
ronskade pga. nedfaldende dele
Sorg for at sikre componenten mod at falde ned.

Fare for nedfaldende dele pga. Iosnedeskruer!
Sarg for at sikre componenten mod at falde ned.
Preindstilling:
Sorg for at sikre apparater mod at glide.

Fare for nedfaldende dele pga. Iosnede skruer!
ronskade pga. nedfaldende dele
Sorg for at sikre componenten mod at falde ned.

Fare for nedfaldende dele pga. Iosnede skruer!
Sarg for at sikre componenten mod at falde ned.
Preindstilling:
4.16 Udskifting at LED-spotlampe
Nodvendig voektoj:
Specialvarktj [00342180]

4.16.2 Montering of LED-spotlampe
Monteri omvendr rakkefolge.

Reparation
4.17 Udskifting at LED-lampe foroven
Nodvendig voarktoj:
Kaervskruetraekker Blad 2,4 mm x 0,4 mm x 60 mm i saettet [00341820]


Preindstilling:
Apparaat is losgekoppeld is van de stroomvoorziening.
Deur is open.
Repair hints - Fridge-freezer
1 Concerning this document. 148
1.1 Important information 148
1.1.1 Purpose 148
1.2 Explanation of symbols 148
1.2.1 Danger levels.. 148
1.2.2 Hazard symbols 148
1.2.3 Structure of the warnings.. 149
1.2.4 General symbols 149
Safety. 150
2.1 General Safety instructions 150
2.1.1 All domestic appliances 150
Tools and aids. 151
Repair 152
4.4 Replacing door upper hinge (door with display) 158
4.7 Replacing shelf. 162
4.7.1 Removing shelf 162
4.7.2 Installing shelf 162
4.8 Replacing variable shelf 163
4.8.1 Removing variable shelf. 163
4.8.2 Installing variable shelf 163
4.9 Replacing flexible shelf 164
4.9.1 Removing flexible shelf 164
4.9.2 Installing flexible shelf 164
4.10 Replacing breakfast set 165
4.10.1 Removing breakfast set 165
4.10.2 Installing breakfast set 165
4.11 Replacing bottle tray 166
4.11.1 Removing bottle tray 166
4.11.2 Installing bottle tray. 166
4.12 Replacing door rack 167
4.12.1 Removing door rack. 167
4.12.2 Installing door rack 167
4.13 Replacing frozen food container 168
4.13.1 Removing frozen food container 168
4.13.2 Installing frozen food container 168
4.14 Replacing container 169
4.14.1 Removing container 169
4.14.2 Installing container 169
4.15 Replacing extendable container 170
4.15.1 Removing extendable container 170
4.15.2 Installing extendable container 170
4.16 Replacing LED spot light 171
4.16.1 Removing LED spot light 171
4.16.2 Installing LED spot light 171
4.17 Replacing LED top light 172
4.17.1 Removing LED light 172
4.17.2 Installing top LED light 173
4.18 Replacing LED side bar light. 174
4.18.1 Removing LED side bar light 174
4.18.2 Installing LED side bar light 175
Concerning this document
1.1 Important information
1.1.1 Purpose
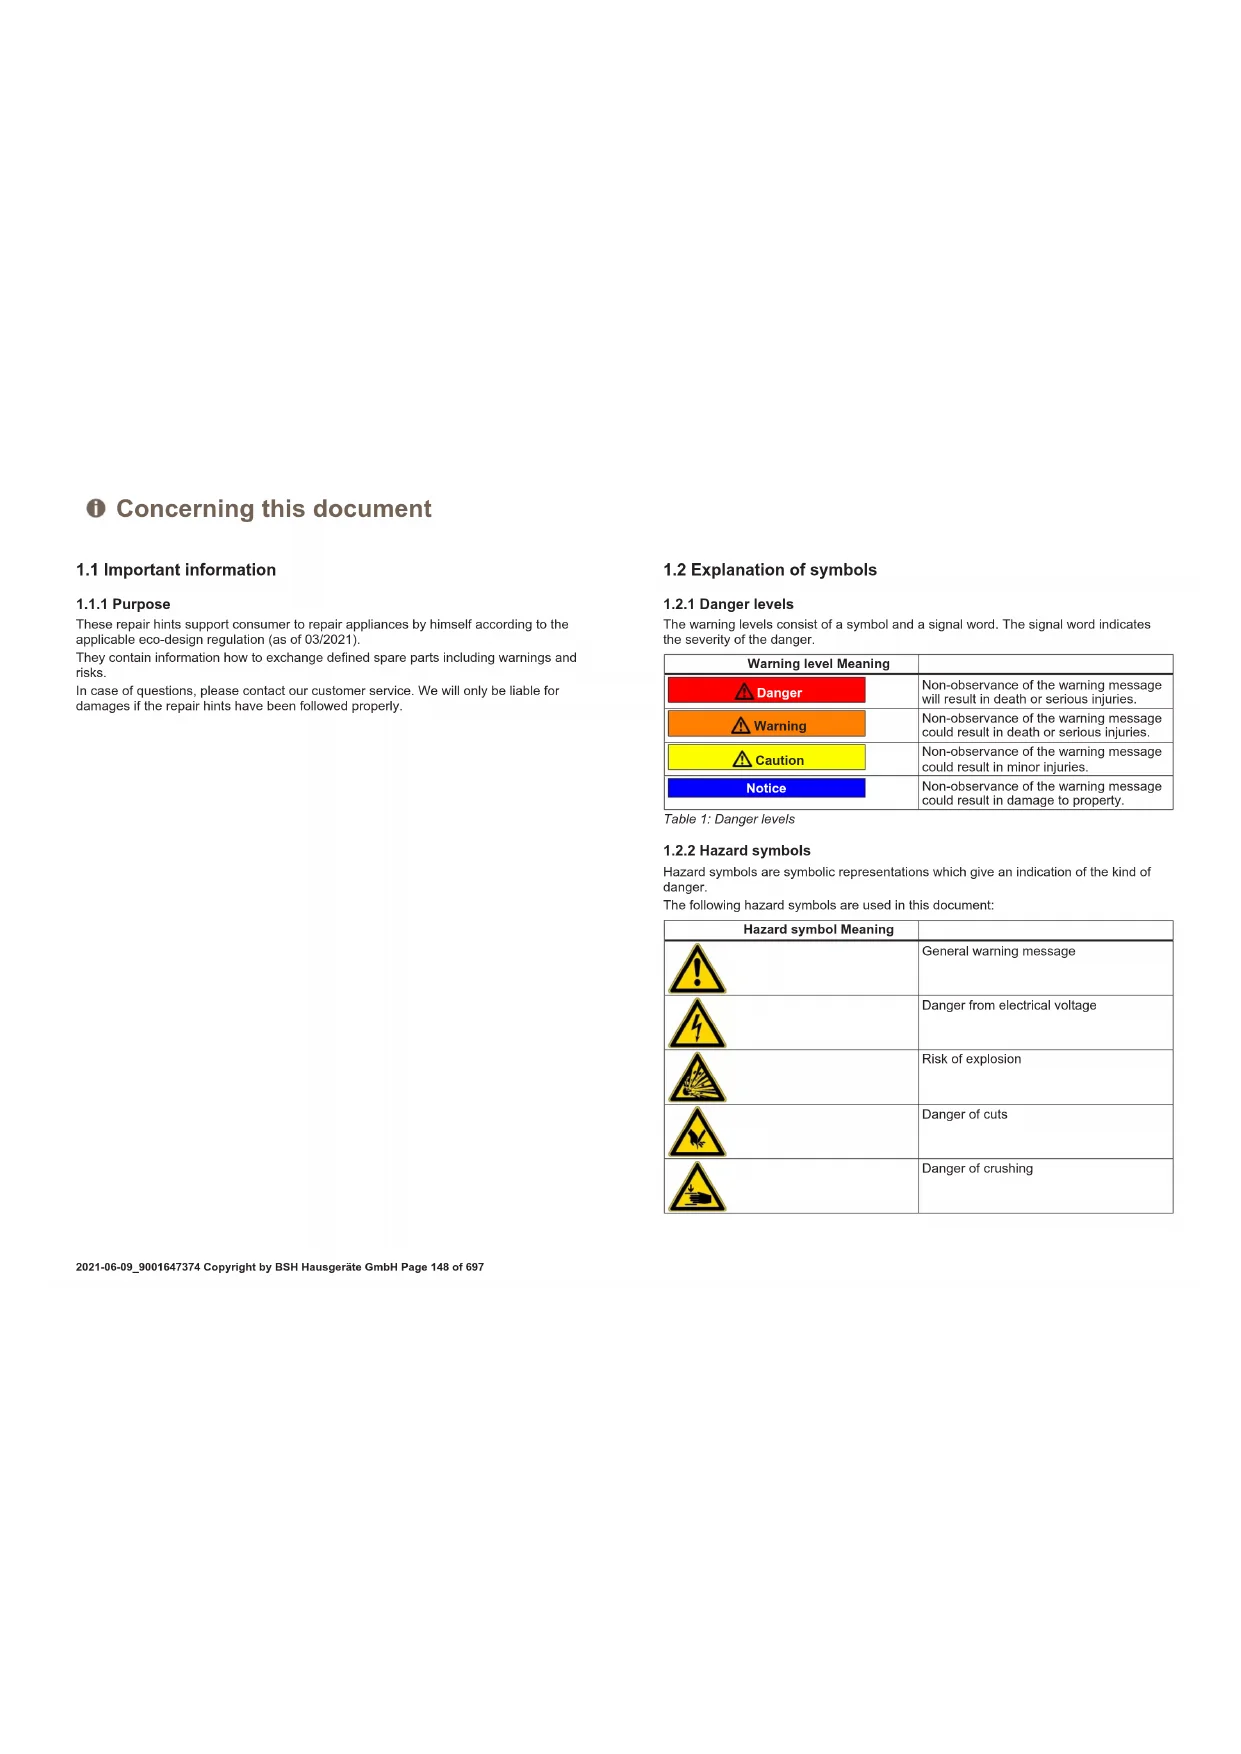
These repair hints support consumer to repair appliances by himself according to the applicable eco-design regulation (as of 03/2021).
They contain information how to exchange defined spare parts including warnings and risks.
In case of questions, please contact our customer service. We will only be liable for damages if the repair hints have been followed properly.
1.2 Explanation of symbols
1.2.1 Danger levels
The warning levels consist of a symbol and a signal word. The signal word indicates the severity of the danger.
| Warning level Meaning | |
| Danger | Non-observation of the warning message will result in death or serious injuries. |
| Warning | Non-observation of the warning message could result in death or serious injuries. |
| Caution | Non-observation of the warning message could result in minor injuries. |
| Notice | Non-observation of the warning message could result in damage to property. |
Table 1: Danger levels
1.2.2 Hazard symbols
Hazard symbols are symbolic representations which give an indication of the kind of danger.
The following hazard symbols are used in this document:
| Hazard symbol Meaning | |
| ! | General warning message |
| ! | Danger from electrical voltage |
| Risk of explosion | |
| Danger of cuts | |
| Danger of crushing |
Concerning this document
| Hazard symbol Meaning | |
| Danger from hot surfaces | |
| Danger from strong magnetic field | |
| Danger from non-ionizing radiation |
Table 2: Hazard symbols
1.2.3 Structure of the warnings
Warnings in this document have a standardised appearance and a standardised structure.

Danger
Type and source of danger!
Possible consequences of ignoring the danger / warning.
Measures and prohibitions for preventing the danger.
The following example shows a warning that warns against electric shock due to live parts. The measure for avoiding the danger is mentioned.

Danger
Risk of electric shock due to live parts!
Death by electrocution
- Disconnect appliances from electrical supply at least 60 seconds before starting repairs.
1.2.4 General symbols
The following general symbols are used in this document:
| Gen. symbol Meaning | |
| i | Identification of a special tip (text and/or graphic) |
| j | Identification of a simple tip (only text) |
| Identification of a link to a video tutorial |
Table 3: General symbols
| Gen. symbol Meaning | |
| Identification of required tools | |
| Identification of required preconditions | |
| Identification of a condition (if ..., then ...) | |
| Identification of a result | |
| [Start] Identification of a key or button | |
| [00123456] Identification of a material number | |
| Status Identification of displayed text / window(in the appliance's display) | |
Safety
2.1 General Safety instructions
2.1.1 All domestic appliances
Risk of electric shock due to live parts!
Errors by repairs involving electrical components can lead to electrical shock!
- Disconnect the appliance from the mains for at least 60 seconds before starting work.
After the repair have a safety test according VDE 0701 or country-specific regulations performed.
Risk of injury from sharp edges!
Wear protective gloves.
Risk of crushing during repair, maintenance, troubleshooting and service due to heavy and moving components
Wear protective shoes.
- Secure heavy components from falling down.
- Do not stick body parts into moving components.
Risk to the appliance's safety / function!
Only use original spare parts.
Risk of damage to electrostatically sensitive components (ESDs)!
- Do not touch the modules, including connections and conductor paths.

Tools and aids
| Designation Details Images | ||
| Protection cloth [00342013] | 60 cm x 50 cm | ### |
| Slotted screwdriver | blade 2.4 mm x 0.4 mm x 60 mm, in the kit [00341820] | Φ |
| Special tool [00342180] | ||
| Suction cup [00342224] | ∅50 mm | |
| Torx Bit TX20 [00340865] | 6.3 mm (1/4") | Φ |
| Slotted screwdriver | blade 10 mm x 1.6 mm x 200 mm | Φ |
Prerequisite:
Door is open.
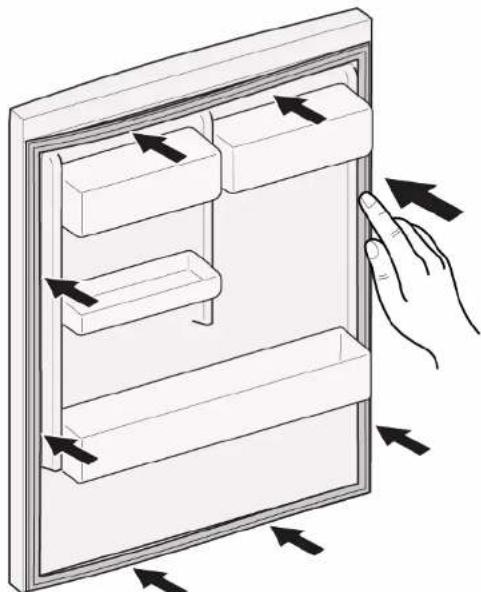
- Release door gasket from the groove on right and left corner.
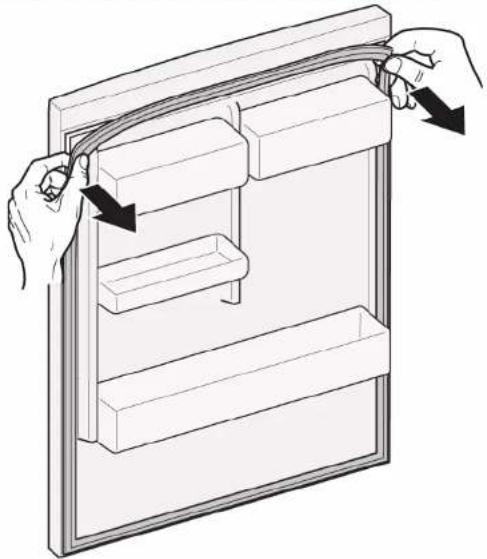
- Pull out door gasket from groove.
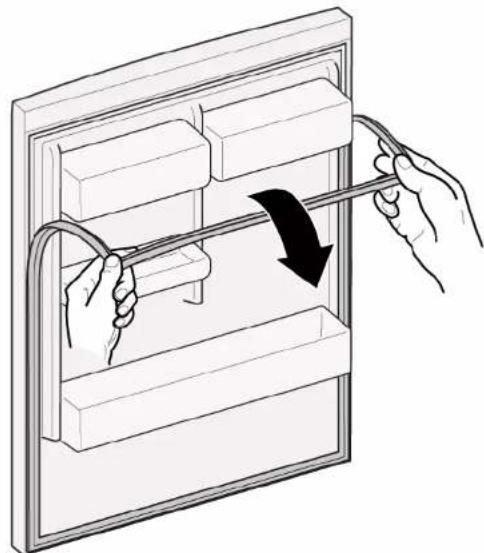

Door gasket is removed.
| i | Thickness of new door gasket may deviate slightly from thickness of old door gasket. This will not affect closing behavior and long-term function. |
| i | If your appliance has adjustable hinges or hinge attachments, you can optimize the closing behavior subsequently. |
| i | Small side holes in door gasket are functional (required for ventilation). These are not production faults. |

Repair
- Check groove for gasket for damage.
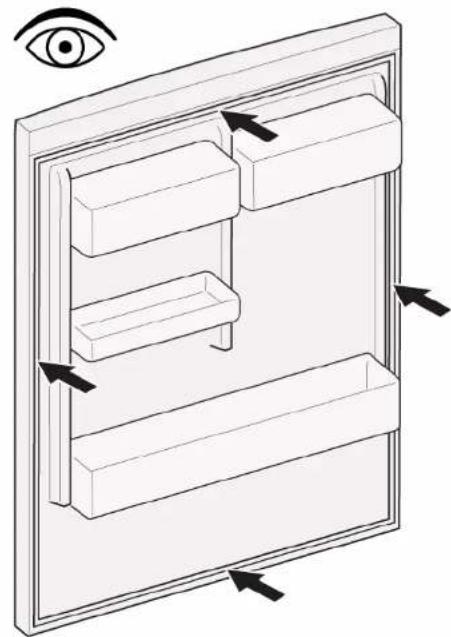
- If groove for gasket is it is damaged.
- Contact customer service.
- Slight deformation of door gasket is normal and does not affect its function. It is recommended to straighten door gasket before inserting it into appliance.
Heat door gasket with a hair dryer or hot water and manually reshape it.
- Push corners of gasket at the top and bottom to the groove.
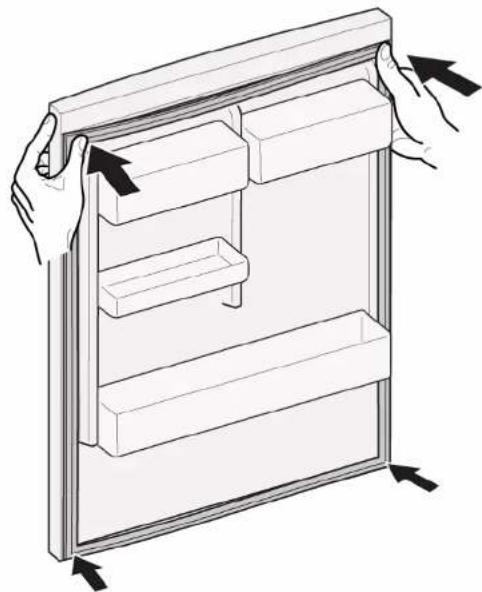

Repair
- Press whole gasket step by step into the groove.
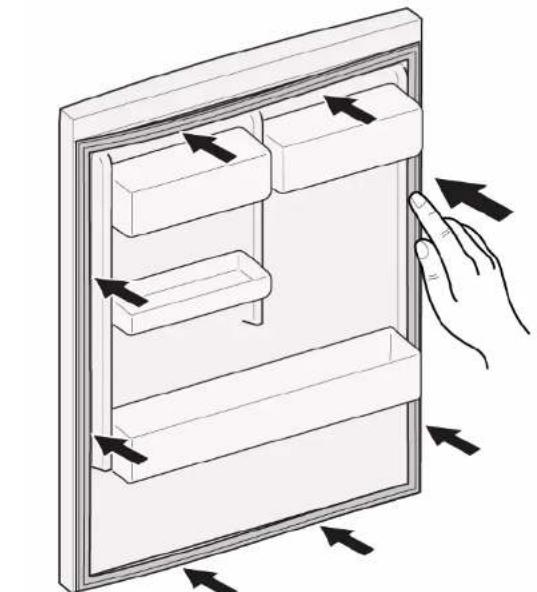

Door gasket is installed.

Repair
4.2 Replacing door handle
Required tools:
Torx Bit TX20 6,3 mm (1/4") [00340865]
Slotted screwdriver Blade 10 mm x 1.6 mm x 200 mm
Prerequisite:
Appliance is disconnected from power supply.
Door is open.
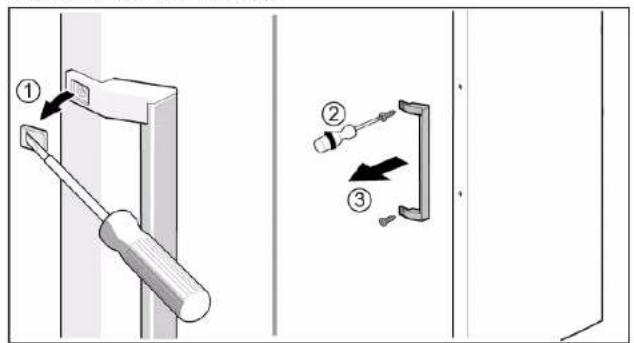
4.2.1 Removing door handle
-
Remove two screw caps (1).
-
Unscrew two screws (2).
- Remove door handle (3).
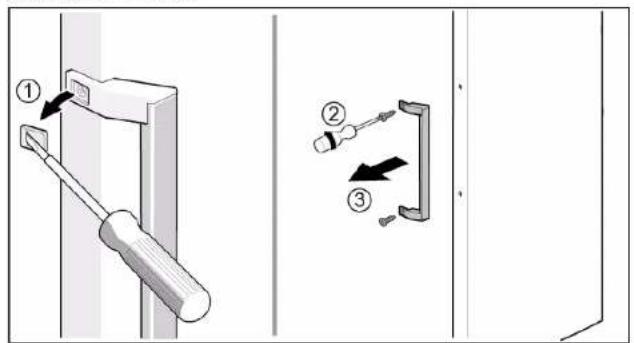

Door handle is removed.

Door handle for the second door can be removed in the same manner.
Install in reverse order.

Repair
Appliance is disconnected from power supply.
Appliance interior fittings are removed.
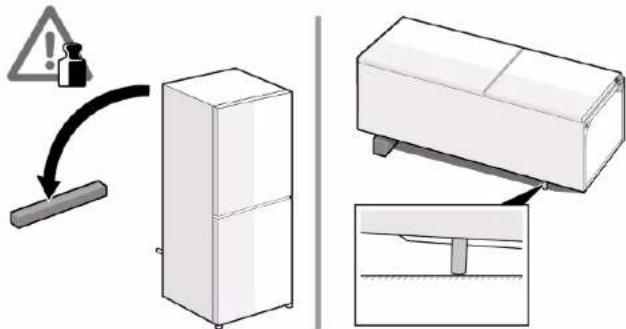
- Place appliance on the back side.
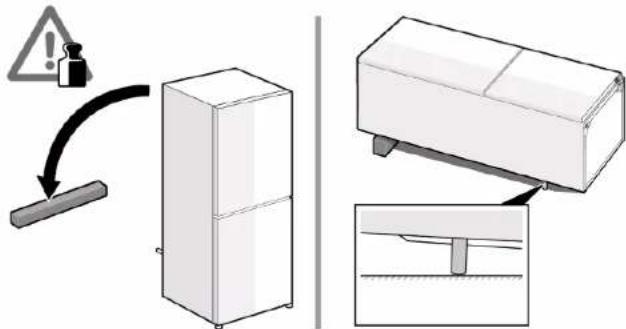

Repair
2.1. Press upper hinge cover on both sides (1).
- Move out upper hinge cover (2).
- Rotate hinge cover (3).
- Remove upper hinge cover (4).
- Unscrew two screws (5).
- Remove upper hinge (6)


Upper hinge is removed.
Install in reverse order.

Repair
4.4 Replacing door upper hinge (door with display)
Required tools:
Torx Bit TX20 6,3 mm (1/4") [00340865]
A Warning
Heavy, bulky appliances!
Back and muscle injuries
- Appliance door removal operation should only be carried out by trained specialists.
To move the appliance, two people are required.
Use only suitable tools and equipment.
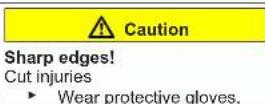
Caution
Sharp edges!
Cut injuries
Wear protective gloves.
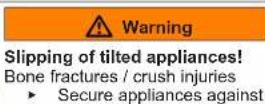
Warning
Slipping of tilted appliances!
Bone fractures / crush injuries
Secure appliances against slipping

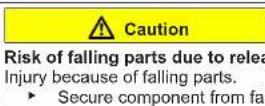
Caution
Risk of falling parts due to released screws!
ury because of falling parts.
- Secure component from falling down.
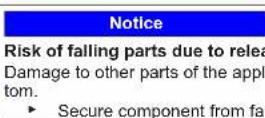
Notice
Risk of falling parts due to released screws!
Damage to other parts of the appliance or at customers home e.g. bot
tom.
- Secure component from falling down.
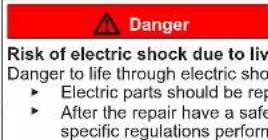
Danger
Risk of electric shock due to live parts!
Danger to life through electric shock in case of improper repair
Electric parts should be repaired by a qualified electricians.
After the repair have a safety test according VDE 0701 or country-specific regulations performed.

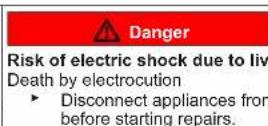
Danger
Risk of electric shock due to live parts!
Death by electrocution
- Disconnect appliances from electrical supply at least 60 seconds before starting repairs.
Prerequisite:
Appliance is disconnected from power supply.
Appliance interior fittings are removed.
- Place appliance on the back side.
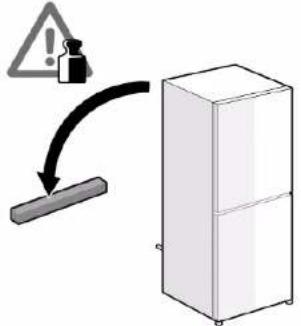
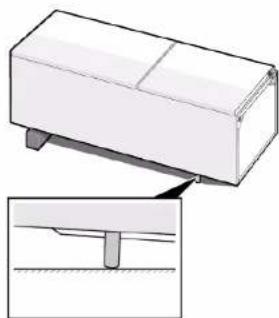

Repair
-
- Remove upper hinge cover (1).
-
Remove cable box cover (2).
- Disconnect electrical connection (3)
- Unscrew ground connection screw (4).
- Remove cable protection (5).
- Unscrew the screw (6)
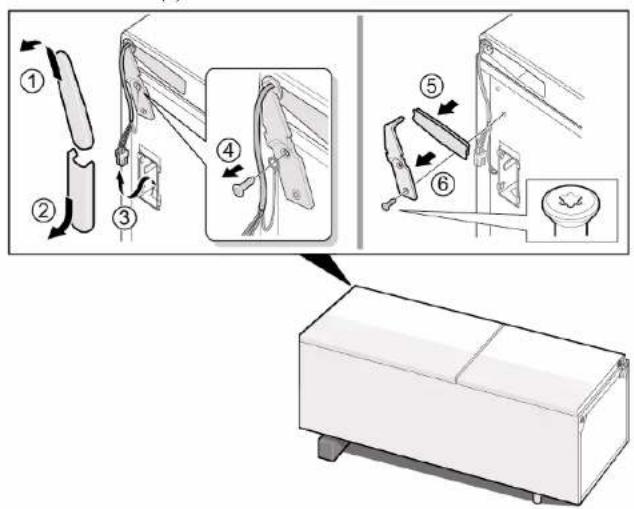

Upper hinge is removed.
Install in reverse order.

Repair
4.5 Replacing door middle hinge
Required tools:
Torx Bit TX20 6,3 mm (1/4") [00340865]

Heavy, bulky appliances!
Back and muscle injuries
- Appliance door removal operation should only be carried out by trained specialists.
To move the appliance, two people are required.
Use only suitable tools and equipment.

Sharp edges!
Cut injuries
Wear protective gloves.

Slipping of tilted appliances!
Bone fractures / crush injuries
Secure appliances against slipping

Risk of falling parts due to released screws!
ury because of falling parts.
- Secure component from falling down.

Risk of falling parts due to released screws!
Damage to other parts of the appliance or at customers home e.g. bot
tom.
- Secure component from falling down.
Prerequisite:
Appliance is disconnected from power supply.
Appliance interior fittings are removed.
Door upper hinge is removed.

Upper door is removed.
4.5.1 Removing door middle hinge
- Remove fridge compartment door (1).
- Unscrew two screws (2).
- Remove middle hinge (3).
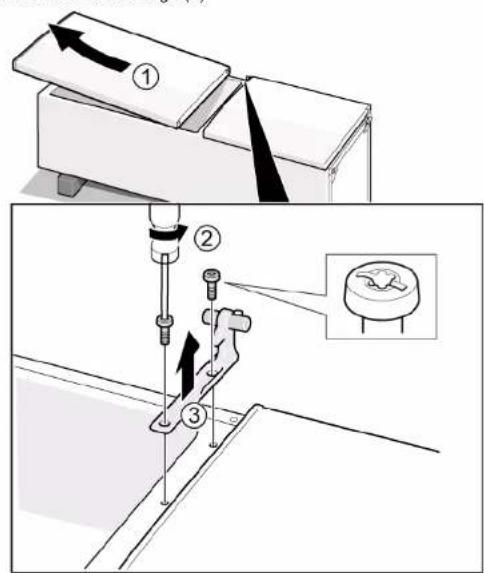

Middle hinge is removed.
4.5.2 Installing door middle hinge
Install in reverse order.

Repair
4.6 Replacing door lower hinge
Required tools:
Torx Bit TX20 6,3 mm (1/4") [00340865]
Prerequisite:
Appliance is disconnected from power supply.
Appliance interior fittings are removed.
Upper hinge is removed.

Middle hinge is removed.
4.6.1 Removing door lower hinge
- Remove freezer compartment door (1).
- Unscrew the screw (2).
- Turn lower hinge out (3).
- Remove lower hinge (4).
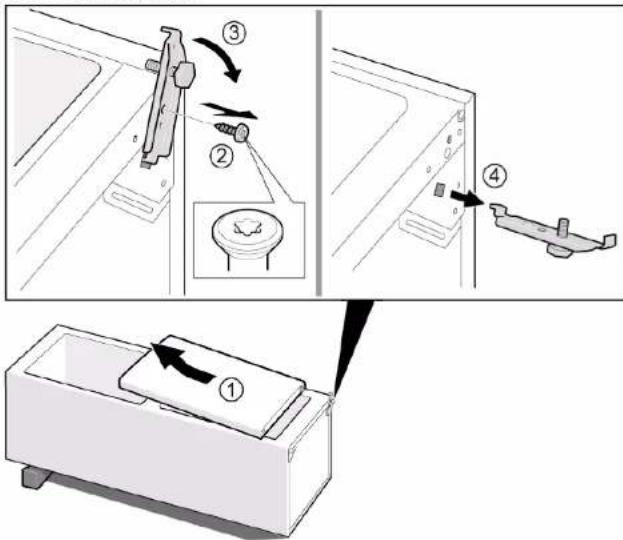

Door lower hinge is removed.
Install in reverse order.

Repair
4.7 Replacing shelf
Prerequisite:
Door is open.
4.7.1 Removing shelf
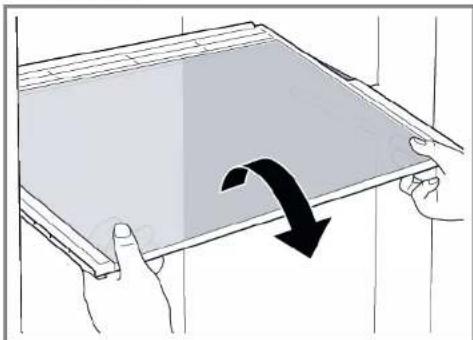
Pull out shelf.
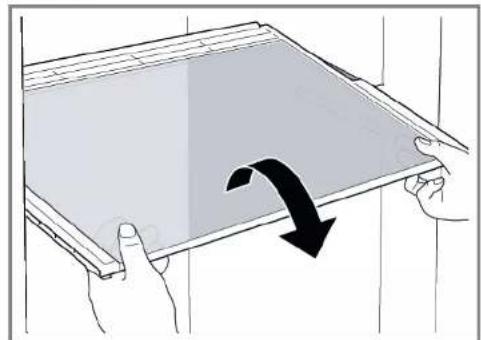

Shelf is removed.
4.7.2 Installing shelf
Install in reverse order.

Repair
4.8 Replacing variable shelf
Prerequisite:
Door is open.
4.8.1 Removing variable shelf
-
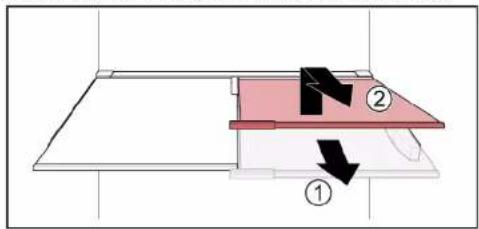
- Pull the right-hand section of variable shelf forwards (1).
- Remove right-hand section of variable shelf (2).
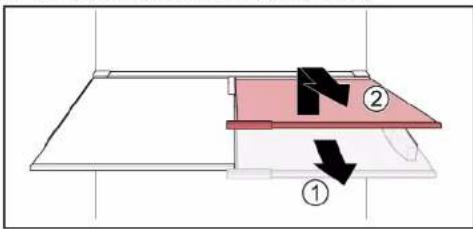
- Remove left-hand section of variable shelf in the same manner.
Variable shelf is removed.
4.8.2 Installing variable shelf
Install in reverse order.

Repair
4.9 Replacing flexible shelf
Prerequisite:
Door is open.
4.9.1 Removing flexible shelf
- Remove glass shelf (1)
- Lift flexible shelf and pull it out (2).
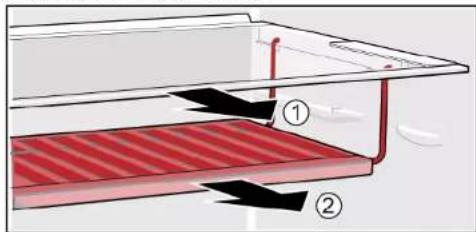
Flexible shelf is removed.
4.9.2 Installing flexible shelf
Install in reverse order.

Repair
4.10 Replacing breakfast set
Prerequisite:
Door is open.
4.10.1 Removing breakfast set
- Lift breakfast set and pull it out.
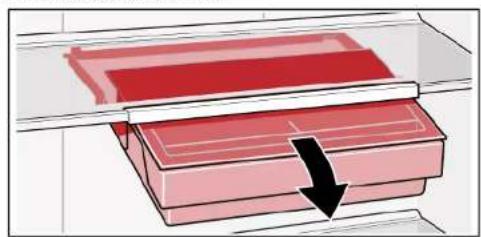

Breakfast set is removed.
4.10.2 Installing breakfast set
Install in reverse order.

Repair
4.11 Replacing bottle tray
Prerequisite:
Door is open.
4.11.1 Removing bottle tray
Pull out bottle tray.
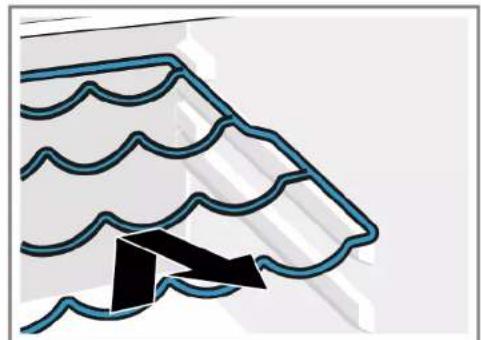

Bottle tray is removed.
4.11.2 Installing bottle tray
Install in reverse order.

Repair
4.12 Replacing door rack
Prerequisite:
Door is open.
- Lift door rack upwards.
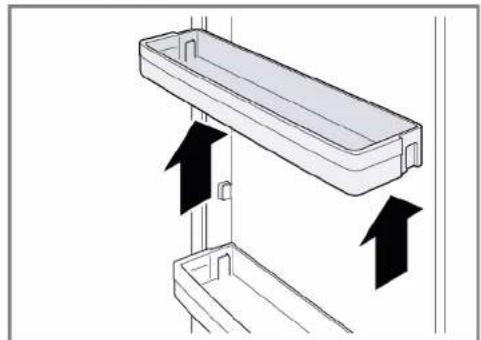
Door rack is removed.
Install in reverse order.

Repair
4.13 Replacing frozen food container
Prerequisite:
Door is open.
4.13.1 Removing frozen food container
- Pull out frozen food container all the way (1).
- Remove food container (2).
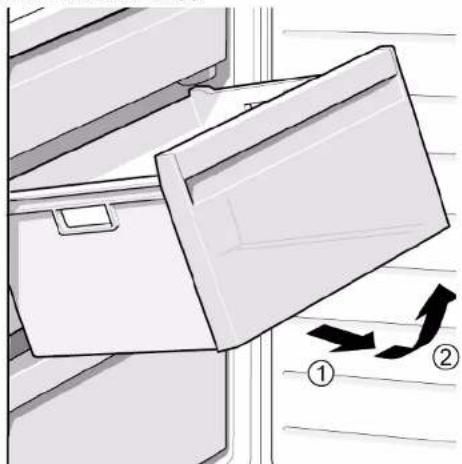

Frozen food container is removed.
4.13.2 Installing frozen food container
Install in reverse order.

Repair
4.14 Replacing container
Prerequisite:
Door is open.
4.14.1 Removing container
- Move out lower fridge container (1).
- Move out upper fridge container (2).
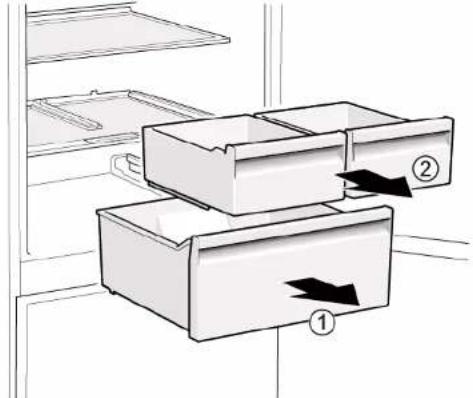

Containers are removed.
4.14.2 Installing container
Install in reverse order.

Repair
4.15 Replacing extendable container
Prerequisite:
Door is open.
4.15.1 Removing extendable container
- Pull extendable container out all the way (1).
- Remove extendable container (2).
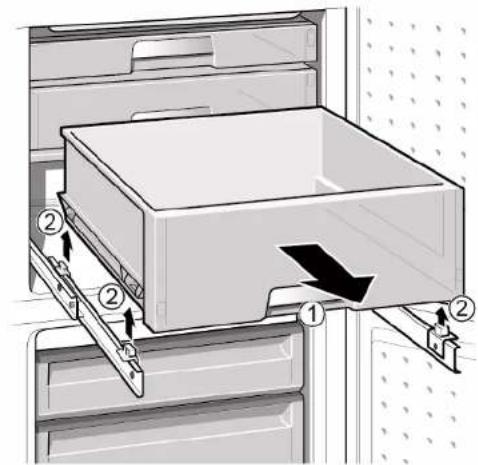

Extendable container is removed.
4.15.2 Installing extendable container
Install in reverse order.

Repair
4.16 Replacing LED spot light
Required tools:

Special tool [00342180]

Your appliance features a maintenance-free LED light. These lights may be repaired by customer service or authorised technicians only!
Danger to life through electric shock in case of improper repair
Electric parts should be repaired by a qualified electricians.
After the repair have a safety test according VDE 0701 or country-specific regulations performed.
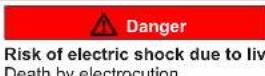
Disconnect appliances from electrical supply at least 60 seconds before starting repairs.
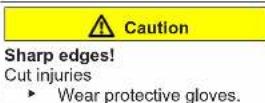
Prerequisite:
Appliance is disconnected from power supply.
Door is open.
4.16.1 Removing LED spot light
- Use special tool to pull out LED spot light (1).
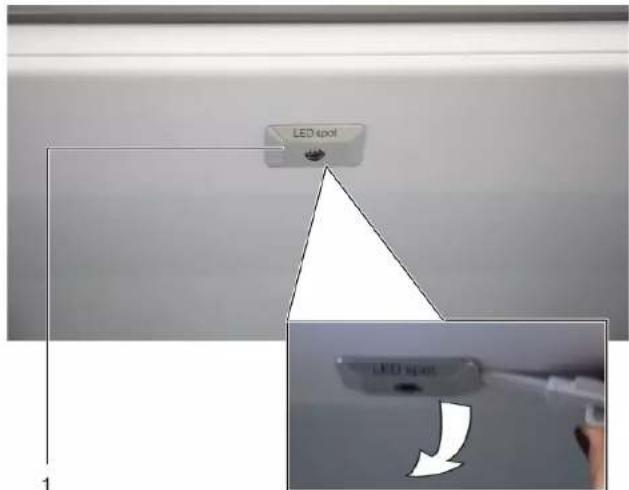
- Unplug electrical connections of LED spot light.
LED spot light is removed.
4.16.2 Installing LED spot light
Install in reverse order.

Repair
4.17 Replacing LED top light
Required tools:
Slotted screwdriver Blade 2.4 mm x 0.4 mm x 60 mm, in the kit [00341820]

Your appliance features a maintenance-free LB
These lights may be repaired by customer service or authorised technicians only!


Danger
Risk of electric shock due to live parts!
Danger to life through electric shock in case of improper repair
Electric parts should be repaired by a qualified electricians.
After the repair have a safety test according VDE 0701 or country-specific regulations performed.


Danger
Risk of electric shock due to live parts!
Death by electrocution
- Disconnect appliances from electrical supply at least 60 seconds before starting repairs.


Caution
Sharp edges!
Cut injuries
Wear protective gloves.
Prerequisite:
Appliance is disconnected from power supply.
Door is open.
Upper interior fittings are removed.
4.17.1 Removing LED light
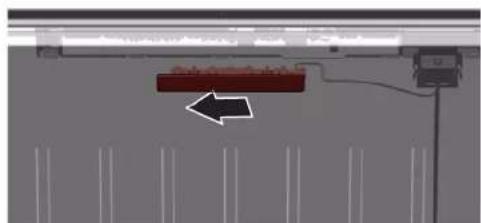
- Move the LED light to the left side.
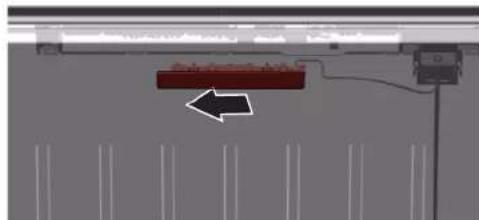
LED light electrical connection is disconnected.
- Release LED light hooks.
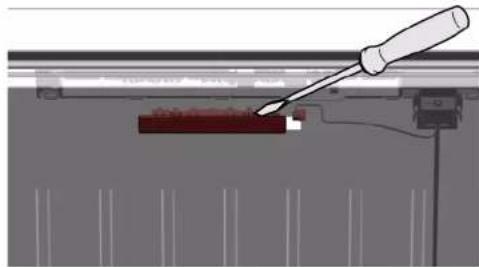

Repair
- Remove LED light moving it forward.
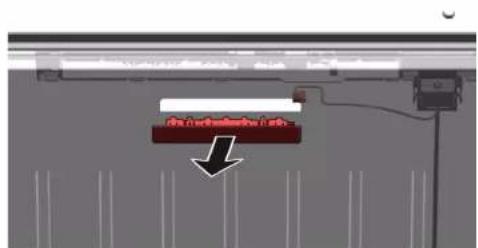
LED light is removed.
4.17.2 Installing top LED light
Install in reverse order.

Repair
4.18 Replacing LED side bar light
Required tools:
Suction cup 050 mm [00342224]

Your appliance features a maintenance-free LED light. These lights may be repaired by customer service or authorised technicians only!
Prerequisite:
Appliance is disconnected from power supply.
Door is open.
Fridge compartment shelves are removed.
4.18.1 Removing LED side bar light
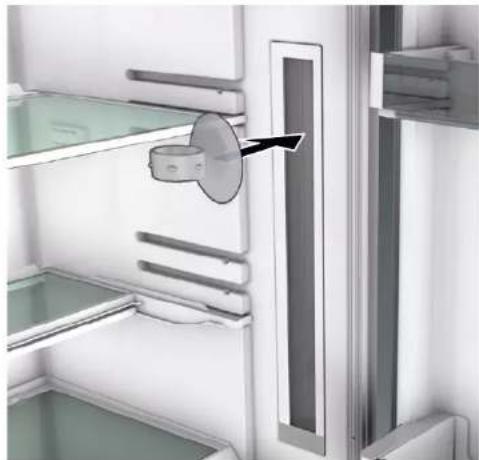
- Stick the suction cup on the upper third of LED side bar light.

Repair
- Pull suction cup with forward LED side bar light in one rotary movement.
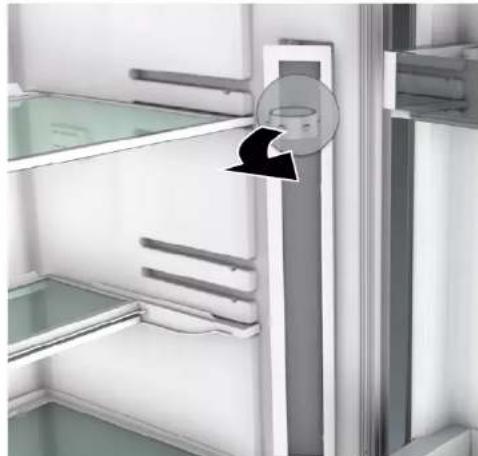
- Disconnect electrical connection of LED side bar light.
LED side bar light is removed.
4.18.2 Installing LED side bar light
- Connect electrical connection of LED side bar light.
- Fix LED side bar light into it's location on compartment wall (hooks click).
LED side bar light is installed.
Remonditeave - Kombikülmik
Selle dokumendiga seoses 177
1.1 Tahtis teave 177
1.1.1 Eesmark 177
1.2 Sumbolite selgitus 177
1.2.1 Ohutased 177
1.2.2 Ohusumbolid 177
1.2.3 Hoiatuste struktuur 178
1.2.4 Üldised sumbolid 178
Ohutus 179
2.1 Üldised ohutusjuhised 179
2.1.1 Kofik kodumasinad 179
Tabel 1: Ohutasedmed
1.2.2 Ohusumbolid
Ohusumbolid on sumboolsed kujutised, mis viytavad ohu laadile. Selles dokumendis kasutatakse alljargnevaid ohusumboleid.
Eritorist [00342180]

La clayette flexible est retiree.
4.9.2 Monter la tablette flexible
Outil special [00342180]

m = 311
1.2.3 Doun Twv TpoeiToiOneWv
OITPOEIOIIOAEiOe auto To Eyypao Exouv Mua TUTOTOIINeVn EpaVion KAI MIA TUTOTOIINeVn Doun.


KINADYNOE
EiOgKai Tny KIVovou!
PiBavcs ouveteies edyayvonaeToV KIOUVO/THV TPOEOToln.
Mtpa kai aayopeuoeic yia tyn pOAnn tou Kivouou.
To napakutnapadeyia deixvei maipinoeodtoinn Tou pioeiodtoei kat a n n n n n n n n n n n n n n n n n n n n n n n n n n n n n n n n n n n n n n n n n n n n n n n n n n n


KINADYNO
Kivouos nAekptponanlag Aoyw nAektpopopowepw!
Oavatoa nto nkeptnla
AToouvdeTe Tc oukeuec aTTO nV npoxn nAekptikou pEuatoc
Touaxiotov 60 deutepoaettna piv Eekivnoete Tc ETIOKEUEC.
1.2.4 Tevik
Ta akolouba yevikα σμβoλ xρησιοποιuovtai oTo napov εyypapo:
Mun Torx TX20 6.3 mm (1/4") [00340865]
Pnakke katoaibi Aetia 10 mm x 1,6 mm x 200 mm
PouTo6eOg:
Houkeunivataoovudevnantoynpaoxnpofoa
H Tóptá éival avoixTn.
4.2.1 Aqaipeoan aBnns tropras
1.Apaipoe ta duu mua bioc(1).
2.3εβδωτε δuο βδες (2).
3.Apaieote nAaBn nC nproas (3).

HaaBnTns TOpTaEeI apapeBei

H aβn triptac yia tn deutepn tropta mtopei va aqpaiee ie tov ibio npTO.
4.2.2 ToTobetnnon aBns tropas
Eykataotnote nV aTtBttn eipa

EMIOKEUN
4.3 Avikataoan Eavw mevtoe tropas
EiokaBonBntikαμεσα:
Mun Torx TX20 6,3 mm (1/4") [00340865]
IPOEIOIHEN
Bapie,oykwdeis oukeuec
Tpaunpatiogoi eonkaipuwv
Hdiakiaia aqaipeoans nTn TpOaTn OOUKEUNI pETTEI va
EKTAEITAI MOVO aTTO EKTAIDEOUEVOUc EIOIKOUs
Hetakivnon tsoukeun TpTeTie va EKTEAEiAto du o taopa.
XpooiotoiieTe mOvo kataaannaa epyaleia kai eonlaio.
NPOOxH
Aixunpeaekes!
Tpaunpoaianto kmt
Opate Ippoataeutikayavtia.
A PPOEIAOIOIHEN
Oia0nKeKaipevovoukeuov!
Katayata ootaw/tpaupatiaooi ouvBaiu
AopaaIote Tc oukeuec aTIO aIaOthon.

IPOSOXH
Kivduvoi ano mwn npw v faia c hao apw biov!
aoupatioos egatiaans wongns mpatow
Aopaiote ta eapntmuata ano Twnon.

PPOZOXHI
Kivuvwv ano Twnn eapntmuw v gaitas xalapwBidwV
Znuae aaaa aepn ts ouokueu n otyn oikia tou Taeatn, x. datteo
AopaaioTe ta eapntmuataaio Twn
PountoEaŋ:
H ouakeun eivai aonouvodepevn an to nT npox npofoooiac.
ApaipouviT a eowtepiKa eapntnata ouokeuC.
4.3.1 AqaipeoN ETrawu MeVTeE TOpTAs
- TOnoBcTeHnTo nouKeun otyn Niow nIeupa.

EMIOKEUN
4.13.2 ToToBéTnO uptapiou KATEeuuyevwV TpoipuW
EvkataoTnote me tynavtiOtn oipa.
EπIOKεUN
4.14 Avikataoan ouptapiou
PouT6ean:
H Tóptá éival avoiXTH.
4.14.1 Aqaiepoou
Eiokoεpyaλeio[00342180]

Houkeun diabeet eva quc LED tou dev xpeidctai auvtnpan. Auta ta qwta mtropov vaetaekauotov mvo ato tvn egutnpen Tneatuv n ao eouaoiootmveoux TeVKoo
KINADYNOE Kivuyoc nAekptponAnieac Aovw
Kivvovc nAekptponnngiaos Aoyw nAektpoopowepow!
Kivvocva in nwn atio nekrtponia o nepittwnakatdaannc
Ta naekpikae npn tpette va eTIOKEAUovai tio kTeAIEeouc TaekpOAOyOUs.
MetaTnEvETIOKEUnTTpayuatoTOIOInoteEeVyoAoPaeIacOUPUVA μEto VDE 0701 nKavovioouc tsouykepiEvns xpaas.
KINAYNOE
Kivouo nKetpOraIaoc Aoyw NkTPOVU HEPW! OAtovoc atno NkTPOAnia
ATOauvduete TIG OKEuEs aTIO TIV TAPoxn NAEKtPikopeuato tsouaxioT6 0eutepeaTTI PPV EKivnoTe TIS ETIOKEues.
NPOSOXH
Aixmupe akec? Taupauaioi oitro kotri
Φopáte TPOOATEUITKA yáVTIA.
PouT6eGn:
H oukeun eivai aioouvdeepv ano Tnv npox npopodocia
H nóptα εναλ ovoixn.
4.16.2 ToTtoBttnon spot wwnou LED
EykataaTnOte mTvavltBent oepia.

EMIOKEUN
4.17 AvikataoTaon eTavw wToC LED
Eioka Bonntika eo:
4.17.1 Apaipoeon ±b wroLED
- MetakivnoTe TO pws LED Otnv apiotepn Taeupa.
Torx uzgalis TX20 6,30mm (1/4") [00340865]
BRIDINAJUMS
Smaga Iellzmera Ierice!
Muguras un muskulu savainojumi
lerces durvis drikst nopem tikai apmacits specialists.
lericeirjaparvietrodivata.
Ir jaizmanto tikai piemeroi darbariki un aprkojums.
ESIET PIESARDZIGI
Asas malas!
Grieztas bruces
Lietojiet aizsargcimdus.
BRIDINAJUMS
Sasveruos iericu paslidesana!
Kaulu luzumi / saspieesan traumas
Cap torx TX20 6.3 mm (1/4") [00340865]
Surubelinita platá Lamá de 10 mm x 1,6 mm x 200 mm
Cerintă:
Aparatul este deconectat de la sursa de energia electrica.
Usa este beschisä.
Cap torx TX20 6.3 mm (1/4") [00340865]

AVERTISMENT
Aparate grele, masive!
Accidentarea spatelui si leziuni musculare
Cap torx TX20 6.3 mm (1/4") [00340865]

AVERTISMENT
Aparate grele, masive!
Accidentarea spatelui si leziuni musculare
Cap torx TX20 6.3 mm (1/4") [00340865]

AVERTISMENT
Aparate grele, masive!
Accidentarea spatelui si leziuni musculare
Cap torx TX20 6.3 mm (1/4") [00340865]

AVERTISMENT
Aparate grele, masive!
Accidentarea spatelui si leziuni musculare
Instrument special [00342180]

Aparatul dumneavoastré este echipat cu o lampa LED care nu necessita Intretinere.
Aceste lampi pot fi nlocuite numai de câtre département du service pentruclienti saudecalctehnicieni autorizatl!


PERICOL
m = 311
- Tryck in hela packningen i sparet bit for bit.

Special tool [00342180]

- OTHOCHO To3n DokyMeHT
- Baxha nHΦopMaζη
- Uen
- 06aCHeHne Ha cHMBOJInTe
- HbHa onachoct
- Cnmbon3a onachoct
- PemOH
- CmHa Ha rohata naHt ha BpataTa
- PENEUPPEXDEHNE
- CmHa Ha rohata naHTa Ha BpaTata (BpTa c dncnnei)
- PPEUYPNPEJDEHNE
- MoHTnpaHe Ha roPHaTa nAHTa Ha BpaTaTa
- CmHa Ha cpeHata naHTa Ha Bpata
- PDEYIPKXDEHNE
- 4.6CMraHa Ha donHaTa naHTa Ha BpaTaTa
- PNEyPEXKDEHNE
- CmHa Ha paPta
- N3BaXdAne Ha paΦTa
- MoThupaHe Ha paΦTa
- CmHa Ha npomehnB paΦT
- OTeTpaHraBaHe Ha npomEHHB paΦT
- MoHTIpaHe Ha npOMeHINBnPa paT
- CmHa Ha npomeHnBna paΦT
- OTeTpaHbAe Ha npomeHnBna paΦT
- MoHTnpaHe Ha TBKBaBn paΦT
- CmHa Ha KOMnJKeTa 3a 3aKycka
- PpeMaxBaHe Ha KOMJIeKtA 3a 3aKycka
- MoHTIpaHc Ha KOMIIeKTa 3a 3aKycka
- CmraHa Ha Ta6nukata 3a 6ytunkn
- CbajnHe Ha Ta6nukata 3a 6ytunkn
- MoHTnpaHHe Ha Ta6nUkKaTa 3a 6yTnKu
- CmHa Ha cTeNa Ka Ha BpaTaTa
- 3BaxdaHe Ha cTeJaKa Ha BpaTaTa
- MoHTnpaHe Ha cTeNaKa Ha BpaTaTa
- CMHa Ha KOHTeHepa 3a 3ampa3EHn XpaHHTeHH npOdykTN
- N3Baxdahe Ha KOHTeHepa 3a 3ampa3EH XpaHNTenH npOdykTN
- MoHTnpaHe Ha KOHTeHepa 3a 3ampaehn XpaHntEnn npOdykTN
- CMHa Ha LED cnot JAmnata
- ONACHOCT
- BHIMATEHNO
- CbānHa He LED cNOT JAmNaTa
- MoHTnpaHe Ha LED cnot lamnata
- CMЯHa HA LED oCBeTneHneTo otrope
- BHIMATEJIHO
- CbajnHe Ha LED ocBtJeHneTo
- MoHTnpaHe Ha LED ocBETneHnEto OTrope
- CMnHa Ha LED cbEtnnHata Ha cTpaHnHaTa JeHtA
- BHIMATEENHO
- CbānHe HA LED cbTJnHaTa Ha ctpaHnHaTa JeHTa
- MoHTnpaHc Ha LED cBeTnHaTa Ha cTpaHnHaTa IeHTa
- PAS PAI
- BEMERKI
- BEM/ERK!
- FARE
- Preindstilling:
- Udskifting at LED-spotlampe
- Montering of LED-spotlampe
- Reparation
- Udskifting at LED-lampe foroven
- Repair hints - Fridge-freezer
- Concerning this document
- Important information
- Purpose
- Explanation of symbols
- Danger levels
- Hazard symbols
- Structure of the warnings
- Danger
- General symbols
- Safety
- General Safety instructions
- All domestic appliances
- Tools and aids
- Repair
- Replacing door handle
- Removing door handle
- Replacing door upper hinge (door with display)
- A Warning
- Caution
- Warning
- Notice
- Replacing door middle hinge
- Removing door middle hinge
- Installing door middle hinge
- Replacing door lower hinge
- Removing door lower hinge
- Replacing shelf
- Removing shelf
- Installing shelf
- Replacing variable shelf
- Removing variable shelf
- Installing variable shelf
- Replacing flexible shelf
- Removing flexible shelf
- Installing flexible shelf
- Replacing breakfast set
- Removing breakfast set
- Installing breakfast set
- Replacing bottle tray
- Removing bottle tray
- Installing bottle tray
- Replacing door rack
- Replacing frozen food container
- Removing frozen food container
- Installing frozen food container
- Replacing container
- Removing container
- Installing container
- Replacing extendable container
- Removing extendable container
- Installing extendable container
- Replacing LED spot light
- Removing LED spot light
- Installing LED spot light
- Replacing LED top light
- Removing LED light
- Installing top LED light
- Replacing LED side bar light
- Removing LED side bar light
- Installing LED side bar light
- Remonditeave - Kombikülmik
- Ohusumbolid
- Monter la tablette flexible
- m = 311
- Doun Twv TpoeiToiOneWv
- KINADYNOE
- KINADYNO
- Tevik
- Aqaipeoan aBnns tropras
- ToTobetnnon aBns tropas
- EMIOKEUN
- Avikataoan Eavw mevtoe tropas
- IPOEIOIHEN
- NPOOxH
- A PPOEIAOIOIHEN
- IPOSOXH
- PPOZOXHI
- AqaipeoN ETrawu MeVTeE TOpTAs
- ToToBéTnO uptapiou KATEeuuyevwV TpoipuW
- EπIOKεUN
- Avikataoan ouptapiou
- Aqaiepoou
- KINADYNOE Kivuyoc nAekptponAnieac Aovw
- KINAYNOE
- NPOSOXH
- ToTtoBttnon spot wwnou LED
- AvikataoTaon eTavw wToC LED
- Apaipoeon wroLED
- BRIDINAJUMS
- Smaga Iellzmera Ierice!
- ESIET PIESARDZIGI
- Asas malas!
- Sasveruos iericu paslidesana!
- AVERTISMENT
- PERICOL
Brand : Profilo
Model : BD2076LFXN
Category : Refrigerator