
Steam Power 24420 - Iron RUSSELL HOBBS - Free user manual and instructions
Find the device manual for free Steam Power 24420 RUSSELL HOBBS in PDF.
| Product type | Steam generator iron |
| Brand | Russell Hobbs |
| Model | Steam Power 24420 |
| Power supply | 220-240 V ~ 50/60 Hz |
| Power | 2400 W (estimated) |
| Tank capacity | Approximately 1.5 L (estimated) |
| Functions | Steam ironing, dry ironing, vertical steam |
| Thermostat | Adjustable according to fabric type |
| Indicator lights | Power indicator, steam operation indicator, warning/reset indicator |
| Anti-scale system | Replaceable anti-scale cartridge (lifespan ~100 uses in soft water) |
| Safety | Overheat protection cut-off, do not immerse, use on stable heel |
| Maintenance and cleaning | Clean the soleplate with vinegar, wipe surfaces with a damp cloth |
| Included accessories | Steam hose clip, plug storage compartment |
| Recommended water type | Tap water (demineralized water in hard water areas) |
| Usage | Household use only |
| Weight | Not specified in the manual |
| Dimensions | Not specified in the manual |
Frequently Asked Questions - Steam Power 24420 RUSSELL HOBBS
User questions about Steam Power 24420 RUSSELL HOBBS
0 question about this device. Answer the ones you know or ask your own.
Ask a new question about this device
Download the instructions for your Iron in PDF format for free! Find your manual Steam Power 24420 - RUSSELL HOBBS and take your electronic device back in hand. On this page are published all the documents necessary for the use of your device. Steam Power 24420 by RUSSELL HOBBS.
USER MANUAL Steam Power 24420 RUSSELL HOBBS
natural_image
Steam power iron with attached cord and brand logo (no visible text or symbols on body)


natural_image
Line drawing of a steam iron with attached circuit board (no text or symbols)IMPORTANT SAFEGUARDS
Follow basic safety precautions, including:
This appliance can be used by children aged from 8 years and above and persons with reduced physical, sensory or mental capabilities or lack of experience and knowledge if they have been supervised/instructed and understand the hazards involved. Children shall not play with the appliance. Cleaning and user maintenance shall not be done by children unless they are older than 8 and supervised. Keep the iron and cable out of reach of children under 8 years.
Sit the base unit on a stable, level, heat-resistant surface, preferably a purpose-built “steam generator” type ironing board.
Rest the iron only on the base unit.
Don't leave the iron unattended while plugged in or standing on the ironing board. It could be knocked over.
Don't use the iron if it's dropped, damaged, malfunctions or leaks.
If the cable is damaged, return the iron, to avoid hazard.
The surfaces of the appliance will get hot.
Don't put the iron in liquid, don't use it in a bathroom, near water, or outdoors.
- Route the cable so it doesn't overhang, and can't be tripped over or caught.
- Don't iron clothing while it's being worn – you'll burn or scald the wearer.
- Don't touch the soleplate, and keep away from the steam coming from it.
- Don't use the iron in the vicinity of children.
- Don't sit the base unit on a soft, carpeted, or upholstered surface, as this may block the vents underneath the base unit.
- Keep the cables and steam pipe away from hot parts.
- Don't use the iron for any purpose other than those described in these instructions.
- Take care not to scratch the soleplate – avoid buttons, zips, etc.
- The iron has a protective thermal fuse, which will blow if it overheats. If this happens, the iron will stop working, and must be returned for repair.
HOUSEHOLD USE ONLY
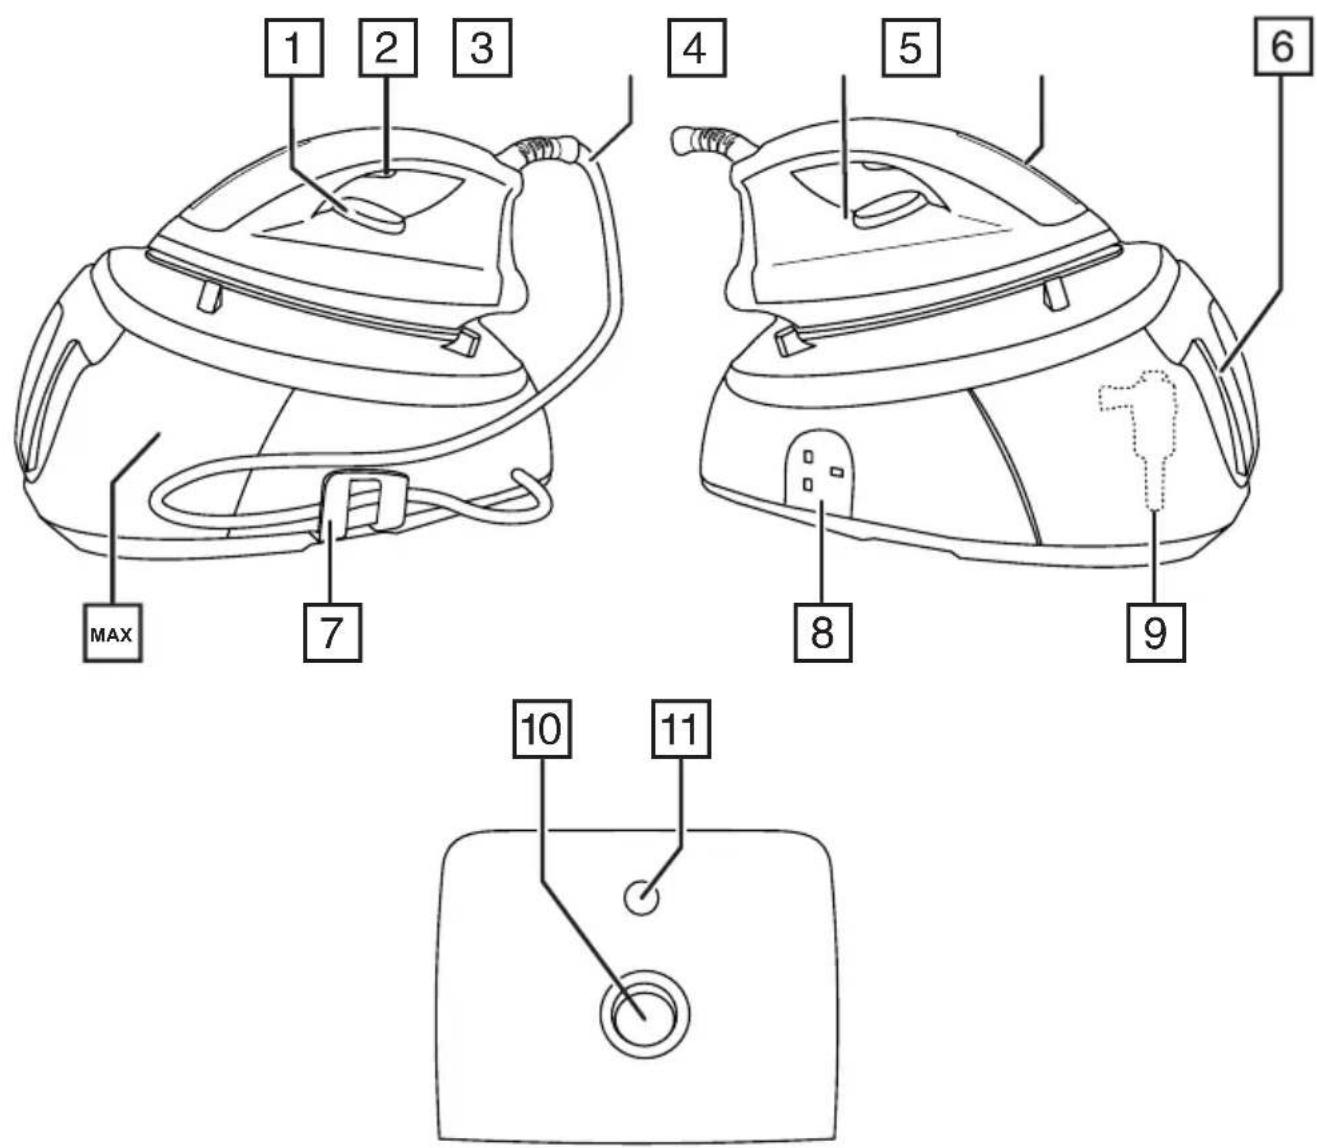
DIAGRAMS
- Temperature control
- Steam button
- Steam pipe
- Mark
- Power light
-
Reservoir
-
Steam pipe clip
- Plug storage
- Anti scale cartridge (inside reservoir)
- On/off switch
- Steam ready light
BEFORE FIRST USE
- Remove any labels, stickers or packaging from the iron and soleplate.
- Before using the iron for the first time, or if it's not been used for a long time, iron a scrap piece of cotton (an old towel is ideal) to remove any accumulated residues.
- Don't worry if the iron smokes a bit at first, it will soon stop as the manufacturing residues evaporate.
FILLING/REFILLING
You may use the iron with tap-water, but if you live in a hard water area, you should use distilled water (not chemically descaled or softened water).
If you buy distilled water, check that it's suitable for use in irons.
- Remove the reservoir by pulling it away from the body of the steam generator using the grip on the front of the reservoir.
- Fill the reservoir to the max mark. Do not exceed the max mark.
- Refit the reservoir into the base unit.
PRELIMINARY SETTINGS
- Put the iron on top of the base unit.
- Put the plug into the power socket (switch the socket on, if it's switchable).
- Turn the unit on by setting the on/off button to I.
- Turn the temperature control to bring the setting you require next to the mark.
TEMPERATURE SELECTION GUIDE
- Check for textile care symbols (☒☐☐☐).
- Iron fabrics needing low temperatures first, then those that need medium temperatures, and finish with those needing high temperatures (or max).
- Turn the temperature control to bring the setting you require next to the mark.
If the instructions on the fabric label differ from this guide, follow the instructions on the label.
| Label marking | Dot setting |
| cool – nylon, acrylics, polyester | ● |
| warm – wool, polyester mixtures | ●● |
| hot – cotton, linen | ●●●/max |
| do not iron |
STEAM IRONING
-
Set the temperature control to 🏠 or higher – otherwise the steam might condense on the soleplate, giving you water instead of steam.
-
Squeeze the steam trigger to produce steam, release it to stop.
NOTE: When you first start your steam station and pull the trigger for steam ironing, there will be a delay as your steam station pumps water from the reservoir to prime the system. This is normal and may take 20-30 seconds. This will also happen after refilling the reservoir.
STEAM READY LIGHT
The steam ready light will flash while the iron is heating up. Wait until the steam ready light stops flashing before trying to steam iron. Note that operating the steam trigger will have no effect until the steam ready light stops flashing.
DRY IRONING
You can dry iron by just not pressing the steam button, but if you want to make sure you don't press it accidentally, then you should iron with an empty reservoir. You can do your dry ironing first, then switch off, fill the reservoir and do your steam ironing.
VERTICAL STEAMING
Remove wrinkles from hanging clothes, hanging curtains, and furnishing fabrics.
- Check that there's adequate ventilation behind the fabric otherwise moisture may build up causing mildew.
- Check that there's nothing behind the fabric that may be damaged by the steam.
- Check that pockets, turn-ups, and cuffs are empty.
- Set the temperature control to max.
- Hold the iron close to (but not touching) the fabric.
We recommend using the steam button to produce steam for smaller areas, as it gives you better control.
AFTER USE
- Put the iron on top of the base unit and turn the temperature control to ●.
- Set the on/off switch to O and unplug the base unit.
- Empty the reservoir.
- Let the iron cool down completely before cleaning it, moving it, or storing it away.
- The steam pipe can be coiled together and placed into the hose clip.
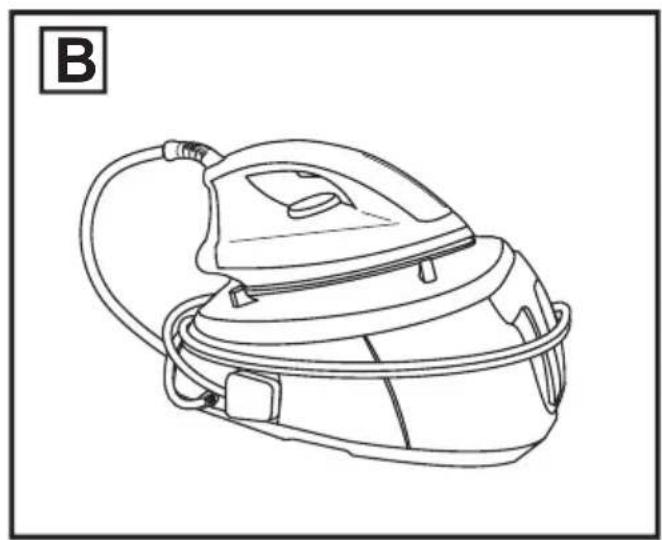
- Wrap the mains cable around the steam generator in an anti-clockwise direction then slot the plug into the socket (Fig B).
CARE AND MAINTENANCE
- Unplug the base unit, and let the appliance cool down fully.
- Wipe outer surfaces with a damp cloth.
- Remove spots from the soleplate with a little vinegar.
- Take care not to scratch the soleplate.
ANTI-SCALE CARTRIDGE
To extend the life of the appliance and to avoid problems with lime scale, your steam generator is fitted with an anti-scale cartridge. The life of the anti-scale cartridge depends on the frequency of use and the hardness of the water in your area. In a soft water area this should be about 100 uses. Do not put any descaling products (including vinegar) into the reservoir. This can damage the appliance.
To replace the cartridge:
- Switch off and unplug your steam generator
- Allow your steam generator to cool down for at least 1 hour until the soleplate is cold.
- Remove the reservoir from the front of the unit.
-
Pull the anti-scale cartridge vertically out of the reservoir. Note that the cartridge may contain water when it is removed (Fig A).
-
Fit the new cartridge and push it down firmly into the water tank.
-
Refill and refit the reservoir.
-
Plug in your steam generator.
-
Once the appliance is ready, pull the steam trigger until the steam is being produced. This will prime the system.
Important: Using the appliance without changing the cartridge can cause a reduction in the generated steam output and damage the appliance. The guarantee will not cover damage caused to the appliance by not changing the anti-scale cartridge when required.
REPLACEMENT ANTI-SCALE CARTRIDGES
Contact your local service agent with the model number for information on how to purchase replacement anti-scale cartridges. See the enclosed guarantee card for details.
RECYCLING

To avoid environmental and health problems due to hazardous substances, appliances and rechargeable and non-rechargeable batteries marked with one of these symbols must not be disposed of with unsorted municipal waste. Always dispose of electrical and electronic products and, where applicable, rechargeable and non-rechargeable batteries, at an appropriate official recycling/collection point.