SelecTone 302GC - Speaker Federal Signal - Free user manual and instructions
Find the device manual for free SelecTone 302GC Federal Signal in PDF.

User questions about SelecTone 302GC Federal Signal
0 question about this device. Answer the ones you know or ask your own.
Ask a new question about this device
Download the instructions for your Speaker in PDF format for free! Find your manual SelecTone 302GC - Federal Signal and take your electronic device back in hand. On this page are published all the documents necessary for the use of your device. SelecTone 302GC by Federal Signal.
USER MANUAL SelecTone 302GC Federal Signal
People's lives depend on your safe installation of our products. It is important to read, understand and follow all instructions shipped with these products. Listed below are some other important safety instructions and precautions you should follow:
- This unit must be installed by a qualified electrician in accordance with all National and Local Electrical Codes, and be acceptable to the Local Authority Having Jurisdiction.
- Do not connect this unit to the system wiring when circuits are energized.
- For optimum sound distribution do not install this device where objects would block any portion of the front of the speaker.
- All effective warning speakers produce loud sounds, which in certain circumstances, may cause permanent hearing loss. Take appropriate precautions such as wearing hearing protection. Recommendations in OSHA-Sound Level Standard (29 CFR 1910) should not be exceeded.
- After installation and completion of initial system test, provide a copy of this instruction sheet to all personnel responsible for operation, periodic testing, and maintenance of the equipment.
WARNING
Failure to follow all safety precautions and instructions may result in property damage, serious injury, or death to you or others.
I. GENERAL
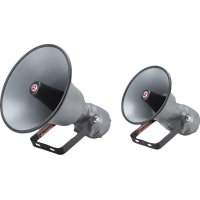
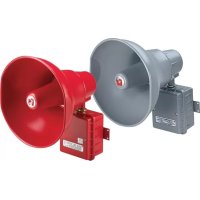
These SelectTone ^® Models are high output, continuous duty, indoor/outdoor rated audible signal/amplified speaker devices with internal gain controls. A plug-in tone module is required for tone generation. If the use of externally generated tones or voice signals from a remote amplifier is desired, the plug-in speaker connector cards may be used. See the specification section for compatible plug-in models. These models may also be used for playback of pre-recorded messages or tones when used with the Model TM-33 Custom Tone Module. The mounting bracket is adjustable to allow positioning to obtain desired sound coverage. Speaker projectors on all models are adjustable and may be repositioned to obtain desired sound distribution.
The SelectTone Models 300GCX and 302GCX are designed for use in areas where Flammable Gases, Vapors and Liquids and Combustible Dusts are not normally present, except for abnormal conditions as defined by the National Electrical Code. These models are suitable for use in Class I, Division 2, Groups A, B, C, & D; Class II, Division 2, Groups F and G; Class III or non-hazardous locations only. The Selectone Models 300GCX-CN and 302GCX-CN are suitable for the use in Class I, Zone 2 and Zone 22 or non-hazardous locations only.
II. SPECIFICATIONS
Operating Voltages: 24 VAC/DC, 120 VAC, 240 VAC
Supervisor Voltage: 50 VDC (When speaker plug-in module is installed.)
Current Requirements:
300GC & 300GCX(-CN): 24 VAC - 1.0 A 24 VDC - 1.0 A
120 VAC - 0.25 A 240 VAC - 0.15 A
302GC & 302GCX(-CN): 24 VAC - 1.5 A 24 VDC - 1.5 A
120 VAC - 0.3 A 240 VAC - 0.15 A
Weight 24 VAC/DC 120 VAC, 240 VAC
300GC: 4.5 lb [2.0 kg] 5.5 lb [2.5 kg]
300GCX(-CN): 4.9 lb [2.2 kg] 5.9 lb [2.7 kg]
302GC: 6.1 lb [2.8 kg] 7.5 lb [3.4 kg]
302GCX(-CN): 6.5 lb [3.0 kg] 7.9 lb [3.6 kg]
Construction
Amplifier Housing: Die-cast aluminum alloy with powder coated
finish. Housing sealed with a neoprene rubber
gasket. External mounting bracket on Models
300GCX & 302GCX series.
Speaker Cone Tip & Projector: Spun aluminum alloy with powder coated finish.
Sound Level on Axis @ 10 ft [3 m]: 300GC & 300GCX(-CN): 110dBA
302GC & 302GCX(-CN): 114dBA
Compatible Tone Modules: TM2, TM33-SD*, or UTM
* - Series A and B versions of the TM33-SD
module are not compatible.
Compatible Speaker Connector Cards: AM25CK*, AM70CK*, EM3, 300CK,
E-300CK, T-300CK, or 300CKS
* - Series A versions of these connector cards
are not compatible.
IIA. CERTIFICATION
A. Models 300GCX and 302GCX:
Operating Temperature Code:
| Max Operating Temp./T-Code at 66°C 40°C | ||
| CI, Div. 2, Grp. A,B,C,D | T2C | T3 |
| CII, Div. 2, Grp. F,G | T6 | T6 |
| CIII | T6 | T6 |
B. Models 300GCX-CN and 302GCX-CN:
Operating Temperature Code:
| Max Operating Temp./T-Code at 66°C 40°C | ||
| Class I, Zone 2 T2 T3 | ||
| Class II, Zone 22 T85°C T85°C | ||
Hazardous Locations Designation:
Class I, Zone 2, AEx nA IIC Gc;Zone 22 AEx tc IIIC Dc
Conditions of Acceptability:
- The device shall be used in an area of not more than pollution degree 2, as defined in IEC 60664-1.
- Provision shall be made to prevent the rated voltage being exceeded by the transient disturbances of more than 140%.
- Device to be mounted in vertical position only, with housing positioned below horn.
III. INSTALLATION
A. Unpacking
After unpacking the speaker, examine it carefully for possible damage that may have occurred in transit. If equipment has been damaged, immediately file a claim with the carrier stating the extent of the damage. Carefully check all shipping labels and tags for special instructions before removing or destroying them.
B. Mounting Arrangements (see Figure 1).
CAUTION
To maintain the Hazardous Location ratings of the Models 300GCX and 302GCX series enclosure, do not use the 0.9" knockout (concealed conduit mounting.)
The amplified speaker can be mounted on any relatively flat surface. Conduit connections can be made to the two 1/2" threaded openings at bottom of the housing. A 1/2" conduit plug is supplied for field installation if one of the 1/2" threaded openings is not utilized. After the mounting location and mounting method have been selected, proceed with the applicable instructions below.
WARNING
Property damage, serious injury, or death could occur if an accumulation of water, snow, dust, etc. resides in the speaker projector, severely reducing or preventing operation of this device. Mount the unit so speaker projector is pointed horizontally or slightly downward.
WARNING
Property damage, serious injury, or death could occur if the projector is mishandled during installation or over time. DO NOT rotate the projector more than 180 degrees or internal speaker wiring may be damaged.
- Flat Surface Mounting.
a. Remove and retain the two screws that secure cover to housing. Remove the cover.
WARNING
Property damage, serious injury, or death could occur if any objects are in front of the speaker, severely reducing optimum sound distribution. For maximum effectiveness, ensure that the front of the speaker is clear of obstructions.
b. Select the mounting location and place rear of the housing against mounting surface.
c. Using the mounting holes (two [2] inside for Models 300GC and 302GC's housing or four [4] outside for the Models 300GCX and 302GCX's series external housing bracket) as a template, scribe drill position marks on the mounting surface. See Figure 1 for mounting hole locations and dimensions.
CAUTION
Before drilling holes in any surface, ensure that both sides of surface are clear of items that could be damaged.
d. Secure the unit to a wooden mounting surface with #10 x 1" wood screws. If mounting on a metal surface, drill 13/64" diameter holes and secure the unit with #10 screws, lockwashers and nuts.
e. Route wires through the 1/2" threaded openings into the SelecTone unit in accordance with National and Local Electrical codes. Wire size depends upon the operating current and the distance from the power source.
f. Reposition speaker projector if necessary to obtain desired sound coverage. Loosen collar nut (see Figure 1) and move projector to desired position.
- Concealed Conduit Mounting (300GC and 302GC Models ONLY).
a. Remove and retain the two screws that secure cover to housing. Remove the cover.
b. Remove the 0.9" knockout at rear of housing.
c. Install the conduit connection.
d. Route wires through the 1/2" threaded openings into the SelecTone unit in accordance with National and Local Electrical codes. Wire size depends upon the operating current and the distance from the power source.
e. Select the mounting location and place rear of housing against mounting surface.
f. Using the two (2) mounting holes as a template, scribe drill position marks on the mounting surface. See Figure 1 for mounting hole locations and dimensions.
CAUTION
Before drilling holes in any surface, ensure that both sides of surface are clear of items that could be damaged.
g. Secure the unit to a wooden mounting surface with #10 x 1" wood screws. If mounting on a metal surface, drill 13/64" diameter holes and secure the unit with #10 screws, lockwashers and nuts.
h. Reposition speaker projector if necessary to obtain desired sound coverage. Loosen collar nut (see Figure 1) and move projector to desired position. Install 1/2" conduit plugs in the unused bottom entryways (one plug supplied).
C. Electrical Connections
DANGER
To avoid electrical shock, do not connect wires when circuits are energized.
WARNING
Never energize unit unless the cover is securely fastened to housing. Property damage, serious injury, or death could occur if the housing is not closed properly.
National and Local Electrical Codes must be adhered to in the installation and operation of these models. All electrical wiring must be routed through approved conduit and fittings as specified.
1. Power Connections
Use only 12 to 18 AWG [2.5 – 1.0 mm2] wire for the power connection. Strip no more than .25 inch [6 mm] of wire insulation from the ends of the power leads. If stranded wire is used, be sure that there are no loose strands outside the connector plug that could touch the adjacent lead and cause a short circuit. Tighten terminal screw 5 in-lb (0.56 N-m).
a. 24V AC/DC models
For 24VDC operation, connect the power source positive (+) lead to one of the (+) terminals of the connector plug and connect the power source negative (-) lead to one of the (-) terminals of the connector plug as shown in Figure 2. For 24VAC operation con-
nect the line (hot) power source wire to the terminal marked “L”. Connect the common (neutral) power source wire to the terminal marked “N”. See Figure 2. If required by local building codes, connect the earth ground wire to the green screw threaded into the interior of the housing.
b. 120VAC & 240VAC models
Connect the line (hot) power source wire to the terminal marked “L”. Connect the common (neutral) power source wire to the terminal marked “N”. See Figure 2. If required by local building codes, connect the earth ground wire to the green screw threaded into the interior of the housing.
Plug the connector into the receptacle provided on the printed circuit board.
- Tone Card Installation
NOTE
Tone card is purchased separately.
a. Plug the desired tone card into the socket as shown in Figure 2.
b. To ensure a proper seal, be sure that the rubber cover gasket is properly seated in the housing groove and reinstall the housing cover.
- Speaker Connector Card Installation (Models AM25CK, AM70CK, and 300CK).
NOTE
Connector card is purchased separately.
a. Route the audio signal leads into the enclosure and connect the signal leads to the connector card audio inputs. The connector cards are NOT polarity sensitive, however, polarity should be observed when placing units within close proximity to each other. Refer to the connector card installation manual provided with the connector card kit for additional wiring information.
b. Plug the desired connector card into the socket as shown in Figure 2.
c. To ensure a proper seal, be sure that the rubber cover gasket is properly seated in the housing groove and reinstall the housing cover. Tighten the two screws that secure cover to housing to 25-30 in-lbs.
WARNING
Property damage, serious injury, or death could occur if the housing is not closed properly. To reduce possibility of explosion, the housing cover must be kept tight while circuits are energized.
These devices are capable of producing sounds loud enough to cause hearing damage. Adequate hearing protection should be worn if standing within close proximity to device while testing. Recommendations in the OSHA Sound Level Standard (29 CFR 1910F) should not be exceeded.
A. After installation is complete, be sure to test the system to verify that each amplified speaker operates satisfactorily. If it is found that the unit is too loud for its location, an internal volume control can be adjusted. Remove the housing cover. Using a slotted screwdriver with a 1/8" blade, gently turn control to desired loudness. See Figure 2. Reinstall the housing cover.
B. After completion of initial system test, establish a program for periodic testing of this device.
C. Provide a copy of these instructions for the Safety Engineer, system operator(s) and maintenance personnel.
SAFETY MESSAGE TO OPERATORS
Even if your warning system is operating properly, it may not be completely effective. People may not hear or heed your warning signal. You must recognize this fact and ensure that your warning signal achieves its intended effect through proper test/training sequences within your specific application(s).
WARNING- EXPLOSION HAZARD
Substitution of components may impair suitability for Class I, Division 2, and Class I, Zone 2.
V. MAINTENANCE
SAFETY MESSAGE TO MAINTENANCE PERSONNEL
Failure to follow all safety precautions and instructions may result in property damage, serious injury, or death to you or others.
- Read and understand all instructions before performing maintenance on this unit.
- To reduce the risk of electrical shock or ignition of hazardous atmospheres, do not perform maintenance or service on this unit when circuits are energized.
-
Periodic checks should be made to ensure that effectiveness of this device has not been reduced because speaker has become clogged with a foreign substance or because objects have been placed in front of the speaker.
-
Any maintenance on this unit MUST be performed by a licensed electrician in accordance with NEC guidelines and local codes.
- Never alter these units in any manner. Note, additional openings or alterations made to the 300GCX or 302GCX Series Models may jeopardize the safety of the hazardous location.
- The nameplates, which contain cautionary or other information of importance to maintenance personnel, should not be obscured if the exterior of device is painted.
A. Periodically inspect this device to verify that there are no foreign substances in, or in front of the speaker, which will reduce its notification effectiveness.
B. Periodic evaluation on the performance of the unit should be conduct at regular intervals.
C. In the event a volume adjustment or other repair is required, be sure to refer to the Safety Message For Maintenance Personnel before proceeding.
WARNING
Unauthorized repair/servicing of the unit may result in degradation of performance and/or safety, resulting in property damage, serious injury, or death to you or others. If a malfunctioning unit is encountered, do not attempt any field repair/retrofit of parts.
VI. SERVICE
Federal Signal will service your equipment or provide technical assistance with any problems that cannot be handled locally.
Any units returned to Federal Signal for service, inspection, or repair, must be accompanied by a Return Material Authorization. This R.M.A. can be obtained from the local Distributor or Manufacturer's Representative.
At this time a brief explanation of the service requested or the nature of the malfunction, should be provided.
Address all communications and shipments to:

FEDERAL SIGNAL
Safety and Security Systems
2645 Federal Signal Drive
University Park, Illinois 60484-3167
www.fedsig.com
Customer Support 800-344-4634 • +1 708 534-4756
Technical Support 800-524-3021 • +1 708 534-4790
| Part Models Part Number | ||
| Amplifier Sub-Assy. | 300GC-024, 300GCX-024(-CN),300GC-120, 300GCX-120(-CN),300GC-240, 300GCX-240(-CN) | K2005502-04 |
| Amplifier Sub-Assy. | 302GC-024, 302GCX-024(-CN),302GC-120, 302GCX-120(-CN),302GC-240, 302GCX-240(-CN) | K2005502-02 |
| Amplifier Power Board 300 | GC-024, 300GCX-024(-CN) K2001961-05 | |
| Amplifier Power Board | 300GC-120, 300GCX-120(-CN),300GC-240, 300GCX-240(-CN) | K2001961-04 |
| Amplifier Power Board 302 | GC-024, 302GCX-024(-CN) K2001961-03 | |
| Amplifier Power Board | 302GC-120, 302GCX-120(-CN),302GC-240, 302GCX-240(-CN) | K2001961-02 |
| Speaker | 300GC-024, 300GCX-024(-CN),300GC-120, 300GCX-120(-CN),300GC-240, 300GCX-240(-CN) | 8593082 |
| Speaker | 302GC-024, 302GCX-024(-CN),302GC-120, 302GCX-120(-CN),302GC-240, 302GCX-240(-CN) | 8593103 |
| Transformer 300GC-120, 300 | GCX-120(-CN) K120857 | |
| Transformer 300GC-240, 300 | GCX-240(-CN) K120858 | |
| Transformer 302GC-120, 302 | GCX-120(-CN) K120846 | |
| Transformer 302GC-240, 302 | GCX-240(-CN) K120856 | |
| Voice Coil | 300GC-120, 300GCX-120(-CN),300GC-240, 300GCX-240(-CN) | K8593035 |
| Voice Coil | 302GC-120, 302GCX-120(-CN),302GC-240, 302GCX-240(-CN) | K8590246 |
Federal Signal Corporation
Industrial Systems
Service Department
2645 Federal Signal Drive
University Park, IL 60484-3167
VII. COMPONENTES DE REEMPLAZO (Serie D)
| Parte Modelos Número | de parte | |
| Subconjunto de amplificador | 300GC-024, 300GCX-024, 300GC-120, 300GCX-120, 300GC-240, 300GCX-240 | K2005502-04 |
| Subconjunto de amplificador | 302GC-024, 302GCX-024, 302GC-120, 302GCX-120, 302GC-240, 302GCX-240 | K2005502-02 |
| Tablero de alimentación del amplificador, | 300GC-024, 300GCX-024 K2001961-05 | |
| Tablero de alimentación del amplificador | 300GC-120, 300GCX-120, 300GC-240, 300GCX-240 | K2001961-04 |
| Tablero de alimentación del amplificador | 302GC-024, 302GCX-024 K2001961-03 | |
| Tablero de alimentación del amplificador | 302GC-120, 302GCX-120,302GC-240, 302GCX-240 | K2001961-02 |
| Altavoz | 300GC-024, 300GCX-024, 300GC-120, 300GCX-120, 300GC-240, 300GCX-240 | 8593082 |
| Altavoz | 302GC-024, 302GCX-024, 302GC-120, 302GCX-120, 302GC-240, 302GCX-240 | 8593103 |
| Transformador 300GC-120 | 300GCX-120 K120857 | |
| Transformador 300GC-240 | 300GCX-240 K120858 | |
| Transformador 302GC-120 | 302GCX-120 K120846 | |
| Transformador 302GC-240 | 302GCX-240 K120856 | |
| Bobina de voz | 300GC-120, 300GCX-120, 300GC-240, 300GCX-240 | K8593035 |
| Bobina de voz | 302GC-120, 302GCX-120, 302GC-240, 302GCX-240 | K8590246 |
CONSIGNES POUR L'INSTALLATION ET L'UTILISATION DES MODÈLES 300GC, 300GCX, 302GC ET 302GCX
MESSAGE DE SÉCURITÉ POUR LES INSTALLATEURS
24 V CA/CC 120 V CA, 240 V CA
WARNING - RISQUE D'EXPLOSION
Federal Signal Corporation
Industrial Systems
Service Department
2645 Federal Signal Drive
University Park, IL 60484-3167
VII. PIÈCES DE RECHANGE (Série D)
| Pièce Modèles Numéro de pièce | ||
| Sous-ensemble d'amplificateur | 300GC-024, 300GCX-024, 300GC-120, 300GCX-120, 300GC-240, 300GCX-240 | K2005502-04 |
| Sous-ensemble d'amplificateur | 302GC-024, 302GCX-024, 302GC-120, 302GCX-120, 302GC-240, 302GCX-240 | K2005502-02 |
| Circuit d'alimentation d'amplificateur | 300GC-024, 300GCX-024 K2001961-05 | |
| Circuit d'alimentation d'amplificateur | 300GC-120, 300GCX-120, 300GC-240, 300GCX-240 | K2001961-04 |
| Circuit d'alimentation d'amplificateur | 302GC-024, 302GCX-024 K2001961-03 | |
| Circuit d'alimentation d'amplificateur | 302GC-120, 302GCX-120,302GC-240, 302GCX-240 | K2001961-02 |
| Haut-parleur | 300GC-024, 300GCX-024, 300GC-120, 300GCX-120, 300GC-240, 300GCX-240 | 8593082 |
| Haut-parleur | 302GC-024, 302GCX-024, 302GC-120, 302GCX-120, 302GC-240, 302GCX-240 | 8593103 |
| Transformateur 300GC-120 | 300GCX-120 K120857 | |
| Transformateur 300GC-240 | 300GCX-240 K120858 | |
| Transformateur 302GC-120 | 302GCX-120 K120846 | |
| Transformateur 302GC-240 | 302GCX-240 K120856 | |
| Bobine acoustique | 300GC-120, 300GCX-120, 300GC-240, 300GCX-240 | K8593035 |
| Bobine acoustique | 302GC-120, 302GCX-120, 302GC-240, 302GCX-240 | K8590246 |

text_image
MODELS 300GC & 302GC MODELS 300GCX & 302GCX 1.21" (31) 2.56" (65) G F B" D C" 1/2"-14 NPT 1.06" (27) 3.35" (85) 5.63" (143) 1.0" (25) 2.30" (58) 5.0" (127) 5.5" (140) 1/2"-14 NPT 1.13" (29) 3.42" (88) B" D H 5.63" (143)English
300GC & 300GCX 302GC &
302GCX
A 7.9" (200) 10.2" (258)
B. 12.4" (314) 13.9" (353)
C. 8.5" (216) 9.9" (252)
D. Collar Nut
E. Conduit Plug
F. 0.9" (23) Diameter Conduit Knockout
G. 0.201" (5.1) Diameter, 2 Mounting holes
H. 0.201" (5.1) Diameter, 4 Mounting holes
Español
300GC y 300GCX 302GC y 302GCX
A. 7.9 pula (200) 10.2 pula (258)
B. 12.4 pula (314) 13.9 pula (353)
C. 8,5 pulg (216) 9,9 pulg (252)
D. Tuerca de collar
A. Volume Control
B. Tone/Connector Card Socket
C. Power Connector Plug
D. Earth Grounding Terminal