SmartRack SR18UB - Wardrobe Tripp Lite - Free user manual and instructions
Find the device manual for free SmartRack SR18UB Tripp Lite in PDF.

User questions about SmartRack SR18UB Tripp Lite
0 question about this device. Answer the ones you know or ask your own.
Ask a new question about this device
Download the instructions for your Wardrobe in PDF format for free! Find your manual SmartRack SR18UB - Tripp Lite and take your electronic device back in hand. On this page are published all the documents necessary for the use of your device. SmartRack SR18UB by Tripp Lite.
USER MANUAL SmartRack SR18UB Tripp Lite
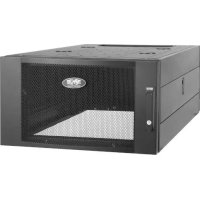
18U SmartRack® Enclosure
Model: SR18UB
(Series Number: AG-0189)
Table of Contents
- Important Safety Instructions 2
- Overview 2
- Feature Identification 3
-
Enclosure Installation 4
4.1 Preparation 4
4.2 Unpacking 4
4.3 Installing Casters and Levelers 4
4.4 Placement 4
4.5 Leveling the Enclosure 5
4.6 Ground Connection 5 -
Enclosure Configuration 6
5.1 Door Locks 6
5.2 Reversing the Doors 6
5.3 Mounting Rails 6
5.4 Adjusting Mounting Rail Depth 6 - Equipment Installation 7
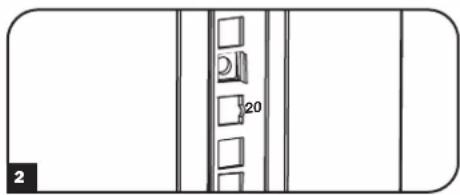
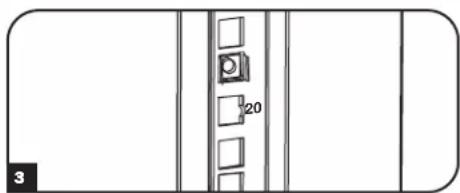
6.1 Installing or Removing Cage Nuts 7 - Specifications 7
8.Storage and Service 8 - Warranty & Product Registration 8
Espanol 9
Français 17
Pycckn 25
WARRANTY REGISTRATION
Register your product today and be automatically entered to win an ISOBAR® surge protector in our monthly drawing!
tripplite.com/warranty


Manufacturing Excellence
1111 W. 35th Street, Chicago, IL 60609 USA · triplite.com/support
Copyright © 2022 Tripp Lite. All trademarks are the sole property of their respective owners.
1. Important Safety Instructions
SAVE THESE INSTRUCTIONS
All sections of this manual contain instructions and warnings that should be followed during the installation and use of the Enclosures described in this manual. Read all instructions and warnings thoroughly before attempting to move, install or use the Enclosures described in this manual. Failure to comply will create a risk of personal injury and property damage and may invalidate the warranty.
- Keep the enclosure in a controlled indoor environment, away from moisture, temperature extremes, flammable liquids and gasses, conductive contaminants, dust and direct sunlight.
- Leave adequate space at the front and rear of the enclosure for proper ventilation. Do not block, cover or insert objects into the external ventilation openings of the enclosure.
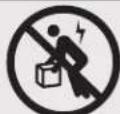
- The enclosure is extremely heavy. Use caution when handling the enclosure. Do not attempt to unpack, move or install it unassisted. Use a mechanical device such as a forklift or pallet jack to move the enclosure in the shipping container.
- Do not place any object on the enclosure, especially containers of liquid, and do not attempt to stack the enclosures.
- Inspect the shipping container and the enclosure for shipping damage. Do not use the enclosure if it is damaged.
- Leave the enclosure in the shipping container until it has been moved as close to the final installation location as possible. The casters are designed for minor position adjustments within the final installation area only. The casters are not designed for moving the enclosure over longer distances.
The casters are not designed to provide long-term support for the enclosure after final installation. Use the levelers to provide long-term support. - Install the enclosure in a structurally sound area with a level floor that is able to bear the weight of the enclosure, all equipment that will be installed in the enclosure and any other enclosures and/or equipment that will be installed nearby.
- Install the cabinet securely to the building structure, using the hold down brackets as illustrated in the Enclosure Installation section of this manual.
- Do not push the enclosure from the side panels to move it. Pushing from the side panels will cause a tipping hazard.
- When rolling the enclosure on its casters, always push it from behind, never pull it toward you.
- A rolling enclosure can cause personal injury and property damage if not properly supervised. If rolling the enclosure down a ramp is required, use extreme caution. Do not attempt to use ramps that have a slope steeper than 1:12.
- Use caution when cutting packing materials. The enclosure could be scratched, causing damage not covered by the warranty.
- Save all packing materials for later use. Repacking and shipping the enclosure without the original packing materials may cause product damage that will void the warranty.
- Do not re-ship the enclosure with additional equipment unless the enclosure was shipped with a special shock pallet ("SP1" models only). The combined weight of the enclosure and installed equipment must not exceed the load capacity of the pallet. Tripp Lite is not responsible for any damage that occurs during re-shipment.
DANGER: STABILITY HAZARD, RACKS ARE TO BE INSTALLED BY QUALIFIED SERVICE PERSONNEL ONLY. - Use of this equipment in life support applications where failure of this equipment can reasonably be expected to cause the failure of the life support equipment or to significantly affect its safety or effectiveness is not recommended.
2. Overview
SmartRack Enclosures accommodate all standard 19-inch rackmount equipment, regardless of vendor, and ship fully assembled for quick and easy deployment.
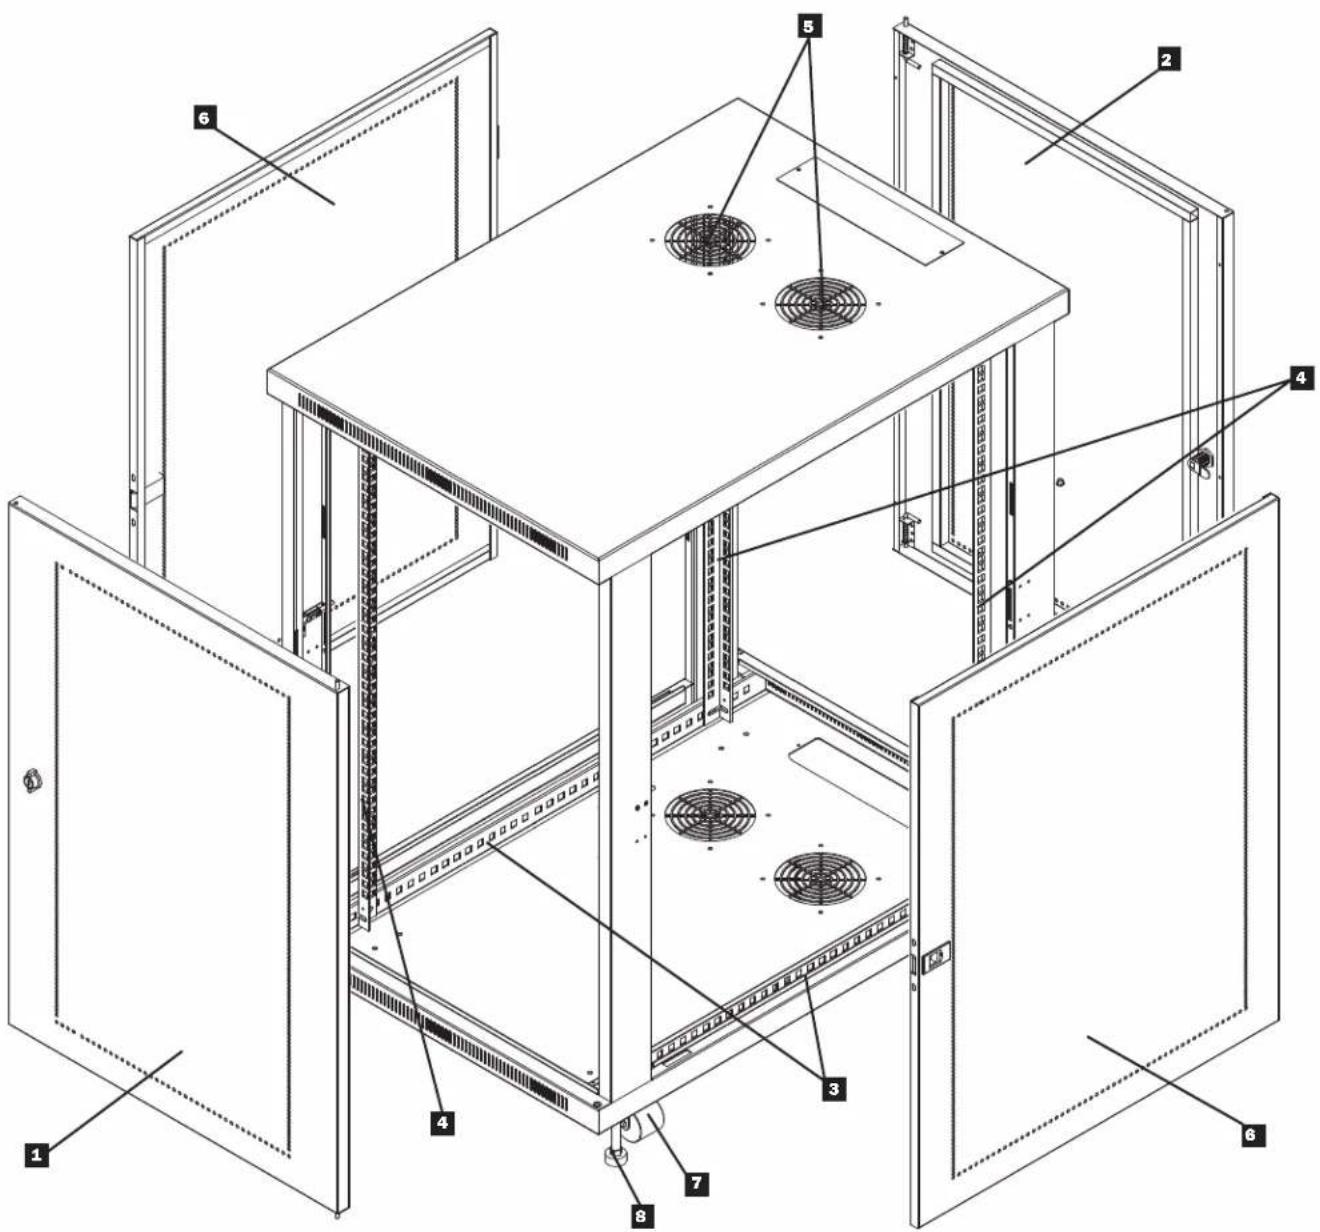
3. Feature Identification
Locking/Reversible Front Door
2 Locking/Reversible Back Door
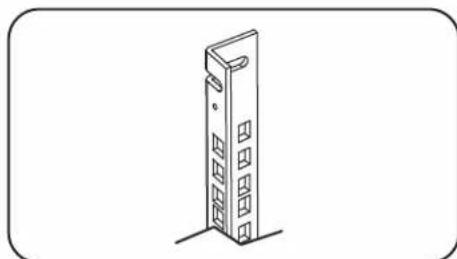
3 Horizontal Rails
4 Vertical Mounting Rails
5 Vents
6 Locking/Removable Side Panels
7 Casters
8 Leveling Feet
4. Enclosure Installation

Caution! Read All Instructions andWarnings Before Installation!

WARNING: The rack enclosure is extremely heavy. Do not attempt to unpack, move or install the enclosure without assistance. Until it has been properly installed and stabilized, the enclosure is prone to tipping and could cause property damage and/or personal injury. Use extreme caution when handling the enclosure and be sure to follow all handling and installation instructions. Do not attempt to install equipment without first stabilizing the enclosure.
4.1 Preparation
The enclosure must be installed in a structurally sound area that is able to bear the weight of the enclosure, all the equipment that will be installed in the enclosure and any other enclosures and/or equipment that will be installed nearby. Before unpacking the enclosure, you should transport the shipping container closer to the final installation location to minimize the distance you will need to move the unit after the protective packaging has been removed. If you plan to store the enclosure for an extended period before installation, follow the instructions in the Storage and Service section.
You need several tools:
- Level
14 mm Open-End or Combination Wrench
10 mm Open-End or Combination Wrench (2)
- Phillips-Head Screwdriver
4.2 Unpacking

Use at least two people to unpack the enclosure.
1 Move shipping pallet to a firm, level surface.
2 Save all packing materials for later use unless you are certain they will not be required. Packing materials are recyclable.
3 With one person on each side, carefully lift the enclosure off of the pallet and place on a firm, level surface.
Examine the enclosure for any damage or loose parts. Confirm all parts are present. If anything is missing or damaged, contact Tripp Lite for assistance. Do not attempt to use the enclosure if it has been damaged.
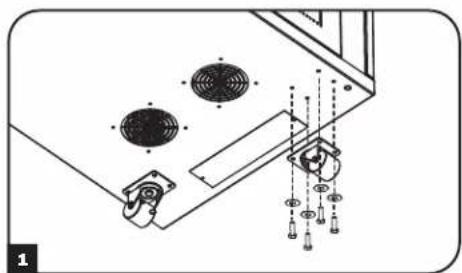
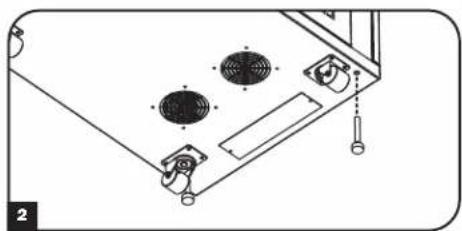
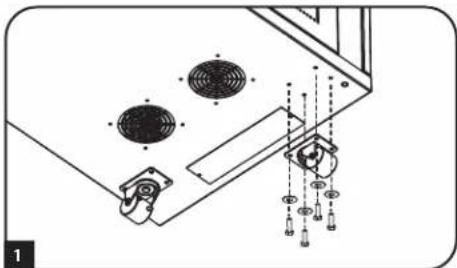
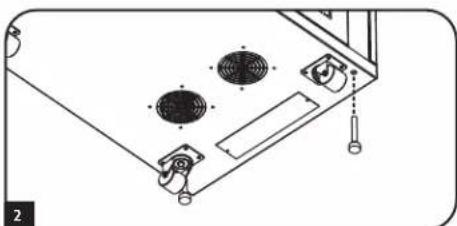
4.3 Installing Casters and Levelers
1 Installing Casters
Tripp Lite's accessory SRCASTER kit is included with your rack enclosure. This kit consists of 4 casters with required locknuts, washers and bolts for installation. Using two 10mm open-end or combination wrenches, install the casters to the base of the unit using the pre-drilled holes near each corner of the enclosure.
2 Installing Levelers
There are 4 levelers included with your rack enclosure, 2 for the front and 2 for the rear. Using a 14mm open-end wrench, install the levelers at the base of the unit using the threaded holes near each corner of the enclosure by turning the leveler in counter-clockwise. When the rack enclosure is moved to its installation location, use a 14mm open-end wrench to level the rack.
4.4 Placement
You can use the casters to move the enclosure for a short distance over a level, smooth, stable surface by pushing it from the front or rear (not the side panels). Do not attempt to roll the enclosure over long distances. The enclosure should be moved close to its installation location inside its shipping container before it is unpacked. Warning: Use appropriate equipment and follow all applicable safety procedures and regulations.

Warning: Never attempt to lift or install without adequate help. Do not try lifting the enclosure alone.

4. Enclosure Installation (continued)
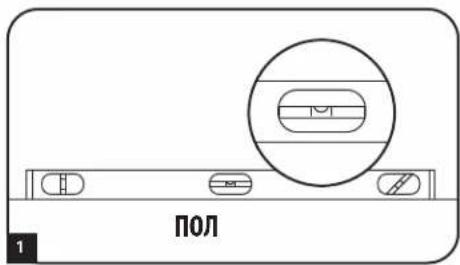
4.5 Leveling

WARNING: Level the enclosure before attempting to install equipment. The casters are not designed to provide long-term support for the enclosure. Use the levelers to provide long-term support. Install the enclosure in a structurally sound area with a level floor that is able to bear the weight of the enclosure, all equipment that will be installed in the enclosure and any other enclosures and/or equipment that will be installed nearby.
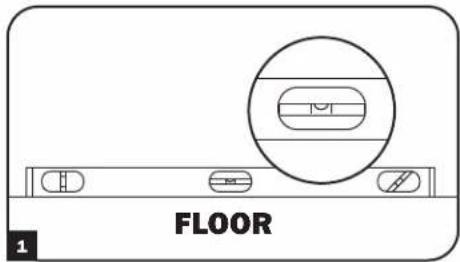
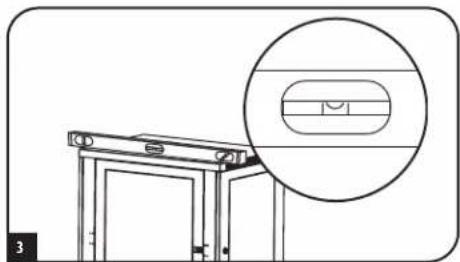
After the enclosure has been moved to the installation location, use a carpenter's level to check the slope of the floor. If the floor slopes more than 1% , choose an alternate installation site.
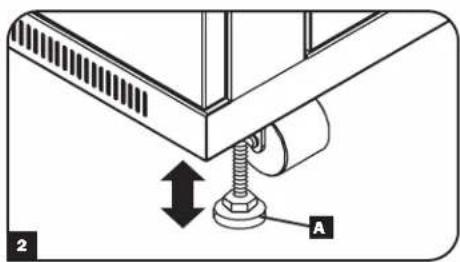
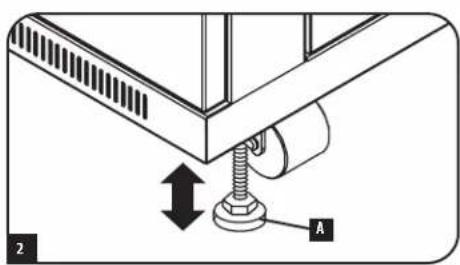
2 Use a 14 mm open-end wrench to lower each leveler until it reaches the floor. (There are 4 levelers, 2 at the front and 2 at the rear.) Make sure each leveler contacts the floor solidly. Note: Lower a leveler by turning it clockwise; raise a leveler by turning it counter-clockwise.
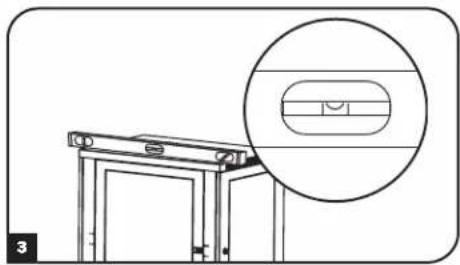
After lowering each leveler, use the carpenter's level to confirm that the enclosure is level in all directions. Adjust the levelers as required until the enclosure is level.
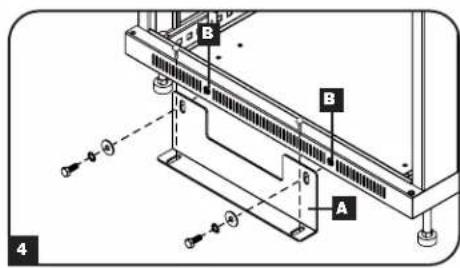
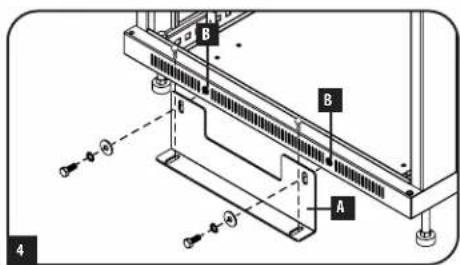
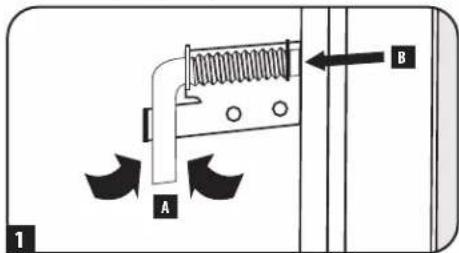
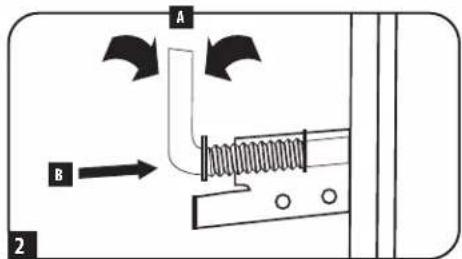
4 In order to secure the cabinet to the building structure for stability, attach the 2 hold down brackets using the hardware provided with the brackets. Use a 13mm open-end wrench to connect the brackets A to the outer bracket mounting points of the enclosure B Attach the brackets secure mounting points in the floor using user-supplied hardware or Tripp Lite's SmartRack Bolt-Down Kit (Part # SRBOLTDOWN).
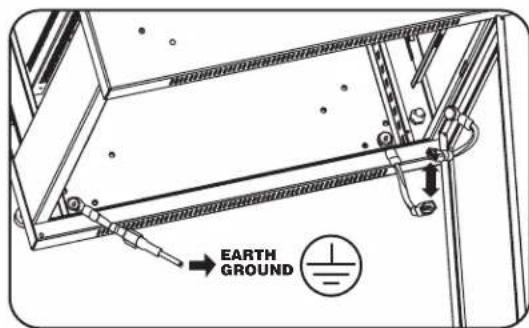
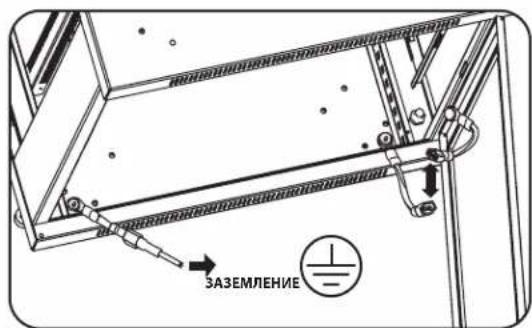
4.6 Ground Connection
- All parts of the enclosure are grounded to the frame of the enclosure.
- Grounding studs have been provided in all four corners of the enclosure to allow for grounding in any configuration (including front or back door reversals).
- Grounding holes are also provided on top and bottom corners of both front and back doors to accommodate any configuration.
- To ground the enclosure simply connect the two quick-disconnect grounding wires, one to the hole provided on the inside of either the front or back door and the other to the stud provided in any corner of the enclosure. Connect your facility's earth ground connection to the grounding stud not used by door connections, using an 8 AWG (3.264 mm) wire.
Warning: Attach each enclosure to earth ground separately. Do not use the enclosure without an earth ground connection.
5. Enclosure Configuration
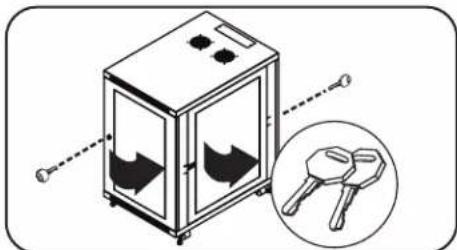
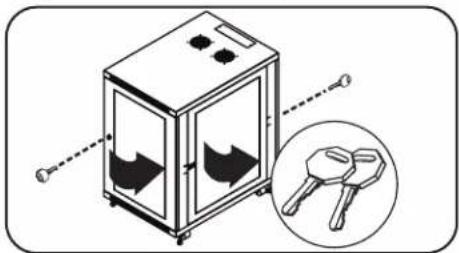
5.1 Door Locks
The front and back doors have locks that are accessible by the included keys. Each side panel locks using an L-shaped lever on the inside of the enclosure.
To unlock and remove the side panels, lift the shorter leg of the "L" up and pull it away from the side panel. Pull the tab on the side panel and remove it from the enclosure.
To re-lock the side panels, secure it in the proper position, lift the shorter leg of the "L" up and push it toward the side panel, back into the hole that it was in initially. Once it is in place, push the shorter leg of the "L" down to lock it. Note: To lock and unlock the side panels, you will need to have access to the interior of the enclosure.
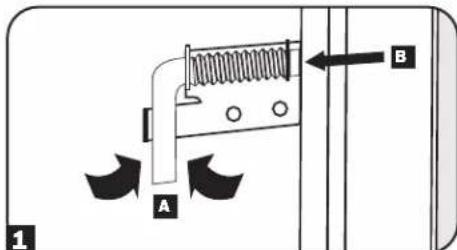
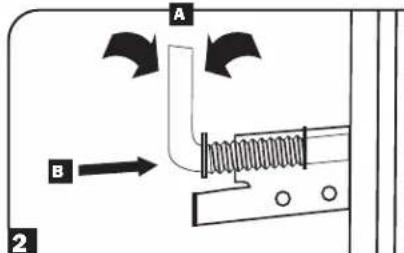
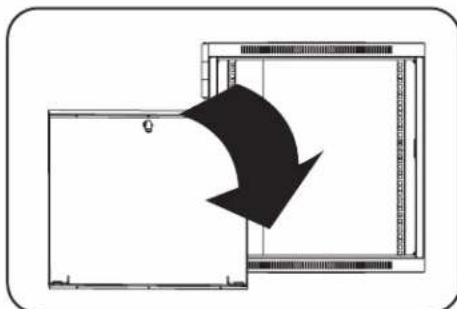
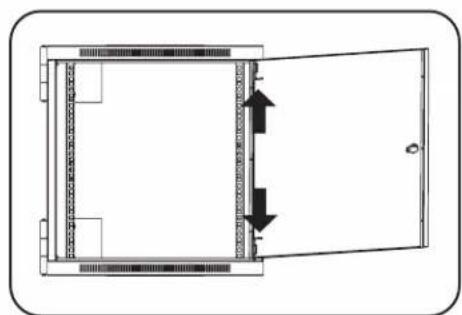
5.2 Reversing the Doors
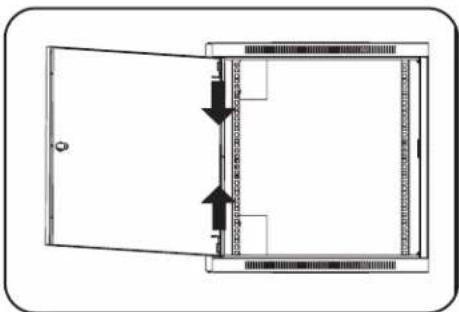
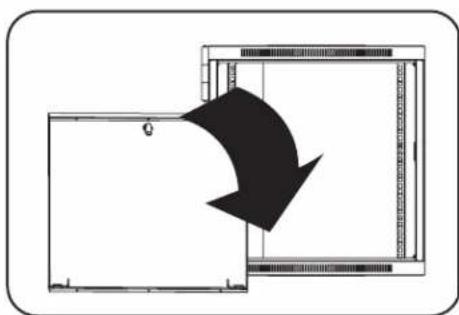
The doors of the enclosure are held in position on the enclosure's frame with two spring-loaded pins. To reverse the door's swing direction, simply release the pins by pulling them up (lower pin) or down (upper pin) and remove them from the mounting holes on the frame of the enclosure.
Flip the door in the opposite direction and replace the pins in the identical mounting holes on the other side of the enclosure's frame by lining them up with the mounting holes and engaging them again.

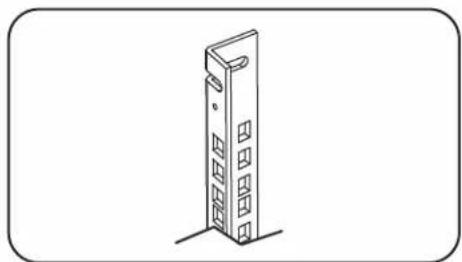
5.3 Mounting Rails
The enclosure comes with mounting rails that have square holes for mounting rack equipment. To install equipment, use the included cage nuts and other hardware. (See page 7 for installation of cage nuts.) Warning: Be sure to have the enclosure in its final position on the floor before mounting any equipment inside. Also be sure to have all the right adjustments on your rails before mounting equipment. (See below for Adjusting Mounting Rail Depth.)
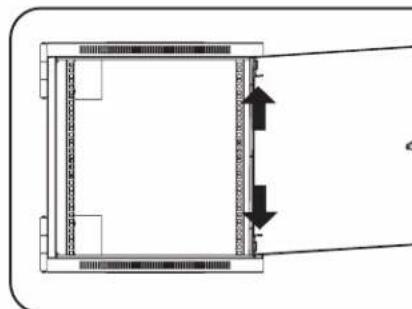
5.4 Adjusting Mounting Rail Depth
Warning: Do not attempt to adjust rails while equipment is installed in the enclosure. Do not attempt to use rails without screws installed. (2 per rail.)
The 4 mounting rails are pre-installed to accommodate equipment with a mounting depth of 20.5 inches (521 mm). Do not adjust the mounting rails unless your equipment requires a different mounting depth. The front and rear sets of rails can be adjusted independently for mounting of equipment with depths between 3 inches (76 mm) and 32.5 inches (826 mm).
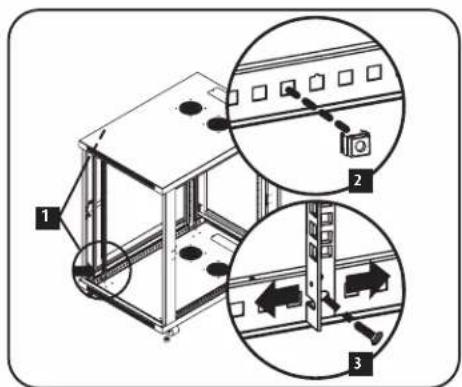
Each rail is connected to the enclosure with 2 screws and 2 cage nuts: 1 set in the upper corner and another in the lower corner. Using a Phillips-head screwdriver, remove the screws that fasten the rails to the enclosure.
2 Move cage nuts to desired depth and reinstall.
Slide the mounting rails to the desired depth and reattach them using the screws you removed in Step 1.
6. Equipment Installation
Warning: Do not install equipment until you have stabilized the enclosure. Install heavier equipment first and install it towards the bottom of the enclosure. Install equipment starting from the bottom of the enclosure and proceeding toward the top of the enclosure - never the reverse. If using sliding equipment rails, be careful when extending the rails. Do not extend more than one set of sliding equipment rails at one time. Avoid extending sliding equipment rails near the top of the enclosure.
Note: The square holes in the middle of each rack unit are numbered and also include a small notch to aid identification. A single rack unit includes the space occupied by the numbered hole and the holes directly above and below.

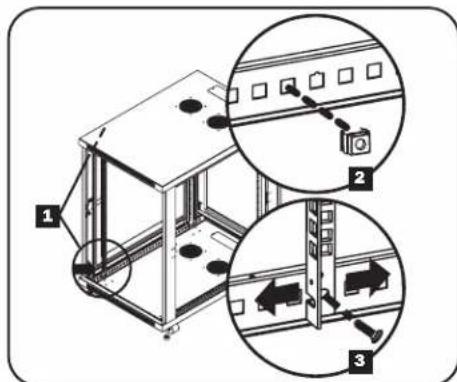
6.1 Installing or Removing Cage Nuts
WARNING: The flanges of the cage nuts should engage the sides of the square opening in the rail, not the top and bottom. Follow the instructions in your equipment documentation to ensure proper installation of your equipment.
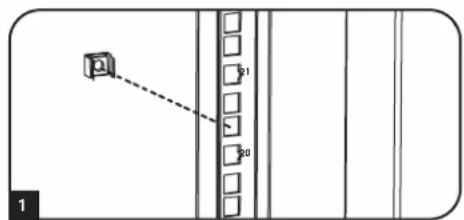
1 Locate the numbered square openings in the mounting rails where you plan to install your equipment. You will install cage nuts (included) into the square openings in order to provide an attachment point for the mounting screws (included).
Note: Consult your equipment documentation to determine how many cage nuts will be required and where they will need to be installed.
2 From the inside of the mounting rail, insert one of the flanges of the cage nut through the square opening. Press it against the side of the square opening. Each flange should engage one side of the square opening, not the top or bottom.
3 Compress the cage nut at the sides slightly to allow the remaining flange to fit through the square opening. When the cage nut is properly installed, both flanges will protrude through the square opening and will be visible on the outer surface of the mounting rail. Repeat steps 1-3 until all required cage nuts are installed.
4 After installing the required cage nuts, use the included mounting screws and cup washers to secure your equipment to the rack rail. Place the cup washers between the screws and the equipment mounting brackets.
Note: Your equipment may also include mounting hardware. Read the mounting instructions that came with your equipment before installing your equipment.
To Remove Cage Nuts, Reverse Steps 1-3
Note: You may wish to use a cage nut tool (user-supplied) to aid cage nut installation and removal.


7. Specifications
| Model SR18UB | |
| Dimensions (H x W x D) 35.6 x 23.63 x 33.5" (905 x 600 x 850 mm) | |
| Unit Weight 105 lb (48 kg) | |
| Load Capacity 1000 lb (453 kg) Stationary or Rolling | |
| Mounting Depth (Adjustable) 3" to 32.5" (76 to 826 mm) | |
8. Storage and Service
Storage
The enclosure should be stored in a controlled indoor environment, away from moisture, temperature extremes, flammable liquids and gasses, conductive contaminants, dust and direct sunlight. Store the enclosure in its original shipping container if possible.
Service
Your Tripp Lite product is covered by the warranty described in this manual. A variety of Extended Warranty and On-Site Service Programs are also available from Tripp Lite. For more information on service, visit triplite.com/support. Before returning your product for service, follow these steps:
- Review the installation and operation procedures in this manual to insure that the service problem does not originate from a misreading of the instructions.
- If the problem continues, do not contact or return the product to the dealer. Instead, visit triplite.com/support.
- If the problem requires service, visit triplite.com/support and click the Product Returns link. From here you can request a Returned Material Authorization (RMA) number, which is required for service. This simple on-line form will ask for your unit's model and serial numbers, along with other general purchaser information. The RMA number, along with shipping instructions will be emailed to you. Any damages (direct, indirect, special or consequential) to the product incurred during shipment to Tripp Lite or an authorized Tripp Lite service center is not covered under warranty. Products shipped to Tripp Lite or an authorized Tripp Lite service center must have transportation charges prepaid. Mark the RMA number on the outside of the package. If the product is within its warranty period, enclose a copy of your sales receipt. Return the product for service using an insured carrier to the address given to you when you request the RMA.
9. Warranty and Product Registration
5-Year Limited Warranty
Seller warrants this product, if used in accordance with all applicable instructions, to be free from original defects in material and workmanship for a period of 5 years from the date of initial purchase. If the product should prove defective in material or workmanship within that period, Seller will repair or replace the product, at its sole discretion.
THIS WARRANTY DOES NOT APPLY TO NORMAL WEAR OR TO DAMAGE RESULTING FROM ACCIDENT, MISUSE, ABUSE OR NEGLECT. SELLER MAKES NO EXPRESS WARRANTY OTHER THAN THE WARRANTY EXPRESSLY SET FORTH HEREIN. EXCEPT TO THE EXTENT PROHIBITED BY APPLICABLE LAW, ALL IMPLIED WARRANTYES, INCLUDING ALL WARRANTYES OF MERCHANTABILITY OR FITNESS, ARE LIMITED IN DURATION TO THE WARRANTY PERIOD SET FORTH ABOVE; AND THIS WARRANTY EXPRESSLY EXCULES ALL INCIDENTAL AND CONSEQUENTIAL DAMAGES. (Some states do not allow limitations on how long an implied warranty lasts, and some states do not allow the exclusion or limitation of incidental or consequential damages, so the above limitations or exclusions may not apply to you. This warranty gives you specific legal rights, and you may have other rights which vary from jurisdiction to jurisdiction).
WARNING: The individual user should take care to determine prior to use whether this device is suitable, adequate or safe for the use intended. Since individual applications are subject to great variation, the manufacturer makes no representation or warranty as to the suitability or fitness of these devices for any specific application.
Product Registration
Visit triplite.com/warranty today to register your new Tripp Lite product. You'll be automatically entered into a drawing for a chance to win a FREE Tripp Lite product!*
- No purchase necessary. Void where prohibited. Some restrictions apply. See website for details.
Tripp Lite has a policy of continuous improvement. Specifications are subject to change without notice. Photos and illustrations may differ slightly from actual products.


Manufacturing Excellence
1111 W. 35th Street, Chicago, IL 60609 USA · triplite.com/support
PykoBODCTBO N0Ib30BaTeJia
UkaΦ cepn SmartRack® BbICOTo18U
Modèle: SR18UB
(homep cepnu: AG-0189)
Copepkanne
- Baxhble yka3aHnno no TexHnke 6e3oNaChoctn 26
-
KpaTkoe onncahne 26
3.Cxema paononoKeHHyHKUHOHaJIbHbIX 3neMeHTOB 27
4.Порядok установкишkaф28
4.1 IoprotoBka 28
4.2 Pacnakobka 28
4.3 YctaHObKa poNkOB n perynnpoBoHbIX HOKe 28
4.4 Pa3MeueHne 28
4.5 BbipabHbHaHe uKaΦa 29
4.63a3eMJIeHne 29 -
KomnohoBka wka 30
5.1Дверныезамки 30
5.2 IpepcTaHOBKa IBepeu 30
5.3 MoTtAkhHbIe HnpaBnaIOuNe 30
5.4 Perynnpobka rny6bHb MOHTaXhbix HnpaBraIoUx 30
6.YctanOBka 6obopydOBaHn3
6.1 yctahOBka/chTne 3aknaHbIX raek 31 - TexHHueckne xapaKTepeHCTnKn 31
8.XpaHHeHnTexHnueckoe 6cbnyKbHaHne 32 - FapantnHbIe 06aTeJbCTBa 32
English 1
Espanol 9
Français 17
EAC


Pnpduuuiu uuaeou
1111 W. 35th Street, Chicago, IL 60609 USA - triplite.com/support
OxpaHrTcA aTbOPcknmpaBOM 2022 Tripp Lite. Bce TOproBbe 3aKaN ABAHOTcA MCKNoHTeBHO Co6CTBeHHoCTbCOXm COOTBeTcByuXn BnaJeIbueB.
1. Baxxhble yka3aHnno no TexHnke 6e30nacHOCTN
COXPAHNTHE HACTOUIE YKA3AHNA
Bo Cex paoen hactoepy kyoobqcba coepkata yka3aHn npdynpckdHn, KOTOpbIe Heo6xOIMO c06hAoTaB b Pooce cye taHOBKn HcKcNpyataum omcaHHbx B hem uKaObo. BHMaTeNbHO 33aKoMbteCb CO BcMn Yka3aHnMMn npdynpckdHn mpeB bblonHHeHm NIO6bX dKeCTbB, CBzAHHbxCpeMeueHHeHm, yctahOBKn mHKcNpyataum uKaObo, OINCAHHbx B HactoJeem pykoBocTbe. Hec6knOeHne DAnHoro Tpe6oBaHn Co3dAc TOnaCHOb TpABM nNn BO3HNKOBHeHm MUYueCTBeHHOr yuapeb a MoKet pmbctm K anHympoBaHNO raptAHtn.
KdJHnHxOHTBcBnOMeEHmC KOnHPOINpEMybMMNkPOKIMaTOM BdaIINOT HCTOHKNOB BnaIV,3KCTpeMaJIbHbIX TeMnepaTyP,BOcIIaMeHRIUHXcKmIKoCTeNra3OB,NEKTPnpOBdHbIX 3aqr3HNTeNe,blHn IN pAmrTO cONHeuHOrCBeta.
Ipeed shkafo m no3aHr hro heo6xmo oecneuMb doctatoHc Cboodno npoctpaHCTBa Ira ero haadnegaero npobetpmbaHry. He 3aropaxbaTe H He hakpbaiTe BHeHMe BeHTmuaOHbte OTBepCTMa Ka, a TAKGE He BCTabAITe B HIX KaKHe-NbO ppeMtb.
- Ⅲkaфянгскраимпгхлбесьм. Рпп пошеменишkaфсбддгпсгггггггггггггггггггггg He nbtaitecpaacakobbaba,pepemaatbHytahabnBbT erO bDIOHcy.Длпрemeehenry shkaфa BHTPn TpAChnpotmpoBOHORO KOTeHepa HcNtOJIb3yTe MExaHueckoe yCTpoIcTB0 TmHa BInIOUHOr NpRpy3uKa HINBINOuHOr NmdpabNueckoi TeneKKn.
He KnaIaHTe Ha kaKa KaKMe-JHbO npEmeTb, Oc0beHNo EMcKoTH C KJNkoCTaMn, a TaKHe He yCTaHaBInBaIte ShkaKbI dpyr Ha dpyra.
Ocmotptte tpaHcnpTPOBOUHb KOHTeHep Ha npEpmet HauuHnOBpeKdHn, nOnyueHHbX npTpaHcnpTIpOBke. He noB3yTeCb uKafoB ero noBpeKdHnA
He 3BneKeIe 7kaΦ n3 TpaHcnpTPOBOUHO KOHTeHepa d0 ero nepeMeueHnHa MaKcMaJIbHo 6N3Koe paCtOHe K MeCy OKOHATeHbOH yCTAHOBKn. POnIKn npEHa3NaeHb ToJbKO dIe H3NaHTeNBHX KoppeKTPoBOK NIOJOeHnHa Ha MeCe OKOHATeHbOH yCTAHOBKn. POnIKn He paccHTaHb Ha nepeMeueHne 7kaΦ a HoBJLmpeACToHnA.
PONK TAKKE He paccHTaHbHa dOIOBpeMeHHoe HcIIOb30BaHHe B KaueCTBe OOpbl DnA IkaKaa oocne erO OKOHATeHbHO yCTAHOBKn. B KaueCTBe DOIOBpeMeHHo OnOpbl HcNOb3yTe PnCIOcoBHeHn Da BpAbHBNAHn.
KoHOBnHbOHTyHOBnHbOHOHIOHOHOHOHOHOHOHOHOHOHOHOHOHOHOHOHOHOHOHOHOHOHOHOHOHOHOHOHOHOHOHOHOHOHOHOHOHOHOHOHOHOHOHOHOHOHOHOHOHOHOHOHOHOHOHOHOHOHOHOHOHOHOHOHOHOHOHOHOHOHOHOHOHOHOHOHOHOHOHOHOHOHOHOHOHOHOHOHOHOHOHOHOHOHOHOHOHOHOHOHO HO HO HO HO HO HO HO HO HO HO HO HO HO HO HO HO HO HO HO HO HO HO HO HO HO HO HO HO HO HO HO HO HO HO HO HO HO HO HO HO HO HO HO HO HO HO HO HO HO HO HO HO HO HO HO HO HO HO HO HO HO HO HO HO HO HO HO HO HO HO HO HO HO HO HO HO HO HO HO HO HO HO HO HO HO HO HO HO HO HO HO HO HO HO HO HO HO HO HO HO OH OH OH OH OH OH OH OH OH OH OH OH OH OH OH OH OH OH OH OH OH OH OH OH OH OH OH OH OH OH OH OH OH OH OH OH OH OH OH OH OH OH OH OH OH OH OH OH OH OH OH OH OH OH OH OH OH OH OH OH OH OH OH OH OH OH OH OH OH OH OH OH OH OH OH OH OH OH OH OH OH OH OH OH OH OH OH OH OH OH OH OH OH OH OH OH OH OH OH OHOHOHOHOHOHOHOHOHOHOHOHOHOHOHOHOHOHOHOHOHOHOHOHOHOHOHOHOHOHOHOHOHOHOHOHOHOHOHOHOHOHOHOHOHOHOHOHOHOHOHOHOHOHOHOHOHOHOHOHOHOHOHOHOHOHOHOHOHOHOHOHOH
- PiooHc yctAHOBHTe KHa CTPOHTeBHyO KOCTpyKTHCnMOOsbHO UyepKbMaOuXk KPOHTeHOB, KaK NOKa3aHO Ha pMCYHKe B pa3dene IpopJokcYctAHOBKnKaΦa daHHOro pykoBODCTBA.
Pn npnepeeennn hkeyet tokabte ero ctoponb bokobix nahenei. Pn tonkannn kopnyca co tpohbl bokobix nahenei cyecctbyer onachoctbe eron pokmbibanm.
Pn nepeKaTbIaHmUkaHa npOuKax 683aTeBHO TOnKaIte erO cAun H N B KOem Cnyae HE TAnHe Ha ce6a.
- IpekaTbIaHmE uKaFa 6e3 HndIeXaUero KOHTPOMoKET PnBECTN K PnUHEnHIO TpABM NIM MMyUeCTBEHHORO yUepe6a. Pn He06xOIMOCTH cKaTbIBAHNr UkaFa BnH3 nO HAKIOHNO INOCKOT co6nOaIte npdeIbHyO octopokHOCTb. He nONb3yIte HAKIOHbIE NPOCKOTc yKLOHOM 6one 12%.
Pn pa3pe3aHH ynaKOBuHbIX MaepnAIOB co6IouaTe ocTo pOxHocTb. 3To MoKeT PnBeCTN K HaeceHIO caapnn Ha nobepxHOctb IkaFa, 4To npEcdTabIeT c6oB yuepe6, He nokpbBaembl DeiCTByUooi rapantmei.
Bce ynaKOBouHbIe MaTePnAbIb cIeDyet coXpaHnIT IINocEduOJeero HcNtloh3oBaHnI. NObTOpHra ynaKOBka HtpaHcnpTnPoBkA WkaFa 6e3 HcNtlo3oBaHnI OPMtnHbHbIX ynaKOBouHbIX MaTePnAnOB MoKeT pInBeCTM K NpOBeJxHeHIO H3dEnH, KOToPOe NOBneUeT 3a cOob anHynuPBOAHue HeiCTByuie rapaHTHM.
He npcykaetcnoeinyoata TpaHcnoptnpbOKa Wkka cdoonohntebHbIM oobpyoabHnem 3a Ncknooyehnem CnyaeB nepBOHaanbHOIOCTABKm Wkafo co CneuaNBHM yap03auueneHHbM noDIOHOM (ToIbKO dna moen SP1).CymMaphB Bec WkaF a M yctahOBHeHHoro B HEM oobpyoabHnA He doJKeH npeBbIaB IpyzOnOBeMHOCb IooHa. KomnaHr Tripp Lite he Hecet OTBeTcBEHNOCT3a Kaokn-ll6o uep6, pnuHHeHHB B IpOceCE Pocneyioee TpaHcnptnpbOKn.
- OINACHOCTb: BO IN36EJAHNE IOTEPN YCTOHNUBOCTN YCTAHOBKA UIKAFIOB IOJINKHA IPOIN3BOIDNTCB TOLIKKO KBAJINHIOUPOBAHHbIM CEPBNCbIM IPEPCOHAJIOM.
He peKoMeHdyETcN cNoIb3OBAHnne daHHoro 6OpbyOBaHnB B CHTeMaX KJ3He06ecneHn, Tge erO BBxOJ N3 CTPOR npEiIOIOXHTeBO HO MOKeT pINBecTu K nepe6oAM B pa6ote obopydOBAHn J3He06ecneHn HIN B 3aHuNTeBHO Mepe CH3HTB erO 6e3oNaCHOTb INI 3ΦeKTbHOCtB.
2. KpaTkoe onncahne
Ukafo bceMeBCTBa SmartRack BMeauHbCE 19-IOMOoe 06e H3aHcHMo oE rO npn3BOuTeN I NOCTABIOTC nIOHOCTbIO B c6ope Iy o6ecneHn 6bIcTpoTbI N erKoCTB BBOA B Kcnnyatauio.
C
Kpeo06pa3nHaOTBeptKa
4.2 PacnaKobka

Ipa pacnakobbbanu shkafo Tpe6yetc He Mehee Dbyx Yenobek.
1 Nepemecnte TpaHcnpTIpOboHyb KoHTeHep Ha npOuyHy IOBHyIOBepxHOCTb.
Bce ynapobuHme MaepnabI cneyet coxpaHntb dna nocnekyoero mncnb3oBaHn, eCN Bbl He y6eKdHe b TOM, 0TO OH 6one He nOpebyOTc. Ynakobouhble MaepnabI noDnEkat BtopmHO nepepabotke.
3 PaonnoKmbnc no ONDMOy cheOBky cKaJdoN CTPOHb, AKKypaTHO CHMHTe 1kOHa c NIOHOHa N IOMeCTMe eTo HA npOHy n POBHy NOBepxHOCTb.
0cmptnte 1nepmert HauHnKx- n6o nobpeXeHn Hn He3akpenHehBx Detane. YeTeCB HauHn Bcxetae B Cnyae otcyctbnn nopeKdHn KaHX-n6o Detaneo
4.3 yctaHOBKa pOIMKOB u perynnpoBOyHbIX HOKeK
1UctaHOBKa pONIKOB
UkaKoMnNeKryTeTc HabOpom BCmOnOratEnbHbX pOuNKOB SRCAster nPon3BODCTBa TrippLite. KOMnKeT coepKHT 4 polNkC KOHTprAaKAMn, uAnBamn 60IaTMn, Heo6xOaHMBmN dIy yctaHOBKM. C NOMOsbPO poKkoBbIXnn KOMbHMIOBaHbIX raeHbIX kIOueHn Ha 10 MM npHKpENrte pONIK K OCHOBaHNO, KcNoIb3y3 aBOdCKne OTBepCTNa, paONIoXeHHble no yIaAM UkaFa.
2 YctahOBkapepyHnpoBOOhybIXHOKeK
B komnneKt ukaqha BxodT 4perynpoobHbte Hoo - no 2 wt. cpeepn n Czau. C nomoubo pookoBoro raeuHoro knoHa Ha 14 MM yctahOBITE peryunpoobHbte Hoo K B pe3b6Oble BTykn, paCNOIOKeHHbe no yyam OCHOBHn ukaqha, bpaaA HN npOTNB YacobOn CTpeKN. Pocne nepemueHN ukaqKa Ka MeCTy UCTAHOBKn BbyPOBHeIe erO C NOMOUbo poKkoBOro raeeHoro kNoHa Ha 14 MM.
4.4 Pa3MeuEHe
Ponknpnepnaaehbny npepemeen Hkaqha Na KOpTKe paccToHne no poBho, rnaKo h yctOHHBOB NOBExHOCT nyTe er oToKaHN CpepeHn c3aDn (He co tOPOHb 60OBx naHene). He nepeKaTaBaiBte Wkaq h DaHHNbe paccToHn. Wkaq cneyet doCTabHt b Ka MoxHo Bmke K MeCte ty eYcTAHOBN BHTp TaHCnOtpMOBOHOr KOHeHepa BynKAOBAHOM BnDE. BHMnHe! CnEpyTe BcEM npMeHbIM K DaHHomy Cuyao Yka3AHm No TexHke 6e3oNaChOCTn H HopMaTHBbIM PpeHnCaHm, NcNoB3y Dn ETOrO COOTBeCTByuOe obOpdyOBaHne n OCHACTky.

BHHMaHHe Hb Koem cnyae He nbTaTecb N3BneKaTb uKaΦ n ynaKOBKn m
ycTaHaBnBaTb ero 63 nonHoceHHo nOMoU.
He nbitaTecb noDHMaTb WkaB OOnHouKy.
4.YctahOBka shkaΦa (npoDOnKHeHne)
4.5 BbipabHbBAHne

BHIMAHHE! BbipOBHnE t WkaF neped yctahOBkOB H eror o6OpDobAHn. POnHKn TaKxHe He paccHTaHbHa noRtBpeMHoe NcNoB3oBAHne B KaecTe bonpbl nWkaFa. B KauCTBe DoTROBpeMeHHo onOpby nCnoB3yte npncocObeHn DnBa IbpaBnBAHn. WkaF dONKeH 6bIb YctAHOBnB KOHCTpykuHO npouHOM MeCe CPOBhM OCHOBHnEM, cnoCoHBm BbIepXMBaTB Bec Camoro WkaF, Bcero o6OpDobAHn, KOTOpoe 6ydt YctAHOBnEO BHYrH Hero, a TAKKe IIObIx dpynx WkaFob H/nn O6OpDobAHn, KoTopble 6dyT yctAHOBNeHb B6n3n Hero.
1 Nocne nepemeene HkaKa K MeCTy yCTaHOBKn npOBePbTe yKNoH nona c NOMoUbO CTpONTeBHO rPOBnE. EcIn yKNoH nona npBbIaet 19%, BbIepeHTe IyaYCTaHOBKn dpyroe MeTo.
2 Pn nnono pOkoBoro KIOUHa 14 MM BbBepHne KaKdyo perynpoBOHy IOKky A Do ee cOpNHKOHOBeHH C NOOM (IkaΦ HmeeT 4 npncoc6NeHH Ia IBaPBABHBAHn - no 2 cpeEHN C3aN).Y6eHNTecb TOM, YTO KaKdoe H3 Hx NIOTHO cOnpHKacaetc C NOOM.
PnmeHne. JnBbEptbBaHna (onykaHn) perynpOBOHO HOKKm ee cIeYET BpaaTb NO yacOBtCPenke, a 3abeptbBAHn (noHHMaHn) - npTMB YACOBtCPENK.
Pocne BbEpBtBaanKaKdopeynpoBOHnHOxKn npOBepaTe c NMOUcBTO CToPteNBo yPOBHa, 406bl uKaF paCnonarApcpno Bo BCEx HapabEnHX. PerynpyTe BicotpyeynpoBOnHoxKe No Mepe Heo6XmOcTn DoTex nop, noka KaHe 6yDen YCTAHOBen pOBHo.
4ДЯКрENHЯшkaФСТоHTeHNoKCHTPyCmN CcIbNoOeCneHnYcTOnMBOCTnPpKNpeNTe2YdEeKHBaOuHxKPOHHTeHa C NOMOuBkoPENHbIX PnncnOcBHeN, NOCTabReMbX B KOMPKeTe C KPOHHTeHaAMn. C NOMOuBIOPOKKOBOKHOJHa 13 MM 3aKpeNTe KPOHHTeHbA BO BHEuHNx ToKax KpENHeHn KPOHHTeHOB K WkaFy B 3aKpeNTe KPOHHTeHbIB ToKax MoTHaKHO K pNO npN OcHaCtKM (B KOMPKeT He BXoDIT) nN ppeNaerMoR KO mAnHe Tripp Lite KOMNeKaTDAЯKpENHeHs KaΦoSMrack K noNy (Kat. N SRBOLTDOWN).
4.63a3emJIeHnE
Bce Detanu ukaa 3a3eMnroTcpe3 efo Kapac.
3a3eMnHouuie KOHTAOKTbI IMEOTcBO Bcex Ytebpex yTnx Ika,TO 06ecneHBAET BO3MOXHOCT bero 3a3EmnHn npm JIOBOMKONOBKe (B TOM cncpe npnpepctAHOBKe nepedne Hnn 3aehn Dbepu).
KpOmeToro,BBepxHIN HnHnHnx yIax nepeDneHn 3aJHe n Dbeepu MeIOCT npoyuHbI dna 3a3emHn, oecneWBAoUe BO3MOXHOCTb IIO60I KOMNHOBOHKn.
IIN3a3eMnHn 10K4oOIO NOOcEHNHTB Db6bCTPOOTcEOINHEMbIX 3a3eMnHOxNPOBOda:OINK npoyuHHe H BHTpeHHHe CTOpOE NpeDHe HIN 3aJeH DePbU, dpyrO - K 3a3eMnHOxM KoHTaTky, paONoJKeHHOMy B IIObOM IVYIOB 10ka. CoeHNITe 3a3eMnHOuM KOHTAKT, He NCIOb3yeMbI INI NOcOeHHeHn DBepen, c IINHOI 3a3eMnHnCBOero O6bKa T CNOMOBIO pOBoDA KANb6pm 8 AWG (3,264 MM).
BHMaHHe!KaJbI WkaΦ DoJIKeH NoIOCoEINHrTaC K WnHe 3a3EmneHnNo OTdEnbHOCTN. Nolb3OBaHHe3a3EmeHHbIM WkaΦom He OOnyckaetc.
5. KomnohoBka wkaΦa
5.1ДвернBLEЗаMKN
IpeHnra H 3aHnra DbePcbl OChaIeBb 3amKaMn,OTNpaemMbIMn C NOMOuBb BXoDJIUX B KOMIIeK TKnoue. KaJaa H3 60KobBx NaHeJe 3aNpAeTcR np NOMOUI I-6pa3HO rpo bMyka C bHyTpEnHei TOpObl kHa.
I DnTtHpaHHn HcTHaB60KbBx naneHneJe Tceyet NoHHTb BBePc KOpOTKe PteO I-6p3HO pTuAka NOTCPaHb ETo OT6koBOHaHE. BByHb 60KOByIO NaHeH. BByHb 60KOByIO NaHeHb NskaF, noTbYb e3 a3blyOk.
2 1nOBTOHIOI OHCAUIN 60KOBOI naHn HA CBOEM MeCTe CNEyET yCTAHOBHT ee B HxHoe NOnOKeHHe, NOHNb BBExP KOpTko PNeO I-6pa3HOro pbuaKk HA HADABITb Ha Hero B CTOPHY 60KOBIOI naHnC uENb IOMeCTB erO o6pAHO B TO OTBepCTME, rE OH HaxoUNcNepBOHaayabHo. Iocne toro kak KopTko PNeO I-6pa3HOro pbuaKk OKaKetc HA CBOEM MeCTe, CNEyET aHiknpoBtB ERO HAXaTMEM BH3.
PImMeaHHe.ДЯЗIMAPAHN H OITMnPAHNA6OKOBxIIaHEeI Heo6xoDMIOHMETb DOCTyBHTbUkaF.
5.2 IpeptaHOBkaIbepeu
IeBepu 1kka ydpKBAOTc B HxHOM nOIOKeHH Ha er0 Kopnyce c nmooub do Byx noDnpyKHeHHbx uTmTOB. UTo6bH3MeHt b HapBaJIeHne OTKpbBAHn DEepz, IOCTaTOHO BBIECTN 3TH uTmΦtb H3 aauenHn H bHyTB NxN MoTHAKHbX OTBepChn B KOpnyce Wka, NotAHyB 3a HxH BBeP (HXHN WHT) NIN BHN (BepxHn WTH).
IpeBepHnTe IeBepu Iy UcTaHOBHe TlHIObI Ha CBOM MeCTa B TaKMe Jx MoHTaXHbIe OTBepTMA Ha DpyrOJ CTopoHE KOpNya Shka,coMBeMTH IN C MOHTaXHbIMN OTBepTMA IM N CHOB BBeJe B3aUenneHe.
5.3 MoTaxKhble HappaBIAIOUne
Ukaqnoctabnretc moTahxHbIMn HapnbAIOUMM, KOtOpbIe IMeIOKBAdPbTHBe OTBepCTNDA MOHTaKa CTOeHOrO o6opyoBaHm.
JyCTAHOBKn 60pOyDobAHn CNEyET NcNOb3oBaT NoCTABREMble B KOMNKeTE 3aknaHbte RAnu npOvO OCHACTKy. (NoPdoK
yCTAHOBKn 3aKnAdhX Taek CM. Ha CTp 7). BHMnHaie! Pepe yCTAHOBKO kAKoro-n6o6opyoBaHn BHYtp uKaFa
Heo6xoMDMO y6eHntBCaB TOM, QTO OH HaxoITCB CBOEM KOeHOM NOnOKeHH. KpOme TORO, pepe MoTAtkOM
60pOyDobAHn Heo6xoMDMO DOnKbHM 6pa3OM OTperynpoBaT Bce HappbAHOUne. (CM. PpeCTabEnHbM HnHex
pa3Je "PerynpoBaKraY6HbM MoTachKbHx HappbAHOUnx").
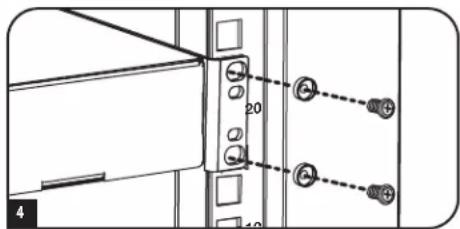
5.4 PerynnpoBkA rny6HbMoHTaXhBix HappaBriaUOxN
BHHMaHHe HbItaTeCb perynnpoBat hAnpaBnaIOUne npyctahOBneHOM B WkaΦ 6OpdyoBaHH. He bItaTeCb nObl30BaTb hAnpaBnaIOUne 6e3 yctahOBKn BHTOB (no 2 Ha KaKdyu HappaBnaIOUyo).
4 MOHTaXhIbe HAnpabNIOUe yCTaHbANBbAOTcRa Ha 3aOBe-3rOToBtEne n paCCHTaHbHa pa3MeueHne O6OpYOBaHn C MoTAtKHO rnybHn 521 MM. He perynpyte MOHTaXhIbe HApabNIOUe 3a NCKNoeHem TEx cNoyaeB, KOrDa Iry aCTaHbANBaEMo BAAM o6OpYOBaHn Tpebyetcrd pyra TMaTHaHn rnybHn. PepeHra N 3aDnHr pynb HapabNIOuix Moryt perynpobatc He3ABNCMO dpyr ot Dpyra dna MoTAtKa o6OpYOBaHn rnybHn ot 76 Do 826 MM.
1 KaJdA HnpaBnIoua npKpEnHe a K Kopnyc uKaHa pnp nOmoU 2 BnHTOB u 2 3aknaHbX raeK: Onda npa TaKHX Detanei paCnOlaeraTcB BepxHem yIy, a Dpyra - B HIXHem. C nOmoIbIO KpeCtOo6paHoi OTBePTKn BblBepHIne BnHTb, KOtpbE KpenAT HnpaBnIoue K Kopnyc uKaHa.
1 PtepeMeCTIe 3aKnlaHbIe raiKn Ha JeNaeAemyIry6BHy N yCTAHOBITE BnHTbl Ha MeCTO.
3 CdBMHbTe MoHTaxKHe HAnpAbIaOuH He KaEnaEmy Iry6mHy N ChOba 3akpenTe Hx C NoMoUbB BMTHOB, BbIeBPhYbIX Ha Wae 1.
6. YctaHOBka o6OpydoBaHnIa
BHHMaHHe yctahabnBaIte obopydOBaHne Do o6ceueehnY cToMBOcTH uKaFa. Chayana yCTAHoBHe obopydOBaHne, KOtOpoe cNeyTe pa3MeTb B HxKHe qAChn UkKaF. YctahabnBaIte obopydOBaHne HauHna C hHa3a uKaF a No HapPabLeHnB Bepx — Hn B Kcem cyae He HAObOp. Ipn HcNoB3OBaHm HapPabLnOuXn Dn pyCTAHOBKn 6010aIte octopoxhoctb Pn Hx BblBHXeHN. He BblBnraTe 6oone OHOH rpynnbI HapPabLHOUxN OHOBpeMeHHo. CtapaiTe b He BblBnAtb HapPabLHOUme dny CTAHOBKn 6010aIte octopoxhoctb Pn HbBnBnAe HApPabDnHnOuXn Dn
PnmeHne. KbaepbHe B cepHHe Kaqdo Hkaqpa npohymepoabHn H MeHOT He6oBHyO Hdceky dny yDObCTBa paCno3HaBaHn. B Kaqdom OTeNbHom WkaFy MMeTc MeTo, rde pacnonararet HmepoBaHHoe OTBpCTHe O TBpCTHe HaxoJHHeC HEnocpeCTBeHHo HAD n noHMM

6.1 YctaHObKa/ChrTne 3aKnlaHbIX raeK
BHIMAHWE!OTRw6bI KpOMOK3aKnAdhBx Raek DOnkHb3auePnTcBra 3a6okOBBe, a He BepXn HmXnK pKa BApTaHO rOBepCTN HnpaBnIOuEe. IJa o6ecneHn npabunhoCTN yCTaHOBKn O6OpDobHnn CNeUyTe Yka3AnM, M3IOKeHNbM B COpBOOHTeBHOJ DOKUMENTAUKN Hemy.
1 Haimite HymepoBaHbIe KBApaTHbIe OTBepCTMa B MOthaXbIX HAnpabJIHOux, KOtOpbe IInaHpyETc INCnlo3OBaTdIy cYtaHOBKn o6OpyOBOAHN. BCTABTe 3akJaHbIe raiKu (m3 KomnneKtA) B KBApaTHbIe OTBepCTMa C cIeMbIO6ceNeHn ToKu KpeHHeIra MoTaXhBX BuHTOB (NoCTabJIReMbx B KOMnKeTe).
PnmeaHne. IOnpeEnenHeo6xoMIMO KOINcETBa 3aknaDbIx raeK MeCT Hx yCTaHOBKn O3HaKOBKn C0npOBOuNTbHON DOkymeTaunE K CBOemy O6OpyDObAHIO.
2IpoDaeHbTeOJHn3OTRb6OBKpOMKn3aKaJaNHOraKMYepe3 KBaPaTHoe OTBepCTe C BHyTpHeHcSTOpHOblMOHTaJHoH HapabJIHOuEi.BDaBte e no HapabJIeHHo K 6oKobOMy KpaO KBaPaTHoro OTBepCTna.OTrBb KpOMok 3aKaJaNbIX Raek DOnXbbl 3auePJIbC3a 6oKOBbe, a He BePxNHm N HxHnnK pKa R KaBpaTHoro OTBepCTna.
3 CnIeKa HauaBHe Ha 3aKnaIHyo raiKy no 60kAM, 7TO No3BOINHT dpyrOmy OTN6y KpOMKn pnoTnYepe3 KBaDpaTHOE oTBepCTne. PnP npAubHbOn yCTaHOBKe 3aKnaIHOH raiKKs 60a OTN6a ee KpOMOK BbIaIOcra c O6pTaHOH CTOpOH b KaDpaTHOrO oTBepCTm N BnHbHa BHeuHne NOBepxHoCTM MoTHaKHOH HapablaIOeJe. IOToTpRte 1-3 do tex nop, noka He 6ydt YCTaHOBHe b BCE Heo6xoIMMbte 3aKnaIDbie raiKn.
4 Nocye UCTAHOBKHeo6xOaHbIX 3aKaIaNbIX Taek npKpeNITc CBOE o6OpyDobAHNE K CToeHoi HapabnHOe C NOMUbHO MOHTaKbIX BNTHO u aWeo6pa3bIX Wai6 H3 KOmNtKa. IomeCTHte aWeo6pa3bIe Wai6bIMexdy BNHTAMN M OHTaXbMM KPOHtEHaMn DnA KpennneHn OBopyDobAHn.
PnmeaHne.B KOMNNT NOCTABKMOBOPyOBAHIN MORYTAKKBEXOHTMBOTMTOHXTKHEI pNcNO6NEHNI.IEpe yCTaHOBKO CBOEObOpYOBAHIN 03HAKOmbTeC bKa3AHMIIM NO MOHTAKY, NOCTABNEMBMIM B KOMNNTKe CHMM.
IaN3BnueHnna 3aknaadhraeK nobToPHTe WAn 1-3 B o6paTHOM npAKe
PnmeHne. PnKJIaHmYcTaHOBky N3BcueHHe 3aKnadbIX Raek MoXHO pOn3BOdntb CnOMoubIO CNEuaHbHO INCTpyMeHTA (B KOMNIKT NOCTABKN HE BXOHT).


7. TexHnueckne xapaKTePncTnKn
1111 W. 35th Street, Chicago, IL 60609 USA - triplite.com/support