True Air 04384 - Air purifier HAMILTON BEACH - Free user manual and instructions
Find the device manual for free True Air 04384 HAMILTON BEACH in PDF.

| Type | Air purifier |
| Brand | Hamilton Beach |
| Model | True Air 04384 |
| Main functions | 4-stage filtration: permanent pre-filter, charcoal filters, H.E.P.A. filter (99% of particles 3 microns), ionizer (on some models) |
| Speeds | 5 settings: Off, WhisperClean™, Med, QuickClean™, Ionizer |
| Power supply | 120 V, 60 Hz, polarized plug |
| Maintenance | Clean the permanent pre-filter every 1 to 3 months with a vacuum; replace charcoal filters every 3 months; use a time strip cartridge for tracking. |
| Replacement parts | H.E.P.A. and charcoal filters: pack of 3 (ref. 04234_Pets) or individual (ref. 04294 Pets) |
| Safety | Do not immerse; do not use outdoors; unplug before cleaning; do not block the grilles. |
| Warranty | 1 year limited (defects in materials and workmanship) |
| Usage | Indoor only; flat surface; avoid kitchens, garages, heat sources |
| Customer service | Canada: 1-800-267-2826; United States: 1-800-851-8900 |
Frequently Asked Questions - True Air 04384 HAMILTON BEACH
User questions about True Air 04384 HAMILTON BEACH
0 question about this device. Answer the ones you know or ask your own.
Ask a new question about this device
Download the instructions for your Air purifier in PDF format for free! Find your manual True Air 04384 - HAMILTON BEACH and take your electronic device back in hand. On this page are published all the documents necessary for the use of your device. True Air 04384 by HAMILTON BEACH.
USER MANUAL True Air 04384 HAMILTON BEACH
Visit hamiltonbeach.com for delicious recipes, tips, and to register your product online!
Please call us – our friendly associates are ready to help. USA: 1.800.851.8900
Questions?
natural_image
White industrial air purifier device with a circular vent and handle (no visible text or symbols)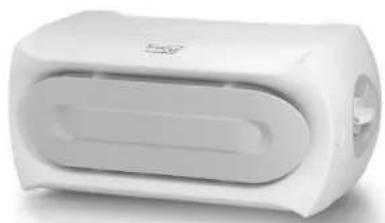
natural_image
White cylindrical electronic device with a flat top and ventilation slots (no visible text or symbols)Hamilton Beach®
TrueAir®
In order to prevent the risk of fire, electric shock, personal injury, or damage to property, follow these instructions carefully. When using electric appliances, basic safety precautions should be followed, including the following:
- Read all instructions before using this air purifier. Save these instructions for reference.
- Do not immerse this product in water or splash water on it. An electrical short may result in shock or fire.
- Do not handle the plug with wet hands; electrical shock may occur, resulting in injury or death.
- Never attempt to disassemble or alter the product in any way not instructed by this manual. Shock, fire, or bodily injury may occur. Contact Hamilton Beach at 1-800-851-8900 (U.S.) or 1-800-267-2826 (Canada) for assistance.
- Do not operate this product in any greasy environment, such as in the kitchen. This product is not intended to filter oil or grease from the air.
-
Do not operate this product near an open fire. It may ignite and cause fire, resulting in bodily injury or property damage.
-
Do not operate this product in a garage or other area with oil or chemicals such as solvents or insecticides.
- Always unplug the power cord from the receptacle when the air purifier is not in use, before cleaning, when replacing parts, or before moving to another location.
- Do not insert foreign objects into the product for any reason. Bodily injury or property damage may occur.
- Do not use this product outdoors. It is intended for indoor use only.
- Do not use air purifier in unheated areas such as a garage or porch.
- Do not operate this air purifier without the outlet grille in place or if the outlet grille is broken or damaged.
- WARNING: To reduce the risk of fire or electric shock, do not use this air purifier with any solid-state speed control device.
SAVE THESE INSTRUCTIONS!
OTHER CONSUMER SAFETY INFORMATION
This appliance is intended for household use only.
WARNING! Shock Hazard: This appliance has a polarized plug (one wide blade) that reduces the risk of electric shock. The plug fits only one way into a polarized outlet. Do not defeat the safety purpose of the plug by modifying the plug in any way or by using an adapter. If the plug does not fit, reverse the plug. If it still does not fit, have an electrician replace the outlet.
The length of the cord used on this appliance was selected to reduce the hazards of becoming tangled in or tripping over a longer cord. If a longer cord is necessary, an approved extension cord may be used. The electrical rating of the extension cord must be equal to or greater than the rating of the appliance. Care must be taken to arrange the extension cord so that it will not drape over the countertop or tabletop where it can be pulled on by children or accidentally tripped over.
To avoid an electrical circuit overload, do not use another high-wattage appliance on the same circuit with this appliance.
840156702 ENv04.qxd:Layout 1 11/13/09 2:37 PM Page 3
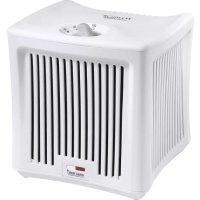
HOW THE AIR PURIFIER WORKS
The air purifier functions as an air cleaner by helping to remove particulates (such as pet dander, dust, pollen, mold and mildew spores) from the air.
The air is cleaned in four stages:
- A fan draws air through the sides of the front panel.
- The permanent prefilter captures large particles (such as dog or cat hair), while the two carbon filters assist in removing odors. The HEPA-grade filter then removes particles as small as 3 microns from the air at 99% effectiveness.
- The ionizer (on select models) then releases negative ions into the air which attract positively charged particles.
- The purified air is then released through the back of the unit.
Parts and Features

natural_image
Diagram of a device with a handle and internal components, showing directional arrows (no text or symbols)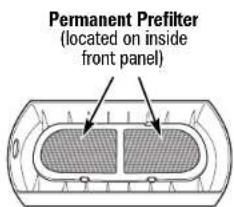
Control Knob - Turn the control knob to the desired setting. There are five settings:
• Off
- WhisperClean™ – Use for quiet, nighttime operation or for constant low-speed filtration.
- Medium – Provides a higher fan speed; use to quickly filter dust, pollen, etc., from a room.
- QuickClean™ – Provides cleaning during acute needs.
- Ionizer – On select models, the ionizer will activate for fresher, cleaner air. Also illuminated with a soft blue ambient light (on select models).
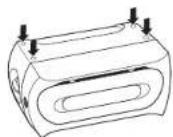
Adhesive Feet
Four adhesive feet are provided to use the air purifier in console mode as shown on the front cover. Adhere the feet to indentations as shown in the illustration.
How to Replace the Timestrip Cartridge:
- Press firmly on foil bubble on the cartridge to activate. A red line will appear a few moments later on the left side of the holder to indicate it has been correctly activated.
- Slide activated cartridge into the plastic holder on unit.
- The activated cartridge will "count down" for 3 months, indicating that it is time to replace the filter.


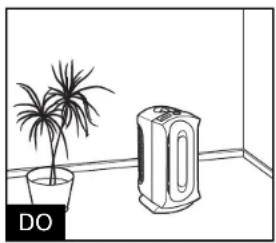
Selecting a Location
The air purifier is designed for easy use and maintenance. Make sure to remove all packing materials and properly install the permanent filter before use. Remember to remove the plastic bag around filters before using.
natural_image
Simple line drawing of a room with a potted plant and an air purifier (no text or symbols)- Place the air purifier on a flat, stable surface.
- Place the air purifier near an electrical outlet where it is out of the way. Make sure that the air purifier and the cord do not present tripping hazards.
- Select a central location with adequate air circulation.
- Turn off and unplug the air purifier before moving or servicing it, or if it will not be used for several days.
- Route the electrical cord clear of furniture to prevent damage from pinching.
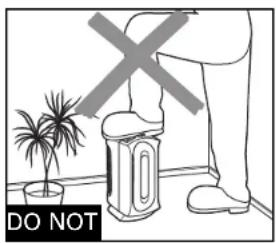
- Do not stand, sit, or place any objects on the air purifier. It is not designed to support additional weight.
- Do not block the air intake and outlet grilles with drapes, curtains, or blinds. This may cause reduced performance.
- Do not use in a kitchen, garage, or area with grease, oil, or chemicals such as solvents or insecticides.
- Do not place on or near heat sources such as stoves, radiators, or heaters, or in direct sunlight.
- To reduce electrical noise and interference, do not place on or near, or plug into the same outlet as TVs, baby monitors, or cordless phones.
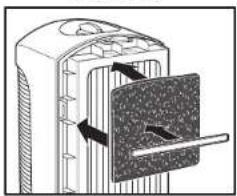
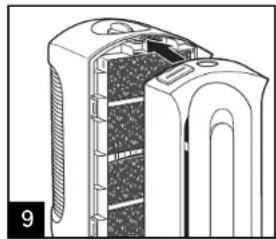
Cleaning
WARNING
Electrical Shock Hazard.
Disconnect power before cleaning. Do not immerse unit in any liquid. Remember to activate a new timestep cartridge when replacing the carbon filters.

natural_image
Line drawing of a portable air purifier with a power outlet connected to its side (no text or symbols)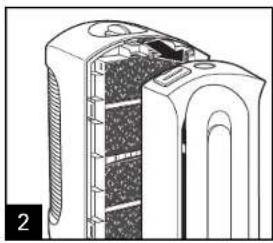
natural_image
Cross-sectional diagram of a mechanical device showing internal components and housing (no text or symbols)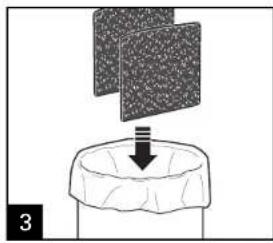
natural_image
Diagram showing a mechanical setup with a downward arrow emerging from a textured block (no text or symbols)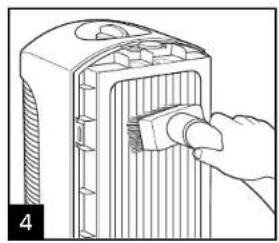
natural_image
Line drawing of a hand inserting a plug into a device housing (no text or symbols)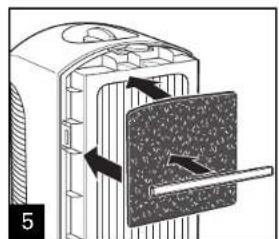
natural_image
Diagram of a mechanical device with internal components and directional arrows, no visible text or symbols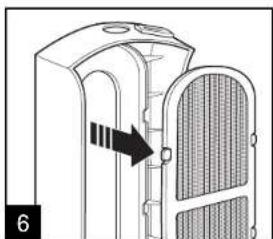
natural_image
Diagram of a mechanical component with internal structure and directional arrow (no text or symbols)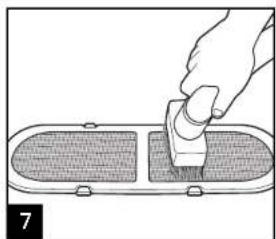
natural_image
Illustration of a hand using a tool to press or install a component on a flat surface (no text or symbols visible)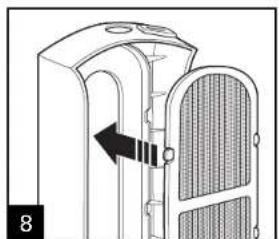
natural_image
Diagram of a mechanical device with a directional arrow indicating movement, no text or symbols present
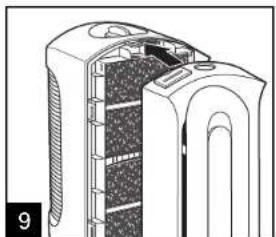
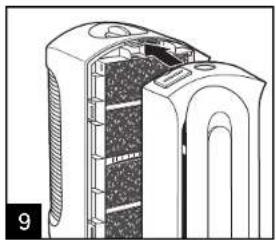
Cleaning (cont.)
natural_image
Cross-sectional diagram of a mechanical device showing internal components and housing (no text or symbols)Filters should last up to 3 months, depending on use.
Always discard used filters. Timestrip cartridges are included with new filters and should be replaced along with filters. Filters may be purchased through www.hamiltonbeach.com or through Consumer Affairs 1.800.851.8900.
Use only Hamilton Beach Brands, Inc., filters.
3-Pack Filters
Single-Pack Filters
04234 Pet
04294_Pet
Troubleshooting
PROBLEM
Unit will not turn on.
Reduced airflow or poor filtering.
PROBABLE CAUSE
- Is the unit plugged in?
• Is the control knob turned on? - The air intake or air outlet grille may be blocked. Make sure nothing is in front of or directly behind the unit.
- The filter may be clogged. Clean the filter with a vacuum if needed.
- The permanent prefilter may be clogged. We recommend vacuuming the permanent prefilter every 1–3 months, depending on usage conditions.
- Replace carbon filters every 90 days, or sooner, depending on usage. Remember to replace your timestep cartridge when doing so. See "How to Replace the Timestrip Cartridge" in the Parts and Features section.
Limited Warranty
This warranty applies to products purchased in the U.S. and Canada. This is the only express warranty for this product and is in lieu of any other warranty or condition.
This product is warranted to be free from defects in material and workmanship for a period of one (1) year from the date of original purchase. During this period, your exclusive remedy is repair or replacement of this product or any component found to be defective, at our option; however, you are responsible for all costs associated with returning the product to us and our returning a product or component under this warranty to you. If the product or component is no longer available, we will replace with a similar one of equal or greater value.
This warranty does not cover glass, filters, wear from normal use, use not in conformity with the printed directions, or damage to the product resulting from accident, alteration, abuse, or misuse. This warranty extends only to the original consumer purchaser or gift recipient. Keep the original sales receipt, as proof of purchase is required to make a warranty claim. This warranty is void if the product is used for other than single-family household use.
We exclude all claims for special, incidental, and consequential damages caused by breach of express or implied warranty. All liability is limited to the amount of the purchase price. Every implied warranty, including any statutory warranty or condition of merchantability or fitness for a particular purpose, is disclaimed except to the extent prohibited by law, in which case such warranty or condition is limited to the duration of this written warranty. This warranty gives you specific legal rights. You may have other legal rights that vary depending on where you live. Some states or provinces do not allow limitations on implied warranties or special, incidental, or consequential damages, so the foregoing limitations may not apply to you.
To make a warranty claim, do not return this appliance to the store. Please call 1.800.851.8900 in the U.S. or 1.800.267.2826 in Canada or visit hamiltonbeach.com in the U.S. or hamiltonbeach.ca in Canada. For faster service, locate the model, type, and series numbers on your appliance.
DIRECTIVES IMPORTANTES DE SÉCURITÉ
natural_image
Diagram of a mechanical device with internal components and directional arrows (no text or symbols)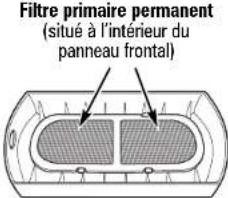
natural_image
Simple line drawing of a potted plant next to a 3D printer with label 'À FAIRE' (no other text or symbols)natural_image
Line drawing of a portable air purifier with a power outlet and cable (no text or symbols)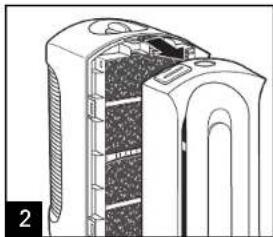
natural_image
Cross-sectional diagram of a device showing internal components and layered structure (no text or symbols)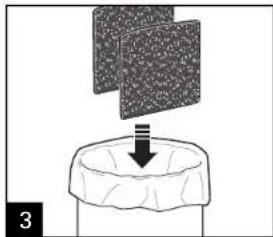
natural_image
Diagram showing a process with a downward arrow emerging from a textured surface, no text or symbols present.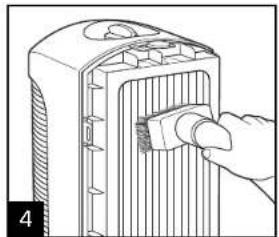
natural_image
Line drawing of a hand inserting a small component into a device housing (no text or symbols)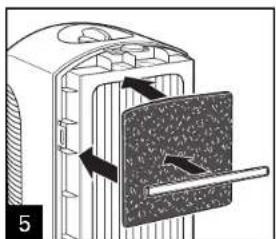
natural_image
Diagram of a mechanical device with arrows indicating motion or force direction (no text or symbols)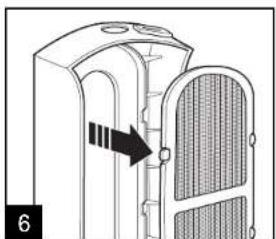
natural_image
Diagram of a device with a handle and internal structure, showing an arrow pointing to a component (no text or symbols present)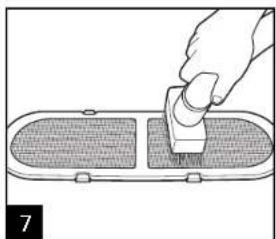
natural_image
Illustration of a hand using a tool to press or install a component on a surface (no text or symbols visible)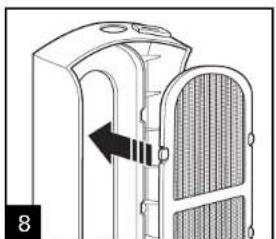
natural_image
Diagram of a device with a left-side arrow indicating movement or force, showing internal structure (no text or symbols)
Nettoyage (suite)
natural_image
Cross-sectional diagram of a mechanical device showing internal components and structural layers (no text or symbols)natural_image
Diagram of a device with a handle and internal components, showing directional arrows (no text or symbols)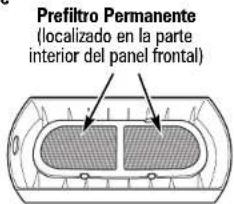
natural_image
Simple line drawing of a room with a potted plant and a wall-mounted device labeled 'SIEMPRE' (no other text or symbols)natural_image
Line drawing of a portable air purifier with a power outlet connected to its side (no text or symbols)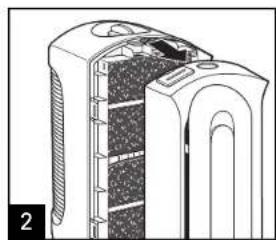
natural_image
Cross-sectional diagram of a mechanical device with internal layered structure (no text or symbols)
natural_image
Diagram showing a mechanical setup with a textured block and a downward arrow, no text or symbols present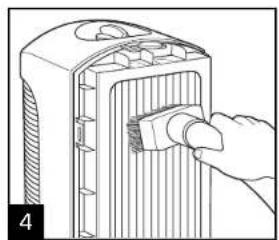
natural_image
Illustration of a hand inserting a component into a device housing (no text or symbols visible)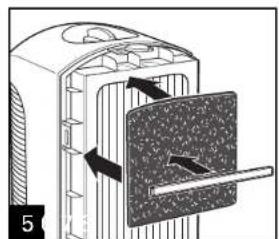
natural_image
Diagram of a mechanical component with internal structure and directional arrows, no visible text or symbols
natural_image
Diagram of a mechanical component with a highlighted section and arrow indicating direction (no text or symbols)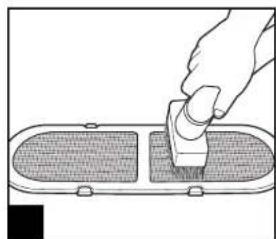
natural_image
Hand using a tool to cut or mark a rectangular object, no text or symbols visible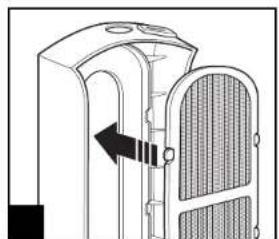
natural_image
Diagram of a mechanical device with internal components and an arrow indicating direction (no text or symbols)
Limipeza (cont.)
natural_image
Cross-sectional diagram of a mechanical device showing internal components and structural layers (no text or symbols)Col. Palmitas Polanco
Mixcoac MEXICO 03910 D.F.
Tel: 01 55 5563 8723 • Fax: 01 55 5615 1856