
RK100S - MIDI Keyboard KORG - Free user manual and instructions
Find the device manual for free RK100S KORG in PDF.
| Product Type | Shoulder-type MIDI keyboard (Keytar) with built-in synthesizer |
| Sound Engine | MMT (Multiple Modeling Technology) with analog modeling |
| Number of Programs | 200 factory Programs, editable via software |
| Maximum Polyphony | 8 voices (4 voices in Vocoder mode) |
| Keyboard | 37 SlimKey keys, touch-sensitive (velocity), no Aftertouch |
| Ribbons | Long ribbon (monophonic playing, pitch/filter control) and short ribbon (pitch/modulation) |
| Arpeggiator | 6 types (UP, DOWN, ALT1/2, Random, Trigger) with Step Arpeggiator and Latch function |
| Vocoder | 16-band Vocoder with level and pan settings, Formant Shift and Hold |
| Effects | 2-band equalizer per Timbre, 2 master effects (17 algorithms) |
| Connectivity | Stereo output (6.35 mm jack), INPUT (mono minijack), MIDI OUT, USB Type B |
| Power Supply | 6 AA batteries (alkaline or NiMH) or DC 9V power adapter (optional) |
| Battery Life | Approximately 8 hours with alkaline batteries |
| Dimensions (W x D x H) | 830 x 263 x 68 mm |
| Weight | 3.4 kg (including batteries) |
| Sound Editor Software | Free download from Korg website (requires USB-MIDI driver) |
| Maintenance and Cleaning | Wipe with a dry, soft cloth; use guitar care product if necessary; avoid shocks and temperature variations |
| Safety | Do not expose to extreme temperatures, avoid shocks, use only the recommended power adapter |
| Included Accessories | 6 AA batteries, strap, user manual, soft case |
| Options | DC 9V power adapter (Korg specific model) |
Frequently Asked Questions - RK100S KORG
User questions about RK100S KORG
0 question about this device. Answer the ones you know or ask your own.
Ask a new question about this device
Download the instructions for your MIDI Keyboard in PDF format for free! Find your manual RK100S - KORG and take your electronic device back in hand. On this page are published all the documents necessary for the use of your device. RK100S by KORG.
USER MANUAL RK100S KORG
natural_image
Line drawing of a keyboard with control panel and keypad (no text or symbols)Owner's Manual Manuel d'utilisation Bedienungsanleitung Manual de usuario
KORG
RK-100S
KEYTAR
Owner's manual
Table of contents
Main features 4
Front and side panels 4
Front panel 4
Side panel 6
Attaching the strap 6
Preparations....7
Connections....7
Turning the power on....8
Demo performance 9
Selecting and playing a program......9
Selecting a program....9
Modifying the sound 10
Playing arpeggios....13
Shift functions ......14
Velocity curve....14
Long ribbon velocity....15
Global MIDI channel 15
Long ribbon MIDI channel....15
Transpose....15
Power save function....16
Battery type and remaining power....16
Auto power off function....16
MIDI 17
Using the RK-100S with other MIDI devices (MIDI) 17
Trouble shooting ....18
Specifications....19
Appendices 74
Voice Name List....75
MIDI Implementaton Chart 77
Precautions
Location
Using the unit in the following locations can result in a malfunction.
• In direct sunlight
- Locations of extreme temperature or humidity
• Excessively dusty or dirty locations
- Locations of excessive vibration
- Close to magnetic fields
Power supply
Please connect the designated AC adapter to an AC outlet of the correct voltage. Do not connect it to an AC outlet of voltage other than that for which your unit is intended.
Interference with other electrical devices
Radios and televisions placed nearby may experience reception interference. Operate this unit at a suitable distance from radios and televisions.
Handling
To avoid breakage, do not apply excessive force to the switches or controls.
Care
If the exterior becomes dirty, wipe it with a clean, dry cloth. Do not use liquid cleaners such as benzene or thinner, or cleaning compounds or flammable polishes.
Keep this manual
After reading this manual, please keep it for later reference.
Keeping foreign matter out of your equipment
Never set any container with liquid in it near this equipment. If liquid gets into the equipment, it could cause a breakdown, fire, or electrical shock.
Be careful not to let metal objects get into the equipment. If something does slip into the equipment, unplug the AC adapter from the wall outlet. Then contact your nearest Korg dealer or the store where the equipment was purchased.
DECLARATION OF CONFORMITY (for USA)
Responsible Party : KORG USA INC.
Address : 316 SOUTH SERVICE ROAD, MELVILLE
Telephone : 1-631-390-6500
Equipment Type : Keytar
Model : RK-100S
This device complies with Part 15 of FCC Rules. Operation is subject to the following two conditions:
(1) This device may not cause harmful interference, and (2) this device must accept any interference received, including interference that may cause undesired operation.
THE FCC REGULATION WARNING (for USA)
NOTE: This equipment has been tested and found to comply with the limits for a Class B digital device, pursuant to Part 15 of the FCC Rules. These limits are designed to provide reasonable protection against harmful interference in a residential installation. This equipment generates, uses, and can radiate radio frequency energy and, if not installed and used in accordance with the instructions, may cause harmful interference to radio communications. However, there is no guarantee that interference will not occur in a particular installation. If this equipment does cause harmful interference to radio or television reception, which can be determined by turning the equipment off and on, the user is encouraged to try to correct the interference by one or more of the following measures:
- Reorient or relocate the receiving antenna.
- Increase the separation between the equipment and receiver.
- Connect the equipment into an outlet on a circuit different from that to which the receiver is connected.
- Consult the dealer or an experienced radio/TV technician for help.
If items such as cables are included with this equipment, you must use those included items.
Unauthorized changes or modification to this system can void the user's authority to operate this equipment.
Notice regarding disposal (EU only)

When this “crossed-out wheeled bin” symbol is displayed on the product, owner's manual, battery, or battery package, it signifies that when you wish to dispose of this product, manual, package or battery you must do so in an approved manner. Do not discard this product, manual, package or battery along with ordinary household waste. Disposing in the correct manner will prevent harm to human health and
potential damage to the environment. Since the correct method of disposal will depend on the applicable laws and regulations in your locality, please contact your local administrative body for details. If the battery contains heavy metals in excess of the regulated amount, a chemical symbol is displayed below the "crossed-out wheeled bin" symbol on the battery or battery package.
Precautions for the RK-100S
As with a common electric guitar, the body of this device is made with painted wood.
- After use, wipe the body with a clean, soft and dry cloth. Use a commercially available guitar polish.
- Do not expose this device to rapid temperature changes, such as extremely high or low temperatures. Bringing the device from a cold location directly to a heated room may cause cracks to form in the painted body. In addition, it is extremely dangerous to leave the device in the trunk of a car, where it will be exposed to high temperatures, for example, in the summer.
- Since the body paint is delicate, even a slight shock may cause it to peel off or crack. While playing or transporting, handle the device very carefully to avoid hitting it.
* All product names and company names are the trademarks or registered trademarks of their respective owners.
Thank you for purchasing the Korg RK-100S KEYTAR. To help you get the most out of your new instrument, please read this manual carefully.
Main features
The RK-100S is a stylish shoulder keyboard that's equipped with a synthesizer and the classic tones of a piano or organ, allowing you to play a wide-variety of sounds with the ribbon controllers.
Taking advantage of the battery power, you can enjoy playing in various locations.
200 programs through MMT analog modeling
200 programs that are compatible with various music genres are available through the MMT sound generation system. These are provided with a broad range of oscillator algorithms, including the sawtooth waves and square waves, typical of analog synthesizers, as well as formant waveforms, noise and PCM/DWGS waveforms.
Ribbon controllers
A long ribbon controller and a short ribbon controller are available for controlling the pitch and filter, etc.
The long ribbon controller can be used to control the pitch and filter of sounds, and it can also be used to play scales and the range of notes specified with the sound editor software.
Only a fingertip should be used to control. You shouldn't use anything hard or pointed and you shouldn't be wearing gloves.
Arpeggiator
The built-in arpeggiator can automatically generate an arpeggio when you hold down a chord.
You can choose from six types of arpeggios. Notes can also be individually switched on/off for up to eight steps, allowing you to vary the rhythm for an even wider range of possibilities.
Vocoder functionality
The RK-100S comes equipped with a vocoder function that will let you use your voice via a mic to process the sound of the oscillator, producing the impression that the instrument is "talking."
Virtual Patch functionality
Controllers such as EG, LFO, keyboard tracking, and the ribbons can be virtually connected to parameters such as pitch or cutoff, allowing you to modulate these parameters and create sounds with a high degree of freedom.
Equalizer and effects add a final polish to your sounds
Each timbre provides a two-band equalizer for additional sound-creating potential.
There are also two master effects for each program, allowing you to add final touches to your sound. You can choose one of seventeen types for each effect.
Sound editor software
By connecting the RK-100S to a computer with a USB cable and the using sound editor software, you can edit parameters, such as the sounds and the arpeggio patterns of the RK-100S, from your computer.
You can download the sound editor free of charge from the Korg website.
http://www.korg.com/
Front and side panels
Front panel
1. OCTAVE +/- buttons
This shifts the range of notes assigned to the keyboard and long ribbon controller upward or downward in one-octave steps over a range of 3 octaves.
Tip: These buttons can also be used to specify settings for the shift functions.
2. Short ribbon controller
This controls the pitch and modulation of sounds.
Press the SHORT RIBBON button to switch between pitch and modulation.
3. LONG RIBBON
PITCH button
Press this button to control the pitch with the long ribbon controller.
FILTER button
Press this button to control the filter with the long ribbon controller.
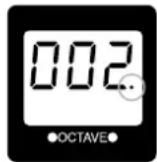
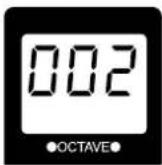
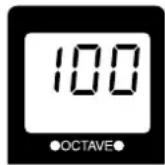
4. Display
The number of the program that's currently selected and the settings for the shift functions are shown here.
In addition, the octave specified with the OCTAVE +/- buttons will be indicated (see 10 page "Switching the octave with the OCTAVE buttons").
5. Long ribbon controller
This is used to play scales (monophonic) and control the pitch and filter of sounds.
Press the LONG RIBBON PITCH and FILTER buttons to select the parameter to be controlled.
6. VOLUME knob
This adjusts the volume of the Output jack.

7. SOUND lever
This selects the program. Move the lever to the + or - direction to switch to the next or previous program.
Tip: The SOUND lever can also be used to specify settings for the shift functions.
8. TAP button
This specifies the tempo (speed) of the arpeggiator, LFO or delay effect.
The tempo is specified according to the number of times the button is pressed. The LED will blink in synchronization with the tempo.
In addition, hold down the SHIFT button and press this button to play the demo song (see 9 page "Demo performance").
9. ARP button
This turns the arpeggiator on/off (see 13 page "Playing arpeggios").
In addition, hold down the SHIFT button and press this button to change the settings of the arpeggiator.
10. SHORT RIBBON button
This switches the parameter that's controlled by the short ribbon controller.
When the button is lit up in red, the pitch of the sound can be controlled.
When the button is lit up in green, the modulation of the sound can be controlled.
In addition, if you hold down the SHIFT button and press the
SHORT RIBBON button, the audio input signal from the INPUT jack will be sent from the Output jack without modification.
11. SHIFT button
Hold down this button and press the corresponding button to play the demo song or specify settings for the shift functions.
12. Favorites buttons A - H
Your favorite programs can be assigned to these buttons. The program can be quickly recalled by pressing the corresponding button.
See page 9 "Favorites function"
In addition, hold down the SHIFT button and press one of the favorites buttons (A - H) to enter a shift function and change the settings for the function.
13. Output jacks [stereo jack]
You can connect powered monitors, a stereo amp, mixer, or headphones to these jacks.
Side panel
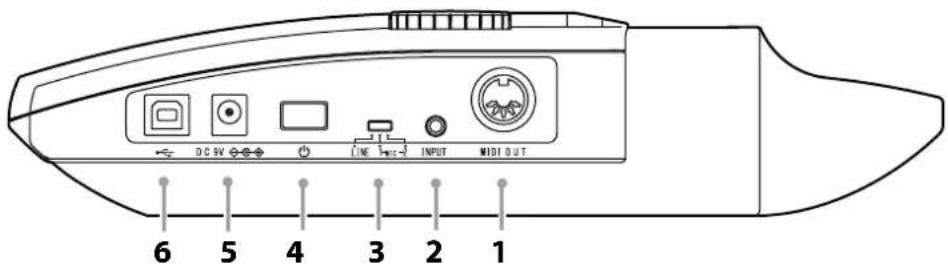
1. MIDI OUT connector
This connector transmits MIDI data to the external MIDI device that's connected to the RK-100S.
2. INPUT jack
Connect the headset/mic (monaural, not plug-in powered) or other audio equipment to this jack.
When a headset/mic is connected, the input can be used as an audio signal for the modulator in a vocoder program.
When audio equipment is connected, this jack will be used as an AUX IN jack. The sound from the connected device will be output from the RK-100S. (See page 7 "Connecting an audio player")
3. Input select switch
Set this switch according to the device that's connected to the INPUT jack.
MIC 1 or MIC2: When a mic is connected
LINE: When audio equipment is connected

When an audio device is connected to the INPUT jack, be sure to set the Input select switch to LINE. Otherwise, the connected device may be damaged.
4. Power switch
This turns the power on/off.
5. DC 9V connector
Connect the optional AC adapter here.
Connect the AC adapter to the RK-100S before you plug it into an AC outlet.
6. USB connector
Connect the RK-100S to a computer and use sound editor software to edit parameters, such as sounds and arpeggio patterns of the RK-100S.
Note: In order to use a USB connection, you'll need to install the Korg USB-MIDI driver in your computer. You can download the "Korg USB-MIDI driver" from the Korg website, and install it as described in the accompanying documentation.
Attaching the strap
Attach the strap to the RK-100S as described below.
- Attach the strap to the two strap pins at the locations shown in the illustration.
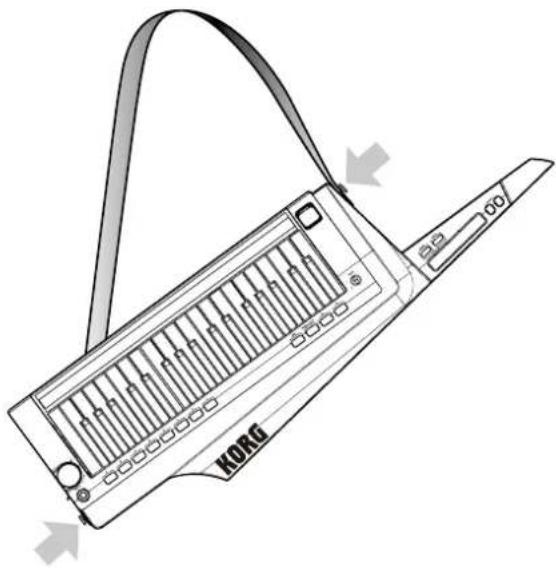
After attaching the strap, verify that it is firmly secured with the pins.
Never loosen the screws mounting the strap pins.
In order to prevent the strap from accidentally becoming disconnected, we recommend using commercially available guitar strap locks.
Preparations
Connections
The illustration below shows a typical example of connections for the RK-100S. Connect your equipment as appropriate for your needs.
You must connect all devices with the power turned off. Failure to observe this precaution may cause malfunctions or damage to your speaker system.

flowchart
graph TD
    A["Input: Mono plug"] --> B["Mono plug"]
    C["Input: Mono plug"] --> D["Mono plug"]
    E["Input: Mono plug"] --> F["Monitor amplifier etc."]
    G["Input: Mono plug"] --> H["headphones"]
    I["Output jack"] --> J["MIDI IN"]
    I --> K["MIDI cable"]
    I --> L["External tone generator"]
    I --> M["Headset mic"]
    I --> N["Digital audio player etc."]
    I --> O["AC adapter (Separately sold)"]
    I --> P["USB cable"]
    I --> Q["Computer"]
Connect your monitor amp or mixer to the output jack
Connect the RK-100S's Output jack to the input jacks of your mixer or powered monitor speakers.
Note: We recommend that you output in stereo in order to take full advantage of the RK-100S's sound. When a cable with standard mono plugs is used, only sound from the left channel will be output.
Connecting the mic
To use the RK-100S as a vocoder, connect the headset/mic (not plug-in powered) to the INPUT jack, and then use your voice as the modulator signal (see 10 page "Playing a vocoder program").
Note: The INPUT jack is monaural.
Do not use excessive force when connecting or disconnecting the mic.
Be careful of the mic output level when connecting a mic.
Connecting an audio player
The RK-100S's INPUT jack can be used as an AUX IN jack.
- Set the Input select switch (on the side panel) to LINE.
When an audio device is connected to the INPUT jack, be sure to set the Input select switch to LINE. Otherwise, the connected device may be damaged.
-
Connect the audio device to the INPUT jack.
-
Hold down the SHIFT button and press the SHORT RIBBON button.
The RK-100S will enter the Audio In Through mode, where the audio signal that's input to the INPUT jack is simply output directly from the Output jack.
When there is an input at the INPUT jack, the SHIFT button is lit up. If the input is overloaded, the button is lit up in red.
Note: The INPUT jack is compatible with a stereo plug, but the audio signal that is output from the Output jack is monaural.
4. Adjust the volume of the connected audio device until the SHIFT button is not lit up in red.
Connecting a MIDI device or a computer to the MIDI OUT connector or USB connector
If the MIDI OUT connector of the RK-100S is connected to the MIDI IN connector of an external MIDI device, the external MIDI device can be controlled with the RK-100S's keyboard or controllers.
If the USB connector of the RK-100S is connected to a computer, sound editor software can be used to edit parameters, such as sounds and arpeggio patterns of the RK-100S, or sequencer software, for example, can be used to play the RK-100S's sound generator.
Turning the power on
The RK-100S can be powered by an AC adapter or batteries. Due to cable routing considerations during live performances, we recommend using batteries.
Before you turn on the power
Make sure that the power switch is off before you connect the power supply.
Using batteries
- Open the battery cover that's located on the bottom of the RK-100S.
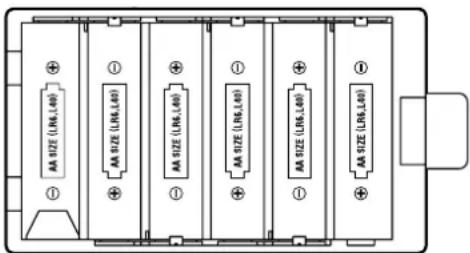
- Insert six AA alkaline or nickel-metal hydride batteries (separately sold).
Make sure that the batteries are oriented correctly.
3. Close the battery cover.
4. In order to get the most accurate readings of the remaining battery power, please refer to the "Battery type and remaining power" section on page 16 and select the type of battery that's being used.
About the empty battery indicator
Hold down the SHIFT button and press the favorites G button to show the remaining battery power using the eight favorites buttons (A - H) as level indicators. The number of lit buttons may be lower depending on the battery capacity.
In addition, when the battery capacity runs down, the dot at the right side of the display will blink. If you continue to use the unit, the blinking will become faster.
If you continue to use the unit in this state, the indicator will begin blinking.
We recommend that you replace the batteries as soon as possible, or connect the AC adapter.
Depleted batteries should be immediately removed from the RK-100S. Leaving depleted batteries installed may cause malfunctions (such as leakage of the battery electrolyte). You should also remove the batteries if you won't be using the RK-100S for an extended period of time.
Connecting the AC adapter
Only use the specified AC adapter. Using any other AC adapter may cause malfunctions.
- Make sure that the RK-100S is powered-off.
- Connect the optional AC adapter to the DC9V connector, located on the side panel.
See page 7 "Connections"
- Plug the AC adapter into an AC outlet.
Use an AC outlet of the correct voltage.
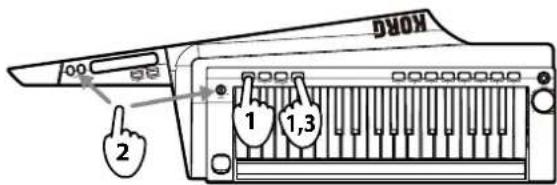
Turning the power on
Before you power-on the RK-100S, you must power-off any external output device such as your powered monitor speakers.
1. Turn the RK-100S's VOLUME knob all the way to the left.
2. Hold down the power switch until the indicators appear in the display.
When the indicators appear in the display, release the switch.
After a while, the program number will appear in the display.
- Lower the volume of your powered monitors or other external output equipment.
- Turn the RK-100S's VOLUME knob to an appropriate position.
- Adjust the volume of your external output equipment.
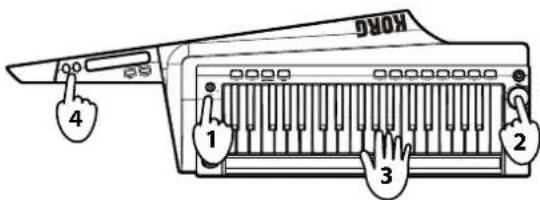
Turning the power off
- Lower the volume of your powered monitor speakers or other external output device, and then turn off their power.
- Turn the VOLUME knob of the RK-100S all the way toward the left, and then press and hold down the power switch until the display indicates that you can safely turn off the power.
If the AC adapter is being used, do not unplug it while the RK-100S is powering off. The RK-100S is saving settings for the favorites buttons and for the various other parameters while it is powering off.
Auto power off function
If there is no user input for approx. 4 hours the auto power off function will automatically turn off the RK 100S.
Note: With the factory settings, the auto power off function is enabled.
This function can be disabled so that the RK-100S will not be automatically turned off.
See page 16 "Auto power off function"
Demo performance
The RK-100S contains demo songs that show off its sounds.
See page 75 "Voice Name List"
- Hold down the SHIFT button and press the TAP button.
The demo performance will begin. - Use the OCTAVE +/- buttons or the Sound lever to select the demo song.
- Press the SHIFT button to end the demo performance.
Selecting and playing a program
Selecting a program
The RK-100S contains 200 programs that can be used with various genres.
Using the SOUND lever
Use the SOUND lever on the front panel to select a program.
- Move the SOUND lever to the + or - direction.
The program is switched. The number of the selected program appears in the display.
Each time the lever is moved, the program is switched incrementally.
See page 75 "Voice Name List"
- Adjust the VOLUME knob to the appropriate level.
- Play the keyboard to check the sound.
- Press the OCTAVE button to change the pitch range assigned to the keyboard.
See page 10 "Switching the octave with the OCTAVE buttons"
Favorites function
The RK-100S is equipped with the favorites function, which allows you to assign your favorite programs to the eight favorites buttons. A total of 40 programs (5 banks × 8 buttons) can be stored.
Using the favorites buttons
Programs have already been assigned to these favorites buttons. Those programs can be immediately recalled by pressing the corresponding button.
- While holding down the SHIFT button, move the lever
to select a favorites bank.
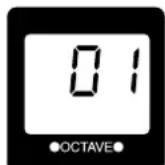
There are five favorites banks. When switching between the banks, the number of the selected bank appears in the display.
Note: The program is not switched if only a bank is selected. Switch the program by then pressing a favorites button.
2. Press one of the eight favorites buttons.
The program that's assigned to the pressed button is selected.
Tip: The program assigned to the button can be changed to a different program.
Assigning programs to favorites buttons
Here's how to change the program that's assigned to a favorites button to your favorite program.

- Select the program to be assigned to a favorites button.
- While holding down the SHIFT button, move the lever to select the favorites bank where the program is to be assigned.
The favorites bank is switched. The number of the selected bank appears in the display.
- Hold down the favorites button where you wish to assign a program.
After all of the favorites buttons are lit up at the same time, the favorites button where the program is to be assigned is lit up, indicating that the program has been assigned.
Playing a vocoder program
A vocoder modifies the signal from an oscillator or other source (the "carrier") by applying the spectral characteristics of an external input source such as a human voice (the "modulator").
The most common way to use a vocoder is to produce a "talking instrument" effect by taking the input signal of your voice from the mic while you hold down a chord on the keyboard. However you can also obtain interesting results by using audio input sources other than a human voice, such as rhythm sounds or anything else you like.
Here's how to connect a mic and try out the vocoder.
- Connect the mic to the INPUT jack on the side panel, and then set the Input select switch to MIC2.
- Hold down the SHIFT button and press the SHORT RIBBON button.
The audio input signal from the INPUT jack will be sent from the Output jack without modification (Audio In Thru).
The SHIFT button will light up if a signal is being input to the INPUT jack. It will light up in red if an input overload occurs.
- Vocalize into the mic. If the SHIFT button is lit up in red, set the Input select switch to MIC1.
- To return to the normal state, hold down the SHIFT button and press the SHORT RIBBON button once again.
- Select a vocoder program.
See page 75 "Voice Name List"
- While vocalizing into the mic, play the keyboard.
To hear different vocoder effects, try vocalizing in different ways and changing the chord you play.
Tip: Some vocoder programs will produce sound when you simply play the keyboard; there's no need to vocalize into the mic.
Modifying the sound
To make your performance more expressive, you can modify the sounds of the RK-100S by using the short ribbon controller, the long ribbon controller, and also by how you play the keyboard.
Try out various ways to play each program you select.
Using the keyboard to modify the sound - Velocity
The effect will vary depending on the amount of force that you use to play the keys. Normally, the force of your strike will affect the tone or volume.
Tip: During a performance, the eight favorites buttons (A – H) light up like a level meter, according to the keyboard velocity.
The RK-100S's keyboard does not support aftertouch.
Switching the octave with the OCTAVE buttons
The pitch range assigned to the long ribbon controller while playing the keyboard or scales can be changed in one-octave increments over a range of ±3 octaves.
| Press the - button | Keyboard and ribbon range | OCTAVE LED in the display | Press the + button |
| ↓ | C6-C9 LED | on right side lit up in red | ↑ |
| ↓ | C5-C8 | LED on right side lit up in orange | ↑ |
| ↓ | C4-C7 | LED on right side lit up in green | ↑ |
| ↓ | C3-C6 | Dark | ↑ |
| ↓ | C2-C5 | LED on left side lit up in green | ↑ |
| ↓ | C1-C4 | LED on left side lit up in orange | ↑ |
| ↓ | C0-C3 | LED on left side lit up in red | ↑ |
Simultaneously press the OCTAVE +/- buttons to return to ±0.
Using the short ribbon controller
The short ribbon controller can be used to control the pitch and modulation of sounds.
The parameter being controlled can be switched with the SHORT RIBBON button.
Tip: The sound editor software (when the RK-100S is connected to a computer via USB) can be used to specify whether pitch or modulation is controlled with the short ribbon controller when the program is switched.
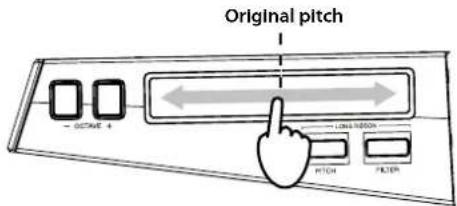
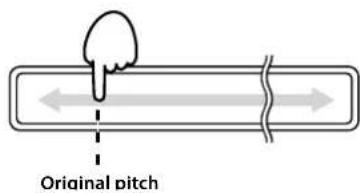
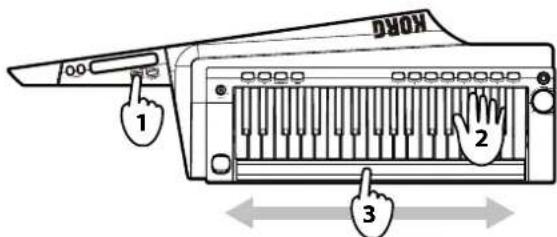
Controlling the pitch
-
Press the SHORT RIBBON button so that it is lit up in red.
-
While playing the keyboard, use the short ribbon controller.
Slide your finger to the left and right along the ribbon controller. With the original pitch at the center of the ribbon, raise and lower the pitch by moving your finger in either direction. Removing your finger from the ribbon will return the pitch to the original setting.
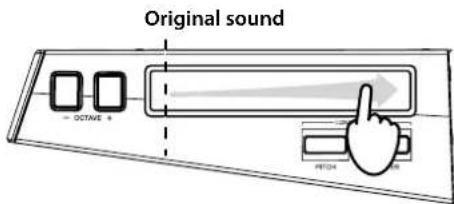
Applying modulation
-
Press the SHORT RIBBON button so that it is lit up in green.
-
While playing the keyboard, use the short ribbon
controller.
Slide your finger to the left and right along the ribbon controller. With the original sound at the left end of the ribbon, apply modulation by moving your finger to the other end. Removing your finger from the ribbon will return the sound to the original setting. Depending on the selected program, the vibrato depth will be varied or the tone will be modified by changing the cutoff frequency.
Using the long ribbon controller
The long ribbon controller can be used to play scales and to control the pitch and filter of sounds.
Tip: The tone, range of notes and direction in which the effect is applied with the long ribbon controller differs depending on the program. In addition, these settings can be specified with the sound editor software (when the RK-100S is connected to a computer via USB).
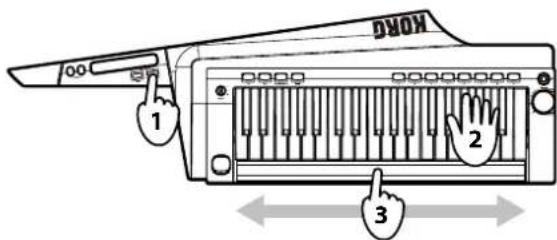
Playing scales
Single notes of the previously specified scale can be played.
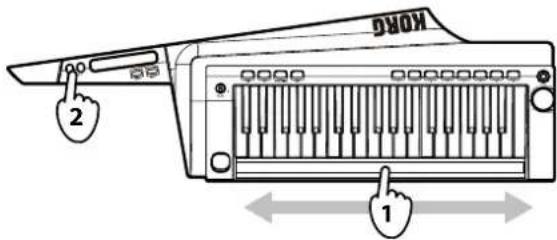
- With the LONG RIBBON PITCH and FILTER buttons turned off, use the long ribbon controller.
Slide your finger to the left and right along the ribbon controller. The specified scale can be played.
The notes produced with the ribbon controller are monophonic (single notes). In addition, higher pitched notes (ribbon position) will take priority when played.
Tip: The specified scale to be played can be changed with the sound editor software (when the RK-100S is connected to a computer via USB).
- The octave range can be switched with the OCTAVE +/- buttons while playing.
Controlling the pitch
There are two control methods.
Tip: The range and direction in which the pitch is adjusted with the long ribbon controller can be specified with the sound editor software (when the RK-100S is connected to a computer via USB).
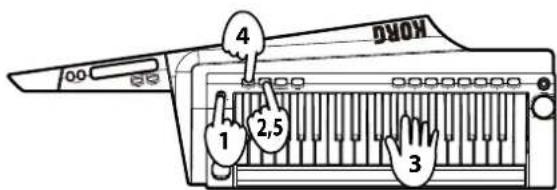
Controlling the pitch of the continuant
1. Select the program.
In this case, select a program where the sound does not immediately decay to silence after a keyboard key is pressed.
There may be no effect with a program where the sound immediately decays to silence after a keyboard key is pressed
2. While a sound is being produced, hold down the LONG RIBBON PITCH button.
The PITCH button is lit up. Sound continues to be produced while the button is held down.
3. Use the ribbon to control the pitch.
Slide your finger to the left and right along the ribbon controller. With the original pitch at the location first touched in the ribbon, raise and lower the pitch by moving your finger in either direction.
Removing your finger from the ribbon will return the pitch to the original setting.
- Remove your finger from the button to stop the continuant.
Controlling the pitch with your left hand free
- While no sound is being produced, hold down the SHIFT button and press the LONG RIBBON PITCH button.
The PITCH button is lit up.
2. Play the keyboard.
Sound continues to be produced.
3. Use the ribbon to control the pitch.
See page 12 "Controlling the pitch of the continuant"
If the pitch was raised with the OCTAVE button, the sound may be difficult to hear, depending on the area used on the ribbon.
4. Press the PITCH button again to turn off the button and stop the continuant.
Controlling the filter
As with pitch control, there are two control methods.
Tip: The effects that can be controlled with the long ribbon controller can be specified with the sound editor software (when the RK-100S is connected to a computer via USB). The filtering effect can be adjusted in the Long Ribbon section of the sound editor software. In the Virtual Patch section, set "Source" to "Long Ribbon", and use "Destination" to specify the parameters to be controlled. The parameters to be controlled can also be specified with Fx Long Ribbon assignments.
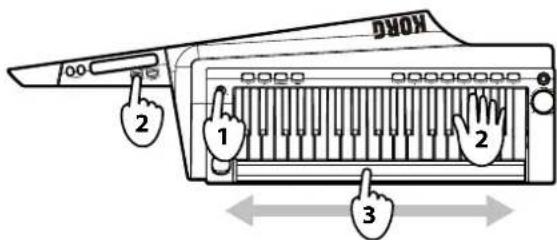
Controlling the filter of the continuant

1. While a sound is being produced, hold down the LONG RIBBON FILTER button.
The FILTER button is lit up.
Sound continues to be produced while the button is held down.
2. Use the ribbon.
Slide your finger to the left and right along the ribbon controller. With the original sound at the left end of the ribbon, apply modulation by moving your finger to the other end. Removing your finger from the ribbon will return the sound to the original setting.

Note: The changes in the effect parameters differ depending on the settings.
3. Remove your finger from the button to stop the continuant.
Controlling the filter with your left hand free
- While no sound is being produced, hold down the SHIFT button and press the LONG RIBBON FILTER button.
The FILTER button is lit up.
- Play the keyboard.
Sound continues to be produced.
- Use the ribbon.
See page 12 "Controlling the filter of the continuant"
Tip: The direction where the effect is applied when the ribbon is used can be changed with the sound editor software (when the RK-100S is connected to a computer via USB).
- Press the FILTER button again to turn off the button and stop the continuant.
Playing arpeggios
The arpeggiator is a function that automatically plays a broken chord (arpeggio) when you hold down a chord on the keyboard.
- Select a synthesizer program.
The arpeggiator can also be used with the vocoder program; however, a better effect can be achieved with a synthesizer program. In addition, we recommend a sound with a short sustain.
- Press the ARP button so that the LED is lit up.
The arpeggiator is turned on.
The ARP button is lit up, and the favorites buttons A-H are sequentially lit up.
- Hold down a chord in the keyboard.
An arpeggio will start playing.
The arpeggio pattern that is played can be changed (see 13 page "Arpeggio pattern settings").
- Press the TAP button to adjust the tempo.
The TAP button is lit in green, and the tempo appears in the display.
- Press the ARP button so that the LED is turned off.
The arpeggio stops playing.
Continuing playing with your hand off the keyboard (latch)
The operation of the arpeggiator when you take your hand off the keyboard can be specified.
- Hold down the ARP button until it is lit up in green.
When the ARP button is lit up in green, the latch is turned on, and the arpeggiator will continue to play even after you take your hand off the keyboard.
Note: Regardless of whether the arpeggiator is turned on or off, holding down the ARP button will turn on the arpeggiator as well as the latch.
- Press the ARP button to turn off the arpeggiator.
The latch is turned off at the same time that the arpeggiator is turned off.
Arpeggio pattern settings
This allows you to select the type of arpeggio produced when the arpeggiator is on and a keyboard key is pressed.
In addition, notes within the selected arpeggio pattern can be turned on/off.
- Hold down the SHIFT button and press the ARP button.
The arpeggio pattern setting appears in the display.
With the favorites buttons A - H used as the arpeggiator step keys, only the buttons corresponding to the enabled steps are lit up (note one).

- Use the OCTAVE +/- buttons or the SOUND lever to specify the arpeggio pattern.
UP: Notes will be played consecutively from low pitches to high.
dn (Down): Notes will be played consecutively from high pitches to low.
AL.1: Up and Down will be alternated. (The highest and lowest notes will be played once.)
AL.2: Up and Down will be alternated. (The highest and lowest notes will be played twice, once on the way up, and once on the way down.)

rnd (Random): Notes will be played randomly.
trG (Trigger): The notes you are holding down will be played simultaneously at the current tempo.
If you are holding down more notes than the maximum polyphony, the lowest pitches you are holding down will be played, up to the maximum polyphony.
- Press the favorites buttons A – H to turn off the button (note off) and change the note corresponding to the step to a rest.
TYPE: UP

- Press the SHIFT button to exit the arpeggio pattern settings.
Shift functions
The shift functions are used to specify various settings for the RK-100S. To change a setting, hold down the SHIFT button and press the appropriate button.
To exit the shift function, press the SHIFT button. In addition, if no button is pressed for a set length of time, the shift function will automatically be exited, and the RK-100S will return to a condition where a program can be selected.

The programs assigned to the favorites buttons and the settings of the shift functions are saved when the RK-100S is powered off. If the batteries are nearing the end of their service life and favorites button A is blinking (refer to "Battery type and remaining power" on page 16), these settings cannot be saved. If you have an AC adapter (optional), connect it.
Velocity curve
This allows you to specify the way that the volume and tone changes according to the keyboard velocity (force used to strike keys).
- Hold down the SHIFT button and press the favorites
A button.
The velocity curve setting appears in the display.
- Use the OCTAVE +/- buttons or the SOUND lever to specify the velocity curve.

line
| Strength (MIDI Velocity) | MIN (1) | MAX (127) | | ------------------------ | ------- | --------- | | ppp | 0 | 0 | | Strength | 0 | 0 | | MIDI | 0 | 0 |Cu.1 This curve requires you to play strongly in order to produce an effect.
Cu.2,3
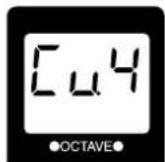
Cu.4 This is the typical curve.
Cu.5
Cu.6 This curve produces an effect without requiring you to play very strongly.
Cu.7 This curve produces a fairly steady effect with little change for medium-strength playing.
Cu.8 This curve produces a fairly steady effect with little change for medium-strength playing (a flatter curve than 7).
127 All notes will sound at maximum velocity (127). This setting mimics the behavior of early analog synths.
Cu.7 and 8 produce little change for medium-strength playing. However, these curves will produce a great deal of change with softly played notes, so they may be more difficult to control. Choose the curve that is most appropriate for your playing dynamics or for the effect you want to obtain.
- Press the SHIFT button to exit the shift function.
Long ribbon velocity
This allows you to specify the velocity when using the long ribbon controller to play scales.
- Hold down the SHIFT button and press the favorites B button.
The velocity setting appears in the display.
- Use the OCTAVE +/- buttons or the SOUND lever to specify the velocity setting.
The velocity setting range is 1 - 127.
If oFF is selected, no sound is produced when the long ribbon controller is used.
- Press the SHIFT button to exit the shift function.
Global MIDI channel
In order to exchange data with a connected external MIDI device, you must set the RK-100S's Global MIDI channel to match the MIDI channel of the external MIDI device.
- Hold down the SHIFT button and press the favorites C button.
The number of the Global MIDI channel appears in the display.
-
Use the OCTAVE +/- buttons or the SOUND lever to specify the Global MIDI channel.
-
Press the SHIFT button to exit the shift function.
-
Set the MIDI channel of the connected external MIDI device.
Note: For details on how to set the MIDI channel of the external MIDI device, refer to the owner's manual of the connected device.
Long ribbon MIDI channel
This allows you to specify the MIDI channel when using the long ribbon controller to play.
Specify a setting when using a program with sound generation set to Multi (Voice mode: Multi) or when the external MIDI device that's connected to the MIDI OUT jack is being played using the long ribbon controller, instead of the keyboard.
When the setting is changed, sound from the RK-100S can no longer be produced with the long ribbon controller.
- Hold down the SHIFT button and press the favorites D button.
The number of the long ribbon MIDI channel appears in the display.

- Use the OCTAVE +/- buttons or the SOUND lever to specify the MIDI channel.
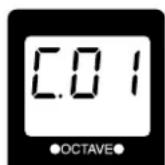
GLb: The MIDI channel will match the global MIDI channel (see "Global MIDI channel").
r.01...r.16: 1ch..16ch
Tip: When using the long ribbon controller to control an external MIDI device that's connected to the MIDI OUT jack, specify the same MIDI channel that's specified on the external MIDI device.
- Press the SHIFT button to exit the shift function.
Note: When the arpeggiator is turned on, note messages are transmitted from the MIDI OUT jack with the global MIDI channel.
Transpose
This allows you to specify overall pitch in steps of a semitone (100 cents). Use this when you want to transpose to suit the song you are playing over a range of one octave up or down.
- Hold down the SHIFT button and press the favorites E button.
The transpose setting appears in the display.
- Use the OCTAVE +/- buttons or the SOUND lever to specify the transpose setting.
The transpose setting range is one octave up or down (-12 - 12).
- Press the SHIFT button to exit the shift function.
Power save function
When the RK-100S is being powered by batteries, the power save function will automatically turn off the display and LEDs depending on the remaining battery power level.
Note: With the factory settings, the power save function is Off.
- Hold down the SHIFT button and press the favorites F button.
The setting for the power save function appears in the display.
- Use the OCTAVE +/- buttons or the SOUND lever to select the setting.
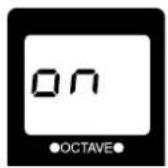
on: Enabled
oFF: Disabled
- Press the SHIFT button to exit the shift function.
Battery type and remaining power
This allows you to select the type of battery to be used. In addition, the remaining power level of the batteries currently being used can be checked.
If the selected type is different from the type of batteries being used, the remaining amount of battery power will not be correctly indicated.
- Hold down the SHIFT button and press the favorites G button.
The battery type appears in the display.
The eight favorites buttons (A - H) are lit up to indicate the remaining battery power level. The number of lit buttons may be lower depending on the battery capacity.
New batteries: All buttons lit

Low remaining battery power level: Only button A lit

Time to replace batteries: Button A blinks

When the AC adapter is connected, all buttons are turned off.
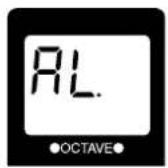
- Use the OCTAVE +/- buttons or the SOUND lever to select the battery type.
AL.: Alkaline batteries
ni.H: Nickel-metal hydride batteries
- Press the SHIFT button to exit the shift function.
Auto power off function
The RK-100S is equipped with an auto power off function. With this function, the RK-100S automatically turns off (low power consumption state) if there is no use for approximately four hours.
If the RK-100S has been automatically turned off with the auto power off function, it cannot be turned on by pressing a button or keyboard key or using a ribbon controller. Turn the RK-100S on again.
Note: With the factory settings, the auto power off function is enabled.
- Hold down the SHIFT button and press the favorites H button.
The setting for the auto power off function appears in the display.
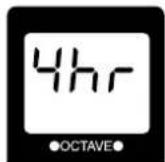
- Use the OCTAVE +/- buttons or the SOUND lever to select the setting.
4hr: Enabled
diS: Disabled
- Press the SHIFT button to exit the shift function.
MIDI
Using the RK-100S with other MIDI devices (MIDI)
MIDI stands for Musical Instrument Digital Interface, and is a world-wide standard for exchanging various types of musical data between electronic musical instruments and computers.
When MIDI cables are used to connect two or more MIDI devices, performance data can be exchanged between the devices, even if they were made by different manufacturers.
The RK-100S lets you assign control change numbers to the major parameters that affect the sound, and control these parameters from an external MIDI sequencer while you play the tone generator.
You can also use the assigned ribbons or buttons to transmit these control changes to control an external MIDI device.
Connecting MIDI devices/computers
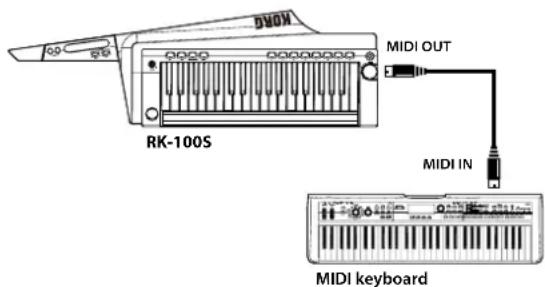
Controlling an external MIDI tone generator from the RK-100S
When you want to use the RK-100S's keyboard, controllers, and arpeggiator. to play an external MIDI tone generator, use a MIDI cable to connect the RK-100S's MIDI OUT connector to the MIDI IN connector of the external MIDI tone generator.
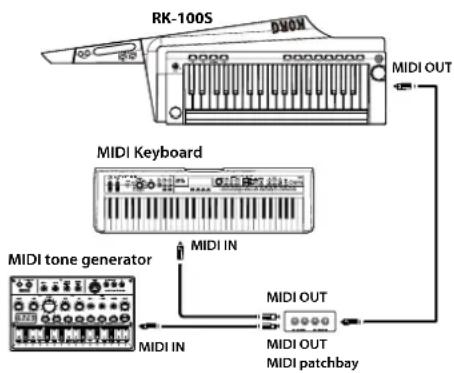
Controlling two or more external MIDI tone generators from the RK-100S
You can also use a MIDI patch bay to control multiple MIDI devices.
Connecting the RK-100S to your computer via USB
Connect a USB cable to the USB connector of the RK-100S and the computer.
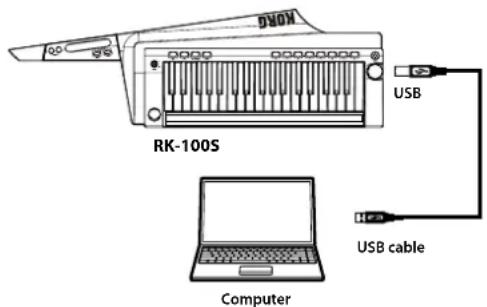
Note: In order to use a USB connection, you must install the Korg USB-MIDI driver in your computer. Download the Korg USB-MIDI driver from the Korg website, and install it as directed by the accompanying documentation.
MIDI-related settings
MIDI channel setting
In order to exchange data with a connected external MIDI device, you must set the RK-100S's MIDI channel to match the MIDI channel of the external MIDI device.
Refer to the "Global MIDI channel" section on page 15, and specify the Global MIDI channel.
Recording the MIDI output from the RK-100S's arpeggiator onto an external MIDI sequencer or computer
Connect and setting
Connect the RK-100S's MIDI OUT connector to the MIDI IN connector of your external MIDI sequencer.
Recording the note data from the arpeggiator onto an external MIDI sequencer
Turn on the RK-100S's arpeggiator (ARP button lit up), play the keyboard, and record the note data on your external MIDI sequencer.
For information on synchronization-related settings of your external MIDI device, refer to the manual of your device. In order to use the RK-100S as master and the external MIDI device as slave, connect the RK-100S's MIDI OUT connector to your external MIDI device's MIDI IN connector.
Set your external MIDI device to receive incoming MIDI clock messages. The external MIDI device (e.g., sequencer or rhythm machine) will operate at the tempo specified by the RK-100S's TEMPO button.
Trouble shooting
If you suspect a malfunction, please check the following points. If this does not resolve the problem, please contact a nearby dealer.
Power does not turn on
- Is the AC adapter connected to an AC outlet? (See page 7 "Connections")
- Are the batteries depleted? Hold down the SHIFT button and press the G button to check the remaining battery power level (See page 16 "Battery type and remaining power").
- Have the batteries been inserted with the correct orientation? (See page 8 "Using batteries")
Automatically turns off
- Has the auto power off function been enabled? (See page 16 "Auto power off function")
No sound
- Are your powered monitors or headphones connected to the jack correctly? (See page 7 "Connections")
- Is the connected monitor system powered-on, and is the volume raised?
- Is the VOLUME knob set to a position where sound will be output?
Nothing happens when the OCTAVE UP or DOWN button is pressed.
- Is a shift function being set? Press the SHIFT button to exit the shift function.
Cannot input sound
- Has the mic that will be used as the modulator with the vocoder program been correctly connected to the INPUT jack?
- Has the Input select switch been set appropriately?
Arpeggiator will not start
- Is the arpeggiator on (ARP button lit up)?
No sound is produced when the RK-100S is controlled with the long ribbon controller
- Have the shift functions been used to change the long ribbon velocity to oFF? Select any setting other than oFF. (See page 15 "Long ribbon velocity")
- Have the shift functions been used to change the long ribbon MIDI channel? Specify the same MIDI channel for producing sound. (See page 15 "Long ribbon MIDI channel")
No sound produced from an external MIDI sound generator that's connected with a MIDI cable
- Is the MIDI cable connected correctly? (See page 7 "Connections")
- Does the MIDI channel of the external MIDI device match the MIDI channel of the RK-100S? (See page 15 "Global MIDI channel")
Specifications
Keyboard 37-note (SlimKey, velocity sensitive, no aftertouch)
Sound generation system MMT (Multiple Modeling Technology)
Programs: Can be edited with sound editor software when a computer is connected.
Number of timbres Maximum 2 (when using Layer, Split, or Multi)
Polyphony 8 voices (up to 4 when the vocoder is selected)
Synth 2 oscillator + noise generator
Oscillator 1
Waveform SAW, PULSE, TRIANGLE, SINE, FORMANT, NOISE, PCM/DWGS, AUDIO IN
Modulation WAVEFORM, CROSS, UNISON, VPM
Oscillator 2
Waveform SAW, PULSE, TRIANGLE, SINE
Modulation RING, SYNC, RING+SYNC
Wave shaping
WS type DRIVE, DECIMATOR, HARDCLIP, OCT SAW, MULTI TRI, MULTI SIN, SUB OSC SAW,
SUB OSC SQU, SUB OSC TRI, SUB OSC SIN, LEVEL BOOST
Multi-mode filters
Filter 1 -24 dB/oct LPF- -12 dB/oct LPF-HPF-BPF-Thru
Filter 2 LPF, HPF, BPF
Vocoder 16-band vocoder, adjustable level and pan for each band, Formant Shift function, Formant Hold function
Effects
Timbre 2-band EQ
Master Master effects (17 effect algorithms)
Arpeggiator UP, DOWN, ALT1/2, Random, Trigger (6 types), Step Arpeggiator function
Programs 200 programs
Input/output
Input
INPUT jack
Input select switch MIC1: Mic input [low gain] (not plug-in powered)
MIC2: Mic input [high gain] (not plug-in powered)
LINE: Line input (monaural [Lch] input)
Output
Output jack
Connectors 1/4" stereo phone jack
Maximum output level 25mW + 25mW @ 33 ohm load
MIDI
OUT
USB connector B type
Display 7-segment LEDs, 3 digits
Power supply Six AA batteries (alkaline or nickel-metal hydride) or AC adapter (DC9V ◇C◆)
Battery life Approximately 8 hours (alkaline battery)
Dimensions (W x D x H) 830 x 263 x 68 mm / 32.68 x 10.35 x 2.68 inches
Weight 3.4 kg / 7.50 lbs (including the battery)
Included items Six AA batteries, strap, owner's manual, soft case
Options (separately sold) AC adapter (DC9V ◇◆◆)
KORG
RK-100S
KEYTAR
Modulation WAVEFORM, CROSS, UNISON, VPM
Oscillateur 2
Formes d'onde SAW, PULSE, TRIANGLE, SINE
Modulation RING, SYNC, RING+SYNC
Types WS DRIVE, DECIMATOR, HARDCLIP, OCT SAW, MULTI TRI, MULTI SIN, SUB OSC SAW,
SUB OSC SQU, SUB OSC TRI, SUB OSC SIN, LEVEL BOOST
Filtres multimodes
Filtre 1 -24 dB/oct LPF- -12 dB/oct LPF-HPF-BPF-Thru
Filtre 2 LPF, HPF, BPF
Modulation WAVEFORM, CROSS, UNISON, VPM
Oszillator 2
Wellenform SAW, PULSE, TRIANGLE, SINE
Modulation RING, SYNC, RING+SYNC
Wave Shaping (Hüllkurven)
WS-Typ DRIVE, DECIMATOR, HARDCLIP, OCT SAW, MULTI TRI, MULTI SIN, SUB OSC SAW,
SUB OSC SQU, SUB OSC TRI, SUB OSC SIN, LEVEL BOOST
Multi-Mode-Filter
Filter 1 -24 dB/oct LPF--12 dB/oct LPF-HPF-BPF-Thru
Filter 2 LPF, HPF, BPF
Tipo WS DRIVE, DECIMATOR, HARDCLIP, OCT SAW, MULTI TRI, MULTI SIN, SUB OSC SAW,
SUB OSC SQU, SUB OSC TRI, SUB OSC SIN, LEVEL BOOST
| No. | Program Name Category | Arp SW Voice Mode | ||
| 1 | Stab Saw Synth Hard Off Single | |||
| 2 | OB Pad Synth Hard Off Single | |||
| 3 | Saw Pad Synth Hard Off Single | |||
| 4 | Needle Synth Hard Off Single | |||
| 5 | Detuned Poly Synth Hard Off Single | |||
| 6 | Unison Poly Synth Hard Off Single | |||
| 7 | Simple Synth Hard Off Single | |||
| 8 | Sep Wave | Synth Hard | Off | Single |
| 9 | Poly Line Synth Hard Off Single | |||
| 10 | P5 Comp Synth Hard Off Single | |||
| 11 | TRANCER | Synth Hard Off Single | ||
| 12 | Detune Pad | Synth Hard Off Single | ||
| 13 | PhasePad | Synth Hard Off Single | ||
| 14 | FILLER | Synth Hard Off Single | ||
| 15 | Bright Pad | Synth Hard Off Single | ||
| 16 | Sweep Pad | Synth Hard Off Single | ||
| 17 | Poly-400 | Synth Hard Off Single | ||
| 18 | Square Comp Synth Hard Off Single | |||
| 19 | Backin Lead Synth Hard Off Single | |||
| 20 | Poly Saw 1 | Synth Hard Off Single | ||
| 21 | Poly Saw 2 | Synth Hard Off Single | ||
| 22 | Edge Saw | Synth Hard | Off | Single |
| 23 | ANALOG | Synth Hard Off Single | ||
| 24 | Fun Lead Synth Hard Off Single | |||
| 25 | TIKTOK Synth Hard Off Single | |||
| 26 | Final Brass | Synth Brass | Off | Single |
| 27 | Brass 99 | Synth Brass | Off | Layer |
| 28 | Super Brass | Synth Brass | Off | Single |
| 29 | Synth Brass | Synth Brass | Off | Single |
| 30 | Fat Brass | Synth Brass | Off | Single |
| 31 | Slow Brass | Synth Brass | Off | Single |
| 32 | Soft Brass | Synth Brass | Off | Single |
| 33 | VPM Brass | Synth Brass | Off | Single |
| 34 | Synth Tp | Synth Brass | Off | Single |
| 35 | Brass Ens Synth Brass Off Layer | |||
| 36 | Saw | Simple Wave | Off | Single |
| 37 | Square | Simple Wave | Off | Single |
| 38 | Pulse | Simple Wave | Off | Single |
| 39 | 8bit Tri | Simple Wave | Off | Single |
| 40 | Sine | Simple Wave | Off | Single |
| 41 | Saw Bass | Bass | Off | Single |
| 42 | Simple Bass | Bass | Off | Single |
| 43 | MG Bass Bass | Off Single | ||
| 44 | Detune Bass | Bass | Off | Single |
| 45 | NuWave Bass | Bass | Off | Single |
| 46 | Line Rez Bass | Bass | Off | Single |
| 47 | Line Bass | Bass | Off | Single |
| 48 | Oddsy Bass | Bass | Off | Single |
| 49 | Krash Bass | Bass | Off | Single |
| 50 | Magnum Bass | Bass | Off | Single |
| 51 | Bakin' Bass | Bass | Off | Single |
| 52 | MS-101 Bass | Off Single | ||
| 53 | Acid Ring Bass | Bass | Off | Single |
| 54 | Boost Bass | Bass | Off | Single |
| 55 | Jami Bass | Bass | Off | Single |
| 56 | Ring Bass | Bass | Off | Single |
| 57 | Knock Bass | Bass | Off | Single |
| 58 | Sub Bass | Bass | Off | Single |
| 59 | 80's Bass | Bass | Off | Single |
| 60 | Mini Bass | Bass | Off | Single |
| 61 | Pulse Bass | Bass | Off | Single |
| 62 | VPM Bass 1 | Bass | Off | Single |
| 63 | VPM Bass 2 | Bass | Off | Single |
| 64 | Hybrid Bass | Bass | Off | Layer |
| 65 | VOX Bass | Bass | Off | Single |
| 66 | DW8000 Lead | Lead | Off | Single |
| 67 | Fusion Lead | Lead | Off | Single |
| 68 | 5th Saw Lead | Lead | Off | Single |
| 69 | Dukey Lead | Lead | Off | Single |
| 70 | Mini KORG | Lead | Off | Single |
| 71 | Pocket Lead | Lead | Off | Single |
| 72 | Turn Lead | Lead | Off | Single |
| 73 | Unison Squ Lead | Lead | Off | Single |
| 74 | Glider Lead | Lead | Off | Single |
| 75 | 3OSC Lead | Lead | Off | Single |
| 76 | Old Lead | Lead | Off | Layer |
| 77 | MG Square Lead | Lead | Off | Single |
| 78 | Cheep Lead Lead | Off Single | ||
| 79 | Phunky Lead | Lead | Off | Single |
| 80 | 70's Fun | Lead | Off | Single |
| 81 | Rez Lead | Lead | Off | Single |
| 82 | Vintage Lead | Lead | Off | Single |
| 83 | Da Lead | Lead | Off | Single |
| 84 | Super Lead | Lead | Off | Layer |
| 85 | Wired Lead | Lead | Off | Single |
| 86 | Velo Sync Lead | Lead | Off | Single |
| 87 | Sync Lead | Lead | Off | Single |
| 88 | Robo Sync Lead Lead | Off Single | ||
| 89 | High Voltage Lead | Lead | Off | Single |
| 90 | Piano & Lead | Lead | Off | Layer |
| 91 | PWM Strings | Strings/Pad Off Single | ||
| 92 | Syn Strings | Strings/Pad Off Single | ||
| 93 | Strings Machine | Strings/Pad | Off | Single |
| 94 | Solin Strings | Strings/Pad Off Multi | ||
| 95 | Str Ensemble | Strings/Pad Off Single | ||
| 96 | Low Pad Strings/Pad | Off Single | ||
| 97 | Ana Strings | Strings/Pad Off Single | ||
| 98 | Royal Pad | Strings/Pad Off Single | ||
| 99 | Warm Pad | Strings/Pad Off Multi | ||
| 100 | Pulse Pad | Strings/Pad | Off | Single |
| 101 | Xtal Pad | Strings/Pad Off Multi | ||
| 102 | E.P Pad Strings/Pad | Off Multi | ||
| 103 | Vox Pad | Strings/Pad Off Layer | ||
| 104 | IDM Pad Strings/Pad | Off Single | ||
| 105 | Pan Tran | Strings/Pad | Off | Single |
| 106 | Oct Pad | Synth Soft | Off | Single |
| 107 | Solemn Brass | Synth Soft | Off | Single |
| 108 | Golden Synth Synth | Soft Off Single | ||
| 109 | Stream Pad | Synth Soft | Off | Single |
| 110 | BPF Sweep Synth Soft | Off Single | ||
| 111 | Tremolos Synth Soft | Off Single | ||
| 112 | Arp Pad Synth Soft On Layer | |||
| 113 | Ambi Pad Synth Soft | Off Single | ||
| 114 | Syn Choir Synth Soft | Off Single | ||
| 115 | Voice /A/ Synth Soft | Off Single | ||
| 116 | Ens Bell Bell/Decay Off Layer | |||
| 117 | VPM Bell Bell/Decay Off Layer | |||
| 118 | Magic Bell | Bell/Decay Off Layer | ||
| 119 | Syn Bell | Bell/Decay Off Layer | ||
| 120 | M1 Bell | Bell/Decay Off Layer | ||
| 121 | Ice Field | Bell/Decay Off Single | ||
| 122 | IDM 5100 Bell/Decay | Off Single | ||
| 123 | Deep Bell Bell/Decay | Off Single | ||
| 124 | EL Pizzo | Bell/Decay Off Single | ||
| 125 | Poly Shot | Bell/Decay Off Single | ||
| 126 | Pizz Corn Bell/Decay | Off Single | ||
| 127 | Dry Plan | Bell/Decay Off Single | ||
| 128 | JPT8 DCY | Bell/Decay Off Multi | ||
| 129 | Synth Pizz | Bell/Decay Off Layer | ||
| 130 | Brett Piano Bell/Decay | On Single | ||
| 131 | M1 Piano | Keyboard | Off Single | |
| 132 | Toy Piano Keyboard | Off Single | ||
| 133 | Synth E.Piano1 | Keyboard | Off Single | |
| 134 | Synth E.Piano2 | Keyboard | Off Single | |
| 135 | P5 Clav | Keyboard | Off Single | |
| 136 | PW Clav | Keyboard | Off Single | |
| 137 | HARPSIN | Keyboard | Off Single | |
| 138 | M1 Organ | Keyboard | Off Single | |
| 139 | DW Organ | Keyboard | Off Single | |
| 140 | VOX Organ 1 | Keyboard | Off Single | |
| 141 | VOX Organ 2 | Keyboard | Off Single | |
| 142 | Wet Reed Keyboard | Off Single | ||
| 143 | Key Flute Keyboard | Off Single | ||
| 144 | Reed Key 1 Keyboard | Off Single | ||
| 145 | Reed Key 2 Keyboard | Off Single | ||
| 146 | Z-Field | Arp/Seq | On Single | |
| 147 | Analog Bell | Arp/Seq | On Single | |
| 148 | Pop Pizz | Arp/Seq | On Layer | |
| 149 | Tiny Mallet Arp/Seq | On Layer | ||
| 150 | Synth Harp | Arp/Seq | On Single | |
| 151 | Auto Bass | Arp/Seq | On Layer | |
| 152 | Time Line | Arp/Seq | On Single | |
| 153 | RHYZMICA | Arp/Seq | On Single | |
| 154 | Builder | Arp/Seq | Off Single | |
| 155 | Min.Deal | Arp/Seq | On Layer | |
| 156 | S&H Sign | Arp/Seq | On Single | |
| 157 | TLKVOXER | Arp/Seq | On Single | |
| 158 | Move Pad | Arp/Seq | On Layer | |
| 159 | RIBBON 1 | Arp/Seq | On Layer | |
| 160 | RIBBON 2 | Arp/Seq | On Layer | |
| 161 | PHAZKIT Arp/Seq | On Multi | ||
| 162 | Eskay Two | Arp/Seq | On | Single |
| 163 | Chip Tune | Arp/Seq | On | Layer |
| 164 | Filter House | Arp/Seq | Off Layer | |
| 165 | SPUTNIK Arp/Seq | Off Layer | ||
| 166 | Sweeping | Motion Off Layer | ||
| 167 | Water Edge | Motion On Layer | ||
| 168 | Stairs Pad | Motion On Layer | ||
| 169 | Blue & White | Motion On Layer | ||
| 170 | S&H Pad | Motion Off Multi | ||
| 171 | TRIPCYCL | Motion Off Single | ||
| 172 | DWGS Wave Motion | Off Single | ||
| 173 | IZDISA | Motion Off Single | ||
| 174 | CPU Talk | Motion | Off | Single |
| 175 | PSYCHETR | Motion On Layer | ||
| 176 | DJ Horn | Hit/Drum | Off Layer | |
| 177 | 2 Many OSC | Hit/Drum | Off Layer | |
| 178 | Domin8or | Hit/Drum | Off Single | |
| 179 | Major Chord | Hit/Drum | Off Layer | |
| 180 | Artcore Chord | Hit/Drum | Off Layer | |
| 181 | 4OSC m7 Hit/Drum | Off Layer | ||
| 182 | Sweep Chord | Hit/Drum | Off Single | |
| 183 | Noisy Hit Hit/Drum | Off Layer | ||
| 184 | Chord Hit Hit/Drum | Off Layer | ||
| 185 | P6 Chord Hit/Drum | Off Layer | ||
| 186 | Gated Chord | S.E | Off Single | |
| 187 | 8bit Gal | S.E | Off Split | |
| 188 | Invaders | S.E | On Single | |
| 189 | Growl FX S.E | Off Single | ||
| 190 | Windstorm | S.E | Off Single | |
| 191 | Thunder | S.E | Off Single | |
| 192 | Jungle | S.E | On Layer | |
| 193 | Siren 1 | S.E | Off Single | |
| 194 | Siren 2 | S.E | Off Single | |
| 195 | Bomb Drop | S.E | Off Split | |
| 196 | Vocoder Pulse | Vocoder | Off Single | |
| 197 | Vocoder Ensemble | Vocoder | Off Multi | |
| 198 | Robot Vocoder | Vocoder | Off | Single |
| 199 | Voice Changer | Vocoder | Off Single | |
| 200 | Audio In | Audio In On Single |
Note: The sounds 196-200 are programs that use the mic input (audio input). In order to play these sounds, you must connect a mic or external audio device to the RK-100S and play the keyboard while sound is being input.
Note: With the factory settings, the Timbre 2 MIDI channel is set to "9" for programs whose Voice Mode is set to Multi.
Demo songs
S001: Asteroid belt
S002: Let's go RK
S003: Science payload
S001 and S003: Composed and performed by Yasushi.K
S002: Composed and performed by KORG Inc.
All demo songs © 2014 KORG Inc. all rights reserved.
For more information about Yasushi.K visit
http://www.net-yk.org
https://www.facebook.com/yasushik1977
RK-100S
MIDI Implementation Chart
| Function Transmitted Recognized Remarks | *M | |||
| Basic Channel | Default Changed | 1-16 1-16 | 1-16 1-16 | Memorized |
| Mode | Memorized Messages Altered | × × ***** | 3 × × | |
| Note Number: | True Voice | 0-127 ***** | 0-127 0-127 | |
| Velocity | Note On Note Off | ○9n, V=1-127 ×8n, V=64 | ○9n, V=1-127 × | |
| Aftertouch Change | Polyphonic (Key) Monophonic (Channel) | × × | × ○ | |
| Pitch Bend | ○ | ○ | *B | |
| Control Change | 0,32 1 6 7,10 11 12,13 64 65 70-76 98,99 0-95,102-119 120,121 | ○ ○ ○ ○ × ○ ○ × ○ ○ ○ × | ○ ○ ○ ○ ○ ○ ○ ○ ○ ○ ○ ○ ○ ○ | Bank Select (MSB, LSB) *P Modulation wheel *C Data Entry (MSB) *C Volume, Pan *C Expression *C Effect control 1,2 *C Damper *C Portamento *C Sound controller *C NRPN (LSB, MSB) *C Panel controls *1,*C All Sound Off, Reset All Controllers *C |
| Program Change | Variable Range | ○0-127 ***** | ○0-127 0-127 | *P |
| System Exclusive | ○ | ○ | *2 | |
| System Common | Song Position Song Select Tune | × × × | × × × | |
| System Real Time | Clock Command | ○ × | ○ ○ | *3 |
| Aux Messages | Local On/Off All Notes Off Active Sense Reset | × × ○ × | × ○123-127 ○ × | |
| Remarks*M: Can only be received from USB connector.*P, *C, *B: Transmitted and received if the MIDI Filter setting (PROG CHG, CTRL CHG, P.BEND) is Enable.*1: Transmitted and received on the number specified by MIDI CC#.*2: In addition to Korg exclusive messages, also supports inquiry messages, master volume, and master fine tune.*3: Transmitted and not received if MIDI "CLOCK" is set to INTERNAL. Not transmitted when receiving "CLOCK" in the "AUTO" mode. | ||||
Mode 1: OMNI ON, POLY Mode 2: OMNI ON, MONO
:Yes O
Mode 3: OMNI OFF, POLY Mode 4: OMNI OFF, MONO
: No X
IMPORTANT NOTICE TO CONSUMERS
This product has been manufactured according to strict specifications and voltage requirements that are applicable in the country in which it is intended that this product should be used. If you have purchased this product via the internet, through mail order, and/or via a telephone sale, you must verify that this product is intended to be used in the country in which you reside.
WARNING: Use of this product in any country other than that for which it is intended could be dangerous and could invalidate the manufacturer's or distributor's warranty.
Please also retain your receipt as proof of purchase otherwise your product may be disqualified from the manufacturer's or distributor's warranty.
REMARQUE IMPORTANTE POUR LES CLIENTS

- KORG
- RK-100S
- Owner's manual
- Table of contents
- Precautions
- Location
- Power supply
- Interference with other electrical devices
- Handling
- Care
- Keep this manual
- Keeping foreign matter out of your equipment
- DECLARATION OF CONFORMITY (for USA)
- THE FCC REGULATION WARNING (for USA)
- Notice regarding disposal (EU only)
- Precautions for the RK-100S
- Main features
- programs through MMT analog modeling
- Ribbon controllers
- Arpeggiator
- Vocoder functionality
- Virtual Patch functionality
- Equalizer and effects add a final polish to your sounds
- Sound editor software
- Front and side panels
- Front panel
- OCTAVE +/- buttons
- Short ribbon controller
- LONG RIBBON
- PITCH button
- FILTER button
- Display
- Long ribbon controller
- VOLUME knob
- SOUND lever
- TAP button
- ARP button
- SHORT RIBBON button
- SHIFT button
- Favorites buttons A - H
- Output jacks [stereo jack]
- Side panel
- MIDI OUT connector
- INPUT jack
- Input select switch
- Power switch
- DC 9V connector
- USB connector
- Attaching the strap
- Preparations
- Connections
- Connect your monitor amp or mixer to the output jack
- Connecting the mic
- Connecting an audio player
- Adjust the volume of the connected audio device until the SHIFT button is not lit up in red.
- Connecting a MIDI device or a computer to the MIDI OUT connector or USB connector
- Turning the power on
- Before you turn on the power
- Using batteries
- About the empty battery indicator
- Connecting the AC adapter
- Turning the power off
- Auto power off function
- Demo performance
- Selecting and playing a program
- Selecting a program
- Using the SOUND lever
- Favorites function
- Using the favorites buttons
- to select a favorites bank.
- Press one of the eight favorites buttons.
- Assigning programs to favorites buttons
- Playing a vocoder program
- Modifying the sound
- Using the keyboard to modify the sound - Velocity
- Switching the octave with the OCTAVE buttons
- Using the short ribbon controller
- Controlling the pitch
- Applying modulation
- controller.
- Using the long ribbon controller
- Playing scales
- Controlling the pitch of the continuant
- Select the program.
- While a sound is being produced, hold down the LONG RIBBON PITCH button.
- Use the ribbon to control the pitch.
- Controlling the pitch with your left hand free
- Play the keyboard.
- Press the PITCH button again to turn off the button and stop the continuant.
- Controlling the filter
- Controlling the filter of the continuant
- While a sound is being produced, hold down the LONG RIBBON FILTER button.
- Use the ribbon.
- Remove your finger from the button to stop the continuant.
- Controlling the filter with your left hand free
- Playing arpeggios
- Continuing playing with your hand off the keyboard (latch)
- Arpeggio pattern settings
- Shift functions
- Velocity curve
- Long ribbon velocity
- Global MIDI channel
- Long ribbon MIDI channel
- Transpose
- Power save function
- Battery type and remaining power
- MIDI
- Using the RK-100S with other MIDI devices (MIDI)
- Connecting MIDI devices/computers
- Controlling an external MIDI tone generator from the RK-100S
- Controlling two or more external MIDI tone generators from the RK-100S
- Connecting the RK-100S to your computer via USB
- MIDI-related settings
- MIDI channel setting
- Recording the MIDI output from the RK-100S's arpeggiator onto an external MIDI sequencer or computer
- Connect and setting
- Recording the note data from the arpeggiator onto an external MIDI sequencer
- Trouble shooting
- Power does not turn on
- Automatically turns off
- No sound
- Nothing happens when the OCTAVE UP or DOWN button is pressed.
- Cannot input sound
- Arpeggiator will not start
- No sound is produced when the RK-100S is controlled with the long ribbon controller
- No sound produced from an external MIDI sound generator that's connected with a MIDI cable
- Specifications
- Demo songs
- IMPORTANT NOTICE TO CONSUMERS
- REMARQUE IMPORTANTE POUR LES CLIENTS
Brand : KORG
Model : RK100S
Category : MIDI Keyboard