Series 5000 S5586 - Shaver PHILIPS - Free user manual and instructions
Find the device manual for free Series 5000 S5586 PHILIPS in PDF.

User questions about Series 5000 S5586 PHILIPS
0 question about this device. Answer the ones you know or ask your own.
Ask a new question about this device
Download the instructions for your Shaver in PDF format for free! Find your manual Series 5000 S5586 - PHILIPS and take your electronic device back in hand. On this page are published all the documents necessary for the use of your device. Series 5000 S5586 by PHILIPS.
USER MANUAL Series 5000 S5586 PHILIPS
natural_image
Black Philips Series 5000 electric shaver with three rotary buttons and a power button (no text or symbols on the device body)
natural_image
Illustration of a laptop with an information icon and globe symbol (no text or labels)
text_image
QR code image containing encoded data, no visible human-readable textwww.philips.com/support/ifu

natural_image
Illustration of an open book with a grid and an arrow indicating rotation (no text or symbols)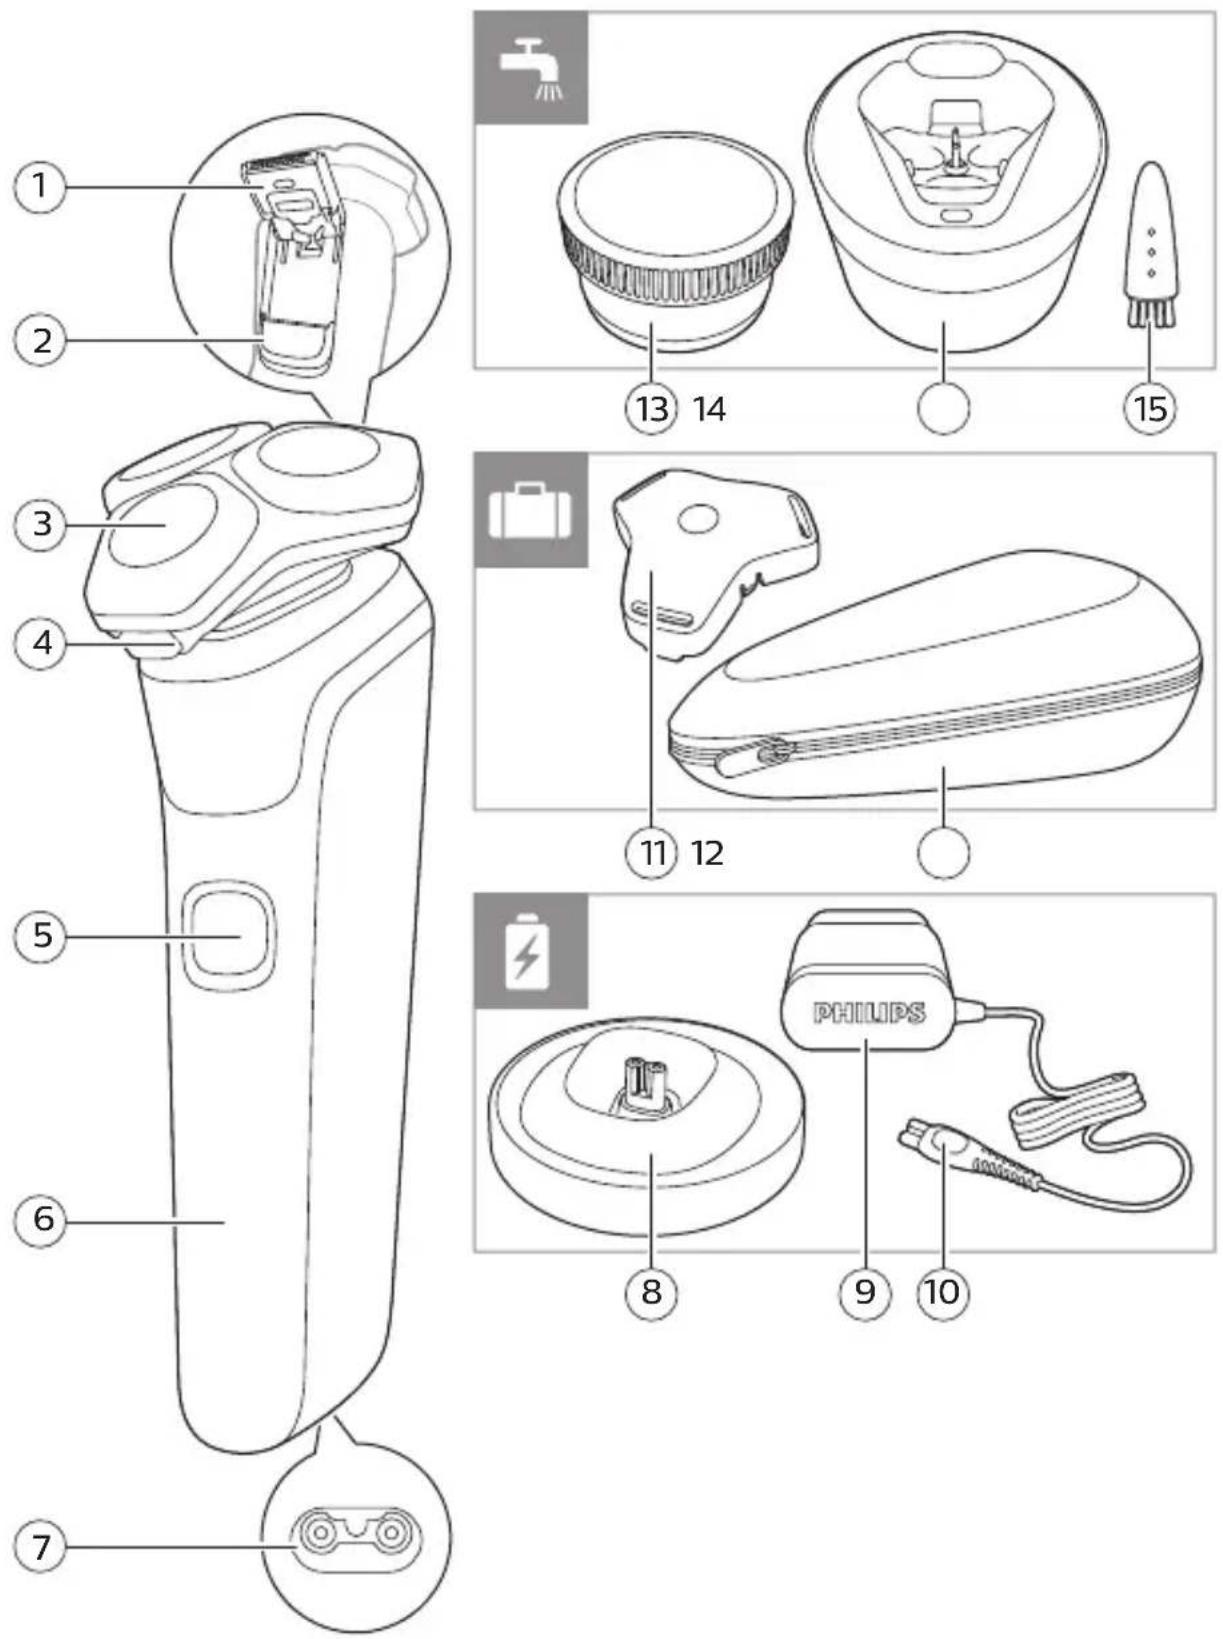
English 6
Français (Canada) 25
Introduction
Congratulations on your purchase and welcome to Philips! To fully benefit from the support that Philips offers, register your product at www.philips.com/welcome or via the app.
General description
1 Pop-up trimmer
2 Trimmer release slide
3 Shaving unit
4 Shaving unit release button
5 On/off button
6 Handle
7 Socket for small plug
8 Charging stand (specific models only)
9 Supply unit
10 Small plug
11 Protection cap
12 Pouch
13 Quick Clean Pod Cartridge (specific models only)
14 Quick Clean Pod (specific models only)
15 Cleaning brush
Note: The accessories supplied may vary for different products. The box shows the accessories that have been supplied with your appliance.
Important safety information
Read this important information carefully before you use the appliance and its accessories and save it for future reference. The accessories supplied may vary for different products.
Danger

natural_image
Prohibition sign showing a faucet without spraying water, enclosed in a circle (no text)- Keep the supply unit dry.
Warning
- To charge the battery, only use the detachable supply unit (HQ8505) provided with the appliance.
- The supply unit contains a transformer. Do not cut off the supply unit to replace it with another plug, as this causes a hazardous situation.
- This appliance can be used by children aged from 8 years and above and persons with reduced physical, sensory or mental capabilities or lack of experience and knowledge if they have been given supervision or instruction concerning use of the appliance in a safe way and understand the hazards involved. Children shall not play with the appliance. Cleaning and user maintenance shall not be made by children without supervision.
- Always unplug the appliance before you clean it under the tap.
- Always check the appliance before you use it. Do not use the appliance if it is damaged, as this may cause injury. Always replace a damaged part with one of the original type.
Philips Quick Clean Pod Cartridge fluid
- Do not swallow.
- Keep out of reach of children.
Caution

natural_image
Prohibition sign showing a faucet with a diagonal line and raindrops (no text)- Never immerse the charging stand in water and do not rinse it under the tap.
- Never use water hotter than 60^ C to rinse the shaver.
- Only use this appliance for its intended purpose as shown in the user manual.
- For hygienic reasons, the appliance should only be used by one person.
- Never use compressed air, scouring pads, abrasive cleaning agents or aggressive liquids such as petrol or acetone to clean the appliance.
- If your shaver comes with a cleaning system, always use the original Philips Quick Clean Pod cartridge.
- Always place the cleaning system on a stable, level and horizontal surface to prevent leakage.
- Always make sure the cartridge compartment is closed before you use the cleaning system.
- When the cleaning system is ready for use, do not move it to prevent leakage of cleaning fluid.
- Water may drip from the socket at the bottom of the shaver when you rinse it. This is normal and not dangerous because all electronics are enclosed in a sealed power unit inside the shaver.
- Do not use the supply unit in or near wall sockets that contain an electric air freshener to prevent irreparable damage to the supply unit.
- Do not use the cleansing brush on chapped skin, open wounds, healing wounds, skin recovering from surgery or if you suffer from a skin disease or severe skin irritation, such as severe acne, sunburn, skin infection, skin cancer, inflammation, eczema, psoriasis, nylon allergy etc.
- Do not use the cleansing brush attachment if you are taking steroid-based medication, as this may cause irritation or injury.
- If you wear piercings on your face, remove the piercings before you use the click-on attachments or make sure that you do not use the appliance on or near the piercing.
- If you wear jewelry, contact lenses or glasses, remove them before you use the click-on attachments, or make sure that you do not use the appliance on or near jewelry or glasses.
Battery safety instructions
- Only use this product for its intended purpose and follow the general and battery safety instructions as described in this user manual. Any misuse can cause electric shock, burns, fire and other hazards or injuries.
- To charge the battery, only use the detachable supply unit (HQ8505) provided with the product. Do not use an extension cord.
- Charge, use and store the product at a temperature between 5 °C and 35 °C.
- Always unplug the product when it is fully charged.
- Do not burn products and their batteries and do not expose them to direct sunlight or to high temperatures (e.g. in hot cars or near hot stoves). Batteries may explode if overheated.
- If the product becomes abnormally hot, gives off an abnormal smell, changes color or if charging takes much longer than usual, stop using and charging the product and contact your local Philips dealer.
- Do not place products and their batteries in microwave ovens or on induction cookers.
- This product contains a rechargeable battery that is non-replaceable. Do not open the product to replace the rechargeable battery.
- When you handle batteries, make sure that your hands, the product and the batteries are dry.
- To prevent batteries from heating up or releasing toxic or hazardous substances, do not modify, pierce or damage products and batteries and do not disassemble, short-circuit, overcharge or reverse charge batteries.
- To avoid accidental short-circuiting of batteries after removal, do not let battery terminals come into contact with metal objects (e.g. coins, hairpins, rings). Do not wrap batteries in aluminum foil. Tape battery terminals or put batteries in a plastic bag before you discard them.
- If batteries are damaged or leaking, avoid contact with the skin or eyes. If this occurs, immediately rinse well with water and seek medical care.
Electromagnetic fields (EMF)
This Philips appliance complies with all applicable standards and regulations regarding exposure to electromagnetic fields.
General

- This shaver is waterproof. It is suitable for use in the bath or shower and for cleaning under the tap. For safety reasons, the shaver can therefore only be used without cord.
- The supply unit is suitable for mains voltages ranging from 100 to 240 volts.
- The supply unit transforms 100-240 volts to a safe low voltage of less than 24 volts.
What do the icons on my appliance handle mean?
Icon Behavior Meaning
 | Flashing Clean the appliance under the tap (see 'How do I clean my appliance and the attachments?'). | |
 | Flashing when you press the on/off button | The travel lock is activated. |
 | Lights up when you pick up the appliance | The number of bars lit up show the remaining battery charge. |
 | Bottom light flashing orange | The battery is almost empty (see 'How do I charge my appliance?'). |
 | Lights flashing in sequence | The appliance is charging. |
 | Lights up continuously | The appliance is fully charged. |
 | Flashing The appliance must be disconnected from the wall socket before you can switch it on (see 'How do I charge my appliance?'). | |
What does the icon on my Quick Clean Pod mean?
| Icon | Behavior Meaning | |
 | Becomes visible on the Quick Clean Pod | The Quick Clean Pod Cartridge needs to be replaced. |
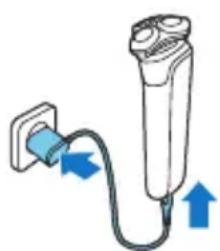
How do I charge my appliance?
Charge the appliance before you use it for the first time and when the bottom light of the battery status indicator flashes orange, indicating that the battery is almost empty.
Charging takes approx. 1 hour.
Quick Charge: After approx. 5 minutes of charging, the battery contains enough energy for one full shave. When the appliance is fully charged it has a cordless operating time of up to 60 minutes.
Note: You cannot use the appliance while it is charging.
Charging with the supply unit
natural_image
Diagram of a medical device with blue arrows indicating direction of connection (no text or symbols)1 Make sure that the appliance is switched off.
2 Insert the small plug into the appliance and put the supply unit in the wall socket.
- While the appliance is in quick charge mode, the lights of the battery status indicator light up one after the other. After approximately 5 minutes, the bottom light of the battery status indicator flashes. The battery now contains enough energy for one full shave.
- While the appliance charges, first the bottom light of the battery status indicator flashes and then lights up continuously. Next the second light flashes and then lights up continuously, and so on until the appliance is fully charged.
- When the appliance is fully charged, all three battery indicator lights light up continuously. After approx. 30 minutes, the light goes out automatically.
12 English
3 After charging, remove the supply unit from the wall socket and pull the small plug out of the appliance.
Charging in the charging stand (specific models only)

natural_image
Illustration of a medical procedure showing a tool interacting with a small object on a circular base (no text or symbols)1 Make sure the appliance is switched off.
2 Put the small plug in the charging stand and put the supply unit in the wall socket.
3 Place the appliance in the charging stand.
Specific models only: The light ring on the bottom of the charging stand lights up and rotates quickly.
- After approximately 5 minutes, the light ring rotates slower. The battery now contains enough energy for one full shave.
- As the appliance continues to charge, the light ring becomes brighter and rotates slower.
- When the appliance is fully charged, the light ring lights up fully and stops rotating.
4 After charging, remove the supply unit from the wall socket and pull the small plug out of the charging stand.
'Unplug for use' symbol

text_image
Diagram showing a test tube with an orange starburst symbol and a warning symbol pointing to it, indicating a hazard or caution.The 'unplug for use' symbol flashes to remind you to disconnect the appliance from the wall socket and remove the small plug from the appliance before you switch it on.
How do I use my appliance and the attachments?
Warning: Always check the appliance and all accessories before use. Do not use the appliance or any accessory if it is damaged, as this may cause injury. Always replace a damaged part with one of the original type.
Note: This appliance is waterproof. It is suitable for use in the bath or shower and for cleaning under the tap.
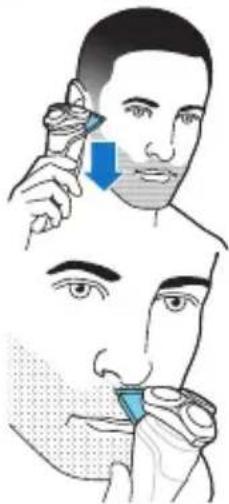
Shaving

text_image
Illustration showing four steps of hair cleaning: shipping, spraying, using a brush, and applying to a face mask.For safety reasons, the appliance can therefore only be used without cord.
You can use this appliance either wet or dry, or even under the shower. For a wet shave, apply some water and shaving foam or gel to your skin and rinse the shaving heads under the tap with warm water before following the steps below.
1 Switch on the appliance.
2 Move the shaving heads over your skin in circular movements to catch all hairs growing in different directions. Make sure each shaving head is fully in contact with the skin. Exert gentle pressure for a close, comfortable shave.
Note: Do not press too hard, as this can cause skin irritation.
Note: If you are shaving with gel or foam, rinse the shaving unit regularly during your shave to ensure that it continues to glide smoothly over your skin.
3 Use the narrow sides of the shaving unit to shave in hard-to-reach areas such as along your jawline and under your nose.
4 Switch off and clean the appliance after each use.
Note: Make sure you rinse all foam or shaving gel off the appliance.
Skin adaptation period
Your first shaves may not bring you the result you expect and your skin may even become slightly irritated. This is normal. Your skin and beard need time

natural_image
Illustration of a test tube with orange star-shaped markings and a speech bubble containing three droplets (no text or symbols)to adapt to any new shaving system. To allow your skin to adapt to this new appliance, we advise you to shave regularly (at least 3 times a week) and exclusively with this appliance for a period of 3 weeks.
Cleaning reminder
When you switch off the appliance, the cleaning reminder flashes to remind you to clean the appliance.
- Clean the appliance and attachments after each use to prevent clogging and damage (see 'How do I clean my appliance and the attachments?').
- Clean the shaving heads thoroughly once a month or when the appliance does not shave as well as it used to (see 'Thorough cleaning').
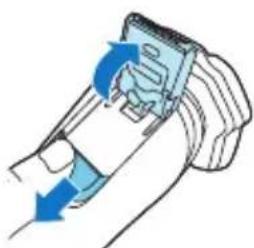
Trimming
You can use the trimmer to groom your sideburns and moustache.
natural_image
Illustration of a hand holding a device with blue arrows indicating motion or force (no text or symbols)1 Push the trimmer release slide downwards to open the trimmer.
2 Switch on the appliance.
3 Hold the trimmer perpendicular to the skin and move the appliance downwards while you exert gentle pressure.
text_image
Illustration showing a person applying a nasal swab to another person's mouth, with a blue arrow indicating the location of the swab.4 You can also use the trimmer under your nose.
5 Switch off the appliance and clean the trimmer after each use to prevent clogging and damage (see 'How do I clean my appliance and the attachments?').
6 Close the trimmer.
How do I clean my appliance and the attachments?
Clean the appliance and the attachments after each use for optimal performance.
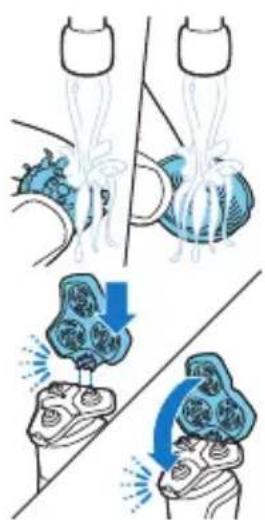
Cleaning the shaver under the tap
Clean the shaver after each use to prevent clogging and damage.
Never dry the shaving unit with a towel or tissue, as this may damage the shaving heads.
While rinsing the shaving unit, water may drip out of the base of the shaver. This is a normal occurrence.

flowchart
graph TD
    A["Fluid Injection"] --> B["Patient Position"]
    B --> C{Recovery}
    C -->|Yes| D["Patient Contact"]
    C -->|No| E["Patient Discharge"]
    D --> F["Patient Progress"]
    E --> F
    F --> G["Patient Recovery"]
1 Switch on the shaver.
2 Rinse the shaving unit under a warm tap.
3 Switch off the shaver. Press the release button to open the shaving unit.
4 Rinse the hair chamber under a warm tap.
5 Rinse the shaving head holder under a warm tap.
6 Carefully shake off excess water and let the shaving head holder air-dry completely.
7 Close the shaving unit.
Thorough cleaning
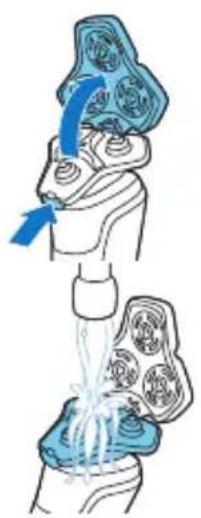
natural_image
Illustration of a medical procedure showing a hand holding a patient's knee joint with an arrow indicating force (no text or symbols present)We advise you to clean the shaving heads thoroughly once a month or when the shaver does not shave as well as it used to.
1 Make sure that the appliance is switched off and disconnected from the wall socket.
2 Press the release button on the shaving unit and pull the shaving head holder off the shaving unit.
3 Rinse the hair chamber and shaving head holder under the tap.
4 Remove the shaving heads. For detailed instructions, see 'How do I replace the shaving heads?'
Note: Do not clean more than one cutter and guard at a time, since they are all matching sets. If you accidentally put a cutter in the wrong shaving guard, it may take several weeks before optimal shaving performance is restored.
natural_image
Illustration of a medical procedure showing steps to form a device with internal components and fluid flow (no text or symbols)5 Clean the cutter and guard under the tap.
6 Shake off excess water.
7 Put the shaving heads back into the shaving unit. For detailed instructions, see 'How do I replace the shaving heads?'
8 Insert the hinge of the shaving head holder into the slot in the top of the shaving unit and close the shaving unit.
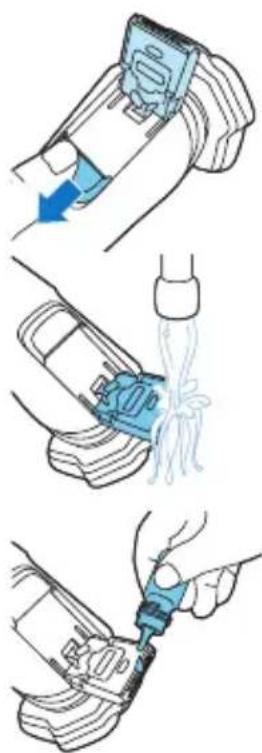
Cleaning the pop-up trimmer
Clean the trimmer after each use to prevent clogging and damage.
text_image
Diagram illustrating three steps of car tire cleaning: adding a blue component, pouring liquid into a bottle, and using a tool to clean the seat.Never dry the trimmer teeth with a towel or tissue, as this may damage the trimmer teeth.
1 Make sure that the appliance is switched off and disconnected from the wall socket.
2 Push the trimmer release slide down to open the pop-up trimmer.
3 Switch on the appliance and rinse the pop-up trimmer with warm water.
4 After cleaning, switch off the appliance.
5 Carefully shake off excess water and let the pop-up trimmer air dry.
6 Close the trimmer.
Tip: For optimal performance, lubricate the teeth of the pop-up trimmer with a drop of mineral oil every six months (oil not included).
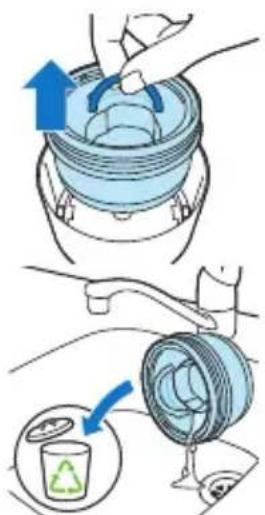
How do I use the Quick Clean Pod? (specific models only)
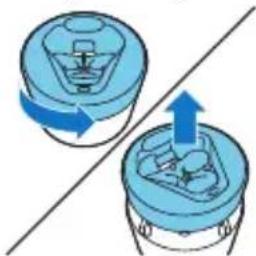
Preparing the Quick Clean Pod for use
natural_image
Diagram showing two blue containers with arrows indicating rotation or movement, no text or symbols present1 Twist and remove the top of the Quick Clean Pod.
2 Twist the lid off of the Quick Clean Pod Cartridge.

text_image
Diagram of a container with labeled arrows indicating flow or movement, numbered 1 and 2.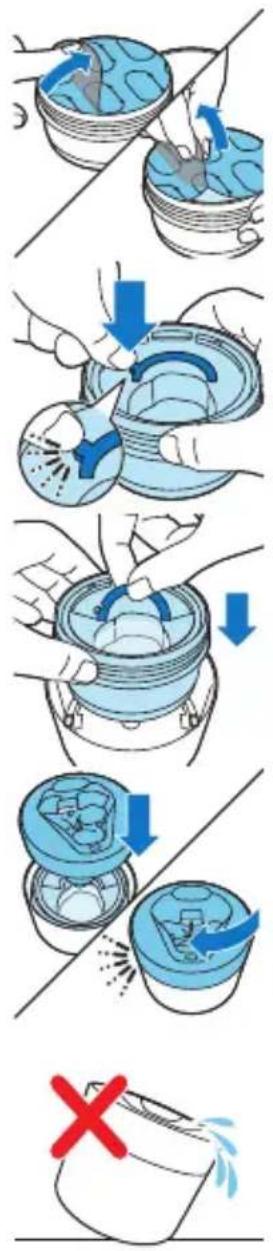
text_image
Diagram illustrating a step-by-step procedure for removing a component, with arrows indicating removal and a red 'X' marking the failure.3 Lift the tab on the seal and pull it by the corner to remove the seal from the Quick Clean Pod Cartridge.
4 Press the small circular piece on the handle of the Quick Clean Pod Cartridge to break the snap hook on the handle.
5 Place the Quick Clean Pod Cartridge into the Quick Clean Pod.
6 Put the top of the Quick Clean Pod back onto the base and turn it clockwise until you hear a click.
Do not tilt the Quick Clean Pod to prevent leakage.
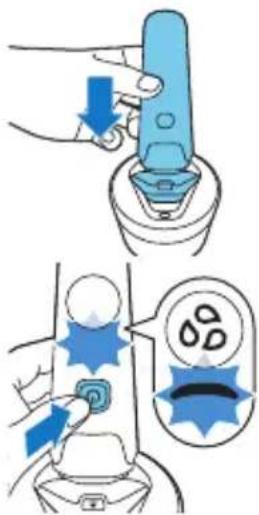
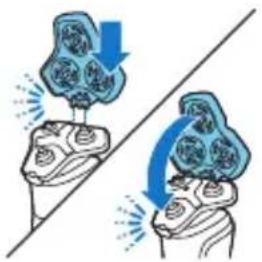
Using the Quick Clean Pod (specific models only)
Note: If you use the shaver with shaving foam, shaving gel or pre-shave products, thoroughly rinse the shaving heads before you use the Quick Clean Pod (see 'How do I clean my appliance and the attachments?').
text_image
Diagram illustrating a medical procedure for using a device to adjust the dose of a tooth, with labeled steps and visual indicators.Always shake excess water off the shaver before you place it in the Quick Clean Pod.
1 Place the shaver upside down into the Quick Clean Pod. The shaver automatically detects that it is in the Quick Clean Pod.
2 Switch on the shaver to start the cleaning program. Each cleaning program takes approximately one minute. During the cleaning program the cleaning symbol lights up continuously and the blue icon pulses. The shaver handle vibrates twice quickly when the cleaning program is finished.
3 Let the shaver air-dry completely in the Quick Clean Pod before storing it.
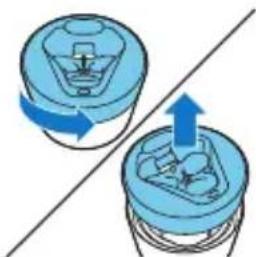
Replacing the Quick Clean Pod Cartridge (specific models only)
text_image
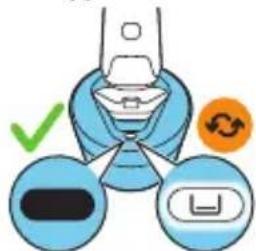
Diagram illustrating a device's switch mechanism with checkmark, refresh, and lock symbolsReplace the Quick Clean Pod Cartridge immediately when the cartridge replacement icon on the Quick Clean Pod becomes visible or follow the table below.
Frequency of use Cycles When to replace the
Quick Clean Pod Cartridge
Every day About 30 Every month
A few times per week About 20 Every 2 months
Every week About 13 Every 3 months
Every month About 3 Every 3 months
natural_image
Diagram showing two blue containers with arrows indicating rotation or movement, separated by a diagonal line (no text or symbols)1 Twist and remove the top of the Quick Clean Pod.
text_image
Diagram illustrating a recycling process with labeled steps: adding a blue arrow to a container, removing a plastic cup into a bottle, and using a brush.
text_image
QR code image containing encoded data, no visible human-readable text2 Lift the Quick Clean Pod Cartridge out of the Quick Clean Pod by the handle.
3 Pour any remaining fluid down a drain and recycle the empty cartridge in accordance with local waste regulations.
4 Place a new Quick Clean Pod Cartridge into the Quick Clean Pod (see 'Preparing the Quick Clean Pod for use').
Scan the QR code to the left or visit www.philips.com/cleaning-cartridge to order replacement Quick Clean Pod Cartridges.
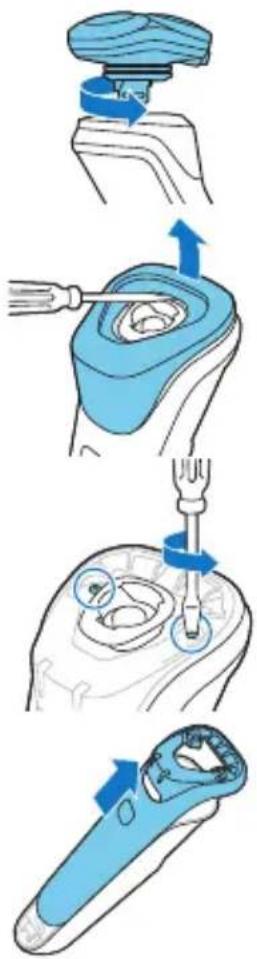
How do I replace the shaving heads?
For maximum shaving performance, we advise you to replace the shaving heads every two years.
Replace damaged shaving heads immediately. Always replace the shaving heads with original Philips shaving heads (see 'Ordering accessories').
Replacing the shaving heads

natural_image
Illustration of a human head with a blue arrow indicating upward motion or force (no text or symbols)1 Switch off the shaver.
2 Press the release button on the shaving unit and pull the shaving head holder off the shaving unit.

flowchart
graph TD
    A["Step 1: Lock"] --> B["Step 2: Gear Shift"]
    B --> C["Step 3: Gear Release"]
    C --> D["Step 4: Gear Capture"]
    D --> E["Step 5: Gear Release"]
    E --> F["Step 6: Gear Launch"]
    F --> G["Step 7: Gear Release"]
    G --> H["Step 8: Gear Capture"]
    H --> I["Step 9: Gear Release"]
    I --> J["Step 10: Gear Launch"]
3 Turn the retaining rings anticlockwise and remove them. Place them aside in a safe place.
4 Remove the shaving heads from the shaving head holder.
Discard the used shaving heads immediately to avoid mixing them with the new shaving heads.
5 Place new shaving heads in the holder.
6 Place the retaining rings back onto the shaving heads and turn them clockwise to reattach the retaining ring.
- Each retaining ring has two recesses that fit exactly into the projections of the shaving head holder. Turn the ring clockwise until your hear a click to indicate that the ring is fixed.
Note: Hold the shaving head holder in your hand when you reinsert the shaving heads and reattach the retaining rings. Do not place the shaving head holder on a surface, as this may cause damage to the shaving heads.
natural_image
Illustration of two hands performing a medical or therapeutic procedure with arrows indicating direction (no text or symbols)7 Insert the hinge of the shaving head holder into the slot in the top of the shaving unit and close the shaving unit.
Support
Ordering accessories
To buy accessories or spare parts, visit www.philips.com/parts-and-accessories or go to your Philips dealer. You can also contact the Philips Consumer Care Center in your country (see the international warranty leaflet for contact details). The following accessories and spare parts are available:
- SH71 replacement Philips shaving heads - CP13 Philips Quick Clean Pod Cartridge 3-pack
Note: The availability of the accessories may differ by country.
Disposal
- This product contains a rechargeable lithium-ion battery which must be disposed of properly.
- Contact your local town or city officials for battery disposal information. You can also call 888-224-9764 or visit www.call2recycle.ca for battery drop-off locations.
- For assistance, visit our website www.philips.com/support or call 1-866-800-9311 toll free.
- Your product is designed and manufactured with high quality materials and components, which can be recycled and reused. For recycling information, please contact your local waste management facilities or visit www.recycle.philips.com.
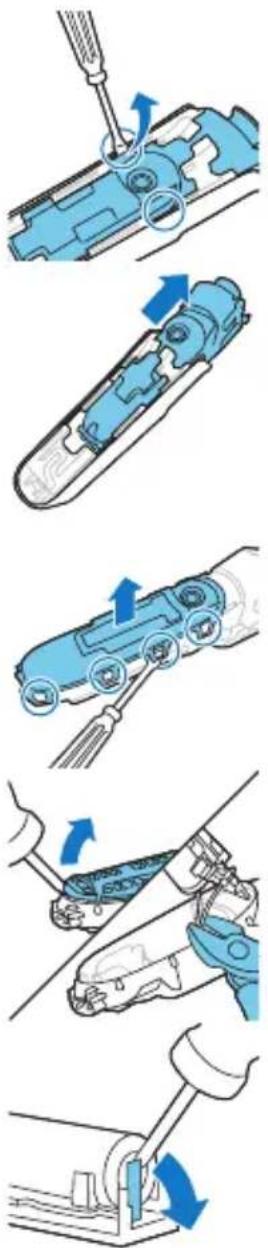
Removing the rechargeable battery
Only remove the rechargeable battery when you discard the appliance. Before you remove the battery,
make sure that the appliance is disconnected from the wall socket and that the battery is completely empty.
Take any necessary safety precautions when you handle tools to open the appliance and when you dispose of the rechargeable battery.
Be careful, the battery strips are sharp.
1 Twist the shaving head to remove it from the handle.
2 Insert a flat-head screwdriver under the rim of the panel and pry off.
3 Remove the two screws from the top with a torx or flat-head screwdriver.
4 Slide the front shell off.
5 Break the bridge on top with a wire cutter.
text_image
Diagram illustrating the step-by-step installation of a mechanical device, showing tool manipulation and assembly steps.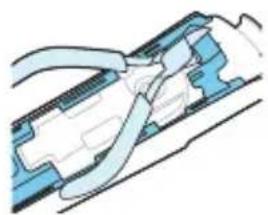
natural_image
Diagram of a mechanical assembly with blue and white components, no visible text or symbolsEnglish
flowchart
graph TD
    A["Disassembly of a mechanical part"] --> B["Actuator with screwdriver"]
    B --> C["Transfer to a device with blue arrows indicating motion"]
    C --> D["Close-up assembly of the component"]
    D --> E["Close-up assembly of the device with blue arrows indicating motion"]
    E --> F["Close-up assembly of the device with blue arrows indicating motion"]
    F --> G["Close-up assembly of the device with blue arrows indicating motion"]
6 Insert a flat head screwdriver on either side of the shaver body to release the hooks.
7 Slide the power unit out of the body.
8 Bend the snap hooks aside and remove the transparent cover of the power unit.
9 Lift out out the battery holder and cut the wires with a pair of cutting pliers or scissors.
10 Bend the battery tags aside with a pair of cutting pliers or a screwdriver.
11 Remove the rechargeable battery.
Warranty and support
If you need information or support, please visit www.philips.com/support or read the international warranty leaflet.
Warranty restrictions
The shaving heads (cutters and guards) are not covered by the terms of the international warranty because they are subject to wear.
Introduction
natural_image
Prohibition sign of a faucet without any text or symbolsnatural_image
Prohibition sign of a faucet without any text or symbolsnatural_image
Diagram of a medical device with blue arrows indicating direction of connection (no text or symbols)natural_image
Illustration of a medical procedure showing a tool injecting a small object onto a circular base (no text or symbols present)text_image
Diagram showing a device with an orange starburst and a warning symbol pointing to it, indicating a hazard or alert.natural_image
Illustration of a test tube with orange starburst pattern and a speech bubble containing three orange droplets (no text or symbols)Rappel de nettoyage
natural_image
Diagram of a hand holding a device with blue arrows indicating motion or force (no text or symbols)natural_image
Illustration of a person applying a medical or cosmetic procedure to another person's face (no text or symbols present)natural_image
Illustration of a hand holding a small object with blue arrows indicating motion or force (no text or symbols)natural_image
Illustration showing two steps of a medical procedure involving a bottle and tubing, with no visible text or symbols.natural_image
Illustration of a hand holding a device with blue arrows indicating motion, and a close-up of the device's internal structure (no text or symbols)natural_image
Line drawing of a hand using a tool to adjust or install a component (no text or symbols visible)natural_image
Diagram showing two blue mechanical components with directional arrows, no text or symbols presenttext_image
Diagram showing a blue cylindrical container with two directional arrows labeled 1 and 2, indicating rotation or flow.text_image
Diagram illustrating a mechanical or fluidic process with labeled steps and a red X mark indicating failure or absence.natural_image
Illustration of a hand using a blue tool to press down a component (no text or symbols visible)
text_image
Diagram illustrating a medical or safety procedure with labeled components and directional arrows indicating action or movement.text_image
Diagram showing a device with three labeled buttons and a checkmark, likely indicating status or operation.text_image
Diagram illustrating the step-by-step installation of a car engine cylinder, showing piston, vent, and disc disposal process.
text_image
QR code image containing encoded data, no visible human-readable texttext_image
Diagram illustrating a dental implant procedure with labeled steps and visual indicators for defect identification.natural_image
Illustration of a mechanical tool interacting with a blue-handled tool, showing step-by-step assembly (no text or symbols)