Fusion Pro 8711 - Basket NOVY - Free user manual and instructions
Find the device manual for free Fusion Pro 8711 NOVY in PDF.


User questions about Fusion Pro 8711 NOVY
0 question about this device. Answer the ones you know or ask your own.
Ask a new question about this device
Download the instructions for your Basket in PDF format for free! Find your manual Fusion Pro 8711 - NOVY and take your electronic device back in hand. On this page are published all the documents necessary for the use of your device. Fusion Pro 8711 by NOVY.
USER MANUAL Fusion Pro 8711 NOVY
Programming activeren
Programming deactiveren
2.1 Packaging material 52
2.2 Disposal of old appliance 52
2.3 Disposal of (rechargeable) batteries 52
2.4 Tips for reducing energy consumption and increasing efficiency 53
3 USING THE APPLIANCE 54
3.1 First use of the appliance 54
4 CONTROLS AND FUNCTIONS 54
4.1 Operating the device 54
4.2Turning the extraction on and off 54
4.3 Lighting 56
4.4 Programming the recirculation mode (optional) 56
4.5 InTouch 57
5 CLEANING AND MAINTENANCE 59
5.1 General maintenance 59
5.2Grease filter 60
5.3 Monoblock recirculation filter (optional) 62
5.4 Service 63
6 QUICKGUIDE 64
6.1 Settings 64
6.2 Indications 65
1GENERALINFORMATION
Carefully read the safety instructions, installation instructions and user manual before installation and putting it into operation.
The safety instructions are listed in a separate booklet supplied with the appliance and listed on our website www.novy.com.
Follow the safety instructions, installation instructions and user manual to prevent injury and material damage.
This manual makes use of a number of symbols. The meanings of these symbols are given below.
| Symbol | Meaning | |
| Indication Ex-planation of an indication on the device. | ||
| Information/Warning | This symbol indicates an important tip or a dangerous situation |
2ENVIRONMENTAND SAVINGS
2.1 Packaging material
This appliance is protected against damage during transport by packaging. The materials used are not hazardous to the environment and are suitable for recycling. Ensure environmentally-friendly disposal of the packaging.
2.2 Disposal of old appliance
Your appliance also contains many materials that can be recycled.
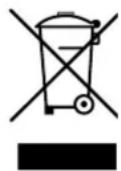
Therefore, used appliances should be separated from other waste. The recycling of appliances organised by your manufacturer is in this way carried out under the best conditions, in accordance with European Directive 2012/19/EU on electrical and electronic waste. Ask your municipality or your salesperson about the closest collection point for your old appliance. Keep old appliances out of the reach of children.
2.3 Disposal of (rechargeable) batteries
(Rechargeable) Batteries should be disposed of in an environmentally friendly manner. Do not dispose of the (rechargeable) batteries in the household rubbish. Ask your local authority or retailer for the nearest collection point for (rechargeable) batteries.
Keep (rechargeable) batteries out of the reach of children.
2.4 Tips for reducing energy consumption and increasing efficiency
The new appliance is exceptionally efficient and economical with energy. Some tips follow below for making your appliance even more energy-efficient.
- Switch the appliance on at the lowest speed when you start cooking to adjust the relative humidity and eliminate cooking odours.
Only use the highest speed when absolutely necessary.
Only increase the speed of the appliance when the quantity of vapour so requires.
Keep the appliance filter/filters clean to optimise grease and odour filtering efficiency.
Switch to higher power in good time if much vapour is released. This is more efficient than using the appliance for a long time, and catching vapour already spread in the kitchen.
Do not allow the appliance to unnecessarily ventilate after cooking.
-
Switch the lighting off when leaving the kitchen or if the kitchen is already light enough.
-
Ensure adequate air supply in the room, so that the appliance can operate efficiently and economically.
-
Put lids on the pots to reduce cooking vapours and condensation.
Switch on the appliance a few minutes before starting to cook for effective extraction of the cooking vapours.
-
Make use of the delay position if the appliance has one. The instructions for the delay position are set out in these directions for use.
-
Avoid all draughts above the cooking surface.
Position your cooking utensils in such a way that rising vapour is directed under the extraction surface of the hood.
- Cooking with induction: set the intensity of the appliance and hob as low as possible in order to limit excess vapour.
3 USING THE APPLIANCE
3.1 First use of the appliance
Scan your QR code on the warranty sticker and register your device.
- Remove all visible stickers before first use.
4 CONTROLS AND FUNCTIONS
4.1 Operating the device
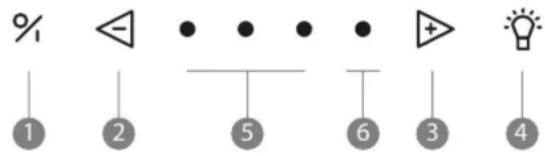
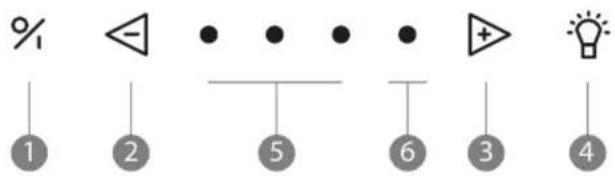
Switch on / off
Decrease speed level
3 Increase speed level
4 Illumination
⑤ Indication lights green speed 1,2,3
⑥ Indication light red Power position
4.2 Turning the extraction on and off
Turning the extraction on off
Open the rotating valve by turning it towards you to effectively remove cooking vapours.
Press button ① to turn on the extractor. The extractor always starts in the function last used (lighting and/or motor).

Turning the extraction off with delay mode
To set delay mode press key 1 once.
The first indicator light flashes, the other indicator lights come on at the last position set. After 10 minutes the motor and lighting automatically switch off.

The delay time is set by default to 10 minutes in extraction mode. It is advised to always fully allow this function to work.
Switching extraction off without delay mode
Press key ① twice.

Extractor power level
To increase the power level press key ③.

To decrease the power level press key ②.

- Three green LEDs show positions one to three.
The red LED ⑥ shows the Power position. The Power position is only used if there are strong odours, or a lot of smoke or vapour. Its use must be kept to a minimum because of the large extraction of air in this position.
The Power position automatically goes back to speed three after 6 minutes.
The motor has a thermal switch that switches the motor off with overheating. After cooling the motor will switch on again.
Determining the cause of overheating is required. This can be caused for example by a pan fire, the impeller motor being blocked or an object getting in the exhaust opening and causing it to be partly or fully blocked.
Auto-Stop
To avoid the extractor hood from staying on, the motor is automatically switched off after 3 hours (only if in 3 hours operation has not been changed). The extractor hood lighting stays on.
4.3 Lighting
Turning the lighting on and off
To turn the lighting on or off press 4.
The light works independent of the motor.

When switching the lighting on it will always go to full power and can also be used when the fan is switched off.
Dimming the LED lighting
When the LED lighting is switched on you can dim it by keeping key 4 pressed.
4.4 Programming the recirculation mode (optional)
If circulation is selected programming must take place once.
This programming function activates the replacement indicator of the monoblock recirculation filter and the delay time is changed.
Activating programming
- The motor must be switched off
- Press the and the keys at the same time for 3 seconds until the red LED flashes 5 times.

The following functions then operate:
Replacement indicator of the monoblock filter is activated. After a set time a red indicator light on the appliance shows that the monoblock filter must be replaced.
- The delay time is set to 30 minutes (instead of the default 10 minutes).
the delay time of 30 minutes so the cooking odours can be properly removed by the monoblock filter.
Read paragraph 5.3 for more information about replacement of the monoblock recirculation filter.
Deactivating programming
- The motor must be switched off
- Pres and at the same time for 3 seconds until the 3rd green LED flashes 3 times.

The delay time is again set to 10 minutes (instead of 30 minutes) and cleaning indicator for recirculation is switched off.
4.5 InTouch
The cooker hood has the InTouch function. If you have an induction hob from Novy with InTouch, you can operate the extraction hood from the hob.
Visit the website for the different models of induction hobs with InTouch.
Turning the InTouch function on and off
The InTouch function is off by default. To connect the cooker hood to a Novy induction hob with InTouch, the InTouch function must first be switched on on the cooker hood.
The InTouch function is off by default. The function can be switched on by pressing the 1 and 3 keys at the same time for 3 seconds.
The 2nd and 3rd LEDs flash 3 times to confirm (the appliance must be switched off).

To switch the InTouch function off press the 1 and 2 keys at the same time for 3 seconds and the 2nd and 4th LEDs flash 3 times to confirm. (The appliance must be switched off).
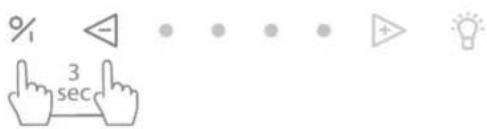
Tapping off the InTouch function on the cooker hood results in the connection between cooker hood and Novy induction hob with InTouch and/or remote control is also disabled.
Programming InTouch on the induction plate
- Connect the plate to the mains supply.
Touch simultaneously the keys and the induction plate until you hear a beep signal (prox. 7 sec.).
The cooker plate now searches automatically for the hood code.
Wait until the cooker hood illumination begins to flashing OR you hear a "click" sound when you have an extractor hood without lighting (Be patient, this can betake a while).
- Does the light blink or you hear the "click" sound; press immediately on any InTouch key or or + or - on the induction hob.
You will hear a "beep" signal to indicate the link between the two devices.
Now you can operate the hood with the keys on the induction plate.
You can find more information about using the InTouch functions in the InTouch manual for the hob.
The InTouch function between cooker hood and hob works with a fixed code.
If the set code disrupts other transmitters, another code can be selected. There are 10 different codes.
A remote control is required to change the code.
More information on reprogramming with the remote control can be found in the manual of the remote control.
Y can obtain a remote control from a dealer which you can find on the Novy website.
Article number remote control : 840029.
5 CLEANING AND MAINTENANCE
Follow all instructions as described in the Conditions for Safety and Use section.
Follow the cleaning instructions below for a longer working life and optimal operation of the appliance.
5.1 General maintenance
The lighting to cool down sufficiently before you start cleaning the extractor hood.
Never use aggressive, abrasive or chlorinated products.
Do not use a high pressure or steam cleaner.
Stainless steel
Clean with a cleansing tissue with mild cleaning agent then dry with a soft cloth. Maintenance of the stainless steel can be performed with the Novy cleaner (906060).
If you use another stainless steel cleaner, we recommend testing it first on an inconspicuous area (inside) of the hood and waiting 24 hours to see the result. If you do not notice anything abnormal, you can clean your hood with this product.
Coated parts of the extractor hood
The extractor hood can be cleaned with a damp cleansing tissue and a mild cleaning agent.
Glass
Glass parts of the extractor hood can be cleaned with a soft cloth and a glass cleaner.
5.2 Grease filter
If the following instructions are not carried out, serious soiling can cause a fire hazard.
Indication cleaning grease filter
Ination: 4 flashing indicator lights

After 20 cooking hours 4 flashing indicator LEDs show that the grease filter must be cleaned.
Reset the cleaning indicator
When you replace the grease filter after cleaning, it is sufficient to press the ② key for 5 seconds to again set the indicator.

If you do not do this the indicator light will continue to flash when switching on the extractor hood.
Accessing the grease filter
-
Protect the hob.
-
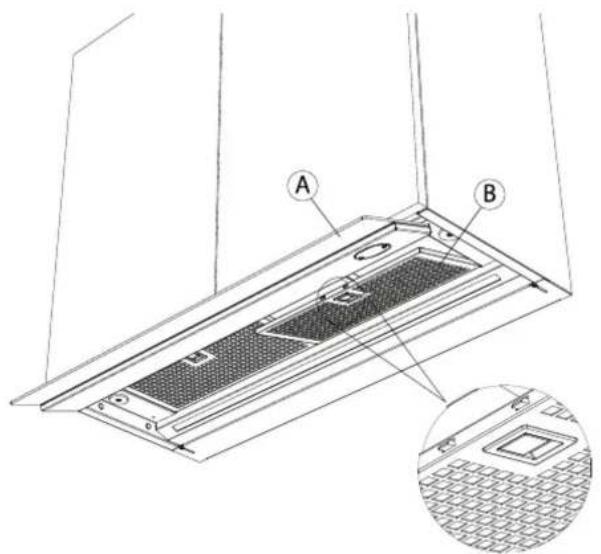
Open the rotating valve A.
You can take the grease filter B from the hood by pulling the handle on the filter.
- The filter will come down.
Cleaning the grease filter
The metal grease filter can be cleaned by hand or in a dishwasher. We recommend cleaning the grease filter by hand.
Cleaning the filter by hand:
Immerse the filter in a solution of boiling water to which a liquid detergent has been added.
Do not use aggressive, acidic or alkaline cleaning products.
-
Use a brush for cleaning.
-
Then rinse the filters with warm water under a tap and allow them to dry.
Cleaning the filter in a dishwasher:
- Use a customary dishwasher detergent.
Do not put the saturated grease filters together with crockery in the dishwasher.
-
Select a programme with a low temperature (max imum 65^ ).
-
After cleaning allow the filter to drain.
When cleaning in a dishwasher the filter may discolour as a result of the salt content. This does not affect its operation.
Replacing the grease filters
- Before replacing the grease filter, clean the edges of the part in the extractor hood in which the filter is placed.
- Grasp the filter with 2 hands.
- Make sure that the lock or the lip on the filter is on the bottom side.
Insert the back of the filter in the opening, press the filter upwards at the front and make sure it clicks tight.
Y can obtain a new grease filter from a dealer which you can find on the Novy website. Article number grease filter:
- 60 cm: 1x 680021
-90cm:2x680020 - 120 cm: 2x 680021
5.3 Monoblock recirculation filter (optional)
When selecting recirculation, always set the recirculation mode on the extractor hood (see paragraph 2.4). If recirculation is chosen a monoblock recirculation filter is fitted in the extractor hood behind the grease filter.
Replacement indicator monoblock recirculation filter
Iation: red indicator light stays on

After a set time a red indicator light on the appliance shows that the monobloc filter must be replaced.
Reset the replacement indicator
motor must be on. When you fit the new monobloc filters, it is sufficient to press the 2 and 3 keys for 5 seconds at the same time to reset replacement indication.

Accessing the monoblock recirculation filter
Remove the Monoblock recirculation filter:
Open the rotating valve with both hands and remove the aluminium grease filter from the hood (5.2).
The Monoblock recirculation filter is located in its opening in the cooker hood. Remove it from the cooker hood.
Place the monoblock recirculation filter
Open the rotating valve with both hands and remove the aluminium grease filter from the hood (5.2).
Place the monoblock recirculation filter is its opening in the cooker hood.
Replace the aluminium grease filter and close the rotating valve.
Y can obtain a new monoblock filter from a dealer which you can find on the Novy website. Article number monoblock filter: 680400.
5.4 Service
Fault: In the event of a fault, please do not hesitate to contact our after sales service: www.novy.com/contact.
Choose you country.
For a proper and prompt handling, the after sales service needs to know the model number of your device. This information can be found on sticker on the inner frame of the extractor hood. This becomes visible as soon as you take the filter(s) out of the extractor hood.
6QUICKGUIDE
6.1 Settings
| EXPLANATIONACTION | NINDICATION | REMARK | |
| Switching on the engine | 1 | ||
| Switching off the motor with delay mode | 1 | Green LED flashes | Engine stays on for 10 minutes |
| Switching off the motor without delay mode | 2 x 1 | Engine goes off immediately | |
| Increase engine speed | 3 | ||
| Decrease engine speed | 2 | ||
| Lighting on | 4 | ||
| Dimming the lighting | Continue to press 4 | ||
| Recirculation on | 2 + 3 for 3 Seconds | Red LED flashes 5x | ! Motor must be switched off! |
| Recirculation off | 2 + 3 for 3 Seconds | Third green LED flashes 5x | ! Motor must be switched on! |
| Reset cleaning indicator grease filters | 2 for 5 Seconds | ||
| Reset replacement indicator monoblock | 2 + 3 for 3 Seconds | Red LED flashes 3x | ! Motor must be switched on! |
| InTouch on | 1 + 3 for 3 Seconds | 2nd en 3th LED flashes | ! Motor must be switched off! |
| InTouch off | 1 + 2 for 3 Seconds | 2nd en 4th LED flashes | ! Motor must be switched off! |
6.2 Indications
| INDICATIONEXPLANATIONREMARK | ||
| Four flashing LEDs | Grease filter must be cleaned. | If the cleaning instructions are not followed, excessive contamination, risk of fire and loss of efficiency will result. |
| Red indication LED lights up | Time to replace the monoblock recirculation filter used. | |
Novy nv reserves the right at any time and without reservation to change the structure and the prices of its products.
NOVYnv
Noordlaan 6
B-8520 KUURNE
Tel. 0032 (0)56 36 51 00
info@nowy.com
www.novy.com