FSMH13E10 - Steam cleaner BLACK & DECKER - Free user manual and instructions
Find the device manual for free FSMH13E10 BLACK & DECKER in PDF.
| Brand | Black & Decker |
| Model | FSMH13E10 |
| Product Type | Steam mop cleaner |
| Supply Voltage | 220-240 V AC |
| Power | 1300 W |
| Water Tank Capacity | 380 ml |
| Weight | 1.8 kg |
| Dimensions (approx.) | Height with handle: approx. 120 cm, head width: approx. 30 cm |
| Compatible Surfaces | Parquet, laminate, linoleum, vinyl, ceramic tile, stone, marble |
| Main Functions | Steam cleaning, disinfection (destroys 99.9% of bacteria and germs in 90 s) |
| Heat-up Time | Approximately 15 seconds |
| Steam Production | Continuous via pump, possible start-up up to 45 s after first fill or dry running |
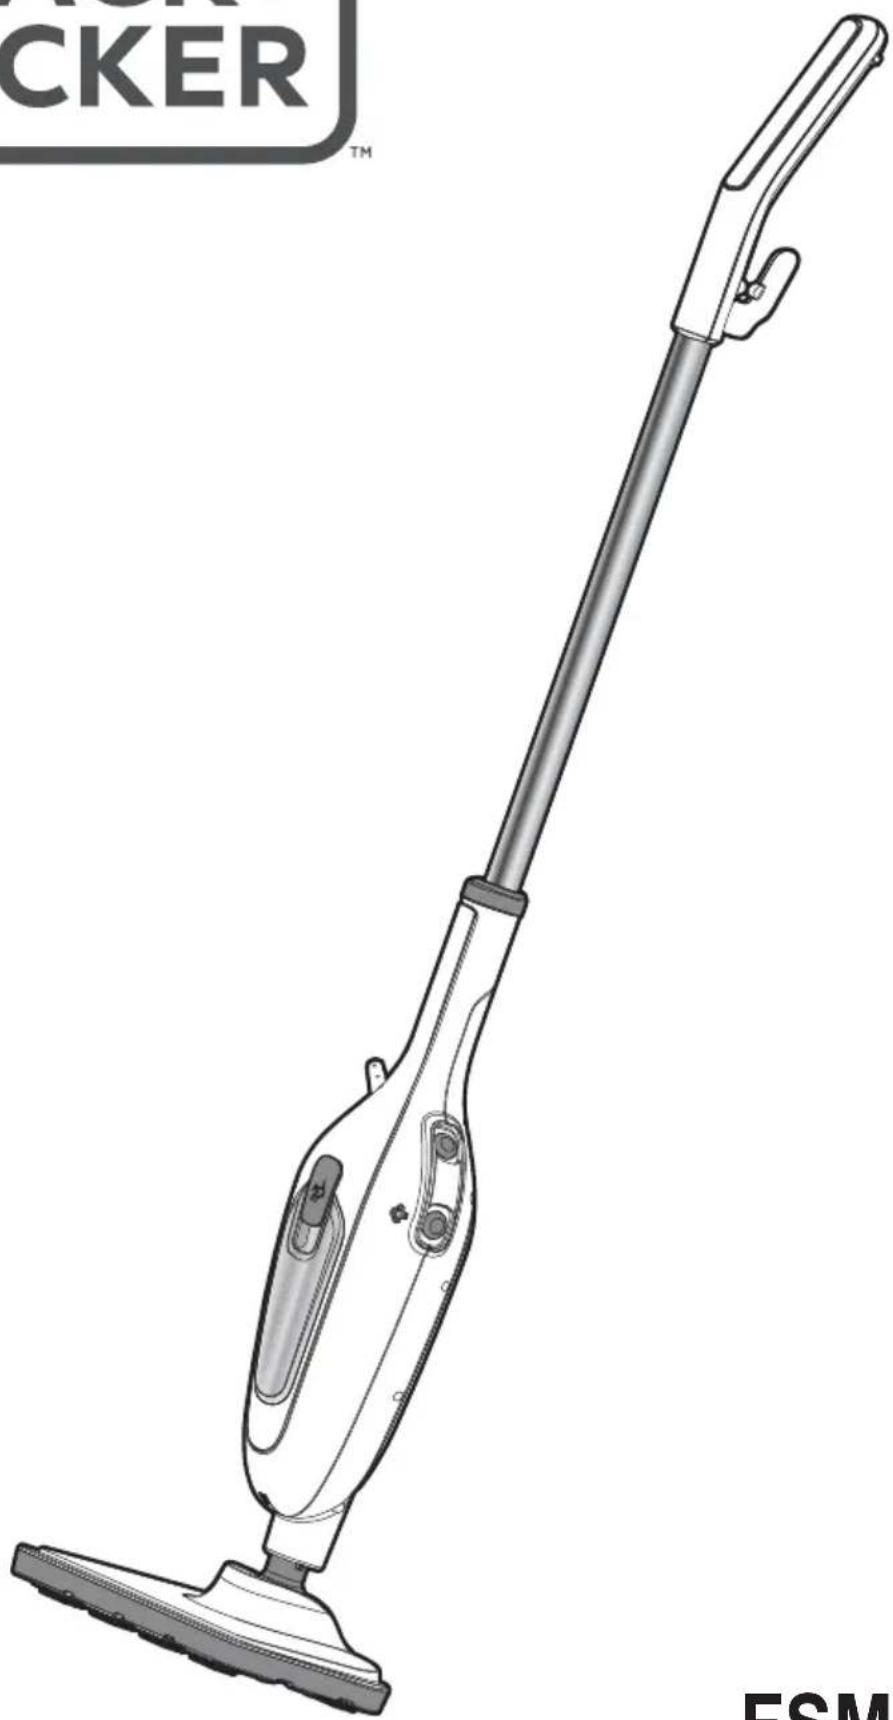
| Included Accessories | Microfibre cleaning pad, accessory adapter, small brush (plastic bristles), small squeegee, grout brush, large squeegee, sock pad for squeegee, large brush (plastic bristles), small brush (copper bristles), small brushes x2, carpet accessory |
| Safety | Thermostat and thermal switch (automatic shutdown in case of overheating), do not direct steam towards electrical components |
| Maintenance | Empty tank after use, wash cleaning pad |
| Warranty | 24 months against defects in materials or workmanship |
| Intended Use | Indoor, household use only |
| Water Recommendation | Tap water; in hard water areas, use demineralised water |
| Storage | Wind the cable around the hook, upright position |
| Spare Parts | Replacement cleaning pad ref. FSMP20-XJ |
Frequently Asked Questions - FSMH13E10 BLACK & DECKER
User questions about FSMH13E10 BLACK & DECKER
0 question about this device. Answer the ones you know or ask your own.
Ask a new question about this device
Download the instructions for your Steam cleaner in PDF format for free! Find your manual FSMH13E10 - BLACK & DECKER and take your electronic device back in hand. On this page are published all the documents necessary for the use of your device. FSMH13E10 by BLACK & DECKER.
USER MANUAL FSMH13E10 BLACK & DECKER
natural_image
Line drawing of a CER vacuum cleaner with a long handle and base mount (no text or symbols on the device itself)
E
F
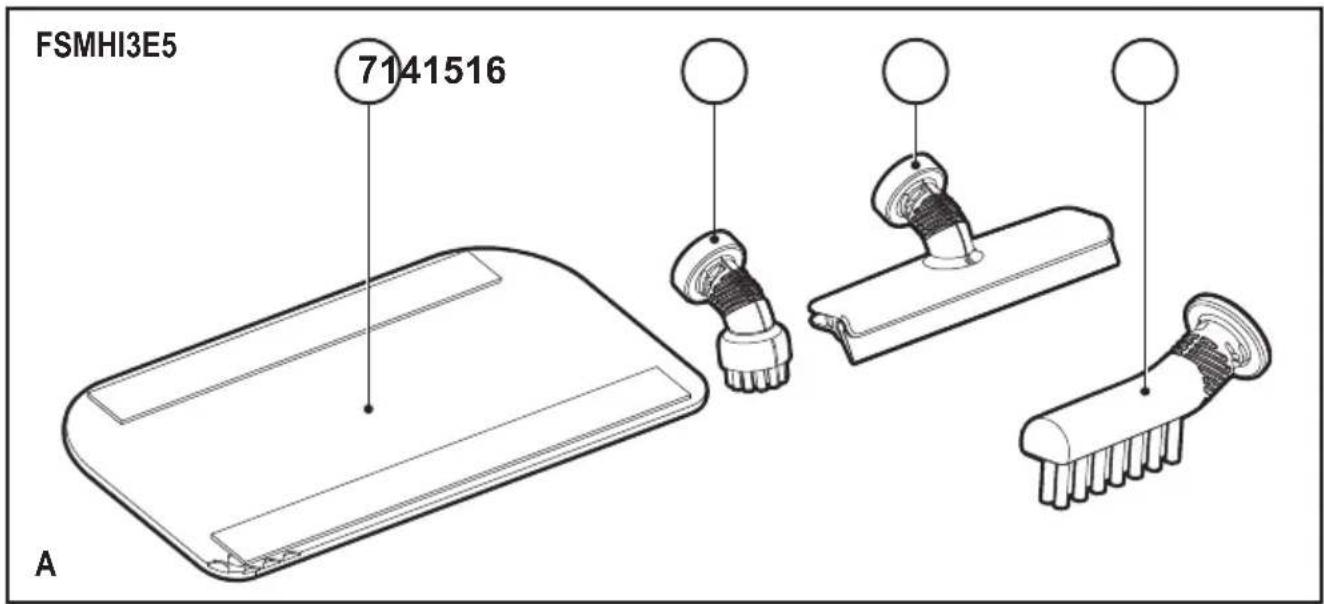
Safety instructions
Warning! Read all Safety, Maintenance, Service' manual carefully before operating this appliance. Read all of this manual carefully before operating this appliance.
Intended use
Your BLACK+DECKER™ FSMH13E5, FSMH13E10 steam mop has been designed for sanitising and cleaning sealed hardwood, sealed laminate, linoleum, vinyl, ceramic tile, stone and marble floors. This appliance is intended for indoor household use only.
Safety of others
- This appliance can be used by children aged from 8 years and above and persons with reduced physical, sensory or mental capabilities or lack of experience and knowledge if they have been given supervision or instruction concerning use of the appliance in a safe way and understand the hazards involved.
- Children shall not play with the appliance. Cleaning and user maintenance shall not be made by children without supervision.
- If the supply cord is damaged, it must be replaced by the manufacturer, its service agent or similarly qualified persons in order to avoid a hazard.
- The plug must be removed from the socket-outlet before cleaning or maintaining the appliance.
- The liquid or steam must not be directed towards equipment containing electrical components, such as the interior of ovens.
- The appliance shall not be left unattended while it is connected to the supply mains;
- The appliance is not to be used if it has been dropped, if there are visible signs of damage or if it is leaking;
- Keep the appliance out of reach of children when it is energized or cooling down.
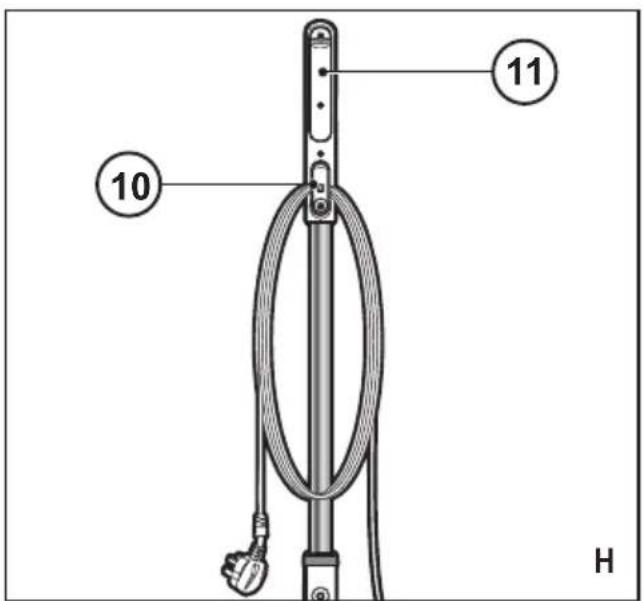
After use (Fig. H)
- Turn the steam mop 'OFF'. turn the steam operation button (2) to off and then press the ON/OFF button (1).
- Wait until the steam mop cools down.
- Unplug the steam mop from the electrical wall outlet.
- Empty the water tank.
- remove the cleaning pad (7) and wash it ready for next use.
- Wrap the power supply cable around the tidy hook (10).
Labels on appliance
The following pictograms along with the date code are shown on the appliance.

CAUTION Hot Steam
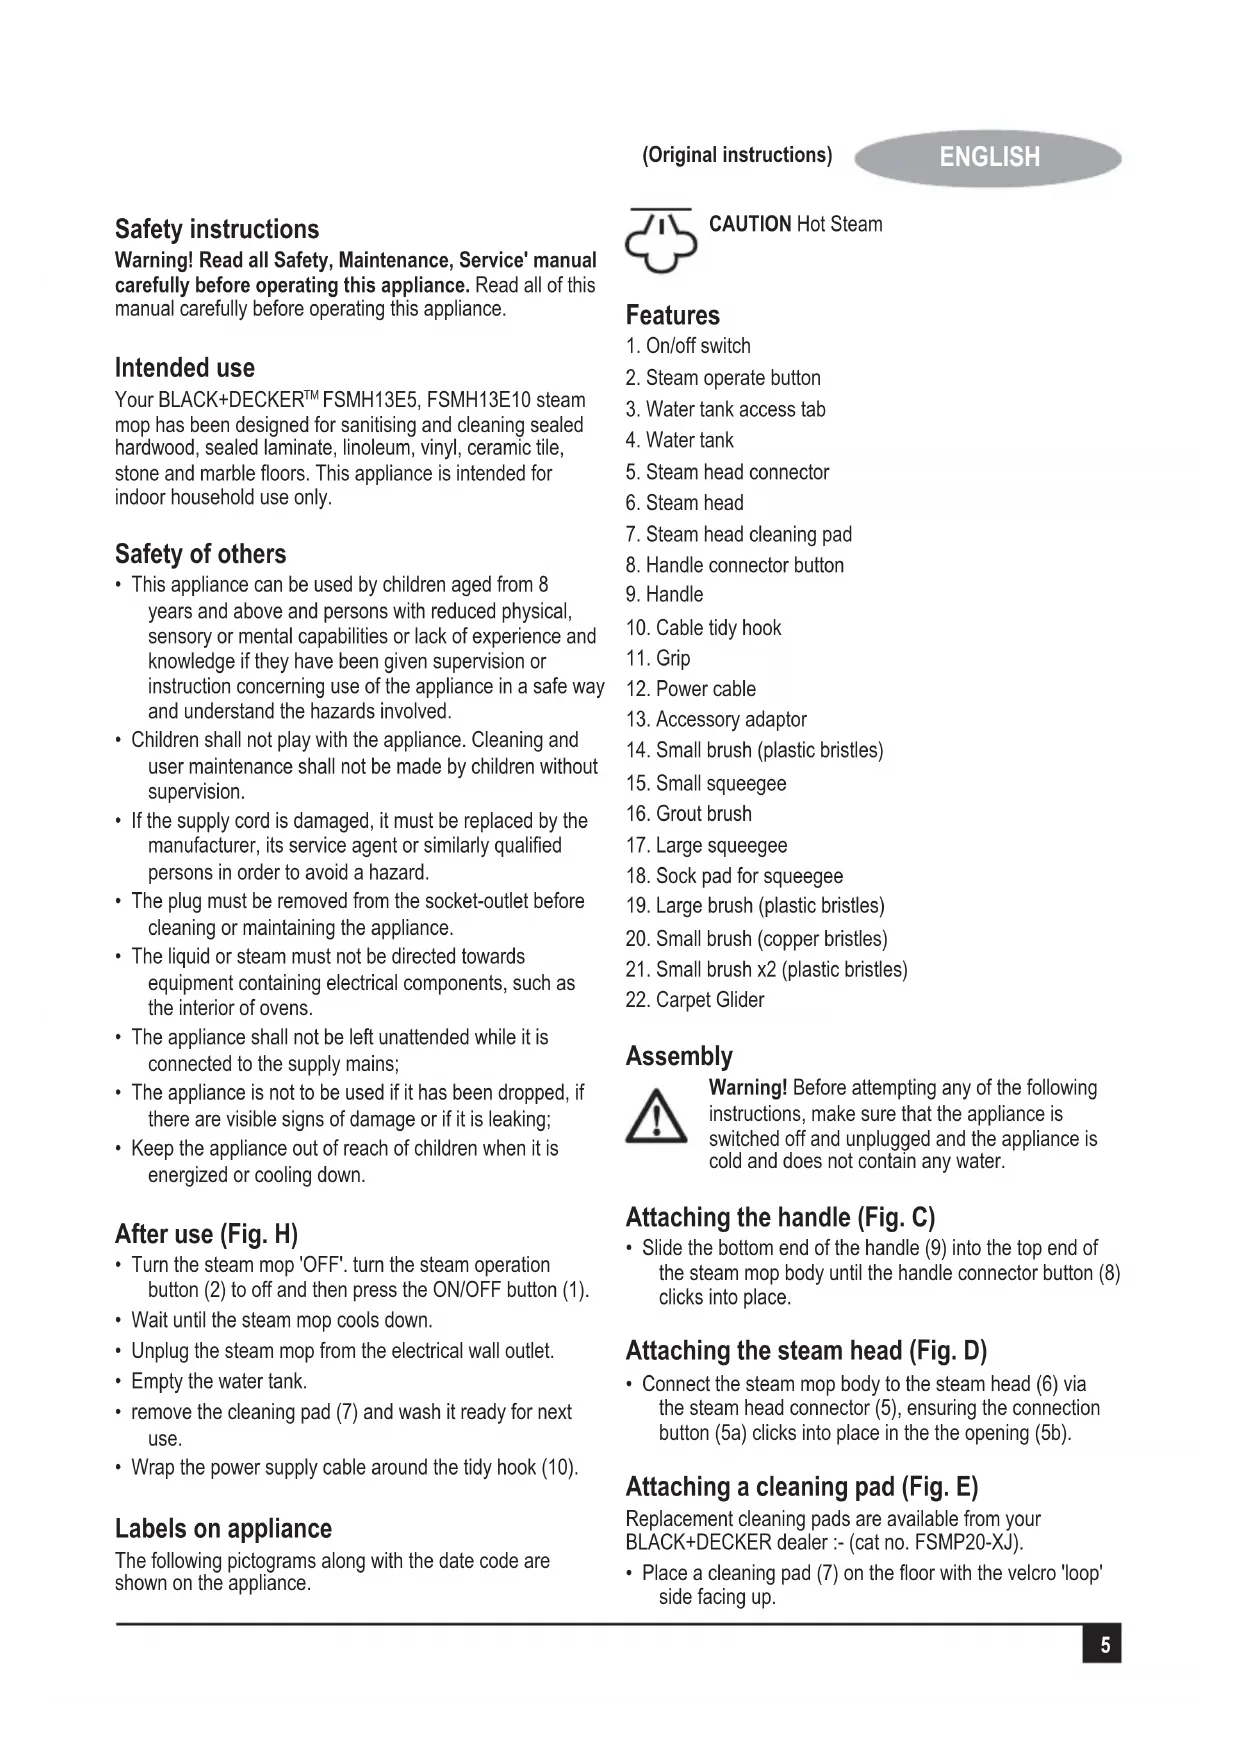
Features
- On/off switch
- Steam operate button
- Water tank access tab
- Water tank
- Steam head connector
- Steam head
- Steam head cleaning pad
- Handle connector button
- Handle
- Cable tidy hook
- Grip
- Power cable
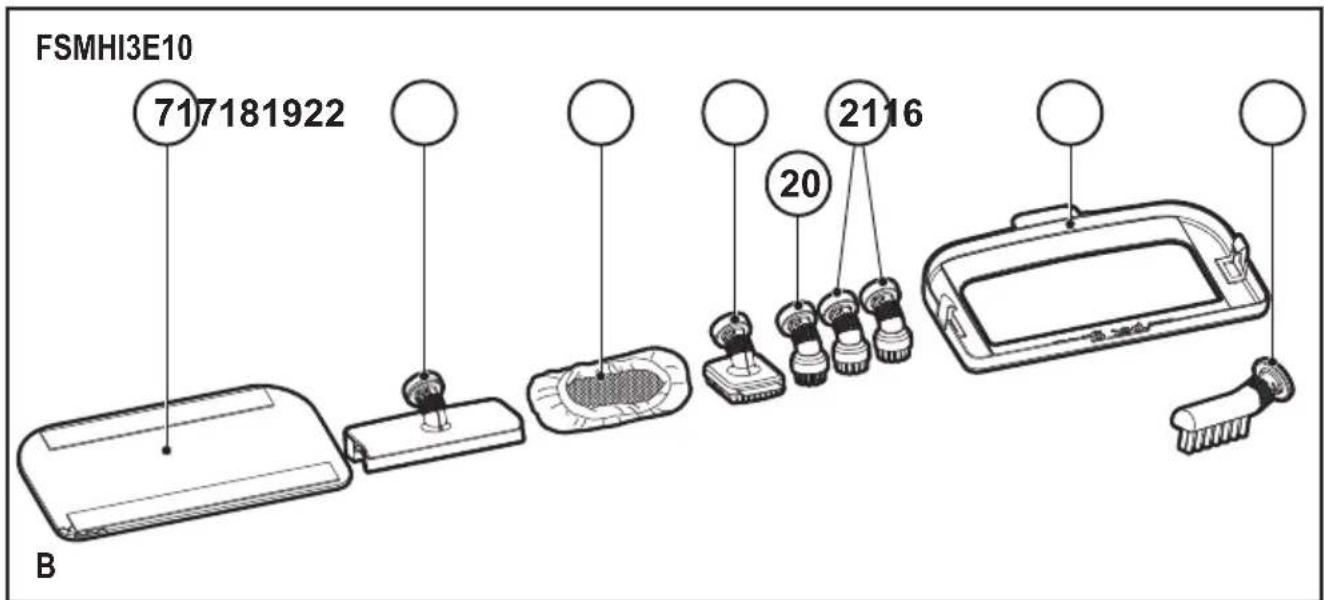
- Accessory adaptor
- Small brush (plastic bristles)
- Small squeegee
- Grout brush
- Large squeegee
- Sock pad for squeegee
- Large brush (plastic bristles)
- Small brush (copper bristles)
- Small brush x2 (plastic bristles)
- Carpet Glider
Assembly

Warning! Before attempting any of the following instructions, make sure that the appliance is switched off and unplugged and the appliance is cold and does not contain any water.
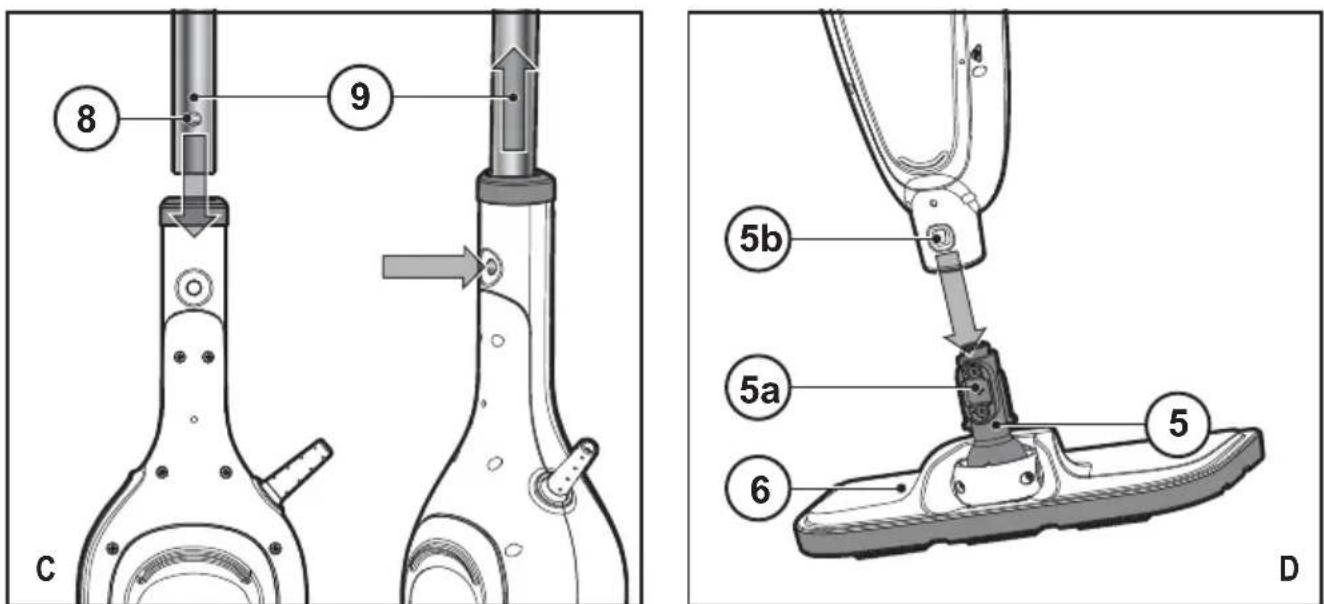
Attaching the handle (Fig. C)
- Slide the bottom end of the handle (9) into the top end of the steam mop body until the handle connector button (8) clicks into place.
Attaching the steam head (Fig. D)
- Connect the steam mop body to the steam head (6) via the steam head connector (5), ensuring the connection button (5a) clicks into place in the opening (5b).
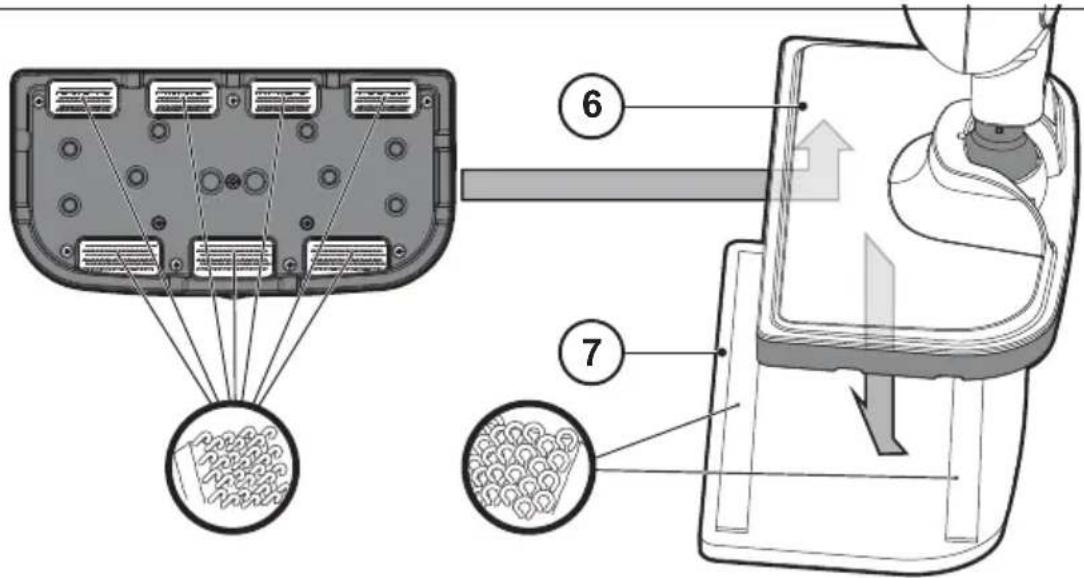
Attaching a cleaning pad (Fig. E)
Replacement cleaning pads are available from your BLACK+DECKER dealer :- (cat no. FSMP20-XJ).
- Place a cleaning pad (7) on the floor with the velcro 'loop' side facing up.
- Lightly press the steam mop down onto the cleaning pad (7).
Caution: Always place your steam mop with the handle (9) supported in the upright position when stationary and make sure the steam mop is turned off when not in use.
Removing a cleaning pad
Caution! Always wear suitable shoes when changing the cleaning pad on your steam mop. Do not wear slippers or open toed footwear.
- Return the handle (9) to the upright position and turn the steam mop 'OFF'.
- Wait until the steam mop cools down (approximately 5 minutes).
- Lift the steam mop away from the cleaning pad freeing it from the velcro fastening.
Caution! Always place your steam mop with the handle (9) supported in the upright position when stationary and make sure the steam mop is turned off when not in use.
Using as a hand held unit
- Disconnect the hand held unit from the steam head by pushing the connection button (5a) figure D.
- Remove the handle (9) from the hand held unit by pushing the handle connector button (8) figure C.
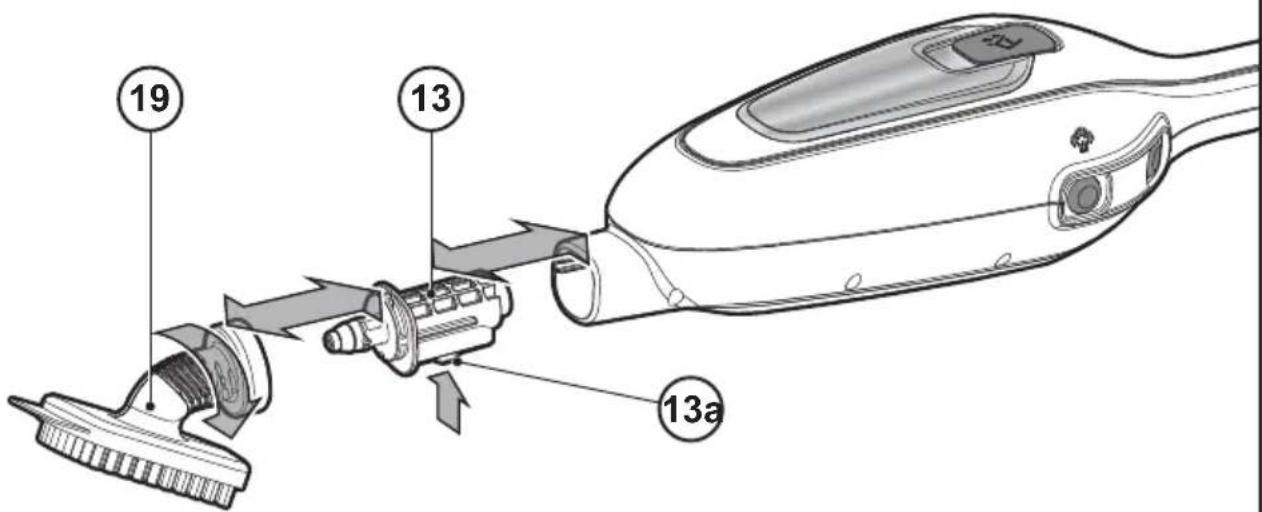
Fitting accessories (Fig. F)
- Fit the accessorie adaptor (13) into the main body of the unit ensuring the button (13a) clicks into the relevant opening.
- Attach the required accessorie to the accessorie adaptor (13) and twist clockwise to lock into place.
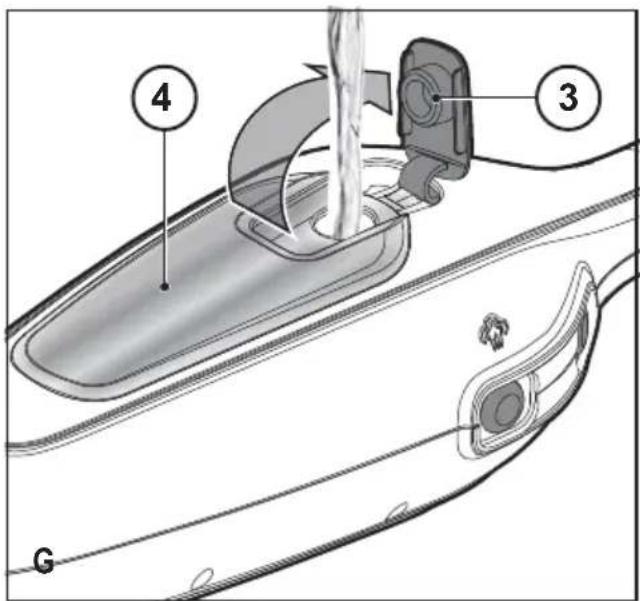
Filling the water tank (Fig. G)
Note! Fill the water tank with clean tap water.
Note! In areas of hard water, the use of de-ionised water is recommended.
- Open the water tank access tab (3).
- Fill the water tank (4) with water.
Warning! Your water tank has a 380ml capacity. Do not over fill the tank.
- Replace the water tank access tab.
Note! Ensure the water tank access tab is firmly secured.
Note! Do not use chemical cleaners with your steam mop water tank.
Use
Important! This unit will kill 99.9% of bacteria and germs when used in accordance with the instructions in this manual and with the micro fibre pad fitted and a continuous run time of 90 seconds.
Switching on and off
- To switch the appliance on, press the ON/Off button (1). It takes approximately 15 seconds for the steam mop to heat up.
- Press the steam operation button (2). This will operate the pump and the unit will begin to produce steam.
- To stop steam generation, turn the steam operation button (2) to off. This will maintain power to the boiler for quicker start up.
- To switch the appliance off, press the ON/Off button (1).
Caution! Never leave the steam mop in one spot on any surface for any period of time.
Always place the steam mop with the handle (9) supported in the upright position when stationary and make sure the steam mop is turned off when not in use.
Caution! Always empty the steam mop after use.
Note! When first filled or after running dry, it can take up to 45 seconds for steam to be produced.
Hints for optimum use
General
Caution: Never use the steam mop without first attaching a cleaning pad.
- Always vacuum or sweep the floor before using the steam mop.
- The easiest way to use the appliance is to tilt the handle to a 45^ angle and clean slowly, covering a small area at a time.
- Do not use chemical cleaners with your steam mop. To remove stubborn stains from vinyl or linoleum floors, you can pre-treat with a mild detergent and some water before using the steam mop.
Steam Cleaning
- Place a cleaning pad (7) on the floor with the velcro 'loop' side facing up.
- Lightly press the steam mop down onto the cleaning pad (7).
- Connect the steam mop to the mains.
- Press the ON/OFF button (1). It takes approximately 15 seconds for the steam mop to heat up.
- Press the steam operate button (2). After a few seconds, steam will start to come out of the steam head.
Note! When first filled or after running dry, it can take up to 45 seconds for steam to be produced.
- It takes a few seconds for steam to enter the cleaning pad. The steam mop will now glide easily over the surface to be sanitized/cleaned.
- Push and pull the steam mop slowly across the surface to thoroughly steam clean each section.
- When you have finished using the steam mop, return the handle (9) to the upright position, making sure that it is supported and turn it 'OFF'. Wait until the steam mop cools down (approximately five minutes).
Caution! It is important to monitor the water level in the water tank (4). To refill the water tank and continue to sanitize/clean stand the mop upright making sure that the handle is supported and turn the steam mop 'OFF'. Unplug the unit from the electrical wall outlet, refill the water tank (4).
Caution! Never leave the steam mop in one spot on any surface for any period of time. Always place the steam mop with the handle (9) supported in the upright position when stationary and make sure the steam mop is turned off when not in use.
Protecting the environment

Separate collection. This product must not be disposed of with normal household waste.
Should you find one day that your BLACK+DECKER product needs replacement, or if it is of no further use to you, do not dispose of it with other household waste. Make this product available for separate collection.
- BLACK+DECKER provides a facility for recycling BLACK+DECKER products once they have reached the end of their working life. This service is provided free of charge. To take advantage of this service please return your product to any authorised repair agent who will collect them on our behalf.
- You can check the location of your nearest authorised repair agent by contacting your local BLACK+DECKER office at the address indicated in this manual. Alternatively, a list of authorized BLACK+DECKER repair agents and full details of our after-sales service and contact are available on the Internet at: www.2helpU.com.
Technical data
| FSMH13E5-B5 | FSMH13E10-B5 | ||
| Voltage V | AC | 220-240 220-240 | |
| Power W 1300 | 300 | ||
| Tank Capacity ml | 380 380 | ||
| Weight kg 1.8 | 1.8 | ||
Troubleshooting
If your appliance seems not to operate properly, follow the instructions below. If this does not solve the problem, please contact your local BLACK+DECKER repair agent.
| Problem Step Possible solution | ||
| The steam mop is not turning on | 1. | Check the unit is plugged in at the wall socket. |
| 2. | Check the unit is switched on using the ON/OFF switch (1) | |
| 3. | Check the fuse in the plug. | |
| The steam mop is not producing steam | 4.(4) is full .NOTE: When first filled or after running dry it can take up to 45 seconds for steam to be produced. | |
| 5. | Check the steam generation button is in the ON position (2). | |
| Where can I get further information/ accessories for my steam mop | 6. | Refer to the assembly chapter of the manual for correct fitting of parts and accessories. |
ENGLISH
(Original instructions)
Warranty
BLACK+DECKER is confident of the quality of its products and offers an outstanding warranty.
This warranty statement is in addition to and in no way prejudices your statutory rights.
If a BLACK+DECKER product becomes defective due to faulty materials, workmanship or lack of conformity, within 24 months from the date of purchase, BLACK+DECKER warranty to replace defective parts, repair products subjected to fair wear and tear or replace such products to ensure minimum inconvenience to the customer unless:
The product has been used for trade, professional or hire purposes;
The product has been subjected to misuse or neglect;
The product has sustained damage through foreign objects, substances or accidents;
Repairs have been attempted by persons other than authorised repair agents or BLACK+DECKER service staff.
To claim on the warranty, you will need to submit proof of purchase to the seller or an authorised repair agent. You can check the location of your nearest authorised repair agent by contacting your local BLACK+DECKER office at the address indicated in this manual.
Alternatively, a list of authorised BLACK+DECKER repair agents and full details of our after-sales service and contacts are available on the Internet at: www.2helpU.com.
Black and Decker (Overseas) GmbH
PO Box 17164, Dubai, United Arab Emirates
Names & Addresses for BLACK+DECKER Service Concessionaries
| COUNTRY NAME ADDRESS TELEPHONE NO. EMAIL | ||||
| BAHRAIN | Alfouz Services Co. WLL | P.O. Box 26562, Tubli, Manama | (00973) 17783562 / 17879987 | alfouz@batelco.com.bh |
| BAHRAIN | Kewalram & Sons Co. WLL | P.O. Box 84, Manama,Kingdom of Bahrain | (00973) 1721311017210617 | kewalram02@batelco.com.bhkewalram@batelco.com.bh |
| EGYPT | Anasia Egypt for TradingS.A.E. (Mentrade) | P.O. Box 2443, 9, Mostafa Refaat Street,Sheraton Heliopolis 11361, Cairo | (00202) 22684159Hotline19311 | wael.salah@anasia.comnevien.elbeshbishy@anasia.com |
| JORDAN | Mega Hardware -(Sami Bashiti & Partners Co.) | 93 King Abdullah II St.,P.O.BOX 3005 AMMAN 11953 | (009626) 5349098 | info@mega-hardware.comwww.mega-hardware.com |
| KSA | Fawaz Ebrahim Al ZayaniTrading Est. | P.O. Box 76026, Al Raka : 31952 | (009663) 8140914 | dewaltdammam@hotmail.comwww.fawazalzayanigroup.com |
| KSA(U-MARK)and Ghunaim Market | United Trading & Marketing Co;Military city road – Near City max | #15, Khamis Mushait 62411, Abha, | (00966) 172500378 | serviceabha@u-mark.net |
| KSA(U-MARK) | United Trading & Marketing Co;Al Saud Street - Near Nawan Hotel | #116, Prince Fahad Ibn Ibrahim | (00966) 11473-3258 | malazservice@u-mark.net |
| KSA(U-MARK)Al Umran & Khub Ath Thinayan | United Trading & Marketing Co;52371 Al Hamr Road near Jaryat | Ash Shiqah, Al Hamr, Buraydah | (00966) 16-3694969 | serviceqaseem@u-mark.net |
| KSA(Sihha Medical Center) | United Trading & Marketing Co;(U-MARK) | King Abdulaziz St, Al AziziyahDammam 32424 near Dat'AS | (00966) 138179319138172654 | servicedammam@u-mark.net |
| KSA(U-MARK)New Jeddah National Hospital | United Trading & Marketing Co;Jeddah 23331 Falastin Road Near | Jabal Ar-Rubabah, Misrifah, | (00966) 126612552 | servicejeddah@u-mark.net |
| KSA | United Trading & Marketing Co; (U-MARK) | #356, Al Talah Medina 42322 | (00966) 148423339 | servicemadina@u-mark.net |
| KUWAIT | Al Omar Technical Co. | P.O. Box 4062, Safat 13041, Kuwait | (00965) 24848595 / 24840039 | alexotc@usa.net |
| LEBANONBuilding, Beirut | Aces Service Centre(Est. F.A.Ketaneh SA) | P.O. Box 90-102, Nahr El Mot,Seaside Highway, Pharaon | (009611) 898989 / 262626 | nissrine.hajj@aces.com.Ibnassim.aziz@Aces.com.lb |
| LIBYA(Benghazi, Libya (P.O. Box 18182 Salmany) | Homeworld Co. | Senidal St. Amr Ibn Elaas Road,ext. 103 | (0021861) 9094183 | nissrine.hajj@aces.com.lb |
| LIBYA( El Ghoul Brothers) | North Africa TradingStreet 11, Benghazi | P.O. Box 348, 7 October | (00218061) 3383994 | nissrine.hajj@aces.com.lb |
| LIBYA | North Africa Trading( El Ghoul Brothers) | AlBarniq Dewalt Center,Mokhazin-elsukar St. Elfallah, Tripoli | (00218021) 3606430 | nagte.ly@gmail.comnagte.dpt@gmail.com |
| MAURITIUS | The Brandhouse Ltd. | Rogers Industrial Park 1, RicheTerre, Mauritius | (00230) 20694502071700 | claims(service.centre@goupille.mustephanie.bijoui@gmail.com |
| OMAN | Oman Marketing & Service Co.(Omasco) | P.O. Box 2734,Behind HondaShowroom,Wattayah,Oman | (00968) 2456023224560255 | npservice@omasco.com.omashok.balan@omasco.com.om |
| OMAN | Oman Marketing & Service Co. (Omasco) | Al Ohi, Sohar,Oman | (00968) 26846379 | sooraj.neeran@omasco.com.om |
| OMAN | Oman Marketing & Service Co. (Omasco) | Sanaya, Salalah,Oman | (00968) 23212290 | rajagopal.pr@omasco.com.om |
| PAKISTANPlaza Behind Gul Plaza MarstonRoad,KARACHI | Ammar Service & Spares | Office No 6068 6th Floor Central | (009221) 32775252 | babji93@yahoo.com |
| QATAR | Al Muftah Service Centre | Al Wakrah Road, P.O. Box 875,Doha,Qatar | (00974) 4465088044650110 | service@almuftah.comalmuftah@almuftah.com |
| TUNISIAMaintenance(STM)2013 BEN AROUS, TUNISIA. | Societe Tunisienne DeZONE INDUSTRIELLE BENA ROUS. | RUE DE LA PHYSIQUE, NOUVELLE | (0021679) 389687 | importa@stqu.com |
| UAE | Light House Electrical | P.O. Box 120, Abu Dhabi | (009712) 6726131 | dewalt_lhe@hotmail.com |
| UAE | Light House Electrical | P.O. Box 120, Abu Dhabi | (009712) 5548315 | dewalt_lhe@hotmail.com |
| UAE | BLACK+DECKER (Overseas) GmbH | P.O. Box 5420, Dubai | (009714) 8127400 / 8127406 | service.mea@sbdinc.com |
| UAE | Zillion Equipment and | P.O. Box 10584, Ras Al Khaimah | (009717) 2277095 | zillionrak@gmail.com |
| UAETrading LLC | Zillion Equipment and Spare PartsTrimix Redymix Sanaiya, Al Ain | P.O. Box 19740, Opp. Bin Sadal / | (009713) 7216690 | zilliontrdg@gmail.com |
| YEMEN | Middle East Trading Co. (METCO) | 5th Flr,Hayel Saeed AnamBldg. Al-Mugamma St. Taiz, Yemen | (009674) 213455 | metco@metcotrading.comsami@metcotrading.com |
| YEMEN | Middle East Trading Co. (METCO) | Mualla Dakka, Aden | (009672) 222670sami@metcotrading.com | metco@metcotrading.com |
| YEMEN | Middle East Trading Co. (METCO) | Hayel st.,Sana'a,Yemen | (009671) 204201sami@metcotrading.com | metco@metcotrading.com |
WARRANTY REGISTRATION CARD
YOUR NAME/ VOTRE NOM/الإسم
YOUR ADDRESS/ VOTRE ADRESSE/ العنوان