
MZ2310PG - Microwave Oven BLACK & DECKER - Free user manual and instructions
Find the device manual for free MZ2310PG BLACK & DECKER in PDF.
| Product Type | Microwave Oven |
| Brand | Black & Decker |
| Model | MZ2310PG |
| Dimensions (W × D × H) | 485 × 405 × 293 mm |
| Net Weight | Approximately 14 kg |
| Power Supply Voltage | 230 V ~ 50 Hz |
| Input Power (Microwave) | 1250 W |
| Output Power (Microwave) | 800 W |
| Input Power (Grill) | 1000 W |
| Capacity | 23 L |
| Turntable Diameter | 270 mm |
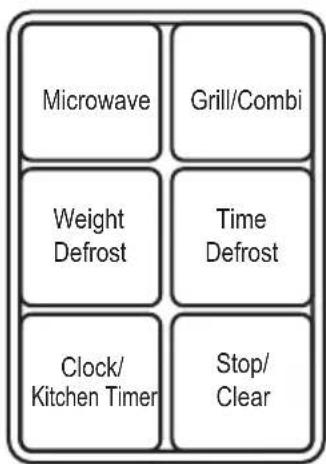
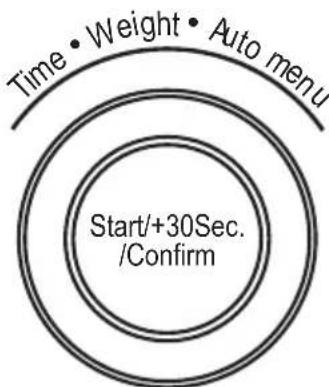
| Main Functions | Microwave, Grill, Combi, Weight/Time Defrost, Auto Menu (8 programs), Kitchen Timer, Clock, Quick Start |
| Microwave Power Levels | 5 levels: 10%, 30%, 50%, 80%, 100% |
| Automatic Programs | Pizza, Meat, Vegetables, Pasta, Potatoes, Fish, Drinks, Popcorn |
| Defrost | By weight (100-2000 g) or by time (max 95 min) |
| Child Lock | Yes (long press 3 s on Stop/Clear) |
| Warranty | 24 months |
| Included Accessories | Glass tray, support ring, drive shaft, grill grid |
| Electrical Class | Class I (grounded) |
| Maintenance and Cleaning | Clean with a damp cloth; avoid abrasives; use lemon to descale |
Frequently Asked Questions - MZ2310PG BLACK & DECKER
User questions about MZ2310PG BLACK & DECKER
0 question about this device. Answer the ones you know or ask your own.
Ask a new question about this device
Download the instructions for your Microwave Oven in PDF format for free! Find your manual MZ2310PG - BLACK & DECKER and take your electronic device back in hand. On this page are published all the documents necessary for the use of your device. MZ2310PG by BLACK & DECKER.
USER MANUAL MZ2310PG BLACK & DECKER
Your BLACK+DECKER MZ2310PG Microwave oven has been designed to heat appropriate foods & beverages using electromagnetic radiation.
Always check the suitability of ingredients before cooking.
This product is intended for consumer use only.
Thank you for choosing BLACK+DECKER. We hope that you will enjoy using this product for many years.
For indoor domestic household use only.
This appliance is not to be used in:
- Staff kitchen areas in shops, offices and other working environments;
- Farm Houses;
- By clients in hotels, motels and other residential type environments;
- Bed and breakfast type environments or any other non-household type environments.
Safety instructions

Warning! Read all safety warnings and all instructions. Failure to follow the warnings and instructions listed below may result in electric shock, fire and/or serious injury.
- Read all of this manual carefully before using the appliance.
- The intended use is described in this manual. The use of any accessory or attachment or the performance of any operation with this appliance other than those recommended in this instruction manual may present a risk of personal injury.
Warning! When using mains-powered appliances, basic safety precautions, including the following, should always be followed to reduce the risk of fire, electric shock and personal injury and material damage.
- The intended use is described in this manual. The use of any accessory or attachment or the performance of any operation with this appliance other than those recommended in this instruction manual may present a risk of personal injury.
- Retain this manual for future reference.
Important safety instructions. Read carefully and keep for future reference
Warning! If the door or door seals are damaged, the oven must not be operated until it has been repaired by a competent person.
Warning! It is hazardous for anyone other than a competent person to carry out any service or repair operation that involves the removal of a cover which gives protection against exposure to microwave energy.
Precautions to avoid possible exposure to excessive microwave energy
- Do not attempt to operate this oven with the door open since this can result in harmful exposure to microwave energy. It is important not to break or tamper with the safety interlocks.
- Do not place any object between the oven front face and the door or allow soil or cleaner residue to accumulate on sealing surfaces.
- If the apparatus is not maintained in a good state of cleanliness, its surface could be degraded and affect the lifespan of the apparatus and lead to a dangerous situation.
Warning! Liquids and other foods must not be heated in sealed containers since they are liable to explode.
- Do not overcook food.
- Do not use the oven cavity for storage purposes. Do not store items, such as bread, cookies, etc. inside the oven.
- Remove wire twist-ties and metal handles from paper or plastic containers/bags before placing them in the oven.
- Install or locate this oven only in accordance with the installation instructions provided
Metallic containers for food and beverages are not allowed during microwave cooking. - The microwave oven is intended for heating food and beverages. Drying of food or clothing and heating of warming pads, slippers, sponges, damp cloth and similar may lead to risk of injury, ignition or fire.
- If smoke is observed, switch off or unplug the appliance and keep the door closed in order to stifle any flames.
- This microwave oven is a free-standing unit & must not be built-in or placed in a cabinet.
- The oven must have sufficient air flow. To ensure good ventilation, a gap of 10 centimetres is required at the back, 15 centimetres at one side, 30 centimetres at the other side and 30 centimetres above.
- Product should not be installed any higher 900mm above floor level.
- Only use utensils that are suitable for use in microwave ovens.
- Never leave metal utensils in the Microwave.
- When heating food in plastic or paper containers, keep an eye on the oven due to the possibility of ignition.
- Microwave heating of beverages can result in delayed eruptive boiling therefore care must be taken when handling the container.
-
The contents of feeding bottles and baby food jars shall be stirred or shaken and the temperature checked before consumption, in order to avoid burns.
-
Eggs in their shell and whole hard-boiled eggs should not be heated in microwave ovens since they may explode, even after microwave heating has ended.
- The oven should be cleaned regularly and any food deposits removed.
- Failure to maintain the oven in a clean condition could lead to deterioration of the surface that could adversely affect the life of the appliance and possibly result in a hazardous situation.
- To protect against the risk of electric shock, DO NOT IMMERSE the appliance, cord set or plug in water or other liquids.
- The appliances are not intended to be operated by means of an external timer or separate remote-control system.
- Accessible parts may become hot during use. Young children should be kept away.
- Steam cleaner is not to be used.
- During use the appliance becomes hot. Care should be taken to avoid touching heating elements inside the oven.
- Only use the temperature probe recommended for this oven.
- Warning: The appliance and its accessible parts become hot during use. Care should be taken to avoid touching heating elements. Children less than 8 years of age shall be kept away unless continuously supervised.
- The rear surface of appliance shall be placed against a wall.
- The microwave oven must not be placed in a cabinet.
- Do not remove the feet from this product.
- Do not cook food directly on the glass tray. Always use a bowl or other container that is suitable for use in a microwave oven.
- Do not cover or block any openings on the appliance.
Using your appliance
- Do not operate any appliance with a damaged cord or plug, or after the appliance malfunctions, or is dropped or damaged in any manner. Return the complete appliance to your nearest authorised service facility form examination, electrical repair, mechanical repair or adjustment to avoid any hazard.
- Do not attempt to repair the appliance yourself; instead, take it to your BLACK+DECKER-owned or Authorised Service Centre for repair.
- The use of attachments or accessories not recommended or sold by this appliance manufacturer may result in fire, electric shock or personal injury.
- Do not let the cord hang over the edge of a table, counter, or touch hot surfaces.
-
Avoid touching hot surfaces, use handles and knobs.
-
Do not operate or place any part of this appliance on or near any hot surfaces (such as gas or electric burner or in a heated oven) or any appliance that generates steam.
- Do not abuse the cord. Never carry the appliance by the cord or yank it to disconnect it from the outlet; instead, grasp the plug and pull to disconnect.
- When using an extension cord with your appliance, make sure the extension cord is correctly wired, and rated for its use.
- The microwave oven should be placed on a flat stable surface which can hold the weight of the appliance and the heaviest of food likely to be cooked inside.
- Do not place any item on top of the oven.
- Do not place the oven where heat, moisture or high humidity are generated, or near combustible materials.
- Do not operate the microwave oven without the glass tray or roller support in their proper positions.
- Make sure that the power supply cord is undamaged and does not run under the microwave oven or over any hot or sharp surfaces.
- The power outlet this oven is connected to must be readily accessible so it can be easily unplugged if necessary.
- Do not operate the appliance when empty. This could damage the oven.
- Do not use the oven to store any items.
- Food surrounded by a membrane, such as egg yolks, potatoes, chicken livers, etc. must be pierced several times with a fork before cooking.
- Do not use metal pans or dishes with metal handles.
- Never place any item with a metal trim inside a microwave.
- Always remove twist-ties from any foods before operating the microwave.
- Some plastics are not suitable for use in a microwave. Always check the suitability of any item before use.
- Do not cook in a container with a restricted opening as they may explode if heated in a microwave oven.
- Conventional meat or candy thermometers must not be used in the oven. Only thermometers that are specifically made for microwaves should be used.
- Microwave utensils should be used only in accordance with the manufacturer's instructions.
- Do not attempt to deep-fry foods in this oven.
- Microwave ovens heat the food in a container and not the container itself. It is always necessary to check the temperature of the food to ensure it is correctly cooked.
- Always stir food to distribute the heat evenly and allow it to stand for a few minutes before consumption.
-
Containers used for cooking can become hot because of heat transferred from the heated food. Always use oven gloves when removing items from the oven.
-
If steam accumulates inside or around the outside of the oven door, wipe with a soft cloth. This may occur when the microwave oven is operated under high humidity conditions and in no way indicates malfunction of the unit.
- Do not use the appliance outdoors.
- Do not operate the appliance if your hands are wet. Do not operate the appliance if you are barefoot.
- If the power supply cord is damaged during use, disconnect the appliance from the power supply immediately. Do not touch the power supply cord before disconnecting from the power supply.
- Disconnect the appliance from the power supply when not in use and before cleaning.
Safety of others
- This appliance is not intended for use by persons (including children) with reduced physical, sensory or mental capabilities, or lack of experience and knowledge, unless they have been given supervision or instruction concerning use of the appliance by a person responsible for their safety.
Children should be supervised to ensure that they do not play with the appliance. - Do not allow children or any person unfamiliar with these instructions to use the appliance.
- Do not allow children or animals to come near the work area or to touch the appliance or power supply cord.
- Close supervision is necessary when the appliance is used near children.
After use
- Switch off and remove the plug from the socket before leaving the appliance unattended and before changing, cleaning or inspecting any parts of the appliance.
- When not in use, the appliance should be stored in a dry place. Children should not have access to stored appliances.
Electrical safety
Before use, check that the mains voltage corresponds to the voltage on the rating plate.
This product must be earthed. Always check that the mains voltage corresponds to the voltage on the rating plate
- Appliance plugs must match the outlet. Never modify the plug in any way.
-
Do not use any adapter plugs with earthed (Class 1) appliances. Unmodified plugs and matching outlets will reduce the risk of electric shock.
-
To avoid the risk of electric shock, do not immerse the cord, plug or motor unit in water or other liquid.
Extension cables & class 1 product
- A 3 core cable must be used as your tool is earthed and of class 1 construction.
- Up to 30m (100 ft) can be used without loss of power.
- If the supply cord is damaged, it must be replaced by the manufacturer or an authorised BLACK+DECKER Service Centre in order to avoid a hazard.
Labels on Appliance
The following pictograms along with the date code are shown on the appliance:
Warning! Hot surface.
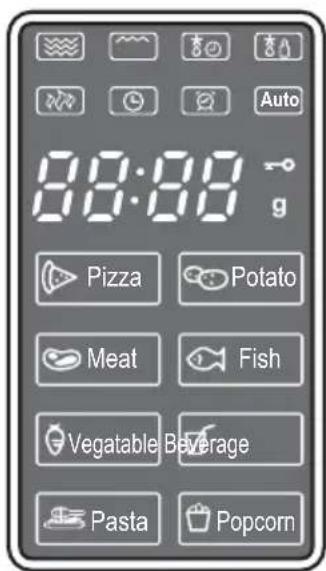
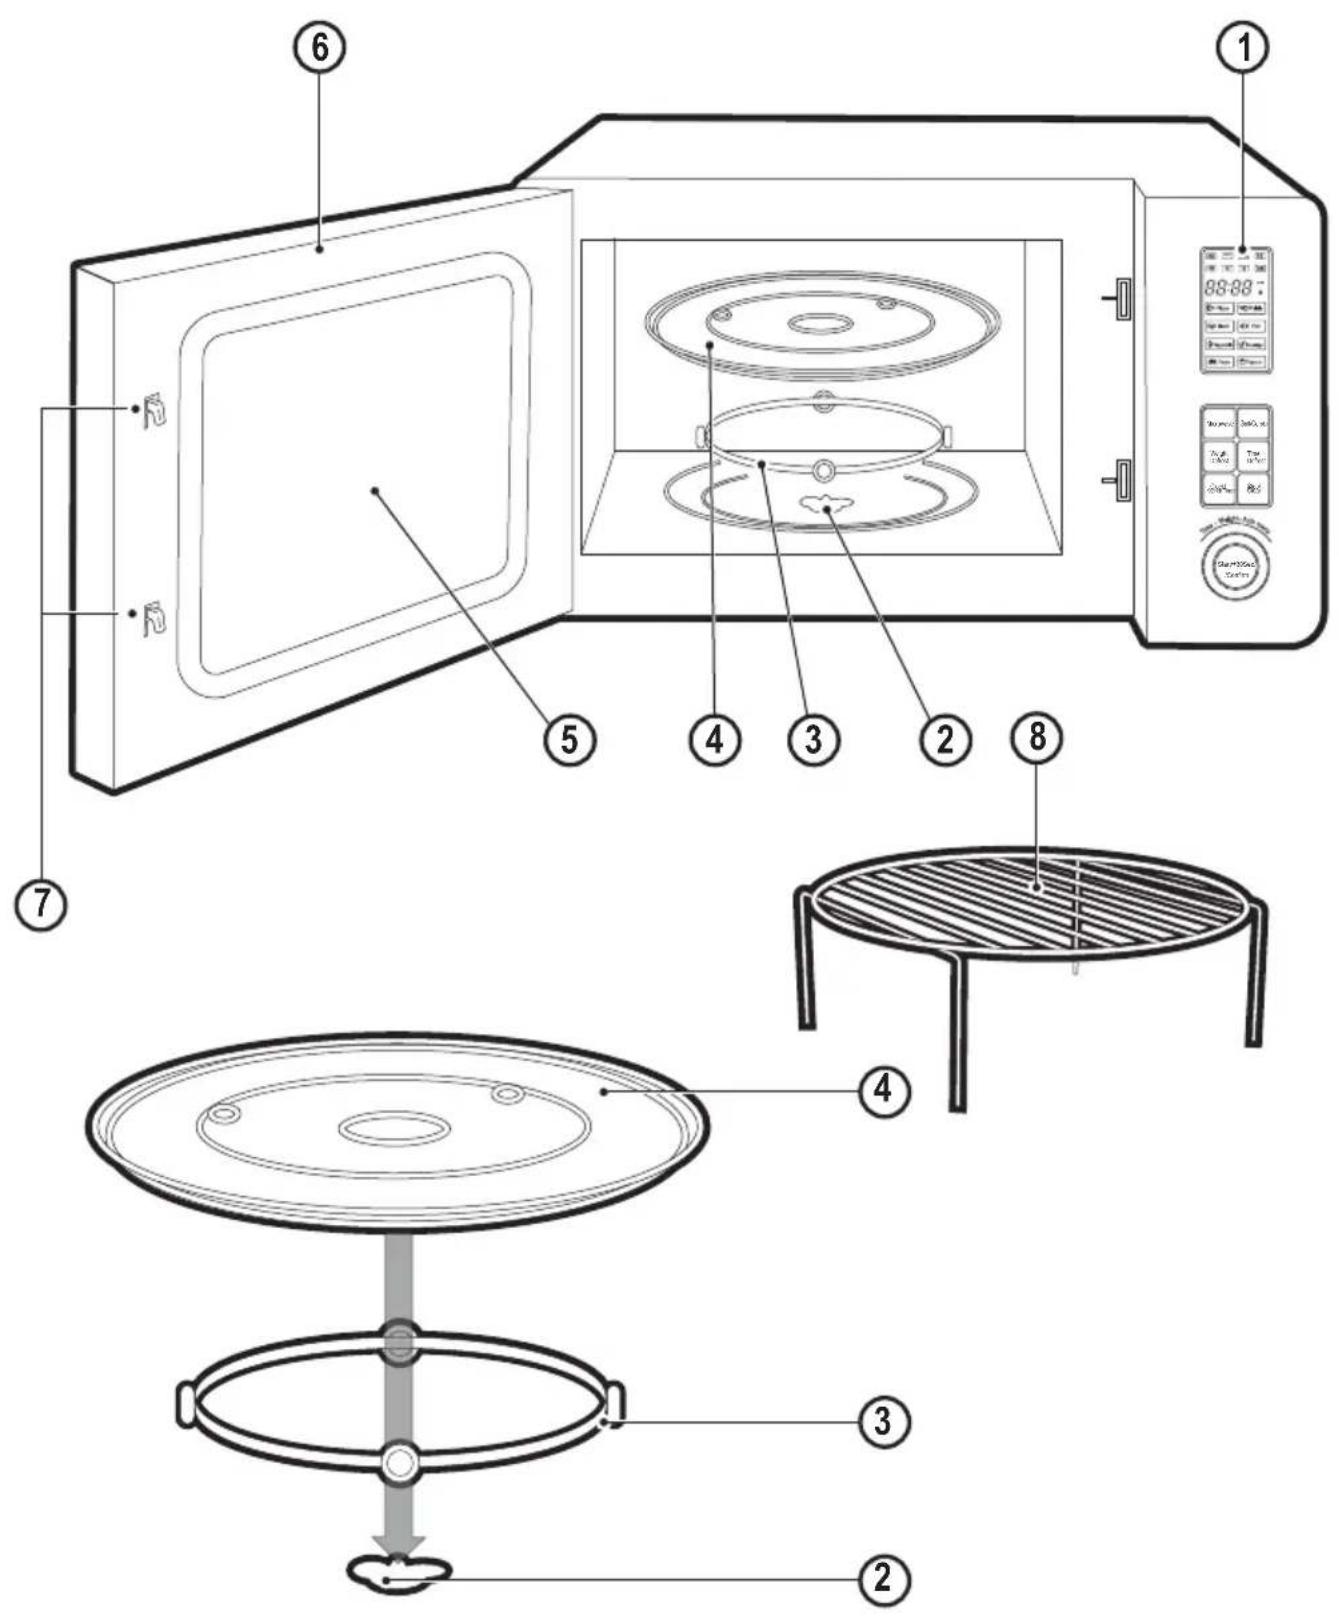
Features
- Control panel
- Turntable shaft
- Turntable ring assembly
- Glass tray
- Observation window
- Door assembly
- Safety interlock system
- Grill rack (only to be used in grill function and must be placed on the glass tray).
Unpacking
- Remove all packaging from the appliance.
- Inspect the oven after unpacking for any damage such as a misaligned or damaged door, door seals, dents or holes in the door window and screen, and any dents in the cavity. If any of these are seen, DO NOT use the oven.
Assembly
Warning! Before assembly, make sure that the appliance is switched off and unplugged.
- Place the appliance on a flat, even surface.
- Open the door (6) & place the turntable shaft (2) into the hole in the cavity base.
- Place the turntable ring assembly (3) into the grooves in the cavity.
- Align the glass tray (4) on top of the turntable ring assembly (3).
- Connect the appliance to a suitable electrical supply.
Use
Setting the clock
When the microwave oven is switched on, the screen will display "0:00" and the buzzer will ring once.
- Press "Clock/Kitchen Timer" once to select clock function, the hour figures will flash.
- Turn " to adjust the hour figures, the input time should be within 0--23.
- Press "Clock/Kitchen Timer", the minute figures will flash.
- Turn " to adjust the minute figures, the input time should be within 0--59.
- Press "Clock/Kitchen Timer" to finish clock setting.": will flash, and the time will light.
Note: If the clock is not set, the microwave will not function when powered.
Note: During the process of clock setting, if you press "Stop/Clear", the oven will go back to the previous status automatically.
Microwave cooking
Press "Microwave" the screen will display "P100". Press "Microwave" or turn "to choose the power you want, "P100", "P80", "P50", "P30" or "P10" will display for each added press.
- Then press "Start/+30Sec./Confirm" to confirm, and turn " " to set cooking time from 0:05 to 95:00. Press "Start/+30Sec./Confirm" again to start cooking.
For example: If you want to use 80% microwave power to cook for 20 minutes, you can operate the oven using the following steps:
- Press "Microwave" once, the screen displays "P100".
- Press "Microwave" once again or turn "to choose 80% microwave power.
- Press "Start/+30Sec./Conrm" to confirm, and the screen will display "P 80".
- Turn " " to adjust the cooking time until the oven displays "20:00".
Press"Start/+30Sec./Confirm"to start cooking
Note: The step quantities for the adjustment time of the coding switch are as follows:
Microwave pad instructions
| Order Display | by Microwave power |
| 1 P100 10% | |
| 2 P80 80% | |
| 3 P50 50% | |
| 4 P30 30% | |
| 5 P10 10% |
Grill or combi cooking
- Press "Grill/Combi" once, screen will display "G", then press "Grill/Combi" for times or turn the "C" to choose the power you want, and "G", "C-1" or "C-2" will display. Then press "Start/+30Sec./Confirm" to confirm, and turn "C" to set cooking time from 0:05 to 95:00. Press "Start/+30Sec./Confirm" again to start cooking.
For example: If you want to use 55% microwave power and 45% grill power(C-1) to cook for 10 minutes, you can operate the oven using the following steps:
- Press "Grill/Combi" once, the screen displays "G".
- Press "Grill/Combi" once again or turn "O" to choose combi. 1 mode.
- Press "Start/+30Sec./Confirm" to confirm, and the screen displays "C-1".
- Turn " to adjust the cooking time until the oven displays "10:00".
- Press "Start/+30Sec./Conrm" to start cooking.
Grill/Combi pad instructions
| Order | Display Micro | wave power Grill power | |
| 1 G | 0% 100% | ||
| 2 C-1 | 55% 45% | ||
| 3 C-2 | 36% 64% |
Note: When half the grill time passes, the oven will beep twice, this is normal. In order to maximise the grilling process, you should turn the food over, close the door, and then press "Start/+30Sec./Confirm" to continue cooking. If you should choose to ignore this however, the oven will continue cooking.
Quick start
- In waiting state, press "Start/+30Sec./Confirm" to start cooking with 100% power for 30 seconds, each added press will increase by 30 seconds cooking time up to 95 minutes.
- In microwave, grill and combination cooking or time defrost state, each press of "Start/+30Sec./Confirm" adds 30 seconds of cooking time.
- In waiting state, turn " left to set cooking time with 100% microwave power, then press " Start/ +30Sec./Confirm" to start cooking.
Defrost by weight
- Press "Weight Defrost" once, and the oven will display "dEF1".
- Turn " to select the weight of food from 100 to 2000 g.
- Press "Start/+30Sec./Confirm" to start defrosting.
Defrost by time
- Press "Time Defrost" once, and the oven will display "dEF2".
- Turn " to select the defrost time. The MAX time is 95 minutes.
- Press " Start/+30Sec./Confirm " to start defrosting. The defrost power is P30 , and it cannot be changed.
Kitchen timer
- Press "Clock/Kitchen Timer" once, screen will display 00:00, clock indicator will light.
- Turn " " to enter the correct time.(The maximum cooking time is 95 minutes).
- Press "Start/+30Sec./Confirm" to confirm setting, the clock indicator will light up.
- When the kitchen time is reached, the clock indicator will go out. The buzzer will ring 5 times. If the clock has been set for the 24-hour system, the screen will display the current time.
Note: The kitchen timer is different from the 24-hour system.
Auto menu
- Turn " " right to choose the menu, and "A-1" to "A-8" will display, which means pizza, meat, vegetable, pasta, potato, fish, beverage and popcorn.
Press "Start/+30Sec./Confirm" to confirm. - Turn " "to choose the default weight as shown on the menu chart.
- Press "Start/+30Sec./Confirm" to start cooking.
For example: If you want to use "Auto Menu" to cook 350g of fish.
- Turn " clockwise till "A-6" displays.
- Press "Start/+30Sec./Confirm" to confirm.
- Turn " " to select the weight of fish till "350" displays.
- Press "Start/+30Sec./Confirm" to start cooking.
Auto menu chart
| Menu Weight | Display | |
| A-1 Pizza | 200g 200 | |
| 400g 400 | ||
| A-2 Meat | 250g 250 | |
| 350g 350 | ||
| 450g 450 | ||
| A-3 Vegetables | 200g 200 | |
| 300g 300 | ||
| 400g 400 | ||
| A-4 Pasta | 50g (with 450 ml cold water) | 50 |
| 100g (with 800 ml cold water) | 100 | |
| A-5 Potato | 200g 200 | |
| 400g 400 | ||
| 600g 600 | ||
| A-6 Fish | 250g 250 | |
| 350g 350 | ||
| 450g 450 | ||
| A-7 Beverages | 1 cup(120 ml) 1 | |
| 2 cups(240 ml) 2 | ||
| 3 cups(360ml) 3 | ||
| A-8 Popcorn | 50g 50 | |
| 85g 85 | ||
| 100g 100 |
Multi-section cooking
2 sections of the appliance can be set for separate functions.
For example: If you want to defrost food for 5 minutes and then cook with 80% microwave power for 7 minutes:
- Press "Time Defrost" once, and the oven will display "dEF2".
- Turn " " to select the defrost time till "5:00" displays.
- Press "Microwave" once, the screen display "P100".
- Press "Microwave" once again or turn " "to choose 80% microwave power.
- Press "Start/+30Sec./Confirm" to confirm and the screen displays "P80".
- Turn " to adjust the cooking time till the oven displays "7:00".
- Press "Start/+30Sec./Confirm" to start cooking, the buzzer will sound once for the first phase and the defrosting time will count down, the buzzer will sound once again to indicate the appliance is entering the second cooking phase. When cooking finishes the buzzer will sound five times.
Child lock function
To Lock: Press "Stop/Clear" for 3 seconds, there will be a long beep denoting that the appliance is entering the child lock state, the current time will display if the time has been set, otherwise, the screen will display "C-3".
To Unlock: Press "Stop/Clear" for 3 seconds, there will be a long "beep" denoting that the lock is released.
Troubleshooting
| Trouble Possible Cause Solution | ||
| Microwave oven interferes with T.V. reception. | Radio and T.V. reception may be interfered with when operating the oven. This is similar to the interference of small electrical appliances, like mixers, vacuum cleaners and electric fans. | This is normal. |
| Dim oven light. In low power microwave cooking, oven light may become dim. | This is normal. | |
| Steam accumulating on door, hot air escaping from vents. | In cooking, steam may escape from food. Most will escape through the vents, but some may accumulate on cool places like the oven door. | This is normal. |
| Oven will not start. | Power cord not connected properly. Fuse blown. Trouble with outlet. | Unplug the power cord. Then plug in again after 10 seconds. Replace fuse and reset circuit breaker. Test outlet with other electrical appliance. |
| Oven will not heat Dood not closed properly | Close door properly | |
| Glass turntable makes noise when microwave is in operation. | Dirt has accumulated on turntable rollers. | Refer to 'Cleaning and Maintenance' section on cleaning parts. |
Materials you can use in microwave oven
| Utensil Remarks | |
| Aluminium foil. Shielding only. Small smooth pieces can be used to cover thin parts of meat or poultry to prevent overcooking. Arcing can occur if foil is too close to oven walls. The foil should be at least 1 inch (2.5cm) away from oven walls | |
| Utensil Remarks | |
| Browning dish. Follow | ow manufacturer's instructions. The bottom of the browning dish must beat least 3/16 inch (5mm) above the turntable. Incorrect usage may cause the turntable to break. |
| Dinnerware. Microwave | ave-safe only. Follow manufacturer's instructions. Do not use cracked or chipped dishes. |
| Glass jars. Always remove lid. Use only to heat food until just warm. Most glass jars are not heat resistant and may break. | |
| Glassware. Heat-resistant oven glassware only. Make sure there is no metallic trim. Do not use cracked or chipped dishes. | |
| Oven cooking bags. Follow manufacturer's instructions. Do not close with metal tie. Make slits to allow steam to escape. | |
| Paper plates and cups | Use for short-term cooking/warming only. Do not leave oven unattended while cooking. |
| Paper towels Use to cover food for reheating and absorbing fat. Use with supervision for short-term cooking only. | |
| Parchment paper Use as a cover to prevent splattering or a wrap for steaming. | |
| Plastic Microwave-safe only. Follow the manufacturer's instructions. Should be labelled "Microwave Safe". Some plastic containers soften, as the food inside gets hot. "Boiling bags" and tightly closed plastic bags should be slit, pierced or vented as directed on package. | |
| Plastic wrap Microwave-safe only. Use to cover food during cooking to retain moisture. Do not allow plastic wrap to touch food | |
| Thermometers Microwave-safe only. | |
Materials to be avoided in microwave oven
| Utensil Rema | ks |
| Aluminium tray. May | cause arcing. Transfer food into microwave-safe dish. |
| Food carton with metal handle. | May cause arcing. Transfer food into microwave-safe dish. |
| Metal or metal-trimmed utensils. | Metal shields the food from microwave energy. Metal trim may cause arcing. |
| Metal twist ties. May | cause arcing and could cause a fire in the oven. |
| Paper bags. May | use a fire in the oven. |
| Plastic foam. Plastic | foam may melt or contaminate the food inside when exposed to high temperature. |
| Utensil | Remarks |
| Wood. | Wood will dry out when used in the microwave oven and may split or crack |
Cleaning and maintenance & storage
Warning! Before cleaning and maintenance, switch the appliance off and remove the plug from the socket.
Warning! Do not immerse the appliance or the cord set or the plug in water or any other liquid.
- Clean the cavity of the oven after using with a slightly damp cloth.
- Clean the accessories in the usual way in soapy water.
- The door frame and seal and neighbouring parts must be cleaned carefully with a damp cloth when they are dirty.
- Do not use harsh abrasive cleaners or sharp metal scrapers to clean the oven door glass since they can scratch the surface, which may result in shattering of the glass.
- Do not use solvents or other corrosive chemicals or vapours for cleaning this appliance.
- Cleaning Tip! For easier cleaning of the cavity walls that the cooked food may come in to contact with: Place half a lemon in a bowl, add 300ml (1/2 pint) water and heat on 100% microwave power for 10 minutes. Wipe the oven clean using a soft, dry cloth.
Mains plug replacement
If a new mains plug needs to be fitted:
- Safely dispose of the old plug.
- Connect the brown lead to the live terminal of the new plug.
- Connect the blue lead to the neutral terminal.
- If the product is class I (earthed), connect the green / yellow lead to the earth terminal.
Warning! If your product is class II double insulated (only 2 wires in the cord set), no connection is to be made to the earth terminal.
Follow the fitting instructions supplied with good quality plugs. Any replacement fuse must be of the same rating as the original fuse supplied with the product.
Protecting the environment

Separate collection. This product must not be disposed of with normal household waste.
Should you find one day that your Black+Decker product needs replacement, or if it is of no further use to you, do not dispose of it with other household waste. Make this product available for separate collection.
- Black+Decker provides a facility for recycling Black+Decker products once they have reached the end of their working life. This service is provided free of charge. To take advantage of this service please return your product to any authorised repair agent who will collect them on our behalf.
- You can check the location of your nearest authorised repair agent by contacting your local Black+Decker office at the address indicated in this manual. Alternatively, a list of authorized Black+Decker repair agents and full details of our after-sales service and contact are available on the Internet at: www.2helpU.com.
Technical data
| MZ2310PG | ||
| Rated voltage V | AC | 230 ~ 50Hz |
| Rated Input Power(Microwave) W | 1250 | |
| Rated Output Power(Microwave) W | 800 | |
| Rated Input Power(Grill) W 1000 | ||
| Oven Capacity L 23 | ||
| Turntable Diameter mm Ø270 | ||
| External Dimensions mm 485 x 4 | 405 x 2 | 93 |
| Net Weight | Kg | Approx.14 |
Warranty
Black+Decker is confident of the quality of its products and offers an outstanding warranty.
This warranty statement is in addition to and in no way prejudices your statutory rights.
The warranty is valid within the territories of the Member States of the European Union and the European Free Trade Area.
If a Black+Decker product becomes defective due to faulty materials, workmanship or lack of conformity, within 24 months from the date of purchase, Black+Decker warranty to replace defective parts, repair products subjected to fair wear and tear or replace such products to ensure minimum inconvenience to the customer unless:
The product has been used for trade, professional or hire purposes;
The product has been subjected to misuse or neglect;
The product has sustained damage through foreign objects, substances or accidents;
Repairs have been attempted by persons other than authorised repair agents or Black+Decker service staff.
To claim on the warranty, you will need to submit proof of purchase to the seller or an authorised repair agent. You can
check the location of your nearest authorised repair agent by contacting your local Black+Decker office at the address indicated in this manual.
Alternatively, a list of authorised Black+Decker repair agents and full details of our after-sales service and contacts are available on the Internet at: www.2helpU.com.
Usage prévu
J 1 J 1 J 1 J 1 J 1 J 1 J 1 J 1 J 1 J 1 J 1 J 1 J 1 J 1 J 1 J 1 J 1 J 1 J 1 J 1 J 1 J 1 J 1 J 1 J 1 J 1 J 1 J 1 J 1 J 1 J 1 J 1 J 1 J 1 J
aJ 1
Jilwggg 111111111111111
Jellall jlll jgjll lllll 1 jlll yj
Jolaoabaiyloaioo cooiuui jjll aee
y1y2y_3 = 4
Lallalaiellalaiiallaiall
aalbllgajabwllaaalal
Lao 1
C. 1,2,3 , 4,5,6 , 7,8
J 1
y_( 1) = 9x
j j 1
Joo
21b j0% 11 gle lglll jwglall no (21y/1)
Lio 1000 1000 1000
LaLacLcL JLaJab
J
y
1
J 1
dlll jssy (s) 1jll jll
1
y) jjj 1000000000000000000000000000000000000000
Lgio 1 Juaa y. (bui juii jiajy Juiu
在 Rt ABN 中:
aagaaagaaagaaagaaagaaagaaagaaagaaagaaagaaagaaagaaagaaagaaagaaagaaagaaagaaagaaagaaagaaagaaagaaagaaagaaagaaagaaagaaagaaagaaagaaagaaagaaagaaagaaagaaagaaagaaagaa
"le biai.90... 11...0 iio gabll
1 1
a1b j0%00 p1jzwl g a jll jla g:Jlall J
1.3531.3520 6811(1-C)241124112411241124112411
ailllglbsllpsswjll jssu
"G" "Grill/Combi"
J"Grill/Combi"
1 1
ailllll 1
C
a
a 1
Grill/Combi
| طالعربية | طالعيلة | الإستعمال | الترجمة |
| \( \% \cdot \cdot \cdot \) | \( \% \cdot \) | G | \ |
| \( \% \cdot \cdot \cdot \) | \( \% \cdot \cdot \) | \( \neg -C \) | \( \neg \) |
| \( \% \cdot \cdot \cdot \) | \( \% \cdot \cdot \) | \( \neg -C \) | \( \neg \) |
"gws/olz!" 1c baiall jie, aclll buo ayloc sliz: a
1
gall
"Microwave"
Microwave"P
"Po·"pPw·"pP1
a#l a#i #ie 1e "P"
" 1
100 100
S ADB = S ADE = 12 × 12 × 3 × 4 = 6
jpaIabll aiaial aoiaiawal abai jao bai jai
假设 S1 = S2 = S3 = ·s = Sn
gssall gai jiu wui jao jie zui uall jgal
oluii iie jnie (jao joi oia jai
pJy jiei i 1
.
a 1
e gglgglgglgglgglgglgglgglgglgglgglgglgglgglgglgglgglgglgglgglgglgglgglgglgglgglgglgglgglgglgglgglgglgglgglgglgglgglgglggl
slll plabll jyjg jn jnnnll lssuall
1
gll jnssal g wglwlll aerall pabll lai
Lulululul
Jellil aissu wll aousswll 5
jlll lssl. jlll lalll
J 1
yIyI yIyI yIyI yIyI yIyI yIyI yIyI yIyI yIyI yIyI yIyI yIyI yIyI yIyI yIyI yIyI yIyI yIyI yIyI yIyI yIyI yIyI yIyI yIyI yIyI yIyI
.
- + = 2, · = - | | · | | .
jgljgall jas 2. jahcdo ell jss loie jglal jas
jll jla lalil 1111111111
Jc 1 Jc 1 1 1 1 1 1 1 1 1 1 1 1 1 1 1
S BCD = S COD + S BDO - S BOC
1
jzj 1
zssssll 1jssll gss jolssll cssssll paaa jzjgall
jlll lal yallg ailll g ailll alllg ailll
jIbI 1J Ie JI JI (JIbJI)
Jgssssssssssssssssssssssssssssssssssssssssssssssssssssssssssssssssssssssss
p_1 = 2k
jolal jolal Jilb 100
oia gle glba jaoi w jilabW clawll pae
l2 = ( l1 + 2) - ( l_2 + 3)
aalgljlll jko no aolilgaiy Llaigaiy g JlsbK
a
Jlalb11 jso jI So jIg2ll Jiaui Jie oui
1
jglld jglslgllg jglglal
aai jia jia jia jia jia jia jia jia jia jia jia jia jia jia jia jia jia jia jia jia jia jia jia jia jia jia jia jia jia jia jia
Jieb1 Jglio 1yj
jLgall jgsll jSs yll gJgJgJgJg
aalall aal 2
j 1 j 1 j 1 j 1 j 1 j 1 j 1 j 1 j 1 j 1 j 1 j 1 j 1 j 1 j 1
jaiwlu:
blll joljolll lll
111111111111111111
iioi iioi iioi iioi iioi iioi iioi iioi iioi
aaggall jglwllllo
Lgbi jgljglal lglal
jLJI pJ
jai jai iui, dji jie yu, jia jia jia jia jia jia
jlll lgl: ggs ygill aagillllaaal
[\left| {g + 1}\right| = 1]
gdllllgljglal jla gdlllplz
aalw lalwlll 1e alol alol o
山
Jg 1
jlllco puiuuiuuiu 1
iSg jsiuog sbo 1e aegsall jj g
JalaJIaJbJaJaaallpaJIaJIgJ4JIJJJagJaa
jllgssie
g 11000000000000000000000000000000000000000
jzU 1yLilgo jno yjllgulge y
aJg aalal aall aag gagggssll
Lolauuuaall uall sLo 1
J 1
Jg jw bW gcl Jg
algusuilln 1sAsSas
J 1 J 2 J 3 J 4 J 5 J 6 J 7 J8
1
blalj jia jia jia ablaa aab
1.426b.1 = 32.1 = 52.1 = 12
2a 2
aagaaal jaiiaeaiaiaiaiaiaiaiaiaiaia
jai jisalil 1 jglallll jie blaal pll
aie piny Lao jqll goljbs Jallgic jgyabwdd
a a a a a a a a a a a a a a a a a a a a
i 1 Sall
p^a + 1 x^b - y^z
juc jus 2. jus jus jus jus jus jus jus jus
jll
1/2a 2000
a 1
sill lalil bgs bbs 150
a.
JL 1
它恰好 x,y 帧 y = kx + 1
bia jlll jjiall Jaauiu
jL11i
Jalllalwglgillsalljgallo Jlaxllbblio
S = 12 × 2t = 12 × 42
yllj
Jolololaljulld Joo
(5)
Slo
aXwll Lalee
S OBC = S ABC + S_ BOC
aillglll
g aaii j sao oia iiaa gall aoal lalai
g 1/2
1
jll jie jie jie jie jie jie jie jie jie
aio jglal pai gll plil 1jlll
jglal 0g jgsall gaa a2a glalcs
slll lgs 100gaiall j 8j 11
J 1
aleyloisj yil jy 11 jy jiei j
aalal jaiall jiaill jaiil aaill lblai
aoyoadd aggysall
jSooaI 1gao 1gao jJai
Names & Addresses for Black & Decker Service Concessionaries
ALGERIA: Sarl Outillage Corporation, DW, B&D Pet, HHD, 08, Rue Med Boudiaf (ex TELLA Achen) Cheraga, Alger, Tel: 00213-0-21375130/ 00213-0-21375131, Fax: 00213-0-21369667, Email: hakim.merdjadi@outillage-dz.com;
nefissa. merdjadi@outillage-dz.com; sidahmed.merdjadi@outillage-dz.com. AZERBAJAN: Kontakt - NN LLC, HHD, M.Qashqay 43, Baku Azerbaijan Az1000, Tel: 00994 12 408 20 50, Mob: +994503442204, Fax: 00994 12 411 70 90, eganjaly@hotmail.com. BAHRAIN: Alfouz Services Co. WLL, Tubli, DW, B&D PET, HHD, P.O. Box 26562, Tubli, Manama, Tel: +973-17783562/ 17879987, Fax: 17783479, Email: alfouz@batelco.com.bh. EGYPT: Anasia Egypt for Trading S.A.E. (Mentreade), HHD, P.O. Box 2443, 9, Mostafa Refaat Street, Sheraton Heliopolis 11361, Cairo, Tel: 00202 22684159, Fax: 00202 22684169, Email: wael.salah@anasia.com; nevien.elbeshbishy@anasia.com. ETHIOPIA: Seif Tewfik Sherif, DW, B&D PET, HHD, Arada Sub City, Kebele 01/02, Global Insurance Bldg, 2nd Flr, Room 43, P.O. Box 2525, Addis Ababa, Tel: 00-251-11-1563968/ 1563969, Fax: 00-251-11-1558009, Email: seif@ethionet.et; nawanag@ethionet.et; seifudint@hotmail.com. IRAQ: Financial Links, B&D PET, HHD, Kazzaz Building Arasat Al-Hindia, Block No: 629, Street: 31, Building No: 1, Baghdad, Iraq, Tel: 00964-(0)780-195-2223/ +964-(0)781-3763044, Email: info@financiallinks-truevalue.com. JORDAN: Bashiti Hardware (Palestine), B&D pet, HHD,"93 King Abdullah, 2nd St., Opp ELBA House, P.O. Box 3005, Amman 11953, Tel: 00962-6-5349098, ext.11, Fax: 00962-6-5330731, Email: manal@bashithardware.com; info@bashithardware.com;
rami@bashithardware.com. KENYA: Zylog Enterprises Ltd. (T/A Leading Concepts), HHD, IPS Building,Kaunda Street, P.O. Box 40877-00100, Nairobi, Tel: 00254-20-6905000, Fax: 00254-20-6905111, Email: admin@alibhaishariff.co.ke; leading@alibhaishariff.co.ke; info@alibhaishariff.co.ke. LEBANON: Aces Service Centre (Est. F.A.Ketaneh SA), HHD, P.O. Box 90-102, Nahr El Mot, Seaside Highway, Pharaon Building, Beirut, Tel: 00961-1-898989/ + 961-(1)-262626, Fax: 0096-1-1245880, Email: Nissrine.haji@aces.com.lb; Nassim.aziz@aces.com.lb; Johnny.sailian@aces.com.lb; Paul.tahan@aces.com.lb. LIBYA: North Africa Trading (El Ghoul Brothers), DW, B&D Pet, HHD, P.O. Box 348, 7 October Street 11, Benghazi, Tel: 00218-061-3383994, Fax: 00218-092-7640688, Email: nagte.ly@gmail.com; CC: nagte.dpt@gmail.com; elghol@technpower.com. North Africa Trading ( El Ghoul Brothers), DW, B&D Pet, HHD, AlBarniq Dewalt Center, Mokhazin-elsukar St., ElFallah, Tripoli, Tel: 00218-021-3606430, Fax: 00218-092-6514813, Email: nagte.ly@gmail.com; cc: (nagte.dpt@gmail.com; elghol@technpower.com. Homeworld Co., HHD, Senidal St. Amr Ibn Elaaas Road, Benghazi, Libya, P.O. Box 18182, Salmany, Tel: 00218-61-9094183, ext. 103, Fax: 00218.61.9094123, ext. 108, Email: nagte.ly@gmail.com. MAURITIUS: J.M. Goupille & Co.Ltd. The Brandhouse Ltd., HHD, Rogers Industrial Park 1, Riche Terre, Mauritius, Tel: 00230-2069450/ +230-207-1700, Fax: 00230-2483188/ 00230-2069474, Email: claims service centre@goupille.mu; stephanie.bijou@gmail.com; beatrice.li@gmail.com; sharon.laprovidence.img@gmail.com, tim.moszuti@goupille.mu; Cc.
Jfrancois.dromart@goupille.mu; mario.catherine@goupille.mu; gerard.gouges@goupille.mu. MOROCCO: UATS, HHD, "No. 37, Lotissement KADIRIA, km 10 Route, Eljadida, LISASSFA, Casablanca, Morocco, Tel: 00212-522652602, Fax: 00212-522652603, Email: farah1406@yahoo.fr; noureddine.uats@gmail.com. OMAN: Oman Marketing & Service Co.(Omasco), Wattayah/ Muscat, HHD, B&D PET, P.O. Box 2734, Behind Honda Showroom, Wattayah, Oman, Tel: +968 24560232/ 24560255, Fax: 24560993, Email: npservice@omasco.com.om; Cc. ashok.balan@omasco.com.om, damodaran pillai@omasco.com.om; unnikrishnan@omasco.com.om. Oman Marketing & Service Co.(Omasco), Sohar, HHD, B&D PET, Al Ohi, Sohar, Oman, Tel: +968 26846379, Fax: 26846379, Email: sooraj.neeran@omasco.com.om. Oman Marketing & Service Co.(Omasco), Salalah, HHD, B&D PET, Sanaya, Salalah, Oman, Tel: +968 23212290, Fax: 23210936, Email: rajagopal.pr@omasco.com.om. Omar Mohammed Ali Bawain Trading Co., Salalah, Al-Awqadain, PC 217, P.O.Box 112, Salalah, Sultanate of Oman, Tel: +968 23214874, Fax: 23214874/ 23211878, Email: jthin@omartrad.com. PAKISTAN: Ammar Service & Spares, B&D PET, HHD, Office No 6068, 6th Floor Central Plaza, Behind Gul Plaza Marston Road, Karachi, Tel: 0092-21-32426905/ 021-32775252, Fax: 0092-21-32427214, Email: babji93@yahoo.com. QATAR: Al MUTFah Service Centre, Doha, HHD, B&D PET, Al Wakrah, Road, P.O. Box 875, Doha, Qatar, Tel: +974 44650880/ 44650110/ 44446868, Fax: 44441415/ 44662599, Email: service@almuftah.com; almuftah@almuftah.com. SAUDI ARABIA: Fawaz Ebrahim Al Zayani Trading Est., Dammam, DW, B&D PET, HHD, P.O. Box 76026, Al Raka: 31952, Tel: +966-3-8140914, Fax: 8140824, Email: dewaltdammam@hotmail.com; (vinoderakatyil@yahoo.com); Website: www.fawazalzayanigroup.com. Fawaz Ebrahim Al Zayani Trading Est., Makkah, DW, B&D PET, HHD, 4753-Wali Alashed, Makkah, 9130-24353 Tel: +966-12-8140914/ 581121778, Fax: 128140914, Email: meraj2515@gmail.com. Banaja Trading Co. Ltd., Riyadh, HHD, P.O. Box 566, Riyadh-11421, Tel: +966-1-4124444, Fax: 4033378, Email: jjophilip@hotmail.com. Banaja Trading Co. Ltd., Jeddah, HHD P.O. Box 366,Jeddah-21411Tel:+966-2-6511111,Fax: 6503668 Email: afouad@banaja.com; ijophilip@hotmail.com. SOUTH AFRICA: Benray Tool Wholesalers C.C., B&D PET, HHD, 460 Koeberg Road Cape Town South Africa Tel: 021-551-7244Fax: 021-552-6395 Email: dewaltct@benray.co.za.Stanley Black & Decker-RSA,BED,PET,HHD 199 Winze Drive Stormill Ext 9 Roodepoort Tel:(271) 472-0454Fax:(271) 472-0482Email: service@sbdinc.co.za; vincent.roets@sbdinc.co.za; jacquesvincent.roets@sbdinc.com. SRI LANKA: Delmege Forsyth & Co. Ltd., DW,B&D Pet,HHD,Delmege Forsyth & Co.Ltd,Lifestyle Cluster, 101,Vinayalankara Mawatha Colombo 10,Sri LankaTel:+94-11-2688462/+94-11-2 Email:dgeservice@delmege.com; Samith.lifestyle@delmege.com cc: Jayantha.lifestyle@delmege.com. TUNISIA:Societe Tunisienne De Maintenance (STM), B&D Pet, HHD,Rue De La Physique.Nouvelle Zone Industrielle Ben Arous 2013 Ben Arous,TUNISIA.Tel:+216-79-389687,Fax:+216-71-385154 Email: importa@stqu.com.UAE: (Abu Dhabi) Galaxy Equipment Trading Abu Dhabi DW,B&D PETHHD,Madinath Zayed (Baada Zaid), Abu Dhabi P.C. 58910Tel:+971-2-8844279Fax:8844297Email: galaxyeq@eim.ae; galaxyeq@emirates.net.ae.Light House Electrical,Abu Dhabi,DW,B&D PET,HHD,P.O.Box 120,Abu Dhabi,Tel:+971-2-6726131Fax:6720667Email: dewalt_lhe@hotmail.com Light House Electrical MusaffahDW,B&D PETHHD,P.O.Box 120,Abu Dhabi,Tel:+971-2-5548315Fax: 5540461 Email: dewalt_lhe@hotmail.com. (Al Ain) Zillion Equipment and Spare Parts Trading LLC.Al Ain,DW,B&D PET,HHD,P.O.Box 19740Opp.Bin Sadal/ Trimix Redymix Sanaiya,AI Ain Tel:+971-3-7216690Fax:7216103Email: zilliontrdg@gmail.com. (Dubai) BLACK & DECKER (OVERSEAS) GmbH,Dubai,DW,B&D PET,HHD,P.O.Box 5420DubaiTel:+971-4-8127400/ 8127406Fax: 2822765Email service.mea@sbdinc.com. (Ras Al Khaimah) Mc Coy Middle East LLC,Ras Al Khaimah,DW,B&D PET,HHD,P.O.Box 10584,Ras Al KhaimahTel:+971-7-2277095Fax: 2277096,Email:mccoyrak@gmail.com. (Sharjah) Mc Coy Middle East LLC SharjahDW,B&D PET,HHD,P.O.Box 25793SharjahTel:+971-6-5395931Fax:5395932Email:mccoy@emirates.net.ae; mccoydewalt@gmail.com.UGANDA Anisuma Investment & Service Ltd. (Jacky's Electronics), HHD,J.R Complies Ware house No.5 Plot No.101. 3rd Industrial Area,Jinja Rd,KampalaTel:00256-414237106Mob:00256 779429501 Email
ha.service.uganda@anisuma.com. YEMEN: Middle East Trading Co. (METCO) DW, B&D Pet, HHD, 5th Flr. Hayel Saeed Anam Bldg. Al-Mugamma St. Taiz, Yemen, Tel: +00967-4-213455, Fax: 00967-4-219869, Email: metco@metcotranding.com; sami@metcotranding.com. Middle East Trading Co. (METCO) DW, B&D Pet, HHD, Mualla Dakka, Aden, Tel: 00967-2-222670, Fax: 00967-2-222670, metco@metcotranding.com; sami@metcotranding.com. Middle East Trading Co. (METCO), DW, B&D Pet, HHD, Hayel st., Sana'a, Yemen, Tel: 00967-1-204201, Fax: 00967-1-204204, Email: metco@metcotranding.com; sami@metcotranding.com.

WARRANTY REGISTRATION CARD
YOUR NAME
YOUR ADDRESS
POSTCODE
DATE OF PURCHASE
DEALER'S NAME & ADDRESS/

- Safety instructions
- Important safety instructions. Read carefully and keep for future reference
- Precautions to avoid possible exposure to excessive microwave energy
- Using your appliance
- Safety of others
- After use
- Electrical safety
- Extension cables & class 1 product
- Labels on Appliance
- Features
- Unpacking
- Assembly
- Use
- Setting the clock
- Microwave cooking
- Grill or combi cooking
- Quick start
- Defrost by weight
- Defrost by time
- Kitchen timer
- Auto menu
- Multi-section cooking
- Child lock function
- Cleaning and maintenance & storage
- Mains plug replacement
- Protecting the environment
- Warranty
- Usage prévu
- J
- Grill/Combi
- jzj 1
- 1
- jLJI pJ
- Names & Addresses for Black & Decker Service Concessionaries
- WARRANTY REGISTRATION CARD
Brand : BLACK & DECKER
Model : MZ2310PG
Category : Microwave Oven