Jet Stream 2 JS5000T - Oven Nesco - Free user manual and instructions
Find the device manual for free Jet Stream 2 JS5000T Nesco in PDF.
User questions about Jet Stream 2 JS5000T Nesco
0 question about this device. Answer the ones you know or ask your own.
Ask a new question about this device
Download the instructions for your Oven in PDF format for free! Find your manual Jet Stream 2 JS5000T - Nesco and take your electronic device back in hand. On this page are published all the documents necessary for the use of your device. Jet Stream 2 JS5000T by Nesco.
USER MANUAL Jet Stream 2 JS5000T Nesco
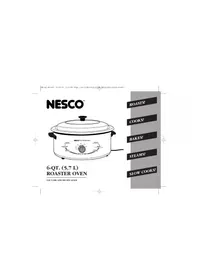
NESCO American American Harvest Jet Stream 2
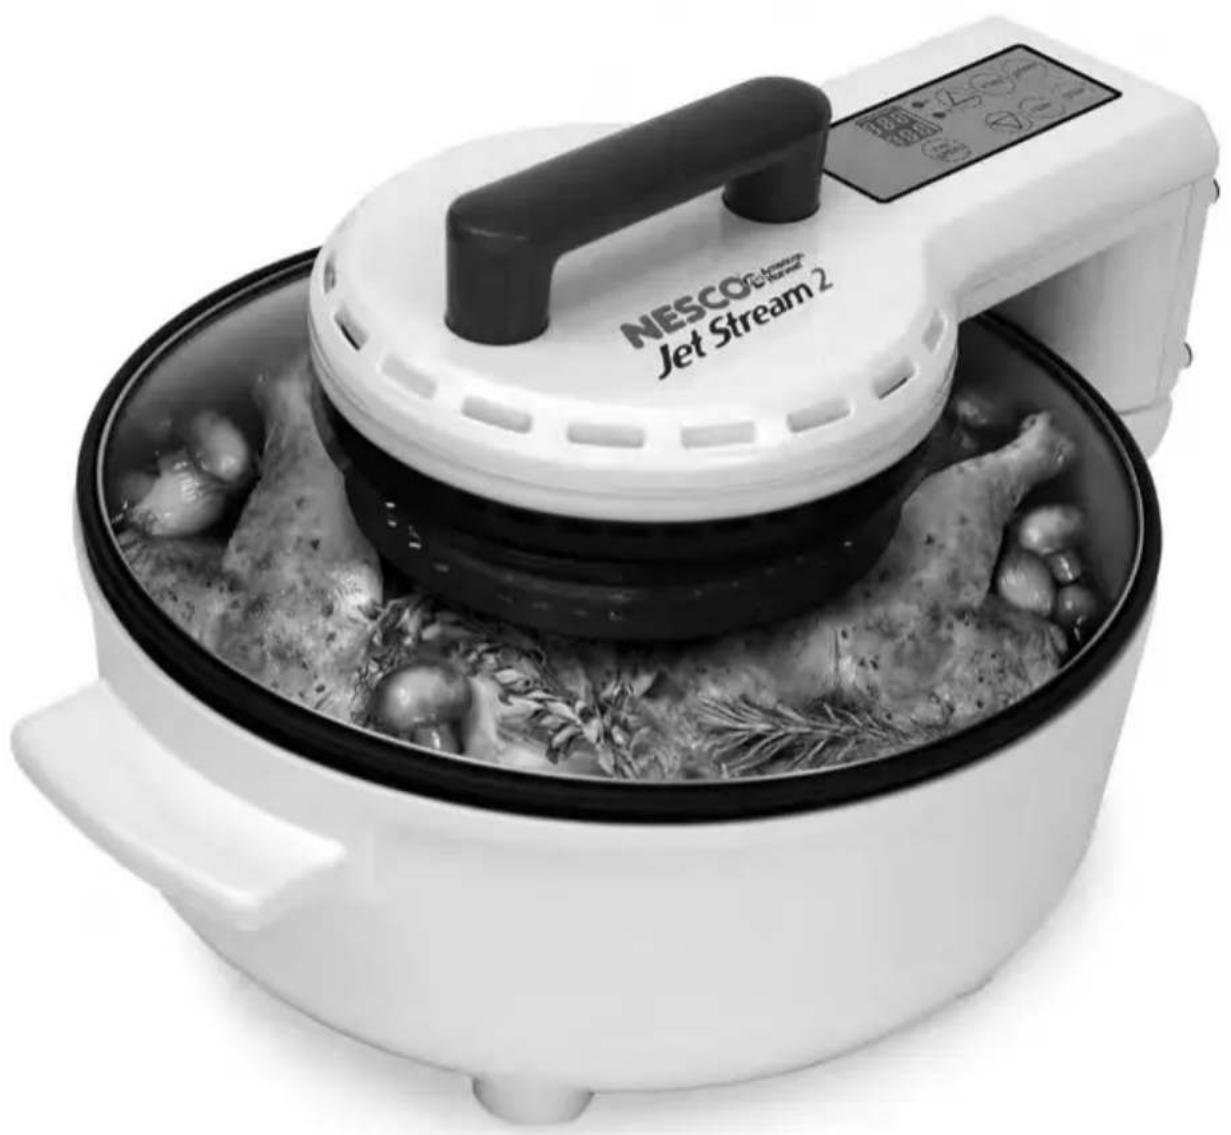
Jet Stream Oven (model / modele JS-5000T)
Instruction Manual · Manuel d'InSTRUCTIONS · Manual de Instrucción
TABLE OF CONTENTS:
IMPORTANT SAFEGUARDS. .1
FEATURES .2
OPERATION 2,3
CARE AND CLEANING INSTRUCTIONS .3
HELPFUL HINTS. .4
COOKING GUIDE FOR CONVENIENT FOODS .5
COOKING GUIDE FOR MEATS .6
COOKING GUIDE FOR VEGETABLES .7
COOKING GUIDE FOR BAKED FOODS .8
APPETIZER RECIPES .9
ENTREE RECIPES .10-12
DESSERT RECIPES .12,13
ONE YEAR LIMITED WARRANTY .14
MEASURES DE PRECAUTION IMPORTANTES 16
CARACTERISTIQUES 17
OPÉRATION 17,18
INSTRUCTIONS D'ENTRETIEN ET DE NETTOYAGE 18
CONSEILS UTILES 19
GUIDE DE CUISSON DES ALIMENTS PRATIQUE 20
GUIDE DE CUISSON POUR LES VIANDES 21
GUIDE DE CUISSON POUR LES LÉGUMES 22
GUIDE DE CUISSON DES ALIMENTS CUITS. 23
APERITIF RECETTE 24
ENTREE RECETTE 25-27
DESSERT RECETTE 27,28
GARANTIE LIMITÉE D'UN AN 29
SALVAGUARDAS IMPORTANTES 31
CARACTERISTICAS 32
OPERACION 32,33
INSTRUCCIONES SOBRE CUIDADO Y LIMPIEZA. 33
CONSEJOS UTILES 34
GUIA DE COCINA PARA ALIMENTOS 35
GUIA DE COCINA PARA CARNES 36
GUIA DE COCINA PARA HORTALIZAS. 37
GUIA DE COCINA PARA ALIMENTOS HORNEADOS 38
APPETIZER RECIPES 39
ENTREE RECIPES 40-42
DESSERT RECIPES 42,43
UN ANO DE GARANTIA LIMITADA 44
Technical Specifications:
Rated 1250 Watts, 120 Volts, 60Hz
IMPORTANT SAFEGUARDS
- This product is designed for household use only -
When using electrical appliances, basic safety precautions should always be followed, including the following: 1. READ ALL INSTRUCTIONS.
- Do not touch hot surfaces. Use handles or knobs.
- To protect against electrical shock and personal injury, do not immerse this appliance, including cord and plug, in water or other liquid.
- This appliance is not intended for use by persons (including children) with reduced physical, sensory or mental capabilities, or lack of experience and knowledge, unless they have been given supervision or instruction concerning use of the appliance by a person responsible for their safety.
- Close supervision is necessary when any appliance is used by or near children.
- Unplug from outlet when not in use and before cleaning. Allow to cool completely before putting on or taking off parts, and before cleaning.
- Do not operate any appliance with a damaged cord or plug or after the appliance malfunctions or has been damaged in any manner. To avoid hazards, return appliance to NESCO® Factory Service Department for examination, repair or adjustment.
- The use of accessory attachments not recommended by the manufacturer may result in fire, electric shock or injury to persons.
- Do not use outdoors.
- Do not let cord hang over edge of table or counter, or touch hot surfaces.
- Do not place on or near a hot gas or electrical burner or in a heated oven.
- Do not use appliance for other than its intended use, as described in this manual.
- Do not use metal scouring pads on the exterior surface of the appliance.
- Operate appliance only when all parts are fully engaged and secured.
- Keep hands and utensils away from the blades when in use.
- Use extreme caution when moving an appliance containing hot oil or other hot liquids.
- Do not operate without cover in place.
- Before removing plug from electrical outlet, always turn OFF appliance using STOP button.
- Make sure the motor stops completely and power cord is removed before removing or assembling any items.
SAVE THESE INSTRUCTIONS
Polarized Plug: This appliance has a polarized plug (one blade is wider than the other). To reduce risk of electric shock, plug is intended to fit into polarized outlet only one way. If the plug does not fit fully into the outlet, reverse the plug. If it still does not fit, contact a qualified electrician. Do not try to modify the plug in any way.
Short Cord Instructions: A short power supply cord is provided to reduce the risk resulting from becoming entangled in or tripping over a longer cord. Extension cords may be used if care is exercised in their use. If an extension cord is used, the marked electrical rating of the cord should be at least as great as the electrical rating of the appliance. The longer cord should be arranged so that it will not drape over the tabletop where it can be pulled on by children or tripped over unintentionally.

FOR ACCESSORIES AND
ADDITIONAL PRODUCTS
nesco.com
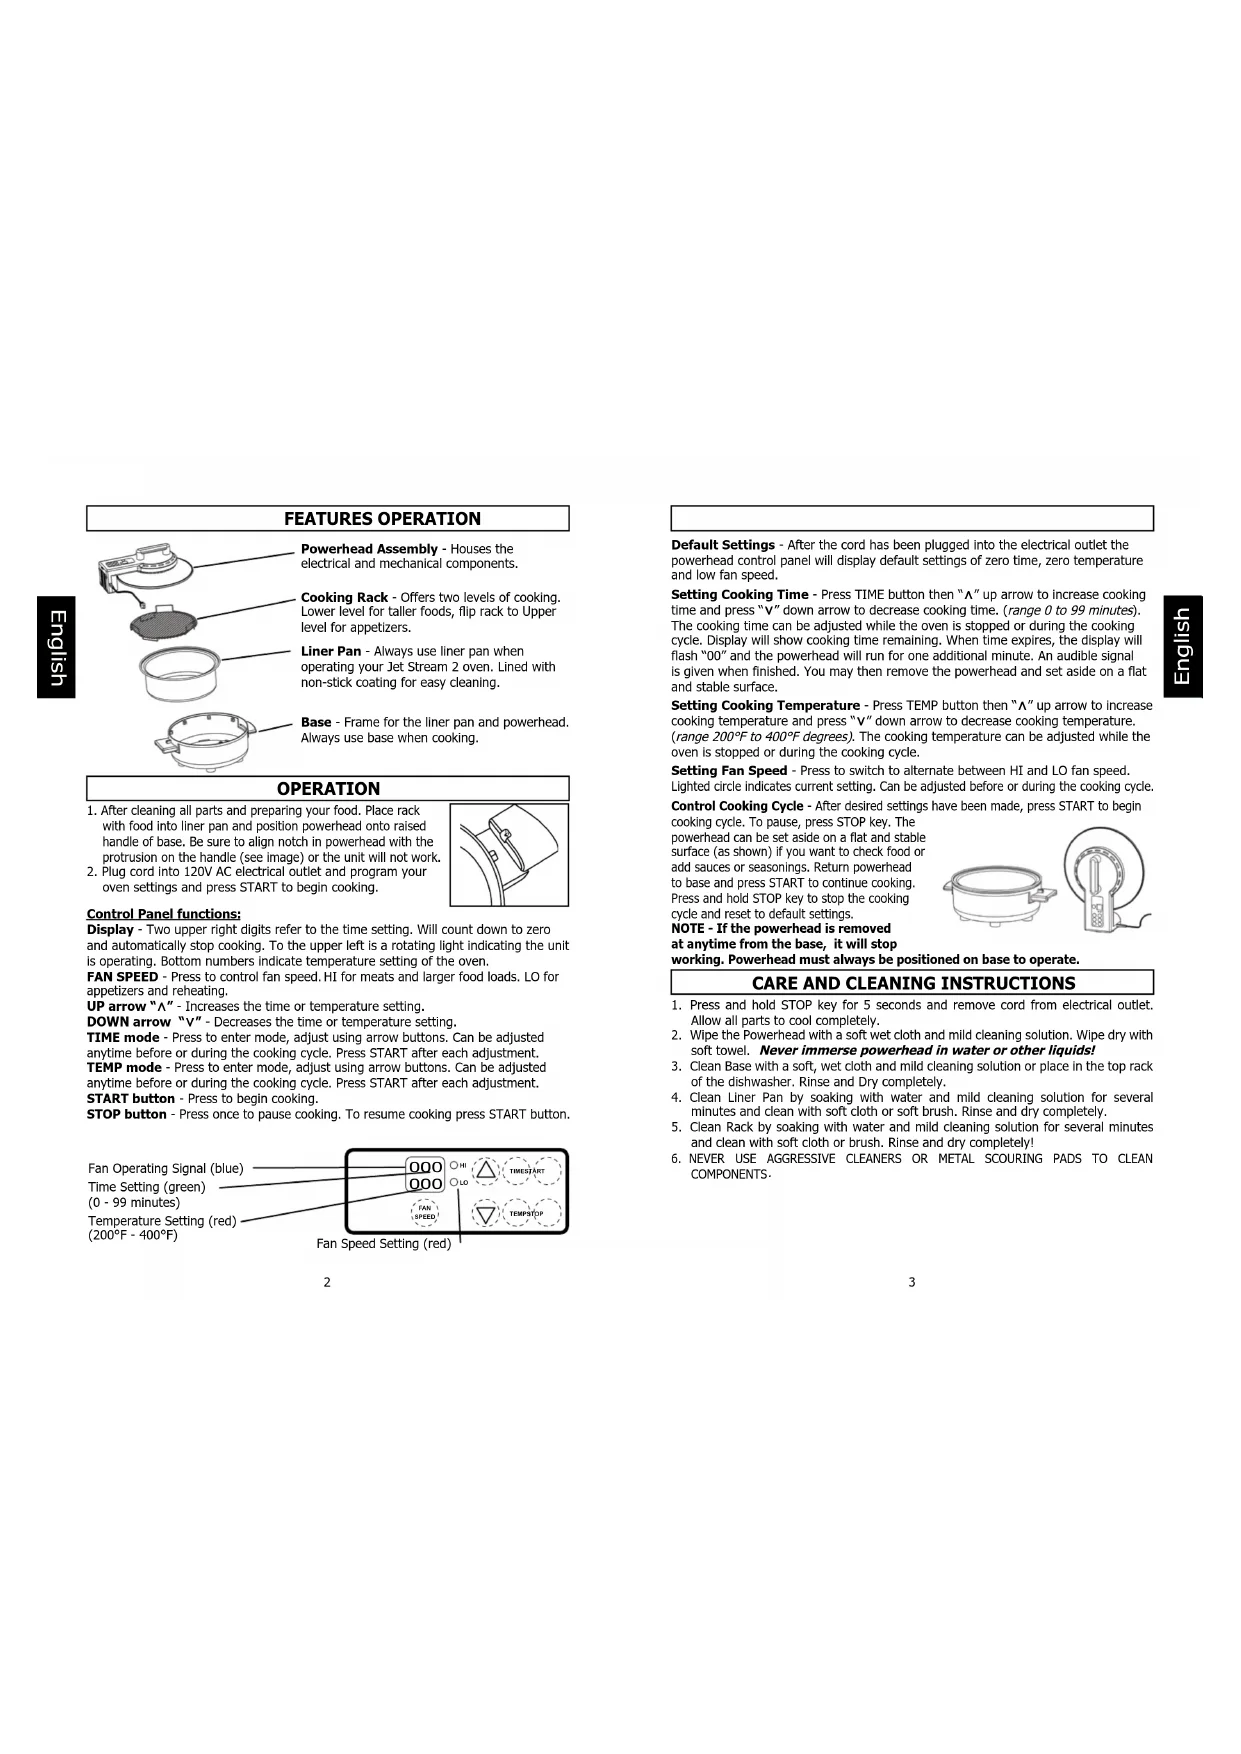
FEATURES OPERATION
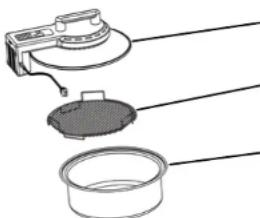
Powerhead Assembly - Houses the electrical and mechanical components.
Cooking Rack - Offers two levels of cooking. Lower level for taller foods, flip rack to Upper level for appetizers.
Liner Pan - Always use liner pan when operating your Jet Stream 2 oven. Lined with non-stick coating for easy cleaning.
Base - Frame for the liner pan and powerhead. Always use base when cooking.
OPERATION
- After cleaning all parts and preparing your food. Place rack with food into liner pan and position powerhead onto raised handle of base. Be sure to align notch in powerhead with the protrusion on the handle (see image) or the unit will not work.
- Plug cord into 120V AC electrical outlet and program your oven settings and press START to begin cooking.

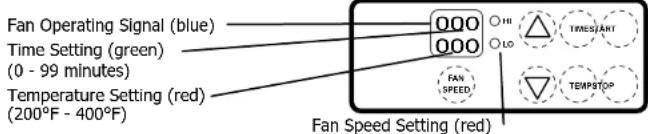
Control Panel functions:
Display - Two upper right digits refer to the time setting. Will count down to zero and automatically stop cooking. To the upper left is a rotating light indicating the unit is operating. Bottom numbers indicate temperature setting of the oven.
FAN SPEED - Press to control fan speed. HI for meats and larger food loads. LO for appetizers and reheating.
UP arrow "A" - Increases the time or temperature setting.
DOWN arrow "v" - Decreases the time or temperature setting.
TIME mode - Press to enter mode, adjust using arrow buttons. Can be adjusted anytime before or during the cooking cycle. Press START after each adjustment.
TEMP mode - Press to enter mode, adjust using arrow buttons. Can be adjusted anytime before or during the cooking cycle. Press START after each adjustment.
START button - Press to begin cooking.
STOP button - Press once to pause cooking. To resume cooking press START button.
Default Settings - After the cord has been plugged into the electrical outlet the powerhead control panel will display default settings of zero time, zero temperature and low fan speed.
Setting Cooking Time - Press TIME button then "A" up arrow to increase cooking time and press "V" down arrow to decrease cooking time. (range 0 to 99 minutes). The cooking time can be adjusted while the oven is stopped or during the cooking cycle. Display will show cooking time remaining. When time expires, the display will flash "00" and the powerhead will run for one additional minute. An audible signal is given when finished. You may then remove the powerhead and set aside on a flat and stable surface.
Setting Cooking Temperature - Press TEMP button then "A" up arrow to increase cooking temperature and press "V" down arrow to decrease cooking temperature. (range 200^ to 400^ degrees). The cooking temperature can be adjusted while the oven is stopped or during the cooking cycle.
Setting Fan Speed - Press to switch to alternate between HI and LO fan speed. Lighted circle indicates current setting. Can be adjusted before or during the cooking cycle.
Control Cooking Cycle - After desired settings have been made, press START to begin
cooking cycle. To pause, press STOP key. The powerhead can be set aside on a flat and stable surface (as shown) if you want to check food or add sauces or seasonings. Return powerhead to base and press START to continue cooking. Press and hold STOP key to stop the cooking cycle and reset to default settings.
NOTE - If the powerhead is removed
at anytime from the base, it will stop
working. Powerhead must always be positioned on base to operate.
CARE AND CLEANING INSTRUCTIONS
- Press and hold STOP key for 5 seconds and remove cord from electrical outlet. Allow all parts to cool completely.
- Wipe the Powerhead with a soft wet cloth and mild cleaning solution. Wipe dry with soft towel. Never immerse powerhead in water or other liquids!
- Clean Base with a soft, wet cloth and mild cleaning solution or place in the top rack of the dishwasher. Rinse and Dry completely.
- Clean Liner Pan by soaking with water and mild cleaning solution for several minutes and clean with soft cloth or soft brush. Rinse and dry completely.
- Clean Rack by soaking with water and mild cleaning solution for several minutes and clean with soft cloth or brush. Rinse and dry completely!
- NEVER USE AGGRESSIVE CLEANERS OR METAL SCOURING PADS TO CLEAN COMPONENTS.

HELPFUL HINTS
- Back in high position, as placed into liner pan, will bring foods closer to the heat and will generally cook foods faster. See Charts for recommended rack position.
- Rack in low position, as placed into liner pan, will keep foods away from the heat and best for larger food items. See Charts for recommended rack position.
- When baking small items, use a foil-wrapped rack that is pierced with a few holes.
- When cooking individual items (i.e. baked potatoes or chicken fillets), arrange around outside of rack.
- Spraying rack with non stick spray will make cleanup even easier. (Do not spray the lid with non-stick spray).
- When cooking foods with high moisture or fat content, remove powerhead carefully to allow steam to escape.
- Use the cooking times in both the charts and recipes as a guide. Variables in food size and thickness, changes in humidity or altitude and your personal preference for doneness all have bearing on actual cooking times.
COOKING GUIDE FOR CONVENIENT FOODS
Great news snack lovers! The Jet Stream 2 oven makes large quantities of delicious appetizers in just minutes or to quickly heat smaller amounts saving energy compared to using the conventional oven.
| ITEM QTY TEM. SPEED TIME | * RACK | ||||
| Chicken Breast, boneless 2 (5oz.) 400 High 8-9 min. | |||||
| Wiener, wrapped 5 (1-2 oz.) | 375 Low | 5-6 min. | |||
| Frozen foods | |||||
| Breaded Shrimp | 12 - 16 oz. | 400 | Low | 5-7 min. | |
| Breaded Cheese sticks | 10 oz. pkg | 400 | Low | 4-5 min. | |
| Breaded Chicken patties 4 (3 oz. ea.) | 400 | High 5-7 min. | |||
| Breaded Fish fillets | 4 (2 oz. ea.) | 400 | Low | 6-8 min. | |
| Buttered Fish fillets | 4 (2 oz. ea.) | 375 | Low | 10-12 min. | |
| Chicken fillets 4 (3 oz. ea.) | 400 Low 7-10 min. | ||||
| Egg rolls | 8 oz. pkg | 400 Low | 4-5 min. | ||
| French Bread pizza | 12 oz. pkg | 375 Low | 8-10 min | ||
| Fried Chicken | 4 pcs. | 375 | High | 10-12 min. | |
| 8 pcs. | 375 | High | 12-14 min. | ||
| Pocket sandwiches | 2 | 375 Low | 6-8 min. | ||
| Microwave Sausage links or patties | 6 | 400 Low | 5-6 min. | ||
| Mini Quiches | 8.5 oz. pkg | 375 High | 4-5 min. | ||
| Pizza | 9 - 10 inch | 375 Low | 8-10 min | ||
| Pot Pie | 1 (8 oz.) | 400 Low | 16-20 min. | ||
| Sandwich Croissant | 2 (4 oz. ea.) | 350 | Low | 10-12 min. | -- |
| Waffle or French toast | 4 squares | 400 | Low | 3-4 min. | |
Rack in high position. Rack in low position.
COOKING GUIDE FOR MEATS
Your new Jet Stream 2 Oven is perfect for meats because the cyclonic cooking action quickly sears in juices allowing the outside to brown while the inside stays moist. In addition to the exceptional taste, the Jet Stream 2 Oven takes the effort out of cooking. There is no need to adjust food because all sides broil or grill at the same time and because the process is entirely enclosed there is not spattered grease or messy broiler pans to clean.
The Jet Stream 2 Oven cooks food so rapidly that there is a tendency to over cook foods, especially meats. Remember that meats will continue to cook after the cooking process is done.
| ITEM QTY TEMP. | SPEED TIME | * RACK | |||
| Bacon 6 slices 400 Low 5-6 min. | |||||
| Whole Chicken, Quartered 3 - 5 lbs. 400 High | 30-45 min. | ||||
| Chicken Breast, with bone 2 h | alves 400 High | 15-18 min. | |||
| Chicken Breast, boneless 4 400 Low | 8-10 min. | ||||
| Cornish Game Hens | 1 (18 oz.) | 375 High | 25-30 min. | ||
| Fish fillets, breaded | 3-4 (3 oz.) | 400 | Low | 6-8 min. | |
| Ground Beef patties | 2-4 | 400 Low | 5-8 min. | ||
| Ground Turkey patties | 4-5 | 400 Low | 10-12 min. | ||
| Ham Steak | 1 lb. | 400 Low | 5-6 min. | ||
| Italian Sausage | 3-4 | 400 Low | 10-12 min. | ||
| Pork Chops, breaded | 2-4 | 400 Low | 12-15 min. | ||
| Salmon Steaks | 2-3 | 400 Low | 10-14 min. | ||
| Steak, beef | 1/2-1 lb. | 400 High | 5-10 min. | ||
| Turkey Breast, halved | 6 lb. | 350 | Low | 45 min. | |
- Rack in high position.
Rack in low position.
COOKING GUIDE FOR VEGETABLES
The Jet Stream 2 Oven offers a new and exciting technique for cooking vegetables. 'Air Frying' provides the crisp taste of fried foods without the grease that traditionally goes along with them. In the following recipes you will discover some interesting applications of this new process "Jet Stream 2 potatoes" for example, is our equivalent to french fries without the guilt! In addition, you can prepare your favorites in a fraction of the conventional time, or for a complete meal, combine vegetables and meats for combination ideas.
| ITEM QTY TEM | SPEED TIME | RACK | |||
| Acorn Squash, halved | 1 (1-1/2 lb.) | 375 Low 15-20 min. | |||
| Baked Potato | 3 (6 oz.) 400 High 40-45 min. | ||||
| Zucchini, halved | 3 - 4 med. | 400 | Low | 9-12 min. | |
| Breaded Vegetables | 12 oz. | 400 Low 4-6 min. | |||
| Corn Souffé | 12 oz. | 375 Low 15-20 min. | |||
| French Fries | single layer | 400 Low 14-16 min. | |||
| Hashbrown patties | 4 400 Hgh 12-14 min. | ||||
| Onion Rings | 9 - 10 oz. | 400 Hgh 10-12 min. | |||
| Potatoes au Gratin | 11 oz. | 375 Low 14-16 min. | |||
| Spinach Souffé | 12 oz. | 375 Low 15-20 min. | |||
| Vegetable Lasagna | 10 oz. | 375 | Low | 25-30 min. | |
| 21 oz. | 375 | Low | 35-40 min. | ||
| Vegetable Pouch | 8 - 10 oz. | 400 High 9-10 min. |
Rack in high position.
Rack in low position.
When baking, the Jet Stream 2 Oven combines the best of both worlds. It provides the browning capabilities of a conventional oven and the shortened time of a microwave oven. Fresh dough products are especially well suited and raise higher than they would in your oven! The circular motion of cyclonic cooking creates an air flow which actually pulls the dough upward causing the increase in volume. Because of the very short cooking times, it is best not to preheat the oven and use LOW fan when baking so that a crust does not form too quickly. This will allow optimum rising and inhibit the surface from becoming too brown while the interior reaches the desired consistency. Use HIGH fan for a minute or two if more browning is needed.
| ITEM QTY TEMP. | SPEED TIME | RACK | |||
| Croutons, 1 inch sq, 2 - 3 cups | 600 Low 8-10 min. | ||||
| Drop biscuits from mix 6 - 8 | 400 Low 6-8 min. | ||||
| Graham Cracker crust 9 inch | 375 Low 4-5 min. | ||||
| Cheese Blintzes | 4 - 6 375 | Low 8-10 min. | |||
| Escaloped Apples | 12 oz. 375 | Low | 10-13 min. | ||
| Fully Baked Pie | 1 (27 oz.) | 375 | Low | 14-17 min. | |
| Muffins | 4 | 375 Low | 4-6 min. | ||
| Pie crust | 9 inch 375 | Low 5-6 min. | |||
| Puff Pastry shells | 4 - 6 400 | Low | 10-12 min. | ||
| Biscuits, refrigerated | 8 | 400 Low | 6-8 min. | ||
| Cinnamon Rolls | 8 | 375 Low | 6-8 min. | ||
| Cookies | 10 - 12 375 | Low 5-8 min. | |||
| Bread Sticks | 6 | 375 Low | 5-8 min. |
- Rack in high position.
Rack in low position.
APPETIZER RECIPIESCOOKING GUIDE
FOR B
Barbecued Shrimp
1 lb. raw shrimp; peeled and deveined 1 small bottle of barbecue sauce; Thread shrimp on 6 inch bamboo skewers and brush with barbecue sauce. Place on rack ( ) coated with non-stick cooking spray. If desired, press STOP and pause cooking cycle to brush extra sauce onto shrimp during last 2 minutes of cooking.
Settings: Time - 5 minutes; Temperature - 400; Fan Speed - LO
Cook until shrimp are pink and flesh is opaque white. Serve immediately.
Crostini with Mozzarella
1 cup large tomato; seeded, chopped
1 cup shredded Mozzarella cheese
1 Tbsp. olive oil
1 tsp. fresh basil, minced
1/4 tsp. balsamic or red wine vinegar
1/8 tsp. salt
12 slices French bread 1/2 inch thick
Combine all ingredients, except bread, and mix well. Spread mixture evenly on bread slices and place on rack ( ).
Settings: Time - 6 minutes; Temperature - 350; Fan speed - LO
Bake accordingly or until cheese melts. Serve immediately.
Mini Nachos
1 large bag of Tostitos® scoops
1 large tomato; diced
1 medium yellow onion; diced
1 Tbsp. lime juice
1 Cup shredded Cheddar cheese
1/2 Cup cilantro; finely chopped
Combine all ingredients, except Tostltos® scoops, and mix well. Spread mix into scoops and place on rack ( ).
Settings: Time - 5 minutes; Temperature - 400; Fan Speed - LO
Cook accordingly or until cheese melts. Serve immediately.
Spinach Stuffed Mushroom
6 oz. frozen spinach souffle
1/4 Cup dried bread crumbs
1/4 tsp. garlic salt
1/3 tsp. pepper, to taste
1/2 Cup shredded Swiss cheese 12 pieces fresh large mushrooms Remove souffle from package and cut in half with a sharp knife. Wrap half in foil and return to freezer; thaw remaining half at room temperature or in microwave oven using defrost setting. Stir in bread crumbs, cheese, garlic salt and pepper. Rinse mushrooms and remove stems. Chop stems and add to spinach mixture. Stuff mushroom caps and place in a flat 8 × 8 inch or 10 inch round baking dish.
Settings: Time - 6 minutes; Temperature - 400; Fan Speed - LO
Bake accordingly until lightly browned on top.
ENTREE RECIPES
Broiled Salmon
1 tsp. dried thyme leaves 1/4 tsp. fresh ground pepper
1/4 tsp. garlic powder 1 Tbsp. olive oil
2 tsp. lime juice 4 pieces salmon steaks
1/2 tsp. salt
Combine marinade ingredients and salmon steaks in a large zip lock bag. Refrigerate 30 minutes. Coat rack with non-stick cooking spray. Place salmon steaks on rack with the thickest part toward the outer edge of the rack. ( )
Settings: Time - 10 minutes; Temperature - 400; Fan speed - HI
Cook accordingly or until flesh becomes flaky.
Chicken Cordon Bleu
4 pieces boneless skinless chicken breasts; halved and made thin.
4 thin slices Swiss cheese 1 tsp. olive oil
4 thin slices cooked ham 1/2 Cup bread crumbs
Top each chicken breast with ham and cheese. Roll up and secure each with
toothpicks. Brush lightly with olive oil and roll in bread crumbs.
Settings: Time - 10 minutes; Temperature - 350; Fan speed - LO
Cook accordingly or until chicken is tender white.
Corn on the Cob
Remove husks and silk.
Wrap each cob in aluminum foil. (Add 1 tablespoon water (for steam) before sealing foil).
Place on rack ( ).
Settings: Time - 18 minutes; Temperature - 375; Fan speed - LO
Cook accordingly or until corn is tender.
Cornmeal Battered Fish
4 pieces walleye or other white fish fillets 1 box cornmeal
1 egg 1 dash salt to taste
3 Tbsp. melted butter 1 dash pepper to taste
In pie plate beat egg with butter until well blended. Add salt and pepper to taste. Dip fillets in mixture and then coat with cornmeal. Place on rack coated with no-stick spray. Place fillets directly on rack.
Settings: Time - 6 minutes; Temperature - 400; Fan speed - LO
Cook until fillets are light and flaky.
ENTREE RECIPES
Dilled Zucchini
2 medium zucchini; cut in half lengthwise 1/4 Cup melted butter or olive oil
1 (8-ounce) container dill weed
Place zucchini directly on rack and brush halves on both sides with melted butter or olive oil. Sprinkle with dill weed.
Settings: Time - 9 minutes; Temperature - 400; Fan Speed - HI
Cook accordingly until tender.
Italian Beef Stir Fry
3/4 lb. beef sirloin; cut into 1 / 8'' strips 1/2 tsp. black pepper
1 Cup cherry tomatoes; halved 3 pieces small zucchini; thinly sliced
1/4 Cup Italian salad dressing 1 Tbs. olive oil
2 Cups cooked spaghetti 2 garlic cloves; minced
1 tsp. grated Parmesan cheese
Combine steak strips, zucchini slices, oil, garlic and pepper in zip top bag. Shake well to evenly coat. Pour into liner pan and stir-fry 4-5 minutes. Stir in tomato halves and Italian dressing, cook 1-2 minutes longer.
Settings: Time - 28 minutes; Temperature - 350; Fan speed - HI, then LO for last 5 minutes of cooking.
Serve beef mixture over hot spaghetti, sprinkle with parmesan cheese.
Italian Stuffed Tomatoes
2 large tomatoes, halved
1 Cup cooked rice
1/4 Cup grated Romano cheese
1 Tbsp. melted butter or margarine
1/2 tsp parsley flakes
1 clove garlic minced
1 dash salt to taste
1 dash pepper to taste
Hollow out tomato halves. Combine rice, 2 tablespoons cheese, butter, parsley, garlic salt and pepper. Toss gently and fill tomatoes. Sprinkle remaining cheese over each filled tomato. Place on rack ( ).
Settings: Time - 6 minutes; Temperature - 400; Fan Speed - HI.
Bake accordingly until lightly browned on top.
Jet Stream 2 Oven Potatoes
4 (6 ounce) baking potatoes
1/4 Cup melted butter
1/4 Cup grated Parmesan cheese
salt to taste
pepper to taste
Cut each potato into lengthwise quarters. Brush all sides with melted butter. Sprinkle with Parmesan cheese, salt and pepper.
Settings: Time - 18 minutes; Temperature - 400; Fan speed - HI
Bake accordingly until lightly browned and tender.
ENTREE RECIPES
Lemon Pepper Chicken
4 boneless, skinless, chicken breasts 1/2 Cup grated Parmesan cheese
1 egg beaten 1 tbsp. lemon pepper
Combine parmesan cheese and lemon pepper; dip chicken in egg and then into the parmesan mixture.
Settings: Time - 15 minutes; Temperature - 400; Fan Speed - LO
Cook accordingly or until browned.
Spicy Chicken Drumsticks
10 Chicken drumsticks 4 Tbsp. soy sauce 3 Tbsp. hot pepper sauce
Combine soy sauce, hot pepper sauce and drumsticks in a zip top bag. Marinate in the refrigerator 1 - 2 hours. Remove chicken from marinade and drain. Coat rack with non stick spray. Place drumsticks on rack ( ).
Settings: Time - 36 minutes; Temperature - 400; Fan speed - HI
Cook until drumsticks are browned.
DESSERT RECIPIES
Almond Croissants
1 (17 oz.) frozen puff pastry; thawed
1/4 Cup ground almonds
1/2 tsp. almond extract
1 egg yolk; beaten
Cook sugar and water in small saucepan until a syrup forms. Remove from heat and stir in almonds and almond extract; cool. Roll out puff pastry to a 6 X 12 inch rectangle and cut into 16 triangles. Spread filling on triangles. Roll up from long side and shape into crescents. Place on rack ( ). Brush with egg yolk and bake.
Settings: Time - 10 minutes; Temperature - 400; Fan Speed - LO
Cook accordingly until golden brown.
Baked Apples with Orange Stuffing
4 medium baking apples
4 tsp. softened butter
1/4 Cup orange marmalade
1/8 tsp. cinnamon
1/4 Cup chopped almonds
1/8 tsp. ginger
2 Tbsp. orange juice
2 Tbsp. sliced almonds
Wash and core apples; place in shallow baking dish. Combine orange marmalade, chopped almonds, orange juice, margarine or butter, cinnamon and ginger; stuff apples. Spread remaining mixture on top of apples and cover with sliced almonds; press gently. Place dish on rack ( ).
Settings: Time - 10 minutes; Temperature - 375; Fan Speed - LO
Bake accordingly until tender.
DESSERT RECIPIES
Baked Pineapple Slices
4 pineapple slices 1/4 tsp. lemon juice
4 tsp. red currant jelly or raspberry jam 1/4 Cup sugar
3 egg whites
Spread pineapple slices with jam. Beat egg whites and lemon juice until foamy.
Gradually beat in sugar until meringue is stiff and glossy; fold in coconut. Spread meringue over pineapple.
Settings: Time - 7 minutes; Temperature - 400; Fan Speed - LO
Bake accordingly until tender.
Breakfast Kabobs
1 (7.5 oz) can refrigerated biscuits, cut into quarters
3 Tbsp. margarine or butter, melted 8 (1oz.) sausage links, cut into thirds
1/3 cup sugar 1/2 tsp. cinnamon
2 medium apples, each cut into 12 pieces 12 6-inch bamboo skewers
Thread biscuits, sausages and apples onto skewers. Brush skewers with margarine and roll in cinnamon-sugar mix. Place on rack ( ).
Settings: Time - 7 minutes; Temperature - 375; Fan Speed - LO
Cook accordingly until biscuits are golden brown.
Breakfast Sandwich
1 pkg. of 5 large biscuits 1/4 Cup sun-dried tomatoes
1/4 Cup spinach 4 eggs in shell
1/4 Cup dried mushrooms 1 small Jar sandwich spread
Place biscuits and eggs in shell on rack ( ). Bake biscuits until browned and continue cooking eggs another 1-2 minutes for medium boiled.
Settings: Time - 7 minutes; Temperature - 375; Fan Speed - LO
Cook accordingly until biscuits are golden brown. Makes 5 sandwiches
ONE YEAR LIMITED WARRANTY
This appliance is warranted for one year from date of original purchase against defects in material and workmanship. This warranty does not cover transportation damage, misuse, accident or similar incident. This warranty gives you specific legal rights and you may have other rights, which vary from state to state. This product is intended for household use only, not for commercial use. Warranty does not cover commercial use.
Your new NESCO® appliance comes equipped with numerous safety features. Any attempt to interfere with the operation of these safety features makes this warranty null and void. In the event we receive an appliance for service that has been tampered with, we reserve the right to restore it to its original state and charge for the repair.
For service in warranty - Defective products may be returned, postage prepaid, with a description of the defect to: The Metal Ware Corporation, 1700 Monroe Street, Two Rivers, Wisconsin 54241, for no-charge repair or replacement at our option. Must include proof of purchase or copy of original bill of sale when returning product for warranty service.
Please call Customer Satisfaction at 1-800-288-4545 to obtain a Return Authorization before shipping.
- For service in warranty, follow instructions set forth in warranty. When ordering new parts, make sure that you always mention the model number of the product.
- Call us on our toll free number, 1-800-288-4545 and tell us about your problem.
- If we instruct you to send all or part of your appliance to us for repair or replacement, our Customer Satisfaction representative will provide a Return Authorization number (this number notifies our receiving department to expedite your repair). Pack your unit carefully in a sturdy carton with sufficient padding to prevent damage because any damage caused in shipping is not covered by the warranty.
- Print your name, address and Return Authorization number on the carton.
- Write a letter explaining the problem. Include the following: your name, address and telephone number and a copy of the original bill of sale.
- Attach the sealed envelope containing the letter inside the carton. Insure the package for the value of the NESCO® appliance and ship prepaid to: The Metal Ware Corporation, 1700 Monroe Street, Two Rivers, WI 54241
MEASURES DE PRECAUTION IMPORTANTES
Italian Tomates Farcies
Lemon Pepper Chicken
4 pechuga de pollo, pechugas 120 mL queso Parmesan ollado
For accessories and additional products, visit us at opencountry.com or nesco.com