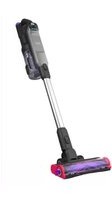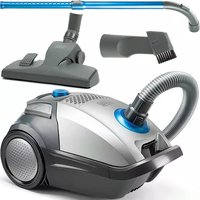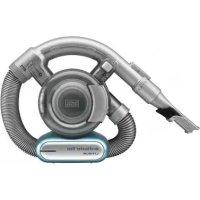
HRV425BLP - Hand vacuum cleaner BLACK & DECKER - Free user manual and instructions
Find the device manual for free HRV425BLP BLACK & DECKER in PDF.


| Product Type | Robot Vacuum |
| Brand | Black & Decker |
| Model | HRV425BLP |
| Power | Rechargeable battery pack, 120V/60Hz wall charger |
| Runtime | Approximately 45 minutes (estimated) |
| Charge Time | Approximately 4 to 5 hours |
| Cleaning Modes | Auto, Spiral, Quick Clean, Manual via app |
| Recommended Floor Types | Hardwood, tile, stone, low or medium pile carpet |
| Filtration | Washable HEPA filter + sponge filter |
| Dustbin Capacity | Not specified (estimated 0.5 L) |
| Brushes | Standard main brush + pet hair brush, two side brushes |
| Connectivity | Bluetooth, BLACK+DECKER mobile app |
| Vacuum Detection | Infrared sensors and floor detection cells |
| Auto Return to Base | Yes, in Auto mode and on low battery |
| Dimensions (L x W x H) | Not specified (estimated 30 x 30 x 8 cm) |
| Weight | Not specified (estimated 2.5 kg) |
| Maintenance | Washable dustbin and filters, cleanable brushes with maintenance tool |
| Safety | Automatic stop on obstruction, anti-drop sensors |
| Spare Parts | Replacement HEPA filter, side brushes, main brush |
| Warranty | 2 years (domestic use) |
| Customer Service Number | 1-800-544-6986 (United States) |
Frequently Asked Questions - HRV425BLP BLACK & DECKER
User questions about HRV425BLP BLACK & DECKER
0 question about this device. Answer the ones you know or ask your own.
Ask a new question about this device
Download the instructions for your Hand vacuum cleaner in PDF format for free! Find your manual HRV425BLP - BLACK & DECKER and take your electronic device back in hand. On this page are published all the documents necessary for the use of your device. HRV425BLP by BLACK & DECKER.
USER MANUAL HRV425BLP BLACK & DECKER
natural_image
Line drawing of a robotic vacuum cleaner with a square chamber and two legs (no text or symbols)Thank you for choosing BLACK+DECKER!
PLEASE READ BEFORE RETURNING THIS PRODUCT FOR ANY REASON.
If you have a question or experience a problem with your BLACK+DECKER purchase, go to http://www.blackanddecker.com/instantanswers If you can't find the answer or do not have access to the Internet, call 1-800-544-6986 from 8 a.m. to 5 p.m. EST Mon. - Fri. to speak with an agent. Please have the catalog number available when you call.
SAVE THIS MANUAL FOR FUTURE REFERENCE.
VEA EL ESPANOL EN LA CONTRAPORTADA.
text_image
Technical diagram of a robotic vacuum cleaner with numbered parts and labeled components1 Power switch
2 Charging socket
3 Start/Stop button
4 Ground detection sensor
5 Front wheel
6 Infrared receiver
7 Charging plate
8 Front lens
9 Dust bin
10 Dust bin release button
11 Side brushes
12 Main brush
13 Main brush frame
14 Main brush frame tabs
15 Charging dock
16 Charging dock infrared window
17 Charging electrodes
18 Battery charger
19 Maintenance tool
28 Charging dock pairing button
Additional Accessories
a. Side brushes (2)
b. Side brush screws (2)
c. HEPA filter
IMPORTANT SAFETY INSTRUCTIONS
When using an electrical appliance, basic precautions should always be followed, including the following:
READ ALL INSTRUCTIONS BEFORE USING THIS APPLIANCE
WARNING: To reduce the risk of fire, electric shock, or injury:
WARNING: Read all safety warnings and all instructions. Failure to follow the warnings and instructions listed below may result in electric shock, fire and/or serious injury.
WARNING: Some household dust contains chemicals known to the State of California to cause cancer, birth defects or other reproductive harm such as asbestos and lead in lead based paint.
- Do not use outdoors or on wet surfaces.
- Do not allow to be used as a toy. Close attention is necessary when used by or near children.
- This product is not intended for use by anyone (including children) with inadequate physical, sensory, or mental abilities, or who lack the experience, knowledge or skills to operate the robot. Children should never be left alone with this product.
- Turn off the power switch when children or pets are alone with the appliance.
- Use only as described in this manual. Use only manufacturer's recommended attachments.
- If appliance is not working as it should, has been dropped, damaged, left outdoors, or dropped into water, return it to a service center.
- Do not step on or put objects on robot.
- Do not handle charger, including charger plug, and charger terminals with wet hands.
- This appliance should only be used for dry pick up. Do not use to pick up anything wet or liquids of any kind.
- Do not put any object into openings. Do not use with any opening blocked; keep free of dust, lint, hair, and anything that may reduce air flow.
- Keep hair, loose clothing, fingers, and all parts of body away from openings and moving parts.
- Do not pick up anything that is burning or smoking, such as cigarettes, matches, or hot ashes.
- Before use, remove any objects from the floor that may become tangled in the appliance, such as power cords, fragile items, strings, toys, or clothing.
- Remove any objects that become lodged in the appliance immediately.
- For rugs with tassels or loose fabric, fold them under the rug. The appliance may grab and unravel the rug.
- Do not use without dust bin and/or filter in place.
- Prevent unintentional starting. Ensure the switch is in the off-position before picking up or carrying the appliance. Carrying the appliance with your finger on the switch or energizing appliance that have the switch on invites accidents.
- Under abusive conditions, liquid may be ejected from the battery; avoid contact. If contact accidentally occurs, flush with water. If liquid contacts eyes, additionally seek medical help. Liquid ejected from the battery may cause irritation or burns.
- Do not use the vacuum cleaner if damaged or modified. Damaged or modified batteries may exhibit unpredictable behavior resulting in fire, explosion or risk of injury.
- Do not expose the vacuum cleaner to fire or excessive temperature. Exposure to fire or temperature above 265^ may cause explosion.
- Follow all charging instructions and do not charge the vacuum cleaner outside of the temperature range specified in the instructions. Charging improperly or at temperatures outside of the specified range may decrease the life of the battery.
- Have servicing performed by a qualified repair person using only identical replacement parts. This will ensure that the safety of the vacuum cleaner is maintained.
- Do not modify or attempt to repair the vacuum cleaner except as indicated in the instructions for use and care.
- Do not charge the unit outdoors.
- Use only the charger supplied by the manufacturer to recharge.
- Do not incinerate the appliance even if it is severely damaged. The batteries can explode in a fire.
- This appliance is intended for household use only and not for commercial or industrial use.
- Keep sensors clean. Sensors may not work properly if they become blocked.
- The sensors on this appliance may not work properly on different floor types. Test the appliance on each surface before allowing it to operate independently.
- Shock Hazard. To protect against risk of electrical shock, do not put unit or charging base in water or other liquid.
- This appliance should not be used on floors with exposed electrical outlets.
- The unit should be placed or mounted away from sinks and hot surfaces.
- Plug the charger directly into an electrical outlet.
- Use the charger only in a standard electrical outlet (120V/60Hz).
- Unplug the charger from outlet before any routine cleaning or maintenance.
- Do not look into the air vents when the unit is switched on, as sometimes there is a possibility of small debris being discharged from the air vents, especially after cleaning / replacement of the filter as debris inside the unit can be disturbed.
- The infrared signal between the appliance and the charging dock may become compromised if more than
English
one robot vacuums are used at the same time, or if used in a location exposed to a halogen lamp.
- Do not use the vacuum in the following environments:
-Wet
- Flammable
- Explosive
-Corrosive
- Extreme hot
- Extreme cold
• This vacuum is for indoor use only.
- Do not let this vacuum clean toner from a laser printer or copier.
- Do not let this vacuum clean sharp objects, such as glass, it may damage the vacuum.
- The charging station should be placed against a wall and on a flat floor surface.
- Do not cover the signal window of the charging station.
- When storing this vacuum, charge the battery fully, turn off the vacuum and place it in a cool dry place. Unplug the charging station.
- Do not lift this vacuum by the front cover.
- Only for use with K25V240100X charger or with N501228 charging dock.
The vacuum is recommended for the following floor surfaces:
- Hardwood/Laminate
- Ceramic/Stone tile
- Low and medium pile carpets (plush carpeting is not recommended)
NOTE: Vacuum may not work on some black carpet and darker floor surfaces, as the sensors may be detecting the surface as a drop off.
Proper room preparation
- Place the cords from other appliances out of the area to be cleaned.
- Do not operate the vacuum in a room where an infant or child is sleeping.
- Do not operate the vacuum in an area where there are lit candles or fragile objects on the floor to be cleaned.
- Do not operate the vacuum in a room that has lit candles on furniture that the vacuum may accidentally hit or bump into.
- Do not allow children to sit on the vacuum.
- Do not use the vacuum on a wet surface.
- Test the height of thresholds. Robot cannot climb thresholds above 1/2 inch (10-15mm).
SAVE THESE INSTRUCTIONS
Assembly
- Remove front lens 8 protection film.
- Ensure the dust bin 9 and main brush 12 are fitted securely.
nOTE: The HRV425BLP contains a standard main brush and an anti-tangle pet brush.
- For general daily maintenance cleaning, the standard main brush should be used.
- Use the anti-tangle pet brush in areas where there is pet or long human hair, areas with excessive hair on floor surface, or areas that require a deeper clean.
Installing side brushes (Fig. B)
- Ensure the power switch 1 is in the off position (0).
- Place the vacuum upside down on a flat surface.
- Locate the side brush retaining screws 20 from the packaging.
- Place the side brushes 11 into the brush slots 21.
- Install side brush retaining screws.
Fig. B
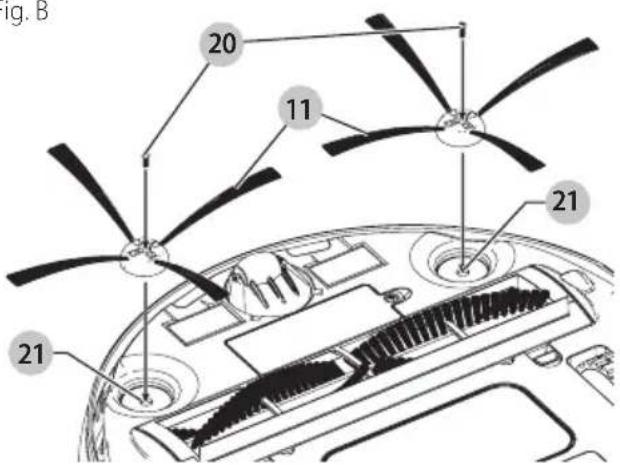
text_image
20 11 21 21 Fig. BCharging (Fig. C)
Your vacuum can be manually charged via the jack plug or automatically charged via the charging dock.
iIMPORTAnT: The power switch 1 MUSt be in the ON position (I) for the vacuum to charge.
- Before first use, the battery must be charged for at least 4-5 hours.
NOTE: While charging, the charger may become warm. This is normal and does not indicate a problem. The appliance can be left connected to the charger indefinitely.
WARNING: Do not charge the battery at ambient temperatures below 50 °F or above 104 °F.
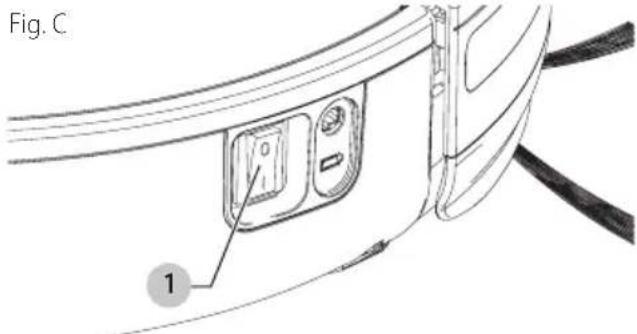
text_image
Fig. C 1Manually charge (Fig. D)
iIMPORTAnT: The power switch 1 MUsT be in the ON position (I) for the vacuum to charge.
- Plug the battery charger 18 into a wall outlet.
- Slide the jack plug 22 end of the charger into the charging socket 2 of the vacuum.
- The Start/Stop button 3 will blink and emit a single short beep, meaning the vacuum is charging. The Start/Stop button LED will turn off when the vacuum is fully charged.
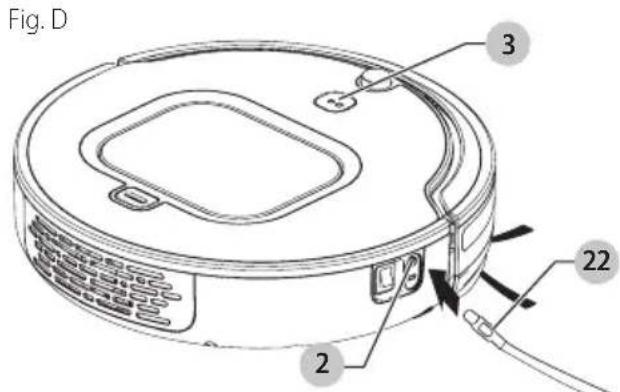
text_image
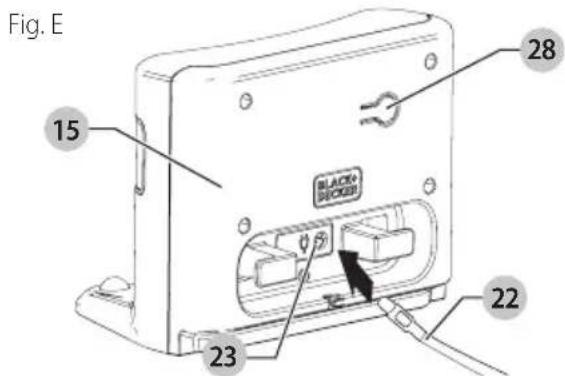
Fig. D 3 22 2Automatically charge (Fig. E, F)
IMPORTANT: The power switch 1 MUST be in the ON position (I) for the vacuum to charge.
- Plug the battery charger 18 into a wall outlet.
- Slide the jack plug (22) end of the charger into the charging dock's charging socket (23) as shown in Figure E.
- Place the charging dock base on a leveled floor with the back of the charger against a wall.
NOTE: Do not place anything under the charging dock. It will prevent the vacuum from automatically charging.
NOTE: Provide a minimum of 48 inches (122 cm) of clear space around the dock.
text_image
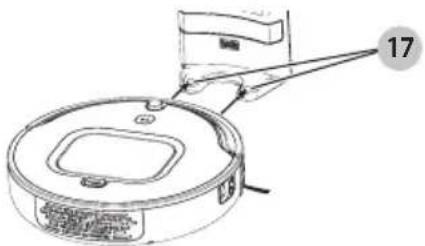
Fig. E 15 28 BLACK BLOCKER 23 22- Place the vacuum on the charging dock so that the charging electrodes 17 contact the two charging plates 7 as shown in Figure F.
- The Start/Stop button 3 will blink and emit a single short beep, indicating the vacuum is charging. The Start/Stop button LED will turn off when the vacuum is fully charged.
NOTE: You can check the charging status of the vacuum from your BLACK+DECKER app.
NOTE: In SPOT and QUICK CLEAN Mode, the vacuum will finish its cleaning cycle and stop and not return to the dock, unless battery level is low, in which case it will search for the dock.
NOTE: In AUTO MODE, the vacuum will search for the charging dock when it is low on battery charge. However, if the room is too large or the vacuum is obstructed from "seeing" the dock, it may fail to find the dock to automatically recharge. If this occurs, place the vacuum on the charging dock as described above.
Fig. F
text_image
17Using the BLACK+DECKER App to operate your robot vacuum
The BLACK+DECKER App allows you to operate and connect to your robot vacuum from a compatible mobile device. After downloading the App, you connect your device to the vacuum. Then you can use the App to operate the robot.
NOTE: Your mobile device has to be within Bluetooth range to operate the robot
You can use the BLACK+DECKER App to:
- Schedule an auto cleaning to occur on the days and times of your choosing.
NOTE: If at any time, the robot is switched to the OFF position, the scheduling function will need to be restored by reconnecting to the app after the unit has been turned back on.
- Initiate a quick, spot, or manual cleaning.
• Monitor the robot's battery charge level. - Add another BLACK+DECKER robot vacuum to your device.
• View Troubleshooting FAQ for suggestions on how to solve common problems or errors. - Create an account to receive promotional materials.
- Disconnect your device from the robot.
To download the BLACK+DECKER App and connect your device, do the following:
- Download the BLACK+DECKER App, application at:

text_image
Download on the App Store ANDROID APP ON Google play- Double-click the BLACK+DECKER App icon to launch the App on your device. An App TERMS AND CONDITIONS page appears.
NOTE: The BLACK+DECKER App is governed by separate terms and conditions available for viewing through the mobile application.
- Scroll down the App TERMS AND CONDITIONS page to make the Agree button clickable.
- Click the Agree button to continue. A CREATE ACCOUNT page appears.
-
Take one of the following options on the CREATE ACCOUNT page:
-
Complete and Submit the form if you want to create a Stanley Black & Decker (SBD) user account. SBD will send promotional emails to the email address you specify.
-
Click Skip to continue without creating an SBD user account.
-
ANDROID ONLY; iOS SKIP to the next step. When the Quick Setup screen appears, ensure that the "Enable Bluetooth", "Location Services", and "App Permissions" boxes are checked, and click Continue.
-
On the Select Product screen, click the Robot Vacuum icon to connect the robot vacuum to your mobile device. IMPORTANT: The power switch 1 MUST be in the ON position (I) for the vacuum to pair
-
When the Connecting screen appears, press and hold the Start/Stop button 3 on the robot vacuum to connect your mobile device to the vacuum. A confirmation message appears when the connection
ENGLISH
process completes, followed by an optional tutorial that explains Robot App basics.
To view the App User Guide and Troubleshooting FAQ:
- Click the Settings icon to launch the Settings page.
- Click App User Guide to view instructions on how to use BLACK+DECKER App features and screens.
- Click FAQ to view robot vac troubleshooting tips.
Manually operating the vacuum
- If you choose to operate the vacuum without the app, ensure the power switch 1 is in the on position (1).
- Press the Start/Stop button 3 once and unit will commence cleaning in Auto Mode. Press the Start/Stop button 3 again to stop cleaning.
- When the cleaning cycle is completed, the unit will start looking for the dock automatically.
Maintenance
WARNING: Make sure the vacuum is completely dry based using it.
- Use only mild soap and damp cloth to clean the vac. Never let any liquid get inside the vac; never immerse any part of the vac into a liquid.
IMPORTANT: To assure product SAFETY and RELIABILITY, repairs, maintenance and adjustment (other than those listed in this manual) should be performed by authorized service centers or other qualified service organizations, always using identical replacement parts.
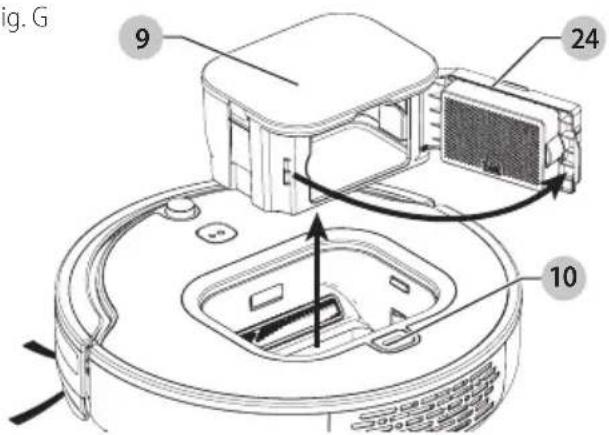
Emptying the dust bin (Fig. G)
- Turn the power switch 1 off.
- Press the dust bin release button 10 and the dust bin will pop up from the top of the vacuum.
- Pull out the dust bin.
- Open the filter door 24 and empty the contents of the dust bin.
NOTE: The dust bin can be washed using mild soap and water. Ensure dust bin is completely dry before reinstalling.
Fig. G
text_image
9 24 10 Fig. GCleaning the filter (Fig. H)
- Turn the power switch 1 off.
- Remove the dust bin 9 as described above.
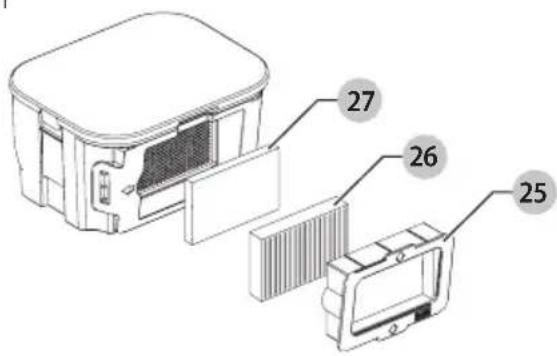
- Pull out the blue or purple filter frame 25. Remove the pleated filter 26 and sponge filter 27 with care.
- To clean the dust from the filters, use the maintenance tool or wash both filters under warm running water.
NOTE: Ensure both filters are completely dry before reinstalling.
- Reinstall dry filters into the filter frame. Insert the filter frame into the dust bin, and reinstall dust bin into the vacuum.
WARNING: Never use the appliance without the filter. Colum dust collection will only be achieved with a clean filter.
Fig. H
text_image
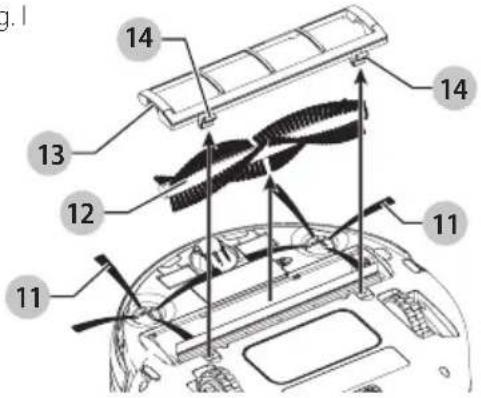
Technical diagram of a device with numbered parts labeled 25, 26, and 27Assembly and removal of the main brush (Fig. I)
- Turn the power switch 1 off.
- Place the vacuum upside down on a flat surface.
- Pull up on the two brush frame tabs 14 and lift off the main brush frame 13.
- Remove the main brush 12.
- Remove all hair and debris using the maintenance tool 19.
- Assemble in the reverse order.
NOTE: When reinstalling the main brush frame, ensure the side brushes 11 are not trapped under the frame.
Fig.1
text_image
Technical diagram of a vehicle interior with numbered components for identificationCleaning the brushes
- Turn the power switch 1 off.
- Place the vacuum upside down on a flat surface.
Cleaning the main brush
- Clean the main brush regularly with the maintenance tool.
- Remove all hair and debris using the maintenance tool regularly.
Cleaning the side brushes (Fig. B)
- Remove the side brush retaining screw 20.
- Remove the side brush 11, clean the side brush, then clean debris in the slot 21.
- Reinstall side brush and retaining screw.
Cleaning the wheels
- Clean the wheels regularly
- Remove all hair and debris using the maintenance tool.
NOTE: If hair is trapped in the front wheel, using a small screwdriver pry out the wheel. Remove any hair or debris and reinstall the front wheel.
Cleaning the wall sensor
- Turn the power switch 1 off.
- Clean the front lens 8 with a clean, dry cloth.
Cleaning the ground detection sensors
- Turn the power switch 1 off.
- Place the vacuum upside down on a flat surface.
- Clean the sensor windows 4 with a clean, dry cloth.
Accessories
Recommended accessories for use with your appliance are available from your local dealer or authorized service center. If you need assistance regarding accessories, please call: 1-800-544-6986.
WARNING: The use of any accessory not recommended for use with this appliance could be hazardous.
Replacing the filter
The filter should be replaced every 6 months and whenever worn or damaged. Replacement filters are available from your BLACK+DECKER dealer.
The RBRC® Seal
The RBRC® (Rechargeable Battery Recycling Corporation) Seal on the nickel cadmium, nickel metal hydride or lithium-ion batteries (or battery packs) indicates that the costs to recycle these batteries (or battery packs) at the end of their useful life have already been paid by BLACK+DECKER. In some areas, it is illegal to place spent nickel cadmium, nickel metal hydride or lithium-ion batteries in the trash or municipal solid waste stream and the Call 2 Recycle® program provides an environmentally conscious alternative.

Call 2 Recycle, Inc., in cooperation with BLACK+DECKER and other battery users, has established the program in the United States and Canada to facilitate the collection of spent nickel cadmium, nickel metal hydride or lithium-ion batteries. Help protect our environment and conserve natural resources by returning the spent nickel cadmium, nickel metal hydride or lithium-ion batteries to an authorized BLACK+DECKER service center or to your local retailer for recycling. You may also contact your local recycling center for information on where to drop off the spent battery. RBRC® is a registered trademark of Call 2 Recycle, Inc.
This Class B digital apparatus complies with Canadian ICES-003. This device complies with part 15 of the FCC rules. Operation is subject to the following two conditions:
- This device may not cause harmful interference, and
- This device must accept any interference received, including interference that may cause undesired operation.
NOTE: This equipment has been tested and found to comply with the limits for a Class B digital device, pursuant to Part 15 of the FCC Rules. These limits are designed to provide reasonable protection against harmful interference in a residential installation. This equipment generates, uses and can radiate radio frequency energy and, if not installed and used in accordance with the instructions, may cause harmful interference to radio communications. However, there is no guarantee that interference will not occur in a particular installation.
If this equipment does cause harmful interference to radio or television reception, which can be determined by turning the equipment off and on, the user is encouraged to try to correct the interference by one or more of the following measures:
- Reorient or relocate the receiving antenna.
- Increase the separation between the equipment and receiver.
- Connect the equipment into an outlet on a circuit different from that to which the receiver is connected.
- Consult the dealer or an experienced radio/TV technician for help.
Changes or modifications to this unit not expressly approved by the party responsible for compliance could void the user's authority to operate the equipment. This Class B digital apparatus complies with Canadian ICES-003.
One-Year Limited Warranty
Black & Decker (U.S.) Inc. warranties this product to be free from defects in material or workmanship for a period of one (1) year following the date of purchase, provided that the product is used in a home environment. This limited warranty does not cover failures due to abuse, accidental damage or when repairs have been made or attempted by anyone other than BLACK+DECKER and its Authorized Service Centers. A defective product meeting the warranty conditions set forth herein will be replaced or repaired at no charge.
Take or send the product (prepaid) to a BLACK+DECKER owned or authorized Service Center for repair or replacement at BLACK+DECKER's option. Proof of purchase may be required. BLACK+DECKER owned and authorized service centers are listed online at
www.blackanddecker.com.
This warranty does not apply to accessories. This warranty gives you specific legal rights and you may have other rights which vary from state to state. Should you have any questions, contact the manager of your nearest BLACK+DECKER Service Center. This product is not intended for commercial use, and accordingly, such commercial use of this product will void this warranty. All other guarantees, express or implied, are hereby disclaimed.
LATIN AMERICA: This warranty does not apply to products sold in Latin America. For products sold in Latin America, check country specific warranty information contained in the packaging, call the local company or see the website for such information.
FREE WARNING LABEL REPLACEMENT: If your warning labels become illegible or are missing, call 1-800-544-6986 for a free replacement.
Imported by Black & Decker (U.S.) Inc., 701 E. Joppa Rd.
Towson, MD 21286 U.S.A.

BlackandDecker.com 1-800-544-6986
TROUBLESHOOTING
| Problem Possible Cause Possible Solution | ||
| Vacuum stops cleaning. • Vacuum is in error state.Battery charge is low.Vacuum has completed Quick Clean or Spot mode. | Clear error (see Error indication patterns table)Charge battery. | |
| Vacuum does not charge. • Charger is not plugged in correctly.Power switch on vacuum is not ON | Ensure the charger is fully plugged into outlet and the jack plug is properly plugged into the vacuum or charging dock.Ensure power switch is "ON". | |
| Vacuum only moves backwards or moves a few inches before backing up and stopping. | Floor has dark stripes or spots that the vacuum detects as a drop off.Sensors are dirty. | Only use vacuum on recommended surfaces. (see recommended floor surfaces section)Clean sensors with dry cloth. |
| Vacuum keeps moving in small circle. | A wheel is blocked.Vacuum is operating in SPOT mode. | Remove debris from blocked wheel. |
| Vacuum does not detect drop offs. | Sensors are covered. • Clean sensors with dry cloth. | |
| Vacuum will not pair with app. | Vacuum not sufficiently charged.Bluetooth function on mobile device is not turned on.Mobile device located too far from vacuum.Location Services and App Permissions for Locations Services may be turned OFF.(Android Only)Vacuum and mobile device need to be restarted. | Ensure the vacuum is fully charged and restart your mobile device.Ensure Bluetooth function on your mobile device is ON.Move your mobile device closer to the vacuum.Go to your mobile devices preferences and turn ON permissions for the BLACK+DECKER APP.Turn vacuum off and then back on and restart your mobile device. Re-open the BLACK+DECKER App. Attempt to pair the robot vacuum again. Be sure to press and hold the Start/Stop button 3 button on the top of the vacuum for at least five seconds. |
| Robot will not return to dock. | Robot is out of range to "see" the dock.Robot is obstructed by objects in the cleaning area.Robot may not be paired to dock. | Move robot closer to dock.Clear obstruction from robot's cleaning area.With the unit turned off, ensure the dock is plugged into a wall outlet. Press and hold the charging dock pairing button 28 and turn the robot power switch 1 to the ON position. Robot will beep twice when pairing is successful. |
| Scheduled cleaning will not work. | Vacuum was not reconnected to app after robot was switched OFF. | If at any time, the robot is switched to OFF position, the scheduling function needs to be restored by reconnecting to the app after the unit has been turned on. |
| Suction power is weak. • Filters are clogged, dustbin full. • Clean dustbin and filters. | ||
| Vacuum noise changes during operation. | Debris in rotating brush, wheel or side brush.AUTOSENSE in action - vacuum changes suction power from carpet to hard surface. | Remove debris from brush, wheel or side brush. |
SEE YOUR BLACK+DECKER APP FOR OTHER TROUBLESHOOTING DETAILS
For assistance with your product, visit our website www.blackanddecker.com for the location of the service center nearest you or call the BLACK+DECKER help line at 1-800-544-6986.
Error indication patterns\*
* Error indications only apply to HRV425 vacuum models.
NOTE: HRV420BP07(NON-LED UNIT) Errors will be indicated by a short recurring beep
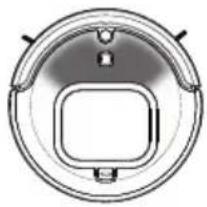
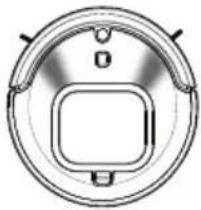
Your robot will indicate several error or status conditions by use of the LEDs. Some of the main errors are:
Error A Error B Error C
natural_image
Top-down schematic of a circular mechanical component with central square and side ports (no text or symbols)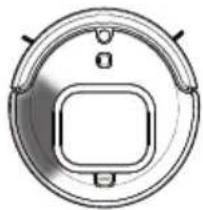
natural_image
Top-down schematic of a circular mechanical component with a central square and two protruding slots (no text or symbols)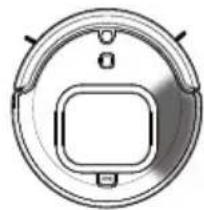
natural_image
Circular mechanical component with a central square and two side protrusions (no text or symbols)Error D Error E
natural_image
Top-down schematic of a circular mechanical component with a central square and two protruding ports (no text or symbols)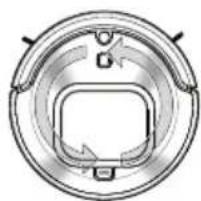
natural_image
Pure mechanical component diagram without any text, numbers, or symbolsError F

natural_image
Top-down schematic of a circular mechanical component with a central square and two curved arms (no text or symbols)ERROR CODE LED PATTERN POSSIBLE CAUSE SOLUTION
| Error A Front LEDs flashing Red to OFF. Main brush stuck. Clear debris/obstruction from main brush. Press the power button to clear error. | ||
| Error B Left hand side LEDs flashing RED to OFF. | Left wheel stuck. Clear debris/obstruction from left wheel. Press the power button to clear error. | |
| Error C Right hand side LEDs flashing RED to OFF. | Right wheel stuck. Clear debris/obstruction from right wheel. Press the power button to clear error. | |
| Error D 2 front LED sections flashing Red to OFF. | Side Brush stuck. C | lear debris/obstruction from main brush. Press the power button to clear error. NOTE: If there is hair wrapped around the side brush, you may need to uninstall and reinstall the side brush. |
| Error E All LEDs Spinning Pattern - Orange to OFF. | Dust Bin not fully inserted. | Press down on the dustbin to fully install into vacuum. |
| Error F Front center LED sections flashing Blue to OFF. | Unit shut down, battery level too low to return to charging dock automatically. | Manually return robot to charging dock. |
To clear an error
-
After debris/obstruction has been removed from the vacuum, clear the error by pressing the Start/Stop button 3.
-
To resume vacuuming, press the Start/Stop button 3 again.
BLACK+ DECKER™
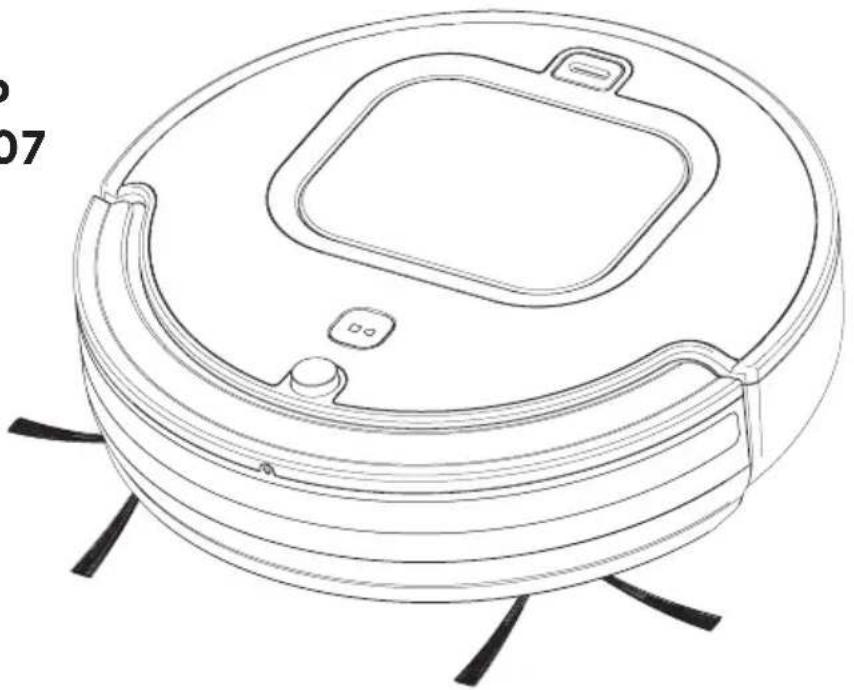
ASPIRATEUR ROBOT
MODE D'EMPLOI
NUMERO DE CATALOGUE
HRV425BL HRV425BLP HRV420BP07
natural_image
Line drawing of a robotic vacuum cleaner with a square chamber and two legs (no text or symbols)text_image
Technical diagram of a robotic vacuum cleaner with numbered parts and labeled componentsnatural_image
Line drawing of a robotic vacuum cleaner with a square chamber and mounting base (no text or symbols)Gracias por elegir BLACK+DECKER!
text_image
Technical diagram of a robotic vacuum cleaner with numbered parts and labeled components12 Cepillo principal
13 Marco del cepillo principal
text_image
Technical diagram of a device with numbered parts labeled 25, 26, and 27text_image
Technical diagram of a device with numbered components and directional arrows indicating assembly or movement.Date of purchase · Fecha de compra Invoice No. · No. de factura