DW493 - Polisher DEWALT - Free user manual and instructions
Find the device manual for free DW493 DEWALT in PDF.

User questions about DW493 DEWALT
0 question about this device. Answer the ones you know or ask your own.
Ask a new question about this device
Download the instructions for your Polisher in PDF format for free! Find your manual DW493 - DEWALT and take your electronic device back in hand. On this page are published all the documents necessary for the use of your device. DW493 by DEWALT.
USER MANUAL DW493 DEWALT
383763-01/DW488 rev. 7/31/2002 1:48 PM Page 1


383763-01/DW488 rev. 7/31/2002 1:48 PM Page 2


DeWALT Industrial Tool Co., 701 East Joppa Road, Baltimore, MD 21286
Printed in U.S.A. (JUL02-CD-1)
Form No. 383763-01
DW488/DW493/DW494/DW494-220 Copyright © 1998
The following are trademarks for one or more D≡WALT power tools: the yellow and black color scheme; the “D” shaped air intake grill; the array of pyramids on the handgrip; the kit box configuration; and the array of lozenge-shaped humps on the surface of the tool.
383763-01/DW488 rev. 7/31/2002 1:48 PM Page 3

INSTRUCTION MANUAL
GUIDE D'UTILISATION
English
IF YOU HAVE ANY QUESTIONS OR COMMENTS ABOUT THIS OR ANY DEWALT TOOL, CALL US TOLL FREE AT:
1-800-4-DEWALT (1-800-433-9258)
TO CONVERT THE
SANDER TO A
GRINDER, A
GUARD MUST BE
INSTALLED.
DEPRESSED CENTER WHEEL
Important Safety Instructions
⚠ WARNING: Use of this tool can generate dust containing chemicals known to cause cancer, birth defects or other reproductive harm. Use appropriate respiratory protection.
⚠ WARNING: When using electric tools, basic safety precautions should always be followed to reduce risk of fire, electric shock, and personal injury, including the following:
READ ALL INSTRUCTIONS
Grounding Instructions (DW488, DW493, DW494)
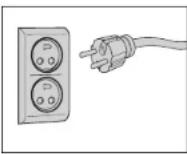
This tool should be grounded while in use to protect the operator from electric shock. The tool is equipped with a 3-conductor cord and 3-prong grounding type plug to fit the proper grounding type receptacle. The green (or green and yellow) conductor in the cord is the grounding wire. Never connect the green (or green and yellow) wire to a live terminal. If your unit is intended for use on less than 150 V, it has a plug that looks like that shown in sketch A. If it is for use on 150 to 250 V, it has a plug that looks like that shown in sketch D. An adapter, sketches B and C, is available for connecting sketch A type plugs to 2-prong receptacles. The green-colored rigid ear, lug, or the
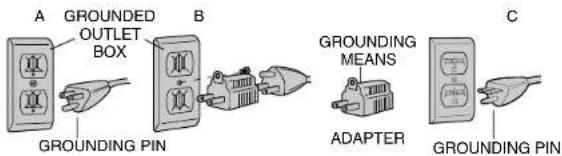
like, extending from the adapter must be connected to a permanent ground, such as a properly grounded outlet box. No adapter is available for a plug as shown in sketch D. ADAPTER SHOWN IN FIGURES B and C IS NOT FOR USE IN CANADA.
Grounding Instructions (DW494-220)
This tool should be grounded while in use to protect the operator from electric shock. The tool is equipped with a 3-conductor cord to fit the proper grounding type receptacle. The green (or A green and yellow) conductor in the cord is the grounding wire. Never
connect the green (or green and yellow) wire to a live terminal.
The two grounding contacts and the grounding receptacle in the plug must be connected to a permanent ground, such as a properly grounded outlet. No adapter is available for a plug as shown in Figure A.
Safety Instructions For All Tools
- KEEP WORK AREA CLEAN. Cluttered areas and benches invite injuries.
- CONSIDER WORK AREA ENVIRONMENT. Don't expose power tools to rain. Don't use power tools in damp or wet locations. Keep work area well lit. Do not use tool in presence of flammable liquids or gases.
- GUARD AGAINST ELECTRIC SHOCK. Prevent body contact with grounded surfaces. For example; pipes, radiators, ranges, and refrigerator enclosures.
- KEEP CHILDREN AWAY. Do not let visitors contact tool or extension cord. All visitors should be kept away from work area.
-
STORE IDLE TOOLS. When not in use, tools should be stored in dry, and high or locked-up place — out of reach of children.
-
DON'T FORCE TOOL. It will do the job better and safer at the rate for which it was intended.
- USE RIGHT TOOL. Don't force small tool or attachment to do the job of a heavy-duty tool. Don't use tool for purpose not intended.
- DRESS PROPERLY. Do not wear loose clothing or jewelry. They can be caught in moving parts. Rubber gloves and non-skid footwear are recommended when working outdoors. Wear protective hair covering to contain long hair. Air vents often cover moving parts and should also be avoided.
- USE SAFETY GLASSES. Also use face or dust mask if operation is dusty.
- DON'T ABUSE CORD. Never carry tool by cord or yank it to disconnect from receptacle. Keep cord from heat, oil, and sharp edges.
- SECURE WORK. Use clamps or a vise to hold work. It's safer than using your hand and it frees both hands to operate tool.
- DON'T OVERREACH. Keep proper footing and balance at all times.
- MAINTAIN TOOLS WITH CARE. Keep tools sharp and clean for better and safer performance. Follow instructions for lubricating and changing accessories. Inspect tool cords periodically and if damaged, have repaired by authorized service facility. Inspect extension cords periodically and replace if damaged. Keep handles dry, clean, and free from oil and grease.
- DISCONNECT OR LOCK OFF TOOLS when not in use, before servicing, and when changing accessories, such as blades, bits, cutters.
- REMOVE ADJUSTING KEYS AND WRENCHES. Form habit of checking to see that keys and adjusting wrenches are removed from tool before turning it on.
- AVOID UNINTENTIONAL STARTING. Don't carry tool with finger on switch. Be sure switch is off when plugging in.
- EXTENSION CORDS. Use only 3-wire extension cords that have
3-prong grounding-type plugs and 3-pole receptacles that accept the tool's plug. Replace or repair damaged cords. Make sure your extension cord is in good condition. When using an extension cord, be sure to use one heavy enough to carry the current your product will draw. An undersized cord will cause a drop in line voltage resulting in loss of power and overheating. The following table shows the correct size to use depending on cord length and nameplate ampere rating. If in doubt, use the next heavier gage. The smaller the gage number, the heavier the cord.
Recommended Minimum Wire Size for Extension Cords
Total Length of Cord
25 ft. 50 ft. 75 ft. 100 ft. 125 ft. 150 ft. 175 ft.
7.6 m 15.2 m 22.9 m 30.5 m 38.1 m 45.7 m 53.3 m
Wire Size
18 AWG 18 AWG 16 AWG 16 AWG 14 AWG 14 AWG 12 AWG
- OUTDOOR USE EXTENSION CORDS. When tool is used outdoors, use only extension cords intended for use outdoors and so marked.
- STAY ALERT. Watch what you are doing. Use common sense. Do not operate tool when you are tired.
- CHECK DAMAGED PARTS. Before further use of the tool, a guard or other part that is damaged should be carefully checked to determine that it will operate properly and perform its intended function. Check for alignment of moving parts, binding of moving parts, breakage of parts, mounting, and any other conditions that may affect its operation. A guard or other part that is damaged should be properly repaired or replaced by an authorized service center unless otherwise indicated elsewhere in this instruction manual. Have defective switches replaced by authorized service center. Do not use tool if switch does not turn it on and off.
Additional Safety Instructions for Grinders
• ALWAYS WEAR EYE PROTECTION.
- WHEN GRINDING, ALWAYS KEEP GUARDS IN PLACE.
- Always use proper guard with grinding wheel. A guard protects operator from broken wheel fragments and wheel contact.
- Always use side handle. Tighten the handle securely. The side handle should always be used to maintain control of the tool at all times.
- Accessories must be rated for at least the speed recommended on the tool warning label. Wheels and other accessories running over rated speed can fly apart and cause injury. Refer to the table below. Accessory ratings are above rated no-load tool speeds because actual tool speeds may vary.
- Use only grinding wheels having a maximum operating speed at least high as "No Load RPM" marked on the tool's nameplate.
- Before using, inspect recommended accessory for cracks or flaws. If such a crack or flaw is evident, discard the accessory. The accessory should also be inspected whenever you think the tool may have been dropped.
- When starting the tool (with a new or replacement wheel installed) hold the tool in a well protected area and let it run for one minute. If the wheel has an undetected crack or flaw, it should burst in less than one minute. Never start the tool with a person in line with the wheel. This includes the operator.
- In operation, avoid bouncing the wheel or giving it rough treatment. If this occurs, stop the tool and inspect the wheel.
- ALWAYS USE GUARDS with depressed center wheels or flaring cup grinding wheels.
- Clean your tool out periodically.
⚠️CAUTION: Use extra care when grinding into a corner as a sudden, sharp movement of the grinder may be experienced when the wheel contacts a secondary surface.
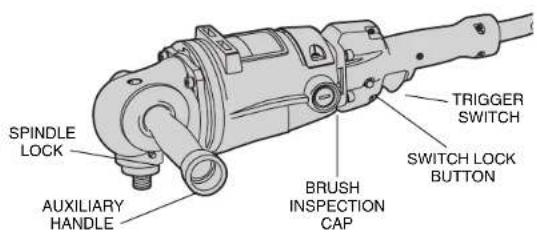
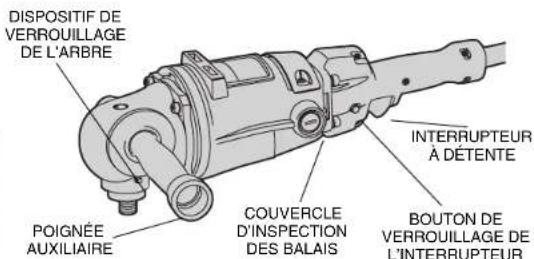
SWITCH LOCKING BUTTON
DISC NUT HUB

BACKING PAD

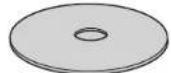
ABRASIVE DISC

AUXILIARY HANDLE CAN
BE INSTALLED ON EITHER
SIDE OF THE GEAR CASE
AUXILIARY HANDLE
△CAUTION: Wear appropriate hearing protection during use. Under some conditions and duration of use, noise from this product may contribute to hearing loss.
⚠ WARNING: Some dust created by power sanding, sawing, grinding, drilling, and other construction activities contains chemicals known to cause cancer, birth defects or other reproductive harm. Some examples of these chemicals are:
- lead from lead-based paints,
• crystalline silica from bricks and cement and other masonry products, and
• arsenic and chromium from chemically-treated lumber (CCA).
Your risk from these exposures varies, depending on how often you do this type of work. To reduce your exposure to these chemicals: work in a well ventilated area, and work with approved safety equipment, such as those dust masks that are specially designed to filter out microscopic particles.
- Avoid prolonged contact with dust from power sanding, sawing, grinding, drilling, and other construction activities. Wear protective clothing and wash exposed areas with soap and water. Allowing dust to get into your mouth, eyes, or lay on the skin may promote absorption of harmful chemicals.
SAVE THESE INSTRUCTIONS
Switch
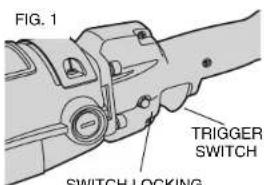
To start the tool, squeeze the trigger switch shown in Figure 1. To turn the tool off, release the switch. The tool can be locked on for continuous use by holding the trigger switch depressed while you depress the switch locking button next to the trigger, as shown in Figure 1. Hold the locking button in as you gently release the trigger. Release the locking button and the tool will continue to run. To turn the tool off from a locked on condition, squeeze and release the trigger once.
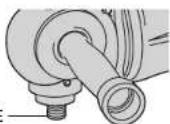
Auxiliary Handle
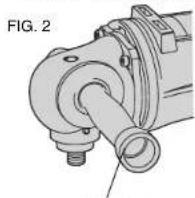
An auxiliary handle is provided with your tool for convenience. The handle can be screwed into either side of the gear case, as shown in Figure 2, and should be used at all times when sanding or grinding.
Sanding With Abrasive Discs
Abrasive discs can be used for smoothing welds, removing rust and paint and general smoothing of rough surfaces.
To install an abrasive disc, follow the steps listed below.
-
TURN OFF TOOL AND DISCONNECT FROM POWER SUPPLY
-
Push the hub of the disc nut through the hole in the center of the abrasive disc and the backing disc as far as it will go.
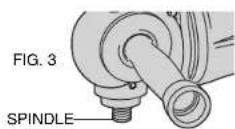
- Install the assembled discs onto the tool spindle, as shown in Figure 3, and engage the disc nut into the disc nut hub.
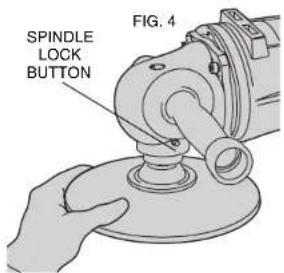
- Using a glove or cloth to protect your hand, screw the whole assembly clockwise onto the tool spindle as far as it will go as shown in Figure 4.
- Engage the spindle lock button to lock the spindle in place and tighten firmly. (See Figure 4)
To remove an abrasive disc, follow the steps listed below.
- Turn off and unplug the tool from the power supply.
- Using a glove or cloth to protect your hand, turn the assembled discs counterclockwise as you depress the spindle lock button.
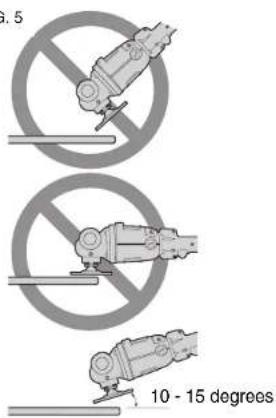
When sanding, maintain an angle of 10-15 degrees between the abrasive disc and the surface being sanded, as shown in Figure 5.
If only the outer edge of the abrasive disc is used, a rough cut surface will result. If the disc is pressed flat against the surface, the sanding action will be bumpy and irregular and the tool will be difficult to control.
FIG. 5
383763-01/DW488 rev. 7/31/2002 1:48 PM Page 5
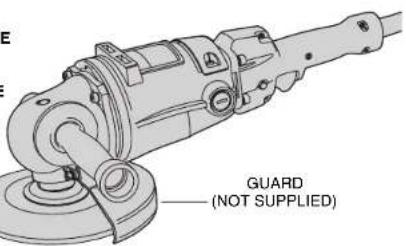
Grinding With Depressed Center Wheels
⚠ CAUTION: BEFORE ANY GRINDING OPERATIONS, THE CORRECT GUARD MUST BE MOUNTED TO THE SANDER. THE MOUNTING OF THIS GUARD CONVERTS YOUR SANDER TO AN ANGLE GRINDER.
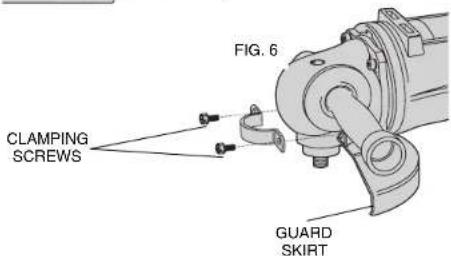
To install the guard to your sander, follow the steps listed below.
- If you cannot determine which guard is the correct one, check with your local DeWALT service center or call toll free: 1-800-4-DeWALT (1-800-433-9258).
- TURN OFF TOOL AND DISCONNECT FROM POWER SUPPLY.
- Install the guard as shown in Figure 6. Position the guard skirt between the spindle and the operator.
- Securely tighten the two clamping screws supplied with the guard. Depressed center wheels can be used for moderate metal removal on flat or contoured surfaces.
To install a depressed center wheel, follow the steps listed below:
⚠️ CAUTION: NEVER USE DEPRESSED CENTER WHEELS WITHOUT THE PROPER GUARD.
- TURN OFF TOOL AND DISCONNECT FROM POWER SUPPLY.
- Be sure the guard is securely attached to the gear case.
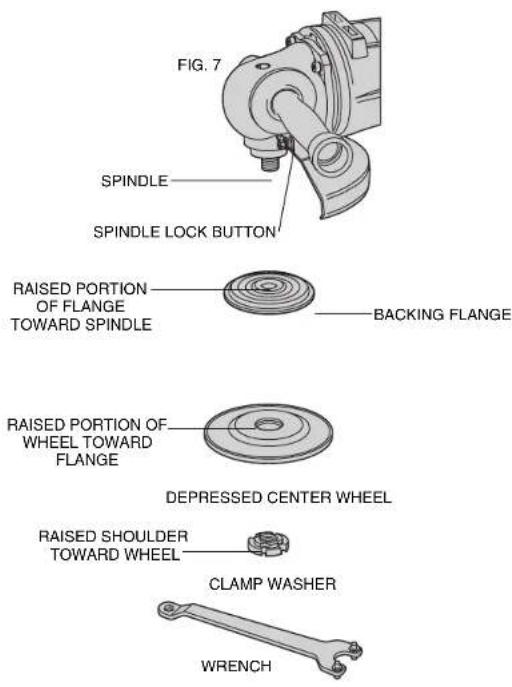
- Install the backing flange onto the tool spindle, as shown in Figure 7.
- Check rated speed of depressed center wheel. Never use wheel rated at less than speed on the nameplate of the tool.
- Install the depressed center wheel onto the tool's spindle, as shown in Figure 7.
- Thread the clamp washer onto the tool's spindle, as shown in Figure 7. Hold the spindle in place with the locking button and tighten with the wrench provided.
To remove a depressed center wheel follow the steps below:
- TURN OFF TOOL AND DISCONNECT FROM POWER SUPPLY.
- Engage the spindle lock by depressing the button shown in Figure 7 and loosen the clamp washer using the spanner wrench provided.
- Examine the depressed center wheel closely for cracks or chips. If either are found, discard the wheel at once.
When using a depressed center wheel, hold the tool so that an angle of approximately 30 degrees exists between the wheel and the surface being ground.
Wire Wheel And Knotted Wire Wheel Brushes
Wire wheels and brushes can be used for removing rust, scale and paint, and for smoothing irregular surfaces. A type 27 guard is required when using wire brushes and wheels.
To install a wire wheel or brush, follow the steps below:
-
TURN OFF TOOL AND DISCONNECT FROM POWER SUPPLY.
-
Rest grinder on its back with the spindle pointing up and remove guard if desired.
- Ensure that the rated speed of the wire wheel or brush is equal to or greater than the rated speed of the grinder found on the tool's nameplate.
- Thread brush or wheel onto spindle and tighten securely.
NOTE: Cover your hand with a glove or cloth when handling wire wheels and brushes.
Maintenance
CLEANING
Blowing dust and grit out of the motor housing using compressed air is a necessary regular maintenance procedure. Dust and grit containing metal particles often accumulate on interior surfaces and
could create an electrical shock hazard if not frequently cleaned out. ALWAYS WEAR SAFETY GLASSES.
⚠️ CAUTION: Never use solvents or other harsh chemicals for cleaning the non-metallic parts of the tool. Use clean, dry cloth only.
LUBRICATION
DeWALT tools are properly lubricated at the factory and are ready for use. Tools should be relubricated regularly every sixty days to six months, depending on usage. (Tools used constantly on production or heavy-duty jobs and tools exposed to heat may require more frequent lubrication.) This lubrication should only be attempted by trained power tool repairpersons, such as those at DeWALT service centers or in other qualified service organizations.
Accessories
Recommended accessories for use with your tool are available at extra cost from your distributor or local service center.
NOTE: USE ACCESSORIES RECOMMENDED PER CHART BELOW.
| Accessory Type Notes Usage | ||
| DEPRESSED CENTER WHEEL | Use for moderate metal and masonry removal on flat or contoured surfaces | |
| SANDING DISCS | Use for smoothing welds, and sharp edges, and automotive body work | |
| WIRE CUP BRUSHES | Always wear eye protection and appropriate clothing | Use for rust removal and surface preparation before painting |
Depressed center grinding wheels must fit within the confines of the guard and must be rated higher than the recommended speed as marked on the nameplate.
Recommended accessories for use with your tool are available at extra cost from your distributor or local service center. A complete listing of service centers is included with your tool.
CAUTION: Strands of wire cup brushes may break and fly off while in use. Users and others in the area should wear adequate eye, face and body protection. Use only wire cup brushes that are rated at or greater than the RPM shown on the tool's nameplate.
⚠ WARNING: To reduce the risk of injury, always use proper guards when grinding and wear eye protection.
⚠️ CAUTION: The use of any non-recommended accessory may be hazardous.
Repairs
To assure product SAFETY and RELIABILITY, repairs, maintenance and adjustment (including brush inspection and replacement) should be performed by authorized service centers or other qualified service organizations, always using identical replacement parts.
Full Warranty
D=WALT heavy duty industrial tools are warranted for one year from date of purchase. We will repair, without charge, any defects due to faulty materials or workmanship. For warranty repair information, call 1-800-4-D=WALT. This warranty does not apply to accessories or damage caused where repairs have been made or attempted by others. This warranty gives you specific legal rights and you may have other rights which vary in certain states or provinces.
In addition to the warranty, DeWALT tools are covered by our:
30 DAY NO RISK SATISFACTION GUARANTEE
If you are not completely satisfied with the performance of your DeWALT heavy duty industrial tool, simply return it to the participating seller within 30 days for a full refund. Please return the complete unit, transportation prepaid. Proof of purchase may be required.
FREE WARNING LABEL REPLACEMENT: If your warning labels become illegible or are missing, call 1-800-4-DEWALT for a free replacement.
POUR TOUT RENSEIGNEMENT SUPPLÉMENTAIRE SUR CET OUTIL OU TOUT AUTRE OUTIL DEWALT, COMPOSER SANS FRAIS LE NUMÉRO:
1 800 4-DEWALT (1 800 433-9258)
POUR TRANSFORMER
LA PONCEUSE EN
RECTIFIEUSE, IL FAUT
INSTALLER UN
PROTECTEUR.S

25 ft. 50 ft. 75 ft. 100 ft. 125 ft. 150 ft. 175 ft.
7.6 m 15.2 m 22.9 m 30.5 m 38.1 m 45.7 m 53.3 m
Intensité
18 AWG 18 AWG 16 AWG 16 AWG 14 AWG 14 AWG 12 AWG
• CORDONS DE RALLONGE PRÉVUS POUR L'EXTÉRIEUR.
BOUTON DE
VERROUILLAGE DE
L'INTERRUPTEUR
INTERRUPTEUR À
DÉTENTE
LA POIGNÉE AUXILIAIRE
S'INSTALLE D'UN COTÉ OU
DE L'AUTRE DU BOITIER
DES ENGRENAGES.
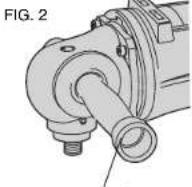
POIGNÉE AUXILIAIRE
FIG. 3
MOYEU DE
L'ÉCROU DU-
DISQUE

TAMPON D'APPUI
DISQUE ABRASIF

Eje Lázaro Cárdenas No. 18 Local D, Col. Obrera 588-9377
MERIDA
Calle 63 #459-A (91 99) 23 54 90
MONTERREY
Av. Francisco I. Madero Pte. 1820-A (91 83) 72 11 25
PUEBLA
17 Norte #205 (91 22) 46 37 14
QUERETARO
Av. Madero 139 Pte. (91 42) 14 16 60
SAN LOUIS POTOSI
Pedro Moreno #100 Centro (91 48) 14 25 67
TORREON
Blvd. Independencia, 96 pte. (91 17) 16 52 65
VERACRUZ
Prolongación Diaz Miron #4280 (91 29) 21 70 16
VILLAHERMOSA
Constitucion 516-A (91 93) 12 53 17