
NSP4113 - Mp3 player INSIGNIA - Free user manual and instructions
Find the device manual for free NSP4113 INSIGNIA in PDF.


| Product type | Portable CD/MP3/WMA player and digital FM tuner |
| Brand | Insignia |
| Model | NSP4113 (NS-P4113) |
| Supported disc formats | Audio CD, CD-R, CD-RW, MP3, WMA (ISO 9660) |
| Anti-shock memory (ESP) | CD: 160 seconds, MP3: 480 seconds, WMA: 960 seconds |
| FM tuner | Digital, up to 10 presets per band |
| Power (batteries) | 2 AA alkaline batteries (LR6/UM-3) |
| Power (adapter) | DC 4.5V jack (center positive), optional AC adapter |
| Power consumption | 0.8 W (3V DC) |
| Headphone output | 15 mW (32 ohms) |
| Line output | 0.6V rms (47k ohms) |
| Frequency response | 20 Hz - 20 kHz |
| Playback functions | Repeat (1/ALL/DIR.), random, intro (10 sec), program (24 tracks) |
| Alphabetical search (MP3/WMA) | Yes, by initial letter or by folder |
| Key lock | Lock switch (HOLD) |
| Display | LCD (liquid crystal display) |
| Maintenance and cleaning | Soft dry cloth, no solvents; CD: wipe from center to edge |
| Safety | Do not open the casing, avoid moisture, surge protection recommended |
| Warranty | Limited to 90 days (parts and labor) |
| Technical support | 1-877-467-4289 (USA/Canada) |
Frequently Asked Questions - NSP4113 INSIGNIA
User questions about NSP4113 INSIGNIA
0 question about this device. Answer the ones you know or ask your own.
Ask a new question about this device
Download the instructions for your Mp3 player in PDF format for free! Find your manual NSP4113 - INSIGNIA and take your electronic device back in hand. On this page are published all the documents necessary for the use of your device. NSP4113 by INSIGNIA.
USER MANUAL NSP4113 INSIGNIA
NS-P4113 Portable CD/MP3/WMA Player and Digital FM Tuner
Contents
Welcome 3
Safety information 4
Features 5
Setting up your CD player. 8
Using your CD player 10
Troubleshooting 19
Maintaining 20
Specifications 22
Legal notices. 23
90-day limited warranty. 25
Francais 27
Espanol. 53
Welcome
Congratulations on your purchase of a high-quality Insignia product. Your NS-P4113 represents the state of the art in portable CD player design and is designed for reliable and trouble-free performance.
Safety information
| Caution RISK OF ELECTRIC SHOCK DO NOT OPEN | |
| Warning To reduce the risk of electric shock, do not remove the cover or back. There are no user-serviceable parts inside. Refer all servicing to qualified service personnel. | |
| The lightning flash with the arrowhead inside an equilateral triangle is intended to alert you to the presence of un-insulated, dangerous voltage within your CD player's enclosure. This voltage may be of sufficient magnitude to constitute a risk of electrical shock. | |
| The exclamation point within an equilateral triangle is intended to alert you to the presence of important operating and maintenance (servicing) instructions in the literature accompanying your CD player. | |
| This product utilizes a Class 1 laser to read CDs. Your CD player is equipped with safety switches to avoid exposure when the CD compartment door is open and the safety interlocks are defeated. Invisible and hazardous laser radiation exist when the door is open and interlocks are failed or defeated. Avoid direct exposure to the laser beam. Do not attempt to defeat or bypass the safety switches. | |
Surge protectors:
We recommend that you use a surge protector when you connect your CD player to AC power. A surge protector will help protect your CD player from lightning and power surges, which are not covered by your warranty.
Follow these safety precautions:
- Read and retain all instructions.
- Do not open the CD door while the CD is spinning. Always keep the CD door closed when not in use.
- Keep all foreign objects out of the CD compartment.
- Place your CD player on a stable surface.
- Avoid installing your CD player in any of the following locations:
- Places exposed to direct sunlight or close to heat radiating appliances, such as electric heaters.
- On top of other stereo equipment that radiates too much heat.
- Places that lack correct ventilation or dusty places.
- Places subject to constant vibration.
- Humid or moist places.
Caution
Do not expose your CD player to dripping or splashing and do not set objects filled with liquid, such as vases, on top of your CD player.
Features
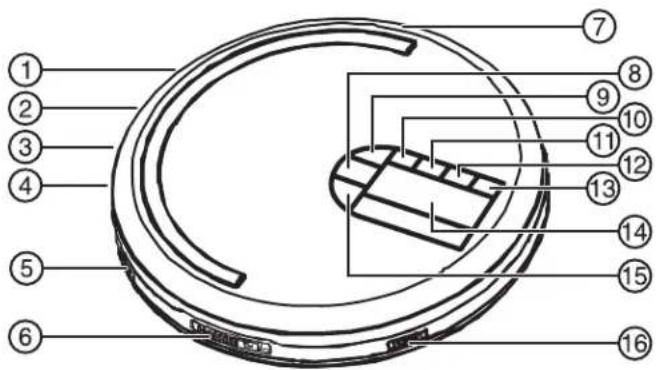
| No. Component Description | |
| 1 Hold switch Slide to lock button controls so you do not accidentally press a button. | |
| 2 LINE OUT jack Plug an audio cable into this jack and into the CD/AUX jack on an external audio system. | |
| 3 PHONE jack Plug headphones into this jack. |
| No. | Component | Description |
| 4 Volume control switch Slide to adjust the volume. | ||
| 5 DBBS switch Slide to the ON position to turn on bass boost. Slide to the OFF position to turn off bass boost. | ||
| 6 OPEN switch Press to open the CD compartment door. | ||
| 7 DC INPUT jack Plug the optional AC/DC power cord into this jack and into an AC outlet. | ||
| 8 / • When playing an audio CD, press to start or pause playback. • When playing an MP3 or WMA CD, press to search up. | ||
| 9 MENU/ESP/PRESET • When playing an audio CD, press to turn the anti-shock feature on or off. • When playing an MP3 or WMA CD, press to start the search function. | ||
| 10 / • When playing an audio CD, press to skip or fast-search backward. • When playing an MP3 or WMA CD, press to search left. • When playing the radio, press to tune to a lower frequency station. | ||
| 11 / • When playing an audio CD, press to skip or fast-search forward. • When playing an MP3 or WMA CD, press to search right. • When playing the radio, press to tune to a higher frequency station. | ||
| 12 PROG/ENTER When programming a playlist or radio station, press to open the programming feature and to confirm selections. | ||
| 13 MODE/CLEAR Press to select the playback mode. You can select REPEAT1, ALL, DIR., INTRO, or RANDOM. | ||
| 14 LCD display Displays information about the currently playing disc and various functions of your CD player. | ||
| 15 /▼ | Press to stop audio CD playback. Press to cancel a playback list. Press to search down on an MP3 or WMA CD. | |
| 16 FUNCTION Slide to select CD or radio mode. | ||
Remote Control
| No. Button Description | |
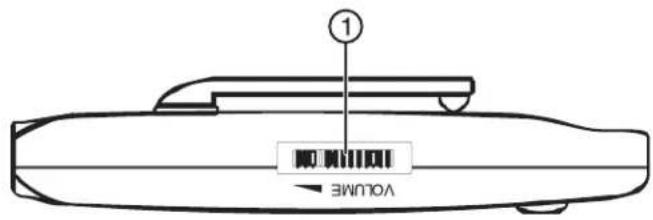
| 1 VOLUME Slide to adjust the volume. | |
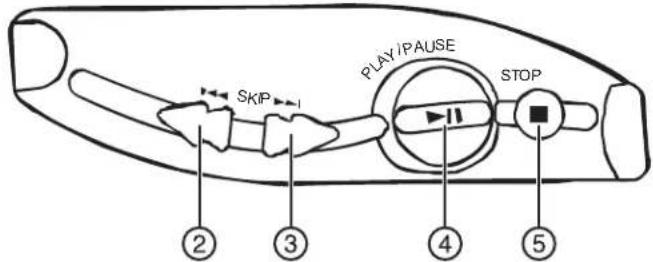
| 2 • When playing an audio CD, press to skip or fast-search backward. • When playing an MP3 or WMA CD, press to search left. • When playing the radio, press to tune to a lower frequency station. | |
| 3 • When playing an audio CD, press to skip or fast-search forward. • When playing an MP3 or WMA CD, press to search right. • When playing the radio, press to tune to a higher frequency station. | |
| 4 • When playing an audio CD, press to start or pause playback. • When playing an MP3 or WMA CD, press to search up. | |
| 5 • Press stop audio CD playback. | • Press to cancel a playback list. • Press to search down on an MP3 or WMA CD. |
Setting up your CD player
Installing batteries
To install batteries:
1 Slide the battery compartment door (located on the bottom of your CD player), then lift it up. Do not remove the door.
2 Insert 2 AA alkaline batteries into the battery compartment. Make sure that the + and - symbols on the batteries match the + and - symbols inside the battery compartment.
3 Close the battery compartment door.
Caution
Use only the size and type of batteries specified.
Make sure that you match the + and - symbols on the batteries with the + and - symbols inside the battery compartment. If you insert the batteries backwards, your CD player may be damaged.
Do not mix different types of batteries together (such as, alkaline, rechargeable, and carbon/zinc).
Do not mix old batteries and new batteries.
When you do not plan to use your CD player for a long period of time, remove the batteries to prevent damage or injury from possible battery leakage.
Do not try to recharge batteries not intended to be recharged. They can overheat and rupture.
Note
If the symbol "LOW BATTERY" appears on the display, batteries are weak and should be replaced.
Using the optional AC/DC power cord
To use the optional AC/DC power cord:
1 Plug one end of the AC/DC power cord into the DC INPUT jack on the back of your CD player.
2 Plug the other end of the AC/DC power cord into an AC outlet.
Note
If the AC adaptor is connected when regular batteries are installed, the power supply automatically switches to the AC power source.
Use only the supplied AC/DC power cord. Using other types of power cords may damage your CD player.
Make sure that the AC/DC power cord matches your household voltage before connecting it to an outlet.
When you are not using AC power, unplug the AC/DC power cord.
Do not touch the AC/DC power cord with wet hands when it is connected to AC power.
Connecting to an external audio system
To connect your CD player to an external audio system:
1. Make sure that your CD player is turned off and unplugged (if you are using an AC/DC power cord). 2. Plug one end of an audio cable into the LINE OUT jack on your CD player. 3. Plug the other end of the audio cable into the CD/AUX jack on the external audio system. Do not plug the cable into an amplifier PHONE jack.
Connecting the headphones
To connect the headphones:
- Plug the headphone cable into the PHONE jack on your CD player.
Using your CD player
Playing a CD
Caution
Your CD player is designed to play audio CDs. Do not try to play any other type of discs.
To play a CD:
1. Connect the headphones (included) or optional earphones into the PHONE jack on your CD player. 2. Press the OPEN button to open the CD compartment door. 3. Insert a disc with the label side facing up. 4. Press down on the CD compartment door until you hear a click. 5. Set the VOLUME control to minimum. 6. Press the button. Your CD player turns on and starts playing the disc. Now Reading appears on the display, then the total number of audio CD tracks (or the total number of MP3 or WMA albums and tracks), and total playing time appears on the display.
After the disc begins to play, the total number of audio CD tracks (or the total number of MP3 or WMA albums and tracks) and elapsed time appear on the display.
7 Adjust the volume to a comfortable level. Do not play a disc at a loud volume level because you may damage your hearing. 8 To pause playback, press the button. The elapsed time and audio CD track number (or MP3 or WMA album and track number) flash on the display. Press the button again to resume playback.
9 To stop playback, press the button once.
10 To turn off your CD player, press the button twice.
Notes
If the CD compartment door opens accidentally during playback, OPEN appears on the display.
Make sure that the CD has stopped spinning before you open the CD compartment door. If you open the door, playback stops.
Your CD player can play 3-inch (8 cm) single CDs without an adapter.
If you try to play a CD-RW that has not been recorded correctly, Disc Error appears on the display.
When a disc is playing EPS flashes.
Automatic power off
If your CD player is in stop (standby) mode for 60 seconds, your player turns off automatically to save battery power. When your CD player turns off, all settings, such as program and playing modes, are erased.
Searching on a CD
Audio CD
To search for a track or a section of a track on an audio CD:
- Press the button once to go to the beginning of the currently playing track.
- Press the button repeatedly to go backwards through the tracks on the audio CD.
- Press the button once to go to the next track.
- Press the button repeatedly to go forward through the tracks on the audio CD.
- Press and hold the left or right arrow button to search backwards or forwards at high speed. When you find the section you want, release the button.
Note
Low level audio is played when you search to help you locate the track or section you want.
MP3 or WMA CD
To search for a track:
- Press the button once to go to the beginning of the currently playing track.
- Press the button repeatedly to go backwards through the tracks on the MP3 or WMA CD.
- Press the button once to go to the next track.
- Press the button repeatedly to go forward through the tracks on the MP3 or WMA CD.
Note
On MP3 or WMA CDs with multiple albums, albums are represented as "folders."
To search for a track name:
1 Press the MENU/ESP/PRESET button once. ABCDEFGHIJKLM appears on the display, and the cursor flashes. To view the rest of the alphabet, press the ▸ button. MNOPQRSTUVWXYZ appears on the display, and the cursor flashes.
2 Press the □∼□ or □∼□ button to select a letter. The letter you selected flashes on the display.
Tip: If an MP3 file name has symbols (for example, *, /, -, 1, or =), select the symbol on the display.
3 Press the PROG/ENTER button. If your CD player finds more than one track that starts with the letter you selected, the first track name flashes on the display. Press the / or button to select a track, then press the PROG/ENTER button. Playback begins after you select a track.
To search for a track in an album:
1 Press the MENU/ESP/PRESET button twice. The album name appears on the upper row of the display, and the track name appears under the album name.
2 Press the ▸ or ▸ button to select an album name, or press the ◂ or ▸ button to select a track name, then press the PROG/ENTER button. The album or track you selected plays automatically.
3 To search in alphabetic order, press the MENU/ESP/PRESET button once, then press the □₁₄ or □₁₅ button to select the letters. (Press the □₁₆ button or the □₁₇ button to skip an entire line of the alphabet at one time.) Press the PROG/ENTER button to confirm your selection, then press the □₁₈ button to start playback.
4 To search for an album (if the CD has multiple albums), press the MENU/ESP/PRESET button twice, press the ▸ / button or the ▸ button to select the album. (Press the ▸ / or ▸ / button to display the entire title.) Press the PROG/ENTER button to confirm your selection, then press the ▸ / button to start playback.
Understanding the CD layout of an MP3 or WMA CD
The following chart shows folder structure for an MP3 CD with four albums.
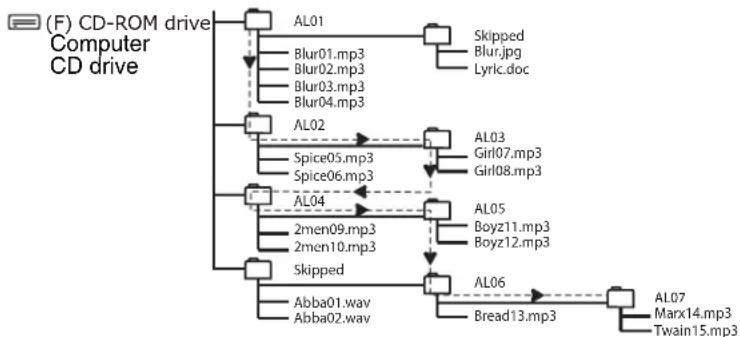
- The arrow pathway shows the playback sequence of MP3 folders and files.
- This example has a total of four MP3 directories. Based on this layout, the first file (track) that plays is Blur01.mp3, and the last file (track) that plays is Twain15.mp3.
- Skipped indicates a folder that does not contain audio files. Your CD player cannot read these folders.
- If a folder contains both MP3 and non-MP3 files, your CD player skips the non-MP3 files.
Using repeat playback
Audio CD
To repeat a track or an entire CD:
1 Press the button. 2 To repeat the same track, press the MODE/CLEAR button once. REP 1 appears on the display. Your CD player repeats the current track until you press the ■/■ button or press the MODE/CLEAR button four times. 3 To repeat the entire CD, press the MODE/CLEAR button twice. REP A appears on the display. Your CD player repeats the entire CD. Press the MODE/CLEAR button three times to cancel repeat mode.
MP3 or WMA CD
To repeat a track, an entire CD, or an album:
1 Press the button. 2 To repeat the same track, press the MODE/CLEAR button once. REP 1 appears on the display. Your CD player repeats the current track until you press the ■/■ button or press the MODE/CLEAR button four times. 3 To repeat the entire MP3/WMA CD, press the MODE/CLEAR button twice. REP A appears on the display. Press the MODE/CLEAR button four times to cancel repeat mode. 4 To repeat the entire album (folder), press the MODE/CLEAR button three times. REP D appears on the display. Press the MODE/CLEAR button three times to cancel repeat mode.
Using INTRO play
You can play the first 10 seconds of each track on a CD to help you find the track you want.
To use INTRO play:
1 Press the button. 2 Press the MODE/CLEAR button three times for an audio CD or four times for an MP3 or WMA CD to start INTRO play. INT appears on the display. Your CD player plays the first 10 seconds of each track on the CD.
Tip
After your CD player plays the first 10 seconds of all the tracks on the CD, your player waits 30 seconds, then turns off.
3 Press the MODE/CLEAR button twice more to cancel INTRO play and resume normal playback.
Playing tracks randomly
To randomly play tracks:
1 Press the MODE/CLEAR button four times for an audio CD or five times for an MP3 or WMA CD to start random mode. RND appears on the display. 2 Press the button to start playback in Random order. 3 Press the or button to go to the previous or next random track. 4 Press the MODE/CLEAR button once to return to the normal playback.
Programming a playback list
Audio CD
To program a playlist:
1 Press the button, wait five seconds, then press the / button. 2 Press the PROG/ENTER button. The track number and P appear on the display to indicate the first selection.
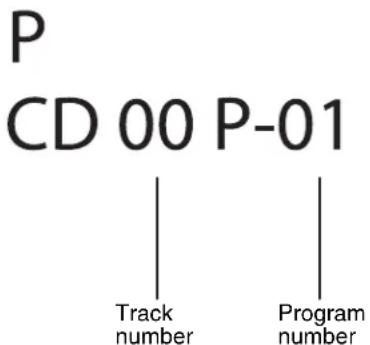
3 Press the 1 1 or 2 1 button to select the track you want to add to the playlist. 4 Press the PROG/ENTER button once to store the track into memory.
5 Repeat Steps 3 and 4 to program as many as 24 tracks. 6 Press the button once to start programmed playback. 7 To cancel the playlist, press and hold the MODE/CLEAR button for three seconds.
Note
During program playback, if you want to play the playlist repeatedly, press the MODE/CLEAR button one or more times until REP A appears on the display.
MP3 or WMA CD
To program a playlist:
1 Press the button, wait eight seconds, then press the button. 2 Press the PROG/ENTER button. The album number, track number, and program number appear on the display. The album number flashes.
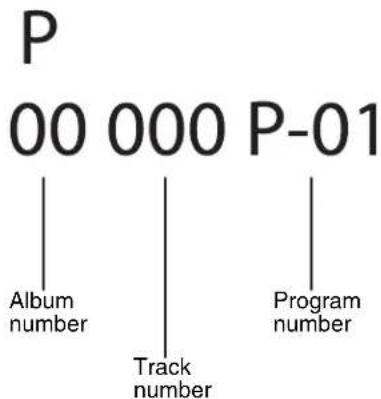
3 Press the 14 or 15 button to select the album you want to add to the playlist. 4 Press the PROG/ENTER button once to store the album into memory. The album number stops flashing, and the track number starts flashing. 5 Press the 1 2 3 or 1 2 3 button to select the track you want to add to the playlist. 6 Press the PROG/ENTER button to store the track into memory.
7 Repeat Steps 3 through 6 to program as many as 24 tracks. 8 Press the button once to start programmed playback. 9 To cancel the playlist, press and hold the MODE/CLEAR button for three seconds.
Using the anti-shock feature
When your CD player moves during playback (for example, when you are walking or in a moving vehicle), your player may be subject to bumps or vibrations.
When you press the button, the anti-shock feature turns on automatically and ESP flashes on the display. The CD spins faster and your CD player stores the audio in memory to make sure that playback does not pause or skip.
If your player is bumped or vibrated too much, the memory buffer gets full and ESP stops flashing on the display. If the memory buffer is full, the sound mutes for a short time. After the bumping or vibration stops, your player resumes normal playback.
Note
You should use the anti-shock feature only when necessary. Using the anti-shock feature while your CD player is running on battery power uses additional battery power. To turn off the anti-shock feature when playing an audio CD, press the MENU/ESP/PRESET button. You cannot turn off the anti-shock feature when playing an MP3 or WMA CD. The anti-shock feature will not correct playback errors if the CD is scratched or dirty.
Playing the radio
Note
The headphone cable is the FM antenna. For best reception, make sure that the cable is fully extended.
To play the radio:
1 Set the FUNCTION switch to RADIO, then press the button. 2 Press the MODE/CLEAR button to select FM MONO or FM STEREO.
Note
If you select FM STEREO and the radio signal is weak, STEREO appears on the display. Press the MODE/CLEAR button to switch to FM MONO. The audio plays in mono, but the background static is reduced.
3 To turn off the radio, press the button.
Tuning to a radio station
To manually tune to a radio station:
- Quickly press and release the \(\boxed{1 - 1}\) /or/ button one or more times until you find the station you want.
To automatically tune to a radio station:
- Press and hold the \(\left\langle \begin{array}{lll}\text{一} & \text{一} & \text{一}\ \text{一} & \text{一} & \text{一}\ \text{一} & \text{一} & \text{一}\ \text{一} & \text{一} & \text{一}\ \text{一} & \text{一} & \text{一}\ \text{一} & \text{一} & \text{一}\ \text{一} & \text{一} & \text{—}\ \text{一} & \text{一} & \text{—}\ \text{一} & \text{一} & \text{—}\ \text{一} & \text{一} & \text{—}\ \text{一} & \text{一} & \text{—}\ \text{一} & \text{一} & \text{—}\ \text{一} & \text{一} & \end{array} \right\rangle\) button. Your CD player automatically tunes to the first clear station.
Programming radio stations
You can program as many as 10 radio stations into memory for each band.
To program a station:
1 Set the FUNCTION switch to RADIO. 2 Select the radio band and tune to the station you want to program. 3 Press the PROG/ENTER button. 4 When PROG appears on display, press ESP/MENU/PRESET to select the storage location, then press PROG/ENTER to store the station. 5 Repeat Steps 3 and 4 to program additional stations.
Note
If you program a station to a preset number that already has been assigned to a station, the new station replaces the old station.
Tuning to a programmed station
To tune to a programmed station:
1 Set the FUNCTION switch to RADIO. 2 Press the MENU/ESP/PRESET button to turn on the radio. 3 Press the MENU/ESP/PRESET button one or more times until the preset number you want appears on the display.
Troubleshooting
Warning
Do not try to repair your CD player. There are no serviceable parts inside. Opening the case voids your warranty. Refer all servicing to qualified service personnel.
| Problem Possible cause Possible solution | ||
| CD player will not turn on. | Batteries are inserted incorrectly. | Make sure that the + and - symbols on the batteries match the + and - symbols inside the battery compartment. |
| Batteries are dead. Replace the batteries. | ||
| AC power adapter is not connected correctly. | Make sure that the AC power adapter is connected correctly. | |
| CD does not play or stops playing | CD compartment door is not closed. | Press down on the CD compartment door to make sure that it is completely closed. |
| Water may have condensed on the lens. | Open the CD compartment door and leave it open for about one hour to let it dry out. | |
| CD is inserted incorrectly. Make sure that the CD is inserted with the label facing up. | ||
| CD is scratched or damaged. Try another CD. | ||
| MP3 or WMA files may have been corrupted when they were created or downloaded, or when they were being recorded to the CD. | Make sure that the MP3 or WMA files are not corrupt. If necessary, burn the files to a new CD. | |
| Playback does not start from the first track. | RESUME or PROGRAM mode may be active. | Turn off RESUME or PROGRAM mode. |
| Problem Possible cause Possible solution | ||
| No sound or poor sound quality. | Cables may not be connected correctly and securely. | Make sure that all the cables are connected correctly and securely. |
| Volume is set too low. Increase | the volume. | |
| The headphone connector may be dirty. | Clean the headphone connector. | |
| Your CD player may be too close to magnetic interference, such as unshielded speakers. | Move your CD player away from magnetic fields. | |
| Temperature inside the car may be too cold or too hot. | Adjust the car temperature. | |
| The cigarette socket may be dirty. | Clean the cigarette socket. | |
| Your CD player may be in reverse mode. | Make sure that your CD player is not in reverse mode. | |
Note: If the CD is still not playing correctly after you try these troubleshooting solutions, turn your CD player off, wait five seconds, then turn it on again.
Maintaining
Handling CDs
- To remove a CD from its case, hold it at the edges while you press down gently on the center hole.
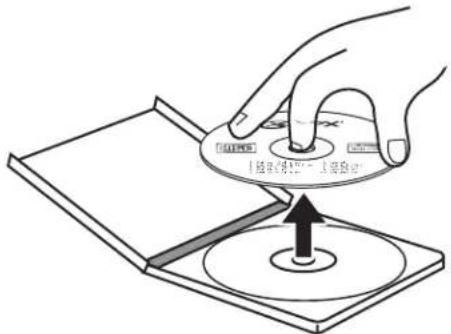
- Do not touch the shiny surface of the CD or bend the CD.
- Place the CD into the CD compartment with the label facing up.
- Store CDs in their cases when you are not using them.
- Do not store CDs in areas where they can get hot, such as an automobile.
- Do not write on the label side of the CD with a ballpoint pen because you may scratch the surface.
Cleaning CDs
A dirty CD may not play correctly.
To clean a CD:
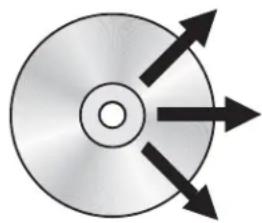
- With a soft cloth, wipe the CD in a straight line from the center to the edge.
Caution
Do not use any solvent, such as record spray, thinner, or benzene, to clean a CD.
Cleaning your CD player
To clean your CD player, follow these guidelines:
- Use a soft, clean cloth moistened with plain, lukewarm water to clean the exterior of your CD player.
- Never use solvents such as benzene or other strong chemical cleaners because these could damage your CD player's finish.
- Do not let liquid drip into the inside of your CD player.
Specifications
Audio
| D/A conversion 1-bit DAC | 8 times oversampling |
| Frequency response 20-20 | 0,000 Hz |
| Anti-shock CD: 160 seconds | MP3: 480 secondsWMA: 960 seconds |
| Wow and flutter Below me asurable limits | |
| Number of channels 2 channels (stereo) | |
| Output level Line output: 0.6V rms (47K Ohm)Headphone: 15mW (32 Ohm) | |
MP3/WMA
Note
Make sure that your CD burner (recorder) complies with these specifications. For more information, see the CD burner documentation.
| MPEG Rate 32-384 Kbps | |
| Sampling Frequency 8/48 | KHz |
| MP3 Playback ISO9660-form compatible | |
| MPEG rate supported MP3 format: Supported 32~384kbps and VBR compatibleWMA format: Supported 16~192kbps and VBR compatible | |
Power
| General Power requirements | 2 LR6 / UM-3 / AA alkaline batteries DC IN 4.5V jack accepts AC power adapter (center positive) |
| Power consumption 0.8 W | (DC 3V) |
Note
Specifications and design are subject to change without notice.
Legal notices
FCC Part 15
Warning
Modifications not authorized by the manufacturer may void the user's authority to operate this device.
This device complies with Part 15 of the FCC Rules. Operation of this product is subject to the following two conditions: (1) this device may not cause harmful interference, and (2) this device must accept any interference received, including interference that may cause undesired operation.
This equipment has been tested and found to comply within the limits for a class B digital device, pursuant to Part 15 of the FCC Rules. These limits are designed to provide reasonable protection against harmful interference in a residential installation. This equipment generates, uses, and can radiate radio frequency energy and, if not installed and used in accordance with the instructions, may cause harmful interference to radio communications. However, there is no guarantee that interference will not occur in a particular installation. If this equipment does cause harmful interference to radio or television reception, which can be determined by turning the equipment off and on, the user is encouraged to try to correct the interference by one or more of the following measures:
- Reorient or relocate the receiving antenna.
- Increase the separation between the equipment and receiver.
- Connect the equipment into an outlet on a circuit different from that to which the receiver is connected.
- Consult the dealer or an experienced technician for help.
Canada ICES-003 statement
This Class B digital apparatus complies with Canadian ICES-003.
Copyright
© 2007 Insignia. Insignia and the Insignia logo are trademarks of Best Buy Enterprise Services, Inc. Other brands and product names are trademarks or registered trademarks of their respective holders. Specifications and features are subject to change without notice or obligation. For service and support call (877) 467-4289.
INSIGNIA
NS-P4113 Portable CD/MP3/WMA Player and Digital FM Tuner
90-day limited warranty
Insignia Products ("Insignia") warrants to you, the original purchaser of this new NS-P4113 ("Product"), that the Product shall be free of defects in the original manufacture of the material or workmanship for a period of 90 days from the date of your purchase of the Product ("Warranty Period"). This Product must be purchased from an authorized dealer of Insignia brand products and packaged with this warranty statement. This warranty does not cover refurbished Product. If you notify Insignia during the Warranty Period of a defect covered by this warranty that requires service, terms of this warranty apply.
How long does the coverage last?
The Warranty Period lasts for 90 days from the date you purchased the Product. The purchase date is printed on the receipt you received with the Product.
What does this warranty cover?
During the Warranty Period, if the original manufacture of the material or workmanship of the Product is determined to be defective by an authorized Insignia repair center or store personnel, Insignia will (at its sole option): (1) repair the Product with new or rebuilt parts; or (2) replace the Product at no charge with new or rebuilt comparable products or parts. Products and parts replaced under this warranty become the property of Insignia and are not returned to you. If service of Products or parts are required after the Warranty Period expires, you must pay all labor and parts charges. This warranty lasts as long as you own your Insignia Product during the Warranty Period. Warranty coverage terminates if you sell or otherwise transfer the Product.
How to obtain warranty service?
If you purchased the Product at a retail store location, take your original receipt and the Product to the store you purchased it from. Make sure that you place the Product in its original packaging or packaging that provides the same amount of protection as the original packaging. If you purchased the Product from an online web site, mail your original receipt and the Product to the address listed on the web site. Make sure that you put the Product in its original packaging or packaging that provides the same amount of protection as the original packaging.
To obtain in-home warranty service for a television with a screen 25 inches or larger, call 1-888-BESTBUY. Call agents will diagnose and correct the issue over the phone or will have an Insignia-approved repair person dispatched to your home.
Where is the warranty valid?
This warranty is valid only to the original purchaser of the product in the United States and Canada.
What does the warranty not cover?
This warranty does not cover:
- Customer instruction
- Installation
- Set up adjustments
- Cosmetic damage
- Damage due to acts of God, such as lightning strikes
- Accident
- Misuse
- Abuse
- Negligence
- Commercial use
- Modification of any part of the Product, including the antenna
- Plasma display panel damaged by static (non-moving) images applied for lengthy periods (burn-in).
This warranty also does not cover:
- Damage due to incorrect operation or maintenance
- Connection to an incorrect voltage supply
- Attempted repair by anyone other than a facility authorized by Insignia to service the Product
- Products sold as is or with all faults
- Consumables, such as fuses or batteries
- Products where the factory applied serial number has been altered or removed. Repair or replacement as provided under this warranty is your exclusive remedy. Insignia shall not be liable for any incidental or consequential damages for the breach of any express or implied warranty on this product, including, but not limited to, lost data, loss of use of your product, lost business or lost profits. Insignia Products makes no other express warranty with respect to the product. All express and implied warranties for the product, including, but not limited to, any implied warranty of and conditions of merchantability and fitness for a particular purpose, are limited in duration to the warranty period set forth above and no warranties, whether express or implied, will apply after the warranty period. Some states, provinces and jurisdictions do not allow limitations on how long an implied warranty lasts, so the above limitation may not apply to you. This warranty gives you specific legal rights, and you may also have other rights, which vary from state to state or province to province.
Contact Insignia:
For customer service please call 1-877-467-4289
www.insignia-products.com
INSIGNIA™ is a trademark of Best Buy Enterprise Services, Inc.
Distributed by Best Buy Purchasing, LLC.
Insignia, 7601 Penn Avenue South, Richfield, Minnesota, U.S.A.
3 REPLACE the compartment cover.
Precautions
Insignia, 7601 Penn Avenue South, Richfield, Minnesota, U.S.A.
Insignia, 7601 Penn Avenue South, Richfield, Minnesota, U.S.A.
INSIGNIA
Distributed by Insignia™ Products
7601 Penn Avenue South
Richfield, MN USA 55423-3645
www.Insignia-Products.com
© 2007 Insignia™ Products
All rights reserved. All other products and brand names are trademarks of their respective owners.
- NS-P4113 PORTABLE CD/MP3/WMA PLAYER AND DIGITAL FM TUNER
- CONTENTS
- WELCOME
- SAFETY INFORMATION
- SURGE PROTECTORS
- FOLLOW THESE SAFETY PRECAUTIONS
- CAUTION
- FEATURES
- REMOTE CONTROL
- SETTING UP YOUR CD PLAYER
- INSTALLING BATTERIES
- TO INSTALL BATTERIES
- NOTE
- USING THE OPTIONAL AC/DC POWER CORD
- TO USE THE OPTIONAL AC/DC POWER CORD
- CONNECTING TO AN EXTERNAL AUDIO SYSTEM
- TO CONNECT YOUR CD PLAYER TO AN EXTERNAL AUDIO SYSTEM
- CONNECTING THE HEADPHONES
- TO CONNECT THE HEADPHONES
- USING YOUR CD PLAYER
- PLAYING A CD
- TO PLAY A CD
- NOTES
- AUTOMATIC POWER OFF
- SEARCHING ON A CD
- AUDIO CD
- TO SEARCH FOR A TRACK OR A SECTION OF A TRACK ON AN AUDIO CD
- MP3 OR WMA CD
- TO SEARCH FOR A TRACK
- TO SEARCH FOR A TRACK NAME
- TO SEARCH FOR A TRACK IN AN ALBUM
- UNDERSTANDING THE CD LAYOUT OF AN MP3 OR WMA CD
- USING REPEAT PLAYBACK
- USING INTRO PLAY
- TO USE INTRO PLAY
- PLAYING TRACKS RANDOMLY
- TO RANDOMLY PLAY TRACKS
- PROGRAMMING A PLAYBACK LIST
- TO PROGRAM A PLAYLIST
- USING THE ANTI-SHOCK FEATURE
- PLAYING THE RADIO
- TO PLAY THE RADIO
- TUNING TO A RADIO STATION
- PROGRAMMING RADIO STATIONS
- TUNING TO A PROGRAMMED STATION
- TROUBLESHOOTING
- WARNING
- MAINTAINING
- HANDLING CDS
- CLEANING CDS
- TO CLEAN A CD
- CLEANING YOUR CD PLAYER
- TO CLEAN YOUR CD PLAYER, FOLLOW THESE GUIDELINES
- SPECIFICATIONS
- AUDIO
- MP3/WMA
- POWER
- LEGAL NOTICES
- FCC PART
- CANADA ICES-003 STATEMENT
- COPYRIGHT
- INSIGNIA
- DAY LIMITED WARRANTY
- HOW LONG DOES THE COVERAGE LAST
- WHAT DOES THIS WARRANTY COVER
- HOW TO OBTAIN WARRANTY SERVICE
- WHERE IS THE WARRANTY VALID
- WHAT DOES THE WARRANTY NOT COVER
- PRECAUTIONS
Brand : INSIGNIA
Model : NSP4113
Category : Mp3 player