Bravos MVWB850WQ - Washing machine MAYTAG - Free user manual and instructions
Find the device manual for free Bravos MVWB850WQ MAYTAG in PDF.


User questions about Bravos MVWB850WQ MAYTAG
0 question about this device. Answer the ones you know or ask your own.
Ask a new question about this device
Download the instructions for your Washing machine in PDF format for free! Find your manual Bravos MVWB850WQ - MAYTAG and take your electronic device back in hand. On this page are published all the documents necessary for the use of your device. Bravos MVWB850WQ by MAYTAG.
USER MANUAL Bravos MVWB850WQ MAYTAG
FOR QUESTIONS ABOUT FEATURES, OPERATION/PERFORMANCE, PARTS, ACCESSORIES OR SERVICE CALL: 1.800.688.9900
OR VISIT OUR WEBSITE AT WWW.MAYTAG.COM
IN CANADA, CALL: 1.800.807.6777
OR VISIT OUR WEBSITE AT WWW.MAYTAG.COM
Quick Start Guide/Washer Use.....pg. 5
ASSISTANCE OR SERVICE 2
In the U.S.A. 2
In Canada 2
Accessories 2
WASHER SAFETY 3
BENEFITS AND FEATURES 4
Benefits 4
Features 4
QUICK START GUIDE/WASHER USE 5
Starting Your Washer 7
Cycles 8
Additional Features 9
Options 10
Changing Cycles, Modifiers, and Options 11
Normal Sounds 11
LAUNDRY TIPS 12
WASHER CARE 12
Cleaning Your Washer 12
Water Inlet Hoses 13
Vacation, Storage, and Moving Care 13
TROUBLESHOOTING 14
Washer and Components 14
Washer Operation.... 15
Clothing Care 16
WARRANTY 18
TABLE DES MATIÈRES
ASSISTANCE OU SERVICE 19
Aux États-Unis 19
Au Canada 19
Accessoires 19
SÉCURITÉ DE LA LAVEUSE 20
AVANTAGES ET CARACTÉRISTIQUES ...... 21
Avantages 21
Caractéristiques 21
GUIDE DE DÉMARRAGE RAPIDE/
UTILISATION DE LA LAVEUSE 22
ASSISTANCE OR SERVICE
Before calling for assistance or service, please check "Troubleshooting." It may save you the cost of a service call. If you still need help, follow the instructions below.
When calling, please know the purchase date and the complete model and serial number of your appliance. This information will help us to better respond to your request.
If you need replacement parts
If you need to order replacement parts, we recommend that you use only factory specified parts. Factory specified parts will fit right and work right because they are made with the same precision used to build every new MAYTAC® appliance.
To locate factory specified parts in your area, call the following customer assistance telephone number or your nearest designated service center.
In the U.S.A.
Call Maytag Services, LLC Customer Assistance toll free:
1-800-688-9900, or visit our website at www.maytag.com.
Our consultants provide assistance with:
Features and specifications on our full line of appliances.
Installation information. ■
Use and maintenance procedures. ■
Accessory and repair parts sales. ■
Specialized customer assistance (Spanish speaking, hearing impaired, limited vision, etc.).
Referrals to local dealers, repair parts distributors, and service companies. Maytag ^® appliances designated service technicians are trained to fulfill the product warranty and provide after-warranty service, anywhere in the United States.
To locate the Maytag ^® appliances designated service company in your area, you can also look in your telephone directory Yellow Pages.
For further assistance
If you need further assistance, you can write to Maytag ^® appliances with any questions or concerns at:
Maytag Services, LLC
ATTN: CAIR® Center
P.O. Box 2370
Cleveland, TN 37320-2370
Please include a daytime phone number in your correspondence.
In Canada
Call the Whirlpool Canada LP Customer Interaction Centre toll free: 1-800-807-6777, or visit our website at www.whirlpool.ca.
Our consultants provide assistance with:
Features and specifications on our full line of appliances.
Use and maintenance procedures. ■
Accessory and repair parts sales.
Referrals to local dealers, repair parts distributors, and service companies. Whirlpool Canada LP designated service technicians are trained to fulfill the product warranty and provide after-warranty service, anywhere in Canada.
For further assistance
If you need further assistance, you can write to Whirlpool Canada LP with any questions or concerns at:
Customer Interaction Centre
Whirlpool Canada LP
1901 Minnesota Court
Mississauga, Ontario L5N 3A7
Please include a daytime phone number in your correspondence.
Accessories
Enhance your washer with these premium accessories.
For more high-quality items or to order, call 1-800-901-2042, or visit us at www.maytag.com/accessories. In Canada, call 1-800-807-6777, or visit us at www.whirlpoolparts.ca.
| Part Number Accessory |
| 8212656RP 10 ft (3.0 m) Black EPDM (2 pack) |
| 8212638RP 6 ft (1.8 m) Nylon braided space-saving inlet hose, 90° elbow, hypro-blue steel couplings. (2-pack) |
| 8212487RP 5 ft (1.5 m) Nylon braided inlet hose. (2-pack) |
| 8212637RP 6 ft (1.8 m) Black EPDM space-saving 90° elbow, hypro-blue steel couplings. (2-pack) |
| 8212545RP 5 ft (1.5 m) Red and Blue EPDM. (2-pack) |
| Part Number Accessory | |
| 8212641RP 5 ft (1.5 m) Black EPDM (2 pack) | |
| 8212546RP 4 ft (1.2 m) Black EPDM (2 pack) | |
| 8212526 Washer drip tray, fits under all | |
| 31682 All purpose appliance cleaner | |
| 1903WH Laundry supply storage cart |
WASHER SAFETY
Your safety and the safety of others are very important.
We have provided many important safety messages in this manual and on your appliance. Always read and obey all safety messages.

This is the safety alert symbol.
This symbol alerts you to potential hazards that can kill or hurt you and others.
All safety messages will follow the safety alert symbol and either the word "DANGER" or "WARNING."
These words mean:
! DANGER
You can be killed or seriously injured if you don't immediately follow instructions.
WARNING
You can be killed or seriously injured if you don't follow instructions.
All safety messages will tell you what the potential hazard is, tell you how to reduce the chance of injury, and tell you what can happen if the instructions are not followed.
IMPORTANT SAFETY INSTRUCTIONS
WARNING: To reduce the risk of fire, electric shock, or injury to persons when using the washer, follow basic precautions, including the following:
■ Read all instructions before using the washer.
■ Do not wash articles that have been previously cleaned in, washed in, soaked in, or spotted with gasoline, dry-cleaning solvents, other flammable, or explosive substances as they give off vapors that could ignite or explode.
■ Do not add gasoline, dry-cleaning solvents, or other flammable, or explosive substances to the wash water. These substances give off vapors that could ignite or explode.
■ Under certain conditions, hydrogen gas may be produced in a hot water system that has not been used for 2 weeks or more. HYDROGEN GAS IS EXPLOSIVE. If the hot water system has not been used for such a period, before using the washing machine, turn on all hot water faucets and let the water flow from each for several minutes. This will release any accumulated hydrogen gas. As the gas is flammable, do not smoke or use an open flame during this time.
■ Do not allow children to play on or in the washer. Close supervision of children is necessary when the washer is used near children.
■ Before the washer is removed from service or discarded, remove the door or lid.
■ Do not reach into the washer if the drum, tub or agitator is moving.
■ Do not install or store the washer where it will be exposed to the weather.
■ Do not tamper with controls.
■ Do not repair or replace any part of the washer or attempt any servicing unless specifically recommended in this manual or in published user-repair instructions that you understand and have the skills to carry out.
■ See "Electrical Requirements" for grounding instructions.
SAVE THESE INSTRUCTIONS
State of California Proposition 65 Warnings:
WARNING: This product contains a chemical known to the State of California to cause cancer.
WARNING: This product contains a chemical known to the State of California to cause birth defects or other reproductive harm.
BENEFITS AND FEATURES
Your washer has several benefits and features which are summarized here. Some items may not apply to your model.
Benefits
High-Efficiency Wash System
Your new top loading, high-efficiency washer saves you time by allowing you to do fewer, larger loads. It also conserves resources and lowers your water and energy bills by using the following innovations.
INTELLIFILL™ Water Level Control
This washer senses the load size and composition through a series of fills and wash motion. It then adjusts the water level for the best cleaning and rinsing performance. It eliminates the guesswork. The water level is just right for every wash load size.
NOTE: You may notice during a cycle that the wash load is not completely submerged in water. This is normal for your washer.
Auto Temperature Control
The Auto Temperature Control system on this washer electronically senses and maintains a uniform water temperature by regulating incoming water temperatures. Using Auto Temperature Control will help dissolve detergent.
Washer Impeller System
Your new washer works differently than most washers that you may be accustomed to. The most striking difference is that the washer has a washer impeller system. It uses this new innovative washer impeller at the bottom of the wash basket to move your load through a mixture of water and detergent. The load is moved from the outside toward the middle with items coming up in the center and down on the outside edges.
Dispensers
The dispensers make your washer truly automatic. It is unnecessary for you to return to the washer during the cycle to add detergent, bleach, fabric softener, laundry boosters, or oxi. Laundry products are added to the load at the proper time in the wash cycle.
Spin Speeds
This washer is preset to automatically select the spin speed based on the cycle selected. Depending on your wash load, you can change the preset speeds. The spin speed on this washer is nearly twice as fast as that of a conventional washer. You may notice different sounds during a spin cycle because of this higher speed.
Clean Boost with Heater
The Clean Boost with Heater option helps to ensure better soil and stain removal. Clean Boost with Heater uses the heater within the washer to maintain the selected temperature setting throughout the wash period. This option will add some additional time to the cycle based on which temperature is selected. Clean Boost with Heater reduces the need for pretreatment and is safe for all fabrics.
High Efficiency (HE) Detergent
This washer is designed for High Efficiency (HE) detergent use only. HE detergents are made to produce the right amount of suds and give the best performance in low water wash systems.

Use only High Efficiency (HE) detergent.
Features
Innovative Features
Your new washer includes these features that help to reduce noise, increase the ease of use, and improve wash performance.
Electronic Controls
Electronic controls with preset cycles are easy to use whether you are a beginner or an "expert."
Quiet Operation
This washer is insulated with sound-dampening materials to reduce washer operation sounds and noises.
Suspension System
To reduce washer "vibration," "walk," and "out of balance" conditions, your new washer combines:
4 Spring damper struts to isolate vibration ■
Balance ring at the top and bottom of the wash basket to ■ minimize vibration
Operating software designed to sense and correct off-balance loads ■
Clean Washer with AFFRESH™ Cycle
This washer features an easy-to-use Clean Washer with AFFRESH ^® cycle that thoroughly cleans the inside of your washing machine using higher water volumes in combination with AFFRESH ^® washer cleaner or liquid chlorine bleach. The use of AFFRESH ^® washer cleaner or liquid chlorine bleach with this cycle, will remove and help avoid odor-causing residue.
Stainless Steel Basket
The stainless steel basket is corrosion resistant and enables higher spin speeds for more water extraction, reducing drying time.
Self-clean Wash and Rinse Filter System
This washer filters 100% of the wash and rinse water. The water is filtered then recirculated. The force filter traps sand and dirt, flushing them down the drain, so they are not redeposited onto the clean clothes.
Delay Start
Delay Start allows you to load your washer and pause the start of the cycle for up to 10 hours.
End Signal - Off - Low - Hi
The End Signal produces an audible sound when the wash cycle is finished. This signal is helpful when you are removing items from the washer as soon as it stops.
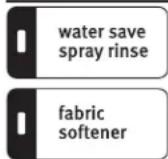
Water Save Spray Rinse
This washer is designed to have the option of saving water by using a spray rinse instead of a deep water rinse. This option is the default setting on some cycles. The option is selectable on other cycles. When using fabric softener, always select the Fabric Softener button, or select Extra Rinse; both of these options will dispense fabric softener in a deep rinse.
Sanitary with Oxi Cycle
This washer is NSF certified to eliminate 99.9% of bacteria when used in conjunction with the Oxi Treat Stains option. To achieve NSF sanitization, set the washer on the Sanitary cycle. Be sure to add an oxygen based stain fighter.
QUICK START GUIDE/WASHER USE
WARNING
Fire Hazard
Never place items in the washer that are dampened with gasoline or other flammable fluids.
No washer can completely remove oil.
Do not dry anything that has ever had any type of oil on it (including cooking oils).
Doing so can result in death, explosion, or fire.
WARNING
Electrical Shock Hazard
Plug into a grounded 3 prong outlet.
Do not remove ground prong.
Do not use an adapter.
Do not use an extension cord.
Failure to follow these instructions can result in death, fire, or electrical shock.
For a summary of how to use your washer following installation, see the QUICK START GUIDE on the next page.
QUICK START GUIDE

MAYTAG
■ heating
flowchart
graph TD
    A["power"] --> B["cancel"]
    B --> C["reminder reset"]
    C --> D["sheets"]
    D --> E["bulky"]
    E --> F["heavy duty"]
    F --> G["drain & spin"]
    G --> H["rinse & spin"]
    H --> I["soak"]
    I --> J["clean washer with flush"]
    J --> K["hand wash"]
    K --> L["pause"]
    L --> M["start"]
    M --> N["pause"]
    N --> O["colors/towels"]
    O --> P["rapid wash"]
    P --> Q["handle with flush"]
    Q --> R["normal"]
    R --> S["power wash"]
BRAVOS MCT Maytag Commercial Technology
flowchart
graph TD
    A["cold"] --> B["cool"]
    B --> C["cold"]
    C --> D["warm"]
    D --> E["cold"]
    E --> F["warm"]
    F --> G["heat"]
    G --> H["cold"]
    H --> I["auto temperature control"]
    I --> J["no spin"]
    J --> K["low"]
    K --> L["medium"]
    L --> M["max extract"]
    M --> N["light"]
    N --> O["medium"]
    O --> P["heavy"]
    P --> Q["extra heavy"]
    Q --> R["salt level"]

    S["water save spray rinse"] --> T["cast treat stains"]
    U["fabric softener"] --> V["extra rinse"]
    W["clean boost with heater"] --> X["end signal off low - hi"]
NOTE: The panel shown above may be different from that of your model.
WARNING: To reduce the risk of fire, electric shock, or injury to persons, read the IMPORTANT SAFETY INSTRUCTIONS before operating this appliance.
The following is a guide to using your washer. Please refer to specific sections of this manual for more detailed information.
OPERATING CONTROLS
POWER/CANCEL - Press POWER/CANCEL to turn the washer on or off.
Start - Press START/PAUSE to start your washer after a cycle has been selected. Be sure all desired Modifiers and Options have been selected. The lid must be closed for the washer to start.
START/PAUSE - Press START/PAUSE to start your washer after a cycle has been selected. Be sure all desired Modifiers and Options have been selected. Press START/PAUSE once to unlock the lid and add a garment. Press START/PAUSE to complete the cycle from where it was stopped. The lid must be closed for the washer to start. Press POWER/CANCEL to stop the wash cycle. The washer will then drain and turn off.
Lid Lock - When the Lid Lock status light glows, the washer lid is locked. The lid must be closed for the washer to Start. NOTE: You must wait until the Lid Lock Light turns off before the lid can be opened.
OPTIONS AND MODIFIERS
You can change Options and Modifiers anytime before Start/Pause is pressed.
Press POWER/CANCEL.
Select Wash Cycle.
Select desired OPTIONS and MODIFIERS.
Press START/PAUSE or select DELAY START (on some models) to start wash at a later time.
Changing cycles after pressing Start:
Press POWER/CANCEL once to cancel the cycle. The washer will drain
Select desired Wash Cycle.
Select desired OPTIONS and MODIFIERS.
Press START/PAGE or select DELAY START (on some models) to start wash at a later time. Washer restarts at the beginning of the new cycle.
NOTE: An error tone will sound if your selection is unavailable.
DETERGENT USE
Use only High Efficiency (HE) detergents.
Using regular detergent will likely result in wash errors, longer cycle times, and reduced rinsing performance.
For more information, see "Using the Proper Detergent."
ADD A GARMENT, PAUSING, OR RESTARTING THE WASHER
You can place additional clothing in the wash when the "Add a Garment" status light is glowing without sacrificing wash performance, at which time, you can:
Press START/PAUSE once. (Lid Lock light turns off, then open the lid.)
Add garments. (Close washer lid.)
Press START/PAUSE to restart.
To unlock the lid after the Add a garment period, Press START/PAUSE once. Pressing POWER/CANCEL will cancel the wash cycle.
STOPPING THE WASHER
You can stop the wash cycle and drain the tub by pressing the Power/Cancel button once.
Starting Your Washer
Your Maytag washer is equipped with an "Auto Wake-up" feature. Press any button or open and close the washer lid, and the display will illuminate. The washer will automatically shut down if a cycle is not selected and started right away.
Your Maytag washer will memorize and save all options ■ and modifiers that have been changed during setting mode (exceptions apply to options for Super Wash, Rapid Wash, and Normal cycles. They will default back to factory default settings.)
Using the Proper Detergent
Use only High Efficiency detergents. The package for this type of detergent will be marked "HE" or "High Efficiency." This wash system, along with less water, will create too much sudsing with a regular non-HE detergent. Using regular detergent will likely result in washer errors, longer cycle times, and reduced rinsing performance. It may also result in component failures and noticeable mold or mildew. HE detergents are made to produce the right amount of suds for the best performance. Follow the manufacturer's instructions to determine the amount of detergent to use. Remember, concentrated detergents such as 2x or higher will use less detergent based on load size.

Use only HE detergent.
- Place a load of sorted clothes into the washer. See "Laundry Tips."
Load evenly to maintain washer balance. Mix large and small items. Items should move easily through the wash water.
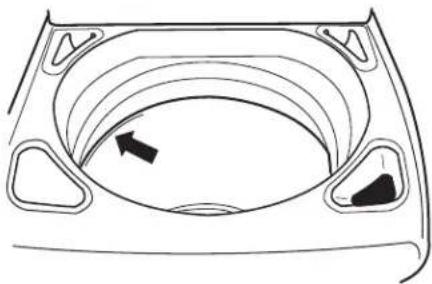
Load only to the top of the basket as shown. Overloading ■ can cause poor cleaning. Items need to move easily through the wash water.
For best performance, load garments in loose heaps evenly around the basket wall. Do not load above the stainless steel portion of the basket as shown.
natural_image
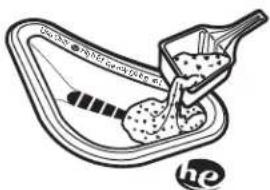
Diagram of a car intake manifold with directional arrows indicating flow or movement (no text or labels)- Pour measured powdered or liquid HE detergent into the High Efficiency detergent dispenser. Always use the detergent dispenser, and do not put detergent directly onto clothes in the washer.
text_image
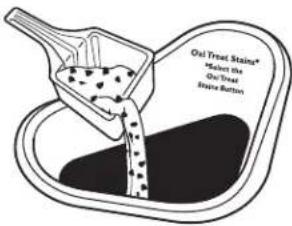
CHINA ZHEJI CONSYTICAL CO. he- Add laundry boosters (powdered or liquid) into the Oxi Treat Stains dispenser, if needed. Laundry boosters are automatically dispensed at the proper time during the wash cycle. Do not mix laundry boosters and chlorine bleach in the same cycle. Be sure to select Oxi Treat Stains from the options to assure proper dispensing.
text_image
Oil Treat Stains* Select the Oil Treat Brine Button- Pour measured liquid chlorine bleach into the liquid bleach dispenser, if needed. Bleach is diluted and automatically dispensed at the proper time during the wash cycle.
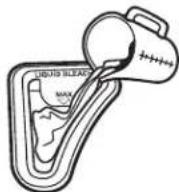
Do not overfill. Do not dilute. Do not use more than 1 cup (250 mL) for a full load. Use less with a smaller load size.
Follow the garment and the chlorine bleach manufacturer's directions for proper use.
To avoid spilling, use a cup with a pouring spout. Do not let bleach splash, drip, or run down into the washer basket.
At the end of the cycle, a small amount of water may be left in the dispenser. This is normal.
NOTE: Use only liquid chlorine bleach in this dispenser.
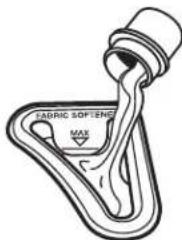
- Pour measured liquid fabric softener into the fabric softener dispenser, if desired.
If you are using fabric softener, be sure to select Fabric Softener from the options to assure proper dispensing.
text_image
FABRIC SOFTIENE MAXDo not overfill. Do not dilute. The dispenser holds 3 oz (94 mL), or a capful of fabric softener.
Fabric softener is dispensed in a deep rinse when the Fabric Softener option is selected. If Extra Rinse is selected, the fabric softener will be dispensed during the final rinse.
Do not use fabric softener dispensing balls in this washer. ■ Dispensing balls will not operate correctly with this washer.
Do not spill or drip any fabric softener onto the clothes. ■
At the end of the cycle, a small amount of water may be left in the dispenser. This is normal.
NOTE: Use only liquid fabric softener in this dispenser.
- Close the washer lid.
- Select a Wash Cycle. See "Cycles."
- Select the desired Modifiers. See "Modifiers."
- Select an Option, if desired. See "Options." Select Fabric Softener or Extra Rinse option if you are using liquid fabric softener.
- Select Delay Start, if desired. See "Delay Start" in the "Modifiers" section.
- Press START/PAUSE. The wash cycle begins, and the display shows the estimated remaining time. The lid will lock.
NOTE: If you do not press Start/Pause within 5 minutes of pressing Power/Cancel, the washer automatically shuts off.
Cycles
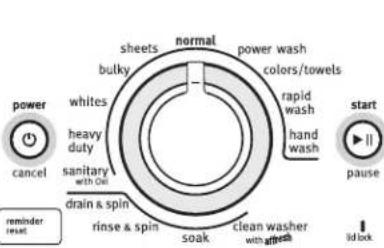
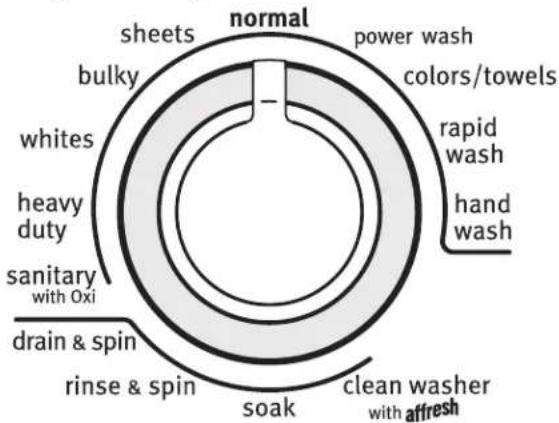
Turn the knob to choose the correct wash cycle for the type of fabrics you are washing. When the knob points to a cycle, the cycle and Start/Pause indicator lights will blink. If the default settings for the Modifiers and Options are acceptable, you may press Start/Pause to begin the wash cycle.
text_image
normal sheets power wash colors/towels bulky whites heavy duty sanitary with Oxi drain & spin rinse & spin soak clean washer with affresh rapid wash hand washPreset Cycle Settings
For ease of use, preset cycle settings provide the recommended fabric care settings for each cycle.
To use the preset cycle settings:
- Press POWER/CANCEL.
- Select the cycle you want by turning the knob. The preset cycle settings will be displayed (see following chart).
NOTE: The preset times may vary slightly depending on your model.
- Press START/PAUSE. The wash cycle will begin.
Preset Cycle Settings
| Cycle Preset | Soil Level** Wash/Rinse | |
| Minutes* | Temp | |
| Sanitary with Oxi 1:39 Extra Heavy Hot/Cold | ||
| Heavy Duty 0:52 Extra Heavy Warm/Cold | ||
| Whites | 1:19 Extra Heavy Hot/Cold | |
| Bulky 0:52 Heavy | Warm/Cold | |
| Sheets | 0:49 Heavy | Warm/Cold |
| Normal | 0:41 Heavy | Warm/Cold |
| Power Wash | 1:09 Extra Heavy Hot/Cold | |
| Colors/Towels | 0:45 Heavy | Warm/Cold |
| Rapid Wash | 0:33 Light | Warm/Warm |
| Hand Wash | 0:36 Light | Cool/Cold |
| Clean Washer with AFFRESHTM | 1:02 Not applicable | Not applicable |
| Soak | 0:31 Light | Cool/Cold |
| Rinse & Spin | 0:24 Not applicable | Cool/Cold |
| Drain & Spin | 0:13 Not applicable | Not applicable |
*These times are for reference only and may not match your model exactly.
**Cycle time in hour and minutes will appear in the display while you are making selections.
The total cycle time will appear, including an estimated time for drain and fill times, once Start/Pause is pressed.
NOTE: Load only to the top of the basket. Overloading can cause poor cleaning. See "Starting Your Washer."
IMPORTANT: When washing waterproof/water-resistant items such as plastic lined mattress pads, shower curtains, tarps, jackets, or sleeping bags, select the lowest spin speed setting available for the cycle and washer model being used.
Sanitary with Oxi
Use this cycle to eliminate 99.9% of bacteria when used in conjunction with the Stain Boost with Heater cycle. Preset cycle setting must be used to achieve the proper sanitization. Be sure to add an oxygen based stain fighter or color safe bleach.
Heavy Duty
Use this cycle for heavily soiled or sturdy cotton items. Cycle combines high-speed wash action and high-speed spin. A Water Save Spray Rinse is a preset cycle setting for this cycle.
Whites
This cycle introduces liquid chlorine bleach to the load at the proper time for improved whitening of your heavily soiled white fabrics. This cycle combines high-speed wash action and high-speed spin speed. For maximum soil and stain removal, liquid chlorine bleach can be used in the liquid bleach dispenser or color safe bleach, laundry boosters, or oxi in the Oxi Treat Stains dispenser. Cycle can also be used for sturdy color fabrics, such as towels without liquid chlorine bleach.
Bulky
Use this cycle to wash large items such as comforters, sleeping bags, and blankets. This cycle starts with a soak to thoroughly saturate your large load. This is followed by medium wash action and medium spin speeds to maintain load balance.
Sheets
Use this cycle for sheets, pillowcases, and light blankets or throws. The wash action of this cycle is designed to keep large items from tangling and balling up.
IMPORTANT: For best performance, drop items in loose heaps evenly around the basket wall. Do not load items directly on the impeller for this cycle.
Normal
Use this cycle for normally soiled cottons and mixed fabric loads. This cycle combines high-speed wash action and medium-speed spin. A Water Save Spray Rinse is a preset cycle setting for this cycle.
When washing waterproof/water-resistant items such as plastic lined mattress pads, shower curtains, tarps, jackets, or sleeping bags, select the lowest spin speed setting available for the cycle and washer model being used.
Power Wash
Use this cycle for overly soiled garments and household items that need additional cleaning effort. Cycle combines high-speed wash action, medium-speed spin and a deep rinse to flush excess dirt from the load.
Colors/Towels
Use this cycle for lightly soiled, colored clothing or towels. This cycle is also a good choice for garments with a wrinkle free finish. This cycle uses medium-speed wash action and medium-speed spin.
Rapid Wash
Use this cycle to wash small, lightly soiled loads that are needed in a hurry. This short cycle combines high-speed wash action and high-speed spin for the optimal cleaning and shortened dry times. A Water Save Spray Rinse is a preset cycle setting for this cycle.
Hand Wash
This cycle combines low-speed wash and low-speed spin action to clean items labeled as "Machine Washable" on the garment care label. Pre Soak and Deep Clean options are not available in this cycle.
Clean Washer with AFFRESH™
Use the Clean Washer with AFFRESH® cycle once a month to keep the inside of your washer fresh and clean. This cycle uses a higher water level. Use with AFFRESH® washer cleaner tablet or liquid chlorine bleach to thoroughly clean the inside of your washing machine. This cycle should not be interrupted. See "Cleaning Your Washer."
IMPORTANT: Do not place garments or other items in the washer during the Clean Washer with AFFRESH™ cycle. Use this cycle with an empty wash tub.
Soak
This cycle is preset for a 31-minute cycle and soak time can be adjusted according to your needs by selecting Soil Level. After the selected soak period has ended, the washer will drain but does not spin the load. At the end of Soak, the washer will drain and wait for a wash cycle to be selected, to complete the cleaning process.
NOTE: Automatic bleach dispensing is not part of the soak cycle.
Rinse & Spin
Use this option to get a deep rinse followed by a high-speed spin. The time display will include an estimate of how long it will take to fill and drain the washer.
When to use RINSE & SPIN:
For loads that need rinsing only. ■
For completing a cycle after the power has been off. The ■ machine will return to pause mode if the power was interrupted or unplugged while cycle was running.
Drain & Spin
Drain & Spin may help shorten drying times for some heavy fabrics or special-care items. Drain & Spin may also be used for draining the washer after canceling a cycle or completing a cycle after a power failure.
Additional Features
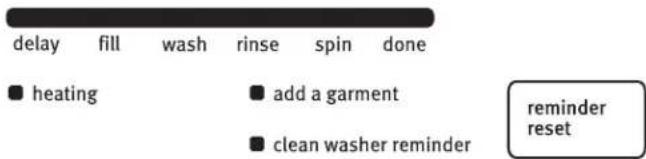
Indicator lights
An indicator light shows which Cycle, Modifiers, and Options you have selected. These lights show which portion of the cycle is operating. They also indicate when you can add other garments to the wash load.
Clean Washer Reminder
Clean Washer Reminder indicator lights after 45 wash cycles without a clean washer cycle. See the "Cleaning your washer" section to run the clean washer cycle, or you can press Reminder Reset button to manually reset clean washer cycle counter.
text_image
delay fill wash rinse spin done ■ heating ■ add a garment ■ clean washer reminder reminder resetEstimated Time Remaining
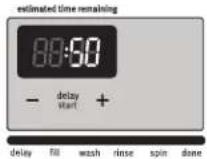
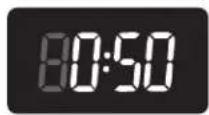
When a wash cycle is started, the estimated time remaining for the cycle, including fills and drains, will be displayed. The time will count down to the end of the cycle.
estimated time remaining
Modifiers
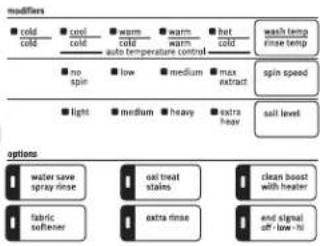
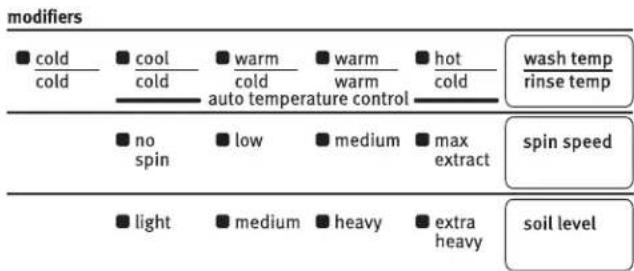
Modifiers allow you to further customize your cycles and save energy.
flowchart
graph TD
    A["■ cold\ncold"] --> B["■ cool\ncold"]
    B --> C["■ warm\ncold"]
    C --> D["■ warm\nwarm"]
    D --> E["■ hot\ncold"]
    E --> F["wash temp\nrinse temp"]

    G["■ no\nspin"] --> H["■ low"]
    H --> I["■ medium"]
    I --> J["■ max\nextract"]
    J --> K["spin speed"]

    L["■ light"] --> M["■ medium"]
    M --> N["■ heavy"]
    N --> O["■ extra\nheavy"]
    O --> P["soil level"]
Wash Temp/Rinse Temp
Select a water temperature based on the type of load you are washing. Use the warmest wash water safe for fabrics. Follow garment label instructions.
Warm rinses leave the loads drier and more comfortable to handle than cold rinses. However, warm rinses also increase wrinkling. Cold rinses may help with wrinkling and save energy.
Temperature Guide
| Wash Water Temperature Suggested fabrics |
| Hot Whites and pastels |
| Warm Bright colors |
| Cold Colors that bleed or fade |
NOTE: In wash water temperatures colder than 60^ F ( 15.6^ C), detergents do not dissolve well. Soils may be difficult to remove.
Spin Speed
This washer automatically selects the spin speed based on the cycle selected. The preset speeds can be changed. Spin speeds may vary by cycle.
Soil Level
Soil Level (wash time) is preset for each wash cycle. See "Preset Cycle Settings" in "Cycles." As you press the Soil Level pad, the cycle time will increase or decrease in the Estimated Time Remaining display and a different wash time will appear. To get the minimum wash time, press the pad until the indicator light next to Light illuminates. This is the shortest wash time available for that cycle with the wash options selected.
For most loads, use the time recommended in the preset cycle ■ settings.
For heavy soil and sturdy fabrics, press Soil Level to select more wash time, if needed.
For light soil and delicate fabrics, press Soil Level to select less wash time, if needed.
Auto Temperature Control
Auto Temperature Control (ATC) electronically senses and maintains a uniform wash and rinse water temperature. ATC regulates incoming hot and cold water. The ATC is automatically turned On when a cycle is selected. (See "Preset Cycle Settings" in "Cycles.")
ATC is available with Warm/Warm, Warm/Cold, and Cool/Cold settings. The water temperature in the Hot/Cold and Cold/Cold settings depends on the water temperature at the water inlet faucets.
ATC ensures consistent cleaning. ■
Heated water consumes the largest amount of energy that a ■ washer uses.
Today's detergents work well at temperatures above 60°F ■ (15.6°C).
Delay Start
You can use the Delay Start feature to delay the start of a wash cycle for up to 10 hours (depending on your model).
- Load the washer and fill the dispensers.
- Close the washer lid.
- Press POWER/CANCEL.
- Select the desired Cycle, Modifiers, and Options. Delay Start not valid for Drain & Spin cycle.
- Press + (plus) DELAY START. 1H (one hour) will be displayed in the time display window. The indicator light for Delay will glow.

-
For a longer delay time, press DELAY START + (plus). For a shorter delay time, press DELAY START - (minus). The Start time will increase or decrease by 1-hour steps.
-
Press START/PAUSE. The countdown in hours and minutes to the wash cycle will show in the time display window and the indicator light will begin to flash.
NOTE: The Start/Pause indicator light will not flash when Delay Start is chosen. You must press Start/Pause to initiate a countdown for the cycle to begin. The cycle selections and modifiers are lit during the Delay Start time.
To cancel Delay Start:
Press POWER/CANCEL once to cancel Delay Start or press START/PAUSE to cancel the countdown and start the cycle.
Options
Use these pads to select or deselect the options for your wash cycle. Options may add time to the wash cycle.
options
Water Save Spray Rinse
The Water Save Spray Rinse option reduces rinse water in the cycle. This option is available on most cycles and must be selected prior to the start of the cycle. Do not use liquid fabric softener with the Water Save Spray Rinse option. Select the Fabric Softener option if using liquid fabric softener to assure proper dispensing.
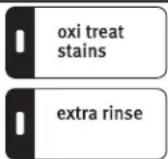
Oxi Treat Stains
This washer is designed to dispense laundry boosters such as oxygenated stain treaters and color-safe bleach at the right time in the cycle for best cleaning performance. Do not use laundry boosters and chlorine bleach in the same cycle.
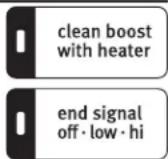
Clean Boost with Heater
The Clean Boost with Heater option helps to ensure better soil and stain removal. Clean Boost uses a heater within the washer to maintain the selected temperature setting throughout the wash period. This option will add some additional time to the cycle based on which temperature is selected. It is a preset cycle setting on the Sanitary and Super Wash cycles.
Clean Boost with Heater may be selected as an option with other cycles. See table for details.
| Cycle | Clean Boost with Heater(Adds time to the wash cycle) |
| Sanitary with Oxi | Default |
| Heavy Duty | Default |
| Whites | Option |
| Bulky | Option |
| Sheets | Option |
| Normal | Option |
Cycle Clean Boost with Heater
(Adds time to the wash cycle)
| Power Wash Option | |
| Colors/Towels Option | |
| Rapid Wash Option | |
| Hand Wash Option | |
| Clean Washer with AFFRESH ^TM | Not available |
| Soak Not available | |
| Rinse & Spin Not available | |
| Drain & Spin Not available | |
Fabric Softener
Fabric Softener option must be selected if liquid fabric softener is added to the fabric softener dispenser. Fabric softener will also be dispensed in the last rinse of the Extra Rinse cycle, if selected. This option flushes the dispenser at the correct time in a deep water rinse for optimal distribution.
Extra Rinse
An Extra Rinse can be used to aid in the removal of detergent or bleach residue, or particulates such as sand and lint, from the load. This option provides an additional rinse with the same water temperature as the first rinse. This is the default rinse setting for the Whites cycle.
End Signal - Off - Low - Hi Cycle Volume
The End Signal produces an audible sound when the wash cycle is finished. This signal is helpful when you are removing items from the washer as soon as it stops. Select Off, Low, or Hi for volume sound.
Changing Cycles, Modifiers, and Options
You can change Cycles, Modifiers, and Options anytime before Start/Pause is pressed. Not all Modifiers and Options are available for all cycles.
A short tone sounds when a change is selected. If you press and hold the End Signal option for more than five seconds, all valid beeps will be eliminated. To turn the signals back on, press and hold the End Signal button for five seconds.
Three short tones sound if an unavailable combination is ■ selected. The last selection will not be accepted.
To return all options and modifiers to Factory Default, press ■ POWER/CANCEL, select Drain & Spin cycle, and then press Extra Rinse, Fabric Softener, Extra Rinse, Fabric Softener within 5 seconds. When done correctly, the 7-segment displays show "Fd" for 3 seconds and then unit returns to Standby Mode.
Changing Cycles after pressing Start
- Press POWER/CANCEL once to cancel the cycle. The washer will drain.
- Select the desired wash cycle.
- Select the desired Modifiers and Options.
- Press START/PAUSE.
The washer restarts at the beginning of the new cycle.
NOTE: If you do not press Start/Pause within 5 minutes of pausing the washer, the washer automatically shuts off.
Changing Modifiers and Options after pressing Start/Pause
You can change a Modifier or Option anytime before the selected Modifier or Option begins by choosing the desired Modifiers and/or Options.
NOTE: An error tone will sound if your selection is unavailable.
To manually drain the washer and spin the load
- Press POWER/CANCEL once to cancel the wash cycle and drain the washer.
- Turn knob to select DRAIN & SPIN.
- Press START/PAUSE.
When the spin is complete, the lid unlocks. Items can be removed from the washer.
Normal Sounds
Your new washer may make sounds your old one didn't. Because the sounds might be unfamiliar, you may be concerned about them. These sounds are normal.
During washing
You will hear spin/spray noise throughout the cycle.
During drain
If water is drained quickly from your washer (depending on your installation), you may hear air being pulled through the pump during the end of draining.
During wash and spin
This washer does not have a transmission. The motor provides direct drive for agitation and spin. You will hear sounds that are different from those of a conventional washer.
LAUNDRY TIPS
Preparing clothes for washing
Follow these recommendations to help you prolong the life of your garments.
■Use only High Efficiency detergents. The package for this type of detergent will be marked "HE" or "High Efficiency." This wash system, along with less water, will create too much sudsing with a regular non-HE detergent. Using regular detergent will likely result in washer errors, longer cycle times, and reduced rinsing performance. It may also result in component failures and noticeable mold or mildew. HE detergents are made to produce the right amount of suds for the best performance. Follow the manufacturer's instructions to determine the amount of detergent to use. Remember, concentrated detergents such as 2x or higher will use less detergent based on load size.

Use only HE detergent.
■ Close zippers, snaps, and hooks to avoid snagging other items. Tie strings and sashes to avoid tangles.
■Remove pins, buckles, and other hard objects to avoid scratching the washer interior. Remove non-washable trim and ornaments.
■Empty pockets and turn them inside out; turn down cuffs. Turn wool and synthetic knits inside out to avoid pilling.
Brush away lint and dirt. Treat spots and stains; stained or wet garments should be washed promptly for best results.
Mend tears, loose hems, and seams. ■
Sorting
Separate heavily soiled items from lightly soiled ones, even if they would normally be washed together. Separate lint-givers (towels, chenille) from lint-takers (corduroy, synthetics, permanent press). When possible, turn lint-givers inside out.
Separate dark colors from light colors, colorfast items from ■ noncolorfast items.
Sort by fabric and construction (sturdy cottons, knits, delicate ■ items).
Separate bulky, nonabsorbent items such as comforters, pillows, and poly-filled jackets. Use the Bulky cycle for these items.
Separate sheets, pillowcases, and light blankets or throws and use the Sheets cycle for these items. For best performance, drop items in loose heaps evenly around the basket wall and do not load items directly on the impeller for this cycle.
When washing waterproof/water-resistant items such as plastic lined mattress pads, shower curtains, tarps, jackets, or sleeping bags, select the lowest spin speed setting available for the cycle and washer model being used.
Loading/Unloading
For best performance, load garments in loose heaps evenly around the basket wall. Do not load above the stainless steel portion of the basket.
Remove clothes from washer after the cycle is completed. ■ Metal objects such as zippers, snaps, and buckles may rust if left in the washer basket for a long time.
WASHER CARE
Cleaning Your Washer
Washer Maintenance Procedure
This washer has a special cycle that uses higher water volumes, in combination with AFFRESH® washer cleaner or liquid chlorine bleach to thoroughly clean the inside of the washer.
NOTES:
- Read these instructions completely before beginning the cleaning process.
After every 45 cycles, the Clean Washer Reminder status light glows. Light can be deactivated by running the Clean Washer with AFFRESH™ cycle or you can press the Reminder Reset button and start the Clean Washer Reminder cycle count over again.
■ It is recommended that you allow the cleanout cycle to complete without interruptions. If necessary, the cleanout cycle may be cancelled by pressing the Power/Cancel button once.
IMPORTANT: If the cleanout cycle is cancelled, run a Rinse & Spin cycle to ensure that all remaining washer cleaner or bleach is rinsed from the washer.
Begin procedure
-
Open the washer lid and remove any clothing or items from the washer.
-
Using the AFFRESH® washer cleaner (Recommended): Add one AFFRESH® washer cleaner tablet to the washer basket.
If using liquid chlorine bleach: Add 1 cup (250 mL) liquid chlorine bleach to the bleach dispenser.
NOTE: Do not add any detergent or load to this cleaning cycle. Use of more than 1 cup (250 mL) of bleach will cause product damage over time.
- Close the lid.
- Turn Cycle Control knob to Clean Washer with AFFRESH™ cycle.
■ The Estimated Time Remaining display will show approximately 1:02.
- Press START/PAUSE.
The cycle will begin and water will dispense in the washer for a moment and pause, then the lid will lock and the cycle will continue.
■ Once the cleaning cycle has begun, allow the cycle to complete. An estimated cycle time will appear on the display.
Always do the following to maintain washer freshness
■ Use only HE detergent when washing a clothes load.
■Repeat the cleaning procedure monthly, using one AFFRESH clean washer tablet or 1 cup (250 mL) of liquid chlorine bleach.
If the procedure does not sufficiently improve washer freshness, evaluate your installation and usage conditions for other causes.
Cleaning the exterior
Use a soft damp cloth or sponge to wipe up any spills. Occasionally wipe the outside of your washer to keep it looking new. Use mild soap and water. Do not use abrasive products.
Water Inlet Hoses
Replace inlet hoses after 5 years of use to reduce the risk of hose failure. Periodically inspect and replace inlet hoses if bulges, kinks, cuts, wear, or leaks are found.
When replacing your inlet hoses, mark the date of replacement on the label with a permanent marker.
Vacation, Storage, and Moving Care
Install and store your washer where it will not freeze. Because some water may stay in the hoses, freezing can damage your washer. If storing or moving your washer during freezing weather, winterize it.
Non-use or vacation care:
Operate your washer only when you are at home. If you will be on vacation or not using your washer for an extended period of time, you should:
Unplug washer or disconnect power. ■
Turn off the water supply to the washer. This helps avoid ■ unintended flooding (due to a water pressure surge) while you are away.
To winterize washer:
- Shut off both water faucets.
- Disconnect and drain water inlet hoses.
- Put 1 qt (1 L) of R.V.-type antifreeze in the basket.
- Run washer on the Rinse & Spin setting for about 30 seconds to mix the antifreeze and remaining water.
- Unplug washer or disconnect power.
To use washer again:
- Flush water pipes and hoses. Reconnect water inlet hoses. Turn on both water faucets.
WARNING

Electrical Shock Hazard
Plug into a grounded 3 prong outlet.
Do not remove ground prong.
Do not use an adapter.
Do not use an extension cord.
Failure to follow these instructions can result in death, fire, or electrical shock.
- Plug in washer or reconnect power.
- Run the washer through the Bulky cycle to clean the washer and remove the antifreeze, if used. Use only HE detergent. Use 12 the manufacturer's recommended amount for a medium-size load.
To transport the washer:
- Shut off both water faucets.
-
Disconnect and drain water inlet hoses.
-
If the washer will be moved during freezing weather, put 1 qt (1 L) of R.V.-type antifreeze in the basket. Run washer on the Rinse & Spin setting for about 30 seconds to mix the antifreeze and remaining water.
- Disconnect the drain from the drain system.
- Unplug the power cord.
- Place the inlet hoses into the basket.
- Drape the power cord and drain hose over edge into the basket.
- Place foam packing ring from the original shipping materials in the top of washer. If you do not have the original foam packing ring, place heavy blankets, towels, etc. into basket opening. Close the lid and put a piece of tape over the lid and down to the front of the washer. Keep lid taped until the washer is placed into the new location.
Reinstalling the washer
- Follow the "Installation Instructions" to locate, level, and connect the washer.
- Run the washer through the Bulky cycle to clean the washer and remove the antifreeze, if used. Use only HE detergent. Use 12 the manufacturer's recommended amount for a medium-size load.
TROUBLESHOOTING
First try the solutions suggested here or visit our website and reference FAQs (Frequently Asked Questions) to possibly avoid the cost of a service call.
In U.S.A. www.maytag.com/help In Canada www.maytag.ca
Washer and Components
Washer displaying code messages
■LF"LF" (Washer is taking too long to fill) Check the following:
Are the hot and cold faucets turned on? Are the water inlet hoses kinked or clogged? Are the water inlet valve screens clear? Press POWER/CANCEL to clear display.
■Ld“Ld” (Washer is taking too long to drain water from the wash tub)
Check the following:
Is the drain hose kinked or clogged? Is the drain hose installed properly? See "Connect the Drain Hose" in the Installation Instructions. Press POWER/CANCEL to clear display.
■uL"uL" (Unbalanced Load)
If the load is unbalanced, the washer will display this code while running an imbalanced load correction routine at the end of the wash cycle and before the final spin. If the code remains and the wash cycle dial is flashing after the recovery routine has stopped, open lid and redistribute the load. Close lid and press START/PAUSE.
NOTE: For best performance, load garments in loose heaps evenly around the basket wall. Do not load above the stainless steel portion of the basket.
■oL"oL" (Over Load)
Is the washer overloaded? The washer has attempted to fill and begin the wash cycle. If the washer is overloaded, it will drain any water and detergent that was added during the fill. To correct the overload, remove several items and add detergent. Close lid and press START/PAUSE.
■5d"Sd" (Suds Detected)
Did you use regular detergent?
Regular or non-HE hand-washing detergents are not recommended for this washer.

Use only HE detergent.
Did you add too much detergent?
Always measure detergent carefully. Follow detergent manufacturer's directions. Remember, concentrated detergents such as 2x or higher will use less detergent based on load size.
If excessive suds are detected, the washer will display this code while running a suds reduction correction routine at the end of the wash cycle. The suds reduction routine removes extra suds and assures proper rinsing of your garments. If the code remains and the wash cycle dial is flashing after the recovery routine has stopped, re-select your desired cycle using cold water. Press START/PAUSE. Do not add detergent.
■id"lid" (Lid Opened)
Is the lid open? Close the lid to clear the display. If the lid remains open for more than 10 minutes, water in the wash tub will drain.
■ HE"HC" (Cold and Hot hoses switched)
This code will appear at the end of the wash cycle to indicate that the cold and hot water inlet hoses are switched. See "Connect the Inlet Hoses" in the Installation Instructions.
■ dL"dL" (Door/Lid cannot lock)
Indicates lid is not locked. Check for items caught in the lid keeping it from closing. Press POWER/CANCEL once to clear the code.
“dU” (Door/Lid cannot unlock)
Is there excessive weight on the lid, such as a basket of laundry? Excessive weight will keep the lid from unlocking. Press POWER/CANCEL once to clear the code.
■F_“F##” code
Press POWER/CANCEL once to clear code. Press START/PAUSE to continue cycle. If code appears again, call for service.
■Fd"Fd" (Factory Default)
This code will appear when your washer sets back to factory default.
To return all options and modifiers to Factory Default, press POWER/CANCEL, select Drain & Spin cycle, and then press Extra Rinse, Fabric Softener, Extra Rinse, Fabric Softener within 5 seconds. When done correctly, the 7-segment displays show "Fd" for 3 seconds and then unit returns to Standby Mode.
Noisy, vibrating, off-balance
Is the washer level? Does the washer rock when pushed ■ against the corners?
The washer must be level. The front and rear feet must be in firm contact with the floor. Check that the locknuts are tightened. See "Level the Washer" in the Installation Instructions.
Is the floor flexing, sagging, or not level? ■
Flooring that flexes or is uneven can contribute to noise and vibration of the washer. A ^3/4 " (19 mm) piece of plywood under the washer will reduce the sounds. See "Location Requirements" in the Installation Instructions.
■ Is the load balanced?
Evenly distribute the load in the washer basket and make sure the height of the load does not exceed the top row of basket holes. See "Starting Your Washer."
Do you hear clicking or other noises when the cycle changes ■ from washing to draining or spinning?
When the drive system shifts or the washer basket settles between cycles, you may hear noises that are different from your previous washer. These are normal washer noises.
Is the washer gurgling or humming? ■
When the washer drains, the pump will make a continuous humming with periodic gurgling or surging sounds as the final amounts of water are removed. This is normal.
Are you washing a small load? ■
You will hear more splashing sounds when washing small loads. This is normal.
■The washer basket moves while washing.
This is normal.
Can you hear water spraying? ■
This is part of the wash action.
Are you washing items with metal snaps, buckles, or zippers? ■
You may hear metal items touching the basket. This is normal.
■ Did you select the Bulky cycle?
Use the Bulky cycle only for oversized, nonabsorbent items such as comforters, pillows, or poly-filled jackets. Other items will create an unbalanced load in this cycle.
Washer leaks
Are the fill hoses tight? ■
Are the fill hose washers properly seated? ■
Check both ends of each hose. See "Connect the Inlet Hoses" in the Installation Instructions.
Did you pull the drain hose from the washer cabinet and install it in a standpipe or laundry tub?
The drain hose should be pulled from the washer cabinet and secured to the drainpipe or laundry tub. See "Connect Drain Hose" and "Secure the Drain Hose" in the Installation Instructions.
■ Is the sink or drain clogged?
Sink and drainpipe must be able to carry away 17 gal. (64 L) of water per minute. If sink or drainpipe is clogged or slow, water can back up out of drainpipe or sink.
Is water splashing off the tub ring or the load? ■
The wash load should be balanced and not overloaded. If the wash load is unbalanced or overloaded, incoming water can deflect off the load.
Is the washer properly installed? ■
The washer must be level. The feet should be properly installed and the nuts tightened. See "Level the Washer" in the Installation Instructions.
Check household plumbing (laundry tubs, faucets, drainpipe, water pipes) for leaks.
Dispenser operation
Did you select Fabric Softener option? ■
Always select Fabric Softener option when using liquid fabric softener.
■Did you select Oxi Treat Stains option?
Always select Oxi Treat Stains option when using a powdered or liquid laundry booster.
■Are the laundry products in the correct dispensers?
Add the correct amounts of detergent (powdered or liquid), liquid chlorine bleach, fabric softener, laundry booster, or oxi to the correct dispenser. You can add powdered or liquid color-safe bleach to the Oxi Treat Stains dispenser. Use only liquid chlorine bleach in the bleach dispenser. Do not dilute fabric softener or bleach, or they will siphon out and dispense at the wrong time.
■ Is there water remaining in the bottom of a dispenser? Did the dispenser drain properly?
A small amount of water may be left in a dispenser at the end of the cycle. This is normal.
Washer odor
See "Cleaning Your Washer."
■Are you using AFFRESH® washer cleaner on a regular basis?
AFFRESH® washer cleaner removes and avoids odor-causing residue in all High Efficiency washers. For washers where odor is present, use 3 tablets instead of 1 tablet. After the Clean Washer with AFFRESH® cycle is complete, wipe away residue if necessary.
■ Are you using HE detergent?
Use of non-HE detergent can cause a film residue which can result in odor.
Washer Operation
WARNING

Electrical Shock Hazard
Plug into a grounded 3 prong outlet.
Do not remove ground prong.
Do not use an adapter.
Do not use an extension cord.
Failure to follow these instructions can result in death, fire, or electrical shock.
Washer won't fill, rinse, or agitate; washer stops
■Is the power cord plugged into a grounded 3 prong outlet? Plug power cord into a grounded 3 prong outlet.
■ Are you using an extension cord?
Do not use an extension cord.
■ Is there power at the plug?
Check electrical source or call electrician.
■Is the indicator on the Cycle Control knob properly lined up with a cycle?
Turn the Cycle Control knob to the right slightly.
■Are the water inlet valve screens clogged?
Turn off the water and remove inlet hoses from the washer. Remove any accumulated film or particles. Reinstall hoses, turn on water, and check for leaks.
■ Are the hot and cold water faucets turned on?
Turn on the water.
■ Is the water inlet hose kinked?
Straighten the hoses.
Does the water level seem too low, or does the washer appear ■ to not fill completely?
The Auto Water Level feature senses the size of the load and adds the correct amount of water for the load size. You may notice during a cycle that the wash load is not completely submerged in water. This is normal and necessary for clothes to move.
■ Has a household fuse blown, or has a circuit breaker tripped?
Replace the fuse or reset the circuit breaker. If the problem continues, call an electrician.
■Is the washer in a normal pause in the cycle?
The washer may pause during certain cycles. Allow the cycle to continue.
■ Is the washer overloaded?
Wash smaller loads. See "Starting Your Washer" for maximum load size.
Is there over sudsing? ■
Cancel the current cycle. Select Drain & Spin to drain the load. Re-select your desired cycle and press START/PAUSE. Do not add detergent. Use cold water.
Is the lid open? ■
The lid must be closed during operation. The washer will not operate with the lid open.
Did you add more items to the load once the washer started? ■ Once the load is wet, there may appear to be space for more items. Do not add more than 1 or 2 garments after the cycle has started. For best results, determine load size with dry items only.
Washer continues to fill or drain, or the cycle seems stuck
Is the top of drain hose lower than the control knobs on washer?
The top of the drain hose must be at least 39" (991 mm) above the floor. See "Drain System" in the Installation Instructions.
Does the drain hose fit too tightly in the standpipe, or is it ■ taped to the standpipe?
The drain hose should be loose yet fit securely. Do not seal the drain hose with tape. The hose needs an air gap. See "Installation Instructions."
Washer won't drain or spin; water remains in washer
Is the drain hose clogged, or the end of the drain hose more than 96" (2.4 m) above the floor?
See "Drain System" in the Installation Instructions.
Is the lid open? ■
The lid must be closed during operation. The washer will not operate with the lid open.
Is there excessive sudsing? ■
Always measure detergent. Follow detergent manufacturer's directions. If you have very soft water, you may need to use less detergent.

Use only HE detergent.
Wash/Rinse temperature
Are the hot and cold water inlet hoses reversed? ■
If the hot and cold water inlet hoses are reversed, the washer will display an "HC" error code at the end of the cycle. See "Connect the Inlet Hoses," in the Installation Instructions.
Are you washing many loads? ■
As your frequency of loads washed increases, the water temperature may decrease for hot and warm temperatures. This is normal.
Do you have an ENERGY STAR ^® qualified washer?
The wash water temperatures may feel cooler to you than those of your previous washer. This is normal.
Does the wash water temperature feel lower than usual? ■
As washing progresses, the wash temperature will decrease slightly for hot and warm washes. This is normal. To reduce wrinkling, the warm rinse is regulated to be cooler than the warm wash.
Excessive sudsing
Did you use a non-HE detergent? ■
Regular or non-HE hand-washing detergents are not recommended for this washer.

Use only HE detergent.
■ Is there excessive sudsing?
Always measure detergent carefully. Follow detergent manufacturer's directions. If you have very soft water, you might need to use less detergent. Remember, concentrated detergents such as 2x or higher will use less detergent based on load size.
Selecting a Fabric Softener or Extra Rinse option will help flush excess suds from your washer.
Cycle did not run Oxi Treat Stains option
■ Did you select the Oxi Treat Stains option?
The Oxi Treat Stains option must be selected for it to be included in a wash cycle.
■ The Oxi Treat Stains option is a default in the Super Wash & Sanitary cycles and may be added to other cycles.
Clothing Care
Load too wet
Did you use the right spin speed for the load being washed? ■ Select a higher spin speed.
■ Did you use a cold rinse?
Cold rinses leave loads wetter than warm rinses. This is normal.
■Did you wash an extra large load?
A large unbalanced load could result in a reduced spin speed and wet clothes at the end of the cycle. Evenly distribute the load and make sure the height of the load does not exceed the top row of basket holes. Select Drain & Spin to remove excess water from the load.
Residue or lint on load
■ Did you add detergent to the dispenser?
For best results, use the dispenser to dissolve the detergent.
■ Did you sort properly?
Sort lint givers (towels, chenille) from lint takers (corduroy, synthetics). Also sort by color.
■Did you overload the washer?
The wash load must be balanced and not overloaded. Clothes should move freely. Lint or powdered detergent can be trapped in the load if the washer is overloaded. Wash smaller loads. See "Starting Your Washer" for maximum load size.
■ Did you use enough detergent?
Follow detergent manufacturer's directions. Use enough detergent to hold the lint in the water.
■Did you line dry your clothing?
If so, you can expect some lint on the clothing. The air movement and tumbling of a dryer removes lint from the load.
■ Was paper or tissue left in pockets?
■ Is your water colder than 60°F (15.6°C)?
Wash water colder than 60^ F ( 15.6^ C) may not completely dissolve the detergent.
Did you use the proper Soil Level and Wash Cycle for the load? ■ Reducing wash time (duration) and wash speed are ways to reduce lint.
Did you select a Water Save Rinse cycle? ■
For loads with particulates such as sand or lint, an Extra Rinse cycle can be added to all wash cycles to aid in the removal of particulates, detergent, and bleach residues.
Load is wrinkled, twisted, or tangled
Did you unload the washer promptly? ■
Unload the washer as soon as it stops.
Did you use the right cycle for the load being washed? ■
To reduce wrinkling, tangling, and twisting, select a lower spin speed on the selected cycle, or select a more delicate cycle such as Hand Wash or Wrinkle Control.
Did you overload the washer? ■
The wash load must be balanced and not overloaded. Loads should move freely during washing to reduce wrinkling, tangling, and twisting.
Was the wash water warm enough to relax wrinkles? ■
If safe for the load, use warm or hot wash water. Use cold rinse water.
Are the hot and cold water hoses reversed? ■
Check that the hot and cold water hoses are connected to the correct faucets. If the hot and cold water inlet hoses are reversed, the washer will display an "HC" error code at the end of the cycle. See "Connect the Inlet Hoses" in the Installation Instructions. A hot rinse followed by spin will cause wrinkling.
Stains, gray whites, dingy colors
Did you properly sort the load? ■
The transfer of dye can occur when mixing whites and colors in a load. Sort dark clothes from whites and lights.
Was the wash temperature too low? ■
Use hot or warm washes if safe for the load. Make sure your hot water system is adequate to provide a hot water wash.
Did you use enough detergent, or do you have hard water? ■
Use more detergent for washing heavy soils in cold or hard water. Water temperature should be at least 60^ F ( 15.6^ C) for soap to dissolve and work properly. For best performance, use the detergent manufacturer's recommended amounts.
Did you follow the manufacturer's directions when adding ■ detergent and fabric softener?
Measure detergent and fabric softener. Use enough detergent to remove soil and hold it in suspension. Do not drip fabric softener onto clothes.
Is there above average iron (rust) in water? ■
You may need to install an iron filter.
■ Did you add detergent to the dispenser?
For best results, use the dispenser to dissolve the detergent.
■ Did you add fabric softener directly to the load?
Use your Fabric Softener dispenser and select Fabric Softener option. Do not drip fabric softener onto clothes.
■ Did you use a fabric softener dispensing ball?
Use the fabric softener dispenser provided with the washer. Dispensing balls will not operate correctly with this washer.
Did you unload the washer promptly? ■
To avoid the transfer of dye, unload the washer as soon as it stops.
■ Did you add detergent, chlorine bleach, fabric softener, laundry boosters, or oxi too late in the cycle?
Detergent, chlorine bleach, fabric softener, laundry boosters, or oxi should be added to the dispensers before starting the washer.
■ Did you use Rapid Wash on a large load?
Rapid Wash is designed to wash only a few items for best results.
■ Did you use a laundry booster?
Some stains require pretreatment. Add a laundry booster, oxi, or chlorine bleach to the proper dispenser. If using a colorsafe bleach, use the Oxi Treat Stains dispenser and this option must be selected.
■For heavily soiled garments, select an Extra Rinse to assure stains, soils, and detergents are thoroughly rinsed from the load.
Garments damaged
■ Were sharp items removed from pockets before washing?
Empty pockets, zip zippers, snap or hook fasteners before washing to avoid snagging and tearing of load.
■ Were strings and sashes tied to avoid tangling?
Straps and strings can easily become entangled in the load, causing strain on seams and tearing.
Were items damaged before washing? ■
Mend rips and broken threads in seams before washing.
Did you overload the washer? ■
The wash load must be balanced and not overloaded. Loads should move freely during washing.
■ Did you add chlorine bleach properly?
Do not pour chlorine bleach directly onto load. Wipe up bleach spills. Undiluted bleach will damage fabrics. Do not place load items on top of the bleach dispenser when loading and unloading the washer (on some models). Do not use more than the manufacturer's recommended amount for a full load.
- Did you follow the garment manufacturer's care label instructions?
Load not rinsed
■ Did you use the proper detergent?
Regular or non-HE hand washing detergents are not recommended for this washer.

Use only HE detergent.
Did you follow the manufacturer's directions when adding ■ detergent and fabric softener?
Always measure detergent and fabric softener carefully. Follow detergent manufacturer's directions. If you have very soft water, you might need to use less detergent. Remember, concentrated detergents such as 2x or higher will use less detergent based on load size.
Selecting a Fabric Softener or Extra Rinse option will help flush excess suds from your washer.
■Did you select the Fabric Softener button?
If liquid fabric softener is added to the dispenser, the Fabric Softener option must be selected.
■ Was the Water Save Spray Rinse selected?
This spray rinse optimizes the water used for rinsing the load. If extra rinsing is needed due to skin sensitivities, a high sudsing detergent, or particulates in the load, such as sand or lint, select the Extra Rinse option.
MAYTAG® LAUNDRY LIMITED WARRANTY
This Maytag Limited Warranty supersedes and replaces the limited warranty printed in the Use and Care Guide for products sold within the United States of America and Canada.
FIRST YEAR
For one year from the date of purchase, when this major appliance is operated and maintained according to instructions attached to or furnished with the product, Maytag brand of Whirlpool Corporation or Whirlpool Canada LP (hereafter "Maytag") will pay for factory specified parts and repair labor to correct defects in materials or workmanship that existed when this major appliance was purchased.
SECOND THROUGH TENTH YEAR (DRUM MOTOR AND STAINLESS STEEL BASKET ONLY)
In the second through tenth years from the date of original purchase, when this major appliance is operated and maintained according to instructions attached to or furnished with the product, Maytag will pay for the replacement of the drum motor (stator and rotor only) and stainless steel basket (side walls only) to correct non-cosmetic defects in materials or workmanship in these parts that prevent function of the washer and that existed when this major appliance was purchased. This limited 10-year warranty on the drum motor (stator and rotor only) and stainless steel basket (side walls only) does not include labor.
YOUR SOLE AND EXCLUSIVE REMEDY UNDER THIS LIMITED WARRANTY SHALL BE PRODUCT REPAIR AS PROVIDED HEREIN. Service must be provided by a Maytag designated service company. This limited warranty is valid only in the United States or Canada and applies only when the major appliance is used in the country in which it was purchased. This limited warranty is effective from the date of original consumer purchase. Proof of original purchase date is required to obtain service under this limited warranty.
ITEMS EXCLUDED FROM WARRANTY
This limited warranty does not cover:
- Replacement parts or repair labor if this major appliance is used for other than normal, single-family household use or when it is used in a manner that is inconsistent to published user or operator instructions and/or installation instructions.
- Service calls to correct the installation of your major appliance, to instruct you on how to use your major appliance, to replace or repair house fuses, or to correct house wiring or plumbing.
- Service calls to repair or replace appliance light bulbs, air filters or water filters. Consumable parts are excluded from warranty coverage.
- Damage resulting from accident, alteration, misuse, abuse, fire, flood, acts of God, improper installation, installation not in accordance with electrical or plumbing codes, or use of products not approved by Maytag.
- Cosmetic damage, including scratches, dents, chips or other damage to the finish of your major appliance, unless such damage results from defects in materials or workmanship and is reported to Maytag within 30 days from the date of purchase.
- Pick up and delivery. This major appliance is intended to be repaired in your home.
- Repairs to parts or systems resulting from unauthorized modifications made to the appliance.
- Expenses for travel and transportation for product service if your major appliance is located in a remote area where service by an authorized Maytag servicer is not available.
- The removal and reinstallation of your major appliance if it is installed in an inaccessible location or is not installed in accordance with Maytag's published installation instructions.
- Replacement parts or repair labor on major appliances with original model/serial numbers that have been removed, altered, or cannot be easily determined.
DISCLAIMER OF IMPLIED WARRANTIES
IMPLIED WARRANTIES, INCLUDING ANY IMPLIED WARRANTY OF MERCHANTABILITY OR IMPLIED WARRANTY OF FITNESS FOR A PARTICULAR PURPOSE, ARE LIMITED TO ONE YEAR OR THE SHORTEST PERIOD ALLOWED BY LAW. Some states and provinces do not allow limitations on the duration of implied warranties of merchantability or fitness, so this limitation may not apply to you. This warranty gives you specific legal rights, and you also may have other rights that vary from state to state or province to province.
LIMITATION OF REMEDIES; EXCLUSION OF INCIDENTAL AND CONSEQUENTIAL DAMAGES
YOUR SOLE AND EXCLUSIVE REMEDY UNDER THIS LIMITED WARRANTY SHALL BE PRODUCT REPAIR AS PROVIDED HEREIN. MAYTAG SHALL NOT BE LIABLE FOR INCIDENTAL OR CONSEQUENTIAL DAMAGES. Some states and provinces do not allow the exclusion or limitation of incidental or consequential damages, so these limitations and exclusions may not apply to you. This warranty gives you specific legal rights, and you also may have other rights that vary from state to state or province to province.
If outside the 50 United States and Canada, contact your authorized Maytag dealer to determine if another warranty applies.
If you think you need repair service, first see the "Troubleshooting" section of the Use & Care Guide. If you are unable to resolve the problem after checking "Troubleshooting," additional help can be found by checking the "Assistance or Service" section or by calling Maytag. In the U.S.A., call 1-800-688-9900. In Canada, call 1-800-807-6777.
ASSISTANCE OU SERVICE
Maytag Services, LLC
ATTN:CAIR® Center
P.O. Box 2370
Cleveland, TN 37320-2370
1901 Minnesota Court
Mississauga, Ontario L5N 3A7
text_image
MAYTAG BRAVOS MCT Maytag Commercial Technology delay start + 80:50 delay fill wash rinse spin done ● heating ● add a garment ● clean washer reminder power cancel reminder reset sheets normal bulky whites heavy duty sanitary with OAI drain & spin rinse & spin soak clean washer with @wash power wash colors/towels rapid wash hand wash start II pause modifiers ● cold ● cool ● warm ● hot ● wash temp cold cold auto temperature control cold cold ● no spin low medium max extract ● light medium heavy extra heavy sell level options water save spray rinse oil treat stains clean boost with heater fabric softener extra rinse end signal off - low - hinatural_image
Diagram of a car intake manifold with no text or symbolstext_image
HOTCH & SENSIFICATION SET hetext_image
Oil Treat Stains* Milk tea Oil Treat Stake Buttontext_image
normal sheets power wash bulky colors/towels rapid wash heavy duty hand wash drain & spin rinse & spin soak clean washer with affreshestimated time remaining
Modificateurs
| cold cold | cool cold | warm cold auto temperature control | warm warm cold | hot cold | wash temp rinse temp |
| no spin | low | medium | max extract | spin speed | |
| light | medium | heavy | extra heavy | soil level |
Wash Temp/Rinse Temp (temp. de lavage/rinçage)
Fabric Softener (assouplissant de tissu)
All rights reserved.
®Registered trademark/TM Trademark of Maytag Corporation or its related companies.
Used under license by Maytag Limited in Canada.
AFFRESH is a trademark of Whirlpool, U.S.A.