
RFH01 - Earphones AMAZON - Free user manual and instructions
Find the device manual for free RFH01 AMAZON in PDF.
| Product Type | Over-ear RF wireless headset with charging station |
| Brand | Amazon |
| Model | RFH01 |
| Category | Headphone |
| Package Contents | Headset, AC adapter, RCA audio cable, 3.5mm to RCA audio cable |
| Connectivity | Wireless (RF) |
| Station Power Supply | AC adapter (input 5V, 500mA) via DC port |
| Headset Battery | Internal rechargeable lithium-ion (non-replaceable) |
| Indicator Lights | Power/pairing light (blue/red), charging light (red/green), pairing light (blinking/solid blue) |
| Controls | Power button, Volume up and down buttons on the right earcup |
| Audio Connections | RCA input (L/R) and RCA output (L/R) on the station |
| Main Functions | Auto-pairing, charging on station, volume control, comfortable listening via cushioned earpads |
| Care and Cleaning | Use a soft, damp cloth without solvents; turn off before cleaning |
| Safety | Avoid water, extreme temperatures; do not open; comply with FCC and IC standards |
| Repairability | Battery not user-replaceable; contact customer service for repair |
| Warranty | Contact customer service at 1-866-216-1072 |
| Compatibility | Audio devices with RCA output or 3.5mm jack (via included cable) |
Frequently Asked Questions - RFH01 AMAZON
User questions about RFH01 AMAZON
0 question about this device. Answer the ones you know or ask your own.
Ask a new question about this device
Download the instructions for your Earphones in PDF format for free! Find your manual RFH01 - AMAZON and take your electronic device back in hand. On this page are published all the documents necessary for the use of your device. RFH01 by AMAZON.
USER MANUAL RFH01 AMAZON
natural_image
Line drawing of a pair of headphones in a matching case (no text or symbols)Over-Ear Wireless RF Headphones with Charging Dock (RFH01)
B01H0QVZXC


English......4
Français....16
Deutsche....28
Italiano....40
Español....52
Japanese 64
Instructions Manual · English
Over-Ear Wireless RF Headphones with Charging Dock (RFH01)
Contents:
Before starting, ensure the package contains the following components:
| Part Name Part Illustration Qty | ||
| Over-Ear Wireless RF Headphones with Charging Dock | 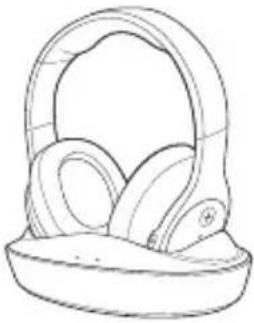 | 1 |
| AC Adapter | 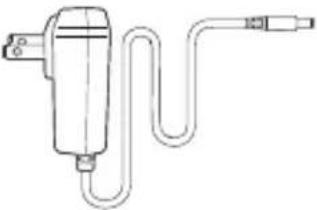 | 1 |
| RCA audio cable 1 |  | |
| 3.5mm-to-RCA audio cable |  | 1 |
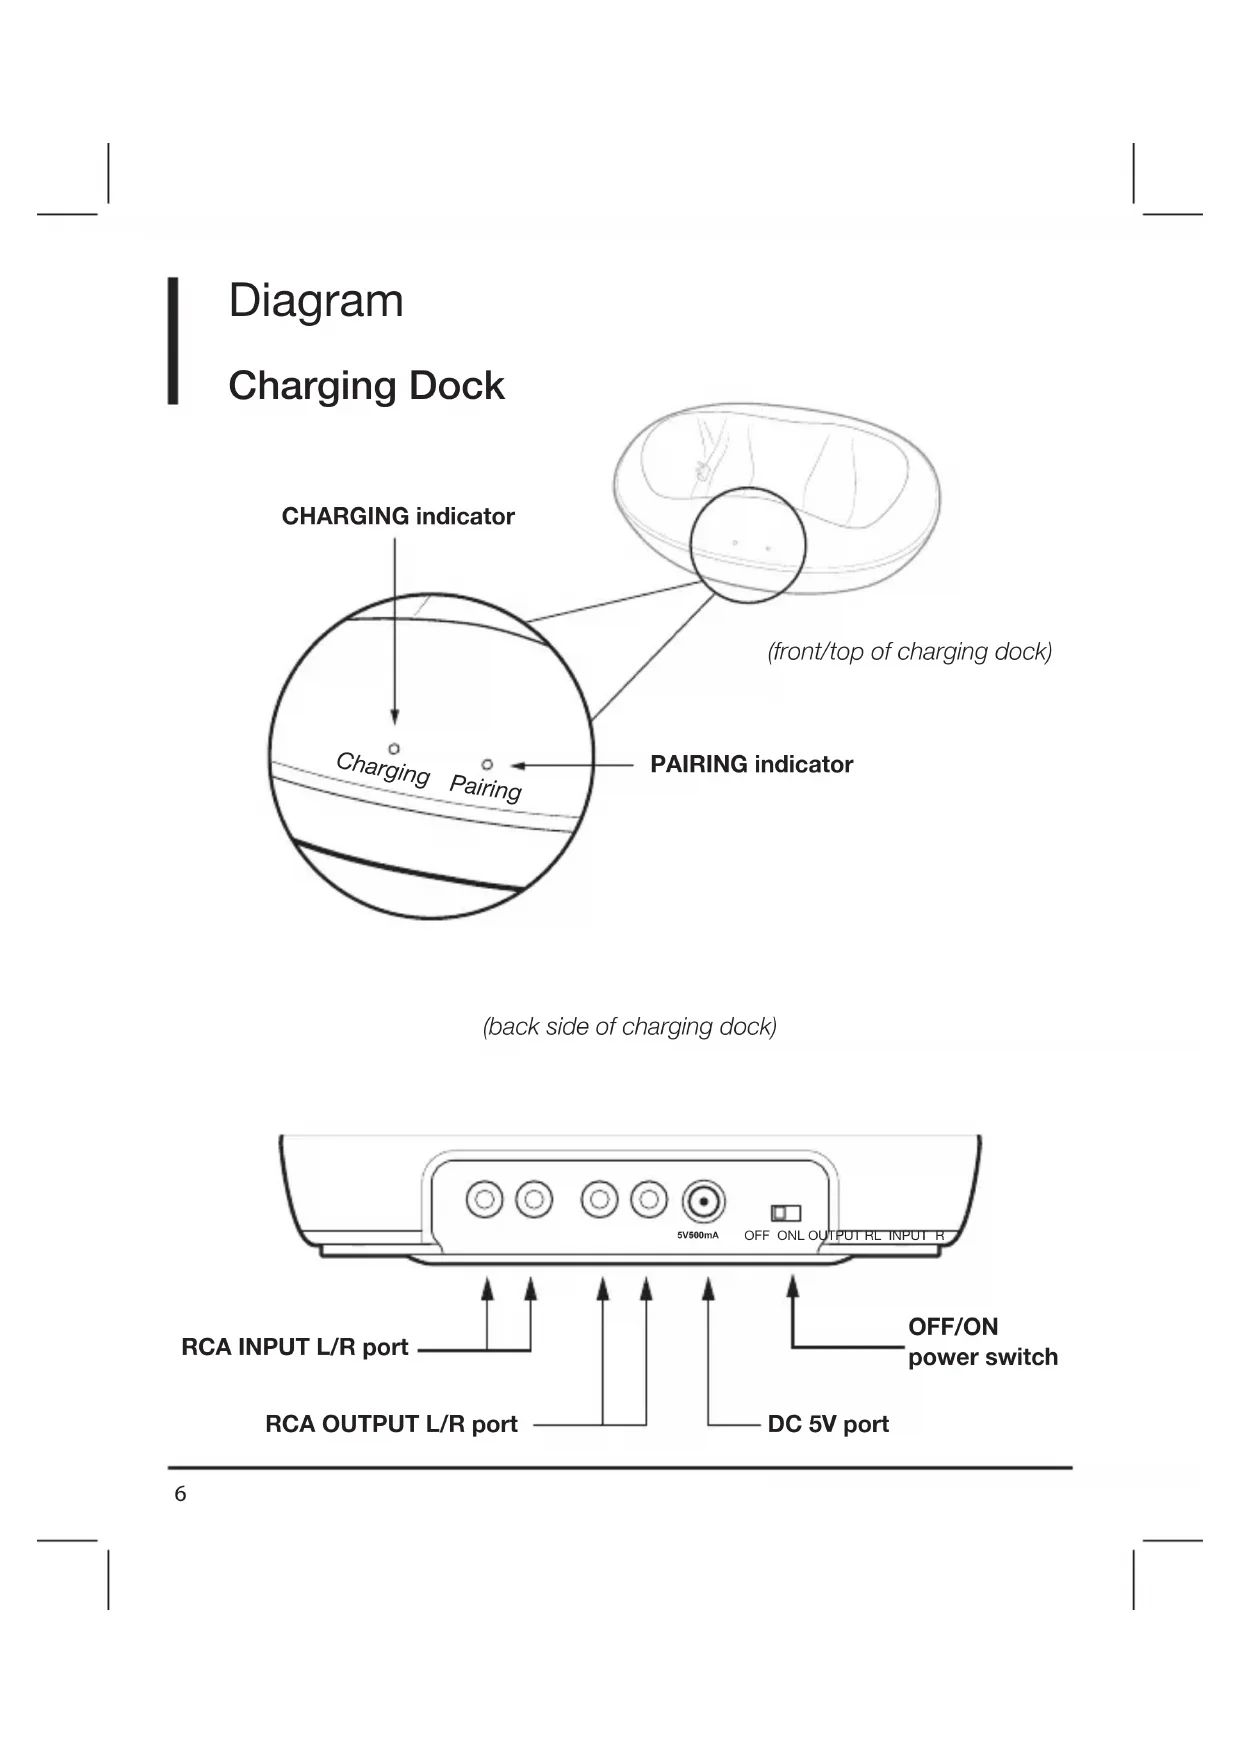
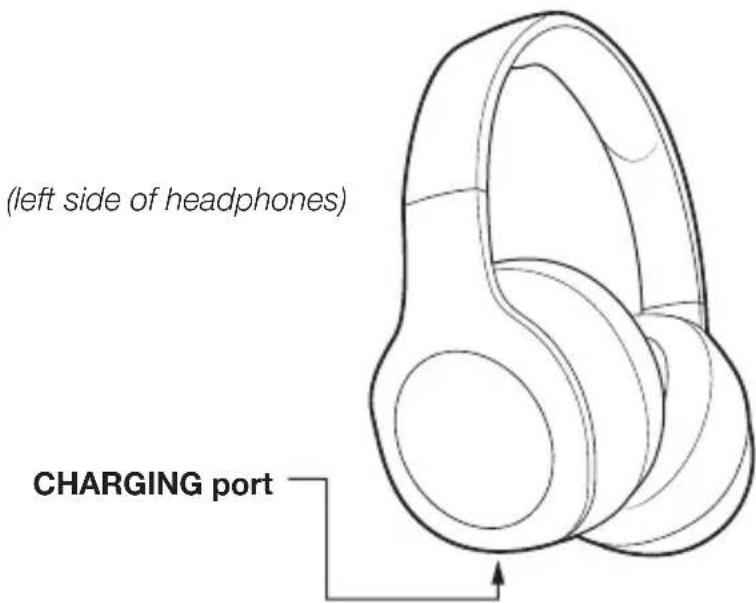
Diagram
Headphones
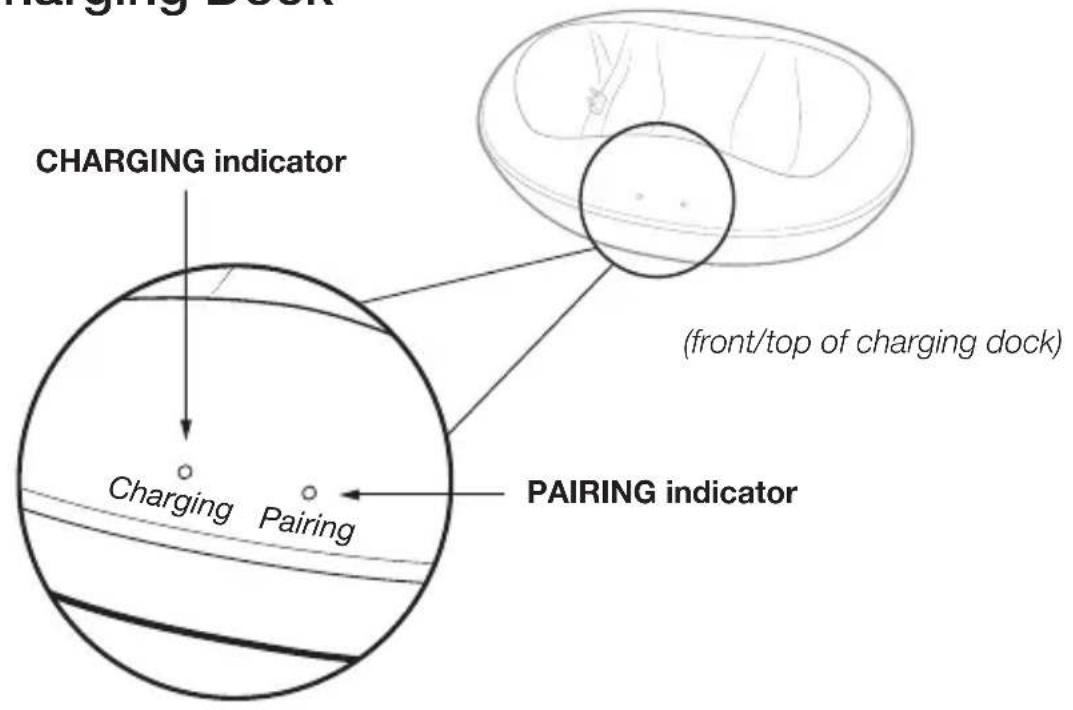
Diagram
Charging Dock
(back side of charging dock)
Setup Instructions
Connecting Charging Dock
-
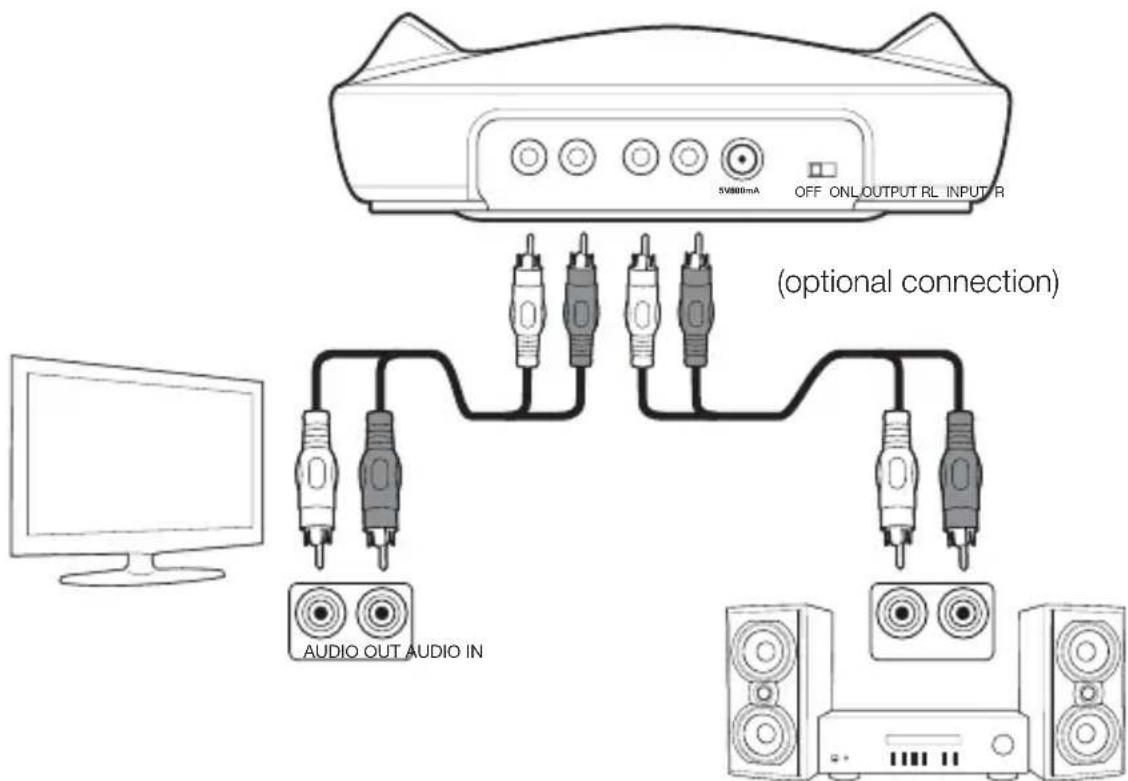
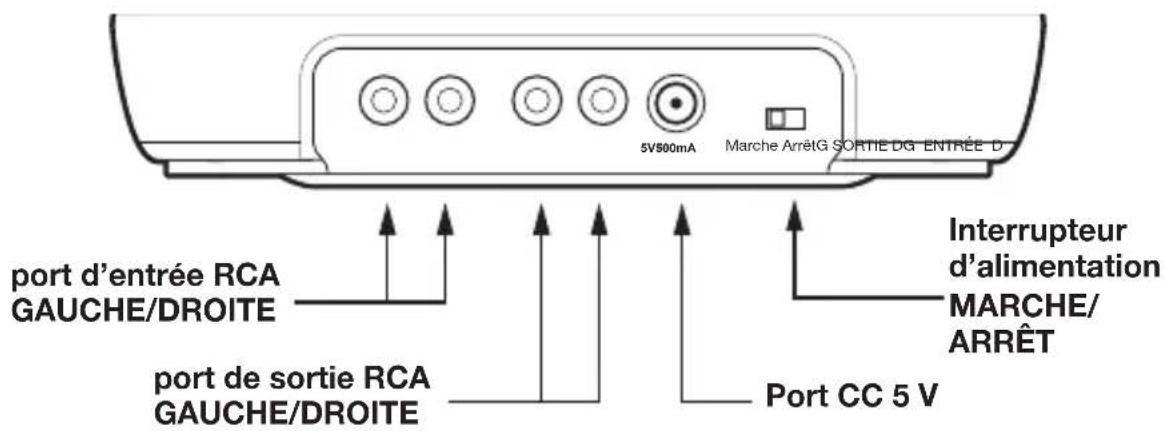
Insert the AC Adapter into the DC 5V port on the back of the charging dock. Connect the AC Adapter plug into an AC power outlet. CAUTION: To avoid risk of fire and damage, only use AC Adapter supplied. Plug the AC Adapter in the outlet after all other connections are completed.
-
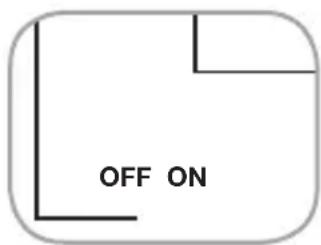
Turn the OFF/ON switch on the back of the charging dock to ON. The Pairing indicator on the charging dock will blink blue.
-
Connect the audio device (tv, laptop, notebook, etc.) by inserting the RCA audio cable plug (red in red/white in white) into the charging dock's INPUT ports and in the audio device's OUTPUT ports. Note: If audio device does not have RCA outputs, use the 3.5mm-to-RCA audio cable to transition the audio connections. Connections will differ per device.
-
If using an additional audio device (see stereo example below), then connect a second cable (not provided) to the charging dock's OUTPUT ports and to the additional audio device's INPUT ports.
Setup Instructions
Charging the Headphones
- Slide the OFF/ON switch on the charging dock to ON.
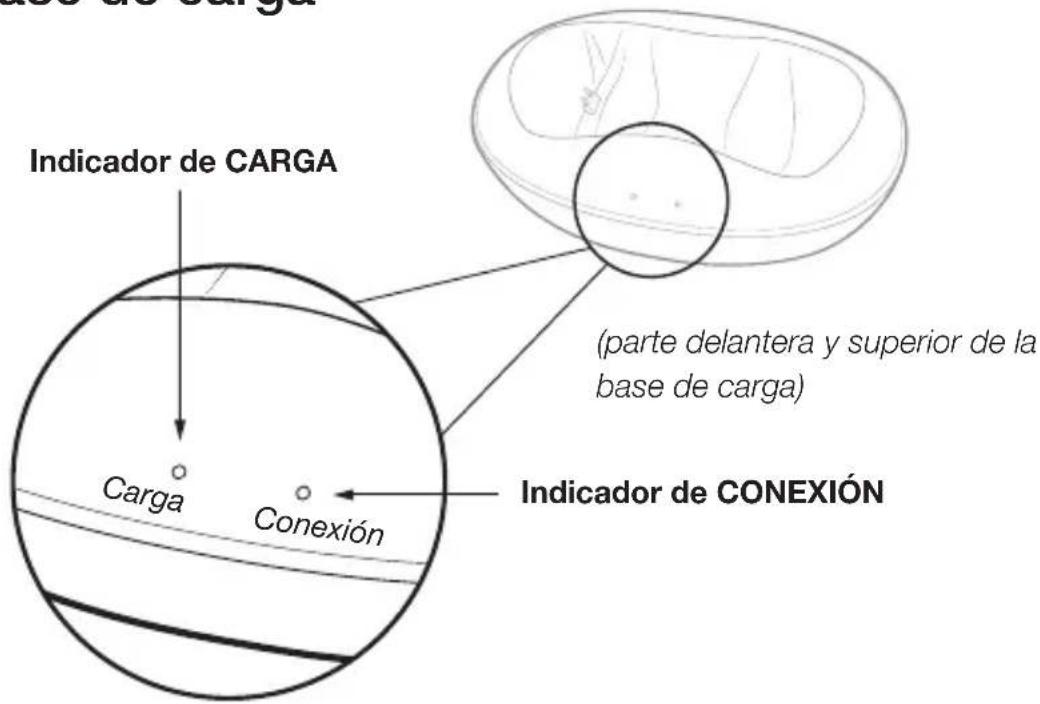
- Place the headphone earpieces in the contoured areas of the charging dock. The headphone's charging port on the left earpiece and the dock's charging pins must make contact with each other to charge correctly.
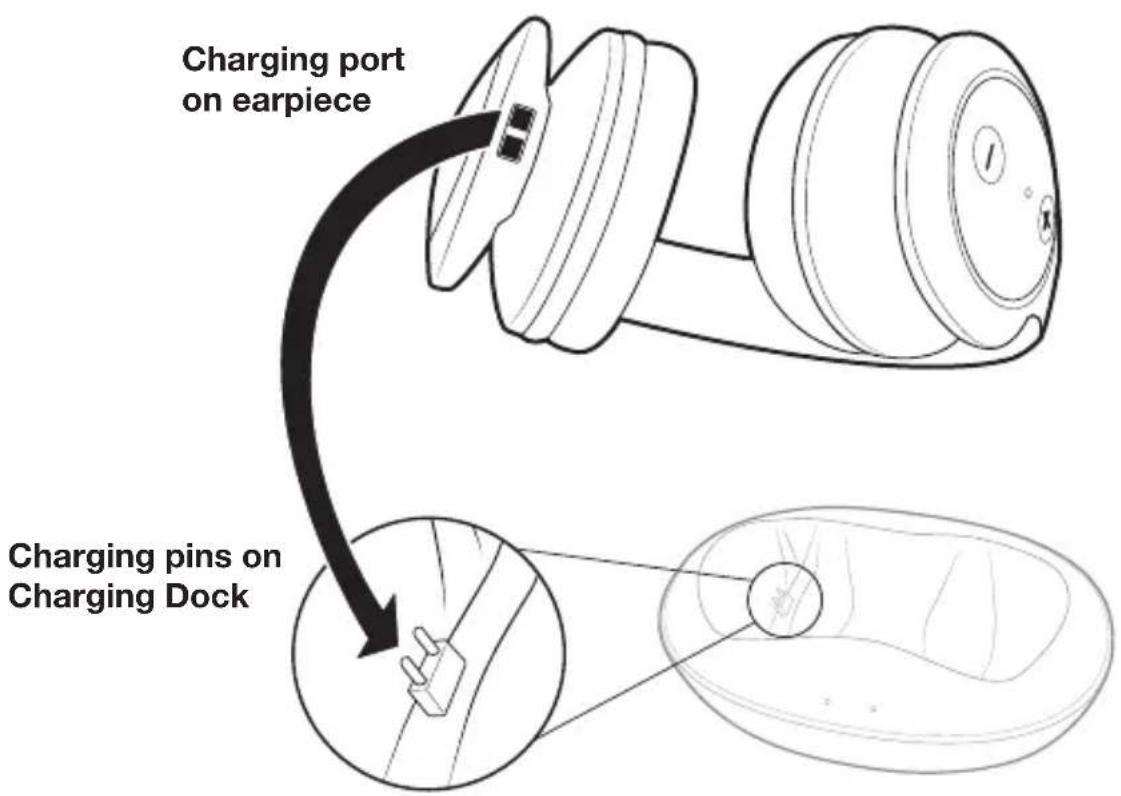
- The Charging indicator turns red when the headphones are charging.
- When fully charged, the Charging indicator turns green.
Note: When the headphone (internal non-replaceable) battery charge is low, the Power/Pairing indicator on the headphone earpiece blinks red approximately 30 minutes prior to the battery being depleted.
Setup Instructions
Pairing Headphones
- Slide the OFF/ON switch on the charging dock to ON. The Pairing indicator on charging dock will blink blue.
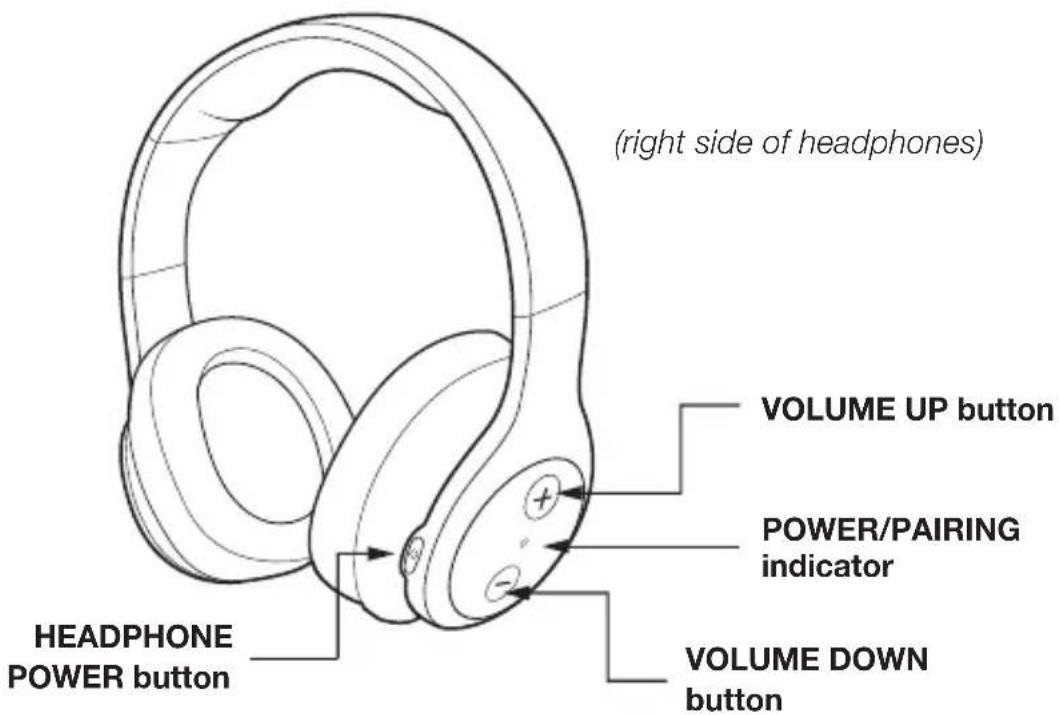
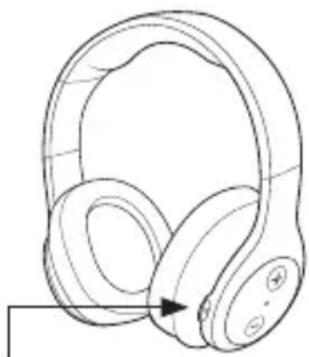
- Press the Power button on the right earpiece of headphones to ON. The Power/Pairing indicator will blink blue.
- When the Power/Pairing indicator on the headphones and Pairing indicators on charging dock both light blue, an active pairing is established between the headphones and the charging dock. The system is now ready for use. Note: Auto-pairing takes 5–10 seconds.
natural_image
Line drawing of a pair of white headphones with earbuds and headband (no text or symbols)Power button
Listening to the Headphones
- Make sure that the charging dock and headphones are wirelessly paired.
- Set the headphone volume level to the low.
- Put the headphones on and adjust the fit for comfort.
- Turn on the audio device and begin play. Depending on the audio device, the volume may need to be increased on the audio device.
- Adjust the volume on the headphone earpiece to a comfortable listening level. On the right earpiece, press the Volume Up button to increase the volume and use the Volume Down button to decrease the volume.
Instructions to Turn Off
Turning Off the Headphone System
- Long press the Power button on right earpiece to turn OFF headphones.
- Slide the OFF/ON switch on the charging dock to OFF.
Guide to Indicators, Ports and Buttons
| COMPONENT DESCRIPTION | ||
| [08SA] | HeadphonePower button | Long press to turn the headphones ON. Long press to turn the headphones OFF. |
| [W7HG] | VOLUME Press to | increase volume |
| [WXHG] | VOLUME Press to | decrease volume |
 | Power/PairingIndicator onHeadphoneearpiece | BLUE LIGHT: Headphones and charging dock are paired. RED LIGHT: Headphones batteries are depleted. (Blinks for approximately 30 minutes before the batteries are depleted.) |
 | ChargingIndicator onCharging Dock | RED LIGHT: Headphones are charging.GREEN LIGHT: Headphones are charged.Indicator light turns off when headphones are removed from the charging dock. |
 | PairingIndicator onCharging Dock | BLINKING BLUE LIGHT: Headphones and charging dock are pairing. SOLID BLUE LIGHT: Headphones and charging dock are paired. |
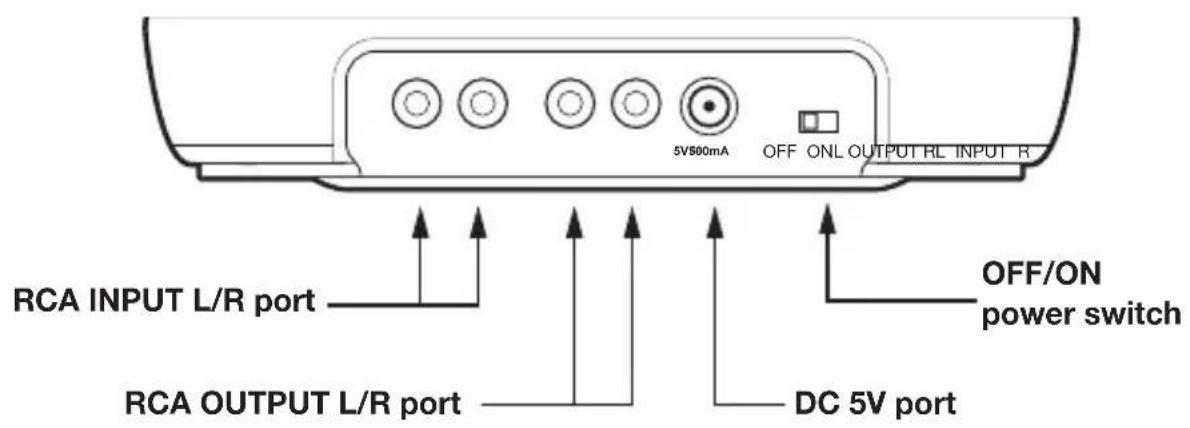
RCA INPUT L/R port  [C0A0] R [C0A0] R | Connect to primary audio device from this port. | |
| RCA OUTPUT L/R port L [SXC7] [C1X02] R | Connect to an additional audio device (optional) from this port. | |
| [WBS4] | DC 5V port Insert | one end of AC Adapter in this port. |
| [2STY] | OFF/ON Power switch | Slide switch on the charging dock to OFF/ON. |
Cleaning and Maintenance
To prevent fire or function issue, turn the headphones off when cleaning. If cleaning is required, use a soft dry cloth; if necessary, use a damp cloth without any solvents. Use caution when cleaning and wiping the plastic parts. If the headphones are not used for a long period of time, charge before using.
Note: See additional Cleaning and Maintenance instructions in Safety and Compliance section.
Safety and Compliance
⚠️ CAUTION Read all safety and operating instructions below before using this product.
- Stop using this product immediately if it causes discomfort or pain. When using this product, it is recommended that the volume is limited to help avoid harm to ears and danger resulting from being unable to hear surrounding sounds.
- Keep the device out of extreme heat and humidity.
- Do not use the device near water, such as sinks, bathtubs, swimming pools, washing machines, areas of water, etc.
- Observe all signs and instructions that require an electrical device or radio product to be switched off in designated areas, such as petrol/refueling stations, hospitals, blasting areas, potentially explosive atmosphere or aircraft.
- Do not push the headphones so the head band is set/pushed to lowest position.
- If cleaning is required, use a soft dry cloth; if necessary, use a damp cloth without solvents. PLEASE NOTE: the information in this user manual was correct at the time of publication, but some minor changes may have been made late in the product's development.
- FCC Warning This device complies with Part 15 of the FCC Rules. Operation of this product is subject to the following two conditions: (1) this device may not cause harmful interference, and (2) this device must accept any interference received, including interference that may cause undesired operation.
Changes or modifications not expressly approved by the party responsible for compliance with the FCC Rules could void the user's authority to operate this equipment.
Note: This equipment has been tested and found to comply within the limits for a class B digital device, pursuant to Part 15 of the FCC Rules. These limits are designed to provide reasonable protection against harmful interference in a residential installation. This equipment generates, uses, and can radiate radio frequency energy and, if not installed and used in accordance with the instructions, may cause harmful interference to radio communications.
However, there is no guarantee that interference will not occur in a particular installation.
If this equipment does cause harmful interference to radio or television reception, which can be determined by turning the equipment off and on, the user is encouraged to try to correct the interference by one or more of the following measures:
- Reorient or relocate the receiving antenna.
- Increase the separation between the equipment and receiver.
- Connect the equipment to an outlet on a different circuit than the receiver is connected.
- Consult the dealer or an experienced technician for help.
This device has been evaluated to meet general RF exposure requirement. The device can be used in portable exposure condition without restriction.
Safety and Compliance (cont.)
- IC Caution - This device complies with Industry Canada license-exempt RSS standard(s). Operation is subject to the following two conditions: (1) this device may not cause interference, and (2) this device must accept any interference, including interference that may cause undesired operation of the device.
This Class B digital apparatus complies with Canadian ICES-3(B)/NMB-3(B).
- WEEE Regulatory information: Disposal of Waste Electrical and Electronic Equipment (WEEE) The Waste Electrical and Electronic Equipment (WEEE) Directive aims to minimize the impact of electrical and electronic goods on the environment, by increasing re-use and recycling and by reducing the amount of WEEE going to landfill. The symbol on this product or its packaging signifies that this product must
be disposed separately from ordinary household wastes at its end of life. Be aware that this is your responsibility to dispose of electronic equipment at recycling centers in order to conserve natural resources. Each country should have its collection centers for electrical and electronic equipment recycling. For information about your recycling drop off area, please contact your related electrical and electronic equipment waste management authority, your local city office, or your household waste disposal service.
CE Hereby, Amazon Fulfillment Services, Inc., declares that this device is in compliance with the essential requirements and other provisions of EMC Directive and Low Voltage Directive. A copy of the EU Declaration of Conformity is available at www.amazon.com/device_eu_compliance.
INTERNAL RECHARGEABLE LITHIUM-ION BATTERY
This device uses an internal rechargeable lithium-ion battery that should last the lifetime of the device. If you suspect your battery may be dead, try charging it several times. If the battery does not recharge, please contact us for repair information.
- WARNING - Disposal of Unit
Please do NOT attempt to change the battery yourself. If the battery has died and you do not want us to replace your battery, you should follow the disposal instructions below:
- Never dispose of used batteries/electronics with ordinary solid wastes, since they contain toxic substances.
- Always dispose of used batteries/electronics in accordance with the prevailing community regulations that apply to the disposal of batteries/electronics. If there are no local regulations concerning battery/electronics disposal, please dispose of the device in a waste bin for electronic devices.
- Many electronics retailers now recycle batteries and other electronic components at no charge. Check to see which retailers in your area provide this service.
- CAUTION - The battery used in this device may present a risk of fire, explosion or chemical burn if mistreated.
- Never use/charge battery if it appears to be leaking, discolored, deformed, or in any way abnormal.
- Never disassemble the unit or attempt to remove battery as that could cause leakage of alkaline solution or other electrolytic substance.
-
Always confirm that the temperature is 5^ C – 35^ C ( 41^ – 95^ Fahrenheit) before you charge the battery. Leakage or deterioration of the battery may occur if this warning is not heeded.
-
Never expose the battery to any liquid.
- Never expose the battery to excessive heat such as direct sunlight or fire. Never use the battery pack in an unventilated vehicle where excessive internal temperatures may be encountered.
- Always keep the battery out of the reach of infants and small children.
IMPORTANT SAFETY INSTRUCTIONS
When used in the directed manner, this unit has been designed and manufactured to ensure personal safety. However, improper use can result in potential electrical shock or fire hazards. Please read all safety and operating instructions carefully before installation and use, and keep these instructions handy for future reference. Take special note of all warnings listed in these instructions and on the unit.
- Water and Moisture – The unit should not be used near water such as near a bathtub, washbowl, kitchen sink, laundry tub, swimming pool or in a wet basement.
- Ventilation – The unit should be situated so that its location or position does not interfere with its proper ventilation. For example, it should not be situated on a bed, sofa, rug or similar surface that may block ventilation openings. Also, it should not be placed in a built-in installation, such as a bookcase or cabinet, which may impede the flow of air through the ventilation openings.
- Heat - The unit should be situated away from heat sources such as radiators, heat registers, stoves or other appliances (including amplifiers) that produce heat.
- Power Sources – The unit should be connected to a power supply only of the type described in the operating instructions or as marked on the appliance.
- Power-Cable Protection – Power supply cables should be routed so that they are not likely to be walked on or pinched by items placed upon or against them.
- Cleaning – It should be cleaned only using a dry or damp cloth. Don't use solvents, etc.
- Objects and Liquid Entry – Care should be taken so that objects do not fall and liquids are not spilled into any openings or vents located on the product.
- Attachments – Do not use attachments not recommended by the product manufacturer.
-
Overloading – Do not overload wall sockets, extension cords, or integral convenience receptacles as this can result in a risk of fire or electric shock.
-
Damage Requiring Service – Unit should be serviced by qualified service personnel if:
-
the power supply cable or plug has been damaged.
- objects have fallen into or liquid has been spilled into the enclosure.
- the unit has been exposed to rain.
- the unit has been dropped or the enclosure damaged.
- the unit exhibits a marked change in performance or does not operate normally.
- Servicing – The user should not attempt to service the unit beyond those methods described in the user's operating instructions. Service methods not covered in the operating instructions should be referred to qualified service personnel.
Warranty Information
To obtain a copy of the warranty for this product:
Visit amazon.com/AmazonBasics/Warranty
- or -
Contact Customer Service at 1-866-216-1072
Feedback
Love it? Hate it?
Let us know with a customer review.
AmazonBasics is committed to delivering customer-driven products that live up to your high standards. We encourage you to write a review sharing your experiences with the product.
Please visit: https://www.amazon.com/review/review-your-purchases

For further service:

Visit amazon.com/gp/help/customer/contact-us
- or -

Contact Customer Service at 1-866-216-1072


natural_image
Line drawing of a pair of headphones (no text or symbols)Schéma
Station de recharge
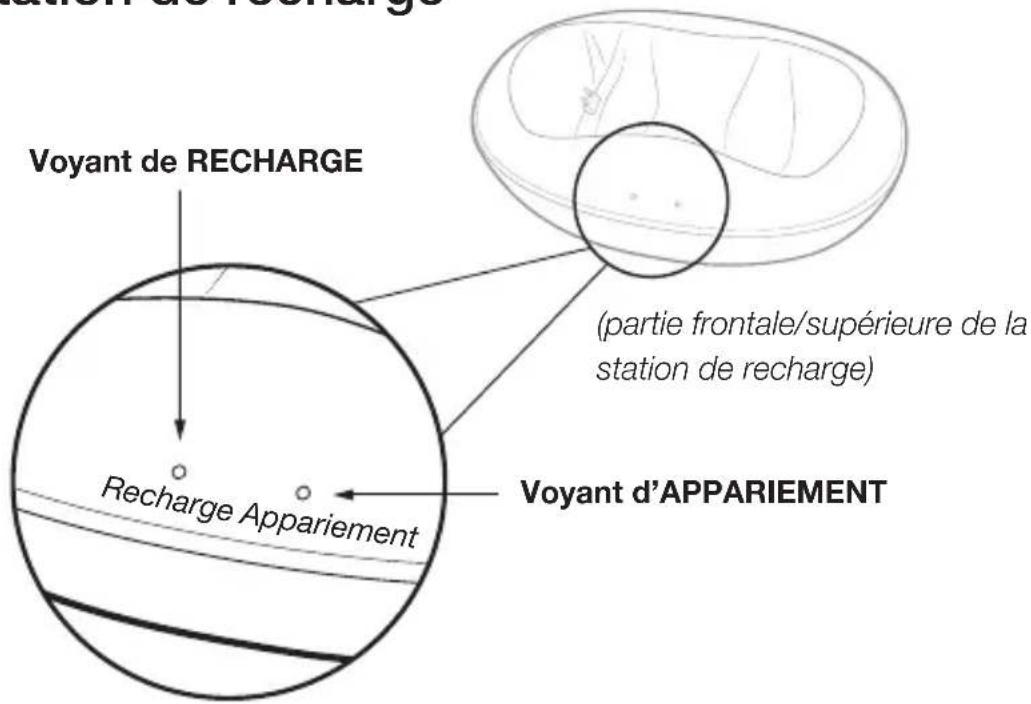
(partie arrière de la station de recharge)
natural_image
Line drawing of a pair of headphones with an arrow indicating compression (no text or symbols)Bouton Marche/Arrêt
Consultez amazon.com/AmazonBasics/Warranty
ou
Consultez : https://www.amazon.com/review/review-your-purchases

consultez amazon.com/gp/help/customer/contact-us
ou

natural_image
Line drawing of a pair of headphones with an arrow indicating head direction (no text or symbols)Ein-/Aus-Taste
Kopfhörer verwenden
amazon.com/AmazonBasics/Warranty
- oder -
https://www.amazon.com/review/review-your-purchases

natural_image
Line drawing of a pair of headphones with earbuds and a button, no text or symbols presentTasto di accensione
Visitare: https://www.amazon.it/review/review-your-purchases

natural_image
Line drawing of a pair of headphones (no text or symbols)Esquema
Base de carga
natural_image
Line drawing of a pair of headphones with an arrow indicating head direction (no text or symbols)Botón de encendido
Visite amazon.com/AmazonBasics/Warranty
Visite: https://www.amazon.com/review/review-your-purchases

Visite amazon.com/gp/help/customer/contact-us
0

amazon.com/AmazonBasics/Warranty
または以下までご連絡ください。
以下をご覧ください。https://www.amazon.com/review/review-your-purchases

amazon.com/gp/help/customer/contact-us
または以下までご連絡ください。

amazon.com/AmazonBasics

- Instructions Manual · English
- Over-Ear Wireless RF Headphones with Charging Dock (RFH01)
- Contents:
- Diagram
- Headphones
- Charging Dock
- Setup Instructions
- Connecting Charging Dock
- Charging the Headphones
- Pairing Headphones
- Listening to the Headphones
- Instructions to Turn Off
- Turning Off the Headphone System
- Guide to Indicators, Ports and Buttons
- Cleaning and Maintenance
- Safety and Compliance
- Safety and Compliance (cont.)
- INTERNAL RECHARGEABLE LITHIUM-ION BATTERY
- - WARNING - Disposal of Unit
- IMPORTANT SAFETY INSTRUCTIONS
- Warranty Information
- Feedback
- Love it? Hate it?
- Schéma
- Station de recharge
- Kopfhörer verwenden
- Esquema
- Base de carga
Brand : AMAZON
Model : RFH01
Category : Earphones