
EOS Rebel T100 - Camera CANON - Free user manual and instructions
Find the device manual for free EOS Rebel T100 CANON in PDF.
| Product type | Digital SLR camera (DSLR) |
| Brand | Canon |
| Model | EOS Rebel T100 / EOS 3000D |
| Lens mount | Canon EF / EF-S |
| Sensor | APS-C CMOS (size not disclosed) |
| Image processor | DIGIC 4+ (estimated) |
| Battery | Lithium-ion LP-E10 |
| Battery charger | LC-E10 or LC-E10E |
| Built-in flash | Yes, pop-up flash (manually raised) |
| Built-in Wi-Fi | Yes, for smartphone connection |
| Display | LCD monitor (size unspecified) |
| Viewfinder | Optical reflex viewfinder (approx. 95% coverage) |
| Shooting modes | Intelligent auto scene, creative modes (Program, aperture priority, shutter priority, manual) |
| Video recording | Yes (details not provided) |
| Interface languages | Multilingual (French, English, Spanish, etc.) |
| Supplied accessories | Camera body, strap, battery LP-E10, charger, body cap |
| Weight (approx.) | 475 g (with battery and card) |
| Sensor maintenance | Contact Canon service center for dust spots |
| Lens cleaning | Use a blower brush, avoid organic solvents |
| Safety instructions | Do not look at the sun through the viewfinder, avoid water, avoid magnetic fields |
Frequently Asked Questions - EOS Rebel T100 CANON
User questions about EOS Rebel T100 CANON
0 question about this device. Answer the ones you know or ask your own.
Ask a new question about this device
Download the instructions for your Camera in PDF format for free! Find your manual EOS Rebel T100 - CANON and take your electronic device back in hand. On this page are published all the documents necessary for the use of your device. EOS Rebel T100 by CANON.
USER MANUAL EOS Rebel T100 CANON
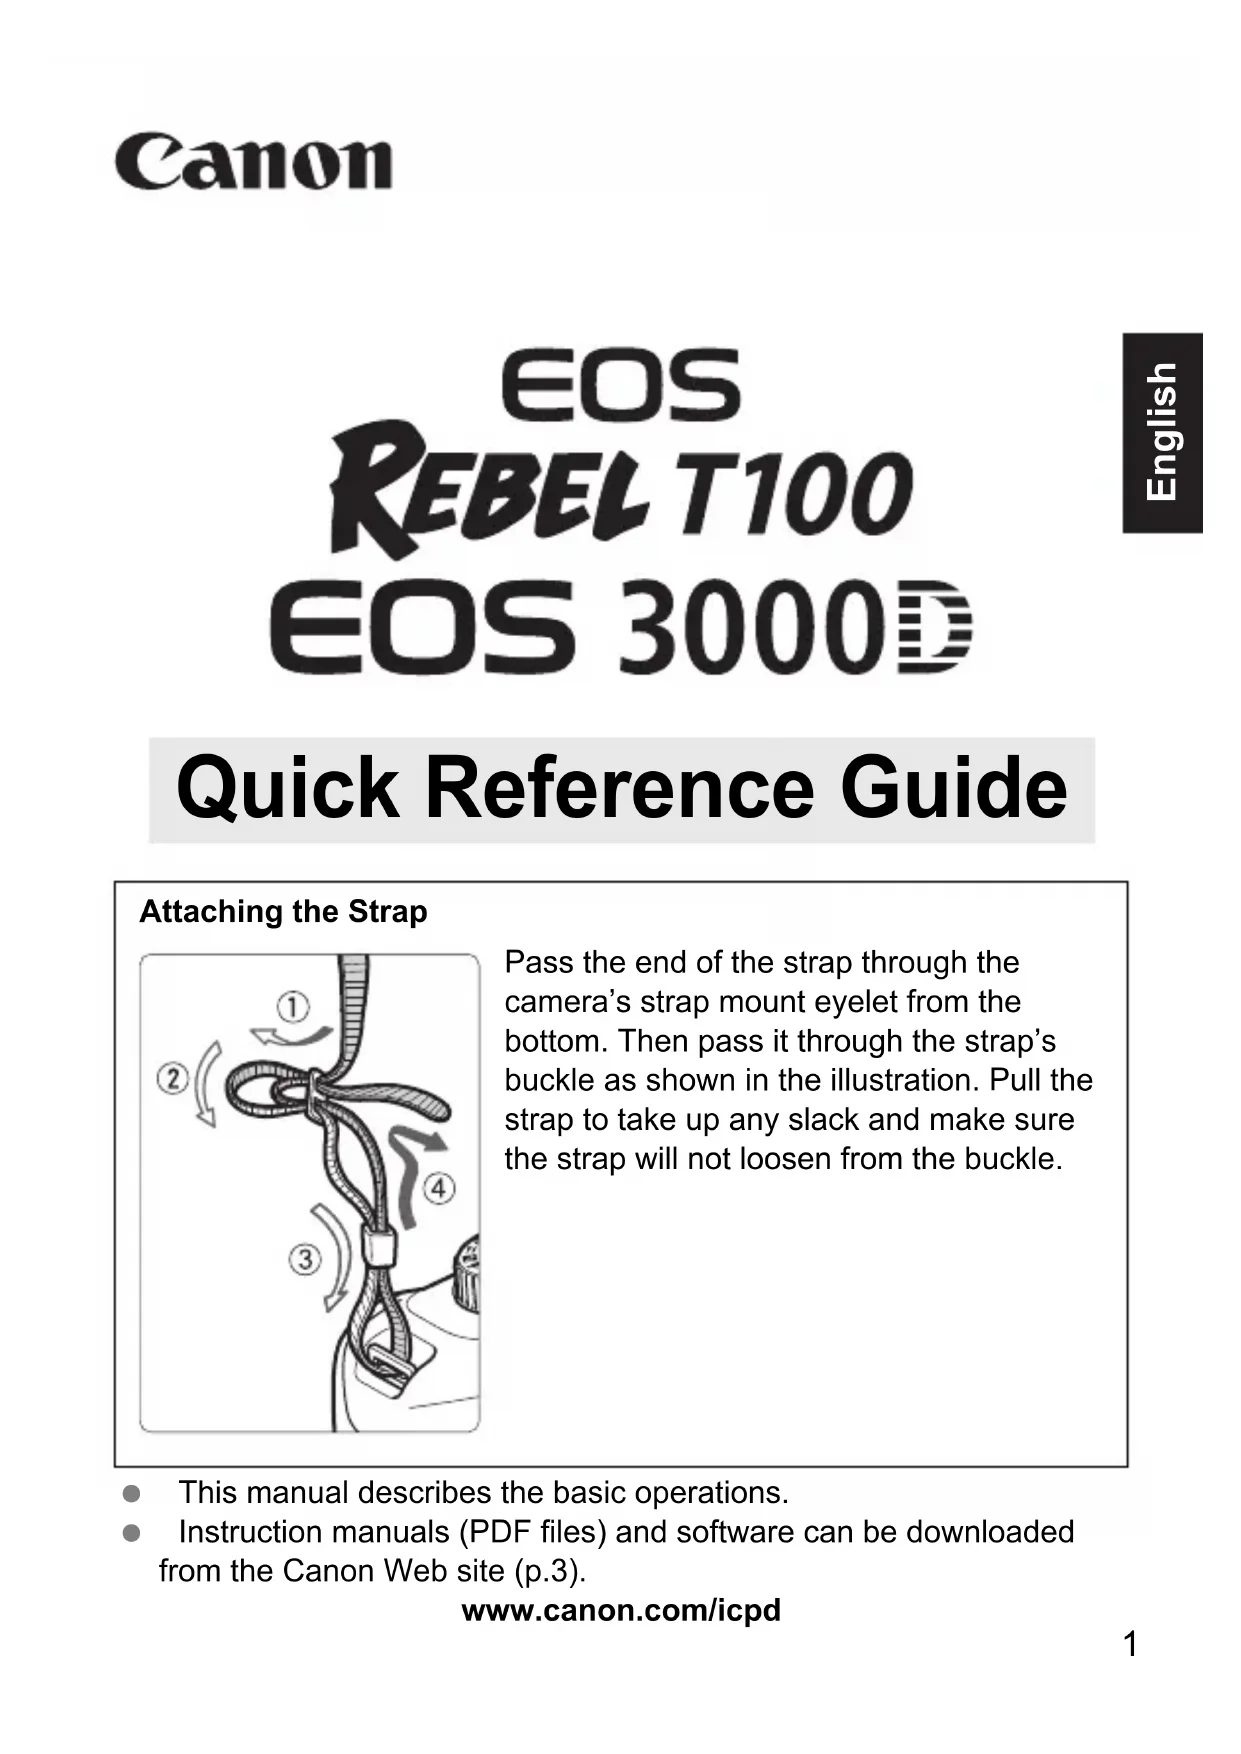
Pass the end of the strap through the camera's strap mount eyelet from the bottom. Then pass it through the strap's buckle as shown in the illustration. Pull the strap to take up any slack and make sure the strap will not loosen from the buckle.
This manual describes the basic operations.
- Instruction manuals (PDF files) and software can be downloaded from the Canon Web site (p.3).
www.canon.com/icpd
Item Check List
Before starting, check that all the following items are included with your camera. If anything is missing, contact your dealer.
natural_image
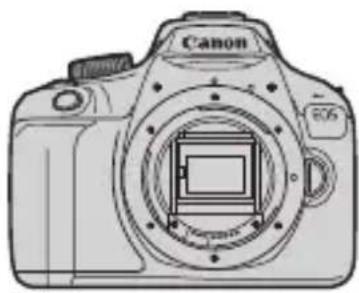
Line drawing of a Canon DSLR camera with no text or symbols on the bodyCamera
(with eyecup and body cap)

natural_image
Illustration of a stylized tool or brush (no text or symbols)Strap
Battery Pack LP-E10
(with protective cover)
Battery Charger
LC-E10/LC-E10E*
* Battery Charger LC-E10 or LC-E10E is provided. (The LC-E10E comes with a power cord.)
- The camera does not come with the Software CD-ROM, an interface cable or HDMI cable.
The Instruction Manuals provided are listed on the next page.
- If you purchased a Lens Kit, check that the lenses are included.
- Be careful not to lose any of the above items.

When you need Lens Instruction Manuals, download them from the Canon Web site (p.3).
The Lens Instruction Manuals (PDF) are for lenses sold individually. Note that when purchasing the Lens Kit, some of the accessories included with the lens may not match those listed in the Lens Instruction Manual.

Software can be downloaded from the Canon Web site for your use.
Instruction Manuals

Quick Reference Guide
The booklet describes the basic operations.
More detailed Instruction Manuals (PDF files) can be downloaded from the Canon Web site.
Downloading and Viewing the Instruction Manuals (PDF Files)
1 Download the Instruction Manuals (PDF files).
- Connect to the Internet and access the following Canon Web site.
www.canon.com/icpd
- Select your country or region of residence and download the Instruction Manuals.
Instruction Manuals Available for Download
- Camera Instruction Manual
- Wireless Function Instruction Manual
- Quick Reference Guide
- Lens Instruction Manuals
- Software Instruction Manuals
2View the Instruction Manuals (PDF files).
- Double-click the downloaded Instruction Manual (PDF file) to open it.
- To view the Instruction Manuals (PDF files), Adobe Acrobat Reader DC or other Adobe PDF viewer (most recent version recommended) is required.
- Adobe Acrobat Reader DC can be downloaded for free from the Internet.
- To learn how to use PDF viewing software, refer to the software's Help section.
Quick Start Guide
1
Insert the battery (p.19).
● To charge the battery, see page 18.
2
natural_image
Diagram of a printer internal structure showing internal components and a device (no text or symbols visible)Insert the card (p.19).
- With the card's label facing toward the back of the camera, insert it into the card slot. - The camera does not come with a card for recording images/movies.
3

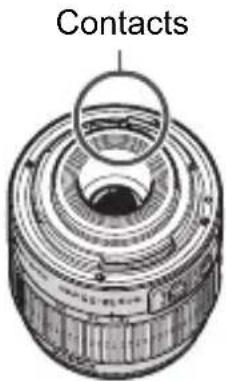
Attach the lens.
- Align the lens's white or red mount index with the camera's mount index of the same color to attach the lens.
4
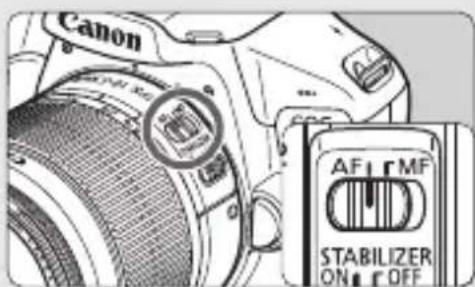
Set the lens's focus mode switch to .
5

Set the Mode Dial to <^+> (Scene Intelligent Auto) (p.24).
● All the necessary camera settings will be set automatically.
- When the LCD monitor displays the date/time/zone setting screen, see page 21.
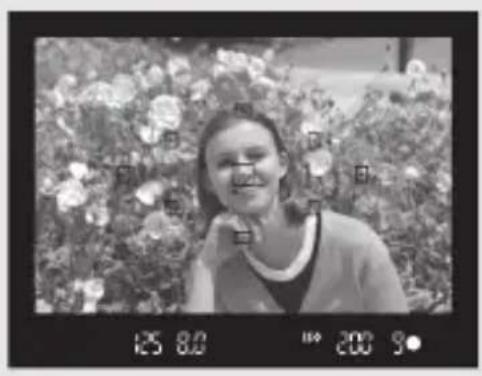
6
natural_image
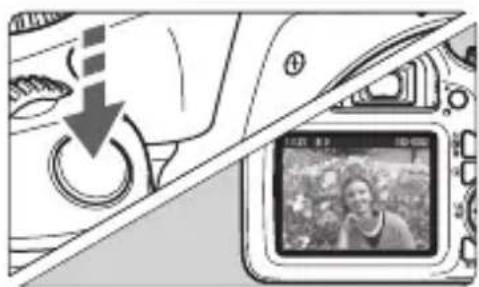
Black-and-white photo of a smiling woman standing in front of a floral background (no visible text or symbols)Focus on the subject.
- Look through the viewfinder and aim the viewfinder center over the subject.
- Press the shutter button halfway, and the camera will focus on the subject.
- If the <> icon blinks in the viewfinder, raise the built-in flash with your fingers.
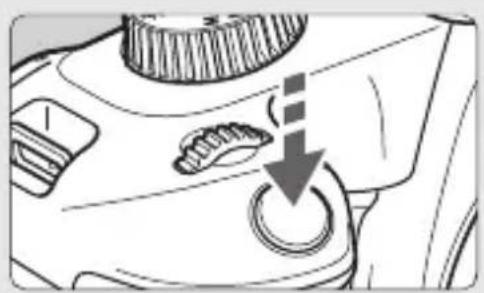
7
natural_image
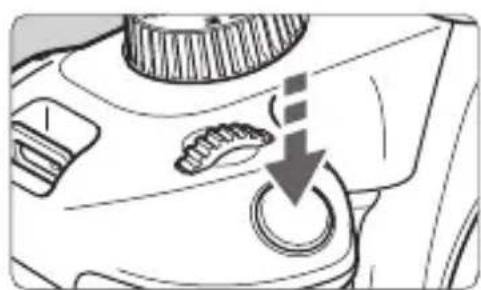
Close-up of a mechanical component with a circular button and a downward arrow indicating a process (no text or symbols visible)Take the picture.
- Press the shutter button completely to take the picture.
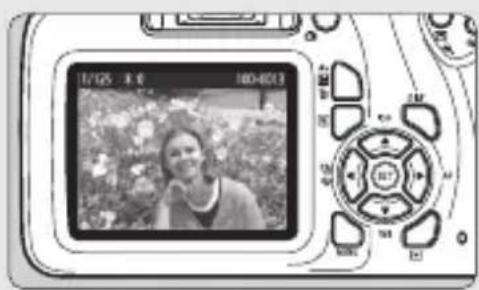
8
natural_image
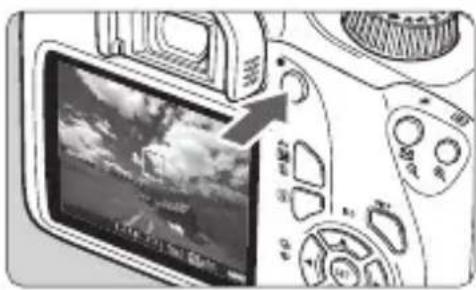
Digital camera module displaying a black-and-white photo of a person outdoors, no visible text or symbols on the device screen.Review the picture.
● The captured image will be displayed for approx. 2 sec. on the LCD monitor.
- To display the image again, press the <▶> button (p.29).
Contents
Item Check List.... 2
Instruction Manuals .... 3
Quick Start Guide 4
Safety Instructions....7
Handling Precautions 10
Nomenclature 13
Charging the Battery 18
Installing and Removing the Battery and Card 19
Turning on the Power 21
Setting the Date, Time, and Zone.... 21
Selecting the Interface Language.... 23
A ^+ Fully Automatic Shooting (Scene Intelligent Auto)...... 24
Using the Built-in Flash.... 26
Shooting with the LCD Monitor 27
Shooting Movies 28
▶ Image Playback.... 29
Connecting to a Smartphone via Wi-Fi.... 30
Wireless Communication Function Precautions.... 38
Index....40

For Troubleshooting guide and Specifications, refer to the Instruction Manual downloadable from the Canon Web site. For how to download the Instruction Manual, see page 3.

Certification Logo
Under the [3] tab, if you select [Certification Logo Display] and press
Safety Instructions
Be sure to read these instructions in order to operate the product safely. Follow these instructions to prevent injury or harm to the operator of the product or others.

WARNING Denotes the risk of serious injury or death.
- Keep the product out of the reach of young children.
A strap wrapped around a person's neck may result in strangulation.
The parts or provided items of cameras or accessories are dangerous if swallowed. If swallowed, seek immediate medical assistance.
The battery is dangerous if swallowed. If swallowed, seek immediate medical assistance.
- Use only power sources specified in this instruction manuafor use with the product.
- Do not disassemble or modify the product.
- Do not expose the product to strong shocks or vibration.
- Do not touch any exposed internal parts.
- Stop using the product in any case of unusual circumstances such as the presence of smoke or a strange smell.
- Do not use organic solvents such as alcohol, benzine or paint thinner to clean the product.
- Do not get the product wet. Do not insert foreign objects or liquids into the product.
- Do not subject the product to high water pressure or get it wet with large quantities of liquids. Do not insert foreign objects or liquids into the product.
- Do not insert foreign objects or liquids into the product.
- Do not use the product where flammable gases may be present.
This may cause electric shock, explosion or fire.
- Do not leave a lens or a camera with a lens attached, exposed without the lens cap attached.
The lens may concentrate the light and cause fire.
- Do not look through the viewfinder at strong light sources such as the sun on a bright day or lasers and other strong artificial light sources.
This may harm your vision.
- Do not touch the product connected to a power outlet during lightning storms. This may cause electric shock.
- Observe the following instructions when using commercially available batteries or provided battery packs.
- Use batteries/battery packs only with their specified product.
- Do not heat batteries/battery packs or expose them to fire.
- Do not charge batteries/battery packs using non-authorized battery chargers.
- Do not expose the terminals to dirt or let them come into contact with metallic pins or other metal objects.
- Do not use leaking batteries/battery packs.
- When disposing of batteries/battery packs, insulate the terminals with tape or other means.
This may cause electric shock, explosion or fire.
If a battery/battery pack leaks and the material contacts your skin or clothing, flush the exposed area thoroughly with running water. In case of eye contact, flush thoroughly with copious amounts of clean running water and seek immediate medical assistance.
- Observe the following instructions when using a battery charger or AC adapter.
- Periodically remove any dust buildup from the power plug and power outlet using a dry cloth.
- Do not plug in or unplug the product with wet hands.
- Do not use the product if the power plug is not fully inserted into the power outlet.
- Do not expose the power plug and terminals to dirt or let them come into contact with metallic pins or other metal objects.
- Do not touch the battery charger or AC adapter connected to a power outlet during lightning storms.
- Do not place heavy objects on the power cord. Do not damage, break or modify the power cord.
- Do not wrap the product in cloth or other materials when in use or shortly after use when the product is still warm in temperature.
- Do not unplug the product by pulling the power cord.
- Do not leave the product connected to a power source for long periods of time.
- Do not charge batteries/battery packs at temperatures outside the range of 6 - 40 °C (43 - 104 °F).
This may cause electric shock, explosion or fire.
- Do not allow the product to maintain contact with the same area of skin for extended periods of time during use.
This may result in low-temperature contact burns, including skin redness and blistering, even if the product does not feel hot. The use of a tripod or similar equipment is recommended when using the product in hot places and for people with circulation problems or less sensitive skin.
- Follow any indications to turn off the product in places where its use is forbidden. Not doing so may cause other equipment to malfunction due to the effect of electromagnetic waves and even result in accidents.
- To prevent fire, excessive heat, chemical leakage, explosions, and electrical shock, follow the safeguards below:
- Do not insert the battery's plus and minus ends incorrectly.
- Do not leave any cords near a heat source. It can deform the cord or melt the insulation and cause a fire or electrical shock.
- Do not fire the flash at anyone driving a car or other vehicle. It may cause an accident.
- Do not use or store the equipment in dusty or humid places. Likewise, keep the battery away from metallic items and store it with its protective cover attached to prevent short-circuit.
This is to prevent fire, excessive heat, electrical shock, and burns.
● To prevent a fire and electrical shock, follow the safeguards below:
- Do not connect too many power plugs to the same power outlet.
- Do not use a cord whose wire is broken or insulation is damaged.
- Do not connect the battery directly to an electrical outlet or a car's cigarette lighter outlet. The battery may leak, generate excessive heat or explode, causing fire, burns, or injuries.
- A thorough explanation of how to use the product by an adult is required when the product is used by children. Supervise children while they are using the product. Incorrect usage may result in electrical shock or injury.

CAUTION: Denotes the risk of injury.
- Do not fire the flash near the eyes.
It may hurt the eyes.
- Strap is intended for use on the body only. Hanging the strap with any product attached on a hook or other object may damage the product. Also, do not shake the product or expose the product to strong impacts.
- Do not apply strong pressure on the lens or allow an object to hit it.
This may cause injury or damage to the product.
- Flash emits high temperatures when fired. Keep fingers, any other part of your body, and objects away from the flash unit while taking pictures.
This may cause burns or malfunction of the flash. - Do not leave the product in places exposed to extremely high or low temperatures. The product may become extremely hot/cold and cause burns or injury when touched.
- Only mount the product on a tripod that is sufficiently sturdy.
- Do not carry the product when it is mounted on a tripod.
This may cause injury or may result in an accident.
- Do not look at the screen or through the viewfinder for prolonged periods of time. This may induce symptoms similar to motion sickness. In such a case, stop using the product immediately and rest for a while before resuming use.
- Do not touch any parts inside the product.
This may cause injury.
Handling Precautions
Camera Care
- This camera is a precision instrument. Do not drop it or subject it to physical shock.
- The camera is not waterproof and cannot be used underwater. If you accidentally drop the camera into water, promptly consult the nearest Canon Service Center. Wipe off any water droplets with a dry and clean cloth. If the camera has been exposed to salty air, wipe it with a well-wrun wet cloth.
- Never leave the camera near anything having a strong magnetic field such as a magnet or electric motor. Also, avoid using or leaving the camera near anything emitting strong radio waves, such as a large antenna. Strong magnetic fields can cause camera misoperation or destroy image data.
- Do not leave the camera in excessive heat, such as in a car in direct sunlight.
- The camera contains precision electronic circuitry. Never attempt to disassemble the camera yourself.
- Do not block the built-in flash or mirror operation with your finger, etc. Doing so may cause a malfunction.
- Use only a commercially-available blower to blow away dust when it adheres to the lens, viewfinder, reflex mirror, focusing screen, etc. Do not use cleaners that contain organic solvents to clean the camera body or lens. For stubborn dirt, take the camera to the nearest Canon Service Center.
- Do not touch the camera's electrical contacts with your fingers. This is to prevent the contacts from corroding. Corroded contacts may cause camera misoperation.
- If the camera is suddenly brought in from the cold into a warm room, condensation may form on the camera and internal parts. To prevent condensation, first put the camera in a sealed plastic bag and let it adjust to the warmer temperature before taking it out of the bag.
- If condensation forms on the camera, do not use the camera. This is to avoid damaging the camera. If there is condensation, remove the lens, card and battery from the camera, and wait until condensation has evaporated before using the camera.
- If the camera will not be used for an extended period, remove the battery and store the camera in a cool, dry, well-ventilated location. Even while the camera is in storage, press the shutter button a few times once in a while to check that the camera is still working.
- Avoid storing the camera where there are chemicals that result in rust and corrosion such as in a chemical lab.
- If the camera has not been used for an extended period, test all its functions before using it. If you have not used the camera for some time or if there is an important shoot such as a foreign trip coming up, have the camera checked by your nearest Canon Service Center or check the camera yourself and make sure it is working properly.
- If you use continuous shooting, Live View shooting, or movie shooting for a prolonged period, the camera may become hot. This is not a malfunction.
- If there is a bright light source inside or outside the image area, ghosting may occur.
LCD Monitor
Although the LCD monitor is manufactured with very high precision technology with over 99.99% effective pixels, there may be a few dead pixels displaying only black or red, etc. among the remaining 0.01% or less pixels. Dead pixels are not a malfunction. They do not affect the images recorded.
- If the LCD monitor is left on for a prolonged period, screen burn-in may occur where you see remnants of what was displayed. However, this is only temporary and will disappear when the camera is left unused for a few days.
- The LCD monitor display may seem slow in low temperatures, or look black in high temperatures. It will return to normal at room temperature.
- Look straight at the LCD monitor. The display may be difficult to see depending on the angle.
Lens Mount Maintenance
If dust adheres to the lens mount, wipe it off with a dry and clean cloth. Never use cleaners that contain organic solvents, such as alcohol wet wipes. Doing so may scratch the lens mount or make it difficult to attach or detach the lens.
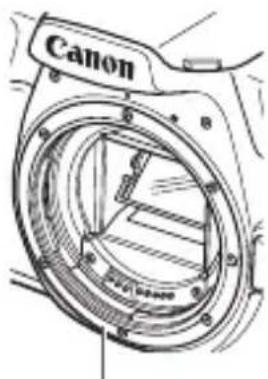
Lens mount
Cards
To protect the card and its recorded data, note the following:
- Do not drop, bend, or wet the card. Do not subject it to excessive force, physical shock, or vibration.
- Do not touch the card's electronic contacts with your fingers or anything metallic.
- Do not affix any stickers, etc. on the card.
- Do not store or use the card near anything that has a strong magnetic field, such as a TV set, speakers, or magnets. Also avoid places prone to having static electricity.
- Do not leave the card in direct sunlight or near a heat source.
- Store the card in a case, etc.
- Do not store the card in hot, dusty, or humid locations.
Lens
After detaching the lens from the camera, put down the lens with the rear end up and attach the rear lens cap to avoid scratching the lens surface and electrical contacts.
Smudges Adhering to the Front of the Sensor
Besides dust entering the camera from outside, in rare cases lubricant from the camera's internal parts may adhere to the front of the sensor. If smudges are visible on the images, having the sensor cleaned by a Canon Service Center is recommended.
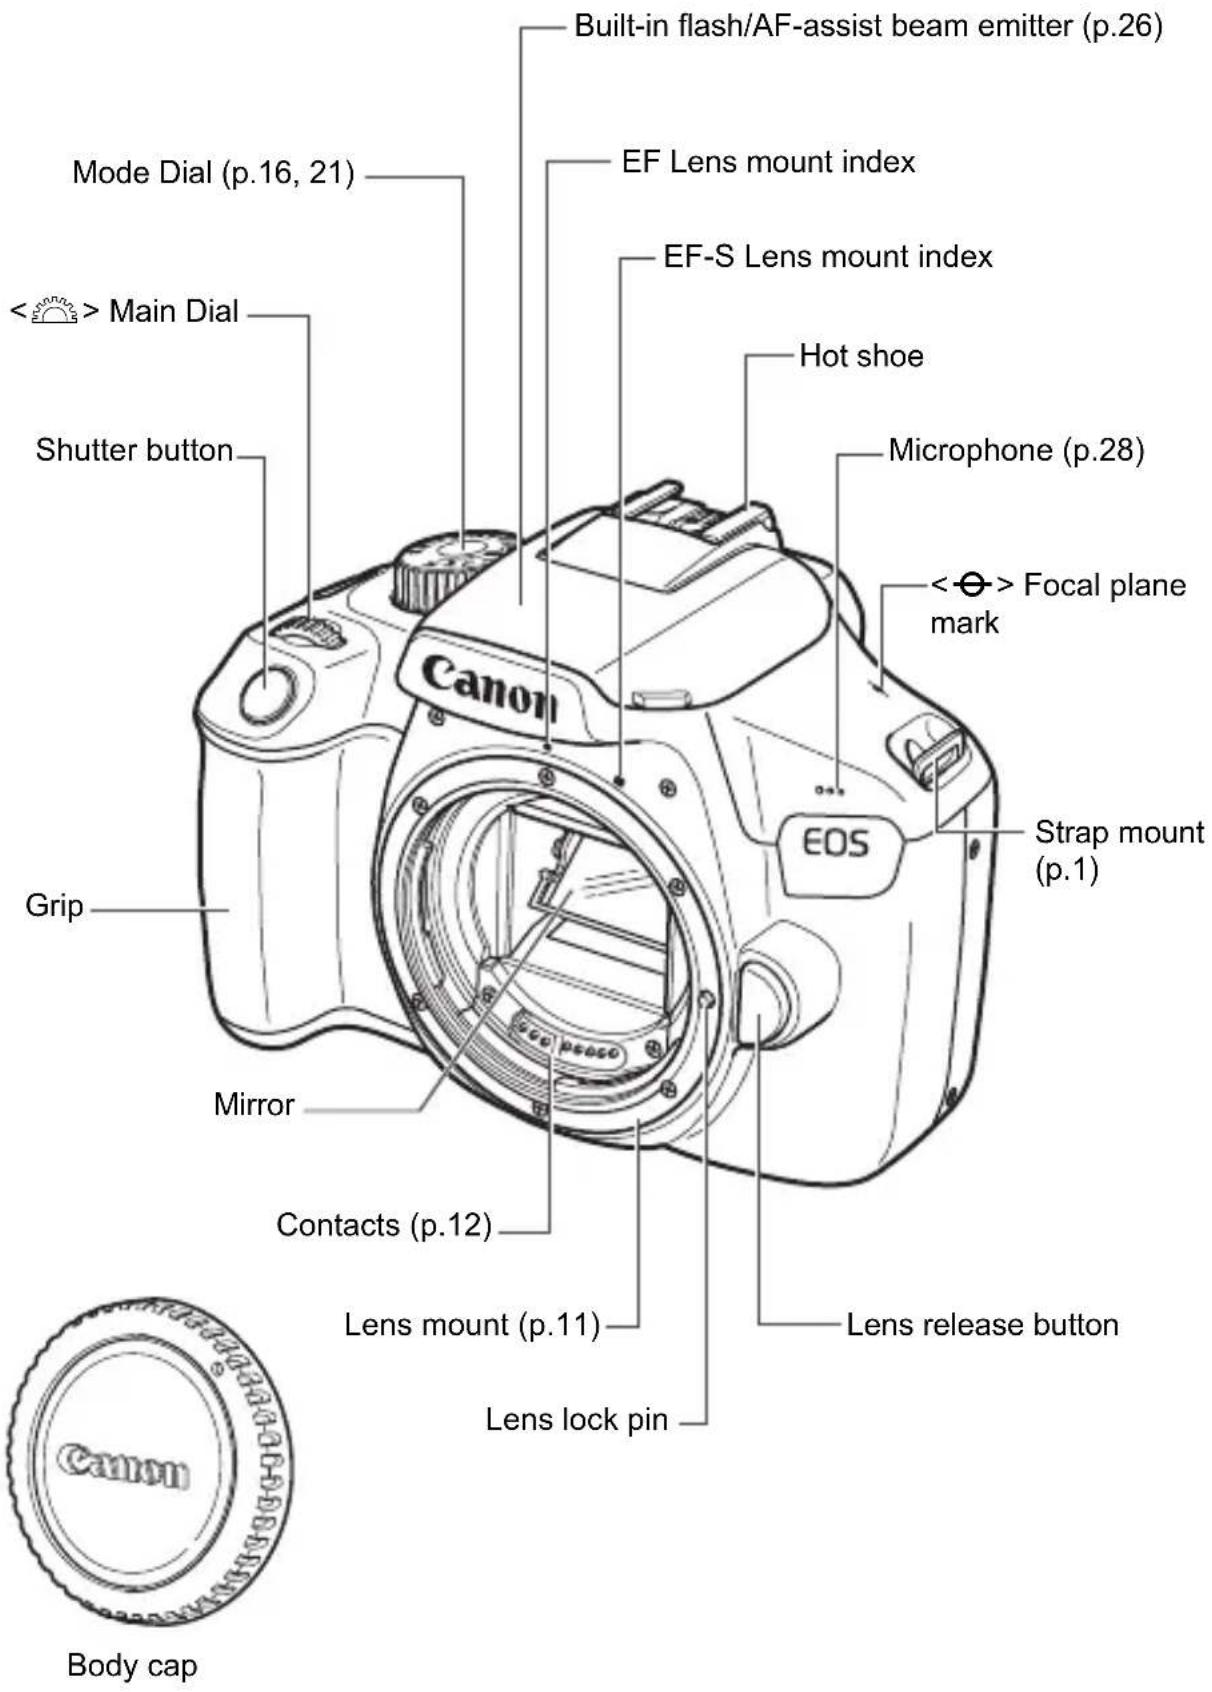
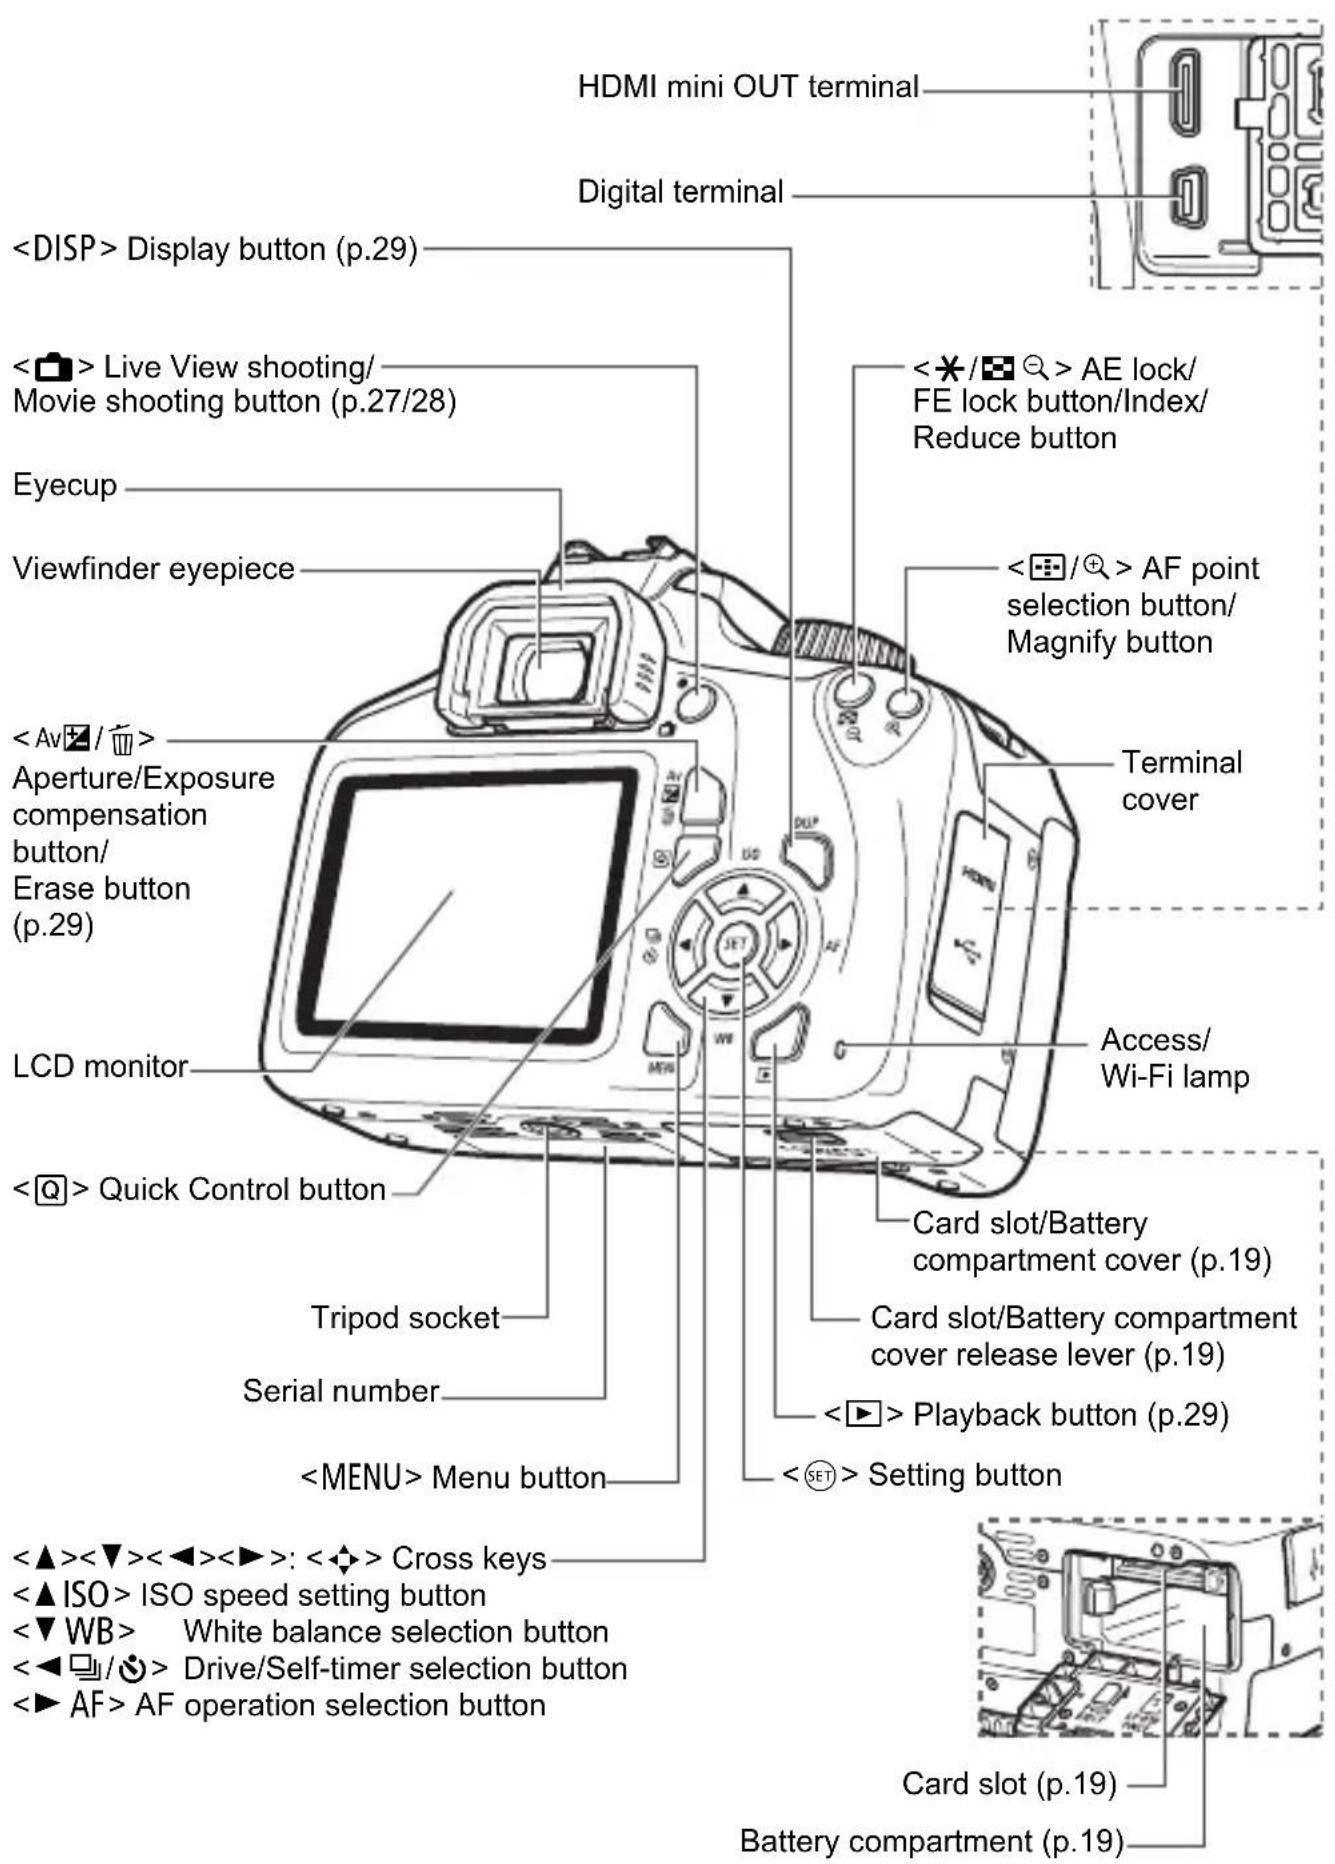
Nomenclature
Viewfinder Information
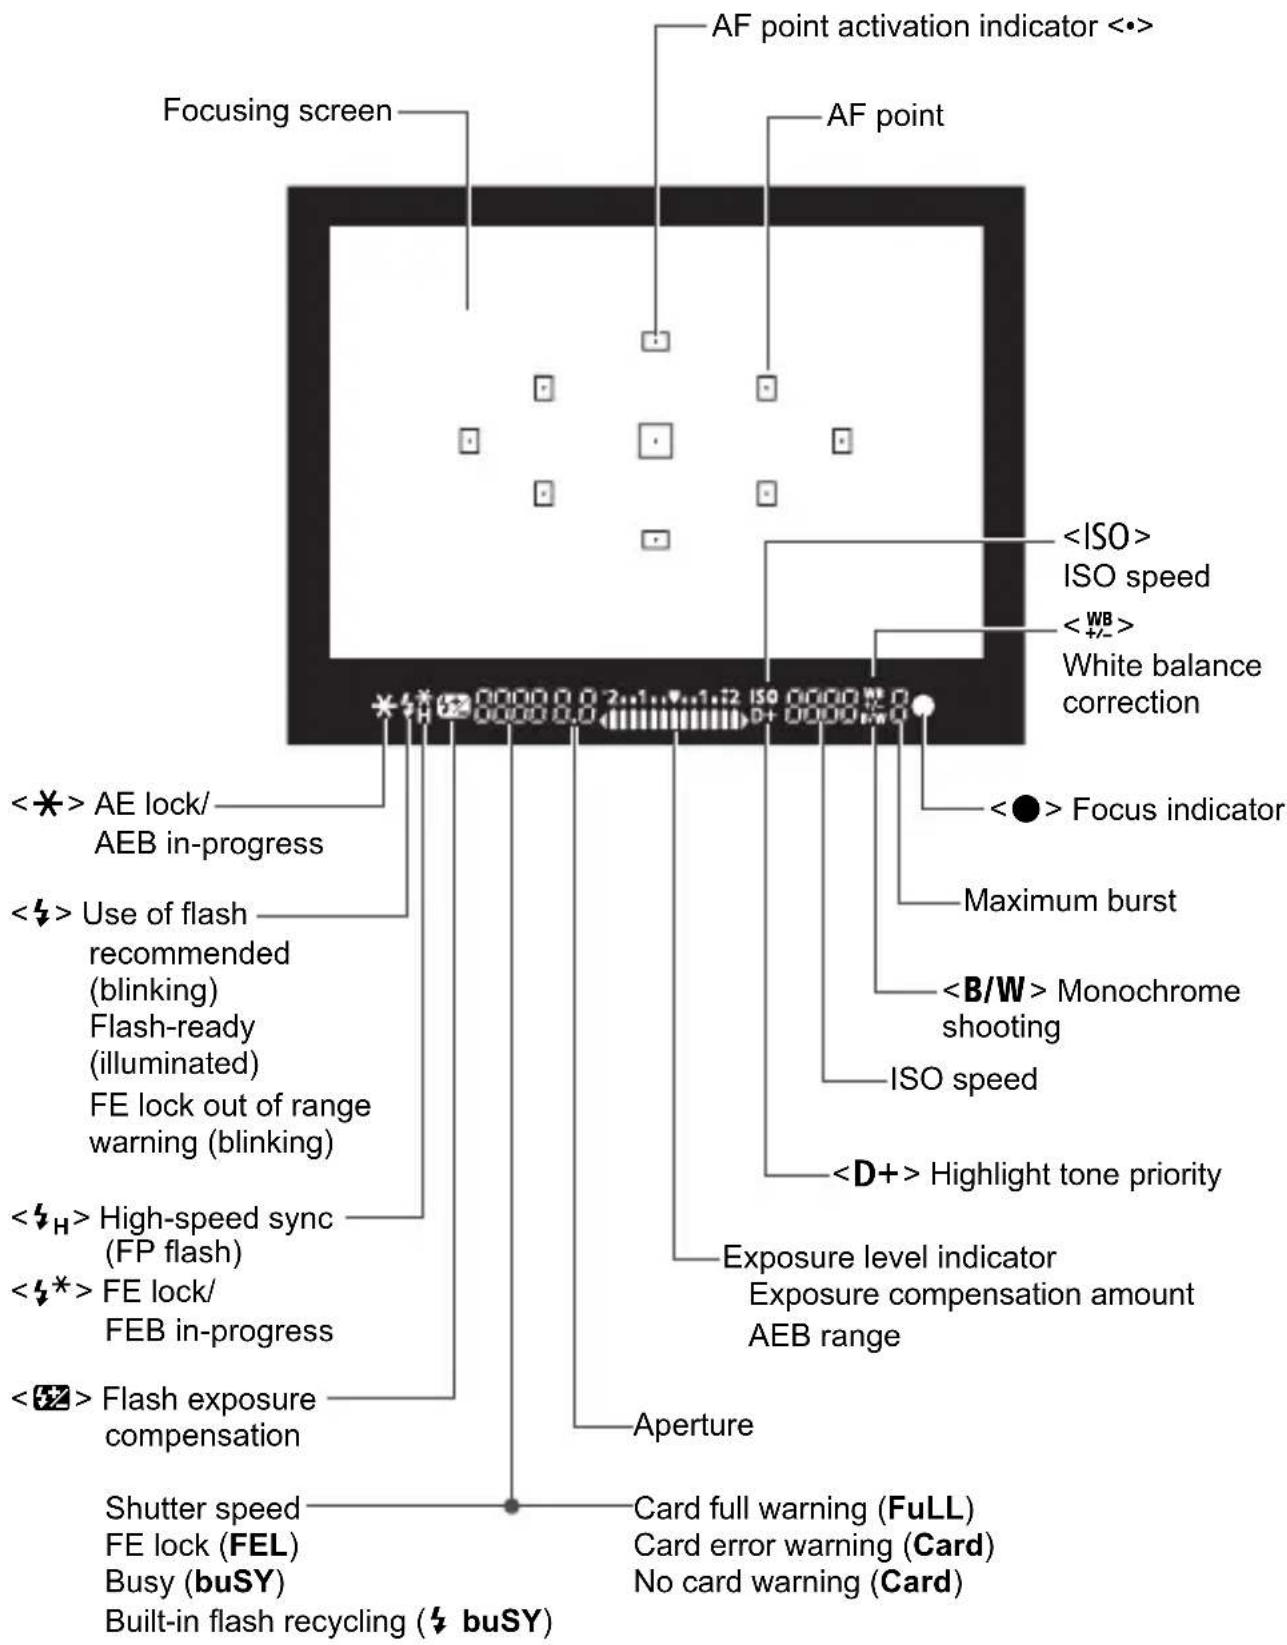
The display will show only the settings currently applied.
Mode Dial
The Mode Dial includes the Basic Zone modes, Creative Zone modes, and the Movie shooting mode.
Creative Zone
These modes give you more control for shooting various subjects as desired.
P: Program AE
Tv : Shutter-priority AE
Av: Aperture-priority AE
M: Manual exposure
OFF: Power off (p.21)
Basic Zone
All you do is press the shutter button. The camera sets everything to suit the subject or scene for shooting.
^+ : Scene Intelligent Auto (p.24)
CA : Creative Auto
Image Zone
: Portrait
: Landscape
: Close-up
: Sports
Food
: Night Portrait

只: Movie Shooting (p.28)
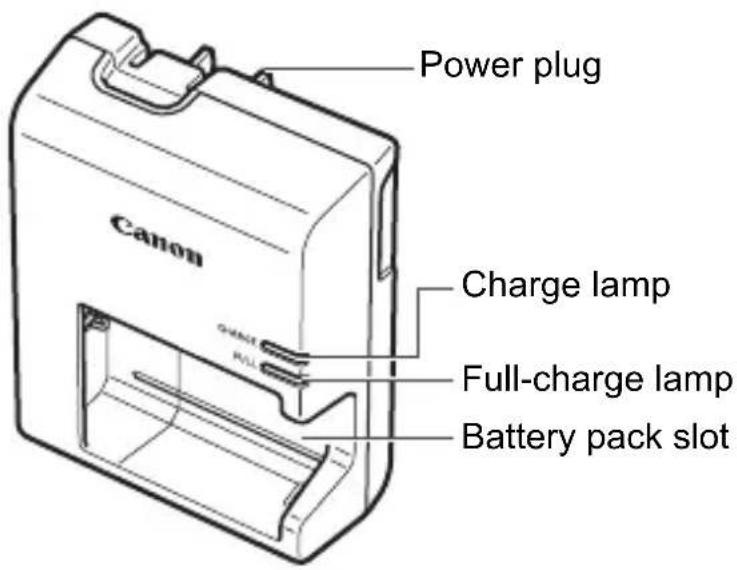
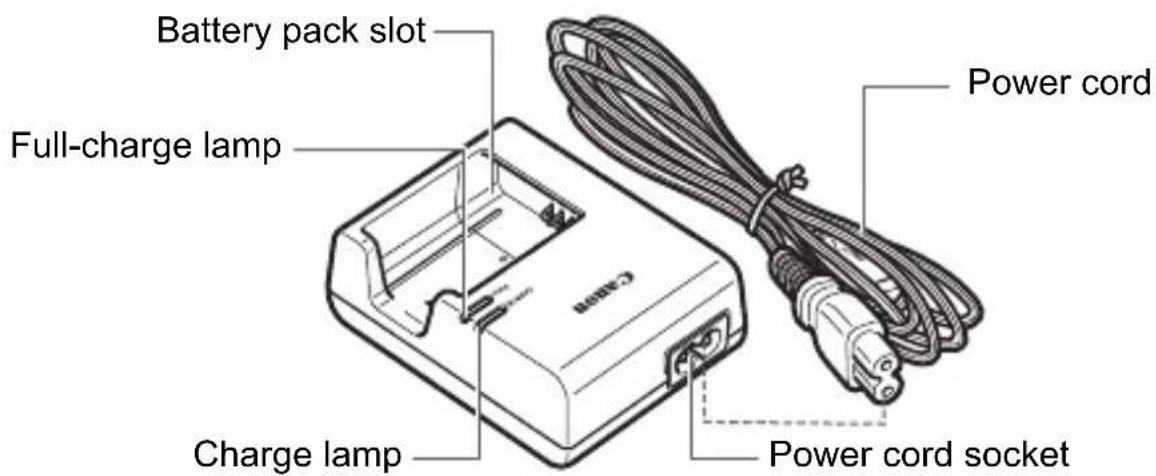
Battery Charger LC-E10
Charger for Battery Pack LP-E10 (p.18).
IMPORTANT SAFETY INSTRUCTIONS-SAVE THESE INSTRUCTIONS. DANGER-TO REDUCE THE RISK OF FIRE OR ELECTRIC SHOCK, CAREFULLY FOLLOW THESE INSTRUCTIONS.
For connection to a supply not in the U.S.A., use an attachment plug adapter of the proper configuration for the power outlet, if needed.
Battery Charger LC-E10E
Charger for Battery Pack LP-E10 (p.18).
Charging the Battery
natural_image
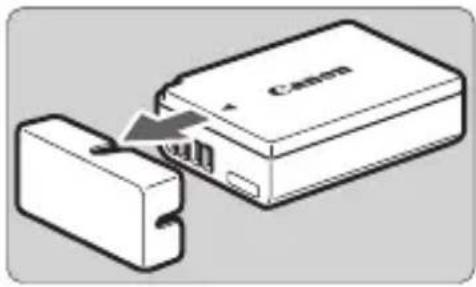
Diagram showing a device being inserted into a housing, with no visible text or symbols.1 Remove the protective cover.
- Detach the protective cover provided with the battery.

Attach the battery.
As shown in the illustration, attach the battery securely to the charger.
- To detach the battery, follow the above procedure in reverse.
LC-E10
Full-charge lamp
Charge lamp
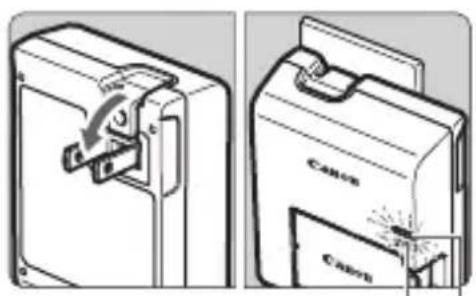
3 Recharge the battery. For LC-E10
As shown by the arrow, flip out the battery charger's prongs and insert the prongs into a power outlet.
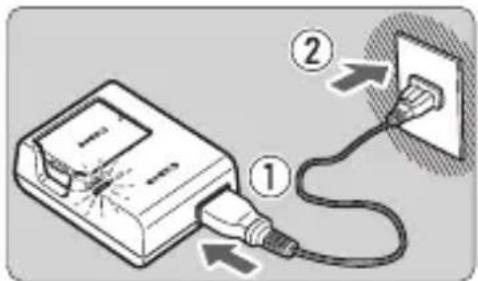
For LC-E10E
- Connect the power cord to the charger and insert the plug into a power outlet.
▶ Recharging starts and the charge lamp lights up in orange.
When the battery is fully recharged, the full-charge lamp will light up in green.
LC-E10E
It takes approx. 2 hours to fully recharge a completely exhausted battery at room temperature ( 23^ C / 73^ F).
Installing and Removing the Battery and Card
Load a fully charged Battery Pack LP-E10 into the camera. You can use an SD, SDHC, or SDXC memory card (sold separately) with the camera. The captured images are recorded onto the card.
Make sure the card's write-protect switch is set upward to enable writing and erasing.
Installing the Battery and Card
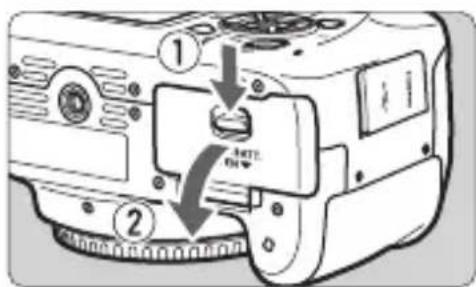
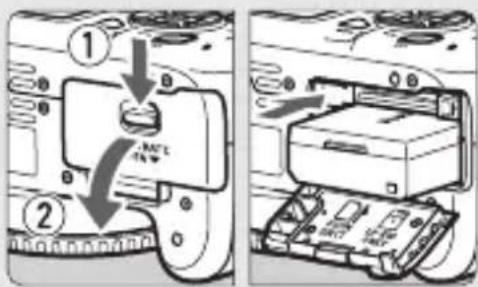
1 Open the cover.
- Slide the lever as shown by the arrows and open the cover.
natural_image
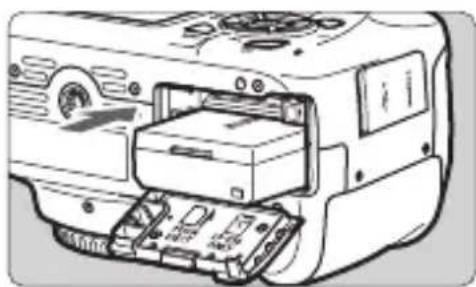
Line drawing of a computer with an open drive and internal components (no text or symbols)2 Insert the battery.
- Insert the end with the electrical contacts.
- Insert the battery until it locks in place.
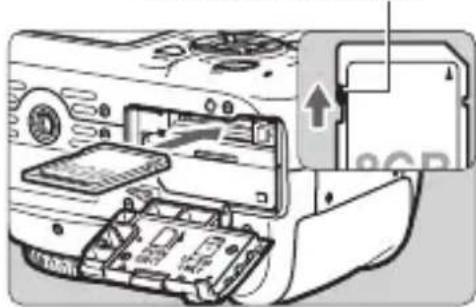
Write-protect switch
natural_image
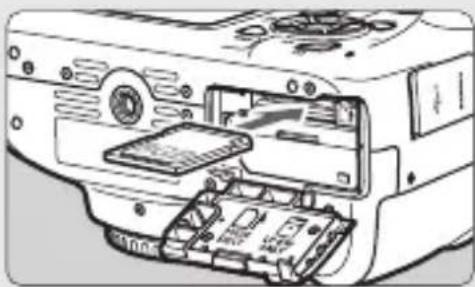
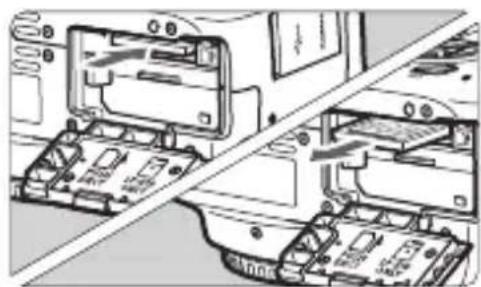
Diagram of a computer monitor internal structure with an open rear panel and a close-up of the screen showing a CD (no text or symbols present)3 Insert the card.
As shown by the illustration, face the card's label side toward the back of the camera and insert it until it clicks in place.

natural_image
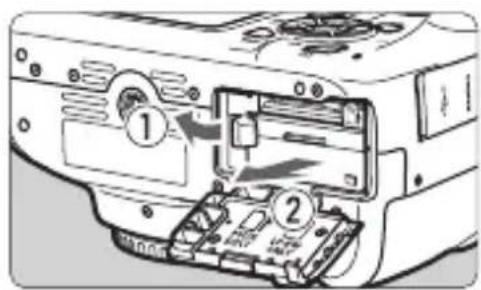
Line drawing of a camera module with an arrow indicating the left side of the screen (no text or symbols present)4 Close the cover.
- Press the cover until it snaps shut.
- When you turn on the power, the number of possible shots will be displayed on the LCD monitor.

Removing the Battery and Card
1 Turn off the power (p.21).

2 Open the cover.
- Make sure the access lamp is off, then open the cover.
- If [Recording...] is displayed, close the cover.
3 Remove the battery.
- Press the battery lock lever as shown by the arrow and remove the battery.
- To prevent short circuiting of the electrical contacts, be sure to attach the provided protective cover (p.18) to the battery.
natural_image
Technical line drawing of a mechanical assembly with internal components (no text or symbols)4 Remove the card.
Gently push in the card, then let it go to eject.
- Pull the card straight out.
5 Close the cover.
- Press the cover until it snaps shut.
Turning on the Power
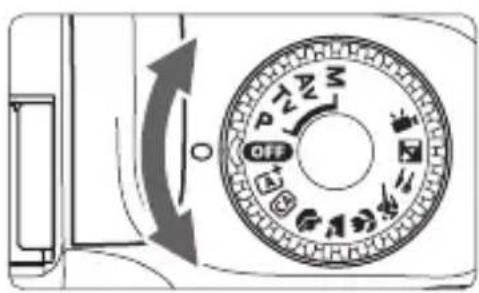
Turning on the power
Set the Mode Dial to any mode other than
Turning off the power
Set the Mode Dial to
MENU Setting the Date, Time, and Zone
When you turn on the power for the first time or if the date/time/zone have been reset, the date/time/zone setting screen will appear. Follow the steps below to set the time zone first. Set the camera to the time zone in which you currently live so that, when you travel, you can simply change the setting to the correct time zone for your destination, and the camera will automatically adjust the date/time.
Note that the date/time appended to recorded images will be based on this date/time setting. Be sure to set the correct date/time.
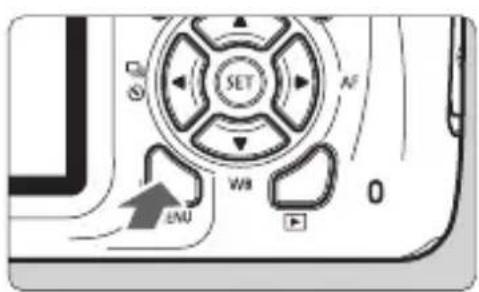
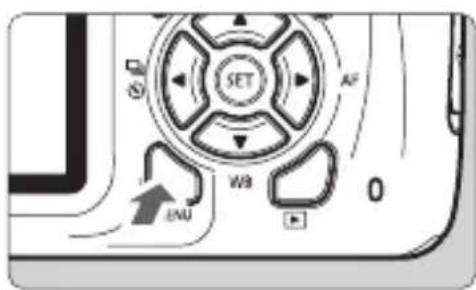
1 Display the menu screen.
- Press the
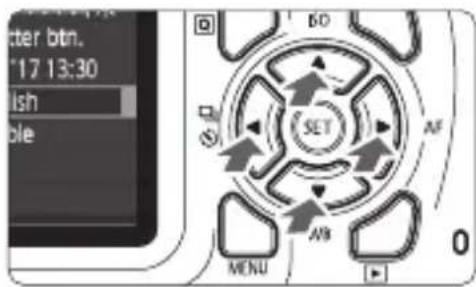
- Press the <◀> <▶> keys to select the [⚡2] tab.
- Press the <> < > keys to select [Date/Time/Zone], then press <> .
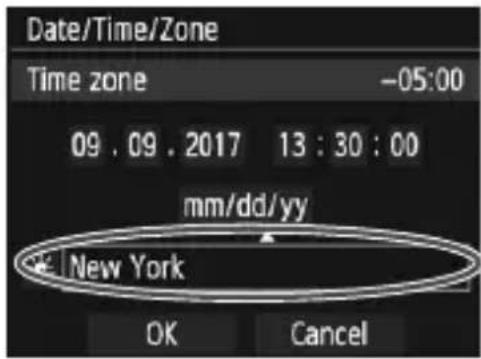
3 Set the time zone.
• [London] is set by default.
- Press the <◀> <▶> keys to select the time zone box.
- Press < > so < > is displayed.
- Press the <> <> keys to select the time zone, then press <> . (Returns to <> .)
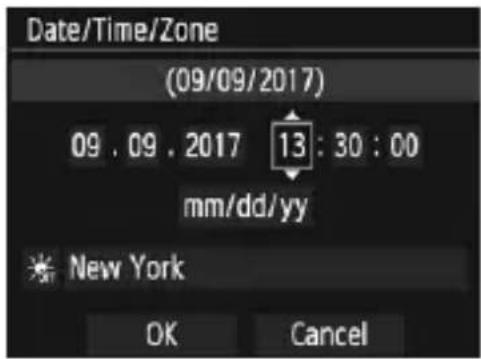
4 Set the date and time.
- Press the <◀> <▶> keys to select the number.
- Press < > so < > is displayed.
- Press the <> <> keys to set the number, then press <> . (Returns to <> .)
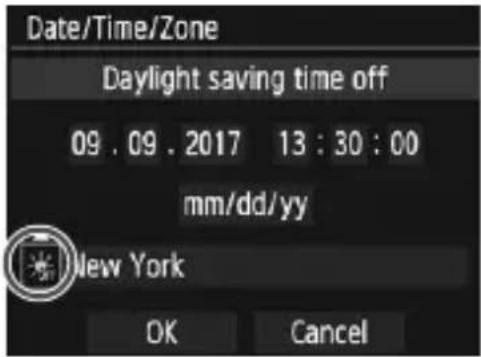
5 Set the daylight saving time.
- Set it if necessary.
- Press the <◀> <▶> keys to select [OFF].
- Press
so <☐> is displayed. - Press the <> <> keys to select [☀️], then press <> .
- When the daylight saving time is set to [💡], the time set in step 4 will advance by 1 hour. If [💡] is set, the daylight saving time will be canceled and the time will go back by 1 hour.
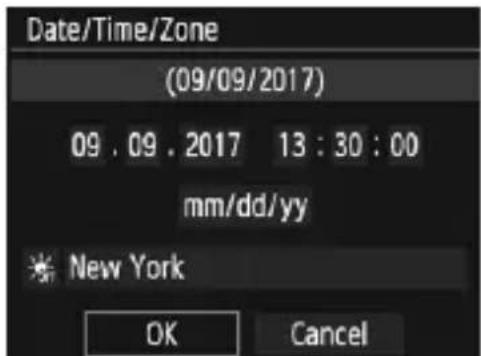
6 Exit the setting.
- Press the <◀> <▶> keys to select [OK], then press
.
The date/time/zone and daylight saving time will be set and the menu will reappear.
MENU Selecting the Interface Language
1 Display the menu screen.
- Press the
- Press the <◀> <▶> keys to select the [◀2] tab.
- Press the <▲> <▼> keys to select the [Language 📋], then press
.
| English | Norsk | Română |
| Deutsch | Svenska | Türkçe |
| Français | Español | العربية |
| Nederlands | Ελληνικά | ### |
| Dansk | Русский | mynlnu |
| Português | Polski | 简体中文 |
| Suomi | Čeština | 繁體中文 |
| Italiano | Magyar | 日本語 |
| Українська |
3 Set the desired language.
- Press the <▲> <▼> and <◀> <▶> keys to select the language, then press
.
The interface language will change.
A ^+ Fully Automatic Shooting (Scene Intelligent Auto)
<[A⁺] is a fully automatic mode. The camera analyzes the scene and sets the optimum settings automatically. It also adjusts focus automatically by detecting whether the subject is still or moving.

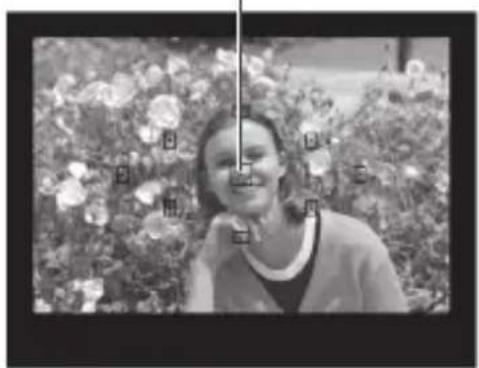
AF point
natural_image
Black-and-white photo of a smiling woman standing in front of a floral background (no visible text or symbols)1 Set the Mode Dial to <^+>.
2 Aim any AF point over the subject.
- All the AF points will be used to focus, and the camera will normally focus on the closest object.
- Aiming the center AF point over the subject will make focusing easier.
natural_image
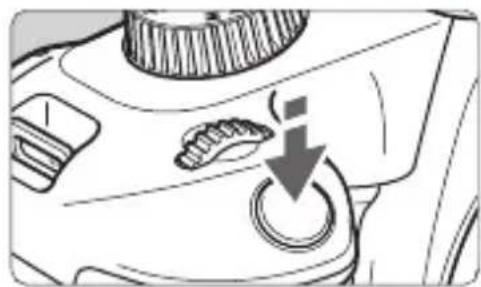
Close-up of a mechanical component with a button and arrow indicator (no text or symbols)3 Focus on the subject.
- Press the shutter button halfway. The lens focusing ring will rotate to focus.
The dot inside the AF point achieving focus flashes briefly in red. At the same time, the beeper will sound and the focus indicator <> in the viewfinder will light up. - If the <> icon blinks in the viewfinder, raise the built-in flash with your fingers.
Focus indicator
natural_image
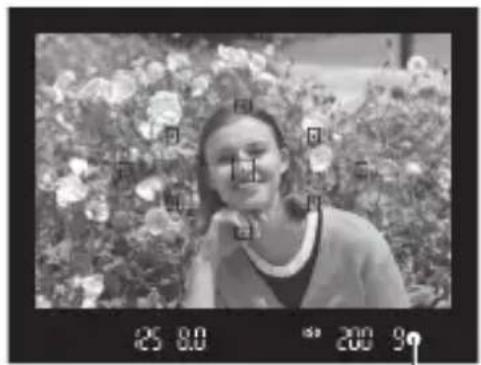
Diagram showing a camera with a downward arrow and a photo frame, no readable text or symbols present.4 Take the picture.
- Press the shutter button completely to take the picture.
The captured image will be displayed for approx. 2 sec. on the LCD monitor. - To retract the built-in flash, push it down with your fingers.
↓ Using the Built-in Flash
In indoor, low light or backlit conditions in daylight, just raise the built-in flash and press the shutter button to take flash pictures. In the
mode, the shutter speed (1/60 sec. - 1/200 sec.) will be set automatically to prevent camera shake.
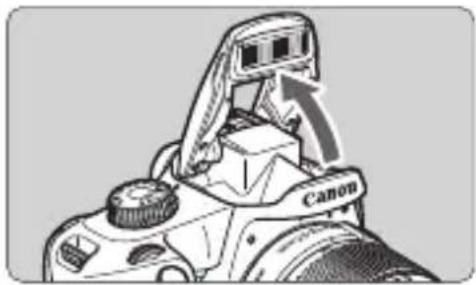
natural_image
Diagram of a Canon camera with an arrow indicating the camera's direction (no text or symbols present)1 Raise the built-in flash with your fingers.
- In Creative Zone modes, when you raise the flash, you can take flash pictures anytime.
- While the flash is recycling, “buSY” is displayed in the viewfinder, and [BUSY] is displayed on the LCD monitor.

Press the shutter button halfway.
- In the bottom left of the viewfinder, check that the <±b> icon is lit.
natural_image
Close-up of a mechanical component with a button and arrow indicator (no text or symbols)3 Take the picture.
- When focus is achieved and you press the shutter button completely, the flash will fire at all times.
- When you finish shooting, push down the built-in flash with your fingers.

Shooting with the LCD Monitor
natural_image
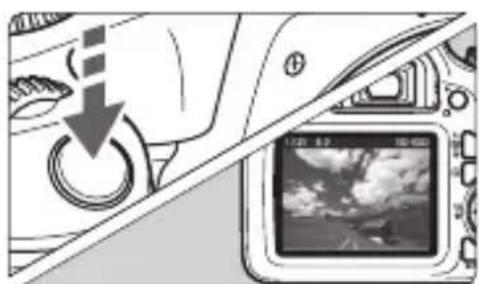
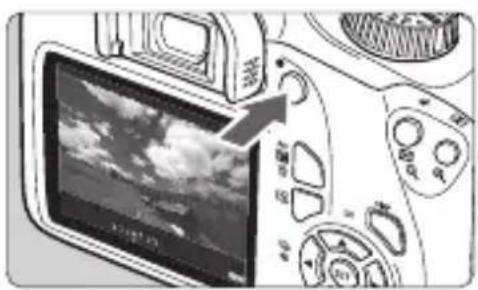
Close-up of a DSLR camera module showing the screen with a black arrow pointing to the left side (no visible text or symbols)1 Display the Live View image.
- Press the
- The Live View image will closely reflect the brightness level of the actual image you capture.
natural_image
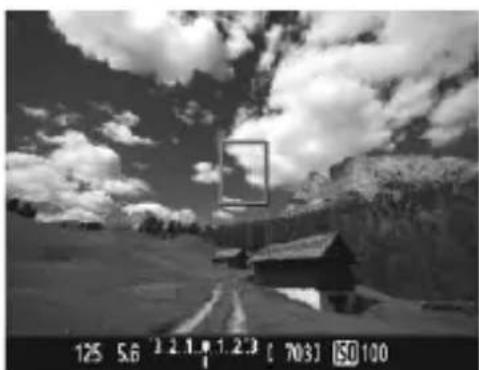
Black-and-white landscape photo showing a mountain road under a cloudy sky, with no visible text or symbols.2 Focus on the subject.
- When you press the shutter button halfway, the camera will focus with the current AF method.
- If the <> icon blinks during shooting in Basic Zone modes, raise the built-in flash with your fingers.
natural_image
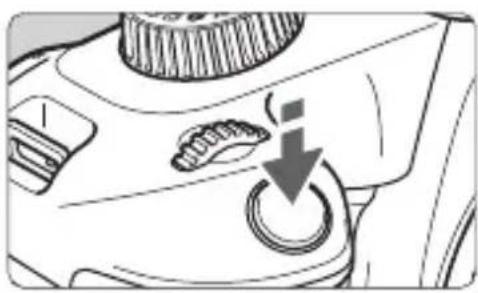
Diagram showing a camera control panel with a power button and a digital camera interface (no text or symbols visible)3 Take the picture.
- Press the shutter button completely.
The picture is taken and the captured image is displayed on the LCD monitor.
When the playback display ends, the camera will return to Live View shooting automatically.
- Press the

Do not point the camera toward an intense light source, such as the sun or an intense artificial light source. Doing so may damage the image sensor or the camera's internal components.

Do not allow the product to maintain contact with the same area of skin for extended periods of time during use.
This may result in low-temperature contact burns, including skin redness and blistering, even if the product does not feel hot. The use of a tripod or similar equipment is recommended when using the product in hot places and for people with circulation problems or less sensitive skin.

Shooting Movies
Connecting the camera to a TV set is recommended to play back the movies shot.
Autoexposure Shooting

natural_image
Simple diagram of a circular object with internal components and a curved line, no text or symbols present.1 Set the Mode Dial to <'☐>.
The reflex mirror will make a sound, then the image will appear on the LCD monitor.
natural_image
Close-up of a mechanical component with a circular knob and a downward arrow indicating a process or action (no text or symbols present)Focus on the subject.
- Before shooting a movie, focus with AF or manual focus.
- When you press the shutter button halfway, the camera will focus with the current AF method.
natural_image
Close-up of a DSLR camera interface showing the screen with a lock and adjustment knob (no text or symbols visible)3 Shoot the movie.
- Press the
While the movie is being shot, the [●] mark will be displayed on the upper right of the screen.
Sound will be recorded by the built-in microphone.
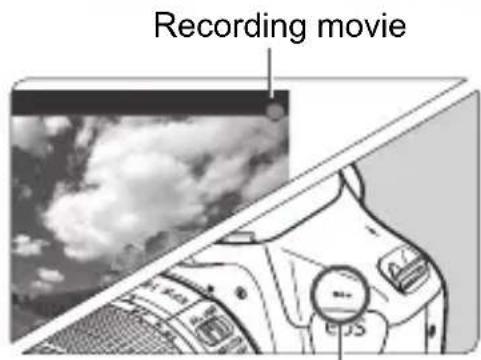
Built-in microphone

Check the recorded sound on a TV set or computer. The camera is not equipped with a speaker.

Image Playback
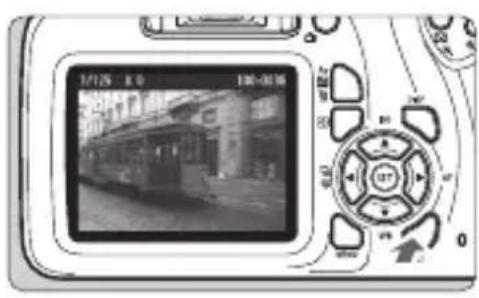
natural_image
Digital camera module displaying a street scene with a digital display (no readable text or symbols)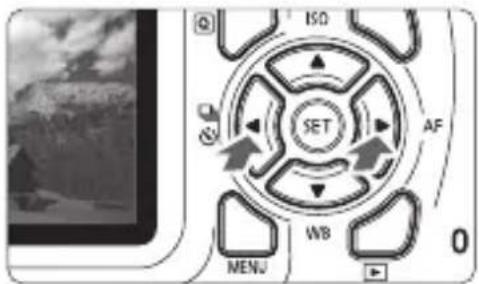
1
Play back the image.
- Press the <▶> button.
The last image captured or played back will appear.
2
Select an image.
- To view images starting with the last captured image, press the <> key. To view images starting with the first (oldest) image, press the <> key.
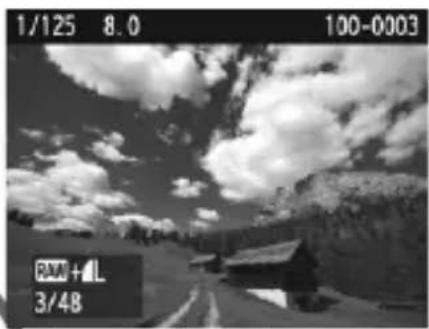
● Each time you press thebutton, the information display will change.
natural_image
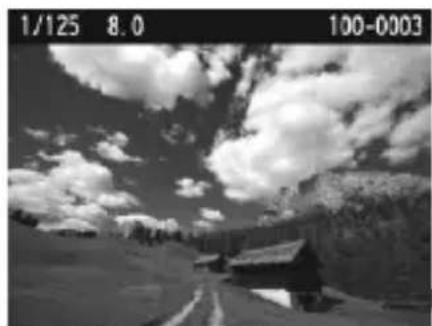
Black-and-white landscape photo showing a mountain road under a cloudy sky (no text or symbols visible)Basic information display
natural_image
Black-and-white landscape photo of a mountain road under cloudy sky, with no visible text or symbolsBasic information + Image quality/Playback number
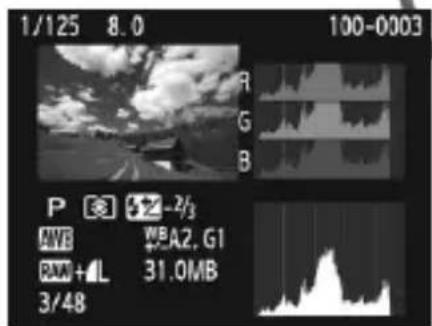
Histogram
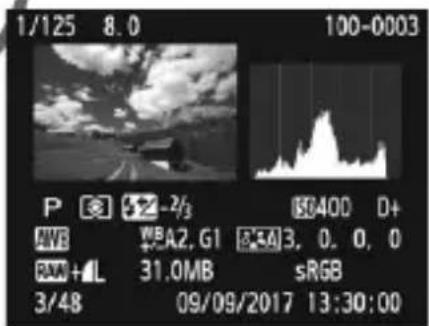
Shooting information display
3 Exit the image playback.
- Press the <▶> button to exit the image playback and return to the shooting function settings display.

To erase an image, press the
Connecting to a Smartphone via Wi-Fi
This section describes how to directly connect the camera to a smartphone via Wi-Fi.
Install Camera Connect on the smartphone before setting up a connection.
Operation on the Camera-1
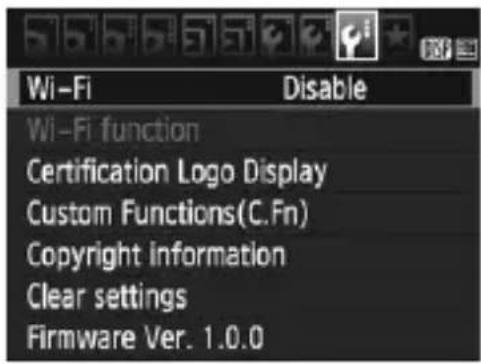
1 Select [Wi-Fi].
● Under the [3] tab, select [Wi-Fi], then press
![Wi-Fi Disable Enable Setting [Wi-Fi] to [Enable] will disable all connections via DIGITAL and HDMI terminals. [Eye-Fi trans.]](/content/2026/03/527527/images/cdd6dc86d4ce4d1137d990b128dce0eeb4559a8ec24b4a39aede390dc5f8417d.jpg)
Select [Enable].
- Press the <> key to select [Enable], then press <> .
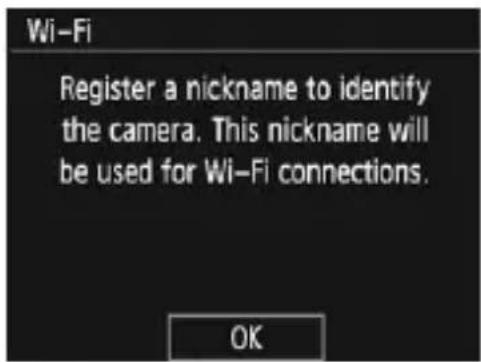
3 Register [Nickname].
- When the screen on the left appears, press < SET> .
![Register nickname 5/10 @-_/::!?() [] <>0123456789 abcdefghijklmnopqrstuvwxyz ABCDEFGHIJKLMNOPQRSTUVWXYZ * #, + = $%&" { } DISP Cancel MENU OK](/content/2026/03/527527/images/65a11c92f7380a96b61ab8fca4482a6e076ce5299305c185b59c51ba6e8e67c0.jpg)
The screen on the left will appear.
- When using the displayed nickname, press the
- Select [☐] (Connect to smartphone) and press
.
The camera's Wi-Fi lamp will blink.

7 Select [Easy connection].
- Select [Easy connection] and press
. - Select [OK] and press < SET> to go to the next screen.
Operation on the Smartphone-1
Smartphone's screen (sample)
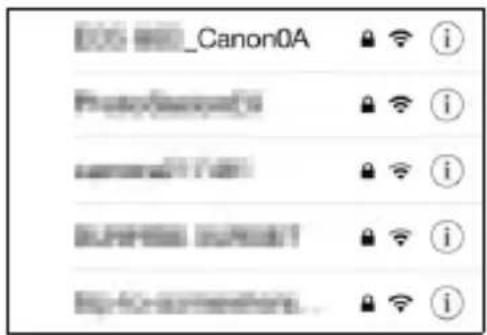
8 Operate the smartphone and connect it to the camera.
- Activate the smartphone's Wi-Fi function, then select the SSID (network name) displayed on the camera's LCD monitor.
- For the password, enter the encryption key displayed on the camera's LCD monitor.
Camera's screen
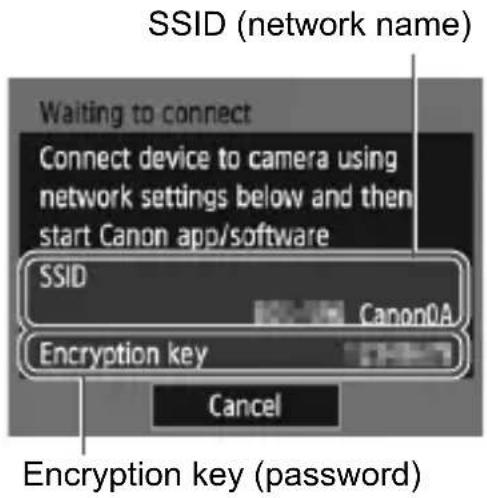

9 Start Camera Connect on the smartphone.
- When the [Waiting to connect] screen is displayed on the camera's LCD monitor, start Camera Connect on the smartphone.
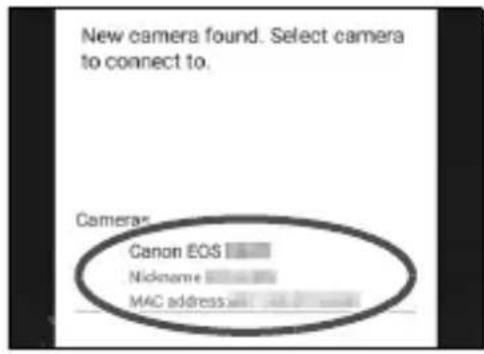
10 Select the camera to connect to on the smartphone.
- Select and touch the camera to connect to from [Cameras] on Camera Connect.
Operation on the Camera-2
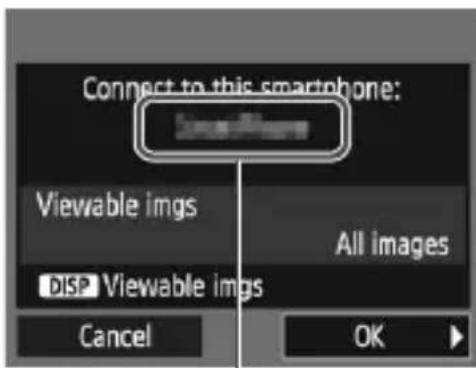
The device name set on Camera Connect
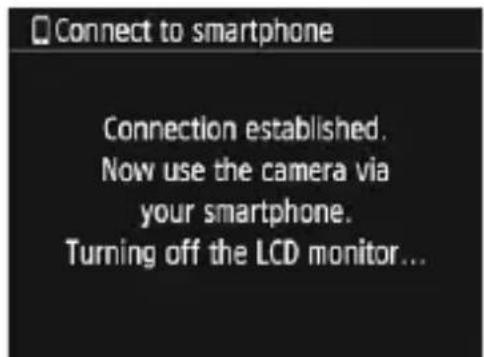
11 Connect to the camera.
- When a connection is established, the screen on the left will appear on the camera's LCD monitor.
- Select [OK] and press < SET> .
The camera's Wi-Fi lamp will light up.
After a message is displayed, the camera's LCD monitor will turn off.
The main window of Camera Connect will be displayed on the smartphone.
Operation on the Smartphone-2
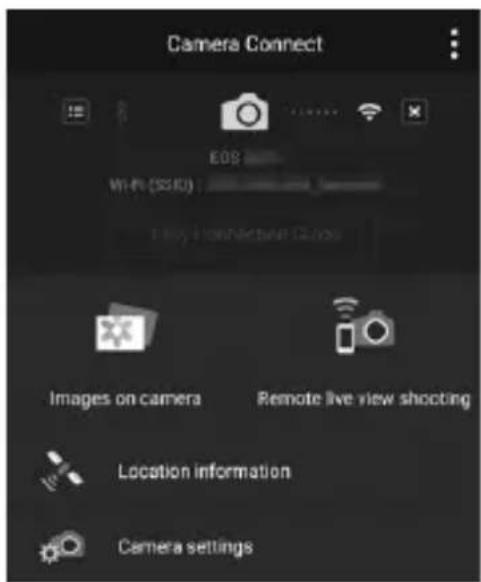
12 Operate the camera using Camera Connect.
- Perform further operations using Camera Connect.
The settings for connecting to a smartphone are now complete.
Third party software
This product includes third party software.
- expat.h
Copyright (c) 1998, 1999, 2000 Thai Open Source Software Center Ltd
Permission is hereby granted, free of charge, to any person obtaining a copy of this software and associated documentation files (the "Software"), to deal in the Software without restriction, including without limitation the rights to use, copy, modify, merge, publish, distribute, sublicense, and/or sell copies of the Software, and to permit persons to whom the Software is furnished to do so, subject to the following conditions:
The above copyright notice and this permission notice shall be included in all copies or substantial portions of the Software.
THE SOFTWARE IS PROVIDED "AS IS", WITHOUT WARRANTY OF ANY KIND, EXPRESS OR IMPLIED, INCLUDING BUT NOT LIMITED TO THE WARRANTIES OF MERCHANTABILITY, FITNESS FOR A PARTICULAR PURPOSE AND NONINFRINGEMENT. IN NO EVENT SHALL THE AUTHORS OR COPYRIGHT HOLDERS BE LIABLE FOR ANY CLAIM, DAMAGES OR OTHER LIABILITY, WHETHER IN AN ACTION OF CONTRACT, TORT OR OTHERWISE, ARISING FROM, OUT OF OR IN CONNECTION WITH THE SOFTWARE OR THE USE OR OTHER DEALINGS IN THE SOFTWARE.
About MPEG-4 Licensing
"This product is licensed under AT&T patents for the MPEG-4 standard and may be used for encoding MPEG-4 compliant video and/or decoding MPEG-4 compliant video that was encoded only (1) for a personal and non-commercial purpose or (2) by a video provider licensed under the AT&T patents to provide MPEG-4 compliant video. No license is granted or implied for any other use for MPEG-4 standard."
* Notice displayed in English as required.
Use of genuine Canon accessories is recommended
This product is designed to achieve excellent performance when used with genuine Canon accessories.
Canon shall not be liable for any damage to this product and/or accidents such as fire, etc. caused by the malfunction of non-genuine Canon accessories (e.g., a leakage and/or explosion of a battery pack). Please note that this warranty does not apply to repairs arising out of the malfunction of non-genuine Canon accessories, although you may request such repairs on a chargeable basis.
This device complies with Part 15 of the FCC Rules. Operation is subject to the following two conditions: (1) This device may not cause harmful interference, and (2) this device must accept any interference received, including interference that may cause undesired operation.
Note: This equipment has been tested and found to comply with the limits for class B digital devices, pursuant to Part 15 of the FCC Rules. These limits are designed to provide reasonable protection against harmful interference in a residential installation. This equipment generates, uses and can radiate radio frequency energy and, if not installed and used in accordance with the instructions, may cause harmful interference to radio communications. However, there is no guarantee that interference will not occur in a particular installation. If this equipment does cause harmful interference to radio or television reception, which can be determined by turning the equipment off and on, the user is encouraged to try to correct the interference by one or more of the following measures:
— Reorient or relocate the receiving antenna.
— Increase the separation between the equipment and receiver.
— Connect the equipment into an outlet on a circuit different from that to which the receiver is connected.
— Consult the dealer or an experienced radio/TV technician for help.
The cable with the ferrite core provided with the digital camera must be used with this equipment in order to comply with Class B limits in Subpart B of Part 15 of the FCC rules.
Do not make any changes or modifications to the equipment unless otherwise specified in the manual. If such changes or modifications should be made, you could be required to stop operation of the equipment.
Canon U.S.A. Inc.
One Canon Park, Melville, NY 11747, U.S.A.
Tel No. 1-800-OK-CANON (1-800-652-2666)
CAN ICES-3 (B) / NMB-3 (B)

USA and Canada only:
The Lithium ion/polymer battery that powers the product is recyclable. Please call 1-800-8-BATTERY for information on how to recycle this battery.
For CA, USA only
Included lithium battery contains Perchlorate Material – special handling may apply.
See www.dtsc.ca.gov/hazardouswaste/perchlorate/ for details.
CAUTION
RISK OF EXPLOSION IF BATTERY IS REPLACED BY AN INCORRECT TYPE. DISPOSE OF USED BATTERIES ACCORDING TO LOCAL REGULATION.
Wireless Communication Function Precautions
■ Countries and Regions Permitting Wireless Communication Function Use
Use of wireless communication functions is restricted in some countries and regions, and illegal use may be punishable under national or local regulations. To avoid violating wireless communication function regulations, visit the Canon Web site to check where use is allowed.
Note that Canon cannot be held liable for any problems arising from wireless communication function use in other countries and regions.
■ Model Number
FCC/IC NOTICE
Model: DS126701 (including WLAN module: ES200)
This device complies with Part 15 of FCC Rules and Industry Canada's licence-exempt RSSs. Operation is subject to the following two conditions:
(1) this device may not cause harmful interference, and
(2) this device must accept any interference received, including interference that may cause undesired operation.
This device must not be co-located or operated in conjunction with any other antenna or device except Canon accessories supplied or designated for this product.
The available scientific evidence does not show that any health problems are associated with using low power wireless devices. There is no proof, however, that these low power wireless devices are absolutely safe. Low power wireless devices emit low levels of radio frequency energy (RF) in the microwave range while being used. Whereas high levels of RF can produce health effects (by heating tissue), exposure of low-level RF that does not produce heating effects causes no known adverse health effects. Many studies of low-level RF exposures have not found any biological effects. Some studies have suggested that some biological effects might occur, but such findings have not been confirmed by additional research. This model has been tested and found to comply with FCC/IC radiation exposure limits set forth for an uncontrolled environment and meets the FCC radio frequency (RF) Exposure Guidelines and RSS-102 of the IC radio frequency (RF) Exposure rules.
Hereby, Canon Inc., declares that this DS126701 is in compliance with the essential requirements and other relevant provisions of Directive 2014/53/EU. The full text of the EU declaration of conformity is available at the following internet address: http://www.canon-europe.com/ce-documentation
Wi-Fi Frequency range: 2401 MHz - 2473 MHz
Wi-Fi Maximum output power: 13.64 dBm
CANON EUROPA N.V.
Bovenkerkerweg 59, 1185 XB Amstelveen, The Netherlands
CANON INC.
30-2, Shimomaruko 3-chome, Ohta-ku, Tokyo 146-8501, Japan
Index
A
^+ (Scene Intelligent Auto)......24
Accessories ......2
B
Basic Zone modes....16
Battery 18, 19
Built-in flash 26
C
Camera Connect....30
Cards ......12, 19
Charger....17, 18
Creative Zone modes .....16
D
Date/time 21
E
Easy connection ....31
F
Focus indicator 24
|
Image Zone......16
L
Language selection....23
Live View shooting....27
M
Mode Dial....16
Movies 28
N
Nickname 30
Nomenclature.... 13
P
Playback.... 29
Power 21
R
Recharging.... 18
S
Shooting modes 16
Strap.... 1
T
Time zone.... 21
V
Viewfinder 15
W
Wi-Fi function 31
The descriptions in this Instruction Manual are current as of September 2017. For information on the compatibility with any products introduced after this date, contact any Canon Service Center. For the latest version Instruction Manual, refer to the Canon Web site.
EOS REBEL T100 EOS 3000D
natural_image
Line drawing of a Canon DSLR camera with no text or symbols on the bodynatural_image
Diagram of a printer internal structure showing internal components and ventilation (no text or symbols)natural_image
Black-and-white photo of a smiling woman standing in front of a floral garden (no visible text or symbols)natural_image
Close-up of a mechanical component with a circular button and a downward arrow indicating a process or operation (no text or symbols visible)Prenez la photo.
natural_image
Digital camera module displaying a black-and-white photo of a person outdoors, no visible text or symbols on the device itself.Vérifiez l'image.
Monture d'objectif
Cartes

- Item Check List
- Instruction Manuals
- Quick Reference Guide
- Downloading and Viewing the Instruction Manuals (PDF Files)
- Download the Instruction Manuals (PDF files).
- www.canon.com/icpd
- Instruction Manuals Available for Download
- 2View the Instruction Manuals (PDF files).
- Quick Start Guide
- 1
- Insert the battery (p.19).
- 2
- Insert the card (p.19).
- 3
- Attach the lens.
- 4
- Set the lens's focus mode switch to .
- 5
- Set the Mode Dial to <+> (Scene Intelligent Auto) (p.24).
- 6
- Focus on the subject.
- 7
- Take the picture.
- 8
- Review the picture.
- Contents
- Certification Logo
- Safety Instructions
- WARNING Denotes the risk of serious injury or death.
- CAUTION: Denotes the risk of injury.
- Handling Precautions
- Camera Care
- LCD Monitor
- Lens Mount Maintenance
- Cards
- Lens
- Smudges Adhering to the Front of the Sensor
- Nomenclature
- Mode Dial
- Creative Zone
- Basic Zone
- Image Zone
- Battery Charger LC-E10
- IMPORTANT SAFETY INSTRUCTIONS-SAVE THESE INSTRUCTIONS. DANGER-TO REDUCE THE RISK OF FIRE OR ELECTRIC SHOCK, CAREFULLY FOLLOW THESE INSTRUCTIONS.
- Battery Charger LC-E10E
- Charging the Battery
- Remove the protective cover.
- Attach the battery.
- Recharge the battery. For LC-E10
- For LC-E10E
- Installing and Removing the Battery and Card
- Installing the Battery and Card
- Open the cover.
- Insert the battery.
- Insert the card.
- Close the cover.
- Removing the Battery and Card
- Turn off the power (p.21).
- Open the cover.
- Remove the battery.
- Remove the card.
- Close the cover.
- Turning on the Power
- Turning off the power
- MENU Setting the Date, Time, and Zone
- Display the menu screen.
- Under the [⚡2] tab, select [Date/Time/Zone].
- Set the time zone.
- Set the date and time.
- Set the daylight saving time.
- Exit the setting.
- MENU Selecting the Interface Language
- Under the [💡2] tab, select [Language💡].
- Set the desired language.
- A + Fully Automatic Shooting (Scene Intelligent Auto)
- Set the Mode Dial to <A+>.
- Aim any AF point over the subject.
- Focus on the subject.
- Take the picture.
- ↓ Using the Built-in Flash
- Raise the built-in flash with your fingers.
- Press the shutter button halfway.
- Take the picture.
- Shooting with the LCD Monitor
- Display the Live View image.
- Focus on the subject.
- Do not allow the product to maintain contact with the same area of skin for extended periods of time during use.
- Shooting Movies
- Autoexposure Shooting
- Set the Mode Dial to <'☐>.
- Shoot the movie.
- Image Playback
- Play back the image.
- Select an image.
- Exit the image playback.
- Connecting to a Smartphone via Wi-Fi
- Operation on the Camera-1
- Select [Wi-Fi].
- Select [Enable].
- Register [Nickname].
- Exit the setting.
- Select [Wi-Fi function].
- Select [☐].
- Select [Easy connection].
- Operation on the Smartphone-1
- Smartphone's screen (sample)
- Operate the smartphone and connect it to the camera.
- Camera's screen
- Start Camera Connect on the smartphone.
- Select the camera to connect to on the smartphone.
- Operation on the Camera-2
- Connect to the camera.
- Operation on the Smartphone-2
- Operate the camera using Camera Connect.
- Third party software
- About MPEG-4 Licensing
- Use of genuine Canon accessories is recommended
- CAUTION
- Wireless Communication Function Precautions
- ■ Countries and Regions Permitting Wireless Communication Function Use
- ■ Model Number
- FCC/IC NOTICE
- Model: DS126701 (including WLAN module: ES200)
- CANON EUROPA N.V.
- CANON INC.
- Index
- A
- B
- C
- D
- E
- F
- |
- L
- M
- N
- P
- R
- S
- T
- V
- W
- EOS REBEL T100 EOS 3000D
- Prenez la photo.
- Vérifiez l'image.
- Cartes
Brand : CANON
Model : EOS Rebel T100
Category : Camera