
WFT-E8 - Camera CANON - Free user manual and instructions
Find the device manual for free WFT-E8 CANON in PDF.


| Product Type | Wireless File Transmitter |
| Compatible Cameras | Canon EOS 5D Mark IV, 1D X Mark II, 5DS R, 6D Mark II (with firmware support) |
| Wireless Standard | IEEE 802.11a/b/g/n/ac |
| Frequency Band | 2.4 GHz / 5 GHz |
| Transfer Speed | Up to 433 Mbps (5 GHz ac) |
| Wired LAN | Ethernet 1000BASE-T |
| Connector | USB Micro-B for power |
| Power Source | Camera battery (LP-E6N or LP-E6) or external via USB |
| Dimensions (W x H x D) | Approx. 100 x 65 x 30 mm |
| Weight | Approx. 115 g (excluding cable) |
| Supported Transfer Protocols | FTP, HTTP, PTP/IP, WFT Server |
| Security Features | WEP, WPA/WPA2-PSK, WPA2-AES, WPA2-AES-Enterprise |
| Operating Temperature | 0°C to 40°C |
| Storage Temperature | -20°C to 60°C |
| Main Functions | Wireless image transfer, remote camera control, GPS log data support |
| Compatible Storage Media | CFast, SD (via camera) |
| Cleaning | Use a dry soft cloth to clean the exterior |
| Repairability | Designed for service by authorized Canon technicians |
Frequently Asked Questions - WFT-E8 CANON
User questions about WFT-E8 CANON
0 question about this device. Answer the ones you know or ask your own.
Ask a new question about this device
Download the instructions for your Camera in PDF format for free! Find your manual WFT-E8 - CANON and take your electronic device back in hand. On this page are published all the documents necessary for the use of your device. WFT-E8 by CANON.
USER MANUAL WFT-E8 CANON
Wireless File Transmitter
WFT-E8
This manual is for the EOS-1D X Mark II installed with firmware version 1.1.0 or later.
This product also supports certain CINEMA EOS cameras. For compatible products, contact the nearest Canon Service Center. When using the transmitter, refer to “Guide for Canon Camcorders”.
Introduction
What You Can Do with the Transmitter
The transmitter is an accessory for EOS cameras that enables wireless functions when attached to the camera.
Using the transmitter's wireless functions enables you to do the following:

FTP Transfer
Transfer images to an FTP server

EOS Utility
Use EOS Utility to shoot, view, and download images remotely

WFT Server
Use a web browser to shoot, view, and download images remotely

Smartphone
Use a smartphone to shoot, view, and download images remotely
Linked Shooting
Sync the Camera Time

- Wirelessly trigger shooting by slave cameras linked to a master camera
- Synchronize time between the same camera models

Conventions Used in this Manual
- To comply with local radio wave regulations, Canon offers five region-specific versions of the transmitter (A, B, C, D, and E) in various areas around the world (see separate sheet). For convenience, the product in this manual is referred to as “WFT-E8”, without reference to the versions A, B, C, D, or E.
- In this manual, the term “access point” indicates wireless LAN access points, wireless LAN routers, etc. that relay a LAN connection.
- These instructions should be followed only after setting up your LAN and FTP server environments. For information about setting up the environments, refer to the documentation provided with each device or contact the manufacturer.
- The EOS-1D X Mark II is used for operation instructions, illustrations, and sample screens in this manual. Note that the functions, operations, screens displayed on your camera, etc. may differ, depending on the camera model used.
- Read the Camera Instruction Manual and familiarize yourself with operating the camera before following the instructions on camera options.
Icons in this Manual
<☀> : Indicates the Main Dial.
<○> : Indicates the Quick Control Dial.
<◇> : Indicates the Multi-controller.
Indicates the Setting button.
In addition to the above, the icons and symbols used on the camera's buttons and displayed on the LCD monitor are also used in this manual when discussing relevant operations and functionality.
(p. **): Reference page numbers for more information.
Warnings to prevent potential problems during operation.
Supplemental information.
Basic Assumptions
- All operations explained in this manual assume that the power switch is set to .
- It is assumed that all the menu settings, Custom Functions, etc. are set to their defaults.
- Image transfer, remote shooting, or viewing images requires adequate knowledge of configuring your wireless LAN and FTP server. Canon cannot provide support for configuring wireless LANs or FTP servers.
- Note that Canon cannot be held liable for any loss or damage to the transmitter from erroneous network or FTP server settings. In addition, Canon cannot be held liable for any other loss or damage caused by use of the transmitter.
- When using wireless functions, establish appropriate security at your own risk and discretion. Canon cannot be held liable for any loss or damage caused by unauthorized access or other security breaches.
Chapter List
| Introduction | 2 | |
| 1 | Basic Network Settings | 13 |
| 2 | Transferring Images to an FTP Server | 37 |
| 3 | Operating Remotely Using EOS Utility | 55 |
| 4 | Operating Remotely Using WFT Server | 59 |
| 5 | Operating Remotely Using a Smartphone | 75 |
| 6 | Linked Shooting | 83 |
| 7 | Synchronizing the Camera Time Wirelessly | 97 |
| 8 | Terminating the Connection and Reconnecting | 101 |
| 9 | Checking and Operating Connection Settings | 105 |
| 10 | Troubleshooting Guide | 117 |
| 11 | Reference | 139 |
Contents
Introduction 2
Conventions Used in this Manual.... 3
Chapter List.... 5
Safety Precautions 8
Nomenclature 10
Attaching to the Camera....11
1 Basic Network Settings 13
Preparation.... 14
Basic Communication Function Settings.... 18
Displaying the Connection Wizard 22
Connecting with Easy Connection.... 25
Checking the Type of Access Point.... 27
Connecting via WPS (PBC Mode).... 28
Connecting via WPS (PIN Mode) 29
Connecting to a Detected Network Manually 31
Setting the IP Address.... 34
2 Transferring Images to an FTP Server 37
Configuring FTP Server Connection Settings 38
Transferring Images Individually.... 43
Batch Transfer 48
Viewing Transferred Images.... 53
3 Operating Remotely Using EOS Utility 55
Configuring EOS Utility Connection Settings 56
Using EOS Utility.... 58
4 Operating Remotely Using WFT Server 59
Configuring WFT Server Connection Settings 60
Displaying WFT Server 62
Viewing Images 65
Shooting Remotely [Camera control] 67
Shooting Remotely [Simple control] 72
Using WFT Server in Linked Shooting 74
5 Operating Remotely Using a Smartphone 75
Configuring Smartphone Connection Settings....76
Operating the Camera Using a Smartphone....78
Specifying Viewable Images ....80
6 Linked Shooting 83
Basic Linked Shooting 84
Positioning the Cameras....88
Using the Transmitter with WFT Server....90
7 Synchronizing the Camera Time Wirelessly 97
Synchronizing the Time....98
8 Terminating the Connection and Reconnecting 101
Terminating the Connection ....102
Reconnecting....103
9 Checking and Operating Connection Settings 105
Displaying the Connection Settings Screen....106
Changing Settings....108
Saving and Loading Settings 112
Function Settings Screen.... 114
10 Troubleshooting Guide 117
Responding to Error Messages 118
Troubleshooting Guide....135
Communication Function Setting Notes....136
Checking Network Settings....138
11 Reference 139
Creating and Registering Captions ....140
Setting Network Manually 142
Setting IP Address Manually....144
Specifications 146
Index 149
Safety Precautions
The following precautions are provided to prevent harm or injury to yourself and others. Make sure to thoroughly understand and follow these precautions before using the product.

Warnings: Follow the warnings below. Otherwise, death or serious injuries may result.
- To prevent fire, excessive heat, chemical leakage, explosions, and electrical shock, follow the safeguards below.
- Do not insert any foreign metallic objects into the electrical contacts of the equipment, accessories, or connecting cables.
- Do not use the equipment where there is flammable gas. There is a risk of explosion or fire.
- If you drop the equipment and the casing breaks open to expose the internal parts, do not touch the exposed parts. There is a possibility of electrical shock.
- Do not disassemble or modify the equipment. High-voltage internal parts may cause electrical shock.
- Do not store the equipment in dusty or humid places. This is to prevent fire or electrical shock.
- Before using the equipment on board airplanes or in hospitals, make sure use is permitted. Electromagnetic waves emitted by the equipment may interfere with instrumentation or medical equipment.
- Do not hold the camera in the same position for long periods of time. Even if the camera does not feel too hot, prolonged contact with the same body part may cause skin redness or blistering due to low-temperature contact burns. Using a tripod is recommended for people with circulation problems or very sensitive skin, or when using the camera in very hot places.

Cautions: Follow the cautions below. Otherwise, physical injury or property damage may result.
- Do not leave the equipment in a hot car interior or near high-temperature objects. The equipment may become hot and cause burns if touched.
- Do not leave the product in a low-temperature environment for an extended period of time. The equipment will become cold and may cause injury when touched.
- Do not cover or wrap the transmitter with a cloth. This may trap heat inside, posing a risk of fire.
- Do not use paint thinner, benzene, or other organic solvents to clean the transmitter. This poses a risk of fire and may be hazardous to your health.
If you experience any malfunctions, problems, or damage to the product, contact the nearest Canon Service Center or the dealer from whom you purchased the product.
Handling Precautions
- The transmitter is a precision instrument. Do not drop it or subject it to physical shock. ● The transmitter is not waterproof. Do not use it underwater.
- Wipe off any moisture with a dry and clean cloth. If the transmitter has been exposed to salty air, wipe it with a clean, well-wrung wet cloth.
- Never leave the transmitter near any equipment that generates a strong magnetic field, such as magnets or electric motors.
- Do not leave the transmitter in excessive heat, such as in a vehicle in direct sunlight. High temperatures may damage the transmitter.
- Do not wipe the transmitter using cleaners containing organic solvents. For stubborn dirt, take it to the nearest Canon Service Center.
- Avoid storing the transmitter where there are chemicals that result in rust and corrosion such as in a chemical lab.
Nomenclature

Transmitter Case
EOS-1D X Mark II Rear LCD Panel (Example Display)
Attaching to the Camera
Set the camera's power switch to before attaching the transmitter.
The transmitter is powered by the camera. Ensure the camera battery has sufficient charge. If the battery level drops to 19% or less, you cannot transfer captured images.
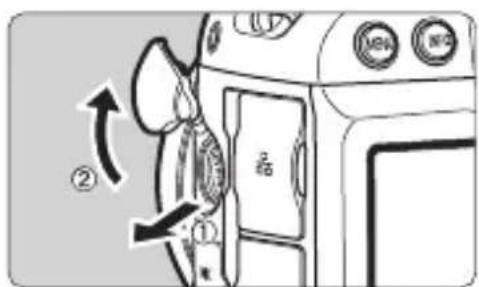
1 Open the terminal cover on the camera.
- Pull out the system extension terminal cover and rotate it toward the front.

Attach the transmitter.
- Align the transmitter terminal and attachment pin with the corresponding camera terminal and hole.
- Push the terminal firmly into the camera.
- As you push the terminal into the camera with your left index finger, turn the tightening screw until it stops rotating to attach the transmitter securely.
Removing the transmitter
- Set the camera's power switch to .
- Loosen the tightening screw until it spins freely.
- Pull the terminal out of the camera.

Use of an External Microphone during Movie Shooting
If wireless functions are in use, noise may be recorded regardless of the use of the built-in microphone(s) or an external microphone. It is recommended that you do not use wireless functions when shooting movies.
1
Basic Network Settings
Complete the basic network settings by using the menu screen on the camera's LCD monitor.
Preparation
[FTP trans.]
You can transfer captured images to an FTP server.
Images can be automatically transferred as you shoot them, or you can select images to be transferred later.
Computer Operating Systems
Use of [FTP trans.] requires that one of the following operating systems be installed on a computer. In addition, the computer must be set up as an FTP server in advance.
- Windows 8, Windows 8 Pro, Windows 8.1, Windows 8.1 Pro
- Windows 7 (Professional, Enterprise, or Ultimate Edition for 32- or 64-bit systems)
- Windows Vista (Business, Enterprise, or Ultimate Edition for 32- or 64-bit systems)
For instructions on setting up a computer as an FTP server, refer to the documentation provided with each device or contact the manufacturer.
Note that the following operating systems cannot be used because FTP server functionality is not provided.
- Windows 7 Home Premium
- Windows Vista Home Premium or Home Basic Edition
• [EOSUtility]
You can perform remote shooting over a wireless LAN using EOS Utility (EOS software).
In addition to remote shooting, almost all EOS Utility camera operations are supported, because this option utilizes a wireless LAN instead of an interface cable.
Requires a computer with EOS Utility (EOS software) installed.
[WFTserver]
You can perform advanced remote shooting or view images stored in the camera by connecting to the transmitter from a web browser on a computer, smartphone, or other device, as easily as accessing a Web site.
Browsers
The following operating systems and web browsers have been confirmed to be compatible with this device. Depending on your environment, operation may differ.
● Windows 8.1, Windows 7: Google Chrome Ver. 44 ● Windows 8.1, Windows 7: Internet Explorer 11 ● OS X (operating system version 10.10): Safari Ver. 8.0 - iOS (operating system version 8.4): Safari ● Android (operating system version 4.4): Google Chrome
* Operation on the above operating systems and web browsers cannot be guaranteed for all the terminals. * Not available unless the web browser is set to allow cookies. * Not available unless the web browser is set to use JavaScript. * Movies cannot be played back unless the web browser supports HTML 5.
[Smartphone]
You can perform basic remote shooting or view images stored in the camera on a smartphone or tablet.
To use this function, a smartphone on which iOS or Android is installed is necessary. In addition, the dedicated application Camera Connect (free of charge) must be installed on the smartphone.
- Camera Connect can be downloaded from the App Store or Google Play.
- For the operating system versions supported by Camera Connect, refer to the download site of Camera Connect.
- The interface and functionality of the camera and Camera Connect are subject to change due to firmware updates for the camera or application updates for Camera Connect, iOS, Android, etc. In such a case, features of the camera or Camera Connect may differ from sample screens or operation instructions in this manual. In this manual and on the camera's LCD monitor, "smartphone" refers to smartphones and tablets.
- [LinkedShot]
You can perform linked shooting using multiple compatible cameras with WFT series transmitters attached. This feature lets you link up to 10 slave cameras to the master camera on which you will release the shutter. Note that there will be a slight delay after you release the master camera shutter before the slave cameras shoot. Movie shooting is not supported.
• [Sync time between cameras]
You can set the master camera time on up to 10 slave cameras.
Note that even after synchronization, there will be a slight margin of error between master and slave camera time of ±0.05 seconds, at most.
Set up multiple cameras of the same camera model with the WFT-E8 or WFT-E6 attached.
Connecting Using an Access Point
When connecting using an access point, connect the target device to the access point in advance.

Transmitting Movies
Because of the large size of individual movie files, wireless file transmission takes some time. Set up an environment where each device can achieve stable communication with the access point and the transmitter by referring to the information on page 136.
Basic Communication Function Settings
First, configure basic communication function settings.
Setting the Communication Function

1 Turn the camera on.

Select [Communication settings].
- On the camera, press the button.
- Under the [⚡3] tab, select [Communication settings], then press .

3 Select [Enable] in [Communication func].
▶ [Network settings] is now available.
![CANON WFT-E8 - Select [Enable] in [Communication func]. - 1](/content/2026/06/1379899/images/636a2a7de5e17d887973b047bb87977487af7d94d6c50f7c61d166cc863fa882.jpg)
If [☐1: Multiple exposure] is set to any setting other than [Disable], [☐3: Communication settings] cannot be selected.
Registering a Nickname
Set a nickname (for identification) for the camera.
When the camera is connected to another device over a LAN, the nickname will be displayed on the device.

1 Select [Communication settings].
- Under the [⚡3] tab, select [Communication settings], then press .

2 Select [Network settings].
- Set [Communication func] to [Enable], then select [Network settings].

3 Select [Nickname].
![Nickname EOS-1DX2 8/10 @-_/::!?()[]<>0123456789 abcdefghijklmnopqrstuvwxyz ABCDEFGHIJKLMNOPQRSTUVWXYZ *#.+=$%&'{}](/content/2026/06/1379899/images/090920e6e7519de0b1575905836d12821a9f924913f2e5773828c69c925a19f8.jpg)
4 Enter a nickname.
- For instructions on entering characters, see the next page.
- Enter any characters between 1 to 10 characters in length.
![[OK] has been selected. The setting screen will close after saving the text entered Cancel OK](/content/2026/06/1379899/images/7ceeac05279efec2eb1526f262cd99e8bfc9268d0008106193f7c03e4f49fa97.jpg)
5 Exit the setting.
- When you are finished, press the button.
- Select [OK] on the confirmation dialog and press < SET> to return to the menu screen.
The basic settings for the communication function are now complete.
For further explanation of syncing the camera time and linked shooting, see the following pages.
- Syncing the camera time
- Linked shooting → page 97 → page 83
For connection settings other than the above, see the explanation from page 22.

Since the nickname is mandatory information for a LAN connection, you cannot delete all the characters.

By default, the camera name will be displayed for the nickname.
Virtual Keyboard Operation
![Nickname EOS-1DX2 8/10 . @-_/: :! ?() [ ] <>0123456789 abcdefghijklmnopqrstuvwxyz ABCDEFGHIJKLMNOPQRSTUVWXYZ * # , + = $&" {} INFO Cancel MENU OK](/content/2026/06/1379899/images/1c4765f66e284058650024807ab2570ef0130eda6acec50da1d85ada1ca631f6.jpg)
- Changing the entry area
Press the button to toggle between the top and bottom entry areas.
- Moving the cursor
Use <○> or <◆> in the top area to move the cursor.
- Entering text
In the bottom area, use <> or <> to select a character, then press <> to enter it.
You can check how many characters you have entered, and how many more can be entered, by referring to [*/*] on the upper right of the screen.
- Deleting a character
Press the <图标> button to delete one character.
• Finishing the text entry
Press the
- Pressing the shutter button or other camera controls during configuration using the connection instructions will close the connection instructions. Do not press the shutter button or other controls until configuration is finished.
- Under the [⚡2] tab, set [Auto power off] to [Disable]. If auto power off is activated, the connection instructions will be closed during the configuration process.

1 Select [Communication settings].
- Under the [⚡3] tab, select [Communication settings], then press .

Select [Network settings].
- Set [Communication func] to [Enable], then select [Network settings].

3 Select [Connection settings].

4 Select [SET*].

5 Select [Connection wizard].
The [Select communication method] screen is displayed. The lamp on the camera will blink in green.

6 Select the communication method.
- Select the communication method by referring to page 14.
- Select [OK] and press to go to the next screen.

7 Select [Wireless].
- Select [OK] and press to go to the next screen.
- Select [Wired] when using a network cable for the Ethernet RJ-45 terminal on the camera. For details, refer to the Wired LAN Instruction Manual provided with the camera.
![CANON WFT-E8 - Select [Wireless]. - 1](/content/2026/06/1379899/images/c0dbe5a46cdf36c0934888d131c1be44a69cbe831954d09df936b7078e4c8066.jpg)
If [Wireless] cannot be selected in step 7, attach the transmitter securely to the camera referring to page 11.

8 Select the connection method.
- Not displayed when [FTP trans.] is selected in step 6. Proceed to step 9.
- Select an item, then press <SET>.
- To connect the camera directly to each device, select [Easy connection]. Proceed to page 25.
- To connect using a Wi-Fi access point, select [Select a network]. Proceed to step 9.
- Select [OK] and press to go to the next screen.

9 Select the network.
- Select a network connection method. For subsequent operations, see page 27.

For [Camera access point mode] displayed in step 9, see page 36.
Connecting with Easy Connection
The instructions in this chapter are continued from page 24.
The camera and each device can be directly connected wirelessly. No access point is necessary, so you can establish a wireless connection easily.
To establish connection, operations on the computer, smartphone, etc. are required. For details, refer to the corresponding device's instruction manual.

1 Select [Easy connection].
- Select [OK] and press <SET> to go to the next screen.
SSID (network name)
Encryption key (password)
2 Operate the target device and connect it to the camera.
- Activate the Wi-Fi function of the target device, then select the SSID (network name) displayed on the camera's LCD monitor.
- For the password, enter the encryption key (password) displayed on the camera's LCD monitor.
Smartphone's screen (sample)


When connecting by selecting [Easy connection], “_Canon0A” is displayed at the end of the SSID.
Completing Settings for the Communication Method
The following instructions are for settings screens that vary depending on the communication method. Read the page that introduces the selected communication method.
EOS Utility
Chapter 3 (p.55)
WFT Server
Chapter 4 (p.59)
Smartphone
Chapter 5 (p.75)
Checking the Type of Access Point
To connect using an access point, check if the access point supports WPS* that allows easy connection between Wi-Fi devices.
If you do not know if the access point you use is WPS-compatible, refer to the access point instruction manual or other documentation.
* Wi-Fi Protected Setup
- When WPS is supported
The following two connection methods are available. Connection can be established easier with WPS (PBC mode).
- Connecting via WPS (PBC mode): Perform the operations described on page 28.
- Connecting via WPS (PIN mode): Perform the operations described on page 29.
- When WPS is not supported
- Connecting to a detected network manually: Perform the operations described on page 31.
Access Point Encryption
The transmitter supports the following options for [Authentication] and [Encryption settings]. Therefore, when connecting to a detected network manually, the encryption used by the access point must be one of the following.
- [Authentication]: Open system, Shared key, or WPA/WPA2-PSK
- [Encryption settings]: WEP, TKIP, or AES

- If stealth functions of the access point are active, connection may be disabled. Deactivate stealth functions.
- When connecting to a network that has a network administrator, ask the administrator about the detailed setting procedures.

If the network you use filters by MAC address, register the MAC address of the transmitter at the access point. The MAC address can be checked on the [Function settings] screen (p.114).
Connecting via WPS (PBC Mode)
The instructions in this chapter are continued from page 27.
This is a connection mode available when using an access point compatible with WPS. In pushbutton connection mode (PBC mode), the camera and the access point can be connected simply by pressing the WPS button on the access point.
- If multiple access points are active in the surrounding area, it may be more difficult to establish a connection. In such a case, try using [WPS (PIN mode)] to establish a connection.
- Check the position of the WPS button on the access point in advance. It may take approx. one minute to establish a connection.

1 Select [Connect with WPS].

Select [WPS (PBC mode)].
- Select [OK] and press <SET> to go to the next screen.
![WPS. Press WPS button of wireless LAN terminal. Connection starts after you press [OK]. Cancel. OK.](/content/2026/06/1379899/images/48edd5fc8adc94a5d60e0097481c7e7645208d2f06689a3f1d350ec1ef332a6d.jpg)
3 Connect to the access point.
- Press the access point's WPS button. For details about where the button is located and how long to press it, refer to the access point's instruction manual.
- Select [OK] and press <SET> to establish a connection with the access point. When a connection with the access point is established, the [IP address set.] screen (p.34) is displayed.
Connecting via WPS (PIN Mode)
The instructions in this chapter are continued from page 27.
This is a connection mode available when using an access point compatible with WPS. In PIN code connection mode (PIN mode), an 8-digit identification number specified on the camera is set at the access point to establish a connection.
- Even if there are multiple access points active in the surrounding area, a relatively reliable connection can be established using this shared identification number. It may take approx. one minute to establish a connection.

1 Select [Connect with WPS].

2 Select [WPS (PIN mode)].
- Select [OK] and press to go to the next screen.

3 Specify the PIN code.
- At the access point, specify the 8-digit PIN code displayed on the camera's LCD monitor.
- For instructions on setting PIN codes at the access point, refer to the access point's instruction manual. After the PIN code is specified, select [OK] and press <SET>.

4 Connect to the access point.
- Select [OK] and press <SET> to establish a connection with the access point. When a connection with the access point is established, the [IP address set.] screen (p.34) is displayed.
Connecting to a Detected Network Manually
The instructions in this chapter are continued from page 27.
Establish a connection by selecting the SSID (or ESS-ID) of the access point to connect to from a list of active access wireless LAN terminals nearby.
Selecting the Access Point
(1) (2) (3)
1 Select an access point.
- Turn the <O> dial to select the access point to connect to from the list of access points.
(1) SSID (2) An icon is displayed if the access point is encrypted (3) Channel used
[Refresh] and [Manual settings]
- Scroll down the screen in step 1 to display [Refresh] and [Manual settings].
- To search for access points again, select [Refresh].
- To configure settings for the access point manually, select [Manual settings]. Enter the SSID using the virtual keyboard and then configure settings following the instructions displayed.
Entering the Access Point Encryption Key
- Enter the encryption key (password) specified for the access point. For details on the specified encryption key, refer to the access point's instruction manual.
- The screens displayed in steps 2 to 4 below vary depending on the authentication and encryption specified for the access point.
- Go to page 34 when the [IP address set.] screen is displayed instead of the screens for steps 2 to 4.

Select a key index.
- The [Key index] screen is displayed only if WEP encryption is used by the access point.
- Select the key index number specified for the access point, then press < SET> .
- Select [OK] and press to go to the next screen.

3 Select the format and the number of characters used for the key.
- Select [OK] and press < SET> to go to the next screen.
![.@-_/::!?()[]<>0123456789 abcdefghijklmnopqrstuvwxyz ABCDEFGHIJKLMNOPQRSTUVWXYZ *#, +=$%&"{}\-|_ INFO. Cancel MENU OK.](/content/2026/06/1379899/images/1dfd0e086bafbee44b68c54c9d05b227365d766a5ec77a913a3353a06fe2ab91.jpg)
4 Enter the encryption key.
- Enter the encryption key using the virtual keyboard (p.21), then press the button. When a connection with the access point is established, the [IP address set.] screen (p.34) is displayed.
Setting the IP Address

Select [Auto setting].
- Select [OK] and press < SET> to display the setting screen for the communication method (p.35).
- If [Auto setting] results in an error or if you want to specify the settings manually, see page 144.
![CANON WFT-E8 - Select [Auto setting]. - 1](/content/2026/06/1379899/images/e41fb4feb46974d7462126f67794d1e7a7827a358b56a8322b75cfc2f2adfe25.jpg)
The IP address can only be set automatically in environments using DHCP servers, or access points or routers with DHCP server functionality, such that IP addresses and related settings are assigned and configured automatically.
Completing Settings for the Communication Method
The following instructions are for settings screens that vary depending on the communication method. Read the page that introduces the selected communication method.
FTP Transfer
Chapter 2 (p.37)
EOS Utility
Chapter 3 (p.55)
WFT Server
Chapter 4 (p.59)
Smartphone
Chapter 5 (p.75)
Camera Access Point Mode


Camera access point mode is a connection mode for connecting the camera directly to each device. Displayed when [EOSUtility], [WFTserver], or [Smartphone] is selected for the communication method.
In camera access point mode, the following two connection methods are available.
- [Easy connection]: See “Connecting with Easy Connection” (p.25) to establish a connection. ● [Manual connection]: See page 142 to establish a connection.
2
Transferring Images to an FTP Server
By connecting to an FTP server, you can transfer images stored in the camera to a computer.
With FTP transfer, you can automatically transfer images to the FTP server as you shoot or transfer a set of shots together.
- The instructions in this chapter are continued from Chapter 1.
Configuring FTP Server Connection Settings
These instructions are continued from Chapter 1.
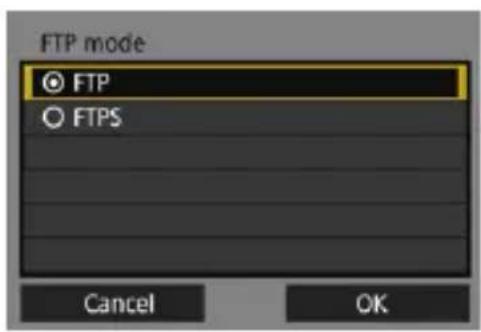
1 Select an FTP mode.
- To establish security for FTP transfer using a root certificate, select [FTPS].
- For root certificate settings, see page 41.
- Select [OK] and press to go to the next screen.

Select [Address setting].
The virtual keyboard is displayed.
![Server name: 192.168.1.20. 12/32. @-_/::!?()[]<>0123456789 abcdefghijklmnopqrstuvwxyz ABCDEFGHIJKLMNOPQRSTUVWXYZ *#.+=$%&'{}](/content/2026/06/1379899/images/c5feb5f832da47df38265f96b643b96ecf465d7f39e87472285d04e5cfc7a6af.jpg)
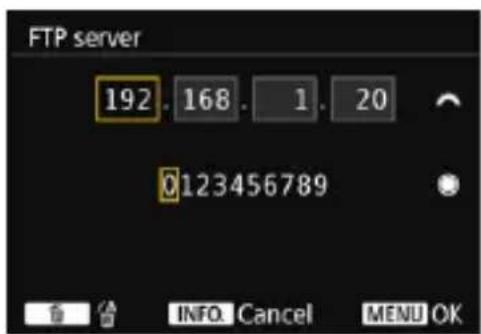
3 Enter the FTP server's server name or IP address.
- If you have set the IP address setting to [Auto setting] or the DNS address setting to [Manual setting], the screen on the left is displayed.
- For instructions on screen operations, see “Virtual Keyboard Operation” (p.21).
- If you have set the DNS address setting to [Disable], the screen on the left is displayed.
- Turn the dial to move the input position in the upper area and turn the dial to select the number. Press to enter the selected number.

4 Set the port number.
- [Port number setting] should usually be 00021.
- Select [OK] and press to go to the next screen.

5 Set the passive mode setting.
- Select [OK] and press to go to the next screen.
- If an Error 41 (“Cannot connect to FTP server”) is displayed in step 8, setting [Passive mode] to [Enable] may resolve it.

6 Set the proxy server.
- Select [OK] and press to go to the next screen.

7 Set the login method.
- Select [OK] and press to go to the next screen.

8 Set the target folder.
- Select [Root folder] to have images saved in the root folder as specified in FTP server settings (p.53).
- Select [Select folder] to specify a target folder in the root folder. If no folder exists, a folder will be created automatically.
- Select [OK] and press to go to the next screen. The lamp on the camera will light up in green.

9 Select [OK].
- Press < SET> . A connection completion screen will appear.

10 Select [OK].
- Press to return to the [Network settings] screen.
- Settings information is stored in the camera. It is not stored in the transmitter.
The connection settings for FTP transfer are now complete.
During image transfer, the lamp on the camera blinks in green.
Importing a Root Certificate for FTPS
If the FTP mode is set to [FTPS] when configuring the connection settings, the same root certificate as the FTP server must be imported to the camera.
- Only the root certificate whose file name is "root.cer", "root.crt", or "root.pem" can be imported to the camera.
- Only one root certificate file can be imported to the camera. Insert a card containing the root certificate file in advance.

1 Select [Communication settings].
- Under the [⚡3] tab, select [Communication settings], then press .

2 Select [Network settings].
- Set [Communication func] to [Enable], then select [Network settings].

3 Select [Function settings].

4 Select [FTP transfer settings].

5 Select [Set root certif].

6 Select [Load root certif from card].

7 Select [OK].
The root certificate is imported. - Select [OK] on the confirmation dialog to return to the [Set root certif] screen.
- Select [Delete root certificate] on the screen for step 6 to delete the root certificate imported to the camera. Select [View root certificate details] to check the issuer, subject, validity period, and other information.
![CANON WFT-E8 - Select [OK]. - 1](/content/2026/06/1379899/images/2577d5b3a936069fd36acf110b4677f37b1b2d0c461d82290b8541214ea5cde7.jpg)
You can import a certificate from the card selected for [Record/play] or [Playback] under [¶1: Record func+card/folder sel.].
Transferring Images Individually
Automatic Image Transfer After Each Shot
An image can be automatically transferred to the FTP server immediately after shooting. You can also continue still photo shooting even while images are being transferred.
Before shooting, be sure to insert a card into the camera. If you shoot without recording images, they cannot be transferred. - Note that automatic transfer of movies during shooting is not supported. Transfer the movie after shooting, as described on pages 48-52.

1 Select [Communication settings].
- Under the [3] tab, select [Communication settings], then press .

Select [Network settings].
- Set [Communication func] to [Enable], then select [Network settings].

3 Select [Function settings].
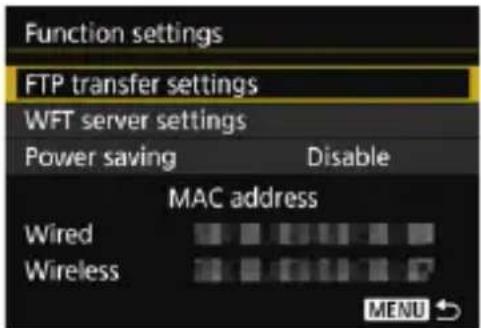
4 Select [FTP transfer settings].

5 Select [Automatic transfer].
- Select [Enable].
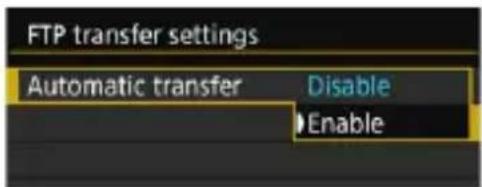
6 Take the picture.
The captured image is transferred to the FTP server.

- During continuous shooting, images are transferred to the FTP server in the order they are captured. ● The captured images are also stored on the card.
- Any images for which transfer fails or is interrupted will be transferred automatically when the connection is recovered (p.47). These images can also be re-transferred in batch at a later time (p.48).
Transferring the Current Image
Simply play back an image and press < SET> to transfer it. You can also continue still photo shooting even while images are being transferred.

1 Select [Transfer with SET].
- On the setting screen of FTP transfer, select [Transfer with SET].
- Select [Enable].

2 Select the image.
- Press the <▶> button on the camera.
- Select the image to transfer, then press < SET> to transfer the image. Movies cannot be transferred this way. Selecting a movie and pressing < SET> will display the movie playback panel.
Selecting Particular Sizes or Types of Images to Transfer
You can select which images to transfer when recording images of different sizes to a CF card and CFast card simultaneously, or when shooting in RAW+JPEG image quality.
Select [Transfer type/size] in step 5 on page 44 to select the size or type of images to transfer.

1 Select [Transfer type/size].

2 Select the size and type of images to transfer.

- To transfer smaller JPEGs when the camera is set up to record larger JPEGs to either a CF card or CFast card and smaller JPEGs to the other, set [JPEG size to trans.] to [SmallerJPEG].
- When the camera is set up to record RAW images to either a CF card or CFast card and JPEGs to the other, specify which images to transfer in the [RAW+JPEG transfer] setting. Similarly, complete the same setting when RAW+JPEG images are recorded simultaneously to a single card.
- When images of the same size are recorded to both a CF card and CFast card simultaneously, images recorded to the card selected for [Record/play] or [Playback] in [Record func+card/folder sel.] under the [1] tab are transferred.
Auto Retry if Transfer Fails

If transfer fails, the lamp on the camera blinks in red. In this case, press the button, select [Communication settings] under the [SET] tab, and press . When the screen shown on the left is displayed, check the error code number and see page 118 to eliminate the cause of the error.
Once the cause of the error is eliminated, the images whose transfer previously failed will be re-transferred automatically. With this option activated, transfer is attempted again automatically after failure, whether automatic transfer is used or captured images are transferred via FTP. Note that when you cancel image transfer, or turn off the camera, the image will not be re-transferred automatically. See page 48 and transfer the image.

By setting the power saving function on the [Function settings] screen (p.114), you can log off the transmitter from the FTP server after transfer and stop the LAN connection.
Batch Transfer
After shooting, you can select multiple images as desired and transfer them all at once. You can also transfer unsent images or images that could not be sent previously. Additionally, you can add a caption before transferring images.
You can also continue still photo shooting even while images are being transferred.
- When the Live View shooting/Movie shooting switch is set to <▶>, images cannot be transferred. Set it to <▶>.
Selecting the Images to be Transferred
Sel.Image

1 Select [Image transfer].
- Under the [▶2] tab, select [Image transfer], then press .

2 Select [Image sel./transfer].

3 Select [Sel.Image].

4 Select images to transfer.
- Turn the <bigcirc> dial to select the image to be transferred, then press <bigcirc T>.
- Turn the <bigcirc> dial to display the [checkmark] on the screen's upper left, then press <bigcirc>.
- If you press the button and turn the <img> dial counterclockwise, you can select an image from a three-image display. To return to the single-image display, turn the <img> dial clockwise.
- To select other images to be transferred, repeat step 4.
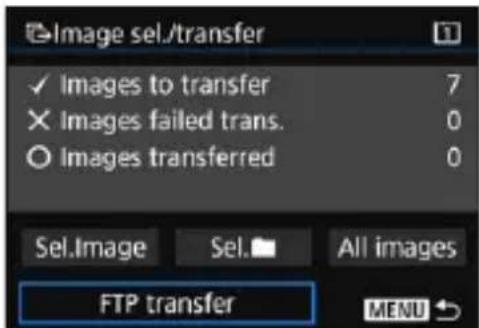
5 Transfer the image.
- Select [FTP transfer], then press <SET>.
- Select [OK] on the confirmation dialog to transfer the image.
- Images selected with [Sel.] and [All images] can also be transferred in this way.

If you set the Live View shooting/Movie shooting switch to <▶> during the image transfer of captured images, the image transfer will be temporarily cancelled. Set it to <▶> to resume the image transfer.

- You can also transfer shot movies. However, when the Live View shooting/Movie shooting switch is set to <▶>, images cannot be transferred. Set it to <▶> and transfer them.
- When [Sel.Image] is selected, you can check the transfer history on the upper left of the screen: No mark: Not selected. √: Selected for transfer. ✗: Transfer failed. ○: Transfer succeeded.
- The procedures for [RAW+JPEG transfer] (p.51) and above steps 1 to 4 can also be performed even while the camera is not connected to an FTP server.


Select [Sel.] and select [Select images not transferred]. When you select a folder, all the images in that folder not yet transferred to the FTP server will be selected.
When you select [Sel img not transfer. (○ only)] and select a folder, the protected images in that folder not yet transferred to the FTP server will be selected.
Selecting [Select transfer failed images] will select the selected folder's images that failed to be transferred.
Selecting [Sel transfer fail img (○-n only)] will select the selected folder's protected images that failed to be transferred.
Selecting [Clear transfer history] will clear the transfer history of the images in the selected folder. After clearing the transfer history, you can select [Select images not transferred] or [Sel img not transfer. (○ only)] and transfer all the images or the protected images in the folder again.
All images

If [All images] is selected and you select [Select images not transferred], all the images in the card not yet transferred to the FTP server will be selected.
Selecting [Sel img not transfer. (○ only)] will select the card's protected images not yet transferred to the FTP server.
For details about [Select transfer failed images], [Sel transfer fail img (○ only)], and [Clear transfer history] for when [All images] is selected, see "Sel. ■".
Transferring RAW+JPEG Images
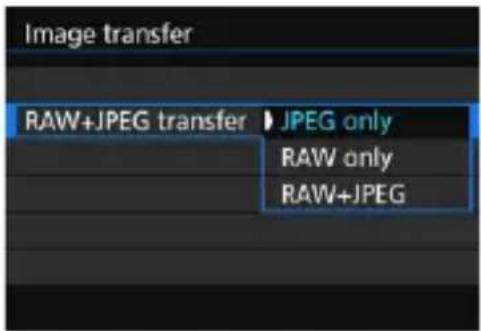
For RAW+JPEG images, you can specify which image to transfer.
In step 2 on page 48, select
[RAW+JPEG transfer], and select the image to be transferred: [JPEG only], [RAW only], or [RAW+JPEG].
- The [RAW+JPEG transfer] setting switches in tandem with the [RAW+JPEG transfer] setting under [3: Communication settings] → [Network settings] → [Function settings] → [FTP transfer settings] → [Transfer type/size] (p.46).
Menu Operation During Image Transfer
You can use the menu even during image transfer. However, to prevent transfer problems, some menu items are unavailable during transfer, including [Network settings], [Protect images], [Erase images], [Format card], and [Record func+card/folder sel.].
Adding a Caption Before Transfer
When you select [Transfer with caption] in step 2 on page 48, you can add a registered caption to each image before transfer. This is convenient if you want to inform the recipient of the printing quantity, for example. The caption is also added to images stored in the camera.
- You can check captions added to images by examining the Exif information, in the user comments.
- For instructions on creating and registering captions, see page 140.

1 Select [Transfer with caption].
- Select [Transfer with caption] on the screen for step 2 on page 48, then press <SET>. The last image played back is displayed.

2 Set a caption.
- Select [Caption], then press .
- Turn the <dial> to select the content of the caption, then press <SET>.

3 Select [Transfer].
The image is transferred with the caption. When the transfer is complete, the [Image transfer] screen will reappear.
![CANON WFT-E8 - Select [Transfer]. - 1](/content/2026/06/1379899/images/d5b2d89fa8b35e3c41c71487ba2a77eb15eb71c34395668e72a79dddfccb386f.jpg)
It is not possible to manually select images on the [Transfer with caption] screen. To select another image for transfer with a caption, play back that image before following these steps.
Viewing Transferred Images
Images transferred to the FTP server are stored in the following folder as specified in the FTP server settings.
Target Folders for the FTP Server
- Under the default settings of the FTP server, images are stored in [C drive] → [Inetpub] folder → [ftproot] folder, or in a subfolder of this folder.
- If the root folder of the transfer destination has been changed in the FTP server settings, ask the FTP server administrator where images are transferred.
Folders for Image Storage
Under the default settings, transferred images will be stored in the root folder specified in the FTP server settings, in a folder structure such as "A/DCIM/100EOS1D", which is automatically created.
However, when a CF card has been selected for recording and playback, a folder structure such as “A/DCIM/100EOS1D” will be automatically created; when a CFast card has been selected, the folder structure will be “B/DCIM/100EOS1D”. (Images will be stored separately, with CF card images in folder A and CFast images in folder B.)
MEMO
3
Operating Remotely Using EOS Utility
Using EOS Utility, you can view images stored in the camera or save them to a computer. Additionally, you can operate the camera remotely to take a picture or change camera settings using EOS Utility.
Almost all EOS Utility camera operations are supported, because this option utilizes a wireless LAN instead of an interface cable.
- The instructions in this chapter are continued from Chapter 1.
- Install EOS Utility on the computer before setting up a connection (p.15).
Configuring EOS Utility Connection Settings
These instructions are continued from Chapter 1.
- To establish a connection, operations on the computer are required. For details, refer to the computer's instruction manual.
- The configuration procedure is as follows, using Windows 8.1 as an example.
Operation on the Camera-1

1 Select [OK].
- Select [OK] and press <SET>. The following message is displayed. “*******” represents the last six digits of the MAC address of the transmitter.

Operation on the Computer

2 Start EOS Utility on the computer. 3 In EOS Utility, click [Pairing over Wi-Fi/LAN].
- If a firewall-related message is displayed, select [Yes].

4 Click [Connect] on the computer.
- Select the camera to connect to, then click [Connect].
- If multiple cameras are displayed, identify the camera to connect to by its MAC address displayed on the camera's LCD monitor.
- The MAC address can also be checked on the [Function settings] screen (p.114).
Operation on the Camera-2

5 Select [OK].
- When the camera detects the computer on which you clicked [Connect] in step 4, the screen on the left is displayed.
- Select [OK] and press <SET>. A connection completion screen will appear.

6 Select [OK].
- Press to return to the [Network settings] screen. The lamp on the camera will light up in green.
- Settings information is stored in the camera. It is not stored in the transmitter.
The settings for connecting to EOS Utility are now complete.
There is no need to complete pairing again if you will continue using a particular camera to which the transmitter is attached and computer together after pairing without changing the settings.
Using EOS Utility
For EOS Utility instructions, refer to the EOS Utility Instruction Manual. In addition to remote shooting, various camera operations are available.
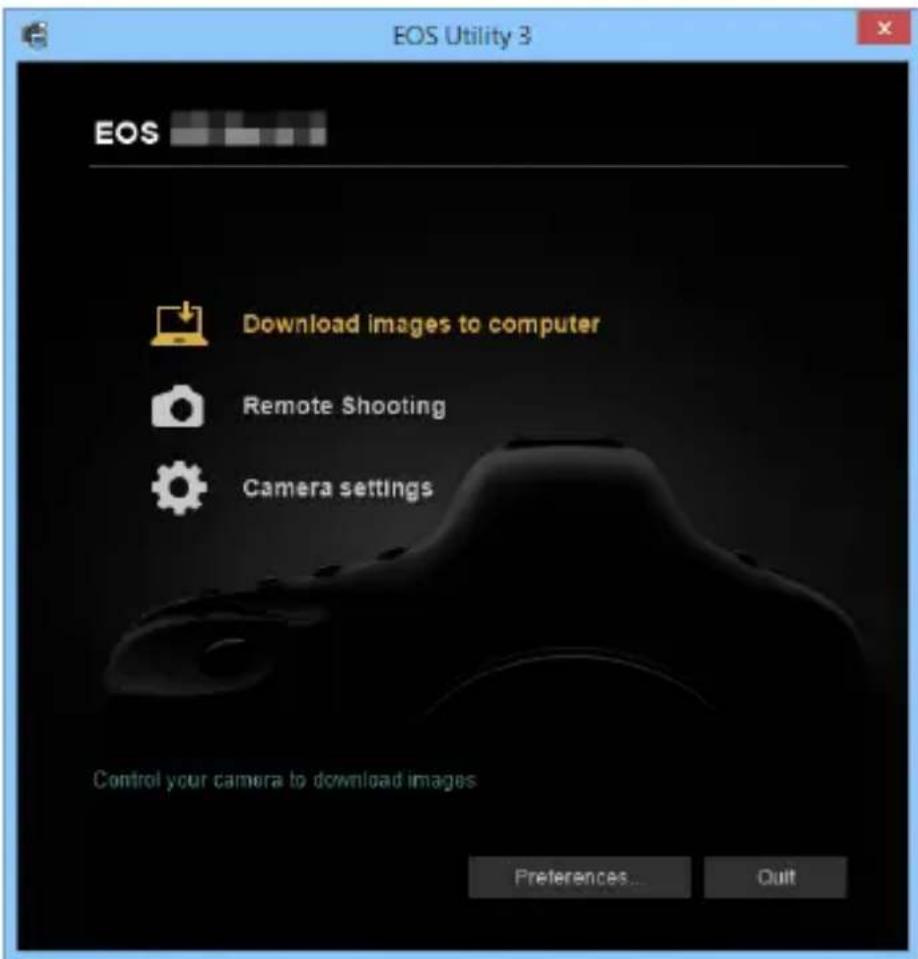

- In Remote Live View shooting, the rate of image transmission is slower compared to a connection via an interface cable. Therefore, moving subjects cannot be displayed smoothly.
- While connected, [Multiple exposure], [RAW image processing], [Cropping], or [Resize] cannot be selected.

Do not hold the camera in the same position for long periods of time.
Even if the camera does not feel too hot, prolonged contact with the same body part may cause skin redness or blistering due to low-temperature contact burns. Using a tripod is recommended for people with circulation problems or very sensitive skin, or when using the camera in very hot places.
4
Operating Remotely Using WFT Server
Using a web browser, you can view images stored in the camera or save them to a computer, smartphone, etc. Additionally, you can operate the camera remotely to take a picture or change camera settings using a web browser.
- The instructions in this chapter are continued from Chapter 1.
Configuring WFT Server Connection Settings
These instructions are continued from Chapter 1.
Enter a login name and password for connecting to the camera from a computer. The login name and password you specify here are used when connecting to the camera.

1 Select [User *].
- With WFT Server, you can connect the camera to up to three devices. Select a user number to prevent conflicts when users at other devices are connected simultaneously.

2 Select [Login name] or [Password].
The virtual keyboard is displayed. See page 21 to enter a login name and password.

3 Select [OK].
- After specifying the login name and password, select [OK] and press . The screen for step 1 will reappear.
- To add a user, repeat steps 1 to 3.

4 Select [OK].
- Select [OK] and press < SET> . A connection completion screen will appear.

5 Select [OK].
- Press to return to the [Network settings] screen.
- Settings information is stored in the camera. It is not stored in the transmitter.
The settings for connecting to WFT Server are now complete.
![CANON WFT-E8 - Select [OK]. - 1](/content/2026/06/1379899/images/3b71f91266bcd15bbbf8371cc79d9fa8202f68141a92545d791bc3a10e915430.jpg)
You can change the WFT account settings on the [Function settings] screen (p.114). The port number setting can also be changed on the [Function settings] screen. Note that there is normally no need to change the port number (80).
Displaying WFT Server
In the web browser, display WFT Server, a screen for transmitter operations. Connect the camera to a computer, smartphone, etc. via LAN in advance.
Checking the Camera's IP Address
To access the camera from a web browser, the camera's IP address displayed in step 6 must be entered in the address field of the web browser.
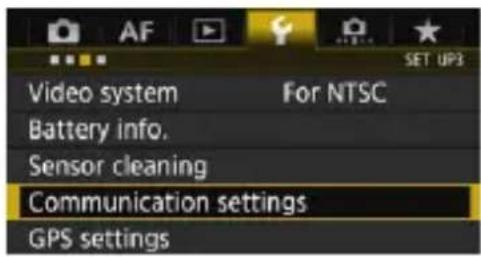
1 Select [Communication settings].
- Under the [⚡3] tab, select [Communication settings], then press .

Select [Network settings].
- Set [Communication func] to [Enable], then select [Network settings].
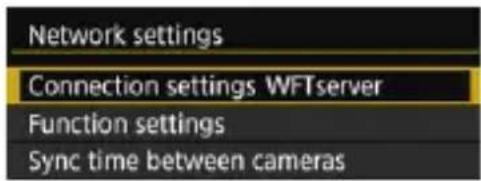
3 Select [Connection settings].

4 Select [SET* WFTserver].

5 Select [Confirm settings].
The settings are displayed.

6 Check the settings.
- Turn the dial to display other screens. • Write down the IP address.
- After checking it, press the button to exit the confirmation dialog.
Logging in to WFT Server
7 Start the web browser.
- Start a web browser on a computer, smartphone, etc.

8 Enter the URL.
- In the address field, enter the IP address you wrote down in step 6.
- Press the key.

9 Enter the [Login name] and [Password].
- Enter the [Login name] (user name) and [Password] specified on page 60.
- Press [OK] to display the WFT Server screen.
10 Select the language.
- Select a language at the bottom of the screen.


- WFT Server cannot be used unless the web browser supports JavaScript.
- While connected, [Multiple exposure], [RAW image processing], [Cropping], or [Resize] cannot be selected.
Viewing Images
You can browse images on the camera's card as follows.

1 Press [▶ Viewer].
The image viewing screen is displayed.

Select the card and folder.
- Press the [CF] or [CFast] tab to select a card.
- Press the folder name on the right of the selected tab to select a folder from the pull-down list.

3 Select an image.
- To view other images, change the screen with [] or [] at the bottom of the screen.
- You can specify how many thumbnails are shown per screen from the pull-down list on the upper right of the screen.
- When you add √ to the checkbox beside [the screen will be refreshed periodically.
- For movies, [MOV] or [MP4] is displayed beside the file names.

4 Download images.
- When you select a thumbnail, the image is displayed at a larger size.
- Press [] to download the image.
- Press [] or [] to display the previous or next image.
- Press [] to return to the image viewing screen.
Still photo playback screen Movie playback screen


Note that due to the performance of computers and smartphones, or browsers used, the following may occur: Images cannot be displayed, images are displayed slowly, or images cannot be downloaded to the devices.
Shooting Remotely [Camera control]
You can use WFT Server to shoot remotely.

1 Press [Camera control].
The advanced capture screen is displayed.

(1) Battery check ( (2) Drive mode ( (3) AF mode ( (4) Possible shots ( (5) AF/MF switching button ( (6) Shutter button ( (7) AF button ( (8) Aperture ( (9) Shutter speed ( (10) Metering mode ( (11) ISO speed (12) Image-recording quality (
2 Set the lens's focus mode switch to .
- When you press and let go of the Shutter button (6), the camera will autofocus and take a picture.

- Drive mode (2) displays the drive mode set on the camera. Note that even if the camera's drive mode is set to continuous shooting, single shooting will apply for remote shooting.
- When the camera's Live View shooting/Movie shooting switch is set to <▶>, still photo shooting is not possible.
- Anti-flicker shooting will be set to [Disable] automatically.
- If Mirror lockup is set to any setting other than [Disable], shooting is not possible. Set it to [Disable] in the Menu (13).

With One-Shot AF, the picture is not taken if focus is not achieved. Display Live View image and focus manually.
Displaying Live View Image for Shooting

1 Display Live View image.
- Press the Still photo Live View shooting button (15).

2 Adjust the focus. Using autofocus
- Press [ON] on the AF button (7) to autofocus.

Focusing manually
- Press the buttons <>, <>, << >, <>, <>, and <> to adjust the focus. To focus more closely, press <>, <>, or <>. To focus farther away, press <>, <>, or <>.
- Three levels of focus adjustment are available.
< >>: Largest increment < >>: Intermediate increment < >>: Smallest increment

- If Live View image is not displayed, enable Live View shooting in the Menu (13).
- To make Live View image display more responsive, press the Live View image size switching button (23). Live View image will be displayed at a smaller size, improving responsiveness. To restore the original size, press the button again.

3 Configure the shooting settings.
- Select setting items (such as image-recording quality) to view the setting details, which you can configure.
- Complete the settings as needed.

4 Take the picture.
- Press the Shutter button (6). When you let go of the button, the picture is taken.
The captured image is displayed.
- Captured images are stored on the camera's card.
- To download images, see "Viewing Images" (p.65).

The Live View image may freeze when shooting if the camera is accessed by multiple devices.
Shooting Movies

Press the Movie shooting button (16) to display the movie shooting screen.
- The setting procedures are the same as still photo shooting.
- Press the Shutter button (6). When you let go of the button, movie shooting will start. During movie shooting, the red [●] on the Shutter button (6) changes to a white [□].
- Press the Shutter button (6) again. When you let go of the button, movie shooting will stop.

Do not hold the camera in the same position for long periods of time.
Even if the camera does not feel too hot, prolonged contact with the same body part may cause skin redness or blistering due to low-temperature contact burns. Using a tripod is recommended for people with circulation problems or very sensitive skin, or when using the camera in very hot places.
Shooting Remotely [Simple control]
Although detailed function settings are not available on the basic capture screen, it is convenient for shooting remotely using a smartphone or other small-screen devices due to the compact design of the operation screen.

1 Press [Simple control].
The basic capture screen and Live View image are displayed.

Still photo/movie shooting switching button
Live View image screen
Magnify/reduce button
Manual focus button

Levels of focus adjustment
< >><>: Largest increment
< >>: Intermediate
increment
< >>: Smallest increment

Adjust the focus.
- Set the lens's focus mode switch to .
Using autofocus
- Press [ON] on the AF button to autofocus.
Focusing manually
- Press the buttons <>, <>, <<, <>, <>, and > to adjust the focus.

3 Take the picture.
- Press the Shutter button. When you let go of the button, the picture is taken. The captured image is displayed.
- Captured images are stored on the camera's card.
- To download images, see "Viewing Images" (p.65).
Shooting Movies

Press the [icon] or ['icon] button to switch between the still photo shooting screen and movie shooting screen.
● The setting procedures are the same as still photo shooting. - Press the Shutter button. When you let go of the button, movie shooting will start. During movie shooting, the red [●] on the Shutter button changes to a white [□]. - Press the Shutter button again. When you let go of the button, movie shooting will stop.
Using WFT Server in Linked Shooting
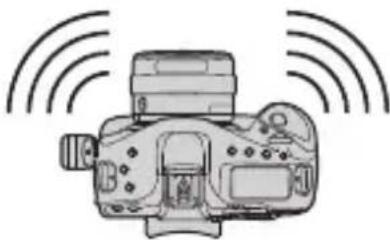
Remote shooting in WFT Server can be used in conjunction with the transmitter's “Linked Shooting” function (p.83). Additionally, images on the master camera’s card and slave cameras’ cards can be viewed and downloaded.
Linked Shooting
Slave camera


Slave camera

Master camera
Slave camera


Slave camera

WFT Server
5
Operating Remotely Using a Smartphone
Using a smartphone, you can view images stored in the camera or save them to the smartphone. Additionally, you can operate the camera remotely to take a picture or change camera settings using a smartphone.
- The instructions in this chapter are continued from Chapter 1.
- Install Camera Connect on the smartphone before setting up a connection (p.16).
Configuring Smartphone Connection Settings
These instructions are continued from Chapter 1.
- To establish connection, operations on the smartphone are required. For details, refer to the smartphone's instruction manual.
Operation on the Smartphone

1 Start Camera Connect on the smartphone.
- When the [Waiting to connect] screen is displayed on the camera's LCD monitor, start Camera Connect on the smartphone.

2 Select the camera to connect to on the smartphone.
- Select and tap the camera to connect to from [Cameras] on Camera Connect. - If multiple cameras are displayed, identify the camera to connect to by its MAC address displayed on the camera's LCD monitor.

The MAC address of the transmitter can also be checked on the [Function settings] screen (p.114).
Operation on the Camera

The device name set on Camera Connect
3 Connect to the camera.
- When a connection is established, the screen on the left will appear on the camera's LCD monitor.
- To specify viewable images, press the button. See step 7 on page 81 to set them.
- Select [OK] and press < SET> . A connection completion screen will appear. The main window of Camera Connect will be displayed on the smartphone. The lamp on the camera will light up in green.

4 Select [OK].
- Press to return to the [Network settings] screen.
- Settings information is stored in the camera. It is not stored in the transmitter.
The settings for connecting to a smartphone are now complete.
![CANON WFT-E8 - Select [OK]. - 1](/content/2026/06/1379899/images/559ef8fa24e903d4202b87367ffe9a987368fbf4c64253be9fcb1808f2dca4e6.jpg)
- You can check or change the device name on the setting screen of Camera Connect. While connected, the camera's auto power off does not function.
Operating the Camera Using a Smartphone
You can use a smartphone with Camera Connect installed to view images stored in the camera and shoot remotely.
Camera Connect Main Window

The main functions of Camera Connect are described below. Touch the screen to learn the operation procedures.
[Images on camera]
- Images stored in the camera can be viewed.
- Images stored in the camera can be saved on a smartphone.
- Operations such as deletion can be performed on images stored in the camera.
[Remote shooting]
- The camera's Live View image can be viewed using a smartphone.
- You can shoot using remote operation.
[Camera settings]
- Camera settings can be changed.
Settings button
- Use this button to access various settings for Camera Connect.

- When the connection is terminated while recording a movie with remote shooting, the camera responds as follows:
- When the Live View shooting/Movie shooting switch is set to <▶>, movie shooting continues.
- When the Live View shooting/Movie shooting switch is set to <■>, movie shooting stops.
- When the Live View shooting/Movie shooting switch is set to <▶> and the movie mode is set by operating Camera Connect, you cannot shoot by operating the camera.
- While connected, [Multiple exposure], [RAW image processing], [Cropping], or [Resize] cannot be selected.
- In remote shooting, the AF speed may become slower.
- Depending on the connection status, image display or shutter release may be delayed.
- When saving images to a smartphone, you cannot take a picture even if you press the camera's shutter button. Also, the camera's LCD monitor may turn off.
Even if MOV-format movies are displayed in the list, they cannot be saved to a smartphone. Note that depending on the smartphone's OS, saving MP4-format movies may not be possible.

- The connection will stop if you set the camera's power to off or open the card slot cover.
- If you send RAW images to a smartphone, they will be saved as resized JPEG images.
- While connected, the camera's auto power off does not function.
- While connected, disabling the smartphone's power saving function is recommended.

Do not hold the camera in the same position for long periods of time.
Even if the camera does not feel too hot, prolonged contact with the same body part may cause skin redness or blistering due to low-temperature contact burns. Using a tripod is recommended for people with circulation problems or very sensitive skin, or when using the camera in very hot places.
Specifying Viewable Images
You can specify images viewable from a smartphone by operating the camera. Images can be specified during connection setup or after the connection is terminated.

1 Select [Communication settings].
- Under the [⚡3] tab, select [Communication settings], then press .

Select [Network settings].
- Set [Communication func] to [Enable], then select [Network settings].

3 Select [Connection settings].

4 Select [SET* Smartphone].

5 Select [Change].
![CANON WFT-E8 - Select [Change]. - 1](/content/2026/06/1379899/images/16cc1d94c3687ea79ed1958d4d8f2795d5edafd3810aed78a60b0da150f5270c.jpg)
If [Viewable imgs] is set to any setting other than [All images], remote shooting is not possible.
![CANON WFT-E8 - Select [Change]. - 2](/content/2026/06/1379899/images/875d23f5ac64fe988ae1eb0a2b1a83f0cec3a8092ca6f8cac9fb46a778ddfc0e.jpg)
When reconnecting to a smartphone, check the viewable images setting before establishing a connection.

6 Select [Viewable imgs].

7 Select an item.
- Select [OK] and press < SET> to display the setting screen.
[All images]
All images stored on the card become viewable.

Specify viewable images on the shooting-date basis. Images shot up to nine days ago can be specified.
- Select an item, then press <SET>.
- When [Images shot in past days] is selected, images shot up to the specified number of days before the current date become viewable. When <☐> is shown for the number of days, turn the <☐> dial to specify the number of days, then press <SET> to confirm the selection.
- Select [OK] and press <SET> to specify the viewable images.
[Select by rating]
![Select by rating: All 25, [·] 5, [·] 0, [·] 12, [·] 8, [·] 0, OFF 18](/content/2026/06/1379899/images/da058c18e3ea2c37b9af278e88d639816114745c6c2f23f0b57edd5b29732af1.jpg)
Specify viewable images depending on whether a rating has been added (or not added) or by the type of rating.
- Select a rating, then press <SET> to specify the viewable images.
[File number range] (Select range)

First image Last image
Select the first and last images from images arranged by the file number to specify the viewable images.
1 Turn the <○> dial to select the first image to be set as viewable.
2 Press <SET> to display the image selection screen.
Select an image using the <○> dial. If you press the button and turn the <Sunshine> dial counterclockwise, you can select an image from the index display.
3 Select an image and press <SET> to determine the selection.
4 Specify the last image to be set as viewable by the same operation. Select an image shot later than the image selected as the first image.
5 When the first and last images are specified, select [OK], then press .
6
Linked Shooting
With linked shooting, up to 10 slave cameras can be linked in a wireless network to the master camera on which you will release the shutter.
Any cameras compatible with linked shooting, when they have WFT series transmitters attached, can be used as slave cameras, regardless of model.
Note that there will be a slight delay after you release the master camera shutter until the slave camera shutters are released. Movie shooting is not supported.

Slave camera

Master camera
Basic Linked Shooting
Link the master camera to slave cameras for basic linked shooting.
- When the Live View shooting/Movie shooting switch is set to <>, linked shooting is not possible. Set it to <>.
Preparing Slave Cameras
First, set up slave cameras by operating the cameras to use as slaves. When using multiple slave cameras, operate all slave cameras in the same way.

1 Select [Communication settings].
- Under the [⚡3] tab, select [Communication settings], then press .

Select [Network settings].
- Set [Communication func] to [Enable], then select [Network settings].

3 Select [Connection settings].

4 Select [LinkedShot].
- Turn the <○> dial to select [LinkedShot] at the bottom.


5 Select [Connection wizard].
6 Select [Slave].
- Select [OK] and press < SET> to go to the next screen. The slave cameras are now ready, with the following screen displayed.
![Linked Shooting settings. Press [OK] when you are ready to connect to the master camera. Cancel. OK.](/content/2026/06/1379899/images/5ee79017f53959e81bb223a4d92463652f306d326a4e4dfd8472d07bade747ff.jpg)
- When using multiple slave cameras, set up all slave cameras to slave state.
- Once the settings are complete, slaves cannot be added. You must repeat the setup process from step 1.
Preparing the Master Camera
Set up the master camera by operating the camera to use as the master.

7 Select [Master].
- Perform steps 1 to 5 on page 84 for the master camera, then select [Master].
- Select [OK] and press <SET> to go to the next screen.

8 Select [Auto connect].
- Select [OK] and press <SET> to go to the next screen. To set manually, see page 91.
Connecting the Cameras
Operate the slave cameras and master camera to connect them.
![Linked Shooting settings. Press [OK] when you are ready to connect to the master camera. Cancel. OK.](/content/2026/06/1379899/images/f8bcb60bc2a20b35a3b3e3face3097f455900aab4ffa8d865fb237c98c229323.jpg)
9 On the slave cameras, select [OK].
- On all slave cameras, select [OK]. On the master camera's LCD monitor, the number of slave cameras detected is displayed.
![Linked Shooting settings. Press [OK] when you are ready to connect to the slave camera. Number of slave cameras: 1. Cancel. OK.](/content/2026/06/1379899/images/6abb3180283058fefd2289001d75dcd622b75c10a30f4e3ba01d1a2cc2d1418e.jpg)
10 On the master camera, select [OK].
- Check the number of slave cameras, then select [OK].

11 On all cameras, select [OK].
On the master camera and all slave cameras, select [OK].
Settings information is stored in the camera. It is not stored in the transmitter.

Positioning the Cameras
Slave camera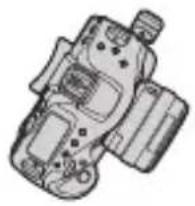

Slave camera


Slave camera Slave came Master camera
- Set the Live View shooting/Movie shooting switch to <☐>.
- Position the slave cameras in clear view of the master camera, without objects between them.
- Slave cameras can be positioned up to approx. 100 m / 656 ft. from the master camera. However, the distance supported for linked shooting may be shorter depending on the wireless communication conditions, which are affected by how the cameras are positioned, the environment of use, and weather conditions.
- Pressing the shutter button halfway on the master camera will also put the slave cameras in the state corresponding to when their shutter buttons are pressed halfway. Similarly, fully pressing the shutter button on the master camera will also put the slave cameras in the state corresponding to when their shutter buttons are fully pressed.
- There will be a slight delay after the master camera shutter is released before the slave camera shutters are released. (Simultaneous shooting is not possible.)

- If focus cannot be achieved with autofocus, linked shooting is not possible with the corresponding slave camera units.
- Do not use multiple flash units. Although slight, there is a difference in the shutter release timing which may cause out-of-sync flash firing and inadequate exposure.
- Linked shooting is not possible when the slave cameras are set to any setting other than [Mirror lockup: Disable], or when the Live View shooting/Movie shooting switch of the master or slave camera is set to <▶>.

- During linked shooting, when you press the AE lock or depth-of-field preview button, the camera adjusts the focus and meters as if you had pressed the shutter button halfway.
- Once you have established a connection between the master camera and slave cameras, the settings are retained even after you replace the batteries.
- If you will no longer use a slave camera in linked shooting, set [Connection settings] to [Disconnect] on that slave camera.
- Any cameras compatible with linked shooting, when they have WFT series transmitters attached, can be used as slave cameras, regardless of model.
Using the Transmitter with WFT Server
Using WFT Server, you can shoot remotely with a master camera linked to slave cameras set to shoot at the same time. WFT Server can also be used to access the master camera or slave cameras for Live View display, and you can adjust the focus and configure remote shooting settings as needed.
- Additionally, images on camera cards can be viewed and downloaded.
- Wireless LAN functions and operating system of the computer must support ad hoc mode.
Linked Shooting Slave camera

Slave camera


Slave cameraSlave came
Master camera
WFT Server
Connecting the Master and Slave Cameras
1 Set up the slave cameras.
- Perform steps 1 to 6 on page 84 for the cameras to use as slaves. When the next screen is displayed, the slave cameras are ready.

Set up the master camera.
- Perform steps 1 to 5 on page 84 for the camera to use as the master, then select [Master]. - Select [OK] and press to go to the next screen.

3 Select [Manual connect].
- Select [OK] and press to go to the next screen.

4 Select connection method.
- Select the wireless LAN ad hoc mode supported by the computer.
- Select [OK] and press to go to the next screen.

5 Specify the channel.
- When selecting [Manual setting], specify the same channel on the master camera, slave cameras, and computer.
- Select [OK] and press to go to the next screen.
![.@-_/::!?()[]<>0123456789 abcdefghijklmnopqrstuvwxyz ABCDEFGHIJKLMNOPQRSTUVWXYZ *#., += $%&'{}\~|^'' INFO. Cancel MENU OK](/content/2026/06/1379899/images/e2dfb831c89db7847584847b6c83749ddd90af784086c2307f2761d26c934270.jpg)
6 Enter the encryption key.
- Enter a 5-digit encryption key (password) and press the button.
- Set the key entered here on the computer in order to connect to the master camera from the computer.
![Linked Shooting settings Press [OK] when you are ready to connect to the master camera Cancel OK](/content/2026/06/1379899/images/e4f3e44560af8dfbce88a5a567b433bc38a301a99c0a6585e5d0f1fe31f1d4a0.jpg)
7 On the slave cameras, select [OK].
- On all slave cameras, select [OK]. On the master camera's LCD monitor, the number of slave cameras detected is displayed.
![Linked Shooting settings Press [OK] when you are ready to connect to the slave camera Number of slave cameras: 1 Cancel OK >](/content/2026/06/1379899/images/e3582873e9bc3a8e9a325ca2adc5b965217fcdd8e4936e4db71c15d3729a2602.jpg)
8 On the master camera, select [OK].
- Check the number of slave cameras, then select [OK].

9 On all cameras, select [OK].
- On the master camera and all slave cameras, select [OK].
- Settings information is stored in the camera. It is not stored in the transmitter.

Checking the Camera's IP Address and SSID
You will need the camera's IP address and SSID, displayed in step 6, to connect to the camera from a computer.

1 Select [Communication settings].
● Under the [3] tab, select [Communication settings], then press .

Select [Network settings].
- Set [Communication func] to [Enable], then select [Network settings].

3 Select [Connection settings].

4 Select [LinkedShot].
- Turn the <○> dial to select [LinkedShot] at the bottom.

5 Select [Confirm settings].
The settings are displayed.

6 Check the settings.
- Turn the <> dial to display other screens.
- Write down the IP address and SSID.
- The SSID is the same for all the cameras.
- After checking the settings, press the button to exit the confirmation dialog.

Check settings on the master camera and all slave cameras in the same way.
IP Addresses Assigned to Computers
IP addresses assigned to cameras end in 1-11, as in 192.168.1.1 - 192.168.1.11.
For this reason, assign computer IP addresses that end in a number higher than 11, as in 192.168.1.12.
Connecting the Cameras and the Computer
To connect the cameras and the computer, use the computer's wireless LAN device search function.
- For information about the wireless LAN device search function, refer to the computer instruction manual.
- Wireless LAN functions and operating system of the computer must support ad hoc mode.
- Set up a WFT account on the [Function settings] screen (p.114) in advance.
1 From the computer, find cameras on the network.
- Use the computer’s wireless LAN device search function.
Connect to a camera.
- Select a device with the same ID as the SSID you wrote down in step 6 on page 94.
- In the password field, enter the encryption key set in step 6 on page 92. The computer is now connected to the camera.
3 Display WFT Server.
- For the operation procedure, see page 62.
- In the address field, enter the IP address you wrote down in step 6 on page 63.
- To connect to a different camera, change the IP address in the address field.
- Log in to a WFT account by entering the [Login name] (user name) and [Password] specified in advance.
Making Images Viewable and Shooting Remotely
For how to use WFT Server, see page 59. - To switch cameras, enter the IP address of the master or slave camera in the web browser. - When shooting remotely with linked shooting, connect to the master camera. If you connect to a slave camera, only that slave camera will shoot, without linked shooting. - You can connect to slave cameras, adjust the focus and configure shooting functions, and then use the master camera for linked shooting.
7
Synchronizing the Camera Time Wirelessly
You can wirelessly synchronize multiple cameras of the same camera model when the transmitter is attached.
You can set the master camera time on up to 10 slave cameras. Note that even after synchronization, there will be a slight margin of error between master and slave camera time of ±0.05 seconds, at most.


Synchronizing the Time
Steps 1 to 5 are the same on the master and slave cameras.

1 Select [Communication settings].
- Under the [⚡3] tab, select [Communication settings], then press .

Select [Network settings].
- Set [Communication func] to [Enable], then select [Network settings].

3 Select [Sync time between cameras].
- If connected to another device, [Set [Connection settings] to [Disconnect]] will appear. Select [OK] to terminate the connection.

4 Select [OK].
![CANON WFT-E8 - Select [OK]. - 1](/content/2026/06/1379899/images/d3f804fb166424f98aabea80edaa0a16a1efe0d18ca98806123bce536a6d24a3.jpg)
Synchronize the camera time between the same camera models.
If the camera models of the master camera and slave cameras are different, synchronizing the time with slave cameras is not possible.

5 Select [Wireless].
- Select [OK] and press to go to the next screen.

6 Set up the master camera.
- Select [Master], then press < > .
- Select [OK] and press to go to the next screen. When the next screen is displayed, the master camera is ready. Go to step 7 to set up the slave cameras.

7 Set up the slave cameras.
- After configuring the slave camera settings following steps 1 to 5 on the preceding page, select [Slave].
- Select [OK] and press to go to the next screen. ▶ Select [OK] on the displayed screen.
- To set the time on multiple slave cameras, follow these steps on all slave cameras. On the master camera's LCD monitor, the number of slave cameras detected is displayed.
![Sync time between cameras. Press [OK] when you are ready to connect to the master camera. 01/23/2016 13:30:00. Cancel OK](/content/2026/06/1379899/images/b3362e4042095b4a72697575a6641f81f7814a88c81369992ad9144c9a50489f.jpg)
![Sync time between cameras. Press [OK] when you are ready to connect to the slave camera. Number of slave cameras: 3. 01/23/2016 13:30:00. Cancel OK](/content/2026/06/1379899/images/a2998bf2e152edd8b73d775d685409cd224b9a3dc6f2d67d5c769d72d15bb9be.jpg)
8 On the master camera, select [OK].
- Check the number of slave cameras, then select [OK]. The time on slave cameras is synchronized to the master camera time.

- Select [OK] to return to the [Network settings] screen.
8
Terminating the Connection and Reconnecting
Terminating the Connection
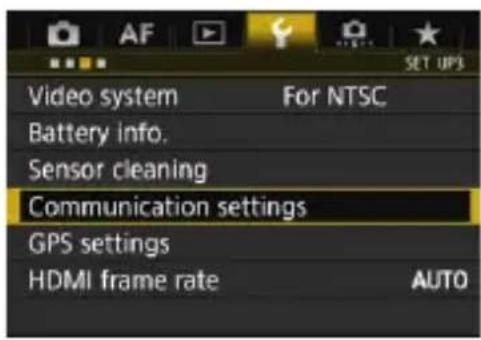
1 Select [Communication settings].
- Under the [⚡3] tab, select [Communication settings], then press .

Select [Network settings].
- Set [Communication func] to [Enable], then select [Network settings].
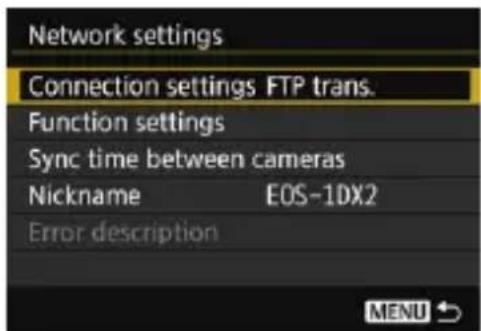
3 Select [Connection settings].

4 Select [Disconnect].
The connection is terminated.
Reconnecting

1 Select [Communication settings].
- Under the [⚡3] tab, select [Communication settings], then press .

Select [Network settings].
- Set [Communication func] to [Enable], then select [Network settings].

3 Select [Connection settings].

4 Select [SET*].
- From the saved settings, select the setting to connect to.

5 Select [Connect].
The connection is re-established. If settings have been changed on the target device, configure the settings again to connect to the camera.
MEMO
9
Checking and Operating Connection Settings
Displaying the Connection Settings Screen
Check, change, or delete connection settings saved on the camera.

1 Select [Communication settings].
- Under the [⚡3] tab, select [Communication settings], then press .

Select [Network settings].
- Set [Communication func] to [Enable], then select [Network settings].

3 Select [Connection settings].

4 Select the setting.
- From the saved settings, select the setting to check.

5 Check or change the settings.
- Select an item and press < SET> , then check or change the settings on the displayed screen.
[Connect] (p.103)
Select this to re-establish a connection. Select [OK] on the confirmation dialog and press < SET> to establish a connection.
[Connection wizard]
Set up a connection using the connection wizard. Follow the procedures displayed to complete the connection settings. If settings are already saved, they will be overwritten.
[Change] (p.108)
Change connection settings saved on the camera.
[Save/load settings on card] (p.112, 113)
Save connection settings saved on the camera to a card, or load connection settings saved on a card into the camera.
[Delete settings]
Delete connection settings saved on the camera. Select [OK] on the confirmation dialog to delete the setting.
[Confirm settings]
Check connection settings saved on the camera. When you select [Confirm settings], the settings will be displayed.
Changing Settings
Settings originally completed using the connection wizard can be changed as follows. You can also change settings that cannot be set using the connection wizard, such as when an image with the same file name as an existing file is sent to the FTP server.

1 Select [Change].
- On the [Connection settings] screen displayed in step 5 on page 107, select [Change].

Select the item to change.
- Select the item and press < SET> . A setting screen will appear.
[Settings name]
You can name the settings. Select [Settings name], then enter characters using the virtual keyboard (p.21).
[TCP/IP]

Configure network settings such as IP address settings and security settings.
[FTP server]

This is displayed for settings that connect to an FTP server. Configure FTP server settings.
[Viewable imgs] (p.80)
This is displayed for settings that connect to a smartphone. See page 80 to set.
IP Security (IPsec)
Configured in [TCP/IP] → [Security].
IPsec is a set of standards for encrypted communication over the Internet. It provides effective security for both wireless and wired LANs. To use this function, you must enable IPsec in the network settings of the computer. When IPsec is employed, only transport mode is supported, and 3DES or AES encryption and SHA-1 authentication are used. Note that the IP address of the computer for communication with the transmitter must be entered in [Destination address] on the settings screen.
Directory Structure of the Target Folder
Configured in [FTP server] → [Directory structure].
Selecting [Camera] automatically creates a folder structure matching that of the camera's (such as A/DCIM/100EOS1D) in the server's root folder for image storage. If you have created a subfolder in the root folder by changing the [Target folder] setting, a folder structure such as "A/DCIM/100EOS1D" is automatically created in that folder for image storage.
Selecting [Default] will use the root folder for image storage. If you have created a subfolder in the root folder by changing the [Target folder] setting, images are saved in that folder.
Overwriting Files of the Same Name
Configured in [FTP server] → [Overwrite same file].
When [Overwrite same file] is set to [Disable]
If there is already a file of the same name in the target folder on the FTP server, the new file is saved with an extension consisting of an underscore and a number, as in IMG_0003_1.JPG.
When you resend images if initial transfer fails
Even if the transmitter is configured to overwrite files of the same name, if you resend an image file that could not be transferred initially, the existing file may not be overwritten in some cases. If this happens, the new file is saved with an extension consisting of an underscore, a letter, and a number, as in IMG_0003_a1.JPG.
Passive Mode
Configured in [FTP server] → [Passive mode].
Enable this setting in network environments protected by a firewall. If an Error 41 occurs (“Cannot connect to FTP server”), setting passive mode to [Enable] may enable access to the FTP server.
Saving and Loading Settings
Connection settings can be saved on a card for use with other cameras. In addition, connection settings configured on other cameras can be applied to the camera to be used.
Saving Settings

1 Select [Save/load settings on card].
- On the [Connection settings] screen displayed in step 5 on page 107, select [Save/load settings on card].

2 Select [Save settings to card].
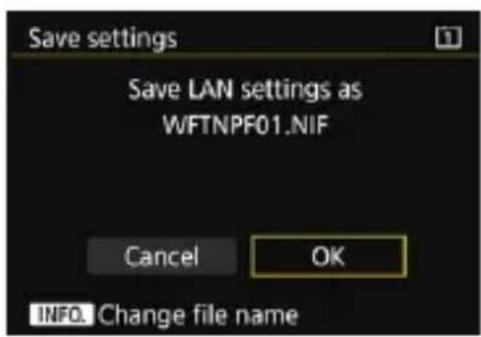
3 Select [OK].
- The file name is determined automatically by the camera: WFTNPF, followed by a number (01 to 99) and the extension NIF. You can rename the file as desired by pressing the [INFO] button.
The settings are saved on the card. - The settings are saved as a file in the area of the card shown when the card is opened (in the root directory).
![CANON WFT-E8 - Select [OK]. - 1](/content/2026/06/1379899/images/eb13457bc3cfbf74ca3a4b369b7dcf4536ad9b3ef580781bd36e3e7a61dab9a8.jpg)
Only forty settings files can be saved on one card from the camera. To save more than forty, use another card.
Loading Settings

1 Select [Save/load settings on card].
- On the [Connection settings] screen displayed in step 5 on page 107, select [Save/load settings on card].

2 Select [Load settings from card].
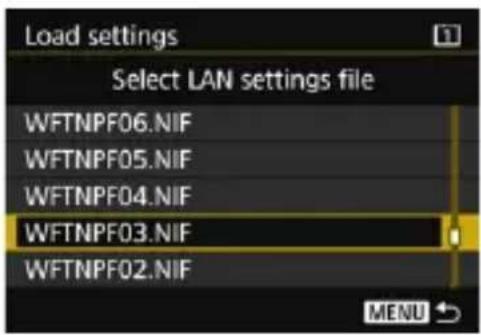
3 Select the settings file.
Select a settings file that matches your network environment.

4 Select [OK].
Information from the settings file is loaded into the selected settings number.
![CANON WFT-E8 - Select [OK]. - 1](/content/2026/06/1379899/images/68faa0687f2ec777269d905c8175fc84982a49c985b2491251358b56c1eadc46.jpg)
Even if a computer or other device is used to save more than forty settings files on one card, only forty will be displayed on the camera's load settings screen. To load forty-one or more settings files, first load up to forty setting files, then load the remaining files from a card that does not contain already loaded setting files.
Function Settings Screen
On the [Function settings] screen, you can configure settings for FTP transfer and the WFT Server, set the power saving function, and check the MAC address.
Displaying the Function Settings Screen

1 Select [Communication settings].
- Under the [⚡3] tab, select [Communication settings], then press .

Select [Network settings].
- Set [Communication func] to [Enable], then select [Network settings].

3 Select [Function settings].
The [Function settings] screen is displayed.

[FTP transfer settings]

Configure FTP transfer settings. See page 37 to set.
[WFT server settings]

Configure WFT Server settings. You can set the WFT account and port number.
- For instructions on setting the WFT account, see page 60. Note that there is normally no need to change the port number (80).
[Power saving]
FTP Trans.
When [Enable] is set, if no image is transferred for a certain period of time, the transmitter will log off from the FTP server and stop the LAN. When the transmitter is ready for image transfer, the connection is re-established automatically.
- EOSUtility/WFTserver/Smartphone
If no communication is established for a certain period of time, the transmission rate drops to save power. Note that the camera responds as follows regardless of the [Power saving] setting.
- When a connection is established with [Easy connection], the power saving function is disabled.
- When a connection is established using an access point, the power saving function is enabled.
- LinkedShot
The power saving function is disabled regardless of the setting.
[MAC address]
The MAC address of the transmitter can be checked. The MAC address of the transmitter is displayed in [Wireless].
10
Troubleshooting Guide

Transfer speed in ad hoc mode may become extremely slow when the transmitter is used with certain types of computer. For more information, contact your dealer or nearest Canon Service Center.
Responding to Error Messages
If a wireless setting error is displayed on the camera's LCD monitor, refer to the examples of corrective actions in this section to eliminate the cause of the error. In case of errors, the lamp on the camera blinks in red. The error details can also be checked under the [3] tab [Communication settings] → [Network settings] → [Error description].
Click the error code number's page in the following chart to jump to the corresponding page.
| 11 (p.119) 12 (p.119) | |||
| 21 (p.119) 22 (p.121) 23 (p.122) | 24 (p.122) | ||
| 41 (p.124) 42 (p.126) 43 (p.126) | 44 (p.126) 45 (p.127) | ||
| 46 (p.128) 47 (p.128) | |||
| 61 (p.129) 62 (p.129) 63 (p.130) | 64 (p.130) 65 (p.131) | ||
| 66 (p.131) 67 (p.132) 68 (p.132) | 69 (p.132) | ||
| 71 (p.133) 72 (p.133) 73 (p.133) | |||
| 82 (p.134) 83 (p.134) | |||
| 91 (p.134) | |||
If [Waiting to retry transfer...] is displayed

If image transfer via FTP fails after shooting, the screen on the left is displayed, and the camera's lamp blinks in red. Check the error code number and eliminate the cause of the error.
Once the cause of the error is eliminated, the images whose transfer previously failed will be re-transferred automatically.
Note that when you cancel image transfer, or turn off the camera, the image will not be re-transferred automatically. See page 48 and transfer the image.
11: Connection target not found
In the case of [EOSUtility], is EOS Utility running? ▶ Start EOS Utility and re-establish the connection (p.56). In the case of [Smartphone], is Camera Connect running? Establish a connection using Camera Connect (p.76). - Are the transmitter and the access point set to use the same encryption key for authentication? This error occurs if the encryption keys do not match when the authentication method for encryption is set to [Open system]. The setting is case-sensitive, so check upper- and lower-case characters. Make sure that the correct encryption key for authentication is entered on the transmitter (p.32).
12: Connection target not found
Are the target device and access point turned on? ▶ Turn on the target device and access point, then wait a while. If a connection still cannot be established, perform the procedures to establish the connection again.
21: No address assigned by DHCP server
What to check on the transmitter
- On the transmitter, IP address is set to [Auto setting]. Is this the correct setting? If no DHCP server is used, configure settings after setting the IP address to [Manual setting] on the transmitter (p.144).
What to check on the DHCP server
Is the power of the DHCP server on? ▶ Turn on the DHCP server. - Are there enough addresses for assignment by the DHCP server? ▶ Increase the number of addresses assigned by the DHCP server. Remove devices assigned addresses by the DHCP server from the network to reduce the number of addresses in use. - Is the DHCP server working correctly? ▶ Check the DHCP server settings to make sure it is working correctly as a DHCP server. If applicable, ask your network administrator to ensure the DHCP server is available.
What to check on the network as a whole
- Does your network include a router or similar device that serves as a gateway? If applicable, ask your network administrator for the network gateway address and enter it on the transmitter (p.138, 144). Make sure that the gateway address setting is correctly entered on all network devices, including the transmitter.

Responding to Error Messages 21 - 24
Also check the following points when responding to errors numbered 21 - 24. Are the transmitter and the access point set to use the same encryption key for authentication?
This error occurs if the encryption keys do not match when the authentication method for encryption is set to [Open system]. The setting is case-sensitive, so check upper- and lower-case characters. Make sure that the correct encryption key for authentication is entered on the transmitter (p.32).
22: No response from DNS server
What to check on the transmitter
- On the transmitter, DNS address is set to [Manual setting]. Is this the correct setting? If no DNS server is used, set the transmitter's DNS address setting to [Disable] (p.144).
- On the transmitter, does the DNS server's IP address setting match the server's actual address? On the transmitter, set the IP address that matches the address of the DNS server used (p.138, 144).
What to check on the DNS server
Is the power of the DNS server on? ▶ Turn on the DNS server. - Are the DNS server settings for IP addresses and the corresponding names correct? On the DNS server, make sure IP addresses and the corresponding names are entered correctly. Is the DNS server working correctly? ▶ Check the DNS server settings to make sure the server is working correctly as a DNS server. If applicable, ask your network administrator to ensure that the DNS server is available.
What to check on the network as a whole
- Does your network include a router or similar device that serves as a gateway? If applicable, ask your network administrator for the network gateway address and enter it on the transmitter (p.138, 144). Make sure that the gateway address setting is correctly entered on all network devices, including the transmitter.
23: Duplicate IP address
What to check on the transmitter
- Is another device on the transmitter network using the same IP address as the transmitter? Change the transmitter's IP address to avoid using the same address as another device on the network. Otherwise, change the IP address of the device that has a duplicate address. If the transmitter's IP address is set to [Manual setting] in network environments using a DHCP server, change the setting to [Auto setting] (p.34).
24: No response from proxy server
What to check on the transmitter
- The transmitter's proxy server setting is [Enable]. Is this the correct setting? If no proxy server is used, set the proxy server setting to [Disable] (p.39).
- Do the transmitter's [Address setting] and [Port No.] settings match those of the proxy server? Configure the transmitter's proxy server address and port number to match those of the proxy server (p.39). Are the transmitter's proxy server settings correctly entered on the DNS server? Make sure the proxy server's [Address] is correctly entered on the DNS server.
What to check on the proxy server
Is the power of the proxy server on? ▶ Turn on the proxy server. Is the proxy server working correctly? ▶ Check the proxy server settings to make sure it is working correctly as a proxy server. If applicable, ask your network administrator for the proxy server's address setting and port number, then enter them on the transmitter.
What to check on the network as a whole
- Does your network include a router or similar device that serves as a gateway?
If applicable, ask your network administrator for the network gateway address and enter it on the transmitter. Make sure that the gateway address setting is correctly entered on all network devices, including the transmitter.
41: Cannot connect to FTP server
What to check on the transmitter
- On the transmitter, does the FTP server's IP address setting match the server's actual address?
Configure the IP address on the transmitter to match the actual FTP server address (p.38).
Are the transmitter and the access point set to use the same encryption key for authentication?
This error occurs if the encryption keys do not match when the authentication method for encryption is set to [Open system]. The setting is case-sensitive, so check upper- and lower-case characters. Make sure that the correct encryption key for authentication is entered on the transmitter (p.32).
- On the transmitter, does the [Port number setting] for the FTP server match the actual port number of the FTP server?
Configure the same port number (usually 21) on the transmitter and FTP server. Configure the port number on the transmitter to match the actual FTP server port number (p.39).
Are the transmitter's FTP server settings correctly entered on the DNS server?
Make sure the FTP server's [Server name] is correctly entered on the DNS server. Make sure the [Server name] for the FTP server is correctly entered on the transmitter (p.38).
What to check on the FTP server
Is the FTP server working correctly? Configure the computer correctly to function as an FTP server. If applicable, ask your network administrator for the FTP server address and port number, then enter them on the transmitter. Is the power of the FTP server on? Turn on the FTP server. The server may have been turned off because of an energy-saving mode. - On the transmitter, does the FTP server's IP address setting (in [Address]) match the server's actual address? Configure the IP address on the transmitter to match the actual FTP server address (p.38). Is a firewall or other security software enabled? Some security software uses a firewall to restrict access to the FTP server. Change the firewall settings to allow access to the FTP server. You may be able to access the FTP server by setting [Passive mode] to [Enable] on the transmitter (p.111). Are you connecting to the FTP server via a broadband router? Some broadband routers use a firewall to restrict access to the FTP server. Change the firewall settings to allow access to the FTP server. You may be able to access the FTP server by setting [Passive mode] to [Enable] on the transmitter (p.111).
What to check on the network as a whole
- Does your network include a router or similar device that serves as a gateway? If applicable, ask your network administrator for the network gateway address and enter it on the transmitter (p.138, 144). Make sure that the gateway address setting is correctly entered on all network devices, including the transmitter.
42: FTP server rejected connection
What to check on the FTP server
- Is the FTP server configured to restrict access to only some IP addresses? ▶ Change the FTP server settings to allow access from the [IP address] configured on the transmitter in the TCP/IP settings.
43: Cannot connect to FTP server. Error code received from server.
What to check on the FTP server
- Have you exceeded the maximum number of FTP server connections? ▶ Disconnect some network devices from the FTP server or increase the maximum number of connections in the FTP server settings.
44: Cannot disconnect FTP server. Error code received from server.
- This error occurs if the transmitter fails to disconnect from the FTP server for some reason. ▶ Turn off and on the FTP server and camera.
45: Cannot login to FTP server. Error code received from server.
What to check on the transmitter
- On the transmitter, is the [Login name] entered correctly? ▶ Check the login name for accessing the FTP server. The setting is case-sensitive, so check upper- and lower-case characters. Make sure the correct login name is entered on the transmitter (p.39).
- On the transmitter, is the [Login password] entered correctly? If a login password is configured on the FTP server, check the upper- and lower-case characters to make sure the password on the transmitter matches it (p.39).
What to check on the FTP server
- Do the user rights for the FTP server allow reading, writing, and log access? Configure the FTP server's user rights to allow reading, writing, and log access.
- Is the folder specified as the transfer destination on the FTP server named with ASCII characters (p.21)? ▶ Use ASCII characters for the folder name.
46: For the data session, error code received from FTP server
What to check on the FTP server
The connection was terminated by the FTP server. ▶ Restart the FTP server. - Do the user rights for the FTP server allow reading, writing, and log access? Configure the FTP server's user rights to allow reading, writing, and log access. - Do user rights allow access to the target folder on the FTP server? Configure the user rights for access to the target folder on the FTP server to allow saving images from the transmitter. Is the power of the FTP server on? ▶ Turn on the FTP server. The server may have been turned off because of an energy-saving mode. Is the hard disk of the FTP server full? ▶ Increase available space on the hard disk.
47: Image file transfer completion not confirmed by FTP server
- This error occurs if, for some reason, the transmitter fails to receive confirmation from the FTP server that image file transfer is complete.
▶ Turn off and on the FTP server and camera, then transfer the images again.
61: Selected SSID wireless LAN network not found
- Are any obstacles blocking the line of sight between the transmitter and the antenna of the access point? ▶ Move the antenna of the access point to a position clearly visible from the point of view of the transmitter (p.136).
What to check on the transmitter
- Does the SSID set on the transmitter match that of the access point? ▶ Check the SSID at the access point, then set the same SSID on the transmitter (p.31).
What to check at the access point
Is the access point turned on? ▶ Turn on the power of the access point. - If filtering by MAC address is active, is the MAC address of the transmitter used registered at the access point? Register the MAC address (p.116) of the transmitter used at the access point.
62: No response from wireless LAN terminal
What to check on the transmitter
- Is the transmitter configured for communication in infrastructure mode? Configure the transmitter for communication in ad hoc mode.
What to check at the access point
- Is there a nearby access point for ad hoc communication? ▶ Set up an access point for ad hoc communication near the transmitter.
63: Wireless LAN authentication failed
Are the transmitter and the access point set to use the same authentication method? The transmitter supports the following authentication methods: [Open system], [Shared key], and [WPA/WPA2-PSK] (p.27). Are the transmitter and the access point set to use the same encryption key for authentication? The setting is case-sensitive, so check upper- and lower-case characters. Make sure that the correct encryption key for authentication is entered on the transmitter (p.32). - If filtering by MAC address is active, is the MAC address of the transmitter used registered at the access point? Register the MAC address (p.116) of the transmitter at the access point.
64: Cannot connect to wireless LAN terminal
Are the transmitter and the access point set to use the same encryption method? The transmitter supports the following encryption methods: WEP, TKIP, and AES (p.27). - If filtering by MAC address is active, is the MAC address of the transmitter used registered at the access point? Register the MAC address (p.116) of the transmitter used at the access point.
65: Wireless LAN connection lost
- Are any obstacles blocking the line of sight between the transmitter and the antenna of the access point? ▶ Move the antenna of the access point to a position clearly visible from the point of view of the transmitter (p.136).
- The wireless LAN connection was lost, for some reason, and the connection cannot be restored. The following are possible reasons: excessive access to the access point from other terminals, a microwave oven or similar appliance in use nearby (interfering with IEEE 802.11n/g/b (2.4 GHz band)), or influence of rain or high humidity (p.136).
66: Incorrect wireless LAN encryption key
- Are the transmitter and the access point set to use the same encryption key for authentication? The setting is case-sensitive, so check upper- and lower-case characters. Make sure that the correct encryption key for authentication is entered on the transmitter and the access point (p.32). Note that if the authentication method is [Open system], an Error 41 (“Cannot connect to FTP server”) is displayed.
67: Incorrect wireless LAN encryption method
Are the transmitter and the access point set to use the same encryption method? The transmitter supports the following encryption methods: WEP, TKIP, and AES (p.27). - If filtering by MAC address is active, is the MAC address of the transmitter used registered at the access point? Register the MAC address (p.116) of the transmitter used at the access point.
68: Cannot connect to wireless LAN terminal. Retry from the beginning.
Did you hold down the access point's WPS (Wi-Fi Protected Setup) button for the specified period of time? Hold down the WPS button for the period of time instructed by the access point's instruction manual. Are you trying to establish a connection near the access point? ▶ Try establishing the connection when both devices are within reach of each other.
69: Multiple wireless LAN terminals have been found. Cannot connect. Retry from the beginning.
- Connection is in progress by other access points in Pushbutton Connection mode (PBC mode) of Wi-Fi Protected Setup (WPS). ▶ Wait a while before trying to establish the connection, or try to establish a connection in PIN code connection mode (PIN mode) (p.29).
71: Cannot connect to slave camera
- Are you following the correct procedure to establish the connection with slave cameras? ▶ Operate slave cameras by following the correct instructions (p.84, 85). Are the slave cameras too far from the master camera? ▶ Bring the slave cameras closer to the master camera.
72: Cannot connect to master camera
- Are you following the correct procedure to establish the connection with master camera? ▶ Operate the master camera by following the correct instructions (p.86, 87). Is the master camera too far from the slave cameras? ▶ Bring the master camera closer to the slave cameras.
73: Could not synchronize the time
Are you following the correct procedure to establish a connection between the master and slave cameras? ▶ Operate the master and slave cameras by following the correct instructions (p.98-100). - Is the master camera too far from the slave cameras? ▶ Bring the master and slave cameras closer together.
82: Wireless File Transmitter not connected
Is the transmitter attached correctly? Make sure the transmitter is securely inserted in the camera (p.11).
83: Wireless LAN connection terminated because of high WFT temperature
Due to transmitter temperature rise, wireless operation has temporarily stopped and the wireless LAN connection has been terminated.
Allow the transmitter to cool down (for example, by shielding it from direct sunlight). When the transmitter cools down, the connection will be automatically re-established.
91: Other error
A problem other than error code number 11 to 83 occurred. Turn off and on the camera's power switch.
Troubleshooting Guide
If a problem occurs, first refer to this Troubleshooting Guide to check the camera and connected device. If this Troubleshooting Guide does not resolve the problem, contact the nearest Canon Service Center.
Cannot transfer images to an FTP server.
- To transfer captured images to an FTP server, set the Live View shooting/Movie shooting switch to <icon>. When the Live View shooting/Movie shooting switch is set to <icon>, images cannot be transferred.
Cannot perform linked shooting.
- To perform linked shooting, set the Live View shooting/Movie shooting switch to <icon>. When the Live View shooting/Movie shooting switch is set to <icon>, linked shooting is not possible.
Cannot reconnect to a smartphone.
- Even with a combination of the same camera and smartphone, if you have changed the settings or selected a different setting, reconnection may not be established even after selecting the same SSID. In such a case, delete the camera connection settings from the Wi-Fi settings on the smartphone and set up a connection again. - If Camera Connect is left running while setting up a connection again, the connection may not be established. In such a case, restart Camera Connect.
The camera and transmitter heat up and the transmission rate drops.
- If wireless operation is used continuously in high ambient temperatures for a prolonged period, the transmitter temperature may rise and the transfer speed may become slow. If the transmitter temperature further rises, an Error 83 may appear and the wireless operation may stop (p.134).
Communication Function Setting Notes
If the transmission rate drops, the connection is lost, or other problems occur when using the communication function, try the following corrective actions.
Access Point and Antenna Installation Location
- When using the transmitter indoors, install the device in the same room where you are shooting.
- Install the device higher than the transmitter.
- Install the device where people or objects do not come between it and the transmitter.
- Install the device as close to the transmitter as possible. In particular, note that during outdoor use in poor weather, rain may absorb radio waves and disrupt the connection.
Nearby Electronic Devices
If the transmission rate of a wireless LAN drops because of the influence of the following electronic devices, stop using them or establish a connection further away from them. In addition, switching to a wired LAN can resolve the problem.
- The transmitter communicates over wireless LANs via IEEE 802.11n/g/b using radio waves in the 2.4 GHz band. For this reason, the wireless LAN transmission rate may drop if there are nearby microwave ovens, cordless telephones, microphones, or similar devices operating on the same frequency band.
- If a wireless LAN terminal on the same frequency band as the transmitter is used nearby, the transmission rate of the wireless LAN may drop.
Notes for Using Multiple Wireless Transmitters
- When multiple cameras with a wireless transmitter attached are connected to one access point, make sure that the cameras' IP addresses are different.
- When multiple cameras with a wireless transmitter attached are connected to one access point, the transmission rate drops.
- When there are multiple IEEE 802.11n/g/b (2.4 GHz band) access points, leave a gap of four channels between each wireless LAN channel to reduce radio wave interference. For example, use channels 1, 6, and 11, channels 2, 7, and 12, or channels 3, 8, and 13. When IEEE 802.11ac/n/a can be used (on the 5 GHz band), switch to IEEE 802.11ac/n/a (on the 5 GHz band) and specify a different channel.
Security
If security settings have not been properly set, the following problems may occur.
• Transmission monitoring: Third parties with malicious intent may monitor the wireless LAN transmissions and attempt to acquire the data you are sending. - Unauthorized network access: Third parties with malicious intent may gain unauthorized access to the network you are using to steal, modify, or destroy information. Additionally, you could fall victim to other types of unauthorized access such as impersonation (where someone assumes an identity to gain access to unauthorized information) or springboard attacks (where someone gains unauthorized access to your network as a springboard to cover their tracks when infiltrating other systems).
To prevent these types of problems from occurring, be sure to thoroughly secure your network.
Checking Network Settings
Windows
Open the Windows [Command Prompt], then type ipconfig /all and press the key.
The IP address assigned to the computer is displayed, as well as the subnet mask, gateway, and DNS server information.
Mac OS
In Mac OS X, open the [Terminal] application, enter ifconfig -a, and press the key. The IP address assigned to the computer is indicated in the [en0] item by [inet], in the format “***.***.***.”
* For information about the [Terminal] application, refer to the Mac OS X help.
To avoid using the same IP address for the computer and other devices on the network, change the rightmost number when configuring the IP address assigned to the camera in the processes described on page 144.
Example: 192.168.1.10
11
Reference
Creating and Registering Captions
Follow these steps to create captions and register them on the camera, as introduced in “Adding a Caption Before Transfer” (p.52). When creating and registering captions, use a computer on which EOS Utility is installed.
See “Operating Remotely Using EOS Utility” on page 55 to enable the use of EOS Utility over a LAN.

1 Start EOS Utility and select [Camera settings].
The camera settings screen is displayed.

Select [WFT Captions].
The screen for caption creation is displayed.
![WFT Captions. Register text to use with [Transfer with caption] feature. 1 Canon. 2 1. 3 2. 4 3.](/content/2026/06/1379899/images/56554fe3e020e97cb77354cedf62c90578abc034e431ff59a4f729babf1d29d6.jpg)

3 Enter the caption or captions.
- Enter up to 31 characters (in ASCII format).
- To acquire caption data stored in the camera, select [Load settings].
4 Register the captions on the camera.
- Select [Apply to camera] to register your new captions on the camera.
Setting Network Manually
Set the network settings for the camera access point mode manually. Set [SSID], [Channel setting], and [Encryption settings] on each screen displayed.

1 Select [Manual connection].
- Select [OK] and press < SET> to go to the next screen.
![.@-_/::!?()[]<>0123456789. abcdefghijklmnopqrstuvwxyz. ABCDEFGHIJKLMNOPQRSTUVWXYZ. *#, +=$%&'{}\-1'. INFO. Cancel. MENU. OK.](/content/2026/06/1379899/images/6386beb6cdd54ad4708249cb7d5b79ba3bc629489f10ea04134204e8468302a0.jpg)
Enter an SSID (network name).
- Enter any characters using the virtual keyboard (p.21).
- When you are finished, press the
- Select an item and press the <SET> button. The number entry screen will appear.
- To use a gateway, DNS address, or IPsec, select [Enable], select [Address], then press the button.


3 Enter the desired values.
- Turn the <O> dial to move the input position in the upper area and turn the <O> dial to select the number. Press <O> to enter the selected number.
- To set the entered values and return to the screen for step 2, press the button.

4 Select [OK].
- When you have completed setting the necessary items, select [OK] and press the <SET> button. The setting screen for the communication method will appear.
- If you are not sure what to enter, see "Checking Network Settings" (p.138), or ask the network administrator or another person knowledgeable about the network.
Specifications
Type
Type: IEEE 802.11ac/n/a/g/b wireless LAN compatible
image transfer accessory
■ Wireless LAN
Standards compliance: IEEE 802.11ac, IEEE 802.11n, IEEE 802.11a,
IEEE 802.11g, IEEE 802.11b
Transmission method: DS-SS modulation (IEEE 802.11b)
OFDM modulation (IEEE 802.11ac/n/a/g)
Transmission range: Up to approx. 150 m / 492 ft.
* With no obstructions between the transmitting and receiving antennas and no radio interference
* Up to 15 m / 49.2 ft. when connected to a smartphone directly
Transmission frequency (central frequency):
| Version Frequency Channels | ||
| WFT-E8A | 2412 to 2462 MHz 1 | to 11 ch |
| 5180 to 5320 MHz 3 | 6 to 64 ch | |
| 5745 to 5825 MHz | 149 to 165 ch | |
| WFT-E8B | 2412 to 2472 MHz | 1 to 13 ch |
| 5180 to 5700 MHz | 36 to 140 ch | |
| WFT-E8C | 2412 to 2472 MHz | 1 to 13 ch |
| 5180 to 5320 MHz 3 | 6 to 64 ch | |
| 5745 to 5805 MHz | 149 to 161 ch | |
| WFT-E8D | 2412 to 2462 MHz 1 | to 11 ch |
| 5180 to 5825 MHz | 36 to 165 ch | |
| WFT-E8E | 2412 to 2472 MHz | 1 to 13 ch |
| 5180 to 5825 MHz | 36 to 165 ch | |
Connection method: Infrastructure mode, camera access point mode, ad hoc mode
* Wi-Fi Protected Setup supported
Security: Authentication method: Open system, Shared key,
WPA/WPA2-PSK
Encryption: WEP, TKIP, AES
* IPsec supported
■ LAN Functions
FTP transfer: Automatic transfer
Image selection and transfer
Transfer using SET button
Transfer with captions
* FTPS supported
EOS Utility: EOS Utility remote control functions over wireless LAN
WFT Server: Camera control, Simple control
Image viewing and downloading
Smartphone: Images can be viewed, controlled, and received using a smartphone.
Remote control of the camera using a smartphone is possible.
Linked shooting: Shooting with up to 10 slave cameras linked to a master camera
Transmission range: Up to approx. 100 m / 328 ft.
Synchronizing camera time: Syncing up to 10 slave cameras to the master camera time
Margin of error with master camera: Approx. ±0.05 seconds
* Synchronize the camera time between the same camera models.
■Number of Possible Shots
Number of possible shots during [Automatic transfer] (Approx. shots)
| Temperature | Normal Temperature (23°C / 73°F) | Low Temperatures (0°C / 32°F) |
| Possible shots 1030 | 900 |
* The figures above are based on a fully-charged Battery Pack LP-E19, [Power saving] enabled, and CIPA (Camera & Imaging Products Association) testing standards. * When transferring images consecutively over wireless LAN, the number of possible shots will decrease.
■ Dimensions and Weight
Dimensions (W x H x D): 24.7 x 57.0 x 34.1 mm / 0.97 x 2.24 x 1.34 in.
Weight: Approx. 38 g / 1.34 oz. (body only)
■ Operation Environment
Working temperature range: 0°C - 45°C / 32°F - 113°F
Working humidity: 85% or less
- All the data above is based on Canon's testing standards and CIPA (Camera & Imaging Products Association) testing standards and guidelines. ● Transmitter specifications and appearance are subject to change without notice.
Trademarks
- Microsoft and Windows are trademarks or registered trademarks of Microsoft Corporation in the United States and/or other countries.
- Macintosh and Mac OS are trademarks of Apple Inc., registered in the U.S. and other countries.
- The Wi-Fi CERTIFIED logo and the Wi-Fi Protected Setup mark are trademarks of the Wi-Fi Alliance.
- WPS used on camera settings screens and in this manual stands for Wi-Fi Protected Setup.
- UPnP is a trademark of the UPnP Implementers Corporation.
- All other trademarks are the property of their respective owners.
Index
A
Account (WFT)......60, 115
Ad hoc....91
AES....27
Area of use
...... Areas of Use and Restrictions
Authentication 27,109
Auto power off....22
Automatic image transfer......43
B
Batch transfer......48
Browsers 15,63
C
Camera access point mode .....36
Camera Connect....16, 78
Camera control (Remote shooting) ...67
Captions....52, 140
Channel...Areas of Use and Restrictions
Connection wizard ......22
D
DHCP server....34
DNS address....144
DNS server 138
E
Easy connection....25
Encryption key 32
Encryption settings......27, 142
EOS Utility....15, 55, 58
Error messages....118
ESS-ID 31
F
Folders ......40, 53
FTP mode ....38
FTP server ....37
FTP transfer....14, 37
FTPS 38
Function settings 114
G
Gateway 144
|
IEEE 802.11ac/n/a/g/b
Areas of Use and Restrictions
Image transfer 37
Individual image transfer 43
IP address 34, 38, 144
IP security (IPsec) 109
J
JPEG 46
K
Key format 32
Keyboard...... 21
L
LCD panel 10
Linked shooting 83
Login method.... 39
Login name...... 60
M
MAC address.... 27, 56, 116
Master camera 86,99
Movies 66, 71, 73
N
Network 13
Nickname 19
O
Open system 27
Overwriting files of same name .... 110
P
Pairing 56
Passive mode.... 111
Password 60
PBC mode 28
PIN code connection mode.....29
PIN mode....29
Port number 39
Power saving ....116
Proxy server....39
Pushbutton connection mode .....28
R
RAW 46
RAW+JPEG 46
Reconnecting....103
Remote shooting.....58, 67, 72, 78
Re-transfer......47
Router 34
S
Select folder....40
Settings......112
Loading....113
Saving 112
Settings name......108
Shared key......27
Simple control (Remote shooting)...72
Slave camera....84, 99
Smartphone 16,75
SSID 31
Stealth functions ......27
Subnet mask....138, 144
Sync camera time 16, 97
T
Target folder......40, 53, 110
TCP/IP 108
TKIP....27
Transfer after shooting......48
Transfer history 49
Transfer with SET 45
Transferred images 53
Troubleshooting.... 117
U
URL 63
V
Viewable images 80
Viewing images 65,78
W
Web browser 15,63
WEP 27
WFT server 15, 59
WFT server.... 15, 59
Wired LAN 23
Wireless LAN specification ....Areas of Use and Restrictions
WPA/WPA2-PSK 27
WPS (Wi-Fi Protected Setup) ...... 27
MEMO
Canon
The descriptions in this Instruction Manual are current as of June 2016. For information on the compatibility with any products introduced after this date, contact any Canon Service Center. For the latest version Instruction Manual, refer to the Canon Web site.
- WIRELESS FILE TRANSMITTER
- WFT-E
- INTRODUCTION
- WHAT YOU CAN DO WITH THE TRANSMITTER
- FTP TRANSFER
- EOS UTILITY
- WFT SERVER
- SMARTPHONE
- LINKED SHOOTING
- SYNC THE CAMERA TIME
- CONVENTIONS USED IN THIS MANUAL
- ICONS IN THIS MANUAL
- BASIC ASSUMPTIONS
- CHAPTER LIST
- CONTENTS
- BASIC NETWORK SETTINGS
- TRANSFERRING IMAGES TO AN FTP SERVER
- OPERATING REMOTELY USING EOS UTILITY
- OPERATING REMOTELY USING WFT SERVER
- OPERATING REMOTELY USING A SMARTPHONE
- SYNCHRONIZING THE CAMERA TIME WIRELESSLY
- TERMINATING THE CONNECTION AND RECONNECTING
- CHECKING AND OPERATING CONNECTION SETTINGS
- TROUBLESHOOTING GUIDE
- REFERENCE
- SAFETY PRECAUTIONS
- WARNINGS: FOLLOW THE WARNINGS BELOW. OTHERWISE, DEATH OR SERIOUS INJURIES MAY RESULT
- CAUTIONS: FOLLOW THE CAUTIONS BELOW. OTHERWISE, PHYSICAL INJURY OR PROPERTY DAMAGE MAY RESULT
- HANDLING PRECAUTIONS
- NOMENCLATURE
- ATTACHING TO THE CAMERA
- OPEN THE TERMINAL COVER ON THE CAMERA
- ATTACH THE TRANSMITTER
- REMOVING THE TRANSMITTER
- USE OF AN EXTERNAL MICROPHONE DURING MOVIE SHOOTING
- PREPARATION
- [FTP TRANS.]
- COMPUTER OPERATING SYSTEMS
- [EOSUTILITY]
- [WFTSERVER]
- BROWSERS
- [SMARTPHONE]
- [LINKEDSHOT]
- [SYNC TIME BETWEEN CAMERAS]
- CONNECTING USING AN ACCESS POINT
- TRANSMITTING MOVIES
- BASIC COMMUNICATION FUNCTION SETTINGS
- SETTING THE COMMUNICATION FUNCTION
- TURN THE CAMERA ON
- SELECT [COMMUNICATION SETTINGS]
- SELECT [ENABLE] IN [COMMUNICATION FUNC]
- REGISTERING A NICKNAME
- SELECT [NETWORK SETTINGS]
- SELECT [NICKNAME]
- ENTER A NICKNAME
- EXIT THE SETTING
- FOR FURTHER EXPLANATION OF SYNCING THE CAMERA TIME AND LINKED SHOOTING, SEE THE FOLLOWING PAGES
- VIRTUAL KEYBOARD OPERATION
- CHANGING THE ENTRY AREA
- MOVING THE CURSOR
- ENTERING TEXT
- DELETING A CHARACTER
- FINISHING THE TEXT ENTRY
- CANCELING THE TEXT ENTRY
- DISPLAYING THE CONNECTION WIZARD
- SELECT [CONNECTION SETTINGS]
- SELECT [SET*]
- SELECT [CONNECTION WIZARD]
- SELECT THE COMMUNICATION METHOD
- SELECT [WIRELESS]
- SELECT THE CONNECTION METHOD
- SELECT THE NETWORK
- CONNECTING WITH EASY CONNECTION
- SELECT [EASY CONNECTION]
- OPERATE THE TARGET DEVICE AND CONNECT IT TO THE CAMERA
- COMPLETING SETTINGS FOR THE COMMUNICATION METHOD
- CHECKING THE TYPE OF ACCESS POINT
- WHEN WPS IS SUPPORTED
- WHEN WPS IS NOT SUPPORTED
- ACCESS POINT ENCRYPTION
- CONNECTING VIA WPS (PBC MODE)
- SELECT [CONNECT WITH WPS]
- SELECT [WPS (PBC MODE)]
- CONNECT TO THE ACCESS POINT
- CONNECTING VIA WPS (PIN MODE)
- SELECT [WPS (PIN MODE)]
- SPECIFY THE PIN CODE
- CONNECTING TO A DETECTED NETWORK MANUALLY
- SELECTING THE ACCESS POINT
- SELECT AN ACCESS POINT
- [REFRESH] AND [MANUAL SETTINGS]
- ENTERING THE ACCESS POINT ENCRYPTION KEY
- SELECT A KEY INDEX
- SELECT THE FORMAT AND THE NUMBER OF CHARACTERS USED FOR THE KEY
- ENTER THE ENCRYPTION KEY
- SETTING THE IP ADDRESS
- SELECT [AUTO SETTING]
- CAMERA ACCESS POINT MODE
- CONFIGURING FTP SERVER CONNECTION SETTINGS
- SELECT AN FTP MODE
- SELECT [ADDRESS SETTING]
- ENTER THE FTP SERVER'S SERVER NAME OR IP ADDRESS
- SET THE PORT NUMBER
- SET THE PASSIVE MODE SETTING
- SET THE PROXY SERVER
- SET THE LOGIN METHOD
- SET THE TARGET FOLDER
- SELECT [OK]
- IMPORTING A ROOT CERTIFICATE FOR FTPS
- SELECT [FUNCTION SETTINGS]
- SELECT [FTP TRANSFER SETTINGS]
- SELECT [SET ROOT CERTIF]
- SELECT [LOAD ROOT CERTIF FROM CARD]
- TRANSFERRING IMAGES INDIVIDUALLY
- AUTOMATIC IMAGE TRANSFER AFTER EACH SHOT
- SELECT [AUTOMATIC TRANSFER]
- TAKE THE PICTURE
- TRANSFERRING THE CURRENT IMAGE
- SELECT [TRANSFER WITH SET]
- SELECT THE IMAGE
- SELECTING PARTICULAR SIZES OR TYPES OF IMAGES TO TRANSFER
- SELECT [TRANSFER TYPE/SIZE]
- SELECT THE SIZE AND TYPE OF IMAGES TO TRANSFER
- AUTO RETRY IF TRANSFER FAILS
- BATCH TRANSFER
- SELECTING THE IMAGES TO BE TRANSFERRED
- SEL.IMAGE
- SELECT [IMAGE TRANSFER]
- SELECT [IMAGE SEL./TRANSFER]
- SELECT [SEL.IMAGE]
- SELECT IMAGES TO TRANSFER
- TRANSFER THE IMAGE
- ALL IMAGES
- TRANSFERRING RAW+JPEG IMAGES
- MENU OPERATION DURING IMAGE TRANSFER
- ADDING A CAPTION BEFORE TRANSFER
- SELECT [TRANSFER WITH CAPTION]
- SET A CAPTION
- SELECT [TRANSFER]
- VIEWING TRANSFERRED IMAGES
- TARGET FOLDERS FOR THE FTP SERVER
- FOLDERS FOR IMAGE STORAGE
- MEMO
- CONFIGURING EOS UTILITY CONNECTION SETTINGS
- OPERATION ON THE CAMERA
- OPERATION ON THE COMPUTER
- CLICK [CONNECT] ON THE COMPUTER
- USING EOS UTILITY
- CONFIGURING WFT SERVER CONNECTION SETTINGS
- SELECT [USER *]
- SELECT [LOGIN NAME] OR [PASSWORD]
- DISPLAYING WFT SERVER
- CHECKING THE CAMERA'S IP ADDRESS
- SELECT [SET* WFTSERVER]
- SELECT [CONFIRM SETTINGS]
- CHECK THE SETTINGS
- LOGGING IN TO WFT SERVER
- START THE WEB BROWSER
- ENTER THE URL
- ENTER THE [LOGIN NAME] AND [PASSWORD]
- SELECT THE LANGUAGE
- VIEWING IMAGES
- PRESS [▶ VIEWER]
- SELECT THE CARD AND FOLDER
- SELECT AN IMAGE
- DOWNLOAD IMAGES
- SHOOTING REMOTELY [CAMERA CONTROL]
- PRESS [CAMERA CONTROL]
- SET THE LENS'S FOCUS MODE SWITCH TO
- DISPLAYING LIVE VIEW IMAGE FOR SHOOTING
- DISPLAY LIVE VIEW IMAGE
- ADJUST THE FOCUS. USING AUTOFOCUS
- FOCUSING MANUALLY
- CONFIGURE THE SHOOTING SETTINGS
- SHOOTING MOVIES
- PRESS THE MOVIE SHOOTING BUTTON (16) TO DISPLAY THE MOVIE SHOOTING SCREEN
- SHOOTING REMOTELY [SIMPLE CONTROL]
- PRESS [SIMPLE CONTROL]
- ADJUST THE FOCUS
- USING AUTOFOCUS
- PRESS THE [ICON] OR ['ICON] BUTTON TO SWITCH BETWEEN THE STILL PHOTO SHOOTING SCREEN AND MOVIE SHOOTING SCREEN
- USING WFT SERVER IN LINKED SHOOTING
- CONFIGURING SMARTPHONE CONNECTION SETTINGS
- OPERATION ON THE SMARTPHONE
- START CAMERA CONNECT ON THE SMARTPHONE
- SELECT THE CAMERA TO CONNECT TO ON THE SMARTPHONE
- CONNECT TO THE CAMERA
- OPERATING THE CAMERA USING A SMARTPHONE
- CAMERA CONNECT MAIN WINDOW
- [IMAGES ON CAMERA]
- [REMOTE SHOOTING]
- [CAMERA SETTINGS]
- SETTINGS BUTTON
- DO NOT HOLD THE CAMERA IN THE SAME POSITION FOR LONG PERIODS OF TIME
- SPECIFYING VIEWABLE IMAGES
- SELECT [SET* SMARTPHONE]
- SELECT [CHANGE]
- SELECT [VIEWABLE IMGS]
- SELECT AN ITEM
- [ALL IMAGES]
- [SELECT BY RATING]
- [FILE NUMBER RANGE] (SELECT RANGE)
- BASIC LINKED SHOOTING
- PREPARING SLAVE CAMERAS
- SELECT [LINKEDSHOT]
- SELECT [SLAVE]
- PREPARING THE MASTER CAMERA
- SELECT [MASTER]
- SELECT [AUTO CONNECT]
- CONNECTING THE CAMERAS
- ON THE SLAVE CAMERAS, SELECT [OK]
- ON THE MASTER CAMERA, SELECT [OK]
- ON ALL CAMERAS, SELECT [OK]
- POSITIONING THE CAMERAS
- USING THE TRANSMITTER WITH WFT SERVER
- CONNECTING THE MASTER AND SLAVE CAMERAS
- SET UP THE SLAVE CAMERAS
- SET UP THE MASTER CAMERA
- SELECT [MANUAL CONNECT]
- SELECT CONNECTION METHOD
- SPECIFY THE CHANNEL
- CHECKING THE CAMERA'S IP ADDRESS AND SSID
- IP ADDRESSES ASSIGNED TO COMPUTERS
- CONNECTING THE CAMERAS AND THE COMPUTER
- FROM THE COMPUTER, FIND CAMERAS ON THE NETWORK
- CONNECT TO A CAMERA
- DISPLAY WFT SERVER
- MAKING IMAGES VIEWABLE AND SHOOTING REMOTELY
- SYNCHRONIZING THE TIME
- SELECT [SYNC TIME BETWEEN CAMERAS]
- SYNCHRONIZE THE CAMERA TIME BETWEEN THE SAME CAMERA MODELS
- TERMINATING THE CONNECTION
- SELECT [DISCONNECT]
- RECONNECTING
- SELECT [CONNECT]
- DISPLAYING THE CONNECTION SETTINGS SCREEN
- SELECT THE SETTING
- CHECK OR CHANGE THE SETTINGS
- [CONNECT] (P.103)
- [CONNECTION WIZARD]
- [CHANGE] (P.108)
- [SAVE/LOAD SETTINGS ON CARD] (P.112, 113)
- [DELETE SETTINGS]
- [CONFIRM SETTINGS]
- CHANGING SETTINGS
- SELECT THE ITEM TO CHANGE
- [SETTINGS NAME]
- [TCP/IP]
- [FTP SERVER]
- [VIEWABLE IMGS] (P.80)
- IP SECURITY (IPSEC)
- DIRECTORY STRUCTURE OF THE TARGET FOLDER
- OVERWRITING FILES OF THE SAME NAME
- WHEN [OVERWRITE SAME FILE] IS SET TO [DISABLE]
- WHEN YOU RESEND IMAGES IF INITIAL TRANSFER FAILS
- PASSIVE MODE
- SAVING AND LOADING SETTINGS
- SAVING SETTINGS
- SELECT [SAVE/LOAD SETTINGS ON CARD]
- SELECT [SAVE SETTINGS TO CARD]
- LOADING SETTINGS
- SELECT [LOAD SETTINGS FROM CARD]
- SELECT THE SETTINGS FILE
- FUNCTION SETTINGS SCREEN
- DISPLAYING THE FUNCTION SETTINGS SCREEN
- [FTP TRANSFER SETTINGS]
- [WFT SERVER SETTINGS]
- [POWER SAVING]
- FTP TRANS
- EOSUTILITY/WFTSERVER/SMARTPHONE
- LINKEDSHOT
- [MAC ADDRESS]
- RESPONDING TO ERROR MESSAGES
- IF [WAITING TO RETRY TRANSFER...] IS DISPLAYED
- CONNECTION TARGET NOT FOUND
- NO ADDRESS ASSIGNED BY DHCP SERVER
- WHAT TO CHECK ON THE TRANSMITTER
- WHAT TO CHECK ON THE DHCP SERVER
- WHAT TO CHECK ON THE NETWORK AS A WHOLE
- NO RESPONSE FROM DNS SERVER
- WHAT TO CHECK ON THE DNS SERVER
- DUPLICATE IP ADDRESS
- NO RESPONSE FROM PROXY SERVER
- WHAT TO CHECK ON THE PROXY SERVER
- CANNOT CONNECT TO FTP SERVER
- WHAT TO CHECK ON THE FTP SERVER
- FTP SERVER REJECTED CONNECTION
- CANNOT CONNECT TO FTP SERVER. ERROR CODE RECEIVED FROM SERVER
- CANNOT DISCONNECT FTP SERVER. ERROR CODE RECEIVED FROM SERVER
- CANNOT LOGIN TO FTP SERVER. ERROR CODE RECEIVED FROM SERVER
- FOR THE DATA SESSION, ERROR CODE RECEIVED FROM FTP SERVER
- IMAGE FILE TRANSFER COMPLETION NOT CONFIRMED BY FTP SERVER
- SELECTED SSID WIRELESS LAN NETWORK NOT FOUND
- WHAT TO CHECK AT THE ACCESS POINT
- NO RESPONSE FROM WIRELESS LAN TERMINAL
- WIRELESS LAN AUTHENTICATION FAILED
- CANNOT CONNECT TO WIRELESS LAN TERMINAL
- WIRELESS LAN CONNECTION LOST
- INCORRECT WIRELESS LAN ENCRYPTION KEY
- INCORRECT WIRELESS LAN ENCRYPTION METHOD
- CANNOT CONNECT TO WIRELESS LAN TERMINAL. RETRY FROM THE BEGINNING
- MULTIPLE WIRELESS LAN TERMINALS HAVE BEEN FOUND. CANNOT CONNECT. RETRY FROM THE BEGINNING
- CANNOT CONNECT TO SLAVE CAMERA
- CANNOT CONNECT TO MASTER CAMERA
- COULD NOT SYNCHRONIZE THE TIME
- WIRELESS FILE TRANSMITTER NOT CONNECTED
- WIRELESS LAN CONNECTION TERMINATED BECAUSE OF HIGH WFT TEMPERATURE
- OTHER ERROR
- CANNOT TRANSFER IMAGES TO AN FTP SERVER
- CANNOT PERFORM LINKED SHOOTING
- CANNOT RECONNECT TO A SMARTPHONE
- THE CAMERA AND TRANSMITTER HEAT UP AND THE TRANSMISSION RATE DROPS
- COMMUNICATION FUNCTION SETTING NOTES
- ACCESS POINT AND ANTENNA INSTALLATION LOCATION
- NEARBY ELECTRONIC DEVICES
- NOTES FOR USING MULTIPLE WIRELESS TRANSMITTERS
- SECURITY
- CHECKING NETWORK SETTINGS
- WINDOWS
- MAC OS
- CREATING AND REGISTERING CAPTIONS
- START EOS UTILITY AND SELECT [CAMERA SETTINGS]
- SELECT [WFT CAPTIONS]
- ENTER THE CAPTION OR CAPTIONS
- REGISTER THE CAPTIONS ON THE CAMERA
- SETTING NETWORK MANUALLY
- SELECT [MANUAL CONNECTION]
- ENTER AN SSID (NETWORK NAME)
- SELECT THE DESIRED CHANNEL SETTING
- SELECT THE DESIRED ENCRYPTION SETTING
- SETTING IP ADDRESS MANUALLY
- SELECT [MANUAL SETTING]
- SELECT THE ITEM TO BE SET
- ENTER THE DESIRED VALUES
- SPECIFICATIONS
- TYPE
- WIRELESS LAN
- LAN FUNCTIONS
- NUMBER OF POSSIBLE SHOTS
- DIMENSIONS AND WEIGHT
- OPERATION ENVIRONMENT
- TRADEMARKS
- INDEX
- A
- B
- C
- D
- E
- F
- G
- J
- K
- L
- M
- N
- O
- P
- R
- S
- T
- U
- V
- W
- CANON
Brand : CANON
Model : WFT-E8
Category : Camera