88200A - Salt spreader Chapin - Free user manual and instructions
Find the device manual for free 88200A Chapin in PDF.

User questions about 88200A Chapin
0 question about this device. Answer the ones you know or ask your own.
Ask a new question about this device
Download the instructions for your Salt spreader in PDF format for free! Find your manual 88200A - Chapin and take your electronic device back in hand. On this page are published all the documents necessary for the use of your device. 88200A by Chapin.
USER MANUAL 88200A Chapin
Failure to do so may result in damage to property and/or person.

text_image
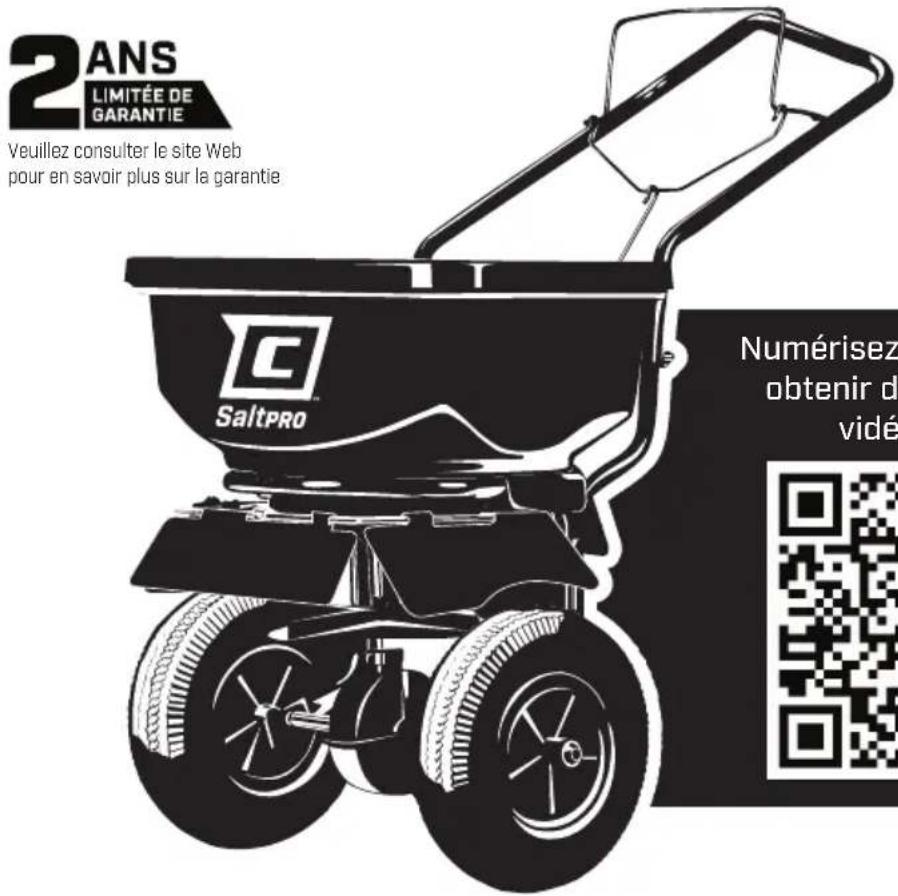
2YEAR LIMITED WARRANTY See website for warranty detail C Saltpro Scan QR video iScan QR Code for easy video instructions.

text_image
QR code image containing encoded data, no visible human-readable textCONGRATULATIONS!
YOU HAVE JUST PURCHASED A QUALITY CHAPIN PRODUCT. REGISTER YOUR SPREADER ONLINE @ WWW.CHAPINMFG.COM VISIT US ON THE INTERNET: WWW.CHAPINMFG.COM
BEFORE RETURNING THIS PRODUCT FOR ANY REASON, PLEASE CALL:
1-800-950-4458
When calling, please have the following information available: Sales receipt & model number. This number connects you directly with the manufacturer of this product. Our Technical Support Team will be happy to help you with any assembly, troubleshooting and replacement information you may need.
WARNING
WARNING: IMPROPER USE OR FAILURE TO FOLLOW INSTRUCTIONS CAN RESULT IN PRODUCT FAILURE OR INJURIES. FOR SAFE USE OF THIS PRODUCT YOU MUST READ AND FOLLOW ALL INSTRUCTIONS BEFORE USING.
Do not allow anyone to operate the broadcast spreader without proper instructions. Do not permit children to operate the broadcast spreader. Wear protective eyewear and gloves when handling and applying lawn and garden chemicals. Read the chemical label instructions and warnings for handling and applying the chemicals you plan to spread – application settings provided are only a guideline.
Auger is designed to work in forward motion. Excessive reverse motion could cause binding. If resistance is felt while pulling spreader backwards, stop and clear salt from auger.
Assembly Instructions
Approximate assembly time is 5-10 minutes
Suggested Tools:
Wrench and/or Ratchet Set
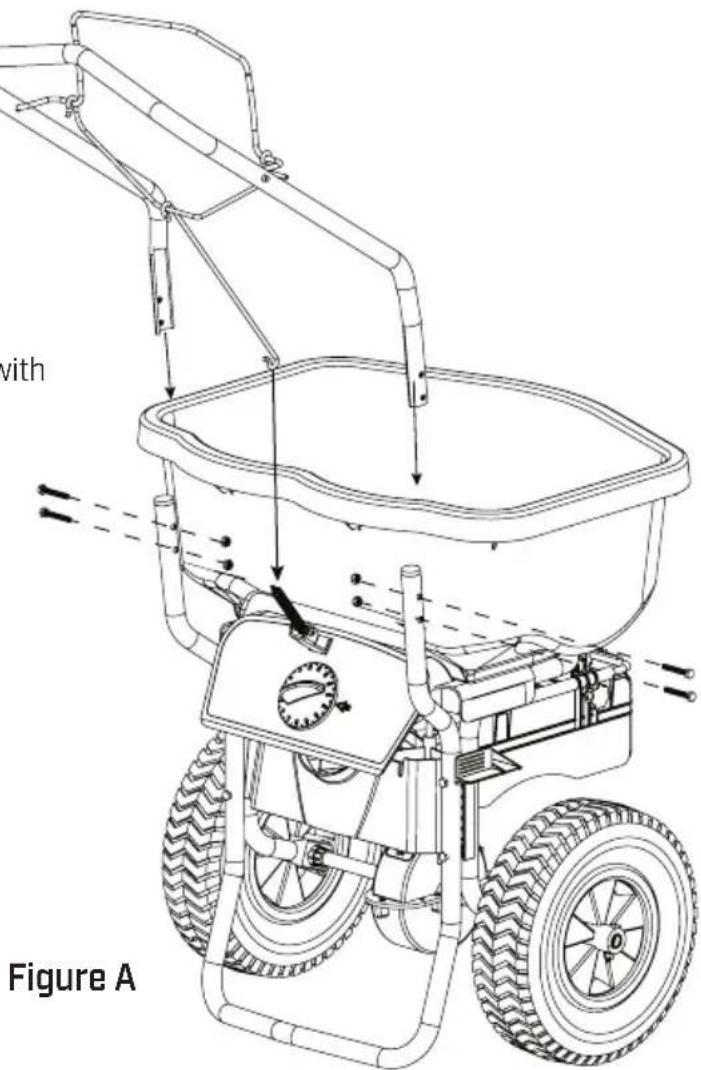
HANDLE ASSEMBLY
- Attach bail hook to spring (Figure A).
- Assemble handle to uprights with Hex bolts and M6 nuts (Figure A).
• Tighten M6 nuts completely.
Note: If you frequently store your spreader with the handle down, optional thumb screws are provided for faster disassembling.
text_image
with Figure ANote: If spring detaches from bail assembly, simply re-attach (see Figure B).

text_image
Figure B Fully AssembledAUGER ASSEMBLY
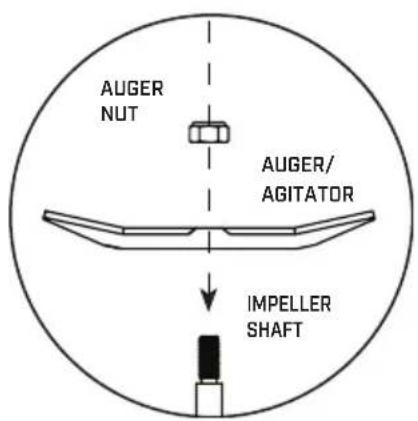
BENT AUGER ASSEMBLY
Thread auger clockwise onto impeller shaft. Screw auger retaining nut into auger hole with M6 socket driver. Tighten completely with wrench to secure.
Choose flat auger for general turf applications.
- Fertilizers
- Herbicides
- Pesticides
- Grass Seed
• Free-Flowing Material
text_image
AUGER NUT AUGER/ AGITATOR IMPELLER SHAFTSPIKED AUGER ASSEMBLY
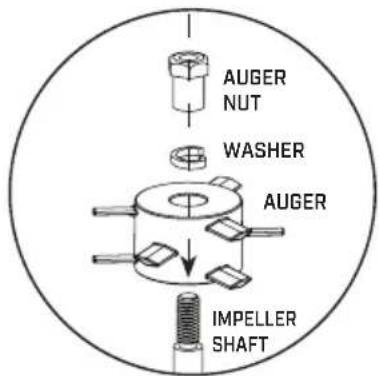
Thread auger clockwise onto impeller shaft. Insert auger nut. Tighten with 10 mm wrench. Do not over tighten.
Choose spiked auger for use with dense materials that have a tendency to clump or have a higher moisture content.
• Ice Melt- Calcium Chloride
• Lawn Mineral Supplement
CAUTION: This spreader is NOT recommended for use with rock salt.
text_image
AUGER NUT WASHER AUGER IMPELLER SHAFTGENERAL OPERATING INSTRUCTIONS
- Be sure gate control is in the closed position [do not hold bail down when filling].
- Determine appropriate setting for material being used by reading the suggested setting on the material's bag AND/OR by referencing the application chart on your spreader's control panel (Charts provided are only guidelines. Be sure to read the instructions on the bag/box of the material you're spreading to identify accurate setting needed).
- Set the dial to the desired setting Important Note: Do not adjust dial while holding bail down and gate is open. This will alter the accuracy of gate settings and cause parts to break.
• To begin spreading, start walking [about 3 mph pace] and pull the bail system down to open gate. - To stop spreading simply let go of the bail and the gate will close.
BAFFLE OPERATING INSTRUCTIONS
- Adjust baffle by hand to block distribution accordingly.
- Use wing nuts to adjust tension on baffles.
NOTE: To avoid overapplication- using the baffle in the down position will disperse product in greater amounts directly below the deflection point. Adjust the gate setting to apply less than the intended amount when using baffle.
STORAGE AND MAINTENANCE
- When finished spreading empty hopper of any remaining material.
- Use garden hose to wash down the spreader after each use.
- Be careful not to direct the spray directly onto the gear box.
- It is recommended that you DO NOT use a power washer on your spreader.
- Allow to dry before storing.
To fold down handle:
- Simply remove the bottom two bolts on the handle
- Loosen two M6 Hex nuts and fold down handle
- Replace two bottom bolts
- Tighten M6 Hex nuts completely
REPLACEMENT PARTS
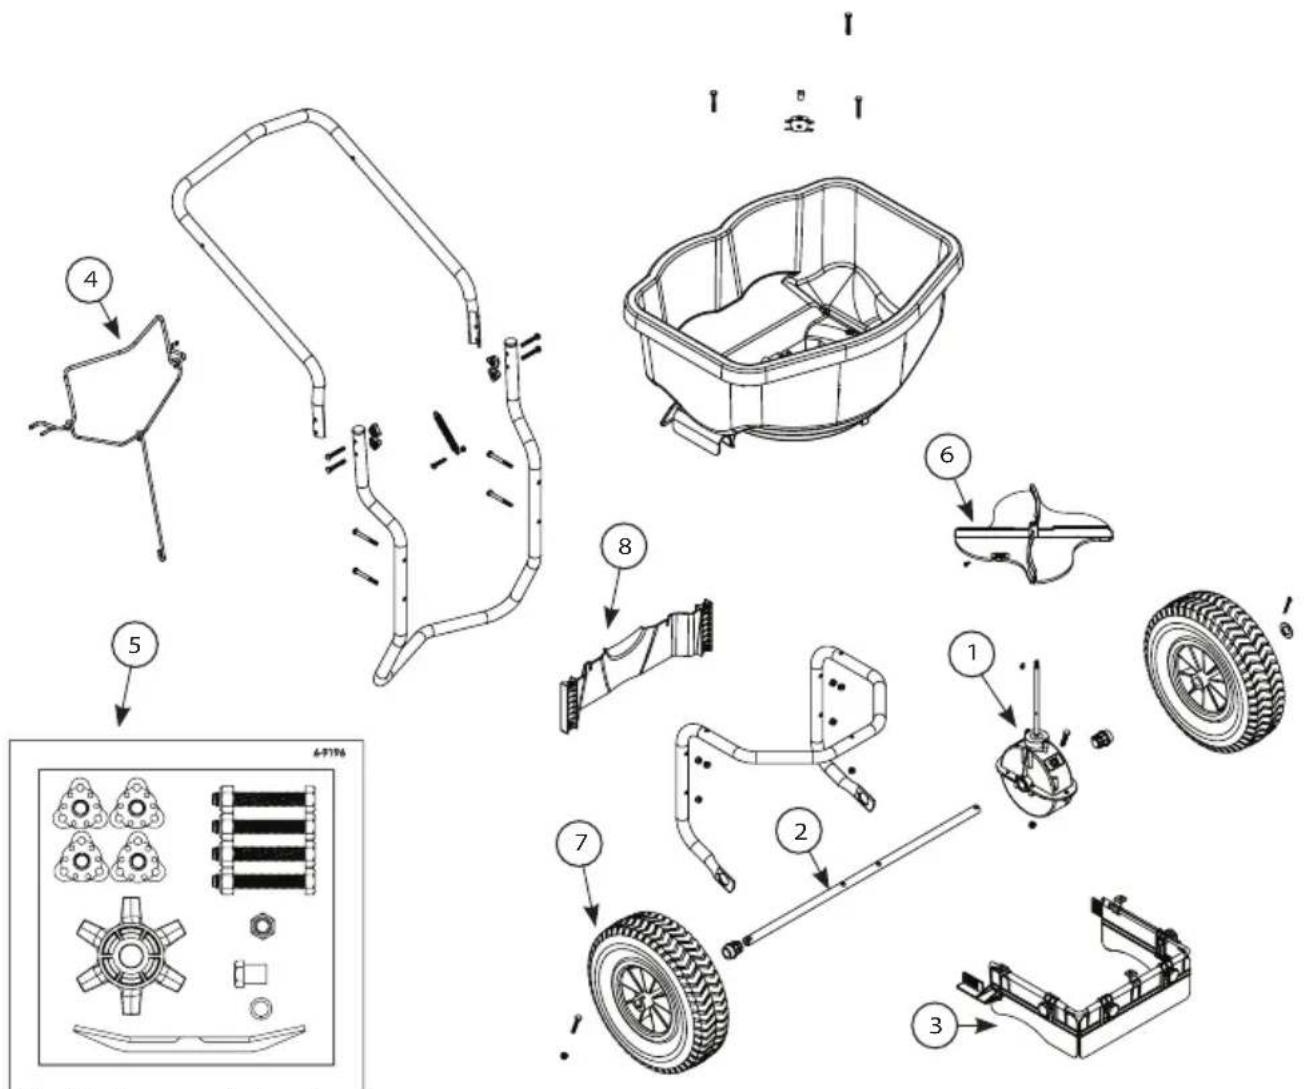
text_image
Exploded view diagram of automotive components with numbered parts and exploded view, including battery pack, wheels, and gear assembly.Note: Not all components shown in kit will be needed for your model
REF NO. PART NO. QTY DESCRIPTION
| 1 6-9071 1 Gear Box Assembly | ||
| 2 6-9040 1 Drive Shaft w/2 bearings | ||
| 3 6-9083 1 Baffle System | ||
| 4 6-9073 1 Bail Assembly | ||
| 5 6-9196-11 Hardware Blister with auger | ||
| 6 6-9061 1 Impeller | ||
| 7 6-9020 1 Wheels w/hardware & instructions | ||
| 8 6-9050 1 Rear Baffle |
APPLICATION CHART
All Season Residential & Professional General Application Guidelines
| SCOTTS | 2 | 2.5 | 3 | 3.25 | 3.5 | 4 | 4.75 | 5 | 5.5 | 6 | 7 | 8 | 9 | 10 | 11 | 12 | 13 | 14 | 15 |
| CHAPIN | 9 | 10 | 11 | 11 | 12 | 13 | 14 | 14 | 15 | 16 | 17 | 19 | 20 | 22 | 23 | 25 | 26 | 28 | 30 |
All Season Residential & Professional General Application Guidelines
| Weed Control | 10-12 |
| Fertilizer | 12-16 |
| Grass Seed-Overseeding | 16-20 |
| Grass Seed-New lawn | 21-27 |
| Salt & Ice-Melt | 28-30 |
For detailed information on how to calibrate your Chapin spreader: visit https://youtu.be/d-RPp8qrM1M
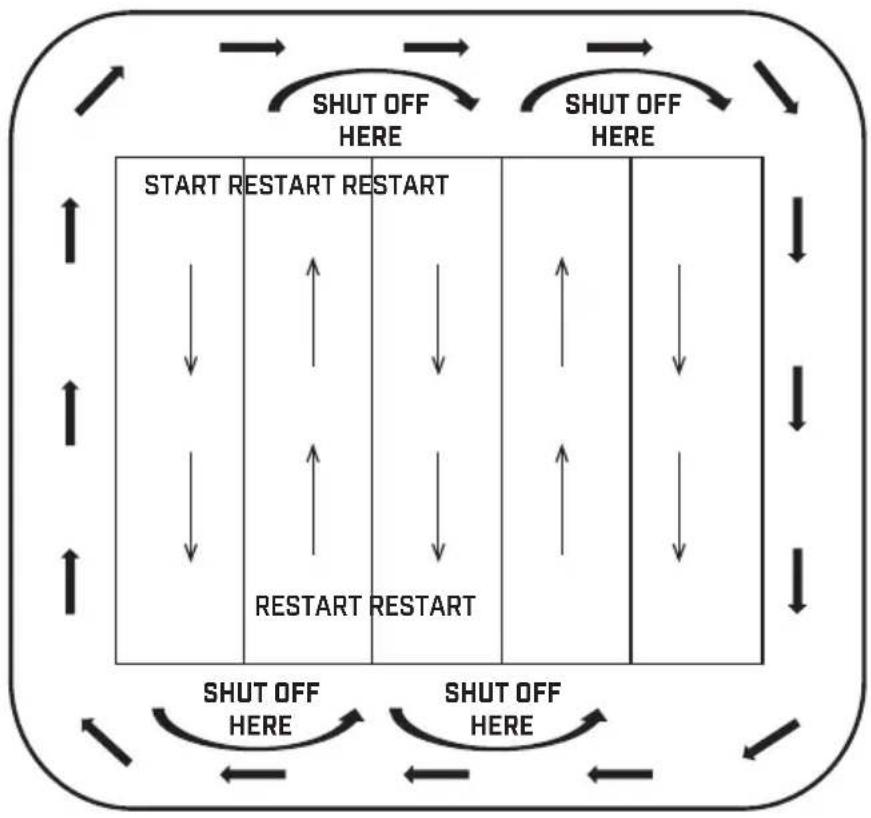
SAMPLE SPREAD PATTERN
flowchart
graph TD
    A["Start"] --> B["ReSTART"]
    B --> C["RESTART"]
    C --> D["ShUT OFF HERE"]
    D --> E["ShUT OFF HERE"]
    E --> F["ShUT OFF HERE"]
    F --> G["ShUT OFF HERE"]
    G --> H["ShUT OFF HERE"]
    H --> I["ShUT OFF HERE"]
    I --> J["ShUT OFF HERE"]
    J --> K["ShUT OFF HERE"]
    K --> L["ShUT OFF HERE"]
    L --> M["ShUT OFF HERE"]
    M --> N["ShUT OFF HERE"]
    N --> O["ShUT OFF HERE"]
    O --> P["ShUT OFF HERE"]
    P --> Q["ShUT OFF HERE"]
    Q --> R["ShUT OFF HERE"]
    R --> S["ShUT OFF HERE"]
    S --> T["ShUT OFF HERE"]
    T --> U["ShUT OFF HERE"]
    U --> V["ShUT OFF HERE"]
    V --> W["ShUT OFF HERE"]
    W --> X["ShUT OFF HERE"]
    X --> Y["ShUT OFF HERE"]
    Y --> Z["ShUT OFF HERE"]
    Z --> A
SaltPRO
ESPARCIDOR PROFESIONAL MANUAL
Failure to do so may result in damage to property and/or person.

text_image
QR code image containing encoded data, no visible human-readable text¡FELICITACIONES!
ACABA DE COMPRAR UN PRODUCTO DE CALIDAD CHAPIN.
REGISTRE SU ESPARCIDOR EN LÍNEA EN WWW.CHAPINMFG.COM/WARRANTY.ASP
VISIT US ON THE INTERNET: WWW.CHAPINMFG.COM
text_image
Technical diagram of automotive components with numbered parts and exploded view, including parts like wheel rim, battery pack, and gear assembly.Failure to do so may result in damage to property and/or person.
text_image
QR code image containing encoded data, no visible human-readable textFélicitations!
VOUS VENEZ D'ACHETER UN PRODUIT DE QUALITÉ CHAPIN.
ENREGISTREZ VOTRE ÉPANDEUR EN LIGNE @ WWW.CHAPINMFG.COM/WARRANTY.ASP
VISIT US ON THE INTERNET: WWW.CHAPINMFG.COM
AVANT DE RETOURNER CE PRODUIT POUR QUELQUE RAISON QUE CE SOIT, VEUILLEZ APPELER :
1-800-950-4458
text_image
Exploded view diagram of automotive components with numbered parts and exploded view, including battery pack, wheels, and gear assembly.TABLEAU D'APPLICATION
You have just purchased a quality Chapin product.
Register Your Sprayer Online@ www.chapinmfg.com/warranty.asp

P.O. Box 549 700 Ellicott St.
Batavia, NY 14021-0549 U.S.A.
1-800-950-4458 www.chapinmfg.com
© 2025 Chapin International, Inc.