
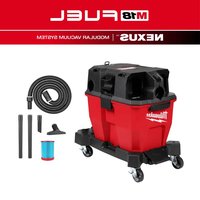
M18 Fuel PACKOUT VACLINK 088820 - Battery MILWAUKEE - Free user manual and instructions
Find the device manual for free M18 Fuel PACKOUT VACLINK 088820 MILWAUKEE in PDF.

| Product Type | Dust Extractor / Cordless Vacuum |
| Brand | Milwaukee |
| Model | M18 Fuel PACKOUT VACLINK (0888-20) |
| Power Source | M18 Battery (36 V DC) or 120 V AC Mains |
| Tank Capacity | 34 L (9 gal) |
| Max Airflow (AC) | 175 ft³/min |
| Max Airflow (DC) | 125 ft³/min |
| Hose Diameter | 36 mm |
| Filter Type | HEPA Filter (2 pieces, part no. 49-90-1968) |
| Dust Bag | Fleece Bag (part no. 49-90-1969) |
| Wireless Technology | VACLINK™ and ONE-KEY™ |
| Connectivity | Pairing with VACLINK™ tools and remotes |
| Adjustable Air Speed | Yes, via + and - buttons |
| Filter Cleaning | Automatic (every 15 s) and manual |
| Low Airflow Indicator | LED indicator and audible alarm |
| Operating Temperature | -18 °C to 40 °C |
| Weight (approximate) | Approximately 9.5 kg (with battery) |
| Dimensions (L x W x H) | Approximately 45 x 40 x 55 cm |
| Maintenance | Clean filters regularly, empty tank, rinse and dry after wet use |
| Safety | Grounding required, do not vacuum flammable liquids, use respiratory protection in dusty environments |
| Spare Parts | HEPA filters, dust bag, hose, accessories available through Milwaukee |
| Repairability | Refer to a Milwaukee authorized service center |
| Warranty | 5 years on tool (battery and charger excluded) |
Frequently Asked Questions - M18 Fuel PACKOUT VACLINK 088820 MILWAUKEE
User questions about M18 Fuel PACKOUT VACLINK 088820 MILWAUKEE
0 question about this device. Answer the ones you know or ask your own.
Ask a new question about this device
Download the instructions for your Battery in PDF format for free! Find your manual M18 Fuel PACKOUT VACLINK 088820 - MILWAUKEE and take your electronic device back in hand. On this page are published all the documents necessary for the use of your device. M18 Fuel PACKOUT VACLINK 088820 by MILWAUKEE.
USER MANUAL M18 Fuel PACKOUT VACLINK 088820 MILWAUKEE
WARNING To reduce the risk of injury, user must read and understand operator's manual.
IMPORTANT SAFETY INSTRUCTIONS
WARNING
Failure to follow the warnings and instructions may result in electric shock, fire and/or serious injury. When using an electrical
appliance, basic precautions should always be followed, including the following: READ ALL INSTRUCTIONS BEFORE USING THIS APPLIANCE.
WARNING
TO REDUCE THE RISK OF FIRE, ELECTRIC SHOCK OR INJURY:
- Do not leave appliance when plugged in. Unplug from outlet when not in use and before servicing. Connect to a properly grounded outlet only. See Grounding Instructions.
- Do not expose to rain – store indoors.
- Do not allow to be used as a toy. Close attention is necessary when used by or near children.
- Not intended for use by persons (including children) with reduced physical, sensory or mental capabilities, or lack of experience and knowledge. For use only by persons who have been instructed in its correct usage. Supervision is required.
- Use only as described in this manual. Use only manufacturer's recommended attachments.
- Do not use with damaged cord or plug. If appliance is not working as it should, has been dropped, damaged, left outdoors, or dropped into water, return it to a service center.
- Do not pull or carry by cord, use cord as handle, close a door on cord, or pull cord around sharp edges or corners. Do not run appliance over cord.
- Keep cord away from heated surfaces.
- Do not unplug by pulling on cord. To unplug grasp the plug not the cord.
- Do not handle battery packs, plug, or appliance with wet hands. Do not wrap cord around hand or fingers.
- Do not put any object into openings. Do not use with any opening blocked; keep free of dust, lint, hair, and anything else that may reduce air flow.
- Keep hair, loose clothing, fingers, and all parts of body away from openings and moving parts.
- Do not pick up anything that is burning or smoking such as cigarettes, matches, or hot ashes.
- Do not use without filters in place.
- Turn off all controls before plugging in or unplugging tool.
- Ensure all latches are secured before transporting. Do not transport with liquid in the tank.
- Use extra care when cleaning on stairs.
- Do not use tool as a step or ladder.
- Do not use to pick up flammable or combustible liquids such as gasoline or use in areas where they may be present.
- Dust extractors have motors and other parts that can produce arcs or sparks during normal use. Do not use within 20 feet of areas where explosive gases may be present (such as gasoline pumps and places where liquids like paint thinners, cleaners, solvents, etc. are stored).
- Do not use as a water pump. Dust extractor is intended to vacuum water/air mixture.
- Unplug power cord whenever motor head is removed from tank.
- Do not use in the presence of explosive dust, liquids or vapors.
- This product is suitable for collection of silica dust when used in accordance with these instructions.
• To reduce the risk of health hazards from other vapors or dust, do not vacuum carcinogenic, toxic or hazardous materials such as asbestos, arsenic, barium, beryllium, pesticides or other health endangered materials.
- Do not use where oxygen or anesthetics are used. - Wear electrically insulated footwear, such as rubber boots, when vacuuming wet material.
- Use only three-wire outdoor extension cords that have three-prong grounding plugs and grounding receptacles that accept the appliance's plug.
- Before using the dust extractor, read this operator's manual, the tool's manual, and all labels on the dust extractor and tool.
- Chemical Burn Hazard. Keep coin cell battery away from children.
WARNING
To reduce the risk of injury, when working in dusty situations, wear
appropriate respiratory protection or use an OSHA compliant dust extraction solution.
• Always use common sense and be cautious when using tools. It is not possible to anticipate every situation that could result in a dangerous outcome. Do not use this tool if you do not understand these operating instructions or you feel the work is beyond your capability; contact Milwaukee Tool or a trained professional for additional information or training.
- Maintain labels and nameplates. These carry important information. If unreadable or missing, contact a MILWAUKEE service facility for a replacement.
WARNING
Some dust created by power sanding, sawing, grinding, drilling, and
other construction activities contains chemicals known to cause cancer, birth defects or other reproductive harm. Some examples of these chemicals are:
- lead from lead-based paint
• crystalline silica from bricks and cement and other masonry products, and
• arsenic and chromium from chemically-treated lumber.
Your risk from these exposures varies, depending on how often you do this type of work. To reduce your exposure to these chemicals: work in a well ventilated area, and work with approved safety equipment, such as those dust masks that are specially designed to filter out microscopic particles.
Federal Communications Commission Pursuant to part 15.21 of the FCC Rules, y
are cautioned that changes or modifications not expressly approved by the party responsible for compliance could void your authority to operate the product.
This equipment has been tested and found to comply with the limits for a Class B digital device, pursuant to Part 15 of the FCC Rules. These limits are designed to provide reasonable protection against harmful interference in a residential installation. This equipment generates, uses and can radiate radio frequency energy and, if not installed and used in accordance with the instructions, may cause harmful interference to radio communications. However, there is no guarantee that interference will not occur in a particular installation. If this equipment does cause harmful interference to radio or television reception, which can be determined by turning the equipment off and on, the user is encouraged to try to correct the interference by one or more of the following measures:
- Reorient or relocate the receiving antenna.
- Increase the separation between the equipment and receiver.
- Connect the equipment into an outlet on a circuit different from that to which the receiver is connected.
- Consult the dealer or an experienced radio/TV technician for help.
This device complies with part 15 of the FCC Rules and ISED-Canada's license exempt RSS standards. Operation is subject to the following two conditions: 1) This device may not cause harmful interference, and 2) This device must accept any interference received, including interference that may cause undesired operation.
READ AND SAVE ALL INSTRUCTIONS FOR FUTURE USE
FOR COMMERCIAL USE ONLY.
SYMBOLGY

Direct Current
Alternating Current


Decrease Air Speed
Increase Air Speed

VACLINK Tool has VACLINK™ technology

Locked
Unlocked
c UL us UL Listing for Canada and U.S.
SPECIFICATIONS
Cat. No. 0888-20
Volts.... 36 DC
Battery Type ......M18™
Charger Type....M18™
Input Volts....120 AC
Input Amps....11.5
Input Hertz....60
Input Watts (AC) 1440
Input Watts (DC)....750
Tank Capacity 9-gallon (34 L)
Max Air Flow (AC)....175 CFM
Max Air Flow (DC) 125 CFM
Hose Diameter....36 mm
HEPA Filter - 2PK 49-90-1968
Fleece Dust Bag - 5PK......49-90-1969
FCC ID: P36-0888
IC: 25187-0888
Recommended Ambient
Operating Temperature....0°F to 104°F
FUNCTIONAL DESCRIPTION
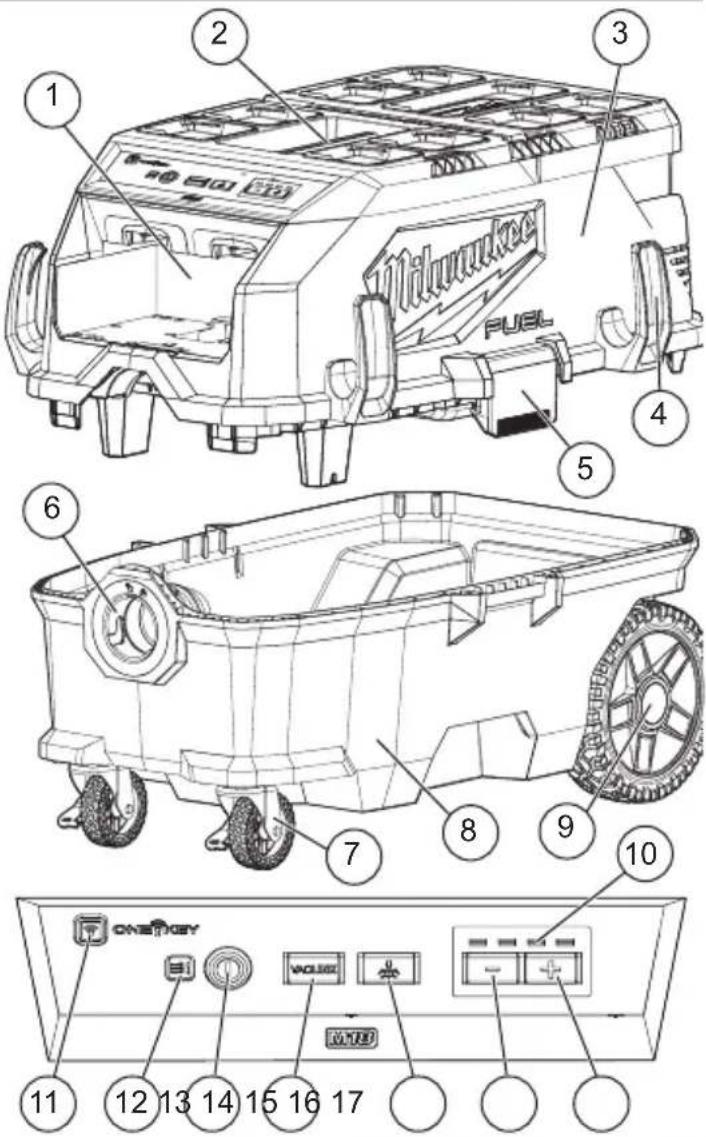
- Batteries bay
- Handle
- Motor housing
- Hose hook
- Housing latch
- Inlet fitting
- Castors
- Tank
- Wheel
-
Air speed indicator
-
ONE-KEY™
- Low airflow
- On/Off
- VACLINK™ pairing button
- Filter cleaning button
- Decrease air speed
- Increase air speed
- VACLINK™ pairing button
- On/Off
- Filters
- AC inlet
GROUNDING INSTRUCTIONS
This appliance must be grounded. If it should malfunction or breakdown, grounding provides a path of least resistance for electric current to reduce the risk of electric shock. This appliance is equipped with a cord having an equipment-grounding conductor and grounding plug. The plug must be inserted into an appropriate outlet that is properly installed and grounded in accordance with all local codes and ordinances.
WARNING
Improper connection of the equipment-grounding conductor can result in a risk of electric shock. Check with a qualified electrician or service person if you are in doubt as to whether the outlet is properly grounded. Do not modify the plug provided with the appliance - If it will not fit the outlet, have a proper outlet installed by a qualified electrician.
This appliance is for use on a nominal 120-volt circuit, and has a grounded plug that looks like the plug illustrated in sketch A. A temporary adapter that looks like the adapter illustrated in sketches B and C may be used to connect this plug to a 2-pole receptacle as shown in sketch B if a properly grounded outlet is not available. The temporary adapter should be used only until a properly grounded outlet (sketch A) can be installed by a qualified electrician. The green colored rigid ear, lug or the like extending from the adapter must be connected to a permanent ground such as a properly grounded outlet box cover. Whenever the adapter is used, it must be held in place by a metal screw.
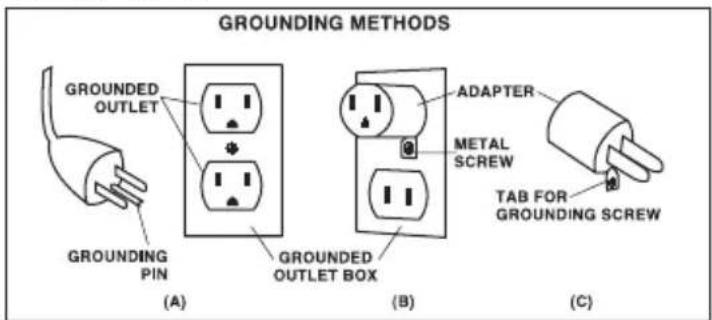
IN CANADA, THE USE OF A TEMPORARY ADAPTER IS NOT PERMITTED BY THE CANADIAN ELECTRICAL CODE. Make sure that the appliance is connected to an outlet having the same configuration as the plug. No adapter should be used with this appliance.
EXTENSION CORDS
Grounded tools require a three wire extension cord. As the distance from the supply outlet increases, you must use a heavier gauge extension cord. Using extension cords with inadequately sized wire causes a serious drop in voltage, resulting in loss of power and possible tool damage. Refer to the table shown to determine the required minimum wire size.
The smaller the gauge number of the wire, the greater the capacity of the cord. For example, a 14 gauge cord can carry a higher current than a 16 gauge cord. When using more than one extension cord to make up the total length, be sure each cord contains at least the minimum wire size required. If you are using one extension cord for more than one tool, add the nameplate amperes and use the sum to determine the required minimum wire size.
Guidelines for Using Extension Cords
- If you are using an extension cord outdoors, be sure it is marked with the suffix "W-A" ("W" in Canada) to indicate that it is acceptable for outdoor use.
- Be sure your extension cord is properly wired and in good electrical condition. Always replace a damaged extension cord or have it repaired by a qualified person before using it.
- Protect your extension cords from sharp objects, excessive heat and damp or wet areas.
| Recommended Minimum Wire Gauge For Extension Cords* | |||||
| NameplateAmps | Extension Cord Length | ||||
| 25' 50' | 75' 100' | 150' | |||
| 0 - 2.0 | 18 | 18 | 18 | 18 | 16 |
| 2.1 - 3.4 | 18 | 18 | 18 | 16 | 14 |
| 3.5 - 5.0 | 18 | 18 | 16 | 14 | 12 |
| 5.1 - 7.0 | 18 | 16 | 14 | 12 | 12 |
| 7.1 - 12.0 | 16 | 14 | 12 | 10 | -- |
| 12.1 - 16.0 | 14 | 12 | 10 | -- | -- |
| 16.1 - 20.0 | 12 | 10 | -- | -- | -- |
* Based on limiting the line voltage drop to five volts at 150% of the rated amperes.
ASSEMBLY
WARNING
Recharge only with the charger specified for the battery. For specific
charging instructions, read the operator's manual supplied with the charger and battery.
Removing/Inserting the Battery
To remove the battery, push in the release buttons and pull the battery pack away from the tool.
WARNING
Always remove the battery pack any time the tool is not in use.
To insert the battery, slide the pack into the body of the tool. Make sure it latches securely into place.
WARNING
Only use accessories specifically recommended for this tool. Others
may be hazardous.
Inserting/Removing Extension Cords to Operate on AC Power
To operate the dust extractor on AC Power, plug in a suitable extension cord into the dust extractor.
NOTE: When an extension cord is plugged into the dust extractor, the dust extractor will automatically run on AC power.
To disconnect the extension cord, press the Power button to turn off the dust extractor, then remove the cord from the outlet.
Unpack accessories and parts from the tank by unlatching the motor housing and pulling it up and off the tank.
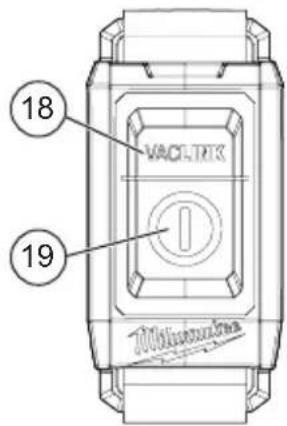
VACLINK™
VACLINK ^™ is a wireless dust control technology that allows a compatible tool and vacuum/dust extractor (vacuum) to connect to each other.
A signal from the tool will turn the vacuum on and off. The tool can be connected to one vac at a time. The vacuum can be connected to multiple remotes or tools at at time.
Pairing a VACLINK™ Remote
If the VACLINK™ remote is not connected to the dust extractor, pairing can be setup by:
- Insert battery packs into the dust extractor.
- Press the VÄCLINK™ button on the dust extractor and the remote until both LED's begin to flash. A steady green light on both the dust extractor and the remote will confirm that the unit is paired.
NOTE: Remote needs to be within close proximity to ensure remote is receiving signal from the dust extractor. This procedure will time out after 30 seconds if the dust extractor is not paired and will enter standby mode for inactivity.
To confirm that the remote has paired with the dust extractor successfully, press the VACLINK™ button on remote and the VACLINK™ button on the dust extractor will light. Multiple remotes can be paired to one dust extractor.
Pairing a VACLINK™ Tool
Consult the VACLINK™ tool's manual for pairing to the 0888-20.
- Install a battery pack on the tool and connect the vacuum to a power source.
- Press and hold the pairing buttons on the tool and vacuum each for >1 second.
VACLINK™ LED:
- Searching - flashing green
-
Paired - solid green
-
See "Troubleshooting" if tool and vacuum do not pair successfully.
-
To unpair, press and hold the pairing button on the tool for >1 second.
VACLINK™ LED:
- Unpaired - off
Unpairing VACLINK™ from all connected devices
- To remove/erase all paired devices from dust extractor, press and hold the VACLINK™ button on the remote until the LED has a flashing red light.
- Press and hold the VACLINK™ button on the dust extractor until the LED has a flashing red light.
If the remote and the dust extractor are not paired after 30 seconds, this procedure will time out and enter standby mode for user inactivity.
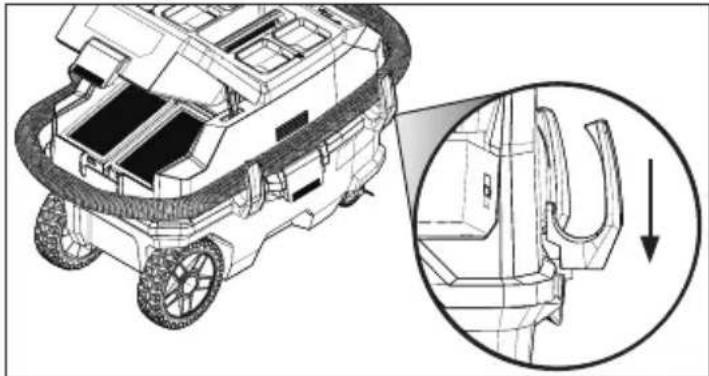
Installing the Hose Hooks
- Slide the four hose hooks onto the mounting brackets.
- Wrap hose around head and on top of hose hooks for storage.
natural_image
Technical line drawing of a vehicle's internal structure with an inset magnified detail showing a curved component (no text or symbols)Installing/Changing the Fleece Dust Bag
CAUTION
To avoid spilled debris when picking up heavy or sharp materials monitor
bag volume and do not overfill.
For increased filter life and ease of cleanup, use a fleece dust bag to collect fine dust particles
- WARNING! Unplug and remove batteries to avoid starting the tool.
- To install, release the tank latches and remove the motor housing.
- Place the cardboard dust bag inlet around the tank inlet with the cardboard tab facing upwards.
- Slide the cardboard dust bag inlet over the ridge of the tank inlet to secure.
- Spread out the dust bag in the tank. Replace the motor housing and secure latches.
- To remove, release the tank latches and remove motor housing.
- Slide the dust bag away from the tank inlet and then up and out to remove from the tank.
- Pull the cardboard tab until the dust bag inlet is closed. Dust bag is now sealed and can be properly disposed.
Replace fleece dust bag once the bag is at full capacity, suction decreases or dust bag is damaged.
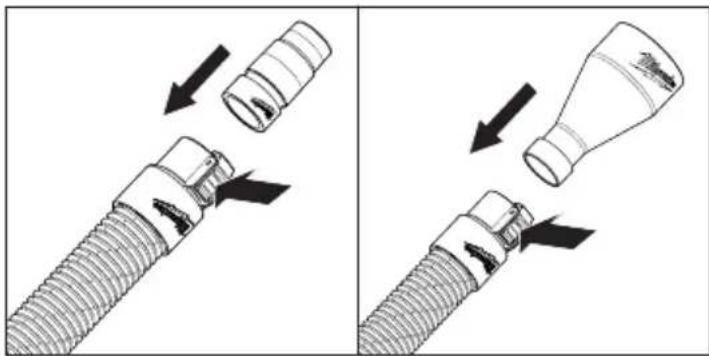
Installing the Hose and Accessories
- Fit the hose into the inlet and twist to secure.

natural_image
Technical line drawing of a mechanical assembly with a cylindrical component and mounting bracket (no text or symbols)- Press the button and insert the appropriate tool or accessory onto the hose until the latch clicks to secure.
natural_image
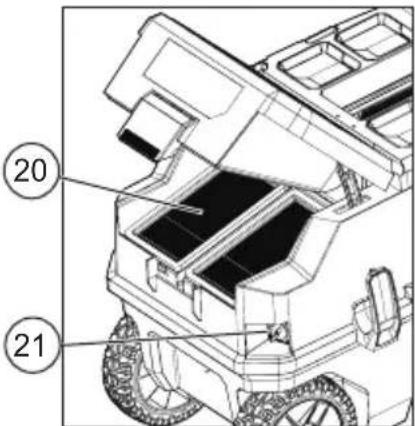
Two-step illustration showing a connector being inserted into a plastic bottle, with arrows indicating the process (no text or symbols present)Removing/Installing the Filters
Filters can become clogged during heavy use. To maintain the efficiency of the dust extractor, empty the tank, change the filter bag, and clean both of the filters periodically. MILWAUKEE suggests cleaning the filters after 200 holes (at 5/8" diameter, 4" deep) or an equivalent amount of produced dust.
To remove the filters:
- Turn off the dust extractor.
- WARNING! Unplug and remove batteries to avoid starting the tool.
- Unlatch and open the filter compartment.
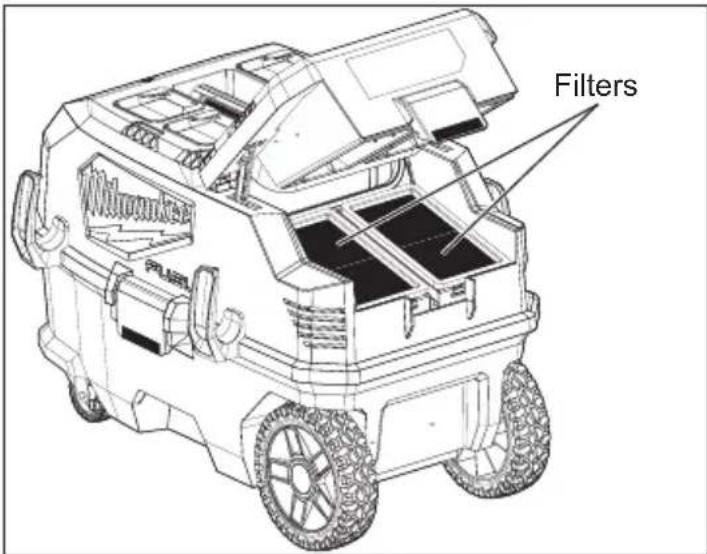
- Pull the filters away from the extractor.
- To clean the filter, while holding over a trash can, tap gently to dislodge any remaining dust.
- Water may be used to clean the filter. If cleaning filters with water, let filters completely dry before using with the extractor.
- Replace filters if damaged or airflow decreases. See "Specifications" for replacement part number.
- To install the filters, reverse the procedure.
ONE-KEY™
To learn more about the ONE-KEY™ functionality for this tool, go to milwaukeeetool.com/One-Key. To download the ONE-KEY™ app, visit the App Store® or Google Play™ from a smart device.
| ONE-KEYTM Indicator | |
| Solid Blue Wi | reless mode is active and ready to be configured via the ONE-KEYTM app. |
| Blinking Blue | Tool is actively communicating with the ONE-KEYTM app. |
| Blinking Red | Tool is in security lockout and can be unlocked by the owner via the ONE-KEYTM app. |
OPERATION
WARNING
Always wear proper eye protection marked to comply with ANSI Z87.1.
Selecting Air Speed
To increase or decrease the air flowspeed, use the air speed control buttons. Press the - to decrease the air flow speed, and press the + to increase the airflow speed.
Automatic Filter Cleaning
The dust extractor has an automatic filter cleaning system. For improved performance, it is recommended to turn on automatic filter cleaning when using the dust extractor. Press the filter cleaning button to turn on the filter cleaning function. The filter cleaning system will clean the filters about every 15 seconds during use.
Manual Filter Cleaning
During extremely heavy or long uses, manual cleaning may be necessary.
To manually clean the filter:
- Turn on dust extractor.
- Turn on automatic filter cleaning.
- Place the palm of your hand over the hose end for about 30 seconds.
- Turn off the dust extractor.
- If manual cleaning does not restore full suction, replace the filter.
Low Airflow
The low airflow LED will light and an alert tone is played when an obstruction occurs and continues to play until obstruction is cleared or the dust extractor is turned off.
Starting and Stopping Dust Extractor
To start the dust extractor, press the On/Off button on the tool, on a paired remote, or start a paired VACLINK™ tool.
To stop the dust extractor, press the On/Off button on the tool, on a paired remote, or stop a paired VACLINK™ tool.
Using VACLINK™
When using VACLINK™, one person must control both the dust extractor and the paired remote or tool. If the extractor becomes clogged, the operator must be able to turn the extractor off to prevent damage to the extractor.
- Once paired, set up the vacuum hose, work area, and job as needed, following the tool and vacuum instructions.
- Turn on the tool. VACLINK™ will automatically turn on the vacuum.
- Turn off the tool and the vacuum will automatically turn off after a short delay.
- See Troubleshooting if tool and vacuum do not operate as expected.
Pausing VACLINK™
VACLINK™ can be paused to halt the connection. NOTE: When the tool's battery pack is removed and then reinstalled, the pause is cancelled and VACLINK™ will be active.
To pause or unpause, quickly press and release the pairing button (<1 second)
VACLINK™ LED:
- Paused - Flashes red, then off
- Unpaused - Flashes red, then solid green
Picking Up Dry Materials
Make sure that the tank is dry before using the dust extractor to pick up dry materials. If the dust extractor tank is wet, run the dust extractor for about 5 minutes (without picking up anything) to dry the inside of the tank.
Picking Up Wet Materials
WARNING
To reduce the risk of electric shock, DO NOT pick up wet materials
unless tank has been cleaned of dust and the dust bag has been removed. Turn off the extractor if foam or liquid escapes from the tool.
- WARNING! Unplug and remove batteries to avoid starting the tool.
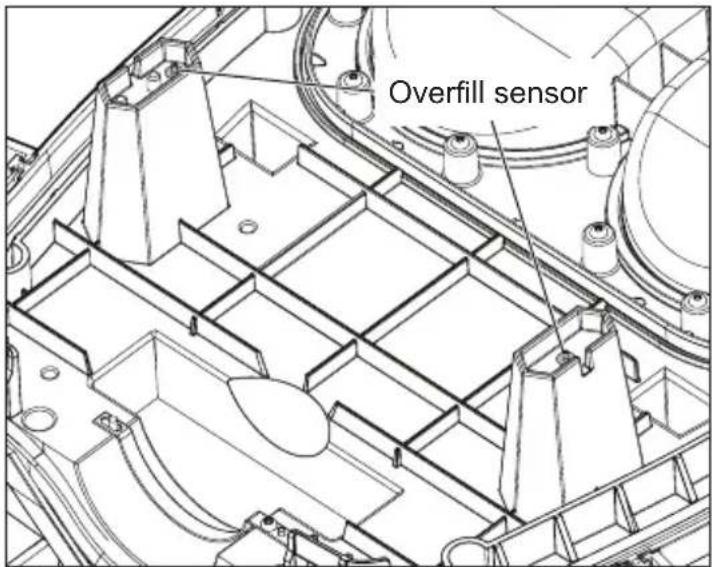
- Release the tank latches and remove the motor housing.
- Remove dust bag and clean tank.
- On the underside of the motor housing, ensure the overfill sensors are dry and clean of debris. The overfill sensors shut off suction when the tank is full.
-
Replace motor housing and latch in place.
-
Turn on the dust extractor.
-
Suction wet materials.
- When finished, turn off the dust extractor.
- WARNING! Unplug and remove batteries to avoid starting the tool.
- Release the tank latches and remove the motor housing.
- To drain liquid, lock wheels and carefully dump contents. Do not store dust extractor with liquid in tank.
- Rinse and dry tank. Run dust extractor for 5 minutes to ensure tank is thoroughly dry before picking up dry materials.
| Troubleshooting | |
| Pairing is unsuccessful | Unplug and remove batteries from tool and power from vacuum for 1 minute.Retry the pairing procedure. |
| Check the vacuum is in range of tool.Retry the pairing procedure. | |
| Move tool and vacuum to an area with lower wireless traffic.Retry the pairing procedure. | |
| If VACLINKTM is still unable to pair, contact authorized MILWAUKEE service center. | |
| VACLINKTM not turning vac on/off | VACLINKTM is paused on the tool.Unpause VACLINKTM. |
| The vacuum is not connected to a power supply.Connect vac to a power supply. | |
| The tool and vacuum are out of range of each other.Move vacuum and tool closer. | |
| Battery low.Replace battery in remote.Replace batteries on tool. | |
| If VACLINKTM still does not turn the vacuum on/off, unpair and re-pair the tool and vacuum. | |
| If VACLINKTM still does not turn the vacuum on/off, contact authorized MILWAUKEE service center. | |
MAINTENANCE
WARNING
To reduce the risk of in-jury, always unplug the charger and remove the
battery packs from the charger or machine before performing any maintenance. Never disassemble the battery packs, charger, or machine, except as provided in these instructions. Contact a MILWAUKEE service facility for all other repairs. Never use extractor without filters properly installed.
Maintaining the Filters
Filters can become clogged during heavy use. To maintain the efficiency of the dust extractor, empty the tank, change the filter bag, and clean both of the filters periodically. MILWAUKEE suggests cleaning the filters after 200 holes (at 5/8" diameter, 4" deep) or an equivalent amount of produced dust.
Maintaining Tool
Keep the tool, battery packs and charger in good repair by adopting a regular maintenance program. Inspect the tool for issues such as undue noise, misalignment or binding of moving parts, breakage of parts, or any other condition that may affect the tool operation. Return the tool, battery pack, and charger to a MILWAUKEE service facility for repair. After six months to one year, depending on use, return the tool, battery pack and charger to a MILWAUKEE service facility for inspection.
If the tool does not start or operate at full power with a fully charged battery pack, clean the contacts on the battery packs. If the tool still does not work properly, return the tool, charger and battery packs, to a MILWAUKEE service facility for repairs.
Internal Coin Cell Battery
WARNING
Chemical Burn Hazard. This device

contains a lithium button/coin cell battery. A new or used battery can cause severe internal burns and lead as little as 2 hours if swallowed or entered. Always secure the battery cover. If it close securely, stop using the device, batteries, and keep it away from children think batteries may have been swallowed under the body, seek immediate medicine
An internal coin cell battery is used to facilitate full ONE-KEY ^™ functionality.
To replace the coin cell battery:
- WARNING! Unplug and remove batteries to avoid starting the tool.
- Loosen the screw(s) and open the coin cell battery door.
- Remove the old coin cell battery, keep it away from children, and dispose of it properly.
- Insert the new coin cell battery (3V CR2032), with the positive side facing up.
- Close the battery door and tighten the screw(s) securely.
WARNING
To reduce the risk of personal injury and damage, never immerse
your tool, battery pack or charger in liquid allow a liquid to flow inside them.
Cleaning
Clean dust and debris from vents. Keep handles clean, dry and free of oil or grease. Use only mild soap and a damp cloth to clean, since certain cleaning agents and solvents are harmful to plastics and other insulated parts. Some of these include gasoline, turpentine, lacquer thinner, paint thinner, chlorinated cleaning solvents, ammonia and household detergents containing ammonia. Never use flammable or combustible solvents around tools.
Storage
Before storing the dust extractor, always empty and clean the tank. Never allow debris to sit in the tank for any extended period of time. The dust extractor should be stored indoors.
Repairs
For repairs, return the tool to the nearest authorized service center.
ACCESSORIES
WARNING
Use only recommended accessories. Others may be hazardous.
For a complete listing of accessories, go online to www.milwaukeetool.com or contact a distributor.
SERVICE - UNITED STATES
1-800-SAWDUST (1.800.729.3878)
Monday-Friday, 7:00 AM - 6:30 PM CST or visit www.milwaukeetool.com
Contact Corporate After Sales Service Technical Support with technical, service/repair, or warranty questions.
Email: metproductsupport@milwaukeeetool.com
Become a Heavy Duty Club Member at www.milwaukeetool.com to receive important notifications regarding your tool purchases.
SERVICE - CANADA
Milwaukee Tool (Canada) Ltd 1.800.268.4015
Monday-Friday, 7:00 AM - 4:30 PM CST or visit www.milwaukeeetool.ca
LIMITED WARRANTY USA & CANADA
This MILWAUKEE power tool* is warranted to the original purchaser from an authorized MILWAUKEE distributor only to be free from defects in material and workmanship. Subject to certain exceptions, MILWAUKEE will repair or replace any part on this power tool which, after examination, is determined by MILWAUKEE to be defective in material or workmanship for a period of five (5) years after the date of purchase unless otherwise noted. Return of the power tool to a MILWAUKEE factory Service Center location or MILWAUKEE Authorized Service Station, freight prepaid and insured, is required. A copy of the proof of purchase should be included with the return product. This warranty does not apply to damage that MILWAUKEE determines to be from repairs made or attempted by anyone other than MILWAUKEE authorized personnel, misuse, alterations, abuse, normal wear and tear, lack of maintenance, or accidents. Normal Wear: Many power tools need periodic parts replacement and service to achieve best performance. This warranty does not cover repair when normal use has exhausted the life of a part including, but not limited to, carriage gears, chucks, brushes, cords, saw shoes, blade clamps, o-rings, seals, bumpers, driver blades, pistons, strikers, lifters, and bumper cover washers. *This warranty does not cover battery packs or all power tools. Refer to the separate and distinct warranties available for those products. The warranty period for the LED in the LED Work Light (49-24-0171) and the LED Upgrade Bulb (49-81-0090) is the lifetime of the product subject to the limitations above. If during normal use the LED or LED Upgrade Bulb fails, the part will be replaced free of charge. Warranty Registration is not necessary to obtain the applicable warranty on a MILWAUKEE power tool product. The manufacturing date of the product will be used to determine the warranty period if no proof of purchase is provided at the time warranty service is requested. ACCEPTANCE OF THE EXCLUSIVE REPAIR AND REPLACEMENT REMEDIES DESCRIBED HEREIN IS A CONDITION OF THE CONTRACT FOR THE PURCHASE OF EVERY MILWAUKEE PRODUCT. IF YOU DO NOT AGREE TO THIS CONDITION, YOU SHOULD NOT PURCHASE THE PRODUCT. IN NO EVENT SHALL MILWAUKEE BE LIABLE FOR ANY INCIDENTAL, SPECIAL, CONSEQUENTIAL, OR PUNITIVE DAMAGES, OR FOR ANY COSTS, ATTORNEY FEES, EXPENSES, LOSSES OR DELAYS ALLEGED TO BE AS A CONSEQUENCE OF ANY DAMAGE TO, FAILURE OF, OR DEFECT IN ANY PRODUCT INCLUDING, BUT NOT LIMITED TO, ANY CLAIMS FOR LOSS OF PROFITS. SOME STATES DO NOT ALLOW THE EXCLUSION OR LIMITATION OF INCIDENTAL OR CONSEQUENTIAL DAMAGES, SO THE ABOVE LIMITATION OR EXCLUSION MAY NOT APPLY TO YOU. THIS WARRANTY IS EXCLUSIVE AND IN LIEU OF ALL OTHER EXPRESS WARRANTIES, WRITTEN OR ORAL. TO THE EXTENT PERMITTED BY LAW, MILWAUKEE DISCLAIMS ANY IMPLIED WARRANTIES, INCLUDING WITHOUT LIMITATION ANY IMPLIED WARRANTY OF MERCHANTABILITY OR FITNESS FOR A PARTICULAR USE OR PURPOSE; TO THE EXTENT SUCH DISCLAIMER IS NOT PERMITTED BY LAW, SUCH IMPLIED WARRANTIES ARE LIMITED TO THE DURATION OF THE APPLICABLE EXPRESS WARRANTY AS DESCRIBED ABOVE. SOME STATES DO NOT ALLOW LIMITATIONS ON HOW LONG AN IMPLIED WARRANTY LASTS, SO THE ABOVE LIMITATION MAY NOT APPLY TO YOU, THIS WARRANTY GIVES YOU SPECIFIC LEGAL RIGHTS, AND YOU MAY ALSO HAVE OTHER RIGHTS WHICH VARY FROM STATE TO STATE.
This warranty applies to product sold in the U.S.A. and Canada only. Please consult the 'Service Center Search' in the Parts & Service section of MILWAUKEE's website www.milwaukeetool.com or call 1.800.SAWDUST (1.800.729.3878) to locate your nearest service facility for warranty and non-warranty service on a MILWAUKEE power tool.
INSTRUCTIONS IMPORTANTES CONCERNANT LA SÉCURITÉ
AVERTISSEMENT
natural_image
Technical line drawing of a vehicle's internal components, showing a close-up and detail view (no text or symbols)natural_image
Technical line drawing of a mechanical assembly with no visible text or symbolsnatural_image
Two-step illustration showing a connector being inserted into a plastic bottle, with arrows indicating the process (no text or symbols present)Milwaukee Tool (Canada) Ltd 1.877.948.2360
Monday-Friday, 7:00 AM - 4:30 PM CST
www.milwaukeetool.ca
GARANTIE LIMITÉE- AUX ÉTATS-UNIS ET AU CANADA
Federal Communications Commission
natural_image
Technical line drawing of a vehicle chassis with a magnified inset showing a cutaway view (no text or symbols)natural_image
Technical line drawing of a mechanical assembly with a cylindrical component and mounting bracket (no text or symbols)natural_image
Two-step illustration showing a connector being inserted into a plastic bottle, with arrows indicating the process (no text or symbols present)Lunes a Viernes (9am a 6pm)
13135 West Lisbon Road
Brookfield, WI 53005 USA
58140434d2
961014881-02(A)
02/25
Printed in

- IMPORTANT SAFETY INSTRUCTIONS
- WARNING
- Federal Communications Commission Pursuant to part 15.21 of the FCC Rules, y
- READ AND SAVE ALL INSTRUCTIONS FOR FUTURE USE
- SYMBOLGY
- SPECIFICATIONS
- FUNCTIONAL DESCRIPTION
- GROUNDING INSTRUCTIONS
- EXTENSION CORDS
- Guidelines for Using Extension Cords
- ASSEMBLY
- Removing/Inserting the Battery
- Inserting/Removing Extension Cords to Operate on AC Power
- VACLINK™
- Pairing a VACLINK™ Remote
- Pairing a VACLINK™ Tool
- Unpairing VACLINK™ from all connected devices
- Installing the Hose Hooks
- Installing/Changing the Fleece Dust Bag
- CAUTION
- bag volume and do not overfill.
- Installing the Hose and Accessories
- Removing/Installing the Filters
- ONE-KEY™
- OPERATION
- Selecting Air Speed
- Automatic Filter Cleaning
- Manual Filter Cleaning
- Low Airflow
- Starting and Stopping Dust Extractor
- Using VACLINK™
- Pausing VACLINK™
- Picking Up Dry Materials
- Picking Up Wet Materials
- MAINTENANCE
- Maintaining the Filters
- Maintaining Tool
- Internal Coin Cell Battery
- Cleaning
- Storage
- Repairs
- ACCESSORIES
- SERVICE - UNITED STATES
- 1-800-SAWDUST (1.800.729.3878)
- SERVICE - CANADA
- Milwaukee Tool (Canada) Ltd 1.800.268.4015
- LIMITED WARRANTY USA & CANADA
- INSTRUCTIONS IMPORTANTES CONCERNANT LA SÉCURITÉ
- AVERTISSEMENT
- Milwaukee Tool (Canada) Ltd 1.877.948.2360
- GARANTIE LIMITÉE- AUX ÉTATS-UNIS ET AU CANADA
- Federal Communications Commission
Brand : MILWAUKEE
Model : M18 Fuel PACKOUT VACLINK 088820
Category : Battery