
Kualo - Pet feeder EBI - Free user manual and instructions
Find the device manual for free Kualo EBI in PDF.
| Product Type | Automatic pet feeder with camera |
| Brand | EBI |
| Model | Kualo |
| Dimensions | 21 x 14.8 x 27.8 cm |
| Weight | 1 kg |
| Reservoir Capacity | 3.5 L |
| Power Supply | 5V 1A (DC adapter) or 4 AA batteries (not included) |
| Power Consumption | 5 W |
| Food Type | Dry food, kibble 5 to 10 mm |
| Portion Size | 20 g per portion |
| Suitable for | Cats and dogs |
| Main Functions | Meal scheduling via app, video camera, manual dispensing, voice recording |
| Connectivity | Wi-Fi 2.4 GHz, Bluetooth |
| App | Smart Life (iOS/Android) |
| Care and Cleaning | Lid, stainless steel bowl, bowl base, and lock are dishwasher safe; reservoir and opening clean with damp cloth |
| Safety | Safety lock, automatic shutoff on low battery |
| Replacement Parts | USB cable, power adapter (not included), anti-condensation packet |
| Warranty | 2-year limited |
Frequently Asked Questions - Kualo EBI
User questions about Kualo EBI
0 question about this device. Answer the ones you know or ask your own.
Ask a new question about this device
Download the instructions for your Pet feeder in PDF format for free! Find your manual Kualo - EBI and take your electronic device back in hand. On this page are published all the documents necessary for the use of your device. Kualo by EBI.
USER MANUAL Kualo EBI
Smart feeder with camera Kualo
IMPORTANT SAFETY INFORMATION
Explanation of Attention Words and Symbols used in this guide

WARNING
WARNING indicates a hazardous situation which, if not avoided, could result in death or serious injury.
CAUTION
CAUTION, used without the safety alert symbol, indicates a hazardous situation which, if not avoided, could result in harm to your pet.
NOTICE
NOTICE is used to address safe use practices not related to personal injury.
WARNING
When using electrical appliances, basic safety precautions should always be followed to reduce the risk of fire, electric shock and/or injury to persons, including the following:
To reduce the risk of injury, close supervision is necessary when an appliance is used by or near children.
- To protect against electric shock, do not place electrical power cord or plug in water or other liquids.
Do not use outdoors. FOR INDOOR HOUSEHOLD USE ONLY.
- Do not pull on the electrical power cord to remove the plug from the wall outlet.
- To unplug, grasp the plug, not the electrical power cord.
- Do not operate any appliance if it has a damaged electrical power cord or plug, or if it is malfunctioning or has been damaged. Call Customer Care Centre immediately for further instructions.
- For a portable appliance - To reduce the risk of electric shock, do not place or store an appliance where it can fall or be pulled into a bathtub or sink.
- Do not use an appliance for anything other than its intended use.
- If the plug of this device gets wet, turn off the electricity to that wall outlet. Do not attempt to unplug.
- Examine this appliance after installation. Do not plug into wall outlet if there is water on the electrical power cord or plug.
Always unplug any appliance when not in use, before putting on or taking off parts, and before cleaning. Never pull on the electrical power cord to remove the plug from the wall outlet.
DO NOT PLACE FEEDER IN DISHWASHER
CAUTION
-
Do not allow pets to chew on or swallow any parts. If you are concerned about the electrical power cord, purchase a cord conduit (a hard plastic protector) at any hardware store.
-
The plastic Pot Feeder parts are BPA-FREE. However, some animals have been known to be sensitive to plastic food and water containers. If your animal shows signs of an allergic reaction to the plastic, please discontinue use until you have consulted with your veterinarian.
NOTICE
- Monitor your Pet Feeder periodically for the first 12 hours to make sure it is running properly.
- Do not attempt repairs on the Pet Feeder yourself.
If an extension cord is necessary, an extension cord with a proper rating should be used.
The electrical use of this appliance is 5 Volt. - The use of attachments not recommended or sold by the manufacturer may cause an unsafe condition. Do not modify the appliance.
- Do not install or store appliance where it will be exposed to weather or temperatures below 4.5^ .
- Read and observe all important notices listed on the appliance and in the packaging.
- If you want to clean the feed container or the outside of the appliance, remove the appliance from the socket and use a (slightly damp) soft microfibre cloth without wetting the electronic components.
SAVE THESE INSTRUCTIONS

Compliance
This equipment has been tested and found to comply with the requirements of the relevant European directives. Before using this equipment outside the EU countries, check with the relevant local authority. Unauthorized changes or modifications to the equipment that are not approved by EBI may violate EU regulations, could void the user's authority to operate the equipment, and will void the warranty.

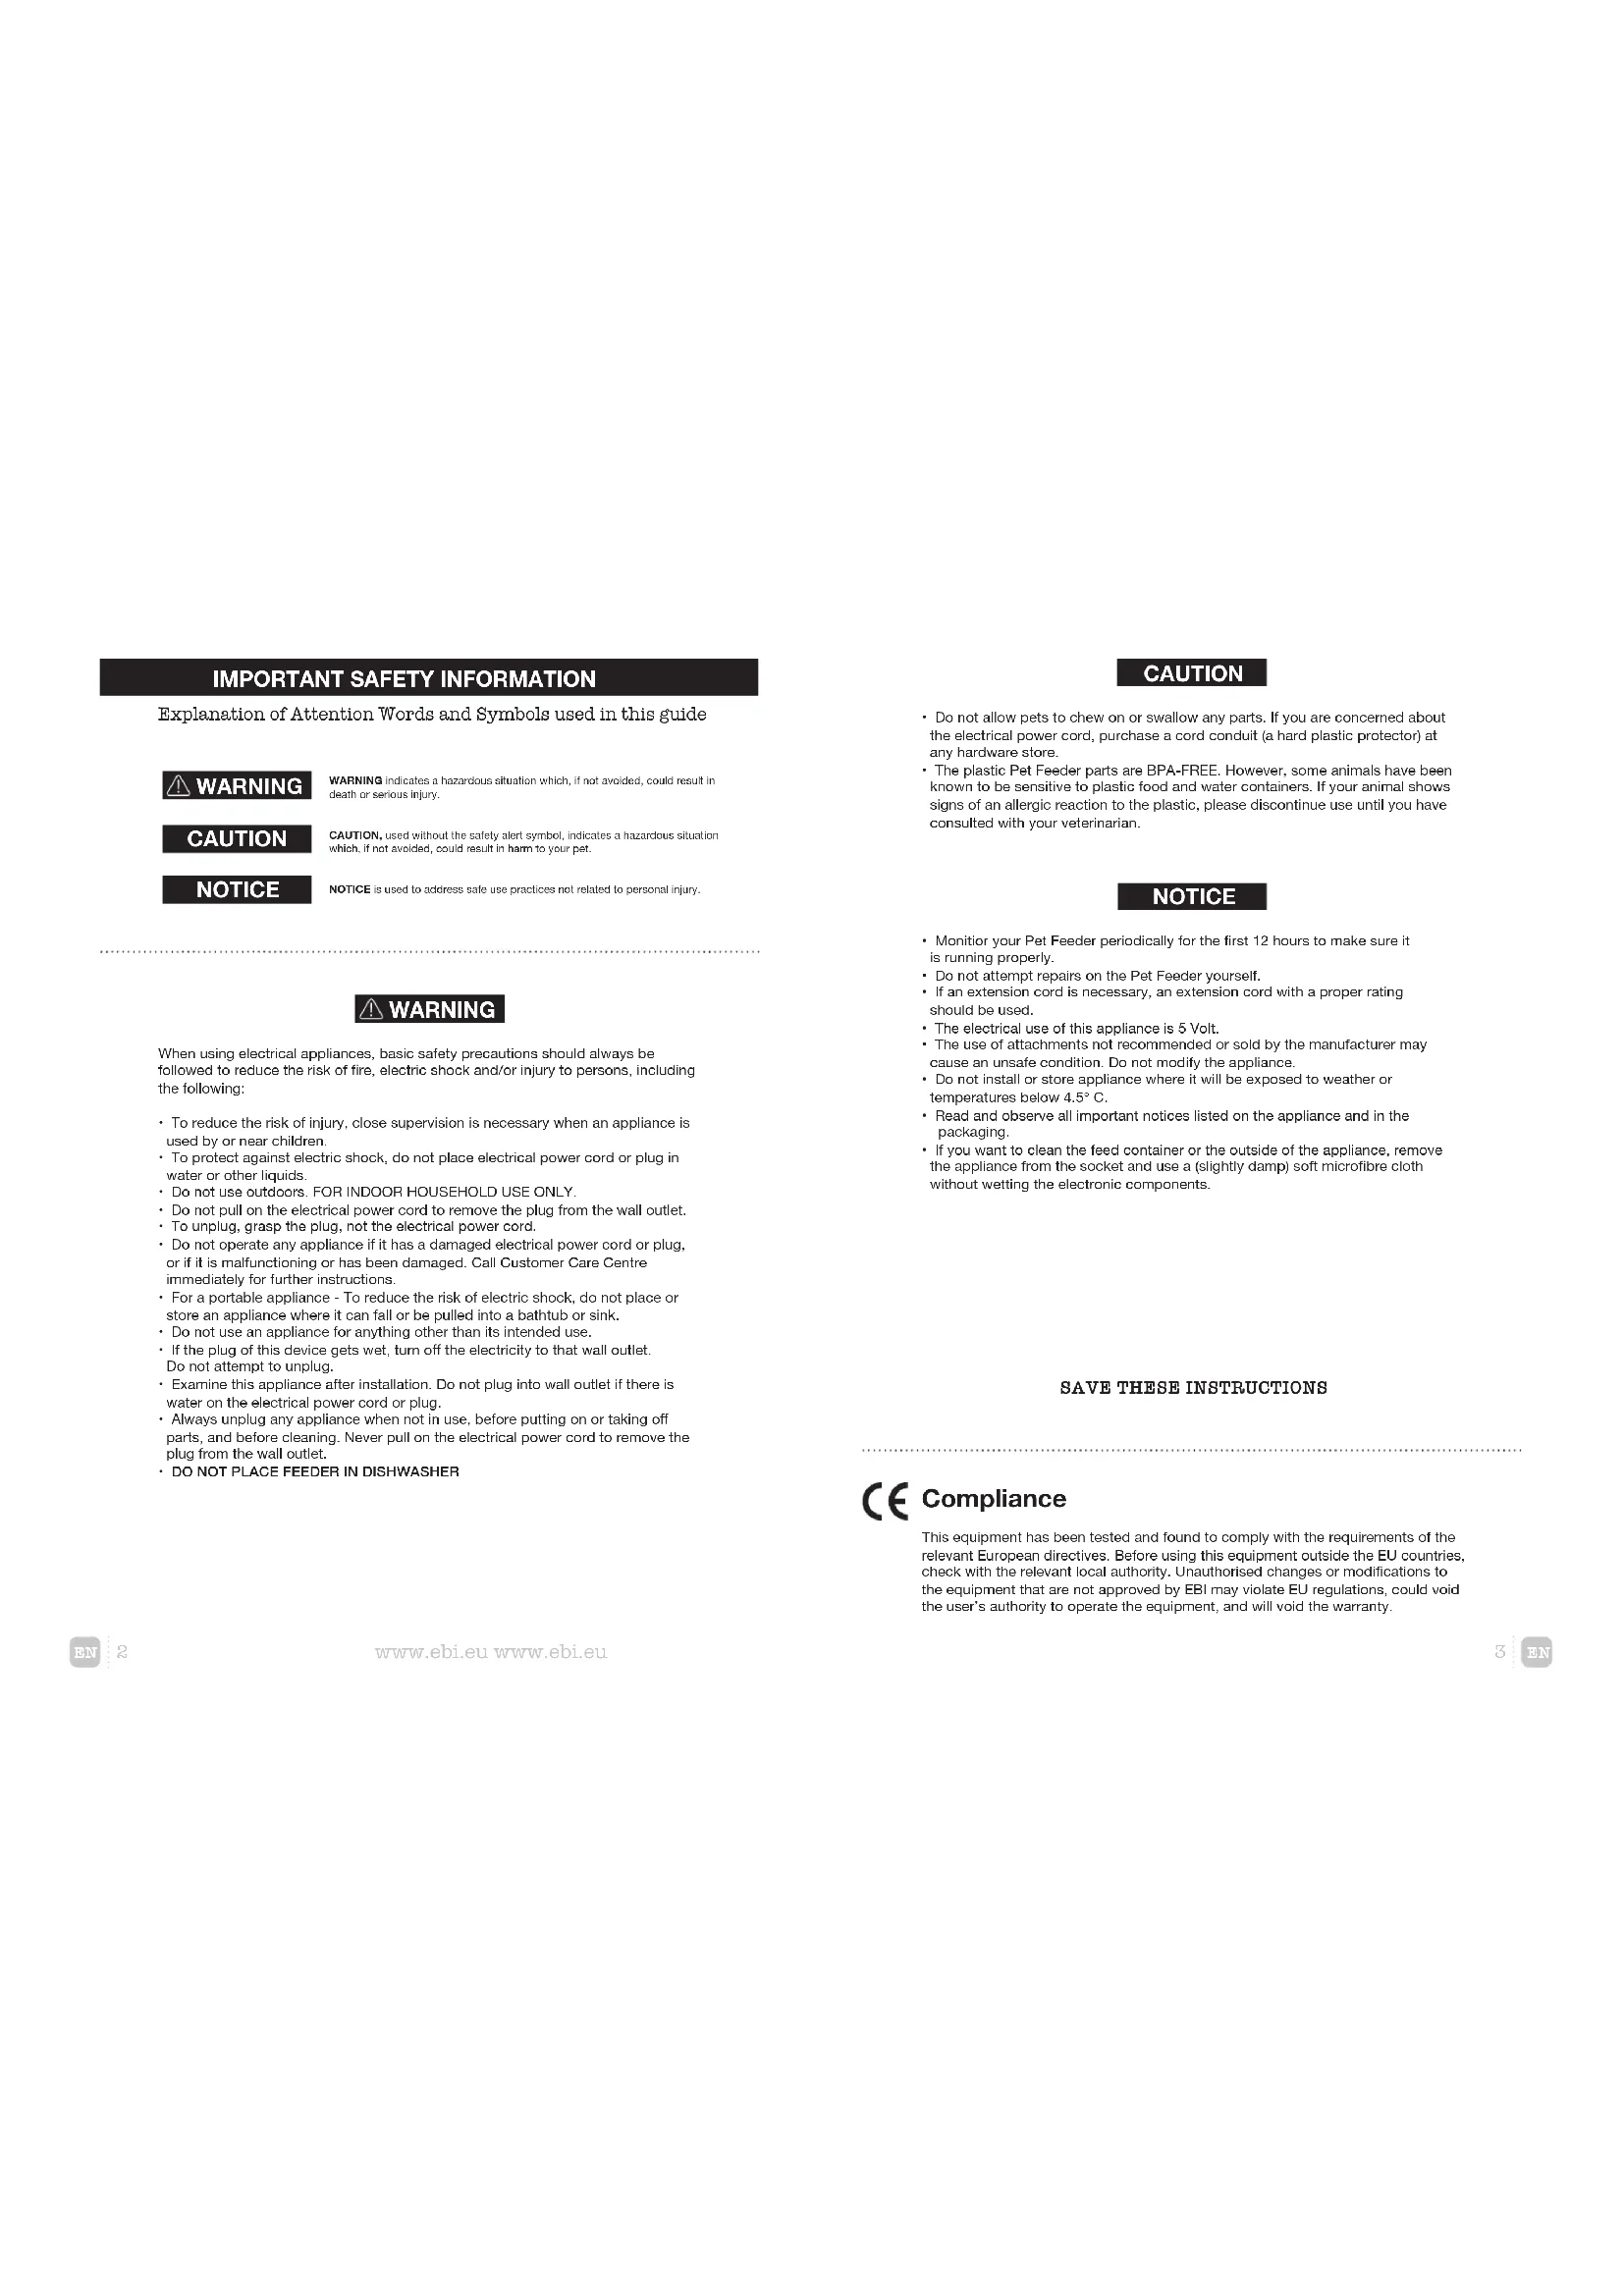
Product components
Product accessories

1. Lid 2. Desiccant bag | 3. Desiccant bag compartment | 4. Food tank |
5. Camera | 6. Control panel | 7. Main frame | 8. Dispensing outlet
9. Stainless steel feeding bow! 10. Bowholcer | 11. Smart Pet Feeder
12. USB cable | 13. Safety lock | 14. Plug | 15. User manual
Product specifications
Product caring & cleaning
| Product name Smart Pet Feeder Camera |
| Suitable for Cats and Dogs |
| Rated voltage 5 V 1 A |
| Product power 5 W |
| Power supply 4 AA Alkaline batteries or DC adapter |
| Product size 21 x 14.8 x 27.8 cm |
| Product weight kg |
| Product capacity 3,5 L |
| Pet food Dry food |
| Portion size 20 g portion |
Theo Lid (1), Stainless steel feeding bowl (8), Bowl holder (9) and Safety lock (12) are washable parts and dishwasher safe.
For the feeder, use a wet cloth to wipe away the dirt inside the food tank and dispensing outlet.
Note: The desiccant holder can be removed for cleaning.
Do not immerse the main frame into the hot water or put it into the dish washer.
Preparation before use
- Assemble the feeding bowl according the steps below.


- Connect to the power supply

- Batteries are not included
- To avoid sudden power outage and the feeding of your pet is affected, do not use the batteries as the only source of power for the feeder, the batteries can only be used as an emergency plan.
- To avoid battery leakage, remove the batteries if the device won't be in use for a period of time.


-
Do Not use canned, wet or moist pet food
-
Recommend kibble size ranging from
5-10mm in diameter.
- Pour in some pet food.
4.Install the safety lock
Buttons and display descriptions
- Indicator
- Record button
- Manual feeding button

1 2 3 4
| Record button | Press and hold the button, start recording after a beep is heard. Record your message (Max:10s). Release the button if you finish recording. Two beeps will be heard indicating it's saved. Delete the recordings: Press and hold the 'Record button' for 2s to delete the recordings. Check the recordings: Press once to broadcast the recordings. | |
| WiFi reset button | Keep holding the reset button until the feeder emits beeps: The WiFi indicator keeps flashing, it indicates the device is ready for re-connection. | |
| Manual feeding button | Press once to dispense (1) portion of food. | |
| Blue | Flashing | The Feeder is ready to connect with APP |
| Stay Solid | Connect to WIFI and fully Operational | |
| Green | Flashing | Poor WIFI signal |
| Stay Solid | WIFI Disconnected | |
| Red | Flashing | Battery running low, (replace battery) powered by battery only |
Download the APP and log in
Scan the QR code or search for 'Smart Life' in the Apple store or Google store to download the APP.

Smart Life
Tip: Due to the upgrade and updates of the APP, The operation in the APP will be slightly different. Please follow up the instructions in the APP to complete the binding process.

Make sure to turn on the WiFi and Bluetooth before trying to connect the device.

Open the APP.
Sign up or log in with your account.

Note: One device can be attached to only one account at a time, but one account can connect to multiple devices and used on multiple phones.
Connect the feeder with your smartphone
Add the feeder
-
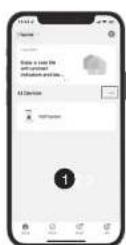
After log in you enter the main interface. Click [+] at the upper right corner to add the feeder (As Fig. 1, next page).
-
Tap the option 'Lock & Camera', then find the option 'Smart Camera (Dual Band)' (Fig 2).


Note:
The product is only suitable for 2.4Ghz network Do not try to connect to the 5GHz network.
Try to put the device near the router while binding to ensure a quick connection.
Connect the feeder to the WIFI network
Follow the instructions in the APP to connect the device to your smartphone.
1. In the APP, click on add device or on the plus sign at the top right and choose Smart camera (wifi or dual band) under the "camera & lock" category.
2. The APP asks to reset your device first. Therefore, press the WiFi button (middle) for 5 to 10 seconds until you hear a long beep. The WiFi indicator on the device should flash blue and you should hear a double beep every minute. If the indicator does not flash or you no longer hear this tone, first press and hold the WiFi button to restart the process.
3. Then, in the APP, click on the option 'Make sure the indicator is flashing...' and then press 'Next' (Fig 1).
4. Select the available 2.4 GHz WiFi Network and type in the network password (Fig 2).
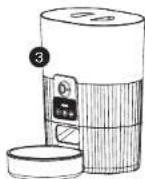
5. A QR code is created on your phone. Use the feeder's camera to scan it at a distance of ± 12 - 20 cm until you hear a 'beep'. Click on the "I Heard a Prompt" option (Fig 3) to continue, 6.Wait for the devices to connect to each other (Fig 4-6).
7. When you see "device added successfully", click continue.
8. If everything went well, you will see the image from the camera in the video control menu (Fig 7). Your device is now set up correctly.


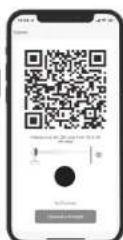


After connecting, click the option "Done" to enter the video and controlling interface. - Click the 'schedule' to set the meal. (Fig 7) - Then enter into the meal setting interface. (Fig 8)
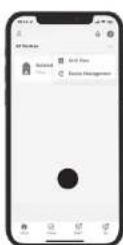
Remove the device
- Click (...) to enter 'All Devices' (Fig 1) and select 'Device Management' (Fig 2).
- Click the option'Remove Device
- Finally click "Confirm" to delete the device (Fig 3).

Q&A trouble shooting
Q: Why doesn't the food come out?
A: 1. Please make sure the food in the tank is the dry food.
2. Check whether the battery level is low, and if the power adapter is connected.
Q: Why I can not connect to the WIFI?
A: Please check if power supply is connected. Then make sure you select the 2,4Ghz instead of 5Ghz WIFI. Then connect it again.
Q: Why is the portion size not even?
A: Because of the startingpositions from the revolving doors when filling with food, the first few portions may vary, but this doesn't mean there is a fault in the appliance. After about 6 feedings, it should be almost even.
Q: The feeder's camera can't read the QR code on your phone?
A:1. Make sure the feeder is ready for network connection, that is the WiFi indicator on the feeder is flashing blue.
2. Hold your phone about 15 - 20cm away from the feeder camera. Remove the food bowl and lift the feeder as needed.
3. If still fail to work, change the option from "QR code scan" to "WiFi connect".
Q: Live video not showing?
A:1. Switch to stronger WiFi signal.
2. If the network is poor, change video quality from HD (High definition) to SD (standard definition).
Q: Where are the photos and videos stored?
A: The screenshots and video clips are stored in the Album section of the APP.
Warranty
Two Year Non-Transferable Limited Warranty
This Product has the benefit of a limited manufacturer's warranty. Complete details of the warranty applicable to this Product and its terms can be found at www.EBI.eu and/or are available by contacting your local Customer Care Centre.

Important Recycling Advice
Please respect the Waste Electrical and Electronic Equipment regulations in your country. This equipment must be recycled. If you no longer require this equipment, do not place it in the normal municipal waste system.
Terms of Use and Limitation of Liability
Terms of Use
Use of this Product is subject to your acceptance without modification of the terms, conditions and notices contained herein. Use of this Product implies acceptance of all such terms, conditions and notices. If you do not wish to accept these terms, conditions, and notices, please return the Product, unused, in its original packaging and at your own cost and risk to the relevant Customer Care Centre together with proof of purchase for a full refund.
Proper Use
If you are unsure whether this Product is appropriate for your pet, please consult 2. Your veterinarian or certified trainer prior to use. Proper use includes, without limitation, reviewing the entire Operating Guide and any specific safety information statements.
No Unlawful or Prohibited Use
This Product is designed for use with pets only. Using this Product in a way that is not intended could result in violation of Federal, State or local laws.
3. Limitation of Liability
In no event shall EBI be liable for (1) any indirect, punitive, incidental, special or 4. consequential damage and/or (2) any loss or damages whatsoever arising out of or connected with the misuse of this Product. The Purchaser assumes all risks and liability from the use of this Product to the fullest extent permissible by law.
Modification of Terms and Conditions
EBI reserves the right to change the terms, conditions and notices governing this 5. Product from time to time. If such changes have been notified to you prior to your use of this Product, they shall be binding on you as if incorporated herein.
Product specifications