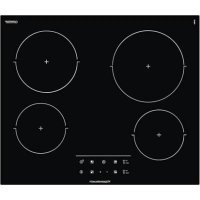
KE6110.0SE - Cooker Küppersbusch - Free user manual and instructions
Find the device manual for free KE6110.0SE Küppersbusch in PDF.



| Product type | Ceramic glass hob with touch control |
| Brand | Küppersbusch |
| Model | KE6110.0SE |
| Power supply | 220-240 V 1N/1L~ or 380-415 V (depending on configuration) |
| Number of cooking zones | 4 |
| Control type | Touch with sensitive keys |
| Special cooking functions | Quick cooking (automatic start), power function (P), Chef functions (yogurt, rice), Sabbath function |
| Timer | Independent for each zone, adjustable from 1 to 99 minutes |
| Double burner (depending on model) | Double ring cooking zone with separate activation/deactivation |
| Safety lock | Key lock and child lock (special sequence) |
| Stop&Go function | Pause all cooking zones with resumption of settings |
| Automatic safety shut-off | Maximum operating time according to power level (e.g., 10h at level 1, 1h at level 9) |
| Residual heat indicator | Display 'H' on still hot zones |
| Cleaning and maintenance | Special ceramic glass cleaner, scraper for encrusted dirt, avoid hot sugar |
| Electrical connection | By circuit breaker or single-pole plug with minimum 3 mm distance between contacts |
| After-sales service | Only by TEKA technical service |
| Warranty | Keep the warranty certificate with the manual |
| Surface material | Ceramic glass |
| Country of origin | Not specified in the manual |
Frequently Asked Questions - KE6110.0SE Küppersbusch
User questions about KE6110.0SE Küppersbusch
0 question about this device. Answer the ones you know or ask your own.
Ask a new question about this device
Download the instructions for your Cooker in PDF format for free! Find your manual KE6110.0SE - Küppersbusch and take your electronic device back in hand. On this page are published all the documents necessary for the use of your device. KE6110.0SE by Küppersbusch.
USER MANUAL KE6110.0SE Küppersbusch
natural_image
Four white circular diagrams with arrows indicating rotation or direction, no text or symbols presentKE6110.0SE
Please read the users and installation instructions carefully before installation of the appliance and before starting to use it.
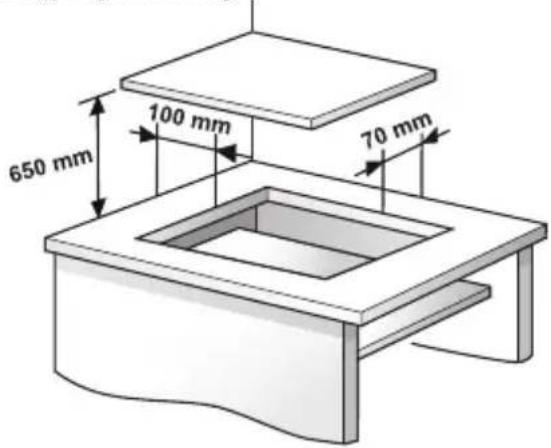
Montage / Installation / Instalación / Instalação / Installation / Kurulum / Installazione / Installatie / Εγκατάσταση
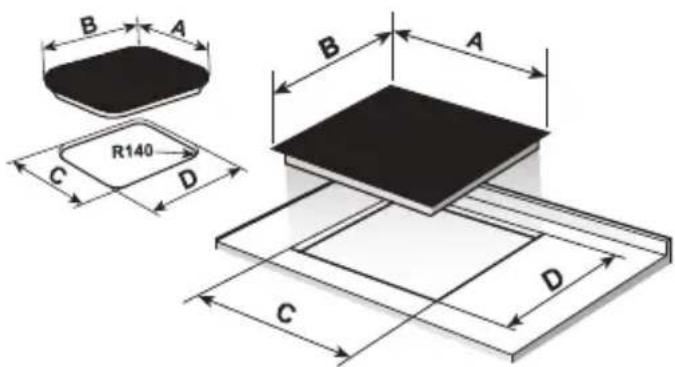
Mindestabstände / Minimum distances / Distancias mínimas / Distâncias mínimas / Distances minimales / Minimum mesafeler / Distanze minime / Minimumafstanden / Ελάχιστες αποστάσεις /
⚠️ If the ceramic glass breaks or cracks, immediately unplug the hob to avoid electric shocks.
⚠ This appliance is not designed to work with an external timer (not built into the appliance) or a separate remote control system.
⚠️ Do not steam clean this device.
⚠ The device and its accessible parts may heat up during operation. Avoid touching the heating elements. Children younger than 8 years old must stay away from the hob unless they are permanently supervised.
⚠ This device may solely be used by children 8 years old or older, people with impaired physical, sensory or mental abilities, or those who are lack of experience and knowledge, ONLY when supervised or if they have been given adequate instruction on the use of the device and understand the
dangers its use involves. User cleaning and maintenance may not be done by unsupervised children.
⚠️ Children must not play with the device.
⚠️ Precaution. It is dangerous to cook with fat or oil without being present, as these may catch fire. Never try to extinguish a fire with water! in this event disconnect the device and cover the flames with a lid, a plate or a blanket.
⚠ Do not put any object on the cooking areas of the hob. Prevent a possible fire hazard.
⚠ “If the mains cord is damaged, should be replaced by the manufacturer or its after sales service”
⚠️ CAUTION: Use only cooktop protectors appropriately designed by the household manufacturer or the protectors already used in this appliance. The use of inappropriate protectors could cause accidents.
Installation
Emplacement with cutlery drawer
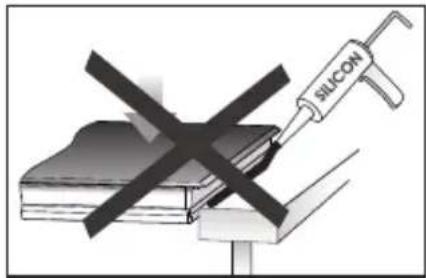
If you wish to mount furniture or a drawer under the hob, a separation board must be fitted between the two. Accidental contact with the hot surface of the device's housing is thus prevented.
The board must be fitted 20 mm under the bottom cover of the hob.
Electrical connection
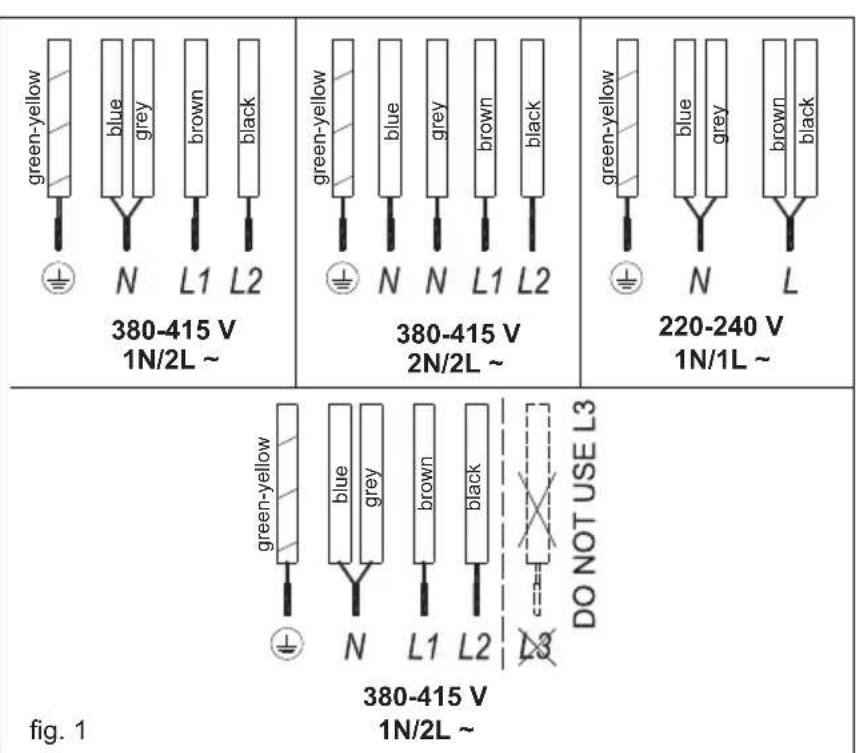
Before you connect the hob to the mains, check if the voltage and frequency match those specified on the hob label, which is placed under the hob or on the Guarantee card, or if applicable on the technical data sheet, which you must keep together with this manual throughout the product's service life.
The electrical connection will be via an all-pole circuit breaker or plug, whenever accessible, in accordance with the current and with a minimum 3mm distance between contacts. This ensures disconnection in emergencies and allows hob cleaning.
Only the TEKA official technical service can handle or repair the appliance, including replacement of the power cable.
Ensure that the inlet cable does not come into contact with the hob housing or the oven housing, if it is installed in the same unit.
Warning:

The electrical connection must be properly loaded, following current regulations, otherwise the may malfunction.

Unusual high power surges can ge the control system (like with electrical appliance).

Keep the Guarantee Certificate or the technical data sheet together with the instructions manual throughout the product's service life. These contain important technical information.
EN
Use and Maintenance
User instructions of the Touch Control
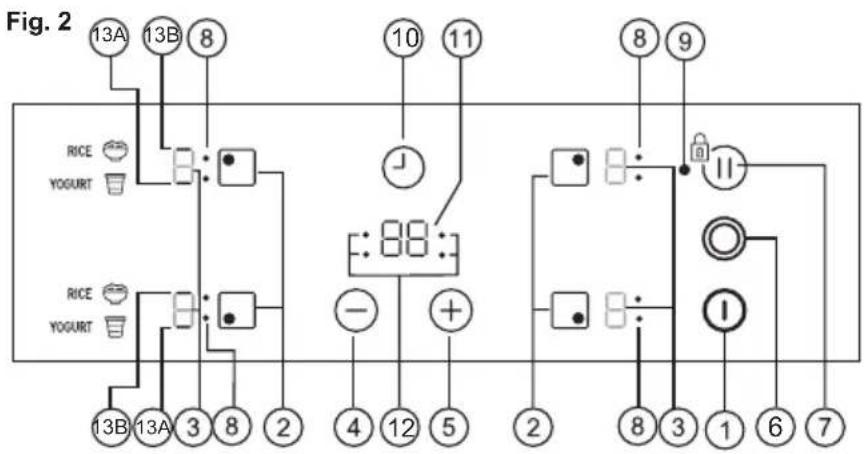
HANDLING ELEMENTS (fig. 2)
① On/off touch key.
② Hot plate selection touch keys.
③**Power and/or residual heat displays.
④ "Decrease" power touch key.
⑤ "Increase" power touch key.
6* Double burner selection touch key (double hot plate).
⑦ Locking touch key for the rest of touch keys or activation sensor for "Stop&Go" function.
⑧**Hot plate double zone indication (only next to double burner hot plates).
⑨ **Lock icon.
⑩ Timer touch key.
11 **Timer display
12* The timed cooking surface indicator
13* **A) Yogurt function indicator
**B) Rice function indicator
* Depending on model
** Only visible while running.
The manoeuvres are done by means of the touch keys. You do not need to exert force on the desired touch key, you only need to touch it with your fingertip to activate the required function.
Each action is notified by a beep.
SWITCHING ON THE DEVICE
When the hob is connected for the first time, it will be locked and the related pilot light (9) will be on. To unlock it, first touch locking touch key until the pilot light (9) switches off.
1 Touch the switching on touch key Ⓙ (1) for at least one second.
The Touch Control is activated and a 0 appears with 50% brightness on all the power displays (3).
If any zone has residual heat indication
flowchart
graph TD
    A["13A"] --> B["8"]
    C["13B"] --> B
    D["RICE YOGURT"] --> E["●"]
    F["RICE YOGURT"] --> G["●"]
    H["13B"] --> I["3"]
    J["13A"] --> K["8"]
    L["3"] --> M["2"]
    N["8"] --> O["4"]
    P["12"] --> Q["5"]
    R["+"] --> S["2"]
    T["10"] --> U["11"]
    V["8"] --> W["11"]
    X["9"] --> Y["11"]
    Z["1"] --> AA["6"]
    AB["7"] --> AC["7"]
before switch on ,the display continuesh showing "H" instead of 0.
If you do not take any action in the next 10 seconds the touch control will switch off automatically.
SWITCHING ON A HOT PLATE
Once the Touch Control has been activated by means of the touch key ⏻ (1), the power indicators of the hot plates will display a 0 (3).
1 Press the touch key for the selected hot plate (2). The related power indicator (3) will be activated and brightness of indicator will increase.
2 Using the touch key or (475), choose the desired power level.
The and touch keys are repetitive, so if you keep them pressed they increase or decrease with a 0.5 second interval.
Only one hot plate can be selected at the same time
Warning:
To operate a hot plate, it must be selected first. When you want to use a hot plate, check the brightness of the power indicator. After choosing hot plate, brightness of power indicator should increase.
Quick switch-on at maximum power: Once you have selected the hot plate, press the touch key (74) once. The hot plate will be activated at full power.
SWITCHING OFF THE HOT PLATE
1 The hot plate must previously be selected.
2 Using the touch key (4), lower the power level to 0.
Quick switch-off alternatives :
i) If user keep finger on the selection sensor for 2 seconds, the related zone will be switched off.
ii) When you press touch keys and (4/5) simultaneously, the hot plate will switch off quickly.
RESIDUAL HEAT INDICATOR
The power indicator of the hot plate will display an H when the glass surface reaches a temperature that could cause burning.
When this risk disappears,
i) the display switches off (if the device is in stand by),
ii) or displays 0 (if the appliance is still running).
Warning:
In a first run, H indication may appear in a short time on the power display. This showing is related with setup operation and it does not mean the cooking zone is hot.
Warning:
H indication is used for the safety purposes in any case. Even if the power is cut off for a long time, after power on, H indication appears.
SWITCHING OFF THE DEVICE
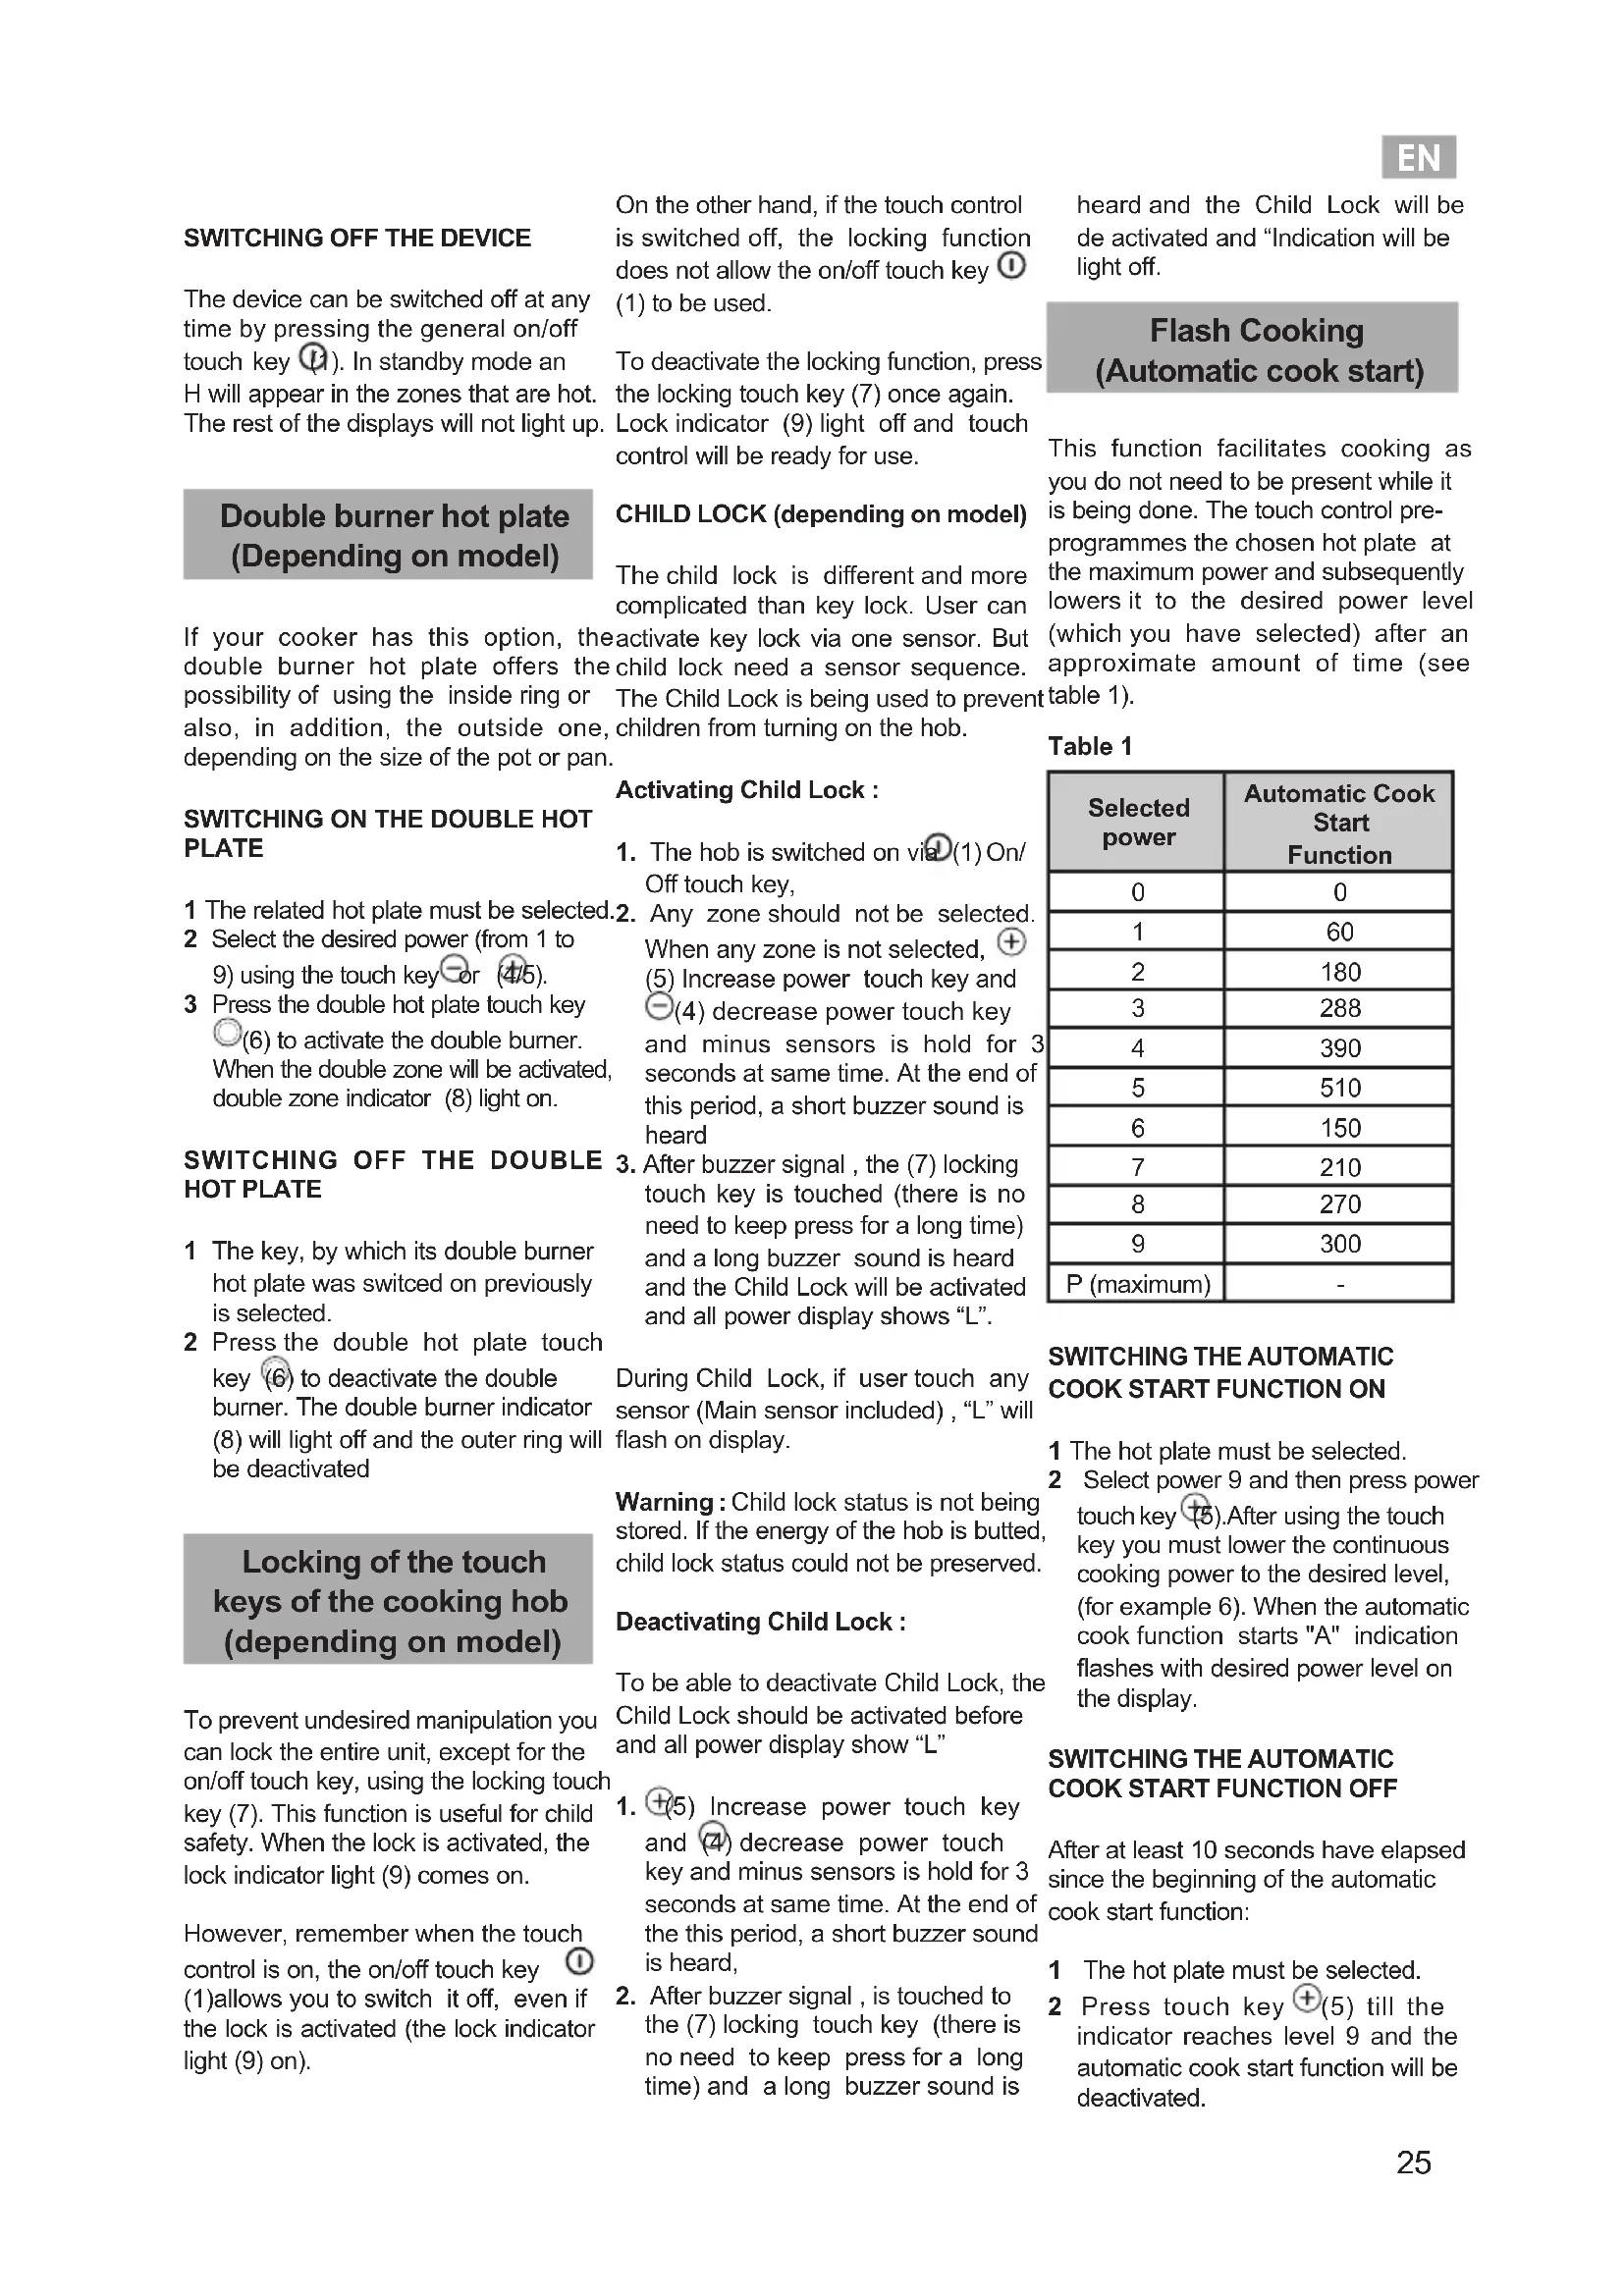
The device can be switched off at any time by pressing the general on/off touch key (1). In standby mode an H will appear in the zones that are hot. The rest of the displays will not light up. On the other hand, if the touch control is switched off, the locking function does not allow the on/off touch key ① (1) to be used.
To deactivate the locking function, press the locking touch key (7) once again. Lock indicator (9) light off and touch control will be ready for use.
Double burner hot plate (Depending on model)
CHILD LOCK (depending on model)
The child lock is different and more complicated than key lock. User can
If your cooker has this option, the activate key lock via one sensor. But double burner hot plate offers the child lock need a sensor sequence. possibility of using the inside ring or The Child Lock is being used to prevent also, in addition, the outside one, children from turning on the hob. depending on the size of the pot or pan.
heard and the Child Lock will be de activated and "Indication will be light off.
Flash Cooking (Automatic cook start)
This function facilitates cooking as you do not need to be present while it is being done. The touch control pre-programmes the chosen hot plate at the maximum power and subsequently lowers it to the desired power level (which you have selected) after an approximate amount of time (see table 1).
SWITCHING ON THE DOUBLE HOT PLATE
1 The related hot plate must be selected.
2 Select the desired power (from 1 to 9) using the touch key or (4/5).
3 Press the double hot plate touch key
(6) to activate the double burner.
When the double zone will be activated,
double zone indicator (8) light on.
SWITCHING OFF THE DOUBLE HOT PLATE
1 The key, by which its double burner hot plate was switched on previously is selected.
2 Press the double hot plate touch key (6) to deactivate the double burner. The double burner indicator (8) will light off and the outer ring will be deactivated
Locking of the touch keys of the cooking hob (depending on model)
To prevent undesired manipulation you can lock the entire unit, except for the on/off touch key, using the locking touch key (7). This function is useful for child safety. When the lock is activated, the lock indicator light (9) comes on.
However, remember when the touch control is on, the on/off touch key ① (1) allows you to switch it off, even if the lock is activated (the lock indicator light (9) on).
Activating Child Lock :
- The hob is switched on via (1) On/Off touch key,
- Any zone should not be selected. When any zone is not selected, + (5) Increase power touch key and -(4) decrease power touch key and minus sensors is hold for 3 seconds at same time. At the end of this period, a short buzzer sound is heard
- After buzzer signal, the (7) locking touch key is touched (there is no need to keep press for a long time) and a long buzzer sound is heard and the Child Lock will be activated and all power display shows "L".
During Child Lock, if user touch any sensor (Main sensor included), "L" will flash on display.
Warning : Child lock status is not being stored. If the energy of the hob is butted, child lock status could not be preserved.
Deactivating Child Lock :
To be able to deactivate Child Lock, the Child Lock should be activated before and all power display show "L"
- ④(5) Increase power touch key and ④ decrease power touch key and minus sensors is hold for 3 seconds at same time. At the end of the this period, a short buzzer sound is heard,
- After buzzer signal, is touched to the (7) locking touch key (there is no need to keep press for a long time) and a long buzzer sound is
Table 1
| Selected power | Automatic Cook Start Function |
| 0 | 0 |
| 1 | 60 |
| 2 | 180 |
| 3 | 288 |
| 4 | 390 |
| 5 | 510 |
| 6 | 150 |
| 7 | 210 |
| 8 | 270 |
| 9 | 300 |
| P (maximum) | - |
SWITCHING THE AUTOMATIC COOK START FUNCTION ON
1 The hot plate must be selected.
2 Select power 9 and then press power touch key (5). After using the touch key you must lower the continuous cooking power to the desired level, (for example 6). When the automatic cook function starts "A" indication flashes with desired power level on the display.
SWITCHING THE AUTOMATIC COOK START FUNCTION OFF
After at least 10 seconds have elapsed since the beginning of the automatic cook start function:
1 The hot plate must be selected.
2 Press touch key (5) till the indicator reaches level 9 and the automatic cook start function will be deactivated.
Timer Function
This function makes it easier to cook, as you do not need to be present throughout the process: the timed hot plate(s) will switch off automatically after the set time has lapsed. There is a separate timer for each hot plate, which allows all of the hot plates to be timed simultaneously.
With these models you can use the clock as a timer for the hotplates for times ranging from 1 to 99 minutes. All the cooking areas can be programmed individually and in a simultaneous manner.
TIMING ONE HOTPLATE
1 The cooking zone to be timed must be selected.
2 Select a power level for the hotplate from 1 to 9 using the touch keys ⊕ or (5/4).
3 Press clock touch key (10). Timer indicator (11) will display 00. Depending on the model, the timed cooking surface indicator (12) will flash.
On the power indicator (3), will flash during the time set.(depending on model)
4 Immediately afterwards, enter a cooking time between 1 and 99 minutes, by using the touch keys or (+ (5/4).
When the power indicator (3) stops flashing, it will start to count down the time automatically. When the countdown starts, the relevant power level and will flash alternately on the power indicator (3) of the relevant heater area. (Depending on model)
When the clock reaches 01, it will switch from counting down minutes to seconds.
Once the selected cooking time has elapsed, the heating zone being timed is turned off and the clock emits a series
of beeps for several seconds. The timer indicator will display a flashing 00 beside the hotplate that has been disconnected.
If you wish to time another hotplate at the same time, repeat steps 3 and 4.
If the heating zone turned off is hot, its indicator displays an H or otherwise an 0. To turn off the audible signal touch any sensor.
CHANGING THE PROGRAMMED TIME
To change the programmed time, you must press the touch key of the timed hotplate (2) to select it and then the clock (10). You may then read and change the time.
DISCONNECTION OF THE TIMER
If you want to stop the timer before the programmed time is up
1 First select the hotplate and then press clock touch key ⏻(10).
2 Use the touch key (-4) to recude the time to 00. The clock is cancelled.
Alternative method :
After zone selection if timer touch key is pressed for two seconds, the related timer will be cancelled.
Power Function (Depending on model)
This function supplies "extra" power to the hot plate, above the nominal value.
1 Select power 9 and then press power touch key (5).
2 The power level indicator (3) will show the symbol P, and the plate will start to supply extra power.
Stop&Go Function (Depending on model)
This function puts the cooking process on pause. The timer will also be paused if it is activated.
Activating the Stop&Go function.
Touch the Stop &Go sensor (7) between 1-3 seconds. The power indicators will show the symbol // to indicate cooking has been paused.
Deactivating the Stop&Go function
Touch the “Stop&Go” sensor (7) between 1-3 seconds again. The cooking is resumed under the same power and timer settings that were established before the pause. If this function is not deactivated within 10 mins, the hob goes to stand-by.
CHEF Functions (Depending on model)
Chef functions are special features that help user to cook easier with its pre allocated power levels.
The feature is set in such a way that it is automatically maintained and does not require user to change the power levels.
YOGURT FUNCTION (Depending on model)
This function automatically sets appropriate power levels during fermentation process to make yogurt.
To activate this function:
- Turn on the hob: Press On/Off touch key(1)
- When all zone displays are, press related zone's ☐ ☐ touch key for at least 2 seconds.
- A beep sound will be heard
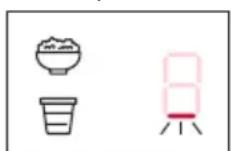
- The bottom line light will appear - "9H" will be shown on the timer display
- The related
zone's timer display dot LED lights up You can switch functions by pressing related zone's touch key again. If the zone display shows, you can turn back to functions just pressing the touch key again, or you can use it in normal cooking mode in this situation.
Wait 10 seconds
- Chef Function will become active
- Timer will count down from 9 hours When the time is up,
- A beep sound will be heard indicating last 1 minute
- After 1 minute, mode will be deactivated.
To exit during operation, press related zone's touch key for at least two seconds.
Yogurt Recipe
- Mix 200 ml of yogurt and some milk in a bowl
- Put the rest of the milk and mixed yogurt into the pot
- Close the lid of pot
- Turn on hob and set the cooking zone to yogurt mode
. Press the related cooking zone touch key at least 2 seconds
. After 10 seconds chef cooking mode activated for related cooking zone
. See the timer automatically set on display - After 9 hours, when the time is up, (buzzer will start to beep to warn), the yogurt should be kept in the refrigerator for approximately 16 hours.
| Heater Diameter (mm) | Amount of Yogurt (gr) | Amount of Milk (L) |
| ≥ 130 < 160 | 200 1 | |
| ≥ 190 < 220 | 200 3 |
RICE FUNCTION (Depending on model)
This function automatically sets an appropriate power levels during rice cooking process.
Turn on the hob: Press On/Off touch key ①
When all zone displays are □ press related zone's □ touch key for at least 2 seconds.
Press related zone's touch key again - A beep sound will be heard
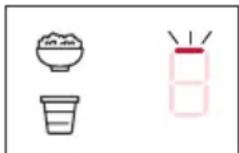
- The top line light will appear - "23" will be shown on the timer display
- The related zone's timer display dot LED lights up
You can switch functions by pressing
related zone's touch key again. If the zone display shows ☐ you can turn back to functions just pressing the touch key again, or you can use it in normal cooking mode in this situation.
Wait 10 seconds
- Chef Function will become active
- Timer counts down from 23min When the time is up,
- A beep sound will be heard indicating last 1 minute
- After 1 minute, mode will be deactivated.
To exit during operation, press related zone's touch key for at least two seconds.
Rice Recipe
- Wash the rice
- Turn on the hob and set the cooking zone to rice mode
. Press the related cooking zone touch key at least 2 seconds
. After chef cooking mode activated for related cooking zone, set the cooking mode to rice cooking by pressing cooking zone touch key
. See the timer automatically set on display - Put the oil into pot and wait about 2 minutes.
- Put the rice into pot and stir it about 2 minutes.
- Put the water into pot
- Put the salt into pot and stir it a couple of times
- Close the lid of pot
- Rice is ready when the time is up (buzzer will start to beep to warn).
| Heater Diameter (mm) | Amount of Oil (tblsp.) | Amount of Rice (gr) |
| ≥ 130 < 160 | 3 180 | |
| ≥ 190 < 220 | 4 540 |
| Amount of Water (ml) | Amount of Salt (tblsp.) |
| 360 1 | |
| 1080 2 |
Shabbat Function (Depending on model)
This function keeps the food in the selected zone warm for 72 hours. To activate Shabbat function, press the timer (10) and plus button (5) for 2 seconds when no zone is selected.
3-lines will flash on the zone display. At the same time, 72→H→72 starts flashing on the timer displays. Low↑, mid↑ and high↑ modes can be selected with the ⊕(5) and ⊖(4) buttons. If the ⊕(5) button is pressed while the High mode □ is selected, the "-small zero icon" □ switches to Low ↑ and the cycle continues.
If you select any of the levels and do not press any buttons after 10 seconds, the mode starts to operate at the selected level. The 72-hour period is started. The timer is displayed decreasingly from 72. In this mode, other heaters can only be operated in Shabbat mode Standart operations cannot be performed unless exited from Shabbat mode.
If you want to turn off this mode;
1 If the ① (1) On/Off touch key is pressed for 2 seconds, Shabbat modes in all zones are canceled and the hob turns itself off. 2 Also in Shabbat mode, if the timer button (10) and minus button (4) are pressed for 2 seconds, Shabbat mode is canceled in all zones. If you want to turn off only the specified zone, that heater will be turned off by pressing the zone button for 2 seconds.
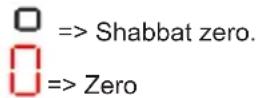
Note:
After initiating the Shabbat function and adjusting the power level, the touch key lock will be active after 50 seconds.
Safety switch off function
If due to an error one or several hot
EN
plates do not switch off, the appliance will be automatically disconnected after a set amount of time (see table 2).
Table 2
| Selected power | MAXIMUM OPERATION TIME (In hours) |
| 0 | 0 |
| 1 10 | |
| 2 | 5 |
| 3 | 5 |
| 4 | 4 |
| 5 | 3 |
| 6 | 2 |
| 7 | 2 |
| 8 | 2 |
| 9 1,5 | |
| P | 1 |
When the “safety switch off” function has been triggered, a 0 is displayed if the glass surface temperature is not dangerous for the user or an H if there is a burn risk.
To reconnect the appliance, switch it off by pressing the on/off key (1) and then switch it on again.

Keep the control panel of the ing areas clean and dry at all s.

In case of operating problems or lents not mentioned in this ual, disconnect the appliance and act the TEKA technical service.
Recommendation for the good use of vitroceramic hobs
* Use pots or pans with thick, completely flat bottoms.
* Pans with a smaller diameter than the shown heating area are not recommended.
* Do not slide pots and pans over the glass as they may scratch it.
* Although the glass can withstand knocks from large pots and pans without sharp edges, try not to knock it.
* To prevent damage to the ceramic
glass induction surface, try not to slide the pots and pans over the glass, and keep the bottoms of the vessels clean and in good condition.
Try not to spill sugar or products containing sugar on the glass while the surface is hot as these could damage it.
Cleaning and maintenance
To keep the appliance in good condition, clean it using suitable products and implements once it has cooled down. This will make the job easier and avoid the build-up of dirt. Never use harsh cleaning products or tools that could scratch the surface, or steam-operated equipment.
Light dirt not stuck to the surface can be cleaned using a damp cloth and a gentle detergent or warm soapy water. However, for deeper stains or grease use a special cleaner for ceramic hot plates and follow the instructions on the bottle. Dirt that is firmly stuck due to being burned repeatedly can be removed using a scraper with a blade. Slight tinges of colour are caused by pots and pans with dry grease residue underneath or due to grease between the glass and the pot during cooking. These can be removed using a nickel scourer with water or a special cleaner for ceramic hot plates. Plastic objects, sugar or food containing a lot of sugar that have melted onto the surface must be removed immediately using a scraper.
Metallic sheens are caused by dragging metal pots and pans over the glass. They can be removed by cleaning thoroughly using a special cleaner for ceramic glass hot plates, although you may need to repeat the cleaning process several times.
A pot or pan may become stuck to the glass due to a product having melted between them. Do not try to lift the pot while the hot plate is cold! This could cause the glass break.
Do not step on the glass or lean on it as it could break and cause injury. Do not use the glass as a surface for putting objects.
TEKA INDUSTRIAL S.A. reserves the right to make changes to its manuals that it deems necessary or useful, without affecting the product's essential features.
Environmental considerations

The symbol ■ the product or its packaging means that this product cannot be treated like ordinary household waste. This product must be taken to a recycling collection point for electrical and electronic appliances. By ensuring that this product is disposed of correctly, you will avoid harming the environment and public health, which could happen if this product is not handled properly. For more detailed information about recycling this product, please contact your local authority, household waste service or the store where you purchased the product.
The packaging materials used are environmentally-friendly and can be recycled completely. Plastic components are marked >PE<, LD<, >EPS<, etc. Dispose packaging materials, like household waste, in your local container.
If something does not work
Before calling the technical service, perform the verifications specified below.
The appliance does not work:
Ensure that the power cable is plugged in.
The pot sticks to the glass:
If there is molten material between the pot and the glass, set the hot plate to maximum power and try to separate them.
Single Sensor Error :
If any of the sensors is active more than 10 seconds, this error situation occurs and error code "F1" is showed. This error can be related with different roots. One
of them is that there may be an object (fork, knife...) on the any of the sensor. and then regularly. If any problem is detected while checking, this error situation occurs and error code is
Make sure that there is no any object or the control unit, hob glass is wiped with a dry cloth. If error situation continue after this solution, please take out plug or switch off fuse switch for 10 second. displayed. When this error message displayed:
Please take out plug or switch off fuse switch for 10 second. Then plug in or switch on fuse switch. If error situation still is active, please contact with nearest authorized service.
Plural Sensor Error:
If more than 2 sensors are sensed at same time, this error situation occurs and error code "F2" is displayed.
Potential root reasons of the problem
:
- There may be an object(pot...) or water accumulation(overflow liquid from pot...) that cover more than 2 sensors
- Touch control location may exposure more heat or steam (from oven bottom of the hob...)
Please be sure that there is no any object on the sensors and switched off all steam and heat sources. Then, hob glass is wiped with a dry cloth. If error situation continue after this solution, please take out plug or switch off fuse switch for 10 second.
FC Error:
Fc message on the control and the hot plates switch off: Overheating in the electronics. Let thestove cool for a while.
F3 / Main sensor error
The touch control unit is designed according to international safety standards. The most important case of this standards; hob shall be possible switch off; hob shall not be switch on by itself under all fault and environmental conditions. Because of these requirements; touch control unit test functionality of main sensor regularly. If an error detected on related main sensor, this error situation occurs and error code is displayed. When this error message displayed:
- Please take out plug or switch off fuse switch for 10 second. Then plug in or switch on fuse switch. If error situation still is active, please contact with nearest authorized service.
F4 / Safety software error
According to safety requirements, microcontroller on the control unit is checked by itself at the time of energized
DE
ZAPNUTÍ JEDNÉ PLOTÝNKY
ZAPNUTÍ JEDNÉ PLOTÝNKY
NASTAVENÍ ČASU JEDNÉ PLOTÝNKY
Locking of the touch keys of the cooking hob
4 Immediately afterwards, enter a cooking time between 1 and 99 minutes, by using the touch keys sau (+)(574).
ACCENSIONE DEL DISPOSITIVO
STARTEN VAN AUTOMATISCHE G E P R O G R A M M E E R D E K O O K F U N C T I E
GEDEACTIVEREN VAN AUTOMATISCHE G E P R O G R A M M E E R D E K O O K F U N C T I E
| A | Product information concerning the COMMISSION DELEGATED REGULATION (EU) No 66/2014 | |||
| B Symbol Unit | ||||
| C Model Identification | KE6110.0SE | |||
| D Type of Hob | ||||
| E | Number of Electric Cooking Zone | 4 | ||
| F Heating Technology | ||||
| G | Dimension for Zone 1 | 21 cm | ||
| Dimension for Zone 2 | 14 cm | |||
| Dimension for Zone 3 | 18 cm | |||
| Dimension for Zone 4 | 14 cm | |||
| Dimension for Zone 5 | - | c | ||
| H | Energy Consumption per zone 1 | EC (Electric Cooking) | 194.5 | Wh/kg |
| Energy Consumption per zone 2 | EC (Electric Cooking) | 194.5 | Wh/kg | |
| Energy Consumption per zone 3 | EC (Electric Cooking) | 194.5 | Wh/kg | |
| Energy Consumption per zone 4 | EC (Electric Cooking) | 194.5 | Wh/kg | |
| Energy Consumption per zone 5 | EC (Electric Cooking) | - | Wh/kg | |
| I | Energy Consumption of hob | EC (Electric Cooking) | 194.5 | Wh/kg |
| J Measured to EN 60350-2 | ||||
| ES PT EN DE FR | |||||
| A | Información sobre el producto en referencia al «REGLAMENTO DELEGADO DE LA COMISIÓN (UE) N.° 66/2014» | Informações do produto associadas ao "REGULAMENTO (UE) N.° 66/2014 DA COMISSÃO" | Product information concerning the "COMMISSION DELEGATED REGULATION (EU) No 66/2014" | Produktinformationen gemäß der "DELEGIERTEN VERORDNUNG DER KOMMISSION (EU) Nr. 66/2014". | Informations sur le produit concernant le « RÈGLEMENT DÉLÉGUÉ (UE) No 66/2014 DE LA COMMISSION » |
| B | Símbolo / Valor / Unidad: | Símbolo/Valor/Unidade: | Symbol / Value / Unit: | Symbol / Wert / Einheit: | Symbole/Valeur/Unité : |
| C | Modelo Modelo Model Modell | Modèle | |||
| D | Tipo de placa de cocción: Eléctrica: | Tipo de placa: Elétrica: | Type of Hob: Electric: | Art des Kochfelds: Elektrisch: | Type de plaque de cuisson : Électrique : |
| E | Número de zonas de cocina eléctrica | Número de zonas de cozedura elétricas | Number of Electric Cooking Zones | Anzahl der elektrischen Kochzonen | Nombre de zones de cuisson électriques |
| F | Tecnología de calentamiento: Radiante (zonas de cocción por inducción y áreas de cocción, zonas de cocción radiantes, placas sólidas) | Tecnología de aquecimento: Radiante (zonas e áreas de cozedura por indução, zonas de cozedura radiante, placas sólidas) | Heating Technology: Radiant (induction cooking zones and cooking areas, radiant cooking zones, solid plates) | Heiztechnik: Strahlung (Induktionskochzonen und kochfelder, Strahlungskochzonen, massive Platten) | Technologie de chauffage : Radiant zones de cuisson à induction et espaces de cuisson, zones de cuisson radiantes, plaques pleines) |
| G | Dimensión para la Zona 1-2-3-4-5: | Dimensões da Zona 1-2-3-4-5: | Dimension for Zone 1-2-3-4-5: | Abmessungen von Zone 1-2-3-4-5: | Dimension pour la zone 1-2-3-4-5 : |
| H | Consumo de energía de la Zona 1-2-3-4-5 (cocción eléctrica): | Consumo de energía da Zona 1-2-3-4-5 (cozedura elétrica): | Energy consumption per Zone 1-2-3-4-5 (electric cooking): | Energieverbrauch von Zone 1-2-3-4-5 (elektrisches Kochen): | Consommation d'énergie pour la Zone 1-2-3-4-5 (cuisson électrique) |
| I | Consumo de energía de la placa de cocción: | Consumo de energía da placa: | Energy consumption of hob: | Energieverbrauch des Kochfelds: | Consommation énergétique de la plaque de cuisson : |
| J | Medido según la norma EN 60350-2: | Medido de acordo com a norma EN 60350-2: | Measured to EN 60350-2: | Gemessen nach EN 60350-2: | Mesuré conformément à EN 60350-2: |
| TR | PL CS | SK | RO | |||
| A | KOMİSYON TÜZÜĞÜ (AB) No 66/2014'e dayanan ilgili ürün bilgileri | Informacje o produkcie dotyczące „ROZPOR-ZÄDZENIA DELEGOWANEGO KOMISJI (UE) Nr 66/2014" | Informace o produktu týkající se „NAŘIZENÍ KOMISE V PŘENESENÉ PRAVOMOCI (EU) č. 66/2014" | Informácie o výrobku týkajúce sa „DELEGOVANÉHO NARIADENIA KOMISIE (EÚ) č. 66/2014" | Informații despre produs referitoare a „REGULAMENTUL DELEGAT (UE) Nr. 66/2014 AL COMISIEI" | |
| B | Sembol / Değer / Birim: | Symbol / Wartość / Jednostka: | Značka / hodnota / jednotka: | Symbol/Hodnota/Jednotka: | Simbol / Valoare / Unitate: | |
| C | Model | Model | Modelka | Model | Model | |
| D | Ocak Tipi: Elektrikli: | Rodzaj płyty grzewczej: Elektryczna: | Typ varné desky: Elektrická: | Typ varnej dosky: elektrická: | Tipul de plită: Electrică: | |
| E | Elektrikli Pişirme Bölgesi Sayısı | Liczba elektrycznych stref gotowania | Počet elektrických varných zón | Počet elektrických varných zón | Numărul de zone electrice de gătit | |
| F | Isıtma Teknolojisi: Radyan (Endük-siyonlu pişirme bölgeleri ve pişirme alanları, radyan pişirme bölgeleri, elektrikli ocak gözleri) | Technologia grzewcza: Promiennikowa (indukcyjne strefy i obszary gotowania, promiennikowe strefy gotowania, płyty lite) | Technologie ohřevu: Sálavé (indukční varné zóny a varné plochy, sálavé varné zóny, pevné plotny) | Technológia ohrevu: Sálavá (indukčné varné zóny a varné plochy, sálavé varné zóny, pevné platničky) | Tecnologia de încălzire: Radiantă (zone și suprafețe de gătit prin in- ducție, zone de gătit convenționale, plăci electrice) | |
| G | Bölge 1-2-3-4-5 için boyut: | Wymiary strefy 1-2-3-4-5: | Rozměr pro zónu 1-2-3-4-5: | Rozmer pre zónu 1-2-3-4-5: | Dimensiunea pentru Zona 1-2-3-4-5: | |
| H | Bölge 1-2-3-4-5 başına enerji tüketimi (elektrikli pişirme): | Zużycie energii dla strefy 1-2-3-4-5 (kuchenka elektryczna): | Spotřeba energie zóny 1-2-3-4-5 (elektrické vaření): | Spotreba energie na zónu 1-2-3-4-5: (elektrické varenie): | Consumul de energie per Zona 1-2-3-4-5 (gătit electric): | |
| I | Ocağın enerji tüketimi: | Zużycie energii płyty grzewczej: | Spotřeba energie varné desky: | Spotreba energie varnej dosky: | Consumul de energie al plitei: | |
| J | EN 60350-2'ye göre ölçülür: | Zmierzono zgodnie z norma EN 60350-2: | Měřeno podle normy EN 60350-2: | Merané podľa normy EN 60350-2: | Măsurat conform EN 60350-2: |
| IT | NL | GR | BG | HU | |
| A | Informazioni sul prodotto relative al "REGOLAMENTO DELEGATO DELLA COMMISSIONE (UE) N. 66/2014" | Productinformatie betreft de "GEDELEGE-ERDE VERORDENING (EU) nr. 66/2014 VAN DE COMMISSIE" | Πληροφορίες προϊόντος σχετικά με τον "ΚΑΤ' ΕΞΟΥΣΙΟΔΟΤΗΣΗ ΚΑΝΟΝΙΣΜΟ (ΕΕ) ΑΡΙΘ. 66/2014 ΤΗΣ ΕΠΙΤΡΟΠΗΣ" | Информация за продукта във връзка с „ДЕЛЕГИРАНИЯ ОТ КОМИСИЯТА РЕГЛАМЕНТ (ΕС) No 66/2014" | A BIZOTTSÁG 66/2014/EU RENDE-LETÉRE vonatkozó termékinfor-mációk |
| B | Simbolo/Valore/Unità | Symbol / waarde / unit: | Σύμβολο / Τιμή / Μονάδα: | Символ / Стойност / Единица: | Jel/Érték/Mértékegység |
| C | Modello | Model | Μοντέλο | Модел | Modell |
| D | Tipo di piano cottura: Elettrico: | Soort fornuis: Elektrisch: | Τύπος εστίας: Ηλεκτρική: | Τип котлон: Електрически | Tüzhely típusa Elektromos: |
| E | Numero di zone di cottura elettriche | Aantal elektrische kookzones | Αριθμός ηλεκτρικών ζωνών μαγειρέματος | Брой електрически зони за готвене | Elektromos főzőfelületek száma |
| F | Tecnologie di riscaldamento: Radiante (aree di cottura e zone di cottura a induzione, zone di cottura radianti, piastre del piano cottura) | Verwarmingstechnologie: Straling (inductiekookzones en kookgebieden), stralingskookzones, vaste kookplaten) | Γεχνολογία θέρμανσης: Δια ακτινοβολίας (επαγωγικές ζώνες και περιοχές μαγειρέματος, ζώνες μαγειρέματος δια ακτινοβολίας, συμπαγείς πλάκες) | Технология за нагряване: Излъчваща (индукционни зони за готвене и области за готвене, излъчващи зони за готвене, твърди плочи) | A hő előállításának elve: Hősugár-zós(indukciós főzőfelület/főzőlap, hősugárzós főzőfelület, tömör lemez) |
| G | Dimensione per la Zona 1-2-3-4-5: | Afmeting voor zone 1-2-3-4-5: | Διάσταση για ζώνη 1-2-3-4-5: | Размери за зона 1-2-3-4-5: | 1-2-3-4-5. zóna méretei: |
| H | Consumo energetico per la Zona 1-2-3-4-5 (cottura elettrica): | Energiegebruik per zone 1-2-3-4-5 (elektrisch koken): | Κατανάλωση ενέργειας ανά ζώνη 1-2-3-4-5 (μαγείρεμα με ηλεκτρισμό): | Потребление на енергия за зона 1-2-3-4-5 (elektriческо готвене): | 1-2-3-4-5. zónára levetített energia-fogyasztás (elektromos tűzhely): |
| I | Consumo energetico del piano di cottura: | Energiegebruik van het fornuis: Κατανάλωση ιαχύος της εστίας: | Потребление на енергия за котлona: | A tűzhely energiafogyasztása: | |
| J | Misurato secondo EN 60350-2: | Berekend naar EN 60350-2: | Μέτρηση σύμφωνα με το EN 60350-2: | Измерено според EN 60350-2: | EN 60350-2 höz mévre: |

- Montage / Installation / Instalación / Instalação / Installation / Kurulum / Installazione / Installatie / Εγκατάσταση
- Installation
- Emplacement with cutlery drawer
- Electrical connection
- Warning:
- EN
- Use and Maintenance
- User instructions of the Touch Control
- HANDLING ELEMENTS (fig. 2)
- SWITCHING ON THE DEVICE
- Touch the switching on touch key Ⓙ (1) for at least one second.
- SWITCHING ON A HOT PLATE
- SWITCHING OFF THE HOT PLATE
- Quick switch-off alternatives :
- RESIDUAL HEAT INDICATOR
- SWITCHING OFF THE DEVICE
- Double burner hot plate (Depending on model)
- CHILD LOCK (depending on model)
- Flash Cooking (Automatic cook start)
- SWITCHING ON THE DOUBLE HOT PLATE
- SWITCHING OFF THE DOUBLE HOT PLATE
- Locking of the touch keys of the cooking hob (depending on model)
- Activating Child Lock :
- Deactivating Child Lock :
- SWITCHING THE AUTOMATIC COOK START FUNCTION ON
- SWITCHING THE AUTOMATIC COOK START FUNCTION OFF
- Timer Function
- TIMING ONE HOTPLATE
- CHANGING THE PROGRAMMED TIME
- DISCONNECTION OF THE TIMER
- Power Function (Depending on model)
- Stop&Go Function (Depending on model)
- Activating the Stop&Go function.
- Deactivating the Stop&Go function
- CHEF Functions (Depending on model)
- YOGURT FUNCTION (Depending on model)
- To activate this function:
- Wait 10 seconds
- Yogurt Recipe
- RICE FUNCTION (Depending on model)
- Rice Recipe
- Shabbat Function (Depending on model)
- Note:
- Safety switch off function
- Recommendation for the good use of vitroceramic hobs
- Cleaning and maintenance
- Environmental considerations
- If something does not work
- Plural Sensor Error:
- Potential root reasons of the problem
- FC Error:
- F3 / Main sensor error
- F4 / Safety software error
- DE
- ZAPNUTÍ JEDNÉ PLOTÝNKY
- NASTAVENÍ ČASU JEDNÉ PLOTÝNKY
- Locking of the touch keys of the cooking hob
- ACCENSIONE DEL DISPOSITIVO
- STARTEN VAN AUTOMATISCHE G E P R O G R A M M E E R D E K O O K F U N C T I E
- GEDEACTIVEREN VAN AUTOMATISCHE G E P R O G R A M M E E R D E K O O K F U N C T I E
Brand : Küppersbusch
Model : KE6110.0SE
Category : Cooker