PDG103MN - Professional cooking appliance Inoksan - Free user manual and instructions
Find the device manual for free PDG103MN Inoksan in PDF.
| Product Type | Professional cooking appliance (gas rotisserie) |
| Brand | Inoksan |
| Model | PDG103MN |
| Dimensions (L x D x H) | 530 x 769 x 973 mm |
| Shipping weight | 33.8 kg |
| Installed weight | 42.8 kg |
| Power supply | 115 V AC, 60 Hz, 0.4 A |
| Required plug | NEMA 5-15P (3-pin with ground) |
| Gas type | Natural gas (NG) |
| Total power | 30,717 BTU/h (7.5 kW) |
| Recommended gas pressure | 15 mbar (6 in WC) |
| Injector (natural gas) | 1.55 mm (0.061 in) |
| Main functions | Motorized rotisserie (horizontal/vertical rotation), vertical/horizontal radiant burners, manual ignition |
| Maximum meat capacity | Indicated on the appliance diagram (do not overload) |
| Material | Stainless steel |
| Installation | Under a hood or in a well-ventilated area, safety distances: sides 304.8 mm, rear 76.2 mm, floor N/A |
| Gas connection | 1/2 in flexible metal hose of sufficient length |
| Maintenance and cleaning | Daily cleaning with a cloth soaked in warm soapy water and suitable disinfectant. Do not use abrasive products. The spit and plates can go in the dishwasher. |
| Safety | Emergency stop: shut off gas and disconnect. In case of gas odor, do not use switches, do not smoke, ventilate, and call gas emergency. |
| Gas conversion | Possible for LPG (butane/propane) by changing the injector (see table T1) |
| Spare parts and repairability | Contact an authorized technician. The electrical diagrams are behind the control panel. Serial number and model required for support. |
| General information | Manual available in French, English, Turkish. Manufacturer: Inoksan USA Corp. Website: www.inoksanUSA.com |
Frequently Asked Questions - PDG103MN Inoksan
User questions about PDG103MN Inoksan
0 question about this device. Answer the ones you know or ask your own.
Ask a new question about this device
Download the instructions for your Professional cooking appliance in PDF format for free! Find your manual PDG103MN - Inoksan and take your electronic device back in hand. On this page are published all the documents necessary for the use of your device. PDG103MN by Inoksan.
USER MANUAL PDG103MN Inoksan
"Professional In Kitchen"
iN·XSAN
WARNING: This appliance shall be installed in accordance with current regulations and used only in well-ventilated space. Refer to instructions before installing and using this appliance.
a. If you smell gas, call your local gas utility emergency line immediately. Until the service team arrives:
i. Don't use electrical appliances or switches that can cause sparks.
ii. Don't smoke or light matches
iii. Leave doors and windows as they are
iv. Go outside
WARNING: Improper installation, adjustment, alteration, service or maintenance can cause property damage, injury or death. Read the installation, operating and maintenance instructions thoroughly before installing or servicing this equipment.
FOR YOUR SAFETY: Do not store or use gasoline or other flammable vapors or liquids in the vicinity of this or any other appliance.
WARNING: Electrical circuit diagram of the appliance is inside the control panel.
Contact your local authorized service agent for service or required maintenance.
Please record the model number, serial number, voltage and purchase date in the area below and have it ready when you call to ensure a faster service.
Authorized Service Agent Listing / List des techniciens agrees
Telephone / Telephone:
Office: 201.467.8333 | Fax: 201.624.7444 |
Fax/Fax:
Cell:201.906.1181
E-mail / Courriel
www.inoksanUSA.com
Be sure to remove all paper protection and packing material from unit prior to lighting.
This appliance should be installed in a non-combustible location only.
The installation of the Appliance must conform to the
NATIONAL FUEL GAS CODE "ANSI Z223.1 - LATEST EDITION" AND ALL LOCAL GAS COMPANY RULES AND
REGULATIONS.
IN CANADA INSTALLATION SHALL BE IN ACCORDANCE WITH THE CURRENT CAN/CGA-B149.1 NATURAL
National Fuel Gas Code, ANSI Z223.1/NFPA 54, or the Natural Gas and, CSA B149.1, as applicable, including:
1) The appliance and its individual shutoff valve must be disconnected from the gas supply piping system during any pressure testing of that system at test pressures in excess of 1/2 psi (3.5 kPa).
2) The appliance must be isolated from the gas supply piping system by closing its individual manual shutoff valve during any pressure testing of the gas supply piping system at test pressures equal to or less than 1/2 psi (3.5 kPa).
WARNING: Appliance must be used by trained personnel.
We recommend you to install the appliance under the Hood.
Provide proper installation gaps to allow adequate clearance for the performance of combustion chamber and to ensure that the appliance correctly and to intervene in case of an emergency.
WARNING: Thisappliance is can only be installed on non combustible floor. Do not keep flammable material beside the appliance. Keep the appliance free and clear front combustibles.
Do not block air flow ofumbustion and ventilation air to ensure a good burning performance.
Do not obstruct the flow of cumbustion and ventilation air.
WARNING: Unplug the appliance during cleaning and maintenance.
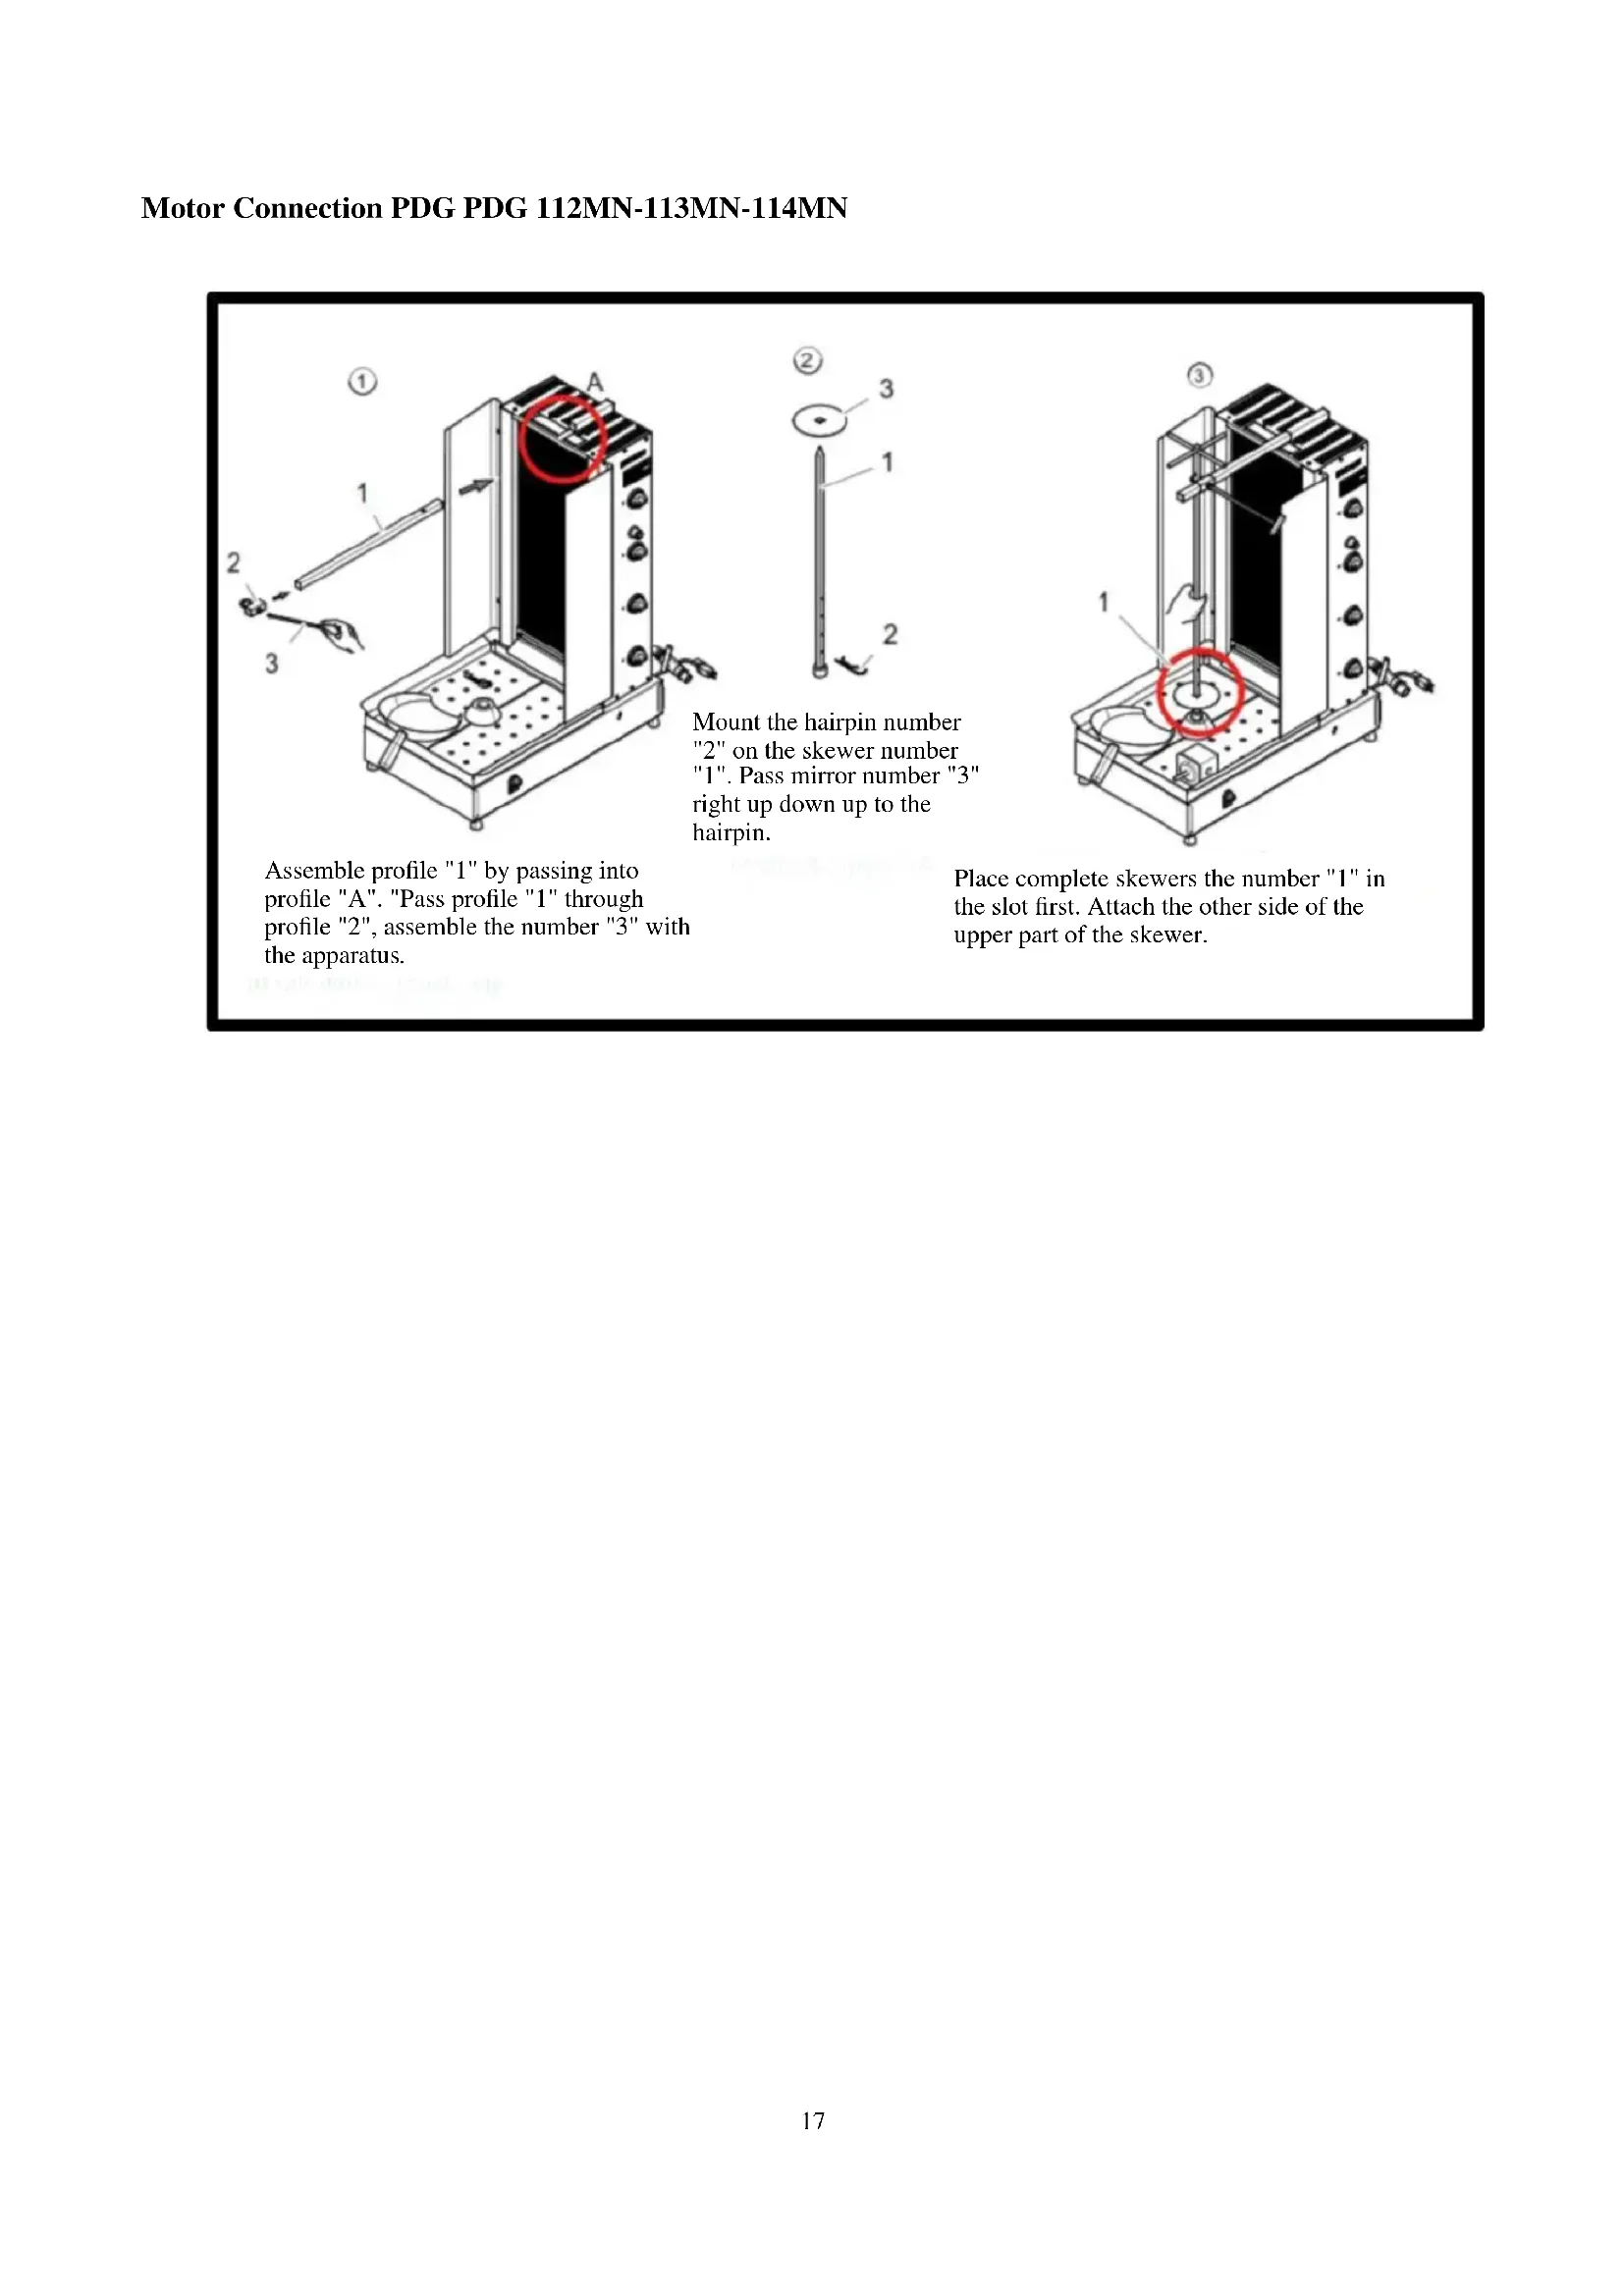
Assemble profile "1" by passing into profile "A". "Pass profile "1" through profile "2", assemble the number "3" with the apparatus.
Place complete skewers the number "1" in the slot first. Attach the other side of the upper part of the skewer.

Always read the instruction manual before starting to use the appliance and keep it for future reference when you
need it.

Manufacturer company does not accept any responsibility for any operations performed without following the instruction manual,
and for damages occurred against people or property due to maintenance or technical interventions by qualified technicians.
1. INSTALLATION
Technical Specifications" table should be based on when installation of the appliance, gas connection and conversion to different gases, electricity supplies are installed by experts in accordance with local standards.
Place the appliance on a bench by taking it on a scale.
Place the appliance under a fume hood or in an environment where adequate ventilation can be carried out in order to exhaust fumes and odors.
2. USER INSTRUCTION
Do not overload the appliance more then the specified meat capacity in the chart
Controlling of the radians can be performed separately in horizontal or vertical row, put the radians into use in accordance with the size of the doner meat.
1d/d motor placed in the lower body rotates the skewer in an inclined or upright position, providing ease of homogeneous cooking and ergonomic use.

WARNING: Allow enough space around the unit for adequate ventilation. Read all labels on the unit and follow their instructions.
If the appliance is mounted in the immediate vicinity of kitchen furniture, decorative coating etc., it is recommended that they should be made of noncombustible material; otherwise they must be coated with non-burning thermal insulation material and fire protection instructions must be followed carefully.
3. GAS PRESSURE PEASUREMENT
"[Toques and mittens" should be used while user working.
Gas inlet pressure must be in accordance with the values given in the table after the gas connection. For this purpose, a hood must be used to ensure proper flow rate and pressure.
Make sure the adaptation of the appliance is carried out in accordance with the gas you will e. If it is not appropriate, the injector must be changed.
All the necessary components for installation will be provided by the manufacturer.

LIGHTING INSTRUCTION
Each gas tap controls a horizontal and/or a rowed of radios.
-First open the main gas valve, manually burn the pilot, then burn the burners starting from the bottom
- For the first burning operation (lower burner), push button "1" and turn counter clockwise from "0" to full flame position.
- For the half flame, press the button and turn counter clockwise from "0" to the half flame position.
- For burn the other burners, turn the burners buttons clockwise from "0" position to full flame position, from the lower hold down the flame until the flame is jumped, and leave the combustion process
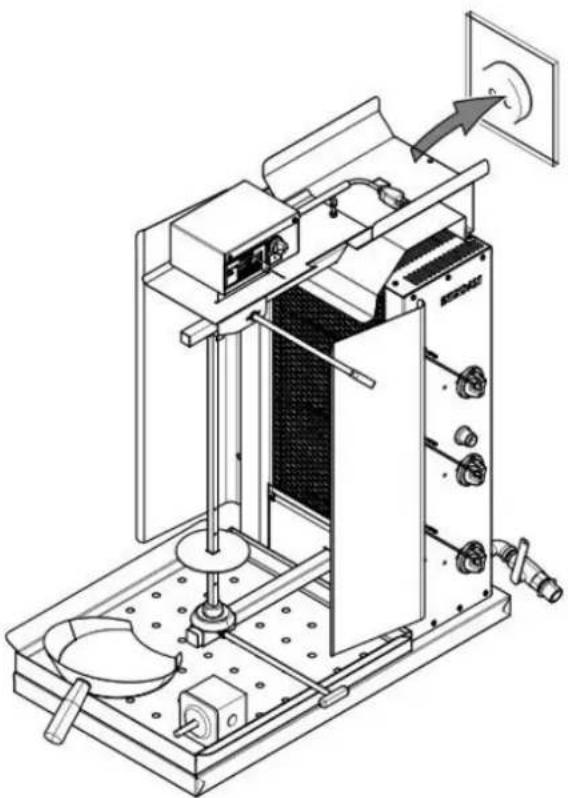
To rotate the skewer, plug the appliance plug "1" into a socket and bring the key "2" with position "I-0-II" to the position "I" or "II" (Right/Left rotation).
SHUTDOWN INSTRUCTION
To shutdown the appliance, turn all knobs clockwise one by one until they are at position 0 starting with the bottom knob. Bring motor power switch to "0".
After all the burners have been switched off, close the main gas valve and completely cut off the gas
"Wait for 5 minutes before restarting the appliance when you turn it off."
SAFETY PRECAUTIONS
When the surfaces of the robax glass and storage system cools down, use a few drops of suitable cleaner and wipe clean with a soft cloth or paper towel.
Rinse thoroughly with water and dry with another paper towel or soft cloth.
4. POWER INLET
The appliance must be supplied with 110V AC 60Hz mains voltage.
The appliance must be grounded.
GROUNDING

WARNING : The appliance is equipped with a three-prong (grounding) plug for your against shock hazard and should be plugged directly into a
properly grounded three-prong receptacle. Do not cut or remove the grounding prong from this plug.
The appliance, when installed, must be electrically grounded in accordance with local codes, or in the absence of local codes, with the National Electrical Code, ANSI/NFPA 70, or the Canadian Electrical Code, CSA C22.2
directly or with high-pressure water. Otherwise you may cause an electrical installation malfunction.

0
CT.OSED

BURNER FULL FLAME
LEFT BURNER HALF FLAME
5. MAINTENANCE
Disconnect the electrical connection of the appliance immediately before beginning maintenance or cleaning activities.
Before the first use, the electrical connection of the appliance must be disconnected and it must be cleaned with warm soapy water.
Water must definitely not be sprayed or spilled on the appliance.
Clean the appliance at the end of each working day with a piece of cloth soaked with warm soapy water and with a disinfectant that will not harm nutrition products (especially the areas in contact with meat).
Pins and tray plate contacted by the meat may be washed in the dishwasher.
Do not use materials that can scratch the surface such as detergent with abrasive ingredients, wire brushes, etc. when cleaning the surface of the appliance.
If the appliance will not be used for a long period of time, the surface should be coated with a thin layer of Vaseline.
□Notify the authorized service if the appliance is considered in a dangerous situation. Do not allow incompetent persons to interfere with the appliance.
□Contact manufacturer when the maintenance period of the appliance has expired and/or when the appliance has a fault.
WARNING: Do not clean the appliance with
9. TRANSFORMATION FOR DIFFERENT GAS TYPES
Refer to table "T1" for adaptation to different gas types.
Choose the injector suitable for the gas type and pressure to be used from table "T1" and install it to the housing of the removed injector.
Label for the new gas type shall be affixed by removing the current label after adapting the appliance to a different gas type than the gas type set by the manufacturer.
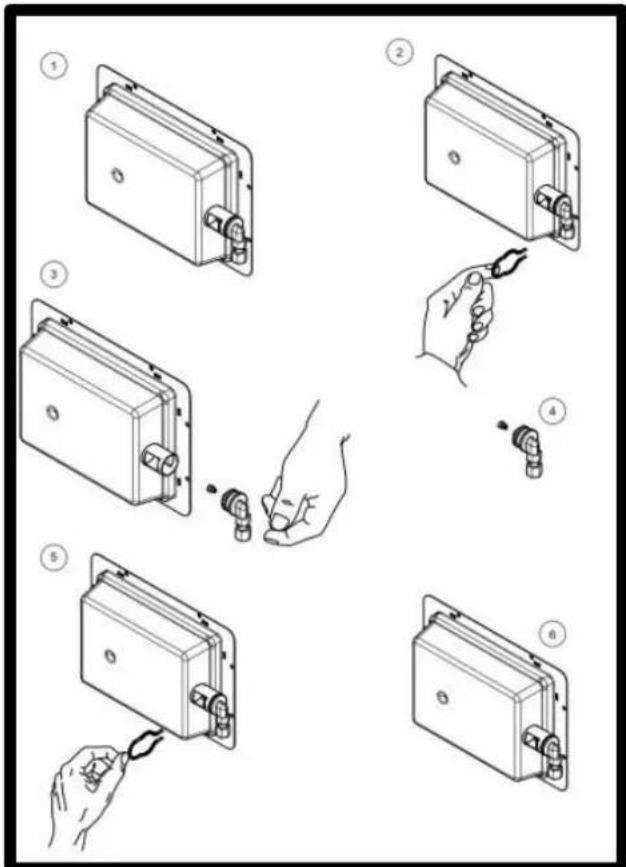
9.1 Replacement of Injector
Select suitable injector from table T1.
Remove the rear plate of the appliance.
(1) Face the radiant. (2) Remove the pin on the radiant. (3) Remove injector from the radiant. (4) Replace with new injector and install the new injector to the same housing. (5) Install the pin as you have removed it. (6) Gas type transformation is complete.
Injector diameters are printed on the injectors.

Motor Connection PDG 102MN-102N-103MN-103N-104MN-104N


Rinse thoroughly with water and dry with another paper towel or soft cloth.