THASN276TM6S - Washing machine HAIER - Free user manual and instructions
Find the device manual for free THASN276TM6S HAIER in PDF.

User questions about THASN276TM6S HAIER
0 question about this device. Answer the ones you know or ask your own.
Ask a new question about this device
Download the instructions for your Washing machine in PDF format for free! Find your manual THASN276TM6S - HAIER and take your electronic device back in hand. On this page are published all the documents necessary for the use of your device. THASN276TM6S by HAIER.
USER MANUAL THASN276TM6S HAIER
Washing machine Top Loader

natural_image
Exterior view of a white disposable washing machine (no visible text or symbols)IT 3
DE 11
EN 19
ES 27
FR 35
NL 43
PT 51
BG 59
HR 67
HU 75
SL 83
SR 91
CS 99
PL 107
RO 115
SK 123
UA 131
EL 139
DA 147
SV 155
FI 163
NO 171
IT

Haier

natural_image
Technical line drawing of a front view of a computer tower case with labeled component (no text or symbols beyond label)
flowchart
graph TD
    A["Open Bin"] --> B["Recycle Icon"]
    B --> C["Recycle Symbol"]
    C --> D["Recycle Bin"]

natural_image
Diagram showing a mechanical device connected to a control panel with a dashed outline (no text or symbols)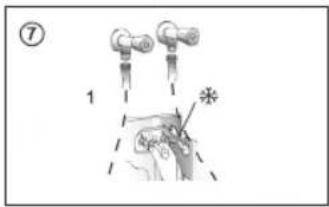
Pulsanti
A Play/pausa
natural_image
Diagram showing a device with labeled buttons and a close-up of its internal structure (no text or symbols present)


Haier

natural_image
Technical diagram showing a device with labeled ports and a close-up view of its internal structure (no text or symbols present)


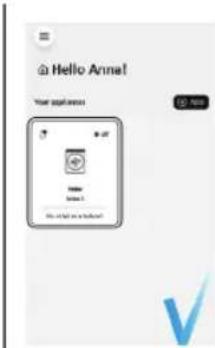
Download the hOn App


Before using the device, carefully read the safety instructions.
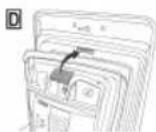
Before using the washing machine, it is absolutely necessary to remove the screws and transport lock spacers.
For detailed instructions on the removal procedure, see the Installation Instructions
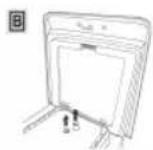
1. Installation
1.1 - Transportation bolts removal
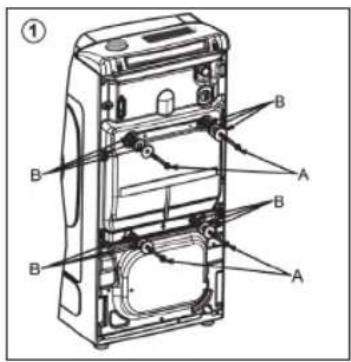
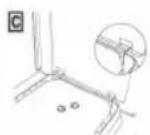
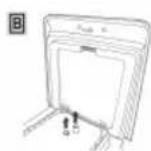
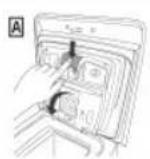
- Remove the 2 or 4 transportation screws (A) on the back and remove the 2 or 4 flat washers, rubber bungs and plastic spacer tubes (B) as illustrated in figure 1.
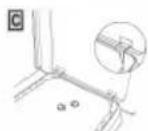
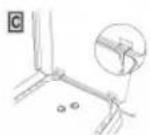
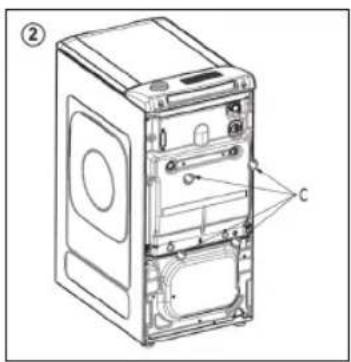
• Fit the trims provided "C" (fig. 2).
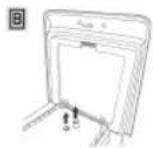
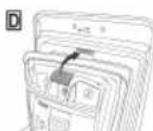
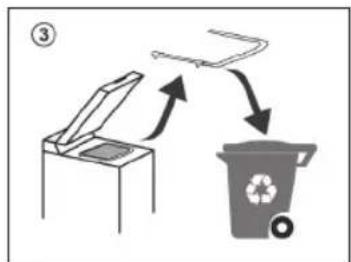
1.2 - Carefully remove and dispose of the protective profile located under the washing machine door (as shown in Figure 3).
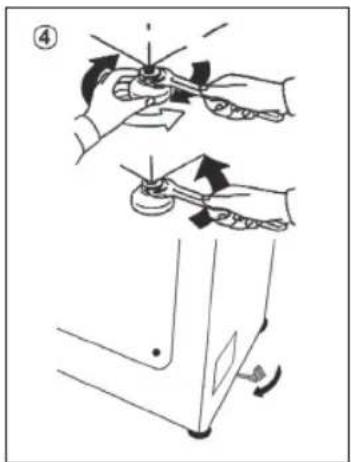
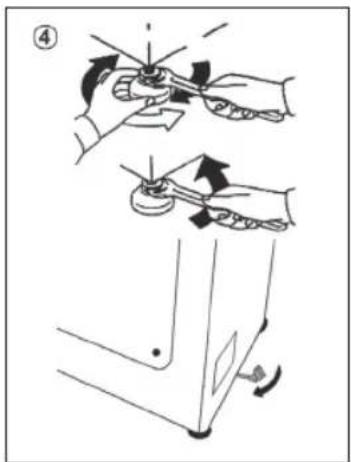
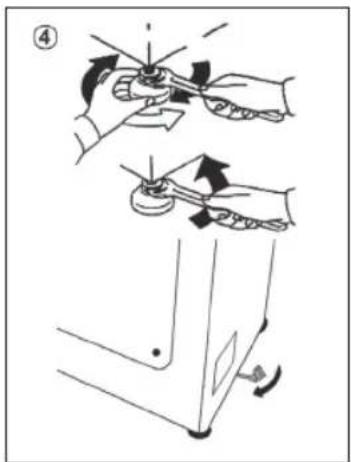
1.3 - Aligning the appliance
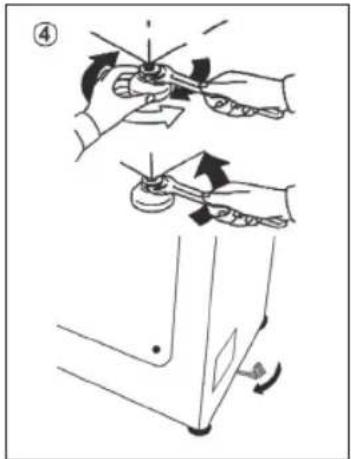
- Level the machine by adjusting the front feet (fig. 4).
a) Turn the nut clockwise to release the screw on the foot.
b) Raise or lower the foot by rotating it until it stands firmly on the floor.
c) Lock the foot in position by turning the nut anticlockwise until it comes up against the bottom of the washing machine.
- Check that the appliance is properly levelled.
- Check that the washing machine does not rock by trying to move two diagonally opposite top corners at the same time.
- If you move the washing machine from one place to another, you must level the feet again afterwards.

natural_image
Technical line drawing of a front view of a washing machine casing with labeled component (no text or symbols beyond label)
flowchart
graph TD
    A["Open Bin"] --> B["Recycle Bin"]
    B --> C["Recycle Icon"]
1.4 - Hydraulic connections
- The washing machine should be connected to the water mains via the new tube supplied with the appliance (inside the drum). Do not use the old tube for this purpose.
- Connect one end of the water inlet pipe with the elbow bend to the electrovalve (top rear part of the machine) and the other end to a tap or a plumbed-in 3/4" gas threaded connection
- Place the washing machine close to the wall, ensuring that there are no bends or kinks anywhere in the tube.
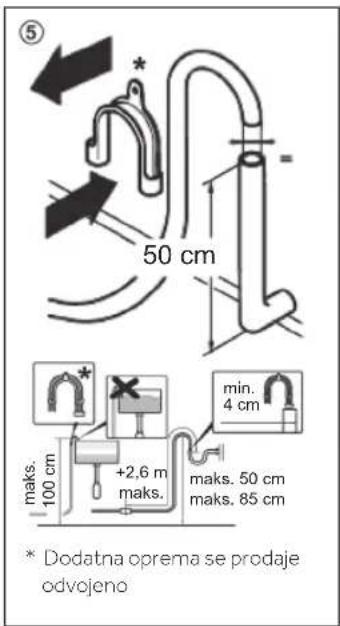
- Hook the outlet pipe to the edge of the sink or preferably to a fixed drainage outlet of a diameter greater than that of the outlet pipe and at a height of min. 50 cm and a maximum of 75 cm from the floor (fig. 5).
- If necessary, use the curved* accessory to attach and support the outlet pipe more securely.
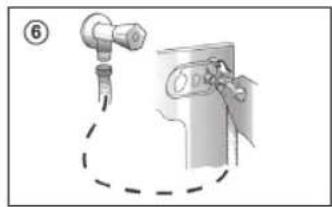
- Connect the water hose to the water supply tap (fig. 6) only using the hose supplied with the appliance (do not reuse old hose-sets)
-
Some models may include one or more of the following features:
-
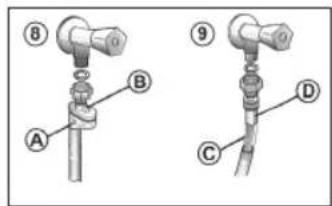
HOT&COLD (fig. 7): water mains connection settings with hot and cold water for higher energy savings. Connect the grey tube to the cold water faucet, and the red one to the hot water faucet. The machine can be connected to the cold water faucet only: in this case, some programs may start a few minutes later.
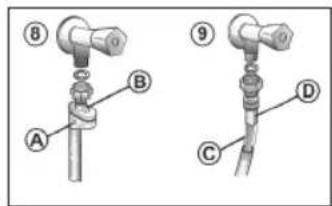
- AQUASTOP (fig. 8): a device located on the supply tube that stops water flow if the tube deteriorates; in this case, a red mark will appear in the window "A" and the tube must be replaced. To unscrew the nut, press the one-way lock device "B".
-
AQUAPROTECT - SUPPLY TUBE WITH GUARD (fig. 9): should water leak from the primary internal tube "C", the transparent containment sheath "D" will contain water to permit the washing cycle to complete. At the end of the cycle, contact the Customer Service Centre to replace the supply tube.
-
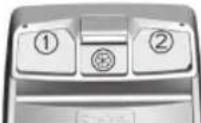
Control panel
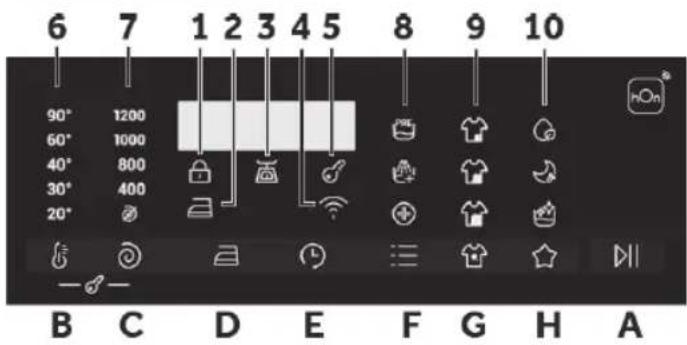
Buttons
A Play/Pause
B Temperature selection
C Spin speed
D Easy iron
E Delay start
F Options
G Stain level/Steam level*
H Special programmes (only available on certain models)
B+C Child lock
* Steam level (only available on certain models)
Icons
1 Door locked indicator
2 Easy iron indicator
3 Kg Load indicator light (active only on certain programmes)
4 Wi-Fi indicator
5 Child lock indicator
6 Wash temperature indicator
7 Spin speed indicator
8 Options indicator
9 Stain level indicators
10 Special programmes indicator
2.1 - Buttons

Play/Pause (A)
Close the door BEFORE selecting the button PLAY/PAUSE. To start the selected cycle with the preset parameters, press PLAY/PAUSE. When the programme is running, the display will show the time to elapse.

Temperature button (B)
This button allows you to change the temperature of the wash cycles. It is not possible to raise the temperature over the maximum allowed for the programme, in order to protect the fabrics. If you want carry out a cold wash all the indicators must be off.

Spin speed button (C)
By pressing this button, it is possible to reduce the maximum speed, and if you wish, the spin cycle can be cancelled.

Easy iron button (D) (Available on some programmes only)
This function allows you to minimize creases as much as possible, eliminating the intermediate spins or reducing the intensity of the last one.

Delay start button (E)
This button allows you to pre-programme the wash cycle to delay the start of the cycle for up to 24 hours.

Options button (F)
This button allows you to choose between different options (depending on the selected programme):

Prewash (F) - This option allows you to make a prewash and it is particularly useful for heavily soiled loads (can be used only on some programmes). When activated, the indicator icon (E) lights up

Extra rinse (F) - This option allows you to add one rinse at the end of the washing cycle and is useful for people with delicate and sensitive skin. When activated, the indicator icon (F) lights up

Hygiene + (F) - Activated when you set 60°C of temperature. This option allows deep cleaning of your clothes by maintaining the same temperature for the whole wash..

Stain level (G)
This option allows you to choose between 3 levels of wash intensity modifying the length of the programme, depending on how much the fabrics are soiled (can only be used on some programmes as shown in the table of programmes).
Steam level (G) (only available on certain models)
After selecting the EASY IRON PLUS programme, you can use this button to choose between three steam treatments of different intensities, designed for dry or wet garments and depending on the type of fabric:
- COTTON (default selection)
This programme is used for cotton garments. On wet fabrics (e.g., after washing), it is suitable for relaxing creases after spinning; on dry fabrics it is instead designed to achieve the ideal humidity level for easier ironing.
- SYNTHETIC (press button once)
This programme is used for synthetic garments. On wet fabrics (e.g., after washing), it is suitable for relaxing creases after spinning; on dry fabrics it is instead designed to achieve the ideal humidity level for easier ironing.
- DELICATES (press button twice)
With the help of steam, the cycle refreshes and relaxes creases in garments after use. The programme consists of an initial phase in which the steam acts and a final phase in which the excess humidity is removed for immediate use. The cycle is suitable for dry fabrics.

Special programmes (H)
This button allows you to choose between different options (depending on the selected programme):

Single item (H) - This option (which can be set in several programs) optimizes the water and energy consumption of the selected program, maintaining the washing performance unchanged.

Night wash (H) - This option reduces the intermediate spin speed to 400 rpm, where applicable, increase the water level during rinsing and keep the laundry immersed in water after the final rinse, in order to spread the fiber perfectly.

Drum clean (H) - Developed to clean the washing machine drum. Use only powder detergent. Do not start the programme with laundry in the washing machine. It is suggested that this is carried out after every 50 washing cycles. The option can only be selected for the DRAIN & SPIN programme.

Child lock (B+C)
- Pressing simultaneously the buttons "TEMPERATURE SELECTION" and "SPIN SPEED" for about 3 seconds, the machine allows you to lock the keys. In this way, you can avoid making accidental or unwanted changes if a button on the display is pressed accidentally during a cycle.
- The key lock can be simply cancelled by pressing the two buttons simultaneously again or turning off the appliance.

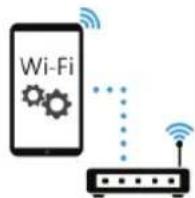
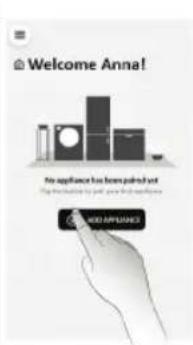
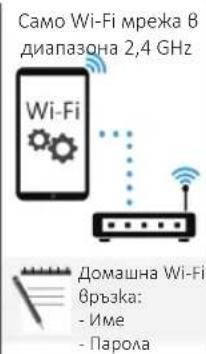
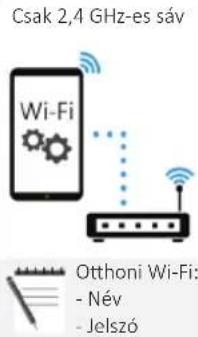
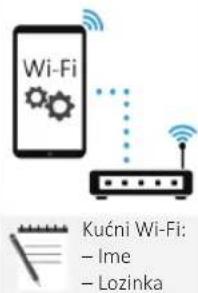
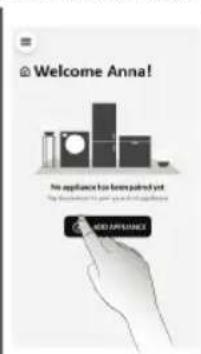
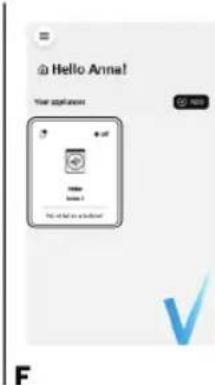
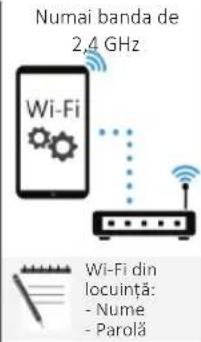
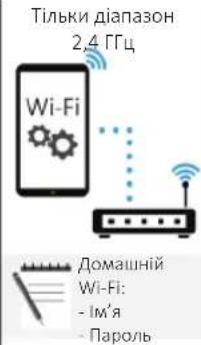
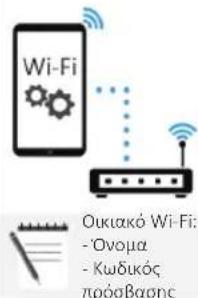
APPLIANCE PAIRING (ON APP)
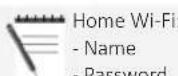
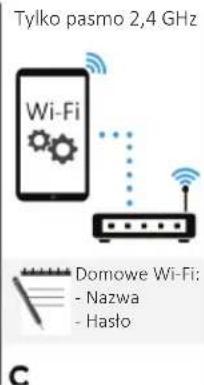
NOTE: The frequency of the home Wi-Fi network has to be set on the 2.4 GHz band. (5 GHz band not allowed).
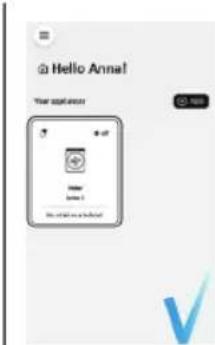
- Download the hOn App on your device by framing the following QR code or by the link: go.haier-europe.com/download-app
• Create the user profile (or log-in) and pairing the appliance following the instructions on the device display.
Download the

App


A

B
2.4 GHz band only
C
Follow pairing instructions


D
E

F
TO ENABLE REMOTE CONTROL
- Close the door and turn the knob to the REMOTE CONTROL (Wi-Fi) position. You can now manage your product from the app.
TO DISABLE REMOTE CONTROL
- Turn the knob to any position other than REMOTE CONTROL (Wi-Fi), without going through the OFF. If there is a cycle underway, it will continue. From the app it is possible to view the status of the product but not to control it.
2.2 - Icons

Door lock indicator (1)
For safety reasons the door is locked partially during the washing cycle. It is only possible to open the door at the end of the program or after the program was cancelled correctly. In case of high water level, high water temperature and during spinning it is not possible to open the door.

Easy iron indicator light (2):
The indicator light shows the selection of the relevant option.

Kg Load indicator light (3): (active only on certain programmes).
Through every wash phase "Kg Load" allows to monitor information on the wash load in the drum and in the first minutes of the wash it:
- adjusts the amount of water required;
• determines the length of the wash cycle; - controls rinsing according to the type of fabric selected to be washed it;
- adjusts the rhythm of drum rotation for the type of fabric being washed;
- recognises the presence of too much soap suds, and if necessary, adjust the amount of rinse water.
- adjusts the spin speed according to the load, thus avoiding any imbalance.

Wi-Fi indicator light (4): On models equipped with Wi-Fi, it indicates the status of the connection. It could be.

Key lock indicator light (5): The indicator light show that the keys are locked.

Wash temperature indicator light (6)
This show the washing temperature of the selected programme that can be changed (where allowed) by the relevant button. If you want carry out a cold wash all the indicators must be off.

Spin speed indicator light (7)
This show the spin speed of the selected programme, you can reduce or omit by the relevant button.


Options indicator light (8)
The indicator lights show the options that can be selected by the relevant button.


Stain level indicator light (9)
- Once the programme has been selected, the indicator light will automatically show the stain level set for that programme.
- Selecting a different stain level the relevant indicator will light up.


Special programmes indicator light (10) *Only available on certain models
The indicator lights show the options that can be selected by the relevant button.
3. Programmes

Yes

Yes by pressing the button

Optionals

No

Detergent compartment for:

② Detergent

Softener or care product

Prewash
| PROGRAMME | [T3Y0] (MAX.) (see control panel) |  | DETERGENT | NIGHT WASH | EXTRARINSE | HYGIENE+ | EASY IRON | STAIN LEVEL | DELAY START | ||||||||||
| 5kg | 5.5kg | 6kg | 6.5kg | 7kg | 7.5kg | 8kg | 8.5kg | (MAX.) | 1 or 2 |  |  | ||||||||
| [W231] | RAPID 44' | 333 | 33.5 | 3.53 | .53 | .540° | ● | ● | / ○ | / / / | ○ | ||||||||
| [H15C] | RAPID 14' | 111 | 111 | 1.51 | .530° | ● | ● | / ○ | / / / | ○ | |||||||||
| [3D0A] | MIXED & COLOURED 59' | 55 | .566 | .577 | .588 | .540° | ● | ● | / ○ | / / / | ○ | ||||||||
 | WOOL/HAND WASH | 111 | 111 | 2230° | ● | ● | ○ | ○ | / ○ | / ○ | |||||||||
 | EASY IRON PLUS | 1.51 | .51 | .51 | .51 | .51 | .51 | - | / / / / | ○ | |||||||||
 | DRAIN & SPIN | - | - | - | - | - | - | - | - | - | / / / / | ○ | |||||||
 | RINSE | - | - | - | - | - | - | - | - | - | △ | ● | / / / / | ○ | |||||
| [X2HS] | STEAM HYGIENE PLUS | 2.52 | .533 | 3.53 | .544 | .60° | ● | ● | / ○ | / / / | ○ | ||||||||
| [W0K5] | BABY CARE | 222 | 22.5 | 2.52 | .52 | .560° | ● | ● | ○ | ○ | ○ | / ○ | |||||||
 | FRESH CARE | 222 | 22.5 | 2.52 | .52 | .540° | ● | ● | / ○ | / / / | ○ | ||||||||
| [3770] | ECO 40-60 | 55 | .566 | .577 | .588 | .560° | ● | ● | / / / / | ○ | ○ | ||||||||
 | 20°C | 55 | .566 | .577 | .588 | .520° | ● | ● | ○ | ○ | / / ○ | ○ | |||||||
| [2Y8T] | SYNTHETICS | 2.52 | .533 | 3.53 | .544 | .60° | ● | ● | (●) | ○ | ○ | ○ | ○ | ||||||
 | COTTON | 55 | .566 | .577 | .588 | .590° | ● | ● | (●) | ○ | ○ | / ○ | |||||||
| [36YS] | REMOTE CONTROL (Wi-Fi) Position that you have to select when you want to enable remote control through the App (via Wi-Fi). | ||||||||||||||||||
3.1 - Programmes description
| [W0HS] | RAPID 44' | A complete washing cycle (wash, rinse and spin). This programme is particularly suited to slightly dirty cottons and mixed fabrics. With this programme it is recommended to use only 20% of the detergent normally used to avoid waste. |
| [K72C] | RAPID 14' | A complete washing cycle (wash, rinse and spin). This programme is suited to slightly dirty cottons and mixed fabrics. With this programme it is recommended to use only 20% of the detergent normally used to avoid waste. |
 | MIXED & COLOURED 59'* | This programme offers you the freedom to wash all kinds of fabrics and non-fading colours together, with a full load, obtaining excellent results in only 59 minutes. With washing at medium temperature, this programme is recommended for laundry that is not particularly dirty.* Preset temperature of 20°C (modifiable by the relevant button). The washing cycle is also suitable for washing cotton fabrics. |
| [C07S] | WOOL/HAND WASH | This programme performs a wash cycle dedicated to the wool fabrics that can be washed in a washing machine, the articles to be washed by hand or laundry items made from silk or specified as "Wash as Silk" on the fabric label. |
 | EASY IRON PLUS | This programme uses a steam treatment to relax creases and achieve the ideal degree of humidity for easier ironing. Three different intensity levels can be selected via the button, designed for dry or wet garments and depending on the type of fabric. |
 | DRAIN & SPIN | The program completes the drain and a maximum spin. It is possible to delete or reduce the spin through the SPIN SELECTION button. |
 | RINSE | This program performs 3 rinses with an intermediate spin (which can be reduced or excluded by using the appropriate button). It is used for rinsing any type of fabric, for example after a wash carried out by hand. |
| [93GW] | STEAM HYGIENE PLUS | This washing programme is capable of reaching a temperature of 60°C for an extended period of time, combining the steam action with a powerful rinsing action for thoroughly clean and hygienic clothing. Recommended for cotton fabrics. |
 | BABY CARE | This program allows you to wash all baby clothes getting a perfect clean and sanitizing effect, setting the temperature at 60°C minimum. To optimize the result of the sanitizing effect we recommend the use of powder detergent. |
| [CGWX] | FRESH CARE | This programme is designed to remove everyday stains with a refreshing action to guarantee outstanding laundry. Low temperature wash recommended for small loads. |
 | ECO 40-60 | The ECO 40-60 programme is able to clean normally soiled cotton laundry declared to be washable at 40°C or 60°C, together in the same cycle. This programme is used to assess the compliance with the EU Ecodesign legislation (environmentally friendly products design). |
 | 20°C | This innovative programme, allows you to wash different fabrics and colours together, such as cottons, synthetics and mixed fabrics at only 20°C and provides an excellent cleaning performance. Consumption on this program is about 40% of a conventional 40°C cottons wash. |
 | SYNTHETICS | This program is studied for synthetics fabrics (as Polyester, Viscos) or mixed cotton lightly dirty. The drum movements and rinses are set in order to optimize the washing phases. The delicate spin phase can decrease the creases on the clothes. |
| [70CH] | COTTON | This programme is suitable for washing coloured cotton garments at 40°C or for ensuring the highest degree of cleanliness for cotton resistant laundry washing at 60°C or 90°C. The final spin is at maximum speed that ensures excellent water removal. |
4. Daily use
- Connect the washing machine to a power supply and water connection (see installation chapter on user manual).
- Prepare the laundry: Sort out clothes according to fabric (cotton, synthetics, wool or silk etc.) and how dirty they are. Check the labels on your garment. Separate white clothes from colored ones. Empty pockets from objects like keys, coins, etc. and remove harder decorative objects.
- Put in the laundry piece by piece avoiding overloads (check the different maximum loadability according to program). Close the door carefully. Make sure that no pieces of laundry are pinched.
- Select the detergent and softener (when needed) and pour it into the correct compartments of the dispenser.
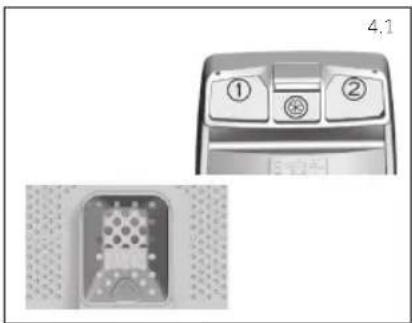
Open dispenser drawer, the following components can be seen (Fig. 4.1):
- Compartment 1 is for powder detergent
- Compartment 2 is for liquid detergent
-
The compartment ✉ is for fabric conditioners, scenting agents and special additives such as starch, blueing, etc.
The recommendation on the type of detergents is suitable for the various washing temperatures, please refer to the manual of detergent (see). -
Select a program by turning the knob, choosing the one that fits the most according to the loaded garments. The display will show the program name, the main options and the duration estimation.
- Add or remove options and change the parameters according to your specific needs.
- Press Start/Pause button to start the program.
- When the cycle is finished, "END" is shown on the display, Switch off the washing machine by turning the selector to OFF. Remove your laundry as soon as possible in order to prevent wrinkles, bad odors and bacteria to proliferate.
natural_image
Diagram showing a device with labeled buttons and a close-up view of a connector (no readable text or symbols)5. Care and maintenance
5.1 - General machine cleaning
- Unplug the machine during cleaning and maintenance.
- Use a soft cloth with soap liquid to clean the machine case and rubber components.
- Do not use organic chemicals or corrosive solvents.
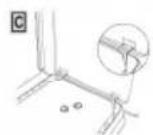
5.2 - Pump filter cleaning
It is recommended to clean the pump filter once a month.
Turn off and unplug the machine and open the cover on the bottom of the appliance. Prepare a flat container to catch leach water.
- Pull the drain hose out and hold its end above the container and open it
• After complete drainage, close the drain hose and push it back into the machine. - Unscrew and remove counter-clockwise the pump filter and clean it carefully
- Put the filter back in the machine and close it carefully.
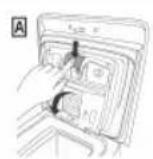
5.3 - Cleaning the detergent dispenser and its compartments
Take always care there are no detergent residues. Clean the drawer regularly
- Press button (A).
- Hold down the button and turn the detergent dispenser outwards.
- Remove the dispenser and clean it.
- It is recommended to remove any remaining detergent in the compartments to avoid any build up that could cause blockages and restrict the water flow from the dispenser to drum.
- Pulling out and extract the trap/traps (B) that are located in the back part of the dispenser and clean them carefully.
- Remove any solid residue which could block the holes in the compartments.

5.4 - Cleaning the drum
- Remove accidentally washed items, especially metal parts such as pins, coins, etc. from the drum and the groove of the door gasket (rubber ring) because they cause rust stains and damage.
- Use a non-chloride cleaner for removing rust stains. Observe the warning hints of the cleaning agent manufacturer.
- Do not use any hard objects or steel wool for cleaning.
- After the procedure, open the door, use a towel to clean the stains and foam around the gasket, and keep the inside and outside of the gasket clean.

Haier
ES

Haier
Lavadora de carga superior


flowchart
graph TD
    A["Open Bin"] --> B["Recycle Bin"]
    B --> C["Recycle Icon"]


flowchart
graph TD
    A["Open Bin"] --> B["Recycle Bin"]
    B --> C["Recycle Icon"]

natural_image
Diagram showing a device with two labeled buttons (① and ②) and a close-up of a textured surface (no text or symbols)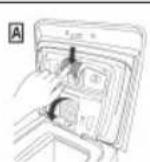


Haier
Download de hOn-app


flowchart
graph TD
    A["Open Bin"] --> B["Recycle Symbol"]
    B --> C["Recycle Bin"]
    style A fill:#f9f,stroke:#333
    style C fill:#bbf,stroke:#333

natural_image
Technical line drawing of a front view of a washing machine with labeled component (no text or symbols beyond label)
APPARAATKOPPELING (IN DE APP)

natural_image
Technical line drawing of a front view of a computer tower with labeled component (no text or symbols beyond label)
flowchart
graph TD
    A["Open Bin"] --> B["Recycle Bin"]
    B --> C["Recycle symbol"]
    style A fill:#f9f,stroke:#333
    style B fill:#ccf,stroke:#333
    style C fill:#cfc,stroke:#333
natural_image
Diagram showing a mechanical component with a dashed outline and a close-up view of a device (no text or symbols present)
Botões
APPLIANCE PAIRING (NA APP)
E

F
ATIVAR O CONTROLO REMOTO
natural_image
Diagram showing a car interior with numbered compartments and a close-up of the interior panel (no text or symbols)


flowchart
graph TD
    A["Open Bin"] --> B["Recycle Symbol"]
    B --> C["Recycle Bin"]
    style A fill:#f9f,stroke:#333
    style C fill:#bbf,stroke:#333

natural_image
Technical line drawing of a front view of a washing machine with labeled component (no text or symbols beyond label)
B
E
F
natural_image
Diagram showing a device with labeled buttons and a close-up of its internal structure (no readable text or symbols)
flowchart
graph TD
    A["Open Bin"] --> B["Recycle Bin"]
    B --> C["Recycle Icon"]


natural_image
Diagram showing a mechanical component with a dashed outline and a close-up view of a device (no text or symbols present)

Gumbi
A Pokreni/pauza
B Gumb za odabir temperature
C Brzina centrifuge
D Easy iron
E Odgoda pokretanja
F Mogućnosti
G Razina zaprljanosti / Razina pare*
H Posebni programi (dostupni samo na
određenim modelima)
B + C Sigurnosno zaključavanje
* Razina pare (dostupno samo na određenim modelima)
Ikone
1 Pokazivač za zaključana vrata
2 Pokazivač Easy iron
3 Indikator opterećenja u kg (aktivan samo u nekim programima)
4 Pokazivač Wi-Fiveze
5 Pokazivač za sigurnosno zaključavanje
6 Pokazivač temperature pranja
7 Pokazivač brzine centrifuge
8 Pokazivač mogućnosti
9 Pokazivači razine zaprljanosti
10 Pokazivač posebnih programa
2.1 - Gumbi

Pokreni/pauza (A)
Zatvorite vrata PRIJE odabiranja gumba POKRENI/PAUZA. Za pokretanje odabranog ciklusa s prethodno postavljenim parametrima, pritisnite gumb POKRENI/PAUZA. Kad je program u radu, na zaslonu će se prikazati vrijeme koje treba proteći.

Gumb za temperaturu (B)
Gumb Delay Start (Odgoda pokretanja)(E)
Ovim gumbom možete prethodno programirati ciklusa pranja i odgoditi početak ciklusa do 24 sata.

Gumb Mogućnosti (F)
Ovim gumbom možete birati između različitih mogućnosti (ovisno o odabranom programu):

Pretpranje (F) - ova mogućnost omogućuje pretpranje i posebno je korisna za jako zaprljano rublje (može se koristiti samo s nekim programima). Kad se aktivira, ikona pokazivača (E) svijetli

Dodatno ispiranje (F) - ova mogućnost omogućuje dodavanje jednog ispiranja na kraju ciklusa pranja i korisna je za osobe s osjetljivom kožom. Kad se aktivira, ikona pokazivača (F) svijetli

natural_image
Diagram showing a device with labeled buttons and a close-up view of a connector (no readable text or symbols)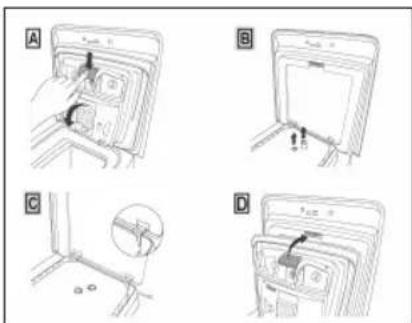


Haier


flowchart
graph TD
    A["Open Bin"] --> B["Recycle Bin"]
    B --> C["Recycle Icon"]
B
E
F
TÁVVEZÉRLÉS ENGEDÉLYEZÉSE
natural_image
Diagram showing a device with labeled buttons and a close-up view of a mechanical component (no text or symbols present)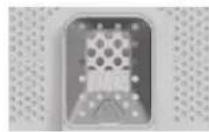


Haier
SL

Haier


flowchart
graph TD
    A["Open Bin"] --> B["Recycle Bin"]
    B --> C["Recycle Icon"]

natural_image
Diagram showing a mechanical component with a dashed outline and a close-up view of a device (no text or symbols present)
Gumbi
A Vklop/premor
B Izbira temperature
C Hitrost ožemanja
D Enostavno likanje
E Zakasnitev vklopa
F Opcije
G Stopnja umazanije/stopnja pare*
H Posebni programi (na voljo samo pri nekaterih modelih)
B+C Varnostno zaklepanje
Ikone

natural_image
Technical line drawing of a front view of a computer tower case with labeled component (no text or symbols beyond label)
flowchart
graph TD
    A["Open Bin"] --> B["Recycle Icon"]
    B --> C["Recycle Symbol"]
    C --> D["Tray Bin"]
    style A fill:#f9f,stroke:#333
    style D fill:#bbf,stroke:#333

Da biste saznali više, preuzmite i pročitajte kompletan priručnik za upotrebu na mreži na veb- lokaciji:
go.he.services/haier-um
1.4 - Priključci za vodu
- Mašina za pranje veša treba da bude povezana na vodovodnu mrežu preko novog creva koja se isporučuje sa uređajem (unutar bubnja). Nemojte koristiti staro crevo u tu svrhu.
- Priključite jedan kraj creva za dovod vode sa savijenim kolenom na elektro ventil (gornji zadnji deo mašine), a drugi kraj na slavinu ili priključak za dovod vode sa navojem od 3/4"
- Postavite mašinu za pranje veša blizu zida, vodeći računa da nema savijanja ili pregiba creva na bilo kom mestu.
- Zakačite odvodno crevo na ivicu sudopere ili po mogućnosti na fiksni odvodni prečnika većeg od prečnika odvodnog creva i na visini od min. 50 cm i najviše 75 cm od poda (sl. 5).
- Ako je potrebno, koristite zakrivljeni* dodatak da biste sigurnije pričvrstili i poduprli odvodno crevo.
- Povežite crevo za vodu sa slavinom za dovod vode (sl. 6) samo pomoću creva isporučenog sa uređajem (nemojte ponovo koristiti stare komplete creva)
-
Neki modeli mogu imati jednu ili više od sledećih funkcija:
-
HOT&COLD (sl. 7): postavke priključka na vodovodnu mrežu sa toplom i hladnom vodom za veću uštedu energije. Priključite sivo crevo na slavinu za hladnu vodu, 🚙 crveno na slavinu za toplu vodu. Uredaj se može povezati samo sa slavinom za hladnu vodu: u tom slučaju, neki programi mogu početi nekoliko minuta kasnije.
- AQUASTOP (sl. 8): uređaj koji se nalazi na crevu za dotok, a koji zaustavlja dotok vode ako sa crevom nešto nije u redu; u tom slučaju, pojavljuje se znak crvene boje u prorezu "A" i crevo mora biti zamenjeno. Da biste odvrnuli maticu, pritisnite osigurač "B".
-
AQUAPROTECT – DOVODNO CREVO SA ŠTITNIKOM (sl. 9): ako voda curi iz primarne unutrašnjeg creva "C", u providnom zaštitnom omotaču "D" će biti vode kako bi se ciklus pranja dovršio. Na kraju ciklusa kontaktirajte Korisnički servisni centar kako biste zamenili dovodno crevo.
-
Kontrolna tabla

natural_image
Diagram showing a mechanical component with a dashed outline and a magnified view of a device (no text or symbols)

Dugmad
A Pokreni/pauza
B Izbor temperature
C Brzina centrifuge
D Lako peglanje
E Odloženi start
F Opcije
G Nivo zaprljanosti/nivo pare*
H Specijalni programi (dostupni samo na određenim modelima)
B+C Blokada tastera
* Nivo pare (dostupno samo na određenim modelima)
Ikone
B
Samo opseg 2,4 GHz
C

D
E

F
AKTIVIRANJE BEŽIČNOG UPRAVLJANJA
- Zatvorite vrata i okrenite okruglo dugme u položaj BEŽIČNO UPRAVLJANJE (Wi-Fi). Sada možete da upravljate proizvodom iz aplikacije.
DEAKTIVIRANJE BEŽIČNOG UPRAVLJANJA
- Okrenite okruglo dugme u bilo koji položaj osim BEŽIČNO UPRAVLJANJE (Wi-Fi), bez prolaska kroz ISKLJUČENO. Ako je neki ciklus bio u toku, nastaviće se. Iz aplikacije je moguće videti status proizvoda, ali ne i kontrolisati ga.
2.2 - Ikone

Indikator zaključanih vrata (1)

natural_image
Technical line drawing of a front view of a computer tower case with labeled component (no text or symbols beyond label)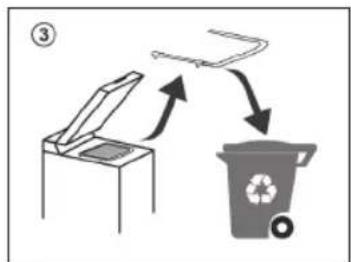
flowchart
graph TD
    A["Open Box"] --> B["Recycle Bin"]
    B --> C["Recycle Icon"]

E

F
AKTIVACE DÁLKOVÉHO OVLÁDÁNÍ
natural_image
Diagram showing a device with labeled buttons and a close-up of its internal components (no readable text or symbols)
Haier

flowchart
graph TD
    A["Open Bin"] --> B["Recycle Bin"]
    B --> C["Recycle Icon"]


natural_image
Diagram showing a mechanical device connected to a door with a hand adjusting the handle (no text or symbols present)

Przyciski
WŁĄCZANIE ZDALNEGO STEROWANIA
natural_image
Diagram showing a car interior with numbered compartments and a close-up of the interior (no text or symbols)Haier
RO
Haier

natural_image
Technical line drawing of a front view of a washing machine (no text or symbols present)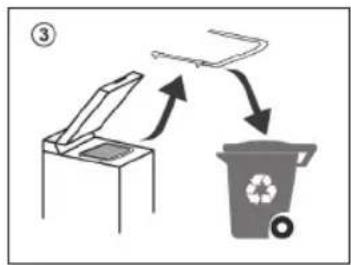
flowchart
graph TD
    A["Open Bin"] --> B["Recycle Symbol"]
    B --> C["Recycle Bin"]
    style A fill:#f9f,stroke:#333
    style C fill:#bbf,stroke:#333

B
E

F
PENTRU ACTIVAREA CONTROLULUI DE LA DISTANTĂ
natural_image
Technical diagram showing a device with labeled buttons and a close-up of its internal component (no readable text or symbols)

flowchart
graph TD
    A["Open Bin"] --> B["Recycle Bin"]
    B --> C["Recycle Icon"]

B
Len pásmo 2,4 GHz
E
F
POVOLTE DIALKOVÉ OVLÁDANIE

natural_image
Technical line drawing of a front view of a washing machine (no text or symbols present)
flowchart
graph TD
    A["Open Box"] --> B["Recycle Bin"]
    B --> C["Recycle Icon"]

B
E

F

natural_image
Technical line drawing of a front view of a washing machine (no text or symbols present)
flowchart
graph TD
    A["Open Box"] --> B["Recycle Bin"]
    B --> C["Recycle Icon"]
Zówη 2,4 GHz μόνο
A
B
C
D
E
F


flowchart
graph TD
    A["Open Bin"] --> B["Recycle Icon"]
    B --> C["Recycle Bin"]
    C --> D["Recycle Icon"]
    style A fill:#f9f,stroke:#333
    style B fill:#ccf,stroke:#333
    style C fill:#cfc,stroke:#333
    style D fill:#fcc,stroke:#333

MASKINPARRING (PÅ APP)
natural_image
Technical diagram showing a device with labeled buttons and a close-up view of a mechanical component (no readable text or symbols)


Haier
Ladda ner hOn-appen


flowchart
graph TD
    A["Open Bin"] --> B["Recycle Bin"]
    B --> C["Recycle Icon"]

natural_image
Diagram showing a mechanical component with a dashed outline and a close-up view of a device (no text or symbols present)

Knappar
flowchart
graph TD
    A["Speaker"] --> B["hOn-app"]
D

E

F
AKTIVERA FJÄRRKONTROLL
natural_image
Diagram showing a device with labeled buttons and a close-up of its internal component (no readable text or symbols)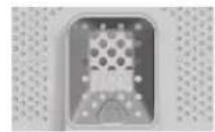


Haier
FI

Haier

natural_image
Technical line drawing of a front view of a computer tower case with labeled component (no text or symbols beyond label)E
F
natural_image
Diagram showing a device with labeled buttons and a close-up view of a connector (no readable text or symbols)

Haier
Last ned hOn-appen


flowchart
graph TD
    A["Open Bin"] --> B["Recycle Icon"]
    B --> C["Recycle Bin"]
    C --> D["Recycle Icon"]
    style A fill:#f9f,stroke:#333
    style B fill:#ccf,stroke:#333
    style C fill:#cfc,stroke:#333
    style D fill:#fcc,stroke:#333

1.4 - Hydrauliske koblinger
natural_image
Diagram showing a mechanical component with a dashed outline and a close-up view of a device (no text or symbols present)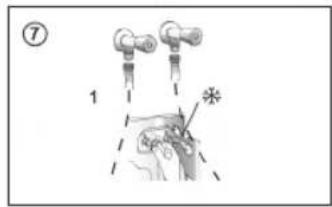

Knapper
A Oppstart / Pause
B Temperaturvalg
C Sentrifugehastigheten
D Lett stryking
E Forsinket start
F Alternativer