
Realikids Cam Waterproof 2 - Camera AGFAPHOTO - Free user manual and instructions
Find the device manual for free Realikids Cam Waterproof 2 AGFAPHOTO in PDF.
| Product type | Waterproof digital camera for kids |
| Brand | AgfaPhoto |
| Model | Realikids Cam Waterproof 2 |
| Screen | 2.8-inch TFT color screen |
| Video resolution | 2.7K / 1080P |
| Video format | MOV |
| Photo resolution | 12 M, 10 M, 8 M, 5 M |
| Photo format | JPG |
| Water resistance | Up to 3 meters |
| Lenses | Dual lens: front and selfie |
| Zoom | Digital zoom (W/T buttons) |
| Flash | Built-in |
| Storage | microSD memory card (not included) up to 128 GB, class C10 or higher |
| Power | Built-in rechargeable battery, charges via USB Type-C (5V DC) |
| Ports | 1 x USB Type-C, 1 x microSD slot |
| Modes | Photo, Video, Playback, Game, Settings |
| Special features | Photo/video filters, fun frames, built-in games |
| Cleaning and maintenance | Wipe with a slightly damp soft cloth; rinse with clean water after underwater use; do not use chemicals |
| Safety | Not suitable for children under 36 months (small parts and long cord) |
| Repairability | Professional repair recommended; do not open the casing |
| Compliance | CE, UKCA |
| Recycling | Device, accessories and cord recyclable (collection points) |
Frequently Asked Questions - Realikids Cam Waterproof 2 AGFAPHOTO
User questions about Realikids Cam Waterproof 2 AGFAPHOTO
0 question about this device. Answer the ones you know or ask your own.
Ask a new question about this device
Download the instructions for your Camera in PDF format for free! Find your manual Realikids Cam Waterproof 2 - AGFAPHOTO and take your electronic device back in hand. On this page are published all the documents necessary for the use of your device. Realikids Cam Waterproof 2 by AGFAPHOTO.
USER MANUAL Realikids Cam Waterproof 2 AGFAPHOTO
Waterproof Kids Camera
Realikids Cam Waterproof 2
User Manual
-
This user manual will provide detailed instructions on how to use, operate, technical specifications, and precautions. Please read this manual carefully.
-
During the printing process of this manual, if the machine's appearance, software or hardware repair process results in inconsistencies with some of the operations in this manual, our company reserves the right of final interpretation.
-
This product has a 3 meter body waterproof design. Please be sure the USB compartment cover is fully closed before using under water. After underwater use, please rinse with clean water and wipe off any remaining moisture on the surface. (After use in seawater or salt water, be sure to clean it with fresh water.)
-
Do not attempt to open the casing or attempt self repair this product. If there is a malfunction with this product or any of its components, please go to a professional repair shop to repair.
-
Do not use irritating chemicals, cleaning solvents or cleaning agents to clean this product. Please wipe this product with a slightly damp soft cloth.
- Please pay attention to environmental protection and do not dispose of this product at will. Do not expose this product to fire or high temperatures.
- Before using, be sure to remove the protective film on the lens and the screen.
- Please pay attention to the cleanliness of the lens surface. Use a slightly damp soft cloth to clean it before use to avoid problems with poor camera performance.
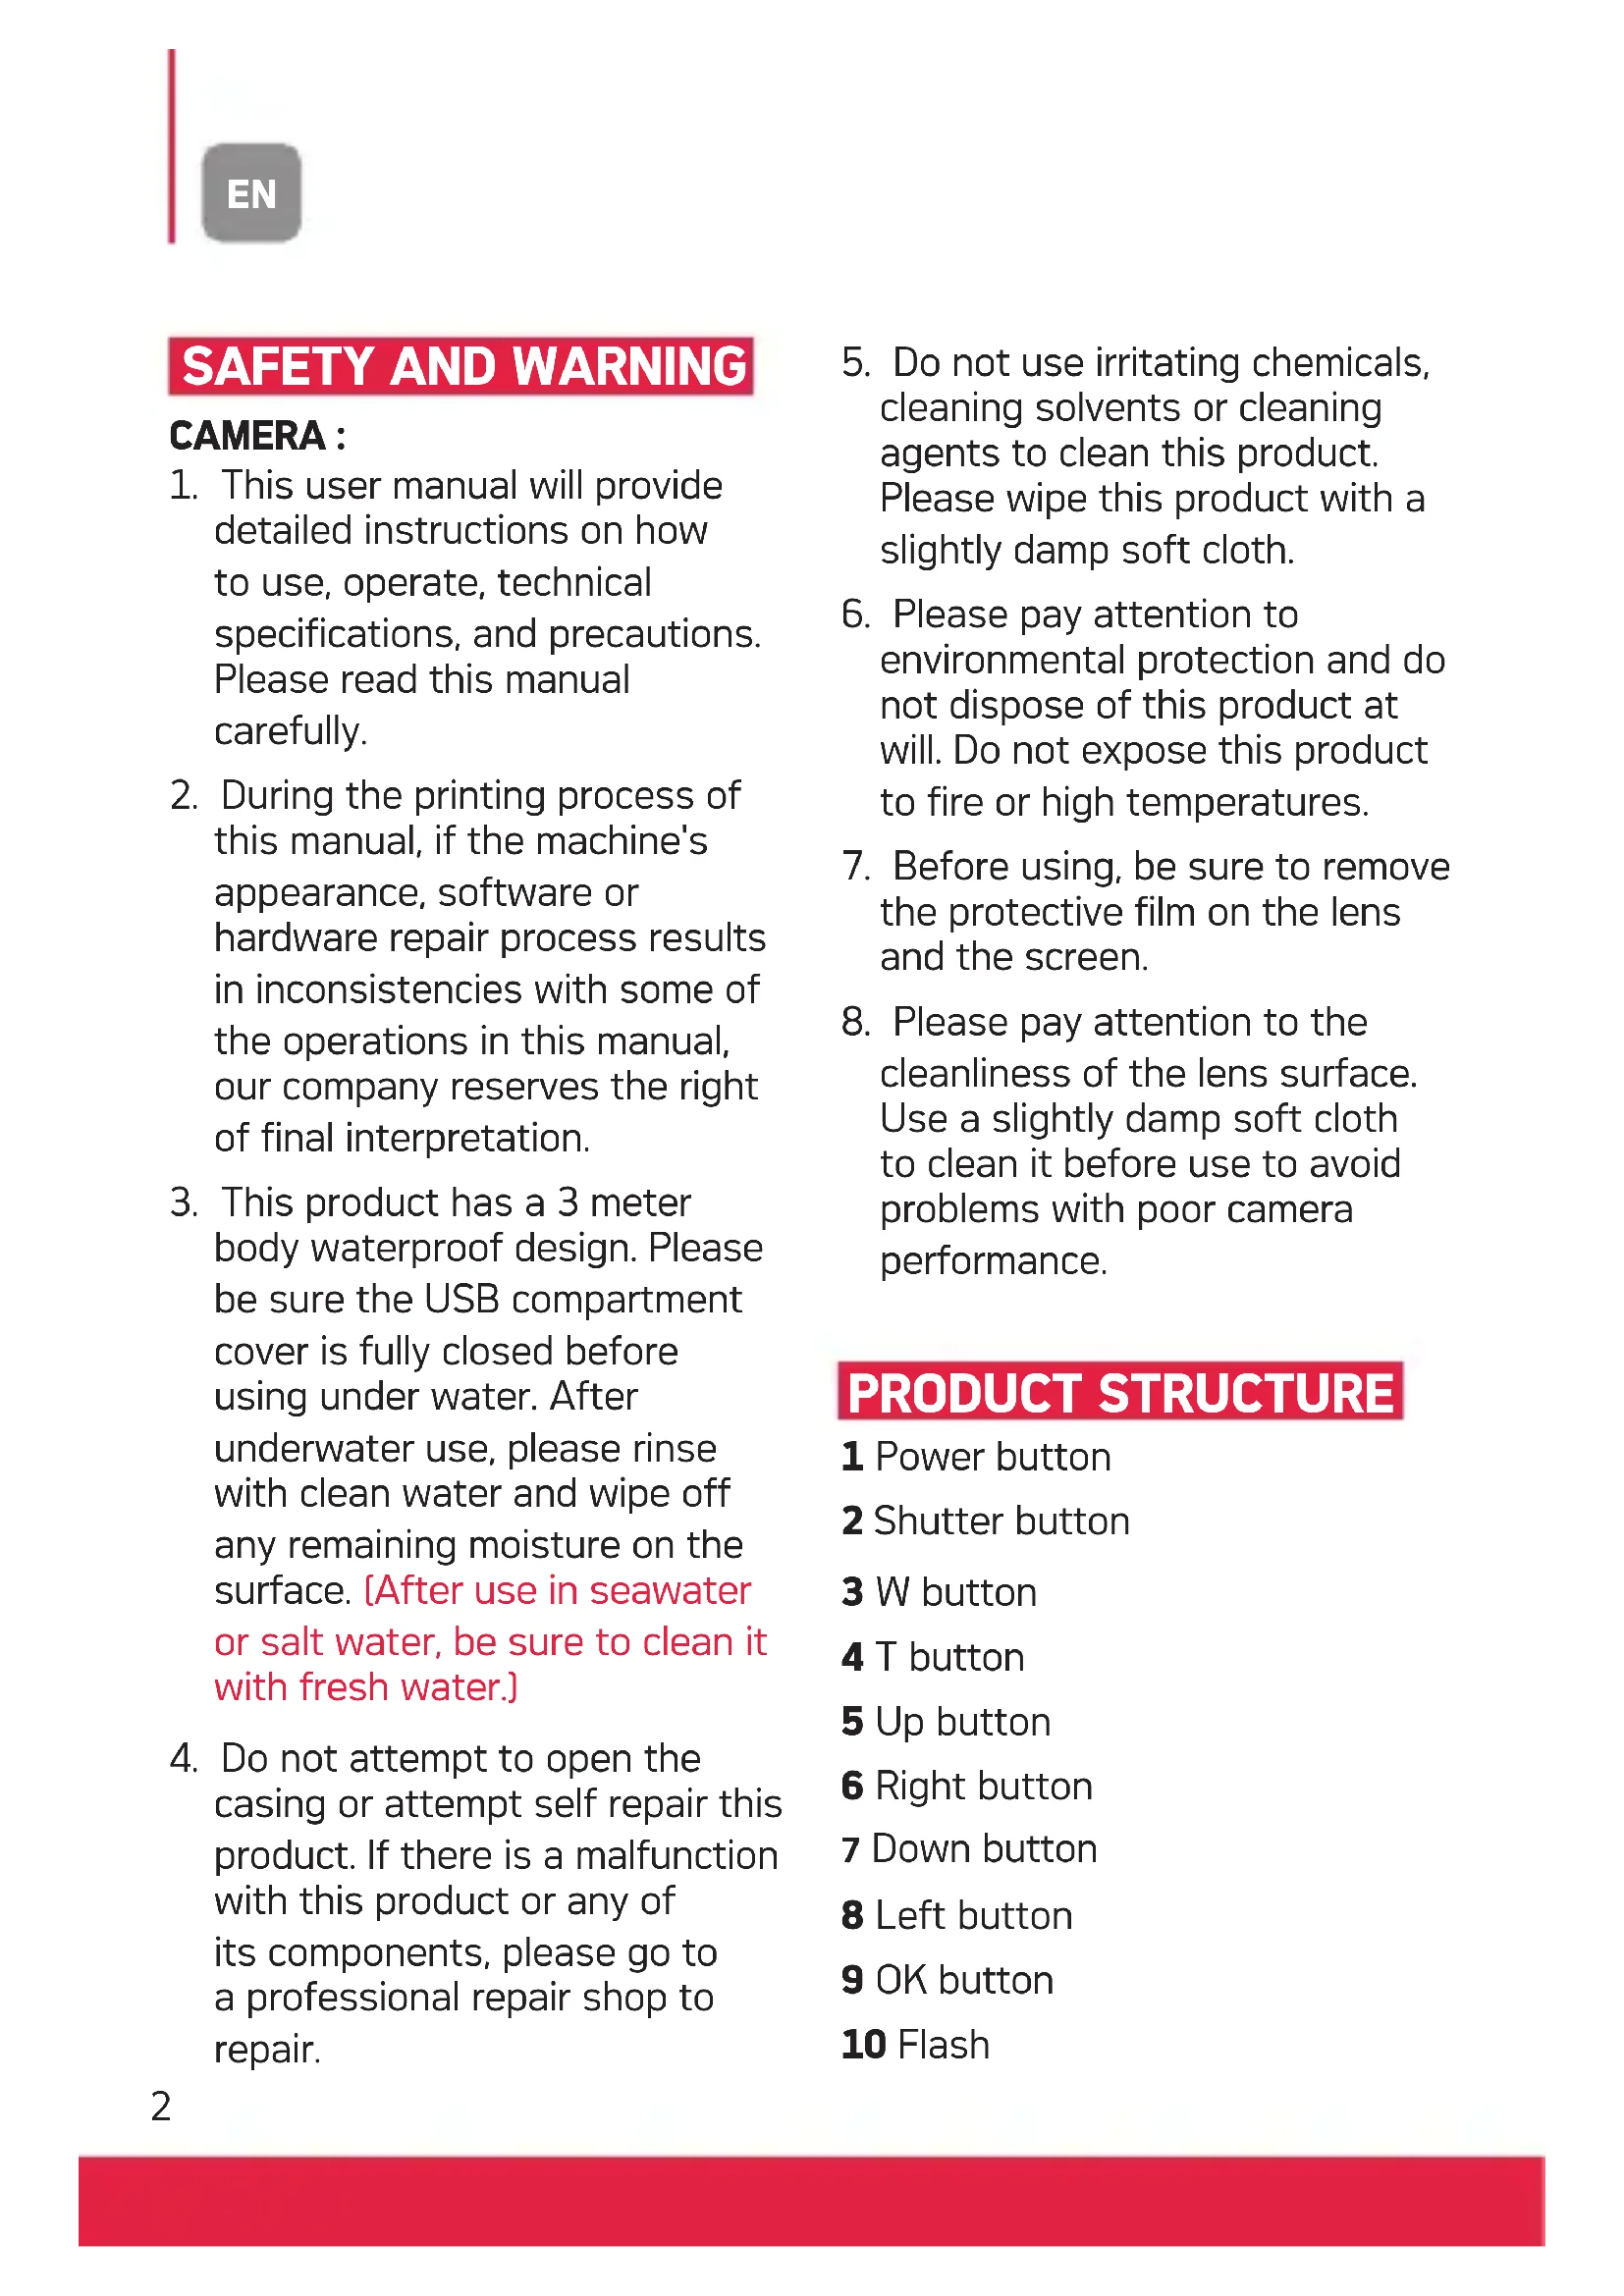
PRODUCT STRUCTURE
1 Power button
2 Shutter button
3 W button
4 T button
5 Up button
6 Right button
7 Down button
8 Left button
9 OK button
10 Flash
11 Front lens
12 USB compartment
13 Speaker
14 MIC
BUTTONS AND INTERFACE FUNCTIONS
Power button
a) Press and hold for 3 seconds to power on/off.
b) Press and hold for 15 seconds to force a restart of the camera. Use this in case of a camera malfunction
Shutter button
a) In photo mode: press once to take take photo.
b] In video recording mode: press once to start recording, press once again to stop recording.
W button
a] In Photo/Video recording mode, press the W button once to switch lenses between the Front lens and Selfie lens.
b) long press for digital zoom (zooming in).
T button
a] Short press to exit/return to mode interface.
b) Long press for digital zoom [zooming out].
OK button
a) Press once to confirm the selection.
Up button
a] Press the Up button to browse the modes or settings.
b) In Photo mode, press the Up button to select filter effects/cartoon frames.
c] In Video recording mode: press up button to select filter effects.
Down button
a] Press the down button to browse the modes or settings
b] In photo mode, press down button 1 time to select filter effects/cartoon frames.
c] In video recording mode: press down button 1 time to select filter effects.
Left button
a) Press the left button to browse the modes or settings
b) In Photo/Video recording mode, press 1 time to open Photo/ Video recording settings.
Right button
a) Press the right button to browse the modes or settings.
b) In Playback mode, press once to open the delete file option.
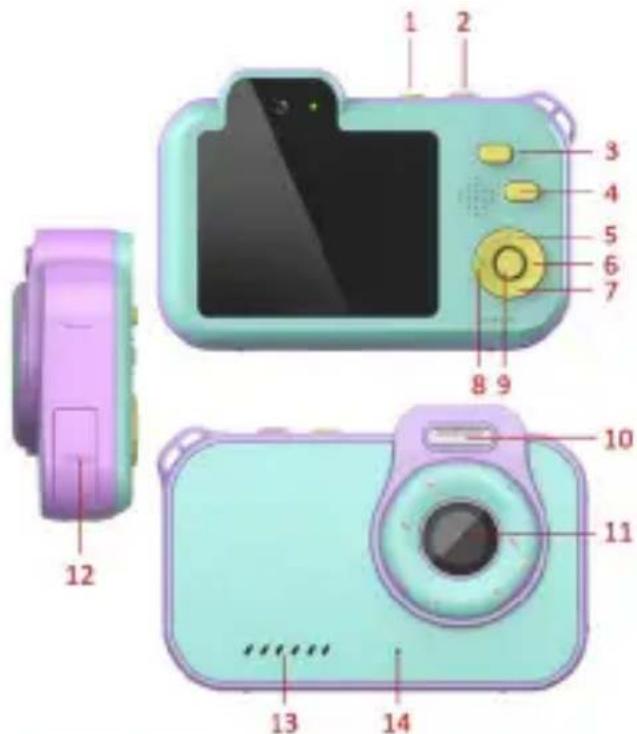
Reset hole
a) When the camera is not working properly, use the reset control to restart the camera.
USB Compartment
Push down the compartment lid and open USB compartment.

a) Type-C charging port.
b) Micro memory card slot: Supports C10 and above card speeds, with a capacity of 16-128GB.
Do not insert or remove cards while recording, taking photos, or playing files.
BASIC OPERATING INSTRUCTIONS
Menu homepage
Press the T button to open the mode selection interface.
Photo mode
Select this icon, and press the OK button to enter photo mode.
Photo Mode controls
a] Press the shutter button once to take a photo.
b) Press the W button once to switch between the front lens and selfie lens.
c] Press the Up/Down buttons to select the filter effects/cartoon frames.
d) Press the Left button to enter the photo settings menu, press the T button to exit.
e ] Press the Right button to enter playback mode, press it again to delete a file, press T button to exit.
Video recording mode
Select this icon and press the OK button once enter Video recording mode.
a] Press the shutter button once to start recording, and press it again to stop recording.
c] Press the W button once to switch lenses between front and selfie lens.
d) Press the up and down keys to select the filter effects.
d) Press the left button to enter the recording settings, press the T button to exit.
e] Press right button to enter playback mode, press right button again to delete the file, press T button to exit.
Playback mode
Select this icon and press the OK button once to enter playback mode.
a] Press the Up/Down button to select and view files.
b) Press the 'OK' button to play/ pause video files.
c] Press the Right Button once to choose to delete the curren
Game mode
Select this icon and press the OK button once to enter game mode interface. Press the left/right buttons to choose a game then press the OK button to start the game. In game mode, press the T button to return to modes interface.
Camera settings
Select this icon, press the OK button once to enter the camera settings.
Press the Up/Down button to select the a setting.
Press the OK button to confirm and save the change.
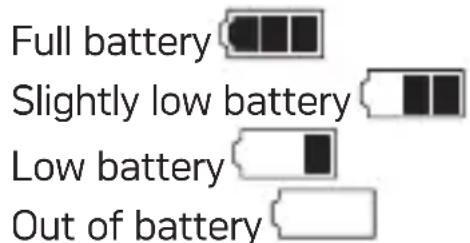
Battery Levels
Battery level indicator, please refer to the diagram:
PRODUCT SPECIFICATION
| TFT screen | 2.8 inch colorful high definition screen |
| Video resolution | 2.7K, 1080P |
| Video format | MOV |
| Shooting pixel | 12M, 10M, 8M, 5M |
| Photo format | JPG |
| Loop recording | Off, 1 min, 2 mins, 3 mins, 5 mins |
| Storage medium | Micro Memory card, supports up to 128G (not included) |
| Charging voltage | DC-5V |
SECURITE ET AVERTISSEMENT
STRUCTURE DU PRODUIT
2.8 inch colorful high definition screen
Video resolution
2.7K, 1080P
Video format
MOV
Shooting pixel
12M, 10M, 8M, 5M
Photo format
JPG
Loop recording
Off, 1 min, 2 mins, 3 mins, 5 mins
Storage medium
Micro Memory card, supports up to 128G (not included)
Charging voltage
DC-5V
SICUREZZA E AVVERTENZE
VEILIGHEID EN WAARSCHUWING
This is the way to choose OK. 100% 100% 100%
This is the way to select OK.
To choose OK, you can use one of the following methods:
- Open OK
- Select OK
- Take OK
- Move OK
八味テ一残量
flulbtyl 1
Notice of compliance for the European Union
Products bearing the CE mark comply with the applicable European directives and associated harmonised European standards.
Disposal of waste equipment by users in the European Union
This symbol means that according to local laws and regulations it is prohibited to dispose of this product with household waste. Instead it is your responsibility to protect the environment and human health by handing over your used device to a designated collection point for the recycling of waste electrical and electronic equipment. For more information about where you can drop off your waste equipment for recycling please contact your local city office, your household waste disposal service or the shop where you purchased the product.
GT Company declares that the electric radio equipment of the type Digital camera/video camera complies with directive 2014/53/EU. The full text of the EU declaration of conformity is available at the following web address: www.agfaphoto-gtc.com
This device complies with part 15 of the FCC Rules. Operation is subject to the following two conditions:
- This device may not cause harmful interference, and
- This device must accept any interference received, including interference that may cause undesired operation.
Warranty : 2-year limited warranty / garantie limitée de deux ans / 2 Jahre eingeschränkte Garantie / Garantía limitada de 2 años / Garanzia limitata di 2 anni / Garantia limitada de 2 años / 2-letnia ograniczona gwarancja / 2 év korlátozott garancia / 2letá omezená záruka / 2aar beperkke garantie / 2-ÎteTNЯ orpɑnHæNHàrapaNTNIA / 2 árs begrænset garanti / 2 vuoden rajoitettu takuu / 2 vuoden rajoitettu takuu.
After sales service / Service après vente / Kundendienst / Serviciopostventa /Assistenza post vendita / Értékesités utáni szolgáltatas /Service na verkoop / Servço pos venda / Serwis pogwarancyjny /
Poprodejni servis / Посlenpopаджhoe обслжване :
aftersales@agfaphoto-gtc.com / +33 [0] 1 85 49 10 26
Made in China
Product manufactured for and distributed by GT Company:
FR Office:5 Rue de la Galmy,77700 Chessy
UK Office : 1st floor gallery court 28 arcadia avenue London - United Kingdom - N3 2FG
USA Office : 1251 Avenue of the Americas, fl.3, 10020 New York www.gtcompany.fr - info@gtcompany.fr
AgfaPhoto is used under license of Agfa-Gevaert NV. For this product a sub-license has been granted by AgfaPhoto Holding GmbH (www.agfaphoto.com). Neither Agfa-Gevaert NV nor AgfaPhoto Holding GmbH manufacture this product or provide any product warranty or support. For service, support and warranty information, contact the distributor or manufacturer.