TYA220CLG - Oven SILVER STYLE - Free user manual and instructions
Find the device manual for free TYA220CLG SILVER STYLE in PDF.

| Brand | Silver Style |
| Model | TYA220CLG |
| Appliance type | Oven |
| Power supply | 220-240 V ~ 50-60 Hz |
| Power | 1700 W |
| Maximum temperature | 230 °C |
| Functions | Defrost (GRILL), Grill (*GRILL), Toast, Convection cooking (BAKE), Air fryer (AIR FRY), Dehydration (DEHYDRATE) |
| Included accessories | Cooking grid, baking tray, frying basket, handle |
| Timer | Yes, mechanical |
| Indicator light | Yes |
| Door | Glass, heavy |
| Feet | Yes |
| Safety | Do not immerse, do not use if cable damaged, repair by qualified personnel |
| Maintenance | Clean with damp sponge and mild detergent, do not use abrasives |
| Interior cleaning | Damp cloth and mild detergent |
| Repairability | Contact the manufacturer, after-sales service or qualified person |
| Warranty | According to distributor, covers manufacturing defects |
| Selective collection | Do not dispose with household waste, follow WEEE directive |
| Use | Household only |
Frequently Asked Questions - TYA220CLG SILVER STYLE
User questions about TYA220CLG SILVER STYLE
0 question about this device. Answer the ones you know or ask your own.
Ask a new question about this device
Download the instructions for your Oven in PDF format for free! Find your manual TYA220CLG - SILVER STYLE and take your electronic device back in hand. On this page are published all the documents necessary for the use of your device. TYA220CLG by SILVER STYLE.
USER MANUAL TYA220CLG SILVER STYLE
Non-contractual photo
Read these operating instructions carefully before using the appliance.
Keep it as it contains important information.
Important safety instructions
This appliance can be used by children aged from 8 years and above and persons with reduced physical, sensory or mental capabilities or lack of experience and knowledge if they have been given supervision or instruction concerning use of the appliance in a safe way and understand the hazards involved.
Children shall not play with the appliance.
Cleaning and user maintenance shall not be made by children unless they are older than 8 and supervised.
Keep the appliance and its cord out of reach of children less than 8 years.
Warning: do not use this appliance if the power cable is damaged.
If the supply cord is damaged, it must be replaced by the manufacturer, its service agent or similarly qualified persons in order to avoid a hazard.
Safety instructions
- Before plugging in your appliance, check that it is compatible with your mains supply. Always connect your appliance to an earthed socket.
- Check that your appliance is in perfect condition before use. Do not use it if you notice any anomalies.
- All repairs must be carried out by the manufacturer, its after-sales service or a similarly qualified person, in order to avoid any danger.
- Place the appliance on a flat, dry surface.
- To ensure good air circulation, leave a space of about 10 ~cm around the sides of the appliance and 10 ~cm above the appliance. See the « Setting up » section.
- Do not move the appliance when it is hot or in use.
- This appliance is intended for domestic use only and may not be used for commercial purposes.
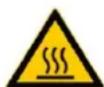
CAUTION: Hot surfaces. Surfaces are likely to become hot during use.
- The external walls of the appliance, including the glass door, become very hot during use. Be careful not to touch them, as there is a risk of burns.
- Do not use the appliance near a heat source. Do not install your oven on a hot surface (e.g. hob) or near heat sources or naked flames.
- Do not use the appliance outdoors and store it in a dry place.
-
Never move the appliance by pulling on the cable. Make sure that the power cord cannot be accidentally accidentally snagged, to prevent the appliance from falling. Avoid wrapping the cord around the appliance and do not twist it.
-
Unplug the appliance when not in use.
-
Always make sure your hands are dry when you switch off or unplug your appliance.
-
Make sure that the power cable is disconnected from the mains before any assembly, cleaning or maintenance operation.
-
Do not immerse the appliance, the power cable or the plug in water or any other liquid.
-
The glass door is heavy: open it by holding the handle, don't let it open without holding it.
-
Always use protective gloves when putting dishes in or taking them out of your oven.
-
Position your dishes in the centre of the oven to ensure even cooking.
-
Do not cover the oven with a baking tray or tea towel.
Do not place anything on the oven. -
Do not put plastic, cardboard, paper or any other unsuitable material in your oven.
-
Wait until the oven and its accessories have cooled before cleaning.
-
Details of how to clean food contact surfaces are given in the « Cleaning and Maintenance » section.
-
Do not clean your oven with abrasive tools.
-
Do not use any accessories not supplied with the appliance.
-
The appliance is not intended to be operated by an external timer or a separate remote control system.
-
This appliance is intended for use in domestic and similar applications such as :
-
kitchen areas reserved for staff in shops, offices and other professional environments;
farms ;
- use by guests of hotels, motels and other residential environments;
- bed and breakfast environments.
IMPORTANT: Never leave the appliance unattended when it is in operation.
CAUTION
Never place a dish or cooking utensils on the open oven door! The door is not designed to be used as a support, and you risk breaking it.
Product description
ACCESSIONS :
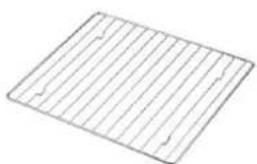
1 cooking grid: chromed steel
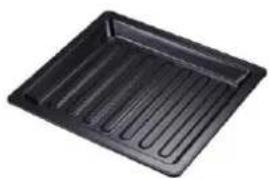
1 baking tray : enamelled steel

1 frying basket: chrome-plated steel
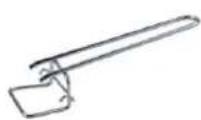
1 handle
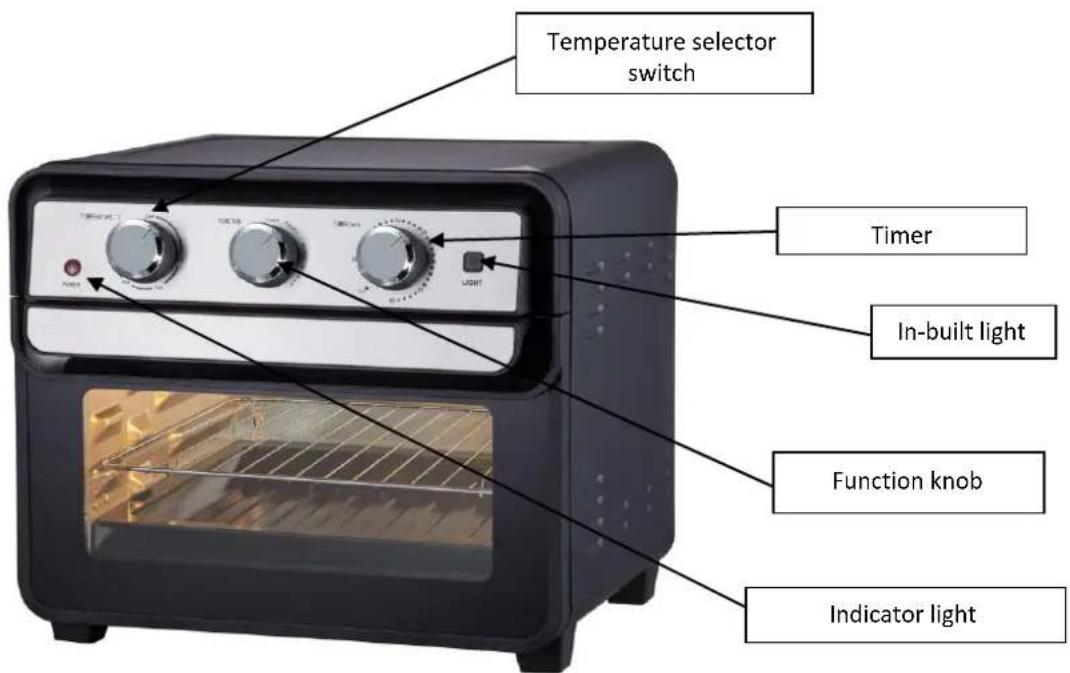
Function knob
| OFF | The oven is switched off |
| GRILL | Activation of 2 upper heating elements (defrost function) |
| * GRILL | Activation of 2 upper heating elements and convection (grill function) |
| TOAST | Activation of 2 upper and 2 lower heating elements (natural convection function) |
| * BAKE: | Activation of 2 upper and 2 lower heating elements and the fan (rotating heat function) |
| AIR FRY | Activation of 4 upper heating elements and the fan (hot air fryer function) |
| * DEHYDRATE: Activation of 2 upper heating elements and the fan (dehydrator function) | |
Setting up
- Read the instructions carefully.
- Remove all accessories from the oven or the packaging box.
- Use hot water to clean the accessories, wipe the inside of the oven with a soft damp cloth soaked in detergent, and wait until it is completely dry before using it.
- Leave enough space around the oven so that the surface of the oven is more than 10cm from other objects; do not place any items on top of the oven.
The oven must not be placed on an untreated wooden surface. Place the oven on a heat-resistant surface.
Make sure that the electrical supply cable does not come into contact with the walls of the oven, as this could damage it when the oven heats up.
The feet of the oven may leave some marks on the surface on which it is placed; if this happens, remove the marks with a damp cloth.
- Before operating an electric oven for the first time, turn the temperature knob to the maximum setting (230 degrees) and preheat for 10 to 15 minutes to remove any mechanical oil that may remain on the oven:
It is normal for smoke to be produced when the oven is used for the first time.
Use
PREHEATING
Before placing the food in the oven, preheat the oven for 15 minutes.
- Set the timer for 15 minutes. The indicator light comes on.
- Set the desired temperature using the temperature control knob.
- Turn the function knob to the desired position.
- When the timer sounds, the oven is preheated and ready for cooking.
1. GRILL (Defrost function)
This function is suitable for defrosting all types of meat.
- Preheat the oven.
- Place the food to be defrosted on the grill or baking tray.
- Place the rack or baking tray in the middle or at the top of the oven.
- Use the temperature knob to select the desired temperature.
- Set the function knob to "GRILL". The two upper heating elements will heat up simultaneously.
- The indicator light comes on when the oven is in use. Use the timer to set the defrosting time.
- At the end of the defrosting process, the timer will beep. If the defrosting process is not complete, reset the timer.
- Turn all the knobs to the OFF position to switch off the oven.
2. GRILL
This function is suitable for cooking various types of bread, pizzas, biscuits, steaks, etc.
- Preheat the oven.
- Place the food on the grill or baking tray.
- Place the rack or baking tray in the middle or at the top of the oven.
- Set the temperature knob to the desired temperature.
- Turn the function knob to "GRILL" and the two upper heating elements and the fan will come on.
- The indicator light comes on when the oven is in use. Use the timer to set the cooking time.
- At the end of cooking, the timer will beep. If cooking is not finished, reset the timer.
- Turn all the knobs to the OFF position to switch off the oven.
3. TOAST
This function is suitable for roasting fish, beef and vegetables.
- Preheat the oven.
- Place the food on the grill or baking tray.
- Place the rack or baking tray in the middle or upper part of the oven.
- Set the temperature knob to the desired temperature.
- Turn the function knob to "TOAST" and the top and bottom elements will heat up at the same time.
- The indicator light comes on when the oven is in use. Use the timer to set the cooking time.
- At the end of cooking, the timer will beep. If cooking is not finished, reset the timer.
- Turn all the knobs to the OFF position to switch off the oven.
4. BAKE
This function is suitable for cooking various types of bread, pizzas, biscuits, steaks, etc.
- Preheat the oven.
- Place the food on the grill or baking tray.
- Place the rack or baking tray in the middle or upper part of the oven.
- Set the temperature knob to the desired temperature.
- Turn the function knob to "BAKE" and the two upper elements, the two lower elements and the fan will come on.
- The indicator light comes on when the oven is in use. Use the timer to set the cooking time.
- At the end of cooking, the timer will beep. If cooking is not finished, reset the timer.
- Turn all the knobs to the OFF position to switch off the oven.
5. AIR FRY
This function allows you to cook without using oil while retaining the crispiness of traditional fried foods.
- Place the food in the frying basket.
- Place the frying basket in the upper part of the oven, near the heating elements.
- Set the temperature knob to the desired temperature.
- Turn the function knob to "AIR FRY" and the four upper heating elements will heat up simultaneously.
-
The indicator light comes on when the oven is in use. Use the timer to set the cooking time.
-
At the end of cooking, the timer will beep. If cooking is not finished, reset the timer.
- Turn all the knobs to the OFF position to switch off the oven.
6. DEHYDRATE
This function is suitable for drying a variety of fruit and vegetables.
- Place the food on the grill or baking tray.
- Place the rack or baking tray in the middle or upper part of the oven.
- Set the temperature knob to the desired temperature.
- Turn the function knob to "DEHYDRATE" and the two upper elements and the fan will come on.
- The indicator light comes on when the oven is in use. Use the timer to set the cooking time.
- At the end of cooking, the timer will beep. If cooking is not finished, reset the timer.
- Turn all the knobs to the OFF position to switch off the oven.
Cooking guide :
- Cooking times vary according to the temperature, mass, weight, etc. of the materials used and can be adjusted according to the cookbook and the actual situation.
- When cooking continuously, the cooking time will be shorter than when first used due to the higher starting temperature in the oven.
| Type of food | Oven temperature | Cooking time | Description |
| Red Meat | 230°C | 10-15min | Lay the baking paper on the hob, cook the food on it and select the "AIR FRY" or "TOAST" function. |
| Pork chops | 230°C | 20-30 min | Lay the baking paper on the hob, cook the food on it and select the "AIR FRY" or "TOAST" function. |
| Prawns | 180°C | 10-12 min | Lay the baking paper on the hob, cook the food on it and select the "AIR FRY" or "TOAST" function. |
| Sausages | 180°C | 12-15min | Lay the baking paper on the hob, cook the food on it and select the "AIR FRY" or "TOAST" function. |
| Meatballs | 230°C | 15-17min | First, preheat the oven for 5 minutes, then place the food on the baking tray. Set the oven to "GRILL", turn the food over after 5 minutes and cook for 7 minutes. |
| Quiche | 230°C | 18-20min | Lay the baking paper on the baking tray, cook the quiche on it or in a suitable dish and set the oven to "TOAST". |
| Doughnut | 230°C | 7-10min | Lay the baking paper on the baking tray, cook the doughnuts on it and choose the "TOAST" cooking mode. |
| Oven fries | 230°C | 25-30min | Place the food in the frying basket and place the basket in the upper part of the oven. Select the "AIR FRY" or "TOAST" function. |
| Chicken wings | 230°C | 15-18min | Place the food in the |
RECIPES
1. Chicken, pesto and goat's cheese quesadillas
Ingredients
- 4 tortillas (+/-20cm diameter)
- 4 tbsp pesto
- 300g cooked chicken pieces
- 1 roasted red pepper, cut into strips
1 onion, finely chopped - 250g goat's cheese
- 1 tbsp. salsa sauce & 1 tbsp. guacamole
Salt and pepper
Preparation
Spread pesto on half of each tortilla and goat's cheese on the other half.
Top with pieces of chicken, pepper and onion.
Season to taste.
Close the tortillas in half.
Cook the quesadillas on the hot air function at 200^ for 4 minutes.
Serve with salsa and guacamole.
2. Dried citrus slices
Ideal for cocktails!
Ingredients
1 grapefruit
1 orange
Preparation
Slice the citrus fruit very thinly.
Place the slices on absorbent paper to soak up some of the fruit juice.
Place the slices in the oven basket.
Use the dehydrator function for a minimum of 2 hours at 80^
Continue cooking if necessary.
3. Cooked salmon and prawn sushi
- 1/2 cups cooked and cooled sushi rice
- 2 tbsp. rice vinegar
1 teaspoon sesame oil - 1 tsp. sugar
1 175g salmon steak
175g peeled medium prawns, thawed - 2 tbsp. mayonnaise
1/2 cup red pepper, cut into small cubes - 2 onions, chopped
- 2 tbsp. fresh coriander, chopped
1/4 tsp garlic powder
1 tbsp. Sriracha sauce
4-8 Nori seaweed leaves, cut into 4 pieces
FOR THE GARNISH:
- Panko breadcrumbs
- Sesame seeds
- Chopped chives
- Soy sauce
Spicy mayonnaise
Preparation
Preheat the oven to 210^ .
In a large bowl, mix the rice with the rice vinegar, sesame oil and sugar and set aside.
Remove the skin from the salmon and cut into 1.5cm cubes.
In a large bowl, mix together the salmon, prawns, mayonnaise, red pepper pieces, green onion, coriander, garlic powder and Sriracha sauce.
Place silicone moulds in the cavities of a muffin tin.
Place one or two sheets of Nori in each mould.
Place 1 tbsp of rice in each mould.
Pour 1 tbsp of the salmon mixture over the rice.
Cook on natural convection for 10 minutes.
Finish cooking for 2 minutes in the fan oven,
Garnish with Panko breadcrumbs, sesame seeds and chives.
Serve with soy sauce and/or spicy mayonnaise.
4. Fried lasagna with 3 cheeses and spinach
Ingredients
8 lasagna sheets, cooked
1 tbsp. olive oil
140 g spinach
100 g goat's cheese
- 280 g ricotta cheese
100 g mozzarella cheese, grated
4 eggs
- Zest and juice of half a lemon
Salt and pepper to taste
1/2 tsp Tabasco
1 cup flour
- 2 cups seasoned Italian breadcrumbs
1 cup marinara sauce
- Basil leaves, to taste
Preparation
Heat the oil in a frying pan over medium heat and cook the spinach for 5 minutes.
Drain the spinach, chop and set aside.
In a bowl, mix the ricotta, goat's cheese and mozzarella together.
Add the spinach, 1 egg, lemon zest, lemon juice, Tabasco and season with salt and pepper. Mix well.
Spread the mixture over each lasagna sheet.
Fold each pastry over itself 3 times to form squares.
Place the lasagna pieces in the freezer for 30 minutes.
Place the flour in a bowl.
Whisk the 3 eggs in another bowl.
Place the breadcrumbs in a third bowl.
Dip each pastry into the flour, eggs and breadcrumbs.
Place a sheet of greaseproof paper in the basket of the hot air oven.
Place the lasagna pieces in a single layer.
Spray the lasagna pieces with a little oil.
Bake for 10 minutes at 200^ , turning the lasagna over halfway through.
5. Vegetable pizza
Ingredients
1/3 cup of flour
1 ball pizza dough
1/3 cup pizza sauce
- 100g feta cheese, coarsely crumbled
- 1 cup Parmesan cheese
Salt and pepper
VEGETABLES FOR GARNISH
- 2 Italian tomatoes, quartered
- 1 yellow pepper, cut into strips
- 1 green pepper, cut into strips
1 portobello mushroom - 2 garlic cloves, chopped
- Olive oil
Salt and pepper
Preparation
Preheat the oven.
In a bowl, combine all the vegetable ingredients for the filling and bake in the hot-air oven for 20 minutes at 210^ . Remove from the hot-air oven basket and set aside in a bowl.
On a large clean surface, sprinkle a little flour and place the dough ball on top. Separate into 2 with a knife. Using a rolling pin or your hands, roll out the 2 pizza doughs one at a time so that they fit into the hot air oven.
Place one of the 2 pizza doughs on the baking tray in the hot air oven and top with half of the following ingredients: pizza sauce, cooked vegetables, Parmesan and feta cheese. Drizzle with oil and season with pepper.
Bake the pizza for 7 minutes at 200^ .
Butter (to butter the ramekins)
Cocoa powder
- 170 g dark chocolate, cut into small pieces
1/3 cup unsalted butter
2 eggs
1/4 cup white sugar
- 1 tbsp pure vanilla extract
1/4 cup all-purpose white flour - Pinch of salt
Preparation
Grease 4 ramekins and sprinkle evenly with cocoa powder, then set aside.
Preheat the oven.
In a microwave-safe bowl, add the chocolate and butter and microwave in 30-second intervals until the chocolate is completely melted. Mix well and set aside.
In a large bowl, add the eggs, sugar and vanilla and mix well with a mixer.
Then add the flour, pinch of salt and chocolate mixture. Mix well with the mixer.
Divide the mixture between 4 ramekins.
Place the ramekins in the hot air oven and bake for 7 minutes at 190^ .
Using a clean tea towel or oven gloves, remove the ramekins from the hot air oven and leave to rest for 2 minutes.
Using a butter knife, separate the fondant from the edge of the ramekins so that it can be removed from the mould.
Then, place the ramekins on 4 plates and, using a kitchen towel or oven gloves, turn them over to remove them from the moulds.
Serve immediately with the accompaniment of your choice. Here are a few suggestions: sprinkle with icing sugar, serve with a scoop of ice cream or whipped cream and/or a few berries.
7. Vietnamese-style grilled chicken
Ingredients
MARINADE
- 900g boneless chicken thighs, cut into large chunks
1/3 cup (80 ml) fish sauce - 2 tbsp. maple syrup
- 2 tbsp. water
- 2 cloves garlic, chopped
1 green onion, chopped - 2 tbsp. lemongrass, chopped
SAUCE
- Juice of 2 limes
1/2 cup (125 ml) water
1/4 cup (60 ml) fish sauce
1 clove garlic, pressed - 3 tbsp. maple syrup
1 finely chopped chilli pepper or 1 tsp. sambal olek
8-10 small skewers
Preparation
- Combine the chicken pieces with all the marinade ingredients and leave to marinate all day or overnight (or for at least an hour).
- Place the marinated chicken pieces onto a small skewer.
Cook at 190^ for 12-15 minutes.
8. Beef flank steak with white wine
Ingredients
1 tbsp. wholegrain mustard
- 1 tbsp. Dijon mustard
1/2 cup white wine
- 2 tbsp. olive oil
1 tbsp. white wine vinegar
1 sprig fresh rosemary
- 1 tbsp. dried oregano
- 2 sprigs thyme
- 2 cloves garlic, chopped
- 1 tsp. sriracha sauce
1 shallot, chopped
1 tsp capers, chopped
- Freshly ground pepper, to taste
- 2 beef flank steaks, 225g each
- Steak spices
- 2 slices semi-hard cheese
Preparation
- Mix all the marinade ingredients in a bowl.
- Marinate the flank steaks in an airtight bag for a minimum of 4 hours or more in the refrigerator.
- Place the 2 flank steaks in the basket of the hot air oven.
- Season the steaks with steak spices.
- Bake for 5 minutes at 210^ .
- Turn the steaks over and cook for a further 5 minutes.
- Add the cheese slices to the steaks and cook for a further 2 minutes.
Garnish with pink peppercorns, store-bought fried onions and parsley.
9. Mini Oreo cheesecakes
Ingredients
20-24 Oreo-type biscuits
- 250 g cream cheese,at room temperature
- 1 egg
- 64 g Mars-type chocolate bar (2 packets)
1/2 tsp vanilla essence
20-24 paper muffin cases
- Caster sugar
Preparation
- Using an electric mixer, beat the cream cheese in a bowl until smooth. Add the egg and vanilla and beat until well combined.
- Place the chocolate bars in a microwave-safe bowl and heat until softened.
- Add the melted chocolate to the cream cheese mixture. Beat until well incorporated. Set aside.
- Line 10 small paper muffin tins. Set aside.
- Divide the Oreo biscuits in half and place one biscuit half in the mould, making sure to put the cream side up.
- Divide the cheese mixture between the moulds.
- Cover each mould with the other half of the Oreo biscuit, this time making sure to put the cream side down.
- Preheat the oven to 160^ .
- Carefully transfer the moulds to the deep fryer and cook for 8 minutes or until the mixture is almost set. Depending on the size of the basket, you may need to make several batches. As you need to leave space between the cakes, cook 5-6 at a time.
- Transfer the mini-cakes to a wire rack to cool completely.
- Sprinkle lightly with icing sugar and serve.
10. Meatballs with mint and feta cheese
Ingredients
1 beef stock cube, well crumbled
1 tbsp. apple cider vinegar
2 tbsp. honey
- 2 shallots, finely chopped
1/3 cup chopped mint
- 2 cloves garlic, chopped
1 tbsp. olive oil
- 450g medium-lean ground beef
1/3 cup panko breadcrumbs
1/2 cup crumbled feta cheese
- 1 egg
Salt and pepper
Preparation
Preheat the oven to 200^
In a bowl large enough to hold all the ingredients, add the beef stock cube, vinegar, honey, shallots, mint, garlic and olive oil and whisk well to combine.
Then add all the remaining ingredients, and season lightly with salt and pepper. Mix with your hands for about 2 minutes.
Form into approximately 16 balls, then place on a baking tray lined with baking paper.
Cook the meatballs for 10 minutes and/or until cooked through. (Shake the basket of the air fryer after 7 minutes of cooking).
Suggestion: serve with a homemade mint vinaigrette, cucumbers and rocket.
After use
- Set the timer to OFF.
- Set the cooking selector to the OFF position.
- Set the temperature selector to the OFF position.
- Unplug the appliance.
- Wait for the appliance to cool down completely before servicing.
Cleaning and maintenance
- Unplug the appliance.
- Wait for the appliance to cool down completely.
- Do not immerse the appliance in water or any other liquid.
- Clean exterior surfaces with a slightly damp sponge.
- Clean the interior, hob and grill with a damp sponge and mild detergent.
- Do not use abrasive sponges or hard brushes to avoid scratching the exterior and interior surfaces or the accessories.
- Do not use sharp utensils to clean your oven.
- Do not use toxic or abrasive cleaning products.
- Dry exterior and interior surfaces and accessories thoroughly.
Technical specifications
Power supply: 220 - 240V 50 - 60Hz
Power rating : 1700W
Warranty
This product is guaranteed for a period agreed with the distributor from the date of purchase against any defect resulting from faulty workmanship or materials.
This guarantee does not cover defects or damage resulting from incorrect installation, incorrect use or abnormal wear and tear of the product.
The appliance must be returned in its original packaging and accompanied by the receipt, provided it has been handled correctly. Please follow the instructions for use and safety instructions set out above. Furthermore, we cannot guarantee your appliance if you or a third party have carried out modifications or repairs to it.
Selective collection of electrical and electronic waste

Electrical products must not be disposed of with household waste. Under European Directive 2012/19/EU on the disposal of electrical and electronic equipment and its implementation in national law, used electrical products must be collected separately and disposed of at the collection points provided for this purpose. Contact your local authority or dealer for advice on recycling.
1 Grapefruit
1 Orange