
THERMIC 22 H - Pressure washer Lavor - Free user manual and instructions
Find the device manual for free THERMIC 22 H Lavor in PDF.
| Product type | High pressure cleaner |
| Brand | Lavor |
| Model | THERMIC 22 H |
| Motorization | Honda GX 690, petrol |
| Power | 16,4 kW (22 HP) |
| Rotation speed | 3400 - 3600 rpm |
| Maximum pressure | 500 bar (7250 psi) |
| Nominal pressure | 480 bar (6960 psi) |
| Maximum flow rate | 16,5 l/min (4,4 USgpm) |
| Nominal flow rate | 15 l/min (4,0 USgpm) |
| Max feed water temperature | 60 °C |
| Min feed water temperature | 5 °C |
| Max feed water pressure | 8 bar |
| Dimensions (L x W x H) | 1185 x 740 x 1020 mm |
| Weight | 180 kg |
| Sound pressure level | 89 dB(A) |
| Sound power level | 107 dB(A) |
| Hand-arm vibration | 3,9 m/s² |
| Pump oil | 15W-40 |
| Gear oil | 80W-90 |
| Safety devices | Pressure limiting/regulating valve, trigger safety stop |
| Included equipment | High pressure hose, gun, lance tube, suction kit, nozzle cleaning tip |
| Start | Electric |
| Fuel tank capacity | Large capacity integrated into chassis |
Frequently Asked Questions - THERMIC 22 H Lavor
User questions about THERMIC 22 H Lavor
0 question about this device. Answer the ones you know or ask your own.
Ask a new question about this device
Download the instructions for your Pressure washer in PDF format for free! Find your manual THERMIC 22 H - Lavor and take your electronic device back in hand. On this page are published all the documents necessary for the use of your device. THERMIC 22 H by Lavor.
USER MANUAL THERMIC 22 H Lavor
IT·IDROPULITRICI AD ACQUA FREDDA CON MOTORE A SCOPPIO
| Mobil Delvac MX 15W-40 Total Rubia TIR 7400 15W-40 | |
| Shell Rimula R4 15W-40 ENI i-Sigma performance E7 15W-40 | |
| Gazprom-Neft super oil GTD 15W-40 Castrol | GTX Professional 15W-40 |
AVVERTENZA
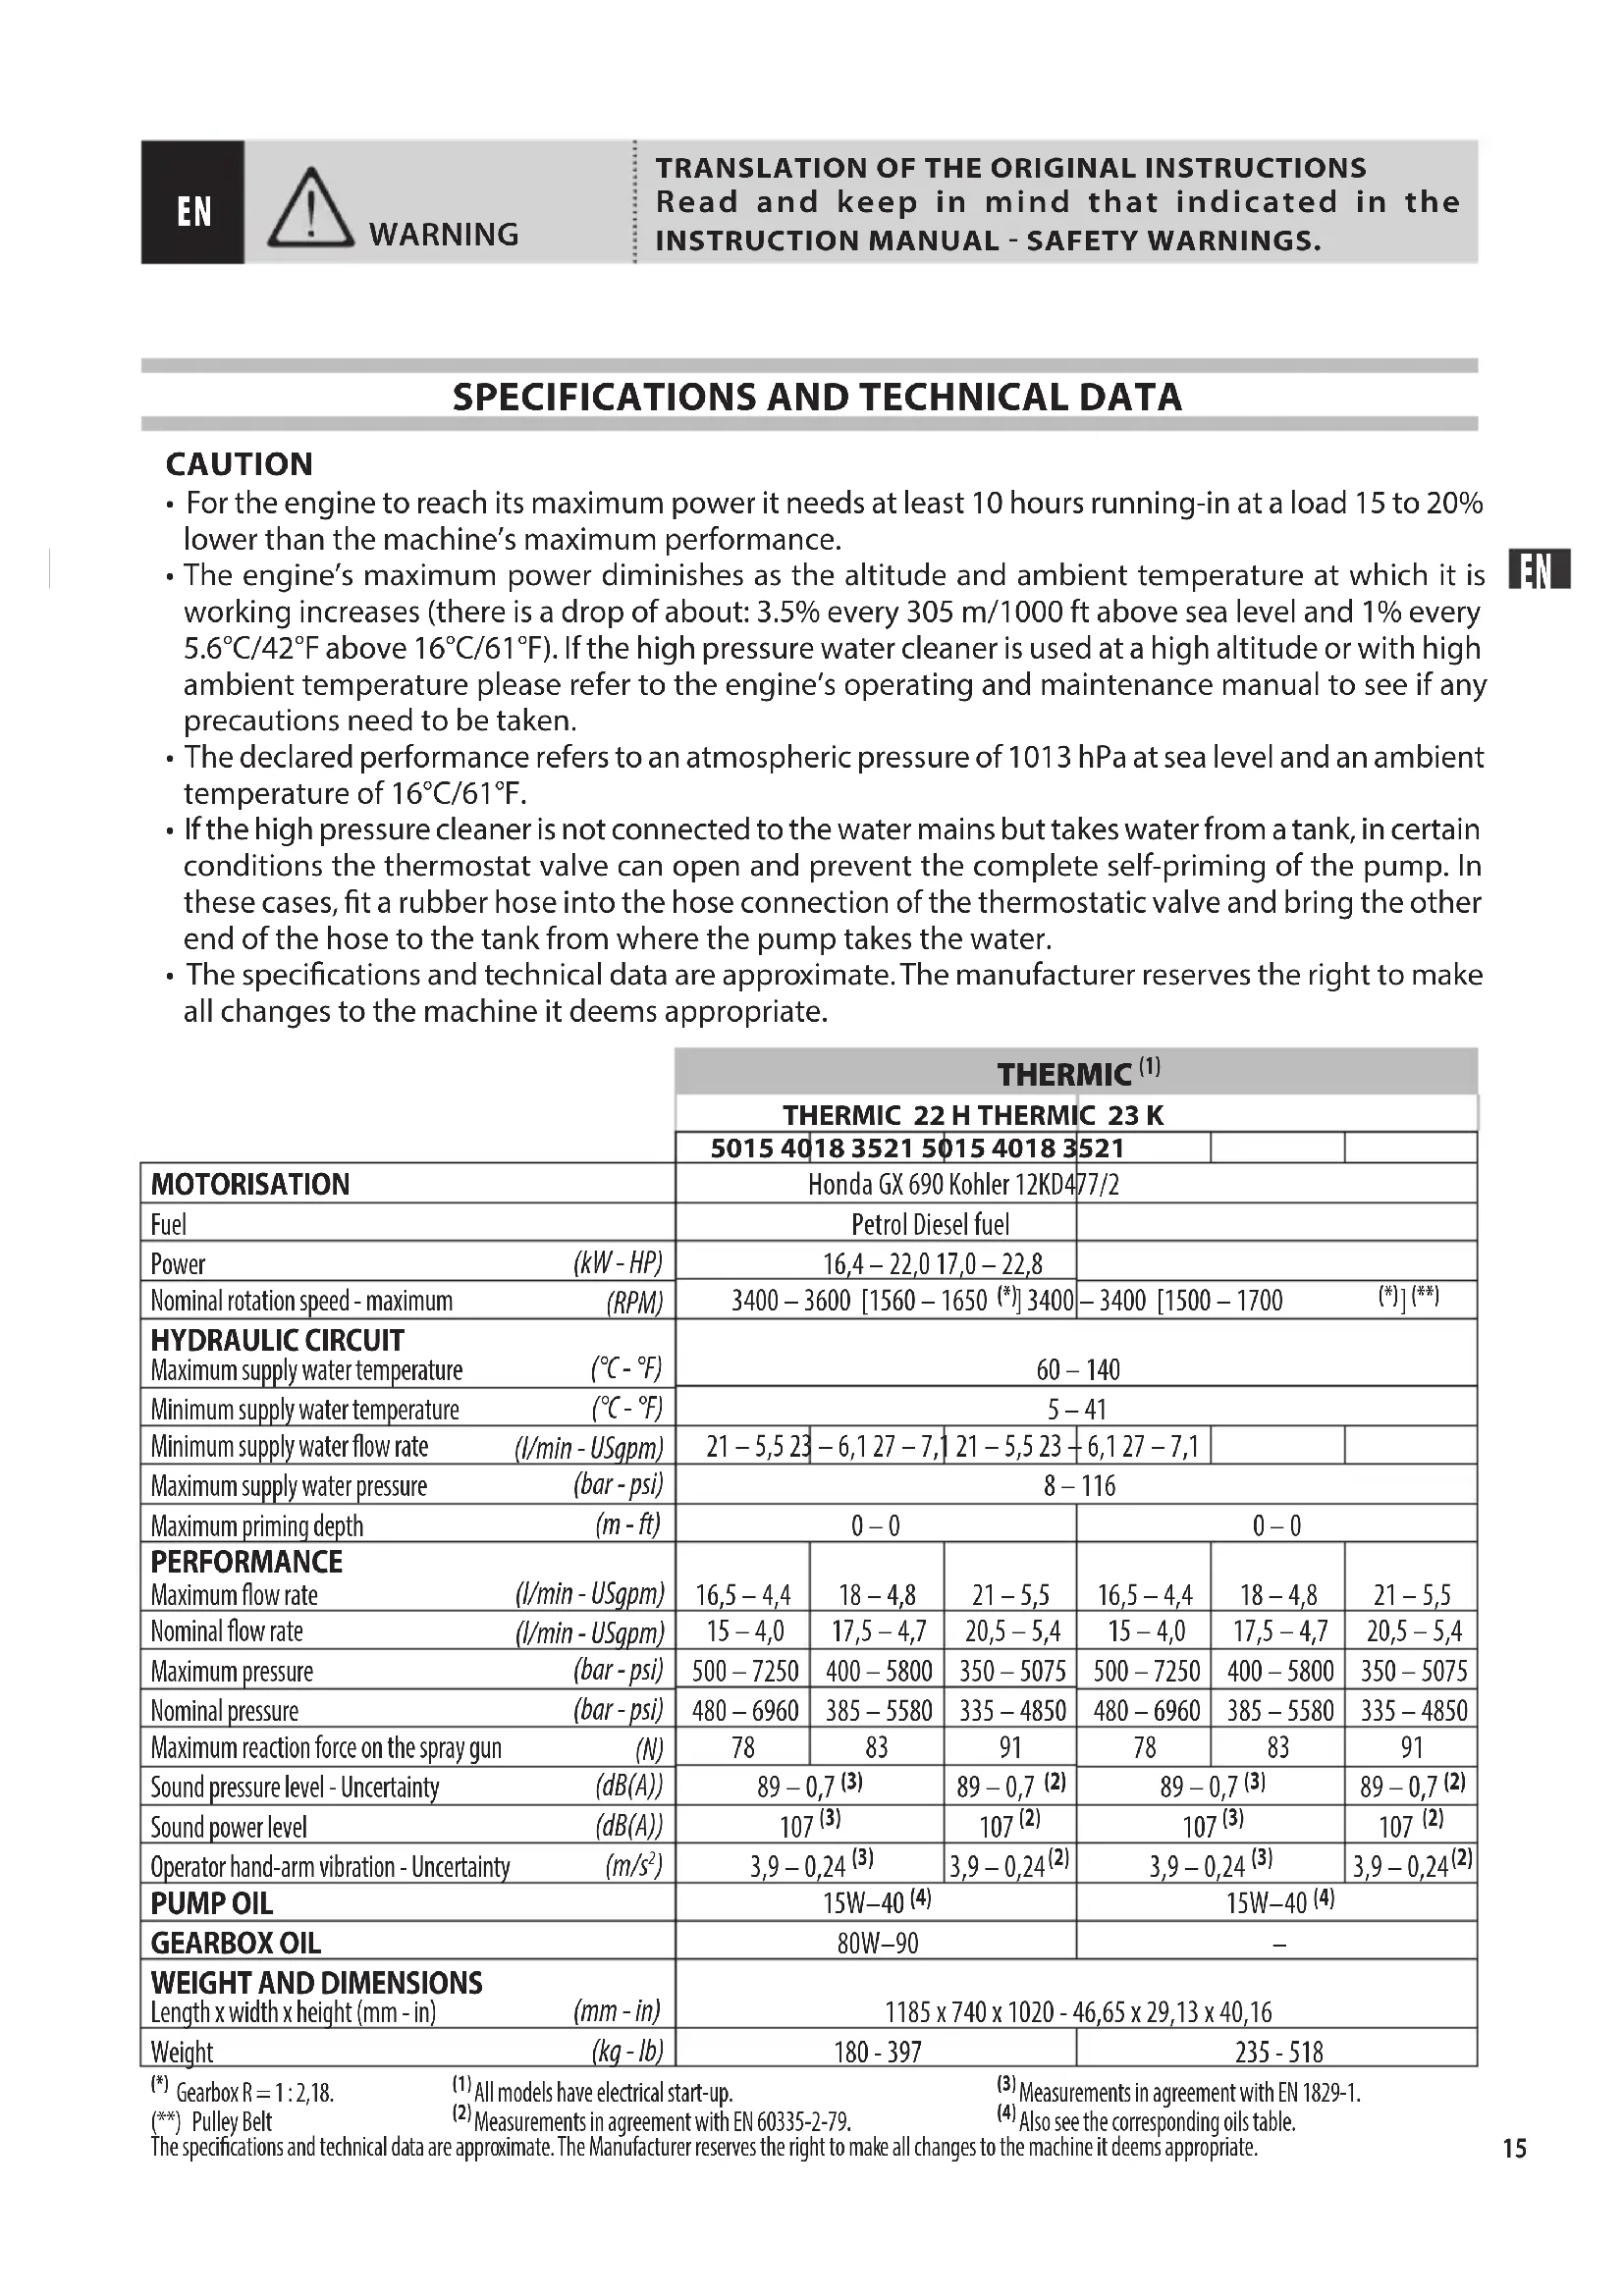
- For the engine to reach its maximum power it needs at least 10 hours running-in at a load 15 to 20% lower than the machine's maximum performance.
- The engine's maximum power diminishes as the altitude and ambient temperature at which it is working increases (there is a drop of about: 3.5% every 305m / 1000 ft above sea level and 1% every 5.6^ / 42^ above 16^ / 61^ ). If the high pressure water cleaner is used at a high altitude or with high ambient temperature please refer to the engine's operating and maintenance manual to see if any precautions need to be taken.
- The declared performance refers to an atmospheric pressure of 1013hPa at sea level and an ambient temperature of 16^ / 61^ .
- If the high pressure cleaner is not connected to the water mains but takes water from a tank, in certain conditions the thermostat valve can open and prevent the complete self-priming of the pump. In these cases, fit a rubber hose into the hose connection of the thermostatic valve and bring the other end of the hose to the tank from where the pump takes the water.
- The specifications and technical data are approximate. The manufacturer reserves the right to make all changes to the machine it deems appropriate.
| THERMIC (1) | ||||||
| THERMIC 22 H THERMIC 23 K | ||||||
| 5015 4018 3521 5015 4018 3521 | ||||||
| MOTORISATION | Honda GX 690 Kohler 12KD4 77/2 | |||||
| Fuel | Petrol Diesel fuel | |||||
| Power (kW - HP) | 16,4 - 22,0 17,0 - 22,8 | |||||
| Nominal rotation speed - maximum (RPM) | 3400 - 3600 [1560 - 1650 (*)] 3400 | - 3400 [1500 - 1700 (*)] (**) | ||||
| HYDRAULIC CIRCUIT Maximum supply water temperature (℃ - °F) | 60 - 140 | |||||
| Minimum supply water temperature (℃ - °F) | 5 - 41 | |||||
| Minimum supply water flow rate (l/min - USgpm) | 21 - 5,5 23 | - 6,1 27 - 7, | 21 - 5,5 23 | - 6,1 27 - 7,1 | ||
| Maximum supply water pressure (bar - psi) | 8 - 116 | |||||
| Maximum priming depth (m - ft) | 0 - 0 | 0 - 0 | ||||
| PERFORMANCE Maximum flow rate (l/min - USgpm) | 16,5 - 4,4 | 18 - 4,8 | 21 - 5,5 | 16,5 - 4,4 | 18 - 4,8 | 21 - 5,5 |
| Nominal flow rate (l/min - USgpm) | 15 - 4,0 | 17,5 - 4,7 | 20,5 - 5,4 | 15 - 4,0 | 17,5 - 4,7 | 20,5 - 5,4 |
| Maximum pressure (bar - psi) | 500 - 7250 | 400 - 5800 | 350 - 5075 | 500 - 7250 | 400 - 5800 | 350 - 5075 |
| Nominal pressure (bar - psi) | 480 - 6960 | 385 - 5580 | 335 - 4850 | 480 - 6960 | 385 - 5580 | 335 - 4850 |
| Maximum reaction force on the spray gun (N) | 78 | 83 | 91 | 78 | 83 | 91 |
| Sound pressure level - Uncertainty (dB(A)) | 89 - 0,7 (3) | 89 - 0,7 (2) | 89 - 0,7 (3) | 89 - 0,7 (2) | ||
| Sound power level (dB(A)) | 107 (3) | 107 (2) | 107 (3) | 107 (2) | ||
| Operator hand-arm vibration - Uncertainty (m/s²) | 3,9 - 0,24 (3) | 3,9 - 0,24 (2) | 3,9 - 0,24 (3) | 3,9 - 0,24 (2) | ||
| PUMP OIL | 15W-40 (4) | 15W-40 (4) | ||||
| GEARBOX OIL | 80W-90 | - | ||||
| WEIGHT AND DIMENSIONS Length x width x height (mm - in) (mm - in) | 1185 x 740 x 1020 - 46,65 x 29,13 x 40,16 | |||||
| Weight (kg - lb) | 180 - 397 | 235 - 518 | ||||
(^) Gearbox R = 1:2,18.
(1) All models have electrical start-up.
(3)Measurements in agreement with EN 1829-1.
(^*) Pulley Belt
(2)Measurements in agreement with EN 60335-2-79.
(4) Also see the corresponding oils table.
The specifications and technical data are approximate. The Manufacturer reserves the right to make all changes to the machine it deems appropriate.
15W40 corresponding oils:
| Mobil Delvac MX 15W-40 Total Rubia TIR 7400 15W-40 | |
| Shell Rimula R4 15W-40 ENI i-Sigma performance E7 15W-40 | |
| Gazprom-Neft super oil GTD 15W-40 Castrol | GTX Professional 15W-40 |
WARNING
- As far as engine lubricants are concerned, refer to the relative operating and maintenance manuals.
IDENTIFICATION OF COMPONENTS
Refer to figures 1 to 5.
| 1 - Pump | 29 - Nozzle cleaning needle |
| 2 - Petrol/gasoline engines | 32 - Spray gun lever safety stop |
| 3 - Frame | 33 - Spray gun lever |
| 4 - Handle | 34 - High pressure hose quickfit coupling |
| 8 - Warning plate | 35 - Lance hose |
| 9 - Accessory rack | 38 - Pump oil level indicator |
| 11 - Water inlet hose-end fitting | 41 - Brake |
| 12 - Water inlet hose clamp | 42 - Battery |
| 13 - ID plate | 43 - Ignition key |
| 14 - Base | 44 - Gearbox oil level indicator (THERMIC 22 H) |
| 15 - Water outlet fitting | 46 - Oil plug with vent for gearbox (THERMIC 22 H) |
| 16 - Water inlet fitting | 49 - Water inlet filter gasket |
| 17 - Pressure regulating knob | 57 - Spray gun |
| 18 - Pressure indicator | 58 - Lance knob |
| 20 - Thermal valve | 59 - High pressure hose |
| 23 - Water inlet filter | 60 - High pressure hose sleeve |
| 24 - Single barrel nozzle holder head | 61 - Water inlet filter cup |
| 27 - Oil plug with vent for pump | 63 - Water inlet filter cartridge |
| 28 - Petrol tank |
SAFETY DEVICES
Pressure unloader/regulation valve
Valve, suitably calibrated by the Manufacturer, for regulating work pressure by means of a knob (17) and that allows the pumped fluid to return to pump suction thus preventing the onset of dangerous pressures when closing the spray gun or when trying to set a pressure that is above the maximum permitted values.
- Spray gun lever lock device.
Safety stop (32) for locking the spray gun (57) lever (33) in the closed position so it cannot be started accidentally (Fig. 3, position S).
STANDARD FITTING
Make sure the following are inside the pack of the product you have purchased:
high pressure cleaner;
- high pressure delivery hose;
- spray gun;
- lance hose;
- bag of accessories with:
- the operating and maintenance manual;
- the engine operating and maintenance manual;
- the declaration of conformity;
- suction kit with: fitting and clamp
- nozzle cleaning needle;
If any problems arise please contact your dealer or an authorised assistance centre.
OPTIONAL ACCESSORIES
You can add the following range of accessories to the standard ones supplied with your high pressure cleaner:
- sandblasting lance: designed to smooth surfaces, removing rust, paint, encrustations, etc.;
- drain cleaning kit: designed to unclog pipes and ducts;
- different types of lances and nozzles;
- rotating brush: designed for cleaning fragile surfaces;
- rotating nozzle: designed for removing stubborn dirt;
- foam lance: designed for a more efficient distribution of the detergent.

INSTALLATION - ASSEMBLING THE ACCESSORIES AND FILLING THE ENGINE CRANKCASE WITH OIL
- Unwind the high pressure hose (59) and screw the end without the quickfit coupling onto the spray gun (57) thread and tighten well with two 22mm fixed jaw spanners (not supplied). Operation B in Fig.5.
- Connect the quickfit coupling (34) to the water outlet fitting (15), screw down and tighten the ring nut by hand. Operation C in Fig. 5.
- Insert the gasket (49) in the water inlet fitting (16) and screw the water inlet hose-end fitting (11) on to it. Operation D in Fig. 5.
- Fill the engine crankcase with oil, following the instructions given in the relevant operating and maintenance manual (this is not to be done on machines with Diesel engines as they are filled with oil in the factory).
OPERATION - PRELIMINARY ACTIVITIES
- Do the preliminary activities described in the operating and maintenance manual of the engine mounted on the high pressure cleaner. In particular remember to fill with fuel and check the level of engine oil.
NOTE: the THERMIC model has a capacious tank (28) integrated in the high pressure cleaner frame. - When the engine is off and the machine is completely cold, check the level of pump oil by way of the level indicator (38). Also check the gearbox oil level by way of the level indicator (44) on those models thus equipped.
When topping up is needed please refer to the lubricant types given in the "SPECIFICATIONS AND TECHNICAL DATA" paragraph. - Check if the water inlet filter (23) is clean.
- Take the high pressure cleaner to the place of work using the handle (4).
- Engage the parking brake (41).
- Unwind the high pressure hose completely (59).
Fix a supply hose with an inside diameter of 19mm / 0,75 in to the water inlet hose-end fitting (23).
Operation G in Fig. 5.
- Start the engine, referring to the relevant operating and maintenance manual.
- Open the water supply tap (if connected to the drinking water mains it is mandatory to use a back-flow preventer: to use this device refer to the relevant instruction manual), making sure there are no drips. Alternatively, put a suction hose in a tank.
-
Press the spray gun lever (33) and wait for a continuous jet of water to come through which means the pump is priming correctly.
-
Stop the engine, referring to the relevant operating and maintenance manual, and close the water supply tap, if any.
- Press the spray gun lever (33) to discharge all residual pressure.
- Connect the lance hose (35) to the spray gun (57) depending on the type of high pressure cleaner you have. Operation H in Fig. 5.
STANDARD OPERATION (HIGH PRESSURE)
- Start the engine, referring to the relevant operating and maintenance manual.
- Open the water supply tap, if any.
- Press the spray gun lever (33) checking that the nozzle spray is uniform and there are no drips.
- If necessary regulate the pressure by way of the pressure regulating knob (17). Turn it clockwise to increase pressure, anticlockwise to reduce it. You can see the pressure on the pressure indicator (18).
CAUTION
- Before expecting maximum performance of the high pressure cleaner it is good practice to warm the engine up for a couple of minutes.
STOPPING OPERATION
- When the spray gun lever (33) is released it stops the high pressure jet and the machine goes to the bypass mode.
- Pressing the spray gun lever (33) again the high pressure jet starts again.

WARNING
- If you have to interrupt the high pressure jet and put the spray gun down, without stopping the machine, you have to insert the safety stop (32). Operation S in Fig. 3.
CAUTION
- Do not leave the high pressure cleaner for more than three minutes in bypass (spray gun closed) if the optional thermostatic valve has not been installed by a Specialized Technician.
STOP
- Close the water supply tap or take the suction hose out of the tank.
- Drain the water from the high pressure cleaner, working it for a few seconds with the spray gun lever (33) pressed.
- Carry out the stop operations, explained in the engine operating and maintenance manual and take the ignition key out (43) (Diesel engines and petrol engines with electrical start-up).
- Discharge any residual pressure from the high pressure hose (59), keeping the spray gun lever (33) pressed for a few seconds.
- Wait for the high pressure cleaner to cool down.
DECOMMISSIONING
- Carefully rewind the high pressure hose (30) or (59) without making any kinks in it.
- Follow the instructions for decommissioning as given in the engine operating and maintenance manual.
- The high pressure cleaner must be kept in a dry, clean place paying attention not to damage the high pressure hose. Engage the brake (41) to avoid any uncontrolled movements of the machine.
NOTE: after a prolonged period of non-use you could find a few drops of water under the pump. This dripping normally disappears after a few hours of use. If it does persist however, contact a Specialized Technician.
ROUTINE MAINTENANCE
Do the operations described in the "STOP" paragraph and follow the instructions given in the following table.
Also remember to carry out the routine maintenance jobs given in the engine operating and maintenance manual, especially as regards to checking engine oil, the air filter and the spark plug.
| MAINTENANCE SCHEDULE | JOB |
| Every time it is used | ·Check the high pressure hose, fittings, spray gun and lance hose. If one or more parts are found to be damaged do not, under any circumstances, use the high pressure cleaner and contact a Specialized Technician. ·Check pump oil level. ·Remove all dirt and debris from the cooling fins on the engine, from the air inlet grids, from the mechanisms and rev regulator springs (refer to the engine operating and maintenance manual). |
| Weekly · Clean the water inlet filter (23). Unscrew the cap (61) and take the cartridge out (63), (see Fig. 4). It is normally enough to put the cartridge under running water or blow it with compressed air to clean it. In the most difficult cases, use a scale remover or replace it, contacting an authorised assistance centre to buy the new cartridge. Mount the cartridge and screw the plug back down. | |
| Monthly | ·Clean the water inlet filter (23) (refer to what has been explained previously). ·Clean the nozzle. It is normally enough to put the needle (29) supplied through the hole of the nozzle to clean it. If the results are not good, replace the nozzle purchasing it from an authorised assistance centre. The professional fixed fan nozzle mounted on the nozzle holder heads (24) can be replaced using a 14 mm box spanner (not supplied). ·Oil or grease the rotating or sliding parts the operator is able to reach (refer also to the engine operating and maintenance manual). ·Check soundness of the water inlet and outlet circuits. ·Check clamping of the pump to the engine and the engine to the frame. If clamping is found to be insecure do not, under any circumstances, use the high pressure cleaner and contact a Specialized Technician. |
CAUTION
- When working, the high pressure cleaner should not be too noisy and there should be no obvious drips of water or oil underneath it. If this is the case have the machine checked by a Specialized Technician.
SPECIAL MAINTENANCE
Special maintenance must only be done by a Specialized Technician, complying with the following table. Also remember to carry out the special maintenance jobs listed in the engine operating and maintenance manual.
| MAINTENANCE SCHEDULE | JOB |
| After the first 50 hours of operation | • Change pump oil. |
| Every 200 hours • Check | the pump's hydraulic circuit. • Check pump and engine clamping. |
| Every 500 hours • Change | pump oil and gearbox oil. • Check the pump suction/delivery valves. • Check tightness of pump screws. • Check the pump regulation valve. • Check the safety devices. |
CAUTION
- The data given in the table are approximate. It might be necessary to carry out maintenance more frequently in the case of particularly heavy work.
TROUBLESHOOTING
| PROBLEMS CAUSES REMEDIES | ||
| The engine does not start or there is a malfunction with it or it stops while working. | Refer to the engine operating and maintenance manual. | Refer to the engine operating and maintenance manual after having made sure there is fuel in the tank. |
| The high pressure cleaner is vibrating a lot and is noisy. | The water inlet filter (23) is dirty. Follow the instructions given in the “ROUTINE MAINTENANCE” paragraph. | |
| Air suction. Check soundness of the suction circuit. | ||
| Not enough water is being supplied or priming depth is excessive. | Make sure the tap is fully open and that the mains flow rate or priming depth conform to what is specified in the “SPECIFICATIONS AND TECHNICAL DATA” paragraph. | |
| The high pressure cleaner fails to reach maximum pressure. | The regulation valve is set for a pressure lower than the maximum one. | Turn the pressure regulating knob (17) clockwise. |
| The nozzle is worn. Replace the nozzle as explained in the “ROUTINE MAINTENANCE” paragraph. | ||
| Not enough water is being supplied or priming depth is excessive. | Make sure the tap is fully open and that the mains flow rate or priming depth conform to what is specified in the “SPECIFICATIONS AND TECHNICAL DATA” paragraph. | |
| No water coming through the nozzle. | No water. Check that the mains water tap is fully open or that the suction hose is able to prime. | |
| Suction depth is excessive Make sure priming depth conforms to what is specified in the “SPECIFICATIONS AND TECHNICAL DATA” paragraph. | ||
| Water nozzle clogged. Clean and/or replace the nozzle as explained in the “ROUTINE MAINTENANCE” paragraph. | ||
CARACTERISTIQUES ET DONNÉES TECHNIQUES
AVERTISSEMENT
| Mobil Delvac MX 15W-40 Total Rubia TIR 7400 15W-40 | |
| Shell Rimula R4 15W-40 ENI i-Sigma performance E7 15W-40 | |
| Gazprom-Neft super oil GTD 15W-40 Castrol | GTX Professional 15W-40 |
AVERTISSEMENT
PROBLEMES, CAUSES ET SOLUTIONS
| Mobil Delvac MX 15W-40 Total Rubia TIR 7400 15W-40 | |
| Shell Rimula R4 15W-40 ENI i-Sigma p performance E7 15W-40 | |
| Gazprom-Neft super oil GTD 15W-40 Castrol | GTX Professional 15W-40 |
ADVERTENCIA
| Mobil Delvac MX 15W-40 Total Rubia TIR | 7400 15W-40 |
| Shell Rimula R4 15W-40 ENI i-Sigma performance E7 15W-40 | |
| Gazprom-Neft super oil GTD 15W-40 Castrol GTX Professional 15W-40 | |
WARNHINWEIS
- IT·IDROPULITRICI AD ACQUA FREDDA CON MOTORE A SCOPPIO
- AVVERTENZA
- WARNING
- IDENTIFICATION OF COMPONENTS
- SAFETY DEVICES
- Pressure unloader/regulation valve
- - Spray gun lever lock device.
- STANDARD FITTING
- OPTIONAL ACCESSORIES
- INSTALLATION - ASSEMBLING THE ACCESSORIES AND FILLING THE ENGINE CRANKCASE WITH OIL
- OPERATION - PRELIMINARY ACTIVITIES
- Operation G in Fig. 5.
- STANDARD OPERATION (HIGH PRESSURE)
- CAUTION
- STOPPING OPERATION
- STOP
- DECOMMISSIONING
- ROUTINE MAINTENANCE
- SPECIAL MAINTENANCE
- CARACTERISTIQUES ET DONNÉES TECHNIQUES
- AVERTISSEMENT
- ADVERTENCIA
- WARNHINWEIS
Brand : Lavor
Model : THERMIC 22 H
Category : Pressure washer