
TECHNIVISTA 43 CL - Television TECHNISAT - Free user manual and instructions
Find the device manual for free TECHNIVISTA 43 CL TECHNISAT in PDF.

| Product Type | Television |
| Brand | TechniSat |
| Model | TECHNIVISTA 43 CL |
| Screen diagonal | 43 inches (109 cm) |
| Screen type | TFT-LCD (IPS) |
| Resolution | 1920 x 1080 pixels (Full HD) |
| Refresh rate | 60 Hz |
| Brightness | 250 cd/m² |
| Contrast | 1200:1 (typical) |
| Backlight | Direct LED (DLED) |
| Aspect ratio | 16:9 |
| Response time | 10 ms |
| Tuner type | DVB-T/T2/C, DVB-S/S2, analog PAL/SECAM |
| Connectivity | Wi-Fi 802.11 a/b/g/n/ac, Bluetooth 2.1+EDR/4.2/5.1, Ethernet RJ-45 |
| HDMI inputs | 3 (including 1 eARC) |
| USB ports | 2 (USB 2.0) |
| Other connectors | Composite + Audio, SPDIF optical, headphone jack, F satellite connector, IEC antenna |
| Audio power | 2 x 10 W RMS |
| Operating system | VIDAA (Smart TV) |
| Power supply | 220-240 V, 50/60 Hz |
| Power consumption | 75 W (standby < 0.5 W) |
| Wall mount (VESA) | 200 x 200 mm, screws M6x10 |
| Warranty | 24 months (statutory) |
| Hotline service | 03925/9220 1800 (Mon-Fri 8am-5pm) |
Frequently Asked Questions - TECHNIVISTA 43 CL TECHNISAT
User questions about TECHNIVISTA 43 CL TECHNISAT
0 question about this device. Answer the ones you know or ask your own.
Ask a new question about this device
Download the instructions for your Television in PDF format for free! Find your manual TECHNIVISTA 43 CL - TECHNISAT and take your electronic device back in hand. On this page are published all the documents necessary for the use of your device. TECHNIVISTA 43 CL by TECHNISAT.
USER MANUAL TECHNIVISTA 43 CL TECHNISAT
4.3 Betriebspausen
flowchart
graph LR
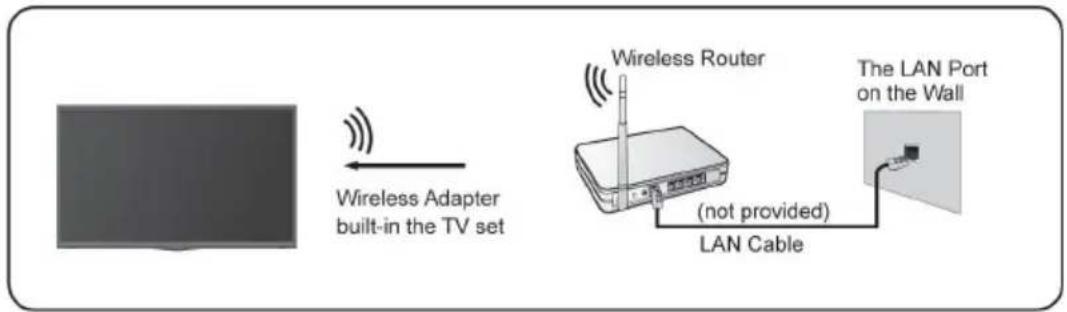
A["TV Set Screen"] -->|Wireless Adapter built-in the TV set| B["Wireless Router"]
B --> C["LAN Cable (not provided)"]
C --> D["The LAN Port on the Wall"]
Empfangsliste (3)
Operating instructions
1 Table of contents
1 Table of contents ......2
2 Device overview ....4
2.1 Remote control....5
3 Read biUe first....6
4 Safety instructions ....6
4.1 Intended use....7
4.2 Area of application 8
4.3 Breaks in operation 10
4.4 Important notes on operation....10
4.5 Important note on data backup....10
5 Disposal instructions....11
6 Legal matters ....12
6.1 Service notes 13
7 First use....14
7.1 Connecting satellite/antenna/cable to the television....14
72 Initial setup wizard....14
7.3 Using the electronic operating instructions .....15
7.4 Call up the electronic operating instructions....15
8 The HOME screen (start page)....16
8.1 Call up HOME screen 16
8.2 Using the navigation bar 16
8.3 Using the shortcuts....17
9 The on-screen menu....18
10 Connection to the Internet....20
10.1 Connection to a wired network (Ethernet) 20
10.2 Connection to a wireless network....20
11 Channel search....21
11.1 Automatic channel scan....21
11.2 Manual search....23
12 Play external devices....24
12.1 Edit the name of the input source....24
13 Use of the TV voice service ....25
14 Customise TV channels and apps....26
14.1 TV channel....26
14.2 Apps 27
15 The channel list....28
15.1 Call up channel list ....28
15.2 The submenu of the channel list....28
16 Programme info 29
17 Programme guide (EPG) 29
17.1 Call up EPG....30
17.2 Functions in the EPG....30
18 Guidelines....31
18.1 How are the TV channels sorted and why? 31
18.2 How are the applications sorted and why?......32
18.3 How are recommendations made? 32
19 Technical data....33
20 Power consumption values ....35
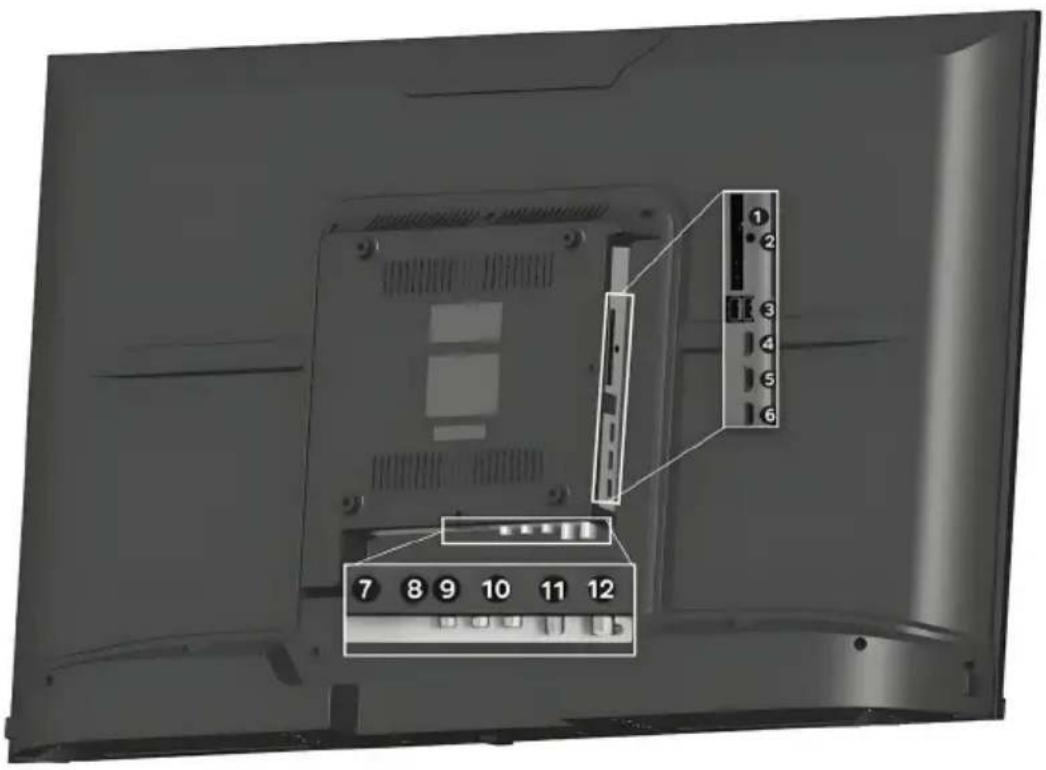
1 Cl+ module slot
2 Headphone output
3 2x USB connection
4 HDMI 1 (eARC)
5 HDMI 2
6 HDMI 3
7 Ethernet (LAN)
8 SPDIF Optical
9 Video input (analogue)
10 Audio input (analogue)
11 F connection DVB-S/S2
12 Antenna socket DVB-T2/DVB-C
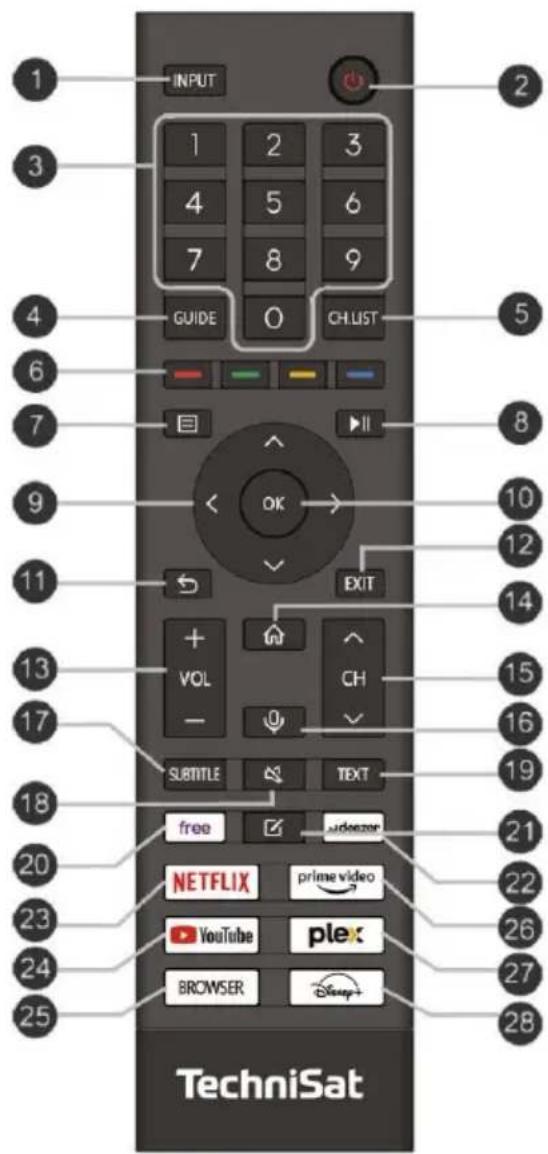
21 Remote control
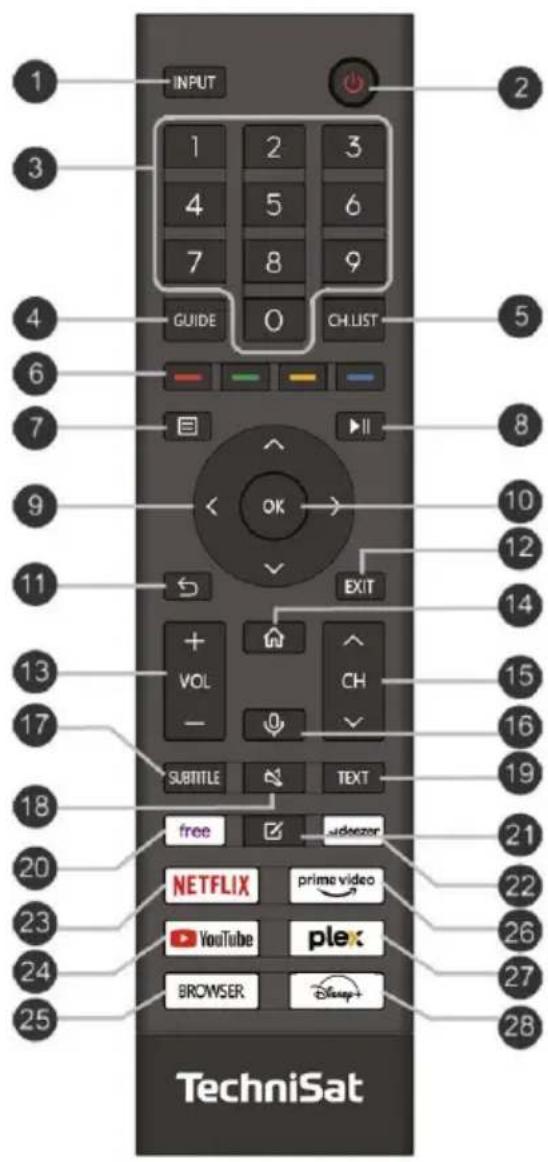
| 1 | INPUT source selection |
| 2 | On/Standby |
| 3 | Numeric keys |
| 4 | GUIDE Programme Guide (EPG) |
| 5 | CH.LIST Channel list |
| 6 | Colour buttons (context-sensitive) |
| 7 | Device menu |
| 8 | Play/pause |
| 9 | Control pad (D-pad / navigation) |
| 10 | OK (confirm selection) |
| 11 | BACK (to the previous menu) |
| 12 | EXIT (exit the menu or a SMART function) |
| 13 | VOL+/- Adjusting the volume |
| 14 | HOME (open Internet functions) |
| 15 | CH+/- (change channel) |
| 16 | VOICE If you press and hold the voice button, the VIDAA-capable microphone on the remote control is activated and voice input is initiated. Releasing the voice button ends the voice input. With |
| VIDAA allows you to use your voice to search for content, control playback and much more. (VIDAA voice service requires an internet connection) | |
| 17 | SUBTITLE (change subtitles) |
| 18 | MUTE (sound mute) |
| 19 | TEXT (activates teletext) |
| 20 | FREE VIDAA Free Portal |
| 21 | EDIT (press and hold to set favourite channel or app) |
| 22 | Open content providers |
| 23 | Open content providers |
| 24 | Open content providers |
| 25 | Start browser |
| 26 | Open content providers |
| 27 | Open content providers |
| 28 | Open content providers |

The remote control can also be operated with the TV set via Bluetooth. This means it does not have to be pointed at the IR sensor on the front of the device. To do this, open Settings> Network> Bluetooth and activate the Automatic remote control pairing function.
3 Read biUe first
Before connecting and operating the appliance, first check that the delivery is complete and familiarise yourself with the safety instructions. The scope of delivery includes
1 TECHNIVISTA 43 CL,
1 Operating instructions
1 remote control, batteries (2 pcs. 1.5V AAA micro cells)
4 Safety instructions
Explanation of symbols

Indicates a safety instruction which, if disregarded, can lead to serious injuries. can lead to injuries or death. Observe the following signal words:
DANGER - Serious injuries with fatal consequences
WARNING - Serious injuries, possibly fatal
ATTENTION - Injuries

Indicates a note that you must observe to avoid device defects, data loss/misuse or unintentional operation. It also describes additional functions for your device.

Warning of electrical voltage. Follow all safety instructions to avoid electric shock. Never open the device or the power supply unit and only connect additional components when the device is switched off.

Indoor use - Appliances with this symbol are only suitable for indoor use.

Protection class II - Electrical appliances in protection class II are electrical appliances that have continuous double and/or reinforced insulation and no connection options for a protective conductor. The housing of an insulated electrical appliance of protection class II can partially or completely form the additional or reinforced insulation.

Your appliance bears the CE mark and fulfils all required EU standards.

Electronic devices do not belong in household waste, but must be disposed of properly in accordance with Directive 2012/19/EU of the European Parliament and Council of 4 July 2012 on waste electrical and electronic equipment (WEEE). At the end of its service life, please dispose of this appliance at the designated public collection points.
For your protection, you must read the safety precautions carefully, before using your new appliance. The manufacturer accepts no liability for damage caused by improper handling and non-compliance with safety precautions.
Leakage currents may occur in electrical appliances due to their function. These are permissible and harmless, even if they can be perceived as a slight "tingling" sensation. To avoid these leakage currents, the new installation or interconnection of mains-powered devices (receiver, TV set, etc.) must always be carried out in a de-energised state, i.e. all devices must be disconnected from the mains.
WARNING
Electrical voltage.
There is a possibility of electric shock.
Never open the device or the power supply unit!

WARNING
In the following cases, you must disconnect the appliance from the mains and ask a specialist for help:
the power cable or the mains plug is damaged
The device has been exposed to moisture or liquid has penetrated
in the event of significant malfunctions
In the event of severe external damage
As this appliance is disconnected from the mains by pulling out the mains plug, it is essential that it is easily accessible at all times.
4.1 Intended use
The device is used to receive digital television programmes in the home. In addition, video and music content can be played via USB and the Internet. It is exclusively for this purpose. The device may only be operated with the accessories supplied (remote control, cable, etc.). Any other use of these accessories is not permitted. Observe all information in these instructions, in particular the Safety instructions. Any other use is considered improper and may result in damage to property or even personal injury. No liability is accepted for damage caused by improper use.
4.2 Area of application
i
Observe all the following instructions for the intended use of the appliance and to prevent appliance defects.
- Do not switch on the TV set immediately after delivery or transport if it is cold; wait for the temperature to equalise.
- The appliance may only be operated in a temperate climate.
- To ensure sufficient ventilation, place the appliance on a smooth, level surface. Do not cover any ventilation slots.
- Do not place the appliance in narrow shelves or cabinets, keep a minimum ventilation distance of 10 cm from the appliance.
- Do not expose the appliance to dripping or splashing water. If water gets into the appliance, unplug it immediately and contact the service centre.
- Do not operate any heat sources in the vicinity of the appliance that will additionally heat the appliance.
- Do not any objects through the ventilation slots.
- Only use accessories approved for the appliance.
- Check the mains connection cable and the mains plug regularly for damage and do not use if damaged.
- When disconnecting the mains cable from the socket, pull the plug - not the cable.
- This appliance is not intended for use by persons (including children) with reduced physical, sensory or mental capabilities, or lack of experience and/or knowledge, unless they have been given supervision or instruction concerning use of the appliance by a person responsible for their safety.
- Children must be supervised to ensure that they do not play with the appliance.

Safety instructions regarding stability
Flat screen televisions can fall and/or tip over if used incorrectly and cause serious injury or death.
Many injuries, especially in children, can be avoided by taking simple precautions:
- ALWAYS use the stands or mounting methods supplied/recommended by the manufacturer of the TV set. Follow the installation instructions supplied with the stands and only use the screws supplied for this purpose.
- ALWAYS use furniture that can safely support the TV set.
- ALWAYS make sure that the screen does not protrude over the edge of the furniture.
- ALWAYS tell children that it dangerous to on furniture to reach the screen or its controls.
- ALWAYS lay the cables connected to the screen in such a way they cannot be tripped over, pulled or grabbed.
- NEVER place a television set in an unstable location.
- NEVER place the screen on high furniture (e.g. cabinets or bookshelves) without anchoring both the furniture and the screen in a suitable position.
- NEVER place the screen on fabrics or other materials that could be between the screen and the furniture.
- NEVER place objects that could tempt children to cling, such as toys and remote controls, on the top of the screen or the furniture on which the screen is placed.

Safe handling of construction materials
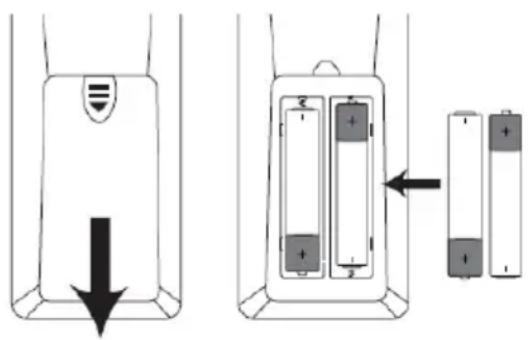
- Only operate the appliance with the baGeries approved for this appliance.
- Normal BaGeries must not be loaded. BaGeries must not be reactivated with other MiGels, taken apart, heated or thrown into an open fire (risk of explosion!).
- BaGerie contacts and device contacts must be cleaned before insertion.
- Pay attention to the polarity. There is a risk of explosion if the battery is inserted incorrectly!
- Replace BaGeries only with BaGeries of the correct type and model number
- Do not expose BaGerien to extreme conditions. Do not place on radiators or expose to direct sunlight!
- Leaked or damaged BaGeria can cause chemical burns if it comes into contact with the skin. In this case, use suitable protective gloves. Clean the BaGeria compartment with a dry cloth.
- If the appliance will not be used for a longer period of time, remove the batteries.
Insert batteries into remote control:
4.3 Breaks in operation
The device must be disconnected from the mains and the antenna cable must be removed during a power failure or during longer breaks in operation (e.g. holidays). Before disconnecting the device from the mains, you should first switch it to standby and wait until the red LED lights up.
4.4 Important notes on operation
The use of a so-called "On Screen Display" simplifies the operation of the device and reduces the number of remote control buttons.
All functions are displayed on the screen and can be controlled with just a few buttons.
Related functions are summarised as a "MENU". The selected function is highlighted. In the bottom line, the "function buttons" are represented by colour bars in red, yellow, green and blue. These colour bars different functions in the individual menus, which are activated by pressing the correspondingly coloured button ("multifunction button") on the remote control. The "function buttons" are only active if a short description is given in the corresponding field.
Key names and terms that appear in the OSD menu are printed in feU in these operating instructions.

The illustrations (screenshots) in these instructions are intended as operating examples and to illustrate the basic operating steps. They may vary depending on the device software used.
4.5 Important note on data backup
We recommend that you remove all storage media or data carriers before returning the device to your specialist dealer for maintenance.
The restoration of data is not part of the maintenance and repair work. TechniSat accepts no liability for the loss or damage of data during the repair.

To prevent data loss, you should back up your data from time to time.
5 Disposal instructions
The packaging of your appliance consists exclusively of recyclable materials. BiGe will sort these and return them to the "Dual System".


Disposal of the packaging:
Your new device is protected by the packaging on the way to you. All materials used are environmentally friendly and recyclable. BiGe help and dispose of the packaging
environmentally friendly. Please contact your dealer or your local waste disposal centre for information on current disposal methods.

WARNING
Choking hazard due to film and other packaging materials. Do not leave packaging and its parts to children.

Disposal of the appliance:
Old appliances are not worthless waste. Valuable raw materials can be recovered through environmentally friendly disposal. Please enquire at your local authority about the options for disposing of the appliance in an environmentally friendly and appropriate manner. Before disposing of the, any batteries should be removed.

Important note on the disposal of batteries/rechargeable batteries:
Batteries/rechargeable batteries may contain toxic substances that are harmful to the environment. Before disposal, remove any batteries and dispose of them separately from the device in accordance with the applicable legal regulations. Never dispose of batteries in the normal waste bin. Household waste. You can dispose of used batteries/rechargeable batteries free of charge at your specialist dealer or at special disposal centres.

We hereby advise you to delete all personal data on the device on your own responsibility before disposing of the device.
6 Legal matters
Your appliance bears the CE mark and fulfils all required EU standards. Subject to changes and printing errors. Status 01/25.
Copying and reproduction only with the authorisation of the publisher.
TechniSat and TECHNIVISTA are registered trademarks of
Declaration of Conformity
Hereby, TechniSat declares that the radio equipment type TECHNIVISTA 43 CL is in compliance with Directive 2014/53/EU.
The full text of the EU Declaration of Conformity is available at the following Internet addresses:
Alternatively, you can also find the Declaration of Conformity in the download area for your product on the TechniSat website at www.technisat.de.

The terms HDMI, HDMI High-Definition Multimedia Interface, HDMI Trade Dress and the HDMI logos are trademarks or registered trademarks of HDMI Licensing Administrator, Inc.
Dolby AUDIO
Dolby, Dolby Audio and the double-D symbol are trademarks of Dolby Laboratories Licensing Corporation.
"YouTube and the YouTube logo are trademarks of Google Inc."
The names of the companies, institutions or brands mentioned are trademarks or registered trademarks of their respective owners.

TechniSat is not liable for product damage due to external influences, wear and tear or improper handling, unauthorised repairs, modifications or accidents.

In the countries listed below, the device may only be operated in the 5GHz WLAN range (5150 to 5350MHz) in closed rooms.
| AT | BE | BG | HR | CY | DK | EE |
| FI | FR | EN | EL | HU | IE | IT |
| LV | LT | LU | MT | NL | PL | PT |
| RO | SK | SI | ES | SE | UK | UK (NI) |
6.1 Service instructions

This product is quality-tested and with a statutory warranty period of 24 months from the date of purchase. Please keep the invoice as proof of purchase. With
For warranty claims, please contact the dealer of the product. The warranty conditions can be found at the end of this document.

For questions and information or if there is a problem with this device, please contact our technical hotline
Mon. - Fri. 8:00 - 17:00 under Tel.:
03925/9220 1800.

Repair orders can also be submitted directly online at www.technisat.de/reparatur, can be analysed.

If you need to return the device, please use only the following address:
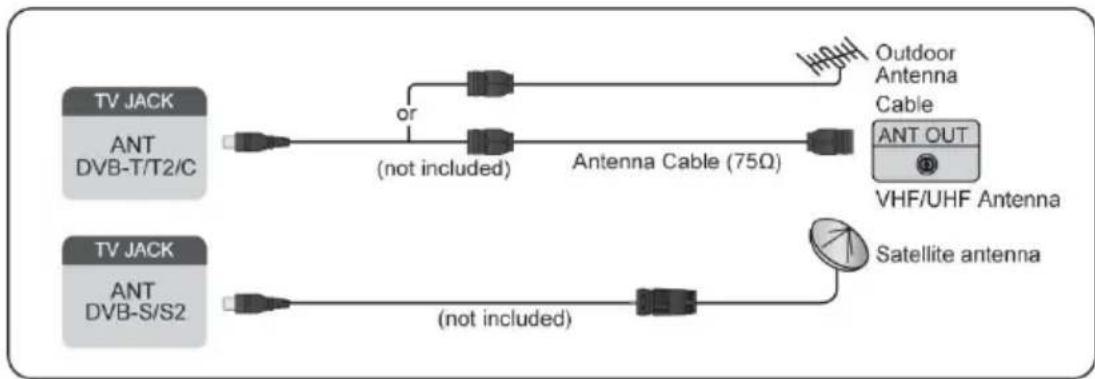
7.1 Connection of satellite/antenna/cable to the television
flowchart
graph LR
    A["TV JACK ANT DVB-T/T2/C"] -->|or| B["Antenna Cable (75Ω)"]
    B --> C["Outdoor Antenna Cable"]
    B --> D["VHF/UHF Antenna"]
    E["TV JACK ANT DVB-S/S2"] -->|(not included)| F["Antenna Cable (75Ω)"]
    F --> G["Satellite antenna"]
The TV connections may vary and the satellite/antenna/cable function cannot be used in some models/countries/regions.
You can also connect devices that can receive radio signals, z. e.g. a set-top box.
7.2 Initial setup wizard
After switching on the TV set for the first time, the initial setup wizard will start and guide you through the basic settings.
First select the operating language with the cursor and confirm with the OK button.
In the next step, select the Start button via Set up the TV and press the button OK Optionally, you can start the initial setup via a smartphone. To do this, scan the QR code displayed and follow the steps shown on the smartphone.
A connection to the Internet is established in the following step. Firstly, activate or deactivate the network standby function. You can then choose whether your TV is connected to the Internet via a cable (LAN) or via a wireless connection (WLAN).
For a wireless connection via WLAN, you will need the SSID and password of your network. You can find more information on this in your router manufacturer's documentation. You can also find more information on this in chapter "10 Connecting to the Internet" on page 20.
Then select the location of your TV set.In the next step, you can now start the station search or, if you only use external devices for playback, select an external input.
Start channel search
Select your favourite reception channel and start the channel search. The live TV picture is then displayed. Information on how to configure the individual reception channels can be found in chapter "11 Channel search" on page 21.
Once the initial setup wizard has been successfully completed, you will receive a brief introduction to the basic operation of your TV set.
7.3 Use of the electronic operating instructions
Your TV set has a built-in electronic operating manual that provides information about the most important functions of your TV set.
Hook exclusion:
The instructions and illustrations in this manual are for reference only and may differ from the actual product.
7.4 Call up the electronic operating instructions
In normal TV mode, press the button on your remote control. Then select Electronic operating instructions from the list.
Go to the Live TV chapter to find out more about how to set up the live TV functions.
Press the INPUT on your remote control and select Connection guide. In the Connecting external devices chapter, you can find out more about how to connect external devices to your TV set and how to set them up.
The symbols with the black background represent the button on the remote control.
The icons with a grey background show the options that you can select within the menu on the TV screen.
8 The HOME screen (start page)
All TV functions can be accessed via the HOME screen.
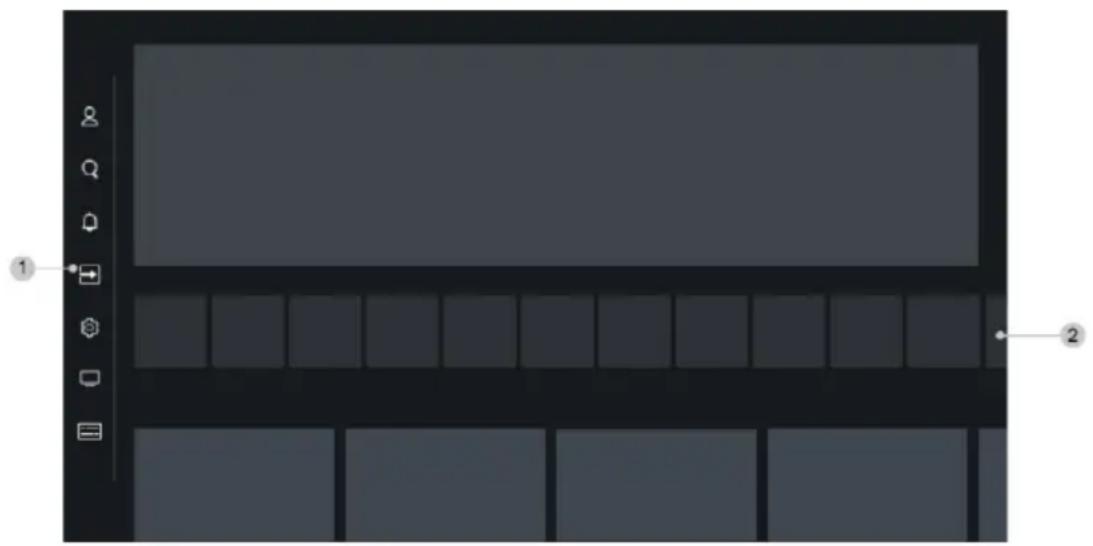
natural_image
Diagram of a computer monitor layout with labeled buttons and frame (no text or symbols beyond labels)- The navigation bar
- Apps

The screen display or the symbols shown may vary depending on the model/country/region.
8.1 Call up the HOME screen
Press the button on your remote control to call up the HOME screen.
To select a different playback source, press the INPUT on your remote control or use the navigation buttons to change the playback source.
Focus on the input symbol in the navigation bar, press the button button to select the desired input source.

To exit the HOME screen without making a selection, press the button again.
8.2 Using the navigation bar
The navigation bar refers to the displays and icons at the top of the HOME screen.

The screen display or the symbols shown may vary depending on the model/country/region.

Search
Search for the desired content.

Playback source
Select the playback source that you have connected to your TV set.

Settings
Manage the TV configuration.

Notifications
Allow pop-up notifications to displayed for useful information and events that your TV receives, including: adverts, news, warnings and legal notices and system messages. You can enable/disable any of these notifications under Settings in the Notification Centre.
You can display the list of event notifications generated by the TV set. To delete all notifications, select Delete all.

When you log in with your VIDAA account, you will find the
Notifications item on the start screen under VIDAA account.

VIDAA account
With a VIDAA account, you can utilise the best features of your Smart TV and ensure that all services are always up to date.
Further information on the VIDAA account can be found at
Advantages of Smart TV> Using a VIDAA account in this manual.

Language service
Quick access to the voice service. You can find further information at
Advantages of Smart TV> Setting up the voice service in this manual.

Live TV
Quick access to live TV. For more information, see Preparing live TV for first-time use> in this manual.
Time
You can always the current time at the top right of the home screen.
Network
Connect your TV to the Internet via a wireless WLAN connection or an Ethernet cable and the corresponding symbol will be displayed.
8.3 Using the shortcuts
You can add inputs, channels and/or websites to the HOME screen for quick access.
8.3.1 Adding and removing external inputs
Press the button INPUT
Set the focus on one of the external inputs that you want to add to the Home screen and press Add to HOME screen > .OK the Apps area of the HOME screen, the external input can be
input can be selected under Shortcuts.


Some options on the input source page cannot be added to the start screen.

To remove the input from the shortcuts, set the focus to the source and then press and hold the okutton on your remote control.
8.3.2 Adding and removing transmitters
In live TV mode, press the buttons OK / CHST to call up the channel list.
Press the Button and then to highlight the channel(s) you want to add to the home screen.
Then select Add to HOME screen. The channel icon appears on the HOME screen in the Apps area under Shortcuts.

To remove the transmitter from the shortcuts, set the focus on the transmitter and then press and hold the button on your remote control.
9 The on-screen menu
In live TV mode, press the button to call up the on-screen menu.
Channel list
Access to the channel list.
Programme overview
Starts the programme guide (EPG).
Teletext
Activate or deactivate the teletext of the current channel.
Audio language
Change the playback language of the current channel.
Subtitle
Switch on the subtitle function or select the subtitle option for digital broadcast content.
Recording list
Quick access to the recording list (only with external storage medium).
Recording
Start the schedule entry (only with external storage medium).
TimeshiL
Starts the timeshift (only with external storage medium).
Electronic operating instructions
Starts the electronic operating instructions
Audio only
If you this option, no picture will be on the screen. Only the sound of the current programme is played. This function is particularly useful in radio mode. Press any button (except the power button, the volume buttons and the mute button) to display the picture again.
Settings
Setting up image, sound, transmitter, network, accessibility, system and support.

Some of the above menus may not be available in all models/countries/regions.
10 V connection to the Internet
You can access the Internet via a wired connection (LAN connection) or a connection to an available wireless network (WLAN connection).
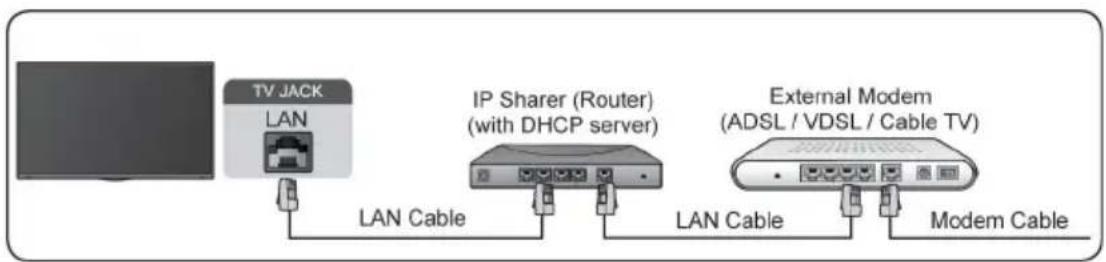
10.1 Connection to a wired network (Ethernet)
To gain access to the Internet via a wired connection, it recommended to use a modem or router that supports the Dynamic Host Configuration Protocol (DHCP). Modems and routers that support DHCP automatically provide the IP address, netmask, gateway, DNS server 1 and DNS server 2 so that you do not have to enter them manually. Most home networks already have a DHCP function.
Once you have connected to a wired network (Ethernet), press the button on your remote control and select >Network> Network configuration and press the OK button.
Connection type
Select a wired network connection (Ethernet) to access the Internet via a LAN cable.
Ethernet
Display of the network status.
IP settings
Configure the IP settings for your network connection.
10.2 Connection to a wireless network
To connect to an available wireless network (WLAN), make sure that your WLAN router is switched on and connected to the Internet. If necessary, have the SSID and password of the WLAN router ready before you attempt to connect to the WLAN router.
To access the Internet via a wireless connection, press the button on your remote control and select > Network> Network configuration and press the OK button.
Connection type
Select WLAN to activate the wireless connection to the Internet.
Update and connect
Start the search for available WLAN networks. The Wi-Fi networks found are displayed in the list. Select the Wi-Fi network you want to connect to from the list and press OK You must then the password for the Wi-Fi network using the virtual keyboard. Then select Connect to the Wi-Fi network. A green tick indicates a successful connection.
Advanced settings
Under Advanced settings, you can activate the WPS function (PBC) or activate WPS with PIN. Under IP settings, you can activate/deactivate the DHCP function and make the IP settings manually.
Add
Under Add, you can manually add the SSID (network name) of your WLAN network.
11 Channel search
You can for channels automatically or manually.

Channels can only be sorted if "Standard" was selected during the channel search. If an operator is selected in the meantime, the sorting is by the operator. Subsequent sorting is then no longer possible.
11.1 Automatic channel scan
First switch to live TV mode (INPUT>TV button).
Press the button on your remote control and select > Channels> Automatic search press the button.
If no TV channels have been saved previously, you will be prompted to perform a channel scan.
Select Search again to start a search with the current reception parameters.
Select Change settings to change the reception parameters for the search run.
11.1.1 Satellite search (DVB-S/S2)
Select Satellite under Reception and press the OK button. Then press the > button to select a provider (Astra or Standard).
Single satellite:
If your satellite system only has one satellite position, select Single satellite. For multiple satellite positions, select DiSEqC.
You can then start the automatic satellite detection, select the satellite manually or configure the reception parameters of the LNB.
Under Set mode, you can configure whether, for example, all stations or only free stations should be scanned, whether a frequency search (longer) or the quick scan should be activated.
Press the Button for the last time to start the search. After the search run, select Done to end the search run or Search again to start a new search run.
DiSEqC:
You can select DiSEqC if you have a DiSEqC system with several satellite positions. Up to four satellites can be set in DiSEqC 1.0 mode. After configuring the satellites, continue as described under Single satellite.
If you are using a motorised antenna, you can use DiSEqC 1.2 mode.
Single cable:
If your home is equipped with a Unicable satellite system, you should use this option. After configuring the satellites, continue as described under Single satellite.
BiGe make sure that you know the Unicable band and the frequency to be used. The information should be available on the device or the landlord/installer can provide it.
11.1.2 Antenna (DVB-T2)
Mode:
Select All channels or Free channels. This option may not be available depending on the country/region/operator.
Search mode:
Choose between digital channels only (Digital TV), digital and analogue channels (DTV+ATV) or analogue channels only (ATV).
If you receive a DVB-T or DVB-T2 signal, use biGe Digital TV.
LCN:
Switch LCN (Logical Channel Number) on/off.
i Please note that some operators block manual channel sorting. If you switch off LCN, the channel list can be edited after the channel search.
11.1.3 Cable (DVB-C)
Mode:
Select All channels or Free channels. This option may not be available depending on the country/region/operator.
Search mode:
Choose between digital channels only (Digital TV), digital and analogue channels (DTV+ATV) or analogue channels only (ATV).
LCN:
Switch LCN (Logical Channel Number) on/off.
i Please note that some operators block manual channel sorting. If you switch off LCN, the channel list can be edited after the channel search.
11.2 Manual search
First switch to live TV mode ( INPUT >TV button). Press the button on your remote control and select > Channels> Advanced settings> Manual search and press the OK button.
11.2.1 Manual digital TV search
When the manual digital TV search screen is displayed, press the < /> buttons to select Aerial, Cable or Satellite and make the appropriate settings. Then select Start to begin searching for this transmitter. When the signal has been received, the signal strength is displayed on the screen.
11.2.2 Manual analogue TV search
Frequency: Enter the desired channel frequency.
Image system: Select the image colour system.
Sound system: Select the sound format.
Then select Start to start the search.
12 Play external devices
Press the INPUT on your remote control and select an input source.
Alternative:
Press the button and then focus on the (input source) field in the navigation bar on the HOME screen. Press the OK button to open it. Select the desired input source.
The input sources HDMI1, HDMI2 and HDMI3 greyed out if no signal is currently being played back there.
121 Edit the name of the input source
You can customise the names of the input sources. Method 1:
Press the INPUT on your remote control.
Alternative:
Press the button and then focus on the (input source) field in the navigation bar on the HOME screen. Press the OK button to open it.
Set the focus to an input source and press the button on your remote control.
Select Rename. You can then enter a new name using the virtual keyboard that appears. Then select the
Method 2:
Press the button on your remote control and select > System > Advanced settings > Input names. Select a input source that you would like to rename. You can then enter a new name using the virtual keyboard that appears. Then select the OK field and move the button to .OK
i Some input sources may not be able to be renamed.
13 Use of the TV voice service
To access the voice service and select a voice assistant:
Press the button on your remote control and select the symbol Language in the navigation bar;
or
Press the button on your remote control; or
Press the button to select the Settings icon and select System> Voice service.
You can operate the voice assistant with your voice by simply pressing and holding the button on your remote control.
The voice service function may not be available in some models/countries/regions. use this feature, you may need to agree to the end user licence agreement and the relevant privacy policy/terms and conditions for the Smart feature.
14 Customise transmitters and apps
14.1 Sort transmitter
Attention!
Channels can only be sorted if the operator Standard was selected under Operator in the channel search. If the operator Astra 19.2 is selected instead, the sorting is carried out by the operator. Subsequent sorting is then no longer possible.
In live TV mode, press the OK /CHIST button on your remote control to call up the channel list. Then press the button to switch to the right-hand side. Here you can select a reception list such as satellite, aerial or cable, or sort the list by genre. Then use the D-pad to select the Edit option at the bottom of the list.
Alternatively, you can press the button in live TV mode, then select Settings > Channel > Edit channel and select a live TV reception list such as satellite, aerial or cable.
Press the OKutton on the selected channel and a checkbox will appear. You can select several channels for moving or deleting at the same time by pressing the OKutton on each channel.
Sort: Press thebutton to move the selected channel(s). The channels are now displayed to the left of the list. Now move the blue bar in the channel list to the position to which you want to move the channel(s) and press the OK button. Press the EXIT button to save and exit.
Delete: Press the delete button to delete the selected channel or channels.
Restore: Press the [RED] button to call up the list of deleted channels. Press the button to restore the deleted channel.
Filtering: Press the [YELLOW] button to display the filter screen. Select one or more filters and press the OK button. Press the EXIT button to save and exit.
Search: Press the [BLUE] button and enter the name of the station you want to find using the virtual keyboard to search for this station.
14.1.1 Favourites list
Displaying the favourites list
In live TV mode, press the OK /CHUST button on your remote control to call up the channel list. Press the button to switch to the right-hand column. Then select FAV to display the favourites lists.
Editing the favourites list
Select one of the favourite lists FAV1, FAV2, FAV3 or FAV4 as described above. The active favourites list is displayed with a green tick. Then select Edit.
You can now add, move or remove your favourite channels.
Select Add channel to add the favourite channel(s) to the favourites list. A heart marks the favourite channels. Press the BACK button when all channels have been marked.
To sort the favourite channels, select one or more channels in the favourites list and press the Sort button to move them.
Select a channel in a favourites list and Remove to remove it.
14.2 Apps
Press the button on your remote control to open the HOME screen. to call up the app. Switch to the line of apps.
Factory installed applications:
Select the app to be moved using the D-Pad. Press and hold the OK button. Then move it with the D-pad and press the OK button again to save the position.
Applications not installed at the factory:
Select the item you want to move and then press and hold the OK button to select "Sort". Use the D-pad to move it and press the OK button to save the position.
i Some apps cannot be moved.
15 The channel list
The channel list contains all channels found during a channel scan. You can sort the channels, filter them by genre or create favourite lists.
15.1 Call up channel list
In live TV mode, press the OK /CHUST button on your remote control to call up the channel list. Alternatively, you can press the E button on your remote control in live TV mode and select the channel list.
15.2 The submenu of the channel list
In the submenu of the channel list, you can select a reception list, select a genre according to which the current channel list is sorted, set a filter, edit the channel list or create/select a favourites list.
Open the submenu (2) of the channel list (1) by opening the channel list in live TV mode with OK / OUST and then pressing the button.
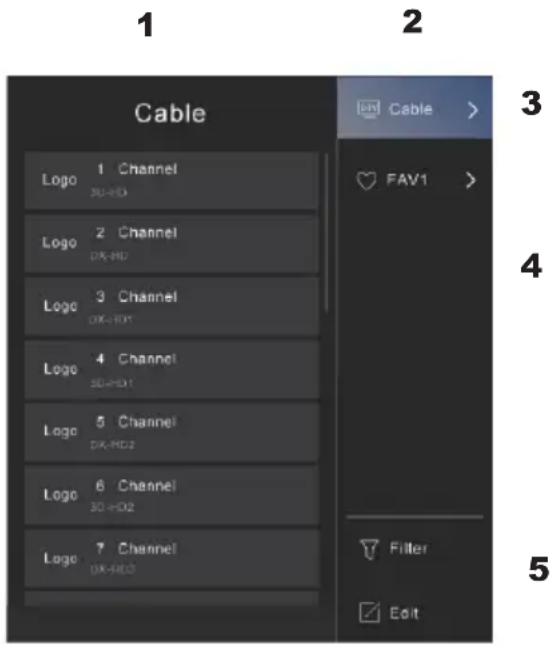
Reception list (3)
Shows the active satellite, aerial or cable reception list.
Genres and favourites (4)
Shows applications of different genres and the favourites lists FAV1 ... FAV4.
Filter (5)
Filter channels by content, HD, parental control, encrypted and sorted. Some options in Filter may not be available in some models/countries/regions.
Edit (5)
Edit the channel list.

The options in the submenu may vary depending on the model/country/region.
16 Programmeinfo
While watching TV, press the buttons 📁 display the programme info bar at the top of the screen.
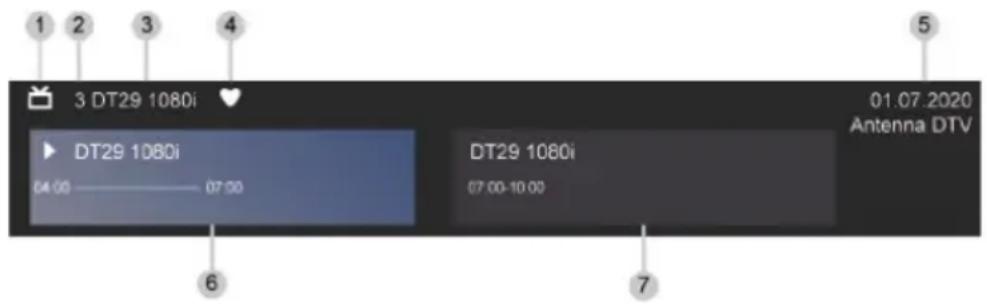
- Reception logo
- Transmitter number
- Name of the sender
- Indicator for favourite
- Date and time as well as reception category
- Current programme
- Next programme

The illustration is for reference only and may differ from the actual case.
17 Programme guide(EPG)
The programme guide (EPG) offers a convenient way of displaying the television programmes for the next 8 days. The information displayed in the programme guide (EPG) is only provided by the TV broadcasters for digital channels. The programme guide (EPG) also offers an easy way to record your favourite programmes and a reminder function that allows you to automatically switch between channels at specific times so that you don't miss any interesting programmes. The availability and scope of programme information varies from channel to channel.

The programme guide (EPG) is only available for digital channels.
Analogue channels are not supported.
17.1 Call up EPG
In live TV mode, press the button or press the button and select Programme overview to display the EPG.
The current and subsequent programmes are now displayed in the main view of the EPG. The vertical bar shows the current time.
172 Functions in the EPG
Watch programme
First select a current programme. Press the OK button to call up additional information on this programme. Select the View field to switch to the desired channel.
Recording/Memory
Open the additional information for a programme and select Record to start a recording (for a current programme, the recording is started immediately; for a future programme, a timer is set) or Reminder (only for a future programme).
Planned
In the programme guide, press the [RED] Scheduled button to call up the list of scheduled reminders and recordings.
Genre Colours
In the programme guide, press the [GREEN] Genre colours button. Use the colours to display different genres in the programme guide so that you can recognise them quickly and easily. Three colours can be defined. The current genres are displayed at the top right of the programme guide.
24h-
In the programme guide, press the button [YELLOW] 24h- to display the programmes of the previous day.
24h+
In the programme guide, press the [BLUE] 24h+ button to display the programmes for the next day.
18 Guidelines
18.1 How are the TV channels sorted and why?
18.1.1 Sorting the channels
- The availability of the individual channels may depend on the selected reception path, e.g. satellite (DVB-S/S2), cable (DVB-C) or aerial (DVB-T2) and the signal strength.
- The standard sorting or an operator (Astra 19.2°, Vodafone (NRW, Hessen, BW) or Pÿur) can be selected for the automatic channel search.
Channel sorting when selecting an operator:
- When an operator is selected, the channels are sorted according to the operator's criteria.
Channel sorting when Standard is selected:
- After a successful channel search, the channels are sorted by genre. These include full programmes, children's programmes, sport, documentaries or regional and local programmes.
- Stations with a shorter range and, if available, international stations are listed in alphabetical order according to the pre-sorted list.
- If LCN (Logical Channel Number, only possible with cable reception) is activated in the programme search, sorting takes place according to the criteria of the local cable network operator.
Search by channel name
- The search within Live TV can be opened using the button. Here you can search for individual channels by name.
Radio station
- The radio stations are listed in alphabetical order after the list of television stations.
- To make it easier to find radio stations, we recommend using the filter function of the channel list (see Displaying the channel list in this manual).
Sponsored content
- On the basis of contracts concluded with the respective broadcasters, the individual programmes are placed in a position in the programme list determined by the broadcaster.
Sort manually
- The channel list can be sorted manually at any time. For more information, see Editing the channel list and Editing the favourites list in this manual.
18.2 How are the applications sorted and why?
The applications on the VIDAA platform are positioned according to the criteria listed below. In the application area on the home screen:
In order to ensure equal representation of apps and to enable fair treatment of newly launched content partners, the apps are ranked on the basis of (i) the number of users worldwide, (ii) the number of users in Germany, (iii) the number of subscribers in Germany, (iv) the share of users in Germany, (v) the number of subscribers in Germany and (vi) the share of users in Germany.
of local language content, (v) the variety of content and (vi) the novelty of the platform. The application launcher must contain at all times:
the 2 world-leading SVOD standards the 2
world-leading TVOD standards the 2 world-
leading AVOD standards the leading local
sports standard
At least 4 leading local applications with predominantly German content
At least 1 leading application with child-orientated content
At least 2 applications started in the last 6 months
The sequence of applications is checked every 6 months and a new programming table is created for newly connected devices.
In the section My apps:
The applications are listed in alphabetical order.
18.3 How are recommendations made?
The recommendations on the platform on the ability and willingness of the partners to metadata to the platform. The positioning of content is based on the following criteria: Applications:
The recommendations come from the highlighted content partners. Further recommendations:
The recommendations are drawn up by the editorial team in accordance with these guidelines:
- Variety of content - provision of a wide range of content.
- Diversity of access types - provision of advertising-supported, subscription-based and transactional content.
- Balance - creating a balance between global and local content.
19 Technical data
| Screen | |
| Diagonal | 43" |
| Type | TFT-LCD (IPS) |
| Resolution | 1920 x 1080 |
| Refresh rate | 60 Hz |
| Brightness | 250 nits |
| Backlight | Direct LED (DLED) |
| Format | 16:9 |
| Contrast | 1200:1 (typ.) |
| Response time | 10 ms |
| Tuner | |
| Digital cable/antenna | DVB-T/T2/C |
| Digital Satellite | DVB-S/S2 (SCR I/II EN50494, EN50607) |
| Analogue cable/antenna | PAL/SECAM |
| Connections | |
| HDMI | HDMI1 (eARC), HDMI2, HDMI3 |
| HDMI version | 1.4 |
| COMPOSITE + Audio | 1 |
| Headphones | 1 |
| SPDIF | 1 (Optical) |
| USB | 2 (V2.0) |
| Ethernet (RJ-45) | 1 (10/100Mbps) |
| F connection | 1 |
| IEC | 1 |
| Programme lists Channels | Sat: 3500DVB-T+ DVB-C: 700 |
| Sound system | |
| Loudspeaker | 2 |
| Output power | 2x 10 W RMS |
| Media formats | |
| Music | LPCM, MPEG1/2 Layer 1, MPEG1/2 Layer 2,MPEG1/2/2.5 Layer 3, AAC, MPEG-H, FLAC, VORBIS, OPUS |
| Pictures | JPG, BMP, PNG, GIF, Webp |
| Multimedia video/audio decoder | MPEG1/2, AVC(H.264), HEVC(H.265), WMV3, VC1, VP8, VP9, AV1, mp4, mov, mks, ts, avi, flv, webm |
| Video format (up to) | 1920x1080 |
| Radio equipment/network | |
| Bluetooth | BT2.1+EDR/4.2/5.1 |
| BT frequency | 2.402 GHz ~2.480 GHz |
| BT transmission power | Max. 4 dBm |
| WLAN | IEEE 802.11bIEEE 802.11gIEEE 802.11nIEEE 802.11aIEEE 802.11ac |
| WLAN frequencies and transmission power | - 2400-2483.5MHz:< 20 dBm (EIRP)- 5150-5250MHz:< 23 dBm (EIRP)- 5250-5350MHz:< 23 dBm (EIRP)- 5470-5725MHz:< 30 dBm (EIRP)- 5725-5875MHz:< 13.98 dBm (EIRP) |
| Power supply | |
| Net | 220 V~ 240 V |
| Power consumption | 75 W |
| Standby consumption | < 0.5W |
| Dimensions / Weights* | |
| Width | - |
| Height (with foot) | - |
| Height (without foot) | - |
| Depth (with foot) | - |
| Depth (without foot) | - |
| Weight (with foot) | - |
| Weight (without foot) | - |
| VESA mount (wall mounting) | |
| Standard | 200 X 200 |
| Required mounting screws (recommended) | 4X M6x10 |
* Please refer to the enclosed leaflet for this data.
20 Power consumption values
TECHNIVISTA 43 CL

Information on data protection for your device
TechniSat Digital GmbH fulfils the legal obligation to provide information in accordance with Art. 13 GDPR regarding the processing of your personal data with the data protection notice for customers available at https://www.technisat.de/produktdatenschutz.
You can also access the data protection notice using the following QR code:

If you have any questions about the processing of your personal data, please contactdatenschutz@technisat.de.
Yours sincerely
TechniSat
TechniSat
TECHNIVISTA 43 CL
Mode d'emploi
Tension électrique.
natural_image
Pure diagram of a rectangular layout with labeled components, no text or symbols present- La barre de navigation
- Apps

flowchart
graph LR
    A["TV JACK"] -->|LAN Cable| B["IP Sharer (Router) (with DHCP server)"]
    B -->|LAN Cable| C["External Modem (ADSL / VDSL / Cable TV)"]
    C -->|Modem Cable| D["External Modem"]
Activer/désactiver le LCN (Logical Channel Number)
Activer/désactiver le LCN (Logical Channel Number)
1 Slot per modulo Cl+
2 Uscita cuffie
3 2x connessione USB
4 HDMI 1 (eARC)
5 HDMI 2
6 HDMI 3
7 Ethernet (LAN)
8 Ottico SPDIF
9 Ingresso video (analogico)
10 Ingresso audio (analogico)
11 F connessione DVB-S/S2
12 Presa antenna DVB-T2/DVB-C
21 Telecomando
natural_image
Interior layout diagram of a computer monitor with labeled buttons and drive indicators (no text or symbols beyond labels)
- Betriebspausen
- Empfangsliste (3)
- Table of contents
- Remote control
- Read biUe first
- Safety instructions
- Explanation of symbols
- WARNING
- Intended use
- Area of application
- i
- Safety instructions regarding stability
- Safe handling of construction materials
- Insert batteries into remote control:
- Breaks in operation
- Important notes on operation
- Important note on data backup
- Disposal instructions
- Important note on the disposal of batteries/rechargeable batteries:
- Legal matters
- Declaration of Conformity
- Dolby AUDIO
- Service instructions
- Connection of satellite/antenna/cable to the television
- Initial setup wizard
- Start channel search
- Use of the electronic operating instructions
- Call up the electronic operating instructions
- The HOME screen (start page)
- Call up the HOME screen
- Using the navigation bar
- Search
- Playback source
- Settings
- Notifications
- VIDAA account
- Language service
- Live TV
- Time
- Network
- Using the shortcuts
- Adding and removing external inputs
- Adding and removing transmitters
- The on-screen menu
- Channel list
- Programme overview
- Teletext
- Audio language
- Subtitle
- Recording list
- Recording
- TimeshiL
- Electronic operating instructions
- Audio only
- V connection to the Internet
- Connection to a wired network (Ethernet)
- Connection type
- Ethernet
- IP settings
- Connection to a wireless network
- Update and connect
- Advanced settings
- Add
- Channel search
- Automatic channel scan
- Satellite search (DVB-S/S2)
- Single satellite:
- DiSEqC:
- Single cable:
- Antenna (DVB-T2)
- Mode:
- Search mode:
- LCN:
- Cable (DVB-C)
- Manual search
- Manual digital TV search
- Manual analogue TV search
- Play external devices
- Alternative:
- Edit the name of the input source
- Method 2:
- Use of the TV voice service
- Customise transmitters and apps
- Sort transmitter
- Attention!
- Favourites list
- Displaying the favourites list
- Editing the favourites list
- Apps
- The channel list
- Call up channel list
- The submenu of the channel list
- Reception list (3)
- Genres and favourites (4)
- Filter (5)
- Edit (5)
- Programmeinfo
- Programme guide(EPG)
- Call up EPG
- Functions in the EPG
- Watch programme
- Recording/Memory
- Planned
- Genre Colours
- 24h-
- 24h+
- Guidelines
- How are the TV channels sorted and why?
- Sorting the channels
- Channel sorting when selecting an operator:
- Channel sorting when Standard is selected:
- Search by channel name
- Radio station
- Sponsored content
- Sort manually
- How are the applications sorted and why?
- How are recommendations made?
- Power consumption values
- Information on data protection for your device
- TechniSat
- Telecomando
Brand : TECHNISAT
Model : TECHNIVISTA 43 CL
Category : Television