
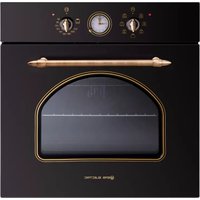
EMV701DGN - Oven EAS Electric - Free user manual and instructions
Find the device manual for free EMV701DGN EAS Electric in PDF.
| Product type | Built-in oven |
| Brand | EAS Electric |
| Model | EMV701DGN |
| Capacity | 70 L |
| Dimensions (H x W x D) | 595 x 595 x 560 mm |
| Weight | 35 kg |
| Power supply | 220-240 V ~, 50/60 Hz |
| Power | 3.0 kW |
| Maximum temperature | 250 °C |
| Cooking functions | Lamp, Defrost, Double grill with fan, Double grill, Single grill, Conventional + fan, Conventional, Bottom heat, ECO, Water cleaning |
| Timer | Electronic timer (duration, end of cooking, alarm) |
| Safety | Automatic shut-off after 10 hours of inactivity |
| Maintenance | Water cleaning, lamp replacement |
| Included accessories | Rack, Drip tray, Tongs |
| Repairability | Replaceable lamp, original spare parts |
| Energy class | Not communicated |
Frequently Asked Questions - EMV701DGN EAS Electric
User questions about EMV701DGN EAS Electric
0 question about this device. Answer the ones you know or ask your own.
Ask a new question about this device
Download the instructions for your Oven in PDF format for free! Find your manual EMV701DGN - EAS Electric and take your electronic device back in hand. On this page are published all the documents necessary for the use of your device. EMV701DGN by EAS Electric.
USER MANUAL EMV701DGN EAS Electric
natural_image
Simple line drawing of a rectangular box with a top and bottom tabs (no text or symbols)EMV701DGN EMV701DGW
18 RECICLAJE DEL PRODUCTO
19 GARANTÍA
natural_image
Simple line drawing of a rectangular tray with cutouts and a central triangular shape (no text or symbols)Bandeja grill
natural_image
Simple line drawing of a seedling in a container with water and a lid (no text or symbols)NOTA:
natural_image
Simple line drawing of a bowl with a circular arrow indicating rotation (no text or symbols)ADVERTENCIA:
RECICLAJE DEL PRODUCTO
Ewcpf q" j c{ c" f gugo dcncf q" gn" j qtpq." cugi ^tgug" f g" swg" pq" j c" uwhtkf q" pkpi ^p" f c»q0"Uk"vkgpg"cni wpc"f wf c."pq"nq"wvknkeg<"r ...pi cug"gp"eqpvcevq"eqp"wp"rtqhgukqpcn" ewcnkhkecf q0" Ocpvgpi c" nqu" o cvgtkcngu" f g" go dcnclg" eqo q" dqnucu" f g" r n" uvkeq." r qnkguvktgpq"q"encxqu"hwgtc"f gn"cnecpeg"f g"nqu"pk»qu."{ c"swg"uqp"rgnki tququ"r ctc" gnnqu0
CONDICIONES DE LA GARANTÍA
1 SAFETY INFORMATION
1 Safety information
4 INSTALLATION
4 Cabinet Diagram (Standing Cabinet)
5 Cabinet Diagram (Ground Cabinet)
6 Installation Important Instructions
7 Installation steps
8 PRODUCT INTRODUCTION
8 Oven
8 Accessories
9 Accessories use
10 Control Panel
11 Before using for the first time
11 Setting the clock
11 Regular operation
12 Mode setting
12 Manual mode
12 Minute minder
13 Cooking dur time
13 Cooking End time
13 Reservation function
14 Precautions for timer use
15 CLEANING AND MAINTENANCE
15 Cleaning
16 Lamp Replacement
17 TROUBLESHOOTING
17 SPECIFICATIONS
18 PRODUCT RECYCLING
19 WARRANTY
SAFETY INFORMATION
Thank you for choosing us! Please read all instructions before using this appliance. This book contains valuable information about operation, care and service. Keep it in a safe place for future reference. Should the appliance be sold or transferred to another owner, or should you move house and leave the appliance, always ensure that the book is supplied with appliance in order that new owner can be acquainted with the functioning of the appliance and relevant warnings.
THESE WARNINGS ARE PROVIDED IN THE INTEREST OF SAFETY. PLEASE READ THEM
CAREFULLY BEFORE INSTALLING OR USING THE APPLIANCE.
To maintain the EFFICIENCY and SAFETY of this appliance, we recommend:
-
Call only the Service Centers authorized by store where you buy the cooker
• Always use original Spare Parts -
When the oven is first switched on, it may give off an unpleasant smell. This is due to the bonding agent used for the insulating panels within the oven. Please run the new empty product with the conventional cooking function, 250°C, 90 minutes to clean oil impurities inside the cavity.
- When you use it for the first time, there will be a pungent smell or smoke, which is normal. If it does happen, you should wait for the smell or smoke to disappear before putting food in the oven.
- Please use the product under an open environment.
- The appliance and its accessible parts become hot during use. Care should be taken to avoid touching heating elements. Children less than 8 years of age shall be kept away unless continuously supervised.
- If the surface is cracked, switch off the appliance to avoid the possibility of electric shock.
-
This appliance can be used by children aged from 8 years and above and persons with reduced physical, sensory or mental capabilities or lack of experience and knowledge if they have been given supervision or instruction concerning use of the appliance in a safe way and understand the hazards involved. Children shall not play with the appliance. Cleaning and user maintenance shall not be made by children without supervision.
-
During use, the appliance becomes very hot. Care should be taken to avoid touching heating elements inside the oven.
- Do not allow children to go near the oven when it is operating, especially when the grill is on.
- Ensure that the appliance is switched off before replacing the oven lamp to avoid the possibility of electric shock.
- The means for disconnection must be incorporated in the fixed wiring in accordance with the wiring specifications.
- Children should be supervised to ensure that they do not play with the appliance.
- This appliance is not intended for use by persons (including children) with reduced physical, sensory or mental capabilities, or lack of experience and knowledge, unless they have been given supervision or instruction concerning use of the appliance by person responsible for their safety.
- Accessible parts may become hot during use. Young children should be kept away.
- An all-pole disconnection means must be incorporated in the fixed wiring in accordance with the wiring rules.
- If the supply cord is damaged, it must be replaced by the manufacturer, its service agent or similarly qualified persons in order to avoid a hazard.
- Do not use harsh abrasive cleaners or sharp metal scrapers to clean the oven door glass since they can scratch the surface, which may result in shattering of the glass.
- Only use the temperature probe recommended for this oven.
- A steam cleaner is not to be used.
- The appliance is not intended to be operated by means of an external timer or a separate remote control system.
-
The instructions for ovens that have shelves shall include details indicating the correct installations of the shelves.
-
Do not use the oven unless you are wearing something on your feet. Do not touch the oven with wet or damp hands or feet.
- For oven: Oven door should not be opened often during the cooking period.
- The appliance must be installed by an authorized technician and put into use. The producer is not responsible for any damage that might be caused by defective placement, and installation by unauthorized personnel.
- When the door or drawer of oven is open do not leave anything on it, or you may unbalance your appliance or break the door.
- Some parts of appliance may keep its heat for a long time; it is required to wait for it to cool down before touching onto the points that are exposed to the heat directly.
- If you will not use the appliance for a long time, it is advised to plug it off.
DECLARATION OF COMPLIANCE
When you have unpacked the oven, make sure that it has not been damaged in any way. If you have any doubts at all, do not use it: contact the technical service department. Keep packing materials such as plastic bags, polystyrene, or nails out of the reach of children because these are dangerous to children.
INSTALLATION
- As the appliance is constantly upgrading, the actual appliance shall prevail if the picture is different from the actual appliance.
- The thickness of the cabinet board is 20 mm.
- If the power socket is installed on the back of the appliance, the depth of the cabinet opening shall be increased from a minimum of 590 mm to 620 mm.
- The dimensions in the figures are in mm.
Cabinet Diagram (Standing Cabinet)

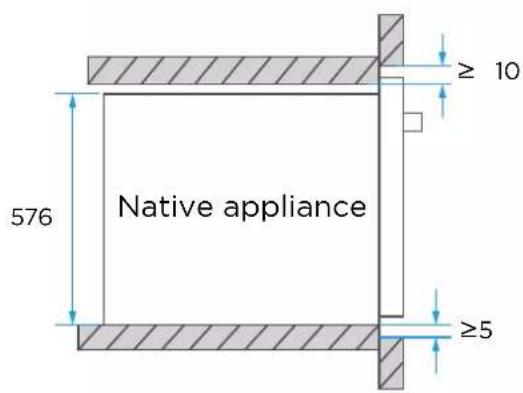

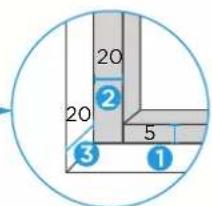
1 Reserve 5 mm for the door panel at the top and bottom respectively.
② Reserve 20 mm for the door panel on the left and right respectively.
③ Reserve 20 mm for the door panel in thickness.
Cabinet Diagram (Ground Cabinet)


Without hob

Minimum bottom ventilation area: 250 mm²

1 Reserve 5 mm for the door panel at the top and bottom respectively.
2 Reserve 20 mm for the door panel on the left and right respectively.
③ Reserve 20 mm for the door panel in thickness.
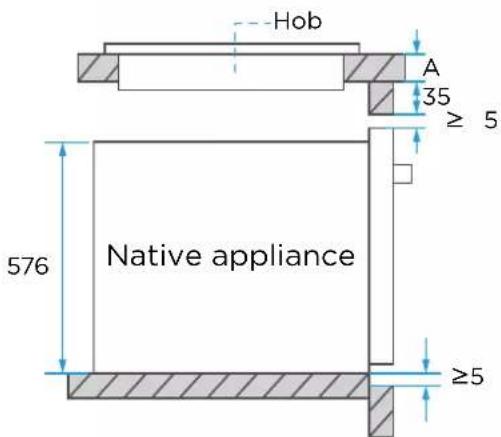
With hob
If the appliance is installed under the hob, the minimum thickness of worktop A is shown below:
| Hob type | worktop A |
| Induction hob 37 mm | |
| Full-surface induction hob 47 mm | |
| Gas hob | 30 mm |
| Electric hob | 27 mm |
Installation Important Instructions
! Content that means [mandatory]
- The safe operation of this appliance can only be guaranteed if it has been installed to a professional standard in accordance with these installation instructions. The installer shall be liable for any damage resulting from incorrect installation.
- The entire installation process requires two professional installers. Wear dry protective gloves during installation to avoid scratch or electric shock.
- Fitted units must be heat-resistant up to 90^ C, and adjacent unit fronts up to 70^ C.
- Please use a 16A socket.
Content that means [prohibit]
- Do not install the appliance behind a decorative door or the door of a kitchen unit, as this may cause the appliance to overheat.
- Check the appliance for damage after unpacking it. Do not connect the appliance if it has been damaged in transit.
- Do not block the vent of the appliance and the gap between the cabinet and the appliance.
- Use extreme caution when moving or installing the appliance. It is very heavy, do not lift the appliance by the door handle.
- If the power cord or power plug is damaged, stop using the appliance immediately, to avoid fire, electric shock or other injuries.
Content that means [note]
- Be very careful when moving or installing the appliance to avoid damage to the appliance or damage to the cabinets.
- Before starting up the appliance, remove all packaging materials and accessories from the cavity.
- The power socket shall be accessible to users (such as next to the cabinet) for easy power-off.
- After installation is complete, make sure that the power plug is firmly inserted into the socket.
- Please refer to the "Cabinet Diagram" for the requirements of net depth of the cabinet. The clearance between the cabinet bottom board and the rear board (or wall) shall not be less than 50 mm.
Installation steps
- Please customize the cabinet according to the "Cabinet Diagram".
- Before installation, please check for normal power socket and appropriate grounding, and check whether the cabinet dimension meets the installation requirements.
- Place the appliance in designated locations in the kitchen, install it in a vertical cabinet, and connect the power supply.
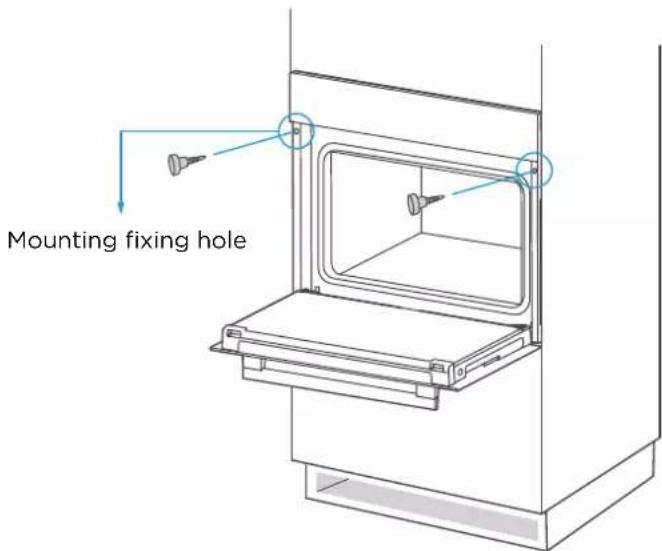
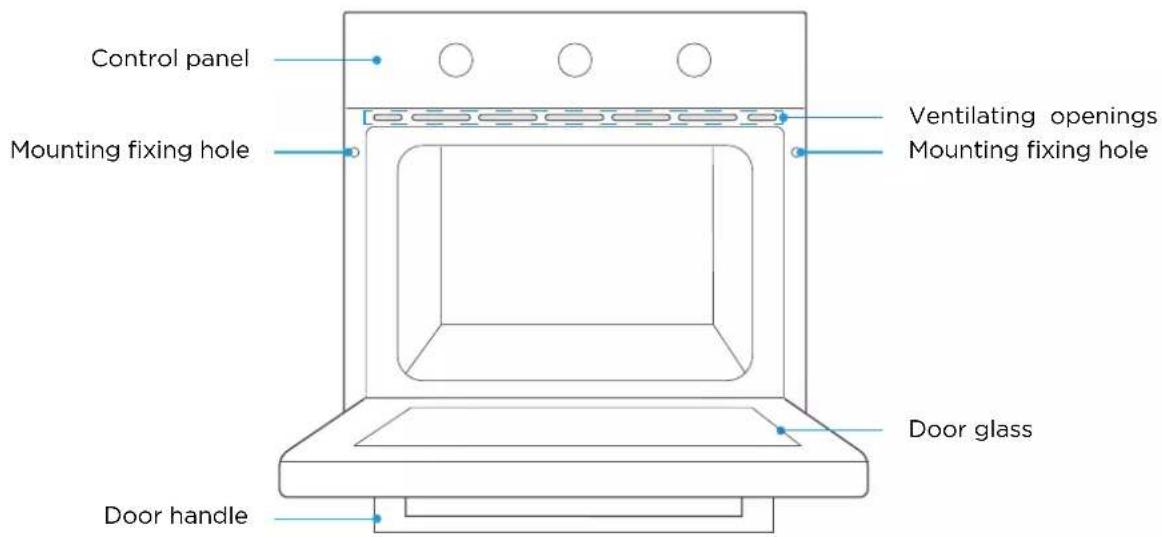
- To locate the mounting fixing holes, open the appliance door and look at the side frame of the appliance (position shown above).
- Fix the appliance to the cabinet with two rubber plugs A and screws B provided with the appliance.
PRODUCT INTRODUCTION
When removing food, please wear heat insulating gloves to prevent burns!
At the moment of opening the door of the furnace, pay attention to the steam. Please open the door at a small Angle to avoid the steam on your face.
As the product is constantly upgraded, if there is any difference between the real object and the picture below, please refer to the real object.
Accessories
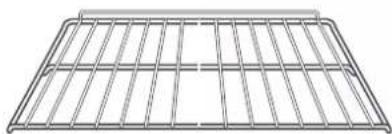
natural_image
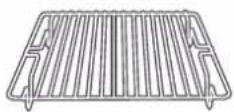
Pure wire mesh diagram without any text, numbers, or symbolsGrill rack
Grill food or place heat-resistant cooking containers
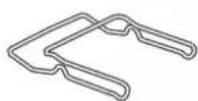
Clips
Remove the grill tray and grill rack ( Only for some models )
natural_image
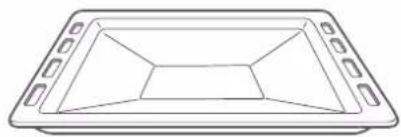
Simple line drawing of a rectangular tray with internal geometric patterns (no text or symbols)Grill tray
Cook large portions of food or catch food scraps
Small grill rack
Cook smaller portions of food ( Only for some models )
Accessories use (Only for some models)
For the oven to work properly, the grill rack and Grill tray should only be placed between the first and fifth levels. When used together, place the Grill tray under the grill rack.

Control Panel
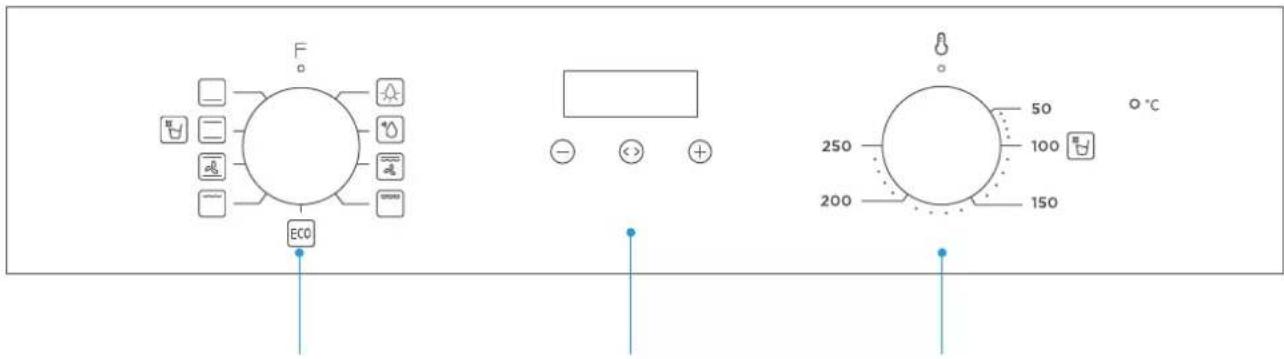
K1 Time Setting K2
K1: For selecting oven functions.
K2: For setting the temperature.
Time Setting: For adjusting the cooking time.
| Function Function introduction | |
 Lamp Lamp | The cooking process can be observed under illuminated conditions.Except ECO function. |
| [22KG]Defrost | The circulation of air at room temperature enables quicker thawing of frozen food (without the use of any heat). |
 Double grill with fan Double grill with fan | The radiant heating element and top heating element are working with fan. |
 Double grill Double grill | The radiant heating element and top heating element are working. |
 Single grill Single grill | The inner grill element switches on and off to maintain temperature.Can be used to grill a small number of food. |
 Conventional+fan Conventional+fan | The combination of fan and the top and bottom heating elements provides more even heat penetration and coloration, primarily for cooking meat. |
 Conventional Conventional | The top and bottom heating elements work together to provide convectional cooking. |
 Bottom heating Bottom heating | Heating is provided by heating pipes at the bottom of the oven.Mainly used for keeping warm and the coloring of the food. |
 ECO ECO | For energy-saving cooking. Cooking the selected ingredients in a gentle manner, and the heat comes from the top and the bottom. |
 Water clean Water clean | Steam softens food residue or grease in the cavity. |
First use
Before using it for the first time, please clean the oven and accessories to a certain extent.
- Remove the oven packaging shipping protection parts.
- Remove all accessories (eg: baking trays, grills, foam, etc.) from the cavity.
- Thoroughly clean the attachment with soapy water and a rag or soft brush. Wipe
- cavity and oven surfaces with a soft damp cloth.
- To avoid fire, please make sure that the cavity is free of any remaining packing materials and accessories when using it for the first time.
- When using it for the first time, keep the kitchen highly ventilated (open the hood and windows). During this time, keep children and pets out of the kitchen and keep the doors of adjacent rooms closed.
- When used for the first time, the anti-corrosion coating of the oven heating tube evaporates when heated, which will produce a pungent smell or smoke, which is a normal phenomenon. Please run the following mode:
| Mode Temperature Time | ||
| Conventional | 250°C | 0.5-1 Hour |
Setting the clock
When the oven is connected to the power supply for the first time, you need to set the clock.
Note: The clock is a 24 hour clock.
- Press ☐ or ⚠ key to adjust the hour setting.
- Press <> key to confirm the hour setting.
- Press ☐ or ☑ key to adjust the minute setting.
- Press ◀ key to complete the clock setting.
Regular operation
- Turn knob K1 to select the oven functions.
- Turn knob K2 to adjust the temperature.
- Mode setting.
- When cooking is finished, turn all knobs to the "○" position.

K1 Time Setting K2
Mode setting
In standby mode, press and hold the "<> " key for 3 seconds to enter manual mode, the "###" icon will light up.
Under manual mode, press the "<> " key to enter the time mode selection: manual → minute minder → dur → End → manual.
The automatic cooking modes that can be set are semi-automatic: dur or End, and full automatic: dur+End.
If the display does not show the icon " ,", the oven will not work or heat up.
The oven will only work or heat up if the display shows icon " ,
Notes
- Manual mode - the cooking time is controlled by the user.
- Minute minder - you can set an audible reminder for the time period of completion.
- Dur - you can set the oven so it will cook for a desired time range.
- End - you can set the oven so it will cook to a desired time.
Manual mode
In manual mode, only the day's time and the symbol " ..., " lights up. The oven is always in working order and the cooking time is controlled by the user.
Notes
- In manual mode, after 5 hours of no operation, the displayed time starts to flash. After 10 hours without any operation, return to the standby state.
- When the time is flashing, if you want to use the manual mode again, please press the "⊖" or "⊕" key.
Minute minder Minute minder
This mode is only used as a reminder function.
- Press " <> " key to select the minute minder function. The relevant " 🔊 " " ■ " symbol will flash.
- Press the "−" or "+" key to enter the alarm clock time setting (Refer to "Setting the clock").
- After setting, press the "◀" key to confirm the alarm clock setting, and the "☐" icon is always on.
- When the time is up, the buzzer beeps to remind you, and the " 🔊 " symbol on the screen begins to blink. At this point, press any key to cancel the reminder.
Cooking dur time
If the dur mode is set for 1 hour, cooking ends after 1 hour.
- Press the "<<" key continuously until the screen shows "dur".
- Press the "−" or "+" key to enter the dur mode time setting (Refer to "Setting the clock"). The maximum setting time is 10 hours.
- After confirming the time setting, press the "◀" key to start. At this time, the icons "###" and "A" are always on.
- If the dur mode is set for 1 hour, the buzzer sounds after 1 hour to indicate the end of cooking and the icon "A" flashes.
- At this point, press any key to return to standby, stop the chirping alert and the icon "A" disappears.
Cooking End time
Cooking starts at the current time and ends at the set clock time.
- Press the "◀" key continuously until the screen shows "End".
- Press the "−" or "+" key to enter the End mode time setting (Refer to "Setting the clock").
- After confirming the time setting, press the " <> " key to start. At this time, the icons " ..., " and " A " are always on.
- When the End time is the same as the system clock time, the buzzer will sound, indicating the end of cooking. The icon "###" disappears and the icon "A" flashes.
- At this point, press any key to return to standby, stop the chirping alert and the icon "A" disappears.
Reservation function
This function can start cooking at a specified time.
- Press the "<> " key until the screen shows "dur".
- Press the "−" or "+" key to adjust the cooking duration (tRefer to "Setting the clock").
- Press the "<> " key to confirm
- Press the "<> " key until the screen shows End".
- Press the "−" or "+" key to adjust the cooking end time (Refer to "Setting the clock").
- Press the "<> " key to start.
Notes
- If the clock time is 12.30, the dur time is set to 1 hour and the end time is set to 16:00, the oven will start cooking at 15:00 and finish at 16:00.
- When the clock time is the same as the scheduled start time, the oven starts cooking and the icons "A" and "###" are always lit.
- When the end time is the same as the clock time, finish cooking, icon "###" disappears, icon "A" flashes, and buzzer sounds. At this point, press any key to cancel the tone.
Precautions for timer use
- When setting the time, press and hold the "⊖" or "⊕" key for 3 seconds to increment or decrement the time continuously.
- In alarm or automatic cooking mode, press and hold the "─" and "+" keys until the buzzer sounds to cancel all mode settings and enter standby mode.
- When setting the timer mode, if nothing is done for 5 minutes, it will return to manual mode.
- When setting each function, press and hold the "<> " key for more than 3 seconds to cancel the current setting and enter manual mode.
- When setting the timer mode, only one of the alarm clock and automatic cooking modes can be selected.
CLEAN AND MAINTENANCE
Cleaning
Disconnect the power supply before cleaning and maintenance. In order to ensure the life of the oven, clean it in time after cooking. Cleaning steps are as follows:
- After cooking, wait for the oven to cool completely.
- Remove oven accessories, rinse with warm water and dry.
- Remove food residues and oil stains from the oevn cavity.
-
Clean the oven surface with a soft cloth dampened with detergent and dry.
-
Start the water clean function as follows:
1). Add about 250 ml of purified water and an appropriate amount of dish soap to the cavity and stir well.
2). With the oven door closed, turn Knob K1 to the "☐" position.
3). Turn knob K2 to the "100°C" position.
4). Select dur mode and set the time to 30 minutes.
5). Press the "↔" key to start.
- After the water clean function is completed, wait for the oven to cool completely. Then dry the furnace oven cavity with clean absorbent sponge or soft cloth.

natural_image
Line drawing of a kitchen oven with a ladle pouring liquid into the interior (no text or symbols)Notes
- Do not use sharp cleaning tools, hard brush and corrosive cleaning products, so as not to damage the machine and its accessories.
- Do not use rough scrubbing agent or sharp metal spatula to clean the door glass.
Lamp Replacement
- Switch off and disconnect the power from the oven. Ensure that the internal parts are cool before touching internal parts.
- Remove the lamp cover by turning it counter-clockwise (note, it may be stiff), replace the bulb with a new one of the same type.
- Insert the new bulb, which should be resistant to 300^ C. For replacement bulbs contact your local service centre.
- Re-fit the cover.
- If in any doubt, consult a qualified electrician for help.

natural_image
Simple line drawing of a bowl with a circular arrow indicating rotation (no text or symbols)WARNING:
To avoid electric shocks-please ensure that the electricity supply to the appliance is switched off and the appliance is fully cold. before removing the lamp lens.
TROUBLESHOOTING
If the problem cannot be solved or other problems occur, please contact the after-sales service.
| Problem Possible reason Solution | ||
| Unable to start | Power is not connected connect power supply | |
| The main power switch is not turned on | Turn on the power switch | |
| Oven door not closed Close the oven door | ||
| lamp does not come on It's broken | Contact after-sales service | |
| Has a pungent odor or smoke | first use No processing required | |
| Food is not cooked | Temperature is too low | Use a higher temperature |
| Food portion is too large | Cook food in smaller pieces or extend the cooking time. | |
| Burnt or uneven food | The temperature is set too high or the heating time is too long | Adjust the cooking temperature or time |
| The food is too close to the heating tube | Adjust the placement layers of accessories | |
| The fan did not stop working after stopping the heating | Fan delays blowing for heat dissipation | No processing required |
SPECIFICATIONS
| Model | EMV701DGN/EMV701DGW |
| Usable Volume | 70L |
| Rated voltage 220-240V~ | |
| Rated frequency 50Hz-60Hz | |
| Electric power 3.0 kW | |
PRODUCT RECYCLING
The european directive 2012/19 /UE on wasted electrical and electronic equipments (WEEE), requires that household electrical appliances must not be disposed of in the normal unsorted municipal waste stream. appliances must be collected separately in order to optimize the recovery and recycling of the materials they contain, and reduce the impact on human health and the environment.
The crossed out “wheeled bin” symbol on the product reminds you of your obligation, that when you disposed of the appliances, it must be separately collected. Consumers should contact their local authority or retailer for information concerning the correct disposal of their old appliance.

When you have unpacked the oven, make sure that it has not been damaged in any way. If you have any doubts at all, do not use it: contact a professionally qualified person. Keep packing materials such as plastic bags, polystyren, or nails out of the reach of children because these are dangerous to children.
WARRANTY CONDITIONS
This appliance is guaranteed for three years from the date of sale against all manufacturing defects, including labour and spare parts. In order to justify the date of purchase, it will be compulsory to present the invoice or purchase receipt. The conditions of this warranty apply only to Spain and Portugal. If you have purchased this product in another country, please consult your distributor for the applicable conditions.
WARRANTY EXCLUSIONS
- Remote controls, drain intake rubbers, dockings and door seals, weather stripping.
- Damage to enamels, paints, nickel plating, chrome plating, oxidation or other types of aesthetic parts or components that do not affect the internal functioning of the appliance.
- Damage to wear parts due to use, corrosion or oxidation, whether caused by normal use of the appliance or accelerated deterioration due to unfavorable environmental or climatic circumstances. Not suitable for outdoor use.
- Damage to fragile pieces of glass, glass ceramic, plastics, handles, baskets, doors or light bulbs when their failure or breakage is not attributable to a manufacturing defect.
- Faults produced by fortuitous causes or accidents of force majeure, or as a consequence of abnormal, negligent or inappropriate use of the device.
- Civil liabilities of any nature.
- Consequential damage to the appliance as long as it has not been caused by an internal malfunction.
- Maintenance or upkeep of the appliance: periodic reviews, adjustments and greases.
- Faults that accessories and complements, adapters, external cables, bags, spare parts of all kinds, lamps, as well as any part considered consumable by the manufacturer, may suffer.
- Faults caused by incorrect or illegal installation, inadequate ventilation, lack of grounding in the home, power disturbances, inappropriate modifications or use of non-original spare parts.
- Appliances used in industrial applications or for commercial purposes.
- Appliances with illegible or altered serial number.
- Defects or breakdowns produced as a result of fixes, repairs, modifications, or disassembly of the installation of the device by the user or by a technician not authorized by the manufacturer, or as a result of manifest non-compliance with the manufacturer's instructions for use and maintenance.
- During the warranty period it is essential to keep all manuals together with the equipment. If the equipment is sold, donated or given away, the manual and all related documents must be given to the new user. If any of these are lost, their replacement cannot be claimed.
- Faults that have their origin or are a direct or indirect consequence of: contact with liquids, chemicals and other substances, as well as conditions derived from the climate or the environment: earthquakes, fires, floods, excessive heat or any other external force, such as insects, rodents and other animals that may have access to the interior of the machine or its connection points.
- Damages derived from terrorism, riot or popular tumult, legal or illegal demonstrations and strikes; facts of actions of the Armed Forces or the State Security Forces in times of peace; armed conflicts and acts of war (declared or not); nuclear reaction or radiation or radioactive contamination; vice or defect of the goods; facts classified by the Government of the Nation as "national catastrophe or calamity".
Design and specifications are subject to change without notice for product improvement. Any changes to the manual will be updated on our website, you can check the latest version.

EAS ELECTRIC
SMART TECHNOLOGY
www.easelectric.es

1 INFORMATIONS SUR LA SÉCURITÉ
8 INTRODUCTION DU PRODUIT
8 Four
8 Accessoires
18 RECYCLAGE DU PRODUIT
19 GARANTIE
INFORMATIONS SUR LA SÉCURITÉ
DÉCLARATION DE CONFORMITÉ
INTRODUCTION DU PRODUIT
natural_image
Simple line drawing of a rectangular tray with cutouts and a central triangular shape (no text or symbols)Plateau de gril
natural_image
Simple line drawing of a bucket with a ladle pouring liquid into a container (no text or symbols)NOTE:
natural_image
Simple line drawing of a bowl with a circular arrow indicating rotation (no text or symbols)AVERTISSEMENT :
CONDITIONS DE LA GARANTIE
EXCLUSIONS DE LA GARANTIE
natural_image
Simple line drawing of a rectangular tray with cutouts and a central triangular shape (no text or symbols)Tabuleiro
natural_image
Simple line drawing of a container with a sprouting plant inside, no text or symbols presentNOTA:
natural_image
Simple line drawing of a bowl with a circular arrow indicating rotation (no text or symbols)ADVERTÊNCIA:
Scan for manual in other languages and further updates:


- EMV701DGN EMV701DGW
- NOTA:
- ADVERTENCIA:
- RECICLAJE DEL PRODUCTO
- CONDICIONES DE LA GARANTÍA
- SAFETY INFORMATION
- THESE WARNINGS ARE PROVIDED IN THE INTEREST OF SAFETY. PLEASE READ THEM
- DECLARATION OF COMPLIANCE
- INSTALLATION
- Cabinet Diagram (Standing Cabinet)
- Cabinet Diagram (Ground Cabinet)
- Installation Important Instructions
- ! Content that means [mandatory]
- Content that means [prohibit]
- Content that means [note]
- Installation steps
- PRODUCT INTRODUCTION
- Accessories
- Accessories use (Only for some models)
- Control Panel
- First use
- Setting the clock
- Regular operation
- Mode setting
- Notes
- Manual mode
- Minute minder Minute minder
- Cooking dur time
- Cooking End time
- Reservation function
- Precautions for timer use
- CLEAN AND MAINTENANCE
- Cleaning
- Lamp Replacement
- WARNING:
- TROUBLESHOOTING
- PRODUCT RECYCLING
- WARRANTY CONDITIONS
- WARRANTY EXCLUSIONS
- INFORMATIONS SUR LA SÉCURITÉ
- INTRODUCTION DU PRODUIT
- INFORMATIONS SUR LA SÉCURITÉ
- DÉCLARATION DE CONFORMITÉ
- INTRODUCTION DU PRODUIT
- NOTE:
- AVERTISSEMENT :
- CONDITIONS DE LA GARANTIE
- EXCLUSIONS DE LA GARANTIE
- ADVERTÊNCIA:
Brand : EAS Electric
Model : EMV701DGN
Category : Oven