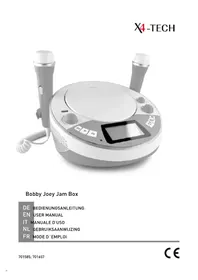
Bobby Joey MP3 - Cd player/recorder X4 Tech - Free user manual and instructions
Find the device manual for free Bobby Joey MP3 X4 Tech in PDF.
User questions about Bobby Joey MP3 X4 Tech
0 question about this device. Answer the ones you know or ask your own.
Ask a new question about this device
Download the instructions for your Cd player/recorder in PDF format for free! Find your manual Bobby Joey MP3 - X4 Tech and take your electronic device back in hand. On this page are published all the documents necessary for the use of your device. Bobby Joey MP3 by X4 Tech.
USER MANUAL Bobby Joey MP3 X4 Tech
DE Bobby Joey MP3 Akku
EN Bobby Joey MP3 Rechargeable
IT Accumatore Bobby Joey MP3
NL Bobby Joey MP3 accu
FR Bobby Joey MP3 accumulator
| Lived non food GmbH Friedrich-Seele-Straße 20 D-38122 Braunschweig | |
| I | +49 (0) 531 224356-10 |
| - | info@lived-non-food.de |
| www.lived-non-food.de |
EN | Declaration of Conformity
This product meets the requirements of both current national and European guidelines. The declaration of conformity can be found at http://productip.com/?f=6c4c9
Information on this user manual 28
Liability 28
Designated Use 28
General Notes. 29
Signal Words 30
Safety Guide 30
Laser beam. 32
Packing contents 33
Specifications 34
Getting started. 36
Power supply 38
Battery operation. 38
Operation with AC/DC power adapter.38
Battery/Rechargeable Battery 39
General operating instructions. 40
On/Off 40
Volume. 40
Headphone 40
USB-/SD-Operation 41
CD playback 41
Selection of a specific track. 42
Fast forward and rewind 43
Playback mode 43
Program playback 44
Karaoke function 44
Public announcements. 45
Cleaning and maintenance. 46
Handling CDs 46
Storing CDs 46
Cleaning CDs 46
Disposal 47
Indices
ITALIANO
Inhoudsopgave
NEDERLANDS
Allimentation electirque 104
Pile / accumulator 105
Instructions generales 106
Étein/allumer. 106
Volume. 106
Casque auditive 106
DE lived non food GmbH
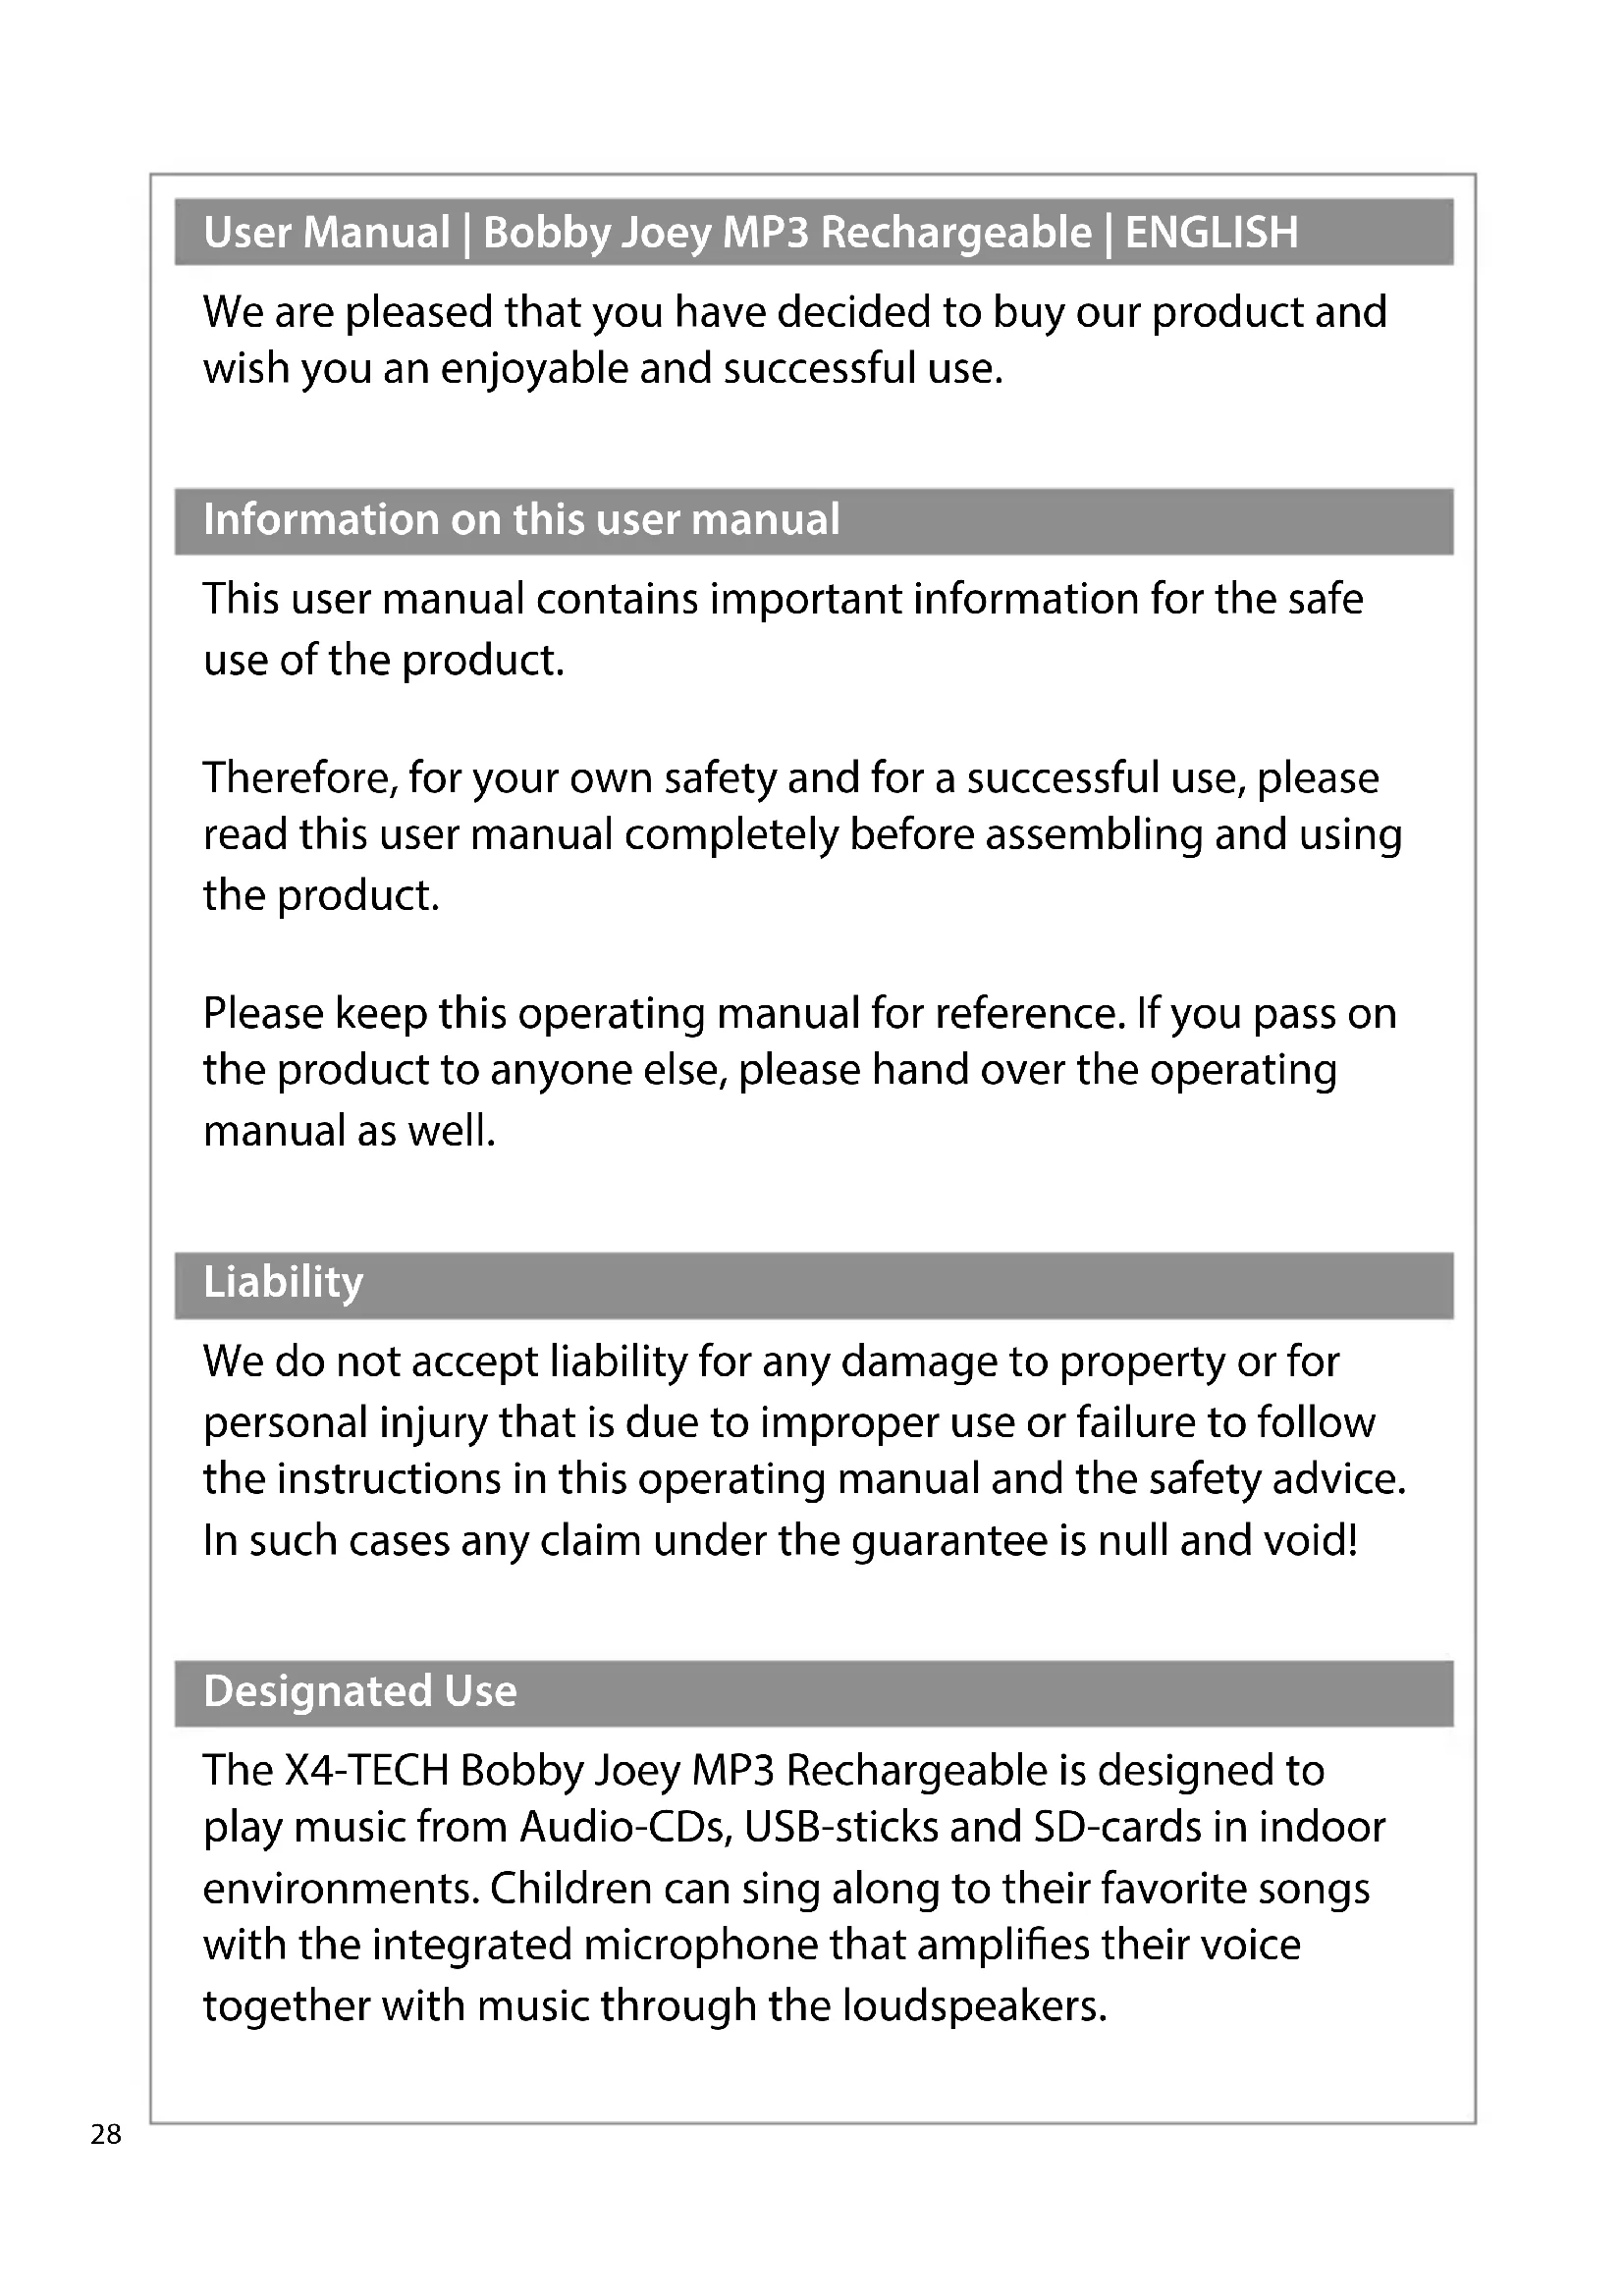
User Manual | Bobby Joey MP3 Rechargeable | ENGLISH
We are pleased that you have decided to buy our product and wish you an enjoyable and successful use.
Information on this user manual
This user manual contains important information for the safe use of the product.
Therefore, for your own safety and for a successful use, please read this user manual completely before assembling and using the product.
Please keep this operating manual for reference. If you pass on the product to anyone else, please hand over the operating manual as well.
Liability
We do not accept liability for any damage to property or for personal injury that is due to improper use or failure to follow the instructions in this operating manual and the safety advice. In such cases any claim under the guarantee is null and void!
Designated Use
The X4-TECH Bobby Joey MP3 Rechargeable is designed to play music from Audio-CDs, USB-sticks and SD-cards in indoor environments. Children can sing along to their favorite songs with the integrated microphone that amplifies their voice together with music through the loudspeakers.
The device has no recording function.
The designated use is defined by the instruction manual and in following the appliance and the warnings mentioned in this user manual.
This product is not suitable for commercial usage.
General Notes
All mentioned company and product names are registered trademarks under the rights of their owners.
© All rights reserved.
No liabilities will be taken for damages or claims resulting out of not reading and/or not following the user guide and/or any form of modification on or in the product. Under these circumstances, no warranty services will be given. Liability cannot be taken for consequential damages.
The contents of this user manual may differ from the product. If so, please consult additional manuals in the packing. Keep this user manual in a safe place. If you give this product away to a third party, make sure that you also pass on the user manual.
For the reason of safety and CE-licensing it is not allowed to modify this unit in any way and/or use it for functions, other than the designated use.
Signal Words

CAUTION!
High risk!
Disregard of this regulation may result in danger to life or physical condition.

WARNING!
Medium risk!
Disregard of this regulation may cause material damage.

ATTENTION!
Low or no risk!
Facts to follow for the designated use of this product.
Safety Guide
CAUTION!
The power adapter is not a toy!
CAUTION!
Danger of hearing damage!
To avoid hearing damage, do not listen to music at maximum volume for a long period of time.

CAUTION!
Risk of strangulation! The cables of this product may become a danger for children.

CAUTION!
Danger of suffocation! The device contains small parts that can be ingested. Packaging and protective foils can constitute a suffocation hazard.
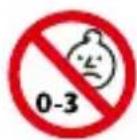
CAUTION!
Not suitable for children under the age of 3
- Danger of suffocation due to small parts.
- Danger of strangulation due to long cables.
- The toy must be kept out of reach of children under 3 years!

CAUTION!
To be used under the direct supervision of an adult!

WARNING!
Misuse may cause risk of damage. Incorrect use of the device may lead to damages.
- The product may not be subjected to extreme heat or cold. Do not expose the product to intense sunlight, open fire or other heat sources: Storage temperature: -0^ to 40^; Working temperature: 0^ to 40^ .
- This device is equipped with an integrated lithium ion battery. Batteries and rechargeable batteries must be kept out of the reach of children. Leaking or damaged batteries can cause acid burns if they come into contact with the skin.
- Fully charge the battery before storage and every 6 months when the product is not in use.
- Charge the battery completely before starting the device for the first time (approx. 2 hours).
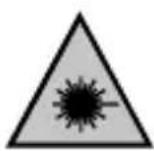
Laser beam

WARNING!
Danger due to laser beams! This device has been classified as a class 1 laser device! Laser beams can cause irreversible eye damage!
- Do not look into the laser beam!
- This CD player is a class 1 laser device and emits visible/unvisible laser beams which may lead to hazardous radiation exposure.
- Only operate this product according to this user manual.
- If the safety lock is bypassed while the CD door is open, invisible laser beams are emitted from the device.
- Never touch the laser lens.
- To avoid any risks and dangers: Leave all maintenance and repair work to the manufacturer or authorized service personnel.

The following safety and danger references/ notices serve not only the protection of the product, but also the protection of your safety and health. Please read all following instructions carefully.
- Avoid high volumes to protect your and your children's hearing. High volumes may cause irreparable damage to children's ears.
- This device contains small parts and cables which can be swallowed. The device is not suitable for children under 3 years.
- NEVER let anyone, especially children, put objects into the holes, slots or openings of this device. This may lead into death due to electric shock. The device must only be opened by a qualified service technician.
-
Beware of small pieces and batteries – do not swallow them. They can be hazardous to your health and lead into suffocation. Make sure to keep small parts and batteries out of reach of children.
-
Never leave packaging material lying around unsupervised – this can become a hazardous toy for children and/or pets and lead to serious injuries, e.g. suffocation.
- The ventilation system must be clear of objects at all times. Do not obstruct the ventilation of this device. Make sure that no curtains, newspapers, furniture or any other types of objects are blocking the ventilation system of this device. Overheating may lead into serious damage of the device and reduce its performance and lifespan.
- Do not expose the device to direct sunlight. Make sure that the device is not exposed to direct heat sources such as heaters or open fire.
- Contact a service technician if there is any reason to believe that the operation or safety of the device has been impaired. Please adhere to the additional safety information found in the individual chapters of this instruction manual. Should you be in doubt of the correct operation of this device or questions arise that are not explained within this manual, please contact our technical hotline or a service technician for further information.
- Only use the included power adapter for charging the device.
- If there is any doubt in the safety of this device (e.g. because of damage to the enclosure, cables, the power adapter or the internal transformer), the device should not be used until the damage has been properly removed.
The internal transformer is not a toy.
Packing contents
| Bobby Joey MP3 Rechargeable |
| Sticker-Set |
| Manual |
| Power adapter / charger |
Specifications
| Power Supply | 8.4 V Li-lon rechargeable battery, 1000 mAh |
| AC/DC power adapter | AC 100 – 240 V ~50/60 Hz / DC 9 V, 1.5 A |
| Dimensions 260 x 210 x 90 mm (W x H x D) | |
| Weight | approx. 876 g approx. 95 g (power adapter) |
| Headphone | The maximum volume of the headphone output is limited. |
| CD Playback from CD, CD-R, MP3 | |
| Anti-Shock 30 sec. | |
| USB | Playback of MP3 files; the volume has to be formatted in FAT32; capacities of up to 32 GB are supported |
SD-card
Playback of MP3 files; the volume has to be formatted in FAT32; capacities of up to 32 GB are supported
WARNING!
Danger of laser beams!
This device has been classified as a class 1 laser device.
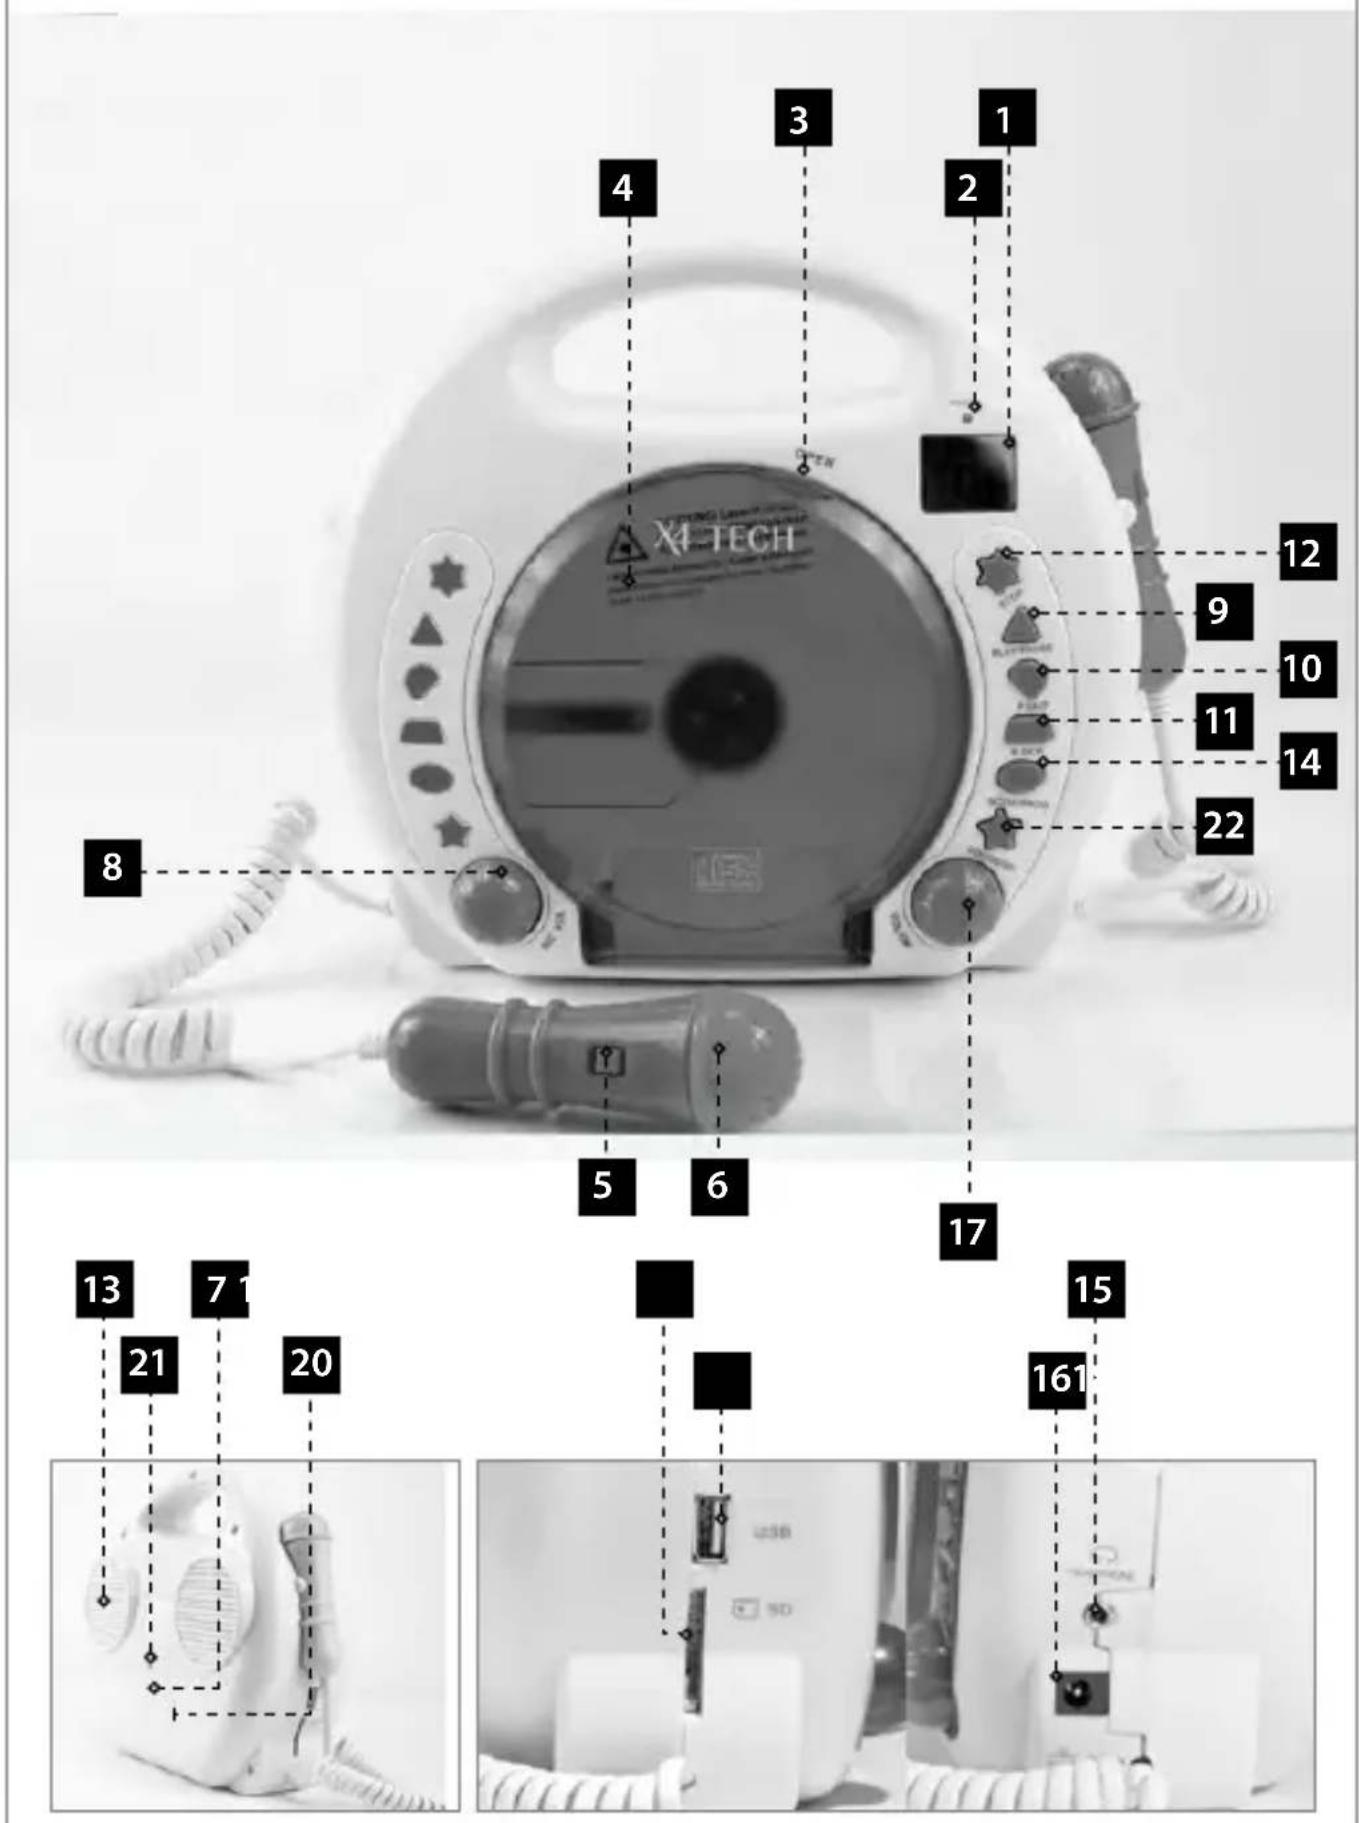
Getting started
| 1.LCD display |
| 2.Power LED |
| 3. OPEN | Open the CD door |
| 4.CD door |
| 5.ON/OFF for microphone | directly on the microphone |
| 6.Microphone |
| 7.Battery compartment | On the back of the device |
| 8.MIC VOL | Microphone volume |
| 9 PLAY/PAUSE | Playback or pause mode |
| 10. Next track |
| 11. Previous track |
| 12.STOP | Stop playback |
| 13.Speaker |
| 14.PROGRAM | Title-programming / repeat modes |
| 15.HEADPHONE | Headphone jack |
| 16.DC 9 V power adapter connector |
| 17.VOL/ON | On and off / volume control |
| 18.USB port |
| 19.SD-card slot |
| 20.Cover for battery compartment |
| 21.Screw for battery compartment cover |
| 22.CD/USB/SD-button |
品
Power supply
Battery operation
- The device has a built-in rechargeable Li-lon battery, which can be charged with the included power adapter. The battery- and charging-status are shown on the LCD display.
- One complete charging takes approx. 2 hours. The runtime is approx. 4 hours, depending on the volume.

The battery may only be charged under the direct supervision of adults.
Operation with AC/DC power adapter
- Only use the included original power adapter.
- Connect the power adapter with the DC 9 V jack (see 36.16).
- Only use the device with the recommended transformer.
Equivalent to CE directive 15.

Wrong usage of the transformer may lead to electric shock. The transformer used for this toy has to be checked for damages to the housing, connector, cable and other parts. If there is any damage, the transformer must not be used.

If there is any doubt in the safety of this device (e.g. because of damage to the enclosure, cables, the power adapter or the internal transformer), the device should not be used until the damage has been properly removed.

This device may only be connected to the provided power adapter. The usage of other kinds of power adapters may damage the device.
Battery / Rechargeable Battery

WARNING!
Children are at risk of injury!
- If the batteries are handled by children or adults unable to assess the risk, they run the risk of injury, which could even be life-threatening.
- Do lot leave batteries lying around. There is a risk that children or pets might swallow them. Seek medical assistance immediately if this occurs.
- Batteries must not be exposed to excessive temperatures, such as arise in direct sunlight, in a fire or an oven. There is an explosion risk.
- Make sure that the batteries are not shortcircuited. Furthermore, they must not be charged. There is an explosion risk.
General operating instructions
On/Off
Switch the unit on by turning the VOL/ON control (see 36.17) clockwise. On the display (see 36.1), - - - - - will be displayed. To switch the unit off, turn the control counter-clockwise until it snaps. The display will turn off.
Volume

CAUTION!
Danger of hearing damage!
To avoid hearing damage, do not listen to music at maximum volume for a long period of time.
Turn the VOL/ON control (see 36.17) clockwise to raise the volume. Turn it counter-clockwise to lower the volume.
Headphone
By connecting a headphone, the speaker will be muted. The volume can be adjusted by the VOL/ON control. The maximum volume of the headphone output is limited.
PROTECT YOUR CHILDREN FROM HEARING IMPAIRMENT
- Be careful by using seperate head- or earphones!
Depending on the head- or earphones, high volume levels can be produced which may lead to permanent hearing impairment due to sustainable usage! - When using a separate head- or earphone, make sure your child uses the device only for short periods of time and only low volume levels are set. Children should be supervised all the time
during usage.
- Determine and retain a pleasant volume level. As the hearing gets accustomed to a certain volume level and the volume perceived by the human ear decreases over time, there is a tendency to increase the volume regularly.
This procedure will inevitably lead to hearing impairment. - The higher the volume levels are set, the faster the hearing of your child will be damaged.
USB-/SD-Operation

SD-cards and USB-sticks have to be formatted in FAT32! Copy your MP3 files to the SD-card or USB-stick. If there
are no preceded consecutive numbers (01_title..., 02_title...) the files will be played in the same order they have been copied onto the medium.
Plug in the USB-stick or SD-card into the relevant connector and press CD/USB/SD-button (see 36.22) to select USB or SD. After this, proceed as described from point 3 onwards (see CD playback).

Note on copy protection. Under applicable law it is forbidden to copy, transfer, lease or make available any
material protected by copyright without a permit of the right-holder.
CD playback
- Switch the unit on by turning the VOL/ON control (see 36.17) clockwise.
-
Open the CD door (see 36.4) by lifting the recess OPEN (see 36.3).
-
Place a CD on the center spindle with the cover side faced up and close the CD door.
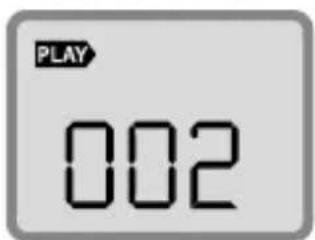
- On the LCD display (see 36.1) the indication - , will be shown for a few seconds. Afterwards, the total number of tracks will be displayed.
- Press PLAY/PAUSE (see 36.9) to start the playback. The track number is indicated (e.g., 01'' ).
- Adjust the volume by rotating the VOL/ON control (see 36.17) to a suitable listening level.
- To interrupt the playback temporarily (pause), press PLAY/PAUSE (see 36.9). Pressing PLAY/PAUSE again resumes the playback.
- Press STOP (see 36.12) to stop the playback of the CD.
Selection of a specific track
During the playback you can skip with (see 36.10) or (see 36.11) to the next or previous track.
- Select the track in the playback, stop or pause mode with (see 36.10) or see 36.11) and start the playback with PLAY/PAUSE (see 36.9).
- Pressing briefly on (see 36.10) you can skip to the next track. Pressing this button repeatedly, you can skip several tracks until the desired track number is shown on the display.
- Pressing briefly (see 36.11) you will return to the beginning of the current track.
To skip back multiple tracks, pre§ (see 36.11) repeatedly.
Fast forward and rewind
Press and hold (see 36.10) or (see 36.11) to move fast forward or backward within the current track. The volume will be muted during this operation.
Playback mode
- By pressing PROGRAM (see 36.14) the playback mode can be changed. The current playback mode is shown on the display (see 36.1).

PROGRAM
Press PROGRAM 1x
The current title will be repeated endlessly. The symbol blinks in the display.
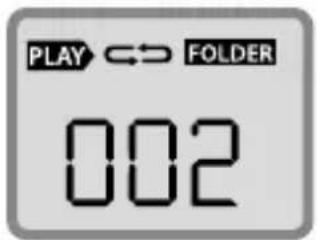
Press PROGRAM 2x
All titles from the selected folder will be repeated endlessly.
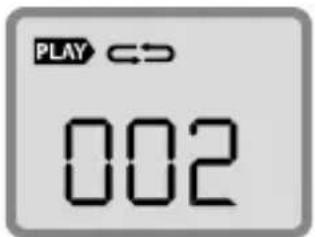
Press PROGRAM 3x
The whole disk/usb-stick/sd-card will be repeated.
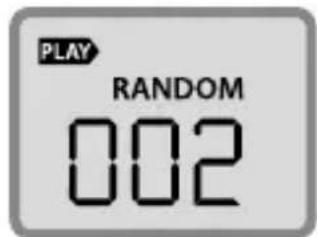
Press PROGRAM 4x
All titles on the disk/ usb-stick/sd-card will be played randomly.
Press PROGRAM 5x
Repeat mode is deactivated.
Program playback
Up to 20 tracks can be programmed to be played in a specific order.
- Press PROGRAM (see 36.14) once while in playback or stop mode. "00" is shown on the display.
- Select the desired track with (3e 36.10) or (36.11).
- Store the track with PROGRAM (see 36.14). The program number will be increased by one and shown on the display for a short period of time.
- Repeat steps 2 and 3 to program up to 20 tracks.
- Press PLAY/PAUSE (see 36.9) to start the playback of the tracks in the programmed order.
- Stop the programmed playback by pressing STOP (see 36.12).
- In stop mode, press PROGRAM (see 36.14) and PLAY/PAUSE (see 36.9) afterwards, to continue the programmed playback.
- After pressing PROGRAM (see 36.14) while in stop mode, you can check the programmed track numbers via (see 36.10) or (see 36.11).
- Delete the programmed sequence by opening the CD door or turning off the CD player via VOL/ON (see 36.17).
Karaoke function
The device is equipped with two coequal microphones.
- Turn the device on by rotating the VOL/ON control (see 36.17) clockwise.
- Place a CD on the center spindle with the cover faced up and close the CD door (see 36.4).
-
Press PLAY/PAUSE (see 36.9) to start the playback.
-
Move the ON/OFF slide control for the microphone (see 36.5) to the ON position.
- Adjust the microphone volume by rotating the MIC VOL control (see 36.8) to a suitable listening level.
- Now you can start singing into the microphone together with the music from CD.

Take care that you don't place the microphone too close to the speaker - otherwise an acoustic feedback (squealing from the speakers) can happen. Higher settings of the microphone volume will result in greater sensitivity for acoustic feedbacks.
Public announcements
No CD necessary. Just talk into the microphone and your voice will be amplified by the device.
- Just turn the device on by the VOL/ON control without a CD inserted.
- Slide the ON/OFF-button (see 36.5) on the microphone to the ON position.
- Adjust the microphone volume by rotating the - MIC VOL control (see 36.8) to a suitable listening level.
- Now you can start singing or talking into the microphone.

Take care that you don't place the microphone too close to the speaker – otherwise an acoustic feedback (squealing from the speakers) can happen. Higher settings of the microphone volume will result in greater sensitivity for acoustic feedbacks.
Cleaning and maintenance

DANGER!
Always use a soft, dry and lint-free cloth to clean the units exterior. If the device is extremely dirty, you can use a soft cloth dampened with water, or a mild
cleaning solution to clean.
Never use any abrasive or harsh cleaning agents (e.g. alcohol, petrol or thinners) as these could damage the controls, casing or any markings and labels found on the device.
Handling CDs

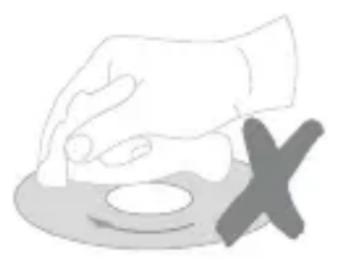
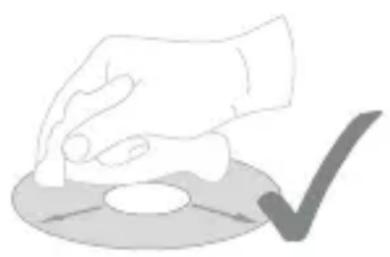
Do not touch the playback side of discs. Hold the discs by the edges without touching the recording surface, so that finger prints do not come in contact with the discs surface. Never stick paper or use tape on discs.
Storing CDs
After you are finished playing a CD, please store it in its respective cover. Never expose discs to direct sunlight, sources of heat or high temperatures. Never leave discs in a car exposed to direct sunlight.
Cleaning CDs
Finger prints and dust found on a CD may be the reason for a poor sound quality. Before playing a CD, carefully wipe off finger prints and dust with a clean cloth. Please clean with an inwards to outwards motion.
Disposal
Electrical- and electronic devices must never be disposed of in the regular household waste!
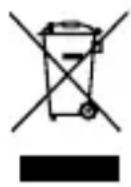
Consumers are legally obligated and responsible for the proper disposal of electronic and electrical devices by returning them to collecting sites designated for the recycling of electrical and electronic equipment waste. For more information concerning disposal sites, please contact your local authority or waste management company.
Do not dispose of batteries and rechargeable batteries with your household waste!
Customers are legally obliged to return used and rechargeable batteries, whether they contain harmful substances* or not, to designated disposal sites or collecting sites in shops selling batteries. By doing so you are contributing to a better and cleaner environment.
- Identification mark Cd= Cadmium; Hg= Mercury; Pb= Plumb
EN lived non food GmbH
lived non food GmbH, all rights reserved.
No liability will be taken for modifications or mistakes regarding the technical data or product features described in this user manual. All rights reserved. Any reproduction, transfer, duplication or filing of this user manual or parts of it, as well as the translation into a foreign language or computer language is prohibited without the explicit approval of the manufacturer. Due to the fast advancement of these products, no guarantee of completeness can be given. Modifications in technique and configuration are subject to change at any time.
To receive a digital copy of this user manual, please contact our service department.
Guarantee and service conditions
You receive a voluntary 2-year manufacturer guarantee, starting at purchase date, for material and production defects of the product. This guarantee is applicable in Germany, Austria and Switzerland. The receipt counts as a proof of guarantee. Within the guarantee period we will repair all material and manufacturer defects free of charge. Your statutory warranties remains unaffected by this guarantee.
The guarantee does not count:
- in case of damages which have arisen after improper use
- for wear parts / accessories that are subject to natural wear and tear
- for defects that are known to the customer at purchase
- in case of damages that occurred due to repair or intervention of the buyer or an unauthorized third party
- in case the device was connected to a higher voltage as stated on the device
-
when dropping the device or single elements of it
-
for improper transportation or packaging
- damages that occurred due to force majeure
for non-observance of valid safety precautions - for non-observance of the manual
Batteries / rechargeable batteries are not covered by the guarantee as they are parts of consumption.
Spare part: X4-TECH replacement rechargeable battery for children CD player Bobby Joey MP3 rechargeable Art. 701482
In case of a guarantee claim, the date of sale has to be proven by receipt or invoice. Replacements for reasons covered by the guarantee do not lead to an extension of the original guarantee period, neither for the device itself nor for any replaced components. If you are claiming a valid guarantee, we are entitled to choose whether we will repair the device free of charge or exchange it for a new device. Any further claims are excluded. Parts replaced will pass into our property. We reserve the right to change defective parts or products against follow-up models.
Please always contact us before you return your product.
Provided that a return shipment has been agreed upon, send the defective product securely packaged at your own cost to our service department.
It is absolutely necessary that you add a copy of your receipt to your return shipment. Repairs carried out after the guarantee period are subject to a charge. We will not accept freight collect shipments and will return them to the sender.
WAARSCHUWING!
MIDDELSTE RISICO!
*Maruqe Cd = Cadmium, Hg = Mercure, Pb = Plong