
EPL-5000 - Laser printer EPSON - Free user manual and instructions
Find the device manual for free EPL-5000 EPSON in PDF.

User questions about EPL-5000 EPSON
0 question about this device. Answer the ones you know or ask your own.
Ask a new question about this device
Download the instructions for your Laser printer in PDF format for free! Find your manual EPL-5000 - EPSON and take your electronic device back in hand. On this page are published all the documents necessary for the use of your device. EPL-5000 by EPSON.
USER MANUAL EPL-5000 EPSON
Copyright Seiko Epson France 1992 - Levallois - France
RIT (Resolution Improvement Technology). 110
PROM Epson Page GQ - Ref. 500 565
C82310* Interface parallele 32Ko - Ref. 500 595
Epson Print N^ 4 - Ref. 550 933
Epson you propose un cable parallele DB25 Ref. 900 316.
SPL (Shared Printer Language). 54
Généralités
Interface paralleled
HP LaserJet IIP PluTM
HP LaserJet IIPTM*
HP LaserJet series I^TM
HP LaserJet PlusTM
HP LaserJet 500^TM
HP LaserJetTM
HP LaserJet series IIITM
HP LaserJet IIPTM
HP LaserJet IIP PlusTM
HP LaserJet series IFM
HP LaserJet PlusTM
HP LaserJet 500^TM
HP LaserJetTM
SPL (Shared Printer Language)
PAGE SIZE (FORMAT) 86
COPIES (COPIES). 86
ORIENT. (ORIENT.). 87
FONT (FONT) 87
STATUS SHEET (FEUILLE ETAT) 87
FONT SAMPLE (LISTE FONTE) 88
SUB CONFIG. (SOUS CONFIGURATION) 88
SYSTEM CONFIG. (CONFIG. SYSTEME) 88
EMULATION (EMULATION). 95
INTERFACE (INTERFACE). 97
RX-BUFFER SIZE (MEMOIRE TAMPON). 101
USER (MODE) 103
CH TIMEOUT 105
AUTO CONT. 106
LANG. 106
DENSITY (DENSITE). 107
TONER. 107
VERSION (VERSION) 108
PAGE COUNTER (NOMBRE PAGES). 109
STANDBY (ATTENTE). 109
RITech. 109
RIT (Resolution Improvement Technology). 110
Emulation Switch (ES). 114
Sommaire des commandes Epson Job Control Language. 114
SUB CONFIG. (SOUS CONFIGURATION)
EMULATION (EMULATION)
SUB CONFIG. (SOUS CONFIGURATION)
EMULATION (EMULATION)
INTERFACE (INTERFACE)
executive<CR>[<LF>]
serverdict<SP>begin<SP>0<SP>exitserver<CR>[<LF>]
executive<CR>[<LF>]
statusdict<SP>begin<CR>[<LF>]
5<SP>setsoftwareiomode<CR>[<LF>]
^D
(caracteres ASCII) [13] 10
Hexadecimal: 40 45 4A 4C 20 45 4E 54
45 52 20 4C 41 4E 47 55
41 47 45 [20] 3D [20]
(caracteres ASCII) [0D] 0A
Le calculé est un excellent tool for the development of machine learning algorithms. It is used to develop machine learning models, particularly in machine learning applications. It is also used in machine learning and machine vision applications. Le calculé est un excellent tool for the development of machine learning algorithms. It is used to develop machine learning models, particularly in machine learning applications.
ADD MEMORY FOR CH x [E] (AJOUTER MEMOIRE CH)
CARD MEMORY OVERFLOW [E] (DEPASSEMENT MEM CART)
ILLEGAL CARD #X [e] (CARTE INCOMPATIBLE)
INITIALIZE (INITIALISATION) [E]
INSUFF. MEMORY [E] (PAS ASSEZ DE MEMOIRE)
INVALID ASSIGN [E] (MAUVAISE ASSIGNATION)
NEW CARTRIDGE? [S] (NOUVELLE CARTOUCHE)
PAGE BUFFERFULL[E] (BUFFERPAGEPLEIN)
PRINTING [S] (IMPRIME)
PRINT PAUSED X/X [S] (ARRET IMPRESS)
REMOVE CARD [E] (ENLEVER CARTE)
SAVE MEMORY OVERFLOW [E] (PAS ASSEZ MEM MACRO)
SET FULL PRINT [E] (REGLER FULL PRINT)
WARMING UP [S] (PRECHAUFFE)
REMOVE CARD (ENLEVER CARTE)
CARD MEMORY OVERFLOW (DEPASSEMENT MEM CARTE)
Altitude: 2500 metres maximum
SUB CONFIG. (SOUS CONFIGURATION)
Epson Roman T italique
Epson Roman T gras italique
Epson Sans serif U
Epson Sans serif U grayscale
Epson Sans serif U italique
Epson Sans serif U grayscale italique
Epson Sans serif U normal condensé
Epson Sans serif U condense gras
Epson Sans serif U normal condense italique
Epson Sans serif U condensé gras italique
ITC Zapf Dingbats
Stick
Jeux de caractères
ITC Zapf Dingbats Series 200
ITC Zapf Dingbats Series 300
Math 7
ESC(10L
ESC(11L
ESC(12L
ESC(13L
ESC(0M
ESC)10L
ESC)11L
ESC)12L
ESC)13L
ESC)0M
| Tech-7 | ESC(0M | ESC)0M |
| PS Math | ESC(5M | ESC)5M |
| Ventura Maths | ESC(6M | ESC)6M |
| Math 8 | ESC(8M | ESC)8M |
| ECMA-94 Latin 1 (ISO 8859/1) | ESC(ON | ESC)0N |
| ECMA-94 Latin 2 (ISO 8859/2) | ESC(2N | ESC)2N |
| ECMA-128 Latin 5 (ISO 8859/9) | ESC(5N | ESS)5N |
| ECMA-113/88 Latin/Cyrillic | ESC(10N | ESC)10N |
| (ISO 8859/5.2) | ||
| OCR A | ESC(0O | ESC)0O |
| OCR B | ESC(1O | ESC)1O |
| OCR M | ESC(2O | ESC)2O |
| APL (Typewriter) | ESC(0P | ESC)0P |
| APL (Bit paired) | ESC(1P | ESC)1P |
| Math-8a | ESC(0Q | ESC)0Q |
| Math-8b | ESC(1Q | ESC)1Q |
| Pi Font-a | ESC(2Q | ESC)2Q |
| OCR-B Etendu | ESC(3Q | ESC)3Q |
| PC LINE | ESC(4Q | ESC)4Q |
| Cyrillique ASCII | ESC(0R | ESC)0R |
| (ECMA-113/96, ISO 8859/5) | ||
| Cyrillique | ESC(1R | ESC)1R |
| PC Cyrillique | ESC(3R | ESC)3R |
| ISO 11 : Noms Suédos | ESC(0S | ESC)0S |
| HP Espagnol | ESC(1S | ESC)1S |
| ISO 17 : Espagnol | ESC(2S | ESC)2S |
| ISO 10 : Suédos | ESC(3S | ESC)3S |
| ISO 16 : Portugais | ESC(4S | ESC)4S |
| ISO 84 : Portugais IBM | ESC(5S | ESC)5S |
| ISO 85 : Espagnol | ESC(6S | ESC)6S |
| HP Espagnol européen | ESC(7S | ESC)7S |
| HP Espagnol sud américain | ESC(8S | ESC)8S |
| HP-GL téléchargee | ESC(16S | ESC)16S |
| HP-GL Drafting | ESC(17S | ESC)17S |
| HP-GL Symboles spéciaux | ESC(18S | ESC)18S |
| HP Thai 8 | ESC(0T | ESC)0T |
| HP Turc 8 | ESC(8T | ESC)8T |
| ISO 6 : ASCII | ESC(0U | ESC)0U |
Legal
ISO 2:IRV
HP HPL Language Set
OEM-1
Roman-8
Windows
ESC(1U
ESC(2U
ESC(5U
ESC(7U
ESC(8U
ESC(9U
ESC)1U
ESC)2U
ESC)5U
ESC)7U
ESC)8U
ESC)9U
| IBM US ou PC-8 | ESC(10U | ESC)10U |
| PC-Danemark/Norvège | ESC(11U | ESC)11U |
| PC-850) | ESC(12U | ESC)12U |
| PC-852 | ESC(17U | ESC)17U |
| Arabe | ESC(0V | ESC)0V |
| Arabe-8 | ESC(8V | ESC)8V |
| Code barre 3 à 9 | ESC(0Y | ESC)0Y |
| Code barre 2 à 5 industriel | ESC(1Y | ESC)1Y |
| Code barre 2 à 5 matrice | ESC(2Y | ESC)2Y |
| Code barre 2 à 5 entrelacé | ESC(4Y | ESC)4Y |
| Code barre CODABAR | ESC(5Y | ESC)5Y |
| Code barre MSI/Plessey | ESC(6Y | ESC)6Y |
| Code barre code 11 | ESC(7Y | ESC)7Y |
| Code Barre EAN/UPC | ESC(8Y | ESC)8Y |
| Espacement | ESC(s#P | ESC)s#P |
| Pas (cpi) | ESC(s#H | ESC)s#H |
| Taille en points | ESC(s#V | ESC)s#V |
| Type | ESC(s#S | ESC)s#S |
| Graissage | ESC(s#B) | ESC)s#B |
| Style | ESC(s#T | ESC)s#T |
| Pas de police | ESC&1#P |
Dimension horizontal (points)
Dimension vertical (points)
ESC^* c#B
Dimension horizontal (decipoints)
ESC*c#H
Dimension vertical (decipoints)
ESC*c#V
SUB CONFIG. (SOUS CONFIGURATION)
SYSTEM CONFIG.* (CONFIG. SYSTEME)
SUB CONFIG. (SOUS CONFIGURATION) 278
SUB CONFIG. (SOUS CONFIGURATION)
| Menu/sous-menu | Options disponibles |
| USA France German UK Denmark Sweden Italy Spain 1 Japan Norway Denmark2 Spain2 LatinA |
P: Portrait, L: Paysage
ESC f Saut vertical/parallele
VT Tabulation verticale
SUB CONFIG. (SOUS CONFIGURATION)
n = 2 Courrier n = 15 CODE 39
n = 3 Prestige n = 16 EAN/UPC
n = 4 Script n = 17 Symbols
n = 5 OCR-B n = 18 Roman P
n = 6 Modern n = 19 ITC Avant
Garde Gothic Book
n = 7 Gothique n = 20 ITC Bookman
n = 8 EDP n = 21 Sans Sérif HN
n = 9 Gothique Kanji n = 22 ITC Zapf
Chancery
n = 10 Kanji n = 23 ITC Zapf
Dingbats
n = 11 Letter Gothique n = 24 Roman CS
Programmed application
Emulation Switch. 116
Encre
nettoyage 128
ENLEVER CARTE. 168
ENQ/ACK. 102
Enveloppes. 58
Epson GL
carte 176
Epson GL/2. 52
Epson Job Control Language. 115
ERR DEMARRAGE 169
ERREUR FORMAT PAPIER. 166
ES 116
Etiquettes 57
EXIT 34
F
FACTORY RESET. 35/165
FEATURE PRINT. 39/76/97
FEED 33/35
FEED JAM 135/165
Feuille d'etat. 37
impression. 41
FEUILLE ETAT 76/89
Fichier d'essai
impression 53
Films de tirage 57
FIN COPIES 164
FIN PAPIER 166
RITech. 77/111
ROM Check. 168
RX-BUFFER SIZE 77/103
S
SAUVE MACRO. 94
Sauvegarde
parametre 84
SAVE MACRO. 94
SAVE MEMORY OVERFLOW. 168
Sélection
:MULATION EMULATION)
HP LaserJet IIP PlusTM
HP LaserJet IIPTM*
HP LaserJet series ITM
HP LaserJet PlusTM
HP LaserJet 500^TM
HP LaserJetTM
HP LaserJet IIP PlusTM
HP LaserJet series ITM
HP LaserJet PlusTM
HP LaserJet 500TM
HP LaserJetTM
All rights reserved. No part of this publication may be reproduced, stored in a retrieval system, or transmitted in any form or by any means, electronic, mechanical, photocopying, recording, or otherwise, without the prior written permission of Seiko Epson Corporation. No patent liability is assumed with respect to the use of the information contained herein. Neither is any liability assumed for damages resulting from the use of the information contained herein.
Neither Seiko Epson Corporation nor its affiliates shall be liable to the purchaser of this product or third parties for damages, losses, costs, or expenses incurred by purchaser or third parties as a result of: accident, misuse, or abuse of this product or unauthorized modifications, repairs, or alterations to this product.
Seiko Epson Corporation and its affiliates shall not be liable against any damages or problems arising from the use of any options or any consumable products other than those designated as Original EPSON Products or EPSON Approved Products by Seiko Epson Corporation.
EPSON is a registered trademark and EpsonScript is a trademark of Seiko
Epson Corporation.
ActionLaser is a trademark of Epson America, Inc.
EPSON Connection is a service mark of Epson America, Inc.
Ariel and Times New Roman are registered trademarks of the Monotype Corporation PLC.
Bitstream and Fontware are registered trademarks and Swiss, Dutch, and FaceLift are trademarks of Bitstream Inc.
CG Times is a trademark of Miles, Inc.
Hewlett-Packard, PCL, HP, HP-GL/2, and LaserJet are registered trademarks and LaserJet-III, LaserJet 4, LaserJet 4L, and PJL are trademarks of Hewlett-Packard Company.
IBM is a registered trademark of International Business Machines, Inc.
Macintosh, TrueType, and AppleTalk are registered trademarks of Apple Computer, Inc.
Microsoft and MS-DOS are registered trademarks and Windows is a trademark of Microsoft Corporation.
PostScript is a trademark of Adobe Systems Incorporated.
Times and Univers are registered trademarks of Linotype AG and/or its subsidiaries.
General Notice: Other product names used herein are for identification purposes only and may be trademarks of their respective companies. EPSON disclaims any and all rights in those marks.
Copyright © 1994 by Seiko Epson Corporation, Nagano, Japan.
FCC COMPLIANCE STATEMENT FOR AMERICAN USERS
This equipment has been tested and found to comply with the limits for a class B digital device, pursuant to Part 15 of the FCC Rules. These limits are designed to provide reasonable protection against harmful interference in a residential installation. This equipment generates, uses and can radiate radio frequency energy and, if not installed and used in accordance with the instructions, may cause harmful interference to radio or television reception. However, there is no guarantee that interference will not occur in a particular installation. If this equipment does cause interference to radio and television reception, which can be determined by turning the equipment off and on, the user is encouraged to try to correct the interference by one or more of the following measures:
Reorient or relocate the receiving antenna
o Increase the separation between the equipment and receiver
o Connect the equipment into an outlet on a circuit different from that to which the receiver is connected
o Consult the dealer or an experienced radio/TV technician for help.
WARNING
The connection of a non-shielded equipment interface cable to this equipment will invalidate the FCC Certification of this device and may cause interference levels which exceed the limits established by the FCC for this equipment. It is the responsibility of the user to obtain and use a shielded equipment interface cable with this device. If this equipment has more than one interface connector, do not leave cables connected to unused interfaces.
Changes or modifications not expressly approved by Epson America, Inc., could void the user's authority to operate the equipment.
FOR CANADIAN USERS
This digital apparatus does not exceed the Class B limits for radio noise emissions from digital apparatus as set out in the radio interference regulations of the Canadian Department of Communications.
Important Safety Instructions 14
Epson Product Guarantee in UK 16
UK ON-SITE COVER 17
Warnings, Cautions, and Notes 20
Chapter 1 Using Your Printer
Controlling the Printer 1-2
Control Panel 1-3
Control panel overview 1-3
Display 1-4
Indicator lights 1-4
Buttons 1-5
Printer Driver 1-7
For DOS users 1-8
Using other emulations 1-8
Remote Control Panel Utility 1-9
EPSON LQ and FX Emulation Modes 1-10
Before printing in the LQ or FX emulation mode 1-11
EPSON GL/2 Mode 1-12
Before printing in the EPSON GL/2 mode 1-13
Intelligent Emulation Switch (IES) 1-13
Paper Handling 1-14
Loading paper 1-14
Setting the paper tray's paper size 1-15
Choosing paper 1-16
Printing on special paper 1-17
Chapter 2 SelectType
SelectType Overview 2-2
When to use SelectType 2-2
Using SelectType 2-6
Control panel 2-6
Display 2-7
Buttons 2-7
Steps for using SelectType 2-8
Level 1 Menus 2-10
Level 2 Menus 2-20
SelectType Options in LQ/FX Emulation Mode 2-30
Chapter 3 Printer Driver Configuration
Printer Driver Overview 3-2
Using the Printer Driver 3-2
Opening the printer driver. 3-3
Changing settings 3-4
Restoring prior settings 3-4
Getting help from the driver 3-5
Closing the printer driver 3-6
Before Printing for the First Time 3-6
Making basic printer driver settings 3-6
Main Window 3-7
SelectType Window 3-10
Paper Sizes Window 3-14
Adding a new size to the Paper Size list 3-16
Print Mode Window 3-17
Adding a new print mode to the Print Mode list 3-19
Font Manager Window 3-21
Adding fonts 3-25
Deleting fonts 3-27
Changing a font name 3-28
Copying and moving fonts to another printer port 3-28
Overlay & Softtray Manager Window 3-30
Creating an overlay 3-31
Creating a softtray 3-32
Printer Settings Window 3-33
Chapter 4 Remote Control Panel Utility
Remote Control Panel Utility Overview 4-2
When to use the Remote Control Panel utility 4-2
Bringing up the Remote Control Panel 4-3
Printer Mode Window 4-4
LaserJet 4L emulation mode/EpsonScript Level 2 mode window 4-4
FX mode window 4-5
LQ mode window 4-5
Page Setup Options 4-6
Type Options 4-8
Printer Setup Options 4-10
Other Options 4-13
More Options 4-15
Chapter 5 Fonts
Printer Driver Overview 5-2
Font Overview 5-2
Tips on Choosing a Font 5-4
Printer and Screen Fonts 5-4
When the printer and screen fonts don't match 5-5
Available Fonts 5-6
Adding More Fonts 5-7
Downloading soft fonts 5-7
Selecting Fonts 5-8
Font Samples 5-9
CourierwC 5-9
Dutch 801 SWC 5-9
Dutch 801 SWM 5-9
Swiss 742 SWC 5-9
Swiss 721 SWM. 5-10
Symbol Set SWA 5-10
More Wingbats SWM. 5-10
Courier 10 cpi (Bitmap) 5-11
Courier 12 cpi (Bitmap) 5-11
Line Printer 16.66 cpi (Bitmap) 5-11
Chapter 6 Troubleshooting and Maintenance
Introduction 6-2
General Problems 6-2
Print Quality Problems 6-9
Option Problems 6-13
Status and Error Messages 6-15
DataDumpMode 6-22
Optimizing Print Quality 6-22
Adjusting the RITech setting 6-22
Adjusting print density 6-25
Resetting and Initializing the Printer 6-26
Reset. 6-26
Initialize 6-26
Factory reset 6-27
Cleaning the Printer 6-27
Removing spilled toner 6-29
Cleaning the printer case 6-29
Replacing the Imaging Cartridge 6-30
Appendix A Technical Specifications
Paper A-2
Printer A-3
General A-3
Environmental A-4
Mechanical . A-4
Electrical A-5
Interface A-5
Options and Consumables A-8
Lower paper cassette (C81230]) . A-8
Face-up output tray (C81231]) A-8
Imaging cartridge (S051011) A-9
Appendix B Symbol Sets
Introduction to Symbol Sets B-2
During LJ4L Emulation Mode B-3
International set for ISO sets B-17
During EPSON LQ or FX Modes B-18
International character sets B-20
Appendix C Command Summary
Supported Control Languages C-2
LaserJet 4L (LJ4L) Emulation Commands C-2
GL/2 context commands. C-6
LQ and FX Emulation Commands C-9
PJL Mode C-12
EJL Mode C-13
Appendix D Option Installation
Installing the Options D-2
Lower Paper Cassette D-3
Installing the lower paper cassette D-3
Loading paper into the lower paper cassette D-5
Face-up Output Tray D-7
Memory Module D-8
Installing the memory module D-9
Removing a SIMM D-15
ROM Module D-15
Optional Interface Cards D-16
Installing an interface D-17
Using the serial interface cards . D-19
Sharing the printer D-20
Optional Cartridge D-20
Installing a cartridge D-21
Removing a cartridge D-21
Availablefontcartridges D-22
Glossary
Index
Getting Started
The EPSON® EPL-5200+ printer combines high performance and reliability with a wide range of features.
To get started with your laser printer, please:
o Read the safety information, laser printer precautions, and important safety instructions in this introduction.
o Use your Getting Ready! guide to set up and test your new printer.
o Refer to this guide for detailed information about your printer.
About This Guide
This guide contains information for using and operating your EPL-5200+ printer. For information about installing and setting up the printer, see the Getting Ready! guide.
Chapter 1, "Using Your Printer," lists the printer's features and describes how to control the printer. This chapter also contains information on the EPSON GL/2, LQ, and FX emulation modes, and loading paper and setting up the printer for the type and size of paper that is loaded.
Chapter 2, "SelectType" contains detailed information on the settings you can make in SelectType. Read this chapter if you are not able to modify a printer setting from your software.
Chapter 3, "Printer Driver Configuration," describes the features of the Windows printer driver packed with your printer. If you need information on how to install the driver, see the Getting Ready! guide.
Chapter 4, "Remote Control Panel Utility," describes the printer settings that can be modified by using the Remote Control Panel utility. Read this chapter if you are not able to modify a printer setting from your software.
Chapter 5, "Fonts," provides basic information about fonts and tells you how to select and add fonts.
Chapter 6, "Troubleshooting and Maintenance," gives helpful information for what to do if you encounter a printer error and provides instructions on how to maintain your printer.
Appendix A, "Technical Specifications," contains the technical specifications about the printer.
Appendix B, "Symbol Sets," lists the symbol sets available in each emulation mode with the tables of the characters for each set.
Appendix C, "Command Summary," lists the commands that can be embedded in print jobs to control the printer. This appendix is intended for advanced users only.
Appendix D, "Option Installation," gives step-by-step instructions for installing the options available for the printer.
About Your Printer
The EPL-5200+ is the latest in EPSON's advanced line of laser printers. It emulates the Hewlett-Packard LaserJet 4L (LJ4L) printer, allowing you to print using the wide variety of software programs that support HP LaserJet printers.
The printer gives you the ability to produce good-looking documents and publications. The printer's 300-dpi resolution is enhanced by the EPSON Resolution Improvement Technology (RITech), which smoothes the jaggy edges of diagonal lines in both text and graphics. This gives your document a clean, crisp look that contributes to a professional appearance.
The printer is easy to install and use. You simply set up the printer and connect it to your computer as described in the Getting Ready! guide. To use the printer, just bring up your software program and use the Print menu option under your File menu. The Print option also contains the settings that allow you to control the print job and the printer itself.
Features
The printer comes equipped with a built-in bidirectional parallel interface and with 1MB of memory, which can be expanded up to 5MB (see Appendix D). You may be able to install an additional Type-B interface, including a serial, coax, or twinax interface. See Appendix D for more information.
The printer comes with a full set of features that contributes to ease of use and consistent, high-quality output. The main features are described below.
Wide variety of fonts
The printer comes with a selection of 22 scalable fonts, including 14 TrueType fonts and seven bitmap fonts, to provide you with the fonts you need to create professional-looking documents and publications. The fonts included with the printer are listed in Chapter 5.
Toner Save Mode
To reduce the amount of toner used in printing documents, you can print draft publications using the Toner Save Mode. See Chapter 4 for more information.
Printer driver
The Windows printer driver packed with your printer enables you to easily print your documents using the best settings possible. See Chapter 3 for more information.
Remote Control Panel utility
The Remote Control Panel utility allows you to easily specify printer settings from your computer. For example, you can change the print density, adjust the RITech setting, or change the symbol set. The Remote Control Panel is described in Chapter 4.
Energy Star compliant
Your EPSON printer complies with the U.S. Environmental Protection Agency's Energy

Star program, which promotes the manufacture of energy-efficient printers, computers, and monitors. The printer conserves electricity by automatically entering a low-power, standby mode when not in use for fifteen minutes.
The EPA estimates that if all desktop computers, printers, and other peripheral devices met Energy Star standards, energy cost savings would exceed $1 billion annually and carbon dioxide emissions would be reduced by 20 million tons.
All of EPSON's dot matrix and ink jet printers conform to Energy Star standards, as do all ActionLaser printers produced after June, 1993.
Note:
The Energy Star emblem does not represent EPA endorsement of any product or service.
Safety Information
Laser safety
This printer is certified as a Class 1 laser product under the U.S.
Department of Health and Human Services (DHHS) Radiation
Performance Standard according to the Radiation Control for Health and Safety Act of 1968. This means that the printer does not produce hazardous laser radiation.
Since radiation emitted by the laser is completely confined within protective housings and external covers, the laser beam cannot escape from the machine during any phase of user operation.
For European users
United Kingdom
The EPL-5200+ is a page printer which utilizes a semiconductor laser.
There is no possibility of danger from the laser, provided the printer is operated according to the instructions in the guides provided.
Since radiation emitted by the laser is completely confined within protective housings, the laser beam cannot escape from the machine during any phase of user operation.
W Warning: Use of controls or adjustments or performance of procedures other than those specified herein, may result in hazardous radiation exposure.
This is a semiconductor laser. The maximum power of the laser diode is 3.025 × 10^-4 ~W and the wavelength is 780 / 20 ~nm .
Denmark
The Center for Devices and Radiological Health (CDRH) of the U.S. Food and Drug Administration implemented regulations for laser products on August 2, 1976. Compliance is mandatory for products marketed in the United States. The label shown below indicates compliance with the CDRH regulations and must be attached to laser products marketed in the United States.
This laser product conforms to the applicable
requirement of 21 CFR
Chapter I, subchapter J.
SEIKO EPSON CORP.
Hirooka Office
80 Hirooka, Shiojiri-shi, Nagano-ken,
Japan
MANUFACTURED:
LasersafetyLabels
W Warning: Use of controls, adjustments, or performance of procedures other than those specified in this guide may result in hazardous radiation exposure.
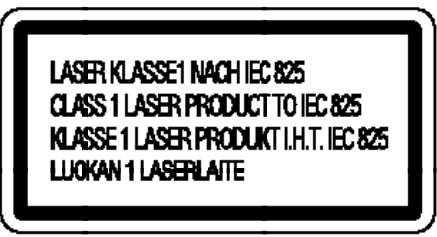
Your printer is a Class 1 laser product as defined in IEC 825 specifications. The label shown below is attached in countries where required.
Internal laser radiation
Max. Radiation Power 3.025 .)10^-4W
Wave Length 780 / 20 ~nm
This is a Class IIIb Laser Diode Assembly that has an invisible laser beam. The printer head unit is NOT A FIELD SERVICE ITEM. Therefore, the printer head unit should not be opened under any circumstance.
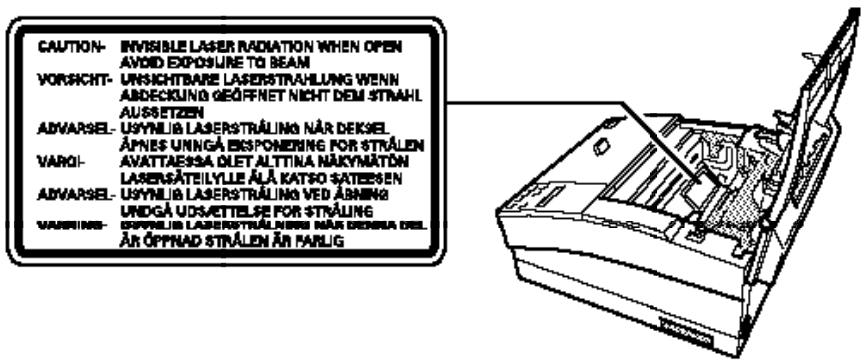
For Denmark, Finland, Sweden, and Norway users
An additional laser warning label is affixed to the inside of the printer, as shown below.
Ozone safety
Ozone emission
Ozone gas is generated by laser printers as a by-product of the printing process. Ozone is produced only when the printer is printing.
Ozone exposure limit
The recommended exposure limit for ozone is 0.1 parts per million (ppm) expressed as an average time-weighted concentration over an eight (8) hour period.
The EPL-5200+ laser printer generates < 0.01 ppm for 8 hours continuous printing when considering a closed room of approximately 1000cu ft ( 8' ) 10^ ) 12^ ).
Minimize the risk
To minimize the risk of exposure to ozone it is recommended that the following conditions be avoided:
o Use of multiple laser printers in a confined area (see above)
o Operation in conditions of extremely low humidity
o Poor room ventilation
o Long continuous printing together with any of the above.
Printer location
The printer should be located so that exhaust gases and heat generated are:
o Not blown directly into the user's face
o Whenever possible, vented directly out of the building.
Laser Printer Precautions
This printer uses laser technology. The following list of precautions applies whenever you open the printer cover.
Even if you are familiar with other types of printers, be sure to follow these precautions carefully to ensure safe, efficient operation.
o Be careful not to touch the fuser, which is marked CAUTION HOT SURFACE. If the printer has been in use, the fuser can be very hot.
o Avoid touching the components inside the printer unless instructed to do so in this guide.
o Never force the printer's components into place. Although the printer is designed to be sturdy, rough handling can damage it.
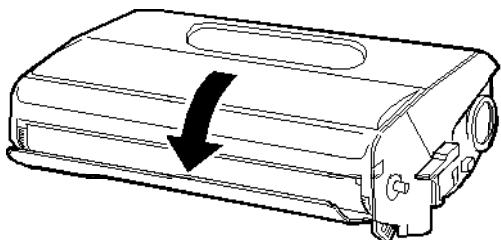
The imaging cartridge is the part of the printer mechanism that forms the image and transfers it onto the paper. Keep the following guidelines in mind whenever you handle the imaging cartridge:
0 When removing the imaging cartridge, avoid exposing it to room light any longer than necessary. The imaging cartridge contains a light-sensitive drum, which is the green cylinder that can be seen through the openings of the cartridge. Exposure to light can damage the drum, causing dark or light areas to appear on the printed page and reducing the service life of the drum. If you need to keep the cartridge out of the printer for long periods, cover it with a cloth.
o Avoid pressing on the top of the imaging cartridge. Pressing directly on the cartridge may cause toner to spill into the printer. If there is a spill, see Chapter 6 for cleaning instructions.
o Be sure not to scratch the surface of the drum. When you remove the imaging cartridge from the printer, always set the cartridge on a clean, smooth surface. Also, avoid touching the drum, since oils from your skin can permanently damage its surface and may affect print quality.
o Do not turn the cartridge upside down or stand it on its sides.
0 When handling the cartridge, always set it on a clean, smooth surface.
o Do not attempt to modify or take apart the cartridge. It cannot be refilled.
Try not to touch the toner and avoid all contact with your eyes.
o Do not use a cartridge for at least one hour after moving it from a cool to a warm environment.
To get the best print quality from your imaging cartridge, do not store the cartridge in locations that are subject to direct sunlight, dust, salty air, or corrosive gasses (such as ammonia). Avoid locations subject to high temperatures or humidity or abrupt changes in temperature or humidity. Also, be sure to keep the cartridge out of the reach of children.
Hinweis:
Important Safety Instructions
Read all of these instructions before operating your printer.
- Follow all warnings and instructions marked on the printer.
- Unplug this printer from the wall outlet before cleaning. Use a damp cloth for cleaning and do not use liquid or aerosol cleaners.
- Do not use this printer near water.
- Do not place the printer on an unstable cart, stand, or table.
- Slots and openings in the cabinet and the back or bottom are provided for ventilation. Do not block or cover them. Do not put the printer on a bed, sofa, rug, or other similar surface or in a built-in installation unless proper ventilation is provided.
- Use the type of power source indicated on the marking label. If you are not sure of the type of power available, consult your dealer or local power company.
- If you are unable to insert the plug into the outlet, contact your electrician to replace your obsolete outlet.
- Do not put your printer where the cord will be walked on.
- If you use an extension cord, make sure that the total of the ampere ratings on the products plugged into the extension cord does not exceed the extension cord ampere rating. Also, make sure that the total of all products plugged into the wall outlet does not exceed 15 amperes.
-
Never push objects of any kind through cabinet slots as they may touch dangerous voltage points or short out parts that could result in a risk of fire or electric shock. Never spill liquid of any kind on the printer.
-
Except as specifically explained in this guide, do not attempt to service this product yourself. Opening or removing those covers that are marked "Do Not Remove" may expose you to dangerous voltage points or other risks. Refer all servicing in those compartments to service personnel.
-
Unplug this printer from the wall outlet and refer servicing to qualified service personnel under the following conditions:
A. When the power cord or plug is damaged or frayed.
B. If liquid has been spilled into it.
C. If it has been exposed to rain or water.
D. If it does not operate normally when the operating instructions are followed. Adjust only those controls that are covered by the operating instructions since improper adjustment of other controls may result in damage and will often require extensive work by a qualified technician to restore the product to normal operation.
E. If it has been dropped or the cabinet has been damaged.
F. If it exhibits a distinct change in performance, indicating a need for service.
Epson Product Guarantee in UK
Under the law, goods sold must comply with their description and must be of merchantable quality and fit for their purpose or correspond with any sample.
This guarantee does not affect the seller's legal obligation or the rights of the consumer in the 'consumer transactions' under any Statute, including Sections 12 to 15 of the Sale of Goods Act, 1979.
All Epson products, other than OEM products, are fully guaranteed against faulty operation or performance for a period of ONE YEAR from date of purchase by the user of the product.
All claims under this guarantee MUST be supported by evidence of purchase, normally the bill of sale invoice, and it is the responsibility of the claimant to furnish such proof.
Epson (UK) Limited does not issue or operate any form of guarantee registration card.
Claims are made by the user returning the product to the supplier from where it was purchased or, if this is impractical, to any Epson supplier who also handles the same product. In the event of any difficulty, users are requested to contact the Service Co-ordinator Manager at Epson (UK) Limited.
Epson (UK) Limited, or Epson Appointed Distributors, will at their discretion repair or replace part or all of the product to provide, in their judgment, a satisfactory performance of the product consistent with its age and apparent usage.
This guarantee covers the cost of both the parts and labor required to correct any malfunction of the equipment, but specifically excludes: wear and tear, consumables, physical damage due to incorrect use or misuse and damage or faulty operation due to unauthorized and inexpert repair.
The guarantee is restricted to the performance of the product alone, and Epson (UK) Limited does not accept responsibility for any consequential loss or damage, nor claimed or implied performance, when the product is used in any combination with other equipment or program software.
Neither Seiko Epson Corporation nor its affiliates shall be liable to the purchaser of this product or third party as a result of accident, misuse, or abuse of this product, or failure to strictly comply with Seiko Epson Corporation's operating and maintenance instructions.
Product guarantee may be invalidated as a result of excessive or inappropriate use, in adverse environment or in conditions outside the specifications or if the product has been subjected to unapproved modifications. The guarantee does not cover visits to the user's premises or the repair or commissioning of the product on site.
Use of options
Epson (UK) Limited shall not be liable against any damages or problems arising from the use of any options or consumable products other than those designated as Original EPSON Products or EPSON Approved Products by Epson (UK) Limited.
UK ON-SITE COVER
In addition to the standard Epson guarantee above, Epson (UK) Limited provides additional benefits to users of this product within the UK Mainland.
Epson provides two levels of support for customers who have difficulty with their machine. There is a laser help desk supported by qualified engineers, plus the additional security of on-site repair, should it be necessary.
If, within the standard guarantee period of 12 months from purchase, your printer fails to operate correctly you should telephone the Epson Laser Helpdesk on 0442 227478. Epson's technical support staff will discuss with you any problems you are having and advise you on the correct operation of the printer. If it appears to Epson that a problem is due to a faulty consumable item, arrangements will be made to send you, by post, a replacement consumable. If it appears to Epson that the problem is due to a fault in some other part of the printer, arrangements will be made for an engineer to call and inspect your printer on-site (within UK Mainland).
Where possible the engineer will repair the printer on-site. This will not always be possible and your printer may have to be taken by the engineer for a workshop repair. In such cases you will be provided with another Epson laser printer on loan while your printer is being repaired. You will be required to show, to the engineer visiting you, proof of purchase of the printer to be repaired, showing the printer's serial number and date of purchase. If this cannot be provided on request,
a charge may be made for the engineer's visit.
Any work carried out by the engineer where proof of purchase is not provided, or if the problem is due to a reason outside the scope of the Epson product guarantee, will be at your own expense. The engineer may require payment at the time the work is done.
Epson (UK) Limited.
Safety information
Warning: This appliance must be earthed. Refer to rating plate for voltage, and check that the appliance voltage corresponds to the supply voltage.
Important: The wires in the mains lead fitted to this appliance are coloured in accordance with the following code:
Green and yellow—Earth
Blue—Neutral
Brown—Live
If you need to fit a plug:
As the colours of the mains lead of this appliance may not match any coloured markings used to identify the terminals in a plug, please proceed as follows:
o The green and yellow wire must be connected to the terminal in the plug which is marked with the letter E or the Earth symbol (G).
o The blue wire must be connected to the terminal in the plug marked with the letter N.
o The brown wire must be connected to the terminal in the plug marked with the letter L.
If damage occurs to the plug, replace the cord set or consult a qualified electrician.
Replace fuses only with a fuse of the correct size and rating.
Warnings, Cautions, and Notes
Warnings must be followed carefully to avoid bodily injury.
Ccautions must be observed to avoid damage to your equipment.
Notes contain important information and useful tips on the operation of your printer.
Chapter 1
Using Your Printer
Controlling the Printer 1-2
Control Panel 1-3
Control panel overview 1-3
Display 1-4
Indicator lights 1-4
Buttons 1-5
Printer Driver 1-7
For DOS users 1-8
Using other emulations 1-8
Remote Control Panel Utility 1-9
EPSON LQ and FX Emulation Modes 1-10
Before printing in the LQ or FX emulation mode. 1-11
EPSON GL/2 Mode 1-12
Before printing in the EPSON GL/2 mode 1-13
Intelligent Emulation Switch (IES) 1-13
Paper Handling 1-14
Loading paper 1-14
Setting the paper tray's paper size 1-15
Choosing paper 1-16
Printing on special paper 1-17
Controlling the Printer
There are several ways to control the settings of your printer:
The Print menu in your software program
The Remote Control Panel utility
o The printer's control panel buttons
o With SelectType
You almost always use the Print menu of your software to control the printer. The Print menu allows you to control the most commonly adjusted parameters, including the number of copies, resolution, and orientation.
Some printer settings, such as the Toner Save Mode and RITech (Resolution Improvement Technology), cannot be changed from your software program. Also, a few software programs do not allow you to control printer settings. In these cases, you can use the Remote Control Panel utility or SelectType to adjust the printer settings. See "Remote Control Panel Utility," for when to use the Remote Control Panel.
The printer's control panel buttons allow you to enter SelcType, turn Toner Save Mode on or off, and recover from errors. For an explanation of changing settings with the control panel, see the next section "Control Panel."
Note:
If you are using Microsoft® Windows™ you can also control the printer through the Printers icon in the Control Panel of Windows. Double-clicking on the Printers icon brings up a dialog box that allows you to install and select the printer driver, change the printer's interface port, and control the printing of your files. Normally you need to use the Printers icon only when you first set up the printer. See your Windows manual for more information.
Control Panel
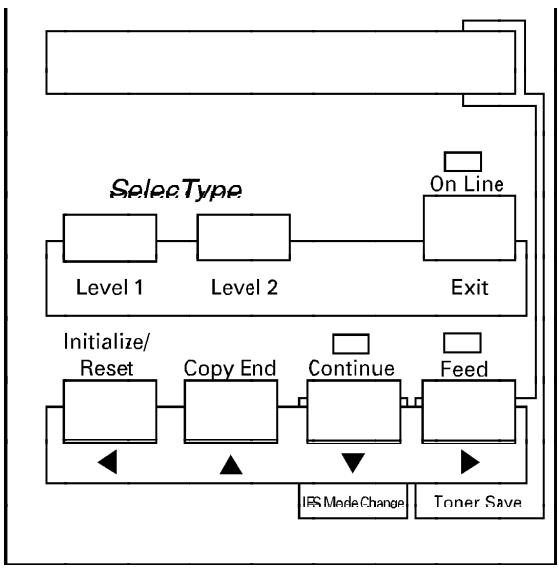
Control panel overview
The printer control panel gives you easy control over most common printer operations. The panel is made up of three elements: a liquid crystal display, indicator lights, and buttons. The display and indicator lights tell you the current status of the printer, and you use the buttons to select printer settings and functions. You can also see the main menus of SelectType on the top of the control panel.
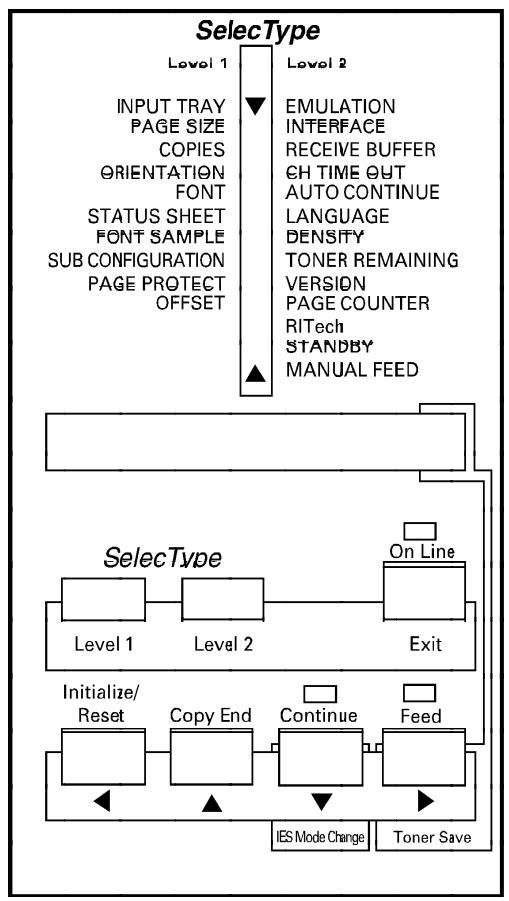
Display
The display shows the following:
o Status messages, such as WARMING UP, indicate the printer's current status.
o Error messages, such as PAPER OUT, identify maintenance procedures you must perform or error conditions you need to correct.
o SelectType options, such as EMULATION, allow you to control the printer mode, font selection, paper handling, and several other printer functions.
For a complete list of status and error messages, see Chapter 6. For information on SelectType, see Chapter 2.
Indicator lights
On Line On when the printer is on line, indicating the printer can receive and print data. When the printer is off line, this light is off. The light flashes as the system switches between on-line and off-line status.
Continue Flashes when an error is detected or a maintenance procedure must be performed. At the same time, an error or maintenance message appears on the display.
Flashes also in the manual feed mode.
Feed On when data is received and stored in the printer's buffer but not yet printed. Rapid flashing indicates the printer is receiving data from the computer. If the light flashes slowly, the printer is receiving data through an interface other than the currently selected interface.
Buttons
Level 1 Enters SelcType Level 1. For a complete description of SelcType, see Chapter 2.
Level 2 Enter SelcType Level 2. For a complete description of SelcType, see Chapter 2.
On Line Switches the printer between on-line and off-line status. When the printer is in the SelectType mode, this button is used to exit SelectType and return to the previous status, on line or off line.
Exit Exits SelcType
udlr Selects and sets the settings in SelcType mode.
Initialize Cancels some settings made with SelectType or software Reset commands. The settings canceled by this button depend on how long you press the button.
RESET—Hold down this button until RESET appears on the display panel. This function returns settings to those previously saved with SelecType. The printer finishes printing the page already in progress at the moment this button is pressed; however, all remaining data is discarded.
INITIALIZE—If you continue to hold down this button after RESET appears, INITIALIZE appears on the display and SelcType settings return to the settings in effect at power on. The received data may be cleared.
FACTORY RESET—When you hold down this button while you turn on the printer, FACTORY RESET appears on the display and all the SelectType settings return to the factory default settings.
Copy End Cancels the remaining copies during multi-copy printing. This button is effective only when the printer is off line.
Continue Enables the printer to resume printing after certain error or maintenance-required conditions. If the Continue light is flashing, read the corresponding status or error message on the display and correct the problem as described in Chapter 6, which has a complete list of status and error messages, then press this button.
IES Mode ChangSelects which of two emulation modes previously set with SelectType will start when the printer is turned on. Hold down this button until the asterisk (*) moves to the desired mode. This button is effective when READY or OFF LINE appears on the display. For more information on IES settings, see page 1-15.
Feed
Prints out the data in the printer's memory if you press this button while the Feed light is lit. If you are using more than one channel, you can print the data received by each channel.
When the printer is on line, pressing the Feed button switches the Toner Save Mode on and off. While the printer is in the Toner Save Mode, "T" is shown at the left side of the display.
Note:
Use the buttons shown below to perform the following:
o On Line Press to set the printer on line after you supply paper. (The printer is off line when paper is out.)
o Reset Press to stop printing or to clear remaining data.
o Feed Press to print out data in the printer's memory. (This button ejects the page even though the printer has not received a form feed command.)
Printer Driver
To take the maximum advantage of your printer, you need to set up the printer driver used by your software.
If you use Microsoft® Windows™ 3.1 or later, you can set up the driver for HP LaserJet 4L emulation with the driver included in the printer box. For instructions on installing the Windows driver, see "Setting up the driver" in the Getting Ready! guide.
If you use DOS or an emulation other than HP LaserJet 4L, you can use drivers other than the Windows driver that comes with your printer.
For DOS users
Since each program differs in its setup capabilities, there is no standard way to select the printer driver. See your software manual for information on how to select the printer.
Select the printer in the order listed below.
EPL-5200+
EPL-3000
EPL-5200
EPL-9000
HP LaserJet 4L
HP LaserJet 4
HP LaserJet IIISi
HP LaserJet III/IIIP/IIID
If you choose a printer other than the EPL-5200+, you may not be able to access some of the printer features (depending on the model you selected).
Using other emulations
If you use an emulation other than HP LaserJet 4L, you can select EPSON GL/2, LQ, or FX emulation mode. However, selecting these emulations requires the printer's emulation setting to be changed from its default.
Use the emulation mode indicated if you want to use drivers or print data already formatted for EPSON LQ or FX series printers.
For more information, see "EPSON LQ and FX Emulation Modes" later in this chapter.
Remote Control Panel Utility
The Remote Control Panel utility, which ships with the printer, allows you to adjust certain printer settings. Normally you do not need to use the Remote Control Panel utility because most printer settings contained on the utility can also be set using your software program.
Whenever you can, use your software program to change printer settings; not only is this method more convenient, but the printer settings in your software program override those of the Remote Control Panel.
The Remote Control Panel does contain some settings that are not accessible from your software program. These settings are assigned default values that should work for your printer in most situations.
However, if you need to, you can use the Remote Control Panel to do the following:
o Specify the size of paper loaded in the paper tray
Turn the Toner Save Mode on or off
Change the print density
o Turn the Standby mode on or off
o Specify the top and bottom offset values
o Change the emulation mode
See Chapter 4 for more information about the Remote Control Panel.
EPSON LQ and FX Emulation Modes
Your printer is designed to work best in its HP LaserJet 4L emulation mode, so you should use this mode whenever possible. However, your printer can also emulate an LQ or FX series printer, if necessary.
o LQmode
Emulates LQ series printers (ESC/P 24-pin), and can print data formatted for them.
o FX mode
Emulates FX series printers (ESC/P 9-pin), and can print data formatted for them.
You may want to use the LQ or FX mode in the following situations:
0 When the data you are printing must be shared with an EPSON LQ or FX series printer.
When you only have access to an LQ or FX series printer driver.
0 When you are using data formatted for an LQ or FX series printer and it is easier to print in the original format than reformat it for an HP LaserJet 4L.
Before printing in the LQ or FX emulation mode
You may need to change printer settings depending on your output needs. Always check the printer's settings to make sure they match the data you are trying to print. Before you switch the emulation mode, check the following items to avoid conflicts with the printer's settings:
Paper size: Printer's paper size setting
Paper type: Continuous or single sheet
Feed type: Bin 1 (for the standard feeder)
Orientation: Portrait or landscape
Top and bottom offset: 0 to 99mm
Printer driver:
For LQ mode: LQ-200
LQ-550/450
LQ-850
LQ-400
Other LQ printers (ESC/P 24-pin)
For FX mode: FX-870/1170
FX-850/1050
FX-800/1000
LX-100
LX-810/850
LX-800
Other FX or LX printers (ESC/P 9-pin)
If you need to configure the printer settings, switch the emulation; then change the settings using SelectType or the Remote Control Panel utility. For information on SelectType, see Chapter 2, for the Remote Control Panel utility, see Chapter 4.
Caution:
C Settings or data saved in printer RAM (such as downloaded fonts) may be erased when you switch emulation.
EPSON GL/2 Mode
EPSON GL/2 mode features plotter commands. In this mode, you can use your printer with plotter applications.
EPSON GL/2 mode is similar to the GL/2 mode included in HP LaserJet 4L mode. This mode emulates some of the HP-GL® plotter commands. It features all of the commands of the GL/2 mode in HP emulation mode, plus two additional commands.
The table below shows the differences between these modes. For more information on GL/2 commands in LJ4L emulation mode, see Appendix C.
| HP GL/2 mode | EPSON GL/2 | |
| Orientation | Printer setting | Landscape only |
| Plotter unit | 1/1016 inch | 1/1021 inch |
| Picture frame | Same as LaserJet 4 mode | Depends on the hard-clip limit |
| Default position of P1 and P2 | Lower left and lower right corners, respectively, of picture frame | Inside of picture frame |
| Undefined commands | First character is ignored | First two characters are ignored |
| CS, CA commands | Not supported | Partially supported |
| PG, AF commands | Not supported | Supported |
| Results when a DT command with no second parameter is sent | Terminator is not plotted | Terminator is plotted |
| ESC E, ESC %#A commands | Supported | Not supported |
Before printing in the EPSON GL/2 mode
You may need to change printer settings depending on your output needs. Always check the printer's settings to make sure they match the data you are trying to print. Before you switch the emulation mode, check the following items to avoid conflicts with the printer's settings:
Paper size:
Printer's paper size setting
Driver (plotter selection): HP-GL/2 or HP-GL plotters
If you need to configure the printer settings, switch the emulation; then change the settings using SelectType or the Remote Control Panel utility. For information on SelectType, see Chapter 2, for the Remote Control Panel utility, see Chapter 4.
C Caution: Setting or data saved in printer RAM (such as download fonts) may be erased when you switch emulation.
Note: The paper automatically ejects if the printer receives no data within 60 seconds.
Intelligent Emulation Switch (IES)
This printer has following IES modes: EpsonScript Level 2/LaserJet 4L, EpsonScript Level 2/LQ, EpsonScript Level 2/FX, EpsonScript Level 2/GL/2, and LJ4L/LQ. When you select one of the IES settings with SelectType, the Remote Control Panel utility, or the printer's control panel, the printer switches automatically between EpsonScript Level 2 and one of four other modes or between LJ4L mode and LQ mode, depending on the received data. However the EpsonScript Level 2 IES settings are available only when the optional EpsonScript Level 2 module is installed.
Paper Handling
Loading paper
The printer's paper tray holds up to 150 sheets of various standard papers, including letter, legal, A4, and executive. For other sizes and exact specifications, see Appendix A.
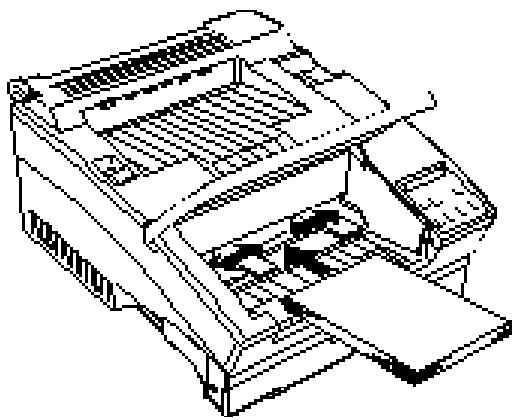
To load paper in the printer's paper tray, follow these steps:
- Open the front cover.
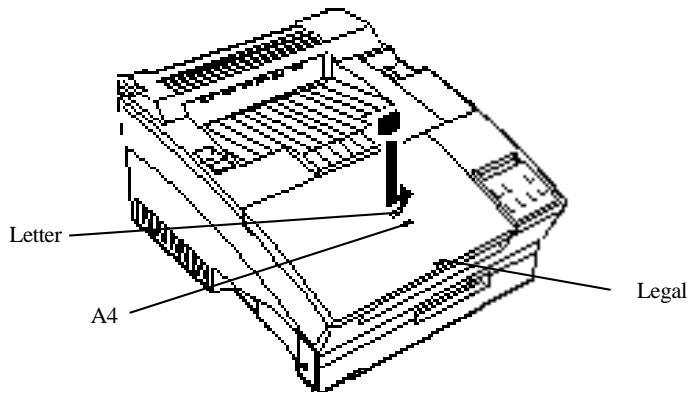
- Adjust the paper guides to match the size of paper.
- Take a stack of paper and fan it. Tap the edge of the paper on a flat surface to even up the stack. Load the stack, with the printable side down, into the tray as far as it will go.
Note:
If you want to print on special paper types, such as heavy (over 90g / m^2 or 24 lb) paper, envelopes, labels, and transparencies, see the section "Printing on special paper" later in this chapter.
-
Close the front cover.
-
Insert the paper stopper into the slot on the front cover that matches the size of your paper.
Setting the paper tray's paper size
By default, the printer is set up for A4 size paper to be loaded in the paper tray. If you load paper of a different size, you may need to use SelectType, the printer driver, or the Remote Control Panel utility packed with your printer to change the paper size setting. To update the printer for the paper size loaded in the tray, use one of the following options.
Using SelectType:
Enter SelcType Level 1 to use the PAGE SIZE option. Press u or d until PAGE SIZE appears on the display; press r to enter the submenu; press u or d to select the paper size you want; then press r. For more information on SelcType, see Chapter 2.
Using the printer driver:
Open the Main window. Next, pull down the Paperformat menu and choose the paper size. You can also click the Paper button if you need to define a custom paper size. For more information, see Chapter 3.
Using the Remote Control Panel utility:
Bring up the Remote Control Panel by typing EPRCPL at a DOS prompt; select the appropriate emulation from the main Remote Control Panel window. Click the Page Setup button; then choose the paper size.
Choosing paper
For best results, use paper made especially for laser printers or plain-paper copiers. Paper should be of good quality and relatively smooth with a weight between 60 and 90g / m^2 (16 and 24 lb). Because the printer is sensitive to moisture, always store paper in a dry place.
You may use colored paper but not paper to which a clear or colored coating has been added. When using preprinted paper stock such as letterheads, use papers and inks designed for laser printers. Ordinary inks or dyes may smear or come off when subjected to the high temperature of the fuser. Always test samples of paper stock before purchasing large amounts.
Note:
The quality of any particular brand or type of paper may be changed by the manufacturer at any time, so EPSON cannot guarantee any particular one.
Printing on special paper
You can print on special paper stock such as heavy (over 90~g/m^2 or 24 lb) paper, envelopes, labels, and transparencies. When printing on special types of paper, you need to feed single sheets one at a time.
Envelopes
Load envelopes with the flap-side down. The printing quality on envelopes may be irregular because different parts of an envelope have different thicknesses. Print one or two envelopes to check the print quality. If the printing is too light, adjust the print density using SelectType or your software.
Do not use window envelopes unless they are specially designed for laser printers. The plastic on most window envelopes can melt when it comes in contact with the hot fuser.
Labels
Use only labels designed for laser printers or plain-paper copiers.
To prevent the adhesive from coming into contact with printer parts, always use labels that completely cover the backing sheet, with no gaps between the individual labels.
You should test the label sheet for leaking adhesive by pressing a sheet of paper on top of a sheet of labels. If the paper sticks, do not use the labels.
Transparencies
You can use overhead projector transparencies and adhesive drafting film if they are made for use with laser printers or plain-paper copiers.
Chapter 2
SelectType
SelectType Overview 2-2
When to use SelectType 2-2
Using SelectType 2-6
Control panel 2-6
Display 2-7
Buttons 2-7
Steps for using SelectType 2-8
Level 1 Menus 2-10
Level 2 Menus 2-20
SelectType Options in LQ/FX Emulation Mode 2-30
SelectType Overview
The control panel's SelectType capabilities give you control over most of the printer's functions and settings. The SelectType settings you make are stored in memory, and the computer is set up using the settings every time you switch on the printer.
SelectType settings are divided between two levels: Level 1 and Level 2. Level 1 contains commonly used printing and font selection settings, while Level 2 is for settings you are less likely to change frequently.
When to use SelectType
In general, use SelectType only for settings you cannot make in your software, including the following:
o Changing the emulation modes and selecting the IES mode
o Specifying the channel and configuring the interface
o Choosing the size of the receive buffer
o Initializing the low toner setting
o Switching between the EpsonScript Level 2 ROM module and an optional font cartridge (if both are installed)
You should keep in mind the following points when using SelectType settings.
o A number of SelectType settings can also be made using the printer driver (see the SelectType window discussion in Chapter 3) and the Remote Control Panel utility (see Chapter 4).
o Application programs may send commands to the printer that override SelectType settings. If you are not getting the results you expect, check your application software settings.
To see the current SelectType settings, print a status sheet.
o A map of all available SelectType menus and options is included in the Quick Reference Card at the back of this guide.
Level 1 functions
There are nine Level 1 main menu items.
INPUT Specifies the standard paper tray or optional lower paper cassette. This menu item also includes an AUTO setting that automatically selects the appropriate paper source in accordance with the PAGE SIZE setting below.
PAGE SIZE Specifies the size of the paper.
COPIES Specifies the number of copies to be printed.
ORIENT. Specifies portrait (vertical) or landscape (horizontal) page orientation.
FONT Specifies one of the available fonts for printing.
STATUS 1Prints a status sheet that shows the current SHEET SelectType settings of the printer.
FONT 1Prints a sample of the fonts available in the SAMPLE current printer mode.
SUB CONFIG. Defines the printer's subconfiguration. The settings here depend on the printer mode, and can include such features as symbol set and number of text lines.
SYSTEM Registers the current printer system configuration by saving Level 1 settings. This menu item is also used to specify page protection, the top and left offsets, and to display the amount of printer memory available.
Level 2 functions
The Level 2 main menu items are as follows:
EMULATION Specifies an emulation mode and assigns it to an interface (when an optional interface is being used). Standard emulation modes available are HP LaserJet 4L, Epson LQ, Epson FX, EPSON GL/2, or HP LaserJet 4L & Epson LQ. Other modes become available with the installation of options.
INTERFACE Configures the interface.
RX-BUFFER Specifies the size of the receive buffer. SIZE
CH TIMEOUT Defines the channel timeout. If no data is received during the specified period, the printer switches channels.
AUTO CONT. Switches auto continue on and off. When auto continue is switched on, the printer continues printing even though certain error conditions occur.
LANG. Specifies the language to use for messages that appear on the display.
DENSITY Specifies the print density.
TONER Displays the approximate amount of toner remaining in the imaging cartridge. This menu item can also be used to specify the expected service life (number of pages) for a newly installed cartridge.
VERSION Displays the version numbers of the printer's firmware components, such as the controller and fonts.
PAGE Displays the total number of sheets printed to date COUNTER by the printer.
RITech Specifies a setting for EPSON's Resolution Improvement Technology, which improves printing for text and graphics.
STANDBY Switches the Standby mode on and off. When Standby is switched on, the printer enters the Standby mode if the printer is not used for 15 minutes.
MANUAL Switches manual feed on and off. When manual feed is switched on, the message MANUAL FEED is shown on the display along with the current paper size setting while printing.
OPT Selects between an optional font cartridge and the EpsonScript Level 2 ROM module (if both are installed).
Using SelectType
This section describes how to use the printer's control panel to access SelectType menus and settings.
Control panel
Use the three SelectType buttons and four arrow buttons to change the display and make settings. Various indicators appear on the display to provide additional information.
Display
When you enter SelectType, menus and options appear on the display. SelectType displays the main menu or submenu on the left, and the options for each menu on the right.
AINPUT AUTO A4 >
The display uses the following indicators:
A This indicator means you can use the control panel's u and d buttons to view other menu items or options.
C This indicator to the left of an option means it is the current selection. You can use the control panel's u and d buttons to view other options.
This indicator means that you can press the r button to change to the submenu. When text appears to the right of > (xxxx>SET), pressing r executes the operation indicated by the text.
Buttons
Level 1 Enters SelectType Level 1.
Level 2 Enters SelectType Level 2.
Exit Exits SelectType Level 1 or Level 2.
r
Depending on the type of screen that is currently displayed (see "Display," above), pressing this button can enter a submenu, execute an operation, or select an option.
1
Returns to the previous menu.
u/d
Scrolls through menu items. Holding down either button scrolls at high speed.
Steps for using SelectType
This section details the basic steps for using SelectType. The following example uses the INPUT menu item in SelectType Level 1 to select the standard paper tray.
- Enter SelcType.
Press Level 1 to enter SelcType Level 1, or Level 2 to enter Level 2. For this example, press Level 1.
- Display the main menu item you want.
Use d and u to scroll through the menu items until the display appears as shown below.
AINPUT AUTO A4 >
This display shows the current INPUT setting (AUTO A4). Most main menu items have a submenu that you display by pressing r.
- Enter the submenu of options.
Press r to display the submenu of options. A display similar to the following appears.
INPUT CAUTO A4>SET
The C indicates the option is currently selected. The message A4>SET means that pressing r registers the selection you make here as the new setting.
- Scroll through the submenu items.
Use u and d to scroll through the options that are available in the submenu. In the INPUT submenu, your options are AUTO, STD, and OPT (if you have an optional lower paper cassette installed on your printer).
Use u and d to display the STD option.
INPUT ASTD >SET
A C indicates the option is selected, a A indicates the option is not selected, and > SET indicates you can set the option.
Note:
If you want to return to the main menu at any time without changing the current setting, simply press 1.
- Set, select, or execute the option.
When the option you want to select is displayed, press r to set, select, or execute it.
Press r to select STD. SET disappears from the display and the > moves to the right of the display, indicating the new option has been selected. At the same time, A moves to the left of the main menu option, indicating that you are back in the main menu.
AINPUT STD
- Save the new settings and exit SelcType
When you press the r in the submenu and return to the main menu, the new settings remain in effect until you change it again or turn off the printer.
If you want the new settings to remain in effect even when you turn the printer off and on, simply exit SelecType by pressing the EXIT button.
Note:
If you exit SelectType before you select an option by pressing the 1 in the submenu, the previous settings are restored.
Level 1 Menus
This section describes all of the menu items and submenu items available in SelectType Level 1. Most menus and submenus are the same regardless of the printer emulation mode. However, the options available for ORIENT., FONT, and SUB CONFIG. differ depending on the printer emulation mode. The options available for the LQ/FX emulation mode can be found on page 2-30.
See the Quick Reference Card at the back of this manual for a complete map of all the SelectType menus and submenus.
Note:
In all of the following explanations, an asterisk indicates the factory default setting.
INPUT
Use this menu to select paper feed from the standard tray or from the optional lower paper cassette.
| Menu/submenu | Available options |
| AINPUT AUTO A4 > | AUTO* STD (Standard) OPT (Optional) |
AUTO tells the printer to automatically decide whether to feed paper from the standard paper tray or the optional lower paper cassette depending on which contains the paper size specified by PAGE SIZE. If both paper sources contain the specified paper size, you can print up to 400 sheets without replenishing paper.
STD causes paper to be fed from the standard paper tray.
OPT causes paper to be fed from the optional lower paper cassette. OPT appears in the submenu only if your printer has an optional lower paper cassette unit installed.
If neither paper source contains the paper size that matches the PAGE SIZE specification, a paper size error occurs.
PAGE SIZE
Normally, you would choose paper and envelope sizes using your application software. If necessary, however, you can use PAGE SIZE to make your selection.
| Menu/submenu | Available options |
| APAGE SIZE A4 > | A4* |
| A5 | |
| B5 | |
| LT (Letter) | |
| HLT (Half letter) | |
| LGL (Legal) | |
| GLT (Government letter) | |
| GLG (Government legal) | |
| EXE (Executive) | |
| F4 | |
| MON (Monarch) | |
| C10 (Commercial 10) | |
| DL | |
| C5 | |
| IB5 (International B5) | |
| C6 |
COPIES
Use COPIES to specify anywhere from 1 to 999 copies of your print job. The factory setting is 1. If you select a number that is greater than one, the display counts the number of copies completed and the total number of copies to be printed. If you specify 10 for COPIES, for example, the display shows 5/10 after five copies are printed.
| Menu/submenu | Available options |
| ACOPYSE 1 > | 1 to 999 |
If you want to interrupt printing, press the Copy End button. This button is available for the current printing page.
ORIENT.
This items specifies the direction in which the characters are printed on a page. Portrait, landscape, reverse portrait, or reverse landscape are available.
If your printer is in the LQ/FX mode, see page 2-30.
| Menu/submenu | Available options |
| AORIENT. PORT > | PORT* (portrait) LAND (landscape) R-PORT (reverse portrait) R-LAND (reverse landscape) |
R-PORT and R-LAND are displayed while the Feed light is flashing. These two options cannot be set from SelectType.
FONT
The FONT option selects the font source and then the font. If you select a scalable font, you must also set the point size for a proportional font or the spacing for a fixed pitch font.
Note:
When your printer is in the LQ/FX mode, see page 2-31.
The font source includes the Resident font (RD), Font cartridge slot (C), or Downloadable font (DL).
| Menu/submenu | Available options |
| AFONT RD- 0 > | RD* (Resident font) C (Font cartridge slot) DL (Downloadable font) |
Only the available options appear on the display. Option C is available only if a font cartridge is in the slot. The DL option appears only when a font has been downloaded from your computer.
Note:
For a list of available font cartridges, see Appendix D.
After you select the font source, press u or d until the display shows the font number you want; then press r to select the font. The font number is based on the font option selected above. The available fonts and their numbers are listed in the SelectType Level 1 FONT SAMPLE printout.
If you selected a scalable font, you must perform an additional step depending on whether the font is proportional or fixed pitch.
For a proportional font:
Press u or d to select the font's point size. Then press r once to set the point size.
| Menu/submenu | Available options |
| HEIGHTA# XXPT.>SET | 4.00 to 999.75 (in steps of 0.25) or [...]]] |
If ***** appears on the display, the point size you selected is outside the possible range of 4.00 to 999.75.
For a fixed pitch font:
Press u or d to select the spacing in characters per inch. Then press r once to set the spacing.
| Menu/submenu | Available options |
| PITCHA #XXCPI >SET | 0.44 to 99.99 (in steps of 0.01) or [...] |
If ***** appears on the display, the character spacing you selected is outside the possible range of 0.44 to 99.99.
STATUS SHEET
This option prints a status sheet that shows the current default SelcType settings.
When you reach this option, press r twice to print the status sheet.
| Menu/submenu | Available options |
| ASTATUS SHEET > |
FONT SAMPLE
This option produces a printout that shows all of the fonts currently available to the printer. After displaying the FONT SAMPLE menu item, press r twice to start printing.
| Menu/submenu | Available options |
| AFONT SAMPLE > |
SUB CONFIG.
The SUB CONFIG. option includes two submenus.
Note:
When your printer is in the LQ/FX mode, see page 2-31.
| Menu/submenu | Available options |
| A SUB CONFIG. > | FORM SYMSET |
FORM
Use the FORM option to set the number of lines for the selected paper size and orientation. The setting you choose also changes the line spacing. The setting is affected by the PAGE SIZE, ORIENT., and FONT settings.
| Menu/submenu | Available options |
| AFORM 64LINES > | 5 through 128 or *** |
If *** appears on the display, the number of lines you selected is outside the possible range of 5 to 128.
SYMSET
Use the SYMSET option to choose from the resident symbol sets. In most cases, you will not change this setting. Character tables of these symbol sets are shown in Appendix B.
| Menu/submenu | Available options (resident) |
| ASYMSET Roman-8 > | Roman-8 (HP Roman-8) IBM-US (IBM-US) IBM-DN (IBM Denmark/Norway) ECM94-1 (ISO 100, ECMA94Latin-1) IRV (ISO 2, IRV) French (ISO 25, French) UK (ISO 4, United Kingdom) Chinese (ISO 57, Chinese) ANSI AS (ISO 6, ANSI ASCII) Norweg1(ISO 60, Norwegian v1) Swedish (ISO 10, Swedish) Norweg2 (ISO 61, Norwegian v2) Swedis2 (ISO 11, Swedish Names) French2 (ISO 69, French New) JIS ASC (ISO 14, JIS ASCII) IBM Por (ISO 84, Portuguese IBM) Italian (ISO 15, Italian) IBM Spa (ISO 85, Spanish IBM) Portugu (ISO 16, Portuguese) HP Germ (HP German) Spanish (ISO 17, Spanish) HP Span (HP Spanish) German (ISO21, German) Roman E (HP Roman Extension) 8859-2 (ISO8859-2) PcTk 437 (Code Page 437 Turkish) 8859-9 (ISO 8859-9) PcE.Eur (Code Page 852) Legal (HP Legal) PcMulti (Code Page 850) PsMath (PSMath) VeInter (Ventura International) PsText (PSText) VeUS (Ventura US) Windows (MS Windows) MsPublici (Microsoft Publishing) WiTurki (Windows Turkish) WiE.Eur (Windows East Europe) WiAnsi (Windows 3.1) Wingding (Wingdings) VeMath (VenturaMath) DeskTop (DeskTop) Math-8 (Math-8) Pi Font (PiFont) McText (McText) Symbol (Symbol) |
SYSTEM CONFIG.
There are four submenus under the SYSTEM CONFIG. menu item.
| Menu/submenu | Available options |
| A#SYSTEM CONFIG. > | PAGE PROTECT T-OFFSET L-OFFSET MEMORY LEFT |
Each submenu is explained in detail below.
PAGE PROTECT
Allocates additional printer memory to a print job. The factory setting of 1 is sufficient for most uses of the printer. If you are printing complex pages, you may need to increase this setting. When PRINT OVERRUN appears on the display, it means that there is not enough memory to print the job. When this happens, increase this setting. If PRINT OVERRUN still appears, the printer does not have enough memory to print your page. You will need to either reduce the complexity of the page you are trying to print or increase the available memory by adding additional memory.
| Menu/submenu | Available options |
| APAGE PROTECT OFF > | 0 to 62 |
Note:
Normally, leave PAGE PROTECT set to 1. You should change this setting only if a PRINT OVERRIDEUN message appears.
T-OFFSET
Or top offset, lets you adjust the vertical (up-down) position of the printing area on the page. You can specify a T-OFFSET value within the range of 0 to 99mm . The factory setting for T-OFFSET is 0.
| Menu/submenu | Available options |
| AT-OFFSET 0 > | 0 to 99 |
L-OFFSET
Or left offset, lets you adjust the horizontal (left-right) position of the printing area on the page. You can specify a L-OFFSET value within the range of 0 to 99mm . The factory setting for L-OFFSET is 0.
| Menu/submenu | Available options |
| AL-OFFSET 0 > | 0 to 99 |
MEMORY LEFT
Displays the amount of memory available. You can use this information to check whether a newly installed memory option is working correctly or to see how much memory is available for fonts and complex graphics.
| Menu/submenu | Available options |
| AMEMORY LEFTXXXXK | 0 to available |
Level 2 Menus
This section describes all of the menu items and submenu items available in SelectType Level 2.
Note:
In all of the following explanations, an asterisk indicates the factory default setting.
EMULATION
Use this menu item to select the printer emulation mode for each channel (interface). After displaying the EMULATION menu item, press r once to display the channel selection submenu.
Next, select the channel you are using by pressing u or d.
| Menu/submenu | Available options |
| ACHP LJ4L > | CHP (Parallel) CHO (Optional) |
CH O (Optional) appears only when an optional interface is installed.
After you specify the channel, press r to advance to the emulation submenu.
| Menu/submenu | Available options |
| CHP C@LJ4L >SET | LJ4L* |
| LQ | |
| FX | |
| SCRIPT2 | |
| EPSON GL2 | |
| PS&LJ4L (IES setting) | |
| PS&LQ (IES setting) | |
| PS&FX (IES setting) | |
| PS&GL2 (IES setting) | |
| LJ4L&LQ (IES setting) |
SCRPT2, PS&LJ4L, PS&LQ, PS&FX, PS&GL2 appear only when the EpsonScript Level 2 module is installed.
Note:
o The IES setting in the above table provides automatic switching between PostScript and another emulation or between LJ4L and LQ emulation.
o If ADD MEMORY appears when you exit SelectType after changing the emulation mode, it means there is not enough memory in your printer to support the emulation you selected. When this happens, either use a different emulation or add more memory to your printer.
INTERFACE
This menu allows you to set the delay between the ACKNLG signal and the BUSY signal. Available settings are 0, -5, +5 microseconds, or MIN. The MIN option sets the ACKNLG signal to high.
| Menu/submenu | Available options |
| AINTERFACE |
When you press r, the parallel submenu appears.
| Menu/submenu | Available options |
| BUSY DELAY C 0>SET | -5, 0, +5, or MIN |
RX-BUFFER SIZE
The RX-BUFFER (receive buffer) SIZE menu item lets you change the size of the printer's input buffer. With an appropriate buffer size, you can quickly transfer the contents of a file from computer memory to printer memory. The printer then prints from its own memory, which frees the computer for other tasks.
After you display the RX-BUFFER SIZE menu item, press r and the following submenu appears.
| Menu/submenu | Available options |
| ACH P XK > | P or O |
X is the RX-BUFFER SIZE setting.
Note:
The O appears only when the printer has an optional interface installed.
Use u and d to select the channel for which you want to set the receive buffer size. Then press r to advance to the next submenu.
| Menu/submenu | Available options |
| CHP@@C XK>SET | See the next table. |
Press u and d to change the size of the receive buffer in 1 KB steps. Holding down either button changes the setting at high speed in 10 KB steps. The following table shows the default, minimum, and maximum settings for the available buffer sizes. The settings vary depending on the total amount of RAM installed in your printer.
| Total RAM (MB) | Default RX Buffer | Available range (X) |
| 1MB ≤ RAM ≤ 2MB | 5 KB | 1 KB to RAM/5 MB |
| 2MB ≤ RAM ≤ 4MB | 50 KB | 5 KB to RAM/5 MB |
| 4MB ≤ RAM ≤ 5 MB | 100 KB | 10 KB to RAM/5 MB |
Note:
If you make the receive buffer too large, you may get an error message telling you to add memory.
After specifying the buffer size you want, press r again. When you do, the following message appears on the display.
| Menu/submenu | Available options |
| CAN< INITIALIZIZE>EXE | <(cancel) or >(execute) |
Before the new settings take effect, you need to initialize the printer. You can initialize the printer from the RX-BUFFER SIZE menu by pressing r. To abort the operation, press l.
Note:
If you exit SelectType without initializing the printer, your receive buffer settings will not take effect until you turn the printer off and then on again, or press the Reset button until INITIALIZE appears on the display.
CH TIMEOUT
This menu can be used to specify the amount of time to allow for a channel timeout. If the printer is on line and receives no new data for the number of seconds specified (channel timeout), and if there is data in another channel, the printer automatically switches to the channel with data. The factory setting is 60.
| Menu/submenu | Available options |
| ACH TIMEOUT 60 > | 10 to 600 (in increments of 10) |
AUTO CONT.
When automatic continue is ON, the printer automatically continues to print after a certain period following a PRINT OVERRUN, PAGE BUFFER FULL, or INSUFF. MEMORY error. It also disables the TRAY SET error. When AUTO CONT. is OFF, you must press the Continue button to resume printing after encountering any of the above errors. In most cases, it is best to leave this item OFF.
| Menu/submenu | Available options |
| AAUTO CONT. OFF > | ON of OFF* |
LANG.
Use this menu item to specify the language used for status and error messages, and for printing the status sheet. This manual uses English for all status and error message display examples.
| Menu/submenu | Available options |
| ALANG. ENGLISH > | ENGLISH* DEUTSCH ITALIANO ESSPANOL FRANCAIS |
DENSITY
Use this menu item to adjust the relative lightness and darkness of your printouts. There are five settings from which to choose, and the more asterisks (*) in a setting, the darker the print. After changing the setting, run the test print to check the new print density.
| Menu/submenu | Available options |
| ADENSITY L*** D > | L****D L****D L*** D L** D L*D |
Note:
Increasing the print density increases toner consumption. If you specify darker print, you may need to replace the imaging cartridge more often.
TONER
This menu item displays the amount of toner remaining in the imaging cartridge. You should check this item whenever print quality deteriorates. If toner is low, prepare a new imaging cartridge for replacement.
After you install a new imaging cartridge, you should reset the toner setting as described in Chapter 6 of this manual. This tells the printer that a new imaging cartridge has been installed.
If you install a used imaging cartridge, you can specify the approximate amount of toner remaining. To do this, first display the TONER main menu item and then press r to move to the submenu.
| Menu/submenu | Available options |
| ATONER E*****F > | NEW |
| E***** F* (100~80%) | |
| E**** F (80~60%) | |
| E*** F (60~40%) | |
| E** F (40~20%) | |
| E* F (20~0%) |
Use u and d to select the toner amount setting you want to set, and then press r to set it. If your used imaging cartridge has about 50% of its toner remaining, for example, select E*** F.
For detailed information on replacing the imaging cartridge, see page 6-30.
You can also specify the number of pages that can be printed by the imaging cartridge you are using. To do so, select NEW in the above submenu and then press r to advance to the following submenu.
| Menu/submenu | Available options |
| LIFE @ @ C6000>SET | 5000 to 9000 (in increments of 1000 pages) |
The default setting is 6000, which you should not need to change if you are using the original imaging cartridge (S051011). Use u and d to select the number of pages you want to use.
VERSION
Use this menu item to display the version number of the printer's controller (C-ROM1) and font (FONT). After displaying the menu item, press r to display the submenu.
| Menu/submenu | Available options |
| A VERSION > | C-ROM 1 FONT |
Use u and d to switch between C-ROM1 and FONT.
PAGE COUNTER
This menu item displays the number of sheets printed since the printer was first set up. It has no submenu.
RITech
EPSON's RITech (Resolution Improvement Technology) produces smoother and crisper lines, text, and graphics. You will probably never have to change the factory setting, which is MEDIUM, but if you do you can then produce a test print to check the results.
| Menu/submenu | Available options |
| ARITech MEDIUM > | DARK MEDIUM* LIGHT OFF |
If you change the setting, you can check the print quality by printing a test pattern. To print the pattern, press r three times. The printer prints the pattern at the current RITech setting.
| Menu/submenu | Available options |
| ARITech MEDIUM>PRINT |
Caution:
C After you print the RITech pattern, SelectType settings return to their current defaults and the printer clears its memory, including any downloaded font data.
See "Optimizing Print Quality" on page 6-22 of this manual for further details on RITech.
STANDBY
When STANDBY is enabled, the printer enters the Standby mode if no data is received for 15 minutes. In this mode, the printer requires much less power. When data is received or any button is pressed while the printer is in the Standby mode, it requires about 35 seconds to warm up before starting operation.
The printer stays warmed up and ready to print if STANDBY is disabled.
| Menu/submenu | Available options |
| ASTANDBY DISABLE > | ENABLE* DISABLE |
MANUAL FEED
This menu item can be used to switch manual feed on and off.
| Menu/submenu | Available options |
| AMANUAL FEED OFF > | OFF* ON |
When MANUAL FEED is ON, MANUAL FEED is shown on the display along with the current paper size setting while printing. When it is ON, press the Continue button to feed paper automatically from the standard paper tray.
OPT
OPT stands for option. When both the EpsonScript Level 2 ROM module and an optional cartridge are installed, display the OPT menu item and then press r to advance to the submenu that lets you select the option. You can use only one option at a time. Make sure the option you want to use is selected before printing.
To make the setting available, turn your printer off and then on, or initialize the printer.
| Menu/submenu | Available options |
| AOPT CARTRIDGE > | CARTRIDGE* ROM MODULE |
SelectType Options in LQ/FX Emulation Mode
This section lists menus and options available only when you use SelectType in either LQ or FX emulation mode.
ORIENT.
The ORIENT. menu item selects the direction in which the characters are printed on a page. You can choose portrait (vertical) or landscape (horizontal) orientation.
| Menu/submenu | Available options |
| AORIENT. PORT > | PORT (Portrait)* LAND (Landscape) |
FONT
The FONT menu item selects a font by typeface.
| Menu/submenu | Available options |
| AFONT Courier > | Courier* Prestige DL (Downloadable font) |
The factory setting is Courier. After selecting the desired font, you can also adjust the character spacing and size of the font with the PITCH and CONDENSED settings in the SUBCONFIG. main menu.
Note:
Resident and optional fonts specifically designed for the HP emulation mode cannot be used in the LQ or FX mode.
SUB CONFIG.
When you set up your printer to operate in LQ or FX mode, the SUB CONFIG. main menu includes the submenus shown below:
| Menu/submenu | Available options |
| A SUB CONFIG. > | PITCH |
| CONDENSED | |
| L-MARGIN | |
| R-MARGIN | |
| T-MARGIN | |
| TEXT | |
| SKIPBOTTOM | |
| CGTABLE | |
| COUNTRY | |
| J-REPRINT | |
| AUTO CR | |
| ZERO CHAR | |
| WIDE PAGE | |
| B-IMAGE |
PITCH
You can select a character pitch of 10, 12, or 15 characters per inch (cpi), or choose proportional spacing.
| Menu/submenu | Available options |
| APITCH 10 CPI > | 10, 12, 15, or PROP |
CONDENSED
Use this item to change the character spacing. Condensed printing is useful for spreadsheets and other applications where you need to fit a large amount of information on each line. 15 cpi characters cannot be condensed.
| Menu/submenu | Available options |
| ACONDENSED OFF > | OFF or ON |
L-MARGIN
Use this item to set the left margin. Margin units are determined by the current pitch (cpi) and the condensed setting (on or off).
| Menu/submenu | Available options |
| AL-MARGIN 0 > | 0 to available |
If you select proportional spacing, 10 cpi and condensed determine margin units. If you change the setting of ORIENT., PAGE SIZE, or WIDE PAGE (when PAGE SIZE is set to A4 or F4) the left margin defaults to 0.
R-MARGIN
Use this item to set the right margin. Margin units are determined by current pitch (cpi) and the condensed setting (on or off). The factory setting is 80.
| Menu/submenu | Available options |
| AR-MARGIN 80 > | 1 to available |
If you select proportional spacing, 10 cpi and condensed determine margin units. If you change the setting of ORIENT., PAGE SIZE, or WIDE PAGE (when PAGE SIZE is set to A4 or F4) the right margin defaults to the setting shown in the following table.
Default right margin
| Paper size | Condensed | Portrait | Landscape | ||||
| 10 cpi | 12 cpi | 15 cpi | 10 cpi | 12 cpi | 15 cpi | ||
| A4 | OFF | 77 | 93 | 116 | 111 | 134 | 167 |
| ON | 133 | 155 | 116 | 191 | 223 | 167 | |
| A4 (80 col) | OFF | 80 | 96 | 120 | 111 | 134 | 167 |
| ON | 137 | 160 | 120 | 191 | 223 | 167 | |
| A5 | OFF | 53 | 63 | 79 | 77 | 93 | 116 |
| ON | 91 | 106 | 79 | 133 | 155 | 116 | |
| B5 | OFF | 66 | 80 | 100 | 96 | 115 | 144 |
| ON | 114 | 133 | 100 | 164 | 192 | 144 | |
| Letter | OFF | 80 | 96 | 120 | 105 | 126 | 157 |
| ON | 137 | 160 | 120 | 180 | 210 | 157 | |
| Legal | OFF | 80 | 96 | 120 | 135 | 162 | 202 |
| ON | 137 | 160 | 120 | 231 | 270 | 202 | |
| Half Letter | OFF | 50 | 60 | 75 | 80 | 96 | 120 |
| ON | 85 | 100 | 75 | 137 | 167 | 120 | |
| Executive | OFF | 67 | 81 | 101 | 100 | 120 | 150 |
| ON | 115 | 135 | 101 | 171 | 200 | 150 | |
| G Legal | OFF | 80 | 96 | 120 | 125 | 150 | 187 |
| ON | 137 | 160 | 120 | 214 | 250 | 187 | |
| G Letter | OFF | 75 | 90 | 112 | 100 | 120 | 150 |
| ON | 128 | 150 | 112 | 171 | 200 | 150 | |
| F4 | OFF | 77 | 93 | 116 | 124 | 149 | 187 |
| ON | 133 | 155 | 116 | 214 | 249 | 187 | |
| F4 (80 col) | OFF | 80 | 96 | 120 | 124 | 149 | 187 |
| ON | 137 | 160 | 120 | 214 | 249 | 187 | |
T-MARGIN
Use this item to specify the distance from the top of the sheet to the baseline of the first printable line (top margin). This is measured in 0.05-inch increments. The factory setting is 0.50 inches.
| Menu/submenu | Available options |
| AT-MARGIN 0.50 > | 0.50* to 1.50 (inch) |
TEXT
Use this item to set the page length. The unit of measure for this option is 1/6 inch. The factory setting is 66 (line spacing of 6 lines per inch).
| Menu/submenu | Available options |
| ATEXT 66 LINES > | 1 to available |
If you change the ORIENT., PAGE SIZE, or FORM TOP settings with SelectType, the page length setting automatically returns to the default setting for each paper size.
SKIPBOTTOM
When you set SKIPBOTTOM to ON, the printer inserts the number of line spaces specified by the ESC N (skip-over-perforation) command between the last line printed on one page and the first printable line on the next page. The total number of lines skipped equals the FORM TOP setting plus the amount of skip-over-perforation set with ESC N. Since most application programs insert their own top and bottom margins, use this feature only if your program does not provide them.
| Menu/submenu | Available options |
| ASKIPBOTTOM OFF > | ON or OFF |
CGTABLE
Use the character generator table option to select the graphics character table, the italics table, or the download table. The graphics table contains graphic characters for printing lines, corners, and shaded areas; international characters; Greek characters; and mathematical symbols. Selecting the italics table defines the upper half of the character table as italic characters. The download table is not available when you are in FX emulation mode.
| Menu/submenu | Available options |
| ACGTABLE PcUSA > | PcUSA PcMulti PcPort PcCanF PcNord DLoad ITALIC |
COUNTRY
Use this item to select one of the thirteen international symbol sets. See "Available Fonts" in Chapter 5 and "Symbol Sets" in Appendix B for samples of the characters in each country's symbol set.
| Menu/submenu | Available options |
| ACOUNTRY USA > | USA France German UK Denmark Sweden Italy Spain 1 Japan Norway Denmark2 Spain2 LatinA |
J- REPRINT
Use this item to reprint after a paper jam. When this option is ON and a page jams in the printer, the page is reprinted after you clear the jam. If this option is set to OFF, the jammed page does not reprint automatically, but complex pages may print faster.
| Menu/submenu | Available options |
| AJ-REPRINT OFF > | ON or OFF |
AUTO CR
Use the automatic carriage return option to perform a carriage-return line-feed (CR-LF) operation whenever the print position exceeds the right margin. If AUTO CR is OFF, the printer does not print characters beyond the right margin, and it does not perform a linewrap until it receives a CR. Most software programs take care of this function.
| Menu/submenu | Available options |
| AAUTO CR ON > | ON or OFF |
ZERO CHAR
This option determines whether the printer prints a slashed zero (0) or an unslashed zero (0). This feature is useful for clearly distinguishing between an uppercase letter O and a zero when printing documents such as programming lists.
| Menu/submenu | Available options |
| AZERO CHAR. 0 > | 0 or 0 / |
WIDE PAGE
When this option is ON, you can print up to 80 characters at 10 cpi across an A4- or F4-size page. When it is OFF, you can print up to 77 characters at 10 cpi. This setting is valid only when PAGE SIZE is set to A4 or F4. If you change the WIDE PAGE setting when sizes other than A4 or F4 are selected with the PAGE SIZE setting, L-MARGIN automatically defaults to 0 and R-MARGIN and TEXT LINES return to the default settings for the currently selected paper size.
| Menu/submenu | Available options |
| AWIDE PAGE ON > | ON or OFF |
B-IMAGE
With B-IMAGE set to DARK or LIGHT, your printer can correctly emulate the graphics densities set with printer commands. When you select DARK, the bit image density is high. When you select LIGHT, the bit image density is low.
| Menu/submenu | Available options |
| AB-IMAGE DARK > | DARK* LIGHT BCODE |
The BCODE setting converts bit images to bar codes by automatically filling in any vertical gaps between dots. This produces unbroken vertical lines that can be read by a bar code reader.
Note:
This mode reduces the size of the image being printed and may cause some distortion when printing bit image graphics.
Chapter 3
Printer Driver Configuration
Printer Driver Overview 3-2
Using the Printer Driver 3-2
Opening the printer driver 3-3
Changing settings 3-4
Restoring prior settings 3-4
Getting help from the driver 3-5
Closing the printer driver 3-6
Before Printing for the First Time 3-6
Making basic printer driver settings 3-6
Main Window 3-7
SelectType Window 3-10
Paper Sizes Window 3-14
Adding a new size to the Paper Size list 3-16
Print Mode Window 3-17
Adding a new print mode to the Print Mode list 3-19
Font Manager Window 3-21
Adding fonts 3-25
Deleting fonts 3-27
Changing a font name 3-28
Copying and moving fonts to another printer port 3-28
Overlay & Softtray Manager Window 3-30
Creating an overlay 3-31
Creating a softtray 3-32
Printer Settings Window 3-33
Printer Driver Overview
The printer driver is software that makes it possible for your printer and computer to communicate effectively with each other when you are using Windows. You can use the printer driver to make various settings, and tailor it to your specific printing needs.
This chapter explains the features of the Windows printer driver on the driver disk that comes with your printer.
EPSON provides a driver that enables you to easily print your documents using the best settings possible.
Note:
o Installation of the Windows driver is covered in the Getting Ready! guide. This chapter explains how to use the Windows printer driver.
o Do not skip the section "Before Printing for the First Time" on page 3-6. If you do not use the procedures in this section to make at least the basic settings, you may experience problems with your printer output.
Using the Printer Driver
The windows of the printer driver utility are designed to make it easy to change settings. Your printer driver has the following windows:
Main, SelectType, Paper Sizes, Print Mode, Font Manager, Overlay & Softtrail Manager, and Printer Settings.
For details on these windows, see the sections later in this chapter.
This section describes the basic usage of the driver.
Opening the printer driver
You can open the printer driver in any one of a variety of ways.
o Using the Control Panel Open the Control Panel window and double-click the Printers icon. In the Installed Printers: list that appears, click EPL-5200+ to highlight it, and then click Setup.
o From an application's Print window Pull down the application's File menu and select Print. In the Print window that appears, click Setup. In the Printer Setup window that appears, click Option. If the EPL-5200+ is not the default printer, you should select it in the list of printers in the Printer Setup window before clicking Option.
o From an application's Setup window Pull down the application's File menu and select Setup. In the Print window that appears, click Setup. Then click Option. If the EPL-5200+ is not the default printer, you should select it in the list of printers in the Printer Setup window before clicking Option.
Regardless of which method you use to open the printer driver, the Main window appears first.
Changing settings
The EPSON printer driver uses a variety of graphic icons, pull-down menus, and sliders to make settings quick and easy. The following are the Windows-type methods you can use to make your settings.
o Click on an on-screen button to execute its function or to switch between two possible settings.
o Click on a check box to select or deselect an option.
o Click on the pointer to open a pull-down menu, and then highlight an item on the list to select it.
o Click on a text box and input a number.
o Move a slider (by dragging it or by clicking on pointers) to select a value on a scale.
This guide uses terms such as "select" or "enter a number" to describe the above operations. If you need more information, see your Windows User's Guide.
Restoring prior settings
None of the settings you make with the printer driver setup windows are actually saved until you click OK in the Main window to close the printer driver.
If you want to close without saving your settings, click Cancel instead of OK. This closes the printer driver and restores its settings to what they were before you changed them.
If you make changes in the Paper Sizes, Print Mode, or Printer Setting window and close the window by clicking OK, the latest settings are not saved until you click OK in the Main window. If you click Cancel instead of OK, your settings will not be saved and the previous settings will remain active.
Note:
o In addition to the OK button, there is also a Restore button and a Delete button in the Paper Size window, and a Delete button in the Print Mode window. The functions of these buttons are described in the sections that explain the applicable windows.
o Be sure that the settings you make are saved whenever you close the printer driver by clicking OK in the Main window.
Getting help from the driver
If you are ever unsure about the meaning or purpose of an item in a window, simply use your mouse to move the pointer so it is over that item or click the Help button:
o Move the mouse pointer over an item in the window. This displays the item's function in the lower part of the window.
Click the Help button This displays the help screen for the current window.
Closing the printer driver
There are two ways to close the printer driver.
Click the OK button in the Main window. This saves all the changes you made (in all the driver setup windows) and closes the printer driver.
Click the Cancel button in the Main window. This cancels all the changes you made and closes the printer driver.
Before Printing for the First Time
Before you try printing with Windows, you should first check to make sure the driver settings match the document you are going to print. While many Windows applications override printer driver settings, some do not. To make sure you get the printing results you want, there are a few basic printer driver settings you must make no matter what application software you plan to use.
Making basic printer driver settings
The following are the basic printer driver settings you should make. These settings should match the requirements of the document you are going to print.
o Paper source—Specify how paper is being fed into the printer (from a paper tray or manually).
o Paper format—Specify the size of the paper to be printed.
o Print mode—Specify the print mode, which affects graphics resolution, halftone, and intensity.
Number of copies—Specify the number of copies of the same document that should be printed.
o Orientation—Specify the direction (landscape or portrait) of the printing.
For your convenience, these basic driver settings can be made directly from the driver's Main window, which is described below.
Main Window
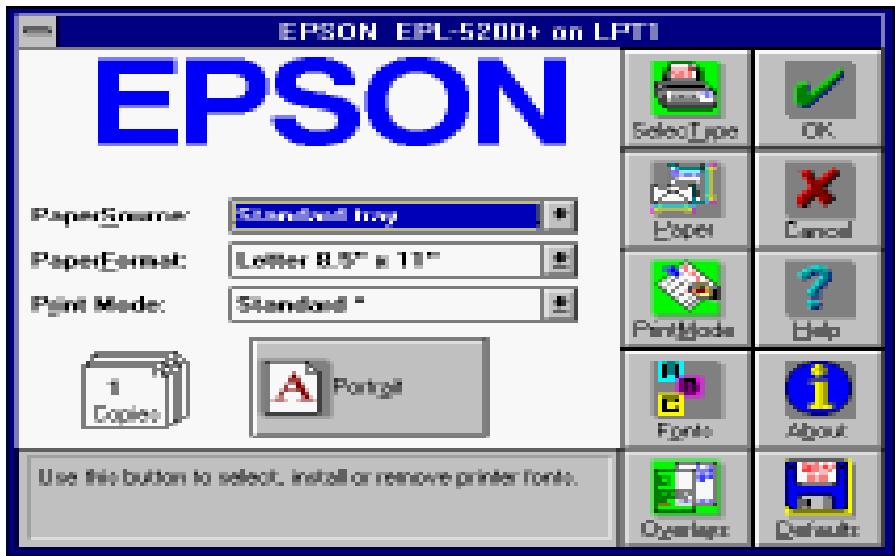
This is the first window that appears whenever you open the printer driver. You can use it to select any of the other windows, and to make the basic printer driver settings explained above.
The settings and button functions for this window are described below.
PaperSource
Use this pull-down menu to select the paper source: either standard tray or manual feed. The standard tray is the default.
PaperFormat
Use this pull-down menu to select the paper size for printing. You can choose standard paper sizes such as A4, letter, or legal, or those that you have defined in the Paper Sizes window. For more information on setting the paper size, see the section on the Paper Sizes window later in this chapter.
Print Mode
Use this pull-down menu to select the print mode, which affects graphic resolution, halftone, and intensity control. You can choose a default print mode setting or one that you define in the Print Mode window. For more information, see the section on the Print Mode window later in this chapter.
Copies
Use this option to specify the number of copies you want to print of the same document.
Portrait/Landscape
Click this button to toggle the page orientation between portrait and landscape.
SelectType
Click this button to display the SelcType window.
Paper
Click this button to display the Paper Sizes window.
PrintMode
Click this button to display the Print Mode window.
Fonts
Click this button to display the Font Manager window.
Overlays
Click this button to display the Overlay & Softtray Manager window.
About
Click this button to display the driver version number and other information.
Defaults
Click this button to display a dialog box that lets you save current settings to a file, or delete a settings file.
SelectType Window
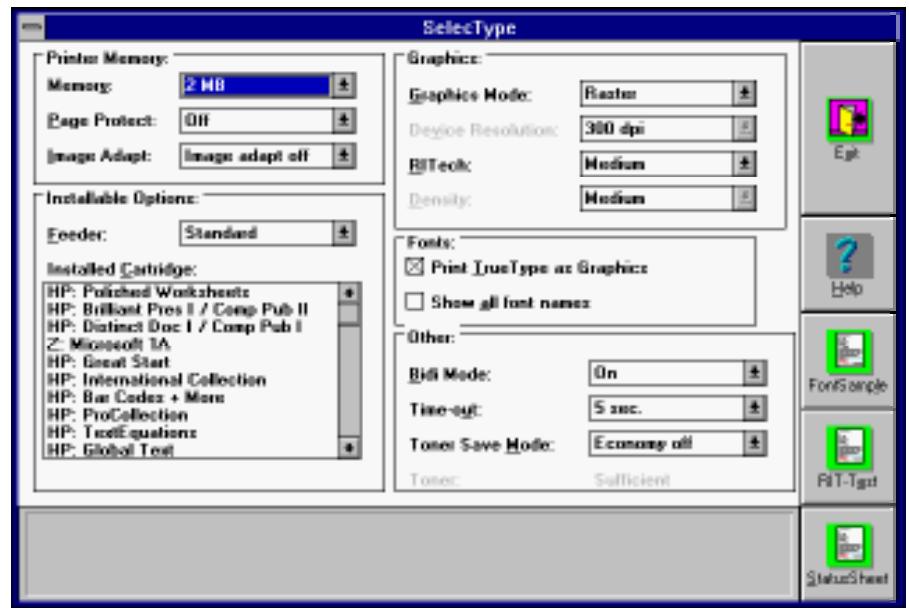
Use this window to set up the printer driver to operate with separately installed options, and to configure the printer to suit your individual requirements. Make sure you have installed all options correctly in accordance with the instructions contained in this guide.
The settings and button functions for this window are described below.
Memory
Use this pull-down menu to specify the amount of memory installed in your printer. The selections available in this list are: 1MB, 2MB, 3MB, 5MB.
Page Protect
Use this pull-down menu to switch the Page Protect function on and off. Page Protect allocates additional printer memory to a printing job. You should turn Page Protect on if you are printing a highly complex page and do not have sufficient memory.
The selections available in this list are: Off, On, Auto (default).
The On and Auto settings are identical, and normally you should set Page Protect to Auto.
If a memory error occurs, change the Page Protect setting to Off and try printing again. If you continue to get a memory error, you will need to increase your printer's memory.
Note:
Changing the Page Protect setting reconfigures printer memory, which causes any downloaded fonts in printer memory to be erased.
Image Adapt
Use this pull-down menu to switch the Image Adapt function on and off. When the Image Adapt function is on, the printing speed is increased.
The selections available in this list are: Image adapt on, Image adapt off (default), Image adapt auto. The On and Auto settings are identical.
Note:
When this setting is on, the fonts printed may not be what you expected.
Feeder
This pull-down menu shows all of the optional feeders that have been installed. Use it to select the feeder you want to use for printing.
The selections available in this list are: Standard (default) or Paper Cassette[PC].
Installed Cartridge
This list shows all of the optional font cartridges that have been installed. Use it to select the font cartridge you want to use for printing. Available cartridges are listed on pages D-22-24 in Appendix D.
Graphics Mode
Use this pull-down menu to select a graphics mode.
The settings available in this list are: Raster (PCL5e emulation) and EPSON GL/2.
Device Resolution
This setting cannot be changed. It is always 300 dpi.
RITech
Use this pull-down menu to select the RITech (Resolution Improvement Technology) setting you want to use. The settings available in this list are: Dark, Medium (default), Light, Off.
You should not need to change the RITech setting for normal printing.
Density
Adjust the print density to make the printout darker or lighter. The settings available in this list are: Darkest, Dark, Medium (default), Light, Lightest.
Print TrueType as Graphics
When this checkbox is selected (when an "x" is in the box),
TrueType fonts are printed as graphics. Some applications require this setting to print graphics overlaying the text.
Show all font names
When this checkbox is selected, only EPSON fonts appear in your application's font lists.
Timeout
Use this pull-down menu to specify how long the printer should wait for data before terminating the current print job. You can specify a time as short as five seconds (default) or as long as 300 seconds.
Toner Save Mode
Use this pull-down menu to switch the Toner Save Mode on and off. The settings available in this list are: Economy on, Economy off (default).
When the Toner Save Mode is switched on, the printer consumes less toner by reducing print quality.
Toner
This is an indicator that shows you when toner is running low. The message Sufficient indicates there is still enough toner remaining, while Empty indicates toner is running low.
Exit
Click this button to close the Selected Type window and return to the Main window.
FontSample
Click this button to print a preset font sample page.
RIT-Test
Click this button to print a preset RITech test page.
StatusSheet
Click this button to print a preset printer status sheet.
Paper Sizes Window
Use this window to select the paper size you want to use. You can also specify your own special paper sizes and include them in the pull-down menu.
The settings and button functions for this window are described below.
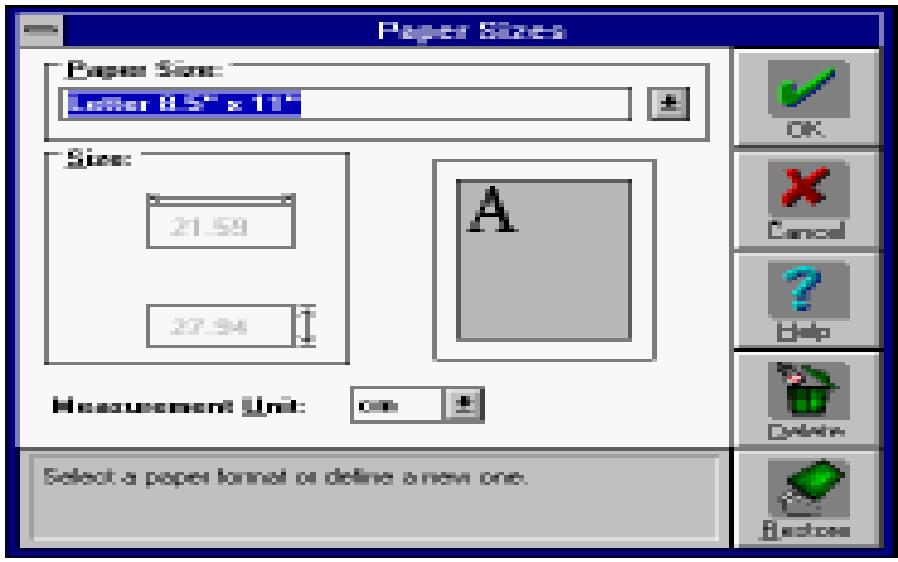
Paper Size
Use this pull-down menu to select a paper size for printing. You can use any of the standard paper sizes that are automatically listed by the printer driver, or you can edit the list to create your own selection of paper sizes.
For more information on how to create your own selection, see "Adding a new size to the Paper Size list" on page 3-16.
Size
The two boxes in this block show the vertical and horizontal dimensions of the paper selected in the Paper Size list. You can also input values into these boxes to change the dimensions of paper sizes you add to the Paper Size list.
Measurement Unit
Use this pull-down menu to select the unit of measurement you want to use. The settings available in this list are: cm (default), Inch, Pixel, Pica, Point.
As soon as you change the measurement unit, the values in the Size block change automatically to match.
Delete
Click this button to delete the name of the paper size that is selected in the Paper Size list. You can use this button to shorten the list to contain only the paper sizes you need.
Restore
Click this button to restore this Paper Size list so it includes all of the preset paper sizes.
Adding a new size to the Paper Size list
Use the following procedure to specify a custom paper size and add it to the Paper Size list.
- Open the Paper Sizes window
- Input the name of the paper size in the Paper Sizes window.
- Use the Measurement Unit pull-down menu to specify the unit of measurement you want to use.
Be sure to click on the Measurement Unit pull-down menu even if you do not want to change the unit. Otherwise, you will not be able to select the dimension values in the Size block.
- Click on the dimension boxes in the Size block and input values for the horizontal and vertical dimensions of the paper you are adding.
- After you are finished, click OK to return to the Main window and save the new paper size.
Note:
Clicking OK in the Paper Sizes window saves the new paper size, even if you click Cancel in the Main window.
Print Mode Window

A print mode is a set of parameters that specify graphic resolution, halftone method, and intensity. Use this window to create your own print modes and add them to the Print Mode pull-down menu in the Main window.
The settings and button functions for this window are described below.
Print Mode
Use this pull-down menu to select a print mode. There are two predefined settings in the list: Standard * (300 × 300 dpi, screening) and High Speed * (300 × 300 dpi, dithering). The asterisk after these print mode names means they are permanent, and cannot be deleted.
You can use the procedure described under "Adding a new print mode to the Print Mode list" on page 3-19 to create your own print modes and add their names to the list.
Graphic Resolution
Use this pull-down menu to select the resolution you want to use for printing graphics. The settings available in this list are: 300 × 300 dpi (default), 150 × 150 dpi, 75 × 75 dpi.
Halftone
Use this pull-down menu to select the grayscale method when printing graphics. The following selections can be included in this list.
Dithering
This method uses the standard Windows dithering patterns, and is the one you should normally select.
Screening (default)
This method represents color intensity by using variable dot sizes. It is similar to the rastering method used to produce newspaper images. You should use this method for scanned images, for bitmap printing, or when your output will be photocopied.
Intensity Control
Use this slider to control the mix of grays sent to the printer. The driver automatically matches the screen grays to printer output for the majority of needs. Move the slider to the left to lighten the grays, and to the right to darken them.
Delete
Click this button to delete the print mode selected in the Print Mode list. This button is disabled when the currently selected print mode name is a permanent one (indicated by an asterisk), which cannot be deleted.
C
Caution:
Clicking the Delete button permanently deletes the selected print mode. Make sure the print mode name that you want to delete is correct before clicking this button.
Adding a new print mode to the Print Mode list
Use the following procedure to specify your own graphic resolution, halftone, and intensity control settings and add them to the Print Mode list.
- Open the Print Mode window.
- Change the current Graphic Resolution, Halftone, or Intensity Control setting. When the permanent print mode (indicated by an asterisk) is selected, User Defined automatically appears in the Print Mode list.
- After you finish making the settings you want, change User Defined to the name you want to use for the settings.
Note:
You may leave the settings named User Defined. In this case, however, any changes you make later in print mode settings will automatically overwrite what was previously saved under the name User Defined. Because of this, it is good idea to assign a unique name to your settings to avoid losing them.
- If you want to make your print mode settings permanent, add an asterisk at the end of the name you assign them. If not, skip this step.
Note:
Once you have made your print mode settings permanent, they cannot be deleted or overridden with other settings, even if you delete the asterisk from its name.
- Make sure that your settings are correct, then click OK to return to the Main window and save the new print mode settings.
Note:
Clicking OK in the Print Mode window saves the new print mode settings, even if you click Cancel in the Main window.
Font Manager Window
The Font Manager window handles the installation and all administration of printer fonts. Fonts of various formats can be added, deleted, and copied using this window. You can specify whether the font being installed is temporary or permanent.
The settings and button functions for this window are described below.
Installed Fonts
This pull-down menu shows all fonts that are already installed. Fonts whose names are marked with a check are permanent. Whenever you highlight a font name in this list with your mouse, the font's format, character set, name, and other information appear in the status line.
Use the procedure described under “Adding fonts” on page 3-25 to install fonts and add their names to the Installed Fonts list.
Available Fonts
This pull-down menu shows all fonts that are currently available for installation. Each font name includes a logo that indicates the format of that font. Whenever you select a font by highlighting its name in this list, the font's format, character set, name, and other information appear in the status line.
Delete
Click this button to delete (de-install) the font whose name is highlighted in the Installed Fonts list.
Edit Font
Click this button to display the Edit Font window for the font whose name is highlighted in the Installed Fonts list. You can use the Edit Font window to change the name of the font.
You can use the Edit Font window to change such information as font description, name, or ID.
Temporary/Permanent Buttons
Click on these radio buttons to specify whether the font selected in the Installed Fonts list is temporary or permanent. Permanent fonts remain in printer memory until power is switched off. Temporary fonts must be downloaded to the printer for each print job.

Click this button to move fonts between the two Font Manager lists.
Add Fonts
Click this button to open the Add Fonts window.

Use this window to select the driver and directory that contains the fonts you want to add. For details on using this window to install fonts, see “Adding fonts” on page 3-25.
After selecting the directory that contains the fonts you want to add, click OK to return to the Font Manager window. The names of the fonts contained in the directory you selected will appear in the Available Fonts list.
You can also exit the Add Fonts window by clicking Cancel. This returns you to the Font Manager window without specifying any directory.
Copy Port
Click this button to open the Copy Port window.
Use this window to copy or move installed fonts to another printer port. For details on using this window to move or copy installed fonts, see "Copying and moving fonts to another printer port" on page 3-28.
Exit
Click this button to exit the Font Manager window and return to the Main window.
Adding fonts
Use the following procedure to install soft fonts. You can also specify certain fonts as being permanent, which means they are kept in printer memory until power is switched off.
- Open the Font Manager window.
- Click Add Fonts.
Initially, the list in the Add Fonts window contains drive names.
- Select the drive that contains the fonts you want to add by double-clicking on its drive name, or by highlighting the drive name and then clicking OK.
The list changes to show all of the directories contained on the drive you selected, in addition to the drive names.
- Display the name of the directory that contains the fonts you want to add and highlight its name in the list.
To open a directory, double-click on its directory name, or highlight the directory name and then click OK.
Directory name [..] on the list indicates the previous directory. This means you can backstep through the directories by selecting [..].
- After highlighting the name of the directory that contains the fonts you want to add, click OK to return to the Font Manager window.
The names of the fonts contained in the directory you selected using the Add Fonts window are shown in the Available Fonts list.
- Select the fonts you want to install by highlighting their names in the Available Fonts list.
As soon as you highlight a font name, the arrow button between the two lists points to the left, indicating the fonts will be transferred to the Installed Fonts list.
- After selecting all of the fonts you want to install, click on the left-pointing arrow button to begin the installation.
The fonts are copied into a directory named PCLFNT, which is created by the Font Manager. If you want to use a different directory name, specify the name you want to use before clicking OK.
- Now you can specify permanent fonts (fonts that stay in printer memory until you switch power off). Select a font name in the Installed Fonts list by highlighting its name, and click on the Permanent radio button.
Note:
You can specify permanent fonts one-by-one. If you select more than one font name in the Installed Fonts list, the Temporary/Permanent radio buttons will become dimmed on the display (which indicates they cannot be used). If you want to make more than one font permanent, you must repeat the above step as many times as necessary.
Though permanently installed fonts may speed up printing, they also reduce the amount of memory available for printing graphics and complex pages.
- After you finish installing the fonts you want, click Exit to return to the Main window.
Deleting fonts
The following procedure deletes fonts from printer memory. It also gives you the option of deleting the font file from the temporary file on your computer's hard disk. Unless you plan to use a font later, it is a good idea to remove it from the hard disk to free up the storage space.
- Open the Font Manager window.
- Select the fonts you want to delete by highlighting their names in the Installed Fonts list.
- After selecting the fonts, click Delete.
A message appears asking if you want to delete the selected fonts from your computer's hard disk.
- Click Yes to delete the selected fonts from both printer memory and from your computer's hard disk.
Selecting No deletes the selected fonts from printer memory but leaves them on the hard disk. The font names will not appear in any of the Windows menus, but the fonts will continue to take up disk space.
- After you finish deleting the fonts you want, click Exit to return to the Main window.
Note:
The above delete operation does not remove permanently installed fonts from printer memory. To delete permanent fonts, perform a Printer Reset operation as described in "Resetting and Initializing the Printer" on page 6-26.
Changing a font name
If you want to install a font that has the same name as a font that is already installed, you should first change the name of the installed font using the following procedure.
- Open the Font Manager window.
- Select the font whose name you want to change by highlighting its name in the Installed Fonts list.
- After selecting the font, click Edit Font.
- Type in the new name for the selected font in the window that appears.
- After typing in the new name, click OK.
The new name appears in the Font Manager's Installed Fonts list and in all Windows applications.
- After you finish renaming the font, click Exit to return to the Main window.
Copying and moving fonts to another printer port
Use the following procedure to copy or move installed fonts to another printer port when you are using more than one EPSON printer or if you change the port to which your printer is connected.
- Open the Font Manager window.
- Click Copy Port.
A window appears with a list of ports.
-
Select the port to which you want to copy or move the fonts by highlighting its name in the list.
-
After selecting a port name, click OK to return to the Font Manager window. You can also return to the Font Manager window without selecting a port by clicking Cancel.
When you return to the Font Manager window, you will notice the addition of Move and Copy buttons. Also, the Copy Port button is now a Close Port button.
You can use the Close Port button to abort the font copy/move operation at any time. The functions of the Move and Copy buttons are described below.
- Select the fonts you want to copy or move to the port you selected by highlighting their names in the Installed Fonts list.
- After selecting the fonts, click Move or Copy.
Clicking Move causes the fonts to be moved to the list on the right for the port you selected. The move operation deletes the fonts from the Installed Fonts list.
Clicking Copy causes the fonts to be copied to the list on the right for the port you selected. The copy operation leaves the fonts in the Installed Fonts list.
- After you finish copying or moving the fonts you want, click Exit to return to the Main window.
Overlay & Softtray Manager Window
The Overlay & Softtray Manager window lets you define, create, and manage overlays. Overlays are stored on the hard disk of your computer, and make it possible to include company logos, forms, and other types of overlays in a printed document. With the Softtray Manager, you can assign previously defined overlays to specific pages.
The button functions for this window are described below.
Exit
Click this button to close the Overlay & Softtray Manager window and return to the Main window.
Softtrays
Click this button to switch between the Softtray window and the Overlay window.
Delete
Click this button to delete an overlay.
Creating an overlay
To create an overlay, follow these steps:
- From the driver menu, click Overlays.
- Make sure the Create menu tab is selected, then input a name for the overlay you want to define in the Overlay Description box.
- Click Start.
- If you are using the Overlay & Softtray Manager for the first time, a dialog box appears showing you the name of the default overlay directory. Click OK to save your overlay in the default directory.
If you want to store your overlay in a different directory, click Cancel and then input the entire path to the directory in the Overlay Description box. Next, click Start.
- In the dialog box that appears, click OK. The next file you send to the printer from an application program, such as Windows Write or Notepad, will be saved as the overlay using the name you entered earlier. If you want to stop the procedure, click Cancel.
- Quit the printer driver and open the application that you will use to create the overlay.
- Print the file that you want to save as the overlay. It is possible to save any kind of file as an overlay. When printing starts, a message appears telling you the overlay was programmed successfully.
Creating a softtray
Before you can use an overlay, you must first create a softtray. The Softtray Manager merges your document files with a previously defined overlay and assigns the overlay to specified pages of the document.
After creating an overlay, follow these steps to create and assign a softtray:
- From the driver menu, click the Overlays button.
- Click the Softtray button.
- From the list of available overlays, select the overlay you want.
- Click on the page or pages (represented by page icons) that you want the overlay to print on. You can assign the overlay to print on either all left or right pages by clicking the Left or Right button at the bottom of the screen. If you want to assign the overlay to print on a range of pages, click on the Option menu tab and then enter the desired values in the "Start with page#" or "Page range from 0 to#" dialog box.
- Click on Softtray at the bottom of the screen to open the Softtray menu.
- From the menu, select Save As and assign a unique name to the softtray. Then click Save to save the softtray.
- Click on Softtray at the bottom of the screen and choose Select Softtray from the menu. Then select the softtray you want from the list to make it the active softtray.
- Click the Select button.
- Exit the printer driver.
All subsequent documents will be printed with the overlay. To stop overlay printing, open the printer driver and deselect the overlay. You can always delete previously defined softtrays and overlays. The Overlay Manager also lets you assign one overlay to different softtrays.
Printer Settings Window
This window appears when you click Defaults in the Main window. It lets you assign a name to the current driver settings for later recall when you need them.
The list and button functions for this window are described below.
Name
This pull-down menu shows the names of all of the default settings that are currently available. Use this list to input new names and to select from among those that are available.
Save
Click this button to save the current printer driver settings under the name that you input into the Name list.
Note: If you save settings in the Printer Settings window, they remain saved even if you exit the window by clicking Cancel.
Delete
Click this button to delete the default settings whose name is currently selected in the Name list. Note that the delete operation is performed as soon as you click this button, and it cannot be undone.
Chapter 4
Remote Control Panel Utility
Remote Control Panel Utility Overview 4-2
When to use the Remote Control Panel utility 4-2
Bringing up the Remote Control Panel 4-3
Printer Mode Window 4-4
LaserJet 4L emulation mode/EpsonScript Level 2 mode window 4-4
FX mode window 4-5
LQ mode window 4-5
Page Setup Options 4-6
Type Options 4-8
Printer Setup Options 4-10
Other Options 4-13
More Options 4-15
Remote Control Panel Utility Overview
If you are not able to change printer settings from your software program, use the printer's Remote Control Panel. The Remote Control Panel utility consists of a series of screens that allow you to change printer settings, such as the print quantity, paper size, and RITech setting.
When to use the Remote Control Panel utility
You do not normally need to use the Remote Control Panel utility to change printer settings. Most software programs allow you to change settings that affect the final printed output, and any settings you make from your software override the settings made from the Remote Control Panel utility.
Some Remote Control Panel settings cannot be controlled from your software program. Normally the only times you need to use the Remote Control Panel utility are the following:
To specify the size of paper loaded in the paper tray
To turn the Toner Save Mode on or off
To change the density setting or RITech setting
To change the emulation mode
To turn the Standby mode on or off
To specify the top and bottom offset
Note:
When the printer is shared by more than one user, the settings may be changed by other users. Even if the Remote Control Panel window shows your desired setting, always click the Send button.
Bringing up the Remote Control Panel
To bring up the Remote Control Panel, type EPRCPL at a DOS prompt. Press Enter. This brings up the initial Remote Control Panel menu.
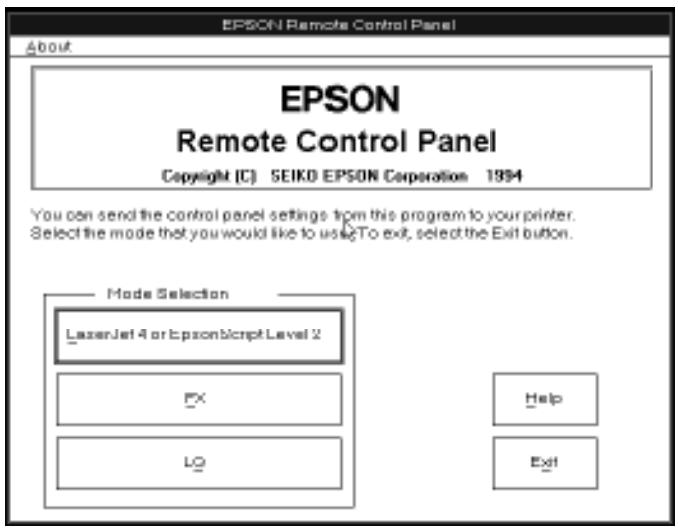
You now see the main Remote Control Panel window, which displays the mode selection: LaserJet 4L & EpsonScript Level 2, FX, or LQ. Choose the printer mode that you want to change the settings for, and the window for the respective mode opens.
To change the printer emulation, choose the emulation mode you want to use from the Emulation menu.
Note:
o EpsonScript Level 2 is available only when the EpsonScript Level 2 option is installed.
o The EPSON GL/2 mode does not have its own settings windows. This mode uses the previously selected setting. See the sections on changing the settings later in this chapter.
Printer Mode Window
The Printer Mode window displays the current printer settings. Each button in the window allows you to access the dialog boxes so you can change any of the listed settings. For more information on these settings, see the sections later in this chapter.
LaserJet 4L emulation mode/EpsonScript Level 2 mode window
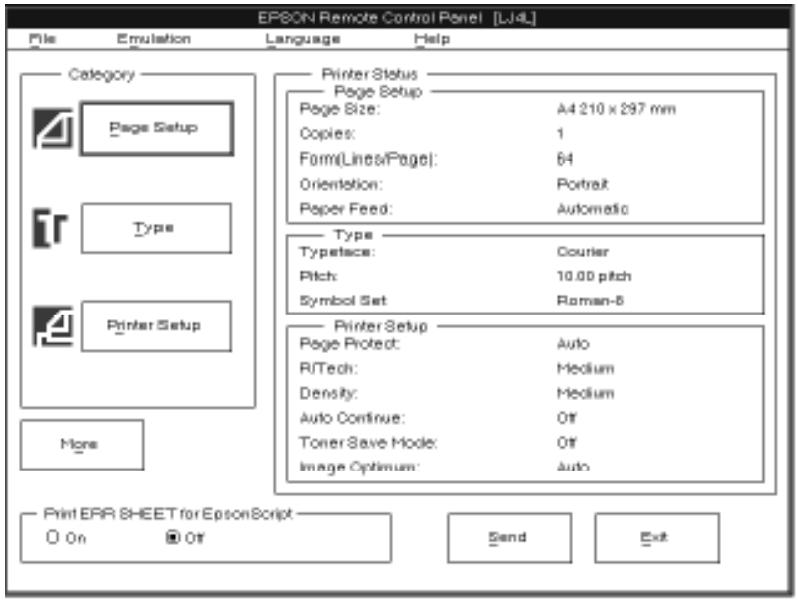
Print Error Sheet for EpsonScript
Turn this setting on if you want a printed record of EpsonScript Level 2 errors. When an error is detected, the printer prints a sheet listing the type of error.
FX mode window

LQ mode window
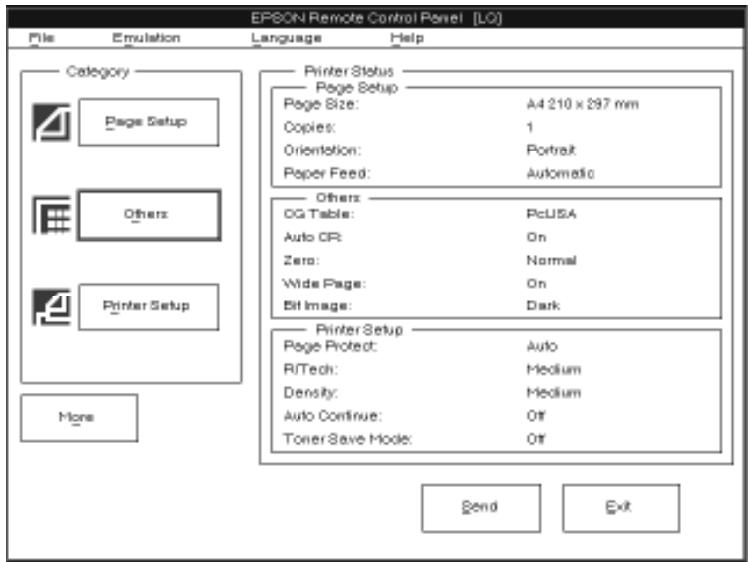
Page Setup Options
When you click the Page Setup button, you see the following dialog box:
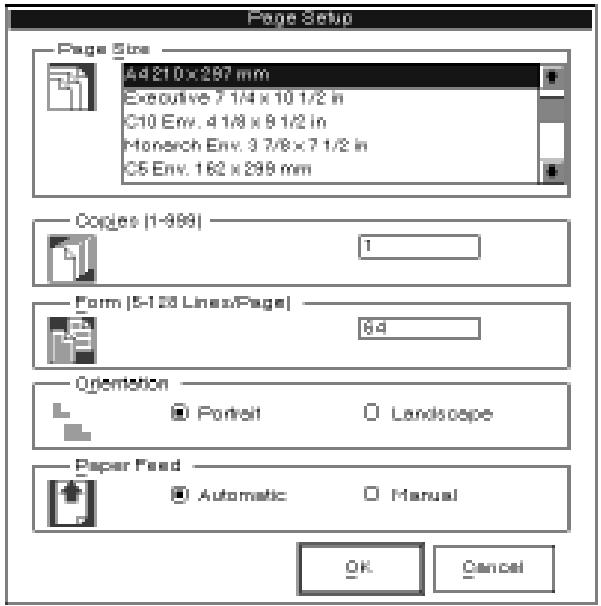
Most of the options in this dialog box are also available in your software program. You should use your software program whenever possible to change page setup settings. However, if you are unable to change the settings from your software program, use the options in this dialog box as follows:
Note:
Any changes made in Page Size, Copies, Orientation, and Paper Feed are reflected in all emulation modes.
Page Size
Selects the default paper size. You should change this item only if you cannot change the paper size from your printer. The options for Page Size are the following:
LT (Letter)
A4
A5
B5
HLT (Half letter)
LGL (Legal)
GLT (Government letter)
GLG (Government legal)
EXE (Executive)
F4
MON (Monarch)
C10 (Commercial 10)
DL
C5
IB5 (International B5)
C6
Copies
Selects the number of copies to be printed. You can enter any number from 1 to 999. Normally you should specify the number of copies from your software program.
Form
Specifies the number of horizontal lines to a page. You can enter any number from 5 to 128. This option is not available in LQ or FX mode.
Orientation
Specifies whether the page is printed in portrait (default) or landscape orientation. In portrait orientation, the top of the page is parallel to the short edge of the paper. In landscape orientation, the top of the page is parallel to the long edge of the paper. The pages in this manual are printed in portrait orientation.
Paper Feed
Specifies whether paper is fed automatically from the paper tray or whether paper is fed manually. The default is Automatic.
Type Options
Normally you will never need to use the Type options of the Remote Control Panel because the typeface selection is usually made from your software program. However, if you are unable to change the settings from your software program, click the Type button. The Type menu is not available for LQ or FX mode.
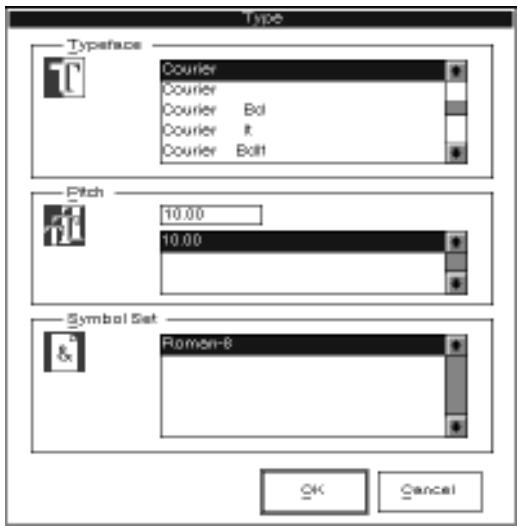
Typeface
Specifies the typeface to use.
Pitch/Point Size
Specifies the point size for proportional and scalable fonts. The range of point sizes is 4.00 to 999.75. Specifies the pitch for fixed pitch fonts.
Symbol Set
Specifies the symbol set to use. If the typeface you selected is not available for the symbol set you select, the typeface is replaced with the currently selected symbol set. The following symbol sets are available:
| Roman-8 | Norweg1 |
| Italian | ECM94-1 |
| Swedis2 | ANSI ASCII |
| UK | French2 |
| German | Legal |
| 8859-2 ISO | Spanish |
| PsMath | 8859-9 ISO |
| WiTurkish | MsPublishing |
| VeMath | DeskTop |
| Math-8 | WiE.Europe |
| PcTk437 | Windows |
| PsText | IBM-US |
| IBM-DN | VeInternational |
| PcMultilingual | PiFont |
| VeUS | Others |
| PcE.Europe | |
| WiAnsi |
Note:
o The following symbol sets cannot be selected with the Swiss 721 SWM and Dutch 801 SWM fonts: PsMath, MsPublishing, VeMath, Math-8, and PiFont.
o The characters 98h to 9Fh in the VeInternational and VeUS symbol sets cannot be printed when either the Swiss 721 SWM or Dutch 801 SWM font is selected.
Printer Setup Options
Clicking the Printer Setup button brings up the following dialog box:
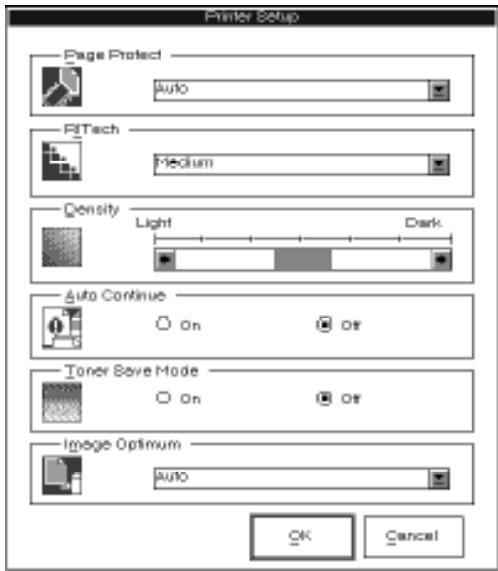
Note:
Any changes made in Page Protect, RITech, Density, Auto Continue, and Toner Save Mode are reflected in all emulation modes.
The options for Printer Setup are the following:
Page Protect
Allows you to allocate additional printer memory. You normally use Page Protect if you are printing a highly complex page and do not have sufficient memory. The options are Off, On, and Auto. If a memory error occurs, change the setting to Off and reprint your data. You will need to increase your printer's memory if memory errors continue to occur. Settings On and Auto are the same.
Normally Page Protect should be set to Auto.
Note:
Changing the Page Protect setting reconfigures the printer's memory, which causes any downloaded fonts to be erased.
RITech
The RITech (Resolution Improvement Technology) item allows you to adjust the RITech setting or turn it off. See "Optimizing Print Quality" in Chapter 6 for more information about RITech. The RITech setting should not normally have to be changed.
The RITech options are Light, Medium, Dark, and Off.
Density
Adjusts the print density to make the printout darker or lighter. Click the arrow key to darken or lighten the output.
Auto Continue
Permits the printer to automatically recover from a Print Overrun or Insufficient Memory error. The printer then continues printing after a wait of five seconds.
When Auto Continue is off, you must press the Continue button on the control panel to resume printing. In most cases, leave Auto Continue off so you are aware of the error messages and can make the necessary corrections. You might want to set Auto Continue on when printing long jobs or when you are away from the printer for long periods.
Toner Save Mode
Turns Toner Save Mode on when you press the Toner Save Mode button on the printer's control panel.
The Toner Save Mode uses less toner than normal. The printer saves toner by substituting a gray shade for the black inside of characters. The outlines of the characters are still printed in full black.
Image Optimum
Reduces the amount of graphics data when the data reaches the memory limit, allowing complex documents to be printed. When this mode is on, the graphics quality is reduced. The options are Off, On, and Auto. On and Auto are the same. This option is not available in LQ or FX mode.
Other Options
Clicking the Others button brings up the following dialog box. This menu is selectable only in LQ or FX emulation mode.
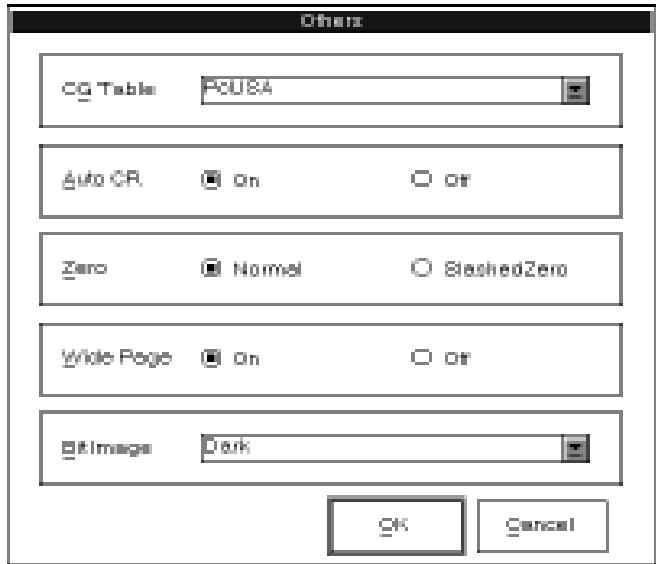
CG Table
Selects the graphics character table, the italics table, or the download table. The graphics table contains graphic characters for printing lines, corners, and shaded areas; international characters; Greek characters; and mathematical symbols. Selecting the italics table defines the upper half of the character table as italic characters. The download table is not available in FX mode.
Auto CR
Sets the automatic carriage return option to On or Off. When Auto CR is on, a carriage-return line-feed (CR-LF) operation is performed whenever the print position exceeds the right margin. If Auto CR is off, the printer does not print characters beyond the right margin, and it does not perform a linewrap until it receives a CR. Most software programs take care of this function.
Zero
This option determines whether the printer prints a slashed zero (0) or an unslashed zero (0). This feature is useful for clearly distinguishing between an uppercase letter O and a zero when printing documents such as programming lists.
Wide Page
Sets Wide Page to On or Off. When this option is on, you can print up to 80 characters at 10 cpi across an A4- or F4-size page. When it is off, you can print up to 77 characters at 10 cpi. This setting is valid only when PAGE SIZE is set to A4 or F4. If you change the Wide Page setting when sizes other than A4 or F4 are selected with the Page Size option, the margins and the text lines for the current paper size are set to the default for the current paper size.
Bit Image
Sets the Bit Image option to Dark, Light, or BCODE. When you select Dark, the bit image density is high. When you select Light, the bit image density is low. The BCODE setting converts bitmaps to bar codes by automatically filling in any vertical gaps between dots. This produces unbroken vertical lines that can be read by a bar code reader.
Note:
This mode reduces the size of the image being printed and may cause some distortion when printing bit image graphics.
More Options
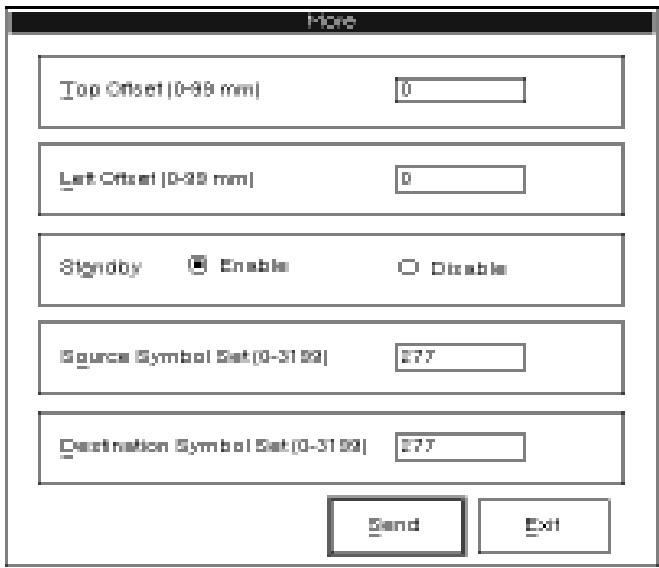
Note:
o Any changes made in Top Offset, Left Offset, and Standby are reflected in all emulation modes.
o Source Symbol Set and Destination Symbol Set items do not appear for FX or LQ mode.
Top Offset
Allows you to adjust the printing position on the page vertically. The setting is in dots; each dot is 1/300 inch (0.0846 mm). You can raise or lower the printing position on the page up to approximately 1/5 inch (settings from 0 to 99).
Left Offset
Allows you to adjust the printing position on the page horizontally. The setting is in dots; each dot is 1/300 inch (0.0846 mm). You can move the printing position on the page up to approximately 1/5 inch to the left (settings from 0 to 99).
Standby
Sets the Standby mode to Enable or Disable. When this setting is enabled, the printer saves power by reducing the power to the fixing heater whenever the printer receives no data for 15 minutes. The printer begins warming up as soon as you press the On Line button or send data; it warms up and is ready to print within 35 seconds. When Standby is disabled, the printer stays warmed up and ready to print at all times.
Source Symbol Set
Available only when an optional font ROM is installed in LJ4L emulation mode.
Destination Symbol Set
Available only when an optional font ROM is installed in LJ4L emulation mode.
Chapter 5
Fonts
Printer Driver Overview 5-2
Font Overview 5-2
Tips on Choosing a Font 5-4
Printer and Screen Fonts 5-4
When the printer and screen fonts don't match 5-5
Available Fonts 5-6
Adding More Fonts 5-7
Downloading soft fonts 5-7
Selecting Fonts 5-8
Font Samples 5-9
CourierwC 5-9
Dutch 801 SWC 5-9
Dutch 801 SWM 5-9
Swiss 742 SWC 5-9
Swiss 721 SWM. 5-10
Symbol Set SWA 5-10
More Wingbats SWM 5-10
Courier 10 cpi (Bitmap) 5-11
Courier 12 cpi (Bitmap) 5-11
Line Printer 16.66 cpi (Bitmap) 5-11
Printer Driver Overview
This chapter provides basic information about fonts. If you are new to fonts and desktop publishing, you might want to read this chapter to understand fonts and the terminology used to describe them.
To select a font, you simply make a selection from your software's Font menu. The font is then displayed on screen and can be printed by using a software menu item.
You might need to understand more about fonts when you encounter font problems. The most common font problems are the following:
o The printer substitutes a font other than the one you selected with your software.
o The printed page does not exactly match what is on screen.
Such problems normally occur when you use an emulation other than LJ4L or when you are trying to print fonts that are not installed on the printer. If you are having font problems, read the section "Printer and Screen Fonts" in this chapter to understand how you can resolve and avoid font problems.
Font Overview
A font, or typeface, is a set of characters and symbols that share a common typographic design and style. Popular fonts include Times Roman, Courier, and Arial.
The characters within a font come in a range of sizes, but they share the same style. A style is a slight variation of a particular font design, such as bold or italic, used for emphasizing words or phrases within a paragraph. Fonts with differing styles, such as Times Roman and Times Roman Bold, are similar enough in design that you can mix them easily while retaining the same basic font design throughout your document.
The entire set of all styles sharing a font design makes up the font family. When you select a font using your software's Font menu, you are actually selecting the font family. A font family normally contains four fonts: Roman (or Medium), Italic, Bold, and Bold Italic. Some font families, however, contain other styles such as oblique (similar to italic) and demi and book, which have slightly different line weights from Roman.
Note:
Although this manual uses the term font as described here, other sources attach a different meaning to this term. Font is sometimes used to refer to a set of characters with the same style and same size; other times, it encompasses the entire set of characters of every size and style of a certain typographical design.
Although fonts come in hundreds of designs, all fonts can be classified either as serif or sans serif. Serifs are the short decorative strokes that come off the main lines of a character, such as the curl at the bottom of the letter n. Serif fonts are commonly used for text. The text you are reading is Palatino, a serif font.

Sans serif fonts, such as Arial, have no serifs and are often used for titles and heads (as in this manual) and within tables and diagrams.
Tips on Choosing a Font
The following guidelines will help you in creating attractive documents that are easy to read:
o Avoid using too many point sizes on one page. As a general rule, use no more than three or four different point sizes on one page.
o Avoid using too many fonts. Having too many different fonts on the page distracts the reader's attention from the meaning of the words.
o Avoid using fonts that have designs similar to one another. Generally a serif font is used for text and a sans serif font is used for headings.
Printer and Screen Fonts
- Fonts are installed on both the printer and the computer. The printer fonts, which reside in printer memory, are used by the printer to print text. Screen fonts, which are stored on your computer's media, are used to display text on screen to represent the fonts that will print.
Two separate sets of fonts are needed because the monitor and printer have different requirements for producing fonts. The monitor normally uses bitmap fonts that are specially designed for the screen's resolution. A bitmap is a dot-by-dot representation of an image or character. The printer, however, normally uses an outline font that is created from a mathematical formula that describes the outline of each character. Using outline fonts allows the printer to render any character in the requested size.


Note:
The distinction between printer and screen fonts is not as important when you are using TrueType fonts, which are included with Windows 3.1. TrueType is an outline font format that can be used by both the printer and the screen.
When the printer and screen fonts don't match
In some cases, you may have a printer font that does not have a matching screen font, or you may have a screen font but not a corresponding printer font. Such situations occur for the following reasons:
o You install a screen font on the computer without installing a printer font.
You use a driver other than the driver provided with the printer.
o You move the screen fonts to a different directory and your computer cannot find them.
If you have a printer font but not a matching screen font, the computer uses an available screen font to display text on the screen. In this case, the screen display will not exactly match the printed output.
If you have a screen font but not a printer font, you will be able to select the font and view it on screen. However, when you send the job to the printer, the printer will not be able to print the font and will substitute another font (Courier).
Available Fonts
The following table lists the fonts that are installed on your printer. The names of all the font families appear on your software's Font menu if you are using the driver provided with the printer. If you are using a different driver, not all font families will be available.
The fonts provided with the printer are shown in the following table. For samples of each font family, see "Font Samples" at the end of this chapter.
Scalable Fonts
| Font family | Fonts | HP equivalent |
| Swiss 721 SWM | Medium, Bold, Italic, Bold Italic | Arial * |
| Dutch 801 SWC | Medium, Bold, Italic, Bold Italic | CG Times® |
| Courier SWC | Medium, Bold, Italic, Bold Italic | Courier * |
| Symbol Set SWA | Symbol * | |
| Dutch 801 SWM | Medium, Bold, Italic, Bold Italic | Times New * |
| Swiss 742 SWC | Medium, Bold, Italic, Bold Italic | Univers® |
| More Wingbats SWM | Wingdings * |
*TrueType font
Note:
Fixed and proportional Stick fonts are available with the GL command.
Bitmap Fonts
| Font name | Fonts | HP equivalent |
| Courier 10 cpi | (Medium) | Courier |
| Courier 12 cpi | (Medium) | Courier |
| Line Printer | Line Printer |
When selecting fonts in your software program, choose the font name listed in the HP equivalent column.
Adding More Fonts
Fonts that reside on your computer's hard disk can be transferred, or downloaded, to the printer so they can be printed. Downloaded fonts, also called soft fonts, remain in printer memory until you turn off the printer or otherwise reinitialize it. If you plan on downloading many fonts, you must make sure your printer has sufficient memory.
Downloading soft fonts
Most font packages make it easy to install fonts by providing their own installer. Normally the installer gives you the option of having the fonts automatically downloaded whenever you start your computer or having fonts downloaded only when you need to print a particular font.
If you're running Windows, you can also install soft fonts by clicking on the Fonts icon in the Control Panel to bring up the Fonts dialog box. Once installed, the fonts are available in all your Windows applications.
Note:
The EPL-5200+ can print fonts generated by Bitstream® FaceLift® and Bitstream Fontware™ Installation Kits using Bitstream Fontware Typeface Packages for the PC. See your FaceLift or Fontware user's guide for instructions on using Bitstream fonts with HP LaserJet compatible printers.
Selecting Fonts
You almost always select fonts from the Font menu of your software application. If you are unsure how to do this, check the manual that comes with your software.
If you are sending unformatted text to the printer directly from MS-DOS® or if you are using a simple software package that does not include font selection, you can select fonts by using the Remote Control Panel utility. For information on how to do this, see Chapter 4.
Note:
Selecting a font using the Remote Control Panel utility or SelectType is not recommended. Selecting fonts from your software program is easier, and any font selection you make from your software overrides the selection you make from the Remote Control Panel or SelectType.
Font Samples
CourierwC
Dutch 801 SWC
Dutch 801 SWM
Swiss 742 SWC
Swiss 721 SWM
Symbol Set SWA
More Wingbats SWM
Note: The More Wingbats SWM character FFh (Microsoft® logo) differs from the HP LaserJet 4 design.
Courier 10 cpi (Bitmap)
Courier 12 cpi (Bitmap)
Line Printer 16.66 cpi (Bitmap)
Chapter 6
Troubleshooting and Maintenance
Introduction 6-2
General Problems 6-2
Print Quality Problems 6-9
Option Problems 6-13
Status and Error Messages 6-15
DataDumpMode 6-22
Optimizing Print Quality 6-22
Adjusting the RITech setting 6-22
Adjusting print density 6-25
Resetting and Initializing the Printer 6-26
Reset 6-26
Initialize 6-26
Factory reset 6-27
Cleaning the Printer 6-27
Removing spilled toner 6-29
Cleaning the printer case 6-29
Replacing the Imaging Cartridge 6-30
Introduction
This chapter provides the information necessary for you to keep the printer in optimum condition and tells you how to:
o Solve any problems you may encounter
o Replace consumables
o Optimize the print quality
Also included is complete list of the status, error, and warning messages shown on the printer's control panel display.
General Problems
Paper jam
Printer stops and FEED JAM message appears
- Open the front cover. Carefully remove all the paper in the paper bin along with any sheets that have fed part way into the printer.
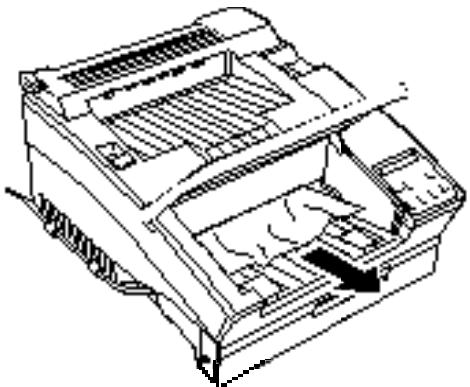
- If the paper tears when you remove it, make sure you remove any pieces remaining in the printer. To do this, gently open the printer cover.
W Warning: Opening the printer cover exposes the fuser, which is marked by a CAUTION HOT SURFACE label. Be careful not to touch the fuser.
Remove the imaging cartridge. Next, remove any paper from the paper feed path, reinsert the imaging cartridge, and close the printer cover.
- Tap the edges of the paper stack on a flat surface and carefully reload it into the paper bin. (Do not reload curled or wrinkled sheets.) Close the front cover.
-
The jammed page is automatically reprinted. If you did not open the printer cover to clear the feed jam, press Continue.
-
Gently open the printer cover and remove the imaging cartridge.
W Warning: Opening the printer exposes the fuser, which is marked by a CAUTION HOT SURFACE label. Be careful not to touch the fuser. - Gently pull out the paper. The direction you should pull depends on where the paper is jammed. If it tears, make sure you remove any pieces remaining in the printer.
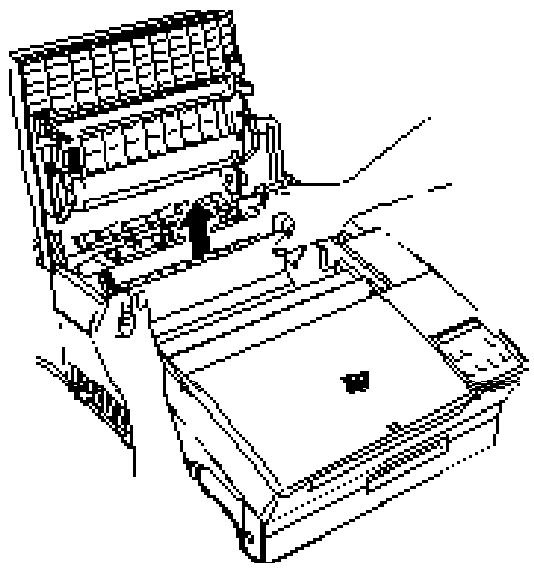
Note: Because the toner on the paper inside the printer may not have been fixed on the page, toner may come off on your hands when you remove the paper. If you spill toner on your clothing, rinse it off with cold water. Using hot water may leave a permanent stain.
- Reinstall the imaging cartridge. Then close the printer cover.
- After a paper jam, the jammed page is automatically reprinted.
Preventing paper feed and paper jam problems.
If you have frequent paper feed or paper jam problems, use this checklist of corrective measures:
o Use a higher-quality paper; one that is not too thin or rough. Some types of paper require single sheet feeding. See “Paper Handling” on page 1-15.
o Fan the stack of paper and then tap its edges to align it before you load it.
o Be sure that you do not load too much paper in the bin.
o Be sure to adjust the paper guides so that the paper can slide in and out freely.
o Never let more than 100 sheets accumulate in the standard face-down output tray on top of the printer.
Try turning over the stack of paper in the bin. Most packages of paper indicate the best side for printing with an arrow on the end of the package. Make sure the best side is loaded face down.
Display panel stays blank when you turn printer on
Turn off the printer and check the power cable connections between the printer and the electrical outlet; then turn the printer back on.
If the electrical outlet is controlled by an outside source such as a wall switch, make sure the switch is turned on or plug another electrical device into the outlet to check whether the outlet is operating properly.
The On Line light is on but nothing prints
Your computer may not be properly connected to the printer. Perform the steps described in "Testing the computer- to-printer connection" in the Getting Ready! guide.
The interface cable may not be plugged in securely. Check both ends of the cable between the printer and the computer. If you are using a parallel interface, secure the connector using the wire retaining clips.
Make sure that your interface cable meets the specifications for the printer and computer.
If you are using the serial interface, set the baud rate, protocol, data bit, and related settings. See your computer manual for the correct settings and interface requirements.
If you are using the parallel interface, set the SPEED settings to match the value the computer requires.
Make sure that your software is properly set up for your printer.
The imaging cartridge may be empty. Replace it as described at the end of this chapter.
Printer doesn't print and the On Line light is off
Press On Line once to set the printer on line (the On Line light comes on).
Output
Font selected with software commands won't print
Be sure you have installed the correct font cartridge and make sure that the orientation (portrait or landscape) matches the selected font.
Some or all of the output is garbled or printed as asterisks
If you use the Remote Control Panel, check whether any Remote Control Panel settings have been changed by another user.
Make sure that both ends of the interface cable are plugged in securely.
If you are using a serial interface, make sure that both the computer and printer are set to use the same number of data bits per word and that they both use the same parity, baud rate, and number of stop bits.
If the printer still does not print correctly, contact your dealer.
Position of the printout is not correct
Make sure that you are using the correct page length and margin settings in your application program. Do not use SelectedType to make these settings because software settings override SelectedType.
Graphics don't print correctly
Make sure that your software program is set for the printer emulation you are using. For example, if you are using the LJ4L emulation, be sure that your graphics software is set for an LaserJet 4L printer.
If you are using a serial interface, see the interface user's guide.
Graphics require large amounts of memory; if you are encountering problems because of insufficient memory, simplify your graphics or use fewer graphics on a page. If you often print graphics-intensive pages, you may want to add more memory as described in Appendix D.
SelectType
SelectType does not function as expected
Software programs override Selected Type settings. Use software settings instead of Selected Type settings whenever possible.
Your setting may have been changed by your software. Initialize the printer as described later in this chapter.
Remote Control Panel
Remote Control Panel
The Remote Control Panel does not function as expected.
Your settings may have been changed by your software program, which overrides the Remote Control Panel. Initialize the printer as described later in this chapter.
Print Quality Problems
W Warning: Opening the printer exposes the fuser, which is marked CAUTION HOT SURFACE. If you have used the printer recently, the fuser may be hot; be careful not to touch it. Let the printer cool before you clean inside it.
Dark or dirty background
Lighten the print density setting as described in "Adjusting print density" on page 6-25.
Turn off the printer. Clean the paper path inside the printer using a clean, soft, dry cloth.
Clean internal printer components by printing three pages with only one character per page.
There may be a problem with the imaging cartridge. Remove the cartridge, shake it from side to side, and then reinstall it. If this does not solve the problem, replace the imaging cartridge as described later in this chapter.
Vertical black or white bands or lines
Clean the printer lens. Remove the imaging cartridge and place it on a clean, flat surface. Locate and clean the clear lens on the inside middle of the printer.
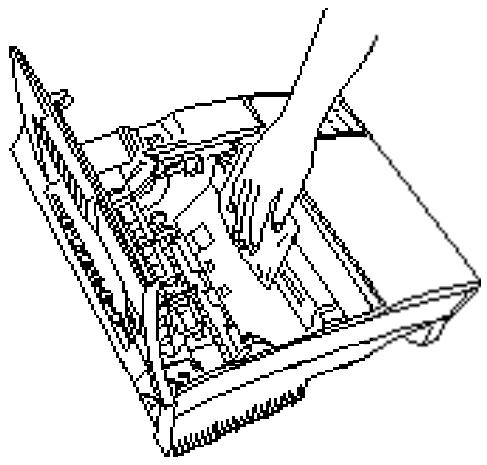
Wipe the lens from end to end with a clean, soft, dry, lint-free cloth. Then reinsert the imaging cartridge in the printer and close the printer cover. If the problem persists, install a new imaging cartridge as described later in this chapter and print several pages to check the print quality.
Horizontal black or white bands, or a black page
Install a new imaging cartridge as described later in this chapter.
Uneven darkness
Turn off the printer. Take out the imaging cartridge, shake it from side to side, and then reinstall it.
Your paper may be moist or damp. Printing is sensitive to moisture absorbed by the paper. Do not store your paper in a humid or damp environment.
If this does not solve the problem, install a new imaging cartridge as described later in this chapter. Then print several pages to check the print quality.
Toner smudges
Turn off the printer. Remove the imaging cartridge, shake it from side to side to distribute the toner, and wipe the bottom of it with a clean, dry cloth.
Clean the paper path inside the printer using a clean, soft, dry cloth.
Clean internal printer components by printing three pages with only one character per page.
If the problem remains, replace the imaging cartridge as described later in this chapter.
Missing areas on printed image
Your paper may be moist or damp. Printing is sensitive to moisture absorbed by the paper. The higher the moisture content in the paper, the lighter the printed output. Do not store your paper in a humid or damp environment.
You may not be using the correct type of paper for your printer. If the surface of your paper is too rough, printed characters appear distorted or broken. Smooth, high-quality copier paper is recommended for best results. See Chapter 1 for information on choosing paper.
Completely blank pages
Check the TONER option in SelectType Level 2 or open the printer cover. The COVER OPEN message also displays the amount of remaining toner. If toner is low (E* F), replace the imaging cartridge as described later in this chapter.
Be sure the imaging cartridge is installed as described in the Getting Ready! guide or "Replacing the Imaging Cartridge" later in this chapter.
The problem may be with your software program or interface cable. Print out a status sheet. If blank pages continue to print, the problem may be with the printer. Turn off the printer and contact your dealer.
Printed image is light or faint
Darken the density setting as described in "Adjusting print density" on page 6-25.
Check the TONER option in SelectType Level 2 or open the printer cover. The COVER OPEN message displays the amount of remaining toner. If toner is low (E* F), replace the imaging cartridge as described later in this chapter.
Your paper may be moist or damp. Printing is sensitive to moisture absorbed by the paper. The higher the moisture content in the paper, the lighter the printed output. Do not store your paper in a humid or damp environment.
Turn off the printer. Take out the imaging cartridge, shake it from side to side to distribute the toner, and then reinstall it. If the problem persists, replace the imaging cartridge as described at the end of this chapter.
Non-printed side of the page is dirty
Toner may have spilled in the paper feed path. Remove the imaging cartridge and then clean the paper path of the printer using a clean, soft, lint-free cloth.
Option Problems
A font cannot be selected or the message REMOVE CART appears
Remove the cartridge, then press Continue.
Make sure the cartridge is listed in the table of available font cartridges listed in Appendix D.
Paper does not feed from the optional lower paper cassette
Be sure you have made the proper tray choice in your software.
STD may be selected in the INPUT menu of SelectType Level 1. To use the optional lower cassette, the setting must be set to OPT. Change the setting as described on page 2-11.
There may be no paper in the lower paper cassette. Add paper.
Be sure that the lower paper cassette is properly installed and that you have not loaded too many sheets of paper. The cassette can hold a maximum of 250 sheets of 75g / m^2 (20 lb) paper.
The lower paper cassette may not be installed properly. See Appendix D for instructions on installing the lower paper cassette.
- Remove the lower paper cassette from the unit.
- Remove any folded paper from the paper cassette, and discard any curled or wrinkled sheets.
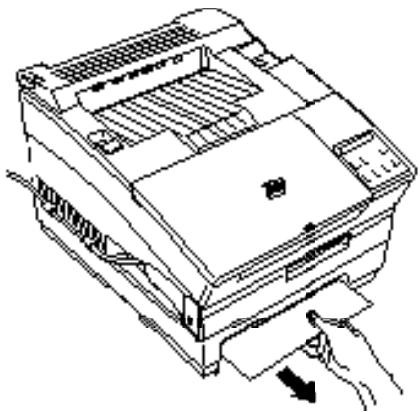
- Tap the edge of the paper stack. Then reinsert it into the cassette making sure the paper is evenly aligned and rests below the maximum paper mark.
- Make sure you are using the correct paper size. Your cassette can contain only A4-, letter-, or legal-size paper. Also make sure you are using paper that meets the specifications for this printer.
- Press Continue. The jammed page is automatically reprinted.
Status and Error Messages
The possible status, error, and warning messages are listed in alphabetical order below.
ADD MEMORY FOR CH
There is not enough printer memory for the indicated channel. This error is caused by changing the emulation mode or by increasing the size of the RX (receive) buffer.
To correct the error, use the SelectType RX-BUFFER SIZE menu item to reduce the size of the RX buffer, or the EMULATION menu item to change to another emulation. Or you can add memory to the printer.
CHARCREATING
A character is being created in printer's RAM.
CHECK PAPER SIZE (warning)
The printed paper size does not match the PAGE SIZE setting in SelectType Level 1. Check to see if the correct size of paper is loaded in the tray. Next press Continue to clear the message.
COPYEND(status)
Multi-copy printing is canceled (you pressed the Copy End button with the printer off line). For more information on Copy End, see page 1-6.
COVER OPEN E****F
The printer's cover is open. Printing cannot be performed while the printer cover is open. The symbols to the right of the error message indicate how much toner remains in the imaging cartridge.
DATA (status)
The printer has received data but is not yet printing or is off line.
FEED JAM
Paper is not feeding properly from the specified source. See page 6-2 of this manual for information on paper jam recovery.
FONTCREATING
A font is being created in printer's RAM.
GRAPHIC DRAWING
Graphics characters are being drawn in printer's RAM.
IMAGE OPTIMUM (warning)
The printer cannot print in the requested quality because of insufficient memory, and the printer reduces the quality automatically so that printing can continue. Check to see if the printout is acceptable. If not, you must increase available memory by adding more memory.
INITIALIZE(status)
The printer is being initialized. SelectType settings return to the settings in effect at power on and the buffer is cleared.
INSUFF. MEMORY
The printer does not have enough memory available for the current printing job. Data in printer RAM, such as a downloaded font, is lost. Press Continue to clear the error. To print the page causing the problem, you will have to either simplify it or add more memory to the printer.
MANUAL FEED XXX (status)
Manual feed mode is specified for the current print job. Make sure the paper size indicated by XXX is loaded in the standard feeder, then press On Line.
If your job should not be printed in manual feed mode, press Continue. The printer feeds paper from the standard tray.
For detailed information on MANUAL FEED, see Chapter 2.
NEW CARTRIDGE? YES, RESET NO, CONTINUE (status)
When the remaining toner quantity indicated in the TONER REMAINING option of SelectType Level 2 is E F, the messages NEW CARTRIDGE? and YES, RESET NO, CONTINUE display in rotation. If you reset the printer while this message is displayed, the TONER REMAINING option shows E****F. If you do not execute reset, the low toner message continues to display.
After warming up, READY appears on the display.
OFFLINE
The printer is off line and cannot receive data.
PAGE BUFFER FULL
Text or graphics data has filled the printer buffer and the printer has ejected an incomplete page. Press Continue to clear the error.
To print the page, you may have to add more memory to the printer.
PAPER FEEDING (status)
The printer is feeding paper.
PAUSE
Displays only when the EPSON C83213] Optional Kit for Microsoft At Work Windows Printing Software (WPS) is installed, and indicates that the WPS operation is interrupted. For more details on WPS, see the user's guide for this option.
PAPER JAM
Paper is jammed in the printer path. See page 6-4 for information on paper jam recovery.
PAPER OUT
There is no paper in either the standard paper tray or the optional lower paper cassette (if installed). Load more paper into the selected paper source and press On Line.
PAPER OUT XXX XXX
There is no paper in the standard paper tray or the optional lower paper cassette (if installed). The message indicates the paper source and the paper size that should be loaded. Load more paper into the indicated paper source and press On Line.
PAPER SET XXX XXX
The paper in the specified paper source does not match the selected paper size. The message indicates the paper source and the paper size that should be loaded. Load the correct paper into the indicated paper source and press Continue.
PRINTING (status)
The printer is printing.
PRINT OVERRUN
The time required to process data exceeds the print engine speed because the current data is too complicated. Press Continue to resume printing. If this message appears again, change the PAGE PROTECT setting in SelectType Level 2 SYSTEM CONFIG. menu. For more information, see Chapter 2.
PRINT PAUSED (status)
The printer interrupts printing.
READY(status)
The printer is ready to receive data or print.
REINSERT CART
Indicates that an optional cartridge was removed while the Feed light was still on. First, make sure that the printer is off line. Next, reinsert the cartridge into the cartridge slot, and then press Continue.
REMOVE CART
Indicates that an optional cartridge was inserted while the printer was on line or while the Feed light was on. First, make sure the printer is off line. Next, remove the cartridge, and then press Continue. Before inserting the cartridge, you should make sure that all data in the buffer has been printed and that the printer is off line. If the Feed light is on, press Feed to print any data remaining in the buffer.
RESELECT TRAY
The SelectType Level 1 INPUT option item is set to OPT, even though the optional lower paper cassette is not installed. Turn off the printer and install the optional lower paper cassette if you have one. Or press Continue to automatically switch to the standard paper tray. After printing, be sure to use the SelectType INPUT option to change the input setting to STD.
RESET (status)
Reset is executed. The settings return to those previously saved with SelcType and the buffer is cleared.
STANDBY (status)
The printer is in its low power state; however, it is still on line if the On Line light is on.
WARMING UP (status)
The printer is warming up.
Data Dump Mode
The data dump mode is a special feature that makes it easy for experienced users to find the cause of problems in communications between the printer and computer. In the data dump mode, the printer produces an exact printout of the codes it receives.
- Make sure that A4 paper is loaded and the printer is off.
- Hold down the Level 2 button while you turn on the printer. Make sure you hold down the button until the message READY: X DUMP appears on the display. X indicates the channel being used.
- Run any program that causes the printer to print. The printer prints out all of the codes it receives in hexadecimal format.
- To turn off the data dump mode, turn off the printer or press the Reset button until INITIALIZIZE appears on the display.
Optimizing Print Quality
Adjusting the RITech setting
Resolution Improvement Technology (RITech) is EPSON's printer technology that produces smoother and crisper lines, text, and graphics.
RITech has four settings: LIGHT, MEDIUM (default), DARK, and OFF. The default setting produces the best text and graphics in most cases and should not normally have to be changed. However, adjusting the RITech setting can sometimes improve print quality.
Note:
RITech may not improve graphics that include gray shading or a screen pattern. If you are printing gray shading or screen patterns, you might want to change the RITech setting to OFF.
Before adjusting the RITech setting, print a RITech test pattern to help you in determining which setting is best for you.
To print a RITech test pattern, use SelectType, the printer driver, or the Remote Control Panel utility packed with your printer.
Using SelectType:
Enter SelcType Level 2 and press u or d until RITech appears on the display, then press r three times. The printer prints the test pattern.
Using the printer driver:
Click the SelectType button in the Main window, then click the RIT-Test button.
Using the Remote Control Panel utility:
Bring up the Remote Control Panel by typing EPRCPL at a DOS prompt; select the appropriate emulation from the main Remote Control Panel window; choose the Print RITech Sheet option from the File menu.
Out of adjustment
Optimal setting
If the pattern is out of adjustment, change the RITech setting or turn it off to improve print quality.
If your pattern is too heavy, change the setting to LIGHT as described in the following procedure; if it is too light, change the setting to DARK; if you are printing gray shading or screen patterns, change the setting to OFF.
To change the RITech setting, follow these steps.
Using SelectType:
Enter SelcType Level 2 and press u or d until Ritech appears on the display; press r and then press u or d to select your desired setting (LIGHT, MEDIUM, DARK, or OFF); press r and press Exit.
Using the printer driver:
Click the SelectType button in the Main window, then change the setting in the RITech pull-down menu.
Using the Remote Control panel utility:
Bring up the Remote Control Panel by typing EPRCPL at a DOS prompt; select the appropriate emulation from the main Remote Control Panel window; click the Printer Setup button. Then change the RITech setting.
If the pattern still needs to be improved, you probably need to change the print density setting. For a darker RITech setting, make the print density lighter and vice versa. See the next section.
Adjusting print density
Note:
Do not change the print density unless it is necessary. Changing the print density affects all text and graphics, so check the new setting by printing several pages with various kinds of text and graphics.
If your test print pages are too light or too dark, adjust the print density by using SelectType, the printer driver, or the Remote Control Panel utility packed with your printer.
Using SelectType:
Enter SelectType Level 2 and press u or d until DENSITY appears on the display; press r and then press u or d to select your desired setting; press r and press Exit.
Using the printer driver:
Click the SelectType button in the Main window, then change the setting in the Density pull-down menu.
Using the Remote Control Panel utility:
Bring up the Remote Control Panel by typing EPRCPL at a DOS prompt; select the appropriate emulation from the main Remote Control Panel window; click the Printer Setup button. Then change the Density setting.
Note:
Increasing the print density increases toner consumption. If you select darker print, you may need to replace the imaging cartridge more often.
Resetting and Initializing the Printer
In many cases, you can eliminate a problem by resetting or initializing the printer.
Reset
Resetting the printer clears the printer memory and returns the settings to those previously saved with SelcType. The print job currently loaded in memory is erased and the printer is ready to accept another print job. Current settings and downloaded fonts are also erased.
You may want to reset the printer when you suspect the print job itself is bad and the printer cannot print it.
To reset the printer, hold down the Reset button until RESET appears on the display.
You can also reset the printer by sending the RESET command from your software to the printer.
Initialize
Initializing the printer clears the memory and also returns the SelectType settings to those in effect at power on. Any downloaded fonts or printer settings that were changed from the defaults are lost. Normally you initialize the printer when you are consistently having problems printing or when the printer settings are not what you want.
To initialize the printer, hold down the Reset button until INITIalyze appears on the disply.
You can also initialize the printer by turning it off and then on. After initialization, the printer returns to normal operation.
C Caution: Whenever you turn off the printer, wait at least 10 seconds before turning it back on. Rapidly turning it on and off can damage the printer.
Factory reset
Performing the factory reset clears printer memory and returns all printer settings to their factory default settings. The print job currently loaded in memory, current settings, and downloaded fonts are erased. The printer hardware also returns to the factory default conditions.
To perform a factory reset, make sure the printer is off, and then turn it on while holding down the Reset button.
Cleaning the Printer
The printer needs only minimal cleaning. If you notice a decline in print quality, clean the glass lens and the inside of the printer, as described in this section.
You should also clean the paper feeder and the printer cover every few months. These procedures are described later in this section.
Fine particles of paper dust and ordinary dust can collect inside the printer. Follow the steps below to clean the inside of the printer and the paper feeder.
-
Make sure the printer is turned off.
-
Open the printer cover.
Warning:
W Opening the printer exposes the fuser, which is marked by a caution label. If you have used the printer recently, the fuser may be hot; be careful not to touch it. Let the printer cool before you clean the inside.
- Remove the imaging cartridge from the printer.
- Remove any dirt inside of the printer with a soft cloth.
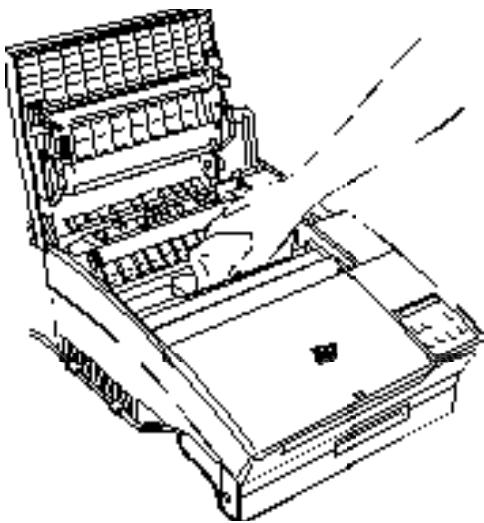
- Replace the imaging cartridge.
- Close the printer cover.
- Open the front cover and clean the paper feeder with a soft cloth
Removing spilled toner
If toner spills inside the printer, do not use the printer until you remove all the spilled toner. Follow these steps:
- If only a small amount of toner is present, carefully wipe out the inside of the printer with a dry cloth.
- If a large amount of toner is present, use a small vacuum cleaner (available from computer supply stores) to remove it.
C Caution: Toner or any other fine powder can damage some vacuum cleaners. Be sure to read the instructions for your vacuum cleaner before you use it on spilled toner.
Note: If you spill toner on your clothing, rinse it off with cold water. Do not use hot water; it may cause the toner to leave a permanent stain.
Cleaning the printer case
If the printer's outer case is dirty or dusty, turn off the printer and clean it with a soft, clean cloth dampened with a mild detergent.
C
Caution: Never use alcohol or thinner to clean the printer cover; these chemicals can damage the components and the case. Be careful not to get water on the printer mechanism or any electronic components.
Replacing the Imaging Cartridge
The imaging cartridge (S051011) prints up to 6,000 pages depending upon the complexity of your print jobs.
While the printer is warming up, if the messages NEW CARTRIDGE? and YES, RESET NO, CONTINUE display in rotation, there is less than 20% toner left in the imaging cartridge and it will eventually need to be replaced.
You can check the toner level at any time by following these steps:
o Open the cover. COVER OPEN E*F shows on the display. The E***F message indicates the amount of remaining toner. Simply count the asterisks between the E (empty) and the F (full.) Each asterisk represents about 20% of the total toner capacity.
o Enter SelecType Level 2 to use the TONER option. This option shows the remaining toner quantity. For more information, see page 2-26.
W Warning: Do not touch the fuser, which is marked with a CAUTION HOT SURFACE label.
- Make sure the printer is turned off.
- Gently open the printer cover and remove the imaging cartridge by pulling it toward you.
-
Dispose of the used imaging cartridge with nonburnable items.
-
Remove the new imaging cartridge from its bag. While holding the cartridge horizontally, gently shake it a few times to distribute the toner evenly.
C Caution: Do not turn the imaging cartridge upside down. Do not expose the imaging cartridge to light any longer than necessary.

- Set the imaging cartridge on a clean, flat surface. Firmly grip the tab on the left side of the imaging cartridge. Pull the clear seal all the way out with firm, even pressure as shown.

- Hold the imaging cartridge and gently shake the cartridge from front to back.
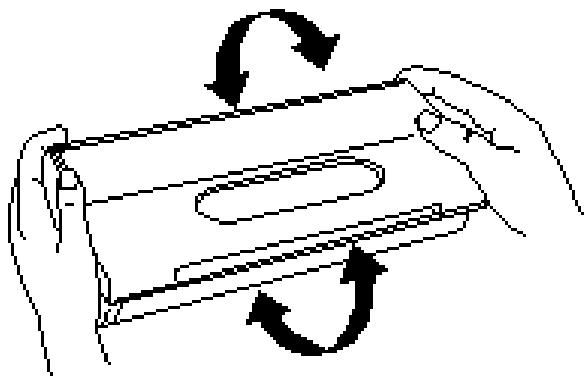
- Insert the imaging cartridge into the printer by placing the pins on each side of the cartridge into the grooves inside the printer. Slide it gently into the opening until it stops.
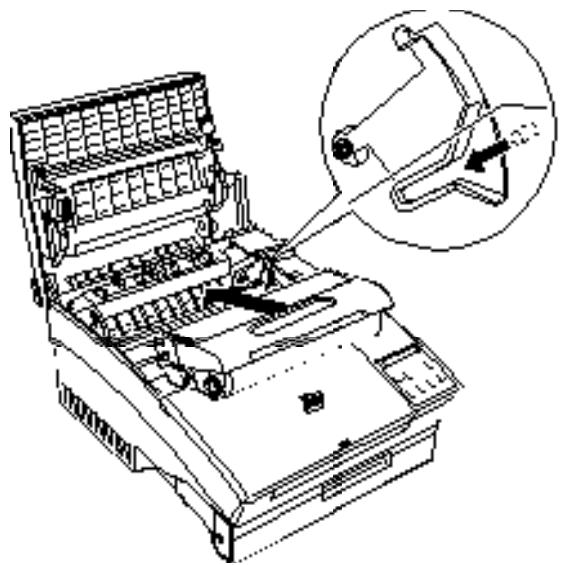
- Gently press down on the printer cover until it clicks shut.
- Turn on the printer. The messages NEW CARTRIDGE? and YES, RESET NO, CONTINUE appear in rotation on the display. Press Reset until RESET appears on the display. The toner level will be reset (E*F).
Note:
If you press Continue instead of Reset while NEW
CARTRIDGE? and YES, RESET NO, CONTINUE display, the toner level message does not change.
- After the printer warms up, READY appears on the display.

Caution:
Never transport the printer with the imaging cartridge installed.
Appendix A
Technical Specifications
Paper A-2
Printer A-3
General A-3
Environmental . A-4
Mechanical A-4
Electrical. A-5
Interface A-5
Options and Consumables A-8
Lower paper cassette (C81230]) A-8
Face-up output tray (C81231]) A-8
Imaging cartridge (S051011) A-9
Paper
Note:
Since the quality of any particular brand or type of paper may be changed by the manufacturer at any time, EPSON cannot guarantee the use of any particular brand or type of paper. Always test samples of paper stock before purchasing large quantities or printing large jobs.
Paper types:
Plain paper
Special paper
□ Labels
Envelopes
Transparencies
Colored paper
Card stock
Paper weight:
Plain paper: 60 to 90g / m^2 , 16 to 24 lb
Card stock: 90 to 157g / m^2 24 to 42 lb (single-sheet feed only)
Paper size:
Paper:
| Type | Size |
| A4 | 210 mm 297 mm |
| A5 | 148 mm 210 mm |
| B5 | 182 mm 257 mm |
| Letter | 8.5 11 inches |
| Half-Letter | 5.5 8.5 inches |
| Legal | 8.5 14 inches |
| Government Letter | 8 10.5 inches |
| Government Legal | 8.5 13 inches |
| Executive | 7.25 10.5 inches |
| F4 | 210 mm 330 mm |
| Envelope: | Monarch | 3 7/8)7 1/2 inches |
| Commercial 10 | ||
| DL | 4 1/8)9 1/2 inches | |
| ISO C5 | 220 mm 110 mm | |
| ISO C6 | 162 mm 229 mm | |
| ISO B5 | 114 mm 162 mm | |
| 176 mm 250 mm | ||
| Range of paper size: | Width | 92 to 216 mm |
| (3.63 inches to 8.5 inches) | ||
| Length | 148.5 mm to 356 mm | |
| (148.5 inches to 14 inches) |
Caution:
Do not load any size of paper other than those listed above.
Printable area: 47 dots from paper edge
Note:
Printable area varies according to the emulation mode.
Printer
General
| Printing method: | Laser beam scanning and dry electrophotographic process |
| Resolution: | 300 \ 300 dpi |
| Printing speed: | Up to 6 pages per minute (letter or A4), depending on the font and quantity of data |
| First print: | Less than 20 seconds with A4/letter |
| Warm-up time: | 35 seconds or less at normal temperature |
| Paper feed: | Automatic or manual feed |
| Paper feed alignment and direction center alignment for all sizes | |
| Input paper supply (75 g/m2paper): | 150 sheets with the standard paper tray 250 sheets with the optional paper tray |
| Paper eject: | Face down or face-up (optional) |
| Paper eject capacity (75 g/m2paper): | Face-down: 100 sheets Face-up: 20 sheets with optional face-up tray |
| Internal emulation: | HP LaserJet 4L emulation (LJ4L mode) ESC/P 24-pin printer emulation (LQ mode) ESC/P 9-pin printer emulation (LX mode) HP-GL/2 emulation (EPSON GL/2 mode) |
| Optional emulation: | EpsonScript Level 2 EPSON® C83213] Optional Kit for Microsoft® At Work Printing Software |
| Resident fonts: | 22 scalable fonts and seven bitmap fonts. (See Chapter 5 for a list of resident printer fonts.) |
| RAM: | 1MB, expandable up to 5MB |
Environmental
Temperature: Operation: 10 to 35^ (50 to 95^ ) Storage: 0 to 35^ (32 to 95^ )
Humidity: Operation: 15 to 85% RH Storage: 30 to 85% RH
Altitude: 2500 meters (8200 feet) maximum
Mechanical
| Dimensions and weight: | Height: 226 mm (8.9 inches) |
| Width: 368 mm (14.5 inches) | |
| Depth: 456mm (18.0 inches) | |
| Weight: 10 Kg (22 pounds) including the imaging cartridge | |
| Durability: | 5 years or 180,000 sheets, whichever comes first. |
Electrical
| 120 V model | 220 V model | |
| Voltage | 90 V to 132 V | 198 V to 264 V |
| Rated frequency | 50 Hz to 60 Hz/3 Hz | 50 Hz to 60 Hz/3 Hz |
| Rated current | 5.5 A/10% | 3 A/10% |
| Power consumption | Less than 500 W | Less than 600 W |
| Power consumption* in Standby mode | Less than 15 W | Less than 15 W |
- No option installed
Interface
The parallel interface connector pin assignments and a description of the interface signals are shown in the table below.
| Signal Pin | Return Pin | Signal | Direction | Description |
| 1 | 19 | STROBE | IN | STROBE pulse to read data. Pulse width must be at least 0.5 μs at the receiving terminal. |
| 2 | 20 | DATA 1 | IN | These signals represent parallel data bits 1 to 8, respectively. Each signal is at HIGH level when data is logical 1 and LOW when it is logical 0. |
| 3 | 21 | DATA 2 | IN | |
| 4 | 22 | DATA 3 | IN | |
| 5 | 23 | DATA 4 | IN | |
| 6 | 24 | DATA 5 | IN | |
| 7 | 25 | DATA 6 | IN | |
| 8 | 26 | DATA 7 | IN | |
| 9 | 27 | DATA 8 | IN | |
| 10 | 28 | ACKNLG | OUT | About a 1-μs pulse width. LOW indicates data has been received and the printer is ready to accept more data. |
| 11 | 29 | BUSY | OUT | A HIGH signal indicates that the printer cannot receive data. The signal goes HIGH in the following cases: 1. During printing 2. When off line 3. During a printer-error state |
| 12 | 30 | PE | OUT | A HIGH signal indicates the printer is out of paper. |
| 13 | — | SLCT OUT | OUT | Available only for bidirectional use. |
| 14 | — | AUTO | IN | Available only for bidirectional use. |
| 15 | — | NC | — | Not used |
| 16 | — | GND | — | Logic ground level |
| 17 | — | CHASSIS GND | — | Printer's chassis ground, which is connected to the signal ground. |
| 18 | — | NC | — | Not used |
| 19–30 | — | GND | — | Twisted-pair return signal ground level. |
| 31 | — | INIT | IN | When this signal goes LOW, the printer controller ignores the STROBE signal. |
| 32 | — | ERROR | OUT | This signal level goes LOW when the printer is: 1. Out of paper 2. In an error state 3. Off line |
| 33 | — | GND | — | Same as for Pins 19–30 |
| 34 | — | NC | — | Not used |
| 35 | — | +5V | — | Pulled up to +5 V through 1 KΩ resistance. |
| 36 | — | SLCTIN | IN | Available only for bidirectional use. |
Note:
All interface conditions are based on TTL level. Both the rise and fall times of each signal must be less than 0.2 microseconds.
Data transfer must be carried out by observing the ACKNLG or BUSY signal. (Data transfer to this printer can be carried out only after receipt of the ACKNLG signal or when the level of the BUSY signal is LOW.)
The column heading "Direction" refers to the direction of signal flow as viewed from the printer.
- Return denotes the twisted-pair return to be connected at signal ground level. For the interface wiring, be sure to use a twisted-pair cable for each signal and to complete the connection on the return side.
The ACKNLG pulse width varies.
To enable bidirectional parallel interface communications between the printer and computer, set the connector pin assignments as follows:
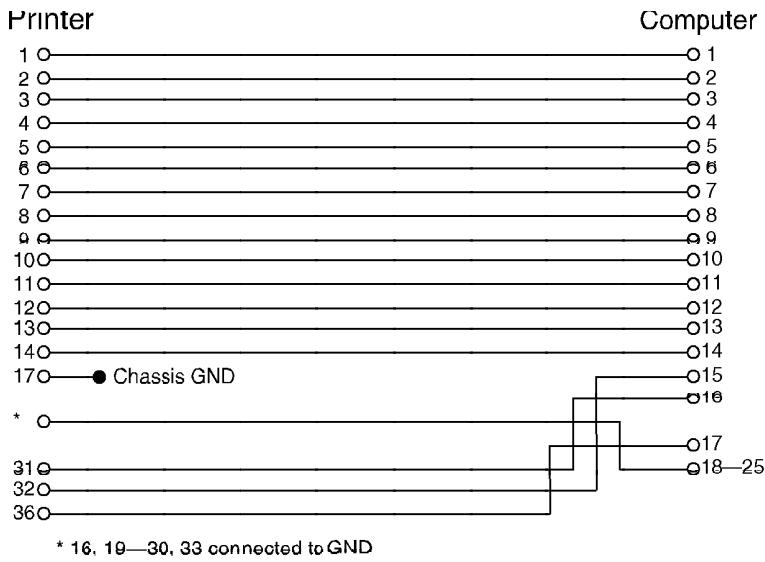
Options and Consumables
Lower paper cassette (C81230])
Paper size: A4 (C812302) or Letter (C812301)
Paper weight: 60 to 90g / m^2 (16 to 24 lb)
Paper feed: Automatic feed delivery system. Cassette capacity up to 250 sheets (75 g/m² or 20 lb paper).
Feeding speed: For first sheet, 22 seconds or less. For subsequent sheets, 6 pages per minute.
Paper types: Plain paper, such as copier paper, memo sheets, and letterheads.
AC power supply: DC 24V supplied by the printer.
Dimensions (including printer) and weight:
Height: 297 mm (11.7 inches)
Width: 368 mm (14.5 inches)
Depth: 480 mm (18.9 inches) including the cassette
Weight: 2.8kg (6.2 lb) including the cassette
Face-up output tray (C81231])
Dimensions (including printer) and weight:
Height: 360 mm (14.2 inches)
Width: 368 mm (14.5 inches)
Depth: 632 mm (24.9 inches)
Weight: 0.1kg (0.2 lb)
Paper eject capacity: 20 sheet (80g / m^2)
Imaging cartridge (S051011)
Storage temperature: 0 to 35^ (32 to 95^ )
Storage humidity: 30 to 85% RH
Shelf life: 18 months after production
Life: Up to 6000 pages under the following conditions: Letter or A4-size paper, continuous printing, and 5% print ratio.
The number of pages you can print with an imaging cartridge varies depending on the type of printing. If you print a few pages at a time or print dense text exceeding the 5% print ratio, your cartridge may print fewer pages.
Appendix B
Symbol Sets
Introduction to Symbol Sets B-2
During LJ4L Emulation Mode B-3
International set for ISO sets B-17
During EPSON LQ or FX Modes B-18
International character sets B-20
Introduction to Symbol Sets
Your printer can access a variety of symbol sets. Many of these symbol sets differ only in the international characters specific to each language.
Note:
Normally, your software handles fonts and symbols, so you probably never need to adjust the printer's settings. If you are writing your own printer control programs, or if you are using older software that cannot control fonts, see the following sections for symbol set details.
When you are considering which font to use, you should also consider which symbol set to combine with the font. Available symbol sets vary depending on which emulation mode you use and which font you choose. This appendix includes a complete table of the symbol sets available for each emulation mode.
During LJ4L Emulation Mode
The following table lists the symbol sets available in LJ4L emulation mode. A table of the characters for each set is included later in this appendix. In this table, the "3 typefaces" listed under available typefaces are Courier SWC, Dutch 801 SWC, and Swiss 742 SWC. The "5 typefaces" include those listed above plus Swiss 721 SWM and Dutch 801 SWM.
| Symbol set name | Symbol set ID for ESC ( | Available typefaces |
| Roman-8* | 8U | 5 typefaces + bitmap** |
| ECM94-1 | 0N | 5 typefaces + bitmap** |
| Legal | 1U | 5 typefaces + bitmap** |
| 8859-2 ISO | 2N | 5 typefaces |
| PsMath | 5M | 3 typefaces |
| 8859-9 ISO | 5N | 5 typefaces |
| WiTurkish | 5T | 5 typefaces |
| MsPublishing | 6J | 3 typefaces |
| VeMath | 6M | 3 typefaces |
| DeskTop | 7J | 5 typefaces |
| Math-8 | 8M | 3 typefaces |
| WiE.Europe | 9E | 5 typefaces |
| PcTk437 | 9T | 5 typefaces |
| Windows | 9U | 5 typefaces |
| PsText | 10J | 5 typefaces |
| IBM-US | 10U | 5 typefaces + bitmap** |
| IBM-DN | 11U | 5 typefaces + bitmap** |
| McText | 12J | 5 typefaces |
| PcMultilingual | 12U | 5 typefaces + bitmap** |
| VeInternational | 13J | 5 typefaces |
| VeUS | 14J | 5 typefaces |
| PiFont | 15U | 3 typefaces |
| PcE.Europe | 17U | 5 typefaces |
| Symbol | 19M | Symbol Set SWA |
| WiAnsi | 19U | 5 typefaces |
| Wingdings | 579L | More Bats SWM |
- For scalable fonts, the available sets include: Norweg1, Italian, Swedis2, ANSI ASCII, UK, French2, German, and Spanish. For bitmap fonts, the available sets include the above plus the following: Roman Extension, French, HP German, JIS ASCII, Norweg2, HP Spanish, Chinese, IRV, Swedish, Portuguese, IBM Portuguese, and IBM Spanish. These are partial variations of the Roman-8 set.
**ÉBitmapE means the ÉLine PrinterÉ and Courier typefaces. All other typefaces are scalable.
Roman-8 (8U)
ECM94-1 (ON)
Legal (1U)
8859-2 ISO (2N)
PsMath (5M)
8859-9 ISO (5N)
WiTurkish (5T)
MsPublishing (6J)
VeMath (6M)
DeskTop (7J)
Math-8 (8M)
WiE.Europe (9E)
PcTk437 (9T)
Windows (9U)
PsText (10J)
IBM-US (10U)
IBM-DN (11U)
McText (12J)
PcMultilingual (12U)
VeInternational (13J)
VeUS (14J)
PiFont (15U)
PcE.Europe (17U)
Symbol (19M)
WiAns1 (19U)
Wingdings (579L)
International set for ISO sets
To obtain the symbol sets listed below, substitute the characters in the ANSI ASCII sets with the characters in the table below.
| Iso set | ASCII code hex |
| 23 24 40 5B 5C 5D 5E 60 7B 7C 7D 7E | |
| ANSI ASCII (0U) | |
| Norwegian v1 (0D) | |
| French (0F) | |
| HP German (0G) | |
| Italian (0l) | |
| JIS ASCII (0K) | |
| Swedish 2 (0S) | |
| Norwegian v2 (1D) | |
| UK (1E) | |
| French 2 (1F) | |
| German (1G) | |
| HP Spanish (1S) | |
| Chinese (2K) | |
| Spanish (2S) | |
| IRV (2U) | |
| Swedish (3S) | |
| Portuguese (4S) | |
| IBM Portuguese (5S) | |
| IBM Spanish (6S) |
During EPSON LQ or FX Modes
This section provides character tables for the character sets available in the LQ and FX emulation modes. The tables show the characters and their hexadecimal values.
PC437 (USA, standard Europe)
PC850 (Multilingual)
PC860 (Portuguese)
PC863 (Canadian-French)
PC865 (Norwegian)
Italic
No character is available for hex code 15 in the italic character table.
International character sets
You can select one of the following international character sets using the ESC R command. For example, when you select "Italic France" the characters in the "France" row in the table below are used in the italic character table.
| Country | ASCII code hex |
| 23 24 40 5B 5C 5D 5E 60 7B 7C 7D 7E | |
| USA | |
| France | |
| Germany | |
| UK | |
| Denmark | |
| Sweden | |
| Italy | |
| Spain | |
| Japan | |
| Norway | |
| Denmark II | |
| Spain II | |
| Latin America |
Appendix C
Command Summary
Supported Control Languages C-2
LaserJet 4L (LJ4L) Emulation Commands C-2
GL/2 context commands C-6
LQ and FX Emulation Commands. C-9
PJL Mode C-12
EJL Mode C-13
Supported Control Languages
This appendix lists the available printer commands for these modes by topic.
Your printer emulates the following printers in each printer mode:
LJ4L Hewlett-Packard LaserJet 4L (PCL5e printer)
LQ mode EPSON LQ-200/400 or LQ-2500 (24-pin, ESC/P printer)
FX mode EPSON FX-800/1000 or FX-870/1170 (9-pin, ESC/P printer)
In addition, the following printer control languages are supported:
PJL Printer Job Language
EJL EPSON Job control Language
This appendix lists the available printer commands for these modes by topic.
For further information about using printer commands, see Hewlett-Packard's LaserJet 4L reference manual and the comprehensive EPSON ESC/P Reference Manual.
LaserJet 4L (LJ4L) Emulation Commands
This section lists the printer commands supported in the LJ4L emulation mode.
The following commands are specific to this printer; they belong to the page control command set. For more information on the other commands, see Hewlett-Packard's LaserJet 4L reference manual.
Job control
Reset ESC E
Number of copies ESC&1#X*
Universal exit language ESC % #X
Long-edge (left) offset registration ESC &1#U
Short-edge(top) offset registration ESC&1#Z
Unit of measure ESC &u#D
*The parameter's value is 1 to 999.
Page control
| Paper source* | ESC &l#H |
| Paper size* | ESC &l#A |
| Page length | ESC &l#P |
| Orientation | ESC &l#O |
| Print direction | ESC &a#P |
| Top margin | ESC &l#E |
| Text length | ESC &l#F |
| Left margin | ESC &a#L |
| Right margin | ESC &a#M |
| Clear horizontal margins | ESC 9 |
| Perforation skip | ESC &l#L |
| Horizontal Motion Index (HMI) | ESC &k#H |
| Vertical Motion Index (VMI) | ESC &l#C |
| Line spacing | ESC &l#D |
*These commands are specific to the EPSON EPL-5200+. For more information, see page C-8.
Cursor positioning
| Vertical position | ESC &a#R |
| ESC *p#Y | |
| ESC &a#V | |
| Horizontal position | ESC &a#c |
| ESC *p#X | |
| ESC &a#H | |
| Half line feed | ESC = |
| Line termination | ESC &k#g |
| Push/Pop position | ESC &f#S |
Font selection
Primary symbol set ESC (id Secondary symbol set ESC)id
Primary spacing ESC (s#P
Secondary spacing ESC) s#P
Primary pitch ESC (s#H
Secondary pitch ESC) s#H
Set pitch mode ESC &k#S
Primary height ESC (s#V
Secondary height ESC) s#V
Primary style ESC (s#S
Secondary style ESC)s#S
Primary font stroke weight ESC (s#B
Secondary font stroke weight ESC)s#B
Primary typeface family* ESC (s#T
Secondary typeface family* ESC)S#T
Primary font default ESC (3@
Secondary font default ESC)3@
Enableunderline ESC&d#D
Disable underline ESC &d@
Transparent print data ESC &p#X[data]
*These commands show the EPSON font (typeface). The corresponding HP equivalent is shown on page 5-6. For more information, see Hewlett-Packard's LaserJet 4L reference manual.
Font management
Assign font ID ESC *c#D
Font and character control ESC *c#F
Select primary font with ID # ESC (#X
Select secondary font with ID # ESC )#X
Set symbol set ESC *c#R
Define symbol set ESC (f#W[data]
Symbol set control ESC *c#S
Soft font creation
Font descriptor (font header) ESC)s#W[data]
Download character ESC (s#W[data]
Character code ESC *c#E
Raster graphics
Raster resolution ESC *t#R
Raster graphics presentation ESC _#
Start raster graphics ESC *r#A
Raster Y offset ESC *b#Y
Set raster compression mode ESC *b#M
Transfer raster data ESC *b#W[data]
End raster graphics (old version) ESC *rB
End raster graphics (proffered) ESC *rC
Raster graphics height ESC _#
Raster graphics width ESC *r#S
Print model
Select current pattern ESC *v#T
Select source transparency mode ESC *v#N
Select pattern transparency modeESC *v#O
Rectangle width (PCL unit) ESC *c#A
Rectangle width (decipoints) ESC *c#H
Rectangle height (PCL unit) ESC *c#B
Rectangle height (decipoints) ESC *c#V
Fill rectangular area ESC *c#P
Pattern ID ESC *c#G
User-defined pattern/management creation
Define pattern ESC *c#W[data]
User-defined pattern control ESC *c#Q
Set pattern point ESC *p#R
Macros
Macro ID ESC &f#Y
Macro control ESC &f#X
Status readback
Set status readback location type ESC *s#T
Set status readback location unit ESC *s#U
Inquire status readback entity ESC *s#I
Flush all pages ESC &r#F
Free memory space ESC *s1M
Echo ESC *s#X
Programming hints
End-of-line wrap ESC &s#C
Enable display functions ESC Y
Disable display functions ESC Z
Vector graphics
Enter GL/2 emulation ESC % #B
GL/2 emulation plot horizontal size ESC *c#K
GL/2 emulation plot vertical size ESC *c#L
Set picture frame anchor point ESC *cOT
Picture frame horizontal size ESC*c#X
Picture frame vertical size ESC *c#Y
Control codes
Backspace BS
Line feed LF
Form feed FF
Carriage return CR
Select primary font SI
Select secondary font SO
Horizontal tab HT
Escape ESC
Space SP
GL/2 context commands
Dual context extensions
Enter PCL Mode ESC % #A
Reset ESC E
Primary Font FI
Secondary Font FN
Scalable or Bitmapped Fonts SB
Palette extensions
Transparency Mode TR
Screened Vectors SV
Circle CI
Vector group
Arc Absolute AA
Arc Relative AR
Absolute Arc Three Point AT
Relative Arc Three Point RT
Bezier Absolute BZ
Bezier Relative BR
Plot Absolute PA
Plot Relative PR
Pen Down PD
Pen Up PU
Polyline Encoded PE
Polygon group
Fill Rectangle Absolute RA
Fill Rectangle Relative RR
Edge Rectangle Absolute EA
Edge Rectangle Relative ER
Fill Wedge WG
Edge Wedge EW
Polygon Mode PM
Fill Polygon FP
Edge Polygon EP
Character group
Select Standard Font SS
Select Alternate Font SA
Absolute Direction DI
Relative Direction DR
Absolute Character Size SI
Relative Character Size SR
Character Slant SL
Extra Space ES
Standard Font Definition SD
Alternate Font Definition AD
Character Fill Mode CF
Label Origin LO
Label LB
Define Label Terminator DT
Character Plot CP
Transparent Data TD
Define Variable Text Path DV
Line and fill attribute group
Line Type LT
Line Attribute LA
Pen Width PW
Pen Width Unit Selection WU
Number of Pens NP
Select Pen SP
Symbol Mode SM
Fill Type FT
Anchor Corner AC
Raster Fill Definition RF
User-Defined Line Type UL
Configuration and status group
Scale SC
Input Window IW
Input P1 and P2 IP
Input Relative P1 and P2 IR
Default Values DF
Initialize IN
Rotate Coordinate System RO
Comment CO
Commands specific to this printer
Function Command parameter
Paper source ESC&1#H # =0-5
0 =Eject page
1 = Standard (upper) tray
2 = Manual feed
3 = Manual feed
4 = Optional (lower) paper cassette
5 = Optional (lower) paper cassette
Page size
ESC &1#A
= 1,2,3,26,80,81,90,91,100
1 =Executive
2 =Letter
3 = Legal
26 =A4
80 = Monarch
81 = COM 10
90 = International DL
91 = International C5
100 = International B5
LQ and FX Emulation Commands
This section lists the control codes and ESC codes supported in the LQ and FX emulation modes. Some LQ and FX printer codes are not available, either because the functions are not required (such as draft printing) or are not possible because of the different technologies used in these printers. For more information, see the EPSON ESC/P Reference Manual.
Printer operation
Initialize printer ESC @
Select printer DC1
Deselect printer DC3
Control paper loading/ejecting ESC EM
Data control
Carriage return CR
Delete character DEL
Set MSB to 0 ESC =
Set MSB to 1 ESC>
Cancel MSB control ESC#
Vertical motion
Form feed FF
Set page length in lines ESC C
Set page length in inches ESC C0
Set skip-over-perforation ESC N
Cancel skip-over-perforation ESCO
Line feed LF
Select 1/8-inch line spacing ESC0
Select 7/72-inch line spacing (FX only) ESC 1
Select 1/6-inch line spacing ESC2
Select n/180-inch line spacing (LQ) ESC 3
Select n/216-inch line spacing (FX)
Select n/60-inch line spacing (LQ) ESC A
Select n/72-inch line spacing (FX)
Select n/360-inch line spacing (LQ only) ESC +
Perform n/180-inch line spacing (LQ) ESC J
Perform n/216-inch line spacing (FX)
Perform n/180-inch reverse feed ((LQ only) ESC j
Tab vertically VT
Set vertical tabs ESC B
Set vertical tabs in channels ESC b
Select vertical tab channel ESC/
Horizontal motion
Set absolute horizontal print position ESC $
Set relative horizontal print position ESC\
Set left margin ESC1
Set right margin ESCQ
Backspace BS
Tab horizontally HT
Set horizontal tabs ESC D
Overall printing style
Select letter quality or draft ESC x
Select typeface family ESC k
Master select ESC!
Print size and character width
| Select 15 cpi | ESC g |
| Select 10 cpi | ESC P |
| Select 12 cpi | ESC M |
| Turn proportional mode on/off | ESC p |
| Select condensed mode | SI |
| Select condensed mode | ESC SI |
| Cancel condensed mode | DC2 |
| Select double-width mode (one line) | SO |
| Select double-width mode (one line) | ESC SQ |
| Cancel double-width mode (one line) | DC4 |
| Turn double-width mode on/off | ESC W |
| Turn double-height printing on/off | ESC w |
Font enhancement
| Select emphasized mode | ESC E |
| Cancel emphasized mode | ESC F |
| Select double-strike mode | ESC G |
| Cancel double-strike mode | ESC H |
| Select superscript/subscript mode | ESC S |
| Cancel superscript/subscript mode | ESC T |
| Select italic mode | ESC 4 |
| Cancel italic mode | ESC 5 |
| Turn underline mode on/off | ESC - |
Word processing
| Select justification | ESC a |
| Set intercharacter space | ESC SP |
Character handling
| Select character table | ESC t | |
| Select international character set | ESC R | |
| Define user-defined characters | ESC & | |
| Copy ROM to RAM | ESC : | |
| Select user-defined set | ESC % | |
| Printable code area expansion (FX only) | ESC I | |
| Disable upper control codes | ESC 6 | |
| Enable upper control codes | ESC 7 | |
Graphics
Select single-density graphics mode ESC K
Select double-density graphics mode ESC L
Select high-speed double-density graphics mode ESC Y
Select quadruple-density graphics mode ESC Z
Select graphics mode ESC*
Reassign graphics mode ESC?
- Select 9-pin graphics mode (FX only) ESC
PJL Mode
This section lists the available commands for the Printer Job Language (PJL). For more information on PJL, see Hewlett-Packard's Printer Job Language Technical Reference Manual.
Function Command
COMMENT @PJL COMMENT words & [< CR > ] < LF > & [< CR > ] < LF > & [< CR > ] < LF > & [< CR > ] < LF > & [< CR > ] < LF > & [< CR > ] < LF > & [< CR > ] < LF > & % - 12345X & [< CR > ] < LF > & [< CR > ] < LF > & [< CR > ] < LF > & [< CR > ] < LF > & [< CR > ] < LF > & [< CR > ] < LF > & [< CR > ] < LF > & [< CR > ] < LF > & [< CR > ] < LF > & [< CR > ] < LF > & [< CR > ] < LF > & [< CR > ] < LF > & [< CR > ] < LF > & [< CR > ] < LF > & [< CR > ] < LF > & [< CR > ] < LF > & [< CR > ] < LF > & (PJL) [< CR > ] < LF > & (PJL) [< CR > ] < LF > & (PJL) [< CR > ] < LF > & (PJL) [< CR > ] < LF > & (PJL) [< CR > ] < LF > (PJL) [< CR > ] < LF > & (PJL) [< CR > ] < LF > & (PJL) [< CR > ] < LF > & (PJL) [< CR > ] < LF > & (PJL) [< CR> ] < LF > & (PJL) [< CR> ] < LF > & (PJL) [< CR> ] < LF > & (PJL) [< CR> ] < LF > & (PJL) [< CR> ] < LF > & & (PJL) [< CR> ] < LF > & (PJL) [< CR> ] < LF > & (PJL) [< CR> ] < LF > & (PJL) [< CR> ] < LF > & (PJL) [≤slant] < LF > & (PJL) [≤slant] < LF > & (PJL) [≤slant] < LF > & (PJL) [≤slant] < LF > & (PJL) [≤slant] < LF > & [0.0000000000000000000000000000000000000000000000000000000000000000000000000000000000000000000000000000 & (PJL) [< CR> ] < LF > & (PJL) [< CR> ] < LF > & (PJL) [< CR> ] < LF > & (PJL) [< CR> ] < LF > & (PJL) [< CR> ] < LF > & (PJL) [< CR> ] < LF > & (PJL) [< CR> ] < LF > & (PJL) [< CR> ] < LF > & (PJL) [< CR> ] < LF > & [1.99999999999999999999999999999999999999999999999999999999999999999999999999999999999999999999999999998 DEFAULT @ PJL DEFAULT [LPARM] [
DINQUIRE @ PJL DINQUIRE [LPARM] [
ECHO @ PJL ECHO [Words] [
ENTER @ PJL ENTER LANGUAGE = *** [
INFO @ PJL INFO read only variable [
INITIALIZE @ PJL INITIALIZE [
INQUIRE @ PJL INQUIRE [LPARM] variable [
RESET @ PJL RESET [
SET @ PJL SET [LPARM] [
UEL/SPJL
-%-12345X
USTATUS @ PJL USTATUS variable = value [
USTATUSOFF @ PJL USTATUSOFF [
PJL @ PJL [
You can also enter the EJL emulation from the PJL emulation by specifying EJL as the destination language of the ENTER command.
EJL Mode
This section lists the commands for EJL (EPSON Job control Language). EJL can perform the following operations in your printer:
o Switch the printer emulation
o Transfer the printer's system information to the computer
o Enter the Printer Job Language (PJL)
EJL can switch the printer emulation with a mono-directional interface, but a bidirectional interface is required for the computer to receive system information from the printer.
Function Command
Universal exit
Enter printer emulation @EJL
LANGUAGE: LJ4L, LQ, FX, EPSON GL2, SCRIPT2, WPS
*Available only when the appropriate option module is installed.
Comment @EJL
Inquire name @EJL
Overview of the EJL commands
EJL commands must be sent immediately after the printer receives the universal exit command; otherwise the printer returns to its default printer emulation.
Every EJL command starts with the string @EJL, which must be in uppercase letters, although other commands can be in both uppercase and lowercase.
You must send the LF code at the end of an EJL command; only an LF code terminates the EJL command. If the EJL command is not followed by an LF code, the printer does not recognize it as an EJL command; it is then printed as a character string in the current printer emulation.
If the printer emulation you attempt to switch to is not available, the printer switches to the default printer emulation.
Command summary for using EJL
Description: Exit current printer emulation and enter EJL mode
@EJL
Option (Value): LANGUAGE (LJ4L, LQ, FX, EPSON GL2, SCRIPT2, WPS)
- Available only when the appropriate option module is installed.
Description: Enter printer emulation from EJL mode
@EJL
Description: Enter comments
@EJL
Description: Inquires printer name. If you are using a bidirectional between the computer and the printer, your printer outputs the following answer strings:
@EJL ANSWER NAME =
@EJL
Description: Send the device ID to host computer
@EJL
Option (Value): LANGUAGE (LJ4L, LQ, FX)
Description: Specify the available language under EJL mode
@EJL
Description: Specify the setting
Option (Value): STANDBY (ENABLE, DISABLE), TOPOFFSET (0 to 99), LEFTOFFSET (0 to 99), PAGESIZE (LT, LGL, A4, EXE, MON, C5, DL, A5, B5, HLT, GLT, GLG, F4, C6, POSTCARD, COM10, IB5) SRCSYSMSSET (0 to 3199), DESTSYMSET (0 to 3199) CGTABLE (ITALIC, PCUSA, PCMULT, PCPORT, PCCANF, PCNORD, DLOAD) AUTOCR (ON, OFF), ZERO (NORMAL, SLASHEDZERO), WIDEPAGE (ON, OFF), BITIMAGE (DARK, LIGHT, BCODE)
@EJL
Description: Save the setting in EEPROM as the default of the EJL mode settings
Option (value): STANDBY (ENABLE, DISABLE), TOPOFFSET (0 to 99), LEFTOFFSET (0 to 99), PAGESIZE (LT, LGL, A4, EXE, MON, C5, DL, A5, B5, HLT, GLT, GLG, F4, C6, POSTCARD, COM10, IB5) SRCSYSMSET (0 to 3199), DESTSYMSET (0 to 3199) CGTABLE (ITALIC, PCUSA, PCMULT, PCPORT, PCCANF, PCNORD, DLOAD) AUTOCR (ON, OFF), ZERO (NORMAL, SLASHEDZERO), WIDEPAGE (ON, OFF), BITIMAGE (DARK, LIGHT, BCODE)
@EJL
Description: Print the printer's current status sheet
Option: STATUSHEET, RITECHSHEET, LJ4LFONTSHEET, PSFONTSHEET, STATUSLIST, FXFONTSHEET, LQFONTSHEET
Example with
@EJL
Decimal: 64 69 74 76 32 69 78 84 69 82 32 76 65 78 71 85 65 71 69
[32] 61 [32]
Hexadecimal: 40 45 4A 4C 20 45 4E 54 45 52 20 4C 41 4E 47 55 41 47 45
[20] 3D [20]
Note:
Appendix D
Option Installation
Installing the Options D-2
Lower Paper Cassette D-3
Installing the lower paper cassette D-3
Loading paper into the lower paper cassette D-5
Face-up Output Tray D-7
Memory Module D-8
Installing the memory module D-9
Removing a SIMM D-15
ROM Module D-15
Optional Interface Cards D-16
Installing an interface D-17
Using the serial interface cards D-19
Sharing the printer D-20
Optional Cartridge D-20
Installing a cartridge. D-21
Removing a cartridge D-21
Availablefontcartridges D-22
Installing the Options
You can expand the printer's capabilities by adding the following options:
250-Sheet Lower Paper Cassette (C81230]) to load up to 250 sheets of A4-size paper into this cassette.
Face-up Output Tray (C81231]) to allow the printer to deliver paper face-up for immediate viewing of your printed output.
A 1MB, 2MB, or 4MB SIMM to increase your printer's memory.
An optional EpsonScript Level 2 module (C83212]) or EpsonScript Level 2 cartridge (C83202]), which generates crisp documents that have been written in PostScript. See "ROM Module" or "Optional Cartridge" to install.
EPSON® C83213] Optional Kit for Microsoft® At Work Printing Software, which extends the power of the Windows operating system version 3.1 to your printer. See "ROM Module" to install.
- Optional Type-B interfaces, including serial, parallel, coax, twinax, and LocalTalk.
- Optional cartridges to provide many different typefaces in addition to your printer's internal fonts. The list of compatible font cartridges from various vendors begins on page D-22.
Each of these options is discussed in its own section.
If you purchased your printer and options at the same time, first set up the printer and run the print test by following the instructions in the Getting Ready! guide. Then install the options.
C
Caution:
Before installing an option, carefully read the manual that comes with the option.
Lower Paper Cassette
This section covers only the steps to install the lower paper cassette. Since it can be used as an integral part of the printer after installation is complete, see the relevant chapters for information on loading paper, selecting the cassette, or troubleshooting.
Installing the lower paper cassette
To install the lower paper cassette, follow these steps:
- Turn off the printer. Unplug the printer's power cord from the electrical outlet and from the printer. Disconnect all interface cables from the interface connectors.
- Remove the face-up tray, if it is installed.
-
Position the lower paper cassette, with the paper cassette toward you, where you will operate your printer.
-
Lift the printer on each side, making sure the front of the printer faces the same way as the front of the cassette. Then align the printer with the cassette, using the two alignment pins. These pins fit into the two holes on the bottom of the printer. Lower the printer until it rests on the cassette.
C Caution: When lowering the printer, be sure the interface cable is not pinched between the printer and the lower paper cassette.
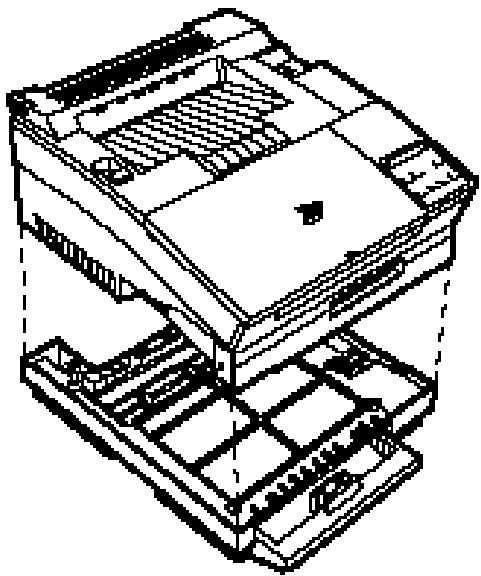
Note: The printer is heavy, so you may need to have someone help you lift it.
- Reconnect any interface cables you removed.
- Be sure the power is turned off and then plug the power cord into the printer and into an electrical outlet.
- Turn the printer on.
To select paper feed from the optional lower paper casstte, you need to set OPT or AUTO in the SelectType Level 1 INPUT menu. For more information on INPUT, see Chapter 2 "SelectType."
Loading paper into the lower paper cassette
- Remove the paper cassette from the printer by lifting up slightly on the front of the cassette while pulling it out. Then place it on a flat surface.
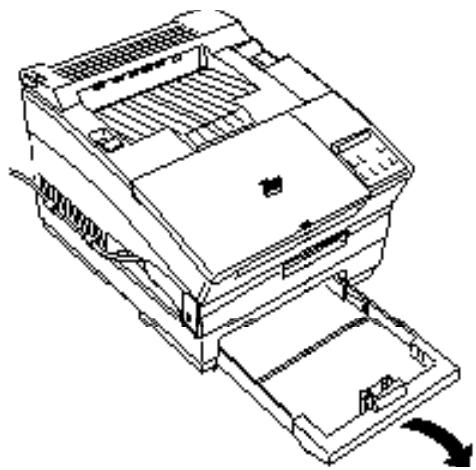
- Take a stack of paper and fan it thoroughly.
- Press down the plate in the cassette until it snaps into position.
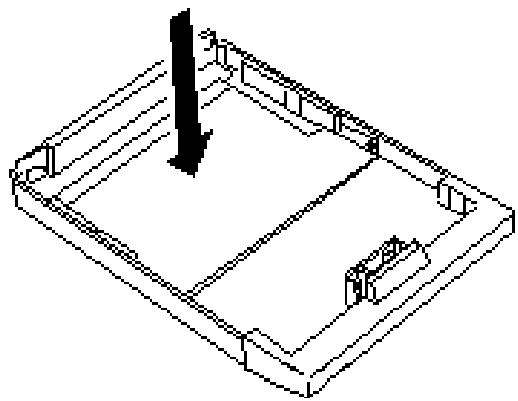
- Insert the stack of paper face-up into the cassette with the corners of the paper beneath the two tabs at the back of the paper cassette.
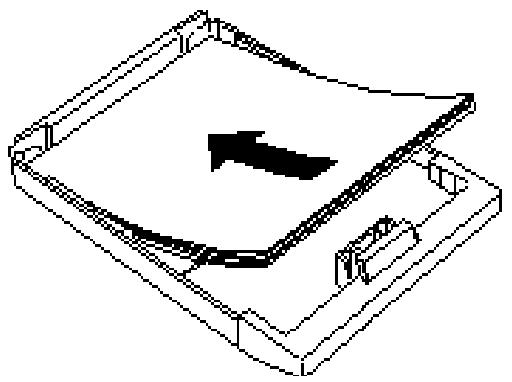
Note: Do not load paper above the marks on the cassette.
- Reinsert the cassette into the lower cassette unit and push it firmly into place.
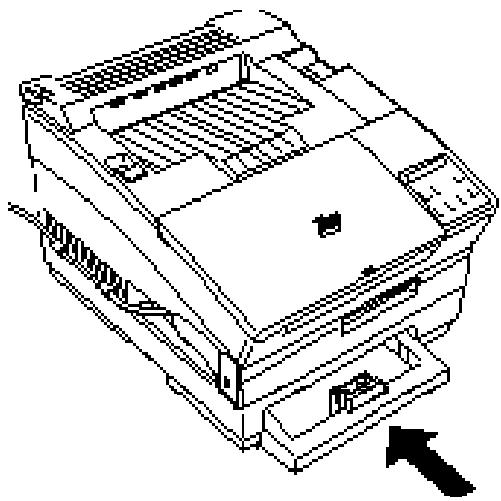
Face-up Output Tray
The printer normally delivers paper face down on top of the printer. If you want face-up delivery, you can install the optional face-up output tray. This tray is recommended for printing on media such as labels and overhead transparencies that require a straight-through paper path.
Using the face-up output tray
- Hold the output tray tilted at a slight angle away from you. Then insert it into the back of the printer; place the pins on the bottom side corners of the tray into the holes on each side of the paper ejection slot one at a time, as shown below.
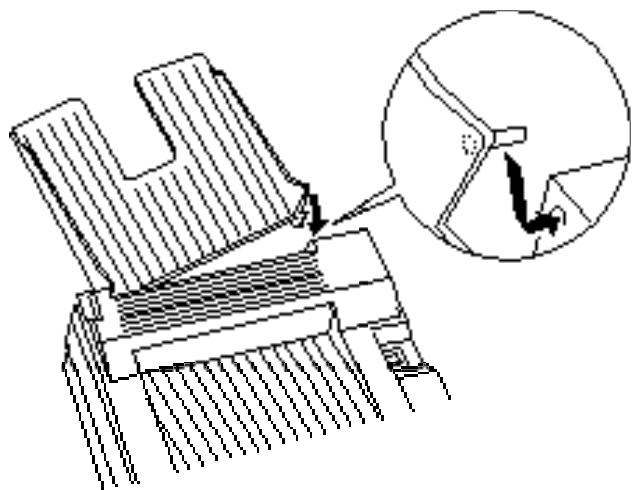
- After installing the face-up output tray, you can switch the paper path selector between face-up and face-down output, as shown below.
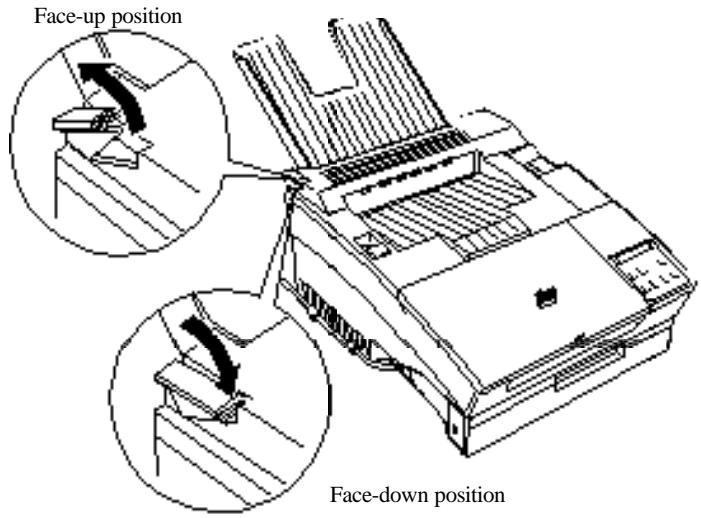
Memory Module
By installing a 1MB, 2MB, or 4MB Single In-line Memory Module (SIMM), you can increase printer memory up to 5MB. You may want to add additional memory if you are having difficulty printing complex, graphics-intensive pages or if you regularly use numerous downloaded fonts.
You can purchase SIMMs from various vendors. Be sure the SIMMs you purchase meet the following requirements:
72-pintype
Capacity of 1MB, 2MB, or 4MB
Access speed less than 70ns
Dimensions within 108mm (4.25 inches) 26mm (1.02 inches), with a thickness of 10mm (.4 inches)
Installing the memory module
W
Warning:
High voltages are present inside the printer when the power is on. Do not attempt to install a SIMM unless the printer is turned off.
- Turn off the printer and unplug the power cable from the electrical outlet. Remove the optional cartridge and lower paper cassette, if installed.
- Turn the printer so that its left side is facing you.
- Disconnect all interface cables from the interface connectors.
- Remove the two screws securing the interface card cover; then pull off the cover. Keep the screws handy so that you can use them later.

C
Caution:
Before you remove the controller board, make sure that you remove any optional cartridges. Otherwise, you may damage it.
- Remove the three screws securing the controller board; then pull the tab on the bracket to release the controller board.
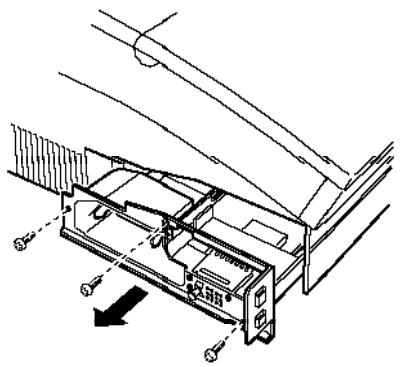
W
Warning:
Avoid touching the electrical components that are exposed after you remove the cover from the mount window. They may be very hot if the printer has been used recently.
C
Caution:
Before you remove the controller board, be sure to discharge any static electricity on your person by touching the printer's shield case. Otherwise, you may damage static-sensitive components.
- Grasp the board with both hands and pull it straight out of its slot.
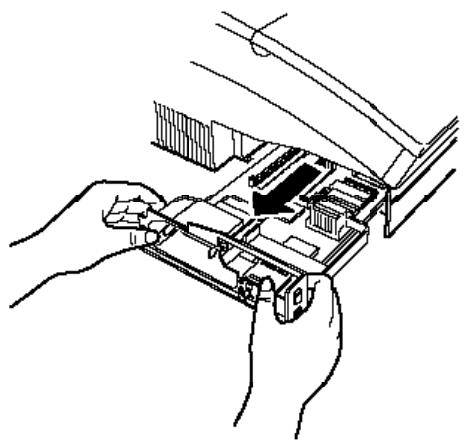
- Place the controller board on a clean, stable surface. Locate the two memory module slots as shown below.
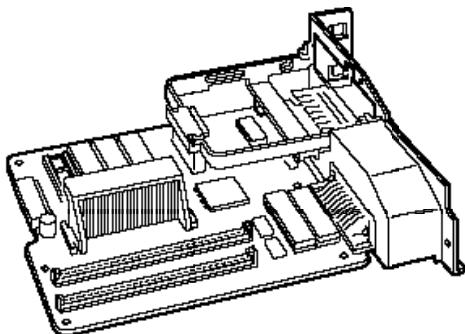
- Install the memory module into the slot marked "RAM SLOT" at an angle (leaning toward you.) Make sure the notch in the module board is positioned at the lower left side.
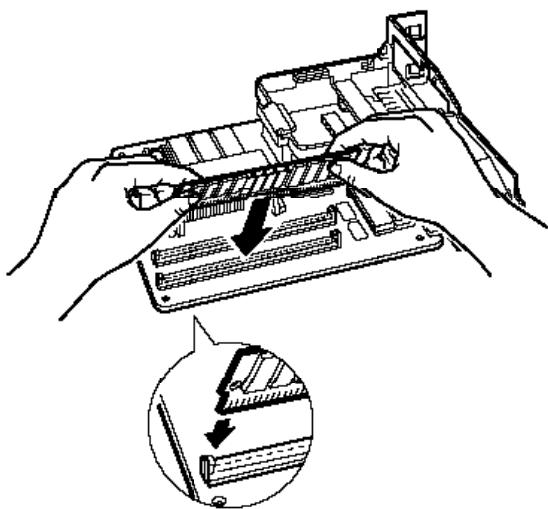
- Press the memory module in firmly, in the direction shown until it snaps into the connector. Do not apply too much pressure.
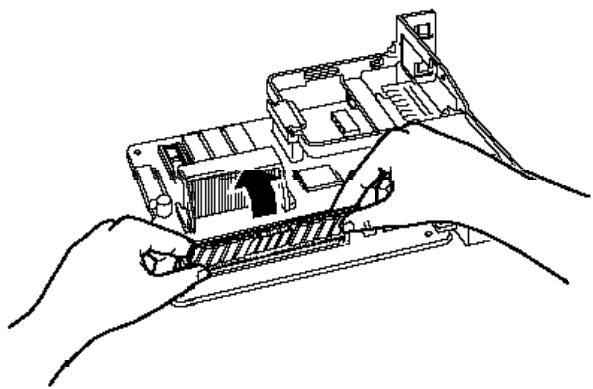
- Reinstall the controller board.
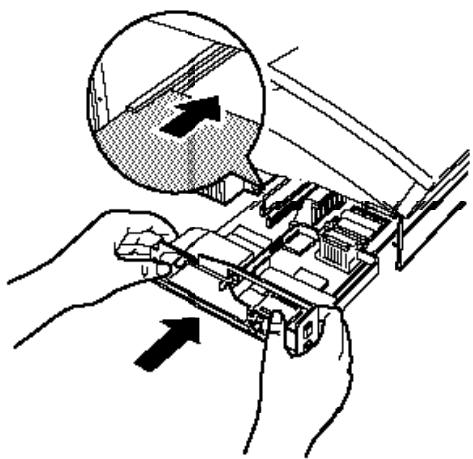
C
Caution:
If the controller board does not fit smoothly into the printer, do not force it. Remove it and make sure the edges fit properly into the grooves inside the slot.
- Secure the board with the three screws you removed earlier.
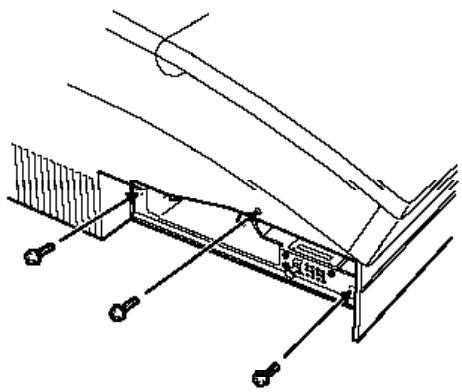
- Replace the interface cover and secure it with the two screws you removed earlier.
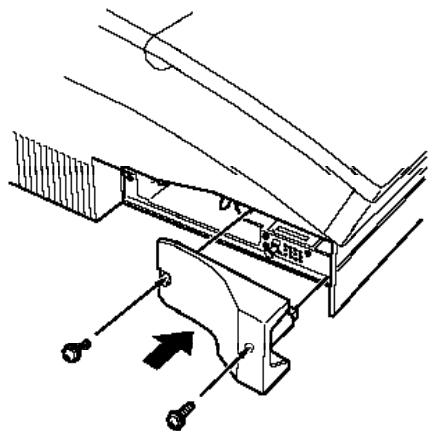
-
Reconnect any interface cables you removed.
-
Insert the interface cable into the U-shaped part of one cable clip. Lift the left side of the printer up slightly. Then hook the short lip of the clip into the forward slot and push the bottom of the clip under the printer until it clicks in place. Repeat with the second clip and install in the rear slot.
Note:
Hook no more than two cables into one cable clip. Never put too much pressure on the cables.
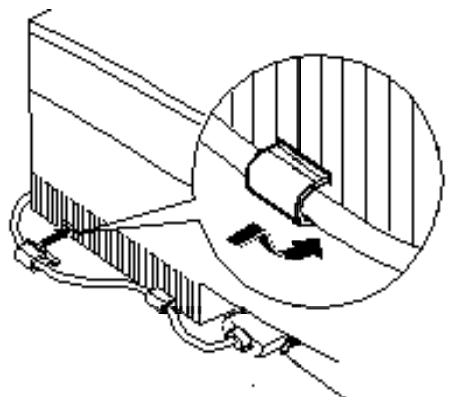
- Be sure the power is turned off and then plug the power cord into an electrical outlet.
- Turn on the printer.
Note:
If you did not install the memory module correctly, INSUFF. MEMORY or ADD MEMORY CH: X shows on the display. Review the steps above to make sure you correctly installed the SIMM. If the amount of RAM is still incorrect, contact your dealer or a qualified service person for assistance.
Removing a SIMM
-
Perform steps 1 through 7 under "Installing a SIMM" to remove the controller board from the printer.
-
Pull the metal clips on each side of the SIMM socket outward to release the SIMM.
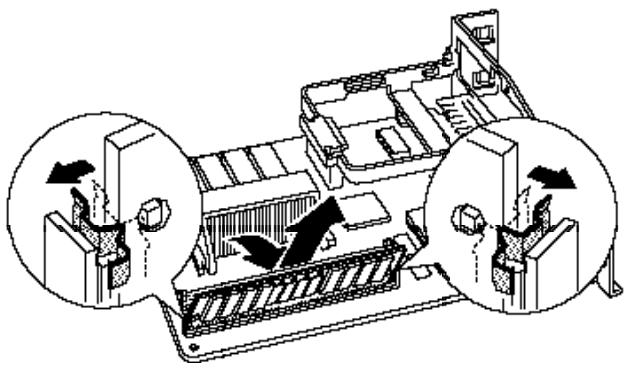
- Grasp both sides of the SIMM and pull it out at an angle.
- Perform steps 10 through 16 under "Installing a SIMM" to reinstall the controller board.
ROM Module
You can install the EpsonScript Level 2 module (C83212]) or the EPSON® C83213] Optional Kit for Microsoft® At Work Printing Software following the same basic steps as those used to install the memory module. See the previous section, "Installing the memory module." However, they must be installed in the ROM slot rather than in the RAM slot.
EpsonScript needs at least 1MB of additional RAM. Increase the amount of RAM before installing the ROM module.
Note:
If you install the EpsonScript Level 2 SIMM and an optional cartridge, you must choose which one you will use from the SelectType Level 2 OPT menu. You cannot use both options at the same time. For more information on setting the OPT option, see 2-29.
EPSON® C83213] Optional Kit for Microsoft® At Work Printing Software needs at least 7.5 MB of available hard-disk space on your computer (you will need less space if you do not install all components).
Optional Interface Cards
To add a parallel or serial interface to your printer, use one of the following:
Serial Interface Card C82305]
32KB Serial Interface Card C82307]
32KB Parallel Interface Card C82310]
To add a direct connection to an IBM^® mini or mainframe system, use one of the following:
Coax Interface Card C82314]
Twinax Interface Card C82315]
The coax and twinax connectors each contain a parallel interface. Since the printer's built-in parallel interface remains active, this gives you two parallel interfaces and a coax or twinax interface. Print jobs can be sent to any connection, and the printer automatically switches between the active ports.
The twinax interface is compatible with the following IBM systems: AS-400, System 36, 5251 (model 12), System 34, System 38, and 5294. When equipped with the EPSON twinax interface, the printer can be used in place of the following IBM system printers: 4210, 5224 (model 1 and 2), 5256 (model 1, 2, and 3), 3218 (non IPDS), 4214 (model 2), 5225 (model 1, 2, 3, and 4), and 5219 D01, D02.
The coax interface allows the printer to be connected to the following IBM control units and mainframe systems: 3174, 3276, 4274, and 3270.
To add a direct connection to a Macintosh® computer with the optional EpsonScript Level 2 SIMM module, use the AppleTalk Interface Card (C82312].
Installing an interface
To install an optional interface, you need a cross-head screwdriver.
- Turn off the printer. Unplug the power cord from both the electrical outlet and the back of the printer. To give yourself more maneuvering space, you might want to unplug the interface cable from the back of the printer.
- Turn the printer so that its left side is facing you.
- Remove the two screws securing the interface card cover; then pull off the cover. Keep the screws handy so that you can use them later.
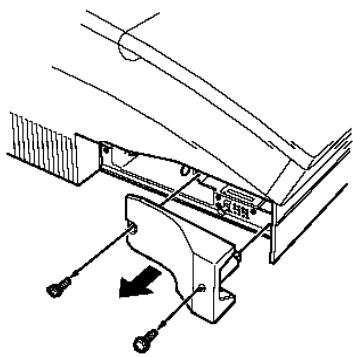
- Slide the interface into the grooves in the interface slot, as shown below. Push it in firmly to make sure it connects to the printer's internal socket.
- Secure the interface card in the slot with the two screws included with the interface card.
- Connect the proper interface cable to the interface and to your computer. Also, reconnect the other interface cables if you disconnected them from your computer. See the Getting Ready! guide for assistance.
- Insert the interface cable into the U-shaped part of one cable clip. Lift the left side of the printer up slightly. Then hook the short lip of the clip into the forward slot and push the bottom of the clip under the printer until it clicks in place. Repeat with the second clip and install in the rear slot.
Note:
Hook no more than two cables into one cable clip. Never put too much pressure on the cables.

- Turn the printer around so that the control panel faces you. Make sure the printer is turned off; then plug the power cord into the printer and into an electrical outlet.
To verify whether the interface is correctly installed, enter SelectType Level 2 and press u or d until INTERFACE appears and press r. Then press u or d until CH O displays. If it does not, check the installation.
Using the serial interface cards
If you installed a serial interface, you need to ensure that the printer and the computer are using the same serial settings. If the serial settings do not match, you must change the appropriate settings. The settings can be changed either at the printer or computer.
The default serial settings for the optional serial interface boards are listed below. To change the serial settings, refer to the interface card's manual. For information about your computer's serial settings, see your computer manual.
Serial RS-232C
Word length 8
Baud rate 9600
Parity
NONE
Stop bit
1
DTR
OFF
XON/XOFF ON
DSR
OFF
You also need to change the port setting at your computer if it is not already selected for the serial port. The following procedure describes how to change the port setting in Windows. To change the setting using non-Windows software, see your software manual.
- In the Main window, double-click on the Control Panel icon.
- Double-click on the Printers icon.
- In the Printers dialog box that appears, click the Connect button.
- Select a COM (serial) port.
- Click the OK button.
- Close the Printers dialog box.
Sharing the printer
Two computers can be connected directly to the printer if you install an optional interface and if each computer is connected to a different interface port. If you need to connect more than two computers or if you need to connect multiple computers to the same port, you can indirectly connect the computers to the printer by using a switch box.
When multiple users are connected to the printer, you need to be aware of the potential configuration conflicts that can occur when different users have different print requirements.
The conflicts occur because Remote Control Panel settings are shared by all users of the printer. Each time the Remote Control Panel settings are changed, other users are affected. Therefore it's important to keep other users informed of the changes you make. Also, if your printout is not what you expect, check first whether any Remote Control Panel settings have been changed by another user.
If you modify printer settings from your software, the changes affect only your print job. Except for Page Protect, changes made from your software application do not affect other users.
Optional Cartridge
The printer has one slot for a font cartridge or an EpsonScript Level 2 cartridge.
With a font cartridge installed in your printer working in HP emulation mode, you can print the many different typefaces it provides. Be sure the EMULATION setting is set to LJ4L any time you use a font cartridge. After installation, you should select the cartridge font with the FONT option in SelectType Level 1 or use the printer driver. For more information on font cartridges, see page D-22.
When you install an EpsonScript Level 2 cartridge, you can select from a variety of printer emulation modes that provide automatic switching between EpsonScript Level 2 and another mode, based on the data being received. For more information, see page 1-13.
Note:
If you install the EpsonScript Level 2 SIMM and an optional cartridge, you must choose which one you will use from the SelectType Level 2 OPT menu. You cannot use both options at the same time. For more information on the OPT menu, see page 2-29.
Installing a cartridge
- Make sure the printer is off, or off line, and the Feed light is off.
- Hold the cartridge so its label faces up.
- Insert the cartridge into the slot and press firmly until it snaps into place.
- Turn on the printer or set it on line.
Note:
Any one of the following messages on the display indicates that a cartridge error has occurred. Review the steps above to make sure you correctly installed the cartridge. A cartridge error occurs if you insert or remove a font cartridge when the printer memory contains data. For more information on the error messages, see page 6-15.
REINSERT CART
REMOVE CART
Removing a cartridge
- Make sure the printer is off line or turned off. If the Feed light is on, press the Feed button to print out any data before you remove the cartridge.
- Remove the cartridge by slowly pulling it straight out of the slot.
Available font cartridges
HP LaserJet compatible font cartridges are available from various suppliers. The following table lists the compatible cartridges for your printer. These cartridges can be used only in HP emulation mode.
| Supplier | Products |
| Hewlett-Packard | 92286A COURIER 1 |
| 92286B TMS PROPORTIONAL1 | |
| 92286C INTERNATIONAL1 | |
| 92286D PRESTIGE ELITE | |
| 92286E LETTER GOTHIC | |
| 92286F TMS PROPORTIONAL2 | |
| 92286G LEGAL ELITE | |
| 92286H LEGAL COURIER | |
| 92286J MATH ELITE | |
| 92286K MATH TMS | |
| 92286L COURIER P&L | |
| 92286M PRESTIGE ELITE P&L | |
| 92286N LETTER GOTHIC P&L | |
| 92286P TMS RMN P&L | |
| 92286Q MEMO1 | |
| 92286R PRESENTATIONS1 | |
| 92286T TAX1 | |
| 92286U FORMS Portrait | |
| 92286V FORMS Landscape | |
| 92286W 3-of-9/OCR A | |
| 92286X EAN/UPC/OCR-B | |
| 92286Y PC COURIER1 | |
| 92286Z MICROSOFT1 | |
| 92290S1 | |
| 92290S2 | |
| 92286PC ProCollection | |
| 92286IC International Collection | |
| C2055A #C01 GreatStart | |
| C2053A #C01 WordPerfect | |
| C2053A #C02 Microsoft | |
| C2053A #C03 Polished Worksheets | |
| C2053A #C04 Persuasive Presentations | |
| C2053A #C05 Forms Etc. | |
| C2053A #C06 Bar Codes & More | |
| C2053A #C07 Text Equations | |
| C2053A #C08 Global Text | |
| C2053A #C09 Pretty Faces | |
| Hewlett-Packard (scalable) | C2050b #C80/C90 C2050C #C80/C90 WordPerfect |
| Anacom General Corp. | AlfaJet MX-1 Maxi-One Cartridge AlfaJet PC Maxi-Pro Cartridge |
| Computer Peripherals, Inc. | JetFont SuperSet JetFont 12/30 JetFont 4-in-1 JetFont SuperSet International JetFont 425-in-One SuperSet Plus |
| Everex Computer Products LTD. | HardFont Cartridge B HardFont Cartridge F HardFont Cartridge T HardFont Cartridge Z HardFont Cartridge LGL HardFont Cartridge SST HardFont Cartridge BST HardFont Cartridge All-in-1 HardFont Cartridge A-to-Z |
| IQ Engineering | Super Cartridge 1 Super Cartridge 2 Super Cartridge 2L Super Cartridge 2LC Super Cartridge 2WP Super Cartridge 2XP Super Cartridge 2LS Series II Package |
| IQ Engineering (scalable) | Super Cartridge 3 Professional Edition Super Cartridge 3 Professional Edition Plus Super Cartridge 3 Creative Collection |
| Pacific Data Products | 25 Cartridge in One Original Version 25 Cartridge in One 172 25 in One! III Headlines in a Cartridge |
| Pacific Data Products (scalable) | Pacific Outlines I Pacific Outlines II COMPLETE FONT LIBRARY CARTRIDGE |
| UDP Data Products, Inc. | DT1-TMS RMN DT2-HELV DT4-TMS RMN/HELV H-65 65-in-One I-65 International 65-in-One PRO 65 86-IC 25 Plus Turbo 25 Super Times T&F Tax and Finance WP Plus C1 MS Plus C2 Spread sheets C3 Presentation Plus C4 Forms C5 Bar Codes C6 Equations C7 Global C8 |
| Intercon Associates, Inc. | PHONT + PRO IIP |
| Bitstream Inc. | CTG-A001 TYPE CITY STARTER PACK, DELI ADD-ON CARD MOD-A001 CENTRAL PARK ADD-ON CARD MOD-A002 SKYSCRAPER ADD-ON CARD MOD-A003 SOHO ADD-ON CARD MOD-A004 CENTURY SCHOOLBOOK ADD-ON CARD MOD-A005 HUMANIST 521 ADD-ON CARD MOD-A006 BITSTREAM CHARTER ADD-ON CARD MOD-A007 DUTCH 801 ADD-ON CARD MOD-A008 HEADLINES II ADD-ON CARD |
| OTC | Better Yet Bizzilians |
Glossary
ASCII
American Standard Code for Information Interchange. A standardized way of assigning codes to characters and control codes. The system is widely used by manufacturers of computers, printers, and software.
auto line feed
A printer feature in which each carriage return code (CR) is automatically accompanied by a line feed (LF) code.
bitmapfont
The dot-by-dot representation of a font. Bitmap fonts are displayed on computer screens and printed on dot matrix printers. See outline font.
buffer
See memory.
character set
A collection of letters, numbers, and symbols used in a particular language.
characters per inch (cpi)
A measure of the size of fixed-width text characters.
control codes
Special codes used to control printer functions such as performing a carriage return or line feed.
cpi
See characters per inch.
default
A value or setting that takes effect when the printer is turned on, reset, or initialized.
dots per inch (dpi)
The number of dots per inch is a measure of printer resolution. The higher the number of dots, the higher the resolution.
download
To transfer information from the computer to the printer.
downloaded font
A font that is loaded into the printer's memory from an outside source, such as a computer. Also called soft font.
dpi
See dots per inch.
driver
The part of a software program that converts commands from the program into commands used by the printer. Also known as the printer driver.
drum
The part of the printer mechanism where the image is formed and transferred to the paper.
emulation
See printer emulation.
ESC (escape) code
A special control code used to begin most printer commands.
fixed-width font
A font whose characters are allotted the same amount of horizontal space, no matter the width of the character. Thus the uppercase M receives the same amount of space as the letter l.
font
A set of characters and symbols that share a common typographic design and style.
font family
The collection of all sizes and styles of a font.
halftone
A grayscale image that is composed of small dots. The dots can be close together to create black or more widely spaced to create gray or white areas in the image. Newspaper photographs are common examples of halftones.
hexdumpmode
A printing mode that can be used to print out the exact codes reaching the printer. The mode can be used by experienced users as a troubleshooting tool.
imaging cartridge
The consumable part of the printer that contains a photosensitive print drum and the toner supply.
initialization
The act of returning the printer to its defaults (fixed set of conditions).
interface
The connection between the printer and the computer. A parallel interface transmits data one character or code at a time, and a serial interface transmits data one bit at a time.
landscape
Printing that is oriented sideways on the page. This orientation gives you a page that is wider than it is high and is useful for printing spreadsheets.
memory
The part of the printer's electronic system that is used to store information. Some information is fixed and is used to control how the printer operates. Information that is sent to the printer from the computer (such as downloaded fonts) is stored temporarily.
orientation
Refers to the direction in which characters are printed on a page. This direction is either portrait with the text printed across the width of the page, or landscape with the text printed across the length of the page.
outlinefont
A font whose outline is described mathematically, allowing it to be rendered smoothly at any size.
PCL
The command language built into the Hewlett-Packard LaserJet series printers.
pitch
A measure of the number of characters per inch (cpi) for fixed-width fonts.
point size
The height of a particular font as measured from the top of the tallest character to the bottom of the lowest. A point is a typographic unit of measure equivalent to 1/72 of an inch.
portrait
Printing that is oriented upright on the page (as opposed to landscape, in which printing is oriented sideways on the page). This is the standard orientation for printing letters or documents.
primer driver
See driver.
primer emulation
A set of operating commands that determines how data sent from the computer is interpreted and acted upon. Printer emulations replicate existing printers, such as the HP LaserJet 4L.
proportional font
A font whose characters have varying amounts of horizontal space depending on the width of the character. Thus the uppercase M takes up more horizontal space than the lowercase I.
RCP
See Remote Control Panel.
Remote Control Panel (RCP)
A software utility used to make changes to printer settings, including print quality, paper size, and RITech.
reset
To refresh the printer's memory and erase the current print jobs.
residentfont
A font that is stored permanently in the printer's memory.
resolution
A measure of the fineness and clarity of images produced by the printer or monitor. Printer resolution is measured in dots per inch. Monitor resolution is measured in pixels.
RITech
Resolution Improvement Technology. A feature that smooths the jagged edges of printed lines or shapes.
sans serif font
A font lacking serif.
scalablefont
See outline font.
serif
The small decorative strokes that come off the main lines of a character.
status sheet
A report that lists the printer settings and other printer information.
symbol set
A collection of symbols and special characters. Symbols are assigned to specific codes in a character table.
TrueType
An outline font format that was developed jointly by Apple Computer and Microsoft Corporation. TrueType fonts are outline fonts that can be easily resized for screen display or for printing.
Index
1, 2, 3, ...
250-sheet lower paper cassette,
see lower paper cassette
A
About, 3-9
Add Fonts, 3-23
Adding
paper size, 3-16
print mode, 3-19-20
fonts, 3-25-26
Adjusting
print density, 6-25
RITech, 6-22-24
Arrow, 3-22
Auto Continue, 4-12
AUTO CONT., 2-24
Auto CR, 4-14
AUTO CR, 2-36
Available fonts, 3-22, 5-6
bitmap, 5-7
scalable, 5-6
B
B-IMAGE, 2-37
Bit Image, 4-14
Bitmap fonts, 5-7
Buttons
Continue, 1-6
Copy End, 1-6
Exit, 1-5
Feed, 1-7
IES Mode Change, 1-6
Initialize, 1-5
Level 1, 1-5
Level 2, 1-5
On Line, 1-5, 1-7
Reset, 1-5, 1-7
C
CG Table, 4-13
CG TABLE, 2-35
CH TIMEOUT, 2-23
Changing
font name, 3-28
primer driver settings, 3-4
Choosing paper, 1-16
Cleaning
primer, 6-27-29
primer case, 6-29
spilled toner, 6-29
Closing, printer driver, 3-6
Commands
EJL, C-13-15
FX emulation, C-9-12
LJ4L emulation, C-2-9
LQ emulation, C-9-12
PJL, C-12
CONDENSED, 2-32
Consumables,A-8-9
Continue button, 1-6
Control
languages, C-2-15
panel, 1-3
primer, 1-2
Copies, 2-12, 3-8, 4-7
Copy Port, 3-24
Copying, fonts, 3-28-29
COUNTRY, 2-35
Creating
overlay, 3-31
softray,3-32-33
D
Data dump mode, 6-22
Default right margin, 2-33
Defaults, 3-9
Delete, 3-15, 3-19, 3-22, 3-30
Deleting fonts, 3-27
Density, 3-12, 4-11, 6-25
DENSITY, 2-25
Destination Symbol Set, 4-16
Device Resolution, 3-12
Display, 1-4
Dithering, 3-18
Downloading soft fonts, 5-7
Driver, see Printer driver
E
Edit Font, 3-22
Emulation
EpsonScript Level 2, 1-13, 4-4, D-2, D-15-16
GL/2, see GL/2 mode
FX, see FX emulation mode
LaserJet 4L, see LaserJet 4L emulation mode
LQ, see LQ emulation mode
EMULATION, 2-20
EJL mode, C-13-15
Envelopes, 1-17
specifications,A-3
EPRCPL, 4-3
EPSON FX, see FX emulation mode
EPSON GL/2, see GL/2 mode
EPSON LQ, see LQ emulation mode
EPSON Optional Kit for Microsoft At Work Printing Software, D-2, D-15-16
EpsonScript Level 2,4-3-4
Error messages, 6-15-21
Error sheet, 4-4
Exit, 3-13, 3-24, 3-30
F
Face-up output tray, D-7-8
Feeder, 3-12
Fixed pitch font, 2-14
FONT, 2-13
Font Manager window, 3-21
Fonts, 3-9, 3-25-29, 5-2-11 available, 5-6
downloading, 5-7
outline, 5-4
primer, 5-4
samples, 5-9-11
screen, 5-4
selecting, 5-8
Font Sample, 3-14
FONT SAMPLE, 2-15, 2-30
FORM, 2-16
Form, 4-7
FX emulation mode, 1-12-13
command, C-9-12
setting, 1-10-12, 4-5
symbol set, B-18-20
G
GL/2 mode, 1-12-13, 4-3
Graphic Resolution, 3-18
Graphics Mode, 3-12
H
Halftone, 3-18
Help, 3-5
1
IES, see Intelligent Emulation Switch
INPUT, 2-11
Image Adapt, 3-11
Image Optimum, 4-12
Imaging cartridge
replacing, 6-30-33
specifications, A-9
Initialize, 6-26-27
Installed Cartridge, 3-12
Installed Fonts, 3-21
Installing
interface card, D-17-19
memory module, D-9-15
ROM module, D-15-16
Intelligent Emulation Switch, 1-13
Intensity Control, 3-18
Interface
available, D-16
cards, D-16-20
specifications,A-5-7
using,D-19
INTERFACE, 2-21
J
J-REPRINT, 2-36
L
Labels, 1-17
Landscape, 3-8
LANG., 2-24
LaserJet 4L (LJ4L) emulation
command, C-2-9
setting, 3-2-31, 4-4
symbol set, B-2-17
Left Offset, 4-16
L-MARGIN, 2-32
L-OFFSET, 2-19
Level 1, 2-3-4, 2-10-19
Level 2, 2-4-5, 2-20-29
Lights
On Line, 1-4
Continue, 1-4
Feed, 1-5
Loading paper
standard paper tray, 1-14-15
lower paper cassette, D-5-6
Lower paper cassette, D-2, D-3-7
LQ emulation mode, 1-10-11
command, C-9-12
setting, 4-5
symbol set, B-18-20
M
Main window, 3-7
Main Remote Control Panel window, 4-3, 6-23-25
Maintenance, 6-2-33
MANUAL FEED, 2-29
Memory, 3-10
MEMORY LEFT, 2-19
Memory module, D-2-5
Measurement Unit, 3-15
Mode
EJL, C-13-15
EpsonScript Level 2,4-3-4,D-2, D-15-16
FX, see FX emulation mode
GL/2, see GL/2 mode
LaserJet 4L, see LaserJet 4L emulation mode
LQ, see LQ emulation mode
PJL, C-12
Toner Save, 1-7, 4-12
More, 4-15-16
Moving, fonts, 3-28-29
N
Name, 3-30
0
Opening, printer driver, 3-3
OPT., 2-29
Options,A-8-9,D-2-24
Installation, D-2-24
Specification,A-8-9
Lower paper cassette, A-8, D-3-6
Face-up output tray, A-8, D-7-8
Memory module, D-8-15
ROM module, D-15-16
Interface cards, D-16-20
Optional cartridge, D-20-24
ORIENT., 2-13, 2-30
Orientation, 4-8
Others, 4-13-14
Outline fonts, 5-4
Overlay, 3-30-33
P
PAGE COUNTER, 2-27
Page Protect, 3-11, 4-11
PAGE PROTECT, 2-18
Page Setup, 4-6-8
Page Size, 2-12, 4-7
Paper, 3-8
choosing, 1-16
Feed, 4-8
Format, 3-8
handling, 1-14-17
jam recovery, 6-2-5
loading, 1-14-17
size, 1-15-16, 3-14-16, A-2-3
Sizes window, 3-14
Source, 3-8
special, 1-17
specifications,A-2-3
stopper, 1-15
types, A-2
Permanent button, 3-22
PJL mode, C-12
Pitch, 4-9
PITCH, 2-31
Point Size, 4-9
Portrait, 3-8
density adjustment, 6-25
Mode, 3-8, 3-9, 3-17-20
Mode window, 3-17
quality optimizing, 6-22-25
TrueType as graphics, 3-13
Printer
cleaning, 6-27-29
control, 1-2
fonts, 5-4
initialize, 6-26-27
reset, 6-26
settings window, 3-30
Setup, 4-10-12
sharing, D-20
specifications,A-3-5
Printer driver, 1-7-8, 3-2-31
Printing
envelopes, 1-17
labels, 1-17
special paper, 1-17
transparencies, 1-17
Problems, 6-2-21
general, 6-2-8
option, 6-13-14
output, 6-7-8
paper jam, 6-2-5
power supply, 6-6-7
print quality, 6-9-13
Remote Control Panel, 6-8
SelectType, 6-8
Proportional font, 2-14
R
RCP, see Remote Control Panel
Remote Control Panel, 1-9, 4-2-16
Replacing the imaging cartridge, 6-30-33
Reset, 6-26
Restore, 3-4-5
Right margin, 2-33
RITech, 2-28, 3-12, 4-11, 6-22-24
RIT-Test, 3-14
R-MARGIN, 2-32
ROM module, D-15-16
RX-BUFFER SIZE, 2-21
S
Samples, fonts, 3-14, 5-9-11
Save, 3-31
Scalable fonts, 5-6
Screen fonts, 5-4
Screening, 3-18
Selecting fonts, 5-8
SelectType, 2-2-37, 3-8, 3-10-14
Level 1, 2-3-4, 2-10-19
Level 2, 2-4-5, 2-20-29
Using, 2-6-10
in LQ/FX mode, 2-30-37
Serial interface cards, D-16-19
Serif, 5-3
Setting
basic, printer driver, 3-6-7
paper size, 1-15-16
Show all font names, 3-13
Size, 3-15
SKIPBOTTM, 2-34
Soft fonts, 5-7
Softray, 3-30-33
Source symbol set, 4-16
Special paper, 1-17
Specifications,A-2-9
electrical,A-5
environmental, A-4
imaging cartridge, A-9
interface,A-5-7
mechanical, A-4
paper, A-2-3
parallel interface, A-5-7
primer, A-3-5
Spilled toner, cleaning, 6-29
Standby, 4-16
STANDBY, 2-28
Status messages, 6-15-21
Status sheet, 3-14
STATUS SHEET, 2-15
Stopper,paper,1-15
SUB CONFIG., 2-15, 2-31
Symbol Set, 4-9
Destination, 4-16
Source, 4-16
Symbol Sets, B-2-20
FX emulation, B-18-20
LJ4L emulation, B-2-17
LQ emulation, B-18-20
SYMSET,2-16-17
SYSTEM CONFIG, 2-18
T
Temporary button, 3-22
TEXT, 2-34
Time-out, 3-13
Toner, 3-13
TONER, 2-26
Toner Save Mode, 1-7, 3-13, 4-13
T-MARGIN, 2-34
T-OFFSET, 2-19
Top Offset, 4-15
Transparencies, 1-17
Troubleshooting, 6-2-33
Error messages, 6-15-21
option,6-13-14
Output, 6-7-8
paper jam, 6-2-5
power supply, 6-6-7
print quality, 6-9-13
Remote Control Panel, 6-8
SelectType, 6-8
TrueType, 3-13, 5-5
Type, 4-8-10
Typeface, 4-9
V
VERSION, 2-27
W
Wide Page, 4-14
WIDE PAGE, 2-37
Window (printer driver)
Add Fonts, 3-23
Copy Port, 3-24
Font Manager, 3-21-29
Overlay & Softtray Manager, 3-30-33
Main, 3-7-9
Paper Sizes, 3-14-16
Print Mode, 3-17-20
Printer Settings, 3-30-31
SelectType, 3-10-14
Window (Remote Control Panel)
Main Remote Control Panel, 4-3
Printer Mode, 4-4-5
WPS, see EPSON Optional Kit for Microsoft
At Work Printing Software
Z
Zero, 4-14
ZERO CHAR., 2-36
SelectType Level 1
COPIES 1-999
ORIENT. Refer to mode
FONT Refer to mode
STATUS SHEET
FONT SAMPLE
SUB CONFIG. Refer to mode SYSTEM CONFIG. Page Protect
0 to 62
0 to 99
0 to 99
(0 to available)
SelectType Level 2
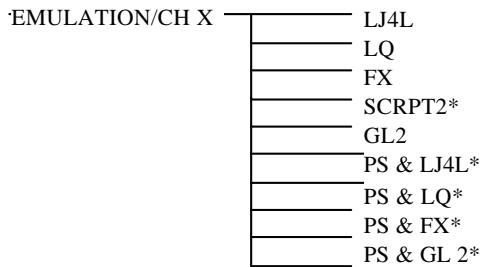
LJ4L
LQ
FX
SCRPT2*
GL2
PS & LJ4L*
PS & LQ*
PS & FX*
PS & GL 2*
LJ4L & LQ
INTERFACE
BUSY DELAY
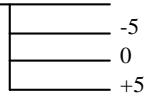
MIN
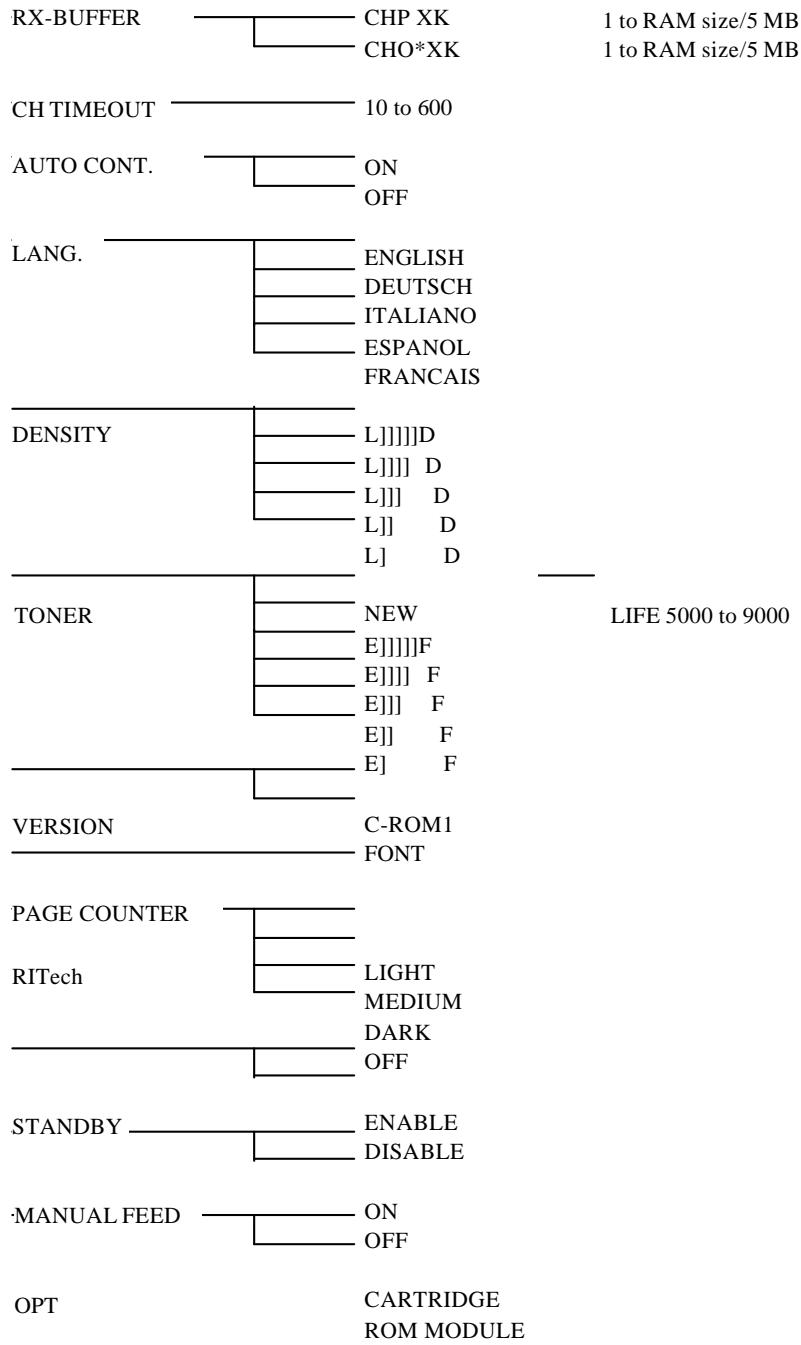
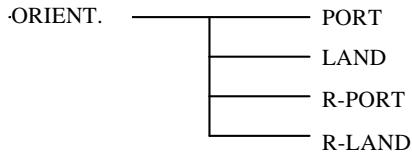
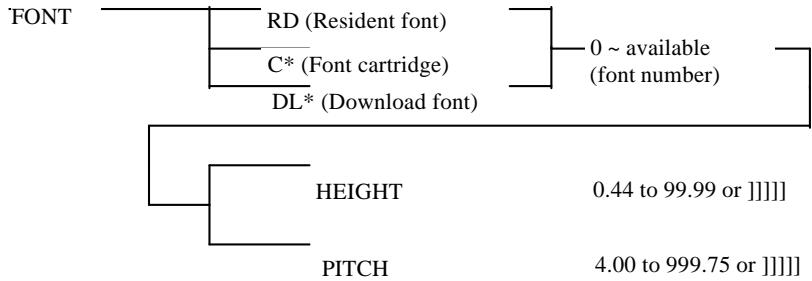
Roman-8
IBM-US
IBM-DN
ECM94-1
IRV
French
UK
Chinese
ANSI AS
Norweg1
Swedish
Norweg2
Swedis2
French2
JIS ASC
IBM Por
Italian
IBM Spa
Portugu
HP Germ
Spanish
HP Span
German
Roman E
8859-2
PcTk 437
8859-9
PcE. Eur
Legal
PcMulti
PsMath
Velnter
PsText
VeUS
Windows
MsPubli
WiTurki
WiE. Eur
WiAnsi
Wingdings
VeMath
DeskTop
Math-8
PiFont
McText
Symbol
SelectType Level 1 in LQ and FX modes
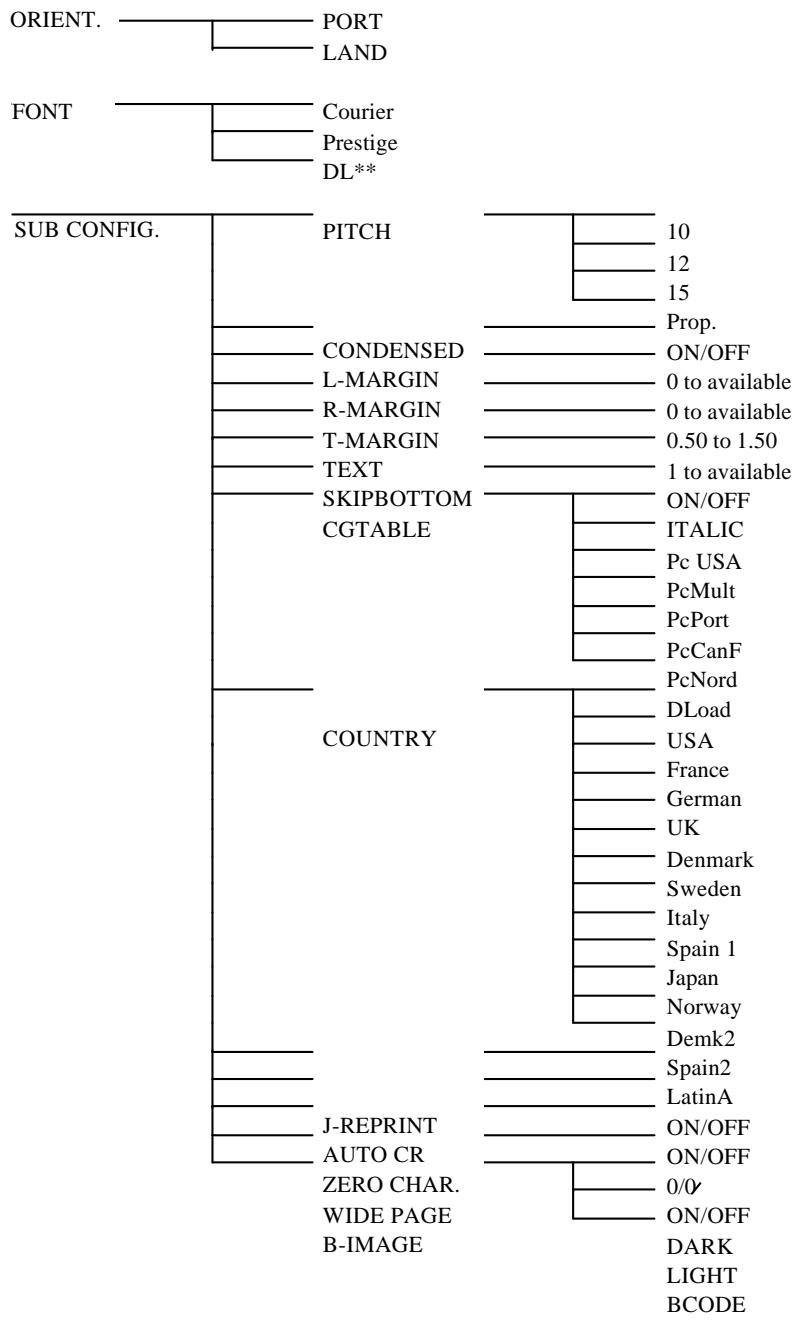
SelectType Level 1 in LJ4L mode
EPSON
EPL-5200+
Quick Reference
SelectType Map
The following menu maps show the possible menus and options in SelectType. Mode-specific options, those marked "refer to mode," are listed under each printer mode later on this card. See Chapter 2 for a description of each option.
Key
- — Only available with option
** — Only available when a font is downloaded
Note:
GL/2 mode does not have its own menu.
Contents
1 Finding a place for the printer 1
2 Unpacking 3
3 Installing the imaging cartridge 4
4 Loading paper 7
5 Attaching the power cord 8
6 Testing the printer 10
7 Connecting the printer to the computer 11
8 Testing the computer-to-printer connection 13
9 Setting up the driver 14
This booklet is to help you set up your printer and begin printing quickly. If you need detailed information on printer use or if you have problems printing, see your Reference Guide.
EPSON is a registered trademark of Seiko Epson Corporation.
General Notice: Other product names used herein are for identification purposes only and may be trademarks of their respective owners. EPSON disclaims any and all rights in those marks.
Copyright © Seiko Epson Corporation 1994, Nagano, Japan.
1 Finding a place for the printer
o Place your printer close enough to the computer or workstation for its cable to reach.
o Use a grounded outlet, one that has three holes to match the power plug on the printer. Do not use an adapter plug.
o Leave adequate room around the printer to allow easy operation and maintenance and sufficient ventilation. The diagram below shows the recommended amount of space.
o If you install the optional face-up output tray, you need additional space as shown in the illustration.
o If you install the optional lower paper cassette, you need an additional 80mm (3.2 inches) above the printer.
100mm (4") minimum each side
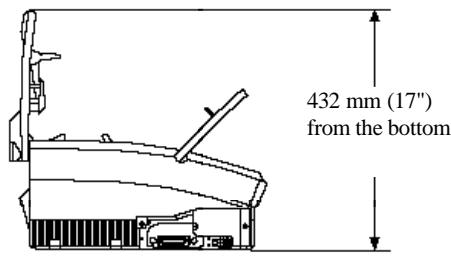
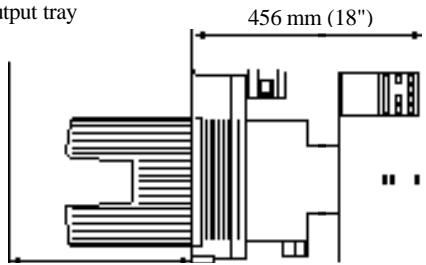
Optional face-up output tray
350mm (14") minimum
C
Caution:
o Place the printer where you can easily unplug the power cord.
o Avoid using or storing the printer in places subject to rapid changes in temperature and humidity. Also keep it away from direct sunlight, strong light, heat sources, humidifiers, or dust.
o Avoid using an electrical outlet that is controlled by wall switches or automatic timers. Accidental disruption of power can wipe out valuable information in your computer's and printer's memory.
o Avoid using outlets on the same circuit with large motors or other appliances that might disturb the power supply.
o Keep the entire computer and printer system away from potential sources of interference, such as loudspeakers or the base units of cordless telephones.
2 Unpacking
- Remove the accessories and printer from the shipping carton.
- Set the printer on a flat, stable surface.
- Take the packaging off the printer and the other items and store it for future use.
Note:
The printer weighs about 10kg (22 lbs) and should be lifted with care.
4. Make sure you have the accessories shown below.
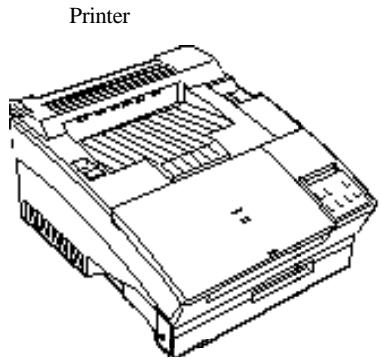

Paper stopper

Cable clips

Imaging cartridge
Power cord
3 Installing the imaging cartridge
C Caution: Do not turn the imaging cartridge upside down or expose it to light any longer than necessary.
- Pull the latch on the left toward you to open the printer cover.
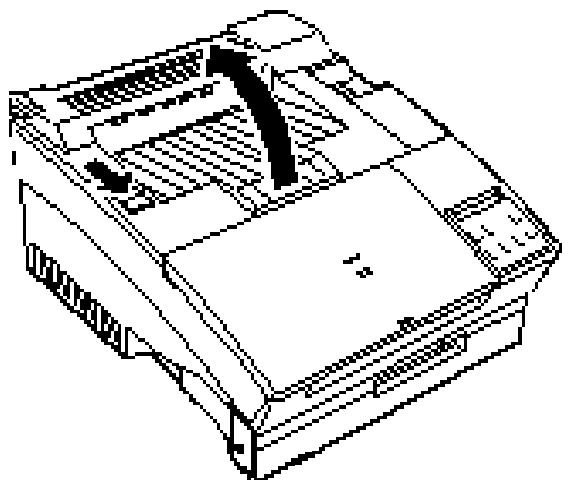
- While holding the imaging cartridge horizontally, gently shake it a few times to distribute the toner evenly.
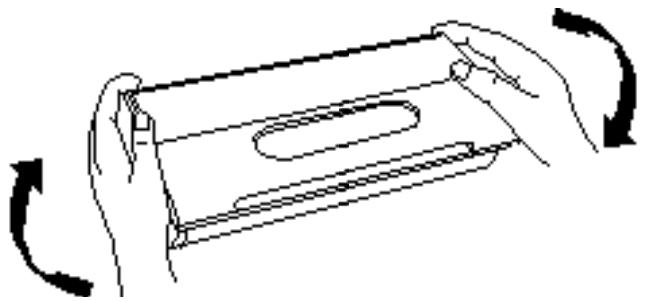
- Set the imaging cartridge on a clean, flat surface.
Firmly grip the tab on the left side of the imaging cartridge. Pull the clear seal all the way out with firm, even pressure as shown.
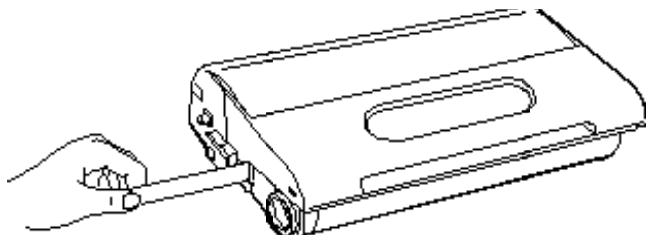
- Hold the imaging cartridge and gently shake it from front to back.
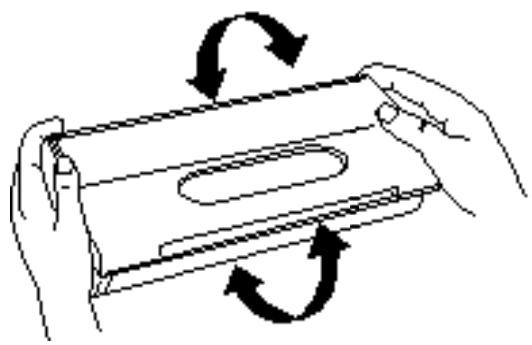
- Insert the imaging cartridge into the printer by placing the pins on each side of the cartridge into the grooves inside the printer. Slide it gently into the opening until it stops.
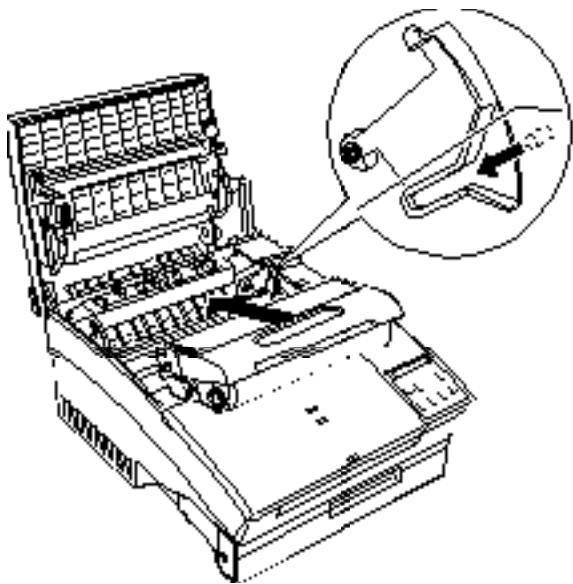
- Gently press down on the printer cover until it clicks shut.
C
Caution:
Never transport the printer with the imaging cartridge installed.
4 Loading paper
- Fan a stack of A4-size paper and even up the edges.
- Open the front cover located on the top front of the printer.
- Adjust the paper guides inside the paper bin to match the size of the paper. Load the stack of paper (up to 150 sheets) into the paper bin. Make sure that the paper guides do not press the paper too tightly.
-
Close the front cover.
-
Install the paper stopper into the slot on top of the paper cover to match the size of the paper in the bin; it stops the paper as it is fed from the printer.
Note:
To load special paper types such as envelopes, transparencies, heavy paper, or labels, feed sheets one at a time through the standard paper bin feed slot. See the section "Printing on special paper" in Chapter 1 of your Reference Guide.
5 Attaching the power cord
-
Make sure the power switch at the top right of the printer is turned off.
-
Be sure the rated voltage of the printer matches your outlet voltage.
Warning: If the voli
If the voltage of the printer and outlet do not match, contact your dealer for assistance. Do not plug in the power cord.
- Insert the power cord into the back of the printer. Then plug the other end into a properly grounded outlet.
C Caution: Avoid
Avoid using an outlet that is controlled by wall switches or automatic timers. Accidental disruption of power can wipe out valuable information in your computer's or printer's memory. Also avoid outlets on the same circuit with large motors or appliances that might disturb the power supply.
6 Testing the printer
To test whether the printer is correctly installed, print a status sheet. The status sheet contains information about the printer, including the current settings.
Load A4 paper into the standard paper tray and follow these steps to print the status sheet:
- Turn on the printer.
- Press Level 1 to enter SelcType Level 1.
- Press d until STATUS SHEET appears on the display.
STATUS SHEET
- Press r twice to print the status sheet.
- Press the Exit button to exit SelcType.
7 Connecting the printer to the computer
The printer comes with a parallel interface. You can install an additional optional interface. See Appendix D of the Reference Guide for more information.
- Make sure both the printer and the computer are off.
- Locate the parallel interface connector and plug the parallel cable connector securely into the interface connector.
- Squeeze the wire clips together and connect a grounding wire if the cable has one, as shown below.
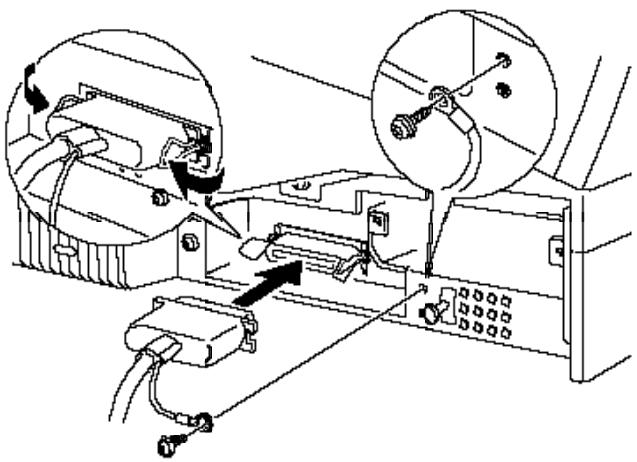
- Plug the other end of the cable into your computer.
- Insert the interface cable into the U-shaped part of one cable clip. Lift the left side of the printer up slightly. Then hook the short lip of the clip into the forward slot and push the bottom of the clip under the printer until it clicks in place. Repeat this procedure with the second clip and insert it into the back slot.
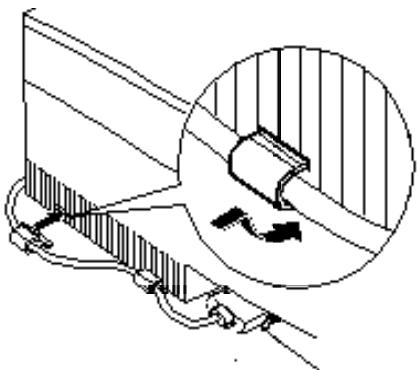
8 Testing the computer-to-printer connection
Use the following procedure to make sure you properly connected your computer to the printer. If you are using an optional interface, skip this procedure.
- Turn on your computer; then turn on your printer.
- Bring up a DOS prompt on your computer screen such as:
C:>
- Type the following:
PRINT AUTOEXEC.BAT
The computer displays the following message:
NAME OF LIST DEVICE (PRN):
- Type the following:
LPT1
The printer prints the AUTOEXEC.BAT file.
If nothing prints or the results are not what you expect, make sure you used the proper cable and that the cable is connected securely to both the computer and the printer.
9 Setting up the printer driver
After you confirm that your computer and printer are connected correctly, you need to set up the appropriate printer driver. A printer driver allows your software program to control the operation of the printer by translating a document's margins, fonts, and other selections into control codes that the printer understands.
The driver disk comes with your printer. If you use Microsoft WindowsTM 3.1 or later, you can set up the printer driver for LaserJet 4LTM emulation with this disk. The Windows printer driver provides the best performance with your printer.
Your computer system must meet the following minimum requirements to use the Windows driver contained on the driver disk.
Microsoft Windows 3.1 or later
2MB of free disk space on the hard drive
o 4MB installed RAM recommended
To install the Windows driver and the screen fonts, follow the instructions shown below.
- In Program Manager, click File in the menu bar.
- Click Run.
- Insert the Printer Driver Disk into the computer's A: drive (or B: drive).
- Type the following:
A:\INSTALL
If you are using the B: drive, be sure to substitute B: for A: in the above example.
- Follow the instructions that appear on the computer screen.
Note:
If your printer is connected to the computer's serial interface, you also need to configure the "port" setting. For full information on printer setup with Windows, see your Microsoft Windows user's guide.
o If you use DOS or emulations other than HP LaserJet 4L, you can use drivers other than the Windows driver included in the printer box. For more information on other emulations, see "EPSON LQ and FX Emulation Modes" in Chapter 1.
For DOS users
The utility disk packed with your printer contains the Remote Control Panel utility. When you are running under DOS, you can use this utility to access the printer's control panel settings. For detailed information, see Chapter 4, "Remote Control Panel Utility," in the Reference Guide.