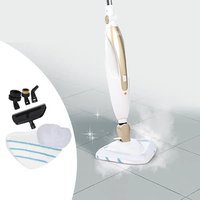
Prime Ultimate - Vacuum Cleaner Livington - Free user manual and instructions
Find the device manual for free Prime Ultimate Livington in PDF.
User questions about Prime Ultimate Livington
0 question about this device. Answer the ones you know or ask your own.
Ask a new question about this device
Download the instructions for your Vacuum Cleaner in PDF format for free! Find your manual Prime Ultimate - Livington and take your electronic device back in hand. On this page are published all the documents necessary for the use of your device. Prime Ultimate by Livington.
USER MANUAL Prime Ultimate Livington
Instructions for Use 12
Mode d'emploi 16
EN: PLEASE READ THIS MANUAL THOROUGHLY PRIOR TO USE AND KEEP IT FOR FUTURE REFERENCE
FR: VEUILLEZ LIRE ATTENTIVEMENT CE MODE D'EMPLOI AVANT D'UTILISER L'APPAREIL ET LE CONSUMER POUR LE CONSULTER ULTERIEUREMENT
IT: SI PREGA DI LEGGERE ATTENTAMENTE QUESTE ISTRUZIONI PER L'USO PRIMA DI UTILIZZARE L'APPARECCHIO E DI CONSERVARLE IN UN LUOGO SICURO PER POTERLE SEMPRE REPERIRE IN UN SECONDO MOMENTE
NL: DEZE HANDLEIDING VOOR GEBRUK ZORGVULDIG DOORLEZEN EN BEWAREN OM OOK LATER NOG IETS OP TE KUNNEN ZOEKEN
HU: KERJUK, HOGY A KESZULEK HASNZLATA ELOTT OLVASSA EL FIGYELMESEN A JELEN HASZNALATI UTASITAST ES ORIZZE MEG KESOBBI FELHASZNALASRA
SK: PRED POUZIM SI POZORNE PRECITAJTE TENTO NAVOD A USCHOVAJE HO K NAHLIADNUTIU
CZ: TENTO NÁVOD K POUŽITÍ SI PRED POUŽITÍM PECLIVE PROSTUDUJTE A ULOŽTE SI JEJ K POZDEŠIMU NAHLEDNUTI
RO: VÁ RUGÁM CA INAINTE DE UTILIZARE SÁ CITITI ACESTE INSTRUÇIUNI ŞI SA LE PÁSTRATI PENTRU CONSULTARE UTERIOARÁ
TR: LUTFEN KULLANMADAN ONCE BU KILAVUZU DIKKATLICE OKUYUN VE DAHA SONRA BASVURMAK IÇIN SAKLAYIN
I. Please read the manual thoroughly prior to use.
II. Please bear this manual in mind, as inappropriate handling can lead to injuries and damage the appliance.
Warning Notice:
Small parts in this box must not be used as toys, and plastic bags are a danger and can cause suffocation, and must always be kept away from babies and children.
III. Power Supply:
- This appliance operates with a 100-240V- alternating current.
- Please do not use any other connecting cable for this appliance.
- Should the electrical cable or plug turn out to be defective, please do not continue to use the product. Contact our customer service depart ment for an exchange of cable; keep a hold of the plug and do not twist the electrical cable; beware of the danger of electrical shock; please switch off and remove the electrical cable.
- Please pay attention to dry hands when unplugging the cable, otherwise an electric shock could occur; If you should not use this device for a long time, switch it off at the main switch, unplug the cable. Please do not use any other connection power for the device.
IV. Rechargeable Battery
- Do not use any other charging appliance, otherwise it may damage the appliance.
- Please remove the charging appliance following full charge, in order to avoid a reduced lifespan of the battery and a decrease in performance.
- On no account can the battery be disassembled, nor thrown in a fire, as this would be a danger of explosion.
- The terminals should not be short-circuited or exchanged; the housing must not be opened; the battery cannot be stored in any damp or hot location.
- On no account should benzol, acetate or any other solvent be used to clean the battery; in the event of abnormal temperatures or leakage stop immediately; do not put pressure on or strike the battery as this may cause heat and start a fire.
V. Operating Conditions
This product is only suitable for home use and must not be deployed outdoors or for commercial purposes; nor is its use authorized on clothing, fingers, the head or hair. It is an electronic appliance, and in order to avoid faults, it should not be
exposed to rain, water or dampness (for example, the bathroom, laundry etc). On no account should fluids be absorbed. The appliance must not be used in potentially dangerous surroundings, for example, in the vicinity of gas plants, oil tanks, chemicals and other inflammable and explosive materials; neither should this appliance be used for the removal of ash, burning cigarettes or matches - danger of fire.
Do not use this product to remove flammable or volatile liquids such as gasoline, kerosene, paint, cleaner, alcohol, perfume, carpet, floor cleaner, etc. use. Do not use this product to remove paint powder or toner in the laser printer or copier so as to avoid fire or explosion.
VI. Further Points:
This appliance may be used by children from the age of 8 years, as well as by people of reduced physical, sensory or mental capabilities or lacking in experience and knowledge, provided they are supervised or have been instructed with regard to the safe use of the appliance and understand the possible resulting dangers. Children must not play with the appliance. Cleaning and user maintenance must not be carried out by children without supervision.
USER MANUAL
Affixing the charging station: If you do not want to affix the charging station to the wall, you can of course simply place the charging station on the ground.
- Hold the charging station in the desired position on the wall and mark the drill holes with a pencil (Illu. 1). Drill three holes with an electric drill with 6mm insert.
- Insert the dowels (not included in the delivery contents) into the mounting holes and fasten the charging station to the wall with screws (Ilu. 2).
- Slide the tube or brush brackets into the recess provided as shown in Ilu.. 7. Make sure that the two longer brackets are fastened at the top.
- Insert the replacement battery (not included in delivery contents) into the charging slot ( Ihu. 3).
- Insert the handset into the charging point and bring the battery into contact with the charging point guide (IIIu. 4).
-
Insert the adapter plug as shown in (IIIu. 5).
-
Connecting the charging station: connect the charging station to the power grid
-
Charging station: plug the spare battery (not included in delivery contents) and the handset into the device - see Fig. 5; the red charging indicator starts flashing. When the battery in the vacuum cleaner is fully charged, the replacement battery begins to charge and the red light at the charging point starts to flash.
The blue bars on the vacuum display indicate the current charge status. The charging process is complete when all bars are blue.
If the charge indicator turns green after 5 hours, it means that both batteries are fully charged.
Precautions on Use
- Please use the vacuum cleaner twice before charging for five hours, aim: full activation of the battery activity
- If the battery voltage drops, the first of the four LEDs will flash, indicating that the battery needs to be recharged soon.
Device not used for a long time, the battery reduces its activity; Please recharge once or twice every six months.
3. Tube Connection:
Insert the aluminum tube into the appliance (Iliu. 8), holding the two pins corresponding to the two holes on the appliance, then firmly secure the aluminum tube.
4. Brush Connection:
press the ON/OFF BUTTON to switch on the vacuum cleaner, then the appliance starts to suck, the four blue LEDs light up; after 7 to 8 minutes, the first blue light goes out, after 13 to 14 minutes the second and after 17 to 18 minutes the third and fourth. Clean the filter after each use. Then restart the sucker so that it runs properly again.
5. LED-Display:
Move the vacuum cleaner to a trash can, then pull out the dust collector on the handle (Illu. 11) and empty the dust, clean the bowl, and immediately replace it; Clicking sounds indicate that the shell is snapped in again (Illu. 12-13). Turn clockwise to remove and clean the HEPA filter, then reinsert clockwise.
6. Cleaning of the Dust Collection Container, including HEPA-Filter:
- Pull the dust container out of its holder: Hold the white tab in the middle in place with two fingers and pull the container out (Illu. 21).
- Open the dust container over a dustbin, by unlocking the flap underneath the dust container, in order to empty the dust out (Illa. 22).
- To clean the filter turn it in an anti-clockwise direction and brush it off, then reattach it to the dust container by turning it in a clockwise direction.
- After cleaning, reinsert the dust container by sliding it directly into the appliance with a firm push.
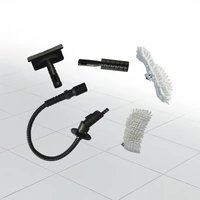
7.3-in-1 Combination Brush:
This appliance is equipped with a 3-in1-combination brush, consisting of a grout nozzle for narrow gaps (a), brush attachments (b) and the furniture brush (c) - see (Iliu. 14). press the locking mechanism to remove the brushes head; the nozzle can be used for cleaning narrow gaps; brush attachments can be used for the cleaning of, for example, computer keyboards and the rear-side can be used as a furniture brush.
8. Flexible tubing:
In order to release the flexible tubing (See illustration page 4), press briefly on the release knob and gently bend the tube forwards. The lock is then detached. Following use, let the lock click back into place.
PRECAUTIONARY MEASURES
- When the battery is inserted in the charging station, the red light flickers and shows the charging process, ending with the green light, which means „fully-charged".
- If the appliance is not in use for a long period of time, the charge level of the battery will decrease; please recharge the battery, once or twice, every six months.
CLEANING AND MAINTENANCE
I. Cleaning the Appliance:
- All routine maintenance and repair tasks should be carried out following display of a charged appliance.
- Following every period of use the dust collection container should be cleaned.
- When not in use, the appliance should be kept in a cool and dry place, and not be exposed to direct sunlight or dampness.
- Ensure that the appliance is kept separate from the power supply and the ON/OFF buttons switched off; wipe it down with a damp, cotton towel (with water or a neutral cleaner), without letting water or cleaner get inside and causing defects.
II. Brush Cleaning:
Insert a coin into the roller lock as shown in Ilu. 15, turn clockwise and unlock, open the roller cover plate (Ilu. 16), remove the brush roller and remove hair and dirt from the roller. Long hair can also be cut up with scissors before removal. Then replace the brush and close the roller lock with coin.
STORAGE OF THE APPLIANCE
When not in use, hang the device in the charging station (IIIu. 6). - Hang the flat suction brush against the left hook of the device, slide the suction tube onto the right hook and plug in the brush.
TROUBLESHOOTING
NB: if you are aware of one of the following problems, immediately switch off the appliance, in order to not damage and to prevent further defects.
| Faults Possible Cause Solution | ||
| No longer functions | Rechargeable battery is weak Recharge | the battery |
| Switch is not on Turn the switch to ON | ||
| Deterioration of suction | Dust collection container is full Empty the dust collection container | |
| Suction hole is clogged | Clear the blockage | |
| Filter is clogged | Clean the filter | |
| Dust escaping while in operation Dust filter is dirty | Switch off the appliance and clean the filter | |
| Brush does not rotate First light is flickering | Clean the brush and restart the appliance | |
TECHNICAL PRODUCT DATA
| Product Category | Rechargeable DC-Vacuum Cleaner | Product Type MC-603-A | |
| Rated Voltage | 18,5V | Motor Output 130W | |
| Recharger Device & Parameter | Input Circuit 100-240V. Frequency: 50/60Hz Output Power: 24V 500mA | Noise Level | ≤72 dB |
| Rechargeable Battery Li-Ion 2200mAh Capacity 0,5 l | |||
| Weight 2kg | Continuous Operation | 18 min |
Do not dispose this product at the end of its service life through normal domestic waste. It has to be disposed through a collection agency that recycles electric and electronic devices. This is pointed out by the symbol on the product, in the instruction manual, and on the packaging. Please inquire about local collection agencies that may be operated by your distributor or your municipal administration. By recycling, making use of the materials, or other forms of recycling old units you are making an important contribution to protecting our environment.

Safety Class II

For indoor use only

This product complies with the European directives.
FR
CONSIGNES DE SECURITE
VOORZORGSGMAATREGELEN
office@mediashop-group.com | www.mediashop.tv
DE | AT | CH: 0800 37 6 36 06 - kostenlose Servicehotline | ROW: +423 388 18 00
M17133
Stand: 02/2021