KIC30BK - Cooker Hestan - Free user manual and instructions
Find the device manual for free KIC30BK Hestan in PDF.
User questions about KIC30BK Hestan
0 question about this device. Answer the ones you know or ask your own.
Ask a new question about this device
Download the instructions for your Cooker in PDF format for free! Find your manual KIC30BK - Hestan and take your electronic device back in hand. On this page are published all the documents necessary for the use of your device. KIC30BK by Hestan.
USER MANUAL KIC30BK Hestan
Induction Cooktop KIC
Use & Care Manual
WARNING
IF THE INFORMATION IN THIS MANUAL IS NOT FOLLOWED EXACTLY, A FIRE OR EXPLOSION MAY RESULT CAUSING PROPERTY DAMAGE, PERSONAL INJURY, OR DEATH.
Do not store or use gasoline or other flammable vapors and liquids in the vicinity of this or any other appliance.
Installation and service must be performed by a qualified installer or service agency. DO NOT REPAIR, REPLACE OR REMOVE ANY PART OF THE APPLIANCE UNLESS SPECIFICALLY RECOMMENDED IN THE MANUAL. IMPROPER INSTALLATION, SERVICE OR MAINTENANCE CAN CAUSE INJURY OR PROPERTY DAMAGE. REFER TO THIS MANUAL FOR GUIDANCE. ALL OTHER SERVICING SHOULD BE DONE BY A QUALIFIED TECHNICIAN.
READ THESE INSTRUCTIONS CAREFULLY AND COMPLETELY BEFORE INSTALLING OR USING YOUR APPLIANCE TO REDUCE THE RISK OF FIRE, BURN HAZARD, OR OTHER INJURY. KEEP THIS MANUAL FOR FUTURE REFERENCE.
SAFETY DEFINITIONS
WARNING
THIS INDICATES THAT DEATH OR SERIOUS INJURY MAY OCCUR AS A RESULT OF NOT OBSERVING THIS WARNING
CAUTION
THIS INDICATES THAT MINOR OR MODERATE INJURY MAY OCCUR AS A RESULT OF NOT OBSERVING THIS WARNING.
NOTICE
THIS INDICATES THAT DAMAGE TO THE APPLIANCE OR PROPERTY MAY OCCUR AS A RESULT OF NOT OBSERVING THIS WARNING.
INSTALLER: LEAVE THIS MANUAL WITH THE OWNER OF THE APPLIANCE. HOMEOWNER: RETAIN THIS MANUAL FOR FUTURE REFERENCE.
Message from Hestan: Message from Hestan:
Hestan's award-winning culinary innovations and purpose-built features reinvented the restaurant kitchen and redefined culinary experience in some of America's most acclaimed restaurants. Hestan now takes this performance from the back of the house and puts it front and center in yours. Thoughtfully designed and meticulously built, Hestan will serve you beautifully for years to come.
Hestan is the only residential brand born from the dreams and demands of professional chefs. From ranges to refrigeration, every detail is designed to deliver the performance and reliability expected in a restaurant – now available for you.
We appreciate you choosing Hestan, and we promise to deliver the very best to you.
Welcome to Hestan! Welcome to Hestan
EN

3 SAFETY PRECAUTIONS - BEFORE YOU BEGIN
6 MODEL NUMBERS
6 RATING LABEL
6 REGULATORY / CODE REQUIREMENTS
7 MODEL AND PART IDENTIFICATION
8 HOW INDUCTION HEATING WORKS
9 INDUCTION COOKTOP OPERATION
11 USER INSTRUCTIONS
19 TROUBLESHOOTING GUIDE
20 PARTS LIST
20 SERVICE
20 LIMITED WARRANTY
SAFETY PRECAUTIONS - BEFORE YOU BEGIN
When properly cared for, your Hestan appliance will provide safe, reliable service for many years. When using this appliance, basic safety practices must be followed as outlined below.
IMPORTANT: Save these instructions for the local Utility Inspector's use.
INSTALLER: Please leave these Installation Instructions with the owner.
OWNER: Please retain these Installation Instructions for future reference.
This appliance is NOT designed for installation in manufactured (mobile) homes or recreational park trailers. Do NOT install this appliance outdoors.
WARNING
BLECTRICAL SHOCK HAZARDELECTRICAL SHOCK HAZARD
Disconnect power before installing or servicing appliance. Before turning power ON, be sure all controls are in the OFF position. Failure to do so can result in death or electrical shock.

ELECTRICAL GROUNDING ELECTRICAL GROUNDING
- This appliance must be grounded. Grounding reduces the risk of electric shock in the event of a short circuit. Read the ELECTRICAL CONNECTIONS section of the Installation Manual for complete instructions.
DO NOT ground to a gas pipe.
DO NOT use an extension cord with this appliance.
DO NOT have a fuse in the NEUTRAL or GROUNDING circuit. A fuse in the NEUTRAL or GROUNDING circuit could result in an electrical shock.
ELECTRICAL SUPPLY ELECTRICAL SUPPLY
This appliance must be connected to a dedicated circuit, 240 VAC, Single Phase, 60Hz , with a current rating as shown in the model number listing on pg. 4. Have the installer show you where the electric circuit breaker is located so you know how to shut off the power to this appliance. It is the responsibility of the user to have the appliance connected by a licensed electrician in accordance with all local codes, or in the absence of local codes, in accordance with the National Electrical Code. Read the ELECTRICAL CONNECTIONS section of the Installation Manual for complete details.
CHILD SAFETYCHILD SAFETY
IT IS THE RESPONSIBILITY OF THE PARENTS OR GUARDIANS TO ENSURE CHILDREN ARE INSTRUCTED IN THE SAFE USE OF THIS APPLIANCE. Do not allow children to use this appliance without adult supervision. Do not allow children to play in or around the appliance, even when not in use. Items of interest to children should not be stored in or on the appliance, in cabinets above, or on the backguard of the appliance. Children climbing on the appliance could be seriously injured.
WARNING
BURN HAZARD - Cookware can get very hot during operation. Do not let children touch the appliance while in operation. Failure to observe these instructions may result in severe burns or injury.
TECHNICAL SAFETYTECHNICAL SAFETY
Installation and service on this appliance must be performed by a qualified appliance installer, or a Hestan service technician. Do not repair or replace any part of the appliance unless specifically instructed to do so. Defective parts must only be replaced with genuine Hestan parts. Contact Hestan Customer Service for inquiries or to arrange a service call.
The appliance must be disconnected from the power during any service or maintenance work.
USER SAFETYUSER SAFETY
WARNING
BURN HAZARD - Cookware can get very hot during operation.
Avoid wearing loose-fitting garments or long sleeves while cooking. They could ignite. For personal safety, wear proper apparel while using the appliance. Some synthetic fabrics are highly flammable and should not be worn while cooking.
Do not allow anyone to climb, stand, step on, lean against, or sit on any part of the appliance. This may result in damage to the appliance or personal injury.
FIRE SAFETYFIRE SAFETY
To reduce the risk of a grease fire, do not leave surface burners unattended at high settings.
Always turn on the ventilation hood when cooking. Clean vent hood grease filters frequently - grease should not be allowed to accumulate on the fan or filters.
Use the appropriate pan size for the burner being used.
Keep the appliance zone clear and free from combustible materials, gasoline, and other flammable vapors and liquids. NEVER store flammable liquids and materials in, above, or on the range, or near cooking surfaces. Do not obstruct the flow of combustion and ventilation air of the appliance.
ALWAYS have a working smoke detector near the kitchen.
ALWAYS have an appropriate dry-chemical fire extinguisher nearby. Smother fire or flames using the lid of the utensil (pot or pan), a cookie sheet or metal tray. Then shut off the burner. Use an extinguisher, or baking soda if the fire is small and relatively contained. DO NOT USE WATER ON A GREASE FIRE. Doing so may result in spreading the fire elsewhere.
NEVER pick up a flaming pan. You may spill the grease on yourself and be severely burned.
If accessible, turn off the ventilation hood during a fire, but do not reach through the flames to do this. IF THE FLAMES DO NOT GO OUT - EVACUATE AND CALL THE FIRE DEPARTMENT.
In the event of personal clothing or hair catching fire, drop and roll immediately to smother the flames. Seek medical attention if necessary.
SAFETY DURING CLEANING SAFETY DURING CLEANING
Only clean the appliance as directed in the CLEANING & MAINTENANCE section of this manual.
Do not use a steam cleaner to clean the cooktop. Steam could penetrate into electrical components and cause a short circuit and/or shock hazard.
Do not use abrasive cleaners, hard objects such as brushes or scrapers, or sharp metal tools to clean the glass. Scratches could cause the glass to shatter.
Wait until the appliance is completely cool before using any aerosol-type cleaners. Many of these cleaners use flammable propellants which could ignite in the presence of heat.
PROPER USAGEPROPER USAGE
Always position the handles of pot and pans so they do not extend over adjacent work zones or over the edge of the rangetop. This is to avoid knocking over hot contents which could burn you, or result in a fire.
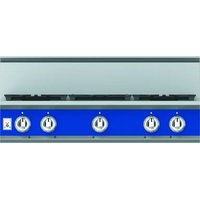
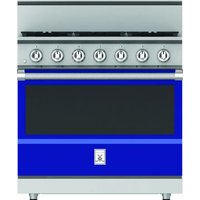
COOKTOP MODELSCOOKTOP MODELS
| MODEL NO. | DESCRIPTION CIRCUIT BREAKER REQ'D |
| KIC 30 30" Induction | Cooktop 40 Amp |
| KIC 36 36" Induction | Cooktop 50 Amp |
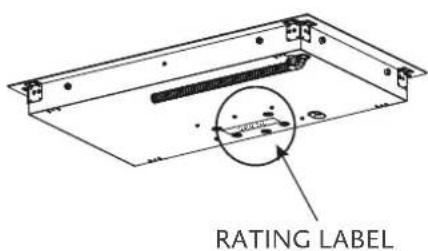
RATING LABEL
The rating label contains important information about your Hestan appliance such as the model and serial number, electrical rating and the minimum installation clearances.
The rating label is located on the bottom surface of the cooktop.
If service is necessary, contact Hestan Customer Care with the model and serial number information shown on the label.
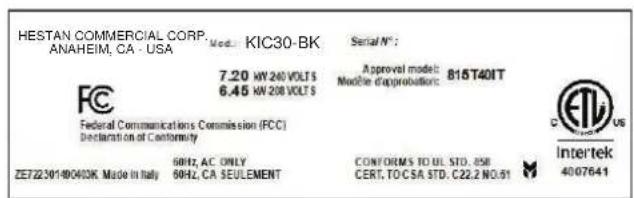
TYPICALRATINGLABEL
REGULATORY / CODE REQUIREMENTS
Installation of this cooking appliance must be made in accordance with local codes. In the absence of local codes, this unit should be installed in accordance with the National Electrical Code and local codes.
This appliance must be electrically grounded in accordance with local codes or in the absence of local codes with the National Electrical Code ANSI/NFPA 70, or Canadian Electrical code CSA C22.1.
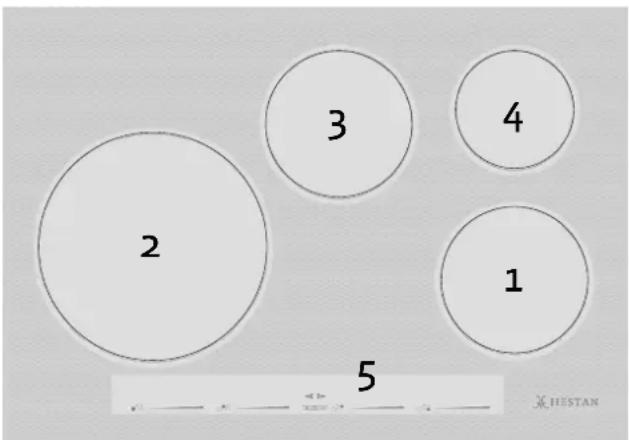
30" MODELS30" MODELS
EN
| Key | |
| 1 | 7" [180 mm] - 1850W (Booster 3000W) |
| 2 | 11" [280 mm] - 2300W (Booster 3600W) |
| 3 | 7" [180 mm] - 1850W (Booster 3000W) |
| 4 | 5 3/4" [145 mm] - 1400W (Booster 2200W) |
| 5 | touch control |
36" MODE S36" MODELS
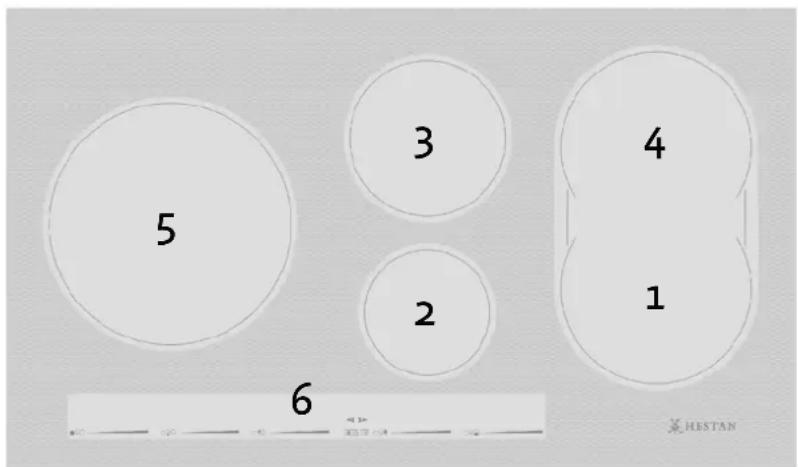
| Key | |||
| 1 | 7 1/2" x 8 1/2" | [190 mm x 220 mm] - 2000W (Booster 3600W) | |
| 2 | 5 3/4" | [145 mm] | - 1400W (Booster 2200W) |
| 3 | 7" | [180 mm] | - 1850W (Booster 3000W) |
| 4 | 7 1/2" x 8 1/2" | [190 mm x 220 mm] - 2000W (Booster 3600W) | |
| 5 | 11" | [280 mm] | - 2300W (Booster 3600W) |
| 6 | touch control | ||
INDUCTIONINDUCTION
Heating by induction is the most efficient form of cooking available.
The heat is generated by an electromagnetic field, directly on the bottom of the pan or pot used.
The surface which is free from contact remains virtually cold.
When the cooking time is up and the container is removed, there is no residual heat. It is efficient because there is no waste of energy due to dispersion, as happens with gas burners. It is 30 to 50% faster than normal cooktops using HGL technology and allows energy savings of up to 25% .
If liquid overflows from the container, it does not stick to the surface of the cooktop, because this is just slightly warm.
OPERATING PRINCIPLE OPERATING PRINCIPLE
This is based on the electromagnetic properties of most cooking containers.
The electronic circuit governs the operation of the coil (inductor), creating a magnetic field.
The heat is transmitted by the container to the food.
The cooking process takes place as follows:
Minimum dispersion (high performance);
- Removing of the pan (simply lifting it) automatically stops the system;
- The electronic system allows maximum flexibility and precision of regulation.
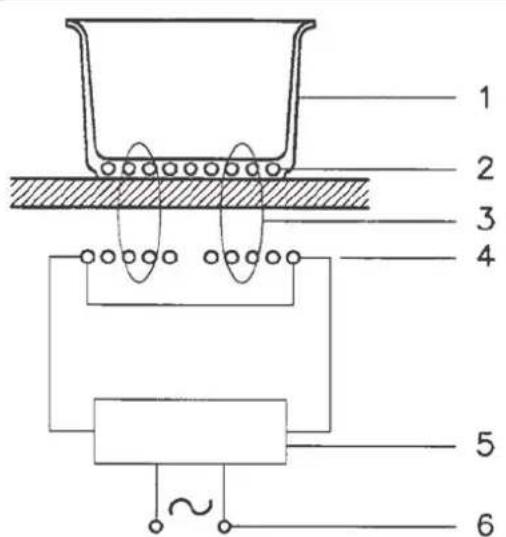
1 - Recipient
2 - Induced current
3 - Magnetic field
4-Inductor
5 - Electronic circuit
6 - Electricity supply
BEFORE USING THE COOKTOP FOR THE FIRST TIME BEFORE USING THE COOKTOP FC
All products are wiped clean with solvents at the factory to remove any visible signs of dirt, oil, and grease which may have remained from the manufacturing process.
If present, remove all packing and literature from the cooktop surface.
Clean your glass top before the first time you use it. A thorough cleaning with a glass top cleaner is recommended. It only takes a minute and puts a clean, shiny coating on the glass top before its initial use.
- There may be a slight odor during the first several uses - this is normal and will disappear.
- Optimum cooking results depend on the proper cookware being selected and used.
- The cooking surface can get hot from the cookware and remain hot for some time after cooking zones have been turned off.
- The glass ceramic cooking surface is a durable material resistant to impact but not unbreakable if a pan or other object is dropped on it.
- Do not allow pans to boil dry. This can damage the pan, element and/or cooktop.
- Do not slide cookware across cooking surface, it may scratch the glass
- Using cast iron cookware on the glass cooktop is not recommended. Cast iron retains heat and may result in cooktop damage.
Four burner cooktop with right and left side (2) induction generators
Five burner cooktop with right, center, and left (3) induction generators
POWER SHARING POWER SHARING
Four burner cooktops are divided into two separate heating zones.
Five burner cooktops are divided into 3 zones. One generator controls 2 elements, or two cooking zones within a heating section share the power of one generator. Power Sharing is activated when both elements in the same cooking zone are activated and one element is set for Boost (P). The element that is not set for Boost will change to a lower power level. This is called Power Sharing.
COOKWARE "NOISE" COOKWARE "NOISE"
When using adjacent elements that are set at certain power level setting, magnetic fields may interact and produce a low whistle or intermitted "hum". Pans that completely cover the element ring will produce less noise. A low "humming" noise is normal particularly on high settings. These noises can be reduced or eliminated by lowering or raising the power level settings of one or both of elements.
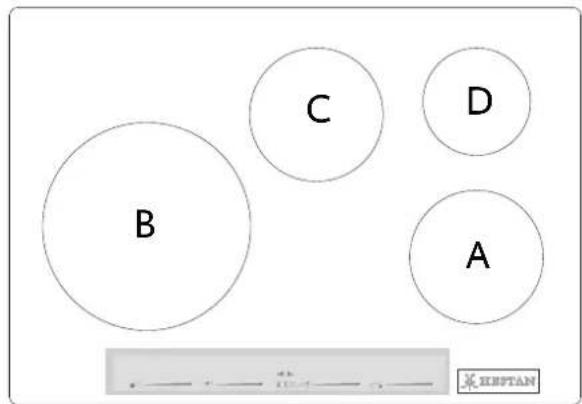
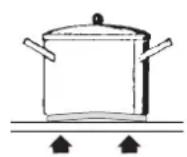
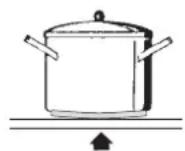
30" Wide Cooktop.
The minimum pan size is shown for each cooking element.
| Position | Pan size | |
| A | 5 3/4" [14.5 cm] | minimum diameter pan |
| B | 7" [18.0 cm] | minimum diameter pan |
| C | 5 3/4" [14.5 cm] | minimum diameter pan |
| D | 4 3/4" [12.0 cm] | minimum diameter pan |
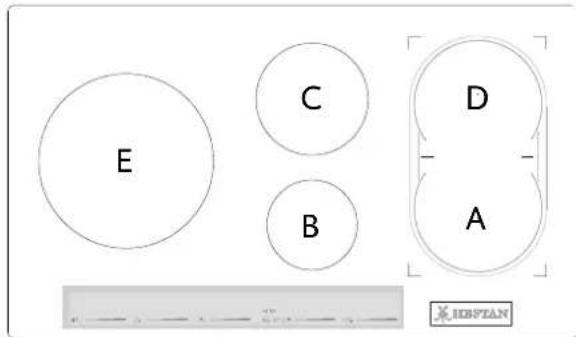
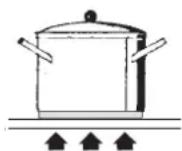
36" Wide Cooktop
The minimum pan size is shown for each cooking element.
| Position Pan size | ||
| A | 5 3/4" [14.5 cm] | minimum diameter pan |
| B | 4 3/4" [12.0 cm] | minimum diameter pan |
| C | 5 3/4" [14.5 cm] | minimum diameter pan |
| D | 5 3/4" [14.5 cm] | minimum diameter pan |
| E | 7" [18.0 cm] | minimum diameter pan |
USING THE INDUCTION COOKTOPUSING THE INDUCTION COOKTOP
To begin, position the pan in the chosen cooking zone. The control will indicate that a pan is detected. If no pan is detected, the system cannot start.
PAN DETECTIONPAN DETECTION
The cooktop will detect a pan in any of the cooking zones. The system will only apply power to a cooking zone where a pan is detected.
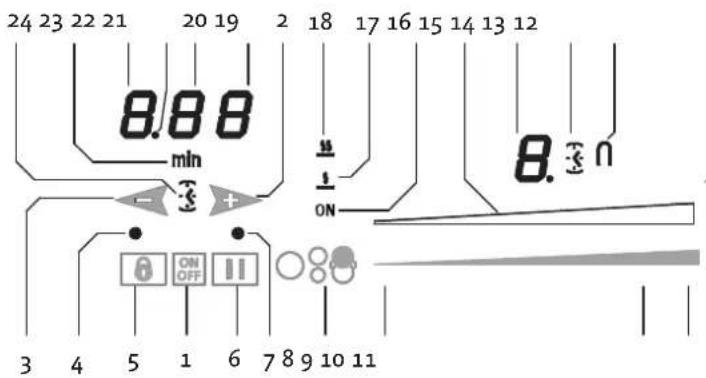
| Parts | ||
| 1 | POWER key | 13 Timer for cooking zone activation icon |
| 2 | + Timer | 14 Cooking zone level display |
| 3 | - Timer | 15 Power level indicator |
| 4 | LOCK indicator | 16 Cooking zone indicator |
| 5 | LOCK key | 17 MELT function symbol |
| 6 | PAUSE key | 18 SIMMER function symbol |
| 7 | Pause and Recall involuntary switch-off indicator | 19 Timer (minutes/seconds) display |
| 8 | Cooking zone selector (zone ON/OFF) | 20 Timer (minutes/seconds) display |
| 9 | Power slider - minimum power | 21 Separator dot (hours/minutes) |
| 10 | Power slider - maximum power | 22 Timer display (hours/minutes) |
| 11 | Select Power Booster (P) | 23 Icon indicating minutes |
| 12 Bridge function indicator | 24 Independent timer icon | |
RESIDUAL HEAT INDICATOR
This warns the user that the glass is hot in the cooking zone. The temperature is determined using a mathematical model and any residual heat is indicated with an "H" on the corresponding display.
Heating and cooling are calculated from the power level selected (from "0" to "9") and the relay activation period.
After switching a cooking zone off, its display shows an "H" until the computed temperature in the zone falls below 140^ [60°C].
PROTECTION IN THE EVENT OF ACCIDENTAL SWITCHING ON
If a key is activated for about 10 seconds, the buzzer begins sounding until the key is released. The display shows an error code, which remains until the selector key for that zone is touched and released.
- If no cooking zone is activated within 10 seconds of switching on the touch control, the control returns to stand-by mode.
The ON/OFF key takes priority over all other keys, so the touch control can be switched off at any time, even in the case of multiple or continuous activation of the keys.
In stand-by mode, continuous activation of the keys will have no effect. However, before the electronic control can be switched on again, it must acknowledge that no key is active.
If the cooking zone has been in use and is hot, an "H" will appear on the display after the zone is turned off. It turns off after the zone has cooled.
PRECAUTIONS PRECAUTIONS
- If there is even the tiniest crack in the ceramic glass surface, immediately disconnect the cooktop from the electricity supply;
- during operation, move any magnetic materials such as credit cards, computer disks, calculators, etc., away from the zone;
- never use cooking foil or rest products wrapped in foil directly on the cooktop;
- metallic objects such as knives, forks, spoons and lids must not be rested on the surface of the cooktop to prevent them from heating up;
- when cooking with non-stick cookware, without using water or oil, limit any preheating time to one or two minutes;
- when cooking foods which tend to stick to the bottom of the pan, start at minimum power and gradually increase the heat, stirring frequently;
- after use, turn off element manually (decreasing to "0") rather than relying on the pan detection sensor.
PANSPANS
If a magnet is attracted to the bottom of your cookware then it is suitable for induction cooking.
- Try to use pans declared as suitable for induction cooking;
- flat, thick-bottomed pans will perform most effectively;
- a 8'' [20 cm] diameter saucepan can benefit from maximum power;
- a small saucepan reduces the power but will not cause energy dispersion. The use of cookware with a diameter of less than 3^ [12 cm] is not recommended;
- stainless steel cookware with multilayer bottom or ferrite stainless steel if the bottom indicates: for induction;
- cast iron containers, better with an enamelled bottom to avoid scratching the ceramic glass cooktop;
- containers made of glass, ceramic, terracotta, aluminium, copper or non-magnetic stainless steel (austenitic) are not recommended and are unsuitable unless using a Hestan-supplied or approved adapter kit.
YesNo No
Traces of foil, food residues, splashes of fat, sugar or very sugary foods must be removed immediately from the cooktop using a scraper to avoid damaging the cooktop surface. Then clean with a proper ceran top cleaner and kitchen paper, rinse with water and dry with a clean cloth. Never use abrasive sponges or clothes and avoid using aggressive chemical cleansers such as OVEN SPRAYS or STAIN REMOVERS. DO NOT USE STEAMCLEANERSCLEANERS

TURNING THE COOKTOP ON AND OFFTURNING THE COOKTOP ON AND OFF
The cooktop is turned on by touching the On/Off key (1), you will hear a short beep and the corresponding led lights up. After switching on, the touch control remains active for 10 seconds. If you do not select either a cooking zone or the timer, the touch control automatically returns to stand-by mode.
ACOLSTIC SIGNAL (BUZZER)ACOUSTIC SIGNAL (BUZZER)
During use, the following activities are signalled by a buzzer:
- Normal touching of the keys with a short beep.
- If a key is held for more than 10 seconds, the buzzer will sound and an error symbol is displayed.
TURNING ON A COOKING ZONETURNING ON A COOKING ZONE
Position a pot and touch the selector key (8) for the cooking zone. Slide your finger on the power slider to the right to increase the cooking level (10), or slide your finger to the left to decrease it (9).
If a pot is not detected in the cooking zone, the display for that zone will alternate between the selected power level and the "missing pan" symbol.
TURNING OFF A COOKING ZONETURNING OFF A COOKING ZONE
A single cooking zone can be turned off directly by touching the selector key (8) for the cooking zone that is working. Hot cooking zones will be displayed with a letter "H". You can turn off all cooking zones immediately at any time using the power On/Off key (1). If, during cooking, you inadvertently turn off the surface while using the controls, you can turn it on again with the On/Off key and you will have 6 seconds to touch the PAUSE key (6) that will be indicated by the (7) flashing of an indicator light above the key; doing so will turn the surface on again with the same settings it had before it was accidentally turned off.
The power level of the cooking zone can be set from level 1 to level 9. A further level P (Power Booster) is available that allows a very rapid heating of food and, therefore, saves you time.
When the automatic preheating function is active, the power level shows a numeric value alternating with the letter "A". See next page for more information.
BOOSTER AND POWER MANAGEMENT BOOSTER AND POWER MANAGEMENT
The power of a cooking zone can be "boosted" for a certain period of time. With Booster enabled, an individual cooking zone is heated with power that is significantly higher than the rated power. When the Booster function is active, the display of the selected cooking zone shows a "P". The Booster function can be activated by touching at the end of the power slider of the cooking zone (11). The power increase is different depending on the size of the cooking zone:
For a cooking zone with a diameter of 53/4'' [145 mm], the power goes from a level 9 of 1400 W to the Booster level of 2200 W for 10 minutes.
For a cooking zone with a diameter of 7^ [180 mm], the power goes from a level 9 of 1850 W to the Booster level of 3000 W for 10 minutes.
For a rectangular cooking zone 71/2'' × 81/2'' [190 mm × 220 mm], the power goes from a level 9 of 2000 W to the Booster level of 3600 W for 10 minutes.
For a cooking zone with a diameter of 11^ [280 mm], the power goes from a level 9 of 2300 W to the Booster level of 3600 W for 10 minutes.
For safety reasons, the Booster function has a limited duration (10 min), after 10 min the zone is reduced to level 9.
If the cooking vessel is removed from the cooking zone during the Booster time, the Booster remains active and the Booster time is not deactivated. With the Booster activated, changing the value set with your finger in the power slider zone deactivates the Booster. The Booster function "P" can be activated in all cooking zones, but priority is given to the last Booster activated, reducing any other cooking levels.

AUTOMATIC PREHEATING (OR "HEAT-UP" FUNCTION) AUTOMATIC PREHEATING (OR "HEAT-UP" FUNC
This feature makes cooking easier by adding 'boil and reduce' functionality to the elements. The surface automatically heats up at Full Power and then returns to the selected power level after a certain time (see Table).
ACTIVATING AUTOMATIC HEATING (OR "HEAT-UP" FUNCTION)
Slide to choose the cooking power, then hold that position for about 3 seconds until you hear a beep. For example, if you select level 3 and hold it until it beeps: the cook zone display will show the letter "A" alternating with "3". With these settings, the cooking surface heats the cooking zone at the maximum level "9" for 2 minutes and then continues cooking at level "3".
| Power level | Automatic Heating Function duration (time in minutes) | Maximum time elements will operate at power setting (time in minutes) |
| 0 | - | |
| 1 0m 40s 516 | ||
| 2 1m 12s 402 | ||
| 3 2m 318 | ||
| 4 2m 56s 258 | ||
| 5 4m 16s 210 | ||
| 6 7m 12s 138 | ||
| 7 2m 138 | ||
| 8 3m 12s 108 | ||
| 9 - 90 | ||
| P - 10 | ||
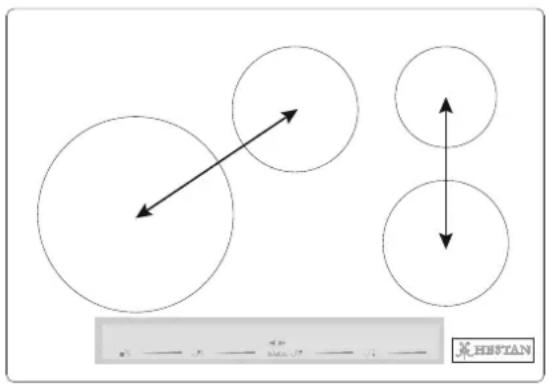
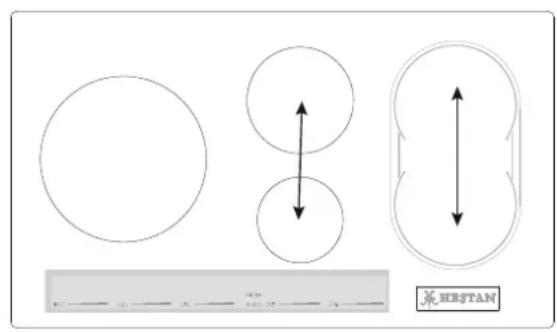
BRIDGE FUNCTION (FOR LARGE PANS)BRIDGE FUNCTION (FOR LARGE PANS)
This function facilitates cooking with elongated pans, and is only available for the 36^ cooktop's rectangular cooking zones. Activate bridge mode by simultaneously touching the power sliders of the two cooking zones involved. The icon will light up next to the bridged cook zone displays.
Once set to bridge mode, both cooking zones are controlled from the left power slider. To disable bridge mode, touch both slider controls simultaneously at any point along the adjustment bars.
SPECIAL FUNCTIONS (LOW TEMP) SPECIAL FUNCTIONS (LOW TEMP)
This function is available in each cooking zone and its activation is indicated by one of the two dedicated icons (17 & 18). It is possible to activate 2 "cooking" levels:
Melting with a temperature of approximately 113^ [45^] .
Simmering with a temperature of approximately 158^ [70^] .
These temperatures are approximate and are greatly dependent on the pot and the quantity of food. After turning on the desired cooking zone by touching the selector key (8), touch the initial part
of the power slider zone (9) to activate the MELT function. To switch to the SIMMER function, touch the power slider in the same position for a couple of seconds.
MELT indicator
SIMMER indicator
Both low temperature functions operate for a maximum of 2 hours.
CONTROL LOCK (CHILD SAFETY) CONTROL LOCK (CHILD SAFETY)
It can only be activated when the appliance is on but no cooking zone is in operation.
-
Simultaneously touch the LOCK key (5) and the PAUSE key (6).
-
Touch the LOCK key (5).
The letter "L" will appear on both displays for 10 seconds and then they will turn off.
When you try to turn on the cooking surface with the On/Off key (1), the letters "L" will be displayed and it will not be possible to cook.
DEACTIVATING CONTROL LOCKDEACTIVATING CONTROL LOCK
There are two types of unlocking, as follows:
UNLOCKING FOR ONE TIME ONLYUNLOCKING FOR ONE TIME ONLY
-
Turn on the cooking surface.
-
Touch the PAUSE (6) and LOCK (5) keys at the same time.
The letters L disappear and all the zones are enabled.
- If you turn off the cooking surface after use, when it is turned on again, the letters L will be displayed to indicate that the surface is locked. Essentially, the cooktop will be safety locked automatically whenever not in use and the special key combination described above will be needed each time to use.
PERMANENTUNLOCKING: PERMANENT UNLOCKING:
-
Turn on the cooking surface
-
Touch the PAUSE (6) and LOCK (5) keys at the same time.
-
Then release these two keys and touch the PAUSE key (6) again.
LOCK
To disable the other controls, touch the LOCK key (5). The light above the key illuminates, and all controls except the cooking zone selector keys (8) and On/Off key (1) are disabled.
- When the LOCK key is active, a cooking zone selector key will only act to turn its zone off.
This may be useful to lock the keypad for cleaning the control zone, or if during operation when you do not want to change any settings.
PAUSEPAUSE
This cooking surface allows setting a pause (6) during cooking (which is useful, for example, when answering a phone call). When this function is touched, an LED lights above the key and the symbol "II" is displayed in all the cooking zones and the cooking settings and timers are frozen for a maximum of 10 minutes, after which the cooking surface turns off.
DEACTIVATING PAUSEDEACTIVATING PAUSE
Once activated, the function can be deactivated as follows:
-
Touch the PAUSE key (6) again. The LED for the pause setting turns off
-
Within 10 seconds, you must slide your finger along the power slider below the illuminated zone (from left to right).
This allows the surface to resume cooking and the timer starts from the same point at which it was stopped.
TIMER FUNCTION TIMER FUNCTION
NOTE: the timer is only intended as an acoustic advisor that recalls the attention of the user.
- Timers have no effect on the heating elements. Cooking zones must always be stopped manually by touching the corresponding [OFF] key.
There are two versions of the timer function:
An independent timer from 1 to 59 minutes: it beeps when the time has run out. This function is always available and is indicated by the clock symbol (24) which is located between the - and + keys (the symbol may be less bright if another cooking zone timer has a remaining time that is less than that set on the independent timer).
A zone timer from 1 to 59 minutes for each cooking zone: it beeps when the time has run out. The cooking zones can be programmed independently (the symbol may be less bright if another cooking zone timer has a remaining time that is less than that set on the independent timer).
There's a zone timer indicator in each zone display. The timer with the least time is highlighted and the related clock icon is brighter (13-24). The other timer settings are still active and running, but the clock icon (13-24) will be less bright. Another icon with the word "min" (23) appears when you set times longer than 10 minutes. For example 0.11 indicates 0 hours and 11 minutes. The separator dot (21) flashes when the timer is running, while the dot is static while the timer is selected and thus modifiable.
INDEPENDENT TIMER INDEPENDENT TIMER
If the touch display is on, the independent timer can be used by simultaneously touching the + and - keys. If all the cooking zones are in position "0", this is the only timer available. The clock icon (24) will turn on and the display will show "0.00". If you do not select any key, the timer deactivates within 5 seconds.
The time setting (0-1hour 59min) can be changed in increments of one minute with the + key from 0 to 99.
Holding down the + or - key dynamically increases the rate of change up to a maximum value, without beeps.
If the + (or -) key is released, the rate of increase (decrease) starts again from the initial value.
The timer can be set by either continuously touching the + or - keys or by touching successively (with beeps).
After the timer is set, it begins to count down. The completion of the time is signalled by a beep or by the flashing of the timer display, which will show "00".
TURNING OFF/CHANCING THE TIMERTURNING OFF/CHANGING THE TIMER
The timer can be changed or turned off at any time by turning on the touch display again, if no cooking zone is on, and touching the + and - keys simultaneously to select the timer. At this point, set it to "0" by touching the - key, to turn it off, or by touching the + key to increase the time setting.
The independent timer remains active even when the On/Off key is touched.
PROGRAMMING THE TIMER FOR THE COOKING ZONES PROGRAMMING THE TIMER FOR THE COOKIN
By turning on the touch display, you can program an independent timer for each cooking zone.
At least one cooking zone must be on and set to a certain level.
By touching the + and - keys simultaneously, you can set a countdown for turning off the cooking zone. There are illuminated clock icons (13) next to the display of the cooking zone. To set the timer on a cooking zone when there are more than one cooking zone on, you must touch the + and - keys simultaneously. You will note that the clock icon will light and move to successive cooking zones each time you simultaneously touch the + and - keys.
When the timer of the cooking zone is selected, the related clock icon near the display becomes brighter (13). The timers programmed for each cooking zone remain active.
Other functions of the timer are the same as the independent timer. To increase the time, use the (plus) key.
The beeping and flashing of the display stops automatically after 2 minutes.
When you touch the + or - keys, the timer display turns off.
Error codes are displayed by the 7-segment display with "E" or "ER" plus the error number.
| Error message | Description Possible error | reason Troubleshooting | |
| “flash” | Control is detecting a key being activated for more than 10 seconds. | Water or cooking utensils on the glass above the control unit | Clean the operational surface |
| Er 22 | Defective Key evaluation . Control unit cuts off after 3.5 - 7.5 sec. | Short-circuit or no continuity in the range of the key evaluation | Exchange control unit |
| Er20 Flash-failure Faulty microcontroller Exchange control unit | |||
| Er36 | NTC value is not within its specification (value < 200mV or > 4.9V; the control unit cuts off | Short-circuit or cut-off at NTC | Exchange control unit |
| Er31 Er47 | Configuration data incorrect | Configuration of induction necessary | New Configuration |
| Communication error between TC and induction | None or faulty communication! | Ensure that connection cable is plugged on correctly and functional. | |
| E2 Overheating of the induction coils Cooling down necessary | |||
| U400 | Secondary voltage of the power unit too high (primary > 300V). Control unit cuts off after 1 sec, sounds a continuous tone. | Control unit is wrongly connected | Connect to correct mains voltage |
| E5 | Error on filter board Exchange filter board | ||
| E6 | Error on power unit Exchange power unit | ||
| E9 Coil temperature sensor defective | Exchange temperature sensor | ||
| Problem Cause Possible | Remedy | |
| Nothing works | Cooktop not connected to proper electrical circuit.Fuse is blown or circuit breaker is tripped.No electricity to the cooktop. Have electrician check your power supply.Cooktop is in lockout mode. Unlock cooktop. | Have electrician verify that the proper rated cooktop voltage is being supplied to the cooktop.Have electrician replace fuse or reset circuit breaker. |
| Heating elements do not heat properly | Improper cookware is being used. Select proper cookware as outlined in the CooktopOperation section of this manual. | |
| Glass ceramic surface is see-through or appears to be red in color | Under direct or bright lighting, you will sometimes be able to see through the glass and into the chassis due to its transparent quality. You may also notice a red tint under these conditions. | These are normal properties of black ceramic glass panels. |
EN
Please visit the Hestan website to access the parts list for your Hestan Indoor product: www.hestanhome.com.www.hestanhome.com.
SERVICE
All warranty and non-warranty repairs should be performed by qualified service personnel. To locate an authorized service agent in your zone, contact your Hestan dealer, local representative, or the manufacturer. Before you call, please have the model number and serial number information ready.
Hestan Commercial Corporation
3375 E. La Palma Avenue
Anaheim, CA 92806
(888) 905-7463
LIMITED WARRANTY
WHAT THIS LIMITED WARRANTY COVERS WHAT THIS LIMITED WARRANTY COVERS
Hestan Commercial Corporation ("HCC") warrants to the original consumer purchaser of a Hestan Indoor Cooking product (the "Product") from an HCC authorized dealer that the Product is free from defective materials or workmanship for a period of three (3) years from the date of original retail purchase or closing date for new construction, whichever period is longer ("Limited Warranty Period"). HCC agrees to repair or replace, at HCC's sole option, any part or component of the Product that fails due to defective materials or workmanship during the Limited Warranty Period. This Limited Warranty is not transferable and does not extend to anyone beyond the original consumer purchaser ("Purchaser"). This Limited Warranty is valid only on Products purchased and received from an HCC authorized dealer in the fifty United States, the District of Columbia and Canada. This Limited Warranty applies only to Products in non-commercial use and does not extend to Products used in commercial applications.
HOW TO OBTAIN WARRANTY SERVICEHOW TO OBTAIN WARRANTY SERVICE
If the Product fails during the Limited Warranty Period for reasons covered by this Limited Warranty, the Purchaser must immediately contact the dealer from whom the Product was purchased or HCC at 888.905.7463.
Purchaser is responsible for making the Product reasonably accessible for service or for paying the cost to make the Product reasonably accessible for service. Service is to be provided during normal business hours of the authorized Hestan Commercial Service Provider. To the extent Purchaser requests service outside of the normal business hours of the authorized Hestan Commercial Service Provider, Purchaser will pay the difference between regular rates and overtime or premium rates. Purchaser is required to pay all travel costs for travel beyond 50 miles (one way) from the nearest authorized Hestan Commercial Service Provider.
EXTENSIONS TO THREE YEAR LIMITED WARRANTY PERIOD:
In addition to the Three-Year Limited Warranty, the following components have extended warranty coverage as specifically set forth below:
- The Product's gas burners (excludes appearance), electric heating elements, blower motors (ventilation hoods), electronic control boards, magnetron tubes and induction generators (where applicable) are warranted to be free from defects in material and workmanship under normal non-commercial use and service for a period of five (5) years of the original Purchaser. This excludes surface corrosion, scratches, and discoloration which may occur during normal use and is limited to replacement of the defective part(s), with the Purchaser paying all other costs, including labor, shipping and handling, as applicable.
WHAT THIS LIMITED WARRANTY DOES NOT COVER WHAT THIS LIMITED WARRANTY DOES NOT COVE
This Limited Warranty does not cover and HCC will not be responsible for and will not pay for: damage to or defects in any Product not purchased from an HCC authorized dealer; color variations in color finishes or other cosmetic damage; failure or damage from abuse, misuse, accident, fire, natural disaster, commercial use of the Product, or loss of electrical power or gas supply to the Product; damage from alteration, improper installation, or improper operation of the Product; damage from improper or unauthorized repair or replacement of any part or component of the Product; damage from service by someone other than an authorized agent or representative of the Hestan Commercial Service Network; normal wear and tear; damage from exposure of the Product to a corrosive atmosphere containing chlorine, fluorine, or any other damaging chemicals; damage resulting from the failure to provide normal care and maintenance to the Product; damage HCC was not notified of within the Limited Warranty Period; and incidental and consequential damages caused by any defective material or workmanship.
ARBITRATION:ARBITRATION:
This Limited Warranty is governed by the Federal Arbitration Act. Any dispute between Purchaser and HCC regarding or related to the Product or to this Limited Warranty shall be resolved by binding arbitration only on an individual basis with Purchaser. Arbitration will be conducted by the American Arbitration Association ("AAA") in accordance with its Consumer Arbitration Rules or by JAMS. The arbitration hearing shall be before one arbitrator appointed by the AAA or JAMS. The arbitrator shall not conduct class arbitration and Purchaser shall not bring any claims against HCC in a representative capacity on behalf of others.
LIMITATION OF LIABILITY:LIMITATION OF LIABILITY:
This Limited Warranty is the final, complete and exclusive agreement between HCC and Purchaser regarding the Product.
THERE ARE NO EXPRESS WARRANTY OTHER THAN THOSE LISTED AND DESCRIBED ABOVE. NO WARRANTY WHEHER EXPRESS OR IMPLIED, INCLUDING, BUT NOT LIMITED TO, ANY IMPLIED WARRANTY OF MERCHANTABILITY OR FITNESS FOR A PARTICULAR PURPOSE SHALL APPLY AFTER THE LIMITED WARRANTY PERIOD STATED ABOVE. NO OTHER EXPRESS WARRANTY OR GUARANTY GIVEN BY ANY PERSON, FIRM OR CORPORATION WITH RESPECT TO THIS PRODUCT SHALL BE BINDING ON HCC. HCC ASSUMES NO RESPONSIBILITY THAT THE PRODUCT WILL BE FIT FOR ANY PARTICULAR PURPOSE, EXCEPT AS OTHERWISE PROVIDED BY APPLICABLE LAW.
HCC SHALL NOT BE LIABLE FOR LOSS OF REVENUE OR PROFITS, FAILURE TO REALIZE SAVINGS OR OTHER BENEFITS, OR ANY OTHER SPECIAL, INCIDENTAL OR CONSEQUENTIAL DAMAGES CAUSED BY THE USE, MISUSE OR INABILITY TO USE THE PRODUCT, REGARDLESS OF THE LEGAL THEORY ON WHICH THE CLAIM IS BASED, AND EVEN IF HCC HAS BEEN ADVISED OF THE POSSIBILITY OF SUCH DAMAGES. NO RECOVERY OF ANY KIND AGAINST HCC SHALL BE GREATER IN AMOUNT THAN THE PURCHASE PRICE OF THE PRODUCT.
WITHOUT LIMITING THE FOREGOING, YOU ASSUME ALL RISK AND LIABILITY FOR LOSS, DAMAGE OR INJURY TO YOU AND YOUR PROPERTY AND TO OTHERS AND THEIR PROPERTY ASING OUT OF THE USE, MISUSE OR INABILITY TO USE THE PRODUCT NOT CAUSED DIRECTLY BY THE NEGLIGENCE OF HCC. THIS LIMITED WARRANTY STATES YOUR EXCLUSIVE REMEDY.
No oral or written representation or commitment given by anyone, including but not limited to, an employee, representative or agent of HCC will create a warranty or in any way increase the scope of this express Limited Three Year Warranty. If there is any inconsistency between this Limited Warranty and any other agreement or statement included with or relating to the Product, this Limited Warranty shall govern. If any provision of this Limited Warranty is found invalid or unenforceable, it shall be deemed modified to the minimum extent necessary to make it enforceable and the remainder of the Limited Warranty shall remain valid and enforceable according to its terms.
INTERACTION OF LAWS WITH THIS LIMITED WARRANTY:
Some states, provinces or territories may not allow limitations on how long an implied warranty lasts or the exclusion or limitation of incidental or consequential damages, so the above limitations or exclusions may not apply to you. Some states, provinces or territories may provide for additional warranty rights and remedies, and the provisions contained in this Limited Warranty are not intended to limit, modify, take away from, disclaim or exclude any mandatory warranty requirements provided by states, provinces or territories, including certain implied warranties. This warranty gives you specific legal rights, and you may also have other rights which vary depending on location.
Any questions about this Limited Warranty may be directed to Hestan Commercial Products at (888) 905-7463
A VERTISSEMENT
L'INOBSERVATION DES INFORMATIONS DONNÉES DANS CE MANUEL PEUT ENTRAIÑER UN INCENDIE OU UNE EXPLOSION DE NATURE À CAUSER DES DÉGATS MATÉRIELS ET DES BLESSURES GRAVES, VOIRE MORTÉLLES.
Hestan Commercial Products
3375 E. La Palma Avenue
Anaheim, CA 92806
(888) 905-7463
ÉLÉMENTS COUVERTS PAR LA PRÉSENTE GARANTIE LIMITÉE
Hestan Commercial Corporation
3375 E. La Palma Ave.
Anaheim, CA 92806
(888) 905-7463