MALIBU212P - Speaker FoneStar - Free user manual and instructions
Find the device manual for free MALIBU212P FoneStar in PDF.

User questions about MALIBU212P FoneStar
0 question about this device. Answer the ones you know or ask your own.
Ask a new question about this device
Download the instructions for your Speaker in PDF format for free! Find your manual MALIBU212P - FoneStar and take your electronic device back in hand. On this page are published all the documents necessary for the use of your device. MALIBU212P by FoneStar.
USER MANUAL MALIBU212P FoneStar
natural_image
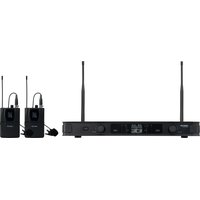
Black FONESTAR audio amplifier device with external microphone, remote control, and earpieces (no visible text or symbols)INSTRUCTION MANUAL/MANUAL DE USUARIO/MODE D'EMPLOI/MANUAL DE INSTRUÇÕES
DESCRIPTION
- High power and sound quality provided by its high-efficiency Class D amplifier.
- They integrate all the necessary elements for a live performance or talk: 2 wireless microphones (1 handheld and 1 headset), 2 microphone inputs, 1 auxiliary input, USB/SD/MP3 player, mixer, graphic equaliser, speaker and amplifier.
- Its trolley together with a rechargeable Li-ion battery of great capacity and autonomy, make it very versatile and adaptable to a multitude of uses.
CONTROLS AND FUNCTIONS
REAR PANEL
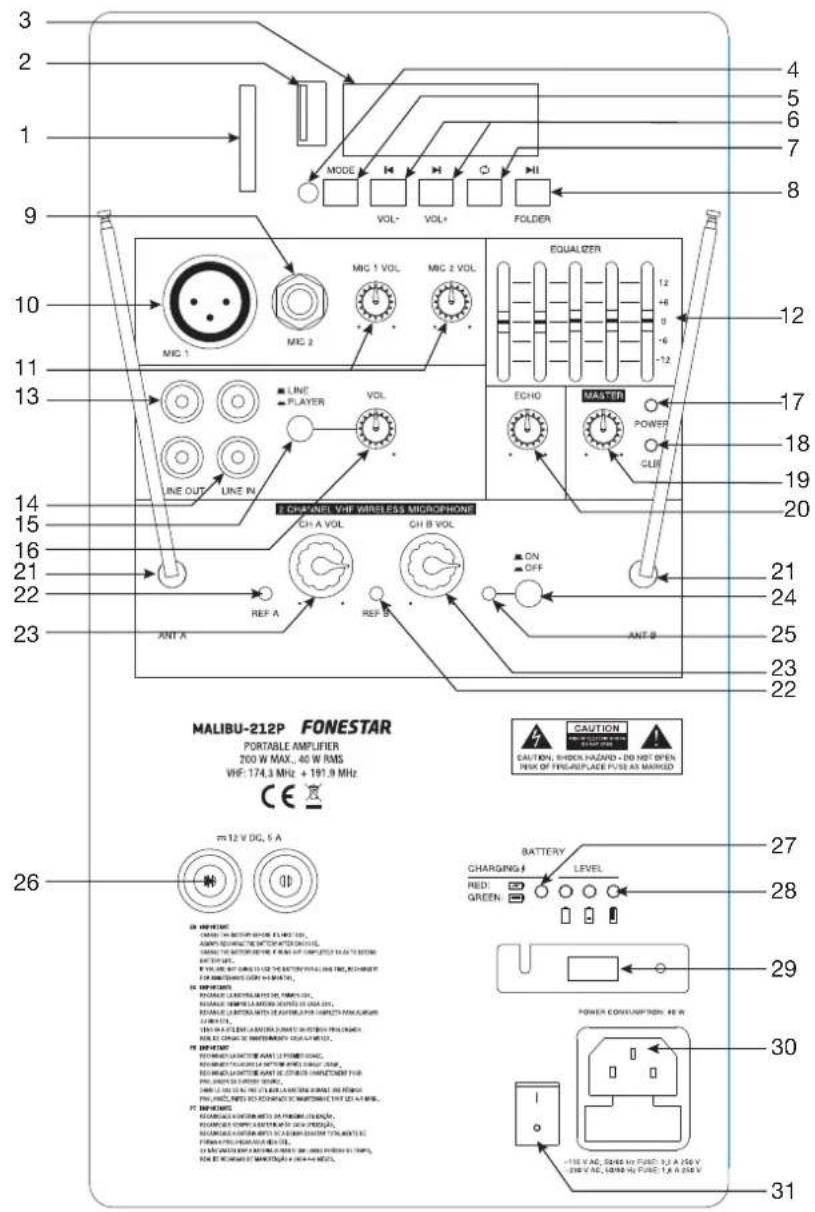
1.- SD memory card connection port.
2.- Connection port for USB storage devices.
3.- Information screen of the USB/SD/MP3 player module.
4.- Infrared receiver for the remote control.
5.- MODE : allows you to select between the different audio sources available.
6.- ▶(VOL-) / ▶(VOL+): a short press on these buttons allows you to skip to the previous/next audio track. A long press on these buttons allows you to decrease/increase the volume of the player.
7.- ☐ : allows you to change the play and repeat mode of the player (repeat all, repeat folder, repeat 1 and random play).
8.- ▶II (FOLDER): A short press on this button starts/pauses playback. A long press displays the folder in playback.
9.- MIC 2: microphone input 2, 6.3 mm jack plug.
10.- MIC 1: microphone input 1, XLR connector.
11.- MIC 1 VOL, MIC 2 VOL: volume controls for microphone inputs 1 and 2.
12.- 5-band graphic equaliser.
13.- LINE OUT: line level stereo output, 2 x RCA connectors.
14.- LINE IN: line level stereo auxiliary input, 2 x RCA connectors.
15.- Auxiliary input operation selector. Allows you to select between the LINE IN input and the player module.
16.- VOL: volume control of the line level input and USB/SD/MP3 player.
17.- POWER: portable amplifier power indicator light.
18.- PEAK: signal peak indicator light. It lights up when an input signal is detected with a level which is too high or when there is an excessive output level that may cause a fault.
19.- MASTER: output volume control of the final mix of all inputs.
20.- ECHO: control for the adjustment of the number of repetitions of the echo effect of the microphone inputs.
21.- Independent telescopic antennas for channels A and B.
22.- REF A-B: adio frequency signal level indicator lights.
23.- CH A-B VOL: volume controls for the wireless microphones.
24.- ON/OFF: switch to activate/deactivate the wireless microphone receiver modules.
25.- Indicator light for the wireless microphone receiver modules.
26.- External power supply terminals 12 V DC.
27.- Charging indicator lights. Illuminates Turns red during battery charging and green when the charging process is complete.
28.- Battery charge level indicators.
29.- Power supply voltage selector 115/230 V.
30.- Input for AC power cord connection.
31.- General on/off switch of the loudspeaker.
HAND-HELD MICROPHONE
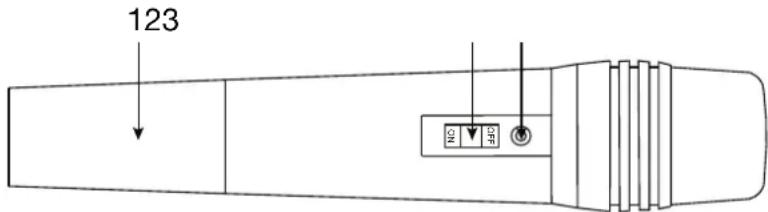
1.- Use two LR-6AA alkaline batteries.
2.- Operation switch. It has 3 positions, ON, STANDBY (central position) and OFF. Place it in the ON position for operation. Place the switch in the position STANDBY to save battery power and the microphone will turn on immediately when switching to ON.
3.- Battery indicator light. It will turn green when the charge level is correct and red when the batteries are low.
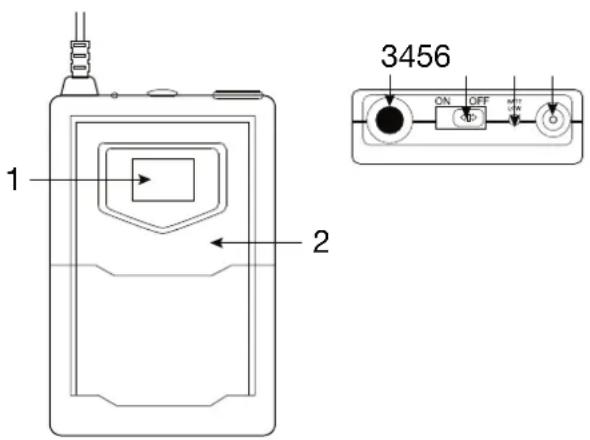
POCKET MICROPHONE
1.- Information screen.
2.- Battery holder. Use two LR-6AA alkaline batteries.
3.- Microphone input, 3.5 mm jack connector.
4.- Operation switch. It has 3 positions, ON 1, STANDBY (centre position) and OFF. Turn it to the ON position for operation. Set the switch to the STANDBY position to save battery power and the microphone will turn on immediately when the switch is turned ON.
5.- BATT LOW: operation and low battery indicator light. When the batteries are low, the indicator light will dim and it is advisable to change the batteries.
6.- Antenna
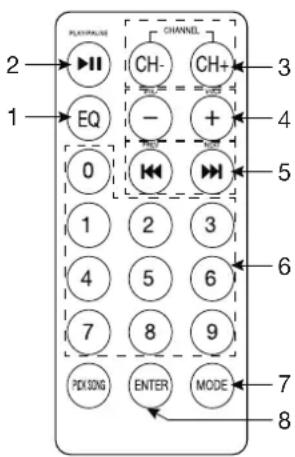
REMOTE CONTROL
1.- EQ: allows you to select between the different existing equalisations.
2.- ▶II: start/pause playback.
3.- CH+/CH+: one press of these buttons allows you to go to the previous/next folder.
4.- VOL-/VOL+: MP3 player volume controls.
5.- <</>>a short press on these buttons allows you to skip to the previous/next audio track. A long press on these buttons allows you to rewind/fast forward the playback.
6.- 0-9: numeric buttons for automatic selection of the desired audio track.
7.- MODE: allows you to select the desired audio source.
8.- ENTER: allows you to change the play and repeat mode of the player (repeat all, repeat folder, repeat 1 and random play).
Before making any connections, make sure that all equipment is switched off and disconnected from the power supply socket.
The basic connections are as follows:
1.- Microphone inputs (MIC 1-2): connect microphones to this input. The inputs are balanced, for dynamic microphones with XLR connector and 6.3 mm jack.
2.- Audio source, it is possible to select between line input LINE IN or the player. To use the line input, connect an external sound source (CD player, audio player, etc.) to the input via 2 x RCA connectors and place the LINE/PLAYER selector without pressing. Otherwise, if you wish to use the player as a source, press the LINE/PLAYER selector and connect the device you wish to play to this module.
3.- Audio output (LINE OUT): connect the audio output signal to a recorder, amplifier, power amplifier or other loudspeaker. Line level output signal with 2 x RCA connectors.
4.- Turn on the amplifier with the switch located at the bottom of the rear panel. You can use the equipment powered directly from the mains or using the internal battery. If you make use of the battery when turning on the loudspeaker, the battery indicator lights will illuminate to indicate the battery level-charge. Check that it is charged before use.
TECHNICAL SPECIFICATIONS
| MALIBU-212P | |
| FEATURES Portable speaker.2 VHF wireless microphones, 1 handheld and 1 head (191'900 MHz and 174'300 MHz respectively).USB/SD/MP3 player.Rechargeable Li-ion battery.Echo function and tone control.Trolley transport cart.Remote control.Hole in the base for 35 mm tube. | |
| POWER 200 W maximum | 40 W RMS |
| LOUDSPEAKERS 1 x 12" woofer1 x 1" tweeter | |
| INPUTS 2 mics, XLR and 6.3 mm jack1 stereo auxiliary, 2 x RCA | |
| OUTPUTS 1 stereo aux. | 2 x RCA |
| POWER SUPPLY 230/1 | 15 V AC and 12 V DCBattery Li-ion 12.8 V, 8000 mAhAutonomy with rechargeable battery: 5 hours (volume at 50%) Battery charging time: 6.5 hours approximately Operative during charge |
| DIMENSIONS 390 x 580 | x 300 mm depth |
| OPTIONAL | FAL-M12: carrying bag |
SIMPLIFIED EU DECLARATION OF CONFORMITY
FONESTAR SISTEMAS S.A. hereby declares that the speaker MALIBU-212P complies with the Directive 2014/53/EU. The complete text of the EU Declaration of Conformity is available at the following internet address: fonestar.com/ES/MALIBU-212P