
B024DPU16 - KVM switch Tripp Lite - Free user manual and instructions
Find the device manual for free B024DPU16 Tripp Lite in PDF.
| Product Type | 16-Port KVM Switch (Model B024DPU16) |
| Brand | Tripp Lite |
| Model | B024DPU16 |
| Form Factor | 1U Rack Mount |
| Number of Ports | 16 CPU Ports (Controlled Computers) |
| Maximum Video Resolution | 4K (3840 x 2160) via DisplayPort 1.4 |
| Video Connectivity | DisplayPort (Input and Console), HDMI (Console Only) |
| USB Connectivity | USB 3.0 (CPU Ports), USB 3.1 Gen 1 (Front Peripherals) |
| Audio Connectivity | 3.5 mm Audio Jacks (Front and Rear, Front Priority) |
| Power Supply | External Power Adapter Included |
| Port Selection Methods | Front Panel Buttons, OSD Menus, Hotkeys, RS-232 Commands |
| Mouse Emulation | Yes, Enable/Disable via Hotkeys |
| Supported Operating Systems | Windows, Mac, Sun (Configurable via Hotkeys) |
| Firmware Upgrade | Via Dedicated Port (Cable Included) |
| Grounding | Recommended Ground Terminal |
| Package Contents | Switch, DisplayPort Cables (x2), USB 3.0 Cables (x2), Audio Cables (x2), Upgrade Cable, Feet, Power Adapter, Mounting Hardware, Quick Start Guide |
| Dimensions (Approx.) | Height 1U (4.4 cm), Width 19 inches (48.3 cm), Depth 30 cm |
| Weight (Approx.) | 2.5 kg |
| Warranty | 1-Year Limited |
Frequently Asked Questions - B024DPU16 Tripp Lite
User questions about B024DPU16 Tripp Lite
0 question about this device. Answer the ones you know or ask your own.
Ask a new question about this device
Download the instructions for your KVM switch in PDF format for free! Find your manual B024DPU16 - Tripp Lite and take your electronic device back in hand. On this page are published all the documents necessary for the use of your device. B024DPU16 by Tripp Lite.
USER MANUAL B024DPU16 Tripp Lite
Register your product today and be automatically entered to win an ISOBAR® surge protector in our monthly drawing!

triplite.com/warranty


1111 W. 35th Street, Chicago, IL 60609 USA · triplite.com/support
Copyright © 2021 Tripp Lite. All rights reserved.
Package Contents
- 8- or 16-Port 4K DisplayPort/USB 3.0 KVM Switch
- DisplayPort 1.4 Cables (x2)
- USB 3.0 Cables (x2)
Audio Cables (x2) - Firmware Upgrade Cable
- Foot Pads (x4)
Power Adapter - Mounting Hardware
Quick Start Guide
Optional Accessories
P580-Series DisplayPort Cables
- UR022-Series USB 2.0 Reversible A/B Cables
P312-Series 3.5 mm Mini Stereo Audio Cables
- P783-0XX-DP DisplayPort/USB/Audio Custom KVM Cables Kits
- P134-000 DisplayPort to DVI Adapter
Product Features
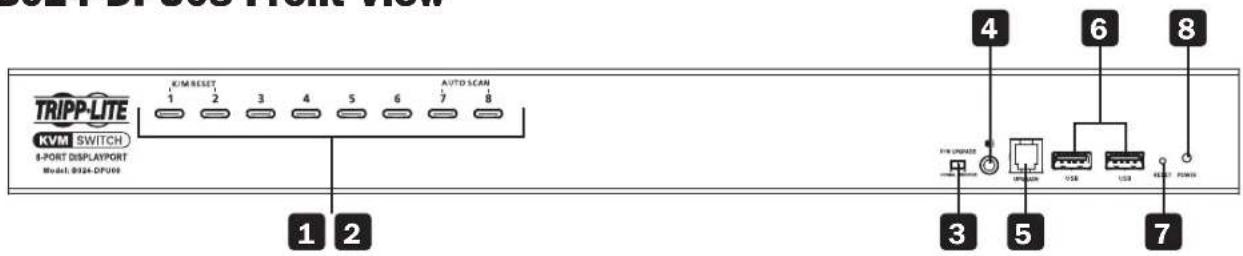
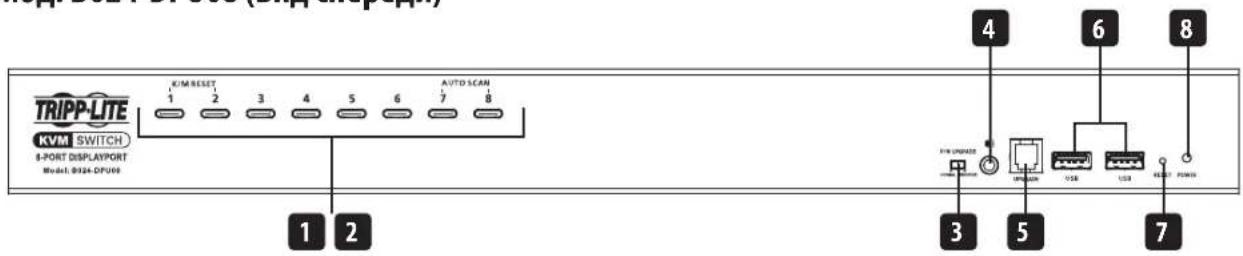
B024-DPU08 Front View

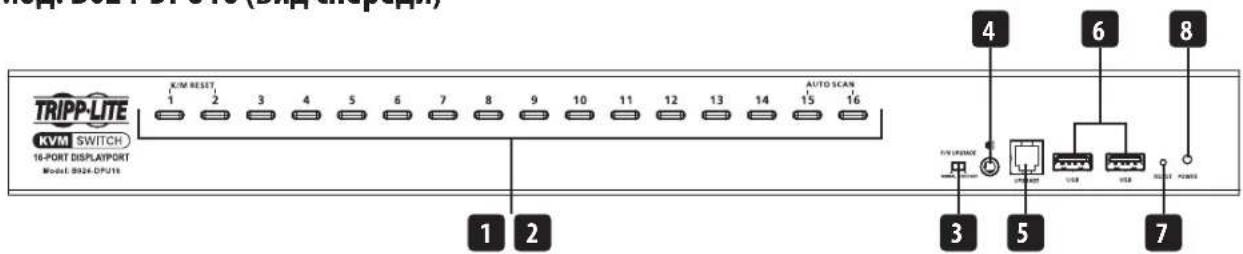
B024-DPU16 Front View
1 Port Selection Buttons
2 Port LEDs
3 Firmware Upgrade Recovery Switch
Audio Jack
5 Firmware Upgrade Port
USB 3.1 Gen 1 Peripheral Ports
7 Reset Button
8 Power LED
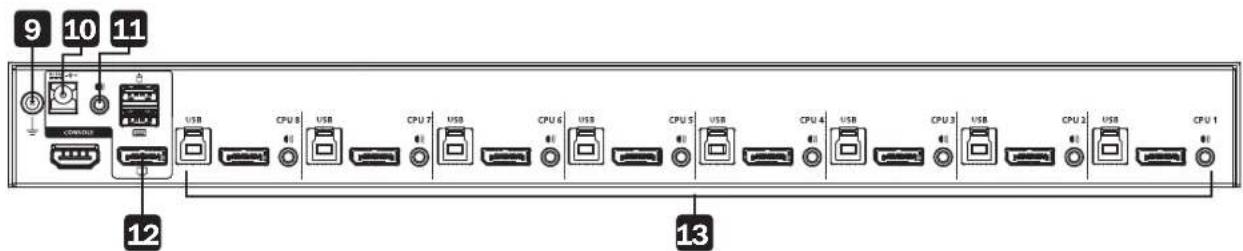
B024-DPU08 Rear View

B024-DPU16 Rear View
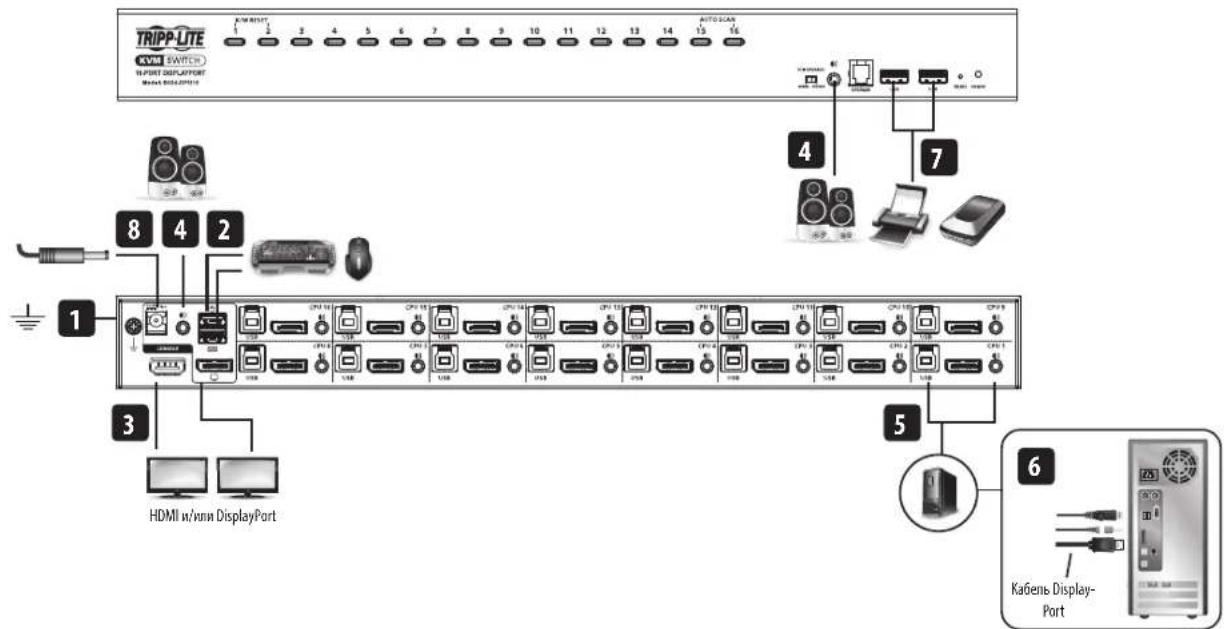
9 Grounding Terminal
10 Power Jack
Audio Jack
12 Console Ports
13 KVM Ports
Installation
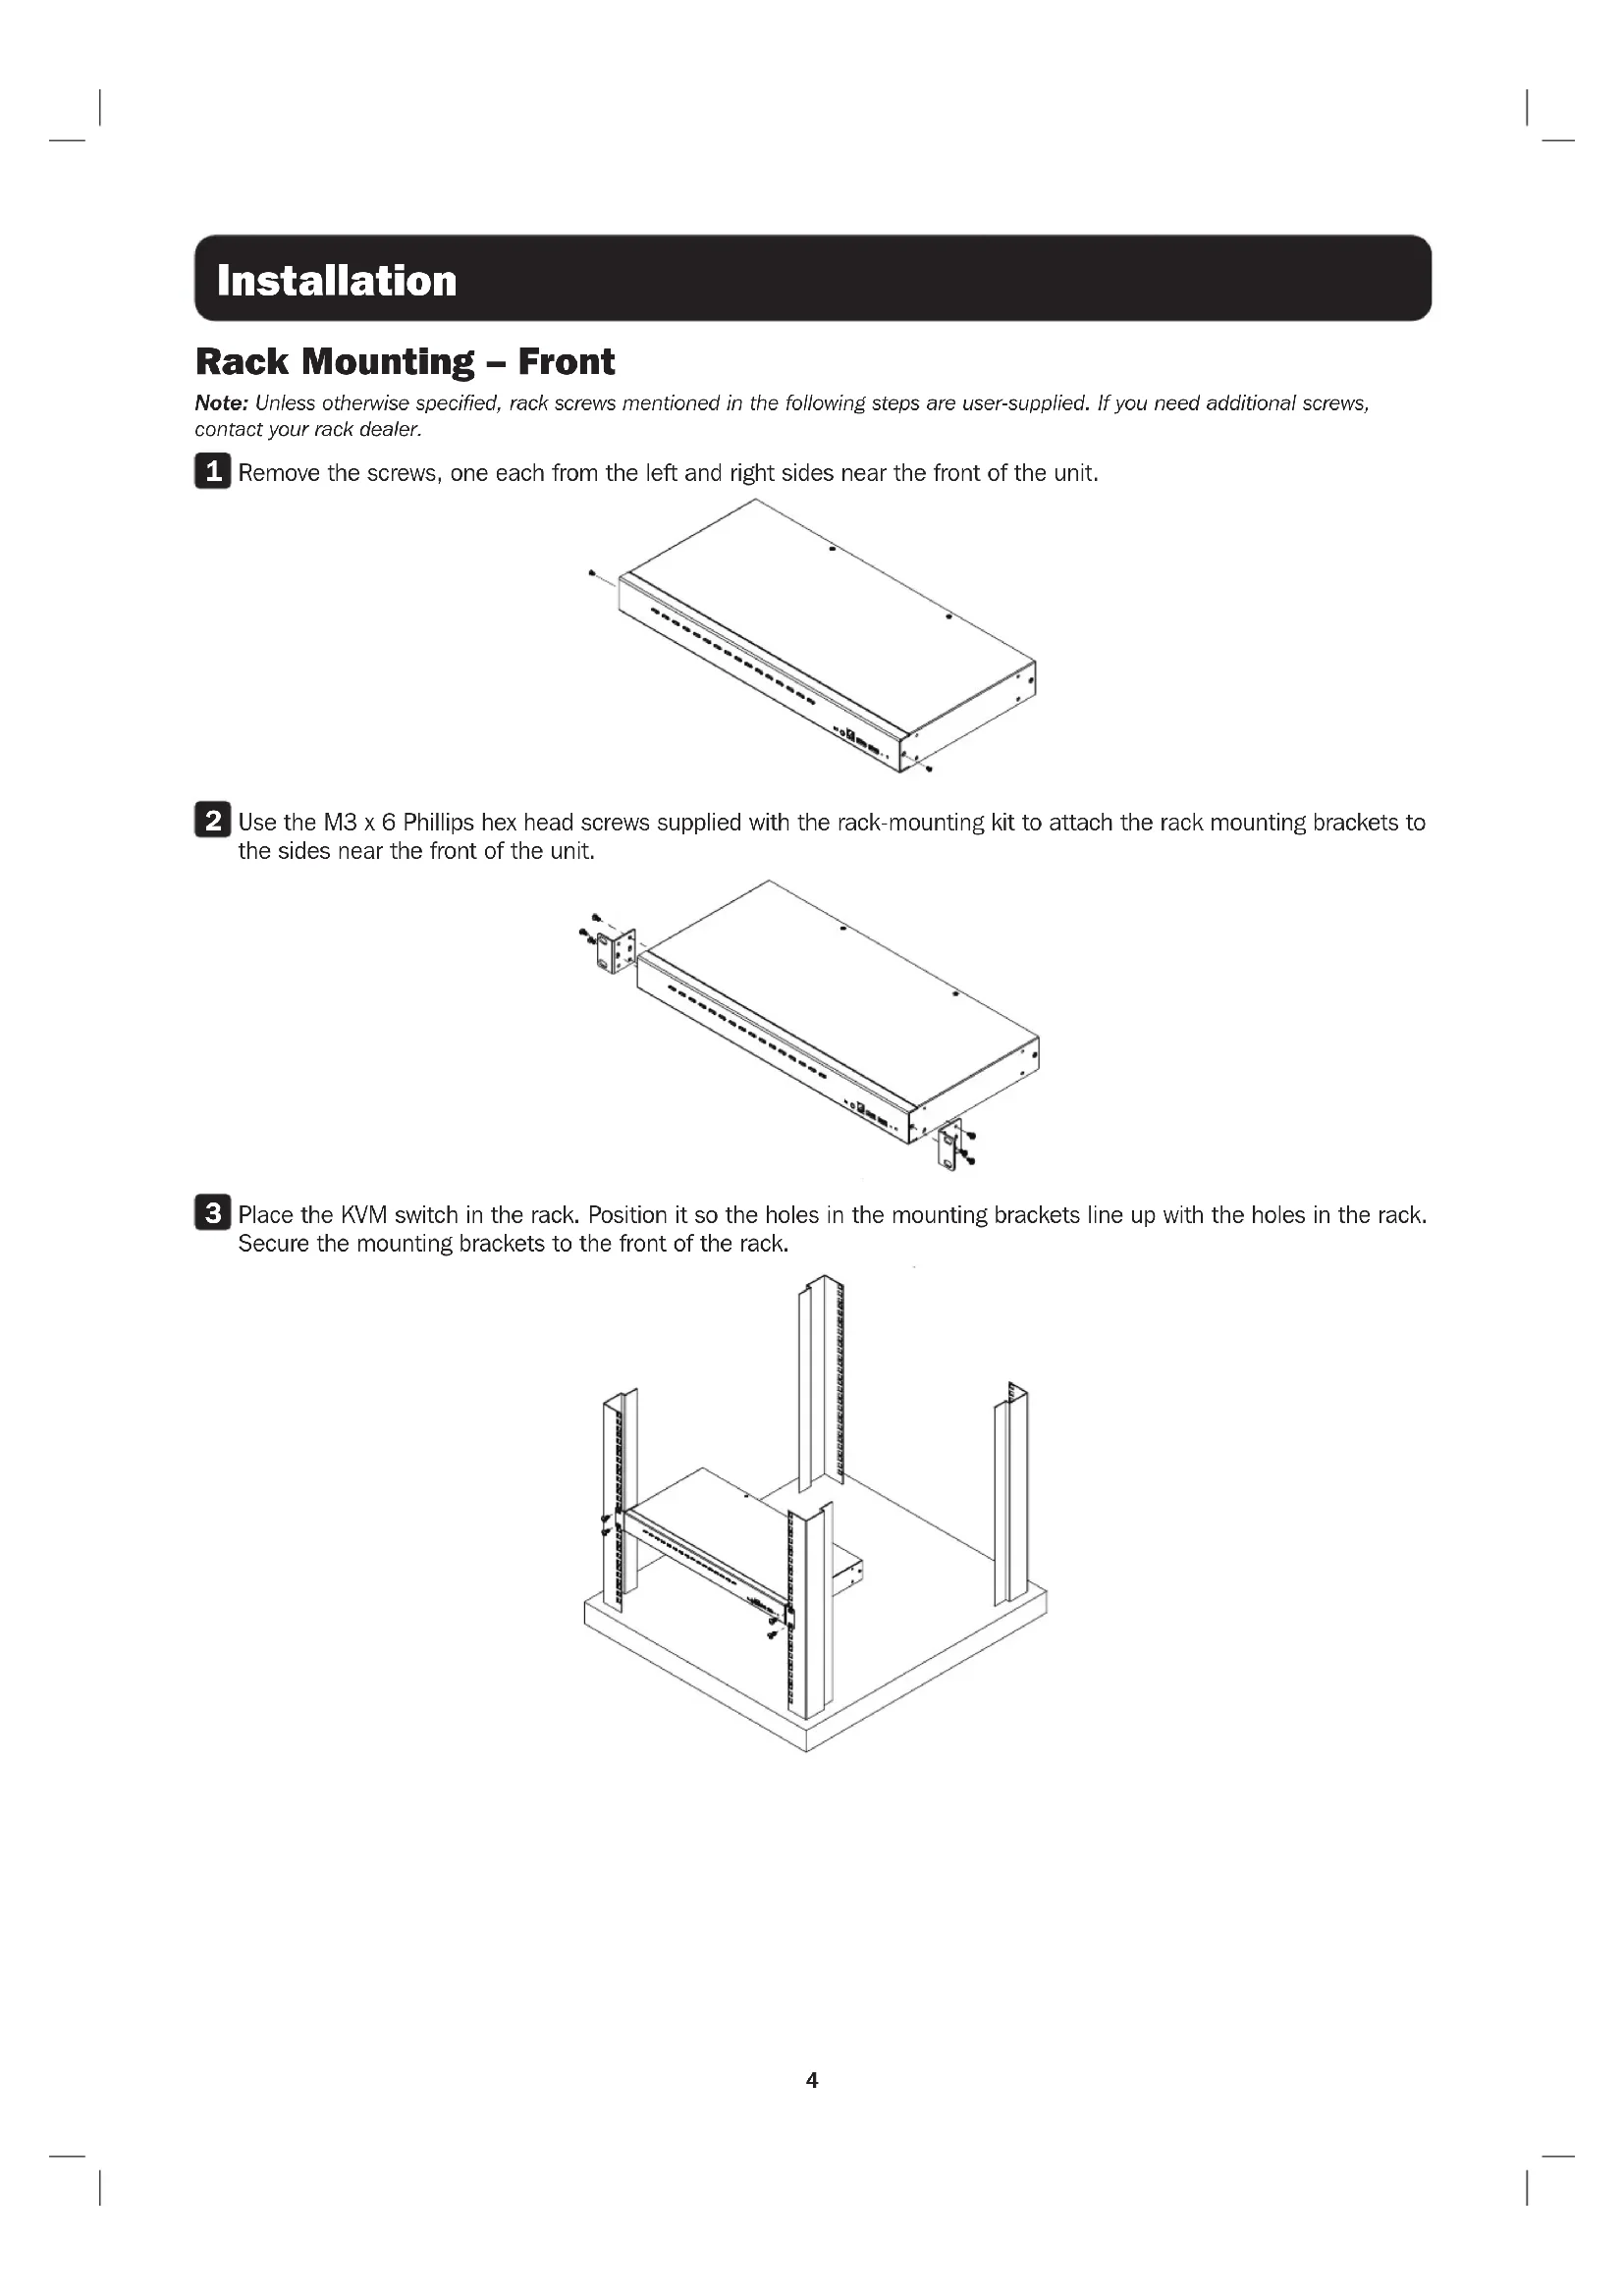
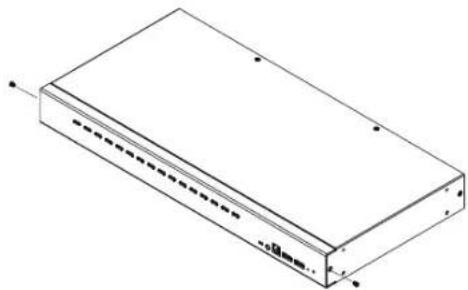
Rack Mounting - Front
Note: Unless otherwise specified, rack screws mentioned in the following steps are user-supplied. If you need additional screws, contact your rack dealer.
1 Remove the screws, one each from the left and right sides near the front of the unit.
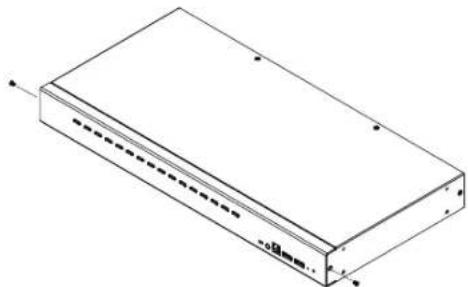
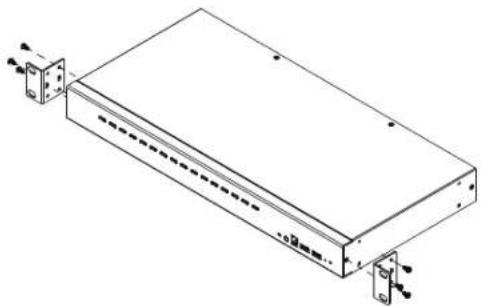
Use the M3 x 6 Phillips hex head screws supplied with the rack-mounting kit to attach the rack mounting brackets to the sides near the front of the unit.
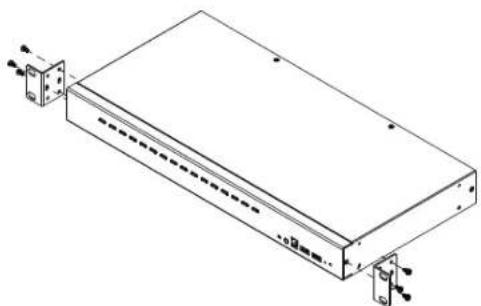
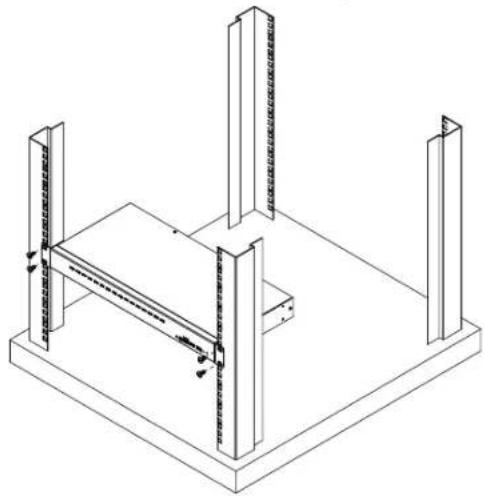
3 Place the KVM switch in the rack. Position it so the holes in the mounting brackets line up with the holes in the rack. Secure the mounting brackets to the front of the rack.

Installation
Single-Stage Installation

To install the switch, refer to the installation diagram and perform the following steps:
Ground the B024-DPU08 / B024-DPU16 by connecting one end of a grounding wire to the Grounding Terminal and the other end to a suitable grounded object.
Note: Do not omit this step. Proper grounding helps to prevent damage to the unit from power surges or static electricity.
Plug your USB keyboard and USB mouse into the USB console ports from the console ports section located on the unit's rear panel.
3 Plug your DisplayPort and/or HDMI monitor(s) into the DisplayPort and/or HDMI console port(s) from the console ports section located on the unit's rear panel and power on the monitor(s).
Note: The B024-DPU08 / B024-DPU16 displays the same source content on both the DisplayPort and HDMI monitors when DisplayPort and HDMI console ports are plugged in simultaneously.
Plug your speakers into the audio jacks located on the unit's front and rear panel. Speakers plugged into the front panel have priority over those plugged into the rear panel.
Use the provided cable sets (DisplayPort cable, USB 3.0 cable and audio cable) with this package. Plug the DisplayPort connector into any available DisplayPort port in the KVM ports section of the switch (CPU 1, CPU 2, etc.), and then plug the USB 3.0 cable and audio cable into their corresponding ports.
Note: Verify that all the connectors are in the same KVM ports section (all in CPU 1, all in CPU 2, etc.).
Plug the other ends of the DisplayPort cable, USB 3.0 cable and audio cable into their respective ports on the computer. Repeat steps 5 and 6 for other PCs you are installing.
7 (Optional) Plug your USB peripherals into the USB Type-A ports in the USB 3.1 Gen 1 peripheral hub section located on the unit's front panel.
Plug the power adapter that came with your switch into an AC power source, then plug the power adapter cable into the switch's power jack. The B024-DPU08 / B024-DPU16 is now on.
9 Power on the computers.
Operation
The B024-DPU08 / B024-DPU16 provides four port selection methods to access the computers on the installation: Manual Switching, an On-Screen Display (OSD) menu system, Hotkeys, and RS-232 commands. For detailed information, please refer to the B024-DPU08 / B024-DPU16 Owner's Manual, available at triplite.com/support/downloads.
Manual Switching
Use the front panel pushbuttons to manually switch to a port.
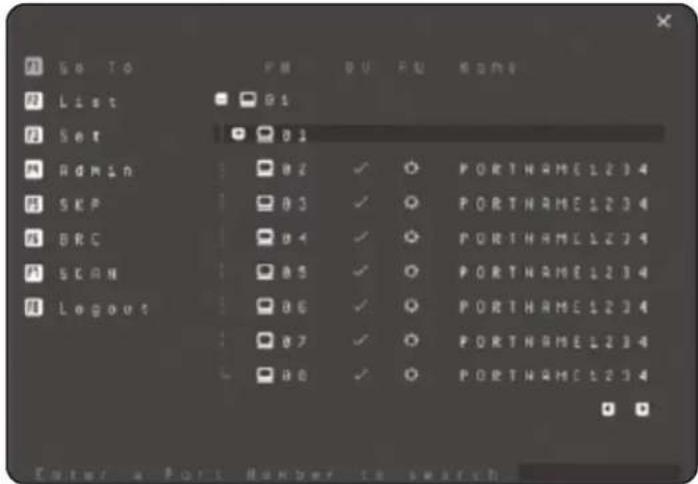
OSD (Port Switching)
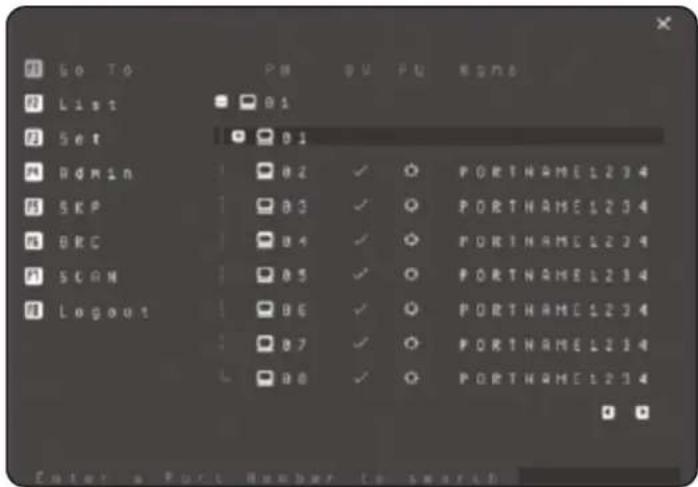
The on-screen display (OSD) is a mouse-and-keyboard enabled, menu-driven method to handle computer control and switching operations. All procedures start from the OSD main screen.
Default OSD Hotkey: Press the [Scroll Lock] key twice to display the OSD. If this is the first time the OSD is being run or if the password function has not been set, simply press [Enter].
To log in as an administrator, use default username and password: administrator / password. For more information, refer to the B024-DPU08 / B024-DPU16 Owner's Manual, available at triplite.com/support/downloads.
Operation
Hotkey Setting Mode (HSM)
Hotkey Setting Mode is used to set functions on the switch. Follow the steps below to invoke HSM and perform a hotkey function.
- Press and hold down the [Num Lock] key.
- Press and release the [-] key.
- Release the [Num Lock] key.
- Press the hotkey to perform the desired function. Refer to the table below for the function.
HSM Summary Table
| Key Function | |
| [Port ID][Enter] Switches the KVM, audio and USB focus directly to the computer that corresponds to that Port ID (B024-DPU08: 1-8 / B024-DPU16: 1-16). | |
| [Port ID][K][Enter] Switches the KVM and audio focus directly to the computer that corresponds to that Port ID (B024-DPU08: 1-8 / B024-DPU16: 1-16). | |
| [Port ID][U][Enter] Switches only the USB focus directly to the computer that corresponds to that Port ID (B024-DPU08: 1-8 / B024-DPU16: 1-16). | |
| Note: This hotkey function works on single-stage installation only. | |
| [A][Enter] Starts Auto Scan. The KVM focus cycles from port to port at the default 5-second interval. | |
| [F1] Sets the port OS to Windows. | |
| [F2] Sets the port OS to Mac. | |
| [F3] Sets the port OS to Sun. | |
| [M] Enables / disables mouse emulation. | |
Warranty & Product Registration
1-Year Limited Warranty
TRIPP LITE warrants its products to be free from defects in materials and workmanship for a period of one (1) year from the date of initial purchase. TRIPP LITE's obligation under this warranty is limited to repairing or replacing (at its sole option) any such defective products. To obtain service under this warranty, you must obtain a Returned Material Authorization (RMA) number from TRIPP LITE or an authorized TRIPP LITE service center. Products must be returned to TRIPP LITE or an authorized TRIPP LITE service center with transportation charges prepaid and must be accompanied by a brief description of the problem encountered and proof of date and place of purchase. This warranty does not apply to equipment which has been damaged by accident, negligence or misapplication or has been altered or modified in any way.
EXCEPT AS PROVIDED HEREIN, TRIPP LITE MAKES NO WARRANTYES, EXPRESS OR IMPLIED, INCLUDING WARRANTY OF MERCHANTABILITY AND FITNESS FOR A PARTICULAR PURPOSE. Some states do not permit limitation or exclusion of implied warranties; therefore, the aforesaid limitation(s) or exclusion(s) may not apply to the purchaser.
EXCEPT AS PROVIDED ABOVE, IN NO EVENT WILL TRIPP LITE BE LIABLE FOR DIRECT, INDIRECT, SPECIAL, INCIDENTAL OR CONSEQUENTIAL DAMAGES. ASRISING OUT OF THE USE OF THIS PRODUCT, EVEN IF ADVISED OF THE POSSIBILITY OF SUCH DAMAGE. Specifically, TRIPP LITE is not liable for any costs, such as lost profits or revenue, loss of equipment, loss of use of equipment, loss of software, loss of data, costs of substitutes, claims by third parties, or otherwise.
PRODUCT REGISTRATION
Visit tripplite.com/warranty today to register your new Tripp Lite product. You'll be automatically entered into a drawing for a chance to win a FREE Tripp Lite product!
- No purchase necessary. Void where prohibited. Some restrictions apply. See website for details.
WEEE Compliance Information for Tripp Lite Customers and Recyclers (European Union)

Under the Waste Electrical and Electronic Equipment (WEEE) Directive and implementing regulations, when customers buy new electrical and electronic equipment from Tripp Lite they are entitled to:
- Send old equipment for recycling on a one-for-one, like-for-like basis (this varies depending on the country)
- Send the new equipment back for recycling when this ultimately becomes waste
WARNING
Use of this equipment in life support applications where failure of this equipment can reasonably be expected to cause the failure of the life support equipment or to significantly affect its safety or effectiveness is not recommended.
Tripp Lite has a policy of continuous improvement. Specifications are subject to change without notice. Photos and illustrations may differ slightly from actual products.


1111 W. 35th Street, Chicago, IL 60609 USA · triplite.com/support
1111 W. 35th Street, Chicago, IL 60609 EE UU · triplite.com/support
1111 W. 35th Street, Chicago, IL 60609 USA · tripnite.com/support
KpaTKoe pyKOBoDCTBO nOJIb30BaTeJia
8- nii 16-nopToBbI cToeHbI (1U) KBM-nepeKIOuateIb 4K DisplayPort/USB
Mодenv: B024-DPU08, B024-DPU16
English 1 • Espanol 9 • Français 17 • Deutsch 33
EAC


1111 W. 35th Street, Chicago, IL 60609 USA - tripplite.com/support
OxpaHReTcA ABTOpCKM npabOM © 2021 Tripp Lite. NpepeuKatka zanpeuaetra.
CopexMoe ynaKOBKn
- 8-ил 16-nopToBbI KBM-nepeKJIuOaTeNb 4K DisplayPort/USB 3.0
- Ka6enn DisplayPort 1.4 (2 w.r.)
- Ka6eMn USB 3.0 (2 wT.)
Aynokabenn(2wT.)
KabénbIyIaObHOBnEMIpyoBnBKN
-Поdkнадкnoн сточу(4ш.) - BLOK NITAHIN
MOnTaXHbIe npCnOc6JIeHHa
KpaTkoe pyKOBOCTBO noIb3OBATeJIa
OnuohbHbIe KOMnKeKTyOuIe
- KaBenu DisplayPort cepuN P580
Ka6eHn cepm UR022 cDBycTOpOHMM pa3bEmAMM USB 2.0 A/B
Ka6eNc pa3bEmom Mini Stereo Audio 3.5 mm cepnn P312
CneuaHnBpaHbHe Na60bpKBM-ka6eJei DisplayPort/USB/aymo MoJ.P783-0XX-DP - IpepexoJHmK DisplayPort - DVI MoD. P134-000
XapaKTepeNCTnKN n3dennia
MoiB. B024-DPU08 (BvIcpepe)
MoiB. B024-DPU16 (BnD cnepeu)
1 KhonknBb6opa npotob
2 CBeToDIOHbIe HINdIKaTOpbI npOTOB
3 PepeknioateBbocstaHOBHeHnIpoceCaobHBeHnIpooBnBKN
4 Ayniopa3bem
5 IopTdIyO6HOBHeHn npOuINBkN
6 IepnepenHbIe npotb USB 3.1 Gen 1
7 KhoNka c6poca/pe3ayncka
8 CND Power("NtTaHne")

MоД.ВО24-DPU08(BИДсЗаи)

Mод.ВО24-DPU16(BиДсЗаи)
9 3aemlyaoum BbBOd
10 Pa3bem nHTaHn
11 Aynopazbem
12 KOHcOJIbHbIe npOpTbI
13 KBM-noptbl
yctaHOBka
MoHTaX B cTOnKy (cJIuIeBOB cTOpOhbl)
PnmuueHne. Ecm He yka3aHO Hnoe, ctoeHbte BnHTb, ynomHaemble Ha cneDyOux Xarax, B KOMnNEKT NoCTABKn HE BXoJrT. B Cnyae Heo6xOIMocTn npO6peHn nnONHNTbHbIX BnHTOB oBpaTntcK npOabuy CTOKN.
1 BbIeBpHtE BnHTbI, paCnoJoxeHHbIe no OJHOmy cIeBa I cnPaba B6n3n nepeJe nAHeN yCTpoCTBa.
PnKpEnIe KpoHTeHbI IaI CTOeUHO MOHTaKa IIO 6OKAM B6N3N IpeDHe N aHEEN yCTPOINCTBa npn NOMOu BNHTOB M3x6C WecTIRpaHNOI RIOBko INKpcTo06pa3HbIM uHcem.
3 NomeCTHe KBM-NepeKnOHTeB CTOnKy. PaCNOIOKHeIero TAKIM O6pa3OM, 0TO6bI OTBePCTN B MOHTaXHbIX KPOHHTeHHAX COBnaJAM C COOTBECTBYOUHMN OTBePCTnMM B CTOnKe. 3aKpEnITe MOHTaXHbIe KPOHHTeHHbI C nIueBoI CTOpOHB CTOnKn.
YCTaHOBKa
YCTAHOBKa B ODHOKaKdHoi CnCTeMe
IyctahOBKn nepeKlnOaTeBnBOcNIOb3yTeCByCTaHOBOOH CXeMO N BbINOHNTE CneJeYIOUne DeiCTBNA:
1 3aemnnte KBM-nepeknouateBb24-DPU08/B204-DPU16, noocoeHHb oHn KOHeu 3a3emnooepo npObaKa 3a3emnooemy BbBOy, a pyroKoHeu - K noXoJHMeMy 3a3emEHHomy 3eMeHTy.
PpmeHHe npocayte 3ot war! Hndnckaaee 3aemneHne nomoraet npedotbpaTb nobpekdeHne yctpoCTBa nD neCTBmEBbl6pOeB HanpKaHnM CTaTuecKOro 3JIeKTpUcTeBA.
NoiknHouTe USB-KnabMaTyPy u USB-MbIbK KOHcOJIbHbIM USB-nopTaPam, paonIOJKeHHbIM B rpynnE KOHcOJIbHbIX noptOB Ha 3aDHeN naHEn yCTpoCTBA.
3 NIOKINHHTe CBOH(-n) DisplayPort- n/nnn HDMI-MOHHTOP(-b) K KOHCONBHOmy(-bIM) npOTy(-am) DisplayPort n/nnn HDMI, paCNOJOXEHMOY(-bIM) B rpynne KOHCOJIbHbIX NOPTOB HA 3aDHeN naHEn yCTpoCTBa, nNoJaTe NTaHMe Ha MOHTOP(-bl).
PpmeH. PnOIOHOBpeMeHHOM NOKIOUeHH K KOHcIbHbIM noptAM DisplayPort HDMI KBM-nepeKIOuATEm B024-DPU08/B024-DPU16 oTo6paKaOT HA MOHTopax DisplayPort nHDMIOHN TOJXCKoDhIKOHTeHT.
4 NpoknHte KOnoHN K ayHmop3bemAM, paCNOJxEHNBIM Ha nepeDne H 3aHne naHEnyCTPOCTBA. AkyCTHueCKoe yCTPOCTBO, noKnOeHHoe K pa3bemy nepeHne NaHEn, IMeET pnpOpTeT OTHcNTelBHO NOKIOUeHHORO K pa3bemy 3aHne NaHEn.
5 DnnoKIOUeHn HNOB3yHe HApobI Ka6eJe, NoCTaBnEMeB B KOMNKeTc (Ka6eB DisplayPort, Ka6eB USB 3.0 n ayDIOKa6eB). BCTabTe pa3bEm DisplayPort B IIO6o CBO6OHyB nopt DisplayPort, BXO4uMn B rpynny KBM-noptOB nepeKnioateA (CPU 1, CPU 2 n T.D.), a 3aTe M BCTabTe Ka6eB USB 3.0 m ayDIOKa6eB B COOTBEcTBYIOUne MM nopTb.
PpmeaHne. PpoBepbte, y06bI Bce p3abembl 6bln BknHouenbl B Ody Hpynny KBM-noproB (Bce B CPU 1, Bce B CPU 2 nT..).
6 BCTABBe npOTBONIOXHbE KOHbI Ka6eNl DisplayPort, Ka6eNl USB 3.0 n ayDnOka6eNl B COOTBETCTByoUme MM NpOtbI KOMNbIoTepa.IOBtOpTe wAr5 n 6 dnn DpyTnx yCTaHAbINBaEMbIX B CNTeMe KOMNbIoTepoB.
7 (Heo6aTeBho) IooKIOHcTe cBoH nepHepuHbIe USB-yCTpoiCTBa K npTAM USB Type-A, HaxOJaUMcB KOHcHTpatope USB 3.1 Gen 1, paCnoJoxEHHom Ha nepeDne NaheJe yCTpoiCTBa.
8 NIOKNIHHTe 6NOK NITAHNA, NOCTABNEMB B KOMNNEKTE C NEPEKNOATeNEM, K HCTOHNKU NITAHNA NEPEMEHHORo TOKA, a 3aTe M BCTABbTe Ka6eNB 6NOKA NITAHNA B paaBem NITAHNA NEPEKNOATeJI. Tenepe yctpoictBO B024-DPU08 / B024-DPU16 BKIOUeHO.
9 BkIouHte nTahHe KOMMbToTePOb.
Popraok əKcnnyatau
KBM- nepekniouateb moB. B024-DPU08 / B024-DPU16 oecneuBaetybe pncobaa bibopa npotob nnonyehndoctyna K komnbtoepam, BXOaummb CNTeMy: pyHoe nepeknuehme, cnTeMaekpaHbIX MeHIO, "ToprHn" knabunm KOMaHbRS-232. Bonee noopbohna HOpmaunn 3IIOKeBA B PykoBoCTBe nbo3oBATEKBM- nepekniouatele moB. B024-DPU08 / B024-DPU16, npedTabenHHom ha ctpanue triplite.com/support/downloads.
PyuHoe nepeKIOUeHne
IpyuHOro nepeKIOUeHnHa TOT NIN NHOI NOpT NcNOb3yTe KHOJIKN Ha nepeJHe NaHEn.
3KpaHHoe MeHIO (pepeKIOueHne npTOB)
IOctynK3KpaHOMy MeHNO OcyuIcTBnIeTcN cNoMOUbKnabNAtpyMbIN MblIN.3OT CnOC6peaun3yeMbIn NocpeCTBOM MeHIO,NCnOJIb3yETcIN ynpabJIeHn KOMNbHTOpom Ionepaun NepeKJIouHEn. Bce npoeJeypbHaunHaONTC r nABHO 3KpHa.
"Topy" KlaBnBa BbI0Ba 3KpaHnro MeHIO NO yMOnuHaHIO: dN OTo6paxeHnE 3KpaHnO MeHIO DBAxNb HAKMTe KHONky [Scroll Lock]. Ecm 3KpaHHe MeHIO 3anyckA TcBnpeBle IIN pHyKU napolbHO 3aunTb He yCTAHOBHe, To npocTo hAKMTe [Enter].
IINBxOdaB CnCTemyC npabAMn aDMNHnCTpaTopa NcNoB3yTe HMa NoNb3oBaTe n Napob, 3aAnHbte no yMOnuHaHIO: administrator / password. Bonee npo6hna HnFopmaunu HnloKeHa B PykoBOpCTbe NoB3oBaTeN KBM-nepeKnUoyateNei MoD. B024-DPU08 / B024-DPU16, npedTabneHHom Ha ctpanue tripplite. com/support/downloads.
Popraok kcnnyatau
PexkHnacTpoKn"ropaux"knabuHs (HSM)
PeknHACrpoKn"Topaunx"KnabuNcNcNb3yETcndla3aDHaNnFyHKUnepeKluOaTeIa.1npeXoDaBpeKmHSMnBbInHeHnaKaKo-Nb60fynkun, ynpabnemOn"Topaunm"KnabuNsaMn,BblonHnte cneNyUoune DeCTBNA.
- HauKMTe n yapeKINbAte KnaBnU [Num Lock].
- HaxMMTe nOTnycTMe KJIaBmUy [-].
- Otnyctte Knabmy [Num Lock].
- Haxmnte "topayu" knabuuy KnaBnuy dIy BbIOnneHn HyKho fynKcuO. OIncaHme fynKcuI pndctTabHeo B npBBeDeHno Nnke Ta6nue.
CbDnHa Ta6Hua peKmHa HSM
1111 W. 35th Street, Chicago, IL 60609 USA · triplite.com/support


- Package Contents
- Optional Accessories
- Product Features
- Installation
- Rack Mounting - Front
- Single-Stage Installation
- Operation
- Manual Switching
- OSD (Port Switching)
- Hotkey Setting Mode (HSM)
- Warranty & Product Registration
- 1-Year Limited Warranty
- PRODUCT REGISTRATION
- WEEE Compliance Information for Tripp Lite Customers and Recyclers (European Union)
- WARNING
- KpaTKoe pyKOBoDCTBO nOJIb30BaTeJia
- 8- nii 16-nopToBbI cToeHbI (1U) KBM-nepeKIOuateIb 4K DisplayPort/USB
- CopexMoe ynaKOBKn
- OnuohbHbIe KOMnKeKTyOuIe
- XapaKTepeNCTnKN n3dennia
- yctaHOBka
- MoHTaX B cTOnKy (cJIuIeBOB cTOpOhbl)
- YCTAHOBKa B ODHOKaKdHoi CnCTeMe
- Popraok əKcnnyatau
- PyuHoe nepeKIOUeHne
- 3KpaHHoe MeHIO (pepeKIOueHne npTOB)
- Popraok kcnnyatau
- PexkHnacTpoKn"ropaux"knabuHs (HSM)
Brand : Tripp Lite
Model : B024DPU16
Category : KVM switch