HQ6415 - Shaver PHILIPS - Free user manual and instructions
Find the device manual for free HQ6415 PHILIPS in PDF.
User questions about HQ6415 PHILIPS
0 question about this device. Answer the ones you know or ask your own.
Ask a new question about this device
Download the instructions for your Shaver in PDF format for free! Find your manual HQ6415 - PHILIPS and take your electronic device back in hand. On this page are published all the documents necessary for the use of your device. HQ6415 by PHILIPS.
USER MANUAL HQ6415 PHILIPS
natural_image
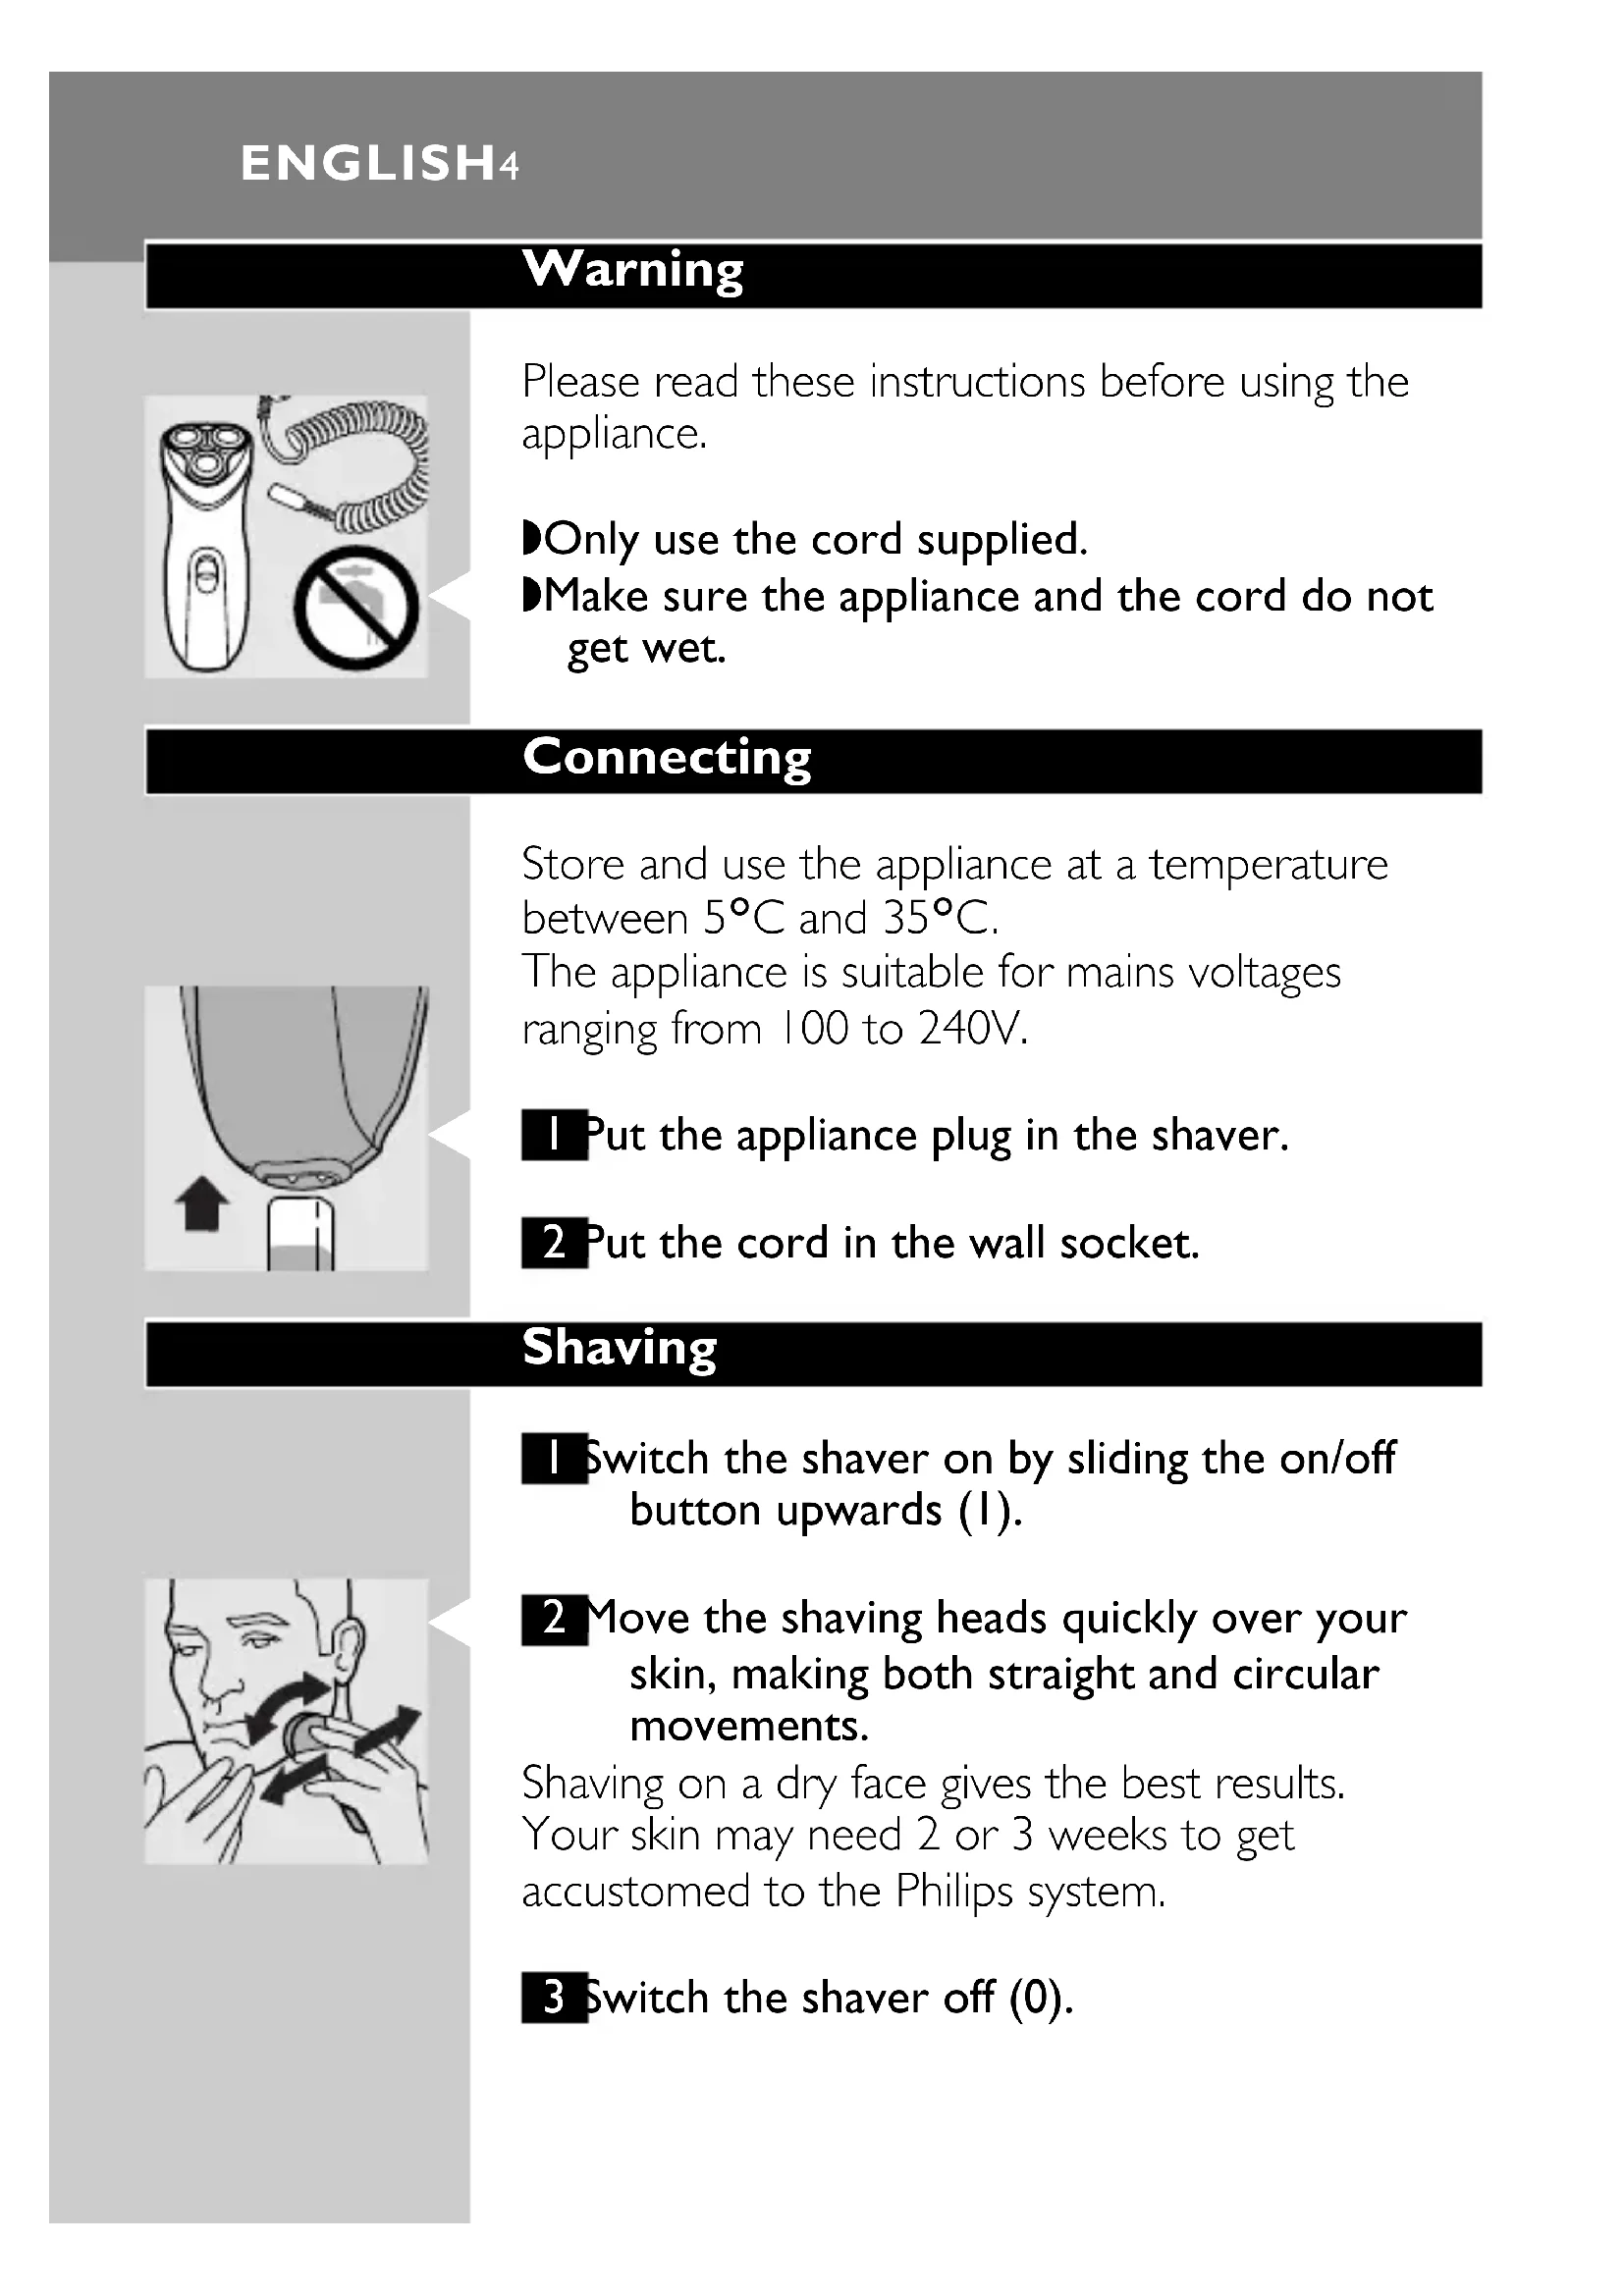
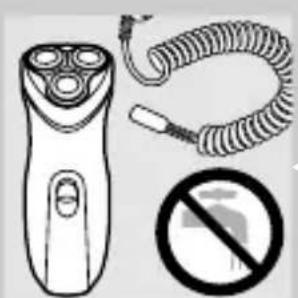
Illustration of a three-pin electric shaver with a coiled cord and a prohibition symbol (no text or labels)Please read these instructions before using the appliance.
▶Only use the cord supplied.
Make sure the appliance and the cord do not get wet.
Connecting
natural_image
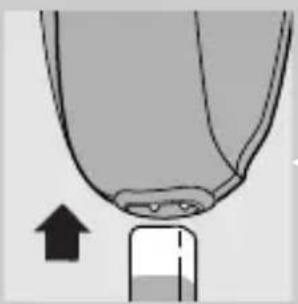
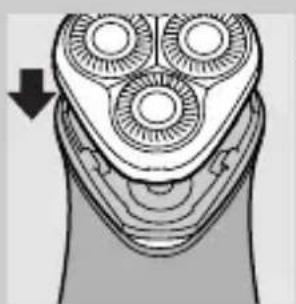
Diagram of a mechanical component with an arrow indicating upward motion (no text or symbols)Store and use the appliance at a temperature between 5^ C and 35^ C.
The appliance is suitable for mains voltages ranging from 100 to 240V.
I Put the appliance plug in the shaver.
2 Put the cord in the wall socket.
Shaving
natural_image
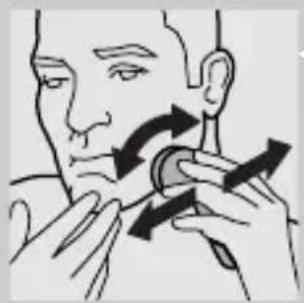
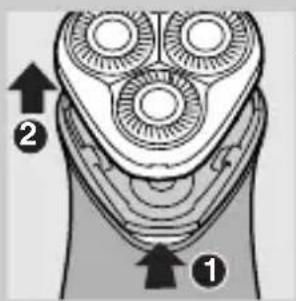
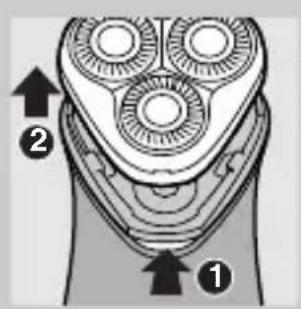
Illustration of a person applying a circular massage or pressure technique to their face (no text or symbols present)I Switch the shaver on by sliding the on/off button upwards (1).
2 Move the shaving heads quickly over your skin, making both straight and circular movements.
Shaving on a dry face gives the best results.
Your skin may need 2 or 3 weeks to get accustomed to the Philips system.
3 Switch the shaver off (0).
natural_image
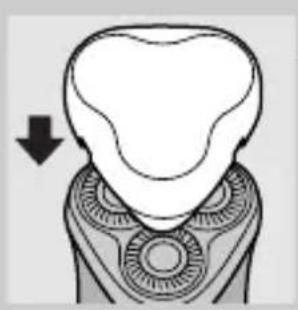
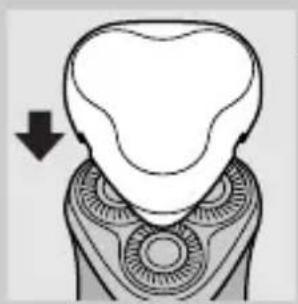
Diagram of a dental implant or tooth structure with an arrow indicating direction (no text or symbols present)4 Put the protection cap on the shaver every time you have used it, to prevent damage.
Replace the shaving heads (type HQ55) every 2 years for optimal shaving results.
Trimming
natural_image
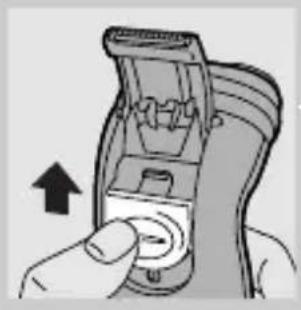
Hand holding a device with an arrow pointing to the button (no text or symbols visible)For grooming sideburns and moustache.
I Open the trimmer by pushing the slide upwards.
The trimmer can be activated while the motor is running.
Cleaning
natural_image
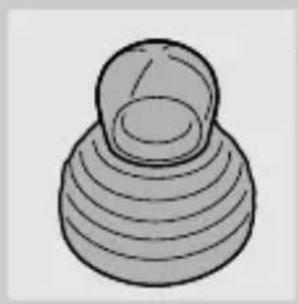
Simple 3D illustration of a conical object with layered spherical structure (no text or symbols)Regular cleaning guarantees better shaving performance.
For easy and optimal cleaning, the Philips Action Clean (shaving head cleaner, type HQ100) is available. Ask your Philips dealer for information.
You can also clean the shaver in the following way:
Every week: shaving unit
I Switch the shaver off (0), remove the cord from the wall socket and pull the appliance plug out of the shaver.
ENGLISH6

natural_image
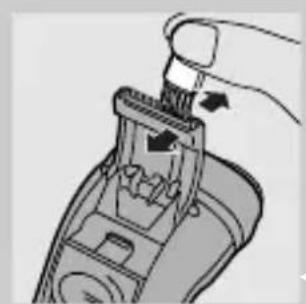
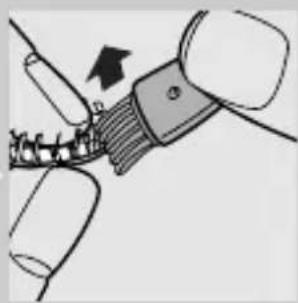
Diagram of a mechanical device with three circular components and a brush applying material (no text or symbols)2 Clean the top of the appliance first, using the brush supplied.
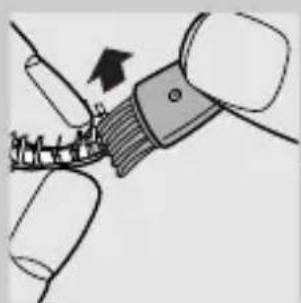
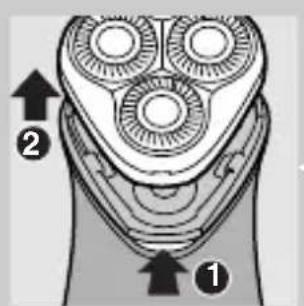
text_image
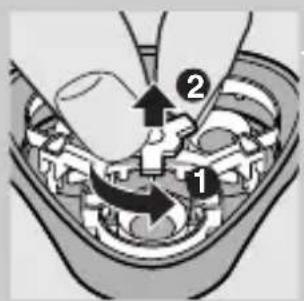
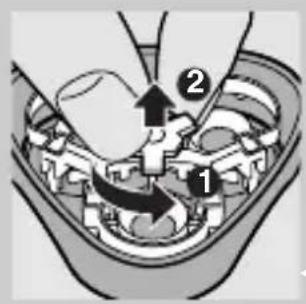
Diagram of a hand holding a three-pin shaver with labeled parts ① and ②, showing mechanical components and directional arrows.3 Press the release button and remove the shaving unit.

natural_image
Diagram of a plug inserted into a three-pin electrical socket (no text or symbols)4 Clean the inside of the shaving unit and the hair chamber with the brush.
natural_image
Diagram of a hand holding three circular brushes, with a downward arrow indicating the direction (no text or symbols present)5 Put the shaving unit back onto the shaver.
Every two months: shaving heads
Replace the shaving heads (type HQ55) every 2 years for optimal shaving results.
I Switch the shaver off (0), remove the cord from the wall socket and pull the appliance plug out of the shaver.
text_image
Diagram of a hand holding a three-pin shaver with labeled parts ① and ②, showing mechanical components and directional arrows.2 Press the release button and remove the shaving unit.
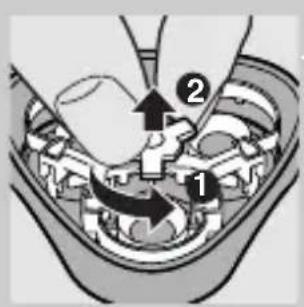
text_image
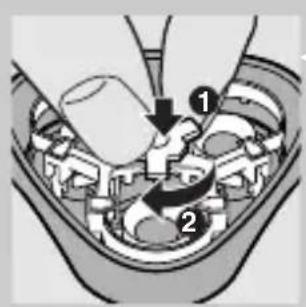
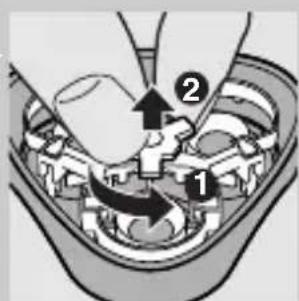
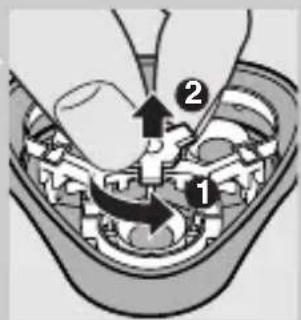
Diagram showing mechanical assembly with labeled parts and directional arrows indicating motion or force3 Turn the wheel anticlockwise and remove the retaining frame.
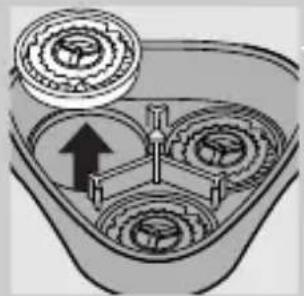
natural_image
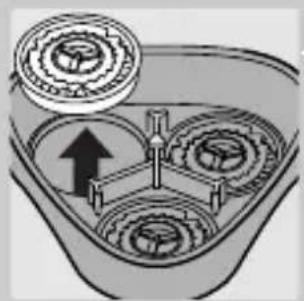
Mechanical gear assembly diagram showing three meshed gears with an upward arrow indicating motion (no text or labels)4 Remove and clean the shaving heads (cutters and guards) one by one.
Do not mix up the cutters and the guards.
This is essential since each cutter has been ground with its corresponding guard for optimal performance. If you accidentally mix the sets up, it could take several weeks before optimal shaving performance is restored.
natural_image
Diagram of a mechanical assembly with a tool and bracket, showing a force or motion direction (no text or symbols)5 Clean the cutter with the short-bristled side of the brush.
Brush carefully in the direction of the arrow.
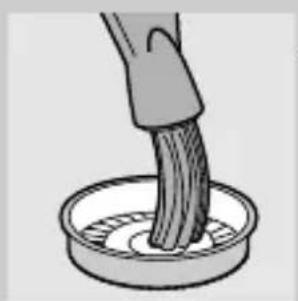
natural_image
Illustration of a hand brushing a textured object into a circular container (no text or symbols)6 Brush the guard.
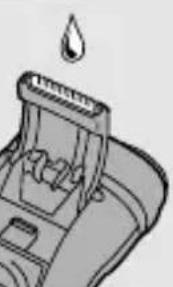
You can also clean the shaving unit with a degreasing liquid (e.g. alcohol). If you do, lubricate the central point of the guards with a drop of sewing machine oil after cleaning. This prevents wear of the shaving heads.
ENGLISH8

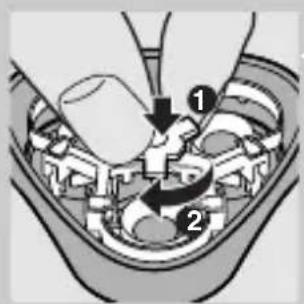
text_image
Diagram showing mechanical assembly with numbered components and directional arrows indicating motion or flow7 Reassemble the shaving unit: turn the wheel clockwise.
8 Put the shaving unit back onto the shaver.
Trimmer
natural_image
Diagram of a hand using a tool to interact with a device (no text or symbols visible)Clean the trimmer every time you have used it.
I Switch the shaver off (0), remove the cord from the wall socket and pull the appliance plug out of the shaver.
2 Clean the trimmer with the brush supplied.
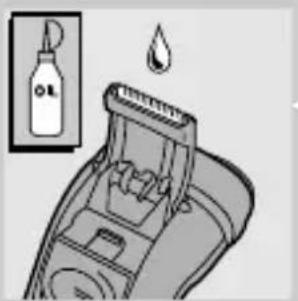
3 Lubricate the trimmer teeth with a drop of sewing machine oil every six months.
natural_image
Illustration of a hairbrush with a droplet above it, showing mechanical components and a bottle (no text or symbols)Replacing the shaving heads
text_image
Diagram of a handbrush with labeled parts and directional arrows indicating motion or movement.Replace the shaving heads every two years for optimal shaving results.
I Switch the shaver off (I), remove the cord from the wall socket and pull the appliance plug out of the shaver.
2 Press the release button and remove the shaving unit.
text_image
Diagram showing mechanical assembly with labeled parts and directional arrows indicating motion or force3 Turn the wheel anti-clockwise and remove the retaining frame.
natural_image
Diagram of a mechanical gear assembly with an arrow indicating direction (no text or labels)4 Remove the shaving heads and place the new ones in the shaving unit.
text_image
Diagram showing a mechanical assembly with labeled parts, including a hand operating a tool and numbered callouts 1 and 2.5 Reassemble the shaving unit: turn the wheel clockwise.
Replace damaged or worn shaving heads with Philips HQ55 shaving heads only.
Storing
natural_image
Diagram of a dental implant or tooth structure with an arrow indicating direction (no text or symbols present)Put the protection cap on the shaver to prevent damage.
The appliance can be stored in the pouch supplied.
Troubleshooting
I Reduced shaving performance
▶ Cause 1: the shaving heads are dirty.
- The shaver has not been cleaned well enough or has not been cleaned for a longer period.
text_image
Medical diagram showing a hand operating a device with labeled parts 1 and 2, likely illustrating a procedure or procedure.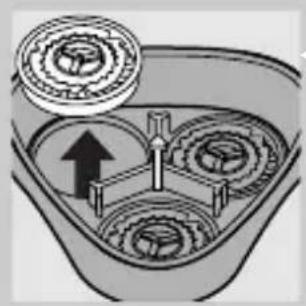
natural_image
Diagram of a mechanical gear assembly with an upward arrow indicating motion (no text or labels)- Clean the shaver thoroughly before you continue shaving (see 'Cleaning').
- Cause 2: long hairs are obstructing the shaving heads.
Remove the retaining frame.
▶Clean the cutters and guards.
Do not clean more than one cutter and guard at a time, since they are all matching sets. If you accidentally mix up the cutters and guards, it may take several weeks before optimal shaving performance is restored.
Remove the hairs with the brush supplied.
Put the retaining plate back onto the shaving unit.
- Cause 3: shaving heads are damaged or worn. See 'Replacing the shaving heads'. Replacing the shaving heads every 2 years prevents wear of the shaving heads.
2 The shaver does not work when the ON/OFF button is pushed upwards (1).
▶ Cause: the shaver is not connected to the mains.
Accessories
The following accessories are available for your shaver:
- HQ55 Philips Shaving Heads.
- HQ100 Philips Action Clean (shaving head cleaner).
- HQ101 Philips Action Refill (shaving head cleaning liquid).
- HQ110 Philips Head Cleaner (shaving head cleaning spray).
Information & service
If you need information or if you have a problem, please visit the Philips Web site at www.philips.com or contact the Philips Customer Care Centre in your country (you will find its phone number in the worldwide guarantee leaflet). If there is no Customer Care Centre in your country, turn to your local Philips dealer or contact the Service Department of Philips Domestic Appliances and Personal Care BV.
Keep these instructions for use for future reference.
Avertissement
natural_image
Illustration of a hand-operated remote control with a coiled cord, a no-smoking symbol, and a circular device (no text or labels)natural_image
Diagram of a mechanical component with an arrow indicating upward motion (no text or symbols)natural_image
Illustration of a person applying a circular massage or pressure technique to their ear (no text or symbols present)natural_image
Diagram of a dental implant or tooth structure with an arrow indicating direction (no text or symbols present)natural_image
Hand inserting a button into a device (no text or symbols visible)natural_image
Simple 3D illustration of a conical object with layered spherical top (no text or symbols)natural_image
Diagram of a mechanical device with three circular components and a tool inserted, showing internal gear structure (no text or symbols)text_image
Diagram of a hand-painted electric shaver with labeled parts 1 and 2, showing internal gear teeth and blade structure.natural_image
Illustration of a hand inserting a plug into a battery pack (no text or symbols)natural_image
Diagram of a hand holding three circular components, with an arrow indicating direction (no text or symbols present)text_image
Diagram of a hairbrush with labeled parts and directional arrows indicating anatomical features.text_image
Diagram showing mechanical assembly with labeled parts and directional arrows indicating motion or force
natural_image
Mechanical gear assembly diagram showing three meshed gears with an upward arrow indicating motion (no text or labels)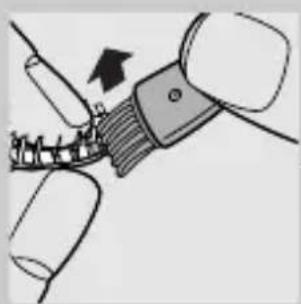
natural_image
Diagram of a mechanical assembly with a tool and bracket, showing a force or movement (no text or symbols present)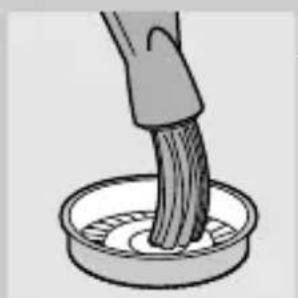
natural_image
Illustration of a hand stirring a substance in a container (no text or symbols)FRANÇAIS16
text_image
Diagram showing mechanical assembly with numbered components and directional arrows indicating motion or flownatural_image
Diagram of a hand holding a tool interacting with a device (no text or symbols visible)natural_image
Illustration of a cleaning or cleaning tool with a bottle and droplet, no text or symbols presenttext_image
Diagram of a hand holding a three-pin electric shaver with labeled parts 1 and 2text_image
Diagram showing mechanical assembly with labeled parts and directional arrows indicating motion or forcenatural_image
Diagram of a mechanical gear assembly with an upward arrow indicating motion (no text or labels)text_image
Diagram showing a mechanical assembly with labeled parts, including a hand operating a tool and numbered callouts 1 and 2.natural_image
Diagram of a dental implant or tooth structure with an arrow indicating direction (no text or symbols present)text_image
Diagram showing mechanical assembly with labeled parts and directional arrows, likely illustrating a process or assembly step.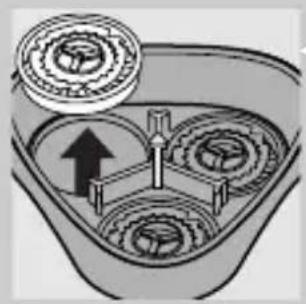
natural_image
Diagram of a mechanical gear assembly with three meshed gears and an upward arrow indicating motion (no text or labels)natural_image
Illustration of a three-pin electric shaver with a coiled cord and a prohibition symbol (no text or labels)natural_image
Diagram of a mechanical component with an arrow indicating upward motion (no text or symbols)natural_image
Illustration of a person applying a circular massage or pressure technique to their face (no text or symbols present)natural_image
Diagram of a dental implant or tooth structure with an arrow indicating direction (no text or symbols present)natural_image
Hand holding a device with an arrow pointing to the button (no text or symbols visible)natural_image
Simple 3D illustration of a conical object with layered spherical structure (no text or symbols)natural_image
Diagram of a mechanical device with three circular components and a brush applying material (no text or symbols)text_image
Diagram of a three-pin electric shaver with labeled parts 1 and 2, showing internal gear structure.natural_image
Diagram of a plug inserted into a three-pin electrical socket (no text or symbols)natural_image
Diagram of a hand holding three circular brushes, with a downward arrow indicating the direction (no text or symbols present)text_image
Diagram of a handbrush with labeled parts and directional arrows indicating motion or force directions.text_image
Diagram showing mechanical assembly with labeled parts 1 and 2, likely illustrating gear or gear mechanism.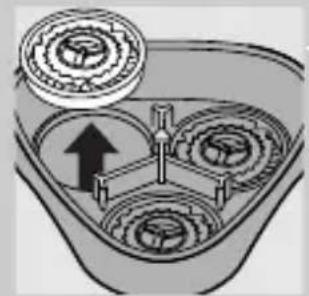
natural_image
Diagram of a mechanical gear assembly with an upward arrow indicating motion (no text or labels)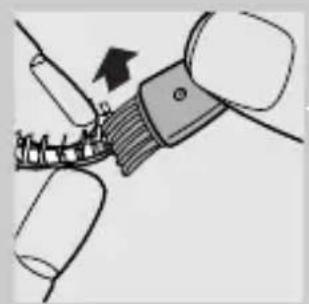
natural_image
Diagram of a mechanical component being inserted into a spring, showing a force direction (no text or symbols)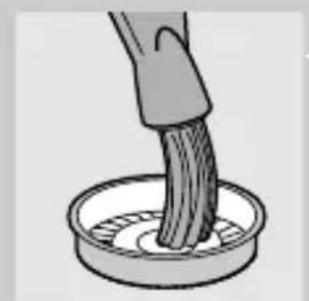
natural_image
Illustration of a hand brushing a textured object into a circular container (no text or symbols)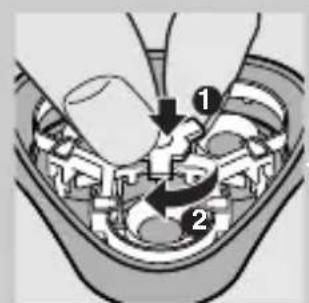
text_image
Diagram of a mechanical assembly with numbered components, likely illustrating a turning or disassembly process.natural_image
Close-up of a hand using a tool to adjust or install a mechanical component (no visible text or symbols)natural_image
Illustration of a hairbrush cleaning a tooth with a droplet, showing no text or symbols.text_image
Diagram of a hand-painted electric shaver with labeled parts ① and ②, showing blade geometry and directional arrows.text_image
Diagram showing mechanical assembly with labeled parts 1 and 2, likely illustrating a gear or tool mechanism.
natural_image
Diagram of a mechanical gear assembly with three rotating components and an upward arrow indicating motion (no text or labels)text_image
Diagram of a mechanical device with labeled parts, showing hand positioning and directional arrows indicating movement or force.natural_image
Diagram of a dental implant or tooth structure with an arrow indicating direction (no text or symbols present)text_image
Diagram showing mechanical assembly with labeled parts and directional arrows, likely illustrating a process or assembly step.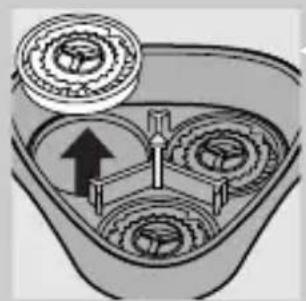
natural_image
Diagram of a mechanical gear assembly with three gears and a central shaft, showing no text or symbols.natural_image
Illustration of a three-pin electric shaver with a coiled cord and a no-smoking symbol (no text or labels)natural_image
Diagram of a mechanical component with an arrow indicating upward motion (no text or symbols)Guarde a máquina numa temperatura entre 5°C e 35°C.
natural_image
Illustration of a person applying a medical or therapeutic tool to their face (no text or symbols present)natural_image
Diagram of a dental implant or tooth structure with an arrow indicating direction (no text or symbols present)natural_image
Hand holding a device with an arrow indicating rotation (no text or symbols visible)natural_image
Simple 3D illustration of a conical object with layered circular structure (no text or symbols)natural_image
Diagram of a mechanical device with three circular components and a tool inserted, showing internal gear structure (no text or symbols)text_image
Diagram of a hand-painted electric shaver with labeled parts 1 and 2, showing internal gear teeth and blade structure.natural_image
Illustration of a hand inserting a plug into a battery pack (no text or symbols)natural_image
Diagram of a hand holding three circular components, with an arrow indicating direction (no text or symbols present)text_image
Diagram of a hand holding a three-pin electric shaver with labeled parts ① and ②text_image
Diagram showing mechanical assembly with labeled parts and directional arrows indicating motion or movementnatural_image
Diagram of a mechanical gear assembly with an arrow indicating direction (no text or labels)natural_image
Diagram of a mechanical assembly with a tool and bracket, showing a force or movement (no text or symbols present)natural_image
Illustration of a hand brushing a textured substance in a circular container (no text or symbols)6 Escove a guarda.
text_image
Diagram showing a mechanical or electrical component with numbered parts and directional arrows indicating motion or flow.natural_image
Diagram of a hand holding a tool interacting with a mechanical device (no text or symbols visible)natural_image
Illustration of a cleaning or cleaning tool with a bottle and drop symbol (no text or labels)text_image
Diagram of a three-pin electric shaver with labeled parts 1 and 2, showing internal gear structure.text_image
Diagram showing mechanical assembly with labeled parts and directional arrows indicating motion or movementnatural_image
Diagram of a mechanical gear assembly with an arrow indicating direction (no text or labels)text_image
Diagram showing mechanical assembly with labeled parts and directional arrows indicating motion or forcenatural_image
Diagram of a dental implant or tooth structure with an arrow indicating direction (no text or symbols present)text_image
Diagram showing mechanical assembly with labeled parts and directional arrows indicating motion or force
natural_image
Diagram of a mechanical assembly with gears and a central shaft, showing no text or symbolstext_image
Diagram showing mechanical assembly with labeled parts and directional arrows indicating motion or force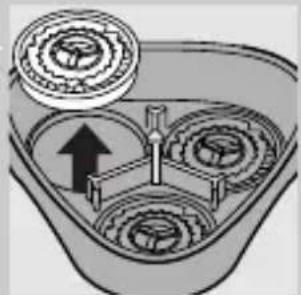
natural_image
Mechanical gear assembly diagram showing three meshed gears with an upward arrow indicating motion (no text or labels)text_image
Diagram showing a mechanical assembly with labeled parts, including a hand holding a tool and two numbered components.ال tangزين
natural_image
Diagram of a dental implant or tooth structure with an arrow indicating direction (no text or symbols present)natural_image
Close-up of a hand using a handheld tool to adjust or install a mechanical component (no visible text or symbols)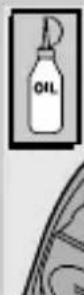
natural_image
Illustration of a mechanical component with a droplet above it (no text or symbols)natural_image
Illustration of a plug inserted into a three-pin electrical socket (no text or symbols)55
text_image
Diagram of a plow with labeled parts and directional arrows indicating movement or force directions.2
text_image
Diagram showing mechanical assembly with labeled parts 1 and 2, indicating a step in a process.3
natural_image
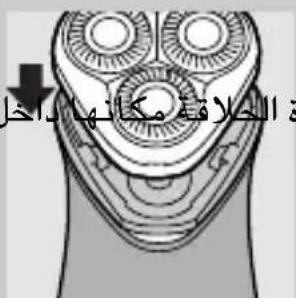
Diagram of a mechanical component with three circular parts and an arrow indicating direction (no text or symbols)التشذيب التشذيب
natural_image
Simple 3D illustration of a mechanical component with concentric layers (no text or symbols)natural_image
Diagram of a three-bladed electric shaver with a tool inserted, showing internal gear structure (no text or symbols)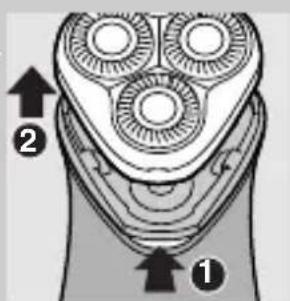
text_image
Diagram of a hairbrush with labeled parts and directional arrows indicating anatomical features.تنبيهتنبيه
natural_image
Diagram of a mechanical component with an arrow indicating upward motion (no text or symbols)natural_image
Illustration of a person applying a circular massage or pressure tool to their face (no text or symbols present)3
natural_image
Diagram of a dental implant or tooth structure with an arrow indicating direction (no text or symbols present)لوزم جانبی
text_image
Diagram showing a mechanical or electrical component with labeled parts and directional arrows indicating movement or flow.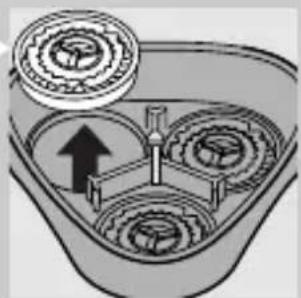
natural_image
Mechanical gear assembly diagram showing three meshed gears with an upward arrow indicating motion (no text or labels)2
text_image
Diagram showing mechanical assembly with labeled parts and directional arrows indicating motion or force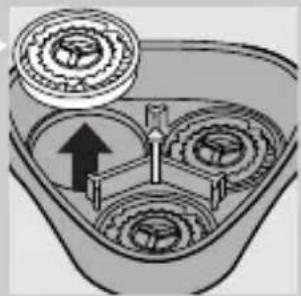
natural_image
Mechanical gear assembly diagram showing three meshed gears with an upward arrow indicating motion (no text or labels)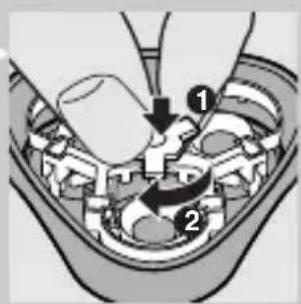
text_image
Diagram showing a mechanical assembly with labeled parts, including a hand holding a tool and two numbered components.نگهداری
natural_image
Simple line drawing of a human tooth with a downward arrow indicating compression or dislocation (no text or symbols)عيب يابى
عملkerد ضعيف اصلاح
I
text_image
Technical diagram illustrating mechanical assembly steps with numbered components and directional arrowstext_image
Diagram showing mechanical assembly with numbered parts, likely illustrating a gear or valve mechanism.natural_image
Close-up of a hand using a handheld tool to adjust or install a device (no visible text or symbols)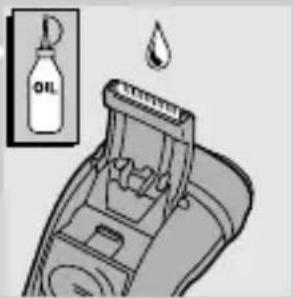
text_image
OILtext_image
Diagram of a handbrush with labeled parts and directional arrows indicating assembly or positioning.text_image
Diagram of a multi-pin electric shaver with labeled parts ① and ②, showing blade geometry and mounting points.3
text_image
Diagram showing mechanical assembly with labeled parts 1 and 2, likely illustrating a gear or valve mechanism.natural_image
Diagram of a mechanical component with three circular cavities and an upward arrow, no text or symbols present.5
natural_image
Diagram of a mechanical component with a directional arrow indicating movement (no text or symbols present)تميز کنید.
natural_image
Illustration of a hand stirring a curved object in a container (no text or symbols)natural_image
Diagram of a hairbrush inserting into an electric shaver with three blades (no text or symbols)text_image
Diagram of a handbrush with labeled parts and directional arrows indicating motion or movement.text_image
Diagram showing mechanical assembly with labeled parts and directional arrows indicating motion or forcenatural_image
Diagram of a three-pin electric shaver with a downward arrow indicating compression (no text or symbols)natural_image
Diagram of a dental implant or tooth structure with an arrow indicating direction (no text or symbols present)مرتب کردن
natural_image
Illustration of a hand inserting a button into a device (no text or symbols visible)تەز کردن
natural_image
Simple 3D illustration of a conical object with concentric rings (no text or symbols)natural_image
Illustration of a hand-operated phone with three buttons and a coiled cord, accompanied by a no-smoking symbol (no text or labels present)اتصال
natural_image
Diagram of a mechanical component with an arrow indicating upward motion (no text or symbols)اصلح کردن
natural_image
Illustration of a person applying a circular massage or pressure technique to their ear (no text or symbols present)3