
DualChef 325 - Barbecue Outdoorchef - Free user manual and instructions
Find the device manual for free DualChef 325 Outdoorchef in PDF.



| Product type | Gas barbecue |
| Brand | Outdoorchef |
| Model | DualChef 325 |
| Power supply | Propane/butane gas; batteries (2x AAA 1.5 V for ignition, 4x AA NiMH 1.2 V/2400 mAh for SLS); mains (S models) |
| Total power | 15.4 kW |
| Gas consumption | 1120 g/h |
| Gas pressure | Butane 28 mbar, Propane 37 mbar |
| Max gas cylinder weight | 11 kg |
| Number of main burners | 2 (DGS® Twin Burner) |
| Side burner | Yes, power 3.4 kW |
| Ignition system | Electric ignition (AAA batteries) |
| Safety Light System (SLS) | Yes, with NiMH rechargeable batteries |
| Grill lighting | Optional (S model: halogen G9 12V/10W) |
| Dual Gourmet System (DGS®) | Zone divider, heat diffuser, protection bars |
| Materials | Injected aluminum casting, stainless steel, enamel |
| Cooking grid | Enameled cast iron (RTG set) or stainless steel (depending on accessories) |
| Maintenance | Clean with brass wire brush; specific detergent; regular leak test |
| Safety | Outdoor use only; minimum distance 1.5 m from flammable materials; leak test before each use |
| Warranty | 10 years housing (corrosion), 5 years burner, 3 years grids and other parts |
| Spare parts | Available at authorized dealers |
Frequently Asked Questions - DualChef 325 Outdoorchef
User questions about DualChef 325 Outdoorchef
0 question about this device. Answer the ones you know or ask your own.
Ask a new question about this device
Download the instructions for your Barbecue in PDF format for free! Find your manual DualChef 325 - Outdoorchef and take your electronic device back in hand. On this page are published all the documents necessary for the use of your device. DualChef 325 by Outdoorchef.
USER MANUAL DualChef 325 Outdoorchef
DUALCHEF MANUAL
DUALCHEF 315 G | DUALCHEF 325 G | DUALCHEF S 325 G
DUALCHEF 415 G | DUALCHEF 425 G | DUALCHEF S 425 G
Please read these instructions carefully before using your OUTDOORCHEF Gas Barbecue.
NOTE:
: From position
: Low power
: Medium power
: High power
: Ignition
2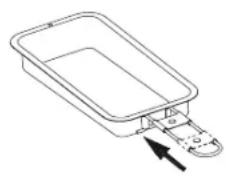

THE DUAL GOURMET SYSTEM (DGS®)
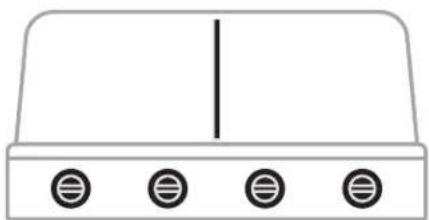
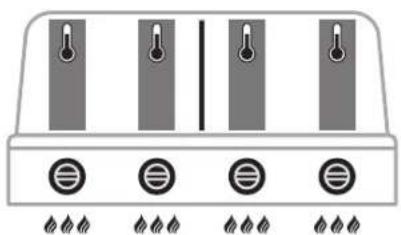
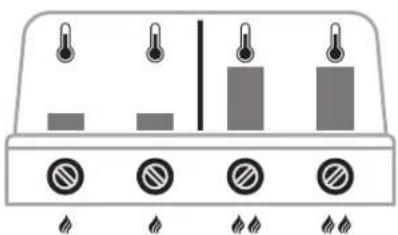
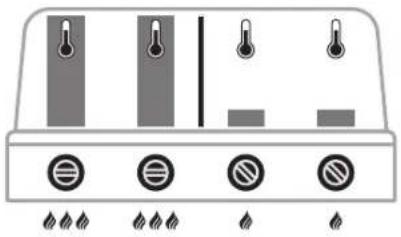
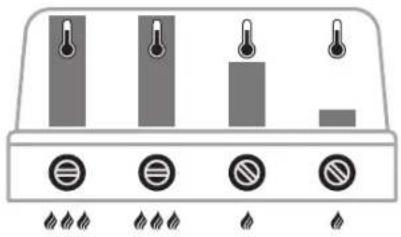
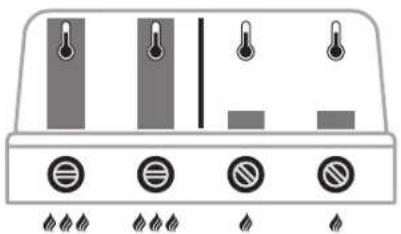
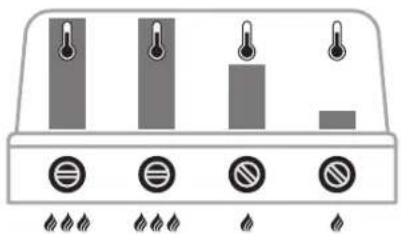
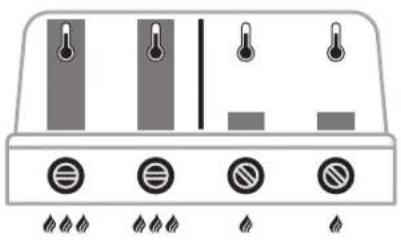
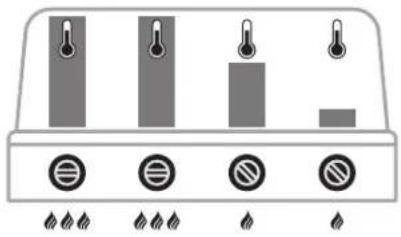
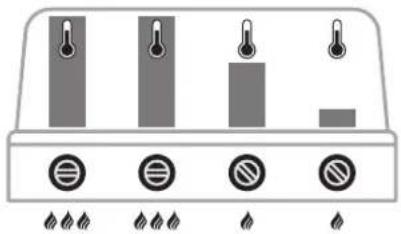
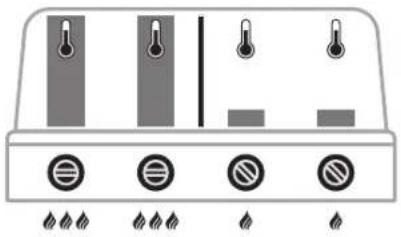
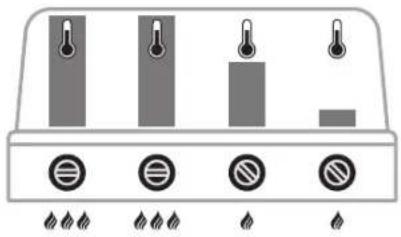
DIFFERENCE IN TEMPERATURE ZONES WITH OR WITHOUT USE OF THE DGZONE DIVIDER
MIT DGS® ZONE DIVIDER OHNE DGS
8 ZONE DIVIDER
NACH DEM GRILLEN
Please read these instructions carefully before using your OUTDOORCHEF gas barbecue.
IMPORTANT:
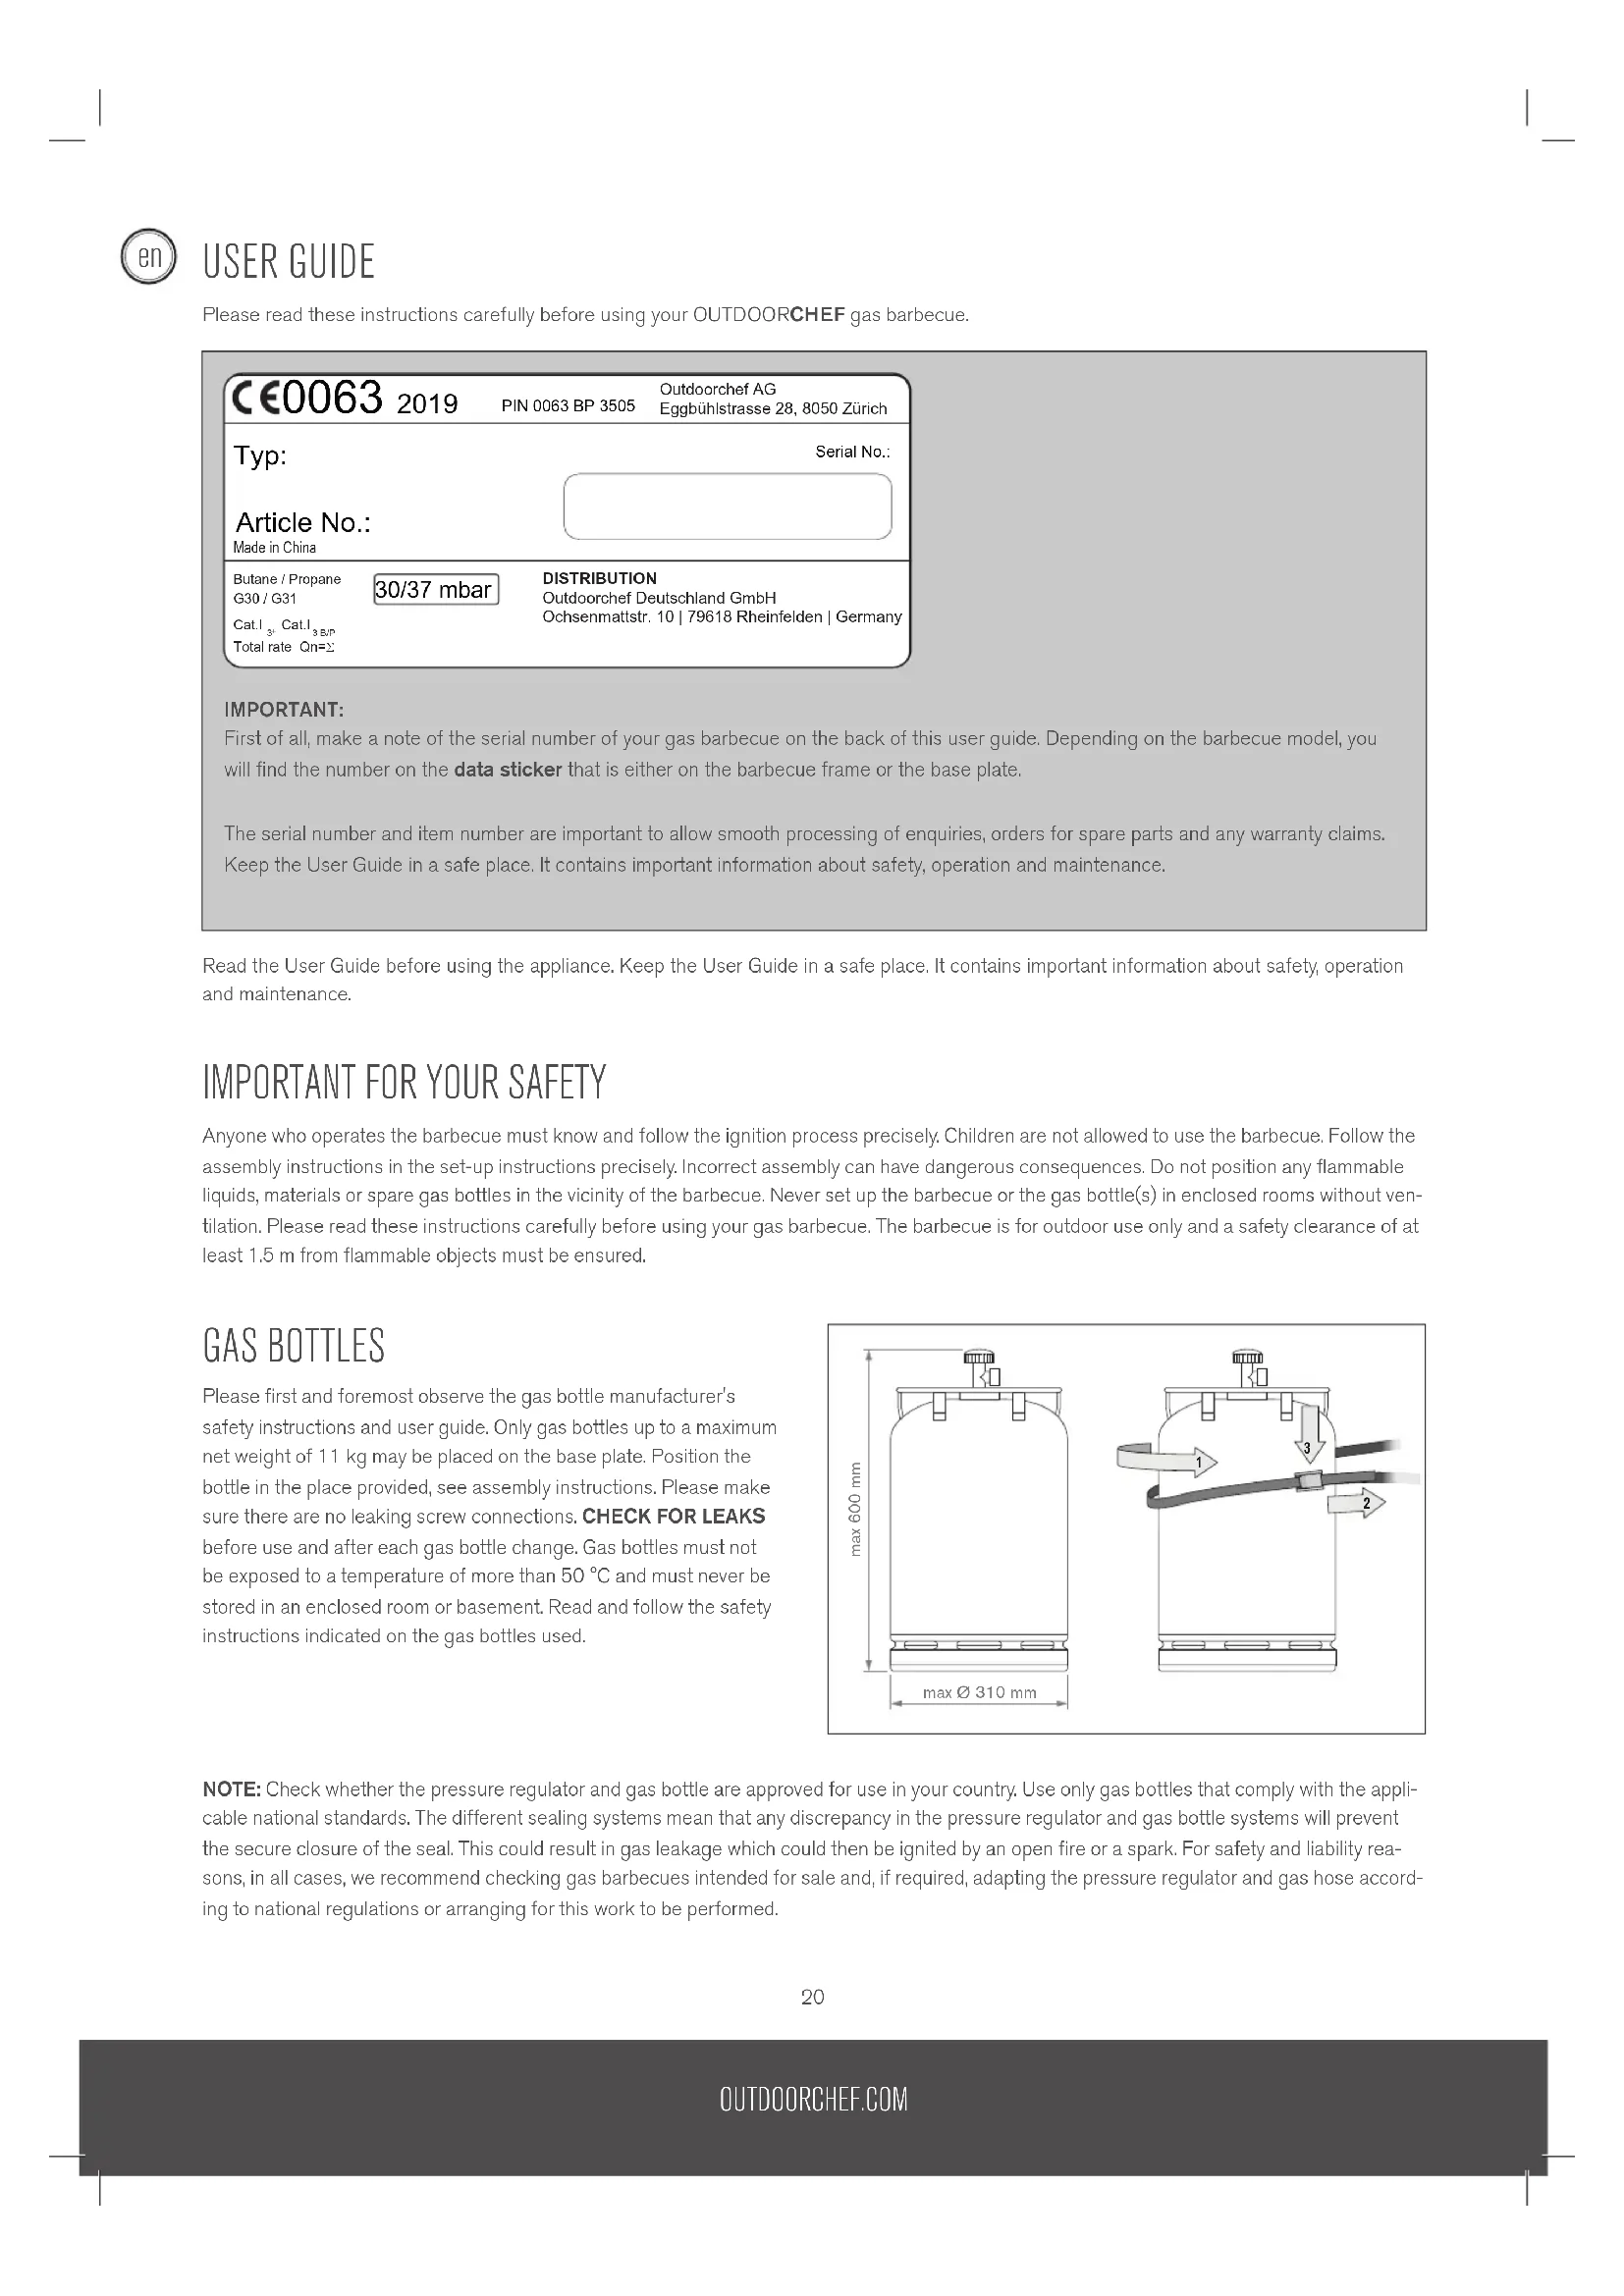
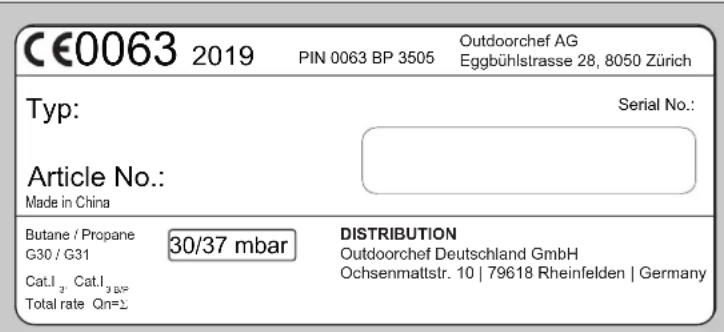
First of all, make a note of the serial number of your gas barbecue on the back of this user guide. Depending on the barbecue model, you will find the number on the data sticker that is either on the barbecue frame or the base plate.
The serial number and item number are important to allow smooth processing of enquiries, orders for spare parts and any warranty claims. Keep the User Guide in a safe place. It contains important information about safety, operation and maintenance.
Read the User Guide before using the appliance. Keep the User Guide in a safe place. It contains important information about safety, operation and maintenance.
IMPORTANT FOR YOUR SAFETY
Anyone who operates the barbecue must know and follow the ignition process precisely. Children are not allowed to use the barbecue. Follow the assembly instructions in the set-up instructions precisely. Incorrect assembly can have dangerous consequences. Do not position any flammable liquids, materials or spare gas bottles in the vicinity of the barbecue. Never set up the barbecue or the gas bottle(s) in enclosed rooms without ventilation. Please read these instructions carefully before using your gas barbecue. The barbecue is for outdoor use only and a safety clearance of at least 1.5 m from flammable objects must be ensured.
GAS BOTTLES
Please first and foremost observe the gas bottle manufacturer's safety instructions and user guide. Only gas bottles up to a maximum net weight of 11 kg may be placed on the base plate. Position the bottle in the place provided, see assembly instructions. Please make sure there are no leaking screw connections. CHECK FOR LEAKS before use and after each gas bottle change. Gas bottles must not be exposed to a temperature of more than 50 °C and must never be stored in an enclosed room or basement. Read and follow the safety instructions indicated on the gas bottles used.
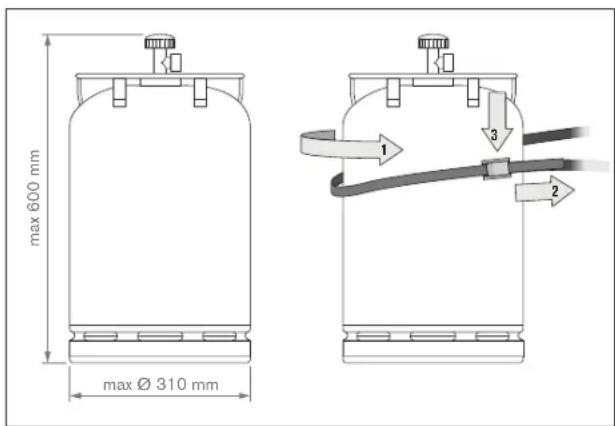
NOTE: Check whether the pressure regulator and gas bottle are approved for use in your country. Use only gas bottles that comply with the applicable national standards. The different sealing systems mean that any discrepancy in the pressure regulator and gas bottle systems will prevent the secure closure of the seal. This could result in gas leakage which could then be ignited by an open fire or a spark. For safety and liability reasons, in all cases, we recommend checking gas barbecues intended for sale and, if required, adapting the pressure regulator and gas hose according to national regulations or arranging for this work to be performed.
SAFETY INFORMATION
This user guide must be kept by the owner and be close at hand at all times.
Take the barbecue into operation in accordance with the INSTRUCTIONS FOR LIGHTING chapter.
- "For outdoor use only"
- "Read the user guide before using the appliance"
- "CAUTION: Accessible parts may be very hot. Keep children away."
- "This appliance must be kept away from flammable materials during use"
- "Do not move the appliance during use"
- "Turn off the gas supply at the gas cylinder after use"
- Never use the barbecue under a canopy
- Devices equipped with castor wheels are not allowed to be pushed across uneven floors or steps
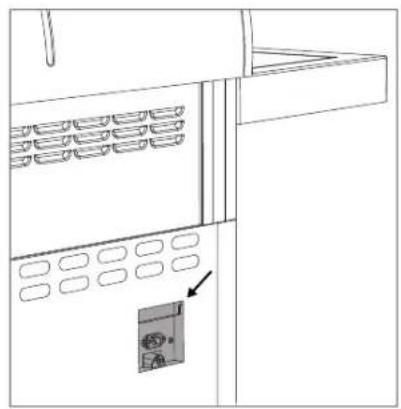
- Make sure that the drip collector tray and the drip pan are always fully closed and engaged during operation
- Wear protective gloves when you touch hot parts
- After grilling, always turn the gas regulating knob to the position and close the gas supply at the gas bottle.
- When changing the gas bottle, make sure that the gas regulating knob is in the ○ position and the gas supply is closed at the gas bottle. IMPORTANT: No sources of ignition are permitted to be in the vicinity
- After connecting a new gas bottle, check the connection parts in accordance with the instructions in CHECKING FOR LEAKS
- If you suspect that parts are leaking, turn the gas regulating knob to the ○ position and close the gas supply at the gas bottle. Have the parts that carry gas checked by a specialist gas equipment retailer
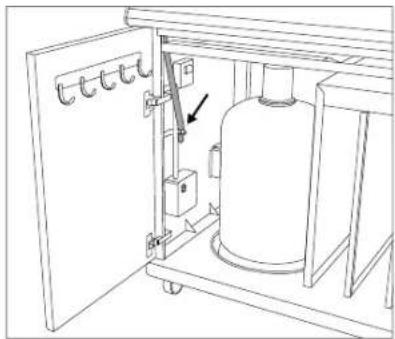
- Renew the gas hose immediately if it is damaged or shows signs of wear. The hose must be free from kinks and must not have any cracks. Do not forget to switch off the gas regulating knob and the gas supply before you remove the hose.
- Renew the hose and the gas pressure regulator after it has been in use for 3 years from the date of purchase. Make sure that the gas pressure regulator and the hose are in accordance with the corresponding EN standards (gas pressure regulator EN 16129 / gas hose EN 16436).
- The recommended length of the gas hose is 90 cm, and it must not be longer than 150 cm.
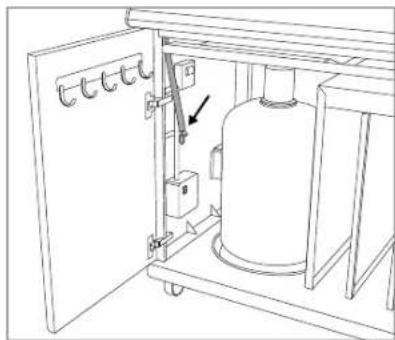
- Never block the air intake slots in the housing or the air slots in the lid. The ventilation openings in the gas bottle compartment must never be closed or covered.
- "Do not modify the appliance." Contact a specialist if you suspect that there is a malfunction.
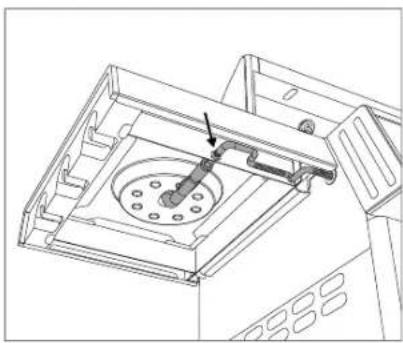
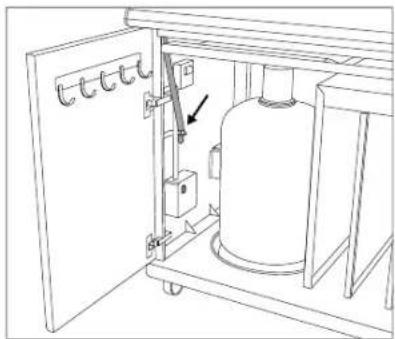
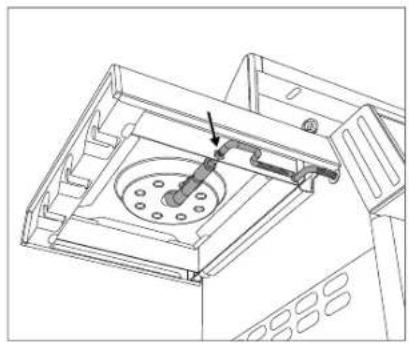
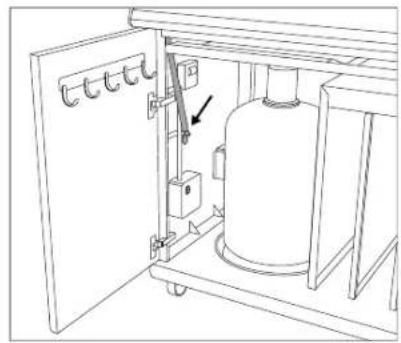
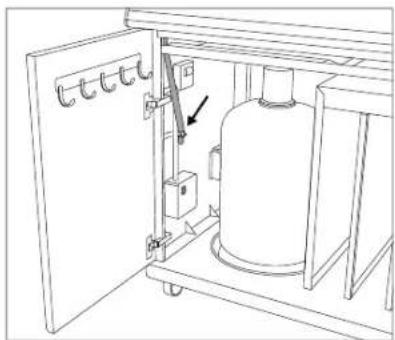
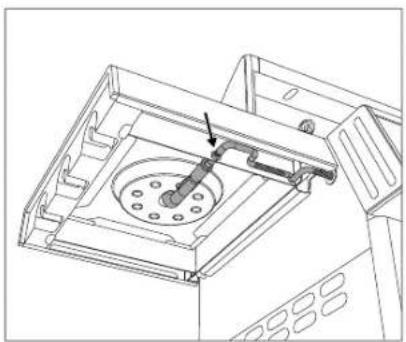
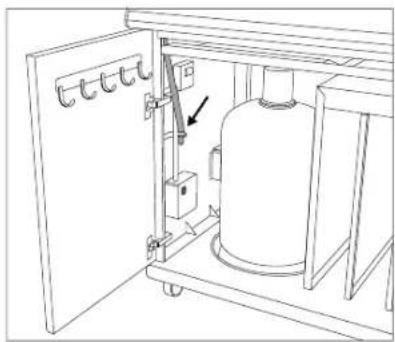
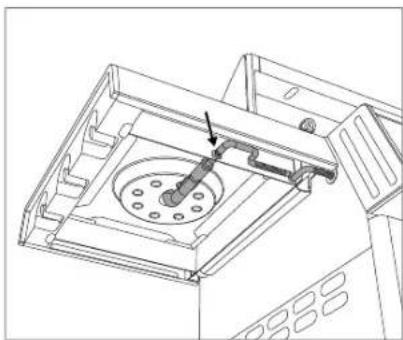
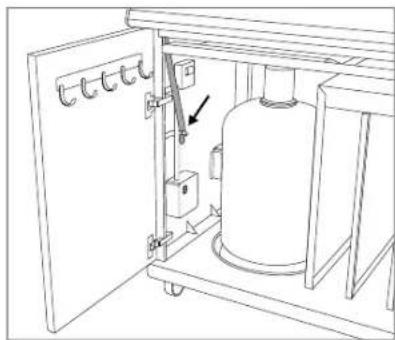
- The barbecue is supplied with a gas hose and gas pressure regulator. It is essential to keep the gas hose away from the hot outside surfaces of the barbecue. The hose is not allowed to be twisted. On barbecue models that have a hose guide, it is essential for the hose to be secured in this guide.
- The hose and regulator are in accordance with the particular national regulations and EN standards (gas pressure regulator EN 16129 / gas hose EN 16436).
- Contact a specialist gas equipment retailer if full power is not achieved and you suspect there may be a blockage in the gas supply.
- Only use the barbecue on firm, secure ground. Never place the barbecue on wooden floors or other flammable surfaces while it is in use. Keep the barbecue away from flammable materials.
- Do not store the barbecue in the vicinity of highly flammable liquids or materials.
- If you store the barbecue indoors over winter, it is essential for the gas bottle to be removed. It should always be stored in a well ventilated location which is inaccessible to children.
- Select a location protected as much as possible from the wind before lighting the barbecue.
- When the barbecue is not in use, and once it has cooled down fully, protect it against the effects of the weather using a cover. Covers can be purchased from your barbecue retailer.
- Remove the cover after heavy rain in order to avoid condensation build-up.
- Only use the device if the mains cable, socket outlet and the device itself are undamaged. Check before each use.
- Only connect the device to an earthed socket outlet
- Disconnect the plug after each use, or in case of a fault. CAUTION: Pull the plug, not the mains cable
- Keep the mains cable away from hot parts
- Do not touch the mains plug if your hands are wet
- Do not move the barbecue while it is operating
- Never leave the barbecue unsupervised during operation
- The barbecue remains hot for quite some time after being switched off. Make sure you do not burn yourself or place any objects on the barbecue; danger of burns
- Do not use the barbecue during rain or snowfall, because this barbecue includes electrical components
- If it is necessary to use an extension cable, it must be earthed and suitable for a current of at least 10A / 230V, with a cable cross-section of at least 1.5 mm. Make sure that the cable does not represent a trip hazard or a potential means of the device being knocked over
- Preferably use a short extension cable and never combine 2 or more extension cables
- Do not run the mains cable over paths
LEAK TEST
WARNING: No sources of ignition are permitted to be in the vicinity during the leak test. This also includes smoking.
Never check for leaks with a burning match or a naked flame, and always do this task outdoors.
- The gas regulating knob must be at the position.
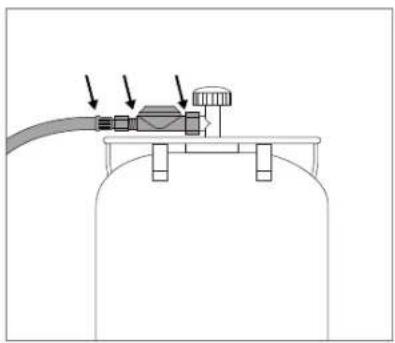
- Open the gas supply at the bottle and brush a soap solution comprising 50% liquid soap and 50% water onto all parts that carry gas (connection at the gas bottle / gas pressure regulator / gas hose / gas inlet / connection on the valve). You can also use a leak spray.
- Bubbles forming in the soap solution indicate there are leaks. IMPORTANT: Do not use the barbecue until all leaks have been eliminated. Turn off the gas supply on the gas bottle.
- Eliminate the leaks by retightening the connections if possible, or else replace the defective parts.
- Repeat steps 1 and 2.
- Contact your specialist gas equipment retailer if the leaks cannot be eliminated.
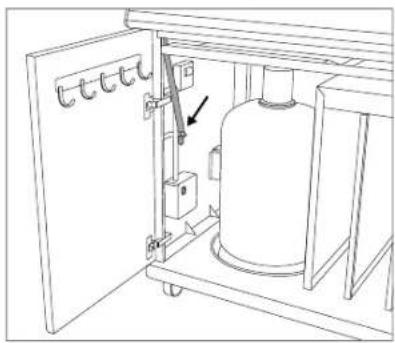
NOTE:
Carry out the LEAK TEST each time you connect or change the gas bottle and also at the start of the barbecue season.
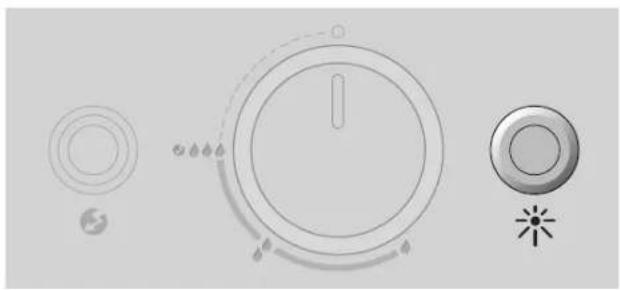
Heat settings/heat levels and ignition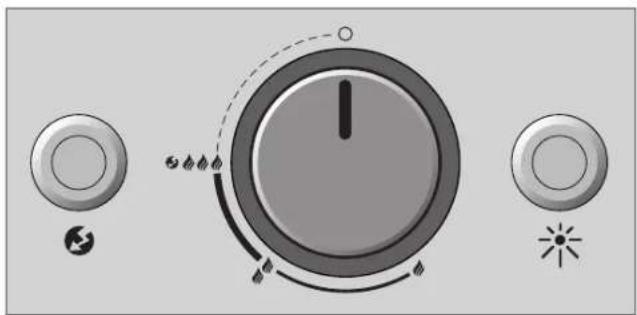
: Off position
: Low Power
: Medium power
: High power

: Ignite
: Light switch for the grill chamber lighting DUALCHEF S 325 G & DUALCHEF S 425 G
BEFORE FIRST USE
- Clean all parts that come into contact with foodstuffs.
- Check all parts that carry gas, as described in the CHECKING FOR LEAKS chapter. Also do this if your gas barbecue was delivered already assembled by the retailer.
- Let the barbecue burn for about 20–25 minutes at the 🔊 🔊 🔊 setting.
- Make sure that the drip collector tray and the drip pan have been pushed in fully. This also applies to normal use of the barbecue.
IGNITING INSTRUCTIONS
NOTE: It is not always necessary to use all burners. This depends on the type of cooking and the amount of food.
IGNITING THE MAIN BURNERS
DUALCHEF 315 G / DUALCHEF 325 G / DUALCHEF S 325 G
DUALCHEF 415 G / DUALCHEF 425 G / DUALCHEF S 425 G
- Make sure that all connections between the gas hose, the gas pressure regulator and the gas bottle are firmly tightened. (Follow the instructions in the CHECKING FOR LEAKS chapter.)
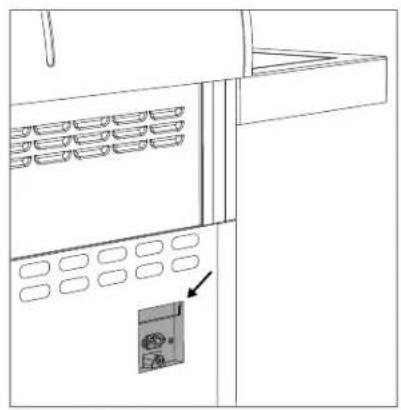
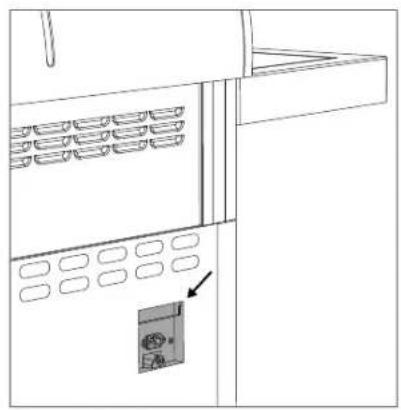
- Switch on the master switch at the electrobox (ON = red checklamp on the master switch will light up).
- Open the barbecue lid. CAUTION: Never ignite the barbecue when the lid is closed.
- Open the gas supply at the gas bottle.
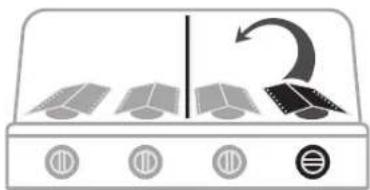
- Press the gas regulating knob of the DGS ® TWIN BURNER you want to start and turn it anticlockwise to the ignition button and hold it until the spark catches fire and the gas is burning.
- If the gas does not ignite within 3 seconds, set the gas regulating knob to O. Wait 2 minutes to allow the uncombusted gas to dissipate. Then repeat points 4 to 5.
- If it is not possible to ignite the barbecue after 3 attempts, check the causes (as described in the TROUBLESHOOTING section).
- Make sure that all connections between the gas hose, the gas pressure regulator and the gas bottle are firmly tightened. (Follow the instructions in the CHECKING FOR LEAKS chapter.)
- Switch on the master switch at the electrobox (ON = red checklamp will light up).
- Open the cover plate at the side burner of the DUALCHEF 325 G / DUALCHEF S 325 G / DUALCHEF 425 G / DUALCHEF S 425 G. CAUTION: Never ignite the side burner when the cover plate is closed.
- Open the gas supply at the gas bottle.
- Press the gas regulating knob marked SIDE BURNER and turn it anticlockwise to the 🔊 🔊 🔊 → setting. Press the ignition button and hold it until the spark catches fire and the gas is burning.
- If the gas does not ignite within 3 seconds, set the gas regulating knob to ☐. Wait 2 minutes to allow the uncombusted gas to dissipate. Then repeat points 4 to 5.
- If it is not possible to ignite the side burner after 3 attempts, search for the causes (as described in the TROUBLESHOOTING section).
- Do not use cooking vessels of <160 mm and >270 mm on the side cooking area.
INFO FOR LEFT SIDE TABLE (APPLIES ONLY TO MODELS WITH SIDE BURNERS)
Extension with BLAZING ZONE infrared side burner (applies only to Dualchef models with side burners)
If you have a Dualchef model with side burners, it is possible to remove the side cooking plate in the left side table and replace it with an OUTDOORCHEF BLAZING ZONE (infrared side burner).
The BLAZING ZONE is available separately as an accessory in your specialist barbecue store. It is a ceramic burner that generates infrared radiation on the surface, emitting concentrated heat in excess of 900 degrees Celsius onto food to be grilled to create a perfect crust on your steak.
Left side table (applies only to Dualchef models with side burners)
To ensure the stability of the left side table (in models with side burners or BLAZING ZONE) and safe operation, the left side table cannot be folded down.
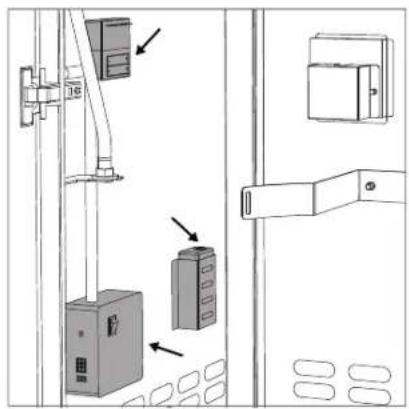
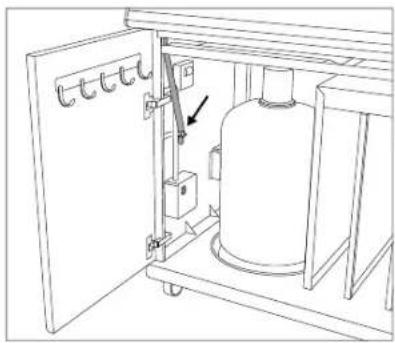
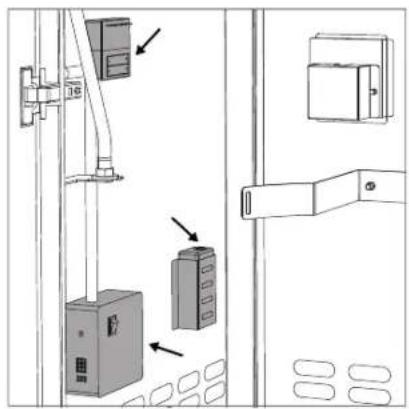
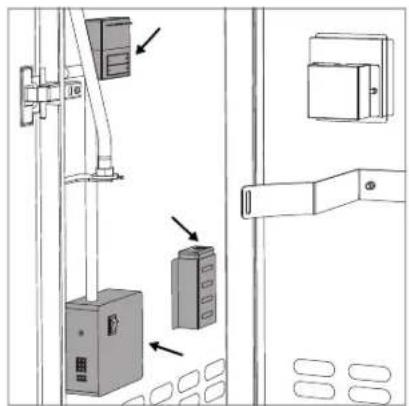
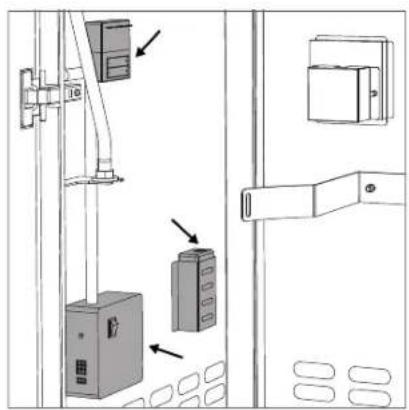
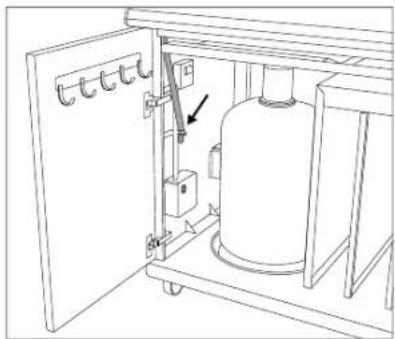
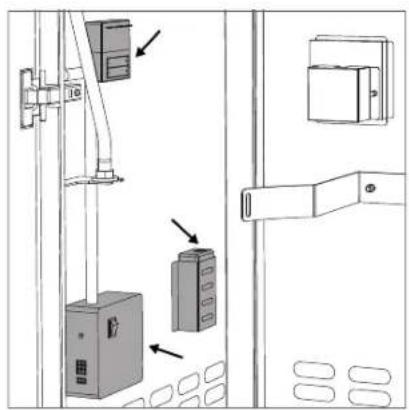
THE ELECTROBOX
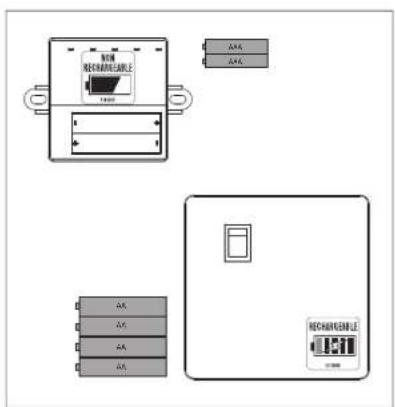
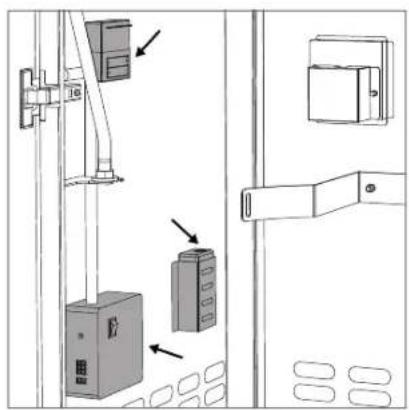
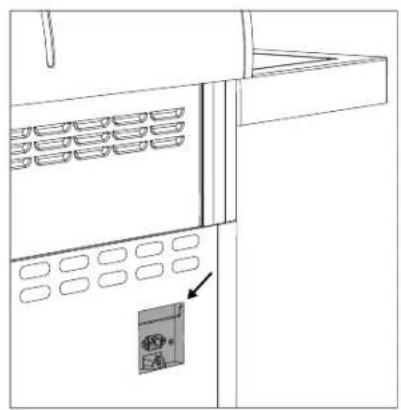
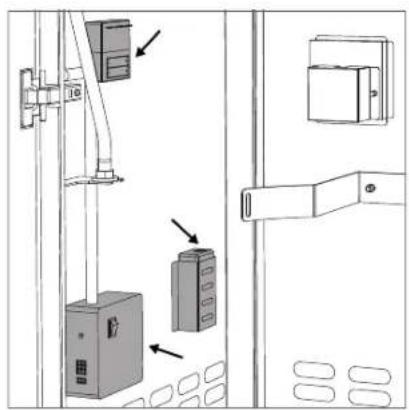
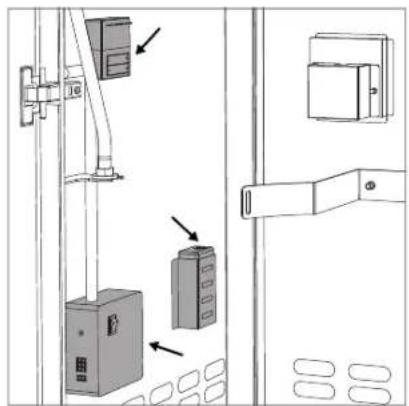
The electrobox includes:
- 4 Ni-MH rechargeable batteries (type AA, 1.2 V/2400 mAh) for the Safety Light System (SLS)
- 2 batteries (type AAA, 1.5 V) for the electric ignition
- 1 master switch to interrupt the power supply to the individual components and prevent the discharge of the rechargeable batteries
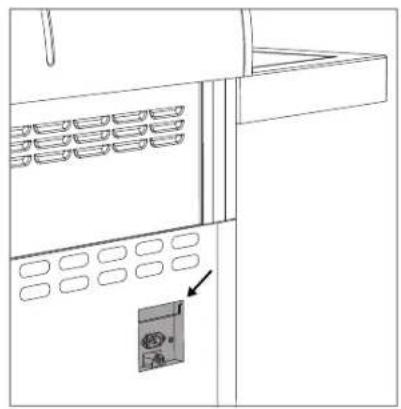
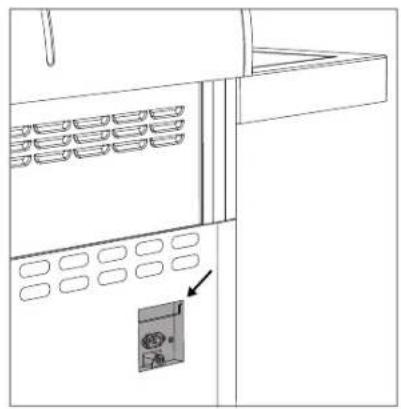
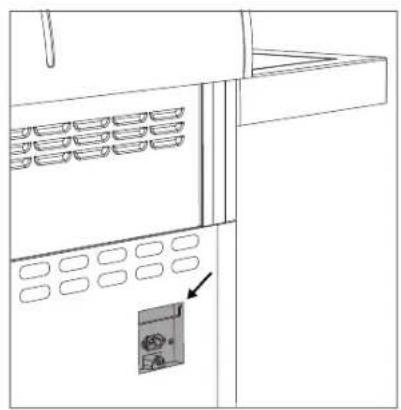
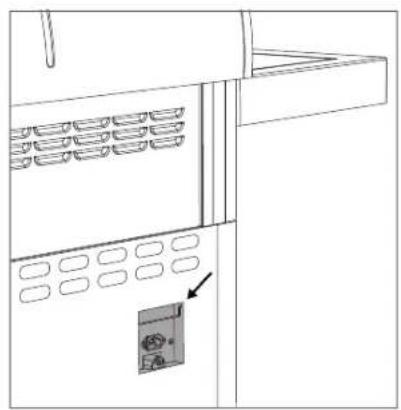
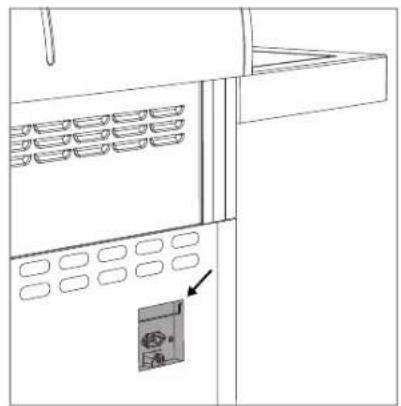
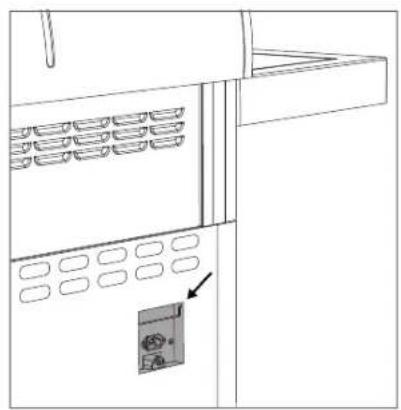
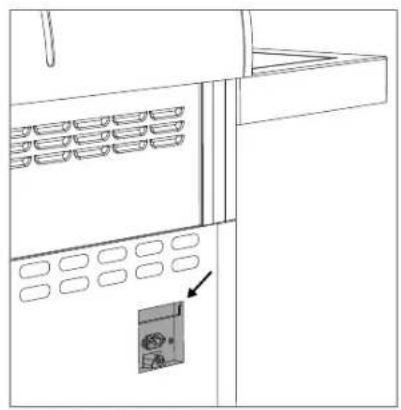
- 1 battery charging station: The battery charging station can be connected to a wall socket outlet using the included mains cable and the connecting socket on the rear side for the DUALCHEF S 325 G and DUALCHEF S 425 G models. When the included mains cable is connected, the 4 integrated rechargeable batteries are charged automatically when the master switch is switched on. During charging, the diodes on the battery charging station are illuminated continuously in orange (approximate charging time of up to 12 hours). Other DUALCHEF barbecues are not supplied with an included mains cable. However, these models also offer a battery charging function. A corresponding mains cable is available from specialist retailers and electronics stores.
CAUTION: The included rechargeable batteries for your DUALCHEF barbecue can be recharged in the electrobox thanks to the integrated battery charging station. These batteries must NOT be replaced with conventional non-rechargeable batteries. If you try to insert non-rechargeable batteries and connect the barbecue to a socket outlet using the mains cable, the device will try to recharge the non-rechargeable batteries. This can result in serious damages and fire!
THE SAFETY LIGHT SYSTEM (SLS)
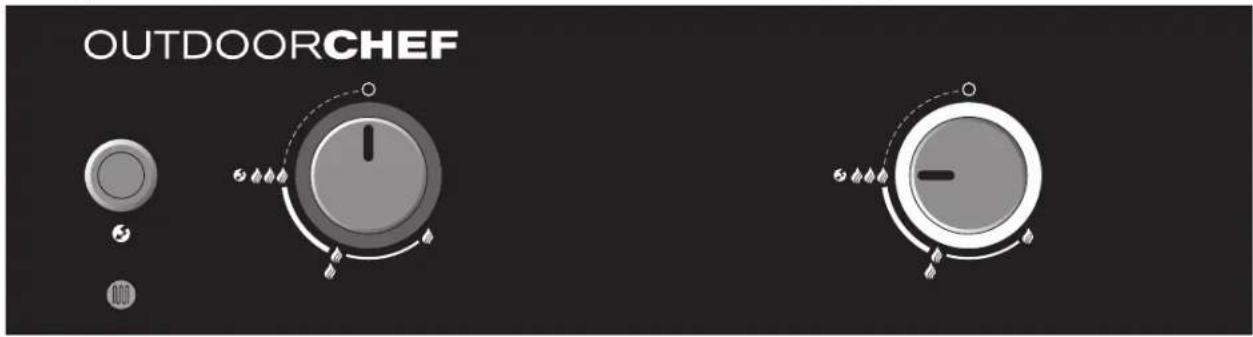
The SAFETY LIGHT SYSTEM (SLS) of your DUALCHEF barbecue will be activated, when you turn the gas regulating knob anticlockwise from the position towards , the activating the gas supply to the DGS ® TWIN BURNER.
The light ring around the gas regulating knob enables you to see from a distance, whether the gas supply of one or multiple burners is activated.
The 4 included rechargeable batteries ensure the energy supply for the SLS. If the rechargeable battery capacity falls to around 20%, the SLS will start flashing to indicate that the SLS display will soon power off if the batteries are not recharged. The gas regulation function will work even if the rechargeable batteries are depleted.
DUALCHEF barbecues are equipped with an integrated battery charging device (see chapter ELECTROBOX).
The operating console is equipped with a light sensor. The sensor measures the environmental light intensity and adapts the luminosity of the SLS accordingly. NOTE: The glass above the sensor must be free and clean for this function to work properly.
INSTRUCTIONS FOR USING THE DUALCHEF
It couldn't be simpler:
- If you only want to prepare small amounts of food to be grilled and just use one or two burners, disconnect the unused grilling zone, using the DGS® ZONE DIVIDER for increased efficiency (see chapter DGS® ZONE DIVIDER). Grilling with the lid closed reduces the grilling time and gas consumption.
- Preheat the barbecue with its lid closed for about 10-15 minutes at the evening.
- Place the food to be grilled on the barbecue grid and regulate the temperature according to your requirements infinitely
- After grilling, always set the gas regulating knob to the ○ position. Then close the gas supply at the gas bottle. The bottle tap must be closed even on empty bottles.
- After grilling, please let the barbecue cool down completely before shifting, moving or cleaning it.
CAUTION: The DUALCHEF S 325 G and DUALCHEF S 425 G models are equipped with a grill chamber lighting (halogen lamps) which may be damaged if the hot barbecue is subjected to major impacts.
- CAUTION: The drip pan may only be removed for emptying and cleaning, when it is cold. The retained hot fat can cause burn injuries. The drip pan may be removed using the included handle only!

THE DUAL GOURMET SYSTEM (DGS®)
In addition to traditional barbecue methods (see chapter DIRECT AND INDIRECT BARBECUE METHOD), the DUALCHEF also offers the unique DUAL GOURMET SYSTEM (DGS*).
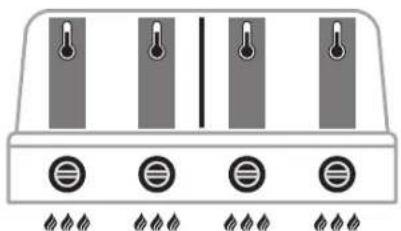
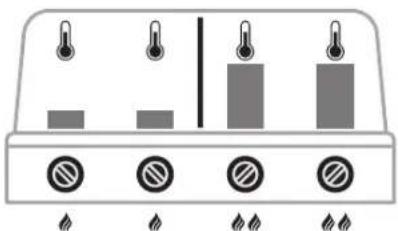
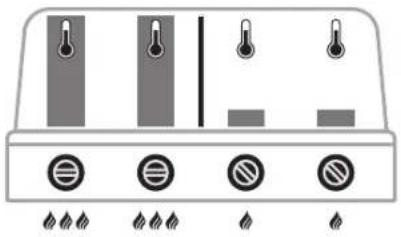
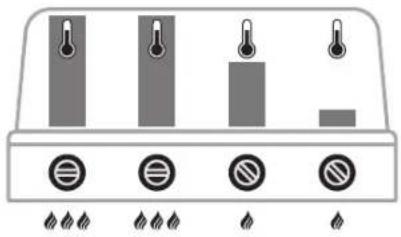
DGS® ZONE DIVIDER, which divides your DUALCHEF into 2 grilling zones, is at the very heart of the DUAL GOURMET SYSTEM (DGS®). The zone divider offers new options for grilling – be it preparing numerous dishes at the same time or avoiding the transfer of smells and odours between various grilled foods.
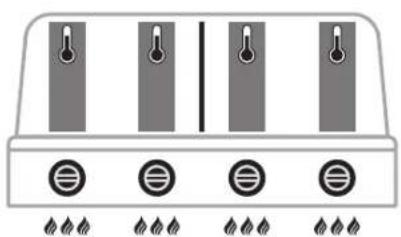
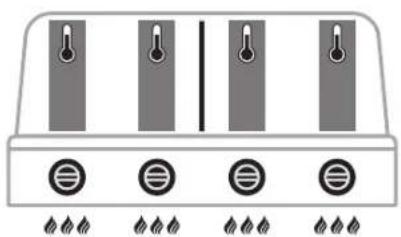
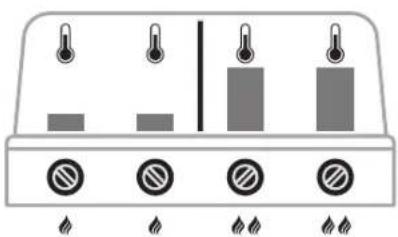
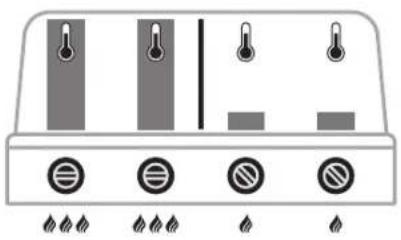
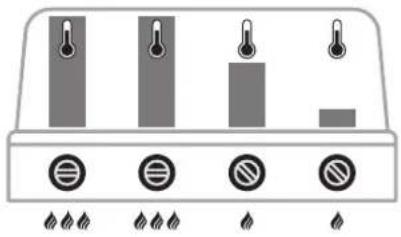
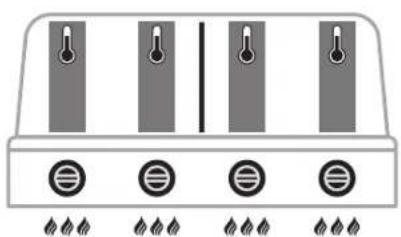
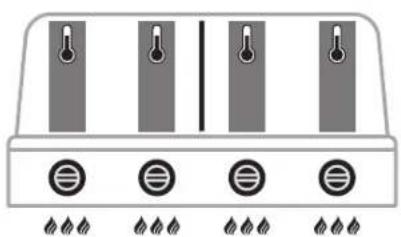
In addition to the separation of the grill chamber, you can also fully control the temperature of the grilling zones. Both zones can be operated and controlled separately. Two thermometers indicate the temperature of the respective zones.
The DGS® accessories world helps you to perfectly use the zones and supports you in achieving the best barbecue result.
The following sections describe the individual components of the DUAL GOURMET SYSTEM (DGS®).

THE DGS® ZONE DIVIDER
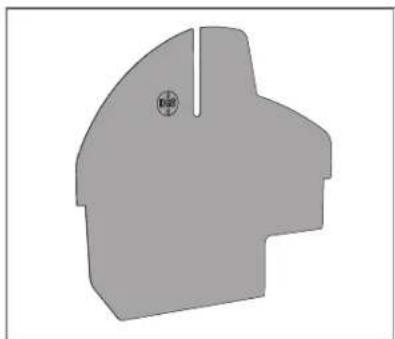
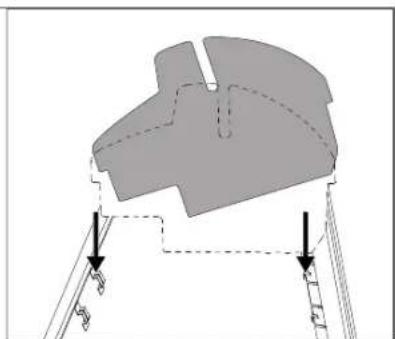
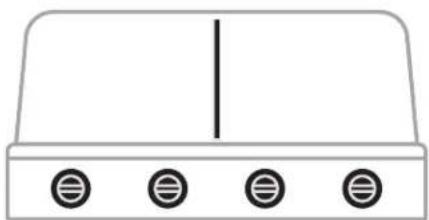
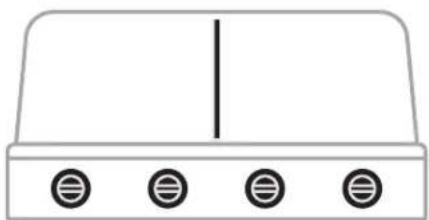
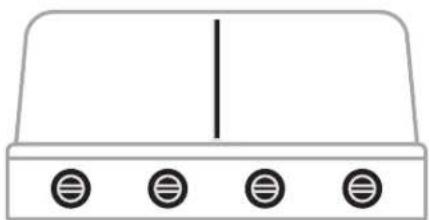
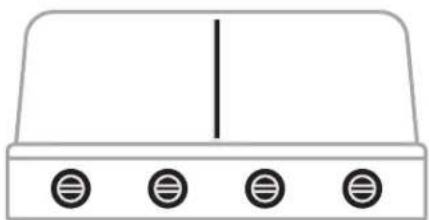
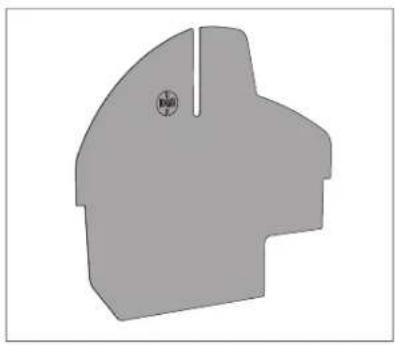
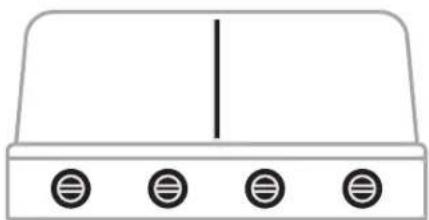
The DGS® ZONE DIVIDER effectively divides the burning chamber into two separately controllable grilling zones.
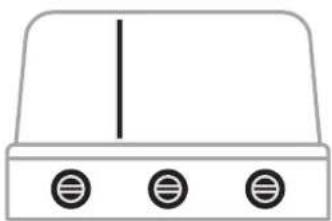
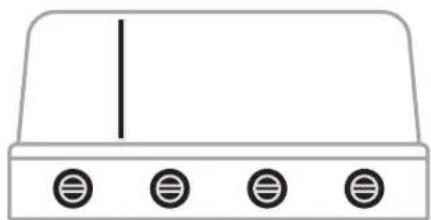
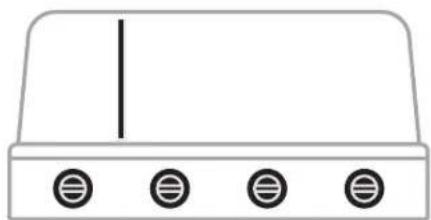
The DUALCHEF 315 G / DUALCHEF 325 G and DUALCHEF S 325 G models are equipped with a zone separation setting.
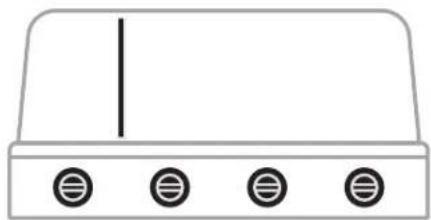
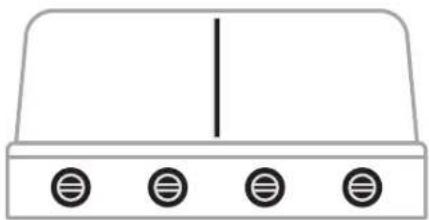
The DUALCHEF 415 G / DUALCHEF 425 G and DUALCHEF S 425 G models are equipped with two zone separation settings.
SEPARATING THE GRILL CHAMBER INTO VARIOUS ZONES ENABLES A CONVENIENT AND EFFICIENT USE OF THE FOLLOWING FUNCTIONS:
- The DGS® ZONE DIVIDER of your DUALCHEF barbecue enables you to prepare various foods simultaneously, separately and thus without any transfer of odours or tastes!
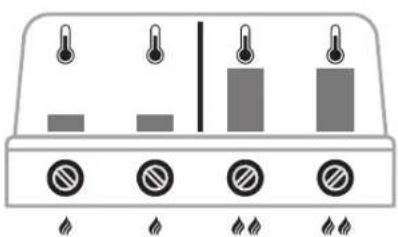
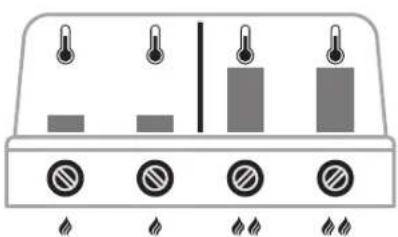
- The individual zones can be controlled separately thanks to the DGS® ZONE DIVIDER, as the generated heat of the DGS® TWIN BURNER rises inside the burning chamber and the DGS® ZONE DIVIDER prevents a major heat transfer to the other grilling zone. This separation enables you to work with various temperatures for your food under the DUALCHEF barbecue hood.
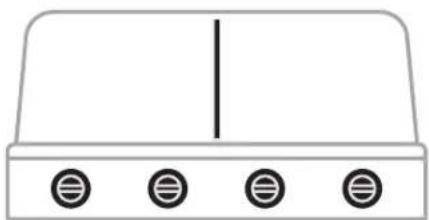
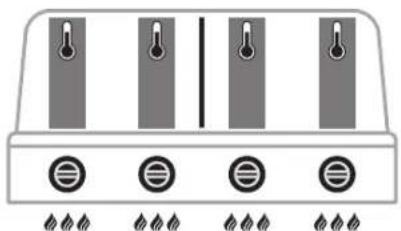
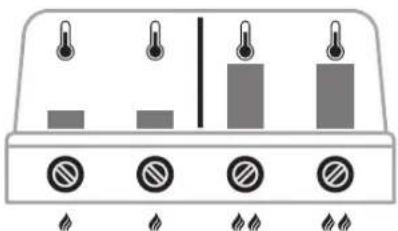
AVAILABLE TEMPERATURE ZONES WITH THE DGS® ZONE DIVIDER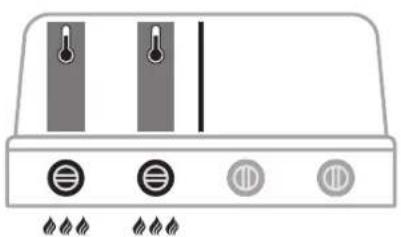
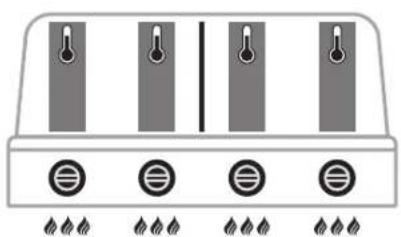
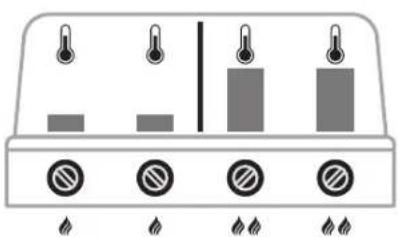
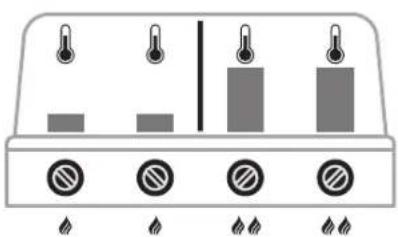
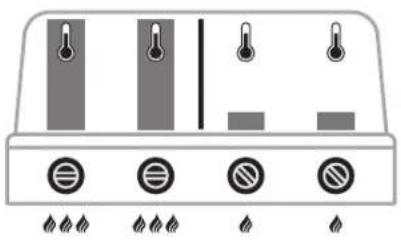
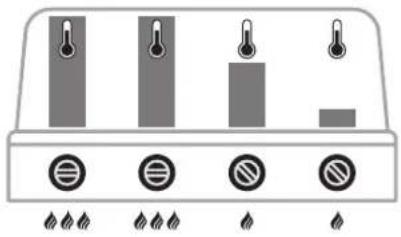
DIFFERENCE BETWEEN THE TEMPERATURE ZONES WITH OR WITHOUT THE DGS® ZONE DIVIDER
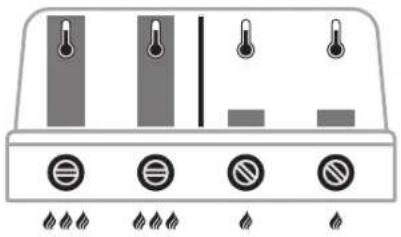
WITH DGS® ZONE DIVIDER WITHOUT DGS® ZONE DIVIDER
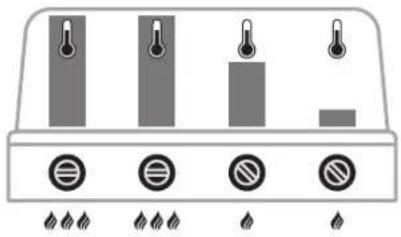
WITHOUT DGS® ZONE DIVIDER
You may e.g. prepare a delicious roast on the right barbecue side, using the DGS® HEAT DIFFUSER (see chapter DGS® HEAT DIFFUSER) and at the same time a pizza or seared steaks on the left side.
- The DGS® ZONE DIVIDER also supports an optimised gas consumption. If you only want to grill a small amount of food, use the DGS® ZONE DIVIDER to separate the unused grill surface. Reducing the size of the DUALCHEF grill chamber increases the efficiency of the used grill surface and the operated burner. See the illustrations below to understand how to separate the zones.
- The DGS® ZONE DIVIDER enables direct grilling in one grilling zone and at the same time careful cooking in the other zone.

THE DGS® HEAT DIFFUSER
When preparing food with a rotisserie, the required heat is usually produced by a rear burner. The rear burner's rising heat and the roast positioned in front of it require a large amount of gas to achieve the desired result. At the same time, the temperature control is highly limited.
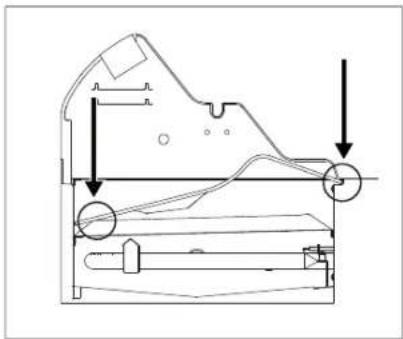
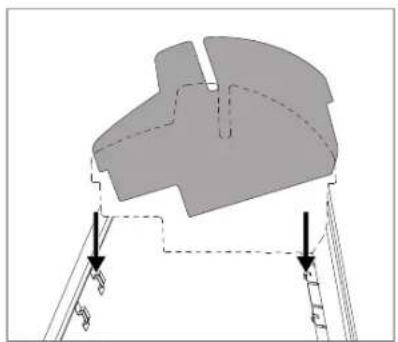
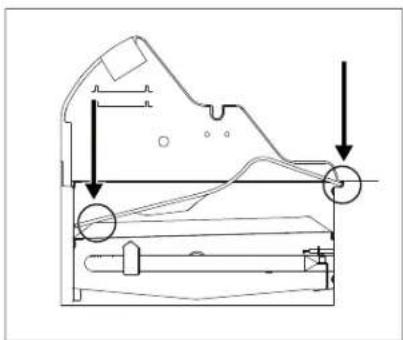
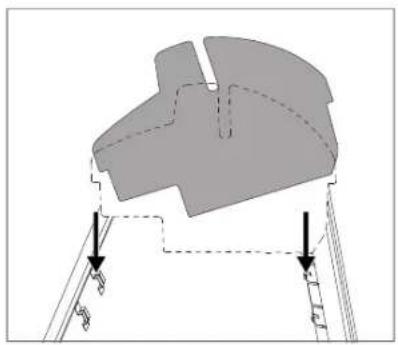
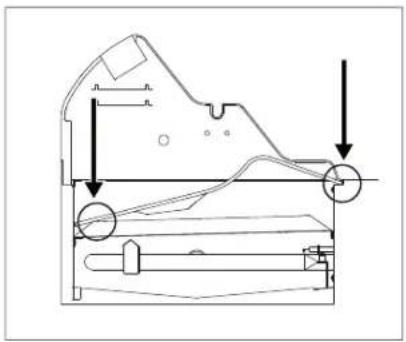
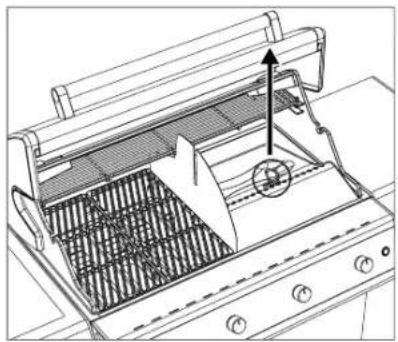
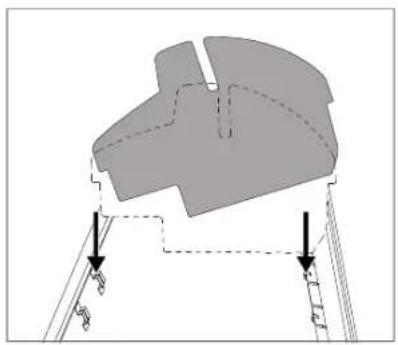
The DGS® HEAT DIFFUSER guides the required heat directly from the DGS® TWIN BURNER to the food to be grilled in the rotisserie. This arrangement enables a roast to be prepared with just one burner set to position 1. Combining the DGS® TWIN BURNER with the DGS® ZONE DIVIDER and the DGS® HEAT DIFFUSER reduces the gas consumption and increases the temperature range.
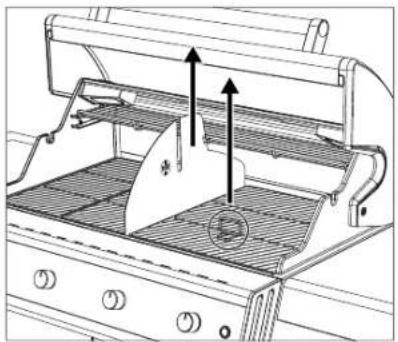
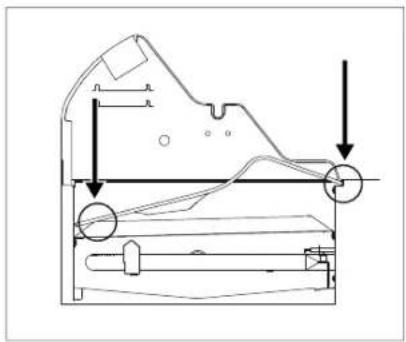
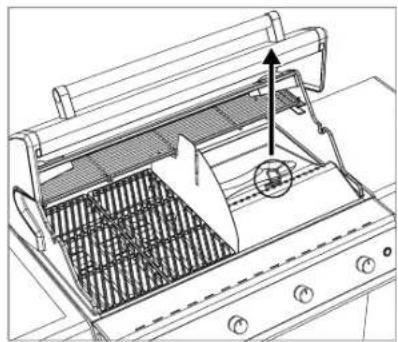
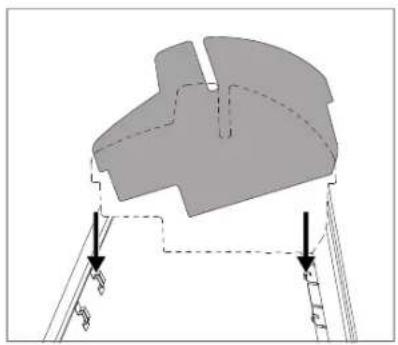
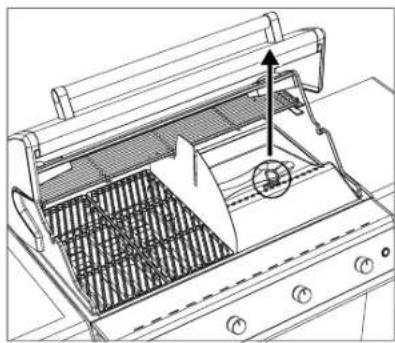
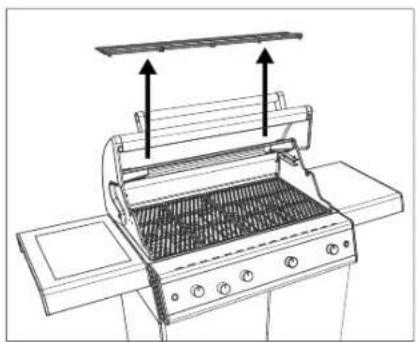
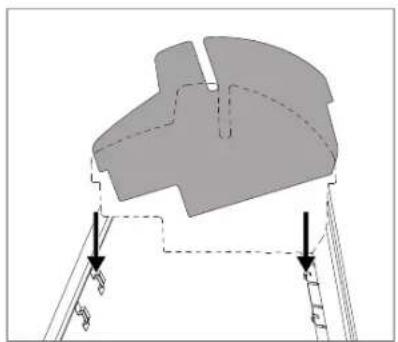
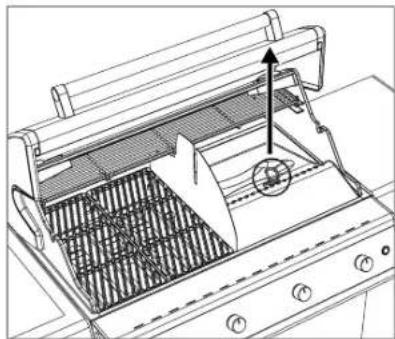
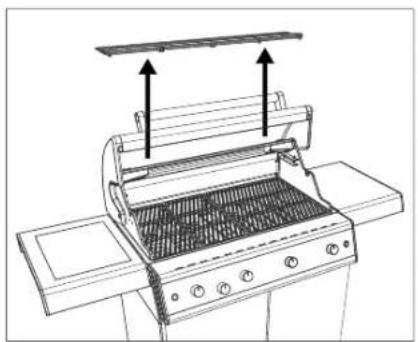
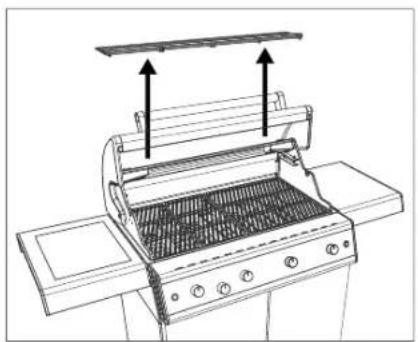
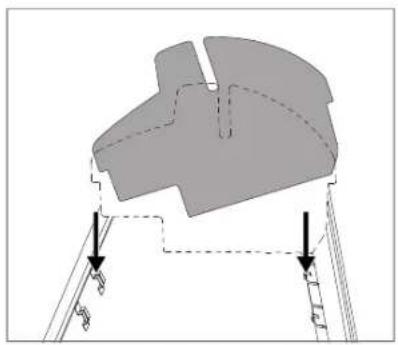
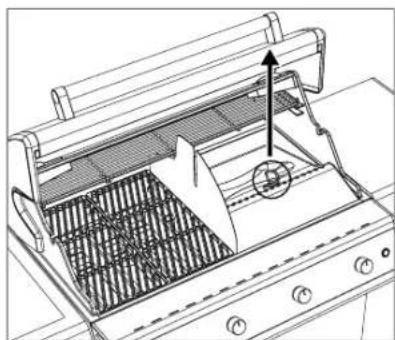
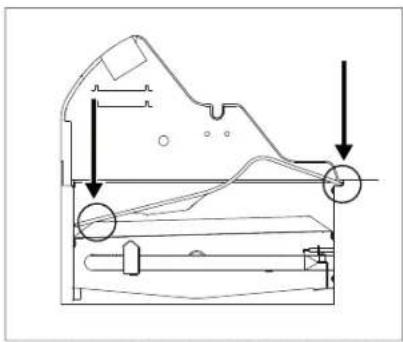
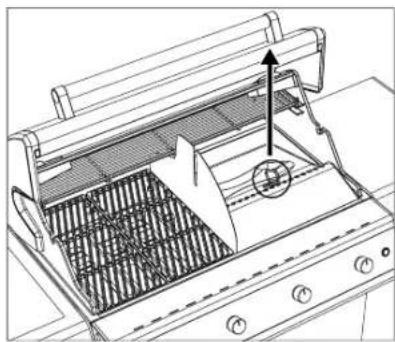
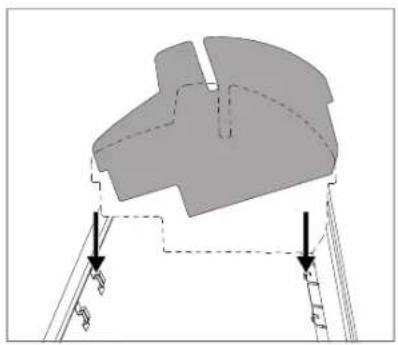
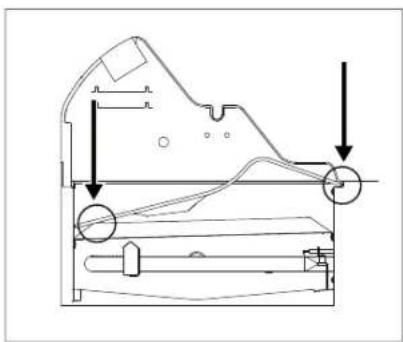
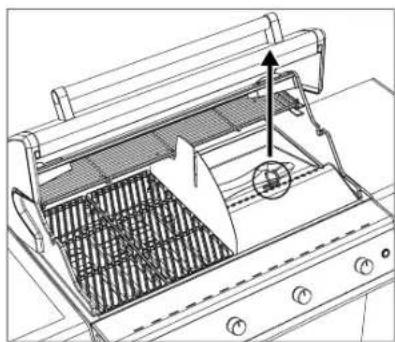
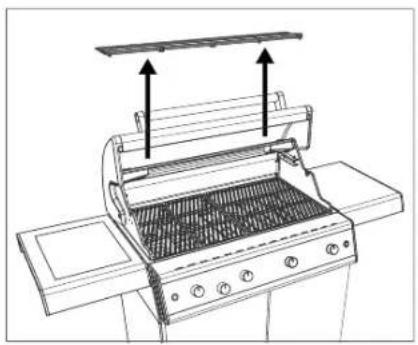
How to use the DGS® HEAT DIFFUSER:
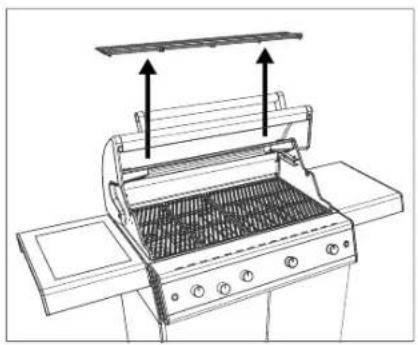
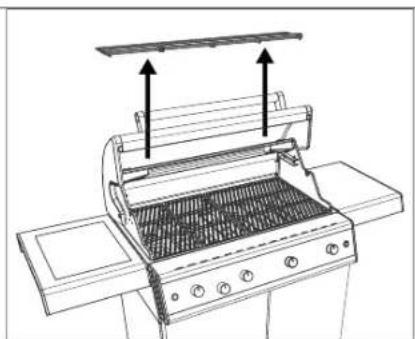
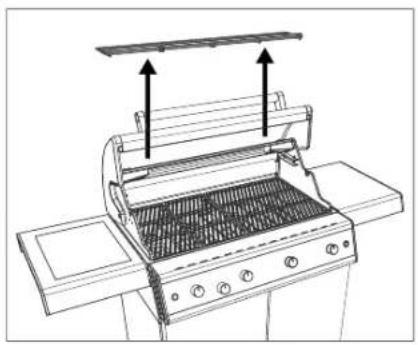
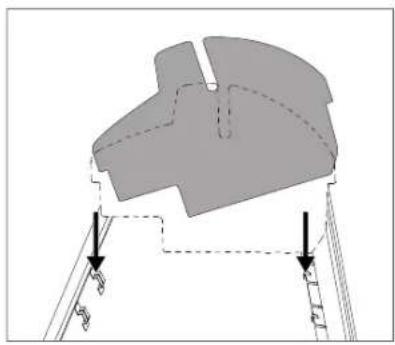
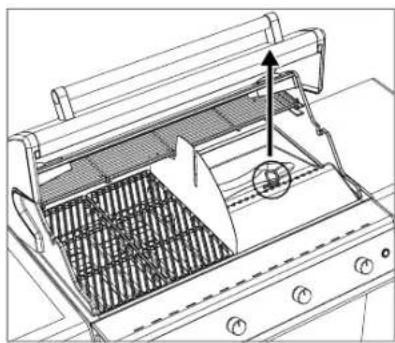
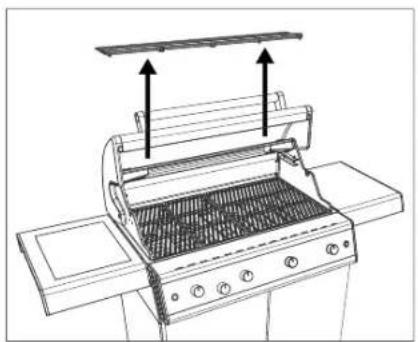
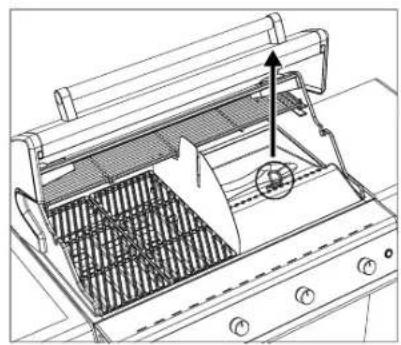
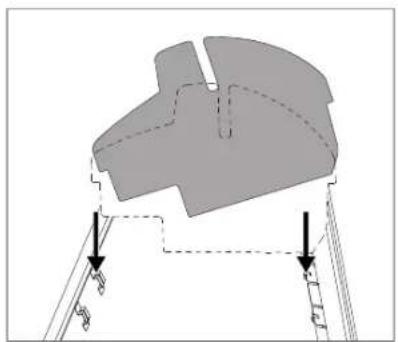
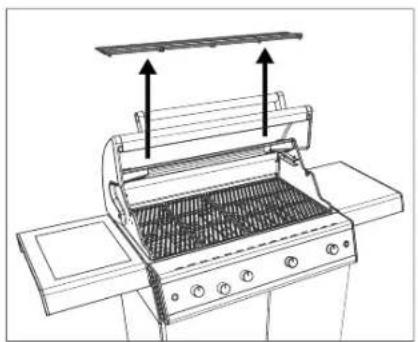
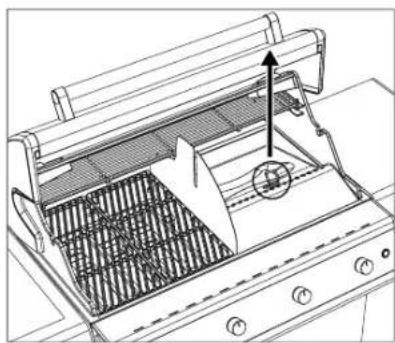
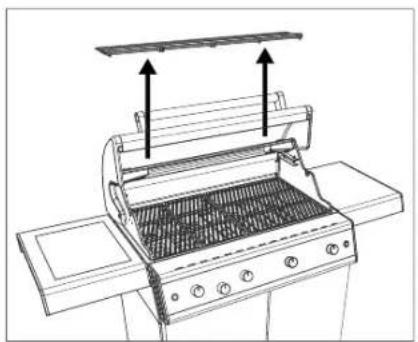
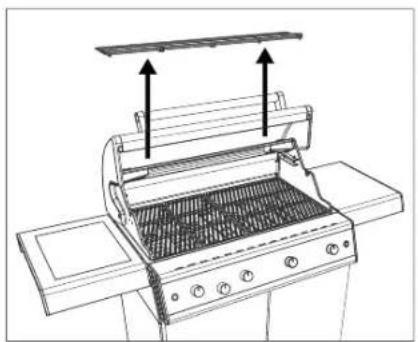
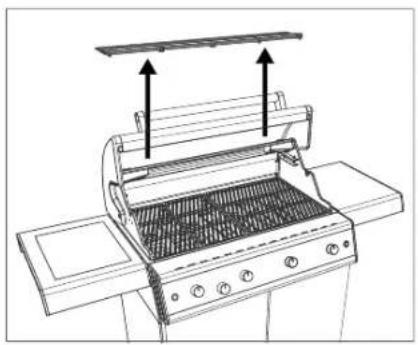
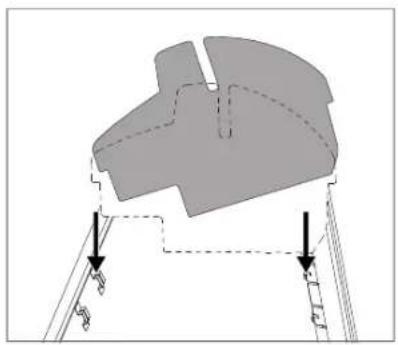
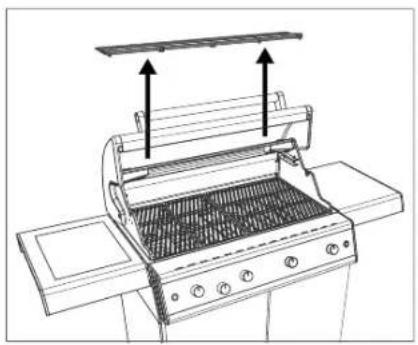
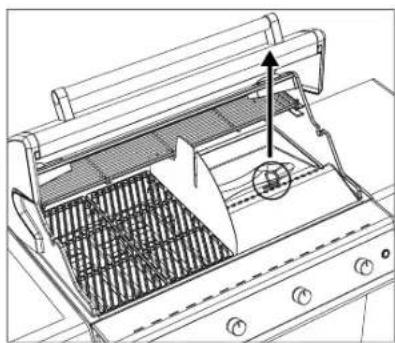
- Use the Grid Lifter to remove the barbecue grid from the right-hand side of the barbecue.
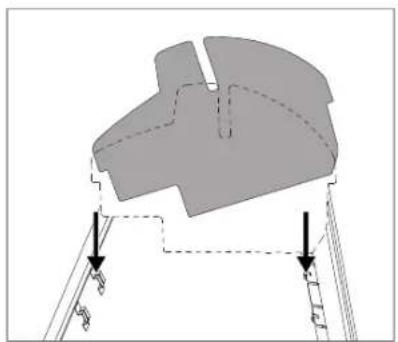
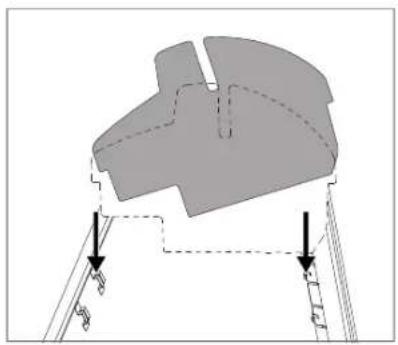
- Place the DGS® HEAT DIFFUSER as shown above.
- Place the food to be grilled in the OUTDOORCHEF DGS® ROTISSERIE KIT (not included, optional accessories).
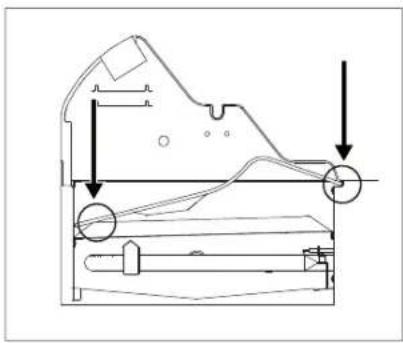
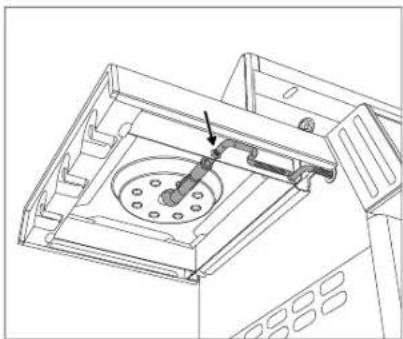
- Push the rotisserie into the motor block (part of the DGS® ROTISSERIE KIT). Next, place the opposite side on the DGS® ZONE DIVIDER equipment.
- Next, start the DUALCHEF and cook the roast with the desired temperature.
- Use the Grid Lifter to remove the DGS® HEAT DIFFUSER again.
The DGS® PROTECTION BARS and the DGS® HEAT DIFFUSER protect the DGS® TWIN BURNER from dripping fat and prevent flare-up. The excessive fat is drained in a controlled manner thanks to the specific shape of the DGS® HEAT DIFFUSER between the DGS® TWIN BURNERS. The grilling zone design enables you to prepare more food to be grilled on the remaining free grilling zone.
HEIGHT-ADJUSTABLE WARMING RACK
The warming rack serves as an additional grill surface with a separate temperature zone. Depending on the size of the food to be grilled, the warming rack may be attached in 2 different positions. The warming rack can also be used to prepare a roast with the help of the DGS® HEAT DIFFUSER and the DGS® ZONE DIVIDER. However, in this case, just one position is possible!
CAST IRON BARBECUE GRIDS
USAGE
Clean the cast iron barbecue grids with water before using them for the first time. Always put on barbecue gloves before touching the grids during use on the barbecue. Never place the hot cast iron barbecue grids on flammable or heat-sensitive surfaces. The Grid Lifter can be used for easier removal of the cast-iron barbecue grids.
CLEANING
Allow the cast iron barbecue grids to burn out on the barbecue at full power for around 10 minutes.
- Use a brush with brass bristles (not steel bristles)
- Let them cool down afterwards
- In case of persistent dirt: Use the OUTDOORCHEF BARBECUE CLEANER for effective cleaning.
NOTE
After cleaning, oil the barbecue grid lightly with an edible oil.
Using the DGS® ZONE DIVIDER, the DUALCHEF provides you with virtually unlimited cooking options. And on top of the varied cooking options, OUTDOORCHEF has developed matching accessories for grilling, cooking, baking, for even more fun with your DUALCHEF. Get inspired and discover the world of DGS® ACCESSORIES.
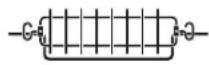

DGS® ROTISSERIE KIT
The DGS™ ROTISSERIE KIT ensures evenly cooked meat. Thanks to its basket shape, the food to be grilled is not skewered and this ensures that the juices remain in the meat. Perfect for crispy chicken, juicy Sunday roasts and tender roastbeef.
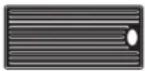

DGS® GRIDDLE PLATE
The DGS™ cast iron GRIDDLE PLATE retains heat optimally and evenly. The reversible griddle plate has a ribbed side and a smooth side, and therefore offers numerous preparation options. The smooth side is perfect for pancakes, crêpes or scrambled eggs, and the ribbed side is ideal for flash-grilling.
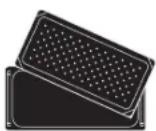

DGS® COOKING SET
The DGS® COOKING SET is the true allrounder among the DGS® accessories. Whether boiling liquids, steaming vegetables, gratinating oven dishes or poaching fish, simply everything is possible. The Cooking Set can be used directly in the barbecue in place of a barbecue grid. Thanks to its elegant handles, the container is easy to hang and won't tilt.


DGS® PIZZA STONE
The new DGS® PIZZA STONE guarantees crispy pizza from the barbecue. The stainless steel frame enables a raised baking position and ensures the perfect combination of top and bottom heat.
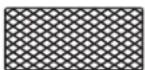

DGS® CAST IRON BARBECUE GRIDS
Thanks to their diamond pattern, the high-quality DGS® CAST-IRON BARBECUE GRIDS guarantee the perfect seared pattern on juicy steaks or pieces of fish. As cast iron retains heat optimally and transfers it to the food to be grilled resting on it, the kit with 2 barbecue grids always comes into use if high temperatures are needed.
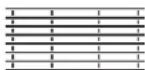

DGS® STAINLESS STEEL GRIDS
The DGS® STAINLESS STEEL GRID guarantees perfect heat conduction and a beautiful seared pattern on the food to be grilled. The high-quality, high-density stainless steel grid prevents food residue from sticking and is easy to clean.
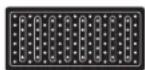

DGS® VEGETABLE GRID
The DGS® VEGETABLE GRID ensures simple and healthy preparation of vegetables, fish or burgers. The grid's porcelain enamel and special perforations guarantee low-fat barbecuing and prevent the food to be grilled from sticking. For uncomplicated barbecue fun with guaranteed success.
DIRECT AND INDIRECT GRILLING METHOD WITH THE DUALCHEF
WHAT IS THE DIFFERENCE?
DIRECT GRILLING METHOD
As the name says, the food to be grilled is placed directly above the heat source for the direct grilling method.
This method is ideal for flash-grilling meat. The high temperature enables a nice crust or the perfectly seared pattern on the steak.
INDIRECT GRILLING METHOD
With indirect grilling the heat circulates around the food to be grilled. The closed lid turns the barbecue into a convection oven.
This method is ideal for cooking large pieces of meat at low temperatures, for gently cooking fish or making crispy pizzas.
With the grilling system of the gas barbecue stations, you can switch from direct to indirect heat in the blink of an eye.
For indirect grilling, cooking and baking, place the food to be grilled in the middle of the grate and only ignite the two outer burners.
DIRECT HEAT INDIRECT HEAT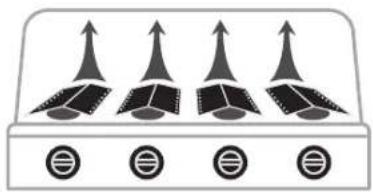
For direct grilling and cooking: Place the food to be grilled above the ignited burners.
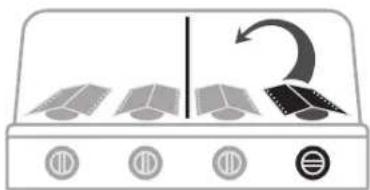
For indirect grilling, cooking and baking: Place the food to be grilled in the middle, close the lid and ignite only the two outer burners.
![graph TD A["Input Node 1"] --> B["Output Node 2"] B --> C["Output Node 3"] C --> D["Feedback Loop"] D --> A style A fill:#f9f,stroke:#333 style B fill:#bbf,stroke:#333 style C fill:#bfb,stroke:#333](/content/2026/03/519855/images/d67d3ac4a6044103097c3987955c75ce55bf6105a22db61c3ff6433030229acc.jpg)
GRILL CHAMBER LIGHTING
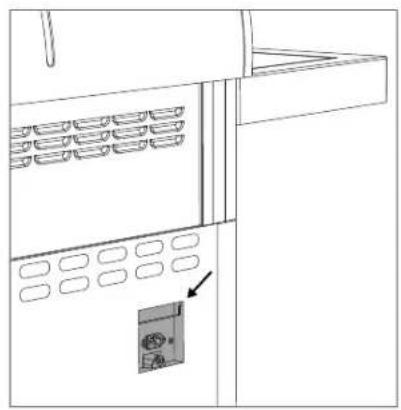
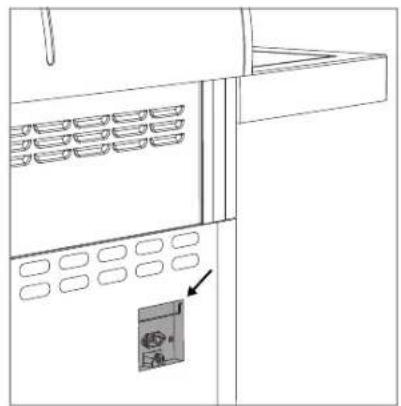
The DUALCHEF S 325 G and DUALCHEF S 425 G models are equipped with a grill chamber lighting. The halogen lamps (G9, 12 V, 10 W) are operated with the included mains cable, which is plugged into the rear side of the barbecue. The on/off-switch is located on the right side of the operating console.
CAUTION: The grill chamber lighting may be damaged if the hot barbecue is subjected to major impacts.
AFTER GRILLING
- Set the gas regulating knob of each burner to .O
- Turn off the gas supply at the gas bottle.
- Shut off the master switch of the electrobox.
- Allow the barbecue to cool down fully and clean it.
- Protect the barbecue with the corresponding cover.
CAUTION: After grilling, please let the DUALCHEF cool down completely before moving it. The DUALCHEF S 325 G and DUALCHEF S 425 G models are equipped with a halogen grill chamber lighting which may be damaged if the hot barbecue is subjected to major impacts.
CAUTION: The drip pan may only be removed for emptying and cleaning when it is cold. The retained hot fat can cause burn injuries. The drip pan may be removed using the included handle only!
CLEANING
Only very minor cleaning is required between uses of the barbecue because most of the grease either evaporates or is gathered in the drip pan. To clean the barbecue grid, use a barbecue brush with brass bristles (not steel bristles).
For a more thorough cleaning of the burning chamber, use the OUTDOORCHEF BARBECUE CLEANER. Alternatively, you can use a nylon kitchen sponge and soapy water in order to remove all loose residues. At the end, you can pull out the collecting tray, empty it and clean it using the OUTDOORCHEF BARBECUE CLEANER. You can clean the stainless-steel components with a conventional stainless-steel cleaner or a polishing sponge available in DIY stores.
RECOMMENDATION: Clean the DGS® HEAT DIFFUSER and the DGS® PROTECTION BARS after each use to avoid scaling and flare-up.
USING THE OUTDOORCHEF BARBECUE CLEANER
IMPORTANT: the barbecue must not be operated while using the OUTDOORCHEF BARBECUE CLEANER.
Wear gloves to protect your hands and, if possible, glasses to shield your eyes. Spray the barbecue or accessories thoroughly while they are still slightly warm and leave the product to work for 15-30 minutes. Spray stained surfaces again, rinse thoroughly with water and leave to dry.
WARNING: Do not use the OUTDOORCHEF Barbecue Cleaner on powder-coated surfaces.
USING THE OUTDOORCHEF CHEF CLEANER
IMPORTANT: the barbecue must not be operated while using the OUTDOORCHEF CHEF CLEANER.
Wear gloves and glasses for protection. Spray the barbecue or accessory while still slightly warm and leave the product to work for 10 minutes until the foam has dissolved.
If required, clean off any remaining residue using a suitable barbecue brush or a nylon sponge. Then rinse thoroughly with water and dry.
WARNING: Not suitable for wood, plastic, powder coated or varnished surfaces.
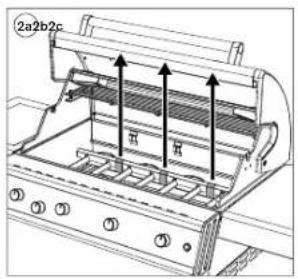
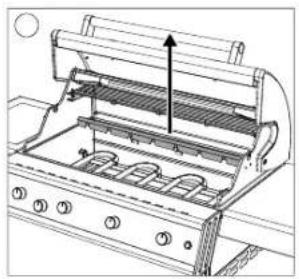
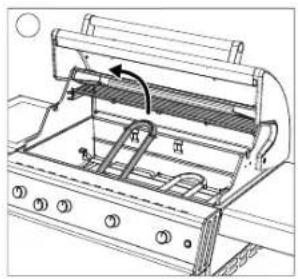
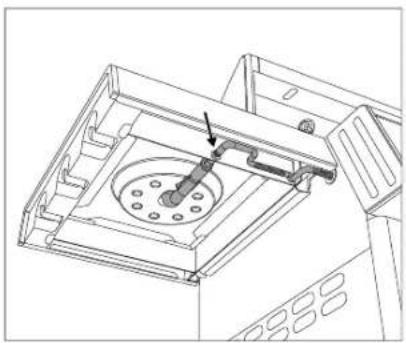
SERVICING THE DGS® TWIN BURNERS
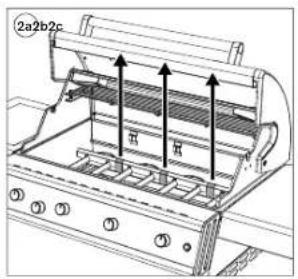
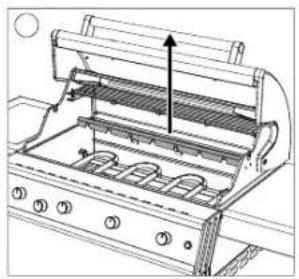
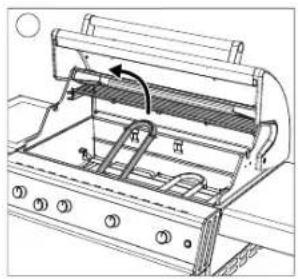
The burners can be clogged by insects. This can impair performance or lead to flashbacks. Please perform the following steps to inspect and clean the burner regularly:
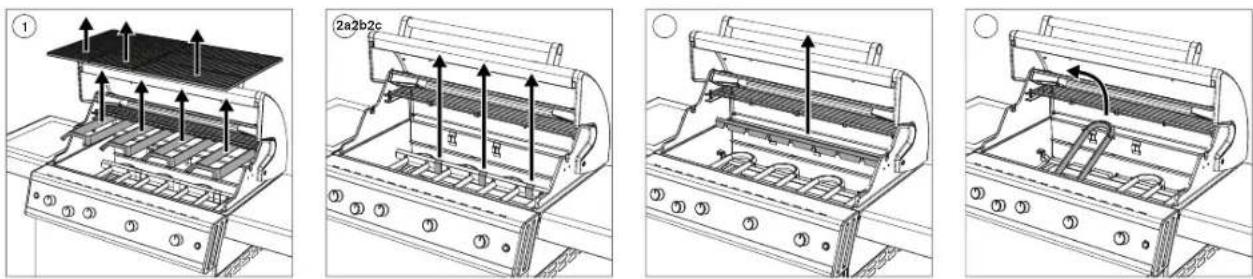
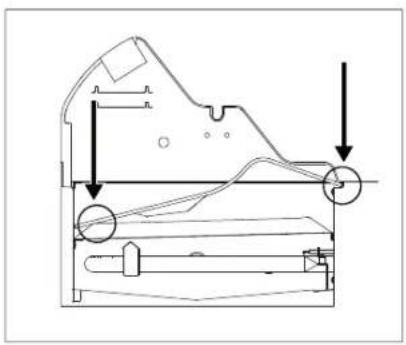
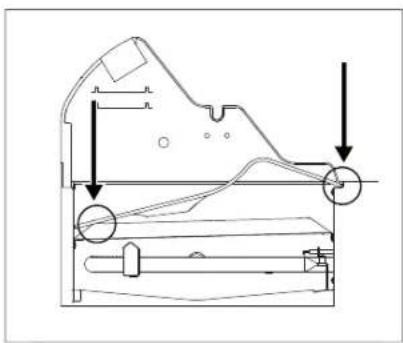
- First, remove the barbecue grids and the DGS® PROTECTION BARS from the DUALCHEF. 2a. Next, remove the retainer clamps from the burner fixation. 2b. Then remove the top burner fixation. 2c. Next, lift the burner out of the burning chamber.
- Clean the burner with a thin bottle brush or wire.
- After having been cleaned successfully, the individual components are re-assembled in reverse order in the burning chamber and started as described in the "IGNITING THE MAIN BURNERS" section.
IMPORTANT: If you use a cleaning agent for cleaning, you must allow the barbecue to dry out correctly after cleaning. To accelerate the drying procedure, you can switch the barbecue on and let it burn out for a few minutes at the closing with the lid open.
MAINTENANCE
Regular maintenance of your DUALCHEF will ensure it functions correctly. At least twice a year, check all parts that carry gas; also check them when you have not used them for longer periods. Spiders and other insects can cause blockages that must be cleared before use. If the barbecue is regularly pushed across uneven ground, check from time to time whether all screws are still tight.
If you have not used the barbecue for a long period, you should carry out a CHECK FOR LEAKS before using it again. If you have any doubts, please contact your gas supplier or the retailer.
To prevent damage due to corrosion, oil all metal parts before lengthy storage. Following lengthy storage, and at least once a year during the barbecue season, you should check the gas hose for cracks, kinks and other damages. A damaged gas hose must be replaced immediately, as described in the SAFETY NOTES chapter.
To allow you to enjoy using your barbecue for as long as possible, protect it from the effects of the weather, using a suitable OUTDOORCHEF cover once it has cooled down completely. Remove the cover after any rain in order to prevent condensation build-up. Covers can be purchased from your barbecue retailer.
TROUBLESHOOTING
The burner does not ignite:
- Check if the gas supply is open at the gas bottle.
- Make sure there is enough gas in the bottle.
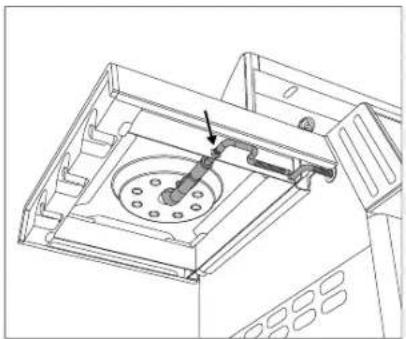
- Check if sparks are passing between the electrode and the burner. CAUTION: This inspection may only be performed with the gas supply fully closed!
No spark:
- Make sure that the batteries have been inserted correctly and are charged.
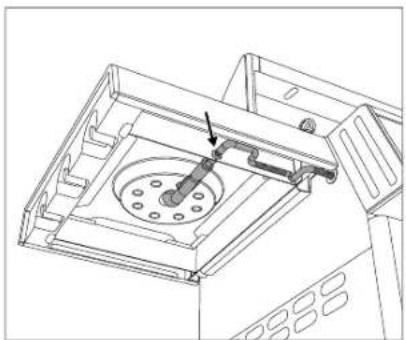
- The distance between the burner and electrode is only allowed to be 4-6 mm.
- Check whether the cables of the electric ignition and the electrode are plugged in and firmly connected.
- Insert 2 new batteries (type AAA, 1.5 V) in the electric ignition.
Please contact the retailer if you cannot get the barbecue to operate with reference to the measures above.
The SAFETY LIGHT SYSTEM (SLS) does not work:
- Check if the gas supply is open at the gas regulating knobs (with the gas bottle valve closed).
- Ensure that the rechargeable batteries for the SLS have been inserted correctly and are charged.
- If the rechargeable batteries are empty, you can (depending on the model)
- plug the included mains cable, to start the charging process (for the DUALCHEF S 325G and DUALCHEF S 425 G models)
- purchase a corresponding mains cable and directly plug it to the electrobox (for the DUALCHEF 315 G / DUALCHEF 325 G / DUALCHEF 415 G / DUALCHEF 425 G models)
- insert new rechargeable batteries
Grill chamber lighting
- Check whether the two G9 halogen lamps (12V/10W) are defective.
CONSUMER WARRANTY
1. Warranty and relation to other rights of the purchaser
As a private end user (consumer) purchasing this OUTDOORCHEF product from an authorized dealer, you are eligible to receive a manufacturer's warranty from OUTDOORCHEF AG (« OUTDOORCHEF »).
The manufacturer's warranty entitles you to assert warranty claims against the warranty provider in accordance with this agreement. The warranty claims exist in addition to your other contractual or statutory rights. These other rights are not excluded or restricted by this warranty. Therefore, you can also assert other contractual or statutory claims against the respective obligated parties. Thus for example, claims asserted under the Product Liability Act are not affected by this guarantee.
As the purchaser, you may in particular also assert contractual warranty claims against the seller. The reversal of the purchase contract, for example, can only be pursued against the seller, but not against OUTDOORCHEF under this warranty.
2. Participants and warranty conditions
OUTDOORCHEF is the warranty provider. This warranty applies to all end customers purchasing a new product from an authorized dealer for private purposes. Proof of purchase shall be the purchase receipt. A purchase for private use means the product is purchased by a person for purposes which are, for the most part, not associated with either their commercial or their independent professional activities. If a warranty claim is accepted, said warranty claim must be asserted against the warranty provider within two months. Otherwise, the warranty claim will be excluded. For obvious defects, this limitation period begins upon receipt of the product. OUTDOORCHEF therefore recommends that you check the product for defects immediately upon receipt.
3. Scope
The warranty is valid from the date of purchase and is granted in the following cases, provided that no exclusion of facts exists pursuant to Paragraph 4:
| ALUMINIUM DIE-CAST AND STAINLESS STEEL HOUSING 10 years Against corrosion perforation | ||
| DGS® TWIN BURNER 5 years Against corrosion perforation or burn-through | ||
| BARBECUE GRIDS 3 years Against corrosion perforation or burn-through | ||
| ENAMEL LID | 3 years | Against corrosion perforation and faults in the enamelling prior to first use |
| DGS® ZONE DIVIDER / DGS® HEAT DIFFUSER / DGS® PROTECTION BARS | 3 years Against corrosion perforation or burn-through | |
| OTHER PARTS 2 years For all remaining manufacturing/material defects | ||
Imperfections which are not considered to be defects include functionally insignificant and reasonable irregularities, differences in the color of enameling and minor defects such as production-related support points at the lower edge of the lid or on the suspensions.
In a warranty case, OUTDOORCHEF will exchange and replace, at the purchaser's request, either the damaged/defective parts or the entire product. As far as is reasonable, an exchange can be made for a similar model of a newer design, e.g. for a successor model. Insofar as the functionality of the product is not affected by a defect and to an extent reasonable for you as the customer, appropriate financial compensation can be offered to you in lieu of repair.
During the processing of a warranty claim (verification and possibly replacement), the purchaser shall not be entitled to assert a claim for a replacement or other compensation against OUTDOORCHEF. Undertaking warranty services does not mean that the warranty period is extended or restarted. Exchanged parts become the property of OUTDOORCHEF. The warranty period will only start again if the product is replaced.
Any further claims against the warranty provider are not covered by this warranty. However, this does not restrict or exclude your claims on other legal grounds (see also section 1 above).
4. Exclusion
The warranty shall not apply in the following cases:
- Normal wear and tear resulting from normal intended use, especially to general wear parts such as thermometer, ignition and battery, electrode, ignition cable, gas hose, gas pressure regulator, halogen lamps, drip collector tray and drip pan.
- Damage to the enamel from the use of utensils and other devices, provided that the defect did not already demonstrably exist before first use.
- Defects and/or damage due to misuse, improper use, in particular due to not following the user guide, safety instructions or operating/maintenance instructions (for example, use of outdoor equipment indoors, damage resulting from incorrect installation, improper cleaning of the enamelled surface of the funnel or grill bars, failure to perform a leakage test to the extent recommended in the user guide, use of harmful chemicals, unintended use, etc.).
- Defects and/or damages that are remedied through intervention or repair by persons other than those authorised by OUTDOORCHEF.
- Defects and/or damage caused by destructive weather influences (e.g. hail or lightning).
- Defects and/or damage due to vandalism or due to intentional or negligent damage to the extent that this was not caused by OUTDOORCHEF.
- Defects and/or damages incurred during transport to the buyer, unless the transport was arranged by the warranty provider.
- Defects and/or damage due to force majeure.
- Defects and/or damage due to wear caused by professional use for commercial purposes (e.g. use in a hotel or restaurant).
5. Processing of warranty claims
In the event of a warranty claim please contact us or one of our authorised dealers (a dealer directory is available at www.outdoorchef.com) as soon as possible and tell us your address and, if possible, the product/product part, sales receipt information, serial number and item number (both can be found on the data sticker on your barbecue; see the first section of the User Guide). Please describe the defect and, if possible, also send us a photo of it. In order to verify your warranty claim, you will need to return the product to us or your local dealer (bring-in warranty). In the case of justified warranty claims, we will reimburse the necessary and required transport and shipping costs. Otherwise we will send the product back to you at your expense.
The registered brand OUTDOORCHEF is represented by the following enterprise:
Outdoorchef AG | Eggbühlstrasse 28 | Postfach | 8050 Zürich-Schweiz | www.outdoorchef.com
TECHNICAL INFORMATION
DUALCHEF 315 G
CE 0063
Gas Propane/butane 30/31
Total output 12 kW
Gas consumption 870 g/h
Nozzle (28–30/37 mbar) 0.98 mm/mark: BK
Nozzle (50 mbar) 0.84 mm/mark: AR
Gas pressure Butane 28 mbar.
Propane 37 mbar
Maximum admissible
net weight of the gas bottle
on the barbecue frame 11 kg
DUALCHEF 325 G / S 325 G
CE 0063
Gas Propane/butane 30/31
Total output 15.4 kW
Gas consumption 1120 g/h
Nozzle (28–30/37 mbar) 0.98 mm/mark: BK
Nozzle (50 mbar) 0.84 mm/mark: AR
Gas pressure Butane 28 mbar.
Propane 37 mbar
Maximum admissible
net weight of the gas bottle
on the barbecue frame 11 kg
DUALCHEF 415 G
CE 0063
Gas Propane/butane 30/31
Total output 16 kW
Gas consumption 1160 g/h
Nozzle (28–30/37 mbar) 0.98 mm/mark: BK
Nozzle (50 mbar) 0.84 mm/mark: AR
Gas pressure Butane 28 mbar.
Propane 37 mbar
Maximum admissible
net weight of the gas bottle
on the barbecue frame 11 kg
DUALCHEF 425 G / S 425 G
CE 0063
Gas Propane/butane 30/31
Total output 19.4 kW
Gas consumption 1410 g/h
Nozzle (28–30/37 mbar) 0.98 mm/mark: BK
Nozzle (50 mbar) 0.84 mm/mark: AR
Gas pressure Butane 28 mbar.
Propane 37 mbar
Maximum admissible
net weight of the gas bottle
on the barbecue frame 11 kg
SIDE BURNER
(DUALCHEF 325 G / S 325 G / 425 G / S 425 G)
CE 0063
Gas Propane/butane 30/31
Power 3.4 kW
Gas consumption 250 g/h
Nozzle (28–30/37 mbar) 0.88 mm/mark: AH
Nozzle (50 mbar) 0.76 mm/mark: AK
Gas pressure Butane 28 mbar.
Propane 37 mbar
13 B/P (30 mbar)
13 B/F (50 mbar)
13 + (28/30/37 mbar)
ELECTRIC IGNITION / THE SAFETY LIGHT SYSTEM (SLS)
2 batteries (type AAA, 1.5V) are required to operate the electric ignition and Ni-MH rechargeable batteries (type AA 1.2
V/2400 mAh) are needed for the SAFETY LIGHT SYSTEM.
HALOGEN LIGHTING (DUALCHEF S 325 G / S 425 G)
The grill chamber lighting requires G9 halogen lamps (12V/10W).
NOTE ON THE TEMPERATURE DISPLAY
The thermometer display is subject to a +/-10 % fluctuation.
WEB PAGE
More information, tips and tricks, recipes and all kinds of useful information about OUTDOORCHEF products can be found at
OUTDOORCHEF.COM

INDICATION:
: position OFF
: low power
: medium power
IGNITION INSTRUCTIONS
2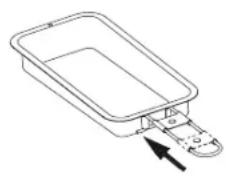

THE DUAL GOURMET SYSTEM (DGS®)

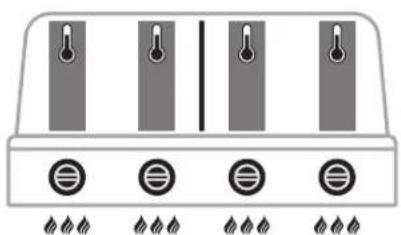
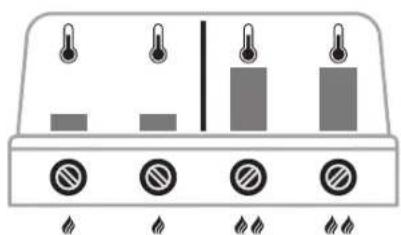
DIFFERENCE BETWEEN TEMPERATURE ZONES WITH OR WITHOUT THE DGS® ZONE DIVIDER
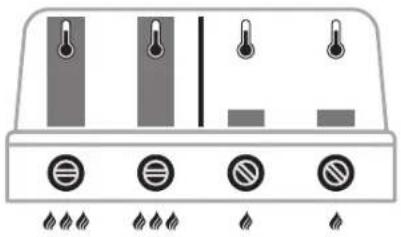
WITH THE DGS® ZONE DIVIDER WITHOUT THE DGS
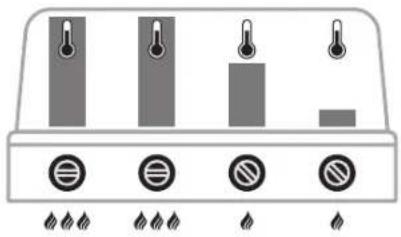
® ZONE DIVIDER
![graph TD A["Node 1"] --> B["Node 2"] B --> C["Node 3"] C --> D["Node 4"] D --> A style A fill:#f9f,stroke:#333 style B fill:#ccf,stroke:#333 style C fill:#cfc,stroke:#333 style D fill:#fcc,stroke:#333](/content/2026/03/519855/images/14ec78fbacfaeb654071efb8726e232b238a48d2bfb8687554d3fc35deb1f454.jpg)
AFTER THE BARBECUE
NOTE:
: Off position
: Low power
: Medium power
High power
Selection
Ignition
2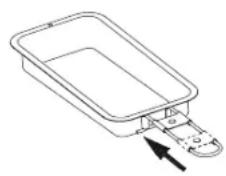

DUAL GOURMET SYSTEM (DGS®)
DIFFERENCE IN TEMPERATURE ZONES WITH OR WITHOUT THE USE OF THE DGS ZONE DIVIDER
WITH THE DGS® ZONE DIVIDER WITHOUT THE DGS
® ZONE DIVIDER
DGS® CAST IRON GRIDDLE SET
NOTE:
: Off position
: low power
: medium power
: high power
A. A.
Ontsøker
2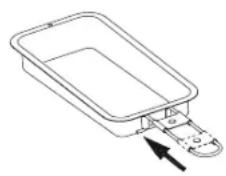

THE DUAL GOURMET SYSTEM (DGS®)
The models DUALCHEF 315 G / DUALCHEF 325 G and DUALCHEF S 325 G have one position to separate the zones.
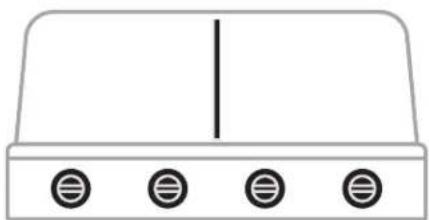
The models DUALCHEF 415 G / DUALCHEF 425 G and DUALCHEF S 425 G have two positions to separate the zones.
BY DIVIDING THE GRILL AREA INTO DIFFERENT ZONES, THE FOLLOWING APPLICATIONS BECOME EASIER AND MORE EFFICIENT:
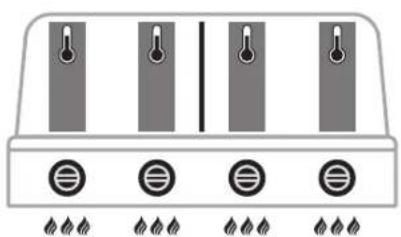
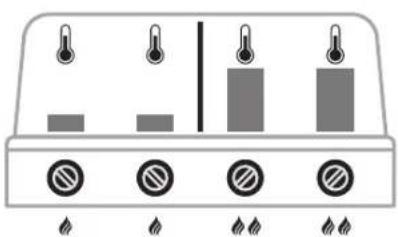
DIFFERENCE BETWEEN THE TEMPERATURE ZONES WITH OR WITHOUT THE DGS® ZONE DIVIDER
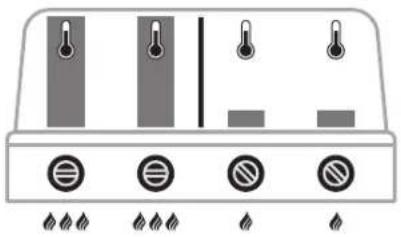
WITH DGS® ZONE DIVIDER WITHOUT DGS
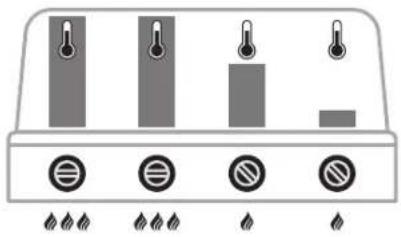
® ZONE DIVIDER
DIRECT GRILLING METHOD
AFTER GRILLING
NOTE:
: Off position
: Low power
: Medium power
The following
2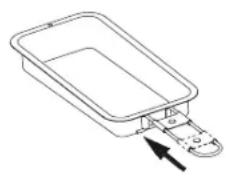

DUAL GOURMET SYSTEM (DGS®)
In addition to the classic grilling methods (see chapter DIRECT AND INDIRECT GRILLING), the DUALCHEF offers you the unique DUAL GOURMET SYSTEM (DGS®).
The models DUALCHEF 315 G / DUALCHEF 325 G and DUALCHEF S 325 G are prepared for one zone separation.
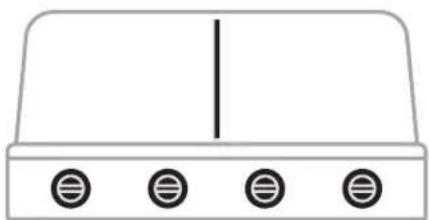
The models DUALCHEF 415 G / DUALCHEF 425 G and DUALCHEF S 425 G are prepared for two zone separations.
BY DIVIDING THE GRILL CHAMBER INTO DIFFERENT ZONES, THE FOLLOWING BECOMES EASIER AND MORE EFFICIENT:
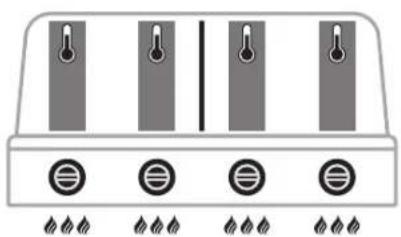
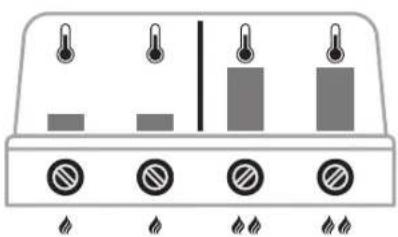
DIFFERENCE IN TEMPERATURE ZONES WITH AND WITHOUT USE OF DGS ZONE DIVIDER
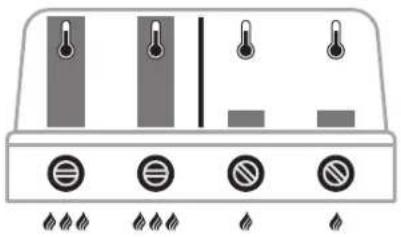
WITH DGS® ZONE DIVIDER WITHOUT DGS
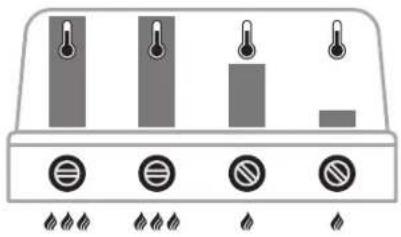
® ZONE DIVIDER
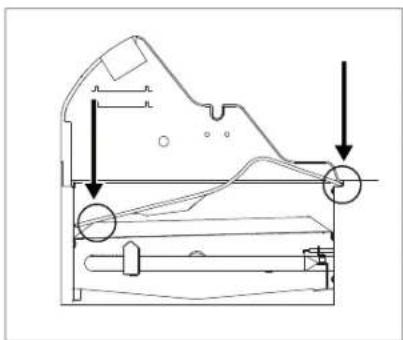
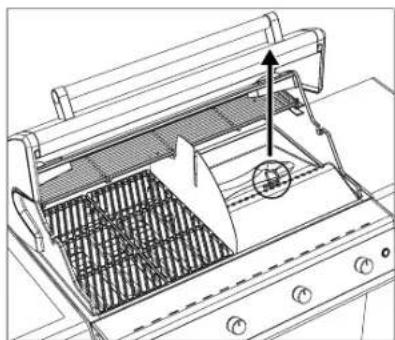
How to use the DGS® HEAT DIFFUSER:
![graph TD A["Device 1"] --> B["Device 2"] B --> C["Device 3"] C --> D["Device 4"] D --> E["Device 5"] E --> F["Device 6"] F --> G["Device 7"] G --> H["Device 8"] H --> I["Device 9"] I --> J["Device 10"] J --> K["Device 11"] K --> L["Device 12"] L --> M["Device 13"] M --> N["Device 14"] N --> O["Devic…](/content/2026/03/519855/images/c46f40369281ed89eb7b05f2f90de6b279767496884dbe9d042220dddfe4064c.jpg)
AFTER GRILLING
NOTE:
From the lid
low power
medium power
high power
A. A.
Igniter
Throttle for grill chamber lighting
DUALCHEF 325 G & DUALCHEF S 425 G
2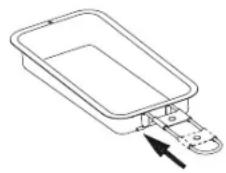

DUAL GOURMET SYSTEM (DGS®)
In addition to the classic grilling methods, the DUALCHEF (see chapter DIRECT AND INDIRECT GRILLING METHODS) offers the unique DUAL GOURMET SYSTEM (DGS®).
DIFFERENCE BETWEEN TEMPERATURE ZONES WITH OR WITHOUT DGS® ZONE DIVIDER
WITH DGS® ZONE DIVIDER WITHOUT DGS
ZONE DIVIDER
AFTER GRILLING
NOTE:
:AV
:Lav eekt
: Mickeits effekt
: koneffekt
The company
: Tenn
: Lysbater for grillkammerbelysning
DUALCHEF S 325 G and DUALCHEF S 425 G
BEFORE FIRST USE
2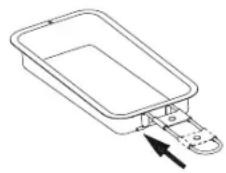

DUAL GOURMET SYSTEM (DGS®)
In addition to the classic grilling methods (see the chapter DIRECT AND INDIRECT GRILLING METHOD), the DUALCHEF also offers the unique DUAL GOURMET SYSTEM (DGS).
DIFFERENCE BETWEEN TEMPERATURE ZONES WITH OR WITHOUT USE OF DGZONE DIVIDER
WITH DGS ZONE DIVIDER WITHOUT DGS
ZONE DIVIDER
How to insert the DGS® HEAT DIFFUSER:
For direct grilling and boiling: Place the food to be grilled over the burners that are switched on.
WHEN YOU HAVE FINISHED GRILLING
NOTE:
: OFF
: low heat
: medium heat
: high heat
: Ignite
②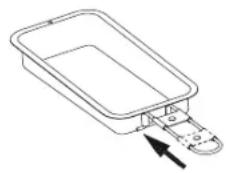

DUAL GOURMET SYSTEM (DGS®) METHOD
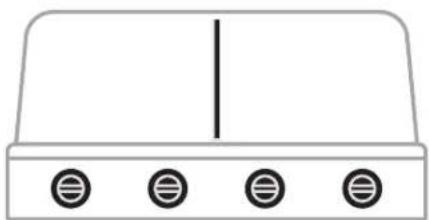
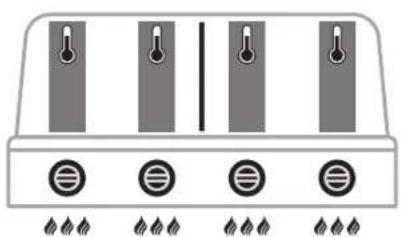
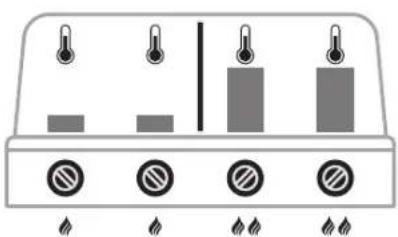
TEMPERATURE ZONES WITH AND WITHOUT THE DGS® ZONE DIVIDER
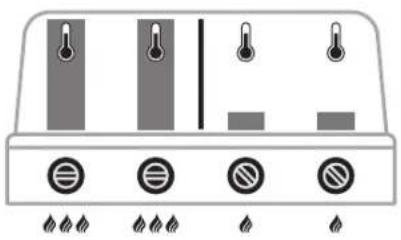
WITH THE DGS® ZONE DIVIDER WITHOUT THE DGS® ZONE DIVIDER

AFTER GRILLING
NOTE:
: Low flame
: Low limit
: Medium flame
:
: Ignition
: Switch for lighting
DUALCHEF S 325 G & DUALCHEF S 425 G
BEFORE FIRST USE
IGNITING THE MAIN BURNERS
DUALCHEF 315 G / DUALCHEF 325 G / DUALCHEF S 325 G
DUALCHEF 415 G / DUALCHEF 425 G / DUALCHEF S 425 G
IGNITING THE SIDE BURNER
DUALCHEF 325 G / DUALCHEF S 325 G / DUALCHEF 425 G / DUALCHEF S 425
2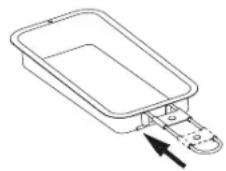

DUAL GOURMET SYSTEM (DGS®)
COOKING ON HEAT ZONES WITH OR WITHOUT DGS® ZONE DIVIDER
WITH DGS® ZONE DIVIDER WITHOUT DGS® ZONE DIVIDER
3 ZONE DIVIDER
WHEN GRILLING IS FINISHED
NOTE:
Perform a LEAK TEST after each connection or replacement of the gas cylinder and at the beginning of the grilling season.
MEANING OF SYMBOLS ON THE CONTROL PANEL
Heat levels and ignition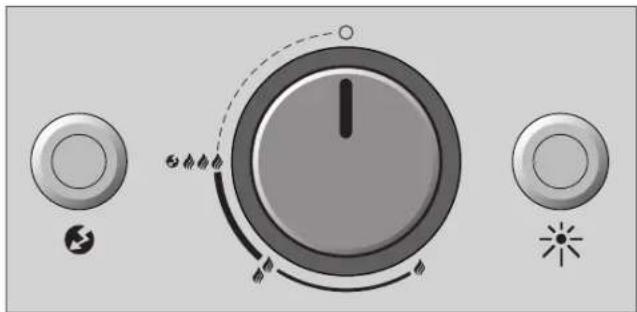
②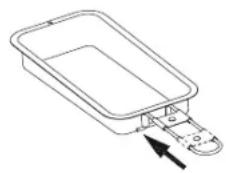

DUAL GOURMET SYSTEM (DGS®)
The DUALCHEF grill, in addition to classic grilling methods (see chapter DIRECT AND INDIRECT GRILLING METHOD), offers you the unique DUAL GOURMET SYSTEM (DGS®).
The core of the DUAL GOURMET SYSTEM (DGS®) is the DGS® ZONE DIVIDER, which divides your DUALCHEF grill into two grilling zones. This separation of zones opens up new possibilities when grilling, whether it is the simultaneous preparation of multiple foods or preventing the transfer of flavors or odors of different foods on the grill.
By separating the grill chamber, you have complete control over the grill zones. You can manage and monitor them individually. Two thermometers show you the temperature of each zone.
The world of DGS® accessories helps you make the most of the zones and supports you in achieving perfect grilling results.
In the following sections, you will learn about the individual elements of the DUAL GOURMET SYSTEM (DGS®).

DGS® ZONE DIVIDER
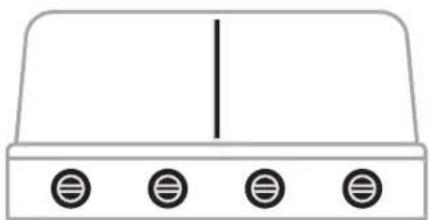
Models DUALCHEF 415 G / DUALCHEF 425 G and DUALCHEF S 425 G have two positions for separating zones.
BY SEPARATING THE GRILL CHAMBER INTO DIFFERENT ZONES, THE FOLLOWING FUNCTIONS ARE EASIER AND MORE EFFICIENT:
- The DGS® ZONE DIVIDER of your DUALCHEF grill allows you to prepare various foods simultaneously. Separated from each other, and thus without the transfer of smells and flavors!
- Thanks to the DGS® ZONE DIVIDER system, individual zones can be controlled separately because the heat generated by the DGS® TWIN BURNER rises within the burner chamber, and the DGS® ZONE DIVIDER prevents a large transfer of heat to the other grill zone. Thanks to this separation, you can work at different temperatures under the lid of your DUALCHEF grill while preparing your dishes.
POSSIBLE TEMPERATURE ZONES USING THE DGS ZONE DIVIDER SYSTEM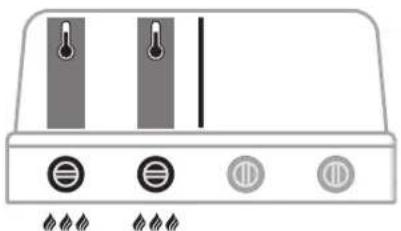
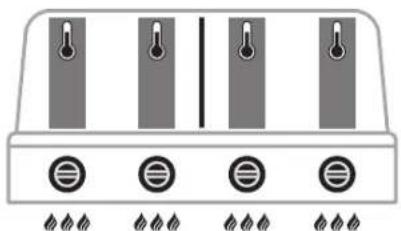
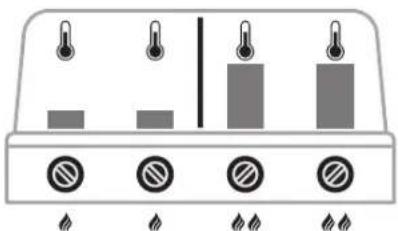
DIFFERENCE IN TEMPERATURE ZONES WITH OR WITHOUT THE DGS® ZONE DIVIDER SYSTEM
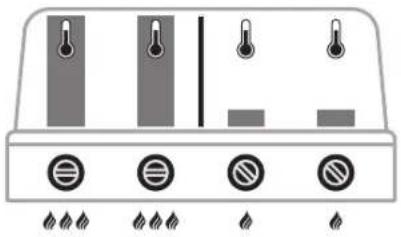
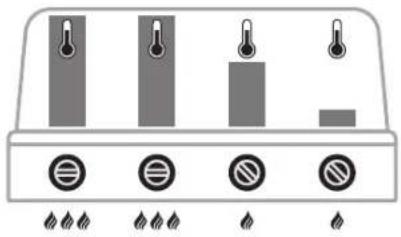
WITH THE DGS® ZONE DIVIDER SYSTEM WITHOUT THE DGS® ZONE DIVIDER SYSTEM
For example, on the right side of the grill you can prepare a delicious roast using the DGS® HEAT DIFFUSER (see chapter DGS® HEAT DIFFUSER), while at the same time on the left side you can prepare pizza or seared steaks.
- The DGS® ZONE DIVIDER also supports optimal gas consumption. If you only want to grill a small amount of food, use the DGS® ZONE DIVIDER to separate the grill surface you don't need. By reducing the grill chamber, the DUALCHEF increases the efficiency of the used grilling surface and the burners in use. You can see how to separate zones in the images above.
- The DGS® ZONE DIVIDER allows you to grill directly in one grill zone and at the same time gently cook in another zone.

DGS® HEAT DIFFUSER
To prepare food with the rotating basket, the heat is usually generated by the rear burner. The rising heat from the rear burner and roasting in front of it require a large amount of gas to achieve the desired result. At the same time, temperature control is reduced.
The DGS® HEAT DIFFUSER sends the necessary heat from the DGS® TWIN BURNER directly to the food in the rotating basket. With this positioning, the roast can be cooked with just one burner at position 1. Combining the DGS® TWIN BURNER system with the DGS® ZONE DIVIDER and DGS® HEAT DIFFUSER systems reduces gas consumption and increases the temperature range.
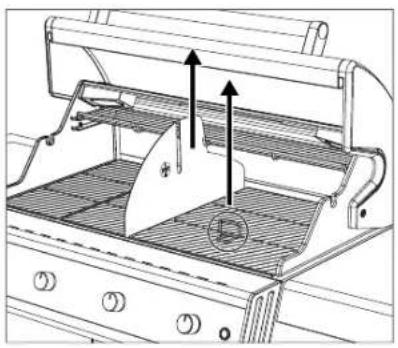
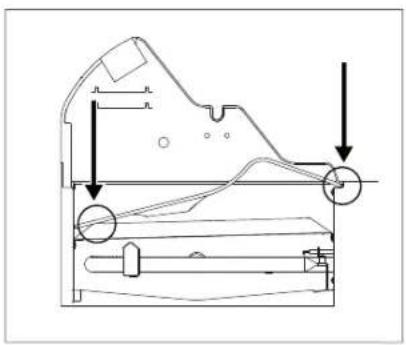
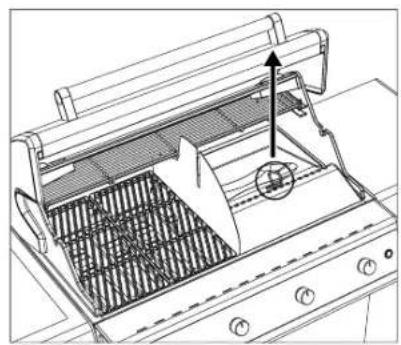
Here's how to use the DGS® HEAT DIFFUSER:
- Using the grill grate lifter, remove the right grate from the grill.
- Position the DGS® HEAT DIFFUSER as shown above.
- Place the food in the OUTDOORCHEF DGS® ROTISSERIE BASKET SET (not included, available as an accessory).
- Slide the rotisserie basket into the motor block (part of the DGS® ROTISSERIE BASKET SET). Then place the opposite side onto the DGS™ ZONE DIVIDER device.
- Then turn on the DUALCHEF grill and roast the meat at the desired temperature.
- Using the grill grate lifter, remove the DGS® HEAT DIFFUSER.
The DGS® PROTECTION BARS and DGS® HEAT DIFFUSER parts protect the DGS® TWIN BURNER burners from dripping fat and prevent grease fires. Excess fat is drained safely between the DGS® TWIN BURNER burners thanks to the specially designed shape of the DGS® HEAT DIFFUSER. Thanks to the grill zones, you can now also prepare other food on the grill at the same time on the free grill zone.
HEIGHT-ADJUSTABLE WARMING RACK
The warming rack serves as an additional grilling surface with its own temperature zone. Depending on the size of the food you place on it, the warming rack can be set at two different positions. The warming rack can also be used when preparing roasts with the DGS® HEAT DIFFUSER and DGS® ZONE DIVIDER parts. In that case, only in one position!
FIREPROOF GRILL GRATES
USE
Before first use, clean the fireproof grill grates with water. During use, only touch the grates with grill gloves. Do not place hot fireproof grates on flammable or heat-sensitive surfaces. To make it easier to remove the fireproof grill grates, you can use the grate lifter.
CLEANING
- The fireproof grids should be heated on the grill at full power for about 10 minutes.
- Use a brush with brass bristles (not steel).
- Then let them cool down.
- In case of stubborn dirt: Use OUTDOORCHEF BARBECUE CLEANER for thorough cleaning.
NOTE

For indirect grilling, cooking, and baking: Place the food in the center, close the lid, and light only the two outer burners.
GRILL CHAMBER LIGHTING
AFTER GRILLING
- Set the gas control knob of each burner to
- Close the gas supply on the gas cylinder.
- Turn off the main switch of the electrical box.
- Let the grill cool completely and then clean it.
- Cover the grill with a suitable protective cover.
WARNING: The DUALCHEF grill must be completely cooled before moving it after grilling. The DUALCHEF S 325 G and DUALCHEF S 425 G models have halogen lighting in the grill chamber that can be damaged if subjected to major movements or shifts while the grill is hot.
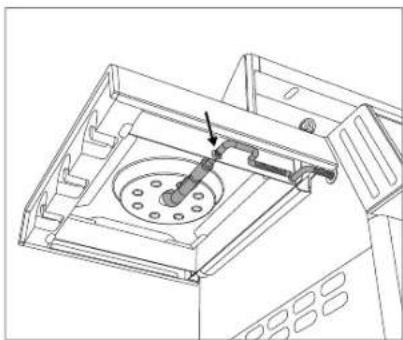
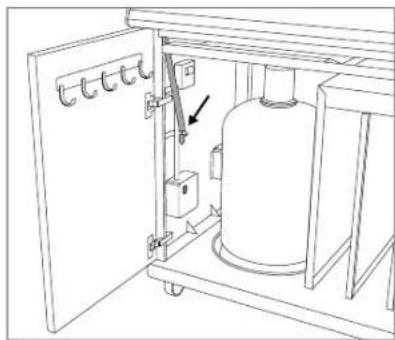
excluded
: low/capacity
: medium capacity
: high capacity
: off
: Light switch for the baking compartment DUALCHEF S 325 G and DUALCHEF S 425 G
BEFORE FIRST USE
2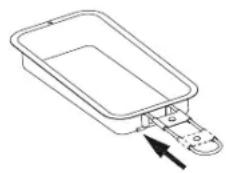

DUAL GOURMET SYSTEM (DGS®)
The DUALCHEF grill, in addition to classic grilling methods (see the section DIRECT AND INDIRECT GRILLING METHODS), offers the unique DUAL GOURMET SYSTEM (DGS 30 ).
DIFFERENCE IN TEMPERATURE RANGES WITH OR WITHOUT THE DGS 3 ZONE DIVIDER
WITH DGS® ZONE DIVIDER WITHOUT DGS ✉ ZONE DIVIDER
Here's how to use the DGS heat diffuser:

For indirect grilling, cooking, and baking: Place food in the center, cover with the lid, and light only the two outer burners.
BAKING COMPARTMENT LIGHT
- Set the gas control knob of each burner to
- Close the valve on the gas cylinder.
- Turn off the main switch on the electrical panel.
- Let the grill cool completely and clean it.
- Cover the grill with an appropriate cover.
Drip position
Low power
Or #
High power
Igniter
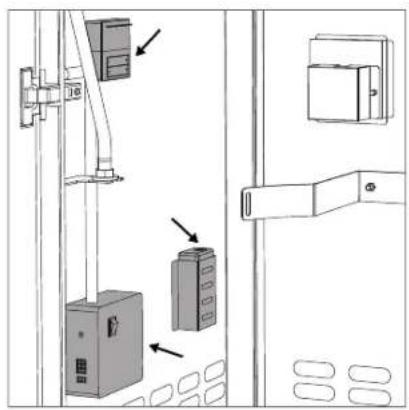
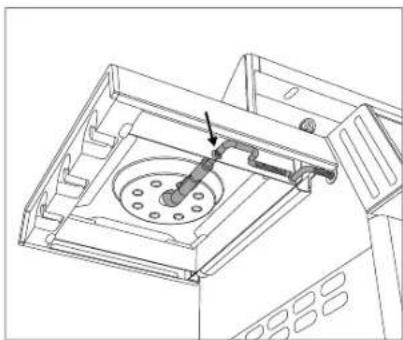
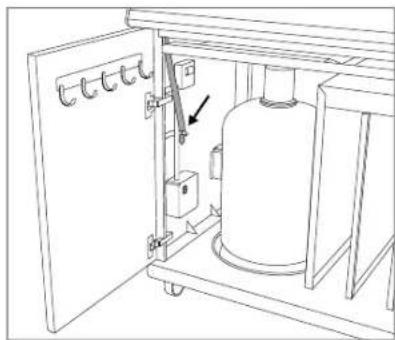
The electrical box contains the following:
2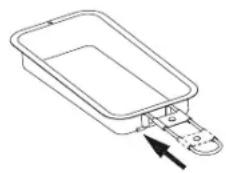

DUAL GOURMET SYSTEM (DGS®)
DIFFERENCE IN TEMPERATURE ZONES WITH AND WITHOUT DGS® ZONE DIVIDER
WITH DGS 3 ZONE DIVIDER
* WITHOUT ZONE DIVIDER
GRILL CHAMBER LIGHTING
AFTER GRILLING
OUTDOORCHEF.COM


- DUALCHEF MANUAL
- NOTE
- THE DUAL GOURMET SYSTEM (DGS®)
- NACH DEM GRILLEN
- IMPORTANT
- IMPORTANT FOR YOUR SAFETY
- GAS BOTTLES
- SAFETY INFORMATION
- LEAK TEST
- BEFORE FIRST USE
- IGNITING INSTRUCTIONS
- IGNITING THE MAIN BURNERS
- DUALCHEF 315 G / DUALCHEF 325 G / DUALCHEF S 325 G
- DUALCHEF 415 G / DUALCHEF 425 G / DUALCHEF S 425 G
- INFO FOR LEFT SIDE TABLE (APPLIES ONLY TO MODELS WITH SIDE BURNERS)
- EXTENSION WITH BLAZING ZONE INFRARED SIDE BURNER (APPLIES ONLY TO DUALCHEF MODELS WITH SIDE BURNERS)
- LEFT SIDE TABLE (APPLIES ONLY TO DUALCHEF MODELS WITH SIDE BURNERS)
- THE ELECTROBOX
- THE ELECTROBOX INCLUDES
- THE SAFETY LIGHT SYSTEM (SLS)
- INSTRUCTIONS FOR USING THE DUALCHEF
- IT COULDN'T BE SIMPLER
- THE DGS® ZONE DIVIDER
- THE DGS® HEAT DIFFUSER
- HEIGHT-ADJUSTABLE WARMING RACK
- CAST IRON BARBECUE GRIDS
- USAGE
- CLEANING
- DGS® ROTISSERIE KIT
- DGS® GRIDDLE PLATE
- DGS® COOKING SET
- DGS® PIZZA STONE
- DGS® CAST IRON BARBECUE GRIDS
- DGS® STAINLESS STEEL GRIDS
- DGS® VEGETABLE GRID
- DIRECT AND INDIRECT GRILLING METHOD WITH THE DUALCHEF
- WHAT IS THE DIFFERENCE
- GRILL CHAMBER LIGHTING
- AFTER GRILLING
- USING THE OUTDOORCHEF BARBECUE CLEANER
- USING THE OUTDOORCHEF CHEF CLEANER
- SERVICING THE DGS® TWIN BURNERS
- MAINTENANCE
- TROUBLESHOOTING
- THE BURNER DOES NOT IGNITE
- NO SPARK
- THE SAFETY LIGHT SYSTEM (SLS) DOES NOT WORK
- CONSUMER WARRANTY
- WARRANTY AND RELATION TO OTHER RIGHTS OF THE PURCHASER
- PARTICIPANTS AND WARRANTY CONDITIONS
- SCOPE
- EXCLUSION
- PROCESSING OF WARRANTY CLAIMS
- TECHNICAL INFORMATION
- DUALCHEF 315 G
- DUALCHEF 325 G / S 325 G
- DUALCHEF 415 G
- DUALCHEF 425 G / S 425 G
- SIDE BURNER
- (DUALCHEF 325 G / S 325 G / 425 G / S 425 G)
- ELECTRIC IGNITION / THE SAFETY LIGHT SYSTEM (SLS)
- HALOGEN LIGHTING (DUALCHEF S 325 G / S 425 G)
- NOTE ON THE TEMPERATURE DISPLAY
- WEB PAGE
- INDICATION
- IGNITION INSTRUCTIONS
- AFTER THE BARBECUE
- DUAL GOURMET SYSTEM (DGS®)
- DGS® CAST IRON GRIDDLE SET
- BY DIVIDING THE GRILL AREA INTO DIFFERENT ZONES, THE FOLLOWING APPLICATIONS BECOME EASIER AND MORE EFFICIENT
- DIRECT GRILLING METHOD
- HOW TO INSERT THE DGS® HEAT DIFFUSER
- WHEN YOU HAVE FINISHED GRILLING
- DUAL GOURMET SYSTEM (DGS®) METHOD
- IGNITING THE SIDE BURNER
- DUALCHEF 325 G / DUALCHEF S 325 G / DUALCHEF 425 G / DUALCHEF S
- WHEN GRILLING IS FINISHED
- MEANING OF SYMBOLS ON THE CONTROL PANEL
- DGS® ZONE DIVIDER
- BY SEPARATING THE GRILL CHAMBER INTO DIFFERENT ZONES, THE FOLLOWING FUNCTIONS ARE EASIER AND MORE EFFICIENT
- DGS® HEAT DIFFUSER
- FIREPROOF GRILL GRATES
- USE
- BAKING COMPARTMENT LIGHT
- THE ELECTRICAL BOX CONTAINS THE FOLLOWING
- OUTDOORCHEF.COM
Brand : Outdoorchef
Model : DualChef 325
Category : Barbecue