
DO725K - Coffee machine DOMO - Free user manual and instructions
Find the device manual for free DO725K DOMO in PDF.
| Brand | DOMO |
| Model | DO725K |
| Product type | Espresso coffee machine with built-in grinder |
| Power supply | 220-240 V ~ 50/60 Hz |
| Power | Approximately 1350 W |
| Pressure | 15 bars (pump) |
| Water tank capacity | 1.8 L (removable) |
| Bean hopper capacity | 250 g |
| Grind settings | 15 levels (1 = fine, 15 = coarse) |
| Main functions | Espresso coffee (1 or 2 cups), steam for milk, hot water, cup warmer |
| Pressure gauge | Pressure display (optimal 9-12 bars) |
| Automatic shut-off | Yes, after 20 minutes of inactivity |
| Dimensions (W x D x H) | Approximately 30 x 30 x 40 cm |
| Weight | Approximately 8 kg |
| Material | Stainless steel and plastic |
| Maintenance and cleaning | Removable parts washable with hot water (except grinder), portafilter and filters dishwasher safe, regular descaling every 4-6 months |
| Safety | Protection against dry running, automatic shut-off, hot surfaces indicated |
| Included accessories | Portafilter, 2 filters (single/double), tamper, measuring spoon, cleaning brush, cleaning pin |
| Warranty | 2 years (accessories and wear parts: 6 months) |
| Repairability | DOMO after-sales service, spare parts available online |
Frequently Asked Questions - DO725K DOMO
User questions about DO725K DOMO
0 question about this device. Answer the ones you know or ask your own.
Ask a new question about this device
Download the instructions for your Coffee machine in PDF format for free! Find your manual DO725K - DOMO and take your electronic device back in hand. On this page are published all the documents necessary for the use of your device. DO725K by DOMO.
USER MANUAL DO725K DOMO
natural_image
Modern espresso machine with glass coffee cup and control panel (no visible text or symbols)DO725K
| Handleiding Semi-professionele espressomachine met bonenmaler |
| Mode d'emploi Machine à espresso semi-professionnelle avec moulin |
| Gebrauchsanleitung Semiprofessionelle Espressomaschine mit Mahlwerk |
| Instruction booklet Semi-professional espresso machine with grinder |
| Manual de instrucciones Cafetera espresso semiprofesional con molinillo |
| Istruzioni per l'uso Macchina espresso semiprofessionale con macinacaffè |
| Návod k použití Pákový kávovar s vlastním mlýnkem |
| Návod na použitie Pákový kávovar s vlastným mlynčekom |

natural_image
Two black-and-white icons: a triangular warning symbol with an exclamation mark and a stack of open books (no text or symbols present)⚠PRODUCTSPECIFIEKE WAARSCHUWINGEN
BEDIENINGSPANEEEL
Gebruik
flowchart
graph TD
    A["1: Before mixing bowl"] --> B["2: Top control knob"]
    B --> C["3: Scale adjustment with 10x14x13x12x11x10x9x8x7x6x5x4x3x2x1"]
    C --> D["4: After assembly step with tool and valve"]
    D --> E["5: Final assembly with tool and valve"]
    E --> F["6: Final assembly with tool and valve"]
Leeg waterreservoir
Volume koffie instellen
Drukmeter

gauge
| Value | |-------| | 10 |REINIGING EN ONDERHOUD

ONTKALKEN
Wanneer?
MILIEURICHTLIJNEN

natural_image
Recycling symbol icon with three chasing arrows forming a triangle (no text or labels)⚠AVERTISSEMENTS SPÉCIFIQUES AU PRODUIT
PANNEAU DE COMMANDE
Utilisation
natural_image
Diagram of a coffee machine with a cup and stand, no visible text or symbols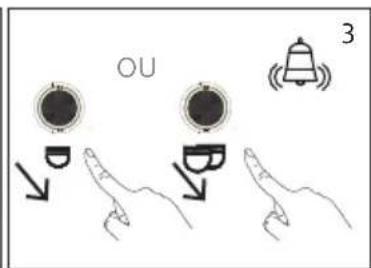
Manomètre
gauge
| Value | |-------| | 12 |NETTOYAGE ET ENTRETIEN
MISE AU REBUT
natural_image
Recycling symbol icon with three chasing arrows forming a triangle (no text or labels)BEDIENFELD
Verwendung
natural_image
Simple line drawing of a water tap in a container (no text or symbols)
natural_image
Hand pressing a button on a circular dial (no text or symbols visible)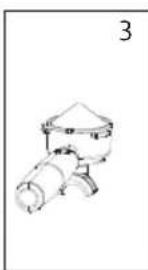
natural_image
Simple line drawing of a person holding a tool, no text or symbols present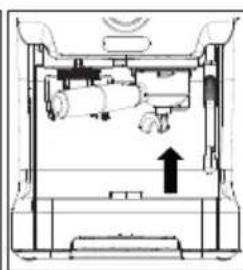
natural_image
Cross-sectional diagram of a mechanical device with internal components and an upward arrow indicating motion (no text or symbols)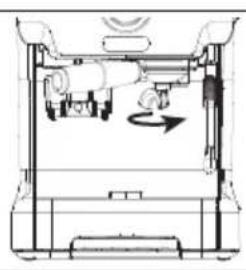
natural_image
Technical line drawing of a mechanical assembly with no visible text or symbols
natural_image
Technical line drawing of a mechanical assembly with no visible text or symbols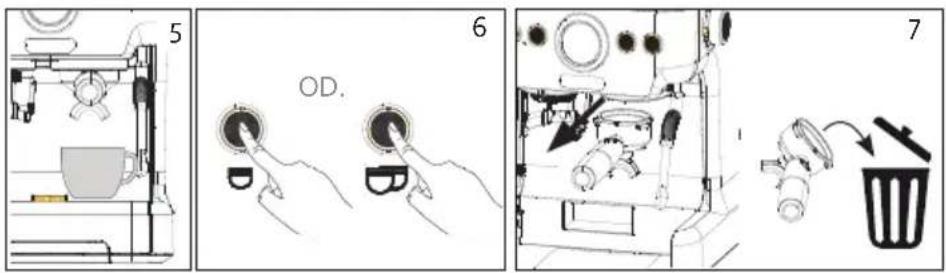
Leerer Wassertank
natural_image
Technical line drawing of a mechanical device with an arrow pointing to a component (no text or symbols present)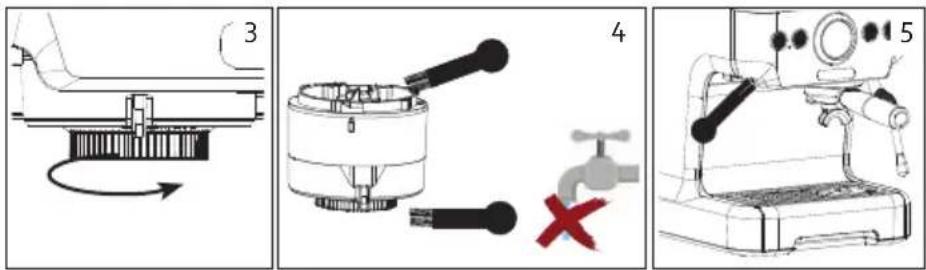
ENTKALKEN

natural_image
Technical diagram of a mechanical device with internal components and an upward arrow indicating motion (no text or symbols)
natural_image
Simple line drawing of a faucet spraying water into a container (no text or symbols)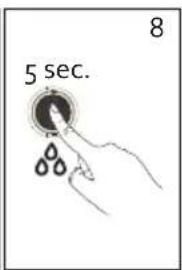
ENTSORGEN
natural_image
Recycling symbol icon with three chasing arrows forming a triangle (no text or labels)All of our products are always submitted to a strict quality control before they are sold to you.
Should you nevertheless experience problems with your device, we sincerely regret this.
In that case, we kindly request you to contact our customer service.
Our staff will gladly assist you.

+32 14 21 71 91

info@linea2000.be
Monday – Thursday: 8.30 – 12.00 and 13.00 – 17.00
Friday: 8.30 - 12.00 and 13.00 - 16.30
This appliance has a two year warranty period. During this period the manufacturer is responsible for any failures that are the direct result of construction failure. When these failures occur the appliance will be repaired or replaced if necessary. The warranty will not be valid when the damage to the appliance is caused by wrong use, not following the instructions or repairs executed by a third party. The guarantee is issued with the original till receipt. All parts, which are subject to wear, are excluded from the warranty. If your device breaks down within the 2-year warranty period, you can return the device together with your receipt to the shop where you purchased it.
The guarantee on accessories and components that are liable to wear-and-tear is only 6 months.
The guarantee and responsibility of the supplier and manufacturer lapse automatically in the following cases:
- If the instructions in this manual have not been followed.
· In case of incorrect connection, e.g., electrical voltage that is too high.
· In case of incorrect, rough or abnormal use.
· In case of insufficient or incorrect maintenance.
· In case of repairs or alterations to the device by the consumer or non-authorised third parties. - If the customer used parts or accessories that are not recommended or provided by the supplier / manufacturer.
SAFETY INSTRUCTIONS
When using electrical appliances, basic safety precautions should always be taken, including the following:
- Read all instructions carefully. Keep this manual for future reference.
- Make sure all packaging materials and promotional stickers have been removed before using the appliance for the first time. Make sure children cannot play with the packaging materials.
· This appliance is intended to be used in household and similar applications such as: - staff kitchen areas in shops, offices and other working environments;
- farm houses;
- by clients in hotels, motels and other residential type environments;
- bed and breakfast type environments.
· Children should be supervised to ensure that they do not play with the appliance.
· This appliance can be used by children aged from 16 years and above and persons with reduced physical, sensory or mental capabilities or lack of experience and knowledge if they have been given
supervision or instruction concerning use of the appliance in a safe way and understand the hazards involved. Children shall not play with the appliance. Cleaning and user maintenance shall not be made by children unless they are older than 16 and supervised.
- Keep the appliance and its cord out of reach of children younger than 16 years.
· All repairs should be carried out by the manufacturer or its aftersales service.
- Any injury or damage caused by failure to comply with these rules are at your own risk. Neither the manufacturer, importer, or the supplier may be held liable.
▲ELECTRICAL WARNINGS
- In order to avoid a hazard this appliance must not be supplied through an external switching device, such as a timer or a separate remote control, or connected to a circuit that is regularly switched on and off by the utility.
- The appliance must be disconnected from its power source when not in use, during service and when replacing parts. Allow to cool before putting on or taking off parts, and before cleaning the appliance. To disconnect, turn controls to "OFF" or "o" position, then remove the plug from the wall. Never pull the cord or appliance to remove the plug from the socket.
- Check carefully that the voltage and frequency of the power net match the indications on the rating label of the appliance.
- The plug must be plugged into an appropriate outlet that is installed and grounded in accordance with all local standards and requirements.
- Do not let the power supply cord hang over the edge of a counter, or touch hot surfaces.
- Keep the power cord away from hot parts and don't cover the appliance.
- Unwrap the cord completely to prevent overheating of the cord. Do not allow the power cord supply to run underneath or around the unit.
- The appliance may not be used with an extension lead or a multiple socket.
- Do not operate this appliance with a damaged cord or plug or in the event the appliance malfunctions or has been damaged in any manner. Return the appliance to the DOMO Service Department or its service agent for examination, repair, or electrical or mechanical adjustment. Do not try to repair the appliance yourself.
⚠️INSTALLATION
- Do not place near flammable materials, gases or explosives.
- Do not use or store this appliance outdoors.
· Always use the appliance on a steady, dry and level surface.
- Never place this appliance near a gas stove or electrical stove or in a place where it may come into contact with a warm appliance.
⚠ USE
- Do not use this appliance for other than intended use.
- Only use the appliance for domestic use. The manufacturer cannot be held responsible for accidents that result from improper use of the appliance or not following the instructions described in this manual.
- Never leave the appliance unattended while it is functioning.
· Do not operate the appliance with wet hands.
- The use of accessories that are not recommended or sold by the manufacturer can cause fire, electrical shock or injuries. Only use the utensils delivered with the appliance.
△CLEANING AND MAINTENANCE
• To protect against electrical shock or burns, do not immerse unit, cord, or plug in water or other liquid.
- Failure to maintain this appliance in a clean condition could adversely affect the life of the appliance and possibly result in a hazardous situation.
⚠PRODUCT-SPECIFIC WARNINGS
Do not overfill the appliance. Never add water above the maximum level marked on the water tank.
- Do not spill any liquid on the connector.
· Do not move the appliance while in use or when still hot. Allow to cool before moving the appliance.
· Do not remove the portafilter or the water reservoir while making coffee or steaming milk.
- Caution should also be taken while removing the porta-filter since the metal parts will be hot.
· The steam from the steam nozzle is hot. Be careful not to get burned.
- Only touch the appliance by its buttons and handles. Other surfaces may become hot during use.
- Never use the appliance without water.
· Turn off the appliance before removing the water reservoir.
· The top of the appliance can be used as a cup warmer. This plate gets hot when in use. Do not touch it.
SAVE THESE INSTRUCTIONS FOR FUTURE REFERENCE
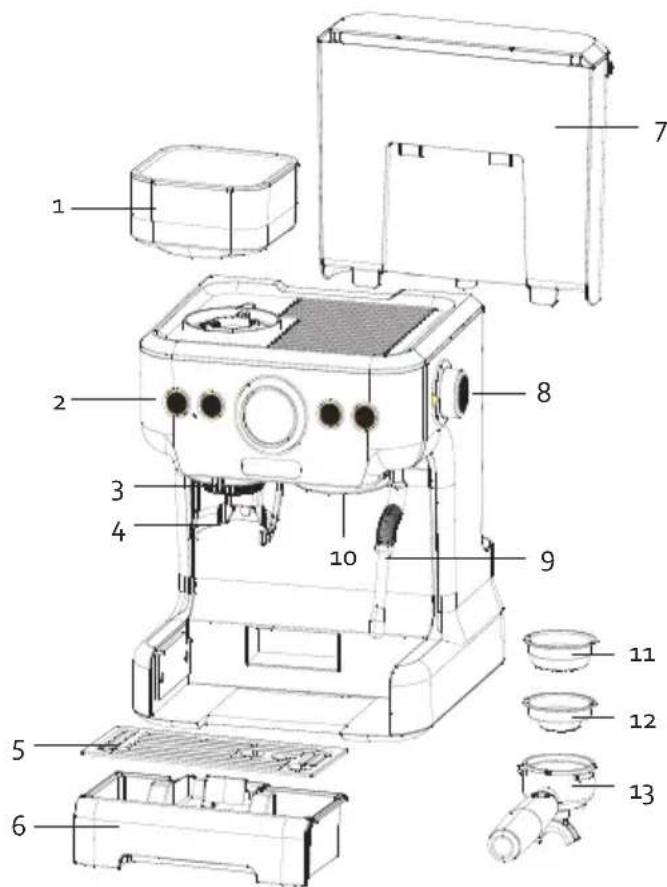
PARTS
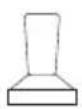
- Bean reservoir
- Control panel
- Grinder
- Grinder support
- Drip tray grille
- Drip tray
- Water reservoir
- Steam knob
- Steam nozzle
- Brew head
- Large filter
- Small filter
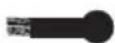
- Portafilter
- Tamper
- Cleaning pin
- Cleaning brush
- Scoop
14 15 16


17
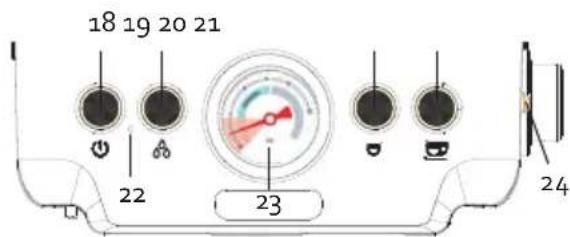
CONTROL PANEL
-
⏻ On/off button
-
How water button
-
Single button: for 1 cup of espresso
-
Double button: for a double shot of espresso or 2 cups
-
Grinder indicator light
-
Pressure gauge
-
Steam indicator lamp
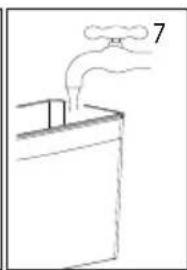
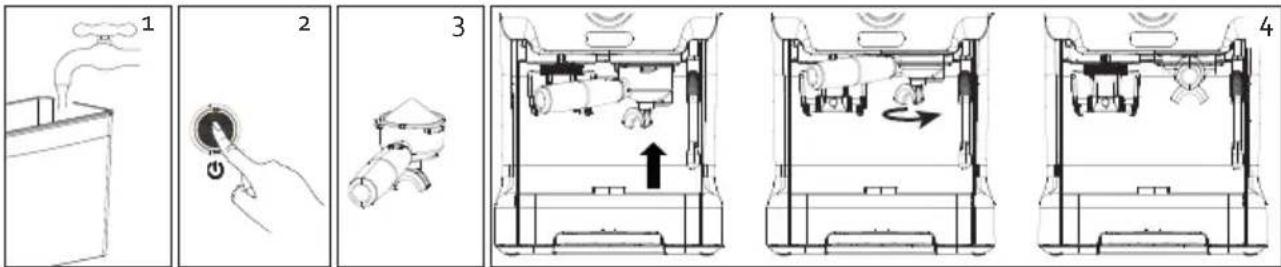
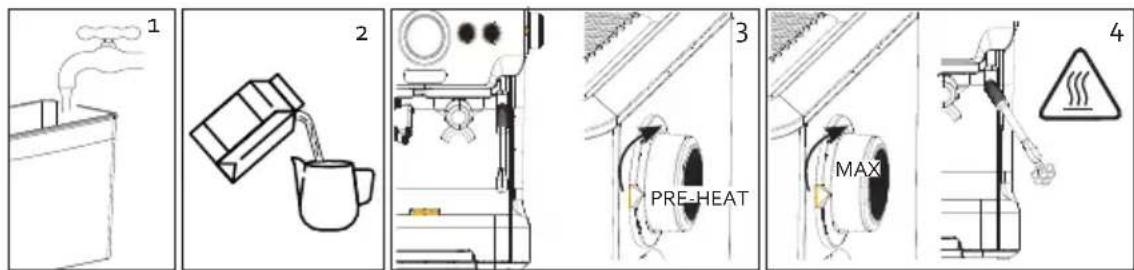
BEFORE THE FIRST USE
- Check that all accessories for the device are present and that the unit is not damaged.
- Flush out the pipes. First, allow the water to run through without adding ground coffee to the filter of the portafilter. See section: 'use/coffee'. Afterwards, throw away the water.
- Flush out the steam nozzle. See section: 'use/hot water feature'. Afterwards, throw away the water.
- Clean all parts with a moist cloth.
USE
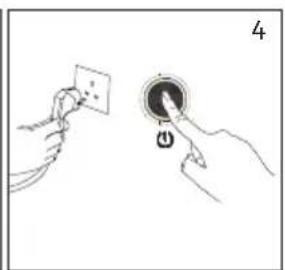
Press the on-off button; the appliance will start warming up. The indicator lights will flash. This warm-up phase lasts about 50 seconds. If all indicator lamps are lit, the appliance has warmed up and goes into standby mode.
If the unit is not used for 20 minutes, it will automatically go into sleep mode. You will hear a signal. Press the on-off button on the unit to activate it and to enable the standby mode.
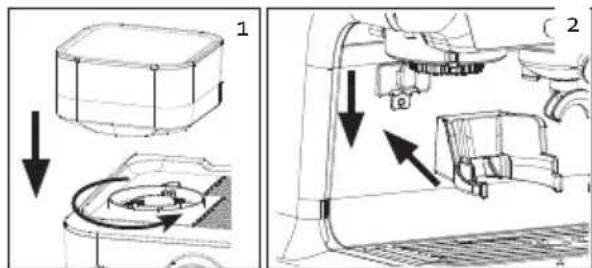
GRINDER
Placement
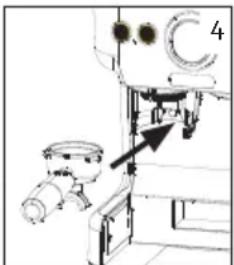
- Place the bean reservoir on the machine and tighten into place. Pay attention to the markings on the reservoir.
- Place the grinder support against the rear wall of the machine, under the grinder. Slide the support downwards so that it is secure.
- Remove the lid from the bean reservoir. Add the beans by slowly pouring them into the reservoir. Do not overfill the reservoir. Place the lid back.
Usage
- Select the desired filter and push this into the portafilter.
· the small filter is for one espresso
· the large filter is for 2 cups or a double espresso
-
Insert the plug in the power socket and press the on-off button. Make sure that the steam knob is in the off position.
-
Turn the grinder to adjust the coarseness of the ground coffee. The number markings indicate the coarseness of the ground coffee. There are 15 settings. The finest grind is indicated by 1. The coarsest grind is indicated by 15.
- Place the portafilter under the grinder outlet in the support provided. There is a push button on the back of the support. Press the portafilter briefly against this push button. Coffee is ground automatically for 14 seconds. The grinder indicator will flash. If you want to stop the grinder earlier, press the portafilter against the push button in the support once more. You can also set the standard grinding time yourself; see the 'Settings' section.
- Take the portafilter from the support and tap it with the rubber on the underside on the counter so that the ground coffee is dispersed evenly.
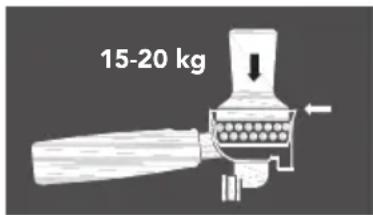
- Place the tamper on top of the ground coffee and press softly with a rotating movement to spread the coffee evenly. Now press the ground coffee stiffly with the tamper with a force of ±15-20 kg and remove any excess coffee from the edge.

⚠️ Use the grinder up to a maximum of 1 minute per grind.
⚠️ Only use coffee beans in the bean reservoir. Never fill the reservoir with ground coffee, instant coffee, or other ingredients or objects.
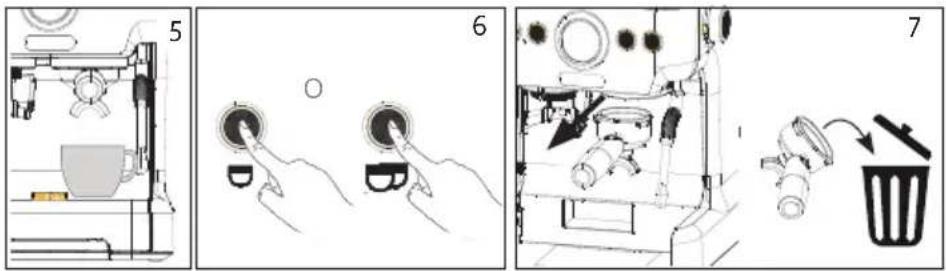
COFFEE
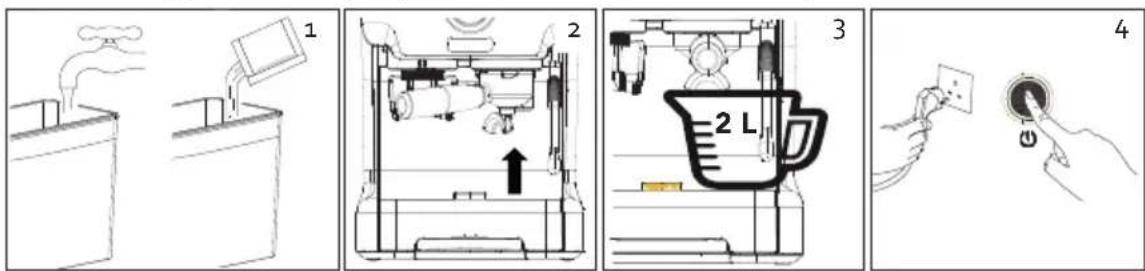
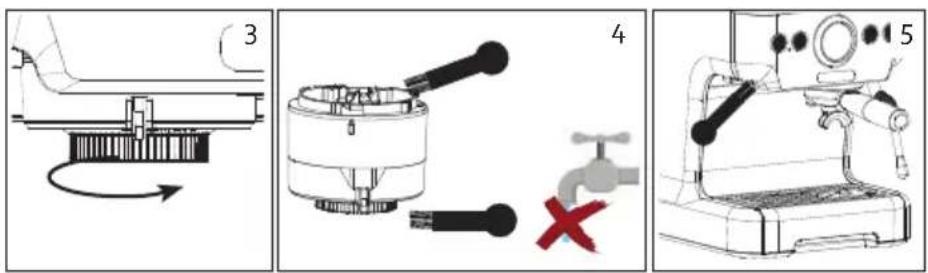
- Fill the water reservoir with the desired amount of water. Make sure if the level is within the 'MIN' and 'MAX' indicators on the reservoir. The reservoir is removable. Lift the reservoir out of the appliance to fill it and then carefully place it back in the appliance.
- Plug the power cord into a socket. Make sure that the steam knob is in the off position. Press the on-off button; the appliance will start warming up. The indicator lights will flash. If all indicator lamps are lit, the appliance has warmed up and goes into standby mode.
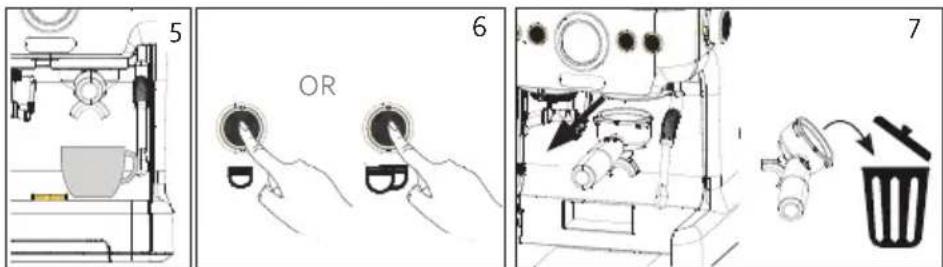
- Fill the portafilter with ground coffee. See section: 'grinder'.
- Put the portafilter under the brew head. Hold the handle so that it correctly aligns with the 'insert' indicator on the unit and sits properly in the groove. Turn it slowly to the right so that the portafilter handle is diagonal with respect to the unit.
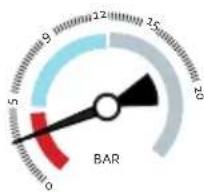
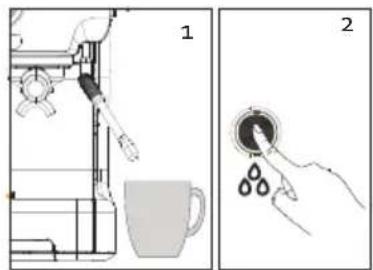
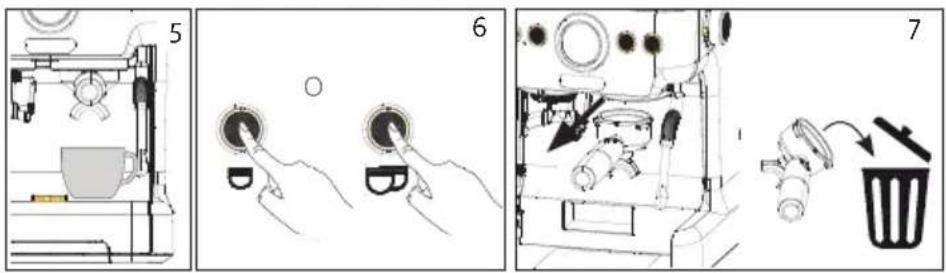
- Place 1 or 2 cups on the drip tray.
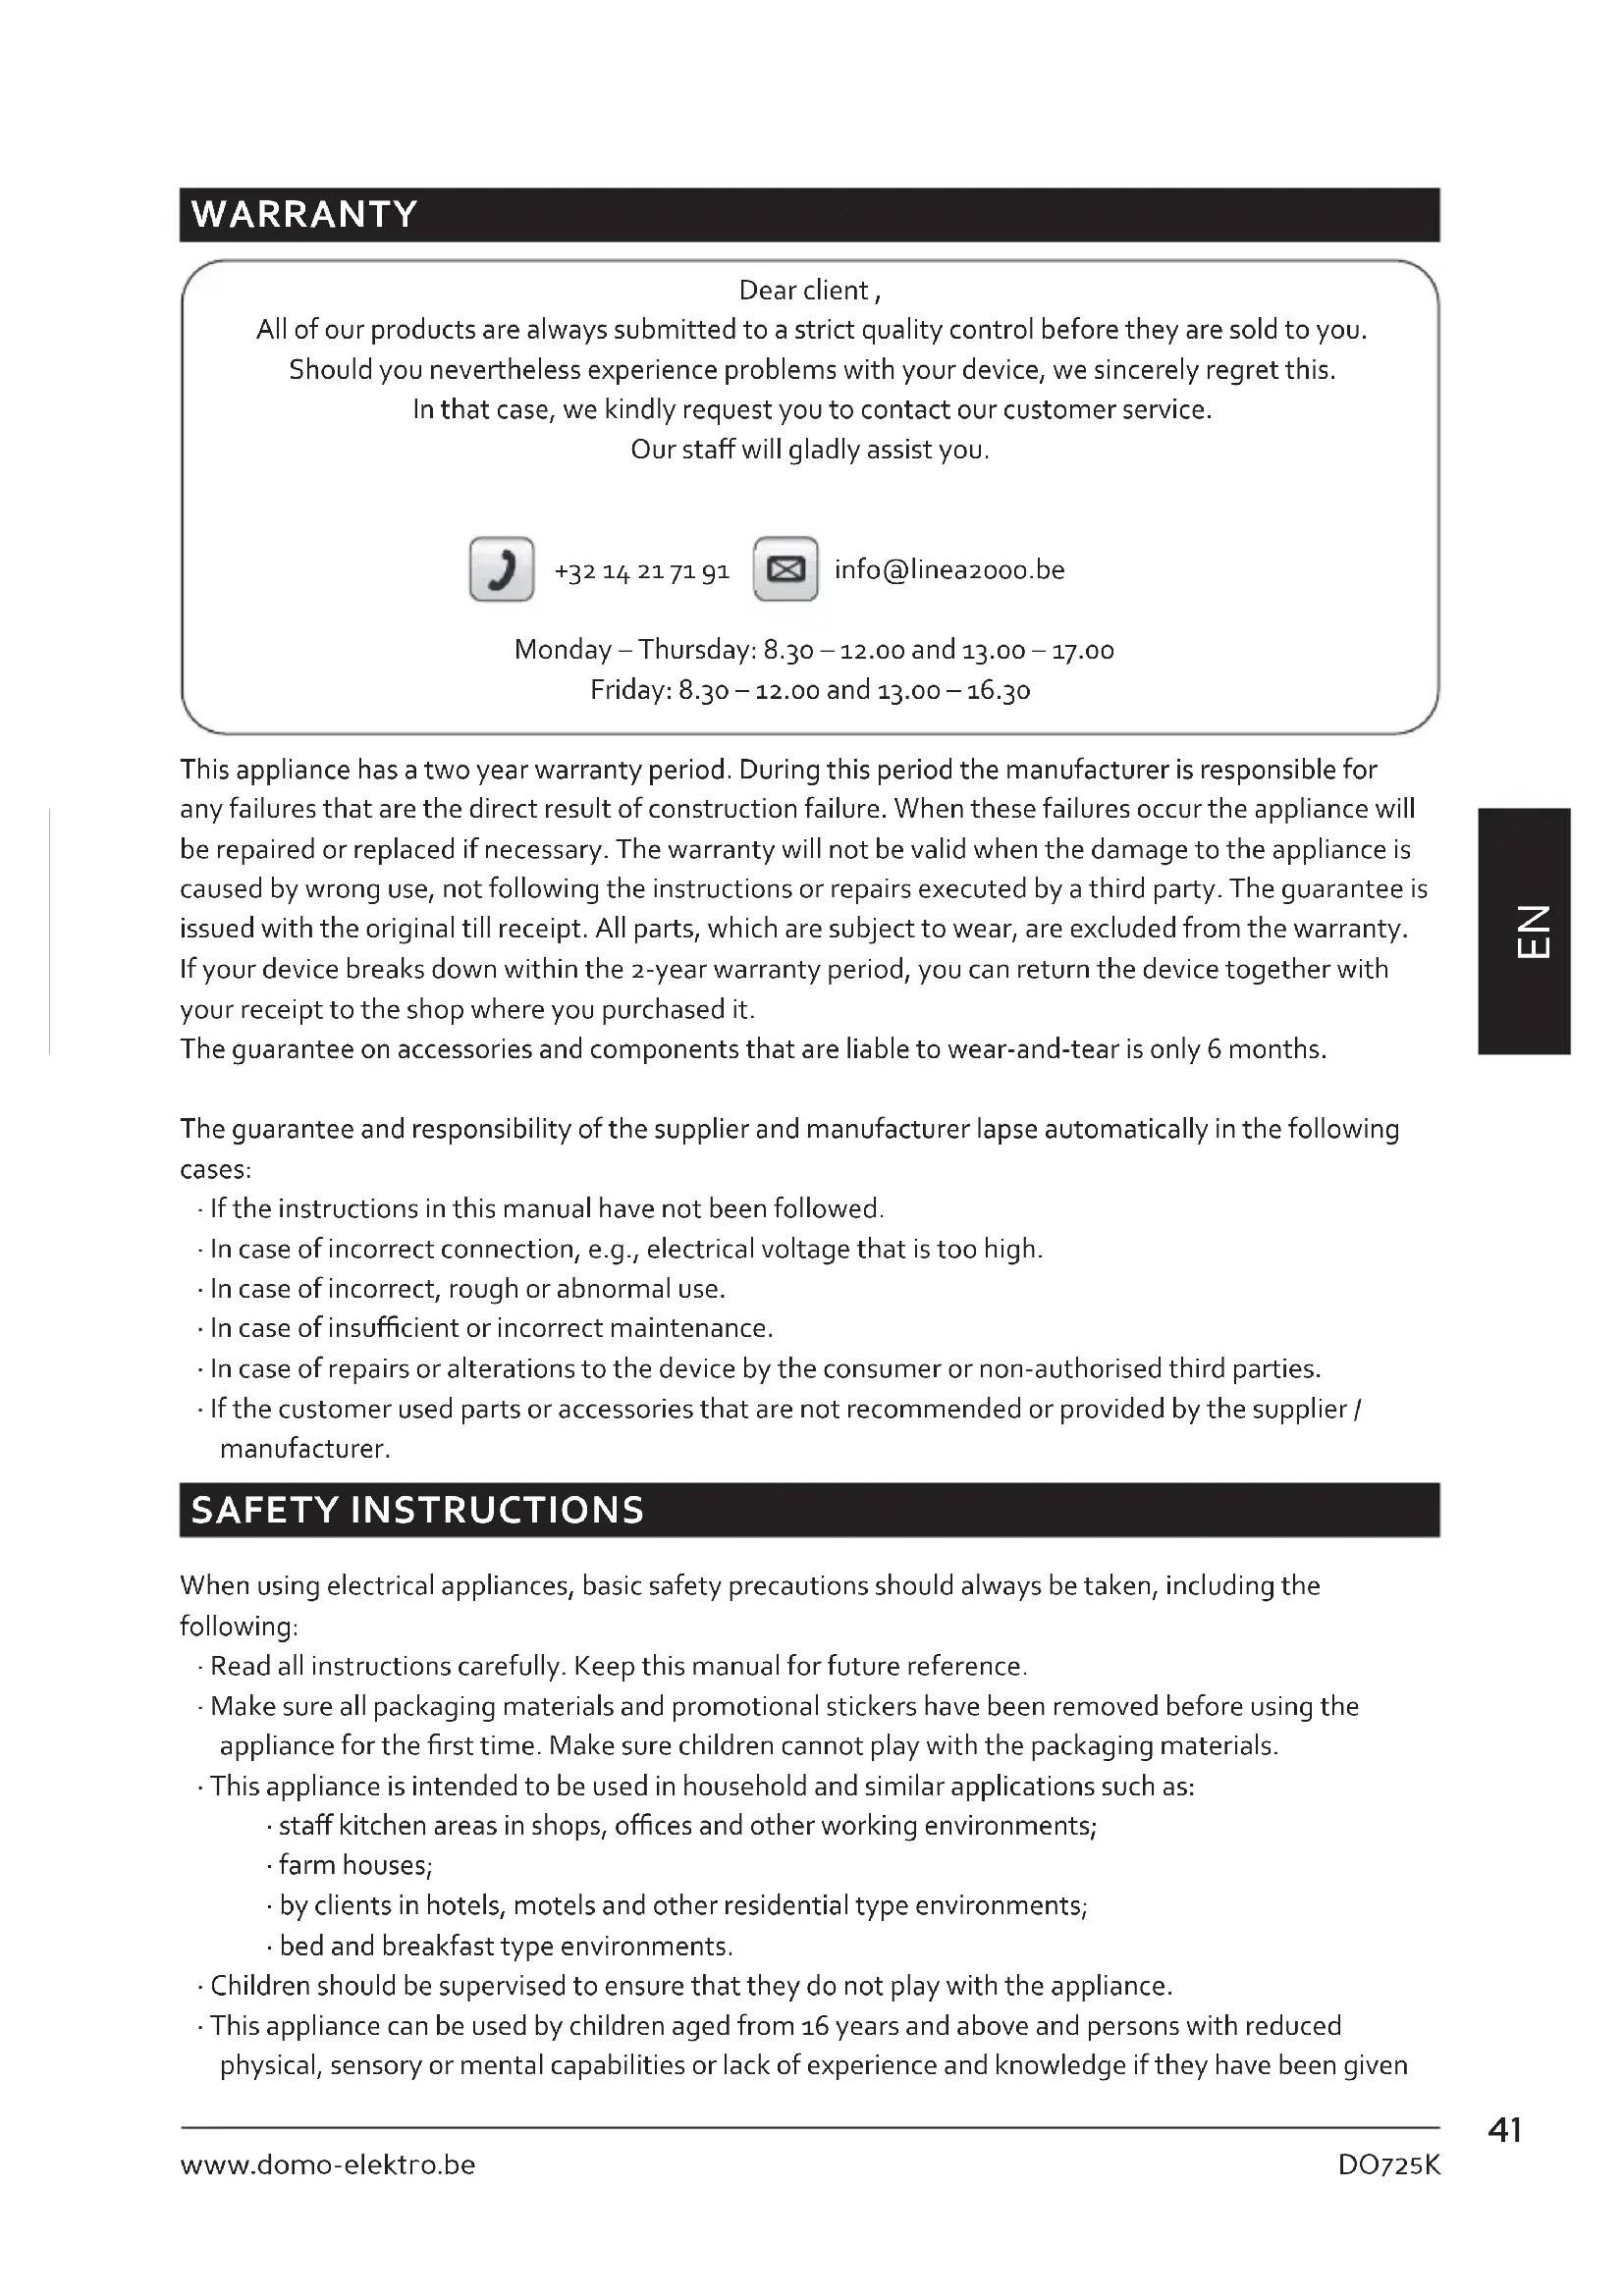
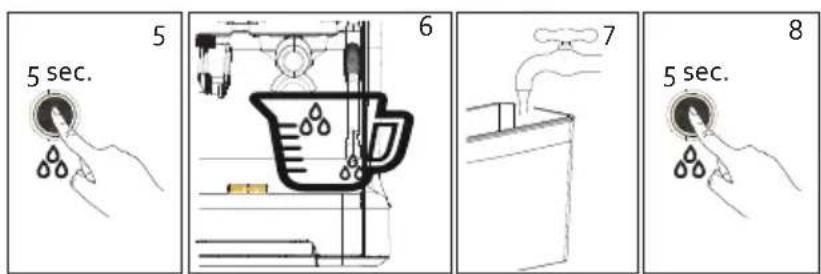
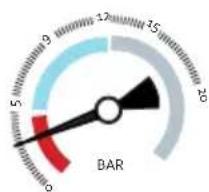
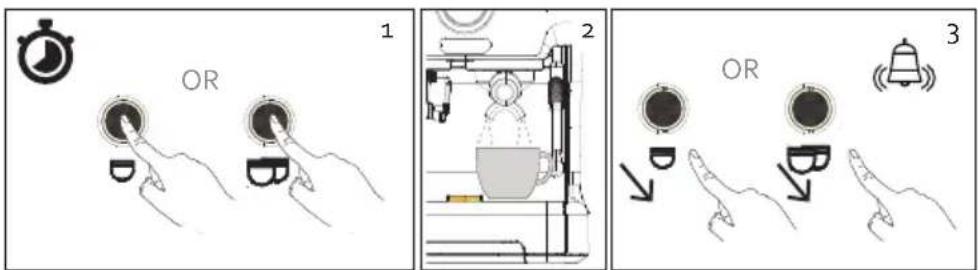
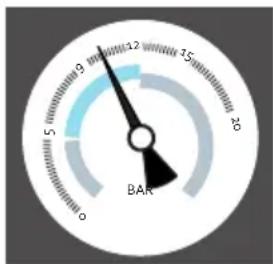
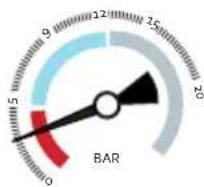
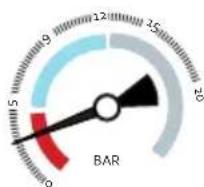
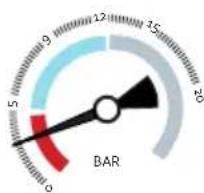
- Press the single button if you used the small filter. Press the double button if you used the large filter, which will give you a double espresso or 2 cups of espresso. The indicator lamp for the selected coffee will light up. The pressure gauge allows you to read the pressure during extraction. The best result is obtained with a pressure between 9 and 12 bar. The 'Settings/Pressure gauge' section explains how to obtain this.
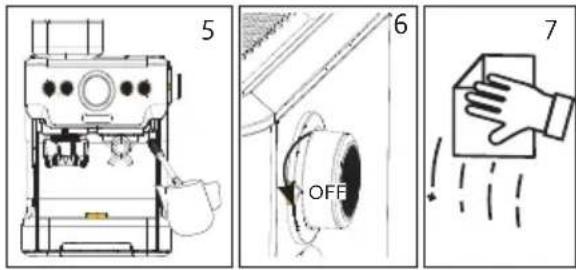
- When the preparation is ready, the unit will go back to standby mode. All indicator lamps will light up again. Remove the portafilter from the unit and coffee grounds from the portafilter. Regularly empty the drip tray. If the tray is full, you will see a red float in the grille.
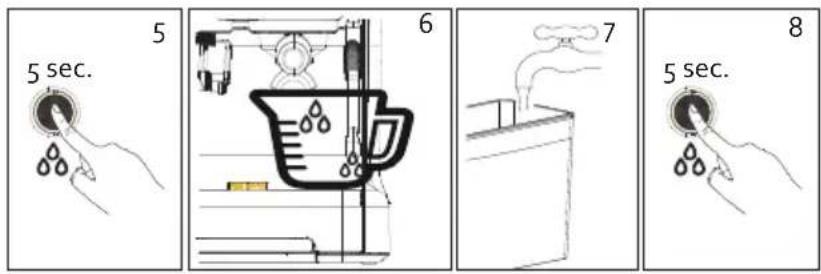
Empty water reservoir
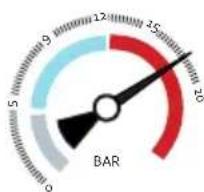
-
If the water reservoir is empty, you will hear an alert that the reservoir must be refilled. You will hear a signal and all indicator lights will flash red. Turn off the appliance.
-
Fill the water reservoir with the desired amount of water. Make sure if the level is within the 'MIN' and 'MAX' indicators on the reservoir. The reservoir is removable. Take the reservoir out of the unit. Open the lid, fill the water reservoir, and carefully place it back in the appliance. Turn the appliance back on.
SETTINGS
There are different ways to set the unit to your likings. We recommend that you first try the unit with the factory settings. If these are not to your liking, use the instructions in the instruction manual to personalise the unit to your liking and align it to the coffee beans you want to use. Besides the settings, the type and quality of the coffee beans influence the taste and intensity of your espresso.
Adjusting coarseness
There are number markings on the grinder that indicate the coarseness of the ground coffee. There are 15 settings. You have to adjust the coarseness while the appliance is grinding. If you rotate it while the unit is in standby mode, a bean might get into the grinder and stop it.
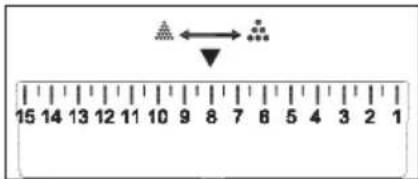
First, try the coarseness at position 8 and taste the coffee. You can then adjust the coarseness based on this taste. A grinding coarseness that is too fine gives the coffee a bitter taste. If it is too coarse, the coffee will be weak and watery.
The finest grind is indicated by 1. The coarsest grind is indicated by 15.
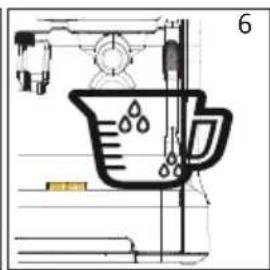
Setting grinder volume
You can set the grind time to your personal preference. The standard setting is 14 seconds. The amount of ground coffee you make depends on the type of bean and the coarseness setting.
-
Hold the portafilter against the push button of the grinder support. Grinding will start. Hold the portafilter against the button and do not release it until the desired amount of ground coffee is reached.
-
You will hear a signal. The new amount of ground coffee for the grind button is now set.
Note: the minimum grind time is 5 seconds. If you grind for less than 5 seconds, the unit will not record that as the new amount. The standard factory setting will be retained.

Setting coffee volume
You can adjust the amount for the single and double buttons.
-
Press and hold the button down for which you want to set the volume (single or double).
-
You will hear a signal and preparation starts.
-
When you obtain the desired amount, release the button. The preparation stops and you will hear an alert, which indicates that the amount is set as the new volume for the button.
Pressure gauge
gauge
| Value | |-------| | 9 |If the pressure gauge indicates a pressure between 0 and 5 bar while brewing coffee, the pressure is too low. In this case, check the following:
- Are the coffee beans fresh?
- Have you put enough pressure on the tamper? When pushing the ground coffee, you should use a force of ±15-20 kg.
- Select a finer grinding setting.
gauge
| Value | |-------| | 12 |If the pressure gauge indicates a pressure between 12 and 20 bar while brewing coffee, the pressure is too high. In this case, check the following:
- Are the holes in the filter blocked?
- Have you put too much pressure on the tamper? When pushing the ground coffee, you should use a force of ±15-20 kg.
- Select a coarser grinding setting.
Restore factory settings
- If you want to restore the single button to its factory settings, press the hot water button and the single button simultaneously until you hear a signal.
- If you want to restore the double button to its factory settings, press the hot water button and the double button simultaneously until you hear a signal.
- If you want to restore the grinder to its factory settings, press the hot water button, the single button, and the double button simultaneously until you hear a signal.
TIPS FOR A PERFECT ESPRESSO
- Read the instruction on the coffee bean packaging. It often provides recommendations. Save your coffee beans in a closed container in a cool place, e.g. your fridge. Do not overfill the bean reservoir. Coffee beans exposed to air lose their taste within a few days. With ground coffee, this can even occur within a few hours.
- To achieve the optimal coffee temperature, we recommend that you heat up the unit and the cup. Use the same method as for preparing coffee, but do not add ground coffee to the filter of the portafilter. Keep your cups above the unit, which acts as a cup warmer.
- Grind 7-9 grams of coffee for a perfect espresso. You can adjust the grinding time. How long the unit takes to provide 7-9 grams of ground coffee depends on the coarseness setting and type of coffee bean.

· Always make sure that the ground coffee is evenly spread out in the filter. This improves the permeation effect. Water by its nature flows along the easiest path with least resistance (i.e. the least coffee). Now press with the tamper with a force of 15-20 kg. You can practice with a scale to estimate how much pressure you need with the tamper. Remove any excess coffee from the edge to prevent loose ground coffee dropping into your cup.
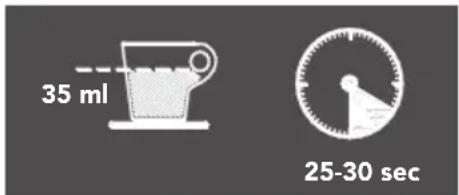
- The perfect espresso is 35 ml and takes 25-30 seconds to complete. If it takes more or less time to finish, adjust the coarseness of the ground coffee. If it takes less time, your grind is probably too coarse and the coffee will taste weak. If it takes more time, your grind is too fine and the coffee will taste too bitter.
- The best result is obtained with a pressure between 9 and 12 bar. The 'Settings/Pressure gauge' section explains how to obtain this.
· Finally, check the colour of the cream. Ideally, it should be a light brown colour and evenly distributed.
Does the coffee taste too bitter or too acid?
· The grinding coarseness is too fine.
- You use too much ground coffee in proportion to the amount of water.
· You tamped the coffee with too much force.
Does the coffee taste too weak or watery?
· The grinding coarseness is too coarse.
· You use too little ground coffee in proportion to the amount of water.
- You did not tamp the coffee hard enough.
STEAM NOZZLE
You use the steam nozzle to froth milk to achieve the perfect cappuccino or latte.
-
Fill the water reservoir. Insert the plug in the power socket and press the on-off button.
-
Fill a jug with cold, full-cream milk. Be careful not to overfill the milk jug. Frothing the milk will increase its volume.
-
Place a collection beaker under the steam nozzle or turn it toward the drip tray. In standby mode, turn the rotary knob to the preheat setting. The indicator will light flash, meaning the steam is now heating up.
-
When the indicator light remains lit continuously, the appliance has warmed up. Turn the knob to the max indication. First, a few drops of water will come out of the steam nozzle, then steam will form. Turn the steam nozzle towards the milk jug.
Note: the steam emitted by the steam nozzle is very, very hot, so keep your hands away from the unit while it is in operation.
- Bring the milk jug up to the steam wand and insert the steam nozzle a few millimetres into the milk. As the milk expands in volume, keep lowering the jug slightly until the steam nozzle tip is just below the surface of the milk. If you insert the steam nozzle too deeply into the milk, it heats the milk but does not froth air into the milk and no foam will form.
Note: do not use the steam feature for more than 5 minutes at a time.
-
When you obtain the desired amount of foam, turn the rotary knob to the off-position.
-
Clean the steam nozzle after every use.
⚠️ Note: the steam nozzle may still be really hot.
The unit must cool down after using the steam feature. Some vapour will drip onto the drip tray, which is normal.
HOT WATER FEATURE
-
Place a cup under the steam nozzle.
-
Press the hot water button. Hot water will flow from the steam nozzle.
-
When there is ±200 ml of hot water in your cup, the machine will stop automatically. If you want less water, you can stop the machine by pressing the hot water button again.
CLEANING AND MAINTENANCE
Note: Before cleaning the unit, pull the plug out of the power socket and let the unit cool down. To avoid the risk of electric shock, never immerse the cord, plug, or unit in water or other liquids.
- Clean all removable parts (filters, portafilter, tamper, water reservoir, bean reservoir, grinder support, drip tray, and grille) with clean warm water after use. Never use aggressive or abrasive cleaning agents. Dry off the parts before putting them back.
⚠️ Note: these parts are not dishwasher safe. Only the portafilter and 2 filters can be cleaned in the dishwasher.
- Wipe the unit housing clean with a soft, damp cloth to remove stains.
- Flush the unit regularly by brewing without putting ground coffee in the filter.
- Flush out the steam nozzle regularly by using the hot water feature. You can clear the opening of the nozzle with the needle of the cleaning pin.
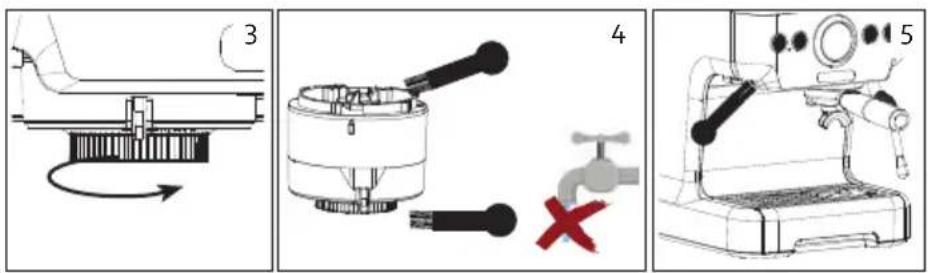
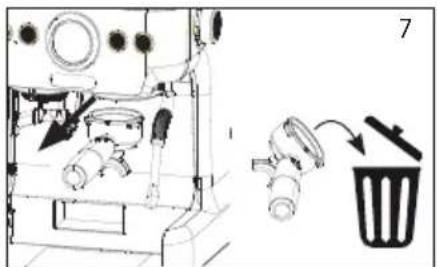
Cleaning the grinder
We recommend cleaning the grinder after each use.
-
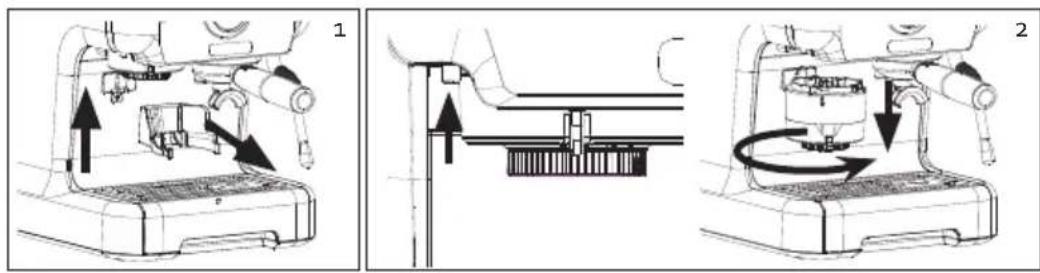
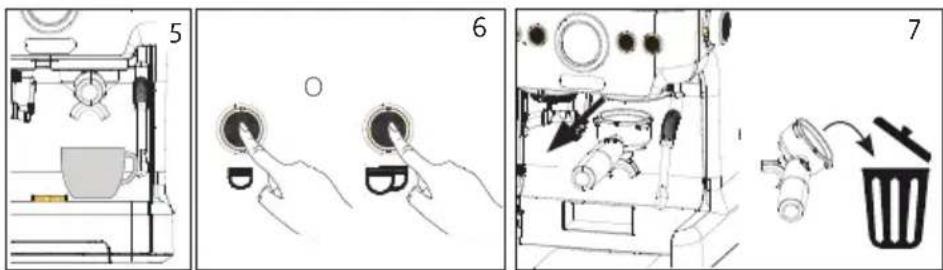
Remove the grinder support from the appliance by lifting it up.
-
Remove the grinder. Turn the grinding gear to the number marking 15. Press the release button and continue to turn the grinder counter-clockwise. Lift the grinder out vertically.
-
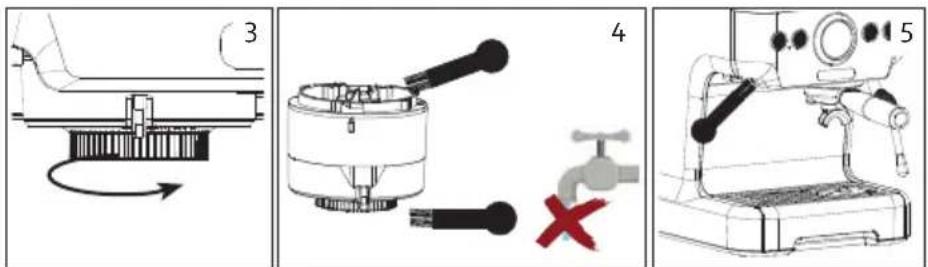
The grinder outlet (black) is at the bottom of the grinder. Unscrew it from the grinder.
-
Clean both parts of the grinder with the cleaning brush.
⚠️ Note: do not clean the grinder with water.
-
Regularly clean the shaft of the grinder outlet using the brush supplied to avoid or remove build-up.
-
Return everything to its original position. Align the protrusion on the grinder with the slot in the appliance. Push the grinder in and turn it clockwise until you hear a click.
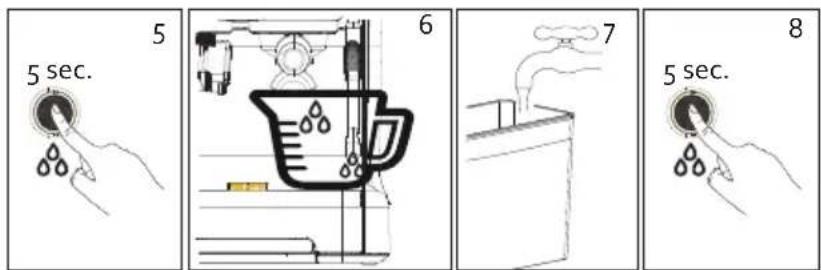
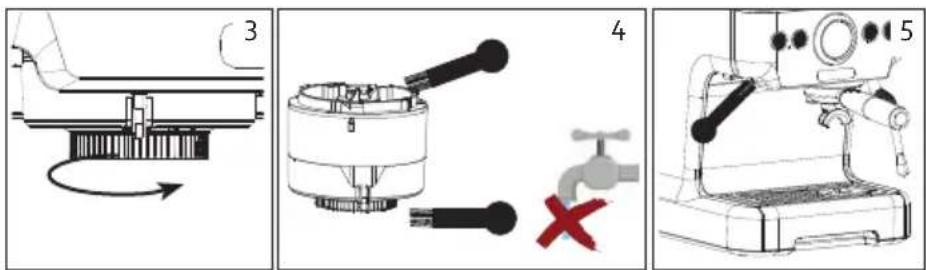
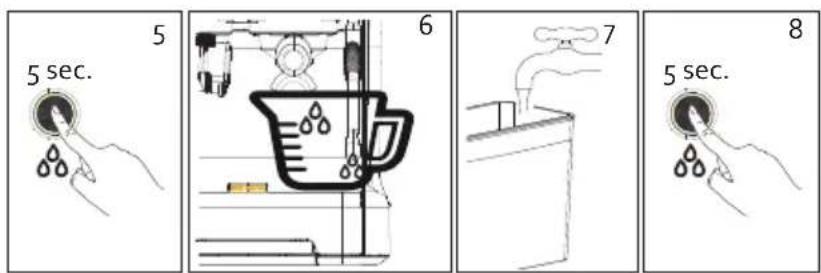
DESCALING
When?
Descale the unit regularly, on average every 4 to 6 months. Regularly descaling ensures the quality of your coffee will be consistent, lowers energy consumption, and extends the espresso machine's working life. After a usage of 1,000 cycles, the four indicator lights will flash red twice to indicate that the appliance needs descaling.
How?
You can use descaling product for coffee machines or water and citric acid.
- Fill the water reservoir to the maximum mark with the descaling product, diluted according to the instructions on the product packaging. If you use citric acid, fill the reservoir with 2 l of water and 3 to 4 tablespoons of citric acid.
- Place the portafilter with filter but without ground coffee in the unit.
- Place a collection container of at least 2 litres under the brewing head and the steam nozzle.
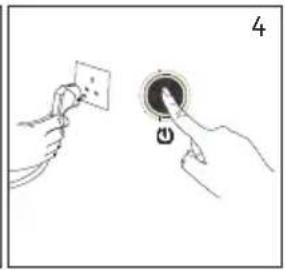
- Insert the plug in the power socket, turn on the unit, and let it heat up.
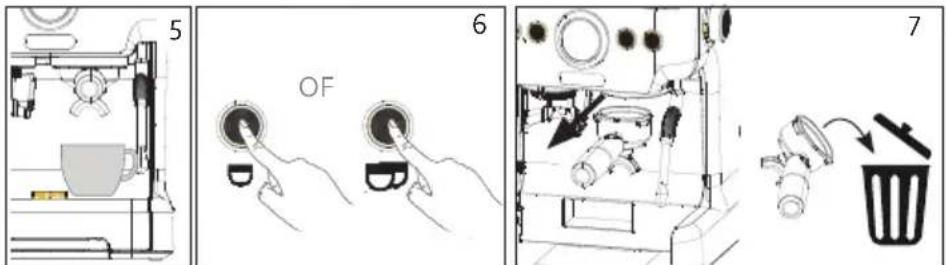
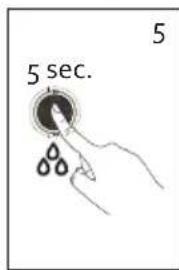
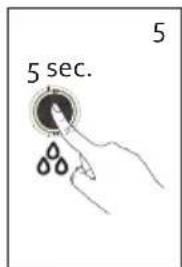
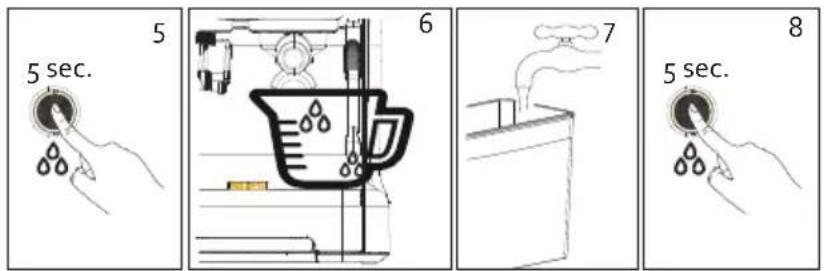
- Press and hold the hot water button for 5-10 seconds until you hear a signal. The appliance is then in descaling mode.
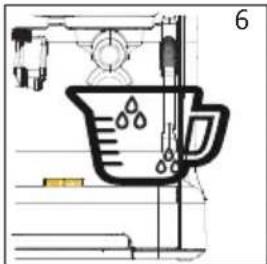
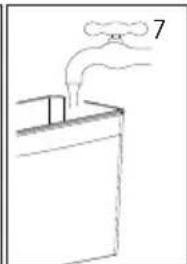
- During this descaling process, descaling liquid flows out of the brewing head and the steam nozzle. This process takes 10-15 minutes. Once complete, the appliance will automatically switch off.
- The unit must now be flushed with clean water to ensure no lime residue remains. Rinse the water reservoir and fill it with clean water. Empty the collection container.
- Repeat the descaling procedure, but now with clean water in the reservoir.
During the descaling process, the pump will switch on and off alternately. This is normal.
ENVIRONMENTAL GUIDELINES

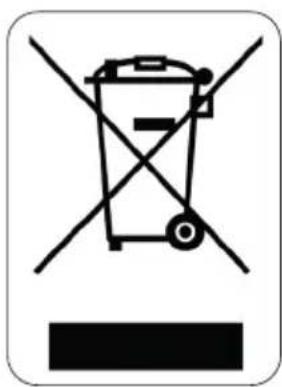
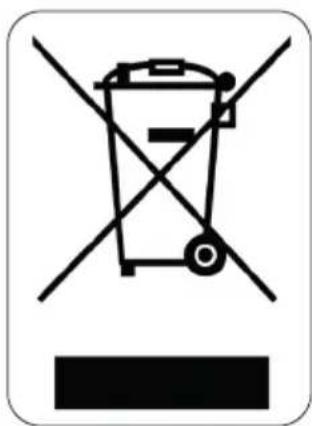
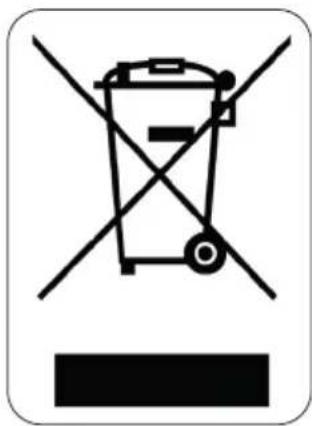
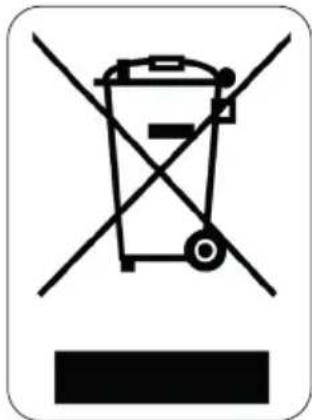
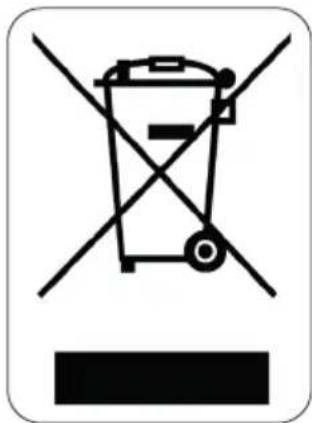
This symbol on the product or on its packaging indicates that this product may not be treated as household waste. Instead it must be brought to the applicable collection point for recycling of electrical and electronic equipment. By ensuring this product is disposed of correctly, you will help prevent potential negative consequences for the environment and human health, which could otherwise be caused by inappropriate waste handling of this product. For more detailed information about recycling of this product, please contact your local city office, your household waste disposal service or the shop where you purchased the product.

natural_image
Recycling symbol icon with three chasing arrows forming a triangle (no text or labels)The packaging is recyclable. Please treat the packaging ecologically.
GARANTIA
PANEL DE CONTROL
Uso
natural_image
Illustration of two hands using a stopwatch and cupping a spoon, with a clock icon above (no text or symbols)
natural_image
Diagram of a coffee machine with a cup and stand, no visible text or symbols
Manómetro
LIMPIEZAY MANTENIMIENTO
DESCALCIFICAR
¿Cuándo?

natural_image
Technical diagram of a mechanical device with internal components and an upward arrow indicating motion (no text or symbols)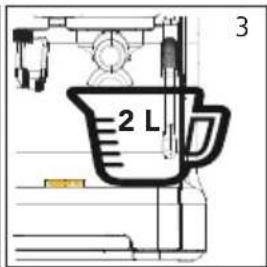
natural_image
Simple line drawing of a container with a piping bag and a water tap, no text or symbols present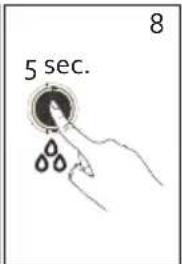
natural_image
Recycling symbol icon with three chasing arrows forming a triangle (no text or labels)PANNELLO DI CONTROLLO
Utilizzo
natural_image
Illustration of two hands using a stopwatch and cupping tool to interact (no text or symbols)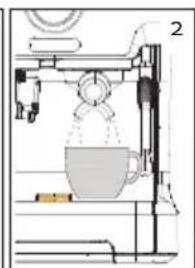
natural_image
Diagram of a coffee machine with a cup and stand, no visible text or symbols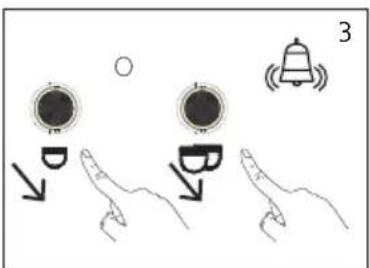
Manometro pressione

DECALCIFICAZIONE
Quando?
MISURE AMBIENTALI
natural_image
Recycling symbol icon with three chasing arrows forming a triangle (no text or labels)OVLÁDACÍ PANEL
Použití
natural_image
Hand pressing a button with an 'OK' button (no text or symbols on the button itself)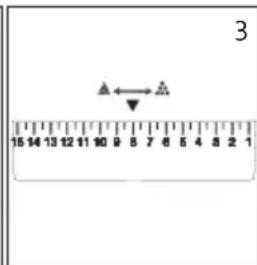
natural_image
Technical diagram of a mechanical assembly with a numbered component (4), showing no readable text or symbols.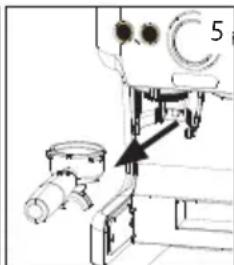
natural_image
Technical line drawing of a mechanical assembly with no visible text or symbols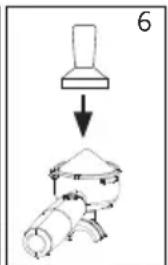
natural_image
Technical line drawing of a coffee machine with a cup and lid (no text or symbols)
Ukazatel tlaku/manometr
gauge
| Value | |-------| | 5 |ČIŠTĚNÍ A ÚDRŽBA
ODVÁPNĚNÍ
Kdy?
OHLED NA ŽÍVOTNÍ PROSTŘEDÍ
natural_image
Recycling symbol icon with three chasing arrows forming a triangle (no text or labels)OVLÁDACÍ PANEL
Použitie
natural_image
Technical line drawing of a mechanical device with an arrow pointing to a component (no text or symbols present)Ukazovatel'tlaku/manometer

ČISTENIE A ÚDRŽBA
ODVÁPNENIE
Kedy?
OHL'AD NA ŽIVOTNÉ PROSTREDIE
natural_image
Recycling symbol icon with three chasing arrows forming a triangle (no text or labels)natural_image
Two cylindrical white objects with clear liquid, possibly milk or similar beverage, placed on a plain white background (no text or symbols visible)
natural_image
Three product photos: square food items, a clear glass coffee pot, and a rectangular baking bowl (no text or symbols visible)of scan hier:
ou scannez ici:
oder hier scannen:
or scan here:


- DO725K
- ⚠PRODUCTSPECIFIEKE WAARSCHUWINGEN
- BEDIENINGSPANEEEL
- Gebruik
- Leeg waterreservoir
- Volume koffie instellen
- Drukmeter
- REINIGING EN ONDERHOUD
- ONTKALKEN
- Wanneer?
- MILIEURICHTLIJNEN
- ⚠AVERTISSEMENTS SPÉCIFIQUES AU PRODUIT
- PANNEAU DE COMMANDE
- Utilisation
- Manomètre
- NETTOYAGE ET ENTRETIEN
- MISE AU REBUT
- BEDIENFELD
- Verwendung
- Leerer Wassertank
- ENTKALKEN
- ENTSORGEN
- SAFETY INSTRUCTIONS
- ▲ELECTRICAL WARNINGS
- ⚠️INSTALLATION
- ⚠ USE
- △CLEANING AND MAINTENANCE
- ⚠PRODUCT-SPECIFIC WARNINGS
- SAVE THESE INSTRUCTIONS FOR FUTURE REFERENCE
- PARTS
- CONTROL PANEL
- BEFORE THE FIRST USE
- USE
- GRINDER
- Placement
- Usage
- COFFEE
- Empty water reservoir
- SETTINGS
- Adjusting coarseness
- Setting grinder volume
- Setting coffee volume
- Pressure gauge
- Restore factory settings
- TIPS FOR A PERFECT ESPRESSO
- STEAM NOZZLE
- HOT WATER FEATURE
- CLEANING AND MAINTENANCE
- Cleaning the grinder
- DESCALING
- ENVIRONMENTAL GUIDELINES
- GARANTIA
- PANEL DE CONTROL
- Uso
- Manómetro
- LIMPIEZAY MANTENIMIENTO
- DESCALCIFICAR
- PANNELLO DI CONTROLLO
- Utilizzo
- Manometro pressione
- DECALCIFICAZIONE
- Quando?
- MISURE AMBIENTALI
- OVLÁDACÍ PANEL
- Použití
- Ukazatel tlaku/manometr
- ČIŠTĚNÍ A ÚDRŽBA
- ODVÁPNĚNÍ
- Kdy?
- OHLED NA ŽÍVOTNÍ PROSTŘEDÍ
- Použitie
- Ukazovatel'tlaku/manometer
- ČISTENIE A ÚDRŽBA
- ODVÁPNENIE
- Kedy?
- OHL'AD NA ŽIVOTNÉ PROSTREDIE
Brand : DOMO
Model : DO725K
Category : Coffee machine