
Kitchen Wizz 11 BFP660 - Food Processor BREVILLE - Free user manual and instructions
Find the device manual for free Kitchen Wizz 11 BFP660 BREVILLE in PDF.
| Product type | Food processor |
| Brand | Breville |
| Model | Kitchen Wizz 11 BFP660 |
| Power supply | 120 V ~ 60 Hz |
| Power | 7.5 A |
| Bowl capacity (solids) | 12 cups (dry) |
| Bowl capacity (liquids) | 8.5 cups (thick liquids) |
| Bowl material | Plastic |
| Blade material | Micro-serrated stainless steel |
| Speed types | Continuous and Pulse |
| Main functions | Chop, mix, whisk, puree, slice, grate, shred, knead |
| Included blades | Micro-serrated S-blade, Dough blade |
| Included discs | Adjustable slicing disc (0.3-8.0 mm), Reversible shredding/grating disc (fine/coarse) |
| Safety system | Safety lock on bowl, lid, and large pusher |
| Motor protection | Overload protection with automatic shut-off |
| Care and cleaning | Bowl and lid dishwasher safe (top rack), blades clean with brush, base wipe with damp cloth |
| Replacement parts available | Replaceable silicone seal, optional blades and discs |
| Usage | Household use only |
| Cord length | Short (approx. 0.8 m) with assist plug |
Frequently Asked Questions - Kitchen Wizz 11 BFP660 BREVILLE
User questions about Kitchen Wizz 11 BFP660 BREVILLE
0 question about this device. Answer the ones you know or ask your own.
Ask a new question about this device
Download the instructions for your Food Processor in PDF format for free! Find your manual Kitchen Wizz 11 BFP660 - BREVILLE and take your electronic device back in hand. On this page are published all the documents necessary for the use of your device. Kitchen Wizz 11 BFP660 by BREVILLE.
USER MANUAL Kitchen Wizz 11 BFP660 BREVILLE
2 Breville recommends safety first
8 Components
10 Assembly
11 Functions
17 Food Processing Guide
19 Care & Cleaning
20 Troubleshooting
BREVILLE RECOMMENDS SAFETY FIRST
At Breville we are very safety conscious. We design and manufacture consumer products with the safety of you, our valued customer, foremost in mind. In addition we ask that you exercise a degree of care when using any electrical appliance and adhere to the following precautions.
IMPORTANT cUL us SAFEGUARDS
READ ALL INSTRUCTIONS BEFORE USE AND SAVE FOR FUTURE REFERENCE
- Carefully read all instructions before operating the appliance for the first time and save for future reference.
- Blades and cutting discs are sharp. Handle them carefully.
- Remove and safely discard any packaging materials and promotional labels before using the appliance for the first time.
- To eliminate a choking hazard for young children, remove and safely discard the protective cover fitted to the power plug of this appliance.
-
To protect against electrical shock, do not immerse the power cord, power plug or motor base in water or any other liquid.
-
Do not place the appliance near the edge of a counter top or table during operation. Ensure the surface is level, clean and free of water. Vibration during operation may cause the appliance to move during use.
- Do not place the appliance on or near a hot gas or electric burner, or where it could touch any other source of heat.
- Do not use on a sink drain board.
Always make sure the food processor is completely assembled before operating. The appliance will not operate unless properly assembled. - Ensure the POWER | OFF button has been pressed and the power cord is unplugged from the power outlet before attaching any blade, disc or lid.
- Handle the food processor and attachments with care.
Blades and discs are razorsharp and should be kept out of reach from children.
To reduce the risk of injury, always secure the processing bowl onto the motor base before attaching the blades or discs.
- Do not allow the power cord to hang over the edge of a table or counter, touch hot surfaces or become knotted. Unwind the power cord fully before use.
- Keep hands as well as spatulas and other utensils away from moving blades or discs while processing food, to prevent the possibility of severe personal injury or damage to the food processor. A plastic spatula may be used, but only when the food processor is stopped. Ensure the POWER | OFF button has been pressed to switch the motor off
and remove the power cord from the outlet before removing the lid from the processing bowl.
- Avoid contact with moving parts. Never push food down by hand when slicing or shredding. Always use pusher.
Make sure motor has completely stopped before removing cover. - Be sure cover and feed tube are securely locked in place before operating food processor.
- Never try to override or tamper with cover interlock mechanism.
Always remove the plug from the power outlet if the appliance is not in use, before attempting to move the appliance, before cleaning, disassembling, assembling and when storing the appliance. - Some stiff mixtures, such as dough, may cause the processing blade to rotate
more slowly than normal. If this happens, do not process for longer than 1 minute.
- Do not process hot or boiling liquids - allow liquids to cool before placing into the processing bowl.
- Do not move appliance while in operation.
- Do not place any part of the food processor in a microwave oven.
- Do not fill the processing bowl above the marked maximum fill line for each type of the ingredients. Failing to follow this instruction may cause product malfunction, product damage or personal injury due to damage to the cover or bowl.
-
Always add drier or thicker ingredients to the processing bowl prior to adding fluids.
-
Never remove the lid while the appliance is operating. Always use the POWER | OFF or PAUSE buttons to stop the machine before lid removal.
- Care should be taken when removing the food from the processing bowl by ensuring the motor and blade/disc has completely stopped before disassembling. Ensure the POWER | OFF button has been pressed to switch the motor off and unplug the power cord from the power outlet before removing the lid from the processing bowl. The processing bowl should then be unlocked from the motor body and the blade/disc should be carefully removed before attempting to remove the processed food.
- Do not use harsh abrasive, caustic cleaners or oven cleaners when cleaning the appliance.
SAFEGUARDS FOR YOUR FOOD PROCESSOR
- This appliance is for household use only. Do not use the appliance for anything other than its intended purpose as described in this book. Do not use outdoors. Do not use in moving vehicles or boats.
- The use of attachments not sold or recommended by Breville may cause fire, electric shock or injury.
- Do not leave the appliance unattended when in use.
-
Ensure the motor and blade/disc have completely stopped before disassembling. Ensure the POWER | OFF button has been pressed to switch the motor off and unplug the power cord from the power outlet when not in use, if left unattended and before assembling, cleaning or storing.
-
This appliance is not intended for use by children or by persons with reduced physical, sensory, or mental capabilities, or lack of experience and knowledge.
- Close supervision is necessary when any appliance is used near children.
Children should be supervised to ensure that they do not play with the appliance. - Turn the appliance OFF, then unplug from the outlet when not in use, before assembling or disassembling parts and before cleaning.
- To unplug, grasp the plug and pull from the outlet. Never pull from the power cord.
- Regularly inspect the power cord, power plug and actual appliance for any damage. Do not operate any appliance
with a damaged cord or plug or after the appliance malfunctions, or is dropped or damaged in any manner. Immediately cease use of the appliance and call Breville Consumer Support.
- For any maintenance other than cleaning, call Breville Consumer Support.
- This appliance has a polarized plug (one blade is wider than the other). To reduce the risk of electric shock, this plug will fit in a polarized outlet only one way. If the plug does not fit fully in the outlet, reverse the plug. If it still does not fit, contact a qualified electrician. Do not modify the plug in any way.
BREVILLE ASSIST® PLUG
- Your Breville appliance comes with a unique Assist® Plug, conveniently designed with a finger hole to ease removal
from the power outlet. For safety reasons it is recommended you plug your Breville appliance directly into its own electrical outlet on a dedicated circuit separate from other appliances. If the electric circuit is overloaded with other appliances, your appliance may not function properly. Use in conjunction with a power strip or extension cord is not recommended.
SHORT CORD INSTRUCTIONS
- Your Breville appliance is fitted with a short power supply cord as a safety precaution to prevent personal injury or property damage resulting from pulling, tripping or becoming entangled with a longer cord. Do not allow
children to use or be near this appliance without close adult supervision. Longer detachable power supply cords or extension cords are not recommended but may be used if care is exercised. If an extension cord is used, (1) the marked electrical rating of the cord set or extension cord should be at least as great as the electrical rating of the appliance, (2) the cord should be arranged so that it will not drape over the countertop or tabletop where it can be pulled on by children or tripped over unintentionally.

WARNING
- Blades and discs are razor sharp, do not touch. Always use a spatula or brush to remove food or when cleaning blades.
FOR HOUSEHOLD USE ONLY SAVE THESE INSTRUCTIONS

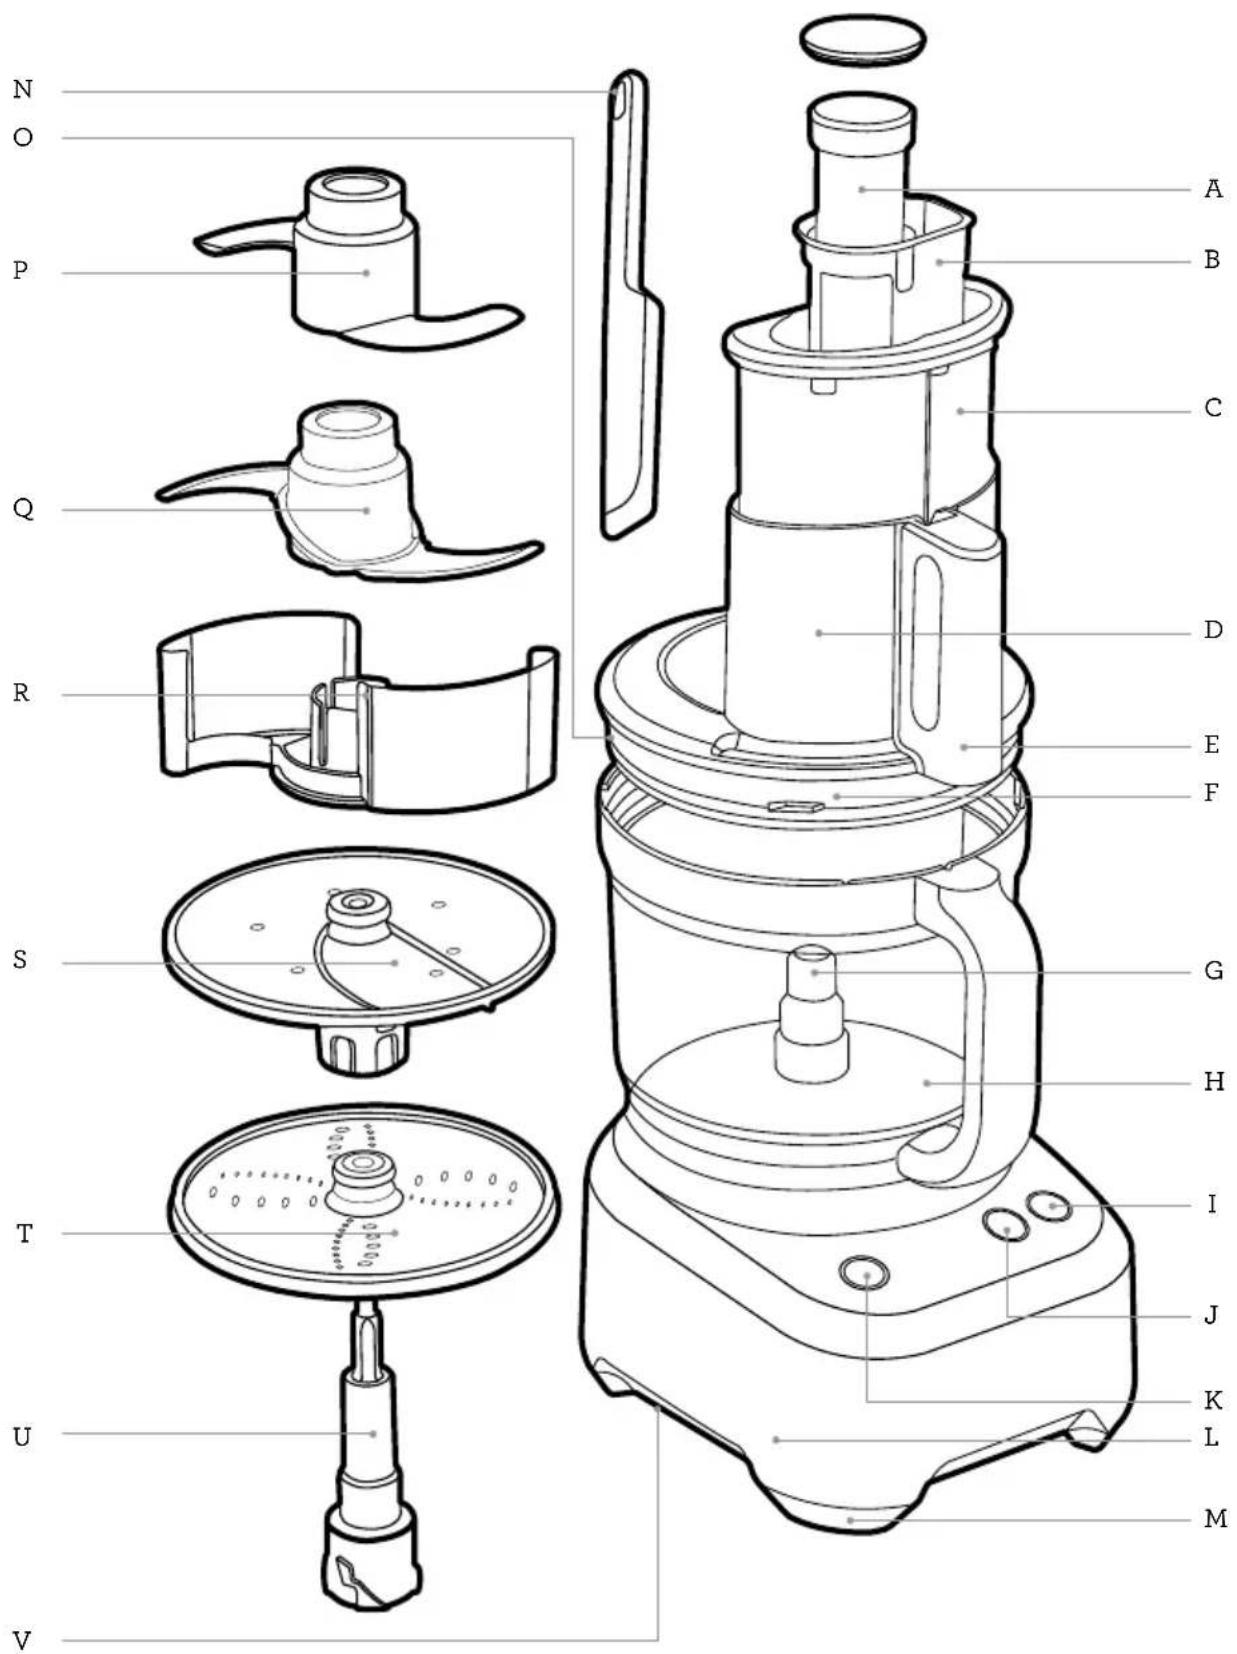
Components
Rating Information
120V\~60Hz7.5A
A. Small food pusher
Use to process smaller ingredients with greater control. It also doubles as a measuring cup for ingredients. The food processor will run continually when the small pusher is out.
B. Mid food pusher
The food processor will run continually whether the mid pusher is in or out.
C. Large food pusher
The food processor will not start unless the large pusher is in place correctly, as it releases the safety interlock system.
D. Extra wide feed chute
5 inch (13cm) wide, for large ingredients.
E. Safety interlock system
Prevents the motor from operating unless the bowl and lid are correctly locked in position, and large feed pusher is inserted.
F. Processing lid
Locks onto the processing bowl and forms part of the safety interlock system.
G. Bowl coupling
Sintered stainless steel motor connector with vibration absorption.
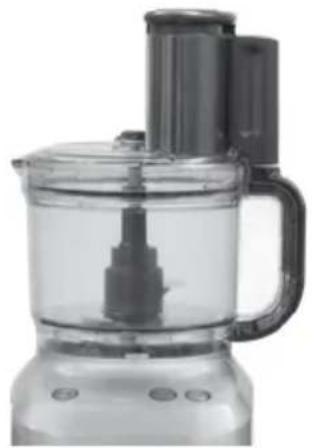
H. Processing bowl
12 cup capacity for dry ingredients and 8 12 cups for thick liquid ingredients. Lock onto base by turning clockwise.
I. PULSE button
Press and release for momentary bursts of power.
J. START | PAUSE button
Provides power to the food processor unit, and puts it into READY mode.
L. Direct drive motor base
Induction motor for high torque and reliable results.
M. No-skid rubber feet
N. Plastic spatula
Scrape the sides of the bowl to help process ingredients evenly.
O. Silicone seal
This replaceable seal reduces the chance of leakage while processing larger volumes of liquid ingredients.
P. Dough blade
Blunt blade designed for a softer action of combining dough ingredients.
Q. Micro-serrated S-BladeTM
Swift action for even chopping, mixing, whipping and processing a variety of ingredients. Safety braking system rapidly stops S-Blades if lid is unexpectedly opened.
R. S-Blade™ cover
S. Adjustable slicer 0.3mm-8.0mm thickness
T. Fine and coarse reversible shredder
U. Spindle
V. Cord storage

Assembly
BEFORE FIRST USE
- Before using your food processor for the first time, remove any packaging material and promotional labels. Ensure the POWER button is OFF and the food processor is unplugged.
- Be careful when handling the blades and discs as they are extremely sharp.
- Wash the processing bowl, processing lid and all attachments in warm soapy water with a soft cloth. Rinse and dry thoroughly. The attachments may be washed in the dishwasher.
- When first using your food processor, you may notice an odor coming from the motor. This is normal and will dissipate with use.
Always use the food processor on a dry, level work surface.
ASSEMBLY
- Position the processing bowl onto the motor base with the handle in line with the ALIGN HANDLE graphic on the motor base.
- Turn the bowl clockwise until the handle locks to the front. The processing bowl should now be securely locked into position. The food processor will not operate unless the bowl is locked into position correctly.

- The spindle is required when using ALL discs and blades. Failing to use the spindle will damage the parts, and incorrect use this way may cause the parts to fuse together.
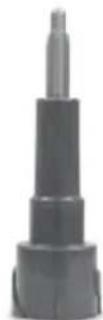
- Before placing the lid onto the processing bowl, position the spindle over the coupling in the center of the processing bowl. Then position your chosen blade or disc over it. The blades drop down lower than the discs.

- Place lid onto the processing bowl so that the ALIGN | LOCK graphics on the lid and handle align. To LOCK the lid, hold the chute and turn clockwise so that the handle parts align. Locking the lid correctly will engage the interlocking safety catch on the handle, and allow the motor to run.


Functions
OPERATION
- The food processor will only operate when the processing bowl, lid and large pusher are correctly assembled. This engages the safety interlock, and allows the motor to run.
The POWER button illuminates red when the machine is connected to power and is ready to run. - The START button allows the motor to run continuously until pressed again. If the lid, bowl or large pusher are removed while the motor is running, the button will flash. The motor will resume running when the bowl, lid and large pusher are assembled and the safety interlock is engaged, the button light will be solid (no longer flashing).
- The momentary PULSE button is ideal for processing foods that need sudden bursts of power. It also encourages ingredients to move around the bowl. PULSE is also best when processing foods that only require processing for a short period of time.
- Use a combination of the START and PULSE buttons for control when processing food.
- The chute has a MAX CHUTE FILL graphic to indicate the maximum volume of food that can be placed in the chute for the pusher to activate the safety locking catch.
- After processing, wait until the blades/discs have stopped moving before unlocking the lid. To ensure safe handling, turn off at the POWER button and unplug at the power outlet before handling the blades.
- When removing blades/discs, lift carefully by gripping the plastic hub in the center.
OVERLOAD PROTECTION SYSTEM
- The food processor has an overload protection system to prevent damage to the motor. If activated, the food processor will go into standby mode, and the buttons will flash.
- Unplug and allow to cool for 30 minutes. Once cooled, you will be able to use the food processor as usual again.
- Note that some stiff mixtures (such as bread dough) may cause the blade to rotate more slowly than normal. If this happens, do not process for more than 1 minute.
- If the blades or discs jam with food while processing, immediately unplug from the power outlet before clearing the wedged food. If this happens more than once, the bowl may be overloaded. Try processing in smaller batches.
CHOPPING WITH THE MICRO-SERRATED S-BLADETM
The S-blade chops raw and cooked food to the consistency required, from coarsely chopped to minced. The blades process very efficiently, and may take less time than expected to process many large tasks.
Always remember to place the spindle and S-blade into the processing bowl before adding the food.
Avoid over-processing by checking the consistency frequently. For many tasks, we recommend using the PULSE button, as it may only take a few seconds to fully process food to your desired consistency.
If necessary, turn the POWER off and use a spatula to scrape down the sides of the bowl to encourage even processing.
Carefully remove the S-blade after pureeing food and use a spatula to scrape food adhering to the blade and bowl.
Raw vegetables, fruit and cooked meats
Trim and cut food into 1 inch (2.5cm) cubes. Process no more than 6 cups at a time using the PULSE button at 1-2 second intervals until chopped to desired size or consistency.
Raw meat, chicken and fish
Trim excess fat and cut food into 1 inch (2.5cm) cubes. Ensure all bones are removed. Chill for a short time in freezer until firm as this will help to cut through the food more readily. Process no more than 214 pounds (or 1kg) of raw meat at a time. At this capacity the motor should run for no more than 30 seconds at a time. Use a combination of the START and the PULSE button until chopped or minced to the desired consistency.
Garlic, chilli and ginger
Peel garlic cloves and process them whole. Leave chillies whole, or remove seeds for milder chilli. Peel and cut ginger into 1 inch (2.5cm) cubes.
For other solid herbs like lemongrass or galangal, peel and cut into cubes or pieces between 12 and 1 inch in size.
Size should be made smaller for harder or more dense herbs.
Process using the PULSE button at 1-2 second intervals until chopped to the desired consistency.
Store chopped herbs with a little vegetable oil in an airtight container in the refrigerator for up to 1 week.
If adding garlic, chilli or ginger to other ingredients, drop whole pieces down the small feed chute while the motor is running.
Leafy herbs
Wash and dry herbs thoroughly. Remove any coarse stems. Process no more than 2 bunches of herbs (approx. 4 cups) at a time using the PULSE button at 1-2 second intervals until chopped to the desired consistency.
Use leafy herbs immediately for the most aromatic results in your recipe.
Nuts
Process no more than 41% cups of shelled nuts at a time using the PULSE button at 1-2 second intervals until chopped to the desired consistency.
Dried fruit
Dried fruit can be sticky, and may stick to the blades during processing. We recommend putting dried fruit in the freezer for about 10 minutes before processing. Process no more than 2 cups at a time using the PULSE button at 1-2 second intervals until chopped to the desired consistency.
If chopping fruit to add to cake mixture, process the fruit before making the cake mix. Add a little flour (from the quantity of flour in the recipe) to prevent fruit from sticking to the S-blade.
We do not recommend to process large dried fruits such as dates and figs.
Soft crumbs
Break stale bread into chunks (fresh bread will stick to blades). Process no more than 4-6 slices at a time using the PULSE button at 1-2 second intervals until crumbed to desired consistency. For best results when making bread crumbs, add one slice at a time.
Dried breadcrumbs
Tear bread into chunks and toast in oven until golden and crisp.Do not over brown.Process no more than 4-6 slices at a time using the PULSE button at 1-2 second intervals.
Cookie crumbs
Break cookies into quarters, and weigh a maximum of 8oz (250g). Process using the PULSE button at 1-2 second intervals until chopped to the desired consistency. Sweet or savory cookie crumbs can be used as an alternative to pastry for sweet or savory pies. Do not process very hard cookies as this may damage the blades.
PURÉEING WITH THE MICRO-SERRATED S-BLADE
The S-blade purées raw and cooked food to the consistency required, including baby food. The blades process very efficiently, and cut the time needed to purée many tasks.
Always remember to place the S-blade into the processing bowl before adding the food.
Carefully remove the S-blade after puréeing food and use a spatula to scrape food adhering to the blade and bowl.
Baby food
Trim and cut vegetables and meat into 1 inch (2.5cm) cubes. Cook vegetables and meat before processing. Process no more than 6 cups at a time (using the START button in intervals) until the food is pureed to a smooth and even consistency. Stock, milk or gravy can be added through the small feed chute if the mixture becomes too thick.
Excess baby food can be frozen in ice-cube trays, and packed in single serve freezer bags ready for use.
Peanut butter
Process no more than 412 cups of shelled nuts at a time using the START button until chopped to the desired consistency.
The volume of nuts reduces after processing, for example 2 cups of nuts will make around 1 cup of nut butter.
Natural nut butter (without using stabilizers) will separate on standing, and needs to be stirred before use.
MIXING WITH THE MICRO-SERRATED S-BLADE
The S-blade mixes ingredients for cakes, batters, and cookie doughs.
The S-blade can also emulsify egg-based sauces such as mayonnaise.
Always remember to place the spindle and S-blade into the processing bowl before adding the food.
Carefully remove the S-blade after pureeing food and use a spatula to scrape food adhering to the blade and bowl.
Butter cake and cookie dough
Place softened, chopped butter and sugar into the processing bowl. Process using the START button until the mixture is lightly creamed. With the motor running, add eggs one at a time through the small feed chute, mixing well after each egg is added. Take lid off and add liquid and dry ingredients to the mixture. Process using the PULSE button until folded evenly. Scrape down sides of bowl as needed. Do not over-process.
Add chic chips, nuts, dried fruit, etc. after the main mixture is done. Use the PULSE button in very short bursts until the additions are combined. Do not over-process, as these larger ingredients will break down quickly.
Quick-mix cakes and batters
Place all ingredients in the bowl, starting with liquids, and being careful not to exceed the MAX LIQUID level. Process using the PULSE button until folded evenly. Scrape down sides of bowl as needed. Do not over-process.
This method can also be used for melt 'n' mix cakes, packet cake mixes and crêpe batters.
Pastry dough
Place flour and chilled, cubed butter into the processing bowl.
Do not process more than 2 cups (300g) of flour (using the START button in intervals) until the butter is absorbed into the flour.
Steadily add liquid through the small feed chute with the motor still running. Process until the mixture forms a ball.
KNEADING WITH THE DOUGH BLADE
Always remember to place the spindle and dough blade into the processing bowl before adding the food.
The edges of the plastic dough blade create a softer action for combining dough ingredients. The dough blade encourages the gluten strands to be stretched rather than cut, and should be used for all yeast doughs, and any other doughs that require kneading
Bread or pizza dough
Place flour and dry ingredients into the processing bowl, including instant active dry yeast.
Do not process more than 5 cups (700g) of flour (using the START button in intervals).
Steadily add liquid (including oil) through the small feed chute with the motor still running. Process until the mixture forms a soft, elastic dough ball. This normally takes about 45-60 seconds. Do not over process.
Transfer dough ball to a lightly floured surface and knead for a further 5 minutes if necessary until soft and pliable.
If processing more than two recipes of dough ingredients (maximum 700g flour), allow the motor base to cool for an extended period before subsequent kneading to prevent the motor from overloading.
Place dough into a large, greased mixing bowl and cover. Allow the dough to rise in a warm place until double in size. Turn the dough out onto a lightly floured surface and knead again until smooth and elastic. Shape the dough then allow to rise in a warm area before baking in a hot oven.
SLICING, GRATING AND SHREDDING
Important: The spindle must be used with both the adjustable slicer and the reversible shredder/grater.
Carefully remove the S-blade after pureeing food and use a spatula to scrape food adhering to the blade and bowl.
Adjustable slicer
The adjustable slicer will slice food to an even and consistent thickness. It can be adjusted to 24 settings, from very fine (0.3mm) to thick (8.0mm). To adjust the slicing thickness, hold the adjustable slicing disc by the outer edge with one hand, and turn the adjustment dial on the underside with the other hand. An arrow graphic indicates the thickness of the slice you will get.
Reversible grater and shredder
This disc has an array of small blades on both sides of the disc. Align the disc so larger holes face up for courser textured results, or with the smaller holes facing up for finer results. The discs are labelled showing which side faces up.
CONTROLLING THE INGREDIENTS
It is important to position the food in the chute to gain maximum control and best results.
Smaller ingredients
For long thin foods such as carrots, cucumbers, zucchini, etc., use the small feed chute. This will avoid the ingredient from tipping over during slicing.
Larger ingredients
The wide feed chute is 5in (13cm) wide, and can fit ingredients up to this size. The chute can be packed to fill the width of the chute. The food should fit snugly so it is supported in an upright position in the chute, but not so tight that it could prevent the food from moving down the chute.
Medium feed chute
Use the medium feed chute for 'in-between' food processing. The medium feed chute is 234 in (7cm) wide, and can fit ingredients up to this size. The chute can be packed to fill the width of the chute. The food should fit snugly so it is supported in an upright position in the chute, but not so tight that it could prevent the food from moving down the chute.
Take care not to overfill the chute, as the pusher will not activate the interlock safety catch if the chute is too full. Do not fill over the MAX CHUTE FILL graphic.
Ensure the large pusher is in place before using the medium pusher.
Pressure
When processing, never force the food down the chute as this can damage the discs.
Apply light pressure for soft foods such as tomatoes and bananas.
Apply medium pressure for firmer foods such as potatoes and apples.
Apply firm pressure for hard foods such as parmesan cheese and deli meats such as salami.
Round fruit and vegetables
Prepare fruit or vegetables by washing and peeling (if necessary).
Small fruit and vegetables should be trimmed on one end so the food sits flat inside the feed chute.
Large fruit and vegetables may need to be cut in half to fit in the chute. Pack the chute from left to right.
Long fruit and vegetables
Prepare fruit or vegetables by washing and peeling (if necessary).
Ingredients can be cut cross-sectionally to create circular results. Use the small and medium feed chute, or pack ingredients vertically in the large feed chute.
Ingredients can be cut lengthwise to create ribbons. Use the large feed chute, and trim ingredients if necessary to encourage them to sit flat in the feed chute when the disc starts. Pack the large feed chute horizontally.
Leafy vegetables
Cut cabbage into wedges to fit the feed chute. For lettuce, separate leaves, then roll up and pack vertically in the feed chute.
Cheese
Caution should be taken when processing cheese in a food processor. For soft cheese such as mozzarella, partially freeze it until firm. This will help prevent jamming the disc. Round cheeses such as mozzarella should be trimmed at one end to encourage them to sit flat in the feed chute with the disc starts.
Hard cheeses such as parmesan must be checked first to ensure they are not too hard (to avoid damaging blade edges). The cheese should slice easily with a sharp knife and remove the rind before processing.
Wedged shaped cheeses such as parmesan can be packed side by side to form a rectangular shape in the chute.
Delimeats
Cut in lengths to fit the height of the feed chute. The length must not be higher than MAX CHUTE FILL graphic. Pack with the cut side facing down. For hard cured sausages like salami and pepperoni trim on one end and process one sausage at a time through the small or medium feed chute, depending on size.
Grated Chocolate
Break a block of chocolate into small pieces, and chill until firm. Pack into the small feed chute, and then grate using either the coarse or fine side of the reversible shredder (do not use S-blade or adjustable slicer).
For more information about preparation of food and how to process, refer to basic processing techniques. For specific recipes, refer to the recipe section.
| FOOD BLADE TYPE ADJUSTABLE SLICING | DISC THICKNESS | RECOMMENDED DISC TYPE | |
| Avocado | S-blade Use: Guacamole | 2-5 | |
| Beets (cooked) 2-5 | Shredder Use: Salad | ||
| Butternut Squash | S-blade Use: Butternut squash soup | ||
| Cabbage / Lettuce | Thin 1-2 and med 2-3 Use: Accompaniment | Shredder Use: Salad | |
| Carrot | S-blade Use: Vegetable soup | 0-5 | Shredder Use: Salad |
| Cauliflower (cooked) | S-blade Use: Cauliflower soup | ||
| Celery | S-blade Use: Vegetable soup | Thin 1-2 med 2-3 Use: Salad | |
| Eggplant | S-blade Use: Accompaniment, dip | 2-5 Use: Grilled eggplant | |
| Herbs | S-blade Use: Seasoning or pesto | ||
| Leeks | S-blade Use: Soups, sauces | 2-5 Use: Vegetable soup | |
| Onion | S-blade Use: Soups, sauces | 0-5 Use: Salad | |
| Potatoes | 0.3-6 Use: Potato au Gratin | Shredder Use: hash browns | |
| Potatoes (cooked) | S-blade Use: Mash potato, gnocchi | ||
| Tomatoes | S-blade Use: Salsa | 2-5 Use: sandwich filling, caprese salad, tomato relish | |
FOOD BLADE TYPE ADJUSTABLE SLICING
DISC THICKNESS
RECOMMENDED DISC TYPE
| Apple / Pear | S-blade Use: Apple sauce | 2-5 Use: Apple pie | |
| Apple / Pear (cooked) | S-blade Use: Baby food | 4-6 Use: Fruit salad | |
| Dried Fruit | S-blade Use: Fruit salad, dessert sauce | ||
| Batters | S-blade Use: Cakes, pancake, waffle batter | ||
| Breadcrumbs | S-blade Use: Coatings, breadcrumb stuffing | ||
| Cheese | 2-5 Use: Garnish, sandwich fillings | Shredder - coarse or fine Use: Grated cheese for pizza | |
| Chocolate | S-blade Use: Chocolate ganache, chocolate chip cookies | Shredder - Coarse or fine Use: Dessert decoration | |
| Doughs (pastry) | S-blade Use: Tarts, Pies | ||
| Doughs (bread, pizza) | Dough blade Use: Bread, pizza | ||
| Eggs (whole or yolks) | S-blade Use: Mayonnaise, Hollandaise sauce | ||
| Meat (raw) | S-blade Use: Meatloaf, burgers, meatballs | ||
| Meat (cooked) | S-blade Use: Sandwich fillings, pate, baby food | ||
| Meat (deli) | 1-6 Use: Sandwiches, antipasto, pizza toppings |

Care & Cleaning
Remove the power cord from the power outlet after use for safety reasons.
Processing bowl and lid
Due to the interlock components, we do not recommend immersing the bowl in water for long periods.
To keep your bowl and lid clean, and to avoid food drying on, follow these steps as soon as possible after use:
- Rinse most of the ingredients off the bowl and lid.
- Hand wash in warm, soapy water using a mild liquid detergent and non-abrasive sponge.
Blades and discs
Blades and discs are razor sharp, do not touch. Always use a spatula or brush to remove food or when cleaning blades.
Motor base
To clean the motor base, wipe with a soft, damp cloth then dry thoroughly. Wipe any excess food particles from the power cord.
Cleaning agents
Do not use abrasive scouring pads or cleansers on either the motor base or the jug, as they may scratch the surface.
Use only warm soap water with a soft cloth.
Dishwasher
The processing bowl and lid may occasionally be washed in the dishwasher (top shelf only), however washing in the dishwasher is not recommended on a regular basis, as prolonged exposure to harsh detergents, hot water and pressure will damage and shorten the life of the plastic and the interlock components.
Stubborn food stains and odors
Strong smelling foods such as garlic, fish and some vegetables such as carrots may leave an odor or stain the bowl or lid.
To remove, pour warm soapy water and fill to the MAX LIQUID mark. Set aside to soak for 5 minutes, without immersing the whole bowl.
Then wash with a mild detergent and warm water, rise well and dry thoroughly. Store the bowl with the lid off.
Storage
Place the large food pusher (with medium and small pushers inserted) into the feed chute for storage.
Store your food processor upright, with the bowl and lid resting in position, but not locked. Locking the bowl and lid can put unnecessary strain on the safety interlock.
All accessories should be kept in a safe place out of the reach of children to avoid accidental cuts. It is not recommended to store the discs in a drawer with other utensils.
We recommend storing the S-blades inside the bowl, with the variable slicer on top. These blades are extremely sharp, and the bowl provides natural protection.
Do not place anything else on top of your food processor during storage.
PROBLEM EASY SOLUTION
| Food is unevenly processed | ·Ingredients should be cut evenly into 1 inch (2.5cm) pieces before processing. ·Ingredients should be processed in batches to avoid overloading. |
| Slices are slanted or uneven | ·Place evenly cut food into the feed chute. ·Apply even pressure on the pusher. |
| Food falls over in the feed chute | ·The large feed chute must be packed full for best results. If processing smaller quantities, place items to the far left in the feed chute, or use the small or medium feed chute, depending on the food size. |
| Some food remains on top of the disc after processing | ·It is normal for small pieces to remain after processing. |
| Motor slows down when kneading dough | ·Amount of dough may exceed maximum capacity. Remove half and process in two batches. ·Dough may be too wet (see below). If motor speeds up, continue processing. If not, add more flour, 1 tablespoon at a time until the motor speeds up. Process until dough cleans the side of the processing bowl. |
| Dough doesn't clean inside of the processing bowl | ·Amount of dough may exceed food processor maximum capacity. Remove half and process in two batches. ·Dough may be too dry (see below). |
| Dough feels tough after kneading | ·Divide dough into 2 or 3 pieces and redistribute evenly in processing bowl. Process 10 seconds or until uniformly soft and pliable. |
| Dough is too dry | ·While machine is running, add water through the small feed chute, 1 tablespoon at a time until dough cleans the inside of the processing bowl. |
| Dough is too wet | ·While machine is running, add flour through the small feed chute, 1 tablespoon at a time until dough cleans the inside of the processing bowl. |
| Dough becomes sticky and attached to dough blade, machine vibrating | ·Reduce process time. Stop the machine when dough balls just formed. This will take about 45-60 seconds. |
PROBLEM EASY SOLUTION
| The motor does not start | ·There is a safety interlock switch to prevent the motor from starting if it is not properly assembled. Make sure the processing bowl and lid are securely locked into position. ·If you are slicing or shredding and the above solution does not work, make sure that the food contents in the feed chute are cut below the maximum fill line so that the activation rod can engage the motor. ·Make sure the large food pusher is inserted in the feed chute low enough to engage safety interlock switch. ·If the motor still will not start, check the power cord and power outlet. |
| The food processor shuts off during operation | ·The lid may have become unlocked; check to make sure it is securely in position. ·If the motor overloads, all buttons will flash in unison. Unplug at the wall, and allow the food processor to cool for 20-30 minutes before resuming. |
| The motor slowed down during operation | ·This is normal as some heavier loads (e.g. slicing/shredding cheese) may require the motor to work harder. Reposition the food in the feed chute and continue processing. ·The maximum load capacity may have been exceeded. Remove some of the ingredients and continue processing. |
| The food processor vibrates/moves during processing | ·Make sure the rubber feet at the bottom of the unit are clean and dry. Also make sure that the maximum load capacity is not being exceeded. ·This is normal as some heavier loads may require the motor to work harder. |

Notes
the Sous Chef 12

FR-CA
MANUEL D'INSTRUCTIONS
Breville

Table des matières
COURTCORDON D'ALIMENTATION
J. Touche DEMARRER | PAUSE
K. Touche MARCHE | ARRET
ENCHUFE BREVILLE ASSIST
Breville Consumer Support
USA Mail: Breville USA 19400 S. Western Ave, Torrance CA 90501-1119 Phone: 1-866-273-8455 1-866-BREVILLE Web: breville.com/us/support
Canada
Mail: Breville Canada
9800 Boulevard Cavendish, Suite 250, Saint-Laurent
Québec, H4M 2V9
Phone: 1-855-683-3535
Web: breville.ca/support
Breville is a registered trademark of Breville Pty. Ltd. A.B.N. 98 000 092 928. Copyright Breville Pty. Ltd. 2021.

- BREVILLE RECOMMENDS SAFETY FIRST
- IMPORTANT cUL us SAFEGUARDS
- READ ALL INSTRUCTIONS BEFORE USE AND SAVE FOR FUTURE REFERENCE
- SAFEGUARDS FOR YOUR FOOD PROCESSOR
- BREVILLE ASSIST® PLUG
- SHORT CORD INSTRUCTIONS
- WARNING
- FOR HOUSEHOLD USE ONLY SAVE THESE INSTRUCTIONS
- Components
- Rating Information
- Assembly
- BEFORE FIRST USE
- Functions
- OPERATION
- OVERLOAD PROTECTION SYSTEM
- CHOPPING WITH THE MICRO-SERRATED S-BLADETM
- Raw vegetables, fruit and cooked meats
- Raw meat, chicken and fish
- Garlic, chilli and ginger
- Leafy herbs
- Nuts
- Dried fruit
- Soft crumbs
- Dried breadcrumbs
- Cookie crumbs
- PURÉEING WITH THE MICRO-SERRATED S-BLADE
- Baby food
- Peanut butter
- MIXING WITH THE MICRO-SERRATED S-BLADE
- Butter cake and cookie dough
- Quick-mix cakes and batters
- Pastry dough
- KNEADING WITH THE DOUGH BLADE
- Bread or pizza dough
- SLICING, GRATING AND SHREDDING
- Adjustable slicer
- Reversible grater and shredder
- CONTROLLING THE INGREDIENTS
- Smaller ingredients
- Larger ingredients
- Medium feed chute
- Pressure
- Round fruit and vegetables
- Long fruit and vegetables
- Leafy vegetables
- Cheese
- Delimeats
- Grated Chocolate
- Care & Cleaning
- Processing bowl and lid
- Blades and discs
- Motor base
- Cleaning agents
- Dishwasher
- Stubborn food stains and odors
- Storage
- PROBLEM EASY SOLUTION
- the Sous Chef 12
- Table des matières
- COURTCORDON D'ALIMENTATION
- ENCHUFE BREVILLE ASSIST
- Breville Consumer Support
Brand : BREVILLE
Model : Kitchen Wizz 11 BFP660
Category : Food Processor