
RCX210 - Clock PANASONIC - Free user manual and instructions
Find the device manual for free RCX210 PANASONIC in PDF.

User questions about RCX210 PANASONIC
0 question about this device. Answer the ones you know or ask your own.
Ask a new question about this device
Download the instructions for your Clock in PDF format for free! Find your manual RCX210 - PANASONIC and take your electronic device back in hand. On this page are published all the documents necessary for the use of your device. RCX210 by PANASONIC.
USER MANUAL RCX210 PANASONIC
Operating Instructions
Mode d'emploi Bedienungsanleitung Gebruiksaanwijzing Bruksanvisning Brugsvejledning Istruzioni per l'uso
FM-AM-FM Stereo Clock Radio
MODEL NO. RC-X210
natural_image
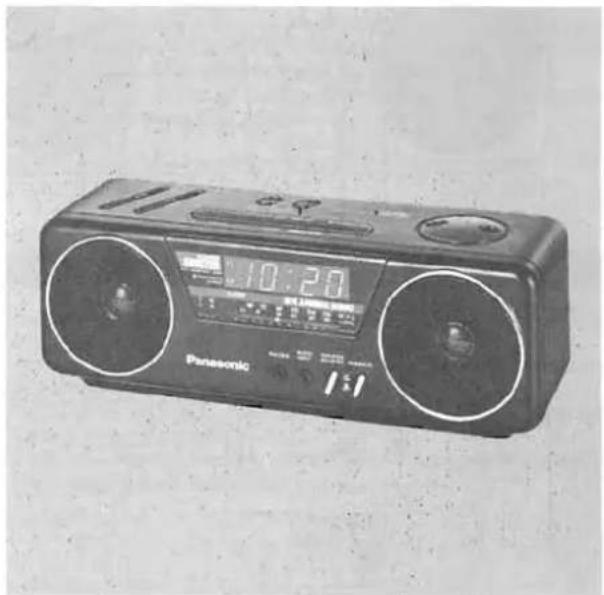
Black Panasonic portable radio with dual dials and a digital display showing 10:20 (no visible text or symbols on device body)Panasonic
Read these instructions completely before operating this unit.
Z

FOR YOUR SAFETY
■ Do not Remove Outer Cover
To prevent electric shock, do not remove cover. No user serviceable parts inside. Refer servicing to qualified service personnel.
■ AC Mains Lead Connection (For U.K.)
The wires in the mains lead of this apparatus are coloured in accordance with the following code.

flowchart
graph LR
    A["Important"] --> B["Blue ...... NEUTRAL"]
    A --> C["BROWN ...... LIVE"]
    D["Mains Lead"] --> E["..."]
As the colours of the wires in the mains lead may not correspond with the coloured markings identifying the terminals in your plug proceed as follows: The wire which is coloured BLUE must be connected to the terminal which is marked with the letter N or coloured BLACK. The wire which is coloured BROWN must be connected to the terminal which is marked with the letter L or coloured RED.
The Name Plate of this set is located on the bottom.
Thank you for purchasing this unit. For optimum performance follow these operating instructions carefully.

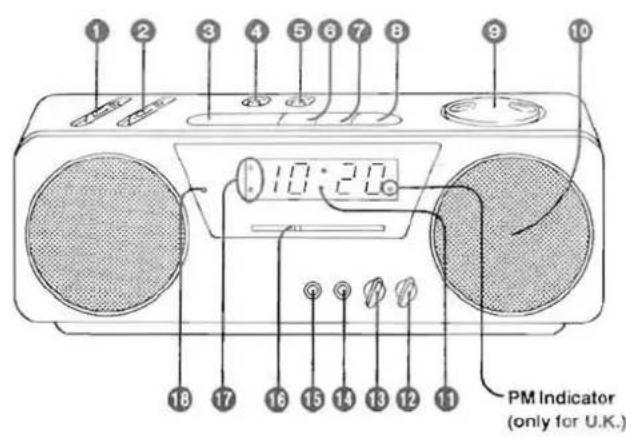
LOCATION OF CONTROLS (Refer to page 2.)
① Volume Control (VOLUME)
② Balance Control (BALANCE)
③ Doze Button (DOZE)
④ Alarm 1 Display/Adjust Button
⑤ Alarm 2 Display/Adjust Button
Sleep Button (SLEEP)
7 Off Button (OFF)
8 Radio On Button (RADIO ON)
⑨ Tuning Control (TUNING)
⑩ Speaker
Clock Display
⑫ Ambience Switch (AMBIENCE)
⑮ Booster Switch (AMPLIFIER BOOSTER)
⑩ Audio Input Jack (AUDIO INPUT)
15 Headphones Jack (PHONES)
16 Radio On Indicator
⑦ Alarm 1/2 Indicators
FM Stereo Indicator (FM STEREO)
19 Band Selector (BAND)
20 Alarm 2 Selector (ALARM 2)
⑦ Alarm 1 Selector (ALARM 1)
Time Set Buttons [TIME SET (REV·FAST·FWD)]
③ Brightness/Time Set Selector (BRIGHTNESS/TIME SET)
24 AC Power Cord
⑤ Back-up Battery Compartment
26 Battery Holder
⑦ Battery Connector
PRECAUTIONS
For your safety and to prevent damage to the set:
- Do not connect the set to an AC power outlet other than one supplying the specified voltage.
* Avoid cuts, scratches, or poor connections in the AC Power Cord which may result in possible fire or electric shock hazard. Also excessive bending, pulling, or splicing of the cord should be avoided. - Do not unplug the AC Power Cord by pulling on the cord. To do so may cause premature failure or shock hazard.
HELPFUL HINTS
- Keep the set away from heating devices and electrical noise generating devices such as fluorescent lamps and motors.
•The set should be kept free from dust, moisture, and vibration, and should not be exposed to direct sunlight. - Do not clean the plastic cabinet with benzine or thinner. Clean it with a mild solution of soap and water.
- Avoid spray-type insecticides. Some insecticides contain chemicals that could cause cabinet deformation.
The correct time can usually be obtained by listening for time checks on the radio or from telephone time services.
ELECTRONIC CLOCK
To set the correct time on the Clock Display, use the following procedure:
- Connect the AC Power Cord to your household AC power outlet.
●The Clock Display will begin to flash continuously. - Set the Brightness/Time Set Selector to "TIME SET".
- Press and hold the Time Set Buttons until the correct time appears on the Clock Display.
•The digits should stop flashing.
•The FWD Button forwards the displayed time and the REV Button reverses it. - To forward or reverse the displayed time rapidly, press and hold the FAST Button with the FWD or REV Button.
- To forward or reverse the displayed time minute by minute, press the FWD or REV Button repeatedly.
- For U.K., observe the PM Indicator. A green dot indicates "PM" and no dot indicates "AM".
- The seconds are automatically set to "0" when the FWD or REV Button is pressed.
- Reset the Brightness/Time Set Selector to "HIGH" or "LOW".
- To increase the brightness of the time display, set this Selector to "HIGH"; to decrease it, set to "LOW".
Antennas
FM:
To obtain the best FM reception, extend the FM Antenna Cord fully.
RADIO OPERATION
- Press the Radio On Button.
•The Radio On Indicator will light up. - Set the Band Selector to the desired radio band.
- Tune in the desired station with the Tuning Control.
- Adjust the Volume and Balance Controls to the desired levels
- Set the Ambience Switch and the Booster Switch to the desired positions (Refer below).
- To turn the radio off, press the Off Button.
Notes:
- To receive FM stereo broadcasts, set the Band Selector to "FM ST". The FM Stereo Indicator will light during stereo broadcasts.
- If FM stereo reception is poor (excessive noise, FM Stereo Indicator flickers), set the Band Selector to "FM". This will reduce the noise and provide clear reception; however, the broadcast will not be heard in stereo.
■ Ambience Switch
When this switch is set to "ON", the ambience sound system enhances the sound from a normal stereo sound source.
Ambience mode increases the stereo imaging, thereby broadening the listening area of the stereo sound. Therefore, you can enjoy the stereo sound as if you were in a concert hall.
■ Booster Switch
When this switch is set to "ON", the sound level is boosted.
AM:
A sensitive ferrite core antenna is built in this set to assure excellent AM reception in most areas.
To improve the reception of weak stations, turn the set in the direction which gives the best results.
This set incorporates a dual wake-up time feature, you can set each alarm time to any desired wake-up time in the following way.
■ Alarm 1 Time Setting
- Press and hold the Alarm 1 Display/Adjust Button.
- Set the desired wake-up time using the Time Set Buttons while pressing the Alarm 1 Display/Adjust Button.
- For U.K., make sure the AM or PM setting is correct.
- Release the Alarm 1 Display/Adjust Button, and the present time is restored on the Clock Display.
- To make sure of the pre-set time, press the Alarm 1 Display/Adjust Button again.
■ Alarm 2 Time Setting
To set the Alarm 2 time, press and hold the Alarm 2 Display/Adjust Button and follow the same procedure as above.
■ Alarm Selection
BUZZER ALARM
- Set the desired wake-up time on the Alarm 1 or Alarm 2.
- Set the Alarm 1 or Alarm 2 Selector to "BUZZER".
•The Alarm 1 or Alarm 2 Indicator will light up. - At the wake-up time, the buzzer alarm will activate.
•The alarm will automatically shut off in about 59 minutes. - To shut the alarm off before automatic shut-off, press the Off Button.
Separate Left/Right Buzzer Alarm
The lower tone buzzer of Alarm 1 will be heard only from the left speaker. The higher tone buzzer of Alarm 2 will be heard only from the right speaker.
RADIO ALARM
- Set the desired wake-up time on the Alarm 1 or Alarm 2.
- Set the Alarm 1 or Alarm 2 Selector to "RADIO".
•The Alarm 1 or Alarm 2 Indicator will light up. -
Follow the procedure described in steps 1–5 of "RADIO OPERATION", on page 4.
-
Press the Off Button.
- At the wake-up time, the radio alarm will activate.
●The alarm will automatically shut off in about 59 minutes - To shut the alarm off before automatic shut-off, press the Off Button.
Notes:
The alarm will activate automatically at the same time every day. Make sure to set the Alarm Selector to "OFF" when you want to cancel the alarm.
- Do not connect the headphones when the radio alarm is set.
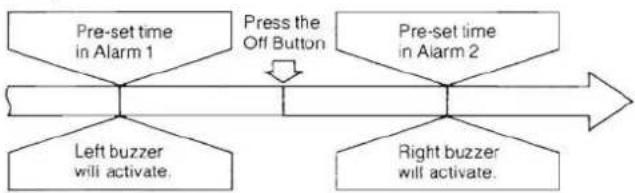
■ Combination of Alarm 1 and Alarm 2
Combination of Alarm 1 and Alarm 2 permits the following convenience.
Example 1:
flowchart
graph TD
    A["Pre-set time in Alarm 1"] --> B["Press the Off Button"]
    C["Left buzzer will activate."] --> B
    D["Right buzzer will activate."] --> B
    B --> E["Pre-set time in Alarm 2"]
- In this case, the Alarm 1 and Alarm 2 Selectors are set to "BUZZER".
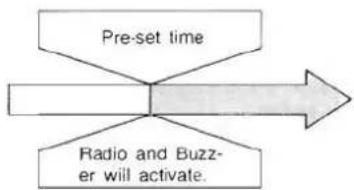
Example 2:
flowchart
graph TD
    A["Pre-set time"] --> B(( ))
    C["Radio and Buzzer will activate."] --> B
    B --> D["Arrow"]
- In this case, the Alarm 1 Selector is set to "RADIO" and the Alarm 2 Selector is set to "BUZZER", both at the same time.
DOZE OPERATION
When the alarm activates, but you do not wish to wake up immediately, press the Doze Button. The alarm will be quiet for about 7 minutes, then the alarm will operate again.
- If you do not need done time and want to cancel the alarm, press the Off Button.
- While you are pressing the Doze Button, the seconds will also be displayed. (At this time, the Display changes from hours and minutes to minutes and seconds.)
GO-TO-SLEEP BY MUSIC INSTRUCTIONS
You can set the clock radio to play up to 59 minutes, then shut off automatically.
- Press and hold the Sleep Button until the length of time for which you wish to listen to the radio is shown on the Clock Display.
- Watch the Clock Display as it counts backwards from 59 to 60 after about two seconds.
- When you release the Sleep Button, the correct time returns on the Clock Display.
- Radio will be shut off automatically in the pre-set sleep time.
- To cancel the sleep timer and shut the radio off, press the Off Button.
■ Combined Operation, Go-To-Sleep by Music & Wake-Up Alarm
You can set the clock radio to play for the desired time (up to 59 minutes) and shut off automatically, then activate the alarm automatically at the desired wake-up time.
- Set the desired wake-up time and select the desired alarm mode as instructed in the section of "OPERATION FOR 2-ALARM SYSTEM".
- Set the desired length of time for which you wish to listen to the radio as instructed in this section.
Notes:
- During radio-listening, you can confirm the number of minutes remaining by pressing the Sleep Button and looking at the Clock Display.
- You can change the length of time for which you wish to listen to the radio by the Time Set Buttons while pressing the Sleep Button.
CONNECTIONS (Refer to page 39.)
■ Using the Set's Built-in Power Booster
- For the volume level of the connected equipment (ex. CD player, headphone audio etc...), 2–3 (low) level is recommended.
- When using this unit as a power booster, be sure to press the Off Button to select the radio off mode. In the radio on mode, the radio function has priority.
■ Listening with Headphones
- When using headphones, avoid listening to sound for a long period of time at excessive volume levels, as this can cause damage to your hearing.
Sure Awake
The Buzzer Alarm is still functional even if headphones or external equipment are connected.
BATTERY BACK-UP SYSTEM (SURE ALARM)
The back-up battery will keep the clock and Buzzer Alarm operating during a power interruption. When power is resumed, the digits of the clock will illuminate and will show the time. The alarm "memory" is not affected by a power interruption—so there is no need to reset the alarm. Even if power is not resumed by the time you have set the Buzzer Alarm to activate, the buzzer alarm will wake you anyway at the pre-set time. (No display will be visible.)
Battery Installation
- Connect a 9-Volt battery (not included) to the connector, observing correct polarity as shown in Fig. 1.
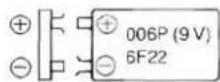
Fig. 1.
- Place the battery in the compartment by inserting it in the direction of the arrow B, while pushing the Battery Holder in the direction of the arrow A, as shown in Fig. 2.

Fig. 2.
■ When Replacing the Battery
●Unplug the AC Power Cord from the AC power outlet.
After several seconds, plug it back into the outlet. If the digits flash continuously, replace the battery with a new one.
- Replace the battery with a new one after one year of use (most batteries have a shelf life of approximately one year).
- If an extended power failure or interruption occurs, replace the battery with a new one.
Notes:
- When the set is unplugged (not in use) for a long time, remove the back-up battery to prevent possible battery leakage.
- Power failures may occur at any time of the night or day and can be of a long or short duration. Most failures are so short that people don't even notice the interruption. These interruptions do, however, affect clocks which do not incorporate a Battery Back-up.
- If the back-up battery goes dead during a power interruption, the present time and alarm time must also be reset after the interruption.
- If the power is not resumed by the wake-up time, the radio alarm will not activate.
26 Zeiteinstelltasten [TIME SET (REV·FAST·FWD)]
Helligkeits-/Zeiteinstellwahlschalter (BRIGHTNESS/TIME SET)
24 Netzkabel
WERKING VAN HET DUBBELE WEKSYSTEEM
BATTERIJ NOODVOEDINGS SYSTEEM (WEKKER GAAT ALTIJD AF)
Power consumption; 10 W
Battery: 9 V (006P/6F22)
for Battery Back-up
Radio Frequency
FM: 87.5-108 MHz
Range
AM: 520-1610 kHz
Power Output:
1 W×2 (RMS Max.)
Speakers:
8cm×2
Jacks:
Input,
Output:
Dimensions (W×H×D):
AUDIO INPUT: ∅3.5×1
PHONES: ∅3.5×1(16-32Ω)
280×97.5×100 mm
Weight:
1.4 kg without battery
Design and Specifications are subject to change without notice.
Matsushita Electric Trading Co., Ltd.