BD3055IFVN - Refrigerator Profilo - Free user manual and instructions
Find the device manual for free BD3055IFVN Profilo in PDF.



| Product type | Fridge Freezer Combo |
| Brand | Profilo |
| Model | BD3055IFVN |
| Dimensions (H x W x D) | 177 cm x 54 cm x 55 cm |
| Weight | Approximately 65 kg |
| Energy class | F (estimate) |
| Total net volume | Approximately 300 L |
| Fridge net volume | Approximately 200 L |
| Freezer net volume | Approximately 100 L |
| Installation type | Built-in |
| Power supply | 220-240 V, 50 Hz |
| Refrigerant | R600a |
| Noise level | Approximately 38 dB |
| Lighting | Interior LED (multiple light points) |
| Main functions | Refrigeration, freezing, food preservation |
| Shelves and drawers | Glass shelves, vegetable drawer, telescopic drawer, adjustable door bins |
| Door gasket | Magnetic, replaceable |
| Handles | Integrated or attached |
| Maintenance and cleaning | Manual defrosting, interior cleaning with soft cloth and soapy water |
| Safety | Mains disconnection mandatory before repair, VDE 0701 safety test |
| Spare parts and repairability | Gasket, handle, hinges, shelves, drawers, LED lighting, LED power module |
| General information | User manual available in multiple languages, BSH after-sales service |
Frequently Asked Questions - BD3055IFVN Profilo
User questions about BD3055IFVN Profilo
0 question about this device. Answer the ones you know or ask your own.
Ask a new question about this device
Download the instructions for your Refrigerator in PDF format for free! Find your manual BD3055IFVN - Profilo and take your electronic device back in hand. On this page are published all the documents necessary for the use of your device. BD3055IFVN by Profilo.
USER MANUAL BD3055IFVN Profilo
4.2 CmHa Ha Dpbkkata Ha BpaTata 10
4.2.1 ⅢaBaxdahe Ha npbXkata Ha BpaTata 10
4.2.2 MoHTpaHe Ha dpbXkata Ha BpaTaTa 10
4.3 CmHa Ha ropHaTa nHa Ta Ha BpaTata 11
4.3.1 CbaHHe Ha rohpHa Ta nHTa Ha BpaTaTa 11
4.3.2 MoHTnpaHe Ha rophata naHTa Ha BpaTata 12
4.4 CmHa Ha rohpata nHa Ta H BpaTata (BpTa c dncnne) 13
4.4.1 CbajrHe Ha rohpata naHTa Ha BpaTata 13
4.4.2 MoHTnpaHe Ha rophata naHTa Ha BpaTata 14
4.5 CmHa Ha cpeHaTa nHa HbPaTaTa 15
4.5.1 CbAJIHe Ha cpeHaTa NaHTa Ha BpaTaTa.. 15
4.5.2 MoHTpaHe Ha cpeHaTa NaHTa Ha BpaTaTa 15
4.6 CMHa Ha DoHaTa NaHTa Ha BpaTaTa 16
4.6.1 CbaJHe Ha donHaTa nAHTa Ha BpaTaTa 16
4.6.2 MoHTpaHe Ha donHaTa nAHTa Ha BpaTaTa 16
4.7 CmHa Ha paTa 17
4.7.1 ⅡBaKaHa ha paTa 17
4.7.2 MoHTnpaHe Ha paTbTa 17
4.8 CMHa Ha Ta6nKata 3a 6ytnkn 18
4.8.1 CbajrHe Ha Ta6nKata 3a 6yTnKn 18
4.8.2 MoNTnpaHe Ha Ta6nukata 3a 6yTuKu 18
4.9 CmHa Ha CTenaja Ha BpaTata 19
4.9.1 3BaJdaHe Ha cTeJaHa BpaTata 19
4.9.2 MoHTnpaHe Ha CTenJaHa BpaTata 19
4.10 CmHa Ha perynpyemna CTenax Ha BpaTata 20
4.10.1 CbanyHe hapeynpemyCteNaXHaBpata 20
4.10.2 MoHTIpaHHe Ha peryInpyeMnA CTeJax Ha BpaTaTa.. 20
4.11 CMHa Ha KOHTeHepa 3a 3ampa3EH XpaHHTeHH npOdyKTn 21
4.11.1 ɪəBaxʌdæHa KoHTeɪHepa 3a 3ampa3eHN xpaHntENn npOdykTN. 21
4.11.2 MoHTnpaHe Ha KOHTeHepa 3a 3ampa3EH XpaHHTeHN npOdykTN 21
4.12 CMHa Ha KOHTeHepa 22
4.12.1 ⅠЗваданHa KOHTeHepa.. 22
4.12.2 MoHTpaHe Ha KOHTeHepa 22
4.13 CmHa Ha pa3TeaTeHnKoHTeHep 23
4.13.1 ⅠЗвадан ha pa3TeaTeHnKoHTeHep 23
4.13.2 MoHTnpaHe Ha pa3TeRaTeJIHHa KOHTeHep 23
4.14 CmHa Ha LED cnot narnata 24
4.14.1 CbAHe Ha LED cnot nAmnata 24
4.14.2 MoHTpaHe Ha LED cnot narnata 24
4.15 CMHa Ha LED oCBetJeHMeTo OTrope 25
4.15.1 CbAHe Ha LED ocBETneHnETo 25
4.15.2 MoHTpaHe Ha LED ocBETneHMeTo OTrope 26
4.16 CMHa HA LED cbetnHaTa Ha cTpaHnHaTa neHa 27
4.16.1 CbAJIHe Ha LED CBETINHATA Ha CTpaHnHATA JeHTa 27
4.16.2 MoHTnpaHe Ha LED CBeTnHata Ha CTpaHHata NeHTa 28
4.17 CmHa Ha LED cnot narnata 29
4.17.1 CbAHe Ha LED cnot narnata 29
4.17.2 MoHTnpaHe Ha LED cnot nAmnata 30
4.18 CMHa HA LED MoDyHa Ha 3axpaHbHeTo 31
4.18.1 OTcpaHbAHe Ha LED Modyna Ha 3axpaHbAHeTo... 31
4.18.2 MoHTuPaHe Ha LED MOnyHa Ha 3axpaHbAHeTo.. 33
OTHOCHO To3n DokyMeHT
1.1 Baxha nHΦopMaζη
1.1.1 Uen
TeHc cBbETn 3a pEmOH T NOMarat Ha Ntpe6nTEnla da pEmOHtnpa Cam ypeiB n BcOTBeTCTBnC pernameHTa 3a ekONOrOcb6p3No npoeKtnpaHe Ha ypeiNe (OT03.2021 r.).
Te cbIbpxkT INHΦopMaJN KAK Da CMeHrTe ONpeDeneHn pe3epBn YactN, BKIOH-TEINHO pnpynpeKdEHN n PNCKOB.
Ako IMATE HRAKAKINBbnpoM,MOJIa CbIpKeTe Ce c HAUNO OTdEe 3a OBCnykBaHe Ha KInENTH. Hne HOCIM OTTOBOPHOCT 3a UETn, CaMO AKO CbBeNTe 3a peMOHT ca cna3eHN npabInHo.
1.2 06aCHeHne Ha cHMBOJInTe
1.2.1 HbHa onaCHOCT
IpeynpeintenHnBaCe cBcTOrT OT CmBOJ nCnHaHa Dyma.CnrHaHaTa yMa noka3Ba cepno3HOCTTA Ha onaCHOCTTA.
| Ниво на п dedурждени 3начени | |
| ОПАСHОCT | Еспаразы新股у на п dedурждени.TО сбоб Shedени по Смьт ини сернони наразяваим. |
| ПРEDУПЕЖДЕНЕ | Еспаразы新股у на п dedурждени.TOTСбоб Shedени по Смьт ини сернони наразяваим. |
| ВИМATEЛНО | Еспаразы新股у на п dedурждени.TOTСбob Shedени по Смьт ини наразяваим. |
| ВИМАМЕЛ | Еспаразы新股у на п dedурждени.TOTСбob Shedени по Смьт ини смьз. БЕТВЕНI.YE.TN. |
Tabuua 1: Hua Ha onachocm
1.2.2 Cnmbon3a onachoct
CIMBOHTE3aONACHOCTCa CIMBOHNUH N3o6paXeHNA, KOHTO DaBaT INDINKAUHA 3a Bnda ONACHOCT.
BTo3n DOKyMeHCTe H3N013BaT CNEdHInTe CMBOIN 3a OnaCHOCT:
MoHTnpaTeB o6paTeH peI.

PemOH
4.3 CmHa Ha rohpHaTa nHa Ta HbpaTaTa
CneuaHn HhctpyMeHTN:
HakpaHHK Torx TX20 6,3 MM (1/4") [00340865]
PNEUYPNEXDEHNE
Teekn, o6emncTuypeu!
MoHTnpaIteB06paTeHpeI.

PemOH
4.4CMHaHa rohHaTa nHa Ta HbpaTa (BpTa Cdnnne)
CneuaHn HhctpyMeHTN:
HakpaHHK Torx TX20 6,3 MM (1/4") [00340865]
PDEUYPEKDEHNE
Teekn, o6emncTuypeu!
IobpeHa HpyrHuactn Ha ypeHa NmB Doma Ha KHeHTa, HAp. DbHO
TO.
3akpenete KOMnoHeHTa, Taka Ye Da He NaHe.
H3nCKBaHe:
YpeBTe n3KIOueHOT 3axpaHbHeTo.
BbTpewHnTeΦmTHnHa ypea ca oTcPaHeHn.
4.4.1 CbanyHe Ha rohpata naHTa Ha BpataTa
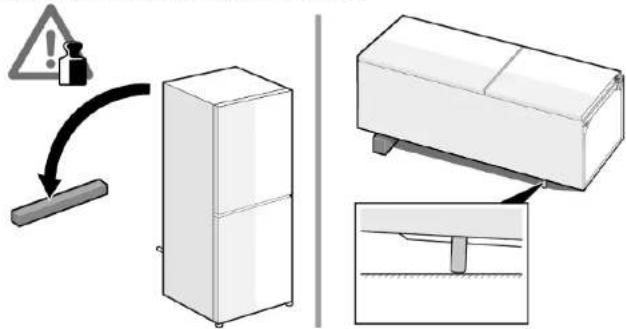
- NocTabete ypea JnerHan Ha 3aHaTa cn cTpaHa.

PemOH
2.1.Canete Kanahe HTo RopHata NaHTa(1). 2.Canete KanaHa Ka6enHata KYTN(2
3.нэклочеTe eNeKtpnHeckaTa BpəkA (3)
4. Pa3BnTe BnHTa 3a 3a3emBaata Bp3ka (4).
5. CbaneTe KaBEnHaTa 3aunTa (5).
6. Pa3BnIe BnHTa (6)
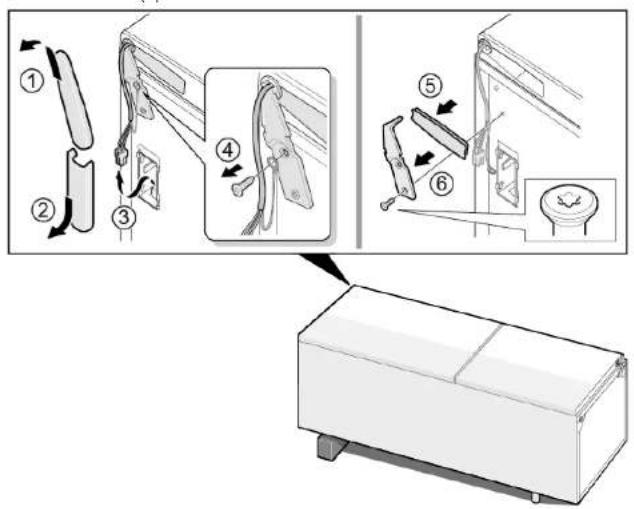

Toghata nHaTa e CbaneHa.
4.4.2 MoHTnpaHe Ha roPHaTa nAHTa Ha BpaTaTa
MoHTnpaTBeBobpaTeHpe.

PemOH
4.5 CmHa Ha cpeHata naHTa Ha Bpata
CneuaHn HhctpyMeHTN:
HakpaHHK Torx TX20 6,3 MM (1/4") [00340865]

A PDEyPExkEHN
Texk, o6emnctuypei!
IobpeHa HpyrHuactn Ha ypeHa NmB Doma Ha KHeHTa, HAp. DbHO
TO.
3akpenete KOMNOHeHTa, TaKa Ye Da He naDHe.
N3nCKBaHe:
YpeBt E N3KJIIOUeH OT 3aXpaHbHaHeTo.
BbtpseHHTEΦHTHnHa ypeDa ca oTcTaHeHN.
Toghata nHaTa HbPaTaTa e cBaNeHa.
4.5.1 CbanyHe Ha cpeHata naHTa Ha BpTaTata
1.CBaIeTe BpaTaHa XnaDnHToO TdJIeHeN (1).
2. Pa3BnIte DBaTa BnHTa (2).
3. Cbanepehdana (3).
CpeHata nHaTa e CBAneHa.
4.5.2 MoThIpaHHe Ha cpeHaTa naHTa Ha BpTaTa
MoHTnpaIteB06paTeHpeI.

PemOH
4.6CMHaHaDOnHaTaNaHTaHaBpTaTa
CneuaHn HhctpyMeHTN:
HakpaHHK Torx TX20 6,3 MM (1/4") [00340865]
PDEYIPKXDEHNE
Teekn, o6emncTuypeu!
MoHTnpaIteB06paTeHpeI.

PemOH
4.7CMHaHa paΦTa
N3nCKBaHe:
BpaTaTa e oTbopeHa.
4.7.1 N3BaXdAne Ha paΦTa
H3dpnaiTepaTa.
PaftbtecbaneH.
4.7.2 MoThupaHe Ha paΦTa
MOHTnpaTeB06paTeH peI.

PemOH
4.8 CmHa Ha Ta6nukata 3a 6yTnIKN
M3nCKBaHe:
Bpatae oTbopeha.
4.8.1 CbAha Hata6nukata 3a 6ytnkn
N3dbpnaTeTa6nHkata 3a 6ytnkn.
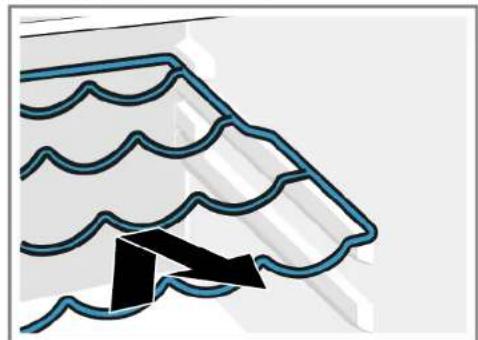
Ta5bNnKata3a6ytnKne cBaaneHa.
4.8.2 MoThiPaHe Ha Ta6JnUkata 3a 6yTnIkn
MoHTnpaTteB06paTeHpe.

PemOH
4.9 CMraHa Ha cTeJaKa Ha BpaTaTa
M3nCKBaHe:
Bpatae oTbopeha.
4.9.1 N3Baxdahe Ha CTenaxa Ha BpaTata
NobHHeTcTeJaxHaBaPaTaHarope.
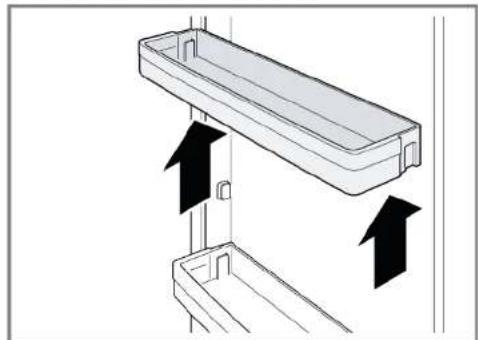
CTenakbT Ha BpaTaTa e cBaHe.
4.9.2 MoNTIpaHc HcTeJaxHa BpTaTa
MoHTnpaTteB06paTeHpe.

PemOH
4.10 CmHa Ha peryInpyemn cTeJax Ha BpaTaTa
N3nCKBaHe:
BpTaTa e TbOpeHa.
4.10.1 CbAHa He perynpyemra TcEnaKa Ha BpaTaT
PfpeMeCTePeYnIPyEMIaTNO BnCOuHbA CTENaK HA BpataTA HArOpe, DOKaTO CE OcbOboN ot DbXkha.
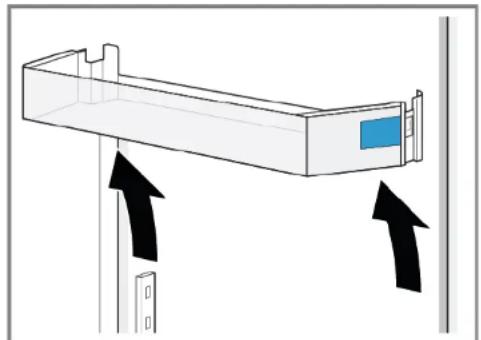
PerynpyemnTcTeJAAHbPaTaTaeCBaJIeN.
4.10.2 MoThIpaHe Ha peryInpyeMn cTeJax Ha BpaTaT
MOHTpauTeB o6paTeH pei.

PemOH
4.11 CMHa Ha KOHTeHepa 3a 3ampa3eHN XpaHHTeHH npOdykTN
N3nCKBaHe:
BpaTaTa e oTBopeHa.
4.11.1 3BaXdaHe Ha KOHTeHepa 3a 3aMPa3eHN XpaHHTeHH npOdyKTH
- 13dbpnaTe DOKpaI KOHTeHepa 3a 3aMPa3EH XpaHNTEN H npOdykTN (1). 2. N3BaTe KOHTeHepa 3a XpaHNTEN H npOdykTN (2).
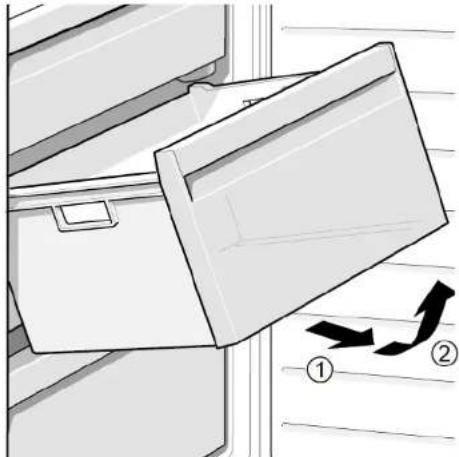
KoHTeHepb3a 3aMPa3EHn XpaHHTeHn npOpykTN e N3BaJeH.
4.11.2 MoHTnpaHe Ha KOHTeHepa 3a 3ampa3eHxpaHnTeHn npOdykTn
MOnTnpaTaeB06paTeHpeJ.
MoHTnpaIteB06paTeHpeI.

PemOH
4.13 CmHa Ha pa3TeratEnHnKoHTeHep
M3nCKBaHe:
BpaTaTa e oTbopeHa.
4.13.1 N3BaXdAhe Ha pa3TeRaTeJIHHa KOHTeHep
- N3dbpnaTe HambnHO pa3rTaTeHHN KOHeHep(1).
2.ИЗbaTepea3TeraTeHnHaKoTHeHep(2).
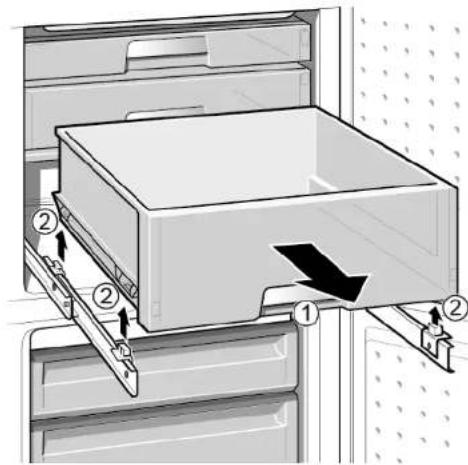
PaTteratENHnT KOHTHepe n3BaHeh.
4.13.2 MoHTupaHe Ha pa3TeRaTeHHra KOHTeHep
MOHTnpaTaTeB06paTeHpeI.

PemOH
CnueHnHCTpyMeHT [00342180]

Baunrtype e cah6dene CLED ocBteHne, KOeTo He n3nckba noDpKka.
Toba ocBtneHme moKe da 6bDe peMOHTnpaHO cAmO OT cNeuHaNCT
OT cnyk6ata 3a o6cnykBaHe HA KIneHTn NnO TcKaIINPnupaHnTe HnU!


ONACHOCT
Pnck OT TokOB yap nopadn qactn noHanpeXeHne!
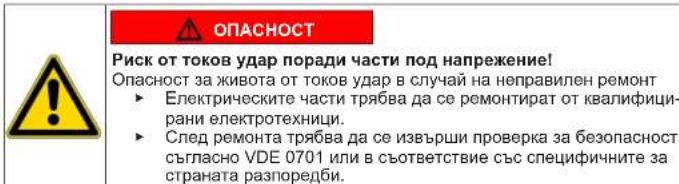
Onachoc3a KIBOTA OT TOKOB ynap B CnyaHa HEnpaBnnepeMOHT
Eeektpnckte Taee Tp86Ba da ce pemohnpat ot kbaanHnHnpan HneektoxHnn.
CnEi pemOHa Tp6BaJa ce n3bPm npOBepKa 3a 6e3oNaHcOCT cbrIacHO VDE 0701 mB CbOTBeTCTBHe CbC cneunHnHTe 3a cTpaHATA paanopepe


OJAGHOCT
PnCK OT TOKOB ydap npaH nuacn noH anpeXeHne!
CmbptOT TOKOB ydap
KnHIOyte ypeNTe O t ENEKTPUeCKTO 3axpaHbAbe NOhe 60 ceHyHNI pEINe 3aIOBAHE Na pEOHOTA.


SHMATEJIHO
Octpnpb60Be!
HapaHbAHmOTnp3BaHe
HocTe npedna3n pbKaBn.
N3nCKBaHe:
YpeIbTe EINKIOUeHOT3aXpaHbHaHeTo.
Bpaatae oTBopeHa.
4.14.1 CbānHa He LED cNOT JAmNaTa
- INON3BAIte cneunaneHnHCTpyMeHT, 3a da n3BaIte LED cnot lamnata (1).
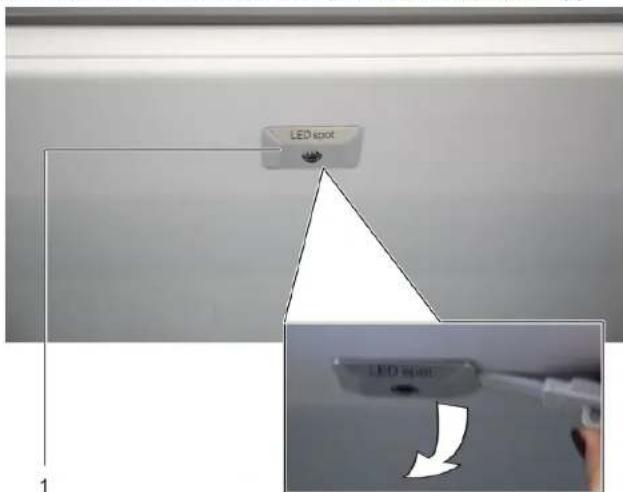
2.ИЗкпунеTe eNEKtpuYeCKnTe Bp63kn Ha LED cNOT nAMnata.
LED cnot namnata e cbanha.
4.14.2 MoHTnpaHc HA LED cNOT nAMnata
MoHTnpaIteB06paTeHpeI.

PemOH
4.15 CMraHa HA LED oCBetneHneTo otrope
CneuaJIHHHnCTpymeHTN:
NnockaOTBeptKaBpbx2,4MMX0,4MMX60MM,B KOMPnEeTa[00341820]

BaWnAT ype n cHa6dene C LED ocBtneHme, KoTe He H3NcKbNa oI- DpBkKa. Toba ocBtneHme MOKe Da 6bJe peMOHTnpaHO CaMo OT CNEuHaNCTU ot cnykbaTa 3a 06cnykBaHe Ha KIneHTn NINOT KBANFmPapnTexHnui!


ONACHOCT
Pmck ot TKOB yub npoprna tactn noanHanpexkHe!
OnAnOHCT 3a KWBOTA ot TKOB yub aB city nHenPBAP
EeKtPrnTeKteTneAactn TpRbBa da ce pEmOHnpat OT KBAIINPHUNPAHn EeKToTeXHn.
Cnep pemoHTA Tp8Ba 1a Ce n3bBpiN npOBepKa 3a 6e30NaCHOCTcRlachO VDE 0701 mnn B cBtBTCTBHe CbC cneunHnHnTe 3a cTpaHATA paanope6n.


ONACHOCT
PnCK OT TOKOB ydap npaHn qactn noHanpeXeHHe!
CmbptOT TOKOB ydap
N3KNUOYE ypeIne O t eENKPTHcNECKOTo 3axpaHbAhe noe 60 ceKHynnpEa3noPABaHa He pMeHTA.


BHIMATEJIHO
Octpn pb6oBe!
HapaHbHaMOnTnnp3BaHe
Hocete npedna3n pkaBn.
N3nCKBaHe:
YpeBt e N3KIOUeHOT 3axpaHbAHeTO.
BpaTata e OTbopeHa
TopHnTe BbTpewHn pHTnHr Ce oTcPaHBAt.
4.15.1 CbajnHe Ha LED ocBetJeHneTo
- Ppemectete LED ocBETneHneto HnABO.
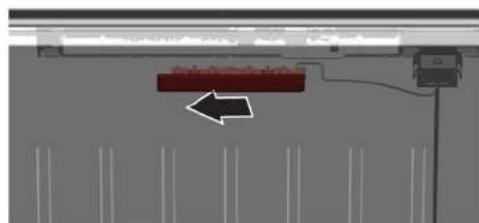
CbpbbaHTo Kb mEeKtpnueckaT Mpeka H LED oCBETneHHeTo e npekbcHATO.
2.Ocbo6oTeKyKnTe HaLEDocBeTneHMeTo.
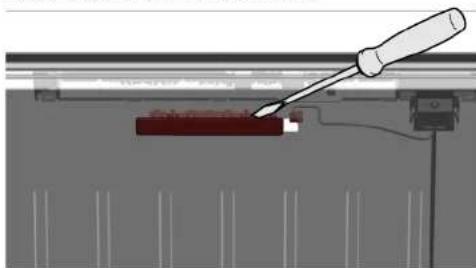

PemOH
3.CBaIeTeLEDocBETHeHnETo,pNIMBKBaIKnroHanpei.
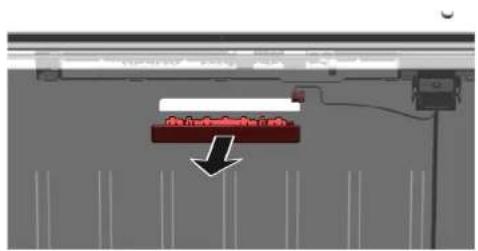
LEDOCBETHeHMeToeCBaneHo.
4.15.2 MoHTnpaHe Ha LED ocBETneHnTo oTrope
MoHTnpaIteB06paTeHpeI.

PemOH
4.16 CMnHa Ha LED cbEtnnHata Ha cTpaHnHata JeHtA
CneuaJIHHHHTpymeHTn:
CmykateHnHa yaa 05Mm [00342224]

BauHrT ype d cchabcn CLED ocBteHne, KoTo He n3NcBa noDpIbXkA.
Toba ocBteHne MoKe Da 6bJe peMOHTnpaHO cAmO ot CneuHaInCT
OT cYkbata 3a 06cNyKbaHe Na KIneHTn Nm OT KBaMnPunpaHn TE Hn!


ONACHOCT
Pnck OT TokOB yap npaH nuoH anpeXeHne!
Onachoc3a KIBOTA OT TOKOB ynap B CnyaHa HEnpaBnnepeMOHT
Eeektpnckte Taee Tp86Ba da ce pemohnpat ot kbaanHnHnpan HneektoxHnn.
CnEi peMOHTA Tp6BaJa Ce n3BbpN npOBepKa 3a Be3ONaCHOT cbrIacHO VDE0701 mN B cBtBETCTBHe CbC cneunHnHnTe 3a cTpaHATA paanopepe


ONACHOCT
PCKOTOKOByapnapaHnactnnoHanpeXeHne!
CmbptOT TOKOB ynap
N3KHyote ypeDte oEeKTPUeCKTO 3aXpaHbAne H06 cKynHnnpEn3aHOBHaNE haPcMOHTA.

BHIMATEHNO
Octpnpb60Be!
HapaHaBaHmO Tnpa3BaHe
HocTe npedna3n pbKaBn.
N3nCKBaHe:
YpeBt E n3KIOueH OT 3aXpaHbAHeTO.
Bpatae o TBopeha.
PaptoBete Ha xnaHnHTo OToJeHeHne ca 3BaHeH.
4.16.1 CbAha He LED cbTnHaTa Ha ctpaHnHaTa JeHTa
- Noctabete CmykatenHata Yawa Bbpxy rohpata Tpeta HA LED cbetnHata Ha ctpaMHATA JNTA.
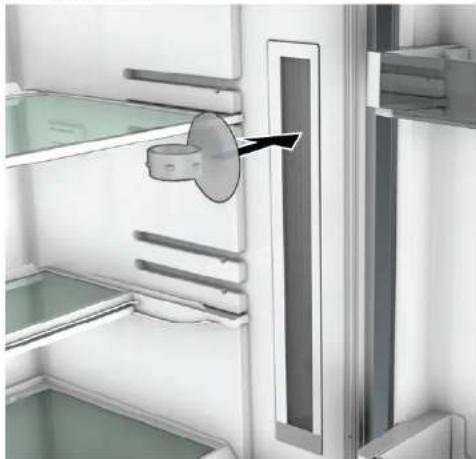

PemOH
2.Иььрайе cmyкATEннATAачаспpeДНATALEDcBETNHaHACTPANHATAJIeHTA cEDHO BbPTENBO DnKHeHne.
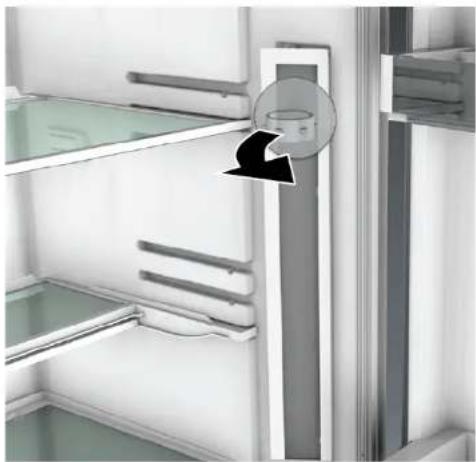
- 3nKIOeTe eNKeTpuNecKa Ta Bp3ka HA LED CBeTIHATA Ha cTaPAHHTA nEHTA. LED CBeTIHMA Ha cTaPAHHTA nEHTA eCBANEHa.
4.16.2 MoHTnpaHc Ha LED cBeTnHaTa Ha cTpaHnHaTa IeHTa
1.Cbpxte enektpueckata Bpb3ka HA LED cbetnHaTa Ha ctpaHHTa neHTa.
2.ФКИССРАЕТLECEBСБПИНATAнСТРИССРАЕТЯЛЕNTAнHAнEHOTOMЯСТОнHACTEHATAнOТДENENHETO(KGYKITEUSPAKBAT)
LED cbETnHaTt ha CtpaHHTa TneHTa e MoHTnpaHa.

PemOH
KOMnneKaTa [00341820]

Baumat ype n e cha6eH c LEOB oCteJIeHne, KOeTo H 3nCKBa noI- npKx#.
Toba OCBETJENHE MOXe Da 6bJe peMOHTIpaHO cAmO CTcEuaJIHCTNOT CNYKbata 3a 0cbNyKBaHe Ha KmENTn HnNt KbANuPapAH TxHHn!


ONACHOCT
PnCK OT TOKOB ydap npaui yactn noHanpeXeHne!
Onachoc3a KIBOTA OT TOKOB ynap B cnhyaHa HnpaBnneH peMOHT
Eekrtpnckteaactnptba da ce pemOHnpat ot kBaIIMPHpAHN eneKPTPOTeXHIN.
Cnep pemohTa Tp6Ba Da Ce N3BbpN PPOBepKa 3a 6e3oNaCHOCTbRtAo VDE0701 mN B CbOETCBHc CcneuHHTHe 3a cTpaHATA paanopeD


ONACHOCT
Puck ot Tokob yap npaui actn noHanpeXeHne!
CmbptOT TOKOB ynap
M3NkhOte ypeHTe OTE enEeKTHueCKTo 3aXpaHbAne HO6 CE KyHnnpDc3aONHBAHe aPeMOHaT.


BHIMATEJIHO
Octpn pb6oBe!
HapaHbAHmO Tnp3BaHe
HocTe npedna3n pbkabu.
N3nCKBaHe:
YpeBt n3KIOueHOT 3axpaHBAHeTo.
BpaTata e OTbopeha
PaTOBeHa xnaHnHOTo OTdeneHne ca n3BaDeHn.
4.17.1 CbānHa He LED cNOT JAmNaTa
1.Ocbo6oTeKaIbphaHaLED cnot lamnata.
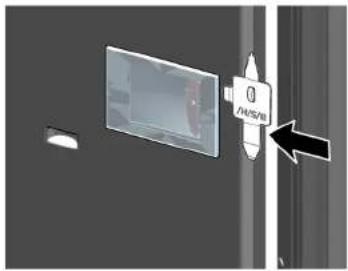
2.Издьрпайе калбфа Ha LED сnot lamnata habытpe n eДновремнс с haTин He Tne Hanpei.
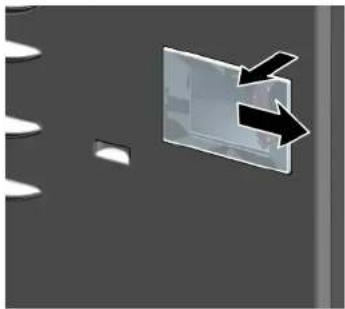

PemOH
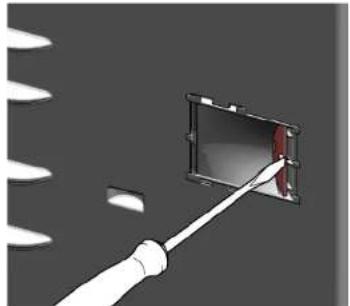
- OTeJeTeMoDyHa HLEDcNOTnAmnata.
- INKIOUeTe eNEKTPnHeckata Bpb3ka Ha LED cnot JAmnata.
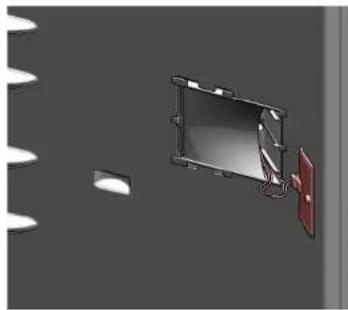
LED cnot narnnata e cbaneHa.
4.17.2 MoHTnpaHc Ha LED cNOT JAMnata
MoHTnpaTBeBoppaTeHpeJ.
4.18 CMHa Ha LED Moyla Ha 3axpaHbHeTo
CneuaJIHHHHTpymeHTn:
HakpaimHKorxTX206.3MM(1/4")[00340865]
PnockaOTBepkA Bpbx2,4MMX0,4MMX60MM,B
KOMnNeKaT [00341820]
KoHTeHep MInH. BmecTmOcT 200 ml
Baxn 3a BapnaHTn Ha ypeDa C KaMepa B XlaadnnHnka (CIF).

EnkpoHmMoynMoraTda6bDatpeMOHTnpaHcmoOTcneua
INCTOcny6bata 3a o6cnykBaHe Na KIneHTN mN O T KBaIINHUPAH NTEXHNI!
ONACHOCT
Pnck OT TKOB yap npaH cyactn noHanpeXeHne!
Onachoc3a KINBOTA OT TOKOB ynap B cnyuHa HnnpaBnneH peMOHT
EneKtpnHecknte Yactn TpR6Ba Da ce peMOHTnpaT OT KBaJIHΦnU
paHn eneKtpoTeXHmU.
CnepeMOHTaTpaBa da ce N3BbpN npOBepka 3a be3oNaCHOCT
CbrnacHO VDE 0701 nnn B cbotBETCTBNE Cbc CneuHnHTe 3a
cipahata p
OJACHOCT
Pnck OT TokOB ydap nopadn hactn noHanpeXeHne!
CMbPT OT TOKOB yap
N3KIOHcTe ypeDnTe OT eNEKTPueCKTo 3axpaHbAne nohe 60 ce
KyHINIpeIN3aONOVAHeHapeMOHTa.
BHMMATEHO
Octpn pb6oBe!
HapaHbHaHnO TnpaBaHae
Hocete npedna3n pbkabu.
N3nCKBaHe:
YpeBt e n3KIOueHOT 3axpaHbHeTo.
3aHaTa cTpaHa Ha ypeiNTe e DocTBnHa.
4.18.1 OTeTpaHbAHe Ha LED Moyla Ha 3axpaHbAHeTo
1.
BHUMAHUEI

Onachoct ot nobpea!
PazIraIbPyXeNEKTPOHHTe KOMNOHEHTN INBp3kHTHe HA KOMNPecopa pa3mpa3eHa BODa MoKe Da NOBpeDn ENEKTPOHHTHe KOMNOHEHTN HA ypeDa.
No BpeMe Ha OToCTpaHrBaHe Ha Mapkya 3a N3TOBaHe ce
yBepeTe,Ye pa3Mpa3eHaTa BODa HrMa Da ce pa3Jee Bbpxy
eNEKTPoHHN KOMnOHeHTN.
- Pa3kayeTe Mapkyua 3a n3TOUbaHe OT n3XOda 3a n3TOUbaHe Ha BOda (1).
- NaeneIte pa3Mpa3eHaTa B0da B KOHTeHep.
- Pa3kaueTe Mapkya 3a n3TOyBaHe OT TaBata 3a B0da OT n3napraBaHe (2)

PemOH
- P3BnTE BHTA.
KoHdENHaTOp3b 3a CTAPnAbe HA KOMPecopca H KyTnra Ha 3axpaHauBaunLED MOyuna 3a xapHauBaHe ce Ocbo6OxkDaBat.
3.Ocbo6oJeDBeTe KyKn.
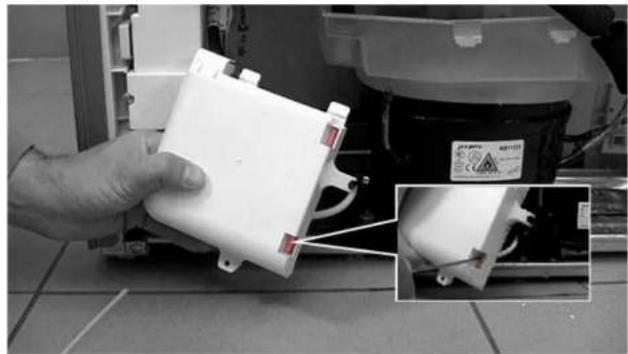
KoHdEn3aTOpB 3a cTAPnHa He KOMIPecOHa NAKkBt HA KytTtA H 3axpaaBaunuLED Moynya 3a xapAABaHe ce Ocb06QkDaBAt.
4.18.2 MoHTnpaHc Ha LED MoUJa Ha 3axpaHbAHeTo
MoHTpaIteB O6paTeH peI.
4.17.1 Fjernelse at LED-spotlampe 125
4.17.2 Montering of LED-spotlampe 126
Sorg for at sikre apparater mod at glide.


PAS PAI
Fare for nedfaldende deleg pga. Iosnedeskruer!
ronskade pga. nedfaldende dele
Sorg for at sikre componenten mod at falde ned.

BEMERKI
Fare for nedfaldende dele pga. Iosnede skruer!
Sorg for at sikre componenten mod at falde ned.
Preindstilling:
Sorg for at sikre apparater mod at glide.


PAS PAI
Fare for nedfaldende deleg pga. Iosnedeskruer!
rsonskade pga. nedfaldende dele
Sorg for at sikre componenten mod at falde ned.

BEM/ERK!
Fare for nedfaldende dele pga. Iosnede skruer!
Sorg for at sikre componenten mod at falde ned.

FARE
Sorg for at sikre apparater mod at glide.

PAS PAI
Fare for nedfaldende dele pga. Iosnede skruer!
ronskade pga. nedfaldende dele
Sorg for at sikre componenten mod at falde ned.

BEMERKI
Fare for nedfaldende dele pga. Iosnede skruer!
Sorg for at sikre componenten mod at falde ned.
Preindstilling:
Sorg for at sikre apparater mod at glide.


PAS PAI
Fare for nedfaldende dele pga. Iosnede skruer!
ronskade pga. nedfaldende dele
Sorg for at sikre componenten mod at falde ned.

BEM/ERK!
Fare for nedfaldende dele pga. Iosnede skruer!
Sorg for at sikre componenten mod at falde ned.
Preindstilling:
4.14 Udskifting at LED-spotlampe
Nodvendig voektoj:

4.17 Udskifting at LED-spotlampe
Nodvendig voektoj:
Specialvarkort0j [00342180]
Kaervskruetraekker Blad 2,4 mm x 0,4 mm x 60 mm i saettet [00341820]

Apparaat is losgekoppeld is van de stroomvoorziening.
Deur is open.
Repair hints - Fridge-freezer
Concerning this document. 163
1.1 Important information 163
1.1.1 Purpose 163
1.2 Explanation of symbols 163
1.2.1 Danger levels.. 163
1.2.2 Hazard symbols 163
1.2.3 Structure of the warnings 164
1.2.4 General symbols 164
Safety 165
2.1 General Safety instructions 165
2.1.1 All domestic appliances 165
Tools and aids. 166
Repair 16
4.4 Replacing door upper hinge (door with display) 173
4.8 Replacing bottle tray 178
4.8.1 Removing bottle tray 178
4.8.2 Installing bottle tray 178
4.9 Replacing door rack 179
4.14 Replacing LED spot light 184
4.14.1 Removing LED spot light 184
4.14.2 Installing LED spot light 184
4.15 Replacing LED top light 185
4.15.1 Removing LED light. 185
4.15.2 Installing top LED light 186
4.16 Replacing LED side bar light 187
4.16.1 Removing LED side bar light 187
4.16.2 Installing LED side bar light 188
4.17 Replacing LED spot light 189
4.17.1 Removing LED spot light 189
4.17.2 Installing LED spot light 190
4.18 Replacing LED power supply module 191
4.18.1 Removing LED power supply module 191
4.18.2 Installing LED power supply module 193
Concerning this document
1.1 Important information
1.1.1 Purpose
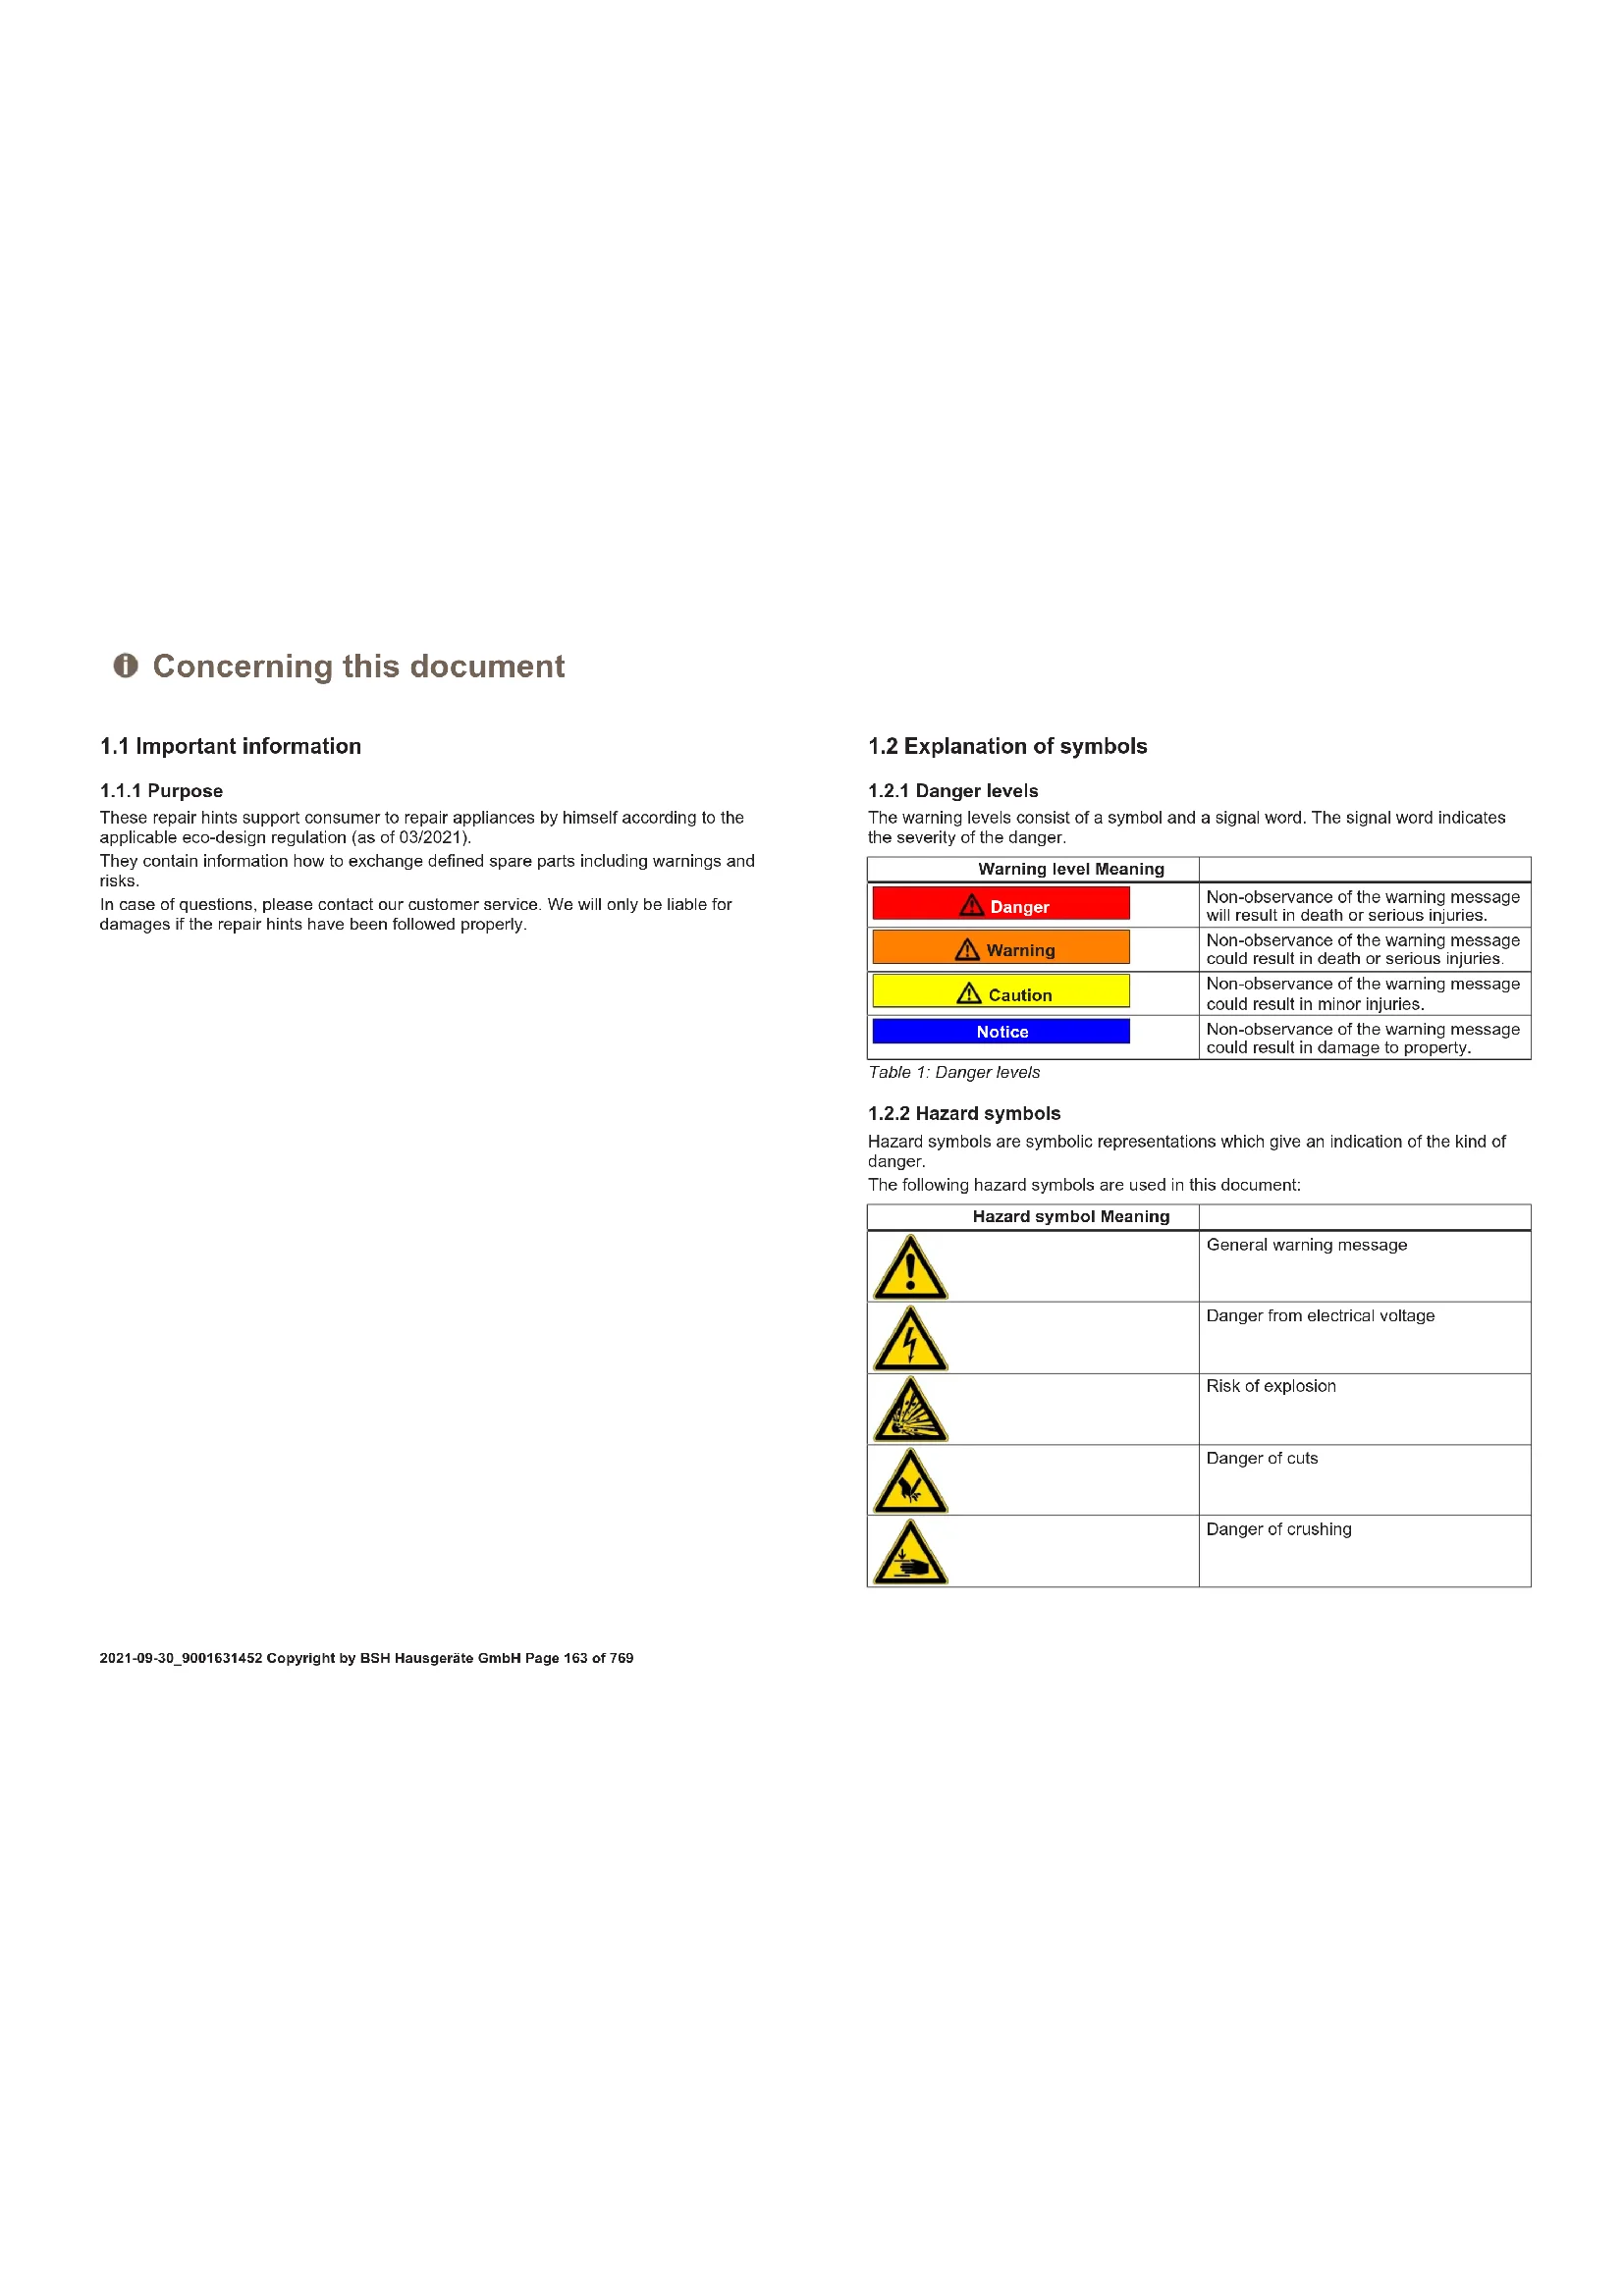
These repair hints support consumer to repair appliances by himself according to the applicable eco-design regulation (as of 03/2021).
They contain information how to exchange defined spare parts including warnings and risks.
In case of questions, please contact our customer service. We will only be liable for damages if the repair hints have been followed properly.
1.2 Explanation of symbols
1.2.1 Danger levels
The warning levels consist of a symbol and a signal word. The signal word indicates the severity of the danger.
Table 1: Danger levels
| Warning level Meaning | |
| Danger | Non-observation of the warning message will result in death or serious injuries. |
| Warning | Non-observation of the warning message could result in death or serious injuries. |
| Caution | Non-observation of the warning message could result in minor injuries. |
| Notice | Non-observation of the warning message could result in damage to property. |
1.2.2 Hazard symbols
Hazard symbols are symbolic representations which give an indication of the kind of danger.
The following hazard symbols are used in this document:
| Hazard symbol Meaning | |
| ! | General warning message |
| Danger from electrical voltage | |
| Risk of explosion | |
| Danger of cuts | |
| Danger of crushing |
Concerning this document
| Hazard symbol Meaning | |
| Danger from hot surfaces | |
| Danger from strong magnetic field | |
| Danger from non-ionizing radiation |
Table 2: Hazard symbols
1.2.3 Structure of the warnings
Warnings in this document have a standardised appearance and a standardised structure.
Danger
Type and source of danger!
Possible consequences of ignoring the danger / warning.
Measures and prohibitions for preventing the danger.
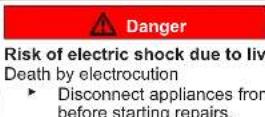
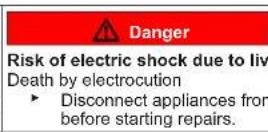
The following example shows a warning that warns against electric shock due to live parts. The measure for avoiding the danger is mentioned.
Danger
Risk of electric shock due to live parts!
Death by electrocution
- Disconnect appliances from electrical supply at least 60 seconds before disconnecting repairs.
1.2.4 General symbols
The following general symbols are used in this document:
| Gen. symbol Meaning | |
| 1 | Identification of a special tip (text and/or graphic) |
| i | Identification of a simple tip (only text) |
| Identification of a link to a video tutorial |
| Gen. symbol Meaning | |
| Identification of required tools | |
| Identification of required preconditions | |
| Identification of a condition (if ..., then ...) | |
| Identification of a result | |
| [Start]Identification of a key or button | |
| [00123456] Identification of a material number | |
| Status Identification of displayed text / window(in the appliance's display) | |
Table 3: General symbols
Safety
2.1 General Safety instructions
2.1.1 All domestic appliances
Risk of electric shock due to live parts!
Errors by repairs involving electrical components can lead to electrical shock!
- Disconnect the appliance from the mains for at least 60 seconds before starting work.
After the repair have a safety test according VDE 0701 or country-specific regulations performed.
Risk of injury from sharp edges!
Wear protective gloves.
Risk of crushing during repair, maintenance, troubleshooting and service due to heavy and moving components
Wear protective shoes.
- Secure heavy components from falling down.
- Do not stick body parts into moving components.
Risk to the appliance's safety / function!
Only use original spare parts.
Risk of damage to electrostatically sensitive components (ESDs)!
- Do not touch the modules, including connections and conductor paths.

Tools and aids
| Designation Details Images | ||
| Protection cloth [00342013] | 60 cm x 50 cm |  |
| Slotted screwdriver | Blade 2.4 mm x 0.4 mm x 60 mm, in the kit [00341820] |  |
| Special tool [00342180] | ||
| Suction cup [00342224] | Ø50 mm | |
| Torx Bit TX20 [00340865] | 6,3 mm (1/4") |  |
| Slotted screwdriver | Blade 10 mm x 1.6 mm x 200 mm |  |

Repair
Prerequisite:
Door is open.
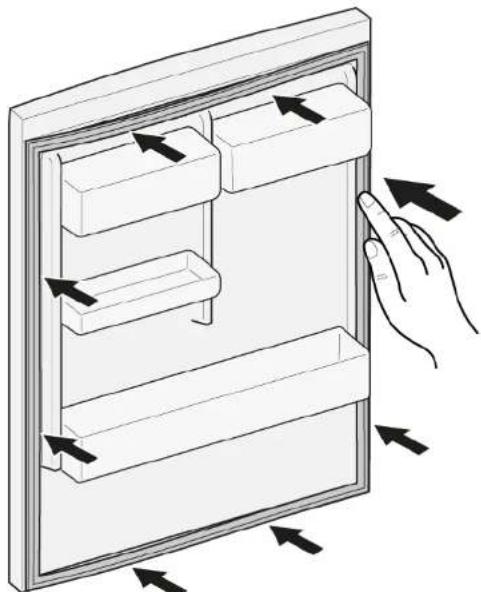
- Release door gasket from the groove on right and left corner.
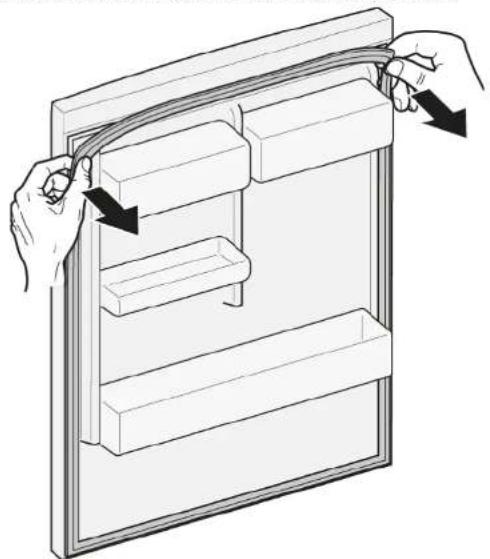
- Pull out door gasket from groove.
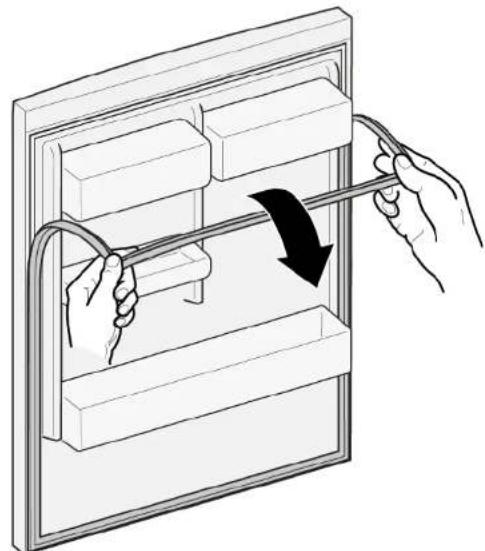

Door gasket is removed.
| Thickness of new door gasket may deviate slightly from thickness of old door gasket. This will not affect closing behavior and long-term function. | |
| If your appliance has adjustable hinges or hinge attachments, you can optimize the closing behavior subsequently. | |
| Small side holes in door gasket are functional (required for ventilation). These are not production faults. |

Repair
- Check groove for gasket for damage.
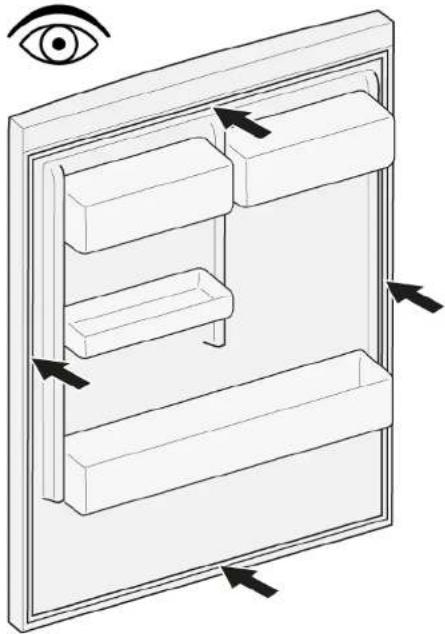
- If groove for gasket is it is damaged.
- Contact customer service.
- Slight deformation of door gasket is normal and does not affect its function. It is recommended to straighten door gasket before inserting it into appliance.
Heat door gasket with a hair dryer or hot water and manually reshape it.
- Push corners of gasket at the top and bottom to the groove.
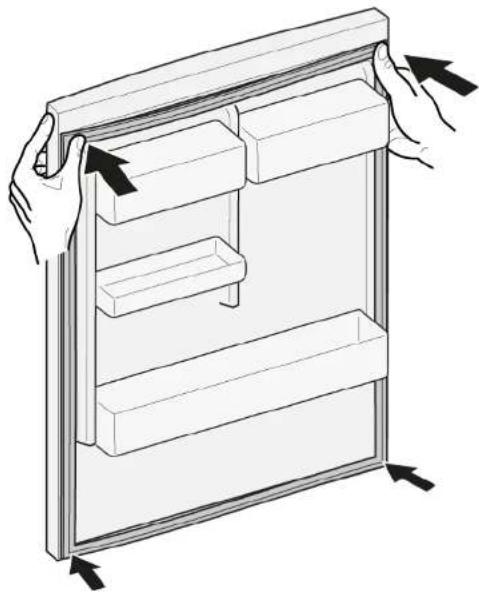

Repair
- Press whole gasket step by step into the groove.
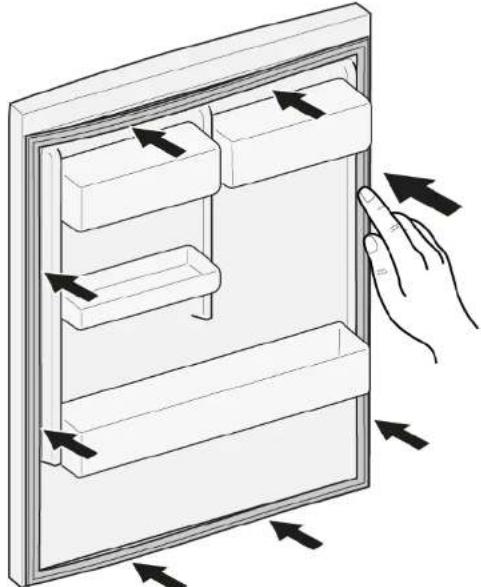

Door gasket is installed.
Slotted screwdriver Blade 10 mm x 1.6 mm x 200 mm
Prerequisite:
Appliance is disconnected from power supply.
Door is open.
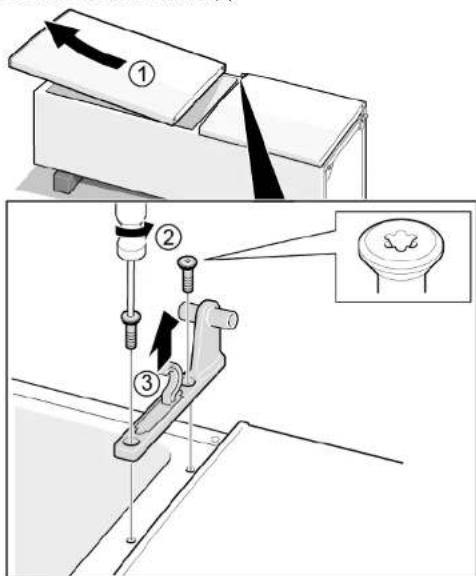
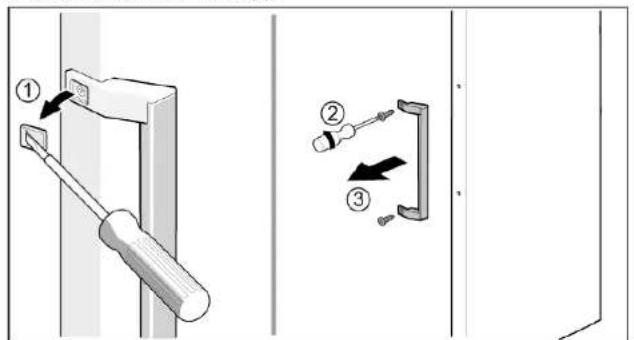
4.2.1 Removing door handle
-
Remove two screw caps (1).
-
Unscrew two screws (2).
- Remove door handle (3).
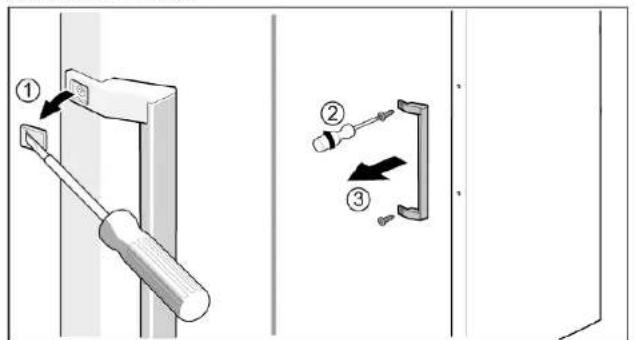

Door handle is removed.

Door handle for the second door can be removed in the same manner.
Install in reverse order.

Repair
Appliance is disconnected from power supply.
Appliance interior fittings are removed.
- Place appliance on the back side.
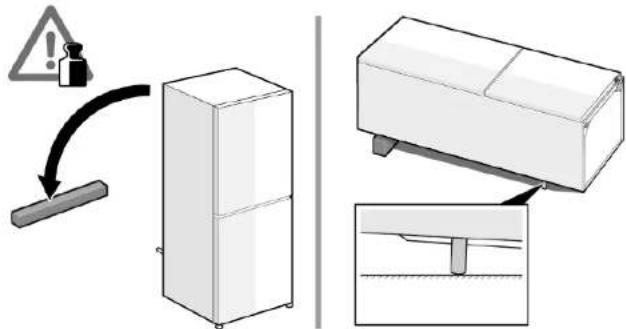

Repair
2.1. Press upper hinge cover on both sides (1).
- Move out upper hinge cover (2).
- Rotate hinge cover (3).
- Remove upper hinge cover (4).
- Unscrew two screws (5).
- Remove upper hinge (6)
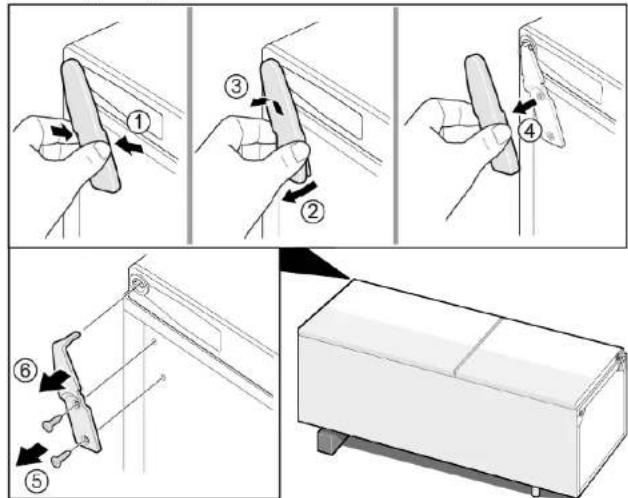

Upper hinge is removed.
Install in reverse order.

Repair
4.4 Replacing door upper hinge (door with display)
Required tools:
Torx Bit TX20 6,3 mm (1/4") [00340865]
Warning
Heavy, bulky appliances!
Back and muscle injuries
Appliance door removal operation should only be carried out by
trained specialists.
To move the appliance, two people are required.
Use only suitable tools and equipment.

Caution
Sharp edges!
Cut injuries
Wear protective gloves.
Warning
Slipping of tilted appliances!
Bone fractures / crush injuries
Secure appliances against slipping
Caution
Risk of falling parts due to released screws!
ury because of falling parts.
Secure component from falling down.
Notice
Risk of falling parts due to released screws!
Damage to other parts of the appliance or at customers home e.g. bot
tom.
- Secure component from falling down.
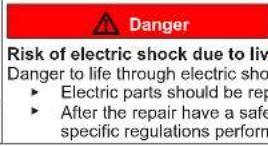
Danger
Risk of electric shock due to live parts!
Danger to life through electric shock in case of improper repair
Electric parts should be repaired by a qualified electricians.
After the repair have a safety test according VDE 0701 or country-specific regulations performed.
Danger
Risk of electric shock due to live parts!
Death by electrocution
- Disconnect appliances from electrical supply at least 60 seconds before starting repairs.
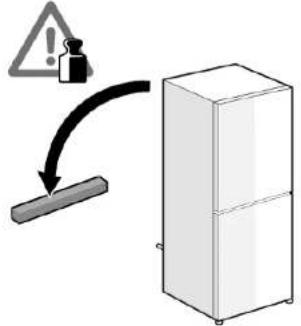
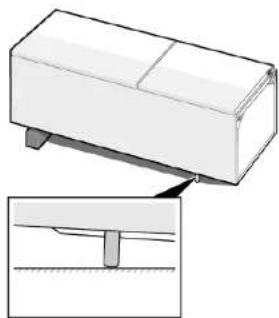
Prerequisite:
Appliance is disconnected from power supply.
Appliance interior fittings are removed.
- Place appliance on the back side.

Repair
-
- Remove upper hinge cover (1).
-
Remove cable box cover (2).
- Disconnect electrical connection (3)
- Unscrew ground connection screw (4).
- Remove cable protection (5).
- Unscrew the screw (6)
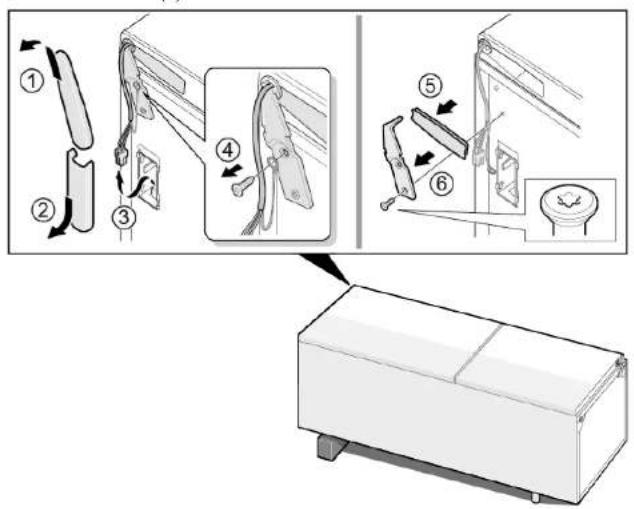

Upper hinge is removed.
Install in reverse order.

Repair
4.5 Replacing door middle hinge
Required tools:
Torx Bit TX20 6,3 mm (1/4") [00340865]

Heavy, bulky appliances!
Back and muscle injuries
Appliance door removal operation should only be carried out by
trained specialists.
To move the appliance, two people are required.
Use only suitable tools and equipment.

Sharp edges!
Cut injuries
Wear protective gloves.

Slipping of tilted appliances!
Bone fractures / crush injuries
Secure appliances against slipping

Risk of falling parts due to released screws!
ury because of falling parts.
- Secure component from falling down.

Risk of falling parts due to released screws!
Damage to other parts of the appliance or at customers home e.g. bot
tom.
- Secure component from falling down.
Prerequisite:
Appliance is disconnected from power supply.
Appliance interior fittings are removed.
Door upper hinge is removed.
4.5.1 Removing door middle hinge
- Remove fridge compartment door (1).
- Unscrew two screws (2).
- Remove middle hinge (3).
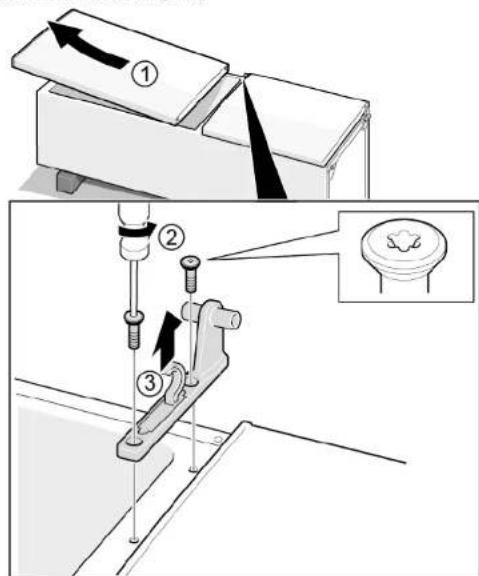
Middle hinge is removed.
4.5.2 Installing door middle hinge
Install in reverse order.

Repair
4.6 Replacing door lower hinge
Required tools:
Torx Bit TX20 6,3 mm (1/4") [00340865]

Heavy, bulky appliances!
Back and muscle injuries
- Appliance door removal operation should only be carried out by trained specialists.
To move the appliance, two people are required.
Use only suitable tools and equipment.


Sharp edges!
Cut injuries
Wear protective gloves.

Slipping of tilted appliances!
Bone fractures / crush injuries
Secure appliances against slipping

Risk of falling parts due to released screws!
ury because of falling parts.
- Secure component from falling down.

Damage to other parts of the appliance or at customers home e.g. bottom.
- Secure component from falling down.
Prerequisite:
Appliance is disconnected from power supply.
Appliance interior fittings are removed.
Upper hinge is removed.

Middle hinge is removed.
4.6.1 Removing door lower hinge
- Remove freezer compartment door (1).
- Unscrew the screw (2).
- Turn lower hinge out (3).
- Remove lower hinge (4).
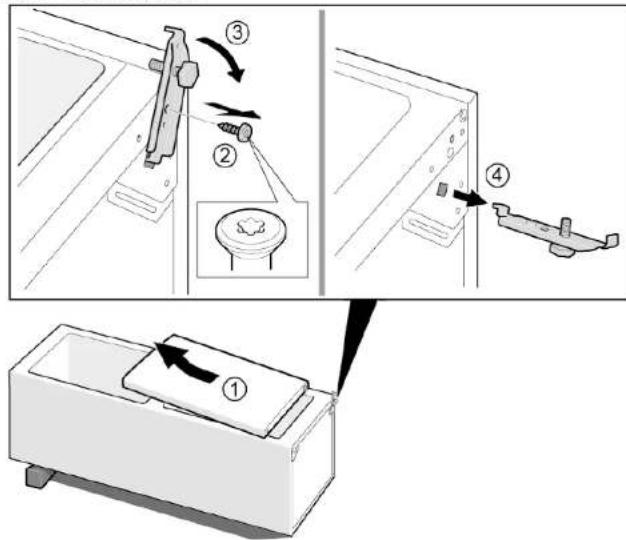

Door lower hinge is removed.
Install in reverse order.

Repair
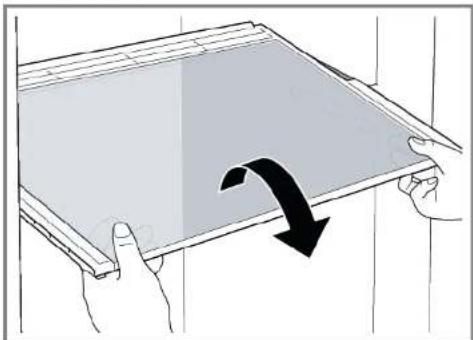
4.7 Replacing shelf
Prerequisite:
Door is open.
4.7.1 Removing shelf
Pull out shelf.
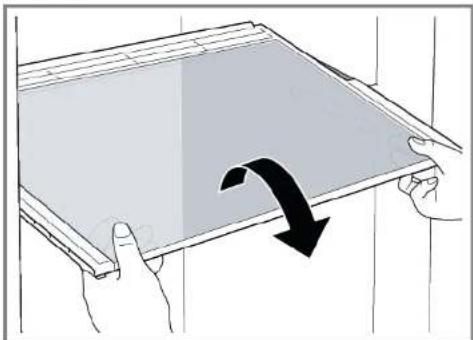
Shelf is removed.
4.7.2 Installing shelf
Install in reverse order.

Repair
4.8 Replacing bottle tray
Prerequisite:
Door is open.
4.8.1 Removing bottle tray
Pull out bottle tray.
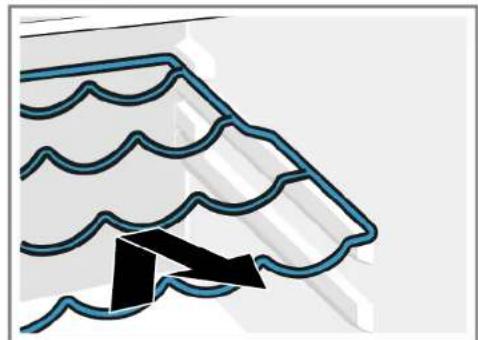
Bottle tray is removed.
4.8.2 Installing bottle tray
Install in reverse order.

Repair
4.9 Replacing door rack
Prerequisite:
Door is open.
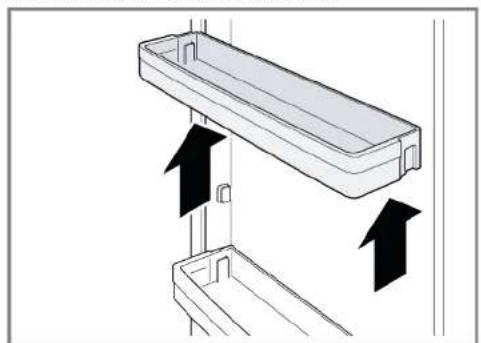
- Lift door rack upwards.
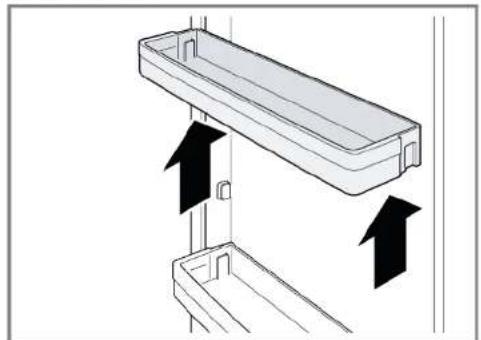
Door rack is removed.
Install in reverse order.

Repair
4.10 Replacing adjustable door rack
Prerequisite:
Door is open.
4.10.1 Removing adjustable door rack
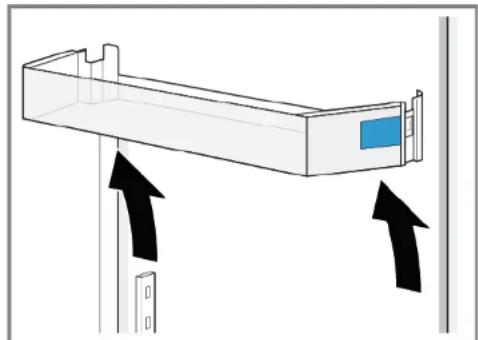
- Move high-adjustable door rack upwards until the door rack is released from the holder.
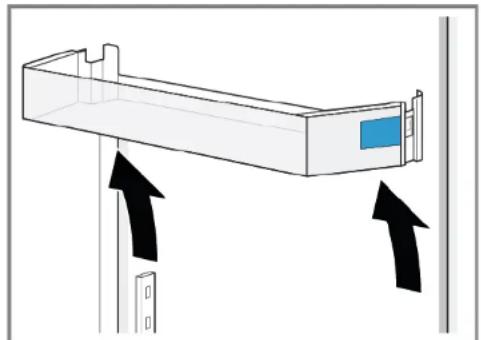

Adjustable door rack is removed.
4.10.2 Installing adjustable door rack
Install in reverse order.

Repair
4.11 Replacing frozen food container
Prerequisite:
Door is open.
4.11.1 Removing frozen food container
- Pull out frozen food container all the way (1).
- Remove food container (2).


Frozen food container is removed.
4.11.2 Installing frozen food container
Install in reverse order.

Repair
4.12 Replacing container
Prerequisite:
Door is open.
4.12.1 Removing container
- Move out lower fridge container (1).
- Move out upper fridge container (2).
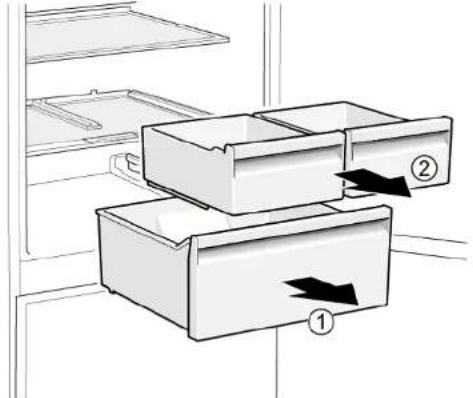

Containers are removed.
4.12.2 Installing container
Install in reverse order.

Repair
4.13 Replacing extendable container
Prerequisite:
Door is open.
4.13.1 Removing extendable container
1.Pull extendable container out all the way (1).
2. Remove extendable container (2).
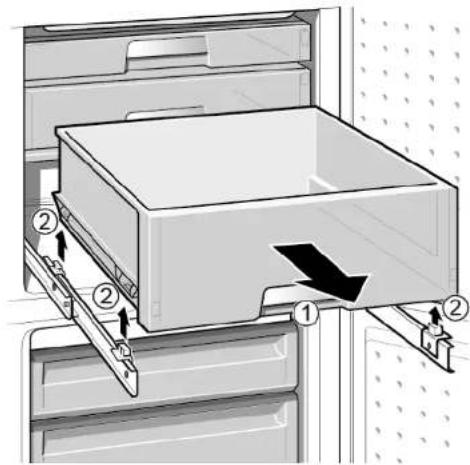

Extendable container is removed.
4.13.2 Installing extendable container
Install in reverse order.

Repair
4.14 Replacing LED spot light
Required tools:
Special tool [00342180]

Your appliance features a maintenance-free LED light. These lights may be repaired by customer service or authorised technicians only!
Electric parts should be repaired by a qualified electricians. After the repair have a safety test according VDE 0701 or country-specific regulations performed.
Prerequisite:
Appliance is disconnected from power supply.
Door is open.
4.14.1 Removing LED spot light
- Use special tool to pull out LED spot light (1).
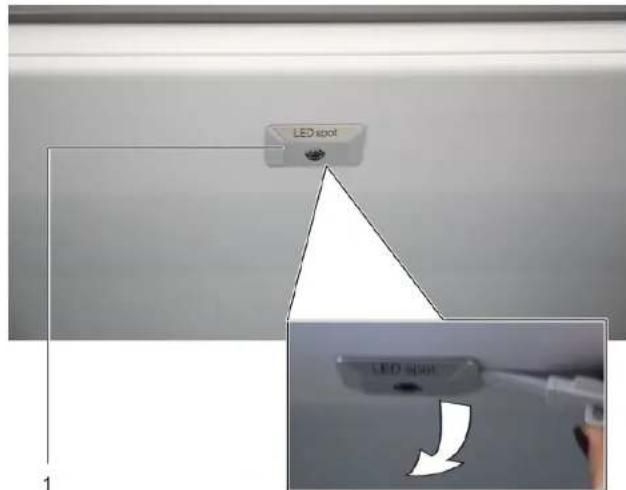
- Unplug electrical connections of LED spot light.
LED spot light is removed.
4.14.2 Installing LED spot light
Install in reverse order.

Repair
4.15 Replacing LED top light
Required tools:
Slotted screwdriver Blade 2.4 mm x 0.4 mm x 60 mm, in the kit [00341820]

Your appliance features a maintenance-free LED light.
These lights may be repaired by customer service or authorised technicians only!


Danger
Risk of electric shock due to live parts!
Danger to life through electric shock in case of improper repair
Electric parts should be repaired by a qualified electricians.
After the repair have a safety test according VDE 0701 or country-specific regulations performed.


Danger
Risk of electric shock due to live parts!
Death by electrocution
- Disconnect appliances from electrical supply at least 60 seconds before starting repairs.


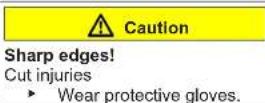
Caution
Sharp edges!
Cut injuries
Wear protective gloves.
Prerequisite:
Appliance is disconnected from power supply.
Door is open.
Upper interior fittings are removed.
4.15.1 Removing LED light
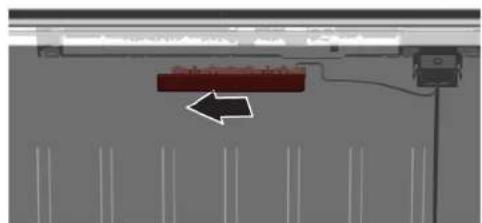
- Move the LED light to the left side.
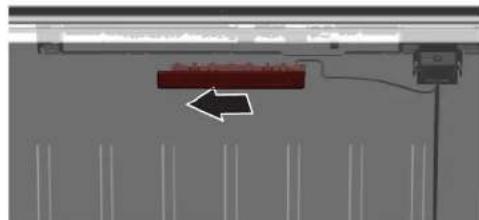
LED light electrical connection is disconnected.
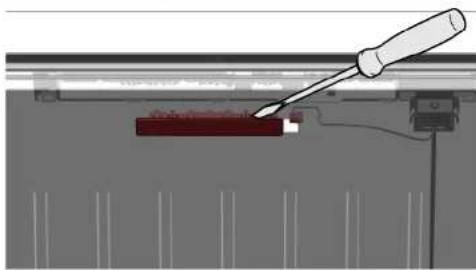
- Release LED light hooks.
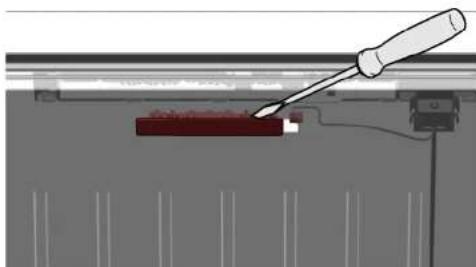

Repair
- Remove LED light moving it forward.
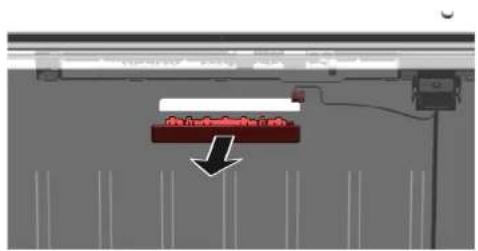
LED light is removed.
4.15.2 Installing top LED light
Install in reverse order.

Repair
4.16 Replacing LED side bar light
Required tools:
Suction cup 050 mm [00342224]

Your appliance features a maintenance-free LED light. These lights may be repaired by customer service or authorised technicians only!
Prerequisite:
Appliance is disconnected from power supply.
Door is open.
Fridge compartment shelves are removed.
4.16.1 Removing LED side bar light
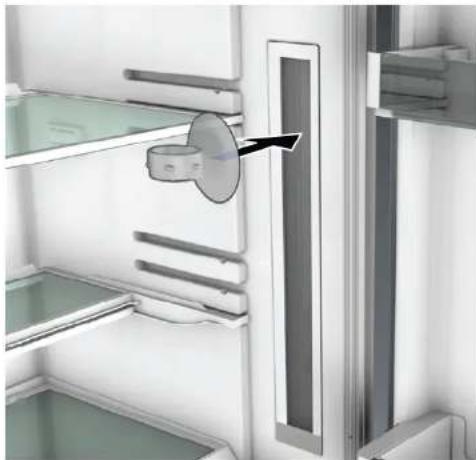
- Stick the suction cup on the upper third of LED side bar light.

Repair
- Pull suction cup with forward LED side bar light in one rotary movement.

- Disconnect electrical connection of LED side bar light.
LED side bar light is removed.
4.16.2 Installing LED side bar light
- Connect electrical connection of LED side bar light.
- Fix LED side bar light into it's location on compartment wall (hooks click).
LED side bar light is installed.

Repair
4.17 Replacing LED spot light
Required tools:
Special tool [00342180]
Slotted screwdriver Blade 2.4 mm x 0.4 mm x 60 mm, in the kit [00341820]

Your appliance features a maintenance-free LED light. These lights may be repaired by customer service or authorised technicians only!

Danger
Risk of electric shock due to live parts!
Danger to life through electric shock in case of improper repair
Electric parts should be repaired by a qualified electricians.
After the repair have a safety test according VDE 0701 or country-specific regulations performed.

Danger
Risk of electric shock due to live parts!
Death by electrocution
- Disconnect appliances from electrical supply at least 60 seconds before starting repairs.

Caution
Sharp edges!
Cut injuries
Wear protective gloves.
Prerequisite:
Appliance is disconnected from power supply.
Door is open.
Fridge compartment shelves are removed.
4.17.1 Removing LED spot light
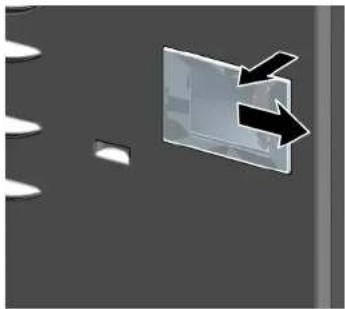
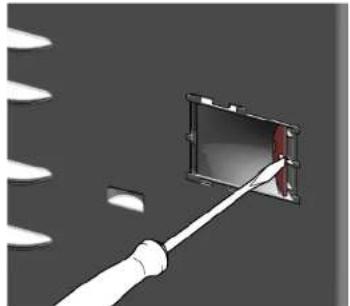
- Release LED spot light cover.
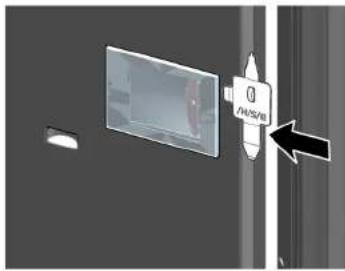
- Pull LED spot light cover inwards and simultaneously push forwards.
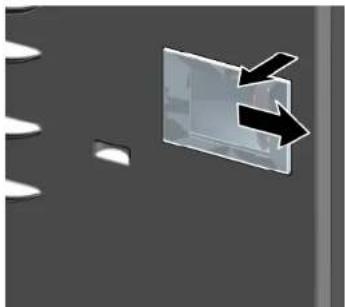

Repair
- Detach LED spot light module.
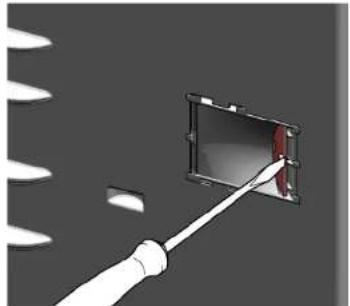
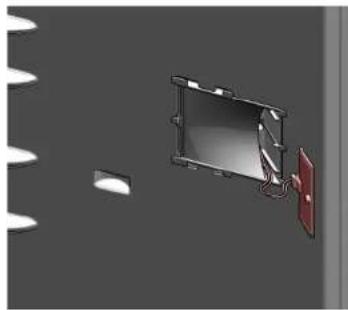
- Disconnect LED spot light electrical connection.
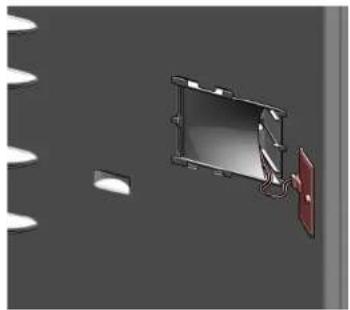
LED spot light is removed.
4.17.2 Installing LED spot light
Install in reverse order.

Repair
4.18 Replacing LED power supply module
Required tools:
Torx Bit TX20 6,3 mm (1/4") [00340865]
Slotted screwdriver Blade 2.4 mm x 0.4 mm x 60 mm, in the kit [00341820]
Container min. 200 ml capacity
Valid for appliance variants with Camera in Fridge (CIF).

Electronic modules may be repaired by customer service or authorised technicians only!

Risk of electric shock due to live parts!
Danger to life through electric shock in case of improper repair
Electric parts should be repaired by a qualified electricians.
After the repair have a safety test according VDE 0701 or country
specific regulations performed.

Risk of electric shock due to live parts!
Death by electrocution
- Disconnect appliances from electrical supply at least 60 seconds
before starting repairs.


Sharp edges!
Cut injuries
Wear protective gloves.
Prerequisite:

Appliance is disconnected from power supply.

Back side of appliances is accessible.
4.18.1 Removing LED power supply module
1.
Notice
Risk of damage!
Defrost water being spilled on the compressor's electronics and connections may damage appliance electronics.
During removal of drainage hose ensure that defrost water will not be spilled on electronic components.
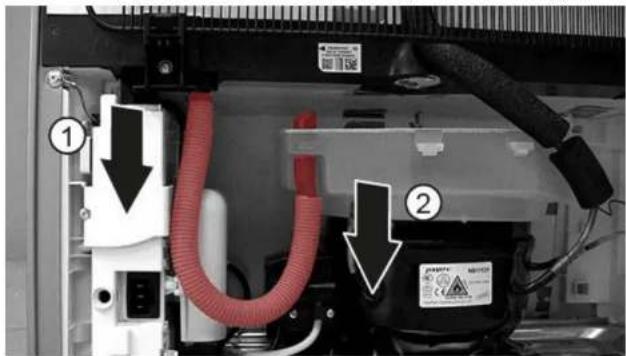
- Disconnect drainage hose from water drain outlet (1).
- Pour defrost water into the container.
- Disconnect drainage hose from water evaporation tray (2).
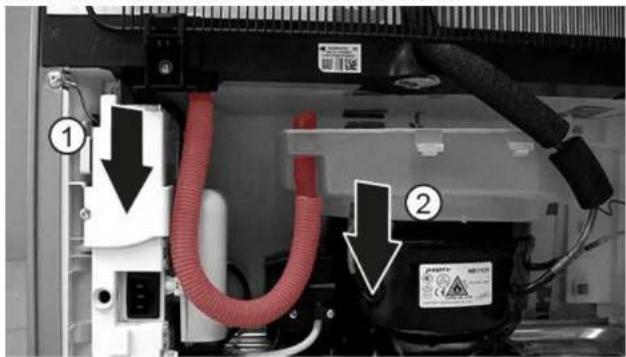

Repair
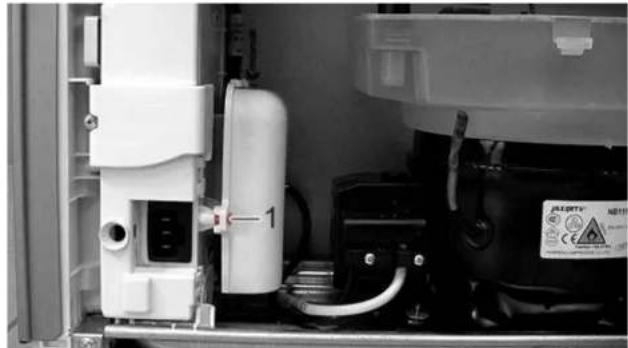
- Unscrew the screw.
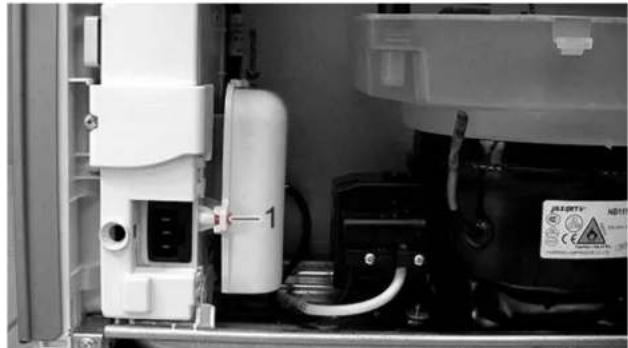
Compressor starting capacitor and LED power supply module box is released.
- Release two hooks.
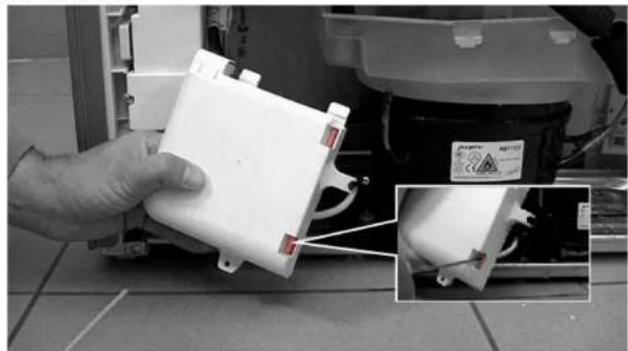
Compressor starting capacitor and LED power supply module box cover is released.
- Release four hooks.
LED power supply module is released.
- Disconnect LED power supply module electrical connections (1) and (2).
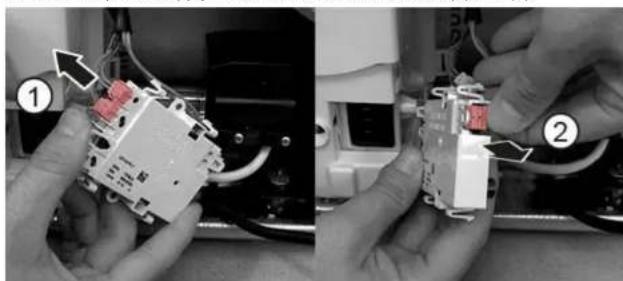
LED power supply module is removed.

Repair
4.18.2 Installing LED power supply module
Install in reverse order.
Remonditeave - Kombikülmik
1 Selle dokumendiga seoses 195
1.1 Tahtis teave 195
1.1.1 Eesmark 195
1.2 Sumbolite selgitus 195
1.2.1 Ohutasemed.. 195
1.2.2 Ohusumbolid 195
1.2.3 Hojatuste struktuur 196
1.2.4 Üldised sumbolid 196
Ohutus 197
2.1 Uldised ohutusjuhised 197
2.1.1 Koki kodumasinad 197
Tabel 1: Ohutasedmed
1.2.2 Ohusumbolid
Eritorist [00342180]

Outil special [00342180]

m = 311
Mny avyicete TIOJovdc,ouMTpeiaqavopevwTov ouvdoewk KaT ovayuyuTw TAKETW.

EpyaIeia Kai BonOnmuata
Mun Torx TX20 6.3 mm (1/4") [00340865]
PλαkeKaασαβδi Λεπιδa 10 mm × 1,6 mm × 200 mm
PouTo6eOg:
HouokekunivataoosuvdeevnantnoTnympoxnpofoofoiaac
H tripta elva aoivxtn.
4.2.1 Aqaipeoan aBnns tropras
1.Apaipoe ta duu muata bioc(1).
2. 3εβδωτε δύο βίδες (2).
3.ApaipoeTnAaBnTns npra3

HaaBnTNSTOPTaCEXeApapeBeI.

HaaBn npTc yia Tn 8eutepn npTa mtopei va apaiee ie tov io tpoTo.
4.2.2 ToTOrBcTeHnAaBnCns TnOptas
Eykaataotne 1y nV aVfTeN oipd.

EMIOKEUN
4.3 Avikataoan Eavw evtoe tropas
EiokaBonBntikαμεσα:
Mun Torx TX20 6,3 mm (1/4") [00340865]

IPOEIAOIOIHSH
Bapie,oykwdioukeu
Tpaunaiouoi peoans kuiuov
Hdiakiaia aqaipeoN TnTnTOAeUNI PETTEI VA
EKTAEITAI MOVO aTTO EKTAIDEOUEVOUc EIOIKOUs
Hetakivnon tsoukeun TpTei va ekteelai ato du o taqa.
XpooiotoiieTe mOvo kataaannaa epyaleia kai eonlaio.

A IPOEOXH
Aixnpes akeis!
Tpaunatiooi ano kton
Opate Ippoataeutikayavtia.

IPOEIAOIOIHEN
Oia0nKekaipevovoukeuwv!
Katayuata ootaw/tpaumaiooi ouvtheiupn
AopaaIote TIGoukeuec aOaio8non.

IPOEOXH
O KATU MEVTEOE CnpTAC Ee iqaipEeI.
4.6.2 ToTtoBETnK Katw vteoTIOptos
Eykaataohtne tntn avtibetn oipa
EπIOKεUN
4.7 AvtikataoTaon paiou
PouT6eOg:
H Tóptá εíval avoiXtN.
4.7.1 Apaipaeon paipou
TpaBnETo papi npoc Ta EeW.

To paqiaqaipéθηκε.
4.7.2 ToToTeTnO npiaou
Eykaataaote eTnV aTtEeTn eipa.
EπIOKEUN
4.8 AvikataoTaon Eriapaviae vantoBcns qaiwv
PouT6eOg:
H Tóptá éival avoiXtN.
4.8.1 Apaieoenniipaeiaesvannoeonqiaaw
TpaBnE TPOs ta Ew Tnv EtnpAveia evanOeogcn piauwv.
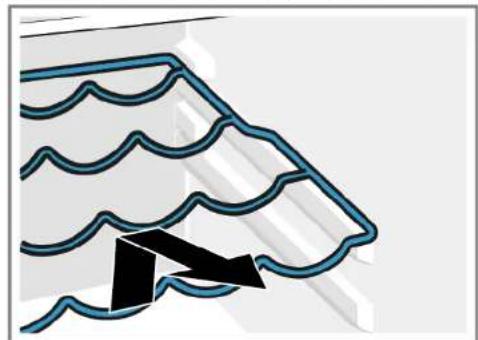
H EtniPnAveia EvanToeOnc piauW exaippeBt.
4.8.2 Tomoettnon emipavexic evamoeos φiaaw
Eykaataaote eTnV aTtEeTn eipa.
EπIOKεUN
4.9 AvtikataoTaon paiou troptas
PouT6eOg:
H Tóptá éival avoiXtN.
4.9.1 Aqaipean paipou npoprac
Avoankwote To pao Tnpa TPOC Ta eTavw.
To papi TnpaTc Exe1 apaipeBt.
4.9.2 ToToBtEtnn papiou nóptas
Eykaataaotee nVnVavthetn eipa.

ETIOKEUN
4.10 Avikataoan paou npota e suvatotnpa uon
Pouu68eση:
H TnpTa eivai aoivxTn.
4.10.1 Apaieo npaiou troptac duatotnta puoians
MetakivnTo papi TpOtacmu duVatotnta puohuion uouc, npoc ta eTavw mExpi To papi TpOtac va ateueBepomega eto to tnpivma.
To paqi npiae duvatotnpaouhionx eaiapaehei.
4.10.2 ToToBéTnO npaiou npoIe duVatoTnTa puOoiIg
Eykataotnoe nV avntiethn oipa.
EπIOKεUN
4.11 AvikataoTaon ouptapoiou kateyuuyevw TpoipuW
Pouu6ean:
H Tóptá éival avoiXTH.
4.11.1 Apaipoeon ouptapoiou kateyuuyevuvtpoipuow
Eiokoεpyaλeio[00342180]

Houkeun diabeet eva quc LED tou dev xpeidctai auvtnpan. Auta ta qwta mtropov va etnkeauotov mvo ato tvgutpten n TEaattuv nto eouaoiootmveovx

KINAYNOZ
Kivduo nAektponAniaos Aoyw nAektpopopowepow!
Kivvocva t in zwn atio nekrtipania o nepittwnakatdaannc
Ta naekpikae npn tipenei va eithoeauovta ato ektaeouveog Taekpokyoouc.
MetaTnEvETIOKEUnTTpayuatoTOnioTeEeVxOaoPaeIacOuPuwA μEto VDE 0701 nKavoviaouc tsouykepiEvns xpaas.


KINAYNO
Kivouoc nAekptorAniaac Aoyw nAektpopov upeov! OAvotoc ato nAekptorAnia
ATOUVOEETIE TIG OUKEUEc ATOI TYAPOAnTJEKIOU PELOJATOC TOAUXIAOTOV 60 DEUTEPAEOTAI TIPV EKIVIOTEC TIC ETIOKEUEc.


PQOEXH
Aixunpec akues!
Tpaunaiouairo konn
ΦopáTE TPOOATEUKÁ yáVTIA.
Pouot6e0n:
Houkeun eivai aioouvduevn aTn Tnpox npofoaia
H npia eivai aoixtn.
4.15.1 Apaipen wroLED
- MetakivnoTe TO pws LED OTHy apiotepn Taeupa.
H nAekpiik ouvdeon qwiou LED eivai aiooovdoepevn.
- ATTELEUeBepwTe Ta dyKIOtpa QWIOOLED.

ETIOKEUN
3.ApaipoeTo 4wGLED,ETAKIVWvTAsTO TPOsTaEPTPOs.
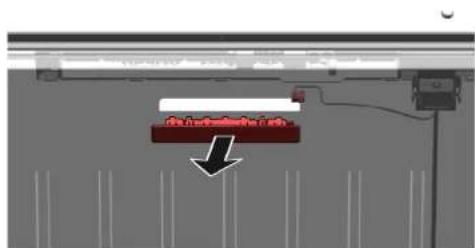
To LED apaipéθηke.
4.15.2 ToToBtToN eTav wOwiou LED
EvkataoThee eTnavthtn oip

EMIOKEUN
4.16 Avikataaon Taeupikns paBou wioou LED
EiokaBonBntikαμεσα:
Bevouca 050 mm [00342224]

Houkeu diéetévaipcLEDtouevxpeiaetauvtnpqn. Auta ta pwta pttopouv va tneuaqotouov mvo ato nTv Eunptnne Taeatuv nto eouaoioohtmveovs TeVKov?

KINAYNOZ
Kivduo nAektponAniaos Aoyw nAektpopopowepow!
Kivvocva t in zwn atio nekrtipania o nepittwnakatdaannc
Ta naekpikae npn tipenei va eithoeauovta ato ektaeouveog Taekpokaoyouc.
MetaTnEvETIOKEUnTTpayuatoTOIOInoteEeVyoAoPaeIacOUPUVA μEto VDE 0701 nKavovioouc tsouykepiEvns xwpas.


KINΔYNO2
Kivouoc nAekptorAniaac Aoyw nAektpopov upeov! OAvotoc ato nAekptorAnia
ATUOUVOEETI GUCNEAE CTO TIV TTAPOHY NAEPIKIOU PEIJUACOT OAUXIAOTOV 60 DEUTEPDAETTA TIPV EKVEIOE TIG IETIOKEAE.


PPOEOXH
Aixunpces akues! Tpaanipoi aro korn
ΦopáTE TPOOATEUKÁ yáVTIA.
Pouot6e0n:
H oukeun eivai aotouuvdeepvntn aTnV npoxn TpOoociaac
H nóptα ενα ανοχή.
Ta paqia xwpou yuyeiou exouv apapeBei.
4.16.1 Aqaipceon nAeupiknc paB8ou wtnoou LED
- Kaaote n bevtouca oTo eavv eva piro tspiuikns paabou qwnmuu LED.
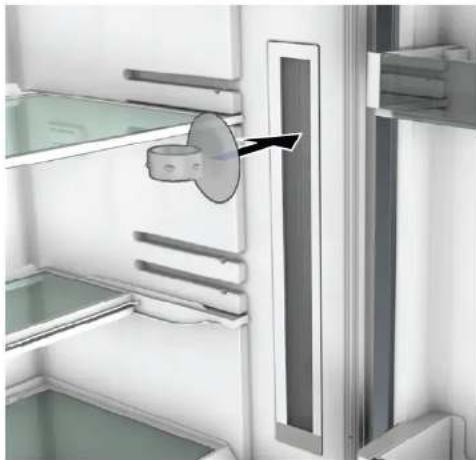

EMIOKEUN
- TpaBnE t n BevToUca TPOs TO ePOS OaS ME TYN TIAeupikn paBdo Qwnoou LED ME mia TEPiTPOpIK kivnon.
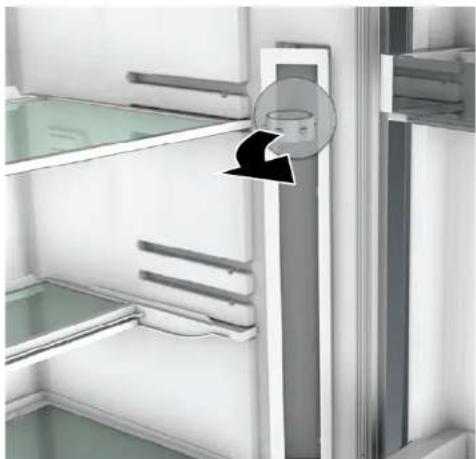
- ATOOUVDEATE NV NAEKPTKNI OUVSEON TNS PAEUPIKN pABDOU FOWIOPOLED H IIAEUPIKI pABOSG FOIIOPOU LED aapapeBke.
4.16.2 ToToeTnO nIaepiKns pabou wtooLED
- ATTEAEUeepwote TO kALUmuA spot wTIOuOLED.
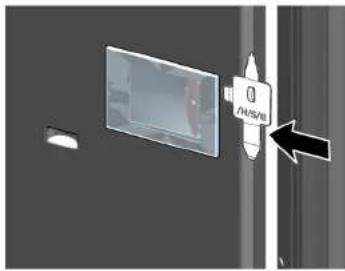
- TpaBnTe To kALuMa spot ownou LED npoc ta meo Kaia tautoxpova anpwei TPOs Ta eptpoc.

EMIOKEUN
3.AmaaiaTe n ovoa spot wiouLED.
- AIOOauvEoTe nV nAekptikn ouvEoan spot wioiou LED.
To spot LED aepiehke.
4.17.2 Torrotheon spot LED
Eykaataohtne tynavriBtneipa.

EMIOKEUN
4.18 Avikataoan ovaacioxuoc LED
EiokaBonθntikαμεσα:
Mun Torx TX20 6,3 mm (1/4") [00340865]
Πακε καταβδι Λεπίδα 2,4 mm × 0.4 mm × 60 mm, ΩΤΟΚΙΤ 1003418201
oxxiElambdaXwopntikotn200ml
Ioxueiia napaaayes ouakeuwyeKaepa oTo uyeyio (CIF).

Oi Naektpovikcs TnaketeC uTropov va Etnkueaotouv mvo aTtyn Eeutnpetpon naiaw n ato ecouodotnevouc texvikouc!
KINADYNO2
Kivduvo ngAekptponanxiac loywnktpopopuvepw!
Kivvoc via n Tzwn atio nkekptionla oe tpiinwn akataaanang EITIOKEUc
TaKaEPKIAePnTIPETIaEITIOKEAUOVTAIOTKTAIEUVOUC TaKPTPOAOYOC
Meta tvn tniokneun typauiatotoinohe Aeyxo aaoaiaeig oupuovae to VDE 0701 n kavoviaoung ts ayuekeipivng xwapc.
KINADYNO2
Kivouoc nAekptroAnlaic Aoyu nAekptopopov hepov! Ovatoac otn aNkctponAnie
AATIOOVAETIE TIG OOUKEAE OTI TYIAPIOX NAEPIKIOU PEUJATOs TOAUXIAOTOV 60 DEUTEPDAETTA TIPY EKIVIOTAE TIC ETIOIKEUEs.

A PPOEOXH
Aixmupeaaket!
Tpaauatouai aTOKnn
ΦopαTE TPOOATEUkA yavTIA
Pounto8e0n:
Houkeun eivai aotouvobéevn anTnV npaoxnpofoaafac
H Tioa TnAeup Taow oukeuwv elvai TpoaBaoiŋ.
Cap torx TX20 6.3 mm (1/4") [00340865]
Surubelinita platá Lama de 10 mm x 1,6 mm x 200 mm
Cerintă:
Cap torx TX20 6.3 mm (1/4") [00340865]

AVERTISMENT
Aparate grele, masive!
Accidentarea spatelui si leziuni musculare
Cap torx TX20 6.3 mm (1/4") [00340865]

AVERTISMENT
Aparate grele, masive!
Accidentarea spatelui si leziuni musculare
Cap torx TX20 6.3 mm (1/4") [00340865]
A VERTISMENT
Aparate grele, masive!
Accidentarea spatelui si leziuni musculare
Cap torx TX20 6.3 mm (1/4") [00340865]


A VERTISMENT
Aparate grele, masive!
Accidentarea spatelui si leziuni musculare
Instrument special [00342180]

- Tryck in hela packningen i sparet bit for bit.

- Lossa LED-spotlightens elanslutning.
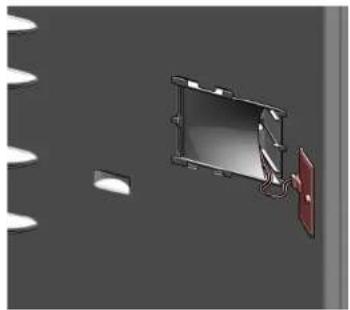
LED-spotlighten har tagits bort.
4.17.2 Montera LED-spotlight
Special tool [00342180]

- OTHOCHO To3n DokyMeHT
- Baxha nHΦopMaζη
- Uen
- 06aCHeHne Ha cHMBOJInTe
- HbHa onaCHOCT
- Cnmbon3a onachoct
- PemOH
- CmHa Ha rohpHaTa nHa Ta HbpaTaTa
- PNEUYPNEXDEHNE
- 4.4CMHaHa rohHaTa nHa Ta HbpaTa (BpTa Cdnnne)
- PDEUYPEKDEHNE
- CbanyHe Ha rohpata naHTa Ha BpataTa
- MoHTnpaHe Ha roPHaTa nAHTa Ha BpaTaTa
- CmHa Ha cpeHata naHTa Ha Bpata
- A PDEyPExkEHN
- CbanyHe Ha cpeHata naHTa Ha BpTaTata
- MoThIpaHHe Ha cpeHaTa naHTa Ha BpTaTa
- 4.6CMHaHaDOnHaTaNaHTaHaBpTaTa
- PDEYIPKXDEHNE
- 4.7CMHaHa paΦTa
- N3BaXdAne Ha paΦTa
- MoThupaHe Ha paΦTa
- CmHa Ha Ta6nukata 3a 6yTnIKN
- CbAha Hata6nukata 3a 6ytnkn
- MoThiPaHe Ha Ta6JnUkata 3a 6yTnIkn
- CMraHa Ha cTeJaKa Ha BpaTaTa
- N3Baxdahe Ha CTenaxa Ha BpaTata
- MoNTIpaHc HcTeJaxHa BpTaTa
- CmHa Ha peryInpyemn cTeJax Ha BpaTaTa
- CbAHa He perynpyemra TcEnaKa Ha BpaTaT
- MoThIpaHe Ha peryInpyeMn cTeJax Ha BpaTaT
- CMHa Ha KOHTeHepa 3a 3ampa3eHN XpaHHTeHH npOdykTN
- 3BaXdaHe Ha KOHTeHepa 3a 3aMPa3eHN XpaHHTeHH npOdyKTH
- MoHTnpaHe Ha KOHTeHepa 3a 3ampa3eHxpaHnTeHn npOdykTn
- CmHa Ha pa3TeratEnHnKoHTeHep
- N3BaXdAhe Ha pa3TeRaTeJIHHa KOHTeHep
- MoHTupaHe Ha pa3TeRaTeHHra KOHTeHep
- ONACHOCT
- OJAGHOCT
- SHMATEJIHO
- CbānHa He LED cNOT JAmNaTa
- MoHTnpaHc HA LED cNOT nAMnata
- CMraHa HA LED oCBetneHneTo otrope
- BHIMATEJIHO
- CbajnHe Ha LED ocBetJeHneTo
- CMnHa Ha LED cbEtnnHata Ha cTpaHnHata JeHtA
- BHIMATEHNO
- CbAha He LED cbTnHaTa Ha ctpaHnHaTa JeHTa
- MoHTnpaHc Ha LED cBeTnHaTa Ha cTpaHnHaTa IeHTa
- CbānHa He LED cNOT JAmNaTa
- CMHa Ha LED Moyla Ha 3axpaHbHeTo
- OJACHOCT
- BHMMATEHO
- OTeTpaHbAHe Ha LED Moyla Ha 3axpaHbAHeTo
- BHUMAHUEI
- MoHTnpaHc Ha LED MoUJa Ha 3axpaHbAHeTo
- PAS PAI
- BEMERKI
- BEM/ERK!
- FARE
- Udskifting at LED-spotlampe
- Udskifting at LED-spotlampe
- Repair hints - Fridge-freezer
- Concerning this document
- Important information
- Purpose
- Explanation of symbols
- Danger levels
- Hazard symbols
- Structure of the warnings
- Danger
- General symbols
- Safety
- General Safety instructions
- All domestic appliances
- Tools and aids
- Repair
- Removing door handle
- Replacing door upper hinge (door with display)
- Warning
- Caution
- Notice
- Replacing door middle hinge
- Removing door middle hinge
- Installing door middle hinge
- Replacing door lower hinge
- Removing door lower hinge
- Replacing shelf
- Removing shelf
- Installing shelf
- Replacing bottle tray
- Removing bottle tray
- Installing bottle tray
- Replacing door rack
- Replacing adjustable door rack
- Removing adjustable door rack
- Installing adjustable door rack
- Replacing frozen food container
- Removing frozen food container
- Installing frozen food container
- Replacing container
- Removing container
- Installing container
- Replacing extendable container
- Removing extendable container
- Installing extendable container
- Replacing LED spot light
- Removing LED spot light
- Installing LED spot light
- Replacing LED top light
- Removing LED light
- Replacing LED side bar light
- Removing LED side bar light
- Installing LED side bar light
- Replacing LED spot light
- Removing LED spot light
- Replacing LED power supply module
- Removing LED power supply module
- Installing LED power supply module
- Remonditeave - Kombikülmik
- Ohusumbolid
- m = 311
- EpyaIeia Kai BonOnmuata
- Aqaipeoan aBnns tropras
- ToTOrBcTeHnAaBnCns TnOptas
- EMIOKEUN
- Avikataoan Eavw evtoe tropas
- IPOEIAOIOIHSH
- A IPOEOXH
- IPOEIAOIOIHEN
- IPOEOXH
- ToTtoBETnK Katw vteoTIOptos
- EπIOKεUN
- AvtikataoTaon paiou
- Apaipaeon paipou
- ToToTeTnO npiaou
- EπIOKEUN
- AvikataoTaon Eriapaviae vantoBcns qaiwv
- Apaieoenniipaeiaesvannoeonqiaaw
- Tomoettnon emipavexic evamoeos φiaaw
- AvtikataoTaon paiou troptas
- Aqaipean paipou npoprac
- ToToBtEtnn papiou nóptas
- ETIOKEUN
- Avikataoan paou npota e suvatotnpa uon
- Apaieo npaiou troptac duatotnta puoians
- ToToBéTnO npaiou npoIe duVatoTnTa puOoiIg
- AvikataoTaon ouptapoiou kateyuuyevw TpoipuW
- Apaipoeon ouptapoiou kateyuuyevuvtpoipuow
- KINAYNOZ
- KINAYNO
- PQOEXH
- Apaipen wroLED
- Avikataaon Taeupikns paBou wioou LED
- KINΔYNO2
- PPOEOXH
- Pouot6e0n:
- Aqaipceon nAeupiknc paB8ou wtnoou LED
- ToToeTnO nIaepiKns pabou wtooLED
- Avikataoan ovaacioxuoc LED
- KINADYNO2
- A PPOEOXH
- AVERTISMENT
- A VERTISMENT
Brand : Profilo
Model : BD3055IFVN
Category : Refrigerator