ETX6520 - Monitor Legamaster - Free user manual and instructions
Find the device manual for free ETX6520 Legamaster in PDF.
| Product Type | Interactive Touch Monitor |
| Brand | Legamaster |
| Model | ETX6520 |
| Screen Size | 65 inches (64.53") |
| Resolution | 3840 x 2160 (4K UHD) |
| Display Technology | Direct LED |
| Touch System | Advanced infrared, 32 touch points |
| Brightness | 350 cd/m² |
| Contrast Ratio | 4000:1 |
| Operating System | Android 8.0 |
| RAM | 4 GB |
| Internal Storage | 32 GB |
| Input Connectors | HDMI 2.0 ARC x1, HDMI 2.0 x2, DisplayPort x1, USB-A 3.0 x3, USB-C x1, VGA + audio, RS-232C, LAN RJ45 x2 |
| Output Connectors | HDMI (4K@60Hz), SPDIF optical, audio 3.5mm, Touch USB-B x3 |
| Built-in Speakers | 2 x 15 W + 15 W subwoofer |
| Dimensions (WxHxD) | 1490.5 x 875.5 x 89.3 mm |
| Net Weight | 43 kg |
| Power Supply | AC 100-240 V, 50/60 Hz |
| Power Consumption | 160 W (standby ≤0.5 W) |
| Operating Temperature | 0 to 40 °C |
| Maintenance and Cleaning | Unplug before cleaning; use a soft, dry cloth; avoid alcohol, solvents, ammonia |
| Safety | Do not expose to rain or moisture; do not open the casing; use the polarized plug correctly |
| Included Accessories | Remote control (batteries included), HDMI cable 5m, USB cable 5m, 2 high-precision styluses, double-sided stylus, EasyFix clips, USB key with manual and drivers |
Frequently Asked Questions - ETX6520 Legamaster
User questions about ETX6520 Legamaster
0 question about this device. Answer the ones you know or ask your own.
Ask a new question about this device
Download the instructions for your Monitor in PDF format for free! Find your manual ETX6520 - Legamaster and take your electronic device back in hand. On this page are published all the documents necessary for the use of your device. ETX6520 by Legamaster.
USER MANUAL ETX6520 Legamaster
We make communication visible
text_image
12:08 2019/11/04 maandag
natural_image
Mountain range landscape with layered ridges and soft lighting (no text or symbols)
text_image
Legamaster Webmaster Webmaster Webmaster Browser APPS
natural_image
Mountainous landscape with a winding dirt road through dense forest (no visible text or symbols)ENGLISH | DEUTSCH | FRANÇAIS | NEDERLANDS | ESPAÑOL
ETX series
USER MANUAL

natural_image
Two people in a meeting room with brick walls and city skyline display (no visible text or symbols)LANGUAGES
| GB | ENGLISH | 2 | |
| DE | GERMAN | DEUTSCH | 30 |
| FR | FRENCH | FRANÇAIS | 58 |
| NL | DUTCH | NEDERLANDS | 86 |
| ES | SPANISH | ESPAÑOL | 114 |
TABLE OF CONTENTS
- Important Information .... 3
1.1. Use 3
1.2. Exemptions 3
- Safety Instructions....4
2.1. Safety Precautions....4
2.2.Moving and Carrying Notice 5
2.3.Installation 5
2.4. Wall Mount Safety Notice....6
2.5. Recommended Use 7
2.6. Cleaning 8
- Package Contents....9
3.1. Unpacking....9
3.2. Included Accessories....9
- Installation 9
4.1. Environment State 9
4.2.General overview of the screen....10
4.3. In- and output connector table 12
4.4. Remote Control....12
- Operating the screen 13
5.1. Turning the display on and off 14
5.2. Quick launch menu 14
5.3.Float menu 15
5.4. Settings menu 15
5.5. Updating the screen....18
5.6. Enabling / Disabling Android 18
-
Touch Operation 18
-
Specifications.... 19
- Supported Timings....21
- Serial Commands....21
9.1. Serial Communications....21
9.2.RS-232 Connection and Port Configuration 21
9.3.RS232 Interface 22
-
Troubleshooting....24
-
Compliance 24
- Appendix.... 25
12.1. Dimensions 25
- Accessories 29
13.1.EasyFix Video Conferencing Unit 29
13.2.EasyFix Proximity Sensor 29
1. IMPORTANT INFORMATION

WARNING:
TO PREVENT FIRE OR SHOCK HAZARDS, DO NOT EXPOSE THIS UNIT TO RAIN OR MOISTURE. ALSO, DO NOT USE THIS UNIT'S POLARIZED PLUG WITH AN EXTENSION CORD RECEPTABLE OR OTHER OUTLETS UNLESS THE PRONGS CAN BE FULLY INSERTED. REFRAIN FROM OPENING THE E-SCREENS HOUSING AS THERE ARE HIGH VOLTAGE COMPONENTS INSIDE.

CAUTION:
TO REDUCE THE RISK OF ELECTRIC SHOCK, MAKE SURE POWER CORD IS UNPLUGGED FROM WALL SOCKET. TO FULLY DISENGAGE THE POWER TO THE UNIT, PLEASE DISCONNECT THE POWER CORD FROM THE AC OUTLET. DO NOT REMOVE COVER (OR BACK). NO USER SERVICEABLE PARTS INSIDE. REFER SERVICING TO QUALIFIED SERVICE
1.1. USE 1.2. EXEMPTIONS
- Transport the product upright with proper packaging. Avoid placing the product face up or down. Handle with care!
- Do not send a static (non-moving) image to the e-screen, it may cause image 'burn-in' or image retention.
- "Burn in" and/or image retention is not covered under warranty.
-
Make sure to change the image on the e-screen periodically. It is recommended to turn off the e-screen for at least 6 hours after 16 hours of usage in a 24 hour period to help avoid image retention.
-
This product isn't warranted for any damage caused by natural disaster (such as earthquake, thunder, etc.), fire, acts by third parties, accidents, owner's intentional misuse and fault, or use in other improper conditions.
- This product isn't warranted for incidental damages (such as profit loss or interruption in business, modification or erasure of record data, etc.) caused by use or inability to use of this product.
- This product isn't warranted for any damage caused by inappropriate operation, or from not following the user manual.
- This product isn't warranted for any damage caused by misuse or malfunction through simultaneous use of this product and the connected equipment or software.
- This product isn't warranted for any damage caused by neglect of the installation instructions.
- This product isn't warranted for any damage caused by improper installation.
- This product isn't warranted for any damage caused by disassembly, modification or repair by non-authorized service centers or people.
2. SAFETY INSTRUCTIONS
Before using this e-screen, please read this user manual thoroughly to help protect against property damage and to ensure your personal safety and the safety of others.
- Read and follow all instructions and safety-warnings found in this manual.
- For installation or adjustment, please follow the instructions in this manual and refer all servicing to qualified service personnel.
2.1. SAFETY PRECAUTIONS
If smoke or a peculiar smell comes from the e-Screen, remove the power plug from the outlet immediately.
Failure to do so may result in fire or electrical shock. Contact your dealer for inspection.
If the e-Screen has been turned on but there is no picture, remove the power plug from the outlet immediately.
Failure to do so may result in fire or electrical shock. Contact your dealer for inspection.
If water is spilled or objects are dropped inside the e-Screen, remove the power plug from the outlet immediately.
Failure to do so may result in fire or electrical shock. Contact your dealer for inspection.
If the e-Screen is dropped or the e-screen's housing is damaged, remove the power plug from the outlet immediately.
Failure to do so may result in fire or electrical shock. Contact your dealer for inspection.
If the power cord or plug is damaged or becomes hot, turn off the main power switch of the e-Screen, make sure the power plug has cooled down and remove the power plug from the outlet.
If the e-Screen is still used in this condition, it may cause fire or electrical shock. Contact your dealer for replacement.
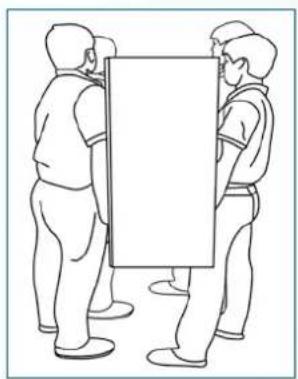
2.2. MOVING AND CARRYING NOTICE
Moving the product:
Moving the product requires at least four people. Attempting to move the product with fewer people may result in damage to the display or in serious injury of the people handling the screen. When moving a display in its shipping carton, lift the carton using the white handles.
natural_image
Line drawing of three people standing in a row holding a blank rectangular object (no text or symbols)
natural_image
Line drawing of two workers in safety gear near a large rectangular object (no text or symbols)
natural_image
Line drawing of a hand holding a pen, no text or symbols presentCarrying the product:
This product is heavy; please follow proper lifting techniques, as pictured below. Failure to do so may cause injury.

natural_image
Two line drawings showing a person bending forward at a desk and kneeling, with no text or symbols present.2.3.INSTALLATION
Don't install in a high-temperature environment.
If the e-screen is used in high-temperatures or in direct sunlight, it may cause the housing of the product or other parts to become distorted or damaged, resulting in overheating or electrical shock.
Don't install in a high-humidity environment.
This may cause overheating or electrical shock.
Don't install near any heat sources such as radiators, heat registers, stoves, or other apparatus that produce heat.
This may cause fire or electrical shock.
Don't overload outlets or cables beyond electrical capacity.
Don't use extension cords as it may cause fire or electrical shock.
Don't insert the power plug into an outlet other than 100\~240V AC.
This may cause fire or electrical shock.
- Don't use a damaged power plug or worn outlet.
- Don't insert an improper power plug it may cause fire or electric shock.
Don't place the e-screen on an unstable shelf or surface.
The e-screen may fall, causing injury. Please install on a horizontal, stable, level surface.
Don't place objects on the e-screen.
- If the e-screen is covered or the vents are blocked, the display could overheat and cause a fire.
- If objects or liquids get inside the e-screen, this may cause fire or electrical shock.
- Do not put heavy objects on the e-screen as they may fall, causing injury.
- Please keep a 10 cm minimum distance between e-screen, wall and/or other objects to ensure sufficient ventilation.
Don't move the e-screen when it is connected to the power cord and AV cables.
- When moving the e-screen, make sure to remove all cables first.
-
When unpacking or carrying the e-screen, at least 4 people are needed. Make sure the e-screen is carried upright.
-
Transport the e-screen upright. Avoid placing the e-screen face up or down.
- Handle the e-screen gently. Do not drop.
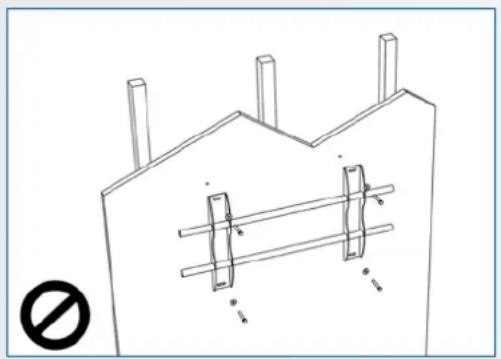
2.4. WALL MOUNT SAFETY NOTICE
- Please make sure the bracket is mounted on a solid surface.
natural_image
Technical line drawing of a structural support frame with no text or symbols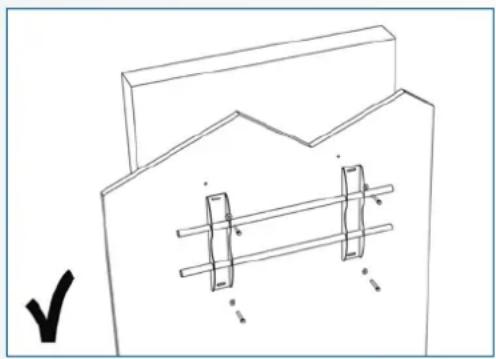
natural_image
Pure technical line drawing of a mechanical assembly with no text or symbols- After mounting the screen, do not pull, push or shake the screen.

natural_image
Simple line drawing of a room corner with vertical bars and a rectangular panel, no text or symbols present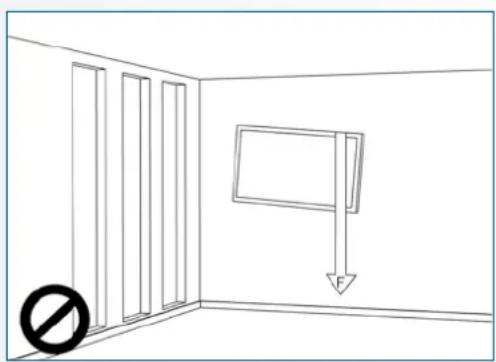
natural_image
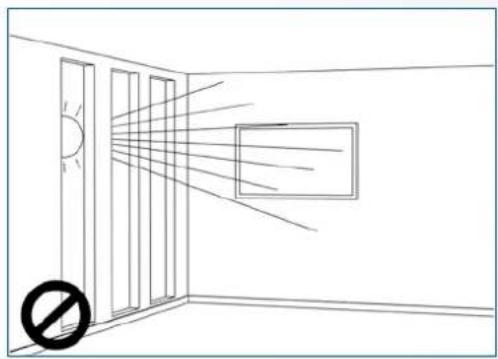
Simple line drawing of a room with vertical bars and a hanging sign, no text or symbols present- Do not install screens in direct sunlight, humid conditions or high temperatures.
natural_image
Simple line drawing of a room corner with sunlight illuminating the wall and a prohibition symbol below (no text or labels)
natural_image
Line drawing of a room with doors, a monitor, and a wall-mounted heater (no text or symbols)4.
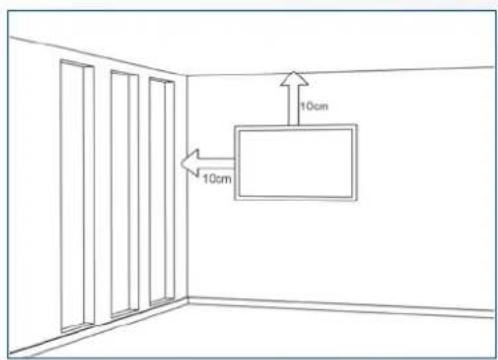
text_image
10cm 10cm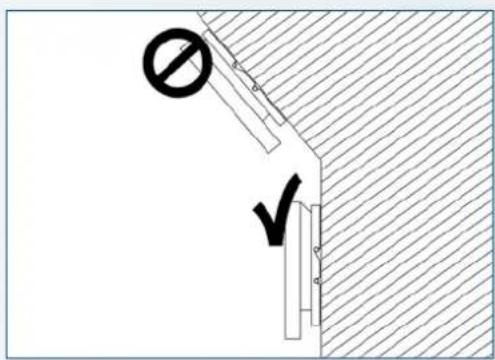
text_image
Technical diagram showing a construction or safety symbol with a prohibition sign and checkmark, likely indicating no protection or clearance.If you encounter a problem during installation, please contact your supplier for assistance. Don't repair or open the e-screen by yourself.
Failure to do so may result in fire or electrical shock. Contact your dealer for inspection.
Protect and correctly use the power cord/plug.
- Don't pinch the power cord/plug between hard surfaces.
- Don't step on the power cord/plug.
• Before inserting the power plug into the wall outlet, connect the power cord to the display. - Using an e-screen with a damaged or non-original powercord can damage the screen, cause fires or electrical shocks.
Using extension cords (not recommended)
If an extension cord must be used, ensure the voltage rating exceeds the max power consumption of the display. If the voltage rating is less than the display, it will cause the extension cord to overheat.
Do not operate the screen during thunder or lightning.
Remove the powerplug from the power outlet.
Don't use any kind of liquid on the e-screen.
- If liquid is spilled on the e-screen, remove the power plug from the wall socket and ask qualified service personnel to check the product.
- If liquid gets on e-screens glass plate, clean it with a dry and soft cloth immediately.
- Don't use any chemicals on the e-screen.
- If metal or liquids get into the e-screen, it may cause a fire or an electrical shock.
Don't install or remove the power plug with wet hands.
This may cause an electrical shock.
If the e-screen will not be used for a long period of time, unplug the display.
Preventing to do so may cause premature wear of electrical components or fire.
Handle the e-screen with care, prevent glass breakage.
- If the glass of the e-screen is broken, liquids may escape. Please don't touch the liquid.
- If these liquids come into contact with skin or eyes, immediately wash it away with clean water and consult a medical professional.
Precautions with the remote control batteries
- Please only use approved AAA type batteries.
- Please be sure to insert batteries by matching the + and -.
- Don't recharge, heat, disassemble, short or throw batteries into a fire.
- Don't mix a new battery with a used one
- Don't mix different types of batteries together (only use the specified type).
2.6. CLEANING
Remove the power plug from the power outlet before cleaning.
Failure to do so may result in electrical shock or damage.
Cleaning the surface of the e-screen
- When the surface of the e-screen becomes dirty, wipe the surface lightly with a soft clean cloth.
-
If the surface requires additional cleaning, lightly moisten the cloth.
-
Do not to let any kind of liquid enter the e-screen as it may cause electrical shock or damage.
- Do not clean the e-screen with alcohol, solvents or ammonia, as this could damage the e-screen.
3. PACKAGE CONTENTS
3.1. UNPACKING
- The e-Screen is packed using cushions to protect the product during shipping.
- Before unpacking, prepare a stable, level, and clean surface near a wall outlet.
-
Set the box in an upright position and open from the top of the box before removing the top cushions.
-
Step 1: Remove the white handle and cut the banding
- Step 2: Remove the top cushion and take the accessory bag out.
3.2. INCLUDED ACCESSORIES
| Item |
| IR Remote Control (Batteries Included) |
| HDMI Cable |
| USB Type B to A |
| Power Cord |
| 2-in-1 stylus |
| 2 x High precision stylus |
| Easyfix cable clips |
| USB drive with user manual, UPDD driver (for Apple computers) and latest firmware-version |
4. INSTALLATION
4.1. ENVIRONMENT STATE
When operating the screen, ambient room conditions should not exceed the following:
- Operating temperature: -5°C to 45°C (41°F to 104°F)
• Humidity: less than 90% RH (Max)
4.2. GENERAL OVERVIEW OF THE SCREEN
text_image
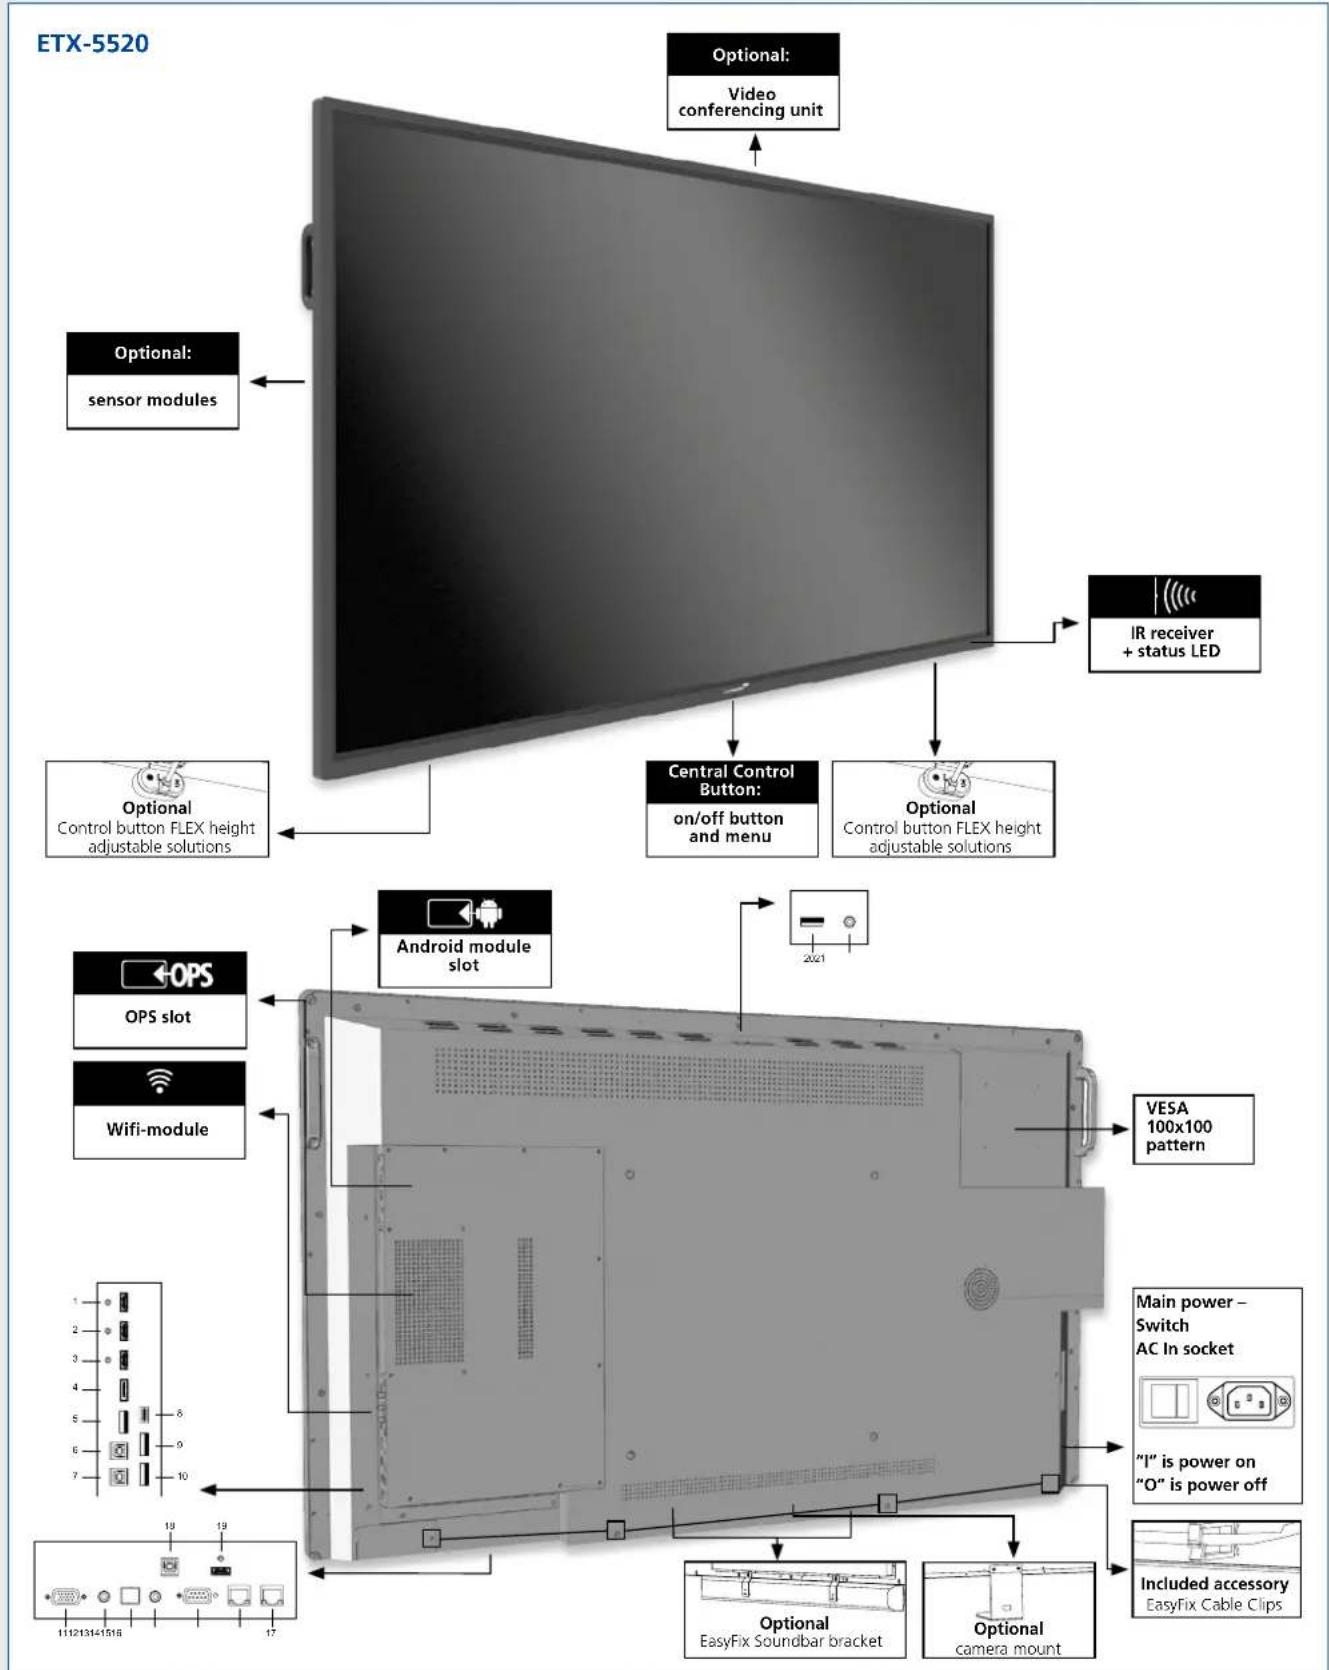
ETX-5520 Optional: sensor modules Optional: Video conferencing unit IR receiver + status LED Central Control Button: on/off button and menu Optional Control button FLEX height adjustable solutions Optional Control button FLEX height adjustable solutions Android module slot OPS slot Wifi-module VESA 100x100 pattern Main power - Switch AC In socket "I" is power on "O" is power off Included accessory Easyfix Cable Clips Optional EasyFix Soundbar bracket Optional camera mount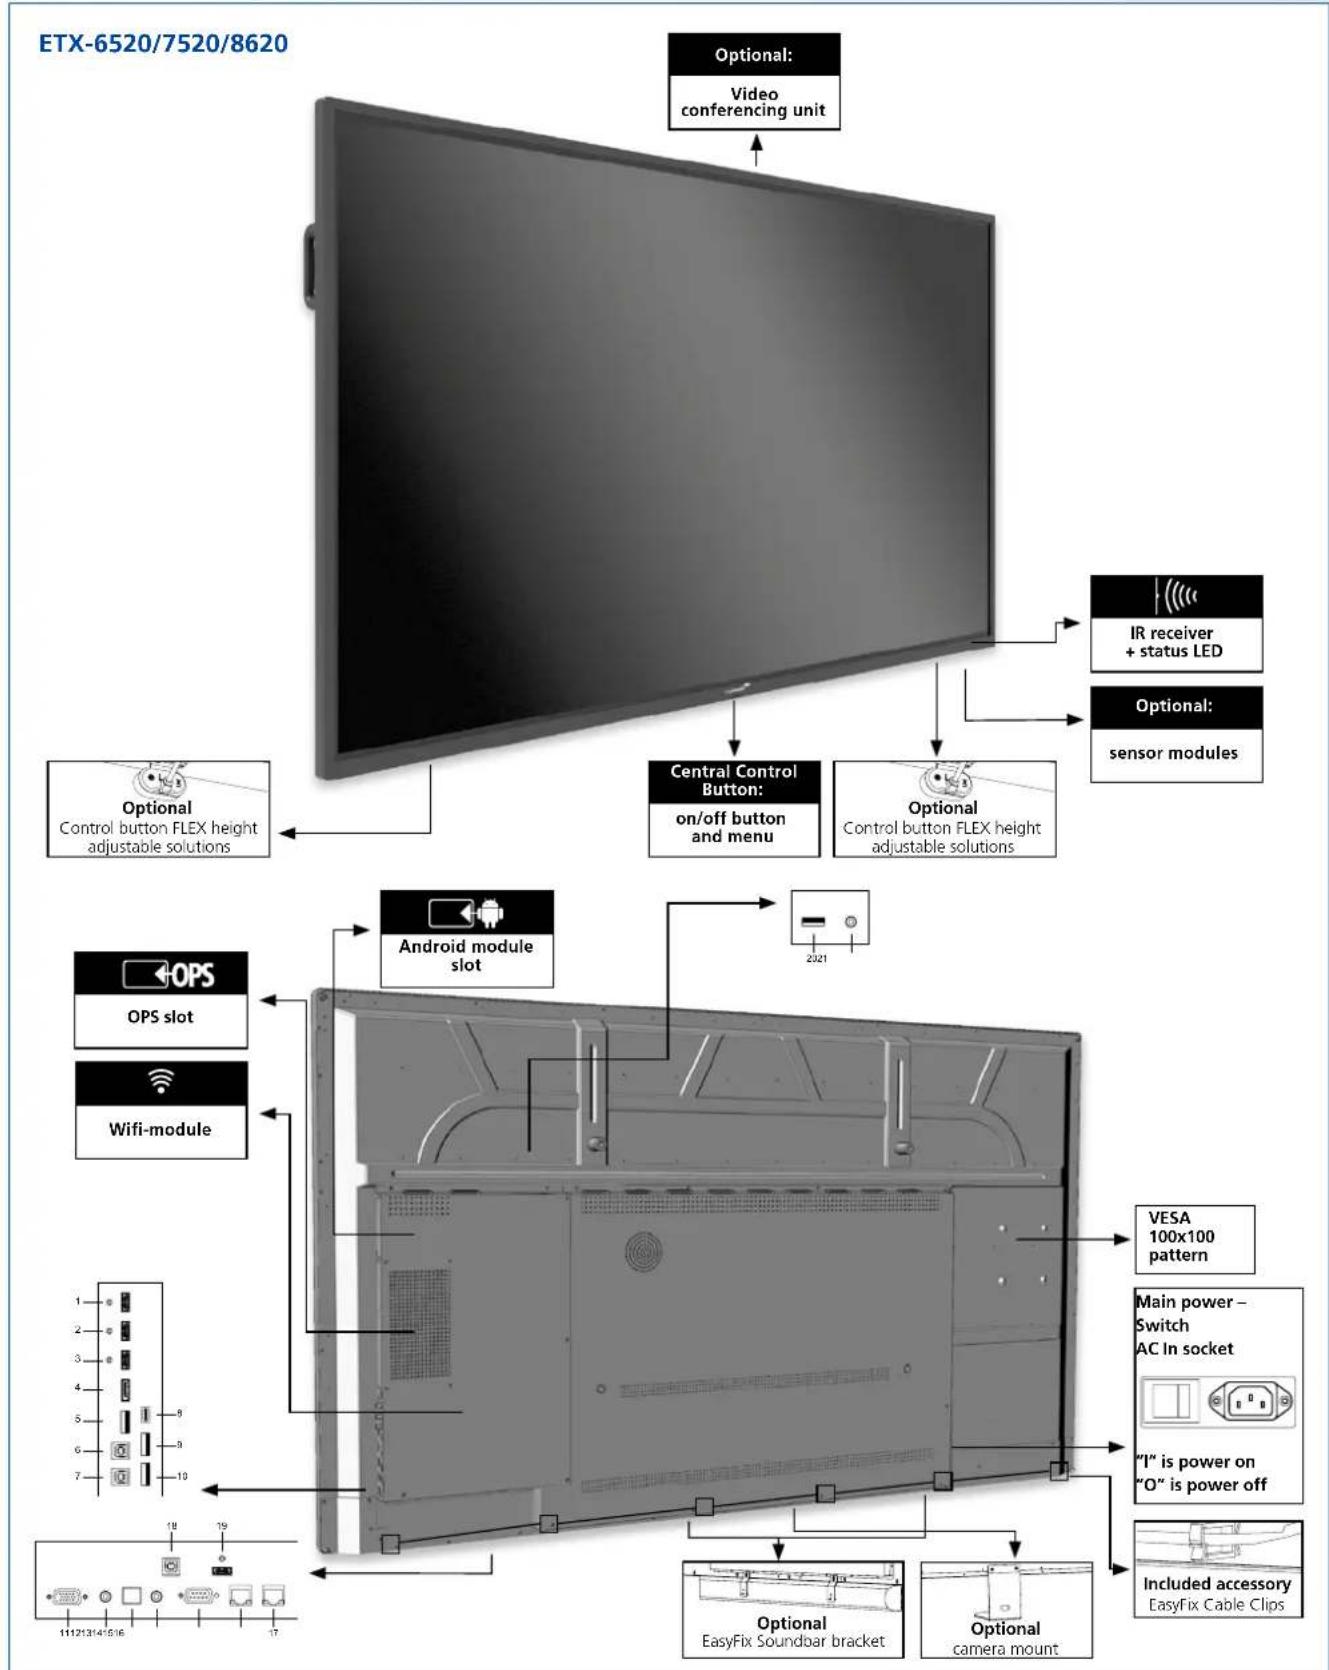
text_image
ETX-6520/7520/8620 Optional: Video conferencing unit Optional: IR receiver + status LED Optional: sensor modules Central Control Button: on/off button and menu Optional Control button FLEX height adjustable solutions Optional Control button FLEX height adjustable solutions Android module slot 2021 OPS OPS slot Wifi-module VESA 100x100 pattern Main power – Switch AC In socket "I" is power on "O" is power off Included accessory EasyFix Cable Clips Optional EasyFix Soundoar bracket Optional camera mount4.3. IN- AND OUTPUT CONNECTOR TABLE
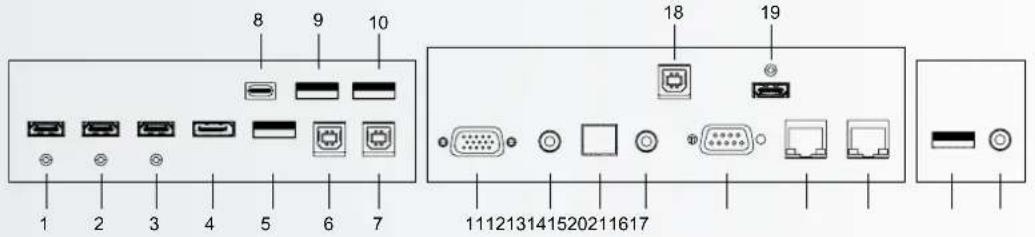
text_image
8 9 10 1 2 3 4 5 6 7 18 19 111213141520211617| 1 | HDMI outCan be used to connect the e-screen to an external monitor. |
| 2 | HDMI (ARC)HDCP-compliant digital video input for ARC enabled devices |
| 3 | HDMI 2HDCP-compliant digital video inputs for connecting HDMI sources. |
| 4 | DisplayPortDisplayPort 1.2, 1.1a and DisplayPort-HDCP 1.1 compliant, SD/HD input for connecting SDTV, EDTV or HDTV component video sources. |
| 5 | USB-A 2.0USB-A 2.0 port for connecting devices using a usb cable.Also used as service port. |
| 6 | Touch USB 1A standard, Type B USB port for the touch functionality of the display.Automatically links to HDMI 1 |
| 7 | Touch USB 2A standard, Type B USB port for the touch functionality of the display.Linked to HDMI 2, DP and VGA. |
| 8 | USB-CA USB-C port supporting power-delivery, USB 3.0 and DisplayPort.Please make sure that certified cables supporting these features are used. |
| 9-10 | USB-A 3.0USB-A 3.0 port for connecting devices using a usb cable. |
| 11 | VGA (D-Sub 15 pin)Connects components that have RGB or component output jacks,such as a personal computer |
| 12 | PC Audio InConnects the audio output from a personal computer |
| 13 | SPDIFConnects external, powered digital speakers or audio receiver/amplifier. |
| 14 | Audio OutConnects external, powered speakers or an external audioreceiver/amplifier. |
| 15 | RS-232CA female, 9-pin D-sub connector for interfacing with a PC or control system. |
| 16-17 | EthernetAn RJ-45 connector for interfacing with a PC or home theaterautomation/control system via a Cat 5 cable. |
| 18 | Touch USB 3A standard, Type B USB port for the touch functionality of the display.Linked to HDMI 3. |
| 19 | HDMI 3HDCP-compliant digital video inputs for connecting HDMI sources. |
| 20 | USB-A 3.0USB 3.0 port for connecting the EasyFix Video Conferencing Unit. Also used as service port. |
| 21 | PC Audio InAudio input for connecting the EasyFix Video Conferencing Unit |
4.4. REMOTE CONTROL
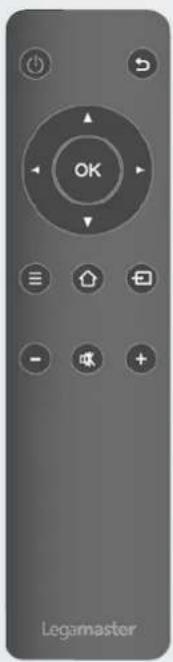
natural_image
Front view of a gray remote control with buttons and a 'OK' button (no readable text beyond the button)| Label Description | |
| Turn the display on and off | |
| Back / return to previous menu | |
| Navigational buttons | |
| Select / confirm (when in menu) or Freeze screen(press and hold in any source except Android) | |
| Menu | |
| Home | |
| Source selection menu | |
| Volume down | |
| Mute | |
| Volume Up | |
4.4.1. Changing the Remote Control Battery
1. Remove the battery cover:
On the backside of the remotecontrol, slide down the battery cover.
2. Insert batteries:
use two AAA batteries and insert them according to the plus and minus indicators in the remote control.
3. Close the battery cover
by sliding it back into place.
I. Discard batteries according the local waist reduction and recovery regulations.
II. Do not keep used, empty batteries in the remote control. They can leak and result in damages to the remote control.
III. Only use batteries according to the instructions and regulations found in this manual and to the instructions and regulations set forth by the batteries' manufacturer.

CAUTION
About the remote control
- Don't drop, shake or bump.
- Avoid moist conditions, liquids, high-temperatures and/or exposure to direct sunlight.
- Don't dismantle.
Before first using the screen, please update it to the latest firmware version. ETX- e-screens can be updated in 2 ways, Over-the-Air (Internet connection required) or using a USB-drive.
To update to the latest firmware version, open the Quick Launch menu by pressing the central control button on the e-Screen. From this menu, click on the settings-button to open up the settings-menu.
In the settings-menu, select 'Device' and then 'System updates'. The update section is pin-code protected (default pin = 0000)
- Local update: Insert a USB drive containing an update.zip file (supplied with the screen) in the USB 2.0 port on the side of the screen. Select 'local update' and select the USB drive. The update process will start.
- Over-the-Air updating: Select 'Online update'. The system will check if a new firmware version is available. If a newer version is available, the system will prompt an update. Please confirm, after which the update process will start
FOR FREQUENTLY ASKED QUESTIONS, PLEASE VISIT:
Please make sure the display is connected to an AC power-socket using the supplied power cable.
Set the AC-switch to „I“. The monitor will be in stand-by mode (indicated by a red light)
To switch the display on, push the central control button once, or push the power-button on the remote control.
To switch the monitor off, press and hold the central control button for 2 seconds, or push the power button on the remote control. The display will switch to stand-by mode.
To turn off power completely, turn the AC switch to „O“ or disconnect the AC power cord from the power outlet.
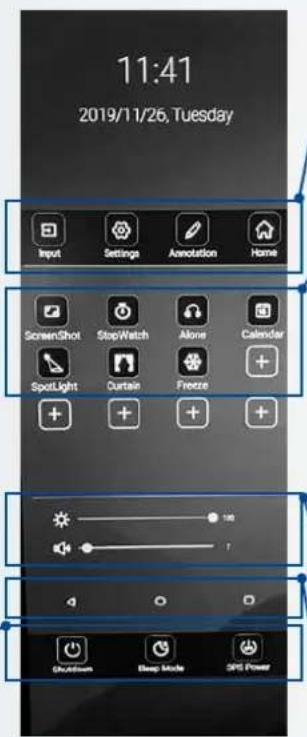
By pushing the Central command button once, the Quick Launch menu will open up. From this customizable menu, the most commonly used features of the screen can quickly be accessed.
text_image
11:41 2019/11/26, Tuesday Input Settings Annotation Home ScreenShot StopWatch Alone Calendar SpotLight Curtain Freeze + + + + 100 7 Bluetooth Sleep Mode GPS Power- Input: Click to select the desired input / source
-
Settings: Opens the settings-menu (see 5.4)
•Annotationtool
• Home: Opens the Android Launcher -
Screenshot: makes an instant screenshot and saves it to the file system, or when a USB-drive is inserted (in a USB 3.0 port) to the USB drive
- Stopwatch: Opens up a clock-screen with timer, stopwatch and alarm functionality
- Alone: Switches off the screen, but keeps playing audio. Wake-up the screen by touching it with 2 fingers.
• Calendar: opens up a calendar - Spotlight: Activates a spotlight. Spotlight can be moved, enlarged or decreased in size.
• Curtain: activates the curtain-feature - Freeze: Freezes the screen. Unfreeze by pressing the Freeze icon again.
Power-buttons:
- Shutdown: shuts down the screen and when applicable the OPS computer.
- Sleep-mode: induces a mode in which screen and audio are switched off, but from which the screen can recover in a snap by touching the screen with 2 fingers, or by pushing the Central control button
- OPS-power: switches the OPS computer on or off.
•Brightness-slider
•Volume-slider
Action-buttons:
• < Back / previous screen
• O Home (Legamaster launcher home-screen)
- □ Overview: Shows all open apps and allows users to quickly switch between them, or close all open apps at once.
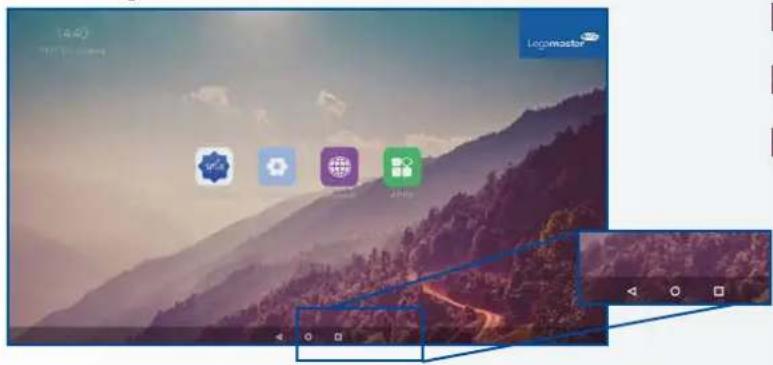
5.3. FLOAT MENU
A float menu appears when you swipe up from the bottom edge of the screen.
text_image
Screenshot of a macOS desktop with app icons and navigation bar, showing a mountain landscape background.In this float-menu, 3 Action-buttons can be found with the following functionality:
Back: takes you back to the previous screen
Home: brings you back to the home screen of the Legamaster Launcher
Overview: Shows all open apps and allows users to quickly switch between them, or close all open apps at once.
5.4. SETTINGS MENU
Below you can find a full overview of the settings menu of the ETX-XX20 e-Screen, together with an explanation of the settings.
| MAIN SETTINGS CATEGORY | SETTING CATEGORY | LEVEL1 LEVEL2 VALUES EXPLANATION | |||
| NETWORK & CONNECTED DEVICES | Ethernet | MAC address shows the MAC address for the wired connection | |||
| IP address shows the IP address for the wired connection | |||||
| Ethernet ON/OFF | Toggle ethernet-connection on / off for the screen itself. Disabling this does not disable ethernet for the OPS | ||||
| Wi-Fi | MAC address shows the MAC address for the Wi-Fi connection | ||||
| IP address shows the IP address for the Wi-Fi connection | |||||
| Wi-Fi ON/OFF Toggle Wi-Fi on and off | |||||
| Portable hotspot | Hotspot ON/OFF Toggle the hotspot-functionality on / off | ||||
| Setup Wi-Fi hotspot Set-up the hotspot | |||||
| Bluetooth | MAC address show the MAC address for the bluetooth adapter | ||||
| Blooth ON/OFF | Toggle bluetooth on/ off, show / connect with available devices | ||||
| DEVICE Picture | Picture mode | Standard | Select pre-set picture modesDynamic | ||
| Soft | |||||
| User | Picture mode where settings can be adjusted manually in ,Advanced' | ||||
| Power mode | User | Choose a power-mode: User = manual brightness setting, Auto = Automatic brightness setting based on ambient light conditions, balanced = brightness 75, ECO = brightness 50, DCR = 100. Power consumption varies based on these settings. | |||
| Auto | |||||
| Balanced | |||||
| ECO Friendly | |||||
| DCR | |||||
| Color temperture | Standard | Select a color temperature modeCool | |||
| Warm | |||||
| Eye protect ON/OFF | Toggle Eye Protect mode on / off. When enabled, the brightness will be reduced when writing. | ||||
| Anti blue light ON/OFF | Toggle Anti blue light on / off. When enabled the amount of blue light will be reduced. | ||||
| Backlight | 0-100 | Manually adjust the brightness. Using this setting will change the power mode setting to ,Manual' | |||
| DEVICE | Picture | Advanced Contrast 0-100 | In Picture mode ,User', use these settings to manually adjust the picture settings | ||
| Brightness 0-100 | |||||
| Saturation 0-100 | |||||
| Sharpness 0-100 | |||||
| PC mode PC / V deo | Allows switching to Video mode, in which ,Overscan' can be used | ||||
| Display mode 16:9/P2P Toggle picture aspect mode | |||||
| MEMC Off/Low/ Middle/High Change the MEMC level | |||||
| Overscan ON/OFF toggle between overscan on and off. | |||||
| HDR ON/OFF toggle between HDR on and off. | |||||
| VGA auto adjust | toggle VGA auto adjust o / off when receiving a VGA signal | ||||
| Sound | Audio output | Speaker/SPDIF/ARC/ Bluetooth | Choose the Audio output | ||
| Sound mode | Standard/Music/Movie/ Sports/User | Select a pre-set sound mode. ,User' allows manual sound settings | |||
| SPDIF mode RAW/PCM | Toogle SP/DIF mode between RAW / PCM | ||||
| AVC | ON/OFF toggle AVC on / off | ||||
| Sound Effect | ON/OFF toggle sound effect on / off | ||||
| Volume | 0-100 | set volume | |||
| Balance | 0-100 | set balance | |||
| EQ 120Hz | 0-100 | Manually adjust settings, when sound mode is set to , User' | |||
| EQ 500Hz | 0-100 | ||||
| EQ 1.5KHz | 0-100 | ||||
| EQ 5KHz | 0-100 | ||||
| EQ 10KHz | 0-100 | ||||
| SYSTEM | Security | Change password | Change your password | ||
| Safe mode | ON/OFF | Safe mode password-protects the complete settings menu, file browser and.... | |||
| App lock | Select individual apps that will be password-protected | ||||
| App install/uninstall lock | ON/OFF App (de)install lock | disables (de)installation of apps | |||
| Touch lock | ON/OFF Touch lock disables touch functionality | ||||
| Keypad lock | ON/OFF Keypad lock disables use of the Central Control Button | ||||
| IR lock | ON/OFF IR lock disables use of the remote control | ||||
| Network lock | ON/OFF | Network lock disables ethernet, Wifi and Bluetooth connections | |||
| Manage apps | Installed apps | manage user-installed apps(FORCE STOP/UNINSTALL/CLEAR DATA) | |||
| All apps | manage all apps(FORCE STOP/DISABLE/CLEAR DATA) | ||||
| Power | Power-on / shutdown timer | Shutdown timer | set the shutdown timer | ||
| Power-on timer | set the power-on timer | ||||
| Power on settings | Power on mode | Direct | set power on mode to direct | ||
| Standby | set power on mode to standby | ||||
| Memory | set power on mode to memory | ||||
| Power on source | Memory/Android/PC/ HDMI1/HDMI2/HDMI3/ DP/USB_C/VGA | Choose the source in which the screen powers-on | |||
| Power on volume | Memory/User | Set the power-on volume. In ,User' users can select a power-on volume manually | |||
| Volume setting | 0-100 | Set the power-on volume | |||
| Boot OPS at power-on | ON/OFF | Choose whether the OPS boots automatically when the screen is powered-on | |||
| Wake on lan | ON/OFF Enable / disable w | wake on Lan | |||
| Motion Wake-up | ON/OFF Enable / disable m | motion wake-up by the proximity sensor | |||
| Motion Detection | Off/15/30/45/60 minutes | Dis-/ enable the proximity sensor to put the screen in sleep mode when no motion is detected by the proximity sensor | |||
| Shutdown timer | OFF/1/10/20/30/ 60/90/120/180 minutes | set a shutdown timer | |||
| Auto shutdown | Off/1/3/5/10 minutes Shut | down the screen when there's no signal | |||
| OTHERS | More | Auto sense OFF/Prompt/Direct | Select the auto sense mode. In auto sense, the screen will detect new active signals and switch to that source automatically (direct), or when confirmed (prompt). When a signal is switched off, autosense will automatically check for other active sources in the sequence OPS slot, HDMI 1, HDMI 2, HDMI 3, DisplayPort, USB C, VGA always ending in the Android launcher (when enabled) | ||
| Temperature protection | ON/OFF | With temperature protection, a user can set an alarm temperature in which the screen will shutdown automatically | |||
| Current temperature 0-100 shows the current temperature of the screen | |||||
| Alam temperature 50-100 | set the alarm temperature value. When reached, the screen will automatically shutdown to prevent further temperature increase | ||||
| HDMI | HDMI out | 1080p 60Hz/2160p 30Hz/2160p 60Hz | set the HDMI out signal | ||
| HDMI EDID version | EDID 1,4/EDID 2.0 set the | HDMI EDID version | |||
| Date & time | Automatic date & time | ON/OFF | Automatic date and time requires an active internet connection. Disabling this setting allows users to maually set the date & time | ||
| Date Show or set the current date | |||||
| Time show or set the current time | |||||
| Time zone set the time zone | |||||
| Use 24-hour format | ON/OFF Choose between a 12 or a 24 hr time format | ||||
| Languages | Deutsch/English/Francais/Nederlands | set the language | |||
| Keyboard & inputs | Current Keyboard | Shows the current keyboard / allows users to switch keyboards | |||
| Android Keyboard (AOSP) | Configure the default (AOSP) keyboard | ||||
| Manage keyboards | Manage keyboards | ||||
| Individuation | Set wallpaper change and set the wallpaper | ||||
| Set 'no input' wallpater | change and set the no input wallpaper | ||||
| Set source label | Label various sources for easier recognition | ||||
| Device | Device name show or change the device name | ||||
| Device model shows the device model | |||||
| System information | Firmware version | shows all system information | |||
| System Updates | Local update | Updates the systems firmware using a USB-drive | |||
| Online update | Checks for updates online | ||||
| Reset | restore factory settings. NOTE! This will erase all custom settings, data and custom apps from your system | ||||
5.5. UPDATING THE SCREEN
The ETX-xx20 (PLUS) e-Screens can be updated with a new firmware version. Updates can be done using a USB-drive or 'over-the-air'.
5.5.1 Updating the e-Screen using a USB-drive
Load the update.zip file on a USB drive, and insert it into the USB 2.0 port on the side of the ETX e-Screen. Go to the settings menu of the ETX e-Screen. In the 'Others' section of the menu, select 'Device'. Select 'System updates' and choose 'local update'. Enter the pin-code set for the system, then select the USB-drive with the update.zip file on it. Follow the prompts until ready.
After completing the update process, please power-down the system completely (using the AC-switch).
5.5.2 Updating the e-Screen 'over-the-air'
Make sure the ETX e-Screen has an active internet connection. Go to the settings menu of the ETX e-Screen. In the 'Others' section of the menu, select 'Device'. Select 'System updates' and choose 'online update'. Enter the pin-code set for the system. The system will check for available updates. When a newer firmware version is available, click the 'download' button to start the update process.
NOTE: please verify that the correct server URL is entered: http://68.66.241.101:8080/ota/upgrade
After completing the update process, please power-down the system completely (using the AC-switch).
5.6. ENABLING / DISABLING ANDROID
ETX-XX20 (PLUS) e-Screens offer users the option to disable Android. To disable or enable Android, use the remote control supplied with the screen.
(slowly) Press: Source / Left / Right / Plus / Minus
A prompt will appear (Android enable); select ON to enable Android, Press OFF to disable Android
NOTE: disabling Android limits the functionalities of the screen. Some settings cannot be accessed or changed after Android has been disabled.
6. TOUCH OPERATION
To be able to control various (enabled) sources using the e-screens touch-functionality, a dedicated connection between the e-screen and the source is needed using a (supplied) USB cable:
- Connect the source with the screen using a video cable (VGA / HDMI / Displayport)
- Use the supplied USB cable to connect the source with the screen, using the USB-A connector for the source and the USB-B connector with the screen.
- Turn both the screen and the source on. It may take up to 5 seconds for touch to become active.
- When a suitable USB-C to USB-C cable is used, video, power-delivery and touch connectivity are manged over 1 cable.
7. SPECIFICATIONS
PRODUCT LOGISTICS ETX-8620 ETX-7520 ETX-6520 ETX-5520
| Dimension of Package Carton (W x H x D) 2139x1363x231 1875x1186x231 1676x1097x231 1414x901x232 | ||||
| Weight of Package Carton (Gross) 85 75,8 56 45 | ||||
| Product SAP / EAN / KEA | 868007000 / 8713797092500 / 7-803120-86 | 868006000 / 8713797092494 / 7-803120-75 | 868005000 / 8713797092487 / 7-803120-65 | 868004000 / 8713797092470 / 7-803120-55 |
PRODUCT SPECIFICATIONS
| Screen Size 86" (85.6") 75" (74.52") 65" (64.53") 55" (54.64") | ||||
| Panel Technology TFT LCD TFT LCD TFT LCD TFT LCD | ||||
| Display Resolution | 3840 x 2160 | 3840 x 2160 | 3840 x 2160 | 3840 x 2160 |
| Brightness (Typical) | 350 cd / m2 | 350 cd / m2 | 350 cd / m2 | 350 cd / m2 |
| Contrast (Typical) | 1200 : 1 | 4000:1 | 4000:1 | 4000:1 |
| Response Time | 8 ms | 8 ms | 9 ms | 9 ms |
| Frame Rate | 60 Hz | 60 Hz | 60 Hz | 60 Hz |
| Viewing Angle (H / V) | 178° / 178° | 178° / 178° | 178° / 178° | 178° / 178° |
| Display Colors | 1.07B (10-bit) | 1.07B (10-bit) | 1.07B (10-bit) | 1.07B (10-bit) |
| Backlight Type | Direct LED | Direct LED | Direct LED | Direct LED |
| Service life | >40.000 Hours >40.000 Hours >40.000 Hours >40.000 Hours | |||
| Orientation | Landscape | Landscape | Landscape / Portrait | Landscape / Portrait |
| CPU | ARM Cortex A73x2; Cortex A53x2 | ARM Cortex A73x2; Cortex A53x2 | ARM Cortex A73x2; Cortex A53x2 | ARM Cortex A73x2; Cortex A53x2 |
| GPU | G51MP4 | G51MP4 | G51MP4 | G51MP4 |
| Operating System | Android 8.0 | Android 8.0 | Android 8.0 | Android 8.0 |
| Memory | 4 GB | 4 GB | 4 GB | 4 GB |
| On-Board Storage | 32GB | 32GB | 32GB | 32GB |
| Detection Method | High Precision Advanced Infrared | High Precision Advanced Infrared | High Precision Advanced Infrared | High Precision Advanced Infrared |
| Available Touch Points | 32 Point ∅5 point ∅3mm | 32 Point ∅5 point ∅3mm | 32 Point ∅5 point ∅3mm | 32 Point ∅5 point ∅3mm |
| Response Time (Typical) | <= 10 ms | <= 10 ms | <= 10 ms | <= 10 ms |
| Minimum Response Size | >= ∅ 3 mm | >= ∅ 3 mm | >= ∅ 3 mm | >= ∅ 3 mm |
| Touch Resolution | 32771 x 32768 | 32770 x 32768 | 32769 x 32768 | 32768 x 32768 |
| Input Connectors | HDMI 2.0 ARC x 1 / HDMI 2.0 x 2 / DisplayPort x 1 / USB-A 3.0 x 3 + 2.0 x 1 / USB-C x 1 / VGA + 3.5mm jack x 1 / RS-232C x 1 / LAN RJ45 x 2 | |||
| Output Connectors | HDMI (4k@60Hz) x 1 / Optical (SPDIF) out x 1 / 3.5mm audio jack x 1 / Touch-out USB-B x 3 | |||
| OPS Slot | YES | YES | YES | YES |
| Android Slot | YES | YES | YES | YES |
| Wifi (pluggable / removable module) | 802.11a/b/g/n/ac, Bluetooth v. 5 | |||
| Audio Power Output (RMS) | 15 W x 2 / 8 Ω | 15 W x 2 / 8 Ω | 15 W x 2 / 8 Ω | 15 W x 2 / 8 Ω |
| Subwoofer | 15 W | 15 W | 15 W | 15 W |
| Dimension of Product (W x H x D) | 1959.5x1140.2x89.3 | 1714.7x1002.8x89.3 | 1490.5x875.5x89.3 | 1285.5x766.2x90 |
| Weight of Product | 66 55,9 | 43 34,3 | ||
| VESA® Hole Pitch (W x H) | 600 x 800 (mm), M8 Screw. Supplied with mounted 400x600 adapter | 400 x 600 (mm), M8 Screw | 400 x 400 mm, M8 Screw | |
| Front Glass | 4mm Tempered Anti-Glare | 4mm Tempered Anti-Glare | 4mm Tempered Anti-Glare | 4mm Tempered Anti-Glare |
| Power Supply | AC 100-240 V 50 / 60 Hz | AC 100-240 V 50 / 60 Hz | AC 100-240 V 50 / 60 Hz | AC 100-240 V 50 / 60Hz |
| Power Consumption (in Operation) | 360 | 295 | 160 | 125 |
| Power Consumption (in Standby) | <= 0.5 W | <= 0.5 W | <= 0.5 W | <= 0.5 W |
| ECO Sensor | Yes | Yes | Yes | Yes |
| Operation Temperature | 0 - 40 °C | 0 - 40 °C | 0 - 40 °C | 0 - 40 °C |
| Storage Temperature | -20 - 60 °C | -20 - 60 °C | -20 - 60 °C | -20 - 60 °C |
| Operation Humidity | 20 - 80 %RH (No Condensation) | 20 - 80 %RH (No Condensation) | 20 - 80 %RH (No Condensation) | 20 - 80 %RH (No Condensation) |
| Storage Humidity | 10 - 90 %RH | 10 - 90 %RH | 10 - 90 %RH | 10 - 90 %RH |
| Accessories | remote, HDMI cable 5m, USB cable 5m, High Precision stylus pack (2pcs), Double side stylus, Easy-fix cable clips | |||
PRODUCT LOGISTICS ETX-8620 PLUS ETX-7520 PLUS ETX-6520 PLUS
Dimension of Package Carton (W x H x D) 2139x1363x231 1875x1186x231 1676x1097x231
Weight of Package Carton (Gross) tbd tbd tbd
| Product SAP / EAN / KEA | 868034000 / 8713797092814 / 7-803120-86P | 868033000 / 8713797092807 / 7-803120-75P | 868032000 / 8713797092791 / 7-803120-65P |
PRODUCT SPECIFICATIONS
Screen Size 86" (85.6") 75" (74.52") 65" (64.53")
Panel Technology TFT LCD TFT LCD TFT LCD
Display Resolution 3840 x 2160 3840 x 2160 3840 x 2160
Brightness (Typical) 350 cd / m
2
350 cd / m²
350 cd / m²
| Contrast (Typical) 1200 : 1 | 4000:1 | 4000:1 | |
| Response Time | 8 ms | 8 ms | 9 ms |
| Frame Rate | 60 Hz | 60 Hz | 60 Hz |
Viewing Angle (H/V) 178° / 178° 178° / 178° 178° / 178°
Display Colors 1.07B (10-bit) 1.07B (10-bit) 1.07B (10-bit)
Backlight Type Direct LED Direct LED Direct LED Service life > 40.000 Hours > 40.000 Hours > 40.000 Hours
| Orientation | Landscape | Landscape | Landscape / Portrait |
| CPU | ARM Cortex A73x2; Cortex A53x2 | ARM Cortex A73x2; Cortex A53x2 | ARM Cortex A73x2; Cortex A53x2 |
| GPU | G51MP4 | G51MP4 | G51MP4 |
| Operating System | Android 8.0 | Android 8.0 | Android 8.0 |
Memory 4 GB 4 GB 4 GB
On-Board Storage 32GB 32GB 32GB
Detection Method High Precision Advanced Infrared High Precision Advanced Infrared High Precision Advanced Infrared
Available Touch Points 32 Point ∅5 point ∅3mm 32 Point ∅5 point ∅3mm 32 Point ∅5 point ∅3mm
Response Time (Typical) <= 10 ms <= 10 ms <= 10 ms
Minimum Response Size >= ∅ 3 mm >= ∅ 3 mm >= ∅ 3 mm
Touch Resolution 32771 x 32768 32770 x 32768 32769 x 32768
Input Connectors
HDMI 2.0 ARC x 1 / HDMI 2.0 x 2 / DisplayPort x 1 / USB-A 3.0 x 3 + 2.0 x 1 / USB-C x 1 / VGA + 3.5mm jack x 1 / RS-232C x 1 / LAN RJ45 x 2
Output Connectors
HDMI (4k@60Hz) x 1 / Optical (SPDIF) out x 1 / 3.5mm audio jack x 1 / Touch-out USB-B x 3
OPS Slot YES YES YES
Android Slot YES YES YES
Wifi (pluggable / removable module) 802.11a/b/g/n/ac, Bluetooth v. 5
Audio Power Output (RMS) 15 W x 2 / 8 Ω 15 W x 2 / 8 Ω 15 W x 2 / 8 Ω
Subwoofer 15 W 15 W 15 W
Dimension of Product (W x H x D) 1959.5x1140.2x89.3 1714.7x1002.8x89.3 1490.5x875.5x89
Weight of Product tbd tbd tbd
VESA® Hole Pitch (W x H) 600 x 800 (mm), M8 Screw. 600 x 800 (mm), M8 Screw. 400 x 600 (mm), M8 Screw. Supplied with mounted 400x500 adaptor.
Front Glass 2mm Optical Bonded Tempered Anti-Glare 2mm Optical Bonded Tempered Anti-Glare 2mm Optical Bonded Tempered Anti-Glare
Power Supply AC 100-240 V 50 / 60 Hz AC 100-240 V 50 / 60 Hz AC 100-240 V 50 / 60 Hz
Power Consumption (in Operation) 360 295 160
Power Consumption (in Standby) <= 0.5 W <= 0.5 W <= 0.5 W
ECO Sensor Yes Yes Yes
Operation Temperature 0 - 40 °C 0 - 40 °C 0 - 40 °C
Storage Temperature -20 - 60 °C -20 - 60 °C -20 - 60 °C
Operation Humidity 20 - 80 %RH (No Condensation) 20 - 80 %RH (No Condensation) 20 - 80 %RH (No Condensation)
Storage Humidity 10 - 90 %RH 10 - 90 %RH 10 - 90 %RH
Accessories remote, HDMI cable 5m, USB cable 5m, High Precision stylus pack (2pcs), Double side stylus, Easy-fix cable clips
8. SUPPORTED TIMINGS
VGA SOURCE DP Source HDMI SOURCE
| No. Signal format |
| 1 640x480/60HZ |
| 2 640x480/75HZ |
| 3 800x600/60Hz |
| 4 800x600/75Hz |
| 5 1024x768/60Hz |
| 6 1024x768/75Hz |
| 7 1280x768/60HZ |
| 8 1280x1024/60Hz |
| 9 1280x1024/75Hz |
| 10 1600x1024/60Hz |
| 11 1920x1080P/60Hz |
| 12 1920x1080P/50Hz |
| No. Signal format |
| 1 640x480/60HZ |
| 2 640x480/75HZ |
| 3 800x600/60Hz |
| 4 800x600/75Hz |
| 5 1024x768/60Hz |
| 6 1024x768/75Hz |
| 7 1280x768/60HZ |
| 8 1280x1024/60Hz |
| 9 1280x1024/75Hz |
| 10 1600x1024/60Hz |
| 11 1920x1080P/60Hz |
| 12 1920x1080P/50Hz |
| 13 3840x2160/30HZ |
| 14 3840x2160/60HZ |
| 15 1280x720P/60Hz |
| 16 1280x720P/50Hz |
| 17 720x480P/60Hz |
| 18 720x576P/50Hz |
| No. Signal format |
| 1 640x480/60HZ |
| 2 640x480/75HZ |
| 3 800x600/60Hz |
| 4 800x600/75Hz |
| 5 1024x768/60Hz |
| 6 1024x768/75Hz |
| 7 1280x768/60HZ |
| 8 1280x1024/60Hz |
| 9 1280x1024/75Hz |
| 10 1600x1024/60Hz |
| 11 1920x1080P/60Hz |
| 12 1920x1080P/50Hz |
| 13 3840x2160/30Hz |
| 14 3840x2160/60Hz |
| 15 1280x720P/60Hz |
| 16 1280x720P/50Hz |
| 17 720x480P/60Hz |
| 18 720x576P/50Hz |
| 19 1920x1080I/60Hz |
| 20 1920x1080I/50Hz |
9. SERIAL COMMANDS
9.1. SERIAL COMMUNICATIONS
The display uses a simple text-based control protocol to take requests from control devices and to provide responses to such devices. This section describes how to send control messages over a serial link between the display and an automation/control system or a PC running a terminal emulation program such as Windows® HyperTerminal or Tera Term.
9.2. RS-232 CONNECTION AND PORT CONFIGURATION
Connect your control system or PC to the RS-232 input of the display.
Configure the RS-232 controller or PC serial port as follows: Baud rate: 115200, 8bit, non parity, 1 stop bit.
9.3. RS232 INTERFACE
| Default Port settings > Baudrate: 115200, Bits:8,Parity: None, Stopbit-1 | ||||||||
| Main Item Control | Item Commando Type | Write / Read | Value in HEX Reply in HEX | Format: STX data ETX (STX=start text / ETX = end tekst) | Reply in Ascii Range | Note | ||
| Power Control and input source | Power control | Power OFF W 02 50 57 44 3A 30 30 30 03 | 4F 4B OK | |||||
| Power ON W 02 50 57 44 3A 30 30 31 03 | 4F 4B OK | |||||||
| Get Power status R 02 50 57 44 3A 3F 03 | 02 xx 03 Only second | nibble of byte | 0-1 | 0 = power OFF 1 = Power ON | ||||
| Backlight | Screen off (Blank) | W 02 42 4C 54 3A 30 30 30 03 | 4F 4B | OK | ||||
| Screen on (Blank) W 02 42 4C 54 3A 30 30 31 03 | 4F 4B OK | |||||||
| Get Screen Status (blank) | R 02 42 4C 54 3A 3F 03 | 02 xx 03 | Only second nibble of byte | 0-1 | 0 = screen OFF 1 = Screen ON | |||
| Backlight Level | W 02 42 4C 56 3A 3x 3x 3x 03 | 4F 4B | OK | 0 ~ 100 | x = 0-9 Example: 30 30 30 = 0 30 35 30 = 50 31 30 30 = 100 | |||
| Get Backlight Level | R 02 42 4C 56 3A 3F 03 | 02 xx xx xx 03 | Only second nibble of each byte | 0 ~ 100 | ||||
| Input source | HDMI 1 | W 02 49 4E 50 3A 30 30 38 03 | 4F 4B | OK | ||||
| HDMI 2 | W 02 49 4E 50 3A 30 30 39 03 | 4F 4B OK | ||||||
| HDMI 3 | W 02 49 4E 50 3A 30 31 30 03 | 4F 4B OK | ||||||
| OPS (PC) | W 02 49 4E 50 3A 30 30 34 03 | 4F 4B OK | ||||||
| Display Port | W 02 49 4E 50 3A 30 31 32 03 | 4F 4B OK | ||||||
| USB-C | W 02 49 4E 50 3A 30 31 36 03 | 4F 4B OK | ||||||
| VGA | W 02 49 4E 50 3A 30 30 35 03 | 4F 4B OK | ||||||
| Get Current Source | R 02 49 4E 50 3A 3F 03 | 02 xx xx 03 | Only second nibble of byte 5, 8, 9, 10, 12, 14, 16 | 5 = VGA 8 = HDMI1 9 = HDMI2 10 = HDMI3 12 = DP 14 = OPS 16 = USB-C | ||||
| Picture | Picture | Set Picture Mode | W 02 50 49 43 3A 3F 03 | 4F 4B | OK | x = 0-3 | 30 = Dynamic 31 = Standard 32 = Soft 33 = User | |
| Get Picture mode R 02 50 49 43 3A 3F 03 | 02 xx 03 Only second | nibble of byte | x = 0-3 0 = Dynamic 1 = Standard 2 = Soft 3 = User | |||||
| Freeze | Freeze | W 02 4B 45 59 3A 30 33 35 03 4F 4B OK | ||||||
| Audio Control | Volume | Volume Down | W 02 4B 45 59 3A 30 31 33 03 4F 4B OK | |||||
| Volume UP | W 02 4B 45 59 3A 30 31 32 03 4F 4B OK | |||||||
| Sel Volume Level | W 02 56 4F 4C 3A 3x 3x 3x 03 | 4F 4B | OK | 0 - 100 | x = 0-9 Example: 30 30 30 = 0 30 35 30 = 50 31 30 30 = 100 | |||
| Get Volume Level | R 02 56 4F 4C 3A 3F 03 | 02 xx xx xx 03 | Only second nibble of each byte | 0 - 100 | ||||
| Mute | Mute | W 02 4D 55 54 3A 30 30 30 03 | 4F 4B OK | OK | ||||
| Unmute | W 02 4D 55 54 3A 30 30 30 03 | 4F 4B OK | ||||||
| Sound mode | Sound mode | W 02 53 4E 44 3A 3F 03 | 4F 4B | OK | 0-4 | 30 = Standard 31 = Music 32 = Movie 33 = Sport 34=User | ||
| Get Sound mode R 02 53 4E 44 3A 3F 03 | 02 xx 03 Only second | nibble of Byte | 0-4 | 0 = Standard 1 = Music 2 = Movie 3 = Sport 4=User | ||||
| Default Port settings > Baudrate: 115200, Bits:8,Parity: None, Stopbit:1 | ||||||||
| Commands Keys Menu W 02 4B 45 59 3A 30 31 34 03 4F 4B OK | ||||||||
| Home W 02 4B 45 59 3A 30 36 30 03 4F 4B OK | ||||||||
| Back W 02 4B 45 59 3A 30 31 36 03 4F 4B OK | ||||||||
| Screenshot W 02 4B 45 59 3A 30 36 32 03 4F 4B OK | ||||||||
| Input key W 02 4B 45 59 3A 30 32 32 03 4F 4B OK | ||||||||
| Infor Key W 02 4B 45 59 3A 30 32 34 03 4F 4B OK | ||||||||
| 1 W 02 4B 45 59 3A 30 30 31 03 4F 4B OK | ||||||||
| 2 W 02 4B 45 59 3A 30 30 32 03 4F 4B OK | ||||||||
| 3 W 02 4B 45 59 3A 30 30 33 03 4F 4B OK | ||||||||
| 4 W 02 4B 45 59 3A 30 30 34 03 4F 4B OK | ||||||||
| 5 W 02 4B 45 59 3A 30 30 35 03 4F 4B OK | ||||||||
| 6 W 02 4B 45 59 3A 30 30 36 03 4F 4B OK | ||||||||
| 7 W 02 4B 45 59 3A 30 30 37 03 4F 4B OK | ||||||||
| 8 W 02 4B 45 59 3A 30 30 38 03 4F 4B OK | ||||||||
| 9 W 02 4B 45 59 3A 30 30 39 03 4F 4B OK | ||||||||
| 0 W 02 4B 45 59 3A 30 30 30 03 4F 4B OK | ||||||||
| OK W 02 4B 45 59 3A 30 31 35 03 4F 4B OK | ||||||||
| W 02 4B 45 59 3A 30 31 39 03 4F 4B OK | ||||||||
| W 02 4B 45 59 3A 30 32 30 03 4F 4B OK | ||||||||
| W 02 4B 45 59 3A 30 31 37 03 4F 4B OK | ||||||||
| W 02 4B 45 59 3A 30 31 38 03 4F 4B OK | ||||||||
| Lock Options Touch Touch Lock | W 02 55 53 57 3A 30 30 34 03 4F 4B OK | |||||||
| Touch Unlock | W 02 55 53 57 3A 30 30 35 03 4F 4B OK | |||||||
| Get Touch Lock Status | R | 02 55 53 57 3A 3F 03 | 02 xx 03 | Only second nibble of byte | 4-5 | 4 = Touch Lock ON5 = Touch Lock OFF | ||
| Keypad Lock | W 02 55 41 44 3A 30 30 31 03 4F 4B OK | |||||||
| Keypad Unlock | W 02 55 41 44 3A 30 30 30 03 4F 4B OK | |||||||
| Get Keypad Lock Status | R | 02 50 41 44 3A 3F 03 | 02 xx 03 | Only second nibble of byte | 0-1 | 0 = Keypad lock OFF1 = Keypad Lock ON | ||
| Remote Lock | W | 02 49 52 4C 3A 30 30 31 03 | 4F 4B | OK | 0-1 | |||
| Remote Unlock | W 02 49 52 4C 3A 30 30 30 03 4F 4B OK | |||||||
| Get Remote Lock Status | R | 02 49 52 4C 3A 3F 03 | 02 xx 03 | Only second nibble of byte | 0-1 | 0 = Remote Lock OFF1 = Remote Lock ON | ||
| Screen Info | Lan | Get Ethernet Mac Adress | R | 02 4D 41 43 3A 3F 03 | 4D 41 43 3A xx xx xx xx xx xx xx | MAC: ,adres' | ex:0:15:45:F3:12:BA | |
| Software | Get Software Version | R | 02 46 56 52 3A 3F 03 | 46 56 52 3A xx xx xx xx xx xx xx | FVR: 'version' | ex:FVR:568PH0009A1002 | ||
| Get Software Date | R | 02 46 56 54 3A 3F 03 | 46 56 54 3A xx xx xx xx xx xx xx | FVT:'date' ex: FVT:20200218 | ||||
| Get Model | R | 02 4D 44 54 3A 3F 03 | 4D 44 54 3A xx xx xx xx xx xx xx | MDT: ,model' | ex:MDT:LegamasterETX6520 e-Screen | |||
| Panel | Get Panel ID | R | 02 50 49 44 3A 3F 03 | 02 xx xx xx 03 | Only second nibble of each byte | Example: if ID =16 xx xx xx = 016 | ||
| Get Panel information | R | 02 50 4E 4C 3A 3F 03 | 50 4E 4C 3A xx xx xx xx xx xx xx xx | PNL: 'panel' | panel in ascii | |||
| Time | Get Total Work Time | R | 02 53 53 53 3A 3F 03 | 53 53 53 3Axx xx xx xx xx xx xx xx xx xx xx xx xx xx xx xx xx xx xx xx xx xx xx xx xx xx xx xx xx xx xx xx xx xx xx xx xx xx xx xx xx xx xx xx xx xx xx xx xx xx xx xx xx xx xx xx xx xx xx xx xx xx xx xx xx xx xx xx xx xx xx xx xx xx xx xx xx xx xx xx xx xx xx xx xx xx xx xx xx xx xx xx xx xx xx xx xx xx xx xx xx xxx xxx xxx xxx xxx xxx xxx xxx xxx xxx xxx xxx xxx xxx xxx xxx xxx xxx xxx xxx xxx xxx xxx xxx xxx xxx xxx xxx xxx xxx xxx xxx xxx xxx xxx xxx xxx xxx xxx xxx xxx xxx xxx xxx xxx xxx xxx xxx xxx xxx xxx xxx xxx xxx xxx xxx xxx xxx xxx xxx xxx xxx xxx xxx xxx xxx xxx xxx xxx xxx xxx xxx xxx xxx xxx xxx xxx xxx xxx xxx xxx xxx xxx xxx xxx xxx xxx xxx xxx xxx xxx xxx xxx xxx xxx xxx xxx xxx xxx xxxxxx xxx xxx xxx xxx xxx xxx xxx xxx xxx xxx xxx xxx xxx xxx xxx xxx xxx xxx xxx xxx xxx xxx xxx xxx xxx xxx xxx xxx xxx xxx xxx xxx xxx xxx xxx xxx xxx xxx xxx xxx xxx xxx xxx xxx xxx xxx xxx xxx xxx xxx xxx xxx xxx xxx xxx xxx xxx xxx xxx xxx xxx xxx xxx xxx xxx xxx xxx xxx xxx xxx xxx xxx xxx xxx xxx xxx xxx xxx xxx xxx xxx xxx xxx xxx xxx xxx xxx xxx xxx xxx xxx xxx xxx xxx xxx xxx xxx xxx xxxxx xxx xxx xxx xxx xxx xxx xxx xxx xxx xxx xxx xxx xxx xxx xxx xxx xxx xxx xxx xxx xxx xxx xxx xxx xxx xxx xxx xxx xxx xxx xxx xxx xxx xxx xxx xxx xxx xxx xxx xxx xxx xxx xxx xxx xxx xxx xxx xxx xxx xxx xxx xxx xxx xxx xxx xxx xxx xxx xxx xxx xxx xxx xxx xxx xxx xxx xxx xxx xxx xxx xxx xxx xxx xxx xxx xxx xxx xxx xxx xxx xxx xxx xxx xxx xxx xxx xxx xxx xxx xxx xxx xxx xxx xxx xxx xxx xxx xxx xxx xx xxx xxx xxx xxx xxx xxx xxx xxx xxx xxx xxx xxx xxx xxx xxx xxx xxx xxx xxx xxx xxx xxx xxx xxx xxx xxx xxx xxx xxx xxx xxx xxx xxx xxx xxx xxx xxx xxx xxx xxx xxx xxx xxx xxx xxx xxx xxx xxx xxx xxx xxx xxx xxx xxx xxx xxx xxx xxx xxx xxx xxx xxx xxx xxx xxx xxx xxx xxx xxx xxx xxx xxx xxx xxx xxx xxx xxx xxx xxx xxx xxx xxx xxx xxx xxx xxx xxx xxx xxx xxx xxx xxx xxx xxx xxx xxx xxx xxxxxxxxxxxxxxxxxxxxxxxxxxxxxxxxxxxxxxxxxxxxxxxxxxxxxxxxxxxxxxxxxxxxxxxxxxxxxxxxxxxxxxxxxxxxxxxxxxxxxxxxxxxxxxxxxxxxxxxxxxxxxxxxxxxxxxxxxxxxxxxxxxxxxxxxxxxxxxxxxxxxxxxxxxxxxxxxxxxxxxxxxxxxxxxxxxxxxxxxxxxxxxxxxxxxxxxxxxxxxxxxxxxxxxxxxxxxxxxxxxxxxxxxxxxxxxxxxxxxxxxxxxxxxxxxxxxxxxxxxxxxxxxxxxxxxxxxxxxxxxxxxxxxxxxxxxxxxxxxxxxxxxxxxxxxxxxxxxxxxxxxxxxxxxxxxxxxxxxxxxxxxxxxxxxxxxxxxxxxxxxxxxxxxxxxxxxxxxxxxxxxxxxxxxxxxxxxxxxxxxxxxxxxxxxxxxxxxxxxxxxxxxxxxxxxxxxxxxxxxxxxxxxxxxxxxxxxxxxxxxxxxxxxxxxxxxxxxxxxxxxxxxxxxxxxxxxxxxxxxxxxxxxxxxxxxxxxxxxxxxxxxxxxxxxxxxxxxxxxxxxxxxxxxxxxxxxxxxxxxxxxxxxxxxxxxxxxxxxxxxxxxxxxxxxxxxxxxxxxxxxxxxxxxxxxxxxxxxxxxxxxxxxxxxxxxxxxxxxxxxxxxxxxxxxxxxxxxxxxxxxxxxxxxxxxxxxxxxxxxxxxxxxxxxxxxxxxxxxxxxxxxxxxxxxxxxxxxxxxxxxxxxxxxxxxxxxxxxxxxxxxxxxxxxxxxxxxxxxxxxxxxxxxxxxxxxxxxxxxxxxxxxxxxxxxxxxxxxxxxxxxxxxxxxxxxxxxxxxxxxxxxxxxxxxxxxxxxxxxxxxxxxxxxxxxxxxxxxxxxxxxxxxxxxxxxxxxxxxxxxxxxxxxxxxxxxxxxxxxxxxxxxxxxxxxxxxxxxxxxxxxxxxxxxxxxxxxxxxxxxxxxxxxxxxxxxxxxxxxxxxxxxxxxxxxxxxxxxxxggggggggggggggggggggggggggggggggggggggggggggggggggggggggggggggggggggggggggggggggggggggggggggggggggggggggggggggggggggggggggggggggggggggggggggggggggggggggggggggggggggggggggggggggggggggggggggggggggggggggggtgggggggggggggggggggggggggggggggggggggggggggggggggggggggggggggggggggggggggggggggggggggggggggggggggggggggggggggggggggggggggggggggggggggggggggggggggggggggggggggggggggggggggggggggggggggggggggggggggggggggaaggggggggggggggggggggggggggggggggggggggggggggggggggggggggggggggggggggggggggggggggggggggggggggggggggggggggggggggggggggggggggggggggggggggggggggggggggggggggggggggggggggggggggggggggggggggggggggggggggggggggcgggggggggggggggggggggggggggggggggggggggggggggggggggggggggggggggggggggggggggggggggggggggggggggggggggggggggggggggggggggggggggggggggggggggggggggggggggggggggggggggggggggggggggggggggggggggggggggggggggggggtggggggggggggggggggggggggggggggggggggggggggggggggggggggggggggggggggggggggggggggggggggggggggggggggggggggggggggggggggggggggggggggggggggggggggggggggggggggggggggggggggggggggggggggggggggggggggggggggggggggaagggggggggggggggggggggggggggggggggggggggggggggggggggggggggggggggggggggggggggggggggggggggggggggggggggggggggggggggggggggggggggggggggggggggggggggggggggggggggggggggggggggggggggggggggggggggggggggggggggggttggggttggggttggggttggggttggggttggggttggggttggggttggggttggggttggggttggggttggggttggggttggggttggggttggggttggggttggggttggggttggggttggggttggggttggggttggggttttttttttttttttttttttttttttttttttttttttttttttttttttttttttttttttttttttttttttttttttttttttttttttttttttttttttttttttttttttttttttttttttttttttttttttttttttttttttttttttttttttttttttttttttttttttttttttttttttttttttttttttttttttttttttttttttttttttttttttttttttttttttttttttttttttttttttttttttttttttttttttttttttttttttttttttttttttttttttttttttttttttttttttttttttttttttttttttttttttttttttttttttttttttttttttttttttttttttttttttattttttttttttttttttttttttttttttttttttttttttttttttttttttttttttttttttttttttttttttttttttttttttttttttttttttttttttttttttttttttttttttttttttttttttttttttttttttttttttttttttttttttttttttttttttttttttttttttttttttttcttttttttttttttttttttttttttttttttttttttttttttttttttttttttttttttttttttttttttttttttttttttttttttttttttttttttttttttttttttttttttttttttttttttttttttttttttttttttttttttttttttttttttttttttttttttttttttttttttttttttgcttcttcttcttcttcttcttcttcttcttcttcttcttcttcttcttcttcttcttcttcttcttcttcttcttcttcttcttcttcttcttcttcttcttcttcttcttcttcttcttcttcttcttcttcttcttcttcttcttcttct tcttcttcttcttcttcttcttcttcttcttcttcttcttcttcttcttcttcttcttcttcttcttcttcttcttcttcttcttcttcttcttcttcttcttcttcttcttcttcttcttcttcttcttcttcttcttcttcttcttctttcttcttcttcttcttcttcttcttcttcttcttcttcttcttcttcttcttcttcttcttcttcttcttcttcttcttcttcttcttcttcttcttcttcttcttcttcttcttcttcttcttcttcttcttcttcttcttcttcttcttgcttcttcttcttcttcttcttcttcttcttcttcttcttcttcttcttcttcttcttcttcttcttcttcttcttcttcttcttcttcttcttcttcttcttcttcttcttcttcttcttcttcttcttcttcttcttcttcttcttacttcttcttcttcttcttcttcttcttcttcttcttcttcttcttcttcttcttcttcttcttcttcttcttcttcttcttcttcttcttcttcttcttcttcttcttcttcttcttcttcttcttcttcttcttcttcttcttcttcttacttgcttcttcttcttcttcttcttcttcttcttcttcttcttcttcttcttcttcttcttcttcttcttcttcttcttcttcttcttcttcttcttcttcttcttcttcttcttcttcttcttcttcttcttcttcttcttcttcttcttCTTCTTCTTCTTCTTCTTCTTCTTCTTCTTCTTCTTCTTCTTCTTCTTCTTCTTCTTCTTCTTCTTCTTCTTCTTCTTCTTCTTCTTCTTCTTCTTCTTCTTCTTCTTCTTCTTCTTCTTCTTCTTCTTCTTCTTCTTCTTCTTCTTCTTCT TCTTCTTCTTCTTCTTCTTCTTCTTCTTCTTCTTCTTCTTCTTCTTCTTCTTCTTCTTCTTCTTCTTCTTCTTCTTCTTCTTCTTCTTCTTCTTCTTCTTCTTCTTCTTCTTCTTCTTCTTCTTCTTCTTCTTCTTCTTCTTCTTCTTCTTTCTTCTTCTTCTTCTTCTTCTTCTTCTTCTTCTTCTTCTTCTTCTTCTTCTTCTTCTTCTTCTTCTTCTTCTTCTTCTTCTTCTTCTTCTTCTTCTTCTTCTTCTTCTTCTTCTTCTTCTTCTTCTTCTTCTTCTTCTTCTTCTTCTTCTTGCTTCTTCTTCTTCTTCTTCTTCTTCTTCTTCTTCTTCTTCTTCTTCTTCTTCTTCTTCTTCTTCTTCTTCTTCTTCTTCTTCTTCTTCTTCTTCTTCTTCTTCTTCTTCTTCTTCTTCTTCTTCTTCTTCTTCTTCTTCTTCTTCTTCTGTTCTTCTTCTTCTTCTTCTTCTTCTTCTTCTTCTTCTTCTTCTTCTTCTTCTTCTTCTTCTTCTTCTTCTTCTTCTTCTTCTTCTTCTTCTTCTTCTTCTTCTTCTTCTTCTTCTTCTTCTTCTTCTTCTTCTTCTTCTTCTTCTTCTTACTTCTTCTTCTTCTTCTTCTTCTTCTTCTTCTTCTTCTTCTTCTTCTTCTTCTTCTTCTTCTTCTTCTTCTTCTTCTTCTTCTTCTTCTTCTTCTTCTTCTTCTTCTTCTTCTTCTTCTTCTTCTTCTTCTTCTTCTTCTTCTTCTTCTTACTTTCTTCTTCTTCTTCTTCTTCTTCTTCTTCTTCTTCTTCTTCTTCTTCTTCTTCTTCTTCTTCTTCTTCTTCTTCTTCTTCTTCTTCTTCTTCTTCTTCTTCTTCTTCTTCTTCTTCTTCTTCTTCTTCTTCTTCTTCTTCTTCTTCTTATTTCTTCTTCTTCTTCTTCTTCTTCTTCTTCTTCTTCTTCTTCTTCTTCTTCTTCTTCTTCTTCTTCTTCTTCTTCTTCTTCTTCTTCTTCTTCTTCTTCTTCTTCTTCTTCTTCTTCTTCTTCTTCTTCTTCTTCTTCTTCTTCTTCTTGTTCCTTCTTCTTCTTCTTCTTCTTCTTCTTCTTCTTCTTCTTCTTCTTCTTCTTCTTCTTCTTCTTCTTCTTCTTCTTCTTCTTCTTCTTCTTCTTCTTCTTCTTCTTCTTCTTCTTCTTCTTCTTCTTCTTCTTCTTCTTCTTCTTCTTCTVCTTCTTCTTCTTCTTCTTCTTCTTCTTCTTCTTCTTCTTCTTCTTCTTCTTCTTCTTCTTCTTCTTCTTCTTCTTCTTCTTCTTCTTCTTCTTCTTCTTCTTCTTCTTCTTCTTCTTCTTCTTCTTCTTCTTCTTCTTCTTCTTCTTCTUCTTCTTCTTCTTCTTCTTCTTCTTCTTCTTCTTCTTCTTCTTCTTCTTCTTCTTCTTCTTCTTCTTCTTCTTCTTCTTCTTCTTCTTCTTCTTCTTCTTCTTCTTCTTCTTCTTCTTCTTCTTCTTCTTCTTCTTCTTCTTCTTCTTCTTACTTCTTCTTCTTCTTCTTCTTCTTCTTCTTCTTCTTCTTCTTCTTCTTCTTCTTCTTCTTCTTCTTCTTCTTCTTCTTCTTCTTCTTCTTCTTCTTCTTCTTCTTCTTCTTCTTCTTCTTCTTCTTCTTCTTCTTCTTCTTCTTCTTCTTAGTTCTTAGTTCTTAGTTCTTAGTTCTTAGTTCTTAGTTCTTAGTTCTTAGTTCTTAGTTCTTAGTTCTTAGTTCTTAGTTCTTAGTTCTTAGTTCTTAGTTCTTAGTTCTTAGTTCTTAGTTCTTAGTTCTTAGTTCTTAGTTCTTAGTTCTTAGTTCTTAGTTCTTAGTTCTTAGTTCTTAGTTCTTAGTTCTTAGTTCTTAGTTCTTAGTTCTTAGTTCTTAGTTCTTAGTTACTTAGTTACTTAGTTACTTAGTTACTTAGTTACTTAGTTACTTAGTTACTTAGTTACTTAGTTACTTAGTTACTTAGTTACTTAGTTACTTAGTTACTTAGTTACTTAGTTACTTAGTTACTTAGTTACTTAGTTACTTAGTTACTTAGTTACTTAGTTACTTAGTTACTTAGTTACTTAGTTACTTAGTTACTTAGTTACTTAGTTACTTAGTTACTTAGTTACTTAGTTACTTAGTTACTTAGTTACTTAGTTACTTAGTTACTAGTTACTTAGTTACTTAGTTACTTAGTTACTTAGTTACTTAGTTACTTAGTTACTTAGTTACTTAGTTACTTAGTTACTTAGTTACTTAGTTACTTAGTTACTTAGTTACTTAGTTACTTAGTTACTTAGTTACTTAGTTACTTAGTTACTTAGTTACTTAGTTACTTAGTTACTTAGTTACTTAGTTACTTAGTTACTTAGTTACTTAGTTACTTAGTTACTTAGTTACTTAGTTACTTAGTTACTTAGTTACTTAGTTACTTAG TTGGTTGGTTGGTTGGTTGGTTGGTTGGTTGGTTGGTTGGTTGGTTGGTTGGTTGGTTGGTTGGTTGGTTGG | ||||
10. TROUBLESHOOTING
FOR FREQUENTLY ASKED QUESTIONS, TROUBLESHOOTING AND TIPS AND TRICKS, PLEASE VISIT:
www.faq.legamaster.com
11. COMPLIANCE
FCC:
FCC CFR Title 47
part 15 Subpart B.
CB:
IEC62368-1
CE:
EN55032
EN55035
EN61000-3-2
EN61000-3-3
EN62368
12. APPENDIX
12.1.DIMENSIONS
The following illustration shows the overall dimensions of the display:
ETX-5520
ETX-6520

text_image
4452 6000 4452 2228 4000 2428ETX-7520
ETX-8620
13. ACCESSORIES
CONFERENCING UNIT
Instantly turns the ETX e-Screen into a full video conferencing screen.
13.1.1 Specifications
- Camera resolution: 1920x1080 / 1280x720 @ 30 hz
- Pixels: 2 million
- Angle (diagonal): 85®
- 4 microphone array, Voice pick-up distance up to 8 meters
• Automatic Echo Cancellation
• Power: DC 5V±0.2V, 60 Hz // 370 mA - Supported operating systems: Windows / Android
13.1.2 Installation
- Use the 2 screws and fix the unit to the top bezel of the ETX-XX20 (PLUS) e-Screen
- Plug the USB cable into the upper USB-slot (No. 20)
- Plug the audio-cable into the upper audio-in port (No. 21)
13.1.3 Operation
- The unit is plug-and-play, open any application on either Android, OPS or any attached PC.
13.2. EASYFIX PROXIMITY SENSOR13.1. EA
Allow the ETX e-Screen to switch between sleep and wake based on room presence
13.2.1 Specifications
• Detection method: Infrared
• Detection angle: 100®
• Detection range: 5-7 m
- DC5V±0.5V
- Connection:USB-A
13.2.2 Installation
- Plug the unit into the USB-A port located on the lower bezelf of the screen, or (ETX-5520 only) on the left side of the screen.
- Fix the unit onto the screen using the 2 screws supplied
13.1.3 Operation
The unit is plug-and-play. The unit is controlled by the below settings, found in the settings menu of the ETX-XX20 e-Screen. Navigate to the settings-menu. In the 'system' part of the settings menu, press power:
- Enable the 'motion wake-up' setting to allow the proximity sensor to switch the ETX e-Screen from sleep to working mode
- Use the 'motion detection' setting to allow the ETX e-Screen to switch itself to sleep mode when no presence is detected in the field of view of the proximity sensor for a certain amount of time.

natural_image
Two people in a meeting room with brick walls and city skyline display (no visible text or symbols)DEUTSCH
INHALTSVERZEICHNIS
4. Installation....37
natural_image
Line drawing of three people standing with a blank rectangular object, no text or symbols present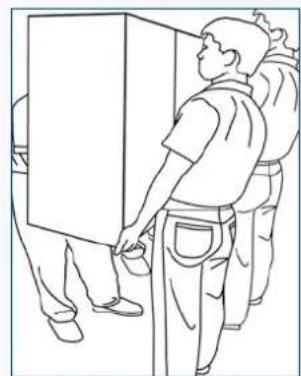
natural_image
Line drawing of a person using a device to interact with another person (no text or symbols present)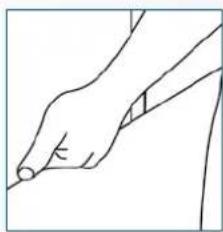
natural_image
Line drawing of a hand holding a pen or stylus (no text or symbols)natural_image
Two line drawings showing a person bending forward at a desk, with no text or symbols present.2.3.INNSTALUATION
natural_image
Technical line drawing of a structural support frame with three vertical posts and two horizontal bars, no text or symbols present.
natural_image
Simple line drawing of a house with two vertical bars and a checkmark (no text or symbols)natural_image
Simple line drawing of a room corner with vertical bars and a rectangular panel, no text or symbols present
natural_image
Simple line drawing of a room with vertical bars and a hanging sign, no text or symbols presentnatural_image
Simple line drawing of a room corner with doors, windows, and a window (no text or symbols)
natural_image
Line drawing of a room with doors, a monitor, and a wall-mounted heater (no text or symbols)text_image
10cm 10cm
text_image
Technical diagram showing a construction or safety symbol with a prohibition sign and checkmark, likely indicating no protection or clearance.natural_image
Gray remote control with black buttons and 'OK' button, no visible text or symbols beyond the button designtext_image
Screenshot of a macOS desktop with app icons and navigation controls, showing a mountain landscape background.| MAIN SETTINGS CATEGORY | SETTING CATEGORY | LEVEL1 LEVEL2 VALUES EXPLANATION | |||
| NETWORK & CONNECTED DEVICES | Ethernet | MAC address shows the MAC address | for the wired connection | ||
| IP address shows the IP address for the wired connection | |||||
| Ethernet ON/OFF | Toggle ethernet-connection on / off for the screen itself. Disabling this does not disable ethernet for the OPS | ||||
| Wi-Fi | MAC address shows the MAC address | for the Wi-Fi connection | |||
| IP address shows the IP address for the Wi-Fi connection | |||||
| Wi-Fi ON/OFF Toggle Wi-Fi on and off | |||||
| Portable hotspot | Hotspot ON/OFF Toggle the hotspot-functionality on / off | ||||
| Setup Wi-Fi hotspot Set-up the hotspot | |||||
| Bluetooth | MAC address show the MAC address for the bluetooth adapter | ||||
| Blooth ON/OFF | Toggle bluetooth on/ off, show / connect with available devices | ||||
| DEVICE Picture | Picture mode | Standard | Select pre-set picture modesDynamic | ||
| Soft | |||||
| User | Picture mode where settings can be adjusted manually in ,Advanced' | ||||
| Power mode | User | Choose a power-mode: User = manual brightness setting, Auto = Automatic brightness setting based on ambient light conditions, balanced = brightness 75, ECO = brightness 50, DCR = 100. Power consumption varies based on these settings. | |||
| Auto | |||||
| Balanced | |||||
| ECO Friendly | |||||
| DCR | |||||
| Color temperture | Standard | Select a color temperature modeCool | |||
| Warm | |||||
| Eye protect ON/OFF | Toggle Eye Protect mode on / off. When enabled, the brightness will be reduced when writing. | ||||
| Anti blue light ON/OFF | Toggle Anti blue light on / off. When enabled the amount of blue light will be reduced. | ||||
| Backlight 0-100 | Manually adjust the brightness. Using this setting will change the power mode setting to ,Manual' | ||||
| DEVICE | Picture | Advanced Contrast 0-100 | In Picture mode ,User', use these settings to manually adjust the picture settings | ||
| Brightness 0-100 | |||||
| Saturation 0-100 | |||||
| Sharpness 0-100 | |||||
| PC mode PC / V deo | Allows switching to Video mode, in which ,Overscan' can be used | ||||
| Display mode 16:9/P2P Toggle picture aspect mode | |||||
| MEMC Off/Low/ Middle/High Change the MEMC level | |||||
| Overscan ON/OFF toggle between overscan on and off. | |||||
| HDR ON/OFF toggle between HDR on and off. | |||||
| VGA auto adjust | toggle VGA auto adjust o / off when receiving a VGA signal | ||||
| Sound | Audio output | Speaker/SPDIF/ARC/ Bluetooth | Choose the Audio output | ||
| Sound mode | Standard/Music/Movie/ Sports/User | Select a pre-set sound mode. ,User' allows manual sound settings | |||
| SPDIF mode RAW/PCM Toogle SP/DIF mode between RAW / PCM | |||||
| AVC | ON/OFF toggle AVC on / off | ||||
| Sound Effect | ON/OFF toggle sound effect on / off | ||||
| Volume | 0-100 | set volume | |||
| Balance | 0-100 | set balance | |||
| EQ 120Hz | 0-100 | Manually adjust settings, when sound mode is set to , User' | |||
| EQ 500Hz | 0-100 | ||||
| EQ 1.5KHz | 0-100 | ||||
| EQ 5KHz | 0-100 | ||||
| EQ 10KHz | 0-100 | ||||
| SYSTEM | Security | Change password | Change your password | ||
| Safe mode | ON/OFF | Safe mode password-protects the complete settings menu, file browser and.... | |||
| App lock | Select individual apps that will be password-protected | ||||
| App install/uninstall lock | ON/OFF App (de)install lock | disables (de)installation of apps | |||
| Touch lock | ON/OFF Touch lock disables touch functionality | ||||
| Keypad lock | ON/OFF Keypad lock disables use of the Central Control Button | ||||
| IR lock | ON/OFF IR lock disables use of the remote control | ||||
| Network lock | ON/OFF | Network lock disables ethernet, Wifi and Bluetooth connections | |||
| Manage apps | Installed apps | manage user-installed apps(FORCE STOP/UNINSTALL/CLEAR DATA) | |||
| All apps | manage all apps(FORCE STOP/DISABLE/CLEAR DATA) | ||||
| Power | Power-on / shutdown timer | Shutdown timer | set the shutdown timer | ||
| Power-on timer | set the power-on timer | ||||
| Power on settings | Power on mode | Direct | set power on mode to direct | ||
| Standby | set power on mode to standby | ||||
| Memory | set power on mode to memory | ||||
| Power on source | Memory/Android/PC/ HDMI1/HDMI2/HDMI3/ DP/USB_C/VGA | Choose the source in which the screen powers-on | |||
| Power on volume | Memory/User | Set the power-on volume. In ,User' users can select a power-on volume manually | |||
| Volume setting | 0-100 | Set the power-on volume | |||
| Boot OPS at power-on | ON/OFF | Choose whether the OPS boots automatically when the screen is powered-on | |||
| Wake on lan | ON/OFF Enable / disable w | wake on Lan | |||
| Motion Wake-up | ON/OFF Enable / disable m | motion wake-up by the proximity sensor | |||
| Motion Detection | Off/15/30/45/60 minutes | Dis-/ enable the proximity sensor to put the screen in sleep mode when no motion is detected by the proximity sensor | |||
| Shutdown timer | OFF/1/10/20/30/ 60/90/120/180 minutes | set a shutdown timer | |||
| Auto shutdown | Off/1/3/5/10 minutes Shut | down the screen when there's no signal | |||
| OTHERS | More | Auto sense OFF/Prompt/Direct | Select the auto sense mode. In auto sense, the screen will detect new active signals and switch to that source automatically (direct), or when confirmed (prompt). When a signal is switched off, autosense will automatically check for other active sources in the sequence OPS slot, HDMI 1, HDMI 2, HDMI 3, DisplayPort, USB C, VGA always ending in the Android launcher (when enabled) | ||
| Temperature protection | ON/OFF | With temperature protection, a user can set an alarm temperature in which the screen will shutdown automatically | |||
| Current temperature 0-100 shows the current temperature of the screen | |||||
| Alam temperature 50-100 | set the alarm temperature value. When reached, the screen will automatically shutdown to prevent further temperature increase | ||||
| HDMI | HDMI out | 1080p 60Hz/2160p 30Hz/2160p 60Hz | set the HDMI out signal | ||
| HDMI EDID version | EDID 1,4/EDID 2.0 set the | HDMI EDID version | |||
| Date & time | Automatic date & time | ON/OFF | Automatic date and time requires an active internet connection. Disabling this setting allows users to maually set the date & time | ||
| Date Show or set the current date | |||||
| Time show or set the current time | |||||
| Time zone set the time zone | |||||
| Use 24-hour format | ON/OFF Choose between a 12 or a 24 hr time format | ||||
| Languages | Deutsch/English/Francais/Nederlands | set the language | |||
| Keyboard & inputs | Current Keyboard | Shows the current keyboard / allows users to switch keyboards | |||
| Android Keyboard (AOSP) | Configure the default (AOSP) keyboard | ||||
| Manage keyboards | Manage keyboards | ||||
| Individuation | Set wallpaper change and set the wallpaper | ||||
| Set 'no input' wallpaper | change and set the no input wallpaper | ||||
| Set source label | Label various sources for easier recognition | ||||
| Device | Device name show or change the device name | ||||
| Device model shows the device model | |||||
| System information | Firmware version | shows all system information | |||
| System Updates | Local update updates the systems firmware using a USB-drive | ||||
| Online update | Checks for updates online | ||||
| Reset | restore factory settings. NOTE! This will erase all custom settings, data and custom apps from your system | ||||
VGA SOURCE DP Source
| No. Signal format |
| 1 640x480/60HZ |
| 2 640x480/75HZ |
| 3 800x600/60Hz |
| 4 800x600/75Hz |
| 5 1024x768/60Hz |
| 6 1024x768/75Hz |
| 7 1280x768/60HZ |
| 8 1280x1024/60Hz |
| 9 1280x1024/75Hz |
| 10 1600x1024/60Hz |
| 11 1920x1080P/60Hz |
| 12 1920x1080P/50Hz |
HDMI SOURCE
| No. Signal format |
| 1 640x480/60HZ |
| 2 640x480/75HZ |
| 3 800x600/60Hz |
| 4 800x600/75Hz |
| 5 1024x768/60Hz |
| 6 1024x768/75Hz |
| 7 1280x768/60HZ |
| 8 1280x1024/60Hz |
| 9 1280x1024/75Hz |
| 10 1600x1024/60Hz |
| 11 1920x1080P/60Hz |
| 12 1920x1080P/50Hz |
| 13 3840x2160/30HZ |
| 14 3840x2160/60HZ |
| 15 1280x720P/60Hz |
| 16 1280x720P/50Hz |
| 17 720x480P/60Hz |
| 18 720x576P/50Hz |
| No. Signal format |
| 1 640x480/60HZ |
| 2 640x480/75HZ |
| 3 800x600/60Hz |
| 4 800x600/75Hz |
| 5 1024x768/60Hz |
| 6 1024x768/75Hz |
| 7 1280x768/60HZ |
| 8 1280x1024/60Hz |
| 9 1280x1024/75Hz |
| 10 1600x1024/60Hz |
| 11 1920x1080P/60Hz |
| 12 1920x1080P/50Hz |
| 13 3840x2160/30Hz |
| 14 3840x2160/60Hz |
| 15 1280x720P/60Hz |
| 16 1280x720P/50Hz |
| 17 720x480P/60Hz |
| 18 720x576P/50Hz |
| 19 1920x1080I/60Hz |
| 20 1920x1080I/50Hz |
9. SERIELLE BEFEHLE
9.1. SERIELLE KOMMUNIKATION
natural_image
Two people in a meeting room with brick walls and city skyline display (no visible text or symbols)FRANÇAIS
TABLE DES MATIÈRES
- Informations importantes .... 59
natural_image
Line drawing of three people standing in a row holding a blank rectangular object (no text or symbols)
natural_image
Line drawing of two workers in safety gear near a large rectangular object (no text or symbols)
natural_image
Line drawing of a hand holding a pen, no text or symbols presentnatural_image
Two line drawings showing a person bending forward at a desk and kneeling, with no text or symbols present.2.3. INSTALLATION
natural_image
Technical line drawing of a structural support frame with no text or symbols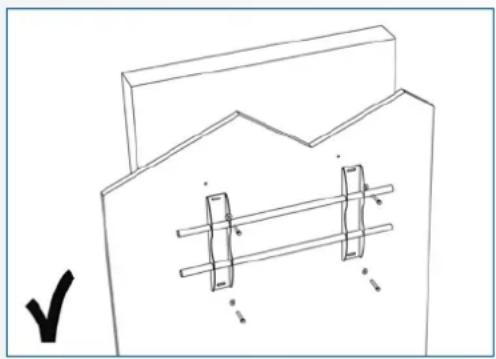
natural_image
Pure technical line drawing of a mechanical assembly with no text or symbolsnatural_image
Simple line drawing of a room corner with a window and wall-mounted panel, no text or symbols present
natural_image
Simple line drawing of a room corner with vertical bars and a hanging sign, no text or symbols presentnatural_image
Simple line drawing of a room corner with doors, windows, and a window (no text or symbols)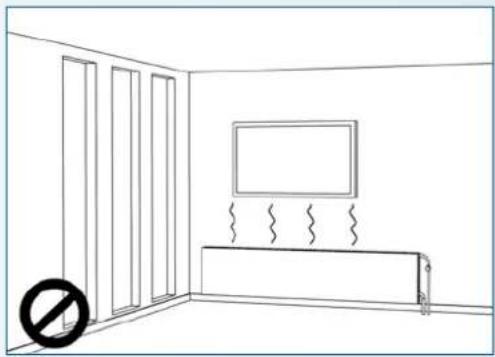
natural_image
Line drawing of a room with doors, a monitor, and a wall-mounted heater (no text or symbols)text_image
10cm 10cm
text_image
Technical diagram showing a construction or safety symbol with a prohibition sign and checkmark, likely indicating no protection or clearance.2.5. UTILISATION RECOMMANDÉE
natural_image
Front view of a gray remote control with black buttons and 'OK' button (no readable text beyond branding)text_image
Screenshot of a macOS desktop with app icons and navigation bar, showing folder navigation and a mountain landscape background.| MAIN SETTINGS CATEGORY | SETTING CATEGORY | LEVEL1 LEVEL2 VALUES EXPLANATION | |||
| NETWORK & CONNECTED DEVICES | Ethernet | MAC address shows the MAC address for the wired connection | |||
| IP address shows the IP address for the wired connection | |||||
| Ethernet ON/OFF | Toggle ethernet-connection on / off for the screen itself. Disabling this does not disable ethernet for the OPS | ||||
| Wi-Fi | MAC address shows the MAC address for the Wi-Fi connection | ||||
| IP address shows the IP address for the Wi-Fi connection | |||||
| Wi-Fi ON/OFF Toggle Wi-Fi on and off | |||||
| Portable hotspot | Hotspot ON/OFF Toggle the hotspot-functionality on / off | ||||
| Setup Wi-Fi hotspot Set-up the hotspot | |||||
| Bluetooth | MAC address show the MAC address for the bluetooth adapter | ||||
| Blooth ON/OFF | Toggle bluetooth on/ off, show / connect with available devices | ||||
| DEVICE Picture | Picture mode | Standard | Select pre-set picture modesDynamic | ||
| Soft | |||||
| User | Picture mode where settings can be adjusted manually in ,Advanced' | ||||
| Power mode | User | Choose a power-mode: User = manual brightness setting, Auto = Automatic brightness setting based on ambient light conditions, balanced = brightness 75, ECO = brightness 50, DCR = 100. Power consumption varies based on these settings. | |||
| Auto | |||||
| Balanced | |||||
| ECO Friendly | |||||
| DCR | |||||
| Color temperture | Standard | Select a color temperature modeCool | |||
| Warm | |||||
| Eye protect ON/OFF | Toggle Eye Protect mode on / off. When enabled, the brightness will be reduced when writing. | ||||
| Anti blue light | ON/OFF | Toggle Anti blue light on / off. When enabled the amount of blue light will be reduced. | |||
| Backlight | 0-100 | Manually adjust the brightness. Using this setting will change the power mode setting to ,Manual' | |||
| DEVICE | Picture | Advanced Contrast 0-100 | In Picture mode ,User', use these settings to manually adjust the picture settings | ||
| Brightness 0-100 | |||||
| Saturation 0-100 | |||||
| Sharpness 0-100 | |||||
| PC mode PC / V deo | Allows switching to Video mode, in which ,Overscan' can be used | ||||
| Display mode 16:9/P2P Toggle picture aspect mode | |||||
| MEMC Off/Low/Middle/High Change the MEMC level | |||||
| Overscan ON/OFF toggle between overscan on and off. | |||||
| HDR ON/OFF toggle between HDR on and off. | |||||
| VGA auto adjust | toggle VGA auto adjust o / off when receiving a VGA signal | ||||
| Sound | Audio output | Speaker/SPDIF/ARC/Bluetooth | Choose the Audio output | ||
| Sound mode | Standard/Music/Movie/Sports/User | Select a pre-set sound mode. ,User' allows manual sound settings | |||
| SPDIF mode | RAW/PCM | Toogle SP/DIF mode between RAW / PCM | |||
| AVC | ON/OFF toggle AVC on / off | ||||
| Sound Effect | ON/OFF toggle sound effect on / off | ||||
| Volume | 0-100 | set volume | |||
| Balance | 0-100 | set balance | |||
| EQ 120Hz | 0-100 | Manually adjust settings, when sound mode is set to ,User' | |||
| EQ 500Hz | 0-100 | ||||
| EQ 1.5KHz | 0-100 | ||||
| EQ 5KHz | 0-100 | ||||
| EQ 10KHz | 0-100 | ||||
| SYSTEM | Security | Change password | Change your password | ||
| Safe mode | ON/OFF | Safe mode password-protects the complete settings menu, file browser and.... | |||
| App lock | Select individual apps that will be password-protected | ||||
| App install/uninstall lock | ON/OFF App (de)install lock disables (de)installation of apps | ||||
| Touch lock | ON/OFF Touch lock disables touch functionality | ||||
| Keypad lock | ON/OFF Keypad lock disables use of the Central Control Button | ||||
| IR lock | ON/OFF IR lock disables use of the remote control | ||||
| Network lock | ON/OFF | Network lock disables ethernet, Wifi and Bluetooth connections | |||
| Manage apps | Installed apps | manage user-installed apps(FORCE STOP/UNINSTALL/CLEAR DATA) | |||
| All apps | manage all apps(FORCE STOP/DISABLE/CLEAR DATA) | ||||
| Power | Power-on / shutdown timer | Shutdown timer | set the shutdown timer | ||
| Power-on timer | set the power-on timer | ||||
| Power on settings | Power on mode | Direct | set power on mode to direct | ||
| Standby | set power on mode to standby | ||||
| Memory | set power on mode to memory | ||||
| Power on source | Memory/Android/PC/HDMI1/HDMI2/HDMI3/DP/USB_C/VGA | Choose the source in which the screen powers-on | |||
| Power on volume | Memory/User | Set the power-on volume. In ,User' users can select a power-on volume manually | |||
| Volume setting | 0-100 | Set the power-on volume | |||
| Boot OPS at power-on | ON/OFF | Choose whether the OPS boots automatically when the screen is powered-on | |||
| Wake on lan | ON/OFF Enable / disable w | wake on Lan | |||
| Motion Wake-up | ON/OFF Enable / disable m | motion wake-up by the proximity sensor | |||
| Motion Detection | Off/15/30/45/60 minutes | Dis-/ enable the proximity sensor to put the screen in sleep mode when no motion is detected by the proximity sensor | |||
| Shutdown timer | OFF/1/10/20/30/60/90/120/180 minutes | set a shutdown timer | |||
| Auto shutdown | Off/1/3/5/10 minutes Shut | down the screen when there's no signal | |||
| OTHERS | More | Auto sense OFF/Prompt/Direct | Select the auto sense mode. In auto sense, the screen will detect new active signals and switch to that source automatically (direct), or when confirmed (prompt). When a signal is switched off, autosense will automatically check for other active sources in the sequence OPS slot, HDMI 1, HDMI 2, HDMI 3, DisplayPort, USB C, VGA always ending in the Android launcher (when enabled) | ||
| Temperature protection | ON/OFF | With temperature protection, a user can set an alarm temperature in which the screen will shutdown automatically | |||
| Current temperature 0-100 shows the current temperature of the screen | |||||
| Alam temperature 50-100 | set the alarm temperature value. When reached, the screen will automatically shutdown to prevent further temperature increase | ||||
| HDMI | HDMI out | 1080p 60Hz/2160p 30Hz/2160p 60Hz | set the HDMI out signal | ||
| HDMI EDID version | EDID 1,4/EDID 2.0 set the | HDMI EDID version | |||
| Date & time | Automatic date & time | ON/OFF | Automatic date and time requires an active internet connection. Disabling this setting allows users to maually set the date & time | ||
| Date Show or set the current date | |||||
| Time show or set the current time | |||||
| Time zone set the time zone | |||||
| Use 24-hour format | ON/OFF Choose between a 12 or a 24 hr time format | ||||
| Languages | Deutsch/English/Francais/Nederlands | set the language | |||
| Keyboard & inputs | Current Keyboard | Shows the current keyboard / allows users to switch keyboards | |||
| Android Keyboard (AOSP) | Configure the default (AOSP) keyboard | ||||
| Manage keyboards | Manage keyboards | ||||
| Individuation | Set wallpaper change and set the wallpaper | ||||
| Set 'no input' wallpater | change and set the no input wallpaper | ||||
| Set source label | Label various sources for easier recognition | ||||
| Device | Device name show or change the device name | ||||
| Device model | shows the device model | ||||
| System information | Firmware version | shows all system information | |||
| System Updates | Local update | Updates the systems firmware using a USB-drive | |||
| Online update | Checks for updates online | ||||
| Reset | restore factory settings. NOTE! This will erase all custom settings, data and custom apps from your system | ||||
5.5. MISE À JOUR DE L'ÉCRAN
VGA SOURCE DP Source HDMI SOURCE
| No. Signal format |
| 1 640x480/60HZ |
| 2 640x480/75HZ |
| 3 800x600/60Hz |
| 4 800x600/75Hz |
| 5 1024x768/60Hz |
| 6 1024x768/75Hz |
| 7 1280x768/60HZ |
| 8 1280x1024/60Hz |
| 9 1280x1024/75Hz |
| 10 1600x1024/60Hz |
| 11 1920x1080P/60Hz |
| 12 1920x1080P/50Hz |
| No. Signal format |
| 1 640x480/60HZ |
| 2 640x480/75HZ |
| 3 800x600/60Hz |
| 4 800x600/75Hz |
| 5 1024x768/60Hz |
| 6 1024x768/75Hz |
| 7 1280x768/60HZ |
| 8 1280x1024/60Hz |
| 9 1280x1024/75Hz |
| 10 1600x1024/60Hz |
| 11 1920x1080P/60Hz |
| 12 1920x1080P/50Hz |
| 13 3840x2160/30HZ |
| 14 3840x2160/60HZ |
| 15 1280x720P/60Hz |
| 16 1280x720P/50Hz |
| 17 720x480P/60Hz |
| 18 720x576P/50Hz |
| No. Signal format |
| 1 640x480/60HZ |
| 2 640x480/75HZ |
| 3 800x600/60Hz |
| 4 800x600/75Hz |
| 5 1024x768/60Hz |
| 6 1024x768/75Hz |
| 7 1280x768/60HZ |
| 8 1280x1024/60Hz |
| 9 1280x1024/75Hz |
| 10 1600x1024/60Hz |
| 11 1920x1080P/60Hz |
| 12 1920x1080P/50Hz |
| 13 3840x2160/30Hz |
| 14 3840x2160/60Hz |
| 15 1280x720P/60Hz |
| 16 1280x720P/50Hz |
| 17 720x480P/60Hz |
| 18 720x576P/50Hz |
| 19 1920x1080I/60Hz |
| 20 1920x1080I/50Hz |
9. COMMANDES SÉRIE
9.1. COMMUNICATIONS SÉRIE
natural_image
Two people in a meeting room with brick walls and city skyline display (no visible text or symbols)NEDERLANDS
INHOUDSOPGAVE
natural_image
Line drawing of three people standing in a row holding a blank rectangular object (no text or symbols)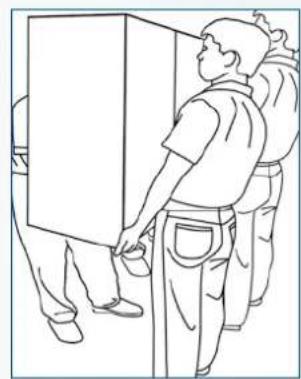
natural_image
Line drawing of two workers in safety gear near a large rectangular object (no text or symbols)
natural_image
Line drawing of a hand holding a pen, no text or symbols presentHet product dragen:
natural_image
Two line drawings showing a person bending forward at a desk and kneeling, with no text or symbols present.2.3. INSTALLATIE
natural_image
Technical line drawing of a structural support frame with three vertical posts and two horizontal bars, no text or symbols present.
natural_image
Pure technical line drawing of a mechanical component with no text, numbers, or symbolsnatural_image
Simple line drawing of a room with vertical bars and a window, no text or symbols present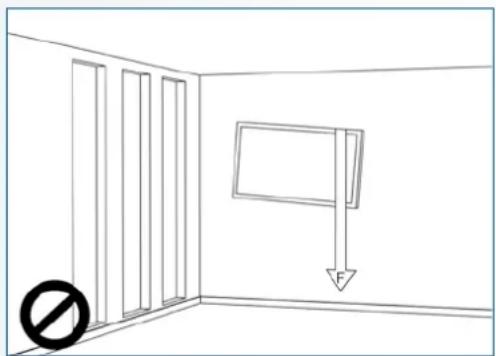
natural_image
Simple line drawing of a room with vertical bars and a hanging sign, no text or symbols presentnatural_image
Simple line drawing of a room corner with sunlight illuminating the wall and a prohibition symbol below (no text or labels)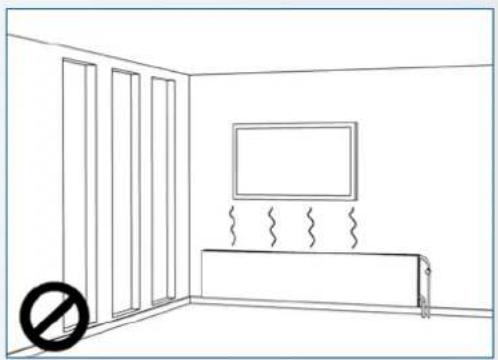
natural_image
Line drawing of a room interior with windows, a TV, and a wall-mounted device (no text or symbols)text_image
10cm 10cm
text_image
Diagram showing a construction or safety symbol with a prohibition sign and checkmark, likely indicating no protection or no detail.natural_image
Front view of a gray remote control with black buttons and 'OK' button (no readable text beyond branding)text_image
Screenshot of a macOS desktop with app icons and navigation bar, showing a mountain landscape background.| MAIN SETTINGS CATEGORY | SETTING CATEGORY | LEVEL1 LEVEL2 VALUES EXPLANATION | |||
| NETWORK & CONNECTED DEVICES | Ethernet | MAC address shows the MAC address for the wired connection | |||
| IP address shows the IP address for the wired connection | |||||
| Ethernet ON/OFF | Toggle ethernet-connection on / off for the screen itself. Disabling this does not disable ethernet for the OPS | ||||
| Wi-Fi | MAC address shows the MAC address for the Wi-Fi connection | ||||
| IP address shows the IP address for the Wi-Fi connection | |||||
| Wi-Fi ON/OFF Toggle Wi-Fi on and off | |||||
| Portable hotspot | Hotspot ON/OFF Toggle the hotspot-functionality on / off | ||||
| Setup Wi-Fi hotspot Set-up the hotspot | |||||
| Bluetooth | MAC address show the MAC address for the bluetooth adapter | ||||
| Blooth ON/OFF | Toggle bluetooth on/ off, show / connect with available devices | ||||
| DEVICE Picture | Picture mode | Standard | Select pre-set picture modesDynamic | ||
| Soft | |||||
| User | Picture mode where settings can be adjusted manually in ,Advanced' | ||||
| Power mode | User | Choose a power-mode: User = manual brightness setting, Auto = Automatic brightness setting based on ambient light conditions, balanced = brightness 75, ECO = brightness 50, DCR = 100. Power consumption varies based on these settings. | |||
| Auto | |||||
| Balanced | |||||
| ECO Friendly | |||||
| DCR | |||||
| Color temperture | Standard | Select a color temperature modeCool | |||
| Warm | |||||
| Eye protect ON/OFF | Toggle Eye Protect mode on / off. When enabled, the brightness will be reduced when writing. | ||||
| Anti blue light ON/OFF | Toggle Anti blue light on / off. When enabled the amount of blue light will be reduced. | ||||
| Backlight | 0-100 | Manually adjust the brightness. Using this setting will change the power mode setting to ,Manual' | |||
| DEVICE | Picture | Advanced Contrast 0-100 | In Picture mode ,User', use these settings to manually adjust the picture settings | ||
| Brightness 0-100 | |||||
| Saturation 0-100 | |||||
| Sharpness 0-100 | |||||
| PC mode PC / V deo | Allows switching to Video mode, in which ,Overscan' can be used | ||||
| Display mode 16:9/P2P Toggle picture aspect mode | |||||
| MEMC Off/Low/ Middle/High Change the MEMC level | |||||
| Overscan ON/OFF toggle between overscan on and off. | |||||
| HDR ON/OFF toggle between HDR on and off. | |||||
| VGA auto adjust | toggle VGA auto adjust o / off when receiving a VGA signal | ||||
| Sound | Audio output | Speaker/SPDIF/ARC/ Bluetooth | Choose the Audio output | ||
| Sound mode | Standard/Music/Movie/ Sports/User | Select a pre-set sound mode. ,User' allows manual sound settings | |||
| SPDIF mode RAW/PCM Toogle SP/DIF mode between RAW / PCM | |||||
| AVC | ON/OFF toggle AVC on / off | ||||
| Sound Effect | ON/OFF toggle sound effect on / off | ||||
| Volume | 0-100 | set volume | |||
| Balance | 0-100 | set balance | |||
| EQ 120Hz | 0-100 | Manually adjust settings, when sound mode is set to , User' | |||
| EQ 500Hz | 0-100 | ||||
| EQ 1.5KHz | 0-100 | ||||
| EQ 5KHz | 0-100 | ||||
| EQ 10KHz | 0-100 | ||||
| SYSTEM | Security | Change password | Change your password | ||
| Safe mode | ON/OFF | Safe mode password-protects the complete settings menu, file browser and.... | |||
| App lock | Select individual apps that will be password-protected | ||||
| App install/uninstall lock | ON/OFF App (de)install lock | disables (de)installation of apps | |||
| Touch lock | ON/OFF Touch lock disables touch functionality | ||||
| Keypad lock | ON/OFF Keypad lock disables use of the Central Control Button | ||||
| IR lock | ON/OFF IR lock disables use of the remote control | ||||
| Network lock | ON/OFF | Network lock disables ethernet, Wifi and Bluetooth connections | |||
| Manage apps | Installed apps | manage user-installed apps(FORCE STOP/UNINSTALL/CLEAR DATA) | |||
| All apps | manage all apps(FORCE STOP/DISABLE/CLEAR DATA) | ||||
| Power | Power-on / shutdown timer | Shutdown timer | set the shutdown timer | ||
| Power-on timer | set the power-on timer | ||||
| Power on settings | Power on mode | Direct | set power on mode to direct | ||
| Standby | set power on mode to standby | ||||
| Memory | set power on mode to memory | ||||
| Power on source | Memory/Android/PC/ HDMI1/HDMI2/HDMI3/ DP/USB_C/VGA | Choose the source in which the screen powers-on | |||
| Power on volume | Memory/User | Set the power-on volume. In ,User' users can select a power-on volume manually | |||
| Volume setting | 0-100 | Set the power-on volume | |||
| Boot OPS at power-on | ON/OFF | Choose whether the OPS boots automatically when the screen is powered-on | |||
| Wake on lan | ON/OFF Enable / disable w | wake on Lan | |||
| Motion Wake-up | ON/OFF Enable / disable m | motion wake-up by the proximity sensor | |||
| Motion Detection | Off/15/30/45/60 minutes | Dis-/ enable the proximity sensor to put the screen in sleep mode when no motion is detected by the proximity sensor | |||
| Shutdown timer | OFF/1/10/20/30/ 60/90/120/180 minutes | set a shutdown timer | |||
| Auto shutdown | Off/1/3/5/10 minutes Shut | down the screen when there's no signal | |||
| OTHERS | More | Auto sense OFF/Prompt/Direct | Select the auto sense mode. In auto sense, the screen will detect new active signals and switch to that source automatically (direct), or when confirmed (prompt). When a signal is switched off, autosense will automatically check for other active sources in the sequence OPS slot, HDMI 1, HDMI 2, HDMI 3, DisplayPort, USB C, VGA always ending in the Android launcher (when enabled) | ||
| Temperature protection | ON/OFF | With temperature protection, a user can set an alarm temperature in which the screen will shutdown automatically | |||
| Current temperature 0-100 shows the current temperature of the screen | |||||
| Alam temperature 50-100 | set the alarm temperature value. When reached, the screen will automatically shutdown to prevent further temperature increase | ||||
| HDMI | HDMI out | 1080p 60Hz/2160p 30Hz/2160p 60Hz | set the HDMI out signal | ||
| HDMI EDID version | EDID 1,4/EDID 2.0 set the | HDMI EDID version | |||
| Date & time | Automatic date & time | ON/OFF | Automatic date and time requires an active internet connection. Disabling this setting allows users to maually set the date & time | ||
| Date Show or set the current date | |||||
| Time show or set the current time | |||||
| Time zone set the time zone | |||||
| Use 24-hour format | ON/OFF Choose between a 12 or a 24 hr time format | ||||
| Languages | Deutsch/English/Francais/Nederlands | set the language | |||
| Keyboard & inputs | Current Keyboard | Shows the current keyboard / allows users to switch keyboards | |||
| Android Keyboard (AOSP) | Configure the default (AOSP) keyboard | ||||
| Manage keyboards | Manage keyboards | ||||
| Individuation | Set wallpaper change and set the wallpaper | ||||
| Set 'no input' wallpaper | change and set the no input wallpaper | ||||
| Set source label | Label various sources for easier recognition | ||||
| Device | Device name show or change the device name | ||||
| Device model shows the device model | |||||
| System information | Firmware version | shows all system information | |||
| System Updates | Local update updates the systems firmware using a USB-drive | ||||
| Online update | Checks for updates online | ||||
| Reset | restore factory settings. NOTE! This will erase all custom settings, data and custom apps from your system | ||||
http://68.66.241.101:8080/ota/upgrade
VGA SOURCE DP Source HDMI SOURCE
| No. Signal format |
| 1 640x480/60HZ |
| 2 640x480/75HZ |
| 3 800x600/60Hz |
| 4 800x600/75Hz |
| 5 1024x768/60Hz |
| 6 1024x768/75Hz |
| 7 1280x768/60HZ |
| 8 1280x1024/60Hz |
| 9 1280x1024/75Hz |
| 10 1600x1024/60Hz |
| 11 1920x1080P/60Hz |
| 12 1920x1080P/50Hz |
| No. Signal format |
| 1 640x480/60HZ |
| 2 640x480/75HZ |
| 3 800x600/60Hz |
| 4 800x600/75Hz |
| 5 1024x768/60Hz |
| 6 1024x768/75Hz |
| 7 1280x768/60HZ |
| 8 1280x1024/60Hz |
| 9 1280x1024/75Hz |
| 10 1600x1024/60Hz |
| 11 1920x1080P/60Hz |
| 12 1920x1080P/50Hz |
| 13 3840x2160/30HZ |
| 14 3840x2160/60HZ |
| 15 1280x720P/60Hz |
| 16 1280x720P/50Hz |
| 17 720x480P/60Hz |
| 18 720x576P/50Hz |
| No. Signal format |
| 1 640x480/60HZ |
| 2 640x480/75HZ |
| 3 800x600/60Hz |
| 4 800x600/75Hz |
| 5 1024x768/60Hz |
| 6 1024x768/75Hz |
| 7 1280x768/60HZ |
| 8 1280x1024/60Hz |
| 9 1280x1024/75Hz |
| 10 1600x1024/60Hz |
| 11 1920x1080P/60Hz |
| 12 1920x1080P/50Hz |
| 13 3840x2160/30Hz |
| 14 3840x2160/60Hz |
| 15 1280x720P/60Hz |
| 16 1280x720P/50Hz |
| 17 720x480P/60Hz |
| 18 720x576P/50Hz |
| 19 1920x1080I/60Hz |
| 20 1920x1080I/50Hz |
| Default Port settings > Baudrate: 115200, Bits:8,Parity: None, Stopbit-1 | ||||||||
| Main Item Control | Item Commando Type | Write / Read | Value in HEX Reply in HEX | Format: STX data ETX (STX=start text / ETX = end tekst) | Reply in Ascii Range | Note | ||
| Power Control and input source | Power control | Power OFF W 02 50 57 44 3A 30 30 30 03 | 4F 4B OK | |||||
| Power ON W 02 50 57 44 3A 30 30 31 03 | 4F 4B OK | |||||||
| Get Power status R 02 50 57 44 3A 3F 03 | 02 xx 03 Only second | nibble of byte | 0-1 | 0 = power OFF 1 = Power ON | ||||
| Backlight | Screen off (Blank) | W 02 42 4C 54 3A 30 30 30 03 | 4F 4B | OK | ||||
| Screen on (Blank) W 02 42 4C 54 3A 30 30 31 03 | 4F 4B OK | |||||||
| Get Screen Status (blank) | R 02 42 4C 54 3A 3F 03 | 02 xx 03 | Only second nibble of byte | 0-1 | 0 = screen OFF 1 = Screen ON | |||
| Backlight Level | W 02 42 4C 56 3A 3x 3x 3x 03 | 4F 4B | OK | 0 ~ 100 | x = 0-9 Example: 30 30 30 = 0 30 35 30 = 50 31 30 30 = 100 | |||
| Get Backlight Level | R 02 42 4C 56 3A 3F 03 | 02 xx xx xx 03 | Only second nibble of each byte | 0 ~ 100 | ||||
| Input source | HDMI 1 | W 02 49 4E 50 3A 30 30 38 03 | 4F 4B | OK | ||||
| HDMI 2 | W 02 49 4E 50 3A 30 30 39 03 | 4F 4B OK | ||||||
| HDMI 3 | W 02 49 4E 50 3A 30 31 30 03 | 4F 4B OK | ||||||
| OPS (PC) | W 02 49 4E 50 3A 30 30 34 03 | 4F 4B OK | ||||||
| Display Port | W 02 49 4E 50 3A 30 31 32 03 | 4F 4B OK | ||||||
| USB-C | W 02 49 4E 50 3A 30 31 36 03 | 4F 4B OK | ||||||
| VGA | W 02 49 4E 50 3A 30 30 35 03 | 4F 4B OK | ||||||
| Get Current Source | R 02 49 4E 50 3A 3F 03 | 02 xx xx 03 | Only second nibble of byte 5, 8, 9, 10, 12, 14, 16 | 5 = VGA 8 = HDMI1 9 = HDMI2 10 = HDMI3 12 = DP 14 = OPS 16 = USB-C | ||||
| Picture | Picture | Set Picture Mode | W 02 50 49 43 3A 3F 03 | 4F 4B | OK | x = 0-3 | 30 = Dynamic 31 = Standard 32 = Soft 33 = User | |
| Get Picture mode R 02 50 49 43 3A 3F 03 | 02 xx 03 Only second | nibble of byte | x = 0-3 0 = Dynamic 1 = Standard 2 = Soft 3 = User | |||||
| Freeze | Freeze | W 02 4B 45 59 3A 30 33 35 03 4F 4B OK | ||||||
| Audio Control | Volume | Volume Down | W 02 4B 45 59 3A 30 31 33 03 4F 4B OK | |||||
| Volume UP | W 02 4B 45 59 3A 30 31 32 03 4F 4B OK | |||||||
| Sel Volume Level | W 02 56 4F 4C 3A 3x 3x 3x 03 | 4F 4B | OK | 0 - 100 | x = 0-9 Example: 30 30 30 = 0 30 35 30 = 50 31 30 30 = 100 | |||
| Get Volume Level | R 02 56 4F 4C 3A 3F 03 | 02 xx xx xx 03 | Only second nibble of each byte | 0 - 100 | ||||
| Mute | Mute | W 02 4D 55 54 3A 30 30 30 03 | 4F 4B OK | OK | ||||
| Unmute | W 02 4D 55 54 3A 30 30 30 03 | 4F 4B OK | ||||||
| Sound mode | Sound mode | W 02 53 4E 44 3A 3F 03 | 4F 4B | OK | 0-4 | 30 = Standard 31 = Music 32 = Movie 33 = Sport 34=User | ||
| Get Sound mode R 02 53 4E 44 3A 3F 03 | 02 xx 03 Only second | nibble of Byte | 0-4 | 0 = Standard 1 = Music 2 = Movie 3 = Sport 4=User | ||||
| Default Port settings > Baudrate: 115200, Bits:8,Parity: None, Stopbit:1 | ||||||||
| Commands Keys Menu W 02 4B 45 59 3A 30 31 34 03 4F 4B OK | ||||||||
| Home W 02 4B 45 59 3A 30 36 30 03 4F 4B OK | ||||||||
| Back W 02 4B 45 59 3A 30 31 36 03 4F 4B OK | ||||||||
| Screenshot W 02 4B 45 59 3A 30 36 32 03 4F 4B OK | ||||||||
| Input key W 02 4B 45 59 3A 30 32 32 03 4F 4B OK | ||||||||
| Infor Key W 02 4B 45 59 3A 30 32 34 03 4F 4B OK | ||||||||
| 1 W 02 4B 45 59 3A 30 30 31 03 4F 4B OK | ||||||||
| 2 W 02 4B 45 59 3A 30 30 32 03 4F 4B OK | ||||||||
| 3 W 02 4B 45 59 3A 30 30 33 03 4F 4B OK | ||||||||
| 4 W 02 4B 45 59 3A 30 30 34 03 4F 4B OK | ||||||||
| 5 W 02 4B 45 59 3A 30 30 35 03 4F 4B OK | ||||||||
| 6 W 02 4B 45 59 3A 30 30 36 03 4F 4B OK | ||||||||
| 7 W 02 4B 45 59 3A 30 30 37 03 4F 4B OK | ||||||||
| 8 W 02 4B 45 59 3A 30 30 38 03 4F 4B OK | ||||||||
| 9 W 02 4B 45 59 3A 30 30 39 03 4F 4B OK | ||||||||
| 0 W 02 4B 45 59 3A 30 30 30 03 4F 4B OK | ||||||||
| OK W 02 4B 45 59 3A 30 31 35 03 4F 4B OK | ||||||||
| W 02 4B 45 59 3A 30 31 39 03 4F 4B OK | ||||||||
| W 02 4B 45 59 3A 30 32 30 03 4F 4B OK | ||||||||
| W 02 4B 45 59 3A 30 31 37 03 4F 4B OK | ||||||||
| W 02 4B 45 59 3A 30 31 38 03 4F 4B OK | ||||||||
| Lock Options Touch Touch Lock | W 02 55 53 57 3A 30 30 34 03 4F 4B OK | |||||||
| Touch Unlock | W 02 55 53 57 3A 30 30 35 03 4F 4B OK | |||||||
| Get Touch Lock Status | R | 02 55 53 57 3A 3F 03 | 02 xx 03 | Only second nibble of byte | 4-5 | 4 = Touch Lock ON5 = Touch Lock OFF | ||
| Keypad Lock | W 02 55 41 44 3A 30 30 31 03 4F 4B OK | |||||||
| Keypad Unlock | W 02 55 41 44 3A 30 30 30 03 4F 4B OK | |||||||
| Get Keypad Lock Status | R | 02 50 41 44 3A 3F 03 | 02 xx 03 | Only second nibble of byte | 0-1 | 0 = Keypad lock OFF1 = Keypad Lock ON | ||
| Remote Lock | W | 02 49 52 4C 3A 30 30 31 03 | 4F 4B | OK | 0-1 | |||
| Remote Unlock | W 02 49 52 4C 3A 30 30 30 03 4F 4B OK | |||||||
| Get Remote Lock Status | R | 02 49 52 4C 3A 3F 03 | 02 xx 03 | Only second nibble of byte | 0-1 | 0 = Remote Lock OFF1 = Remote Lock ON | ||
| Screen Info | Lan | Get Ethernet Mac Adress | R | 02 4D 41 43 3A 3F 03 | 4D 41 43 3A xx xx xx xx xx xx xx | MAC: ,adres' | ex:0:15:45:F3:12:BA | |
| Software | Get Software Version | R | 02 46 56 52 3A 3F 03 | 46 56 52 3A xx xx xx xx xx xx xx | FVR: 'version' | ex:FVR:568PH0009A1002 | ||
| Get Software Date | R | 02 46 56 54 3A 3F 03 | 46 56 54 3A xx xx xx xx xx xx xx | FVT:'date' ex: FVT:20200218 | ||||
| Get Model | R | 02 4D 44 54 3A 3F 03 | 4D 44 54 3A xx xx xx xx xx xx xx | MDT: ,model' | ex:MDT:LegamasterETX6520 e-Screen | |||
| Panel | Get Panel ID | R | 02 50 49 44 3A 3F 03 | 02 xx xx xx 03 | Only second nibble of each byte | Example: if ID =16xx xx xx = 016 | ||
| Get Panel information | R | 02 50 4E 4C 3A 3F 03 | 50 4E 4C 3A xx xx xx xx xx xx xx xx | PNL:'panel' | panel in ascii | |||
| Time | Get Total Work Time | R | 02 53 53 53 3A 3F 03 | 53 53 53 3Axx xx xx xx xx xx xx xx xx xx xx xx xx xx xx xx xx xx xx xx xx xx xx xx xx xx xx xx xx xx xx xx xx xx xx xx xx xx xx xx xx xx xx xx xx xx xx xx xx xx xx xx xx xx xx xx xx xx xx xx xx xx xx xx xx xx xx xx xx xx xx xx xx xx xx xx xx xx xx xx xx xx xx xx xx xx xx xx xx xx xx xx xx xx xx xx xx xx xx xx xx xxx xxx xxx xxx xxx xxx xxx xxx xxx xxx xxx xxx xxx xxx xxx xxx xxx xxx xxx xxx xxx xxx xxx xxx xxx xxx xxx xxx xxx xxx xxx xxx xxx xxx xxx xxx xxx xxx xxx xxx xxx xxx xxx xxx xxx xxx xxx xxx xxx xxx xxx xxx xxx xxx xxx xxx xxx xxx xxx xxx xxx xxx xxx xxx xxx xxx xxx xxx xxx xxx xxx xxx xxx xxx xxx xxx xxx xxx xxx xxx xxx xxx xxx xxx xxx xxx xxx xxx xxx xxx xxx xxx xxx xxx xxx xxx xxx xxx xxx xxxxxx xxx xxx xxx xxx xxx xxx xxx xxx xxx xxx xxx xxx xxx xxx xxx xxx xxx xxx xxx xxx xxx xxx xxx xxx xxx xxx xxx xxx xxx xxx xxx xxx xxx xxx xxx xxx xxx xxx xxx xxx xxx xxx xxx xxx xxx xxx xxx xxx xxx xxx xxx xxx xxx xxx xxx xxx xxx xxx xxx xxx xxx xxx xxx xxx xxx xxx xxx xxx xxx xxx xxx xxx xxx xxx xxx xxx xxx xxx xxx xxx xxx xxx xxx xxx xxx xxx xxx xxx xxx xxx xxx xxx xxx xxx xxx xxx xxx xxx xxxxx xxx xxx xxx xxx xxx xxx xxx xxx xxx xxx xxx xxx xxx xxx xxx xxx xxx xxx xxx xxx xxx xxx xxx xxx xxx xxx xxx xxx xxx xxx xxx xxx xxx xxx xxx xxx xxx xxx xxx xxx xxx xxx xxx xxx xxx xxx xxx xxx xxx xxx xxx xxx xxx xxx xxx xxx xxx xxx xxx xxx xxx xxx xxx xxx xxx xxx xxx xxx xxx xxx xxx xxx xxx xxx xxx xxx xxx xxx xxx xxx xxx xxx xxx xxx xxx xxx xxx xxx xxx xxx xxx xxx xxx xxx xxx xxx xxx xxx xxx xx xxx xxx xxx xxx xxx xxx xxx xxx xxx xxx xxx xxx xxx xxx xxx xxx xxx xxx xxx xxx xxx xxx xxx xxx xxx xxx xxx xxx xxx xxx xxx xxx xxx xxx xxx xxx xxx xxx xxx xxx xxx xxx xxx xxx xxx xxx xxx xxx xxx xxx xxx xxx xxx xxx xxx xxx xxx xxx xxx xxx xxx xxx xxx xxx xxx xxx xxx xxx xxx xxx xxx xxx xxx xxx xxx xxx xxx xxx xxx xxx xxx xxx xxx xxx xxx xxx xxx xxx xxx xxx xxx xxx xxx xxx xxx xxx xxx xxxxxxxxxxxxxxxxxxxxxxxxxxxxxxxxxxxxxxxxxxxxxxxxxxxxxxxxxxxxxxxxxxxxxxxxxxxxxxxxxxxxxxxxxxxxxxxxxxxxxxxxxxxxxxxxxxxxxxxxxxxxxxxxxxxxxxxxxxxxxxxxxxxxxxxxxxxxxxxxxxxxxxxxxxxxxxxxxxxxxxxxxxxxxxxxxxxxxxxxxxxxxxxxxxxxxxxxxxxxxxxxxxxxxxxxxxxxxxxxxxxxxxxxxxxxxxxxxxxxxxxxxxxxxxxxxxxxxxxxxxxxxxxxxxxxxxxxxxxxxxxxxxxxxxxxxxxxxxxxxxxxxxxxxxxxxxxxxxxxxxxxxxxxxxxxxxxxxxxxxxxxxxxxxxxxxxxxxxxxxxxxxxxxxxxxxxxxxxxxxxxxxxxxxxxxxxxxxxxxxxxxxxxxxxxxxxxxxxxxxxxxxxxxxxxxxxxxxxxxxxxxxxxxxxxxxxxxxxxxxxxxxxxxxxxxxxxxxxxxxxxxxxxxxxxxxxxxxxxxxxxxxxxxxxxxxxxxxxxxxxxxxxxxxxxxxxxxxxxxxxxxxxxxxxxxxxxxxxxxxxxxxxxxxxxxxxxxxxxxxxxxxxxxxxxxxxxxxxxxxxxxxxxxxxxxxxxxxxxxxxxxxxxxxxxxxxxxxxxxxxxxxxxxxxxxxxxxxxxxxxxxxxxxxxxxxxxxxxxxxxxxxxxxxxxxxxxxxxxxxxxxxxxxxxxxxxxxxxxxxxxxxxxxxxxxxxxxxxxxxxxxxxxxxxxxxxxxxxxxxxxxxxxxxxxxxxxxxxxxxxxxxxxxxxxxxxxxxxxxxxxxxxxxxxxxxxxxxxxxxxxxxxxxxxxxxxxxxxxxxxxxxxxxxxxxxxxxxxxxxxxxxxxxxxxxxxxxxxxxxxxxxxxxxxxxxxxxxxxxxxxxxxxxxxxxxxxxxxxxxxxxxxxxxxxxxxxxxxxxxxxxxxxxxxxxxxxxxxxxxxxxxxxxxxxxxxxxxxxxggggggggggggggggggggggggggggggggggggggggggggggggggggggggggggggggggggggggggggggggggggggggggggggggggggggggggggggggggggggggggggggggggggggggggggggggggggggggggggggggggggggggggggggggggggggggggggggggggggggggggtgggggggggggggggggggggggggggggggggggggggggggggggggggggggggggggggggggggggggggggggggggggggggggggggggggggggggggggggggggggggggggggggggggggggggggggggggggggggggggggggggggggggggggggggggggggggggggggggggggggggaaggggggggggggggggggggggggggggggggggggggggggggggggggggggggggggggggggggggggggggggggggggggggggggggggggggggggggggggggggggggggggggggggggggggggggggggggggggggggggggggggggggggggggggggggggggggggggggggggggggggggcgggggggggggggggggggggggggggggggggggggggggggggggggggggggggggggggggggggggggggggggggggggggggggggggggggggggggggggggggggggggggggggggggggggggggggggggggggggggggggggggggggggggggggggggggggggggggggggggggggggggtggggggggggggggggggggggggggggggggggggggggggggggggggggggggggggggggggggggggggggggggggggggggggggggggggggggggggggggggggggggggggggggggggggggggggggggggggggggggggggggggggggggggggggggggggggggggggggggggggggggaagggggggggggggggggggggggggggggggggggggggggggggggggggggggggggggggggggggggggggggggggggggggggggggggggggggggggggggggggggggggggggggggggggggggggggggggggggggggggggggggggggggggggggggggggggggggggggggggggggggttggggttggggttggggttggggttggggttggggttggggttggggttggggttggggttggggttggggttggggttggggttggggttggggttggggttggggttggggttggggttggggttggggttggggttggggttggggttttttttttttttttttttttttttttttttttttttttttttttttttttttttttttttttttttttttttttttttttttttttttttttttttttttttttttttttttttttttttttttttttttttttttttttttttttttttttttttttttttttttttttttttttttttttttttttttttttttttttttttttttttttttttttttttttttttttttttttttttttttttttttttttttttttttttttttttttttttttttttttttttttttttttttttttttttttttttttttttttttttttttttttttttttttttttttttttttttttttttttttttttttttttttttttttttttttttttttttttattttttttttttttttttttttttttttttttttttttttttttttttttttttttttttttttttttttttttttttttttttttttttttttttttttttttttttttttttttttttttttttttttttttttttttttttttttttttttttttttttttttttttttttttttttttttttttttttttttttttcttttttttttttttttttttttttttttttttttttttttttttttttttttttttttttttttttttttttttttttttttttttttttttttttttttttttttttttttttttttttttttttttttttttttttttttttttttttttttttttttttttttttttttttttttttttttttttttttttttttttgcttcttcttcttcttcttcttcttcttcttcttcttcttcttcttcttcttcttcttcttcttcttcttcttcttcttcttcttcttcttcttcttcttcttcttcttcttcttcttcttcttcttcttcttcttcttcttcttcttcttct tcttcttcttcttcttcttcttcttcttcttcttcttcttcttcttcttcttcttcttcttcttcttcttcttcttcttcttcttcttcttcttcttcttcttcttcttcttcttcttcttcttcttcttcttcttcttcttcttcttctttcttcttcttcttcttcttcttcttcttcttcttcttcttcttcttcttcttcttcttcttcttcttcttcttcttcttcttcttcttcttcttcttcttcttcttcttcttcttcttcttcttcttcttcttcttcttcttcttcttcttgcttcttcttcttcttcttcttcttcttcttcttcttcttcttcttcttcttcttcttcttcttcttcttcttcttcttcttcttcttcttcttcttcttcttcttcttcttcttcttcttcttcttcttcttcttcttcttcttcttacttcttcttcttcttcttcttcttcttcttcttcttcttcttcttcttcttcttcttcttcttcttcttcttcttcttcttcttcttcttcttcttcttcttcttcttcttcttcttcttcttcttcttcttcttcttcttcttcttcttacttgcttcttcttcttcttcttcttcttcttcttcttcttcttcttcttcttcttcttcttcttcttcttcttcttcttcttcttcttcttcttcttcttcttcttcttcttcttcttcttcttcttcttcttcttcttcttcttcttcttCTTCTTCTTCTTCTTCTTCTTCTTCTTCTTCTTCTTCTTCTTCTTCTTCTTCTTCTTCTTCTTCTTCTTCTTCTTCTTCTTCTTCTTCTTCTTCTTCTTCTTCTTCTTCTTCTTCTTCTTCTTCTTCTTCTTCTTCTTCTTCTTCTTCTTCT TCTTCTTCTTCTTCTTCTTCTTCTTCTTCTTCTTCTTCTTCTTCTTCTTCTTCTTCTTCTTCTTCTTCTTCTTCTTCTTCTTCTTCTTCTTCTTCTTCTTCTTCTTCTTCTTCTTCTTCTTCTTCTTCTTCTTCTTCTTCTTCTTCTTCTTTCTTCTTCTTCTTCTTCTTCTTCTTCTTCTTCTTCTTCTTCTTCTTCTTCTTCTTCTTCTTCTTCTTCTTCTTCTTCTTCTTCTTCTTCTTCTTCTTCTTCTTCTTCTTCTTCTTCTTCTTCTTCTTCTTCTTCTTCTTCTTCTTCTTCTTGCTTCTTCTTCTTCTTCTTCTTCTTCTTCTTCTTCTTCTTCTTCTTCTTCTTCTTCTTCTTCTTCTTCTTCTTCTTCTTCTTCTTCTTCTTCTTCTTCTTCTTCTTCTTCTTCTTCTTCTTCTTCTTCTTCTTCTTCTTCTTCTTCTTCTGTTCTTCTTCTTCTTCTTCTTCTTCTTCTTCTTCTTCTTCTTCTTCTTCTTCTTCTTCTTCTTCTTCTTCTTCTTCTTCTTCTTCTTCTTCTTCTTCTTCTTCTTCTTCTTCTTCTTCTTCTTCTTCTTCTTCTTCTTCTTCTTCTTCTTACTTCTTCTTCTTCTTCTTCTTCTTCTTCTTCTTCTTCTTCTTCTTCTTCTTCTTCTTCTTCTTCTTCTTCTTCTTCTTCTTCTTCTTCTTCTTCTTCTTCTTCTTCTTCTTCTTCTTCTTCTTCTTCTTCTTCTTCTTCTTCTTCTTCTTACTTTCTTCTTCTTCTTCTTCTTCTTCTTCTTCTTCTTCTTCTTCTTCTTCTTCTTCTTCTTCTTCTTCTTCTTCTTCTTCTTCTTCTTCTTCTTCTTCTTCTTCTTCTTCTTCTTCTTCTTCTTCTTCTTCTTCTTCTTCTTCTTCTTCTTATTTCTTCTTCTTCTTCTTCTTCTTCTTCTTCTTCTTCTTCTTCTTCTTCTTCTTCTTCTTCTTCTTCTTCTTCTTCTTCTTCTTCTTCTTCTTCTTCTTCTTCTTCTTCTTCTTCTTCTTCTTCTTCTTCTTCTTCTTCTTCTTCTTCTTGTTCCTTCTTCTTCTTCTTCTTCTTCTTCTTCTTCTTCTTCTTCTTCTTCTTCTTCTTCTTCTTCTTCTTCTTCTTCTTCTTCTTCTTCTTCTTCTTCTTCTTCTTCTTCTTCTTCTTCTTCTTCTTCTTCTTCTTCTTCTTCTTCTTCTTCTVCTTCTTCTTCTTCTTCTTCTTCTTCTTCTTCTTCTTCTTCTTCTTCTTCTTCTTCTTCTTCTTCTTCTTCTTCTTCTTCTTCTTCTTCTTCTTCTTCTTCTTCTTCTTCTTCTTCTTCTTCTTCTTCTTCTTCTTCTTCTTCTTCTTCT TTCCCGCGCGCGCGCGCGCGCGCGCGCGCGCGCGCGCGCGCGCGCGCGCGCGCGCGCGCGCGCGCGCGCGCGCGCGCGCGCGCGCGCGCGCGCGCGCGCGCGCGCGCGCGCGCGCGCGCGCGCGCGCGCGCGCGCGCGCGCGCGCGCGCGCGCGCGCGCGCGCGCGCGCGCGCGCGCGCGCGCGCGCGCGCGCGCGCGCGCGCGGCGCGCGCGCGCGCGCGCGCGCGCGCGCGCGCGCGCGCGCGCGCGCGCGCGCGCGCGCGCGCGCGCGCGCGCGCGCGCGCGCGCGCGCGCGCGCGCGCGCGCGCGCGCGCGCGCGCGCGCGCGCGCGCGCGCGCGCGCGCGCGCGCGCGCGCGCGCGCGCGCGCGCGCGCGCGCGCGCGCGCGCGCGCGCGCGCGCGCGGGCGCGCGCGCGCGCGCGCGCGCGCGCGCGCGCGCGCGCGCGCGCGCGCGCGCGCGCGCGCGCGCGCGCGCGCGCGCGCGCGCGCGCGCGCGCGCGCGCGCGCGCGCGCGCGCGCGCGCGCGCGCGCGCGCGCGCGCGCGCGCGCGCGCGCGCGCGCGCGCGCGCGCGCGCGCGCGCGCGCGCGCGCGCGCGCGCGCGCGAGGGGGGGGGGGGGGGGGGGGGGGGGGGGGGGGGGGGGGGGGGGGGGGGGGGGGGGGGGGGGGGGGGGGGGGGGGGGGGGGGGGGGGGGGGGGGGGGGGGGGGGGGGGGGGGGGGGGGGGGGGGGGGGGGGGGGGGGGGGGGGGGGGGGGGGGGGGGGGGGGGGGGGGGGGGGGGGGGGGGGGGGGGGGGGGGGGGGGGGGGGAGGGGGGGGGGGGGGGGGGGGGGGGGGGGGGGGGGGGGGGGGGGGGGGGGGGGGGGGGGGGGGGGGGGGGGGGGGGGGGGGGGGGGGGGGGGGGGGGGGGGGGGGGGGGGGGGGGGGGGGGGGGGGGGGGGGGGGGGGGGGGGGGGGGGGGGGGGGGGGGGGGGGGGGGGGGGGGGGGGGGGGGGGGGGGGGGGGGGGGACGGGGGGGGGGGGGGGGGGGGGGGGGGGGGGGGGGGGGGGGGGGGGGGGGGGGGGGGGGGGGGGGGG | ||||
10. PROBLEMEN OPLOSSEN
VOOR VEELGESTELDE VRAGEN, HET OPLOSSEN VAN PROBLEMEN EN TIPS EN TRUCS, GA DAN LANGS.
www.faq.legamaster.com
11. NALEVING VAN WET- EN REGELGEVING
FCC:
13.1.1 Specifications
13.2.1 Specifications
•Opsporingsmethode:Infrarood
•Opsporingshoek:100®
• Detectiebereik: 5-7 m
- DC5V±0,5V
- Verbinding:USB-A
13.2.2 Installatie
natural_image
Two people in a meeting room with brick walls and city skyline display (no visible text or symbols)ESPAÑOL
ÍNDICE
natural_image
Line drawing of three people standing in a row holding a blank rectangular object (no text or symbols)
natural_image
Line drawing of two workers in safety gear near a large rectangular object (no text or symbols)
natural_image
Line drawing of a hand holding a pen, no text or symbols presentnatural_image
Two line drawings showing a person bending forward at a desk and kneeling, with no text or symbols present.2.3. INSTALACIÓN
This may cause fire or electrical shock.
natural_image
Technical line drawing of a mechanical assembly with three vertical posts and two horizontal bars, no text or symbols present.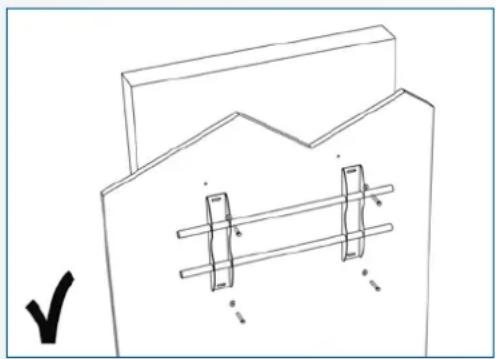
natural_image
Pure technical line drawing of a mechanical component with no text, numbers, or symbolsnatural_image
Simple line drawing of a room corner with vertical bars and a rectangular panel, no text or symbols present
natural_image
Simple line drawing of a room with vertical bars and a hanging sign, no text or symbols presentnatural_image
Simple line drawing of a room corner with doors, windows, and a window (no text or symbols)
natural_image
Line drawing of a room with doors, a monitor, and a heater (no text or symbols)text_image
10cm 10cm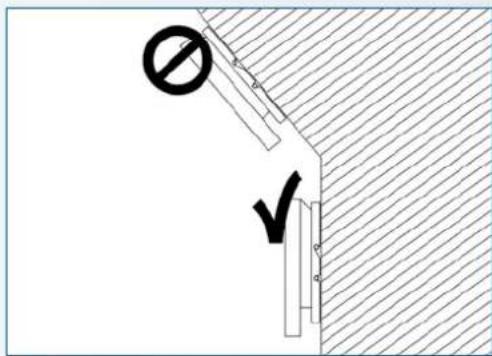
text_image
Technical diagram showing a construction or safety symbol with a prohibition sign and checkmark, likely indicating no protection or rejection.2.5. USO RECOMENDADO
natural_image
Gray remote control with black buttons and 'OK' button, no visible text or symbols beyond the button designtext_image
Screenshot of a macOS desktop with app icons and navigation bar, showing a mountain landscape background.| MAIN SETTINGS CATEGORY | SETTING CATEGORY | LEVEL1 LEVEL2 VALUES EXPLANATION | |||
| NETWORK & CONNECTED DEVICES | Ethernet | MAC address shows the MAC address for the wired connection | |||
| IP address shows the IP address for the wired connection | |||||
| Ethernet ON/OFF | Toggle ethernet-connection on / off for the screen itself. Disabling this does not disable ethernet for the OPS | ||||
| Wi-Fi | MAC address shows the MAC address for the Wi-Fi connection | ||||
| IP address shows the IP address for the Wi-Fi connection | |||||
| Wi-Fi ON/OFF Toggle Wi-Fi on and off | |||||
| Portable hotspot | Hotspot ON/OFF Toggle the hotspot-functionality on / off | ||||
| Setup Wi-Fi hotspot Set-up the hotspot | |||||
| Bluetooth | MAC address show the MAC address for the bluetooth adapter | ||||
| Blooth ON/OFF | Toggle bluetooth on/ off, show / connect with available devices | ||||
| DEVICE Picture | Picture mode | Standard | Select pre-set picture modesDynamic | ||
| Soft | |||||
| User | Picture mode where settings can be adjusted manually in ,Advanced' | ||||
| Power mode | User | Choose a power-mode: User = manual brightness setting, Auto = Automatic brightness setting based on ambient light conditions, balanced = brightness 75, ECO = brightness 50, DCR = 100. Power consumption varies based on these settings. | |||
| Auto | |||||
| Balanced | |||||
| ECO Friendly | |||||
| DCR | |||||
| Color temperture | Standard | Select a color temperature modeCool | |||
| Warm | |||||
| Eye protect ON/OFF | Toggle Eye Protect mode on / off. When enabled, the brightness will be reduced when writing. | ||||
| Anti blue light ON/OFF | Toggle Anti blue light on / off. When enabled the amount of blue light will be reduced. | ||||
| Backlight | 0-100 | Manually adjust the brightness. Using this setting will change the power mode setting to ,Manual' | |||
| DEVICE | Picture | Advanced Contrast 0-100 | In Picture mode ,User', use these settings to manually adjust the picture settings | ||
| Brightness 0-100 | |||||
| Saturation 0-100 | |||||
| Sharpness 0-100 | |||||
| PC mode PC / V deo | Allows switching to Video mode, in which ,Overscan' can be used | ||||
| Display mode 16:9/P2P Toggle picture aspect mode | |||||
| MEMC Off/Low/ Middle/High Change the MEMC level | |||||
| Overscan ON/OFF toggle between overscan on and off. | |||||
| HDR ON/OFF toggle between HDR on and off. | |||||
| VGA auto adjust | toggle VGA auto adjust o / off when receiving a VGA signal | ||||
| Sound | Audio output | Speaker/SPDIF/ARC/ Bluetooth | Choose the Audio output | ||
| Sound mode | Standard/Music/Movie/ Sports/User | Select a pre-set sound mode. ,User' allows manual sound settings | |||
| SPDIF mode RAW/PCM | Toogle SP/DIF mode between RAW / PCM | ||||
| AVC | ON/OFF toggle AVC on / off | ||||
| Sound Effect | ON/OFF toggle sound effect on / off | ||||
| Volume | 0-100 | set volume | |||
| Balance | 0-100 | set balance | |||
| EQ 120Hz | 0-100 | Manually adjust settings, when sound mode is set to , User' | |||
| EQ 500Hz | 0-100 | ||||
| EQ 1.5KHz | 0-100 | ||||
| EQ 5KHz | 0-100 | ||||
| EQ 10KHz | 0-100 | ||||
| SYSTEM | Security | Change password | Change your password | ||
| Safe mode | ON/OFF | Safe mode password-protects the complete settings menu, file browser and.... | |||
| App lock | Select individual apps that will be password-protected | ||||
| App install/uninstall lock | ON/OFF App (de)install lock | disables (de)installation of apps | |||
| Touch lock | ON/OFF Touch lock disables touch functionality | ||||
| Keypad lock | ON/OFF Keypad lock disables use of the Central Control Button | ||||
| IR lock | ON/OFF IR lock disables use of the remote control | ||||
| Network lock | ON/OFF | Network lock disables ethernet, Wifi and Bluetooth connections | |||
| Manage apps | Installed apps | manage user-installed apps(FORCE STOP/UNINSTALL/CLEAR DATA) | |||
| All apps | manage all apps(FORCE STOP/DISABLE/CLEAR DATA) | ||||
| Power | Power-on / shutdown timer | Shutdown timer | set the shutdown timer | ||
| Power-on timer | set the power-on timer | ||||
| Power on settings | Power on mode | Direct | set power on mode to direct | ||
| Standby | set power on mode to standby | ||||
| Memory | set power on mode to memory | ||||
| Power on source | Memory/Android/PC/ HDMI1/HDMI2/HDMI3/ DP/USB_C/VGA | Choose the source in which the screen powers-on | |||
| Power on volume | Memory/User | Set the power-on volume. In ,User' users can select a power-on volume manually | |||
| Volume setting | 0-100 | Set the power-on volume | |||
| Boot OPS at power-on | ON/OFF | Choose whether the OPS boots automatically when the screen is powered-on | |||
| Wake on lan | ON/OFF Enable / disable w | wake on Lan | |||
| Motion Wake-up | ON/OFF Enable / disable m | motion wake-up by the proximity sensor | |||
| Motion Detection | Off/15/30/45/60 minutes | Dis-/ enable the proximity sensor to put the screen in sleep mode when no motion is detected by the proximity sensor | |||
| Shutdown timer | OFF/1/10/20/30/ 60/90/120/180 minutes | set a shutdown timer | |||
| Auto shutdown | Off/1/3/5/10 minutes Shut | down the screen when there's no signal | |||
| OTHERS | More | Auto sense OFF/Prompt/Direct | Select the auto sense mode. In auto sense, the screen will detect new active signals and switch to that source automatically (direct), or when confirmed (prompt). When a signal is switched off, autosense will automatically check for other active sources in the sequence OPS slot, HDMI 1, HDMI 2, HDMI 3, DisplayPort, USB C, VGA always ending in the Android launcher (when enabled) | ||
| Temperature protection | ON/OFF | With temperature protection, a user can set an alarm temperature in which the screen will shutdown automatically | |||
| Current temperature 0-100 shows the current temperature of the screen | |||||
| Alam temperature 50-100 | set the alarm temperature value. When reached, the screen will automatically shutdown to prevent further temperature increase | ||||
| HDMI | HDMI out | 1080p 60Hz/2160p 30Hz/2160p 60Hz | set the HDMI out signal | ||
| HDMI EDID version | EDID 1,4/EDID 2.0 set the | HDMI EDID version | |||
| Date & time | Automatic date & time | ON/OFF | Automatic date and time requires an active internet connection. Disabling this setting allows users to maually set the date & time | ||
| Date Show or set the current date | |||||
| Time show or set the current time | |||||
| Time zone set the time zone | |||||
| Use 24-hour format | ON/OFF Choose between a 12 or a 24 hr time format | ||||
| Languages | Deutsch/English/Francais/Nederlands | set the language | |||
| Keyboard & inputs | Current Keyboard | Shows the current keyboard / allows users to switch keyboards | |||
| Android Keyboard (AOSP) | Configure the default (AOSP) keyboard | ||||
| Manage keyboards | Manage keyboards | ||||
| Individuation | Set wallpaper change and set the wallpaper | ||||
| Set 'no input' wallpaper | change and set the no input wallpaper | ||||
| Set source label | Label various sources for easier recognition | ||||
| Device | Device name show or change the device name | ||||
| Device model shows the device model | |||||
| System information | Firmware version | shows all system information | |||
| System Updates | Local update updates the systems firmware using a USB-drive | ||||
| Online update | Checks for updates online | ||||
| Reset | restore factory settings. NOTE! This will erase all custom settings, data and custom apps from your system | ||||
5.5. ACTUALIZANDO LA PANTALLA
| VESA® Hole Pitch (W x H) | 600 x 800 (mm), M8 Screw. Supplied with mounted 400x600 adapter | 400 x 600 (mm), M8 Screw | 400 x 400 mm, M8 Screw | |
| Front Glass | 4mm Tempered Anti-Glare | 4mm Tempered Anti-Glare | 4mm Tempered Anti-Glare | 4mm Tempered Anti-Glare |
| Power Supply | AC 100-240 V 50 / 60 Hz | AC 100-240 V 50 / 60 Hz | AC 100-240 V 50 / 60 Hz | AC 100-240 V 50 / 60Hz |
| Power Consumption (in Operation) | 360 | 295 | 160 | 125 |
| Power Consumption (in Standby) | <= 0.5 W | <= 0.5 W | <= 0.5 W | <= 0.5 W |
| ECO Sensor | Yes | Yes | Yes | Yes |
| Operation Temperature | 0 - 40 °C | 0 - 40 °C | 0 - 40 °C | 0 - 40 °C |
| Storage Temperature | -20 - 60 °C | -20 - 60 °C | -20 - 60 °C | -20 - 60 °C |
| Operation Humidity | 20 - 80 %RH (No Condensation) | 20 - 80 %RH (No Condensation) | 20 - 80 %RH (No Condensation) | 20 - 80 %RH (No Condensation) |
| Storage Humidity | 10 - 90 %RH | 10 - 90 %RH | 10 - 90 %RH | 10 - 90 %RH |
remote, HDMI cable 5m, USB cable 5m, High Precision stylus pack (2pcs), Double side stylus, Easy-fix cable clips
PRODUCT LOGISTICS ETX-8620 PLUS ETX-7520 PLUS ETX-6520 PLUS
Dimension of Package Carton (W x H x D) 2139x1363x231 1875x1186x231 1676x1097x231
Weight of Package Carton (Gross) tbd tbd tbd
| Product SAP / EAN / KEA | 868034000 / 8713797092814 / 7-803120-86P | 868033000 / 8713797092807 / 7-803120-75P | 868032000 / 8713797092791 / 7-803120-65P |
PRODUCT SPECIFICATIONS
Screen Size 86" (85.6") 75" (74.52") 65" (64.53")
Panel Technology TFT LCD TFT LCD TFT LCD
Display Resolution 3840 x 2160 3840 x 2160 3840 x 2160
Brightness (Typical) 350 cd / m
2
350 cd / m²
350 cd / m²
Contrast (Typical) 1200 : 1 4000:1 4000:1
Response Time 8 ms 8 ms 9 ms
Frame Rate 60 Hz 60 Hz 60 Hz
Viewing Angle (H / V) 178° / 178° 178° / 178° 178° / 178°
Display Colors 1.07B (10-bit) 1.07B (10-bit) 1.07B (10-bit)
Backlight Type Direct LED Direct LED Direct LED
Service life > 40.000 Hours > 40.000 Hours > 40.000 Hours
Orientation Landscape Landscape Landscape / Portrait
CPU ARM Cortex A73x2; ARM Cortex A73x2; ARM Cortex A73x2;
CPU Cortex A3JX2 Cortex A3JX2 Cortex A3JX2
CPU CF1MP4 CF1MP4 CF1MP4
Operating System Android 8.0 Android 8.0 Android 8.0
Memory 4 GB 4 GB 4 GB
On-Board Storage 32GB 32GB 32GB
Detection Method High Precision Advanced Infrared High Precision Advanced Infrared High Precision Advanced Infrared
Available Touch Points 32 Point ∅5 point ∅3mm 32 Point ∅5 point ∅3mm 32 Point ∅5 point ∅3mm
Response Time (Typical) <= 10 ms <= 10 ms <= 10 ms
Minimum Response Size >= 0.3 mm >= 0.3 mm >= 0.3 mm
Touch Resolution 32771 x 32768 32770 x 32768 32769 x 32768
Input Connectors
HDMI 2.0 ARC x 1 / HDMI 2.0 x 2 / DisplayPort x 1 / USB-A 3.0 x 3 + 2.0 x 1 / USB-C x 1 / VGA + 3.5mm jack x 1 / RS-232C x 1 / LAN RJ45 x 2
Output Connectors
HDMI (4k@60Hz) x 1 / Optical (SPDIF) out x 1 / 3.5mm audio jack x 1 / Touch-out USB-B x 3
OPS Slot YES YES YES
Android Slot YES YES YES
Wifi (pluggable / removable module) 802.11a/b/g/n/ac, Bluetooth v. 5
Audio Power Output (RMS) 15 W x 2 / 8 Ω 15 W x 2 / 8 Ω 15 W x 2 / 8 Ω
Subwoofer 15 W 15 W 15 W
Dimension of Product (W x H x D) 1959.5x1140.2x89.3 1714.7x1002.8x89.3 1490.5x875.5x89.3
Weight of Product
tbd tbd tbd
VESA® Hole Pitch (W x H) 600 x 800 (mm), M8 Screw. 600 x 800 (mm), M8 Screw. 400 x 600 (mm), M8 Screw. Supplied with mounted 400x600 adaptor.
Supplied with Informed Temporary Adapter Supplied with Informed Temporary Adapter
Front Glass 2mm Optical Bonded Temporary Anti-Glam 2mm Optical Bonded Temporary Anti-Glam 2mm Optical Bonded Temporary Anti-Glam
Power Supply AC 100-240 V 50 / 60 Hz AC 100-240 V 50 / 60 Hz AC 100-240 V 50 / 60 Hz
Power Consumption (in Operation) 360 295 160
Power Consumption (in Standby) <= 0.5 W <= 0.5 W <= 0.5 W
ECO Sensor Yes Yes Yes
Operation Temperature 0 - 40 °C
0 - 40 °C
0 - 40 °C
Storage Temperature -20 - 60 °C -20 - 60 °C -20 - 60 °C
Operation Humidity 20 - 80 %RH (No Condensation) 20 - 80 %RH (No Condensation) 20 - 80 %RH (No Condensation)
Storage Humidity 10 - 90 %RH 10 - 90 %RH 10 - 90 %RH
Accessories remote, HDMI cable 5m, USB cable 5m, High Precision stylus pack (2pcs), Double side stylus, Easy-fix cable clips
8. INTERVALOS COMPATIBLES
VGA SOURCE DP Source HDMI SOURCE
| No. Signal format |
| 1 640x480/60HZ |
| 2 640x480/75HZ |
| 3 800x600/60Hz |
| 4 800x600/75Hz |
| 5 1024x768/60Hz |
| 6 1024x768/75Hz |
| 7 1280x768/60HZ |
| 8 1280x1024/60Hz |
| 9 1280x1024/75Hz |
| 10 1600x1024/60Hz |
| 11 1920x1080P/60Hz |
| 12 1920x1080P/50Hz |
| No. Signal format |
| 1 640x480/60HZ |
| 2 640x480/75HZ |
| 3 800x600/60Hz |
| 4 800x600/75Hz |
| 5 1024x768/60Hz |
| 6 1024x768/75Hz |
| 7 1280x768/60HZ |
| 8 1280x1024/60Hz |
| 9 1280x1024/75Hz |
| 10 1600x1024/60Hz |
| 11 1920x1080P/60Hz |
| 12 1920x1080P/50Hz |
| 13 3840x2160/30HZ |
| 14 3840x2160/60HZ |
| 15 1280x720P/60Hz |
| 16 1280x720P/50Hz |
| 17 720x480P/60Hz |
| 18 720x576P/50Hz |
| No. Signal format |
| 1 640x480/60HZ |
| 2 640x480/75HZ |
| 3 800x600/60Hz |
| 4 800x600/75Hz |
| 5 1024x768/60Hz |
| 6 1024x768/75Hz |
| 7 1280x768/60HZ |
| 8 1280x1024/60Hz |
| 9 1280x1024/75Hz |
| 10 1600x1024/60Hz |
| 11 1920x1080P/60Hz |
| 12 1920x1080P/50Hz |
| 13 3840x2160/30Hz |
| 14 3840x2160/60Hz |
| 15 1280x720P/60Hz |
| 16 1280x720P/50Hz |
| 17 720x480P/60Hz |
| 18 720x576P/50Hz |
| 19 1920x1080I/60Hz |
| 20 1920x1080I/50Hz |
9. COMANDOS DE SERIE
9.1. COMUNICACIONES DE SERIE
text_image
Legamaster We make communication visible
natural_image
Blurred image with indistinct blue and gray shapes, no readable text or symbols
natural_image
Blank white image with no visible content, text, or symbols
natural_image
Interior of a modern meeting room with blue chairs and a tablet displaying three connected devices (no visible text or symbols)Legamaster International B.V.
Postbus 111
NL-7240 AC Lochem
T +31 (0)573 71 30 00
F +31 (0)573 71 30 01
info@legamaster.com
www.legamaster.com