
ERF220AW05 - Home robot SONY - Free user manual and instructions
Find the device manual for free ERF220AW05 SONY in PDF.
| Product type | AIBO ERS-220 companion robot |
| Dimensions | Approximately 27 x 20 x 15 cm (estimate) |
| Weight | Approximately 1.5 kg (estimate) |
| Power supply | Built-in rechargeable battery; included AC adapter; optional Energy Station |
| Battery life | Varies with use; limited battery life |
| Memory | Memory Stick AIBO-ware (included); Memory Stick reader/writer required for transfer |
| Connectivity | Wireless local area network (WiFi) via inserted AIBO wireless network card |
| Main functions | Remote control from computer (AIBO Navigator 2); forward/backward/turn movement; built-in camera with video transmission; sound playback (WAVE format, 8 kHz, 8-bit, PCM monaural, max 15 sec); still image capture; pink ball tracking and kicking; playback of pre-recorded or custom movements created with AIBO Master Studio; retractable lamp (ERS-220) |
| Sensors | Touch sensor on head; distance sensor (object); fall and lift detection |
| Maintenance and cleaning | Clean with a soft dry cloth; do not wet; avoid static electricity; store in a dry, temperate place |
| Safety | Do not stare at the lamp for long; avoid slippery or inclined surfaces; stop and let cool if overheating; do not pinch joints |
| Spare parts and repairability | Contact AIBO consumer service; replaceable battery; optional Energy Station; specific Memory Stick |
| General information | Brand: Sony; model: ERF220AW05 (ERS-220); AIBO Navigator 2 software included; manual available in multiple languages; support by phone or email |
Frequently Asked Questions - ERF220AW05 SONY
User questions about ERF220AW05 SONY
0 question about this device. Answer the ones you know or ask your own.
Ask a new question about this device
Download the instructions for your Home robot in PDF format for free! Find your manual ERF220AW05 - SONY and take your electronic device back in hand. On this page are published all the documents necessary for the use of your device. ERF220AW05 by SONY.
USER MANUAL ERF220AW05 SONY
User's Guide ERF-220AW05

© 2001 Sony Corporation
日本語
English
Français
Deutsch
警告 安全のために
警告表示の意味
natural_image
Illustration of a cartoon robot with a ball (no text or symbols)ご注意
natural_image
Black-and-white photo of a humanoid robot inside a control panel (no text or symbols visible)2 またはをクリックして画像を選択する
トークボタン
2 [Browse] をクリックする
natural_image
Illustration of a cartoon-style robot with a ball and mechanical limbs (no text or symbols)ボールを探す回数を設定する
ピンクボールを探す回数を設定します。
©2001 Sony Corporation All rights reserved. This manual and the software described herein, in whole or in part, may not be reproduced, translated or reduced to any machine-readable form without prior written approval.
EXCEPT AS SPECIFICALLY SET FORTH IN THE END-USER LICENSE AGREEMENT, SONY CORPORATION PROVIDES THIS MANUAL, THE SOFTWARE AND THE OTHER INFORMATION CONTAINED HEREIN "AS IS" WITH NO WARRANTY AND HEREBY EXPRESSLY DISCLAIMS ANY IMPLIED WARRANTIES OF MERCHANTABILITY, NONINFRINGEMENT OR FITNESS FOR ANY PARTICULAR PURPOSE WITH REGARD TO THIS MANUAL, THE SOFTWARE, OR SUCH OTHER INFORMATION. IN NO EVENT SHALL SONY CORPORATION BE LIABLE FOR ANY INCIDENTAL, CONSEQUENTIAL, OR SPECIAL DAMAGES, WHETHER
BASED ON TORT, CONTRACT, OR OTHERWISE ARISING OUT OF OR IN CONNECTION WITH THIS MANUAL, THE SOFTWARE, OR OTHER INFORMATION CONTAINED HEREIN OR THE USE THEREOF. THIS DOES NOT AFFECT YOUR STATUTORY RIGHTS.
Sony Corporation reserves the right to make any modification to this manual or the information contained herein at any time without notice.
The software described herein may also be governed by the terms of a separate user license agreement.
This product contains software owned by Sony Corporation and licensed from third parties. Use of such software is subject to the terms and conditions of license agreements enclosed with this product. Software specifications are subject to change without notice and may not necessarily be identical to current retail versions.
Before using this software, please read the accompanying End-User License Agreement which governs use of this software.
- This software or document is protected by copyright, and distributed under licenses restricting its use, copying, and distribution. No part of this software or document may be reproduced in any form by any means and rental of this software may not be allowed without prior authorization of Sony Corporation.
- Sony Corporation assumes no responsibility for any inconvenience caused by misuse or any use not stated in this document.
- The supplied software cannot be used with any device other than those devices specified herein.
- The specifications of the supplied software are subject to change without notice.
Customer Support
How to contact the AIBO Customer Link.
In the United States and Canada
1-800-427-2988 (USA)
Email address:
aibosupport@info.sel.sony.com
In Europe
English line: +44 (0)-20-7365-2937
German line: +49 (0)-69-9508-6309
French line: +33 (0)-1-5569-5117
In Australia
Call +1300-36-2426 (toll free within
Australia)
E-mail address: cicci@ap.sony.com
In Hong Kong
Sony style
Tel: +852-2345-2966
E-mail address:
aibo_helpdesk@shk.sony.com.hk

OPEN-R
“OPEN-R” is the standard interface for the entertainment robot system that Sony is actively promoting. This interface expands the capability of the entertainment robot through a flexible combination of hardware and interchangeable software to suit various applications. “AIBO Navigator 2” conforms to OPEN-R version 1.1.2 (software specifications).
“AIBO,” the AIBO logo a/o ^® , “OPEN-R” and the OPEN-R logo are registered trademarks of Sony Corporation.
"Memory Stick," "TM" and "Memory Stickers of Sony
Corporation.
Microsoft, Windows and Direct X are registered trademarks of Microsoft Corporation in the United States and other countries.
All other system names and product names mentioned herein may be the trademarks or registered trademarks of their respective companies.
In this manual, the “TM” and “®” marks have been omitted.
Other information about AIBO is available on the Internet at the following site: http://www.aibo.com/
Reproduction in whole or in part without written permission is prohibited. All rights reserved.

Table of Contents
Introduction 7
Starting up AIBO Navigator 2....8
Quitting AIBO Navigator 2 ....11
AIBO's modes and how to resume normal operation 12
For the ERS-220 12
For the ERS-210 13
Description of Control panel parts ....14
Main panel 14
Sub panel 17
Properties dialog box 19
Controlling AIBO 21
Assigning actions to controller buttons 22
Assigning actions to keyboard keys 23
Moving AIBO....24
Using the mouse 24
Using a controller 25
Using the keyboard 25
Changing AIBO's walking speed 25
If AIBO falls down 26
Adjusting the camera angle/Capturing still-pictures .....27
Adjusting the camera angle 27
Aligning AIBO with the camera angle 28
Capturing still-pictures 29
Sorting pictures in an album 30
Changing the picture quality 31
Playing back sound data 32
Recording sound on the PC and playing it back.... 32
Playing back sound data saved on the PC 34
Transmitting sound 35
Playing back a motion 36
Chasing after the ball 37
Setting the number of times AIBO searches for the ball ...... 38
Kicking/heading 39
Turning on the retractable headlight 40
Using motion data made by AIBO Master Studio 41
Notes on use 44
Troubleshooting ....46
For more information about “AIBO” ERS-210/220 (names of parts, settings, “Memory Stick” installation, safety precautions, etc.), please refer to the “AIBO” ERS-210/220 operation manual.

Introduction
Have you finished installing the AIBO Navigator 2 software?
If not, refer to the Setup Guide to install AIBO Navigator 2 and set up a wireless LAN.
You can now, actually operate AIBO ERS-210/220 by remote control.
This User's Guide describes how to start up AIBO Navigator 2 and provides information on the main Control panel and how to operate AIBO by remote control.

Starting up AIBO Navigator 2
Turn on your PC and AIBO, and then start up AIBO Navigator 2.
Notes
If your PC connects to the Internet using a modem, depending on its configuration, the PC may automatically dial to check the Internet connection when you start up AIBO Navigator 2.
To disable the dial-up connection, you need to make the following setting:
①Click Start—Settings—Control Panel on the Task-bar.
②Double-click the Internet Options icon.
③Under Dial-up settings on the Connections tab, click Never dial a connection.
④Click OK.
1 Turn on your PC.
Turn on your PC and start up Windows.
2 Turn on AIBO.
Insert the “Memory Stick” into AIBO and activate AIBO.
①Insert the AIBO Navigator 2 “Memory Stick” into AIBO.
For details, please refer to the instruction manual for AIBO.
②Press the pause button on AIBO to activate AIBO.
3 Start up AIBO Navigator 2.
①Double-click the short-cut icon on the desktop or select Start-Programs-AIBO Navigator 2-AIBO Navigator 2 on the Task-bar.
The User Authentication dialog box appears. (If the user ID and password were not specified during setup, the User Authentication dialog box will not appear.)
②Enter the user ID and password that were specified when setting up the wireless LAN (see page 17 in the Setup Guide), and then click OK.
If you check the Save password box, you need not enter the ID or password the next time.
The Control panel appears.
Main panel
Sub panel
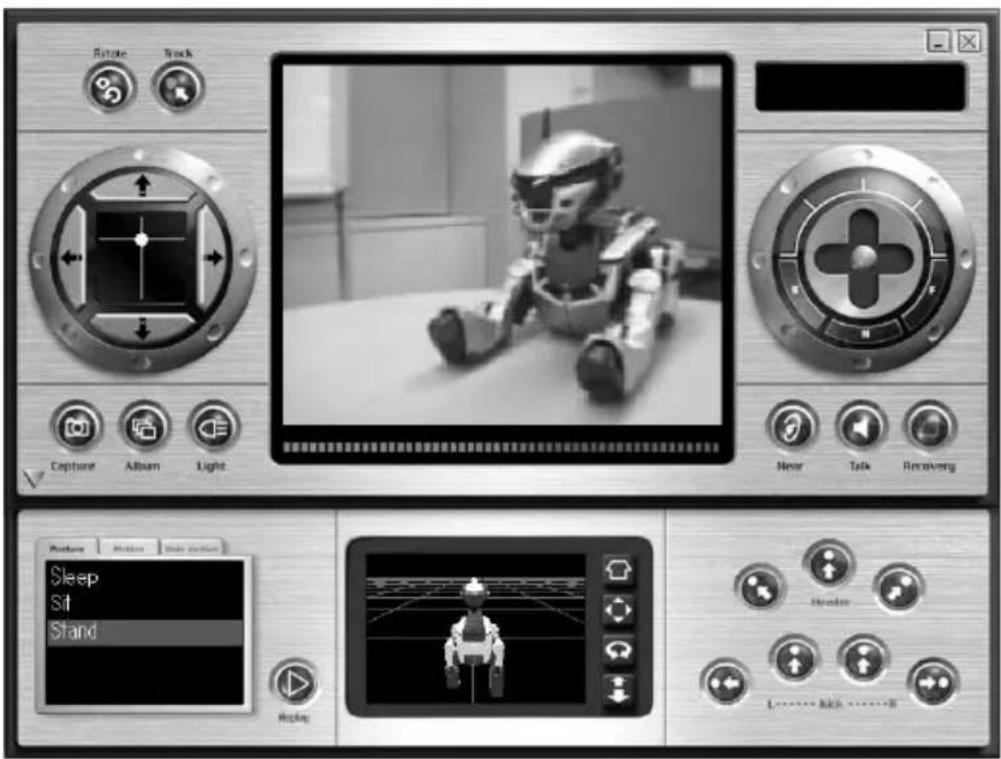
The Control panel consists of the “Main panel” and “Sub panel.” It is possible to open the Main panel only.

Quitting AIBO Navigator 2
Quit AIBO Navigator 2 on both the PC and AIBO.
1 Do either of the procedures below to quit AIBO Navigator 2.
- In the Main panel, click
- Right click in the metallic-gray area in the Control panel, and then choose Exit from the menu.
2 Press the pause button on AIBO's chest to pause AIBO, and then remove the "Memory Stick."
For details on removing the “Memory Stick,” please refer to the instruction manual for AIBO.

AIBO's modes and how to resume normal operation
If an object gets caught in AIBO's joints or AIBO is picked up and AIBO Navigator 2 operation is interrupted, follow the procedure below to restore AIBO to remote control.
For the ERS-220
Normal mode
AIBO moves as instructed by remote control.

Notes
- Do not use AIBO in places subject to vibrations, on an incline, or at a place where it might drop.
• Do not surround AIBO with objects that may obstruct its movements.
Something is caught any of AIBO's joints
Push the head-touch sensor in the rear direction for 3 seconds
Jam condition
All of the joints loosen up when an object gets caught in a joint.
Flashes

If an object gets jammed in AIBO's neck or leg joint, AIBO loosens up all of its joints. This is to prevent accidental injury in case you catch your finger in one of its joints. In this condition, AIBO's mode indicator will flash.
To return AIBO to normal, push the head-touch sensor in the rear direction for 3 seconds.
AIBO is picked up
Put AIBO down on the floor, or push its head-touch sensor in the rear direction for 3 seconds
Pick-up condition
Lights
When you pick AIBO up, it assumes a condition that makes it easier to be held and lights its mode indicator.
To return AIBO to normal, put AIBO back on the floor. If AIBO doesn't return to normal after a while, push its head-touch sensor in the rear direction for 3 seconds.
To charge the battery pack
Press the pause button on AIBO's chest to pause AIBO.
Charge the battery with the AC adapter supplied with AIBO or with an Energy Station (optional). For details, refer to the operating instructions for AIBO or the Energy Station.
natural_image
Two identical cartoon-style robot figures in motion, no text or symbols visibleNote
AIBO is in suspended animation while it is being charged or on the Energy Station. AIBO does not respond to your instruction in these situations.
For the ERS-210
Normal mode
AIBO moves as instructed by remote control.
natural_image
Cartoon character with a hat and roller, no visible text or symbolsNotes
- Do not use AIBO in places subject to vibrations, on an incline, or at a place where it might drop.
- Do not surround AIBO with objects that may obstruct its movements.
Something is caught any of AIBO's joints
Press the head sensor for 3 seconds
Jam condition
All of the joints loosen up when an object gets caught in a joint.
Flashes

If an object gets jammed in AIBO's neck or leg joint, AIBO loosens up all of its joints. This is to prevent accidental injury in case you catch your finger in one of its joints. In this condition, AIBO's mode indicator will flash. To return AIBO to normal, press the head sensor for 3 seconds.
AIBO is picked up
Put AIBO down on the floor, or press the head sensor for 3 seconds after putting it down on the floor
Pick-up condition
Lights
When you pick AIBO up, it assumes a condition that makes it easier to be held and lights its mode indicator.
To return AIBO to normal, put AIBO back on the floor. If AIBO doesn't return to normal after a while, press its head sensor for 3 seconds.

To charge the battery pack
Press the pause button on AIBO's chest to pause AIBO.
Charge the battery with the AC adapter supplied with AIBO or with an Energy Station (optional). For details, refer to the operating instructions for AIBO or the Energy Station.

natural_image
Illustration of a battery connected to a plug and cable, with a device attached nearby (no text or symbols visible)Note
AIBO is in suspended animation while it is being charged or on the Energy Station. AIBO does not respond to your instruction in these situations.

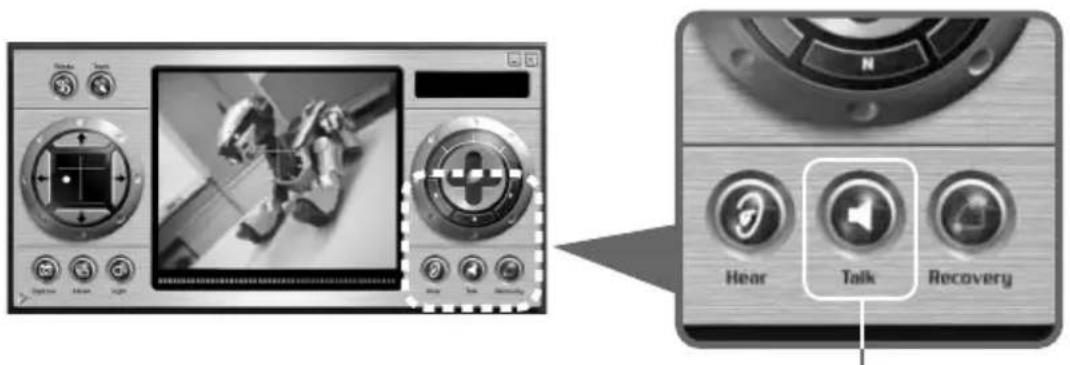
Description of Control panel parts
The Control panel allows you to operate AIBO by remote control from your PC screen.
The Control panel consists of the Main panel and Sub panel.
Main panel
The Main panel is the first panel to appear when AIBO Navigator 2 starts up. It shows the results of controller or keyboard operations.
Move the panel by dragging it with your mouse.
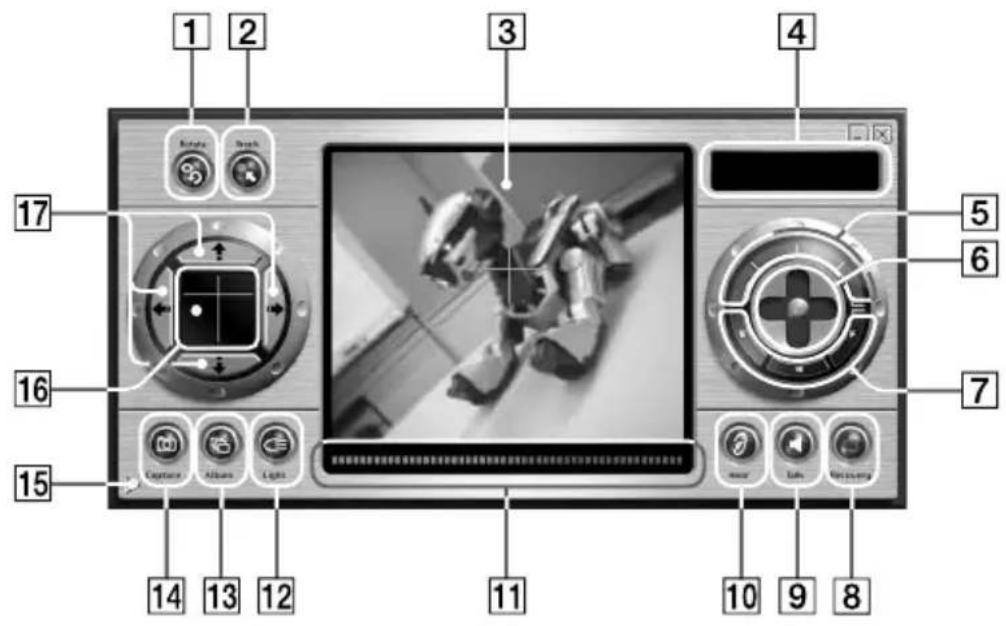
1 Rotate button
Click to make AIBO align its body with the camera angle. When you do this, the camera angle returns to the front (page 28).
2 Track button
Each time you click this button, the tracking function switches on or off. When the tracking function is switched on, AIBO starts chasing for the pink ball (page 37).
3 Camera monitor
Shows the scene being picked up by AIBO's camera.
4 Status indicator
Indicates AIBO's current status.
5 Battery indicator
Indicates the charge level of AIBO's battery pack (four levels).
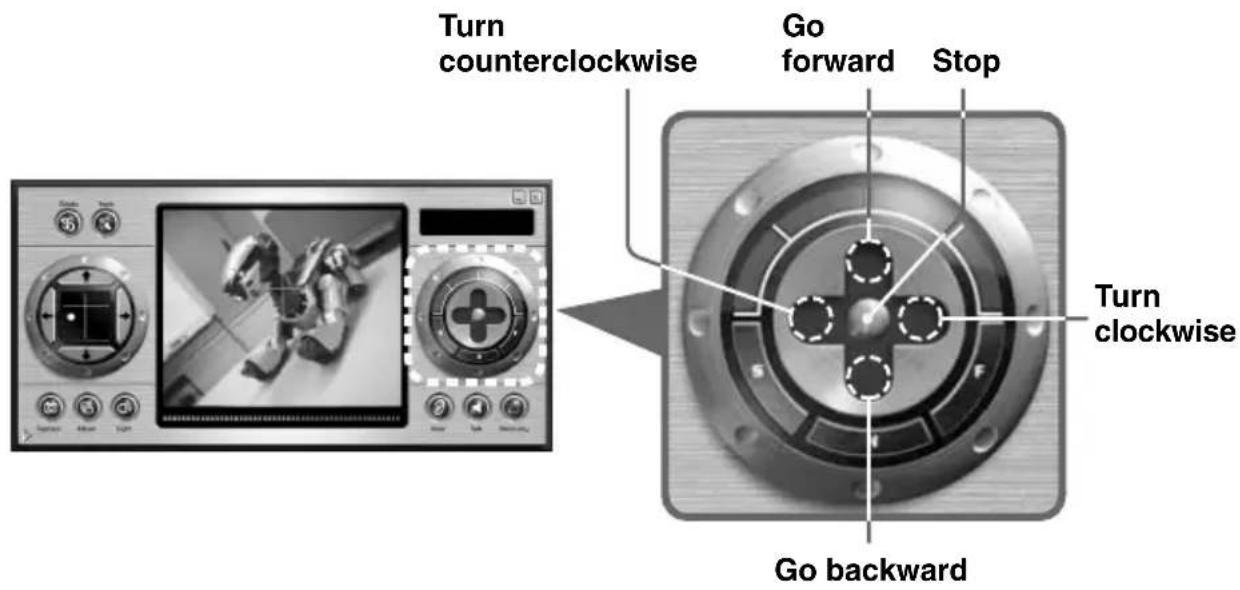
6 Direction control
Controls the direction of AIBO's movement.
Click the dark gray ends of the arms to move AIBO in the respective direction. Click the center of the cross to stop AIBO (page 24).
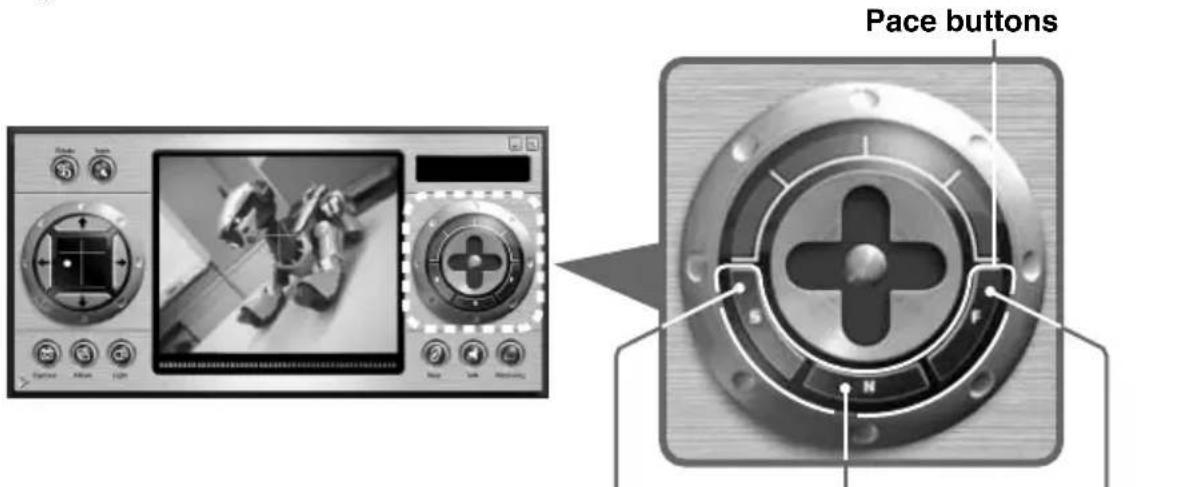
7 Pace buttons
Select how fast you want AIBO to walk: fast (F), normal (N) or slow (S) (page 25).
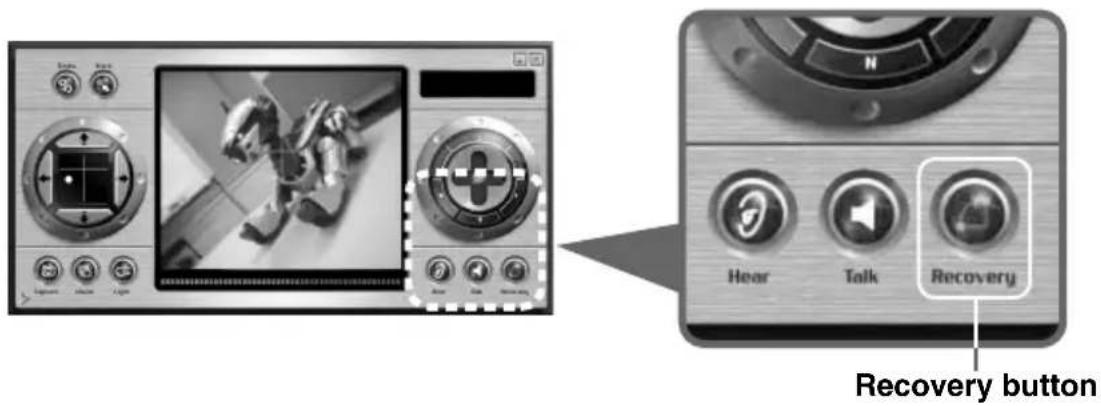
8 Recovery button
Restores AIBO from a fall (page 26).
9 Talk button
This button transmits sound data from your PC for playback by your AIBO (page 32).
10 Hear button
Each time you click this button, the function switches on or off.
When the function is switched on, sound picked up by AIBO is transmitted to your PC (page 35).
11Object sensor
Indicates the distance between AIBO and the object pointed to by the + mark in the Camera monitor 3.
12 Light button
Each time you click this button, the headlight function switches on or off. When the function is on, the retractable headlight on the ERS-220 lights up. Only available on ERS-220 (page 40).
13Album button
Displays the Album window (page 30).
14 Capture button
Click this button to capture the current scene from AIBO's camera as a still-picture (page 29).
15 Sub panel indicator
Click to close the Sub panel. Click again to open the Sub panel again (page 17).
16Camera angle screen
The angle of AIBO's camera is indicated by the yellow lines. The location of the pink ball is indicated when it is detected (page 27).
17 Camera angle buttons
Finely adjusts AIBO's camera angle (page 27).
Sub panel
Use the Sub panel to make AIBO to do a kicking or heading motion, or to replay a motion. The Sub panel usually appears under the Main panel, but you can close it. (see 15 in the “Main panel” section.)
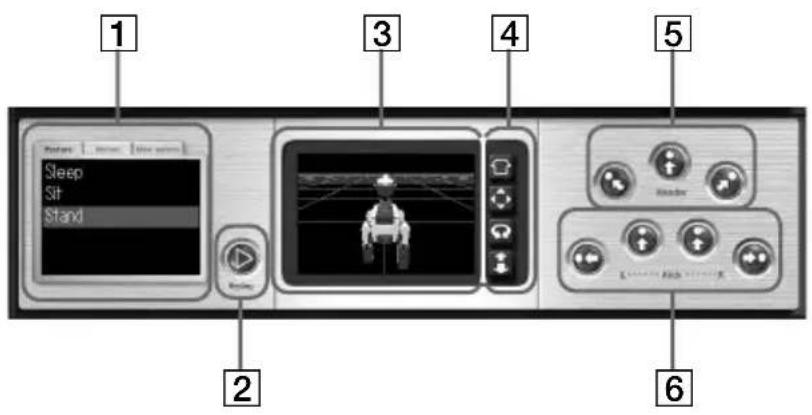
1 Motion menu
Select the tab, and then select the motion to be played back (page 36).
2 Replay button
AIBO plays back the last motion (page 36).
3 3D AIBO screen
Shows a 3D image of AIBO and its current posture. AIBO's sensors appear when they are touched. The 3D image may not always match AIBO's movements exactly.
43D AIBO view button
Click to change the perspective of the 3D image. Only the perspective of the image changes; AIBO itself does not move.

View home position button
Resets the perspective of the 3D image of AIBO to the home position.
Set the home position in the Properties dialog box (page 19).

View pan button
Shifts AIBO's 3D image. Drag the mouse in the 3D AIBO screen to shift the image.

View rotate button
Rotates the 3D image of AIBO. Drag the mouse to view AIBO's current posture from another perspective.

View zoom button
Zooms in and out on the 3D image of AIBO.
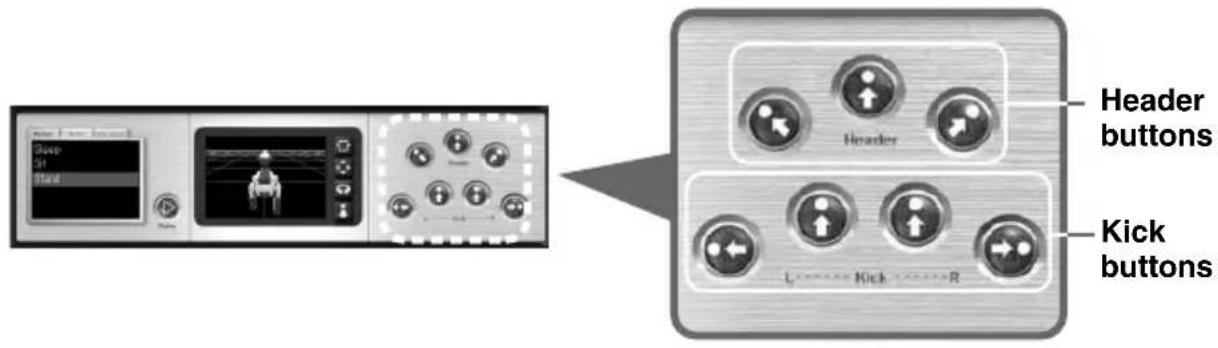
5 Header buttons
Make AIBO do a heading action (page 39).
6 Kick buttons
Make AIBO do a kicking action (page 39).
Properties dialog box
Use this box to set the various preferences for remote control operation.
To open the Properties dialog box, right click in the metallic-gray area in the Control panel, and then click Properties in the menu that appears.
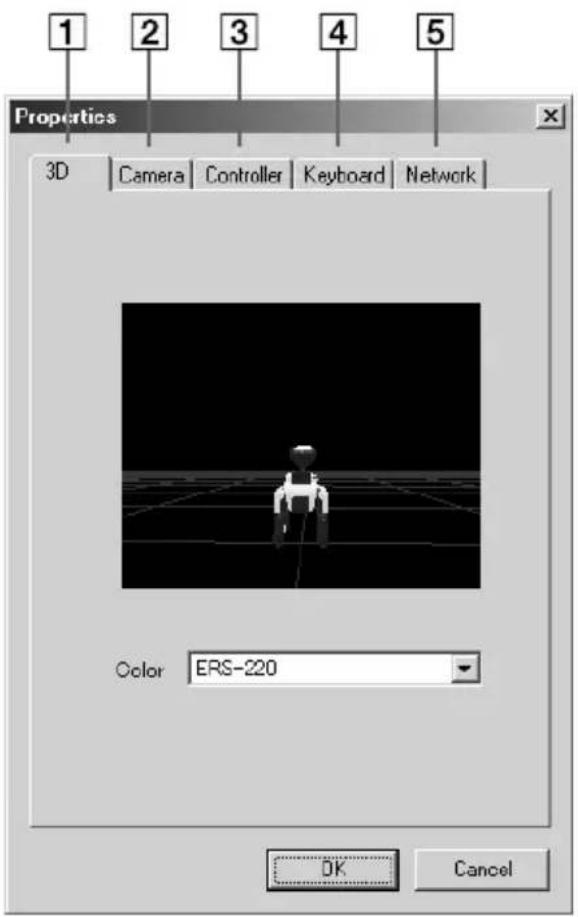
13D tab
Sets the home position of the 3D image of AIBO.
Drag the 3D image in the screen to the perspective you want, and then click OK.
Selects the body color of the 3D image of AIBO.
The color you select from the Color list will be displayed the next time AIBO Navigator 2 is started up.
Note
You cannot select the body color when using the ERS-220.
2Camera tab
Sets the picture quality of the camera (page 31).
Sets the number of times you want AIBO to search for the pink ball (page 38).
3 Controller tab
Assigns AIBO's actions to the controller buttons (page 22).
4 Keyboard tab
Assigns AIBO's actions to the keyboard (page 23).
5 Network tab
Sets the AIBO's IP address (see the Setup Guide).

Controlling AIBO
AIBO is controlled from the Control panel.
You can control the nine functions listed below:
- Walking (page 24)
- Changing the camera angle and capturing a still-picture (page 27)
• Having AIBO play back sound data from your PC (page 32)
• Transmitting sound picked by AIBO to your PC (page 35) - Playing back a motion (page 36)
• Chasing after the ball (page 37)
• Heading and kicking the ball (page 39) - Turning on the retractable headlight (page 40)
• Using motion data created with AIBO Master Studio (page 41)
There are three ways to control AIBO:
- Clicking buttons in the Control panel
• Using a controller (available commercially)
• Using the keyboard
Assigning actions to controller buttons
1 Right click in the metallic-gray area in the Control panel, and then click Properties.
The Properties dialog box appears.
2 Click the Controller tab.
3 From the Controls list, select the key, button or joystick direction to which you want to assign a function and from the Actions list, select the action to be assigned.
The contents of the Controls list will vary depending on the controller that is connected.
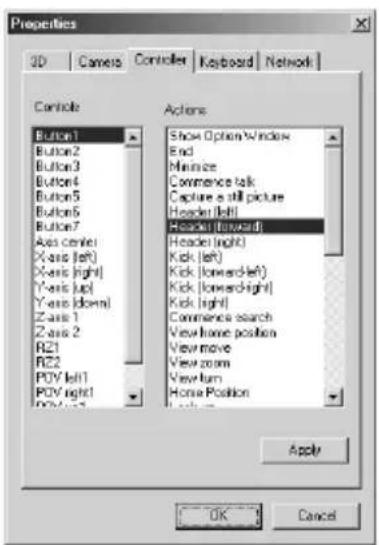
4 Click OK.
The assignment is now complete.
When you operate the button, key or joystick to which you assigned the action, AIBO will do the respective action.
Assigning actions to keyboard keys
1 Right click in the metallic-gray area in the Control panel, and then click Properties.
The Properties dialog box appears.
2 Click the Keyboard tab.
3 From the Keyboard list, select the key to which you want to assign a function, and from the Actions list, select the action to be assigned.
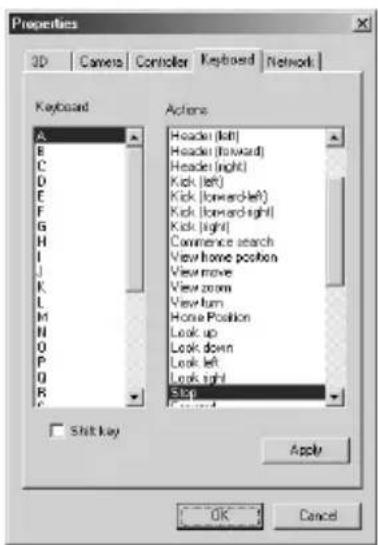
4 Click OK.
The assignment is now complete.
When you press the key to which the action has been assigned, AIBO will do the respective action.

Moving AIBO
There are three ways to make AIBO move or stop.
Using the mouse
Click the end of the Direction control arms. Once clicked, AIBO keeps moving in the selected direction until you click the center of the cross to stop it.
Using a controller
Push and hold the joystick or hold down a direction key. AIBO will keep moving in the selected direction until you release the joystick or key.
Using the keyboard
Press the key for the direction you want and AIBO will move in the specified direction.
Once the key is pressed, AIBO will keep moving until you press the key for stopping AIBO.
Changing AIBO's walking speed
You can choose three speeds: fast (F), normal (N) or slow (S).
To select a speed, click one of the Pace buttons in the Main panel or use the keyboard or controller.
When operated by AIBO Navigator 2, AIBO cannot recover from a fall by itself. If AIBO falls down, help AIBO get up by clicking Recovery in the Main panel or by using the keyboard or controller.
If you cannot help AIBO to get up by remote control, set AIBO upright with your hand.

Adjusting the camera angle/ Capturing still-pictures
The scene picked up by AIBO's camera appears on the Camera monitor. You can adjust the camera angle and also capture still-pictures.
Adjusting the camera angle
Click anywhere in the Camera angle screen.
The camera angle moves to the clicked position.
Click the Camera Angle buttons to finely adjust the angle. The current angle is indicated in the Camera angle screen.
You can also use a controller or keyboard that has been programmed with this function.*
Camera angle buttons
* In this case, release the button or joystick when you reach the angle that you want.
Aligning AIBO with the camera angle
You can have AIBO align its body in the same direction as the camera. When you do this, the camera angle returns to the front.
Click the Rotate button in the Main panel.
You can also use a controller or keyboard that has been programmed with this function.
In addition to the step above, you can move AIBO forward by clicking an top arm in the Direction control (page 24).
Note
The body may not be aligned in the same direction as indicated by the camera depending on the current camera angle.
Capturing still-pictures
You can capture the scene being viewed by AIBO as a still-picture.
Notes
- Sony is not responsible for any rights-infringement disputes and other issues that may arise between you and another person or entity resulting from a still picture saved with AIBO. Do not save any still pictures that may infringe on another person's or entity's rights.
- Taking still pictures of performances or exhibitions may be restricted regardless of whether such material is for private use or not.
Click Capture in the Main panel.
You can also use a controller or keyboard that has been programmed with the Capture picture function.
AIBO takes a picture after it receives the signal to do so. Pictures can be taken again and again (by sending signals to do so again and again).
Still pictures are saved in the Album window. If you take more than 99 pictures, the newest picture will replace the oldest one in the album. See “Sorting pictures in an album” in the next section and save pictures to another folder, if necessary.
About picture quality
- The quality of a saved still-picture depends on the setting in the Properties dialog box (page 31).
High : Approx. 180 × 140 pixels.
Standard : Approx. 90 × 70 pixels. - Depending on the lighting conditions, horizontal lines may appear in the still-picture or the still-picture may have a red or blue hue.
- A still-picture of a fast-moving object captured by AIBO may appear blurry.
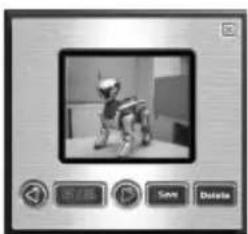
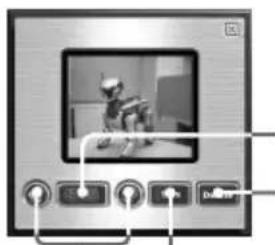
Sorting pictures in an album
You can save or delete the images in an album.
1 Click Album in the Main panel.
The Album window appears.
natural_image
Black-and-white photo of a cartoon character in motion, displayed within a software interface panel (no readable text or symbols on the character or background)2 Click or to select the image.
To save the image, click Save.
In the indicated dialog box, specify the save destination and the file name, and then click OK.
To delete the image, click Delete.
The selected image is deleted.
natural_image
Front view of a computer monitor with control buttons and a small robot image (no visible text or symbols)Image quantity indication
Delete button

button
Save
button
Changing the picture quality
You can change the picture quality of the camera. Specify the setting in the Properties dialog box.
1 Right click to the metallic-gray area in the Main panel, and then click Properties.
The Properties dialog box appears.
2 Click the Camera tab.
3 Select the picture quality.
Select High or Standard.

4 Click OK.

Playing back sound data
AIBO can play back sound data.
You can record sound on the PC for AIBO to play back, or you can have AIBO play back sound data that has already been saved on the PC.
Only WAVE files can be played back with AIBO Navigator 2. The sound format must be 8-kHz, 8-bit, monaural PCM and the maximum playback time is fifteen seconds.
Recording sound on the PC and playing it back
1 Click Talk in the Main panel.
You can also use a controller or keyboard that has been programmed with the Talk function.
The Record dialog box appears.
Talk button
2 Click
Recording begins. Direct the sound toward the microphone on the PC.
You can record for up to fifteen seconds. After fifteen seconds, recording ends.
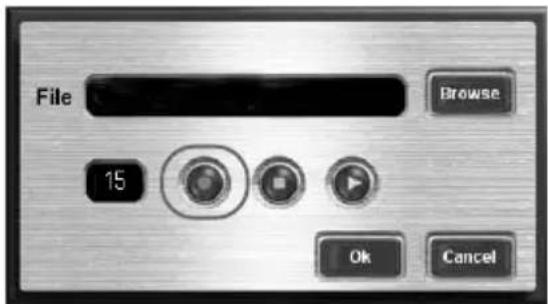
To stop recording before fifteen seconds have elapsed, click 📄. To check the recorded sound, click 📋.
The PC plays back the recorded sound.
To rerecord, click again and record the sound.
3 Click OK.
AIBO plays back the recorded sound data.
The Record dialog box cannot be used to save the recorded sound.
Playing back sound data saved on the PC
1 Click Talk in the Main panel.
You can also use a controller or keyboard that has been programmed with the Talk function. The Record dialog box appears.

2 Click Browse.
The Open dialog box appears.
3 Select the WAVE file you want to play back, and then click OK.
The path to the selected WAVE file appears in the File box in the Record dialog box.
To check the sound data, click 📋. The PC plays back the sound file that was selected.

4 Click OK.
AIBO plays back the selected sound data.

Transmitting sound
You can transmit sound that is picked up by AIBO and listen to it on your PC.
Click Hear in the Main panel to turn on the function.
You can also use a controller or keyboard that has been programmed with the Hear function.
The sound which AIBO picks up is transmitted to the PC and output through the PC's speakers.
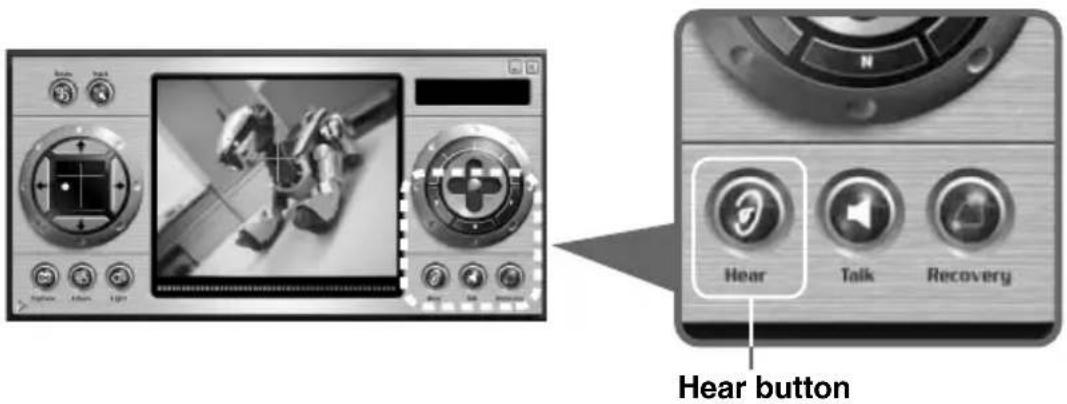
To stop transmitting sound, click Hear again to turn off the function.
Note
Sound that is transmitted from AIBO cannot be saved as a data file on your PC.

Playing back a motion
AIBO can play back a number of built-in motions.
1 Click Sub panel indicator in the Main panel.
2 Select a motion from the Motion menu.
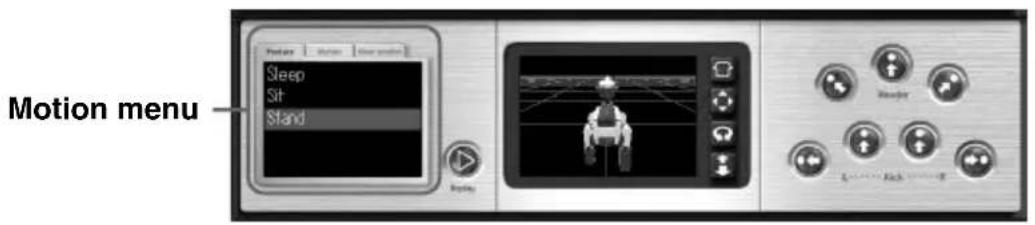
The motions are placed under separate tabs according to category. Click a tab to select the motion you want to play back.
Posture Sleep, Sit, Stand
Motion Supplied motions. (cannot be modified)
User motion Changeable motion data produced using the optional AIBO
Master Studio software. (Normally only one motion is registered under different names.)
See page 41 on how to store another the motion.
AIBO plays back the selected motion.
Click Replay to make AIBO repeat the motion that it just did.

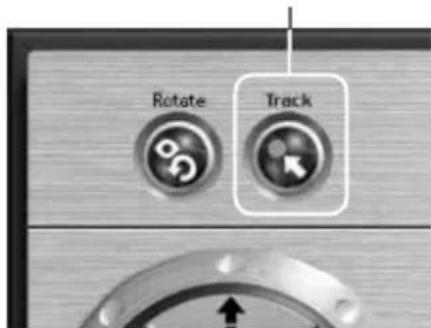
Chasing after the ball
AIBO searches for the pink ball, and when it finds it, automatically starts chasing after it.
Click Track in the Main panel to switch the function on.
You can also use a controller or keyboard that has been programmed with the Tracking function.
Track button
If “Search from in front” is selected under the Camera tab in Properties, AIBO starts searching for the ball in front of itself.
If “Search from the ground” is selected, AIBO starts searching from the ground up.
AIBO searches for the pink ball for the preset number of times. If it still cannot find the pink ball, the Track button is switched off.
To stop AIBO from chasing after the ball, click Track again to turn the function off.
If AIBO loses sight of the ball while chasing after it, the camera angle is reset to the home position and the Track button is switched off.

natural_image
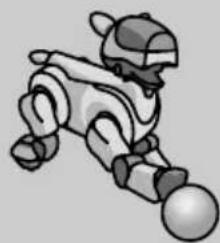
Illustration of a robotic figure with a ball and mechanical limbs (no text or symbols)Setting the number of times AIBO searches for the ball
Set the number of times you want AIBO to search for the pink ball.
1 Right click in the metallic-gray area in the Main panel, and then click Properties.
The Properties dialog box appears.
2 Click the Camera tab.
3 Enter the number of times that you want AIBO to search.
You can enter a number from 1 to 10.
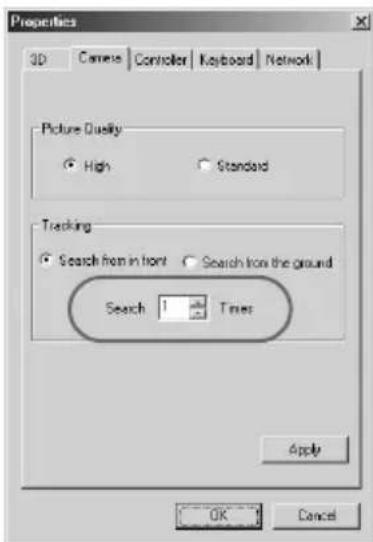
4 Click OK.

Kicking/heading
AIBO kicks with its front legs or makes a heading motion.
Click the Kick or Header buttons in the Sub panel.
You can also use a controller or keyboard that has been programmed with the Kicking or Heading function.

Turning on the retractable headlight
You can turn on the retractable headlight on the ERS-220.
Click Light in the Main panel.
You can also use a controller or keyboard that has been programmed with the Light function.
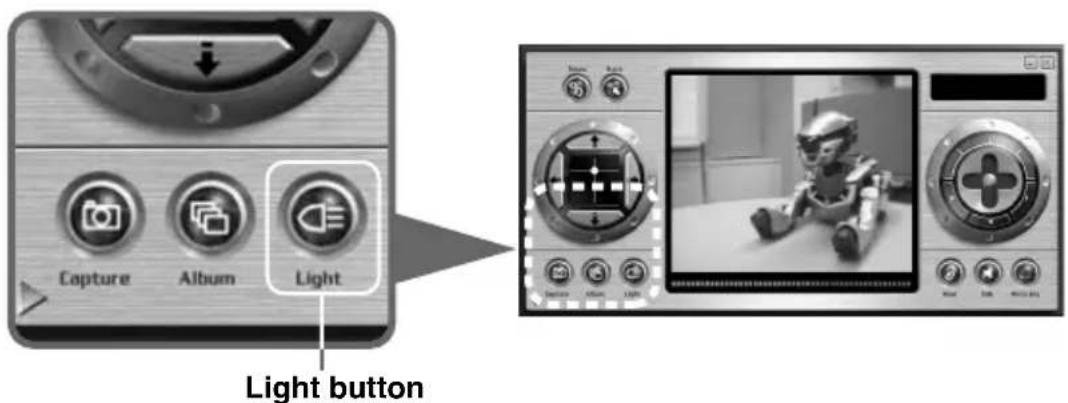
To turn off the retractable light, Click Light again to turn the function off.
Note
Keeping your eyes on the headlight for an extended period of time may be harmful to the eyes.

Using motion data made by AIBO Master Studio
You can replace the user motion with axf-format motion data exported from AIBO Master Studio.
Notes
- This software supports the axf-format motion data made for the ERS-210/220 using AIBO Master Studio version 1.1 or later.
- You need the “Memory Stick” Reader/Writer to use this function.
- If the starting posture is different from the ending posture in the axf format data, you cannot use the data.
1 Insert the AIBO-ware “Memory Stick” that came with AIBO Navigator 2 into the “Memory Stick” Reader/Writer.
2 Select Start-Program-AIBO Navigator 2-AXF Import.
When you select the model, the AXF Import box appears.
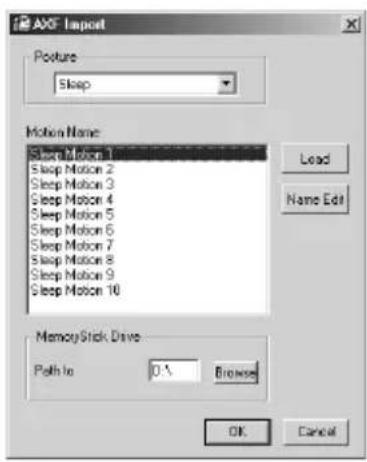
3 In the “Memory Stick” drive box, select the drive to which the “Memory Stick” Reader/Writer is assigned.
4 Select the basic posture in axf format (Sleep, Sit or Stand).
For each posture, ten items are provided in the Motion list. (In the beginning, the same motion is registered for each item. These ten items can be replaced.)
5 In the Motion list, select the user motion (currently registered) that you want to replace.
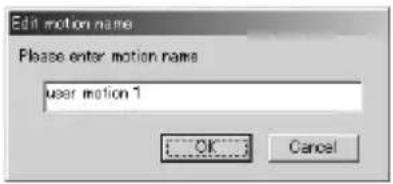
6 Click Open to select the axf-format file in the dialog box.
Edit the name of the motion that appears.
7 Enter the motion name that you want to register, and then click OK.
8 Repeat steps 4 to 7 to replace more motion items.
9 Click OK in the AXF Import box.
The specified user motion on the “Memory Stick” for AIBO Navigator 2 is replaced.
Click Cancel in the AXF Import box to cancel the replacement.
10 Remove the “Memory Stick” from the “Memory Stick” Reader/Writer.
Note
After making sure the “Memory Stick” Reader/Writer is not reading or accessing the “Memory Stick,” remove the “Memory Stick.”
The motion data is now indicated under the User motion tab (page 36) in the Motion menu, and can be selected for playback.

Notes on use
To protect the saved data on the "Memory Stick," observe the following:
- The AIBO-ware “Memory Stick” that comes with AIBO Navigator 2 can also be used with AIBO ERS-210/220. However, it may not operate normally depending on the combination of units used to compose AIBO.
In addition, do not use it with other equipment than AIBO such as a PC or camcorder.
- Do not touch terminal with your hand or metal objects.
- The saved data may be erased or broken if the “Memory Stick” is used in a place subject to static electricity or electrical noise.
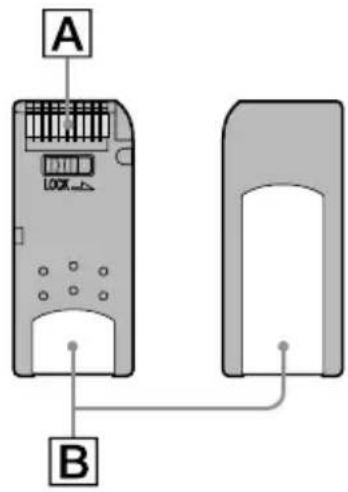
- Do not stick anything other than a dedicated “Memory Stick” sticker in the area indicated by B. A sticker has already been attached to the AIBO-ware “Memory Stick” supplied with AIBO Navigator 2 at the factory.
- Do not bend, drop or apply a strong physical shock to the “Memory Stick.”
- Do not disassemble or modify the “Memory Stick.”
- To remove the “Memory Stick” from AIBO while it is still operating, first press the pause button to stop AIBO’s movements and wait until the lock indicator turns to white.
- Keep the “Memory Stick” away from water and other liquids.
- Do not use or store the “Memory Stick” in places subject to:
– Excessively high temperatures, such as a car parked in the sun
- Direct sunlight
– High humidity or corrosive gas.
- When carrying or storing the “Memory Stick,” keep it in the supplied case.
- AIBO Navigator 2 is designed for use with the “AIBO” ERS-210/220. It cannot be used with the “AIBO” ERS-310 series or 110/111.
- AIBO Navigator 2 cannot be used except through the AIBO-ware “Memory Stick” on which it is supplied.
- Sony assumes no responsibility for any malfunctions that may occur as a result of using AIBO Navigator 2 in a way not specified in this manual.
- The specifications of this software are subject to change without notice.
What is an AIBO-ware "Memory Stick"?
It is a “Memory Stick” produced for exclusive AIBO use, on which is stored application software that can be executed on an AIBO.

Troubleshooting
If you experience any of the following difficulties, use this troubleshooting guide to remedy the problem. Also, refer to the “AIBO” ERS-210/220 operating instructions to check AIBO entirely and its sensor condition in Clinic mode. Should the problem persist, please contact the AIBO Customer Link. (See page 3 for details on the AIBO Customer Support.)
| Symptom Remedy | |
| AIBO does not move as instructed. | Heat may have built up in the battery pack.Wait for a while until the battery pack becomes cool.The wireless LAN settings are incorrect.Check the settings (see the Setup Guide).AIBO is outside the range of wireless LAN communication.Move AIBO closer to the PC or access point.AIBO is jammed or otherwise unable to recover by itself.Restore AIBO to remote control (page 12, 13).AIBO does not respond to remote control when its battery is being charged or it is on the Energy Station. |
| AIBO emits a sad melody and does not move when the pause button is released. | The “Memory Stick” with AIBO-ware is not inserted into AIBO.The inserted “Memory Stick” is not intended for use with AIBO.The battery power is low.→Check the battery power level (see the “AIBO” ERS-210/220 instruction manual). If necessary, recharge the battery pack or insert a charged battery pack.The AC adaptor and conversion plug are connected to AIBO’s charging terminal.→Disconnect the AC adaptor and conversion plug form AIBO, and then restart AIBO. |
| The chest light does not turn off when you press the pause button to make AIBO pause. | There is a problem with the internal program.→Check that the battery pack lock indicator is white and remove the battery pack (see the “AIBO” ERS-210/220 instruction manual).Reinsert the battery pack and then press the pause button once more. |
| The battery pack is locked and cannot be replaced. | The program is running.→Press the pause button to quit the program. |
| AIBO asks to be charged even with a fully charged battery pack. | ·If the battery pack continues to operate for a much shorter period, the battery pack may be reaching the end of its service life. Replace it with a new battery pack (see the “AIBO” ERS-210/220 instruction manual). |
| AIBO cannot be controlled via the wireless LAN.AIBO does not stop moving. | ·The AIBO Wireless LAN Card is not inserted in AIBO.→Insert the AIBO Wireless LAN Card in AIBO.·The IP address for the wireless LAN is not set.→The IP address of the AIBO Wireless LAN card inserted in AIBO needs to be registered in AIBO Navigator 2 (see the Setup Guide).·The PC is not set up for LAN communication.→Check that a wireless LAN card is inserted in the PC or that the PC connects to a wireless LAN access port. |
| It takes a long time for AIBO to start moving. | ·AIBO is loading data from the “Memory Stick.”Wait a while. |
| AIBO tries to walk but it does not move forward. | ·The floor may be too slippery.→Place AIBO on a surface that is not too slippery, such as a carpet with a short nap. |
| AIBO falls often. | The floor may be too slippery, inclined or unstable.→Place AIBO on a flat surface that is not too slippery. |
| AIBO stops in mid-movement. | AIBO's motors are strained.→If you continue operation while the motors are strained,AIBO may automatically stop. To return AIBO to normal, push the head-touch sensor in the rear direction for 3 seconds. (In the case of the ERS-210, press the head sensor for 3 seconds.)AIBO is heating up.→The chest light goes off and AIBO stops moving. Do not operate AIBO until it cools down. |
| After picking AIBO up, it stops moving its legs and otherwise moves very slowly. | AIBO stops moving whenever it is picked up from the floor.→Check that the mode indicator lights and place AIBO on the floor. After a while if AIBO still does not move, push the head-touch sensor in the rear direction for 3 seconds.(In the case of the ERS-210, press the head sensor for 3 seconds.) |
| The mode indicator is flashing and AIBO emits musical tones, but it does not walk. | AIBO's joint is jammed.→Place AIBO on the floor and push the head-touch sensor in the rear direction for 3 seconds. (In the case of the ERS-210, press the head sensor for 3 seconds.) |
| The chest light flashes in orange. | ·There is a problem with the battery pack.→Replace the battery pack with a new one (see the “AIBO” ERS-210/220 instruction manual). |
| You cannot adjust AIBO’s camera to the angle you want. | ·The adjustment range of the camera angle differs according to AIBO’s posture. |
| WAVE data is not accurately reproduced. | →Check that the data is in a format that can be used (page 32). |
| WAVE data is not played to the end. | ·Only fifteen seconds can be played back. |
| Talk was clicked to specify the sound data, but no sound is heard from AIBO. | ·The volume may be set to mute.→Adjust the volume level (see the “AIBO” ERS-210/220 instruction manual).·The sound may not have been picked up by the microphone on the PC.→To record, direct the sound toward the microphone on the PC. |
Symptom Remedy
Hear was clicked, but no sound is heard from the PC.
- The volume on the PC may be set to mute. →Adjust the volume.
"Memory Stick", "TM" et "MEMORY STICK" et "MEMORY STICK" et "MEMORY STICK" et "MEMORY STICK" et "MEMORY STICK" et "MEMORY STICK" et "MEMORY STICK" et "MEMORY STICK" et "MEMORY STICK" et "MEMORY STICK" et "MEMORY STICK" et "MEMORY STICK" et "MEMORY STICK" et "MEMORY STICK" et "MEMORY STICK" and "MEMORY STICK" and "MEMORY STICK" and "MEMORY STICK" and "MEMORY STICK" and "MEMORY STICK" and "MEMORY STICK" and "MEMORY STICK" and "MEMORY STICK" and "MEMORY STICK" and "MEMORY STICK" and "MEMORY STICK" and "MEMORY STICK" and "MEMORY STICK" and "MEMORY STICK" and "Memory Sticks" and "Memory Sticks" and "Memory Sticks" and "Memory Sticks" and "Memory Sticks" and "Memory Sticks" and "Memory Sticks" and "Memory Sticks" and "Memory Sticks" and "Memory Sticks" and "Memory Sticks" and "Memory Sticks" and "Memory Sticks" and "Memory Sticks" and "Memory Sticks"
natural_image
Two identical cartoon-style robot figures in motion, no text or symbols visibleRemarque
natural_image
Illustration of a cartoon robot with a ball, no text or symbols presentRemarques
natural_image
Illustration of a device with plug, cable, and accessories connected to a handheld device (no text or symbols visible)Remarque
1 Bouton Rotate (Pivoter)
7 Boutons Pace (Allure)
8 Bouton Recovery (Redressement)
14 Bouton Capture (Capturer)
Bouton View rotate (Rotation)
4 Cliquez sur OK.
4 Cliquez sur OK.

natural_image
Black-and-white photo of a cartoon character in a room with buttons at bottom (no readable text or symbols)natural_image
Front view of a computer monitor interface with control buttons and a small robot image (no readable text or symbols)Bouton

Bouton Save (Enregistrer)
Bouton Delete (Supprimer)
4 Cliquez sur OK.

2 Cliquez sur

natural_image
Illustration of a robotic robot with a ball and articulated limbs (no text or symbols)4 Cliquez sur OK.

natural_image
Two identical cartoon-style robot figures in side profile, no text or symbols visibleHinweis
natural_image
Illustration of a cartoon robot with a ball, no text or symbols presentHinweise
natural_image
Illustration of a device with plug, cable, and hand holding a handheld device (no text or symbols visible)Hinweis
natural_image
Black-and-white photo of a cartoon character in motion, displayed within a software interface (no text or symbols on the character itself)natural_image
Illustration of a vintage computer monitor with control buttons and a small robot image (no text or symbols)Schaltfläche „Talk“
2 Klicken Sie auf
natural_image
Illustration of a robotic or mechanical device with a spherical base and articulated limbs (no text or symbols)Printed on recycled paper
Printed in Japan

- 警告 安全のために
- 警告表示の意味
- ご注意
- Customer Support
- In the United States and Canada
- In Europe
- In Australia
- In Hong Kong
- Table of Contents
- Introduction
- Starting up AIBO Navigator 2
- Notes
- Turn on your PC.
- Turn on AIBO.
- Start up AIBO Navigator 2.
- Main panel
- Sub panel
- Quitting AIBO Navigator 2
- Do either of the procedures below to quit AIBO Navigator 2.
- Press the pause button on AIBO's chest to pause AIBO, and then remove the "Memory Stick."
- AIBO's modes and how to resume normal operation
- For the ERS-220
- Normal mode
- Something is caught any of AIBO's joints
- Push the head-touch sensor in the rear direction for 3 seconds
- Jam condition
- AIBO is picked up
- Put AIBO down on the floor, or push its head-touch sensor in the rear direction for 3 seconds
- Pick-up condition
- To charge the battery pack
- Note
- For the ERS-210
- Press the head sensor for 3 seconds
- Put AIBO down on the floor, or press the head sensor for 3 seconds after putting it down on the floor
- Description of Control panel parts
- Rotate button
- Track button
- Camera monitor
- Status indicator
- Battery indicator
- Direction control
- Pace buttons
- Recovery button
- Talk button
- Hear button
- 11Object sensor
- Light button
- 13Album button
- Capture button
- Sub panel indicator
- 16Camera angle screen
- Camera angle buttons
- Motion menu
- Replay button
- 3D AIBO screen
- 43D AIBO view button
- View home position button
- View pan button
- View rotate button
- View zoom button
- Header buttons
- Kick buttons
- Properties dialog box
- 13D tab
- 2Camera tab
- Controller tab
- Keyboard tab
- Network tab
- Controlling AIBO
- Assigning actions to controller buttons
- Assigning actions to keyboard keys
- Moving AIBO
- Using the mouse
- Using a controller
- Using the keyboard
- Changing AIBO's walking speed
- Adjusting the camera angle/ Capturing still-pictures
- Adjusting the camera angle
- Click anywhere in the Camera angle screen.
- Aligning AIBO with the camera angle
- Capturing still-pictures
- Click Capture in the Main panel.
- About picture quality
- Sorting pictures in an album
- Click Album in the Main panel.
- Click or to select the image.
- Changing the picture quality
- Playing back sound data
- Recording sound on the PC and playing it back
- Click Talk in the Main panel.
- Click
- Click OK.
- Playing back sound data saved on the PC
- Click Browse.
- Select the WAVE file you want to play back, and then click OK.
- Click OK.
- Transmitting sound
- Click Hear in the Main panel to turn on the function.
- Playing back a motion
- Chasing after the ball
- Click Track in the Main panel to switch the function on.
- Setting the number of times AIBO searches for the ball
- Kicking/heading
- Turning on the retractable headlight
- Using motion data made by AIBO Master Studio
- Click OK in the AXF Import box.
- Remove the “Memory Stick” from the “Memory Stick” Reader/Writer.
- Notes on use
- What is an AIBO-ware "Memory Stick"?
- Troubleshooting
- Symptom Remedy
- Remarque
- Remarques
- Bouton Rotate (Pivoter)
- Boutons Pace (Allure)
- Bouton Recovery (Redressement)
- Bouton Capture (Capturer)
- Bouton View rotate (Rotation)
- Cliquez sur
- Hinweis
- Hinweise
- Klicken Sie auf
Brand : SONY
Model : ERF220AW05
Category : Home robot